commercial customer platform 5.5 user guide · ach (automated clearing ... method a- ascii text ......
TRANSCRIPT

Commercial Customer Platform 5.5 User Guide


iii
Table Of Contents Commercial Customer Platform .................................................................................. 1
Business Banking Overview .................................................................................... 1 Features and Services ......................................................................................... 1
Account Usage Restrictions .................................................................................... 2 Accessing Cash Management Online Banking........................................................... 2 Password Requirements ......................................................................................... 3 Multifactor Authentication ...................................................................................... 4 Enhanced Login Security Challenge ......................................................................... 5 Token Challenge .................................................................................................... 7 Navigation ............................................................................................................. 8 Access to Multiple Company Accounts ................................................................... 10 Administration ..................................................................................................... 11
Access to Multiple Company Accounts ................................................................ 12 Set Account Name ............................................................................................ 13 Change Company Password .............................................................................. 14 Change Company PIN ....................................................................................... 15 Change Timeout ............................................................................................... 16 Change My (User) Password ............................................................................. 17 Change Email Address ...................................................................................... 17 Set Main Page .................................................................................................. 18 Activate Token ................................................................................................. 18 Manage One-time Passcode Delivery - [customized product name] ..................... 20 Maintain Security Questions .............................................................................. 21 Unenroll Computers .......................................................................................... 22 Manage Users .................................................................................................. 24 User Activity Reporting ..................................................................................... 49
Account Activities & Reporting .............................................................................. 54 Account Reporting ............................................................................................ 55 Transaction Search ........................................................................................... 65 Create Reports ................................................................................................. 68 Balance Alerts .................................................................................................. 73 Statements ...................................................................................................... 76 Stop Payments ................................................................................................. 78 Reconciliation Services ...................................................................................... 80
Payments & Transfers .......................................................................................... 91 Account Transfer (Book) ................................................................................... 91 Wire Transfer ................................................................................................. 100 ACH (Automated Clearing House Origination) ................................................... 125 Federal Tax Payments .................................................................................... 158 Bill Pay .......................................................................................................... 163 Sweeps .......................................................................................................... 163
Online Requests ................................................................................................ 166

Commercial Customer Platform 5.5 User Guide
iv
Request Cash/Change Order Form................................................................... 166 Reorder Checks .............................................................................................. 168 Request a Photocopy ...................................................................................... 169 Request Account Research .............................................................................. 171 Request Bill Pay Research ............................................................................... 174 Suppress Paper Statements ............................................................................ 176
Email ................................................................................................................ 178 Help ..................................................................................................................... 181
Help Menu ........................................................................................................ 181 Frequently Asked Questions ................................................................................... 183
Internet Browser Errors...................................................................................... 183 Customer Platform - General .............................................................................. 183 Stop Payments .................................................................................................. 185 Limits and Approvals .......................................................................................... 185 ACH/File Processing ........................................................................................... 186 Wires ................................................................................................................ 188 Federal Tax Payments ........................................................................................ 189 Email/Alerts ....................................................................................................... 189 Enhanced Login Security .................................................................................... 190 Tokens .............................................................................................................. 192
File Formats .......................................................................................................... 195 ACH Upload File Validation ................................................................................. 195 Create a Delimited ACH Map .............................................................................. 201 Create a Fixed ACH Map ..................................................................................... 211 ARP File Formats Processing Method A ................................................................ 220
Issues Upload - Processing Method A .............................................................. 220 Method A- ASCII Text - Comma Delimited ....................................................... 221 Method A - ASCII Text - Fixed Column Length ................................................. 222 ARP Issues Register Export ............................................................................. 223 Comma Delimited ........................................................................................... 223
ARP File Formats Processing Method B ................................................................ 224 Issues Upload - Processing Method B .............................................................. 224 Method B- ASCII Text - Fixed Column Length .................................................. 225 Method B - ASCII - Text Comma Delimited ...................................................... 226
Glossary ............................................................................................................ 227 Glossary ............................................................................................................... 231

1
Commercial Customer Platform
Business Banking Overview
The Business Banking system has been designed as a secure, password-protected area within your organization’s Web site. The Business Banking system allows you to perform a variety of cash management tasks.
Features and Services
The features and services of the Commercial Customer Platform are accessed via the Main Menu and include the following:
Administration- offers a full suite of administrative functions including end user maintenance, activity reporting, account maintenance, password modification, and the inactivity timeout setting. Your company administrator has access to all of the Administration options.
Account Activities & Reporting - provides summary information at a glance and also allows a drill-down into additional detail for a specific account. For added convenience and utility, the Account Summary page may be is customized by using the Create Reports feature. Your paper statement can also be viewed online within this service group.
Account Transfers - allows you to move funds between accounts within the same financial institution. Transfers can be scheduled for the current day, a date in the future or on a recurring basis.
Wire Transfer - moves funds between accounts that are within different financial institutions.
Stop Payment - allows you to place stops on an individual check or a range of checks.
ACH - allows you to create ACH files and submit them to your financial institution.
Tax Payment (EFTPS) - allows you to create Electronic Federal Tax Payments and submit them to your financial institution .
Online Services - provides a direct request channel for financial institution services: photocopies of checks or statements, investigation of questionable transactions, online cash/check orders, and requests to stop receiving paper statements for select accounts.
Reconciliation Services – allows you to import an Issues Register file, manually input issues and display and make decisions on exception items. (Exceptions processing feature is dependent on your FI’s processing method.)
Email - provides a direct link between you and your financial institution.

Commercial Customer Platform 5.5 User Guide
2
Bill Pay The Bill Pay service allows you to pay bills online; add, edit or delete a payee (the entity that receives the payment); check to see if a payment has cleared; and email the electronic bill payment service provider. This service is documented separately.
Account Usage Restrictions
Your host processing system may have intrinsic rules about account usage (e.g., whether it is allowable to use the Account Transfer service to transfer funds into or out of a particular account type).
This system is designed to conform to any such rules that the host system passes along, but it does so in a transparent fashion – that is, it simply does not offer invalid choices. In all services that use drop down lists to let you choose accounts, the system populates the account lists only with allowable accounts.
In practical terms, this means that you should not expect to see every account in the system listed on every drop down list. However, please be aware that some host processing systems have restrictions on account usage that are not passed to this system. These accounts will still display in the drop down list. If one of these accounts is selected and a transaction is initiated, the host may reject the transaction.
Accessing Cash Management Online Banking
Access the online banking system using your financial institution’s Web site.
From your financial institution’s web site, click the graphic or text that indicates a link to the online banking system. The online banking login screen appears.
Note: If your financial institution has elected to use a Four-Part Login, you will also see a Company Password entry field.
1. Enter your company ID as assigned by your financial institution and your company password, if applicable.
2. Enter your user ID as assigned by your company administrator.
Commercial Customer Platform
3
3. Enter your user password.
Note: If this is the first time your organization is logging onto the online banking system, enter the password or passwords as assigned by your financial institution. The system will require you to change the password(s) immediately after login. Special password characteristics may be imposed by the financial institution to provide a greater degree of security. If an invalid password is entered a message will appear with further instructions.
4. Click the Log In button to log into the online banking system. 5. (Optional) If you have been set up to use tokens at login, you will be
prompted to enter a token authorization code after successfully entering your login credentials.
6. (Optional) If you have been set up for multi-factor authentication, you will be prompted to enter a security access code or answer some security questions.
7. (Optional) If your financial institution supports the forgotten password option, you will see the link "Forgot User Password?" directly below the Log In button. This will allow you to reset your user password. In order to utilize this feature, you must have established your security questions and answers from within the online banking site under the Administration menu. Once these questions and answers have been established, to reset a forgotten user password simply enter the other login credentials (except the user password) on the login page and then click the "Forgot User Password?" link. You will then be presented with two of the five security questions that you previously established. If you answer these correctly, you will be allowed to continue to the reset user password screen.
Your financial institution may have links to the following types of disclosure statements on the login page: "Terms & Conditions", "Privacy", and "Security". Click on a link to open a new browser window displaying the message text. Your financial institution may also provide business related links on bottom portion of the log-on screen.
Password Requirements
Password characteristics may be imposed by your financial institution to provide a greater degree of security. These requirements may include minimum and maximum length, upper and lower case alpha characters, numeric, or special characters (e.g. "!" "@" "#" etc.).
The password rules for your financial institution are displayed on the change password screens. If you try to create a password that does not meet the requirements, a message will appear with instructions on creating a valid password.

Commercial Customer Platform 5.5 User Guide
4
For example:
You have entered an invalid password. All passwords must satisfy the following criteria:
* Minimum length (characters): 8
* Maximum length (characters): 16
* Minimum number of alphabetic characters: 4
* Minimum number of special (non-alphanumeric) characters: 2
Multifactor Authentication
Login Challenges This optional security feature provides a two-factor authentication to access the online banking application. After valid login credentials are entered, if the system does recognize the computer, sites enabled for multifactor authentication (MFA) will challenge the user to provide additional security data in order to access their account. How a user is challenged depends on which MFA Security Option is enabled:
One-time Passcode (OTP) - you will be sent a security code to either your email address or a phone destination that you choose. You must retrieve the code and then enter that code on the challenge page in order to continue the login process. Note: phone delivery of the one-time passcode must be offered by your financial institution or the option will not appear.
Security Questions with Second Request - if you are presented with a
challenge to answer one of your pre-established security questions, this option allows you to request another set of your previously established questions.
Security Questions with Reset - this option allow you to reset your security
questions during the login process. It also requires that you enter a security access code in order to do so.
Once the security data has been validated, users will have the option to enroll their computer for future use on the MFA system. Note: One-time Passcode or Security Questions (MFA) is not available for login if
your business is using tokens at login. In-Session Security Challenges
Commercial Customer Platform
5
This optional security features provides another layer of security when initiating or approving transfers or updating user information. If enabled, you will receive a challenge to enter a one-time passcode (OTP) when initiating a wire transfer, an ACH transaction, a Tax Payment, updating an email address or changing another user's profile data. The OTP may be delivered via phone, text or email. The delivery methods available are determined by your financial institution.
Enhanced Login Security Challenge
If your financial institution has implemented Multifactor Authentication, you may be challenged to enter a One-time Passcode (OTP) if you log into the online banking system from an unenrolled computer. This page is displayed after you have successfully entered your required login credentials.
Note: If your financial institution has chosen to customize the name of this page, it may display with a different page title.
The delivery options displayed will vary depending on which delivery methods have been added for the user and what features your financial institution has implemented. To receive the One-time Passcode, simply click on one of the "Send to" links displayed. This will generate the sending of the One-time Passcode to that destination. If you select to receive the OTP by voice or text, be sure that you are close to your phone. Once you retrieve the OTP, enter it into the entry field shown at the bottom of this page and click the continue button.
Note: Pre-paid mobile phones will not support text message delivery of the OTP.

Commercial Customer Platform 5.5 User Guide
6
Once the user clicks the continue button, he or she is presented with a screen that allows them to enroll the computer. Once this computer is enrolled, the user does not receive this challenge again as long as he or she is logging in from the same computer.
Note: If you are logging in from a public or shared computer, it is recommended that you do not register this type of computer. You should only register

Commercial Customer Platform
7
computers that you plan to use on a regular basis to access the online banking system.
Token Challenge
This is an additional multifactor authentication product available which requires the use of a hardware token when gaining access to the application, when funds are being moved out of your accounts and/or when user information is updated. This feature provides an additional level of security by requiring that a token security code, obtained from the hardware token, be entered by the user when performing an action enabled for a token challenge.
• Heightened Security: With tokens, you are presented with a challenge and required to enter a token authorization code response when logging into the application and/or initiating or approving wire transfers and/or ACH transactions, depending on your customer setup. • Multi-application Support: Your tokens are part of the global Symantec VIP Network. This means that users are able to use a single hardware token to access multiple applications within that network, if the application is enabled.
Token authentication is available for Login, Wire Transfer, ACH, Tax Payments and user profile changes, including email address updates. If your business is enabled to receive a token challenge at login, all users are required to enter a token authorization code in order to gain access to the application. Once a user has an activated token, he/she will be challenged to enter a token authorization code at every login. The token Security Code is the code displayed on the front of the token. You have 5 attempts to enter the correct code after which you will be locked out of the system. The number of attempts remaining displays in the header bar above the entry field. After entering the token authorization code, click the Complete Login link to log into the online banking system.

Commercial Customer Platform 5.5 User Guide
8
If you have a new token to activate, click the Activate New Token link to open the Token Activation screen. You do not need to enter a token authorization code before clicking this link. When activating a token during the login process, you have 5 attempts to successfully activate the token. After 5 invalid attempts, you will be locked out of the system.
If your business has token challenge enabled for Wire Transfer, ACH or Tax Payments, users are required to enter a token authorization code in order to move money via these methods. If Approval is not required, then the token authorization code is required at the initiation process. If Approval is required, the approval user must enter a token authorization code during the approval review process. The following actions are eligible for a token challenge:
• Require Tokens at Login • Initiate Freeform Wire • Initiate Wire Template • Initiate Wire Template Groups • Wire Transfer Approval • Initiate ACH Batch • Edit ACH Batch • Send ACH File • Initiate ACH Re-presented Check • ACH Batch Approval • Add Tax Payments • Approve Tax Payments • Updating your Email Address • Updating User Profile information
Navigation

Commercial Customer Platform
9
The online banking system features a navigation menu at the top of the main screen. The display of specific menu items is customized to the individual who is signed on and will only list the options available to him or her. Two levels of control determine which options are displayed:
1. The financial institution specifies the options available to the customer and these options are made available to the company administrator
2. The company administrator specifies the options that are available to the individual end users. Only those options are displayed to the end user .
For example, if the financial institution did not offer the Wire Transfer service to a customer, it would not be listed in the company administrator’s list of available options. If the financial institution did offer Stop Payments, Stop Payments would appear in the company administrator’s available options. However, if the company administrator did not allow an end user to access that service, then it would not appear on that end user’s list of options.
Each option on the main navigation bar represents an online banking service category. Within that category are sub-options that further define the functionality. To access a sub-option, rest the cursor on the menu bar and click on one of the sub-options.
For instructions on how to set up users for the online banking services, refer to the Manage Users topic.
Commercial Customer Platform 5.5 User Guide
10
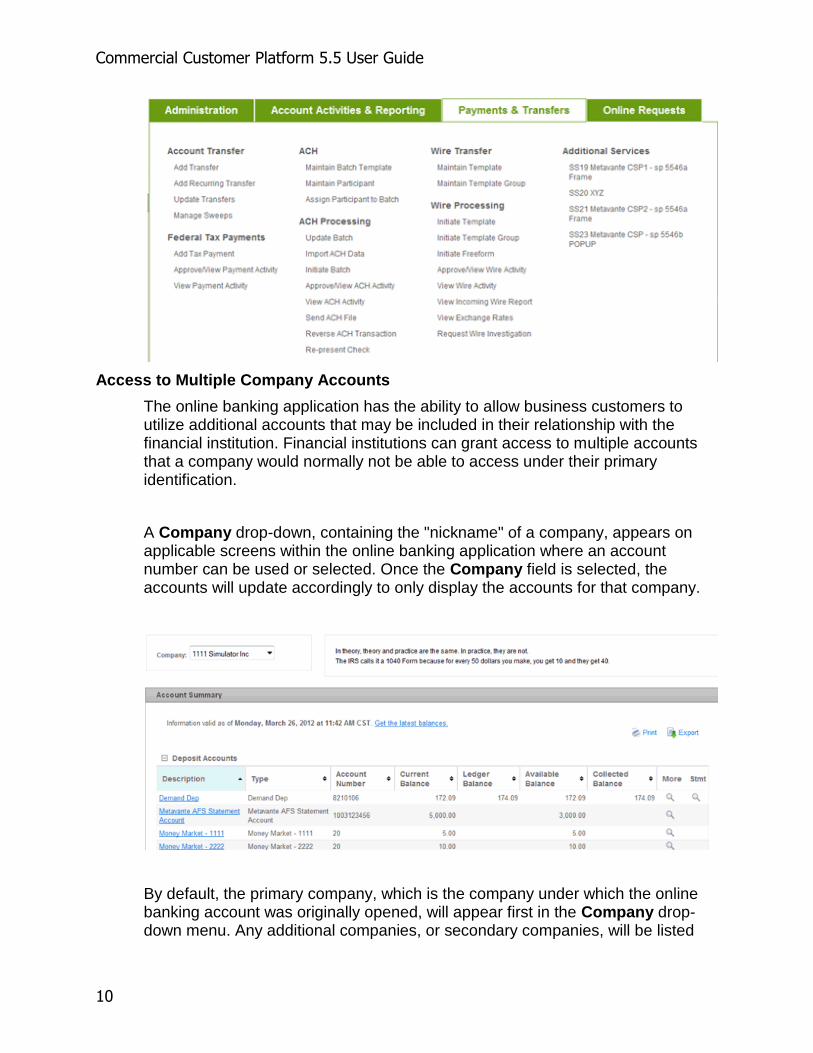
Access to Multiple Company Accounts
The online banking application has the ability to allow business customers to utilize additional accounts that may be included in their relationship with the financial institution. Financial institutions can grant access to multiple accounts that a company would normally not be able to access under their primary identification.
A Company drop-down, containing the "nickname" of a company, appears on applicable screens within the online banking application where an account number can be used or selected. Once the Company field is selected, the accounts will update accordingly to only display the accounts for that company.
By default, the primary company, which is the company under which the online banking account was originally opened, will appear first in the Company drop-down menu. Any additional companies, or secondary companies, will be listed

Commercial Customer Platform
11
after in alphabetical order. Accounts associated with the select company can be used with many of the features within the application. Please refer to that feature's section in this guide for additional details and limitations.
When a selection is made from the Company drop-down menu, the system will begin pulling account data for that company. While the system is working, the following message may be displayed:
Administration
Administration
The Administration menu option provides access to high-level system functions. The options available on this menu include:
Manage Users - This group only displays for company admin users and administrative users. The following functions appear under this section:
Add/Change/Remove Users - Create and manage a "profile" for each user. Along with a unique ID and secure password, define each of the user's permissions for access to accounts and specific services. Or, update / delete an existing user profile, or reset login credentials.
Approve User Updates - If the Dual Control feature is enabled, approve or deny a new user.
View User Activity Reporting - View users' activity in the system by querying account activity logs. Define criteria and select information from available transaction logs for reporting purposes, or download the information for use in another application
Manage Company - This group only displays for company admin users and administrative users. The following functions appear under this section:
Set Account Name - Assign a more descriptive name to any of the available accounts.
Change Timeout - Set the amount of time a user's computer may be inactive before the online banking session is terminated.
Change Company Password - Only authorized administrators may change the company password. Note: if your financial institution is configured for a 3-point login, you will not see this option
Commercial Customer Platform 5.5 User Guide
12
Change Company PIN - Change the PIN setting in the online banking system. (This feature is dependent on the financial institution's host system. If the PIN is changed on the host system, it will be necessary to also update this field in the online banking system to match.)
My Profile - This group displays to all users. The settings available within the My Profile section control only what that user sees.
Change My (User) Password - Allows users to change their passwords.
Change Email Address (optional) - Users may update their contact email address.
Manage Security Code Delivery (optional) - Allows users to manage their multifactor authentication (MFA) delivery options and remove extra security protection (cookies) from computers. Users can manage delivery (Voice and/or Text) of the one-time security code to previously established phone numbers.
Unenroll Computers (optional) -Allows users to remove cookies (for stronger security) from their computer that were placed there so that their computer would be recognized by the security system.
Maintain Security Questions (optional) - Allows users to update their security questions and answers.
Set Main Page - Allows users to select the first page they want to see upon logging into the online banking system.
Activate Token (optional) - Allows users to activate their token.
Access to Multiple Company Accounts
The online banking application has the ability to allow business customers to utilize additional accounts that may be included in their relationship with the financial institution. Financial institutions can grant access to multiple accounts that a company would normally not be able to access under their primary identification.
A Company drop-down, containing the "nickname" of a company, appears on applicable screens within the online banking application where an account number can be used or selected. Once the Company field is selected, the accounts will update accordingly to only display the accounts for that company.

Commercial Customer Platform
13
By default, the primary company, which is the company under which the online banking account was originally opened, will appear first in the Company drop-down menu. Any additional companies, or secondary companies, will be listed after in alphabetical order. Accounts associated with the select company can be used with many of the features within the application. Please refer to that feature's section in this guide for additional details and limitations.
When a selection is made from the Company drop-down menu, the system will begin pulling account data for that company. While the system is working, the following message may be displayed:
Set Account Name
The Set Account Name function allows the company administrator to rename any of the available accounts. There is value to renaming an account if it makes the account’s purpose more obvious to users. All references to the account within the online banking system will use the descriptive name defined here and all other users will also see this account name.
If multiple companies are supported, a Company drop down will appear on the page. Each company selected will update the Account drop down list with accounts that are associated with that company. Only accounts that you have access to will be available. By default, the primary company will appear first in the Company drop down menu. Any additional companies will be listed after the primary in alphabetical order.

Commercial Customer Platform 5.5 User Guide
14
To add a descriptive name to an account:
1. Select the Administration option on the top menu and then select Set Account Name from the Manage Company group. The Set Account Name screen displays.
2. Select the Company whose account(s) you would like to name.
3. Select an account from the Account drop down list.
4. Enter a descriptive name in the Account Name field.
5. Click the Update button to save the new account name. To abandon your changes and restore the fields to their previously saved values, click the Reset button.
Change Company Password
The company administrator can change the company password at any time. The administrator must change this password when required by the financial institution (including the first time the administrator logs into the online banking system). Special password characteristics may be imposed by your financial institution to provide a greater degree of security.
Note: If your financial institution has elected to use the Three-Part Login feature, you will not have the Change Company Password option, nor will you see the company password field on the login page.
Special password characteristics may be imposed by your financial institution to provide a greater degree of security. These password requirements are displayed on the page to assist you in creating your new password.
To change the company password:
1. Select Administration from the top menu bar and then under the Manage Company heading, click on the Change Company Password option. The Change Company Password screen displays.

Commercial Customer Platform
15
2. Enter the existing company password in the Current Company Password field.
3. Enter the new company password in the New Company Password field and again in the Confirm New Password field.
Note: The system’s password checking is case sensitive; users must exactly replicate the pattern of upper and lower case letters to gain entry to the system. Using mixed case for your passwords can help to make them more secure.
4. To save the new password, click the Update Password button.
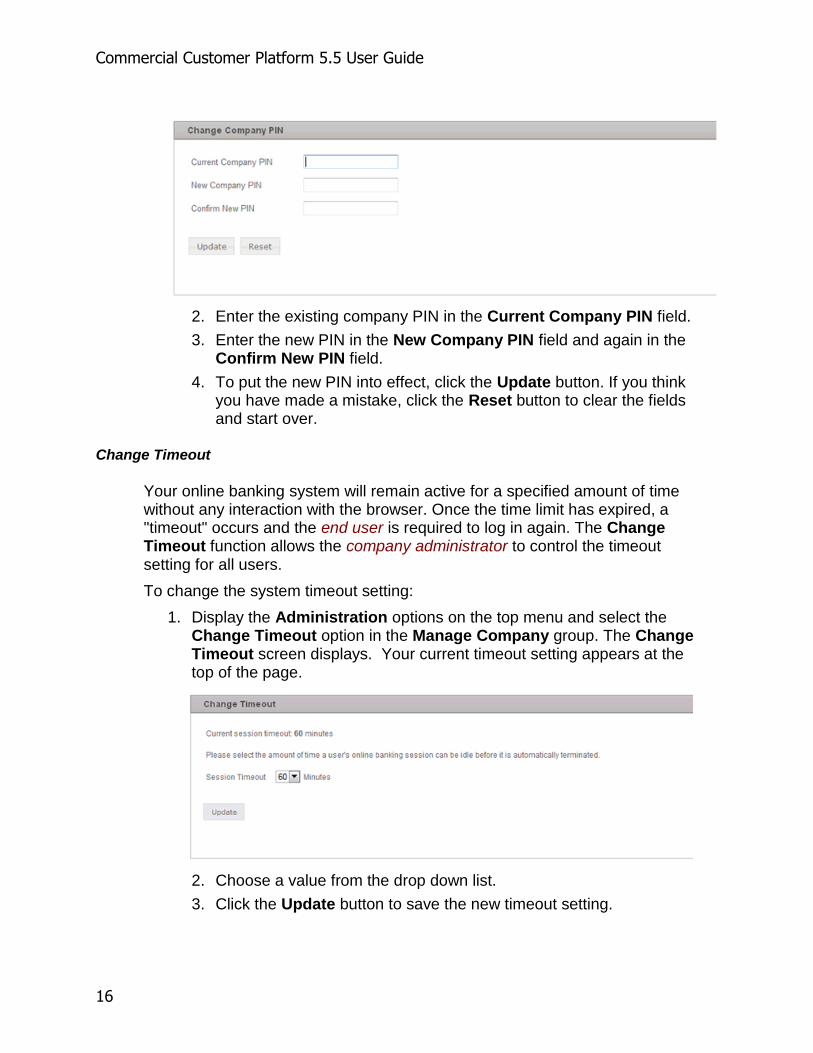
Change Company PIN
The Change Company PIN function lets you change the PIN setting in the online banking system. (This is necessary if the PIN is changed on the Host system. The PIN in the online banking system must be changed so that they match.) This option is enabled only for the Company Administrator, and only on installations where the Host system requires a PIN. This menu option only appears on the Administration menu when a PIN change is necessary.
A Company drop-down will be available on the page. Each company selection allows you to update the Company PIN for that company. By default, the primary company will appear in the Company drop-down menu. Changes made to the PIN will apply to the displayed company only.
To change the Company PIN:
1. Click the Change Company PIN option on the Administration menu under the Manage Company group. The Change Company PIN screen displays.
Commercial Customer Platform 5.5 User Guide
16
2. Enter the existing company PIN in the Current Company PIN field.
3. Enter the new PIN in the New Company PIN field and again in the Confirm New PIN field.
4. To put the new PIN into effect, click the Update button. If you think you have made a mistake, click the Reset button to clear the fields and start over.
Change Timeout
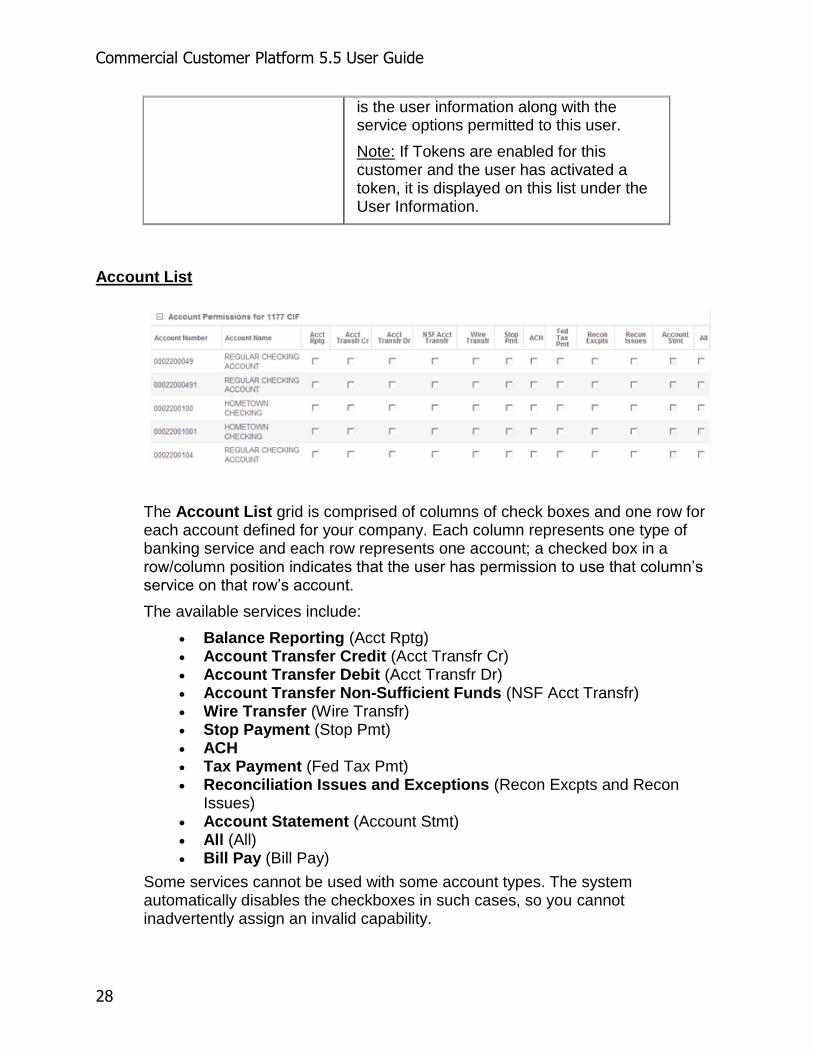
Your online banking system will remain active for a specified amount of time without any interaction with the browser. Once the time limit has expired, a "timeout" occurs and the end user is required to log in again. The Change Timeout function allows the company administrator to control the timeout setting for all users.
To change the system timeout setting:
1. Display the Administration options on the top menu and select the Change Timeout option in the Manage Company group. The Change Timeout screen displays. Your current timeout setting appears at the top of the page.
2. Choose a value from the drop down list.
3. Click the Update button to save the new timeout setting.

Commercial Customer Platform
17
Change My (User) Password
Both the company administrator and end user can change their own passwords at any time and must change their password after a number of days specified by the financial institution. (A user also must change their password if the administrator resets it.)
Special password characteristics may be imposed by your financial institution to provide a greater degree of security. These password requirements are displayed on the page to assist you in creating your new password.
To change your password:
1. Select Administration from the menu and then under the My Profile group click on the Change My (User) Password option. The Change My Password (User Password) screen displays.
2. Enter your existing password in the My Current Password field.
3. Enter your new password in the My New Password field and again in the Confirm My New Password field.
Note: The system’s password checking is case-sensitive; users must exactly replicate the pattern of upper and lower case letters to gain entry to the system. Using mixed case for your passwords can help make them more secure.
4. Click the Update Password button to save your new password.
Change Email Address
Both the company administrator and end user can change their email address at any time if the financial institution has this feature enabled. If this feature is not enabled, the Change Email Address option will not appear on the menu. To change your email address:
1. Under the Administration menu and the My Profile group, select the Change Email Address option. The Change Email Address screen displays.

Commercial Customer Platform 5.5 User Guide
18
2. Enter the new email address in the New Email Address field and again in the Confirm Email Address field.
3. Click Update to put the new email into effect. [If your financial institution has enabled a security challenge for this activity, you will be prompted to enter a token security code or a one-time passcode.]
4. Use the Reset button to clear the fields if you entered incorrect information.
Set Main Page
The Set Main Page function lets you customize the Main landing page displayed when you log in. This preference only affects your own login (i.e., the system will be set a certain way for you but this will not affect any other users). Typically, you would choose the screen you use most often.
To specify a new main page:
1. Display the Administration options on the top menu bar and then select Set Main Page under the My Profile group. The Set Main Page screen displays.
2. Select one of the screens from the drop down list. The list contains the menu options for the services to which you have access.
3. Click Update to save your main landing page.
Activate Token

Commercial Customer Platform
19
If your company is enabled for the Token Challenge service, you will see the Activate Token option on your Administration menu under the My Profile group. If you, as a user, are required to use a token to perform certain functions, your financial institution will supply you with a token. If you have received a token, you are required to activate the token prior to using it. Activating the token associates the token with your user id and registers it within the network.
To activate your token:
Note: If you are required to use a token at login to gain access to the system, a token activation screen will be presented to you upon successful entry of your login credentials.
1. Enter the Token Serial Number into the first entry field. The token serial number is located on the back of the physical token.
2. Enter the Security Code into the second entry field. This is the number displayed on the front of the token. Some tokens refresh this number every 60 seconds; or you may have a token that requires you to push a small button on the face of the token to display the code.
3. When you have finished entering the token information, click the Submit button.
4. If the activation is successful, you will see a message confirming the activation. Note: if the activation is not successful, repeat steps 1-3.
Note: If you are required to use a token at login to gain access to the system, a token activation screen will be presented to you upon successful entry of your login credentials. Activating a token as part of the login process, the buttons displayed on the screen will be Activate Token and Complete Login; Back to Token Challenge; and Log Out instead of Submit and Cancel.

Commercial Customer Platform 5.5 User Guide
20
Manage One-time Passcode Delivery - [customized product name]
If your company is enabled for multifactor authentication, you will have access to the Manage Security Code Delivery page under the Administration, My Profile section. This page contains the MFA delivery destinations established for this user by either the company administrator or the financial institution. The page displays which methods are available for receiving a one-time passcode (OTP). MFA phone numbers and email addresses are added by the company administrator (or the financial institution for the company administrator) on a separate screen. When a phone number is added or modified, it displays on this page with the delivery option set to Voice only. The phone owner may choose to add Text as an additional delivery option by checking the Text checkbox. Once checked, an "Activate Text" hyperlink displays to the right of the checkbox in the Text Action / Status column. After the phone number is activated for text, this link is replaced with the static text, "Text Activated". The Text Activated verbiage indicates that the activation process has been completed and this phone number is capable of receiving a text message containing the one-time passcode. You may repeat this process for any of the phone numbers that support text.
Note: Phone numbers containing an extension may not be enabled for Text delivery. The Text checkbox will appear grayed and disabled and the Text Action / Status column displays N/A.
If you decide that you no longer want the phone number enabled to receive a text message from this source, uncheck the Text checkbox for that phone number and then click Update, or you can text STOP to 44833 from your mobile phone. Contact your company administrator or financial institution if you would like the phone number removed.

Commercial Customer Platform
21
Terms and Conditions: Clicking this link displays your financial institution's terms and conditions regarding the use and possible carrier charges for text messaging.
The Activate Text link initiates the required process of activating the phone to receive a text message from your online banking system. Note: you must have the phone in your possession to perform the text activation. Clicking this link sends an activation code to your phone which you will enter into the Activation Code field on the screen below.
Note: Once all desired phone numbers have been activated or deactivated for text, you must click the Update button at the bottom of the page to complete the text activation process and save any other changes to this page.
Maintain Security Questions

Commercial Customer Platform 5.5 User Guide
22
This feature allows a user to establish and/or update his or her security questions and answers. This menu option is visible if your financial institution allows you to reset a forgotten user password, or if you use security questions as an added security challenge at login. These questions and answers must be established before you are allowed to use the forgotten user password feature.
1. From the Administration menu, select the Maintain Security Questions option under the My Profile group.
2. Select five unique questions from the five drop-down question lists.
3. Enter answers to each question following the guidelines on the page. All five questions must be selected and answered. No answers may be identical.
4. Click the Submit button to save your selections. You can also click the reset button to clear the fields if you entered any incorrect information.
Unenroll Computers
The Unenroll Computers option will allow you to invalidate the user’s computer/cookies without resetting their password. Doing this will force an MFA challenge at the user's next login.

Commercial Customer Platform
23
Note: This option is only available if your financial institution has enabled Multifactor Authentication (MFA).
There are two ways to access the Unenroll Computers function. One to perform the function for another user and the other to perform the function for yourself. If you are an administrative user and you want to perform the function for another user, follow the navigation shown below.
1. From the Administration menu, select the Add/Change/Remove Users screen from the Manage Users group .
2. Select the user from the Current User drop-down list.
3. Click the Unenroll Computers button in the Security Options section (do not click update).

Commercial Customer Platform 5.5 User Guide
24
If you want to unenroll your own computer, select the Unenroll Computers option located under the Administration menu, My Profile group.
The Unenroll This Computer option removes from the computer you are currently using, the cookie that is stored for extra security validation.
The Unenroll All Computers option removes from all of your computers (without
logging into the individual computers), the cookie that is stored for extra security validation.
Note: If you unenroll your computer, you will be challenged upon your next login to provide a Security Access Code or answer Security Questions.
Manage Users
Add/Change/Remove Users
The Add/Change/Remove Users option is used to view, add, modify and delete end users and determine the services and accounts they can access. This function, available to administrative users, lets you create a "profile" for each user. This profile includes a unique ID and secure password, as well as permission settings that allow the user to access certain accounts and use specific services.
The controls are arranged in three logical groups: User Information (basic identifying data), Account List (account access and service restrictions) and Features/Services. If Multifactor Authentication is enabled for a customer, a Security Options section displays between the User Information and the Account List.
Only the company administrator created by the financial institution has the ability to modify other users who are designated as Administrators. An administrative user created by the company administrator can view, add, delete, and modify non-administrative users.

Commercial Customer Platform
25
Note: Changes to a user's profile do not affect sessions that are already underway. Users with active sessions must log out and back on to see modifications made in User Information and Features/Services.
User Information
The User Information section has controls to set the top-level user identification settings, for example, user name, user ID, passwords and email address.
Security Options
If your financial institution is enabled for Multifactor Authentication (OTP or Security Questions), you will also see the MFA One-time Passcode Delivery Options section on this page. The section enables a company administrator or an administrative user to add/modify/delete the OTP email addresses and phone numbers for this user. This section may contain email address fields, phone number fields, or both, depending on the services your financial institution has implemented.
These email addresses and phone numbers will be used as delivery channels for the one-time passcode. A one-time passcode may be required when logging in or when perform certain activities, depending on your setup. When adding or modifying a phone number for a user, the output method defaults to Voice only. If a user would like to receive the one-time passcode in a text message, then text messaging must be enabled by that user - the person whose phone number it is. If the user does enable his/her phone number for Text, it will display on this page with a check mark, but will be grayed and disabled.
A phone extension may also be added for a phone number. If a phone extension is entered, the Ext. Dial Delay must be selected. This indicates how much of a delay there should be between the phone number being dialed and the extension being dialed. Phone numbers containing extensions may not be enabled for Text delivery by the end user.
Note: If the OTP email and phone number fields are left blank and email delivery is one of the available options, then the user's contact email address will be used at the time the user is challenged and then added as an OTP email address.

Commercial Customer Platform 5.5 User Guide
26
Control Description
Current User The drop down list lets you choose a user definition to modify. The field displays the ID of the currently selected user when the drop-down is not being used.
New This button lets you create a new user profile.
User Name This is the user’s name. This information is for identification and definition purposes only and is not accessible outside of this screen.

Commercial Customer Platform
27
User ID This is the ID that the user will use to log into the system.
Email This is the user’s email address. System-generated email messages intended for this user will be directed to this address.
User Password/Confirm
This is the password that the user will use when logging in. The system cross checks the Password and Confirm fields to help eliminate typographical errors.
Reset All MFA Credentials
Displays if MFA (OTP or Security Questions) is enabled; this will reset and invalidate the selected user’s password, security questions and computer/cookies. You must provide new password information prior to clicking this option.
Unenroll Computers Displays if MFA (OTP or Security Questions) is enabled; this invalidates the selected user’s computer/cookies without resetting their password.
Reset Security Questions
Displays if MFA is enabled with the Security Questions option; this will reset the selected user's existing security questions.
MFA One-time Passcode Delivery Options
This section displays if the customer is enabled for MFA One-time Passcode. Please refer to the descriptive paragraph at the beginning of this section.
Add Clicking this button adds the newly entered user to this company.
Update Clicking this button updates an existing user's information.
Delete Clicking this button deletes this user.
Reset Clicking this button resets any changes that were made to the fields on the Add/Change/Remove Users Page.
List Clicking this button displays a listing of all users of this company. Included in this list
Commercial Customer Platform 5.5 User Guide
28
is the user information along with the service options permitted to this user.
Note: If Tokens are enabled for this customer and the user has activated a token, it is displayed on this list under the User Information.
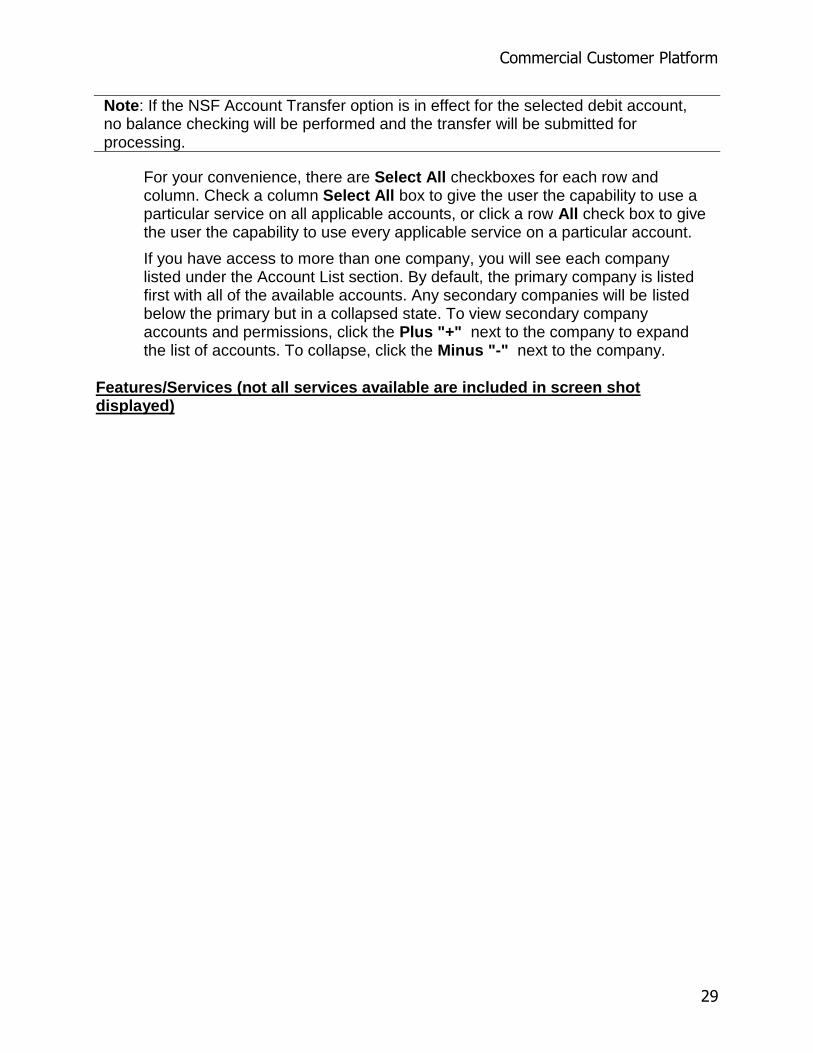
Account List
The Account List grid is comprised of columns of check boxes and one row for each account defined for your company. Each column represents one type of banking service and each row represents one account; a checked box in a row/column position indicates that the user has permission to use that column’s service on that row’s account.
The available services include:
Balance Reporting (Acct Rptg) Account Transfer Credit (Acct Transfr Cr) Account Transfer Debit (Acct Transfr Dr) Account Transfer Non-Sufficient Funds (NSF Acct Transfr) Wire Transfer (Wire Transfr) Stop Payment (Stop Pmt) ACH Tax Payment (Fed Tax Pmt) Reconciliation Issues and Exceptions (Recon Excpts and Recon
Issues) Account Statement (Account Stmt) All (All) Bill Pay (Bill Pay)
Some services cannot be used with some account types. The system automatically disables the checkboxes in such cases, so you cannot inadvertently assign an invalid capability.
Commercial Customer Platform
29
Note: If the NSF Account Transfer option is in effect for the selected debit account, no balance checking will be performed and the transfer will be submitted for processing.
For your convenience, there are Select All checkboxes for each row and column. Check a column Select All box to give the user the capability to use a particular service on all applicable accounts, or click a row All check box to give the user the capability to use every applicable service on a particular account.
If you have access to more than one company, you will see each company listed under the Account List section. By default, the primary company is listed first with all of the available accounts. Any secondary companies will be listed below the primary but in a collapsed state. To view secondary company accounts and permissions, click the Plus "+" next to the company to expand the list of accounts. To collapse, click the Minus "-" next to the company.
Features/Services (not all services available are included in screen shot displayed)

Commercial Customer Platform 5.5 User Guide
30

Commercial Customer Platform
31
The Features and Services blocks give fine control over what system services the user may access and allows you to set dollar-value limits for some services.
Note: All limit definitions represent maximum allowable values. That is, the limit value represents the largest amount that is acceptable, and an exception condition occurs only if the user or company exceeds the limit value.
For example, if a user has a $50.00 per-transaction limit on wire transfers, that user can initiate a $50.00 transfer without needing approval but if he or she tries to initiate a wire for $50.01, the system will flag it as pending and require an approval. (For the sake of simplicity, this example assumes the absence of other approval constraints.)
Control Description
Administration
User Administrator Grants access to this screen (i.e., the capability to create, update and delete user definitions) and other Administration subtopics (Activity Reporting, Balance Alerts, Account Maintenance, Change Company/User Passwords and Change Timeout).

Commercial Customer Platform 5.5 User Guide
32
User Profile Approver Approves or denies any new user profile, changed user profile, deleted user profile or reset login credentials
Suppress Email Approval Request
Prevents the system from sending email approval requests to the user profile approver. Without this setting, a User Profile Approver receives email every time the Company Administrator and user administrators add a new user profile, update an existing user profile, delete an existing user profile or reset login credentials.
Account Reporting
Allow Account Reporting
Grants access to the Account Reporting service.
Account Statements
Allow Account Statements
Grants access to the Statement Manager service.
Account Transfer
Allow Account Transfer Grants access to the Account Transfer service.
Wire Transfer
Allow Wire Transfer Grants general access to the Wire Transfer service. The other checkboxes control access to the specific Wire Transfer functions.
Initiate Template Grants permission to submit Template-based Wire Transfers.
Initiate Group Grants permission to submit Group-based Wire Transfers.
Initiate Freeform Grants permission to submit freeform wire transfers (i.e., wire transfers that do not use predefined templates).
Approval Designates the user as a Wire Transfer Administrator, with the capability to approve or deny wire transfer submittals.

Commercial Customer Platform
33
Wire Transfer Administrators receive system-generated email messages whenever a user submits a new wire transfer that requires approval.
Template Maintenance Grants permission to create, modify and delete wire template definitions
Template Group Maintenance
Grants permission to create, modify and delete wire group definitions.
Investigation Request Grants permission to initiate a wire transfer investigation.
Incoming Wires Grants permission to access incoming transfer details. (Wire Interface Dependent)
Suppress Incoming Email Notification
Prevents the system from sending email to the user regarding incoming wires. (Wire Interface Dependent)
Suppress Email Approval Request
Prevents the system from sending email approval requests to the user. (Without this setting, Wire Administrators receive email every time a user initiates a wire transfer that requires approval.)
Foreign Exchange Rates
Grants permission to view the foreign currency exchange rates table.
Daily Limit Specifies the daily cumulative maximum amount of funds the user can transfer.
Transaction Limit Specifies the maximum amount of funds the user can transfer in any single transaction.
Daily Approval Limit Specifies the daily cumulative maximum amount of funds the user can approve for a transfer.
Transaction Approval Limit
Specifies the maximum amount of funds the user can approve in any single transaction.
Stop Payments
Allow Stop Payments Grants access to the Stop Payments
Commercial Customer Platform 5.5 User Guide
34
service.
ACH
Allow ACH Grants general access to the ACH service. The other checkboxes control access to the specific ACH functions.
Participant Maintenance
Grants permission to add, modify and delete ACH participant definitions.
ACH Approval Designates the user as an ACH Administrator, with the capability to approve or deny ACH submittals. ACH Administrators receive system-generated email messages whenever a user submits a new ACH batch that requires approval.
Batch Template Maintenance
Grants permission to add, modify and delete ACH batch template definitions.
Batch Template Maintenance - ACH Prefunding
Grants permission to add, modify and delete ACH batch template definitions. ACH Prefunding Batch Templates will not include selection of offset account as prefunding templates are required to be unbalanced.
Reversal Grants permission to cancel out a previously submitted ACH transaction. (Note that this does not happen directly – the system sends an email request to the financial institution.)
Initiate Batch Grants permission to submit ACH batches.
Assign Participant to Batch
Grants permission to define which participants are included in ACH batches.
Suppress Email Approval Request
Prevents the system from sending email approval requests to the user. (Without this setting, ACH Administrators receive email every time a user initiates an ACH batch that requires approval.)
Send ACH File Grants permission to upload and send ACH files to the financial institution.

Commercial Customer Platform
35
Import ACH Data Grants permission to import ACH files and add their batch and participant definitions to the database.
Import ACH file - ACH Prefunding
Grants permission to import ACH files and add their batch and participant definitions to the database. When on ACH Prefunding you must import an unbalanced file when importing Standard ACH format. If the file is balanced, the system will remove the offsetting account.
Daily Credit Limit Specifies the maximum daily cumulative amount the user can initiate for ACH Credit origination files.
Daily Debit Limit Specifies the maximum daily cumulative amount the user can initiate for ACH Debit origination files.
Batch Credit Limit Specifies the maximum Credit amount of funds the user can transfer in any single ACH Batch.
Batch Debit Limit Specifies the maximum Debit amount of funds the user can transfer in any single ACH Batch.
Daily Approval Credit Limit
Specifies the maximum daily cumulative amount the user can approval of ACH Credit origination files.
Daily Approval Debit Limit
Specifies the maximum daily cumulative amount the user can approval of ACH Debit origination files.
Batch Approval Credit Limit
Specifies the maximum Credit amount of funds the user can approve in any single ACH Batch.
Batch Approval Debit Limit
Specifies the maximum Debit amount of funds the user can approve in any single ACH Batch.
Federal Tax Payments
Allow Federal Tax Payments
Grants general access to the Federal Tax Payments service. The other checkboxes

Commercial Customer Platform 5.5 User Guide
36
control access to the specific Federal Tax Payments functions.
Federal Tax Payments Grants permission to submit tax payments.
Federal Tax Payments Approval
Designates the user as a Federal Tax Payments Administrator, with the capability to approve or deny tax payment submittals. Tax Payments Administrators receive system-generated email messages whenever a user submits a new tax payment that requires approval.
Suppress Email Approval Request
Prevents the system from sending email approval requests to the user. (Without this setting, Administrators receive email every time a user initiates an EFTPS batch that requires approval.)
Daily Limit Specifies the daily cumulative maximum amount of funds the user can transfer.
Transaction Limit Specifies the maximum amount of funds the user can transfer in any single transaction.
Daily Approval Limit Specifies the daily cumulative maximum amount of funds the user can approve for a transfer.
Transaction Approval Limit
Specifies the maximum amount of funds the user can approve in any single transaction.
Forms
Note: A user must have Account Reporting capability for an account in order to use the Forms service for that account.
Allow Forms Grants general access to the Online Services service. The other checkboxes control access to the specific Online Services functions.
Photocopy Request Grants permission to request a photocopy (or an electronic image) of a paid check or earlier account statement.

Commercial Customer Platform
37
Check Reorder Grants permission to submit online check orders.
Account Research Grants permission to initiate requests to the financial institution to investigate or clarify specific account activity.
Cash/Change Order Form
Grants permission to request cash shipments from the financial institution.
Bill Pay Research Grants permission to initiate requests to the financial institution to investigate or clarify specific Bill Pay activity.
Reconciliation Services
Allow Reconciliation Services
Grants general access to the Reconciliation service. The other checkboxes control access to the specific Reconciliation functions. Reconciliation Services supports checking accounts only.
Issues Register Input Grants permission to reconcile the issued items and allows the user to view, filter, and export the issue items in register.
Exceptions Processing Grants permission to submit exception decisions for processing.
Suppress Exception Notification
Prevents the system from sending email every time the FI uploads exceptions.
Suppress Issues Notification
Prevents the system from sending email every time the FI downloads an Issues Register for processing.
Issues Register Input Grants permission to manually input issues into a register for processing.
File Upload (Upload Issues File)
Grants permission to upload Issues Register file to the FI.
Additional Services
Bill Pay or iPay checkbox
Grants permission to use the Bill Pay system.
Adding a New User

Commercial Customer Platform 5.5 User Guide
38
From the Administration menu, select the Add/Change/Remove Users menu option under the Manage Users menu group. The Add/Change/Remove Users screen displays with fields pre-filled for the user displayed in the Current User field.
1. To add a new user, click the New button, which clears the user related fields and displays an Add button.
2. Enter the User Name and a User ID. The new user will use the User ID when he or she logs in.
3. Enter the new user’s password in the User Password field. This user will also enter this when he or she logs in. Note: passwords must conform to your financial institution's password requirements.
4. Enter the password a second time in the Confirm Password field. This provides verification of the password.
5. Enter the new user’s contact email address.
6. If your company is enabled for Enhanced Login Security (MFA), you will also enter the user's MFA delivery destinations (phone numbers or email addresses) which will be used to deliver the Security Access Code. This section may contain email address fields, phone number fields, or both, depending on the services your financial institution has implemented.
7. In the Account List section, click the check boxes on the grid to grant the user permission to use specific system services with specific accounts. Use the All check box for a row to give the user full permissions for an account, or use the Select All check box for a column to give the user permission to use a given service on all applicable accounts. To access secondary company accounts and permissions, click the Plus "+" next to the company to expand the list of accounts. To

Commercial Customer Platform
39
collapse, click the Minus "-" next to the company. Note: some check boxes may be disabled if your company does not have access to this service.
8. Set the Features/Services check boxes to grant the user appropriate permissions for system services.
9. When you are finished adding the new user, click the Add button at the top or bottom of the page.
Note: If Dual Control is enabled, the new user profile will be in a pending status waiting to be approved or denied.
Changing User Information
From the Administration menu, select the Add/Change/Remove Users menu option. The Add/Change/Remove Users screen displays with fields pre-filled for the user displayed in the Current User field.
1. In the Current User field, select the User ID from the drop-down list. The selected user’s information displays.
2. Make any necessary changes to the user information, security settings, account or service permissions. You may click the Reset button at any time to restore all fields to their previously stored values.
3. When you are finished, click the Update button at the top or bottom of the page to save your changes.
Note: If Dual Control is enabled, the updated user profile will be in a pending status waiting to be approved or denied.

Commercial Customer Platform 5.5 User Guide
40
Deleting a User
From the Administration menu, select the Add/Change/Remove Users menu option. The Add/Change/Remove Users screen displays with fields pre-filled for the user displayed in the Current User field.
1. In the Current User field, select the User ID you want to delete from the drop-down list. The selected user’s information displays.
2. Verify that the correct user is selected.
3. Click the Delete button at the top or bottom of the page. A dialog box appears prompting for confirmation.
4. Click the OK button to confirm the deletion, or click the Cancel button to leave the record unchanged.
Note: If Dual Control is enabled, the updated user profile will be in a pending status waiting to be approved or denied.

Commercial Customer Platform
41
Approve User Updates
The Approve User Updates option allows approvers to approve or deny new user profiles, updated user profiles, deleted user profiles, or profiles that have their login credentials reset. A Deny Message must be entered when a user profile is denied.
From the Administration menu, select Approve User Updates from the Manage Users group. The Approve User Updates screen displays.
Note: If Dual Control feature is disabled for the company, this option will not be on the Administration drop down menu.
Submitters will have display only access of all user profile changes they submitted. Approvers will have display only access of all changes submitted for their own user profiles.

Commercial Customer Platform 5.5 User Guide
42
Control Description
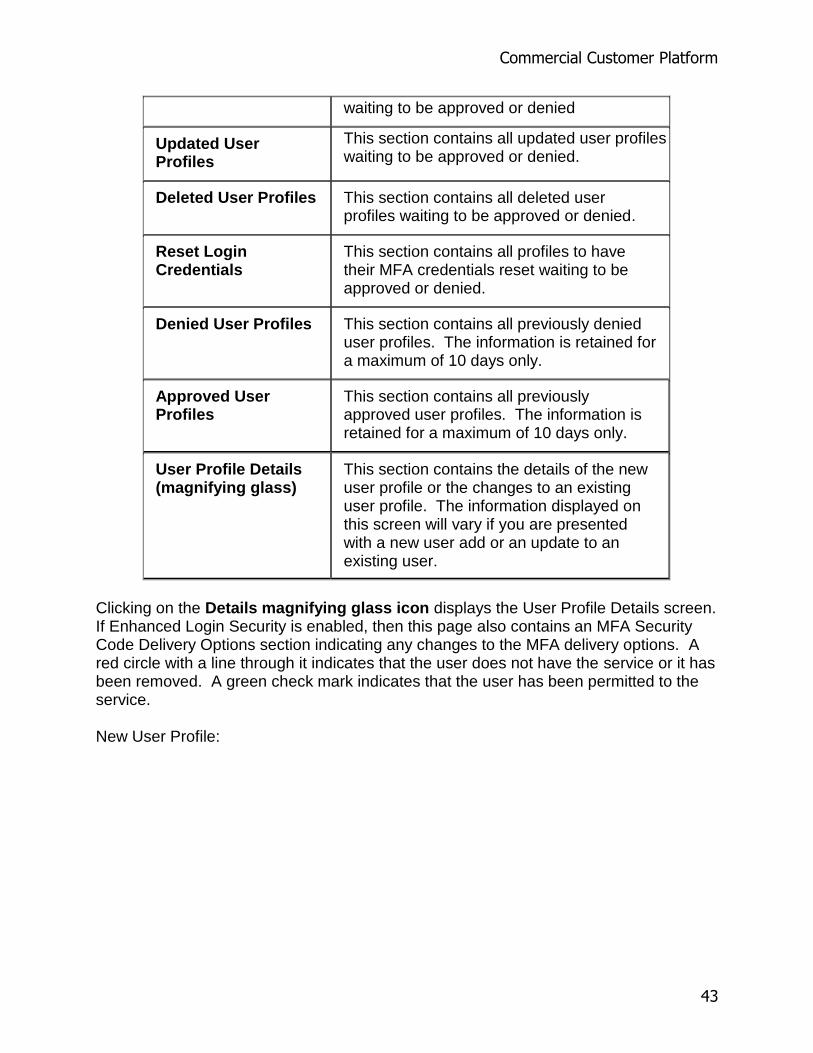
New User Profiles This section contains all new user profiles
Commercial Customer Platform
43
waiting to be approved or denied
Updated User Profiles
This section contains all updated user profiles waiting to be approved or denied.
Deleted User Profiles This section contains all deleted user profiles waiting to be approved or denied.
Reset Login Credentials
This section contains all profiles to have their MFA credentials reset waiting to be approved or denied.
Denied User Profiles This section contains all previously denied user profiles. The information is retained for a maximum of 10 days only.
Approved User Profiles
This section contains all previously approved user profiles. The information is retained for a maximum of 10 days only.
User Profile Details (magnifying glass)
This section contains the details of the new user profile or the changes to an existing user profile. The information displayed on this screen will vary if you are presented with a new user add or an update to an existing user.
Clicking on the Details magnifying glass icon displays the User Profile Details screen. If Enhanced Login Security is enabled, then this page also contains an MFA Security Code Delivery Options section indicating any changes to the MFA delivery options. A red circle with a line through it indicates that the user does not have the service or it has been removed. A green check mark indicates that the user has been permitted to the service. New User Profile:

Commercial Customer Platform 5.5 User Guide
44
Updated User Profile:

Commercial Customer Platform
45
Reset Security Questions
The Reset Security Questions option allows you to reset a user's existing security questions. This will remove the user's current security questions/answers, requiring the user to establish new security questions/answers.

Commercial Customer Platform 5.5 User Guide
46
1. From the Administration menu, select the Add/Change/Remove Users option under the Manage Users group.
2. Select the user from the user name drop-down. 3. Click the Reset Security Questions button (do not click update).
The user is presented with the Create Security Question screen upon the next login. This option is only available if the financial institution has enabled Multifactor Authentication with Security Questions.
Reset All MFA Credentials
This option is located on the Add/Change/Remove Users screen. The Reset All MFA Credentials option allows you to remove security questions, unenroll computers and invalidate the user's existing password at the same time. You must provide new password information prior to clicking this option.

Commercial Customer Platform
47
1. From the Administration menu, select Add/Change/Remove Users from the Manage Users group. .
2. Select a Current User from the drop-down list.
3. Enter new password information in both fields.
4. Click the Reset All MFA Credentials button in the Security Options section (do not click update).
Note: If Dual Control is enabled, the reset login will be in a pending status waiting to be approved or denied. The Reset All MFA Credentials option is only available if Multifactor Authentication (Enhanced Login Security) has been enabled. Depending on which option is enabled by your financial institution, one of two screens will be presented on the user's next login:
One-time Passcode Option - The user is challenged at the next login to provide a one-time passcode or OTP and/or add extra security (enroll their computer).

Commercial Customer Platform 5.5 User Guide
48
Once the user provides the one-time passcode, he or she is presented with the request to change his or her password.
Security Questions Option – The user is challenged with the Security
Questions setup screen. Once the user sets up the new Security Questions, he or she is presented with the request to change his or her password.
Unlocking a User
If a user enters three invalid logins, the system will lock out that user, preventing him or her from logging in. If this should happen, the Company Administrator will need to use the Unlock User button on the Add/Change/Remove Users page. Clicking this button resets the invalid login count back to zero and thereby allows the user to log in. Unlocking the user does not change any of the login credentials, so you may need to reset the password as well. Note: If Multifactor Authentication (Enhanced Login Security) is enabled, an invalid entry of a one-time pass code will also count toward the invalid login count.
Commercial Customer Platform
49
User Activity Reporting
User Activity Reporting
The User Activity Reporting service lets you select information from available transaction logs to download for purposes of importing the information into another application or to display the information on the screen. Common query selections can be saved for later reuse.
IMPORTANT NOTE: If the number of returned records for a query exceeds 200, the first 200 records will be displayed followed by a message recommending that you download the file to your computer. You must download the file in order to access all results returned.
To display the User Activity Reporting screen:
From the Administration menu, select the User Activity Reporting option under the Manage Users group. The User Activity Reporting screen displays.
This screen has four distinct sections: Saved Reports, Date Selection, Query Selection and Presentation Selection.
The Saved Reports section displays, in a drop-down list, report queries that have been previously saved for future use. Select the report from the drop-down and click the Submit button.
To create a new search query, select a defined date from the Search by Log File drop-down or Search by Range of Dates by entering a from and to date.
Under Query Selection, select All Activities to see the activities for the specified date range, or define the query by selecting the transaction type and possible values to search.
Once you have defined the search query, in the Presentation Selection section, you may assign a name and save the search query for future use or choose to display the query results on a new page. Click the Submit button when you are finished defining your query.

Commercial Customer Platform 5.5 User Guide
50
Saved Reports
You can greatly streamline the process of producing frequently used queries by defining a report query and saving it to use again, later. The saved information includes a report title and the values specified in the Date, Query, and Presentation Selection sections.
All saved reports appear in the Saved Reports drop-down list in the top left-hand area of the screen.
To retrieve a saved report:

Commercial Customer Platform
51
1. Choose the report from the Saved Reports drop-down list. All of the fields on the screen are filled out automatically.
2. Look over all of the pre-filled fields and make any necessary modifications. Be sure to check the Date fields.
3. Click the Submit button. If you are creating a data file, you are prompted to select the directory where the file will be saved.
Date Selection
The date range for a query can be based either on a particular transaction log (one week) or on a range of dates that spans one or more log files. Usually, the current transaction log and the logs from the prior four weeks are available for query.
The current week log refers to transactions occurring from midnight on the most recent Monday to 11:59 pm the following Sunday. Example, a "current week" log would run from midnight on 10 Sep 2012 through 11:59 pm on 16 Sep 2012.
Date information is displayed in the Date Selection area. There are two ways to set the date range for a report; you can either choose a single existing log for the data source, or you can specify a range of dates and the system will pull data from all appropriate log files.
Search by Log File:
Choose a log file from the Search Prior Week’s Log drop-down list.
Commercial Customer Platform 5.5 User Guide
52
Search by Range of Dates:
Enter a start date (or select a date from the calendar pop-up) in the From field and an end date in the To field. these dates can span multiple log file periods.
Note: You may specify only dates that fall within the range shown as Available Files (displayed at the bottom of the Date Selection - Search by Log File area).
Query Selection
You can specify that all activities should be reported or you can narrow the scope of the report using two levels of query: use the First Query fields to refine the search; use the Second Query fields for more complex reports. Within each level of query, there are four selection criteria: transaction type, field to search, field value, and a logical operator to tie the fields together. All query-related fields are displayed in the Query Selection area in the middle of the screen.
IMPORTANT NOTE: If the number of returned records for a query exceeds 200, the first 200 records will be displayed followed by a message recommending that you download the file to your PC. You must download the file in order to access all results returned.
Report All Activity
Check the All Activities box. No further query setup is required.
Setting Up a One-Field Query
To set up a one-field query, you need to fill in some of the input fields in the First Query section.
1. Choose a transaction type from the Transaction Type drop down list. All fields associated with that transaction will appear in the Field to Search drop down lists. If you choose All Transactions here, the Field to Search drop down lists are populated with every defined field.
2. Choose a field name from the upper Field to Search drop-down list.
3. Enter a value in the upper Value field.
Setting Up a Two-Field Query
To set up a two-field query, you need to fill in some additional input fields in the First Query section.
1. Follow the instructions above for a One-Field query.
2. Choose a field name from the lower Field to Search drop-down list.
3. Enter a value in the lower Value field.

Commercial Customer Platform
53
4. Choose a logical operator And or Or from the drop-down list. And returns records only if they have matching values for both fields; Or returns records that match either one (or both) of the fields.
Setting Up a Complex Query
To set up a complex query, first follow the instructions above for setting up a One- or Two-Field query in the First Query section, and then use the same guidelines to set up another query in the Second Query section.
Presentation Selection
The information in Presentation Selection section identifies the form and format of the report.
The TITLE field is required only if you are going to save this report for later reuse.
Reports can be displayed directly in the browser window or saved as disk files for later use. Click the Screen Display radio button if the report is to be displayed in the browser window, or click Download Data File if the report is to be created as a file. Because of browser limitations, we recommend that you use the Download Data File option for any report of more than 200 records.
If the report is to be created as a file, choose either the pipe symbol (|) or the semi-colon (;) from the lower drop-down list to be the report’s "field delimiter" character. Your choice should be made based on the compatibility requirements of the program that you will use later to read the report file.
Generating an Activity Report
Running a saved report
1. Choose the report from the Saved Reports list. All of the fields on the screen are filled out automatically.
2. Look over all of the pre-filled fields and make any necessary modifications. Be sure to check the Date fields.
3. Click the Submit button. If you are creating a data file, you are prompted to select the directory where the file will be saved.
Create a new report
1. In the Date Selection section, select a prior week’s log from the Search Prior Week’s Log drop-down list or specify a range of dates.
2. In the Query Selection section, click the All Activities check box to report activity on all log records, or perform a more specific search. For details, see the instructions outlined earlier in Query Selection.
Commercial Customer Platform 5.5 User Guide
54
3. In the Presentation Selection section, enter a report title if you intend to save your report selections for future use. If your report is to be created as a disk file, make sure you choose the correct delimiter. For details, see the instructions outlined earlier in Presentation Selection.
4. Click the Submit button. If you are creating a data file, you are prompted to select the directory where the file will be saved.
5. Click the Main button to re-display the main menu.
Save a Report
1. Display the Activity Reporting screen.
2. Complete the Date, Query, and Presentation sections.
3. In the Presentation Selection section, make sure to enter a report title and select the Save option from the drop-down list below the Title field.
4. Click the Submit button to create the report and save its specifications for future use.
5. Click the Main button to re-display the main menu.
Tip: You can use an existing report as the basis for another similar one. Click the report from the saved reports list, make any desired modifications, and then enter a new report title before you click Submit.
Delete a Saved Report
1. Display the Activity Reporting screen.
2. In the Saved Reports section, select the report title.
3. Click the Delete button. A dialog box appears to confirm the deletion; click OK to delete the report or Cancel to leave it unchanged.
Account Activities & Reporting
Account Activities & Reporting
The Account Activities & Reporting menu provides access to account management functions. The options available from this menu are dependent upon each financial institution's processing methods and may include:
The Account Reporting function gives an overview of all account information and also provides the means to see details, to filter by account or activity type, and to view your account statements online.
Account Summary - Provides complete information at a glance and also provides access to Account Details (record of activity) for each account, loan and investment.
Create Reports - Lets you create report definitions, specifying which accounts and what types of activity are to be displayed.

Commercial Customer Platform
55
Run Selected Report - Displays a filtered version of the Account Summary page, based on the report definition.
Account Statements - Allows you to view your account statement online without having to wait for a paper copy in the mail. The service lets you select the account and period (date range) for the statements you would like to view.
Manage Balance Alerts - Specify alert conditions by defining unique criteria for individual accounts, then set the system to send an email message when an account reaches a specified monetary level.
Note: If your financial institution supports this feature, all balances displayed throughout cash management will have an asterisk (‘*’) appended to indicate when a real-time balance is not available. This asterisk will be displayed on a per-account basis, indicating status for individual accounts
(in case real-time balances are available for certain accounts but not a
Reconciliation Services
Upload Issued Checks – allows you to upload an issue file to cash management
Enter Issued Checks – allows you to manually enter issue items.
View Issued Check Register -- displays a history of the issues you have submitted (input or uploaded) and, depending on your financial institution's processing method, may allow you to reconcile account information and view exceptions.
Positive Pay
Exception Decision Positive Pay Exceptions – allows you to view exceptions and submit decisions (Pay or Return) through the online banking channel. Exception items are updated with decision information. This option is dependent upon on your financial institution’s processing method.
Stop Payments
Add Stop Payment – Allows you to enter a stop payment request on a single check or range of checks.
View Stop Payment Activity – Allows you to view stop payment transaction status.
Account Reporting
Account Summary

Commercial Customer Platform 5.5 User Guide
56
The Account Summary screen gives an overview of company accounts. It displays all of the accounts to which you have access (as determined by the settings in Administration > Manage Users).
To display the Account Summary screen:
Rest the cursor on the Account Activities & Reporting option and then click the View Account Summary option under the Account Reporting group. The Account Summary screen displays with descriptive account and balance information.
1.
Select a Company from the drop-down menu to display that company's associated accounts.
The on-screen disclosure statements indicate the date and time the data displayed was updated.
The Deposit Accounts table contains all deposit accounts, the Other Accounts table contains all certificates and other investments, and the Loan Accounts table contains all loans and lines of credit accounts. (Any table will be omitted from the display if it is empty.) Please note the system does not total the Available Balance column. This is intentional. Totaling this column can provide an overinflated amount if one account's balance affects another account’s available balance. For example, this could happen if there was a sweep relationship between accounts in the table.

Commercial Customer Platform
57
The page will open with all tables expanded. Each table may be expanded or collapsed by clicking the '+' or '-' sign to the left of the table heading.
The columns may be sorted by clicking on the up or down arrow in the column header.
Clicking the magnifying glass icon under the More column displays a pop-up window with additional details for that account. If you have the online statements feature, an additional column labeled "Stmt" will display at the far right of the table.
The Print and Export icons at the top right of the page allow you to print the page or export the information to a file where it can be imported into another application.
Note: You can customize this screen display by creating a report and setting it as your default on the Create Reports screen.
Previously requested account history will be listed on the Account Summary screen under Retrieved Account Details. Each account query will have a status of Finished, Retrieving or More. Click on the account hyperlink to view the account details.
Finished: The system has completed the history request
Retrieving: The system is still retrieving the requested history
More: There are additional transactions to be retrieved within the specified date range that was previously requested.
Account Summary Screen Controls
The tables can be sorted by the data in any column. Click the arrows in the column headers to sort the table (up arrows give an ascending sort, down arrows give a descending sort). The column the table is sorted by will have a shaded header cell.
For the Deposit Accounts and Other Accounts sections, the first column shows the company-defined Description (entered in Administration > Set Account Name) and the financial institution-defined Type. Click the link in the Description field to display the Account Details screen for that account or investment item.
Commercial Customer Platform 5.5 User Guide
58
The Company drop-down menu controls the display of accounts associated with the selected company.
If your financial institution’s host system supports additional account data, you will see a column labeled More with a magnifying glass icon for each account and investment record. Click the magnifying glass to see a record of float data and other CTD (Cycle To Date) summary data for the account or investment. The information appears in its own browser window and can be printed.
If your financial institution’s host system supports Statement data, you will see a column labeled Stmt with a document icon for each account. Click the icon to see a statement with Cycle-to-Date debits and credits for the account or investment. The statement appears in its own browser window and can be printed. On the first day after a statement cycle you will be prompted to enter the date range. Enter the date range for the previous statement cycle.
Click the Print button to print a hardcopy of this screen; a standard Windows dialog box lets you specify a printer. Click Export to create a text file in a comma-delimited format, suitable for import into spreadsheets and other financial programs; a standard Windows dialog box lets you specify the filename and directory location.
Account Details
The Account Details screen provides detailed transaction information for the selected account.
To navigate to the Account Details screen:
Select View Account Summary from the Account Reporting group under Account Activities & Reporting. The Account Summary screen appears
Click one of the Account or Investment links in the Description column to display its details.

Commercial Customer Platform
59

Commercial Customer Platform 5.5 User Guide
60
Selecting the Company drop-down will populate the Account Selection drop-down with accounts tied to the selected company. Once you select your account, you may accept the default date range displayed, enter a specified date range and select Submit, or choose the Retrieve Yesterday's Transactions or Retrieve Today's Transactions buttons to retrieve account details for those days specifically.
Note: The Advanced Search link displays options to further identify search criteria. This functionality is described in the Account Details Advanced Search help section.
The Account Details table shows the basic account information plus the list of transactions (if any) that fit your date and filter settings. Note that this table displays both the Current Balance and the Available Balance for the account, based on results from your financial institution’s host system. The on-screen disclosure statement indicates the date and time the data displayed was updated.
The table display can vary depending on the type of account and the type of transaction being displayed. Each transaction will contain a date and may include a reference number, such as a check number.
Within the transactions table, clicking the up or down arrows in each column heading will re-sort the column in either ascending or descending order. The selected sort will be indicated by the direction of the arrow and the shading of the column header cell. When the table is sorted by date, and if available from your financial institution's host, a Running Balance column will display to the far right of the table.
The table contains pagination which allows you to navigate to the Next, Last, First or Previous page of transaction data.
When viewing the details of Loan Accounts, additional columns for Principal, Interest and Escrow may display to the right of the Credit column if the loan payment information is available from your financial institution.
Commercial Customer Platform
61
Note: Historical requests with a large number of transactions will be processed in the background. You may navigate to any other screen while your request is processing. Previously requested account details can be accessed from the Account Summary screen. Select the account hyperlink under the Retrieved Account Details section to view the account details.
Memo Posted transactions will be listed with the current day’s date and are considered part of the current day’s transactions. If a date range is selected that includes the current date, Memo Postings will be returned, if not, no Memo Postings will appear. The Balance Column (if available) will be blank for memo posted transactions.
At the bottom of the page is the option to export the transaction information. To export the information to a file, select a file format from the drop-down and then click the Export button.
Account Details Advanced Search
The Account Details Advanced Search section allows you to filter the displayed data or submit different search criteria. The Advanced Search section contains the Check Number Selection, Amount Selection and Available Transaction Categories.
To display the Account Details Transaction Search section, click the Advanced Search link on the Account Details page.
You may search for a specific check number or a range of check numbers, or search all checks.
You may also enter a specific amount to search or search transaction details for a range of amounts.
To further narrow your search, a combination of check number and amount search may be submitted together.
If you want to do a broader search, just select a transaction group from the list by checking the adjacent check box.
When you have finished defining your search criteria, click the Submit button below the expanded search section.
To close the Account Details Transaction Search section:
Click the Hide Advanced Search link. The Transaction Search section is hidden.

Commercial Customer Platform 5.5 User Guide
62
Account Details Screen Controls
The listing of transactions in the Account Details table can be sorted by the data in any column. Click the arrows in the column headers to sort the table (up arrows give an ascending sort, down arrows give a descending sort). The column the table is sorted by has a shaded column header cell.
The Company drop-down menu controls the display of accounts in the Account Selection drop-down list.
To see details for a different account, select another account from the Account Selection drop-down list.
Note: For all accounts, the Posted Transactions table will display an Item Reference column..
Imaging Features and Navigation
If you have access to the Imaging service and an image is available, the following will be displayed in the Item Reference column:
Check Imaging - The check number (for checks paid transactions) will display as a hyperlink in the Item Reference column; click the link to display the check image in a secondary browser window.
Deposit Imaging - The text "View" or a deposit transaction number will display as a hyperlink in the Item Reference column; click the link to

Commercial Customer Platform
63
display the deposit slip image or the Deposit Transaction List in a secondary browser window. If your financial institution is able to report associated items, the Deposit Transaction List displays a listing of the associated items included in the deposit and a hyperlink to view the individual deposited item or cash item ticket.
You can set the date range for the transactions you wish to see by filling out the From and To fields in the Request Specific Date Range table. Enter dates in dd/mm/ yyyy format or select the date from the pop-up calendar. For convenience, you can click the Retrieve Yesterday's Transactions or Retrieve Today's Transactions button to set one-day ranges.
You can also filter the data by clicking on the Advanced Search link. The data can be filtered by Check Number, Dollar Amount or Available Transaction Categories. Make your changes and click the Submit button to update the display.
If you have a large number of transaction records, you will be able to page through the list using First, Previous, Next and Last options on screen.
Note: If account category codes are not available, the Available Transaction Categories displayed will be Debits and Credits.
The display of the More button indicates that there are additional transactions available for the date range requested.
If you select the More button without a Sort and/or Transaction Category Filter in use, you will remain on the same page from where you selected the More button.
If you select the More button with a Sort and/or Transaction Category Filter in use, the application will return you to the first page of history and the ‘new’ transactions will be sorted within your original set of transactions.
You can create an export file of Account Details data by choosing a format from the Select Export Format drop-down list and clicking the Export button. A standard Windows dialog box lets you specify the filename and directory location.
Note: If the balance for the account is not real-time, a pop-up warning will be displayed before the download of the file.
The online banking system can export financial transaction data in a format specific to BAI, MicrosoftÒ Money (OFX), WebConnect for QuickBooksÒ or WebConnect for QuickenÒ,. QuickBooksÒ(.IIF), QuickenÒ/Money (. qif). It can also create a comma-delimited text file that can be read by most database systems, spreadsheets, word processors, etc. or an HTML file for display in a browser.
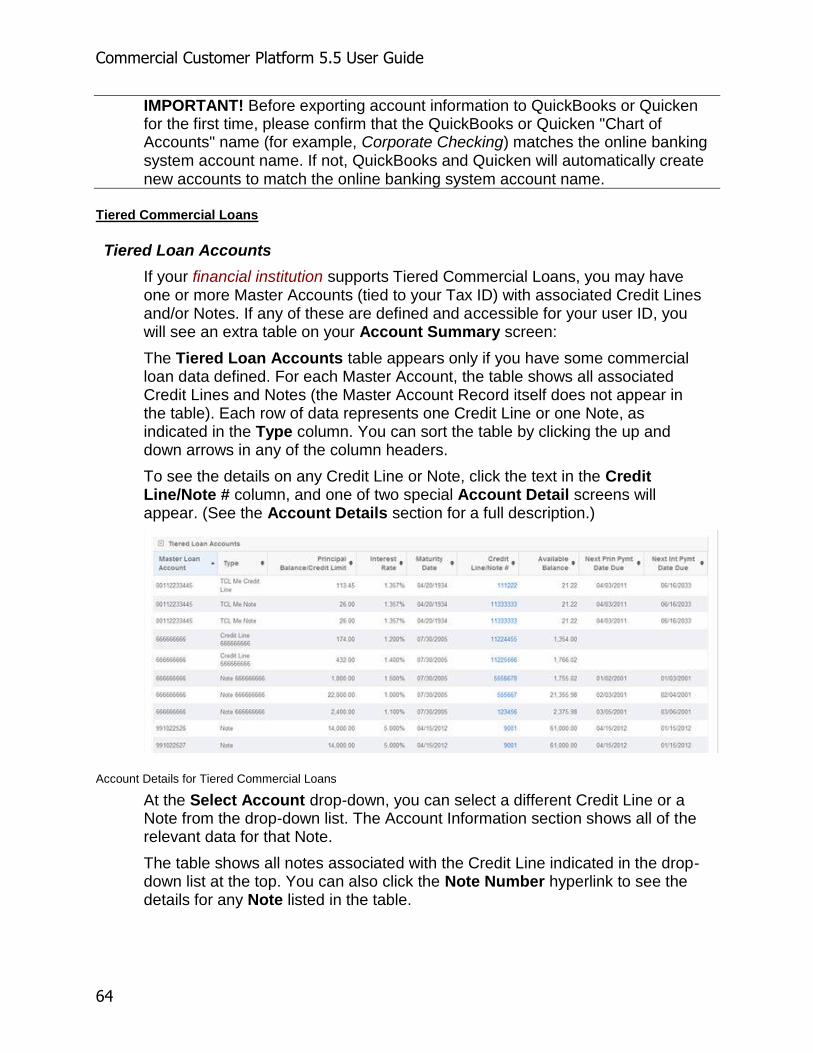
Commercial Customer Platform 5.5 User Guide
64
IMPORTANT! Before exporting account information to QuickBooks or Quicken for the first time, please confirm that the QuickBooks or Quicken "Chart of Accounts" name (for example, Corporate Checking) matches the online banking system account name. If not, QuickBooks and Quicken will automatically create new accounts to match the online banking system account name.
Tiered Commercial Loans
Tiered Loan Accounts
If your financial institution supports Tiered Commercial Loans, you may have one or more Master Accounts (tied to your Tax ID) with associated Credit Lines and/or Notes. If any of these are defined and accessible for your user ID, you will see an extra table on your Account Summary screen:
The Tiered Loan Accounts table appears only if you have some commercial loan data defined. For each Master Account, the table shows all associated Credit Lines and Notes (the Master Account Record itself does not appear in the table). Each row of data represents one Credit Line or one Note, as indicated in the Type column. You can sort the table by clicking the up and down arrows in any of the column headers.
To see the details on any Credit Line or Note, click the text in the Credit Line/Note # column, and one of two special Account Detail screens will appear. (See the Account Details section for a full description.)
Account Details for Tiered Commercial Loans
At the Select Account drop-down, you can select a different Credit Line or a Note from the drop-down list. The Account Information section shows all of the relevant data for that Note.
The table shows all notes associated with the Credit Line indicated in the drop-down list at the top. You can also click the Note Number hyperlink to see the details for any Note listed in the table.
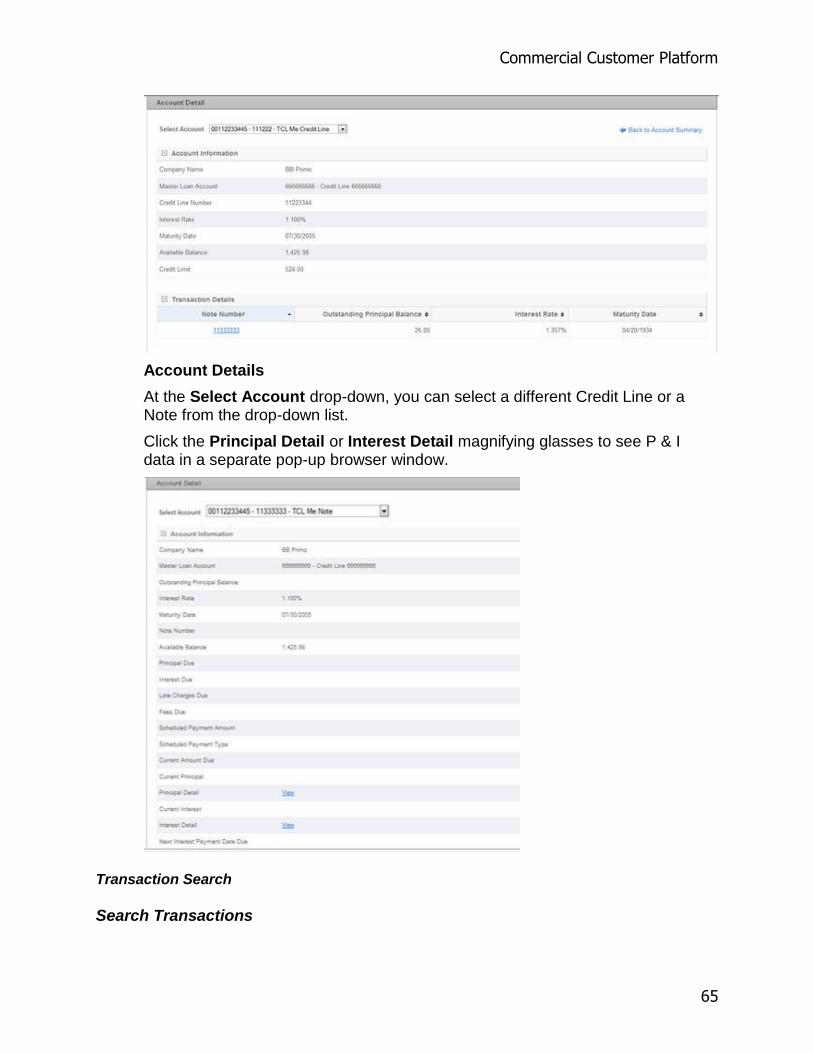
Commercial Customer Platform
65
Account Details
At the Select Account drop-down, you can select a different Credit Line or a Note from the drop-down list.
Click the Principal Detail or Interest Detail magnifying glasses to see P & I data in a separate pop-up browser window.
Transaction Search
Search Transactions
Commercial Customer Platform 5.5 User Guide
66
The Balance Reporting Search Transactions option allows you to create a search request, by account. The search may contain a specific date range or a pre-defined date range, a specific check number, a specific check number and amount, or a range of check numbers. A Company drop-down list is available at the top of the page. This allows you to specify which company's accounts you want to search. To display the Search Transactions screen, select the Search Transactions option under the Account Reporting section of the Account Activities & Reporting menu. The Search Transactions screen displays. This screen has several distinct sections that are used to build your transaction search criteria. Search results are displayed on the Transaction Results screen. If more transactions meet the criteria than are able to be displayed on-screen, you will have the ability to view these records using First, Previous and Last buttons. To create a report using the search feature:
1. In the Account Selection section, select the account to query.
2. In the Date Selection section, select from a predefined time period or enter a date range of your choosing.
3. In the Check / Serial Number Selection section, select a specific check number,a range of check numbers or "All" check numbers for your query.
4. In the Amount Selection section, enter a specific amount or request "All" dollar amounts.
5. In the Transaction Type Selection section, choose between debits, credits or "All" transactions for inclusion in the report.
6. Click the Submit button. The Transaction Results screen is displayed listing all the transactions that match the criteria entered.
7. Click the Reset button to clear the fields.

Commercial Customer Platform
67
Search Transactions Results
The transaction search results screen provides a detailed listing of those transactions that meet your search criteria.
The listing of transactions on the Transaction Search Results screen can be sorted by the data in any column. Click the arrows in the column headers to sort the table (up arrows give an ascending sort; down arrows give a descending sort). To search for additional transactions, select the New Search button.
Note: For checking accounts, the table will also display a Check / Serial Number column. If you have access to the Imaging service and an image is available, the check number will display as a hyperlink; click the link to display the check image in a new window.

Commercial Customer Platform 5.5 User Guide
68
Create Reports
Create Reports
The Create Reports function lets you create, edit and delete custom reports that may be viewed in the format of the Account Summary page. Create Reports lets you configure the display so that you see only the accounts and transactions you want to see.
A report comprises a group of Account settings and a group of Transaction settings. Reports are saved by name and include a descriptive title. When used, the report acts as a filter setting for the Account Summary screen, giving a customized view.
The Company drop-down selection will populate the Available Accounts. Please note that the Report Name drop-down will be populated with reports tied to the selected Company. The reports are listed in alphabetical order.
From the Account Activities & Reporting menu, click the Create Reports option under the Account Reporting group.
Adding a New Report:
You may select an existing report name from the drop-down list, or click the New button to create a new report. If the New button is selected, the Report Name drop-down is pre-filled with the name New Report. You will have an opportunity to name the report at the bottom of the page right before you Save the report definition.
1. Choose the accounts you would like to see displayed on the report by clicking the check box associated with the account -- or you may choose all accounts by clicking the Select All check box.
Commercial Customer Platform
69
2. Then select the Transaction Categories for the report by selecting the specific check box for the category, or the Select All check box for all transaction categories.
Note: If account category codes are not available, the transaction types displayed will be All Debits and All Credits.
3. Once you have defined the report, enter a Report Name in the space provided. The report name may not contain any spaces. Then assign a Report Title. The report title may contain spaces. If you enable the Make this a Favorite Report check box, the report name will appear in the Report Name drop-down list with an asterisk.
4. When you are finished, click the Add button at the bottom of the page.
Displaying the Report Definition for a Saved Report:
Choose the Report Name from the drop-down list.
The page will populate with the report definition for the selected report.
You may edit or delete the report definition. When you are finished, click the Update button at the bottom of the page.
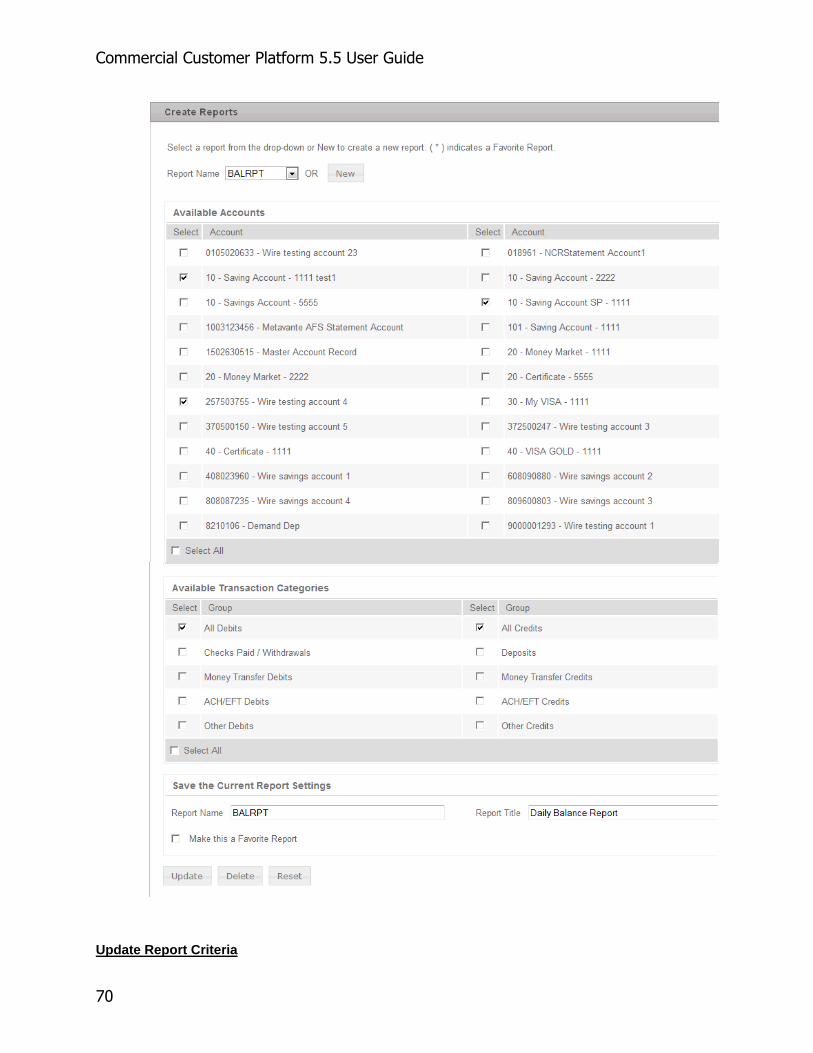
Commercial Customer Platform 5.5 User Guide
70
Update Report Criteria

Commercial Customer Platform
71
1. Rest the cursor on the Account Activities & Reporting option and then click Create Reports. The Create Reports screen appears.
2. Select the appropriate company from the Company drop-down. 3. Select the report from the Report Name drop-down list. 4. Make the desired changes. If necessary, click the Reset button to revert
all fields to their previously-saved values. 5. Click the Update button.
Create a New Report
Rest the cursor on the Account Activities & Reporting option and then click Create Reports. The Create Reports screen appears.
1. Select the appropriate company from the Company drop-down. 2. Click the New button 3. Check the boxes for the desired accounts in the Available Accounts
table. 4. Check the boxes for the desired transactions in the Available
Transaction Categories table. (You can also check Select All to check all the boxes, or uncheck it to clear all boxes.)
5. Enter a Report Name (no spaces) and a descriptive Report Title. 6. (Optional) Check the Favorite Report (default) box if you want to be able
to use this report as the main landing page. 7. Click the Add button.

Commercial Customer Platform 5.5 User Guide
72
Delete a Report
1. Rest the cursor on the Account Activities & Reporting option and then click Create Reports. The Create Reports screen appears.
2. Select the appropriate company from the Company drop-down 3. Select the report from the Report Name drop-down list. 4. Click the Delete button.
Run Selected Report
The Run Selected Report option lets you display the results from your saved reports.
To display the Run Selected Report screen, select the Account Reporting option under the Account Activities & Reporting menu option. The Run Selected Report screen displays.
Select a report from the drop-down list and then click the Submit button. The system displays the Account Summary screen using your saved report criteria as the filtering specification.

Commercial Customer Platform
73
Balance Alerts
Manage Balance Alerts
The Manage Balance Alerts function is used to specify alert conditions by defining unique criteria for individual accounts. These criteria each take the form of a dollar value and an "above" or "below" condition. An account may be assigned both an above and a below threshold, effectively bracketing the acceptable range between floor and ceiling values. The system sends an email message when an account reaches the specified monetary level.
Note: for security purposes, the email content will only alert you that your account is above or below the threshold established.
A Company drop-down will be available. Selecting a company will populate the Account drop-down in the Add An Alert section with that company's accounts. It will also display associated alerts under the Current Alert section of the page.
The Manage Balance Alerts function operates by running an automated program twice a day, once at 4:00am and again at noon (Pacific Time). The system checks all account balances against the Manage Balance Alert(s) definitions, and the online banking system then sends email messages as needed.
To display the Manage Balance Alerts screen:
Click the Manage Balance Alerts option on the Account Activities & Reporting menu. The Manage Balance Alerts screen displays.
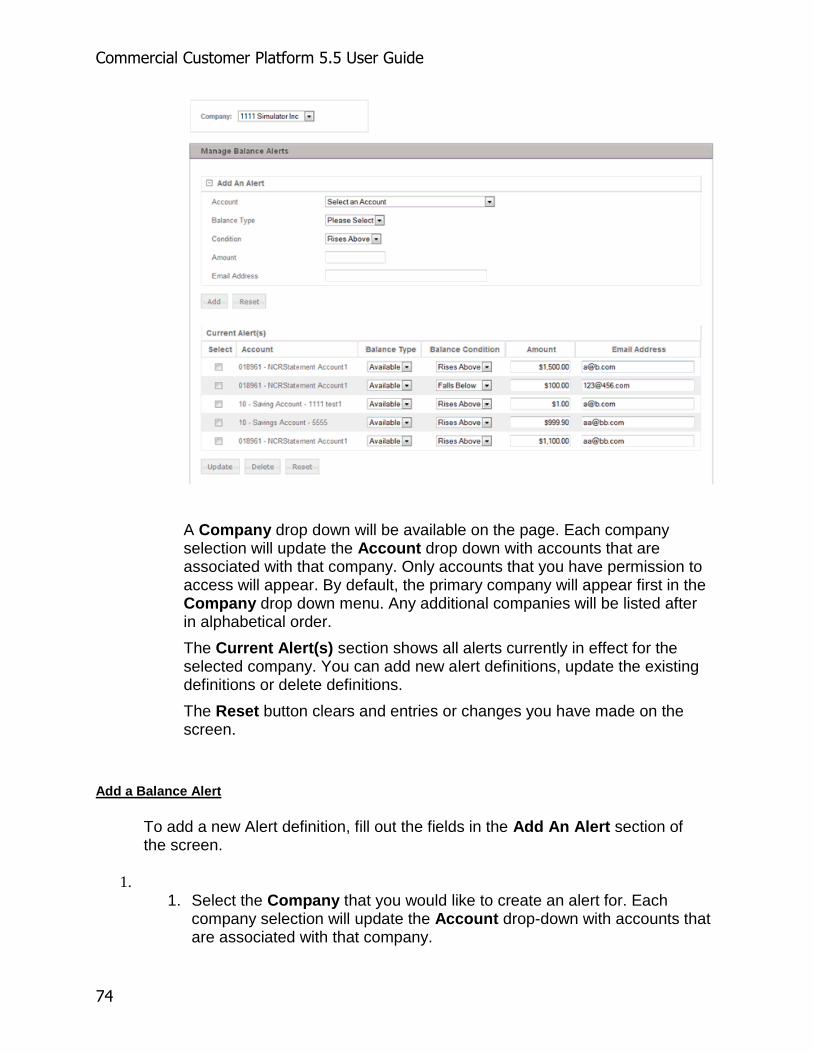
Commercial Customer Platform 5.5 User Guide
74
A Company drop down will be available on the page. Each company selection will update the Account drop down with accounts that are associated with that company. Only accounts that you have permission to access will appear. By default, the primary company will appear first in the Company drop down menu. Any additional companies will be listed after in alphabetical order.
The Current Alert(s) section shows all alerts currently in effect for the selected company. You can add new alert definitions, update the existing definitions or delete definitions.
The Reset button clears and entries or changes you have made on the screen.
Add a Balance Alert
To add a new Alert definition, fill out the fields in the Add An Alert section of the screen.
1.
1. Select the Company that you would like to create an alert for. Each company selection will update the Account drop-down with accounts that are associated with that company.

Commercial Customer Platform
75
2. Select the account from the Account drop-down list. 3. Select the Balance Type you would like monitored from the Balance Type
drop-down list. 4. Select Rises Above or Falls Below from the Condition drop-down list. 5. Enter the threshold amount in the Amount field. 6. Enter the email address to receive the alert notification in the Email
Address field. 7. To add the new alert, click the Add button. To discard the new information
and clear all of the fields, click the Reset button
Update Balance Alerts
1. Select the Company that has an alert you would like to update.
2. In the Current Alert(s) section, click the Select check box next to the alert you want to change.
3. Edit the Balance Type, Balance Condition, Amount and/or Email Address settings.
4. Repeat steps 1 and 2 for other Alert definitions, if desired.
5. Click Update to save the modified definition(s). Reset will return the settings to the original settings.

Commercial Customer Platform 5.5 User Guide
76
Delete a Balance Alert
1. Select the Company that has the alert you would like to delete. 2. In the Current Alert(s) section, click the Select check box next to the alert
you want to delete. 3. The Reset will return the settings to the original settings. 4. Click the Delete button. A dialog box appears, prompting for confirmation. 5. Click the OK button to confirm you want to delete the alert or Cancel to
leave the record as is.
Statements
Account Statements
The Account Statements service allows you to view your account statement online without having to wait for a paper copy in the mail. The service lets you select the account and period (date range) for the statements you would like to view.
All of the accounts to which you have access (as determined by the settings in Administration > Add/Change/Remove Users) will display for you to select from. You may select to view statements from one account or multiple accounts.
To display the Account Statements screen, rest your cursor on the Account Activities & Reporting menu option and then click View Account Statements under the Statements group. The Account Statements screen appears.
To display your online statement:
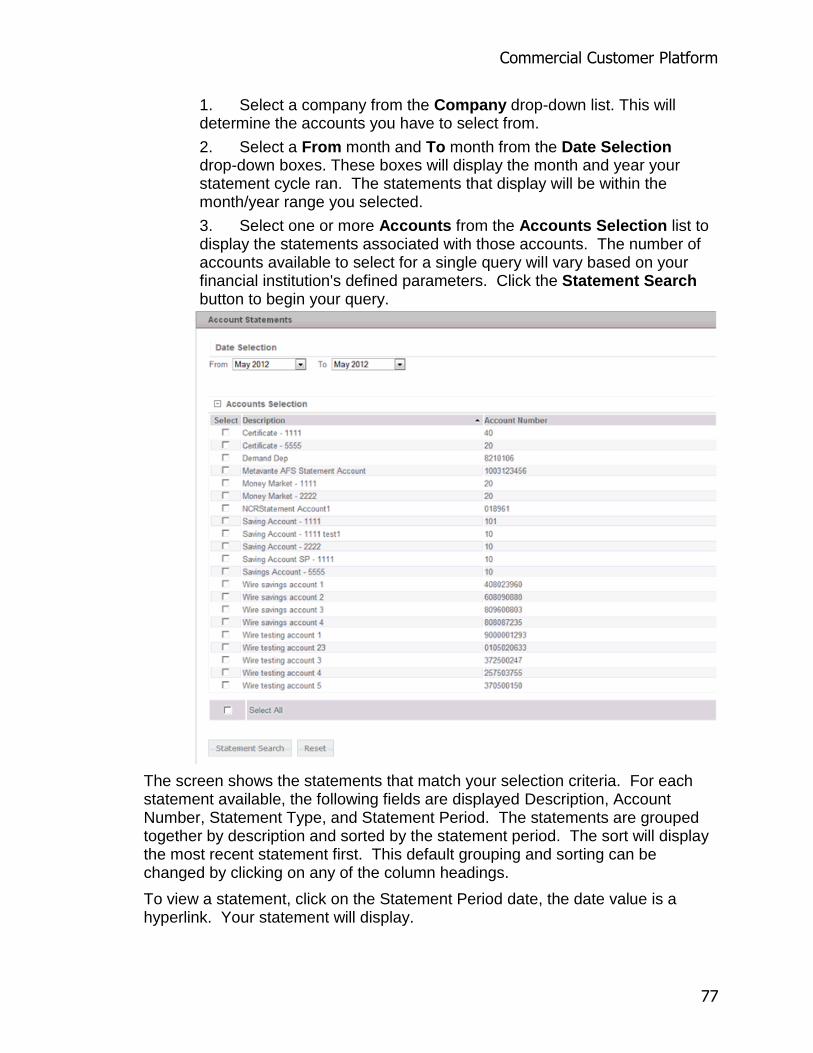
Commercial Customer Platform
77
1. Select a company from the Company drop-down list. This will determine the accounts you have to select from.
2. Select a From month and To month from the Date Selection drop-down boxes. These boxes will display the month and year your statement cycle ran. The statements that display will be within the month/year range you selected.
3. Select one or more Accounts from the Accounts Selection list to display the statements associated with those accounts. The number of accounts available to select for a single query will vary based on your financial institution's defined parameters. Click the Statement Search button to begin your query.
The screen shows the statements that match your selection criteria. For each statement available, the following fields are displayed Description, Account Number, Statement Type, and Statement Period. The statements are grouped together by description and sorted by the statement period. The sort will display the most recent statement first. This default grouping and sorting can be changed by clicking on any of the column headings.
To view a statement, click on the Statement Period date, the date value is a hyperlink. Your statement will display.

Commercial Customer Platform 5.5 User Guide
78
The length of time it takes your statement to appear will vary based on the size of your statement.
Note: Some Financial Institutions do not provide the ability to select the accounts you would like to view. If this is the case, you will not see the Accounts Selection box at the top of the Account Statements screen. Your financial institution has defined the accounts that are available within this service for you. If you have questions about specific accounts and their availability, please contact your Financial Institution.
Stop Payments
Add Stop Payment
The Add Stop Payment function allows you to place stops on an individual check or, if your financial institution supports it, a range of checks. Depending on the type of stop payment, additional information is required.
To display the Add Stop Payment screen:
1. Under the Account Activities and Reporting menu and the Stop Payment group, select the Add Stop Payment option. The Add Stop Payment screen displays.
2. If you have access to multiple companies, a Company drop-down option will display at the top left of the page. The company selected determines the account list on the Account drop-down.
3. The contact information fields are automatically populated with the information on file. These fields contain contact information used by your financial institution if they have any questions regarding the stop payment request. Complete the remaining information requested on this page. Fields with an asterisk (*) are required.
4. Under the Request Type section, toggling between the Stop Individual Check and Stop Range of Checks radio buttons changes the entry fields for each request type. If Stop Range of Checks is selected, the display changes to the following two entry fields -- Starting Check Number and Ending Check Number. Note: The ability to enter a range of checks is determined by your financial institution. Range stops may also be limited to the number of checks allowed in the stop range.
5. Click the Add button to send the stop payment request to your financial institution. A review screen appears allowing you to cancel or submit the Stop Payment for processing. If you click Submit, a confirmation screen appears with a recap of the information sent to the financial institution.

Commercial Customer Platform
79
View Stop Payment Activity
The Stop Payment Activity function allows you to view the status of stop payment requests. The screen will display Stop Payment activity for all users who are permitted to the Stop Payment function.
Stop Payment requests will have one of the following four status designations:
Unprocessed – The Stop Payment Request has been sent to the financial institution and is awaiting action. This status is also assigned when a mixed status is returned on a stop payment range request, i.e., some checks have cleared others have not.
Processing – The financial institution has received the stop payment request from the end user and is in the process of completing that request.
Completed – The financial institution has completed the stop payment request.

Commercial Customer Platform 5.5 User Guide
80
Declined – The financial institution is unable to complete the stop payment request.
Stop Payment requests with a status of Completed or Declined will remain on the activity screen for a period of ten calendar days.
To view the Stop Payment Activity screen, select the View Stop Payment Activity option under the Account Activities and Reporting menu and Stop Payment group.
On initial display, the table is sorted by Date Created with the most recent stop payment transaction appearing at the top of the table. The second level sort is by Company. You may sort the table differently by clicking the up and down arrows in the column headers.
Click the magnifying glass in the Details column to view the details of the stop payment in a separate pop-up window.
Reconciliation Services
Reconciliation Services
Enter Issued Checks
The Enter Issued Checks feature lets you manually enter your check data and submit issued checks for reconciliation processing. There are two sections of the Enter Issued Checks screen. The first section is where a user adds issued checks to send to their financial institution. You do not have to send the entered issued checks to your financial institution until you are ready. You can add the issued checks and then send them to the financial institution separately.
The second section is where you can change or delete the issued items prior to sending to the financial institution. Use the Update function to save issued checks for later edits and additions prior to sending them to your financial institution.

Commercial Customer Platform
81
To add a new Issue:
1. Choose the Reconciliation Services option on the Account Activities & Reporting menu, and then select the Enter Issued Checks sub-menu option. The Enter Issued Checks screen appears and shows all manually entered issues for all accounts.
2. Select an account from the Select Account drop-down list.
3. In the top section of the screen, fill in the Issue Date, Check Number, Amount and Additional Information fields.
Note: The Additional Information field can be used to uniquely identify the issue item, similar to the Memo field on a check.

Commercial Customer Platform 5.5 User Guide
82
4. Set the action to take using the following options:
Click Reg/Add to add a check.
Click Reg/Del to remove a check.
Click Void/Add to add a voided check.
Click Void/Del to remove a voided check.
Click Stop/Add to change check status to "stop payment" (processing method B only)
Click Stop/Del to remove a stop payment on a check (processing method B only)
5. Click the Add button to add the issued check items to the Update Issues list below.
6. Click Save to save the information added to the Update Issues list.
Note: If you have items in the Pending Issues section of the page, prior to leaving this page, you must click the Save button or Send button at the bottom of the page or entered issued check data will be lost.
7. The Update Issues section of the screen shows all manually entered issues. While the Account Number. field is display only, for any issue added you may change the action for the item or update the data fields. Optionally, check the Delete box to remove an issue from the list.
8. Click Save to save changes made to the issue items and remove any items that are marked for deletion. Saving issues simply keeps them in a Pending status. These items will not be processed.
9. Click Send to send the data for processing and add the items to the Issued Check Register. A confirmation screen will appear displaying a summary of the issue register items entered.
Reconciliation Services Processing Methods

Commercial Customer Platform
83
The online banking product is designed to provide Reconciliation Services to financial institutions with different processing methods. There are two possible options available. Each option affects the menu items on the Account Services menu and the appearance and use of the Issues Register. These options are described below.
Note: The instruction set for Enter Issued Checks varies depending on the processing method used by your financial institution. Please take note of the sample screen to determine which Issues Register Instructions to follow.
Reconciliation Services (Processing Method A)
If your financial institution uses this method of handling Reconciliation Services, you will be able to input issues, upload issues, and view issue history on the Issued Check Register. There will be additional reports that your financial institution will provide outside of the online banking application. If your financial institution uses this method of processing, your Enter Issued Checks and Issued Check Register screen will look like this:

Commercial Customer Platform 5.5 User Guide
84
You will be limited to creating issues and exception decisions for the primary company only. No drop down menu will be available to select secondary companies. Only the primary company will display on the top right-hand side of each screen.
The screens available for this method are:
Upload Issues File
Enter Issued Checks
Issued Check Register
If your financial institution also uses the cash management system’s Positive Pay feature, you will have the following additional menu option:
Decision Positive Pay Exceptions
Reconciliation Services (Processing Method B)
If your financial institution uses this method of handling Reconciliation Services, you will be able to input issues, upload issues, and use the Issued Check Register to reconcile the selected account for the designated period. Exceptions are displayed on the register, but processing decisions on those exceptions is not available. If your financial institution uses this method of processing, your Issued Check Register screen will look like this:

Commercial Customer Platform
85
A Company drop down will be available on each page. Each company selection will update the Account Number drop down with accounts that are associated with that company. Only accounts that you have access to will be available.
The screens available for this method are:
Upload Issues File
Enter Issued Checks
Issued Check Register
If your financial institution also uses the cash management system’s Positive Pay feature, you will have the following additional menu option:
Decision Positive Pay Exceptions
Issued Check Register
Method A
The Issues Register allows you to view a history of the issues sent to the financial institution for a selected account. By default, the system initially displays 500 records. You can search for and display issues records from up to 180 days in the past.
To display the Issued Check Register screen:
From the Account Activities & Reporting menu, select the View Issued Check Register option under the Reconciliation Services group. The Issued Check Register screen appears.
1. Select the appropriate account from the Account Number drop-down list.
2. Enter a date range to search within and click Submit or
3. Search for a specific issue by selecting Check Number, Issue Amount, Issue Date or Payee from the Search for: drop-down list, then enter a

Commercial Customer Platform 5.5 User Guide
86
Value to search for and click Submit. The information matching the criteria entered will be displayed.
Note: You can view the detail for a line item by clicking the magnifying glass icon in the Detail column. You can also export the information displayed on screen to a comma-delimited file by clicking the Export button. You will be prompted to save the file to disk, choose a location, and specify the file name for the exported data.
Method B
The Issues Register allows you to view a history of the issues for a selected account. You will be able to input issues, upload issues, and view Outstanding Items, Paid Items, Stale Items and Deleted Items. Exceptions are displayed on the register, but are processed outside the application. By default, the system initially displays 500 records. You can search for and display issues records from up to 180 days in the past.
To display the Issued Check Register screen:
From the Account Activities & Reporting menu, select the View Issued Check Register option under the Reconciliation Services group. The Issued Check Register screen appears.

Commercial Customer Platform
87
1. Select a company from the Company drop-down selection to populate the Account Number drop down list.
2. Select the appropriate account from the Account Selection drop down list.
3. Enter a date range to search within and/or
4. Filter Issues by Status by checking the appropriate check boxes or
5. Search for a specific issue by selecting Check Number, Issue Amount, Issue Date or Payee from the Search for: drop-down list, then enter a Value to search for and click Submit. The information matching the criteria entered will be displayed.
Note: You can export the information displayed on screen to a comma-delimited file by clicking the Export button. You will be prompted to save the file to disk, choose a location, and specify the file name for the exported data.
Upload Issued Checks

Commercial Customer Platform 5.5 User Guide
88
Authorized users may select an Issues Register File (file containing issued check information), upload the issued check items file and send it to the financial institution for reconciliation processing. An email will be sent to your financial institution informing them of the incoming file. Uploaded items may be viewed in the Issued Check Register. Please note that the system will only allow an end user to upload issues for accounts they have access to enter issued checks.
A Company drop down will be available on the page. You will need to select the company that is associated to the account in the uploaded file. Method A users will see the primary company displayed in the top right-hand corner in place of the drop down menu
To upload an issued checks file:
1. (For Method B users only) Select the Company that is associated with the account in the file to be uploaded.
2. Below the Reconciliation Services option on the Account Activities & Reporting menu, select the Upload Issued Checks sub-menu option. The Upload Issued Checks screen appears.
3. Select the file format to be uploaded. The default file format is Proprietary ARP file.
4. Enter the full path name for the file, or for convenience, you may click the Browse… button to open a standard Windows dialog box that allows you to search your local and network drives to locate the file.
5. Click the Upload button to submit the issued checks file to your financial institution for processing. If the upload is not successful, the system will display an error message.
Note for ARP Method A: Submitting issues past cutoff time will prompt the following warning: "Your issued items have been successfully submitted. Due to cutoff time frames established by your financial institution , these issued items will be processed the next business day." Issues submitted past the cutoff time will be assigned an Issue Date of the next business day.

Commercial Customer Platform
89
Decision Positive Pay Exceptions
The Decision Positive Pay Exceptions function lets you review all discrepancies that have occurred between your own issues records and those processed by your financial institution. For each exception item, you can instruct the financial institution on what action to take. You may also view decisions sent for the past 10 calendar days.
A message at the bottom of the screen indicates how many more exceptions require decisions. Once some or all the first 50 exceptions listed have decisions, the screen refreshes with the next 50 exceptions requiring decisions. The Sent Positive Pay Decisions screen displays exception items previously sent to the financial institution for processing. Each exception item has full details, including the Exception Reason. Processed exceptions activity will be retained for 10 calendar days. Exceptions listed may be sorted using the up and down arrows next to each column heading.
A Company drop down is available on the page. You will need to select the company that is associated to the account in the uploaded file. Method A users will see the primary company displayed in the top right-hand corner in place of the drop down menu
To process exception decisions:
1. Rest your cursor on the Account Activities & Reporting menu, and then select the Decision Positive Pay Exceptions option under the Positive Pay group. The Decision Positive Pay Exceptions screen appears.

Commercial Customer Platform 5.5 User Guide
90
2. If your financial institution supports multi-TIN functionality, select a Company from the Company drop-down menu. This will populate the screen with the exceptions for this company. Method A users will see the primary company displayed in the top left corner in place of the drop-down menu.
3. Click the Select checkbox next to the exception item(s) to select that item to be sent to the financial institution.
4. Set the Action to instruct the financial institution what to do with each item. The default decision for exception items is automatically selected. Once a decision on an item has been sent, you may not change the action decision. The actions available are:
Pay: Pay the check Return: Do not honor the check Pay – Adj. Required: (Method A users only) Pay the issue amount
and adjust the check amount to match
5. Click the Send button to submit the selected exceptions to the financial institution for processing. The Exceptions Processing screen will refresh and display the exceptions remaining.
Note: If you do not submit exception decisions for processing before the financial institution's established cutoff time, the default decisions will automatically be sent to the financial institution.
Selecting the Show Sent button will display the Sent Positive Pay Decisions screen.

Commercial Customer Platform
91
Note: Sent decisions with an action followed by an asterisk "*" were automatically sent to the financial institution.
Payments & Transfers
Payments & Transfers
The Payments & Transfers menu provides you with options for the following services:
ACH – allows you to create and send batch files which contain information pertinent to the movement of funds between accounts
Account Transfer - allows you to move funds between accounts within the same financial institution
Federal Tax Payments – allows you to use Electronic Federal Tax Payment System (EFTPS ) as the method to submit tax payments
Wire Transfer - allows you to move funds between accounts at different financial institutions
Sweeps - Set up automated sweeps on accounts to keep their balances within certain limits.
Account Transfer (Book)
Account Transfer
The Account Transfer service allows the end user to move funds between accounts within the same financial institution. Transfers can be scheduled for the current day or a date up to one year in the future. Scheduled transfers can be reviewed and deleted. This service also supports the scheduling of Recurring Account Transfers and allows the viewing, updating and deleting of pending Recurring Account Transfers.
Account Balances are checked by the system for current day transfers only. A disclosure statement appears onscreen indicating the date and time the balance information was updated. Balances are not checked when a future dated book transfer is created.
If you have access to multiple companies, a Company drop-down will be available. Selecting a company populates the To Account and From Account fields on the Add Transfer and Add Recurring Transfer screens. It will also display associated account transfers on the Update Account Transfer screen.
Please note that account transfers can be made across multiple companies if that feature is supported by your financial institution. However, future dated and recurring transfers may not be initiated for cross company account transfers.

Commercial Customer Platform 5.5 User Guide
92
Note: If your Data Processing Vendor supports this feature, all balances displayed will have an asterisk (‘*’) appended to indicate when a real-time balance is not available. This asterisk will be displayed on a per-account basis, indicating status for individual accounts (in case real-time balances are available for certain accounts but not all).
Add Account Transfer
The Add Transfer page allows you to move funds between accounts of common ownership. If your financial institution supports the Multi-TIN feature, you will also be able to initiate cross-company account transfers.
A Word About Account Transfers and Tiered Commercial Loans
If your financial institution supports Tiered Commercial Loans, you may be able to use the Account Transfer service to transfer funds to and from a Loan Note.
The rules for the Tiered Commercial Loan entities prohibit any use of Account Transfers with Master Account Records (MARs) or Credit Lines.
Initiating an Account Transfer
If your financial institution offers the ability to transfer funds between accounts associated with different company tax ID numbers or TINs, a Company drop-down will display on the Add Account Transfer page. If this feature is not available, the Company field will display as text.
Note: Cross-company transfers may only be immediate; future dating or scheduling a recurring transfer is not supported for accounts across companies.
1. Select the Add Transfer option on the Payments & Transfers menu within the Account Transfer group. The Add Account Transfer page displays.

Commercial Customer Platform
93
1. At the Company drop-down under the From heading, select the company to display associated accounts in the From Account drop-down list. Note: If cross company transfers are not supported, the Company field will not have a drop-down and will appear as text.
2. At the Company drop-down under the To heading, select the company to display associated accounts in the To Account drop-down list. Note: If cross company transfers are not supported or enabled, the Company field will appear as static text.
3. Enter the transfer amount and the transfer date. Transfers added for a date in the future will be stored and then processed on the specified date. Note: Cross company transfers may only use the current date.
4. Select a To Account number from the To Account drop-down list.
5. (Optional) Enter a description for the transfer in the Transfer Memo field.
6. Verify that all information is correct. You can click the Reset button to clear all of the fields if necessary.
7. Click the Add button to complete the transfer entry. The transfer information displays on the lower portion of the page. If your financial institution charges a fee for Account Transfers, the fee displays with the transfer details. If you want to remove any transfers displayed in the review section at the bottom of the page, click the Delete link that appears to the right of the transfer.
8. Repeat steps 1-6 to set up additional transfers, if desired. Up to 10 transfers may be entered on this screen.
9. When you are finished entering transfers, click the Submit button to send the transfers to your financial institution. The Account Transfer Review pop-up screen displays. This gives you the opportunity to cancel the submission of the transfers.

Commercial Customer Platform 5.5 User Guide
94
Note: When the "To Account" is a loan, you can select a Loan Payment Type. If you select Multiple Payments as a loan payment type, you will also need to define the Number of Payments. A multiple payment is pre-payment of your scheduled loan payments. The amount you enter must equal the number of payments you are making. Regular Payment may be the only payment type available with your financial institution.
Verify that the transfer information is correct and click the OK button to complete the transfer. The Account Transfer Confirmation screen appears. The Account Transfer is now complete. The default view shows a collapsed view of the account transfers. Click the "+" icon to the left of the accounts to expand the view.

Commercial Customer Platform
95
Add Recurring Account Transfer

Commercial Customer Platform 5.5 User Guide
96
Three screens are involved in the process of adding a recurring book transfer. In the first screen, Add Recurring Account Transfer, you enter the specific transfer information. Using this screen you add one recurring transfer at a time. In the second screen, Recurring Transfer Verification, the transfer information is presented and confirmation is required in order to process the transfer. The third screen, Recurring Transfer Confirmation, provides a confirmation message if the transfer was successful or an error message if the transfer was not successful.
Note: Recurring Account Transfers are inter-company only and may not be made across companies.
Entering a Recurring Transfer
1. Rest your cursor on the Payments and Transfers menu option and then select the Add Recurring Transfer option within the Account Transfers group. The Add Recurring Account Transfer screen appears.
1. From the Company drop-down menu, select the company to populate associated accounts in the From and To drop-down lists.

Commercial Customer Platform
97
Note: Cross company accounts are not supported for recurring transfers.
2. Select the account you will transfer funds out of using the From Account drop-down list.
3. Select the account you will transfer funds into using the To Account drop-down list.
4. (Optional) If the "To Account" is a loan, you can select a Loan Payment Type. If Multiple Payments is available as a loan payment type, and you select this type, then an additional field -- Number of Payments -- will display to the right of the Loan Payment Type drop-down.
Note: A multiple payment is pre-payment of your scheduled loan payments. The amount you enter must equal the number of payments you are making. Regular Payment may be the only payment type available with your financial institution
5. Enter the Amount to transfer and the start date. The Start Date may not be the current date or a prior date. The format for the date is MM/DD/YYYY, or you may select the date by clicking the calendar icon.
6. (Optional) Enter a description for the transfer in the Transfer Memo field. This information will not be sent to the Data Processing Vendor (DPV).
7. Enter the Email Address of the person who will receive notification of whether or not the transfer was successful.
8. In the Transfer Schedule section of the page, you establish the frequency of the transfer.
Note: Weekly Payments – The Start Date must match first Weekly Payment. Monthly Payments – The Start Date must match monthly date. Twice Monthly Payments – The Start Date must match one of the two twice-monthly dates.
Enter the number of transfers or the End Date for the recurring transfer. The year cannot exceed 2031, and the date must be greater than or equal to the start date.
Note: Transfers are processed on the date specified and a confirmation email will be sent to the email address specified. If the transfer cannot be processed, the system will send an email noting the error and the transfer will be deleted

Commercial Customer Platform 5.5 User Guide
98
on the end date. If the email address is invalid, the transaction will still occur but no email will be sent.
Scheduled Recurring Transfers (SRT): For online DPVs, the balance will be checked when the scheduled transfer is kicked off. If the selected balance to check is insufficient*, the online banking system will fail the transfer. The account will only be allowed to go into an overdrawn (NSF) status if your financial institution has enabled this for the account.
For batch processing, the balance will be checked one time, the day of the transfer. The transfer will be sent if the balance, at the time it is verified, is sufficient to cover the transfer, and will fail if the balance at that time is insufficient*.
* Although the balance is being verified, there is a chance that other transactions could post from other external systems, i.e., teller systems, ATM systems, etc., that could cause the account to be overdrawn. The online banking system is unable to guarantee that sufficient funds will be in the account when the transfer actually takes place. For batch DPVs, there is a higher likelihood for this to occur.
9. Verify that all information is correct. You can click the Reset button to clear all of the fields if necessary.
10. Click the Add button. The Recurring Transfer Verification screen appears displaying the information entered on the previous screen.
Recurring Transfer Verification Screen

Commercial Customer Platform
99
11. Click the Submit button to proceed with scheduling the recurring transfer and display the Recurring Transfer Confirmation screen; or click Cancel to return to the Add Recurring Transfer screen.
Recurring Transfer Confirmation Screen
Note: Recurring account transfer instructions are available for viewing, updating, and deleting from the Update Account Transfer screen.
Update Account Transfers
This menu option allows you to view, update, or delete both scheduled account transfers and recurring account transfers. The Update Account Transfers function lets you examine all such transfers and, if appropriate, remove them from the pending list (i.e., cancel them). The Scheduled Recurring Account Transfers portion displays the current recurring transfers scheduled and allows you to edit all fields except the start date, from account, and to account.
Transfers are processed on the date specified and a confirmation email will be sent to the end user that added the account transfer information. If the transfer cannot be processed, the system will send an email noting the error and the transfer will be deleted.
If you have a large number of transfer records, you will be able to page through the list using First, Previous and Last buttons.
To update Account Transfers:

Commercial Customer Platform 5.5 User Guide
100
Rest your cursor on the Payments & Transfers menu and click on the Update Transfers option, located under the Account Transfer section. The Update Account Transfers screen appears.
The Update button saves the selected book transfer changes in the system and updates the screen with the changes.
The Delete button removes the selected transfer from the system. The Reset button clears the screen of any changes and displays the last
saved transfer instructions.
Wire Transfer
Wire Transfer
The Wire Transfer service allows you to move funds between accounts within different financial institutions. Transfers can be scheduled for the current day or (if applicable) a date in the future. Pending transfers can be reviewed and deleted.

Commercial Customer Platform
101
Note: If your financial institution supports foreign currency transactions, always use US dollars in the dollar amount field. The exchange rate process is managed by the financial institution and since your account is in US dollars, it will always be debited the US dollar amount. The financial institution's wire operations area will manage the exchange rate conversion.
The length of time a transfer appears on the various activity screens depends upon the wire status. The table below outlines the default display conditions and the date range availability using the date selection tool:
Screen Category Default "From"
Default "To"
Date Range "From"
Date Range "To"
Wire Status
Incoming Wires
Today 12:00am
Today 23:59pm
Displays up to 10 previous calendar
days
Today Processed
Transfer Activity
& Transfer Admin Activity
Pending Oldest value dated wire
with a status listed in the Wire Status
column
Today plus 30
calendar days
into the future
N.A. N.A. *Pending
*Resubmit
Denied
Oldest value dated wire
with a status listed in the Wire Status
column
Today plus 30
calendar days
into the future
N.A. N.A. *Denied
Sent
Displays up to 10
previous calendar
days
Today plus 30
calendar days
into the future
Displays up to 10 previous calendar
days
Today plus 30
calendar days
into the future
Received, Delete,
Deleted by FI,
Downloaded Processed
* Wires in this status will remain in the wire database indefinitely. For wire statuses that do not have an asterisk, retention period is 10 calendar days.
There is no restriction on dates that can be entered in the "From" and "To" date range fields. Transactions displayed are based upon the value date of the wires within the retention period.
A Word About Daily Transfer Limits
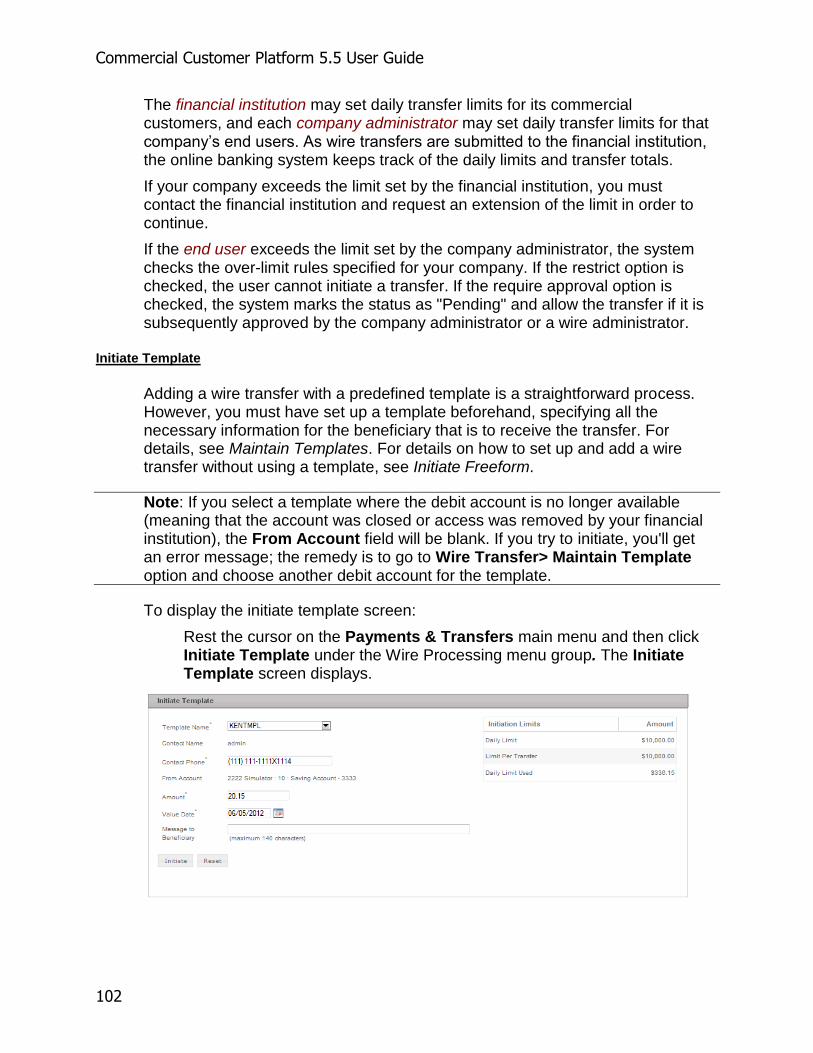
Commercial Customer Platform 5.5 User Guide
102
The financial institution may set daily transfer limits for its commercial customers, and each company administrator may set daily transfer limits for that company’s end users. As wire transfers are submitted to the financial institution, the online banking system keeps track of the daily limits and transfer totals.
If your company exceeds the limit set by the financial institution, you must contact the financial institution and request an extension of the limit in order to continue.
If the end user exceeds the limit set by the company administrator, the system checks the over-limit rules specified for your company. If the restrict option is checked, the user cannot initiate a transfer. If the require approval option is checked, the system marks the status as "Pending" and allow the transfer if it is subsequently approved by the company administrator or a wire administrator.
Initiate Template
Adding a wire transfer with a predefined template is a straightforward process. However, you must have set up a template beforehand, specifying all the necessary information for the beneficiary that is to receive the transfer. For details, see Maintain Templates. For details on how to set up and add a wire transfer without using a template, see Initiate Freeform.
Note: If you select a template where the debit account is no longer available (meaning that the account was closed or access was removed by your financial institution), the From Account field will be blank. If you try to initiate, you'll get an error message; the remedy is to go to Wire Transfer> Maintain Template option and choose another debit account for the template.
To display the initiate template screen:
Rest the cursor on the Payments & Transfers main menu and then click Initiate Template under the Wire Processing menu group. The Initiate Template screen displays.

Commercial Customer Platform
103
1. Select a wire transfer template from the Template Name drop-down list. The list is populated with all approved templates. When you select a template, the From Account field is filled automatically.
2. (Optional) Alter the telephone number in the Contact Phone field. The Contact Name and Contact Phone fields are pre-filled with the data from your login, but you can change the phone number if needed.
Tip: If a template is missing from the list, it may be in Pending status, awaiting approval after a recent modification. You can check on the template’s status if you have access to the Approve/View Template function.
3. Enter the amount of the transfer in the Amount field. If your financial institution supports foreign currency exchange, the currency code (specified in the Wire Template) will be displayed.
4. (Optional) Change the date in the Value Date field. This is the date on which the Funds Transfer is to occur; the Value Date cannot be in the past and must be no more than 30 calendar days into the future from today’s date and must be a business day.
5. (Optional) Enter a brief message in the Message to Beneficiary field.
6. Review all of the information and verify that it is correct. If necessary, you can click the Reset button to clear all of the fields.
7. Click the Initiate button to submit the transfer. Please keep in mind that most financial institutions have a daily cutoff time for wire transfers.
Note: If the restrict option is enabled and a wire transfer exceeds either the company limits or the end user limits, the user will not be able to initiate the transfer. Also, your financial institution may specify that approval is required on all wire transfers, regardless of any defined limits. If approval is required (for any reason), a message will display on the screen with further instructions.
Note: If tokens are enabled for this customer for Wire Transfer and Approval is not required, you will be asked to enter a Security Code on the Initiate Template Review screen.
To check on the status of the submitted Wire Transfer, click View Transfer Activity option on the Payments & Transfers menu.
Initiate Freeform
The Initiate Freeform function accomplishes exactly the same function as the Initiate Template. However, Initiate Freeform does not require the use of a wire template. Instead, it allows you to fill in all of the information that otherwise would reside in the template.
Most financial institutions use an ABA number as their only routing type. The online banking system provides a search mechanism to let you look up ABA

Commercial Customer Platform 5.5 User Guide
104
numbers. If your financial institution supports other ID types (e.g., SWIFT or CHIPS), the drop-down list on this screen will offer these choices.
Please note the Receiving Bank and Intermediary Bank sections are optional and are displayed by clicking on the "+" symbol which expands the section. See Using the ABA Search Feature for details.
To initiate a freeform transfer:
Rest the cursor on the Payments & Transfers main menu and then click Initiate Freeform under the Wire Processing menu group. The Initiate Freeform screen displays.

Commercial Customer Platform
105
1. Select a Company to populate the Debit Account drop-down list.
2. Fill in the required fields in the Transfer Details section: Select the Debit Account from the drop-down list. The account list is populated according to the Company selected. Enter the Amount to be transferred and the Currency Code (if applicable).
Note: If your financial institution supports foreign currency transactions, always use US dollars in the dollar amount field. The exchange rate process is managed by the financial institution and since your account is in US dollars, it will always be debited the US dollar amount. The financial institution's wire operations area will manage the exchange rate conversion.
3. (Optional) Edit the Value Date, if applicable.
4. (Optional) Enter a brief message in the Message to Beneficiary field. (Originator to Beneficiary Information).
5. Then enter the Beneficiary Name and Account information. In the Beneficiary Information section, there are two radio button options for entering a Beneficiary Address -- Domestic Address and Foreign Address. The Domestic Address entry contains separate fields for the City, State, Zip Code and Country. If your beneficiary address does not fit into these individual fields, and/or you need to enter a non-domestic phone number, select the Foreign Address option. In place of separate City, State, Zip Code and Country fields, the Foreign option allows for three free-form address lines of 35 characters each for you to enter the beneficiary address information. It will also support a non-domestic phone number. This entry

Commercial Customer Platform 5.5 User Guide
106
selection can be used even if your wire is not a foreign wire, but you need more flexibility to enter the complete beneficiary address and phone information.
6. Next, to the right of the Beneficiary Address section you will enter the Beneficiary Bank Name and ID Number (ABA, CHIPS). If the Beneficiary Bank identifier is a non-ABA -- if it's SWIFT, DDA or CHIPS -- then the Receiving Bank information is required.
Note: Your financial institution has defined which address fields are required. These are indicated by an asterisk.
7. The Receiving Bank and Intermediary Bank sections are optional and are displayed by clicking on the "+" symbol which expands the section. The Receiving Bank ID must be an ABA number if Fedwire is being used.
8. Review all of the information and verify that it is correct. If necessary you can click the Reset button to clear all of the fields.
9. Click the Initiate button to submit the transfer. Please note that most financial institutions have a daily cutoff time for wire transfers.
Note: If the restrict option is checked and a wire transfer exceeds either the company limits or the end user limits, the user will not be able to initiate the transfer. Also, your financial institution may specify that approval is required on all wire transfers, regardless of any defined limits. If approval is required (for any reason), a message will display on the screen with further instructions.
Note: If tokens are enabled for Wire Transfer, and Approval is not required, you will be asked to enter a Security Code on the Initiate Freeform Review screen.
To check on the status of the submitted Wire Transfer, click the View Transfer Activity button below the Payments & Transfers menu.
Using the ABA Search Feature
1. Click the Search button next to one of the ABA/Routing Number fields. A secondary browser window appears.
2. Type one or more keywords in the Term(s) field and click the Search button. The search usually takes less that a minute, but will vary depending on network conditions and also on how many matches the system finds. The results returned are those institutions whose database records contain the keywords specified.
Note: The ABA Search uses a "Soundex" type of search (i.e., it attempts to find approximate matches based on probable pronunciation). It's tolerant of spelling errors and it looks at both the bank name and the city.

Commercial Customer Platform
107
3. If matching terms are found, the Search window is updated with a table of financial institution names and data.
4. Click the ABA number of the desired financial institution. The system will close the Search window and copy that ABA number into the input field from which you started the search. (It also copies the name, city and state to the corresponding fields.)
You can sort the table by the data in any column. Click the up or down arrows in the column header cells for ascending or descending sorts.
You can print the table by clicking the Print button at the top of the window, or close it by clicking Cancel.
Initiate Template Group
The Initiate Template Group function lets you submit a Wire Template Group for processing. This is equivalent to submitting each of the templates in the group individually but is far more convenient, especially if you have recurring transfers.
In order to use this function, you must have defined at least one Wire Template Group beforehand. A template group definition is essentially a subset of your defined wire transfer templates with some saved (but modifiable) initial values. For details, see Maintain Template Groups.
To initiate a template group:
Rest the cursor on the Payments & Transfers main menu and then click Initiate Template Group under the Wire Processing menu group. The Initiate Template Group screen displays.
1. Select the desired group from the Template Group drop-down list. The screen shows all of the templates that are in the group definition; you can sort the display by clicking the up and down arrows in the Template Name, Value Date, Amount and Message column headers.

Commercial Customer Platform 5.5 User Guide
108
You can see the details for any template by clicking the magnifying glass in its Details column. When you do this, the system opens a secondary browser window with a simplified, read-only version of the data defined in the template.
2. Check the Select box for each template that you want submitted with the group. For convenience, you can check the Select All box to select all of the templates.
3. (Optional) Review the Value Date field for each template that is to be submitted and edit the dates if necessary.
Note: If using Value Date, each wire transfer must follow the same Value Date rules as if it were submitted alone, but there is no requirement that a group’s value dates be synchronized. Any or all of the templates in a group may have different value dates, as long as each one is valid.
4. Review the Amount field for each template that is to be submitted and edit the values if necessary. The system pre-fills these fields with the values from the templates, but they can be altered here (subject to your user limits and company limits).
5. Review the Message field for each template that is to be submitted and edit the messages if necessary. The system pre-fills these fields with the values from the templates, but they can be altered here.
6. If you need to start over with the initial values, click Reset. Once the group is set up to your satisfaction, click Initiate to submit all of the selected transfers.
Note: If tokens are enabled for this customer for Wire Transfer, and Approval is not required, you will be asked to enter a Security Code on the Initiate Template Group Review screen.
Incoming Wire Transfers
This feature is wire interface dependent. The Incoming Wire Report displays all incoming wire transfer activity. This feature serves as an advice that funds have been received via Wire Transfer. The information contained within an advice is simply a notification of the transfer and does not require or cause any action to occur. This feature also provides the capability to view or delete transfer notifications.
To display the Incoming Wire Report screen:
Rest your cursor on the Payments & Transfers main menu option and then select the View Incoming Wire Report option under the Wire Processing menu group. The Incoming Wire Report appears.

Commercial Customer Platform
109
The wire transfer activity displayed defaults to the current day. If there is no activity for the current day, a message appears notifying the user. If incoming transfers were expected and are not displayed on-screen, please check the date range displayed. You may need to modify the date range to include dates other than the current day.
Select a Different Date or Range of Dates
To change the date range displayed:
1. Enter or use the calendar icon to select a new From Date/Time and a new To Date/Time. Dates are required but entering times is optional.
2. Click the Submit button. All wire transfers falling within the specified date range are listed.
View and Print Incoming Wire Details
Details for an individual transfer are displayed by clicking on the Details icon to the right of the entry. You can also select specific wires and view their detail information in a list format.
To view and print selected wires:
1. Check the select box for each wire transfer to include, or check the Select All box.
2. Click the View Details button. A pop-up window appears with the incoming wire detail Information.
3. Click the Print button to print the report.
Delete Incoming Wires
You can manually delete an incoming wire prior to the normal 10-day aging. Any wires left on the list for 10 days will be automatically removed from the system.
To delete a wire manually:
1. Check the select box for each wire transfer to delete, or check the Select All box.
2. Click the Delete button.

Commercial Customer Platform 5.5 User Guide
110
Approve/View Wire Activity
The Approve/View Wire Activity screen displays all pending, denied and completed transfers for the last ten calendar days, and provides you with the ability to approve, delete or deny pending transfers. You must be a designated company administrator or wire administrator to use this function.
To display the Approve/View Wire Activity screen:
Rest your cursor on the Payments & Transfers option on the main menu and then click the Approve/View Wire Activity option under the Wire Transfer group. The Approve/View Wire Activity screen appears.

Commercial Customer Platform
111
This screen has three separate sections, Pending Wires, Denied Wires and Sent Wires, all of which may be expanded and collapsed by clicking the "+"plus and "-" minus icons.

Commercial Customer Platform 5.5 User Guide
112
You can sort the information in each section by clicking the up or down arrows in the column headers. Click the magnifying glass in the Details column to see full transfer details in a secondary browser window. The new window shows data specific to the selected transfer, in a simplified, read-only format similar to the Maintain Template screen.
The Pending Wires section shows all wire transfers that are currently in the system but have not yet been sent to the financial institution for processing. The system automatically flags your wire transfers for pending status if you exceed your per-transaction or daily user limit, or if your company’s financial institution requires administrator approval on all wire transfers. If you have company or wire administrator status, you can approve, delete or deny wire transfers from this screen.
The Denied Wires section shows all completed wire transfer activity for the past ten calendar days along with a brief message explaining the denial.
The Sent Wires section shows all completed wire transfer activity for the past ten calendar days, this includes wires that have been received or deleted. You can click the magnifying glass in the Details column to see all of the data for any completed transfer. Sent Wire items are view-only – they represent completed transactions, so there are no options for approval, deletion or denial. You may view the details for sent wires by clicking the checkbox next to the transactions (or checking the Select All Wires option) and clicking the List button.
Performing Administrative Tasks for Pending Wires
Click the Select check box next to the wire(s) that you want to update and Do One of the Following. For convenience, you can click the Select All box to select all of the wires in the table, or click Reset to return all settings to their saved values.
1. Click the Approve button to send the wire transfer(s) to the financial institution for processing.
Note: If Token Challenge is enabled for Wire Transfer, and Approval is required, upon selecting the approve action you will be asked to enter a Security Code on the Approve Wire Review screen.
2. Click the Delete button to remove the wire transfer(s) without processing. Deleted wires will appear in the Sent Wires section with a status of Deleted.
3. Fill out the Deny Wire message and click the Deny button to send it back to the originator for modification and re-submittal.
When deciding what to do with a pending transfer, remember that you can click the magnifying glass in the Detail column to display the wire transfer details in a separate browser window.
View Wire Activity
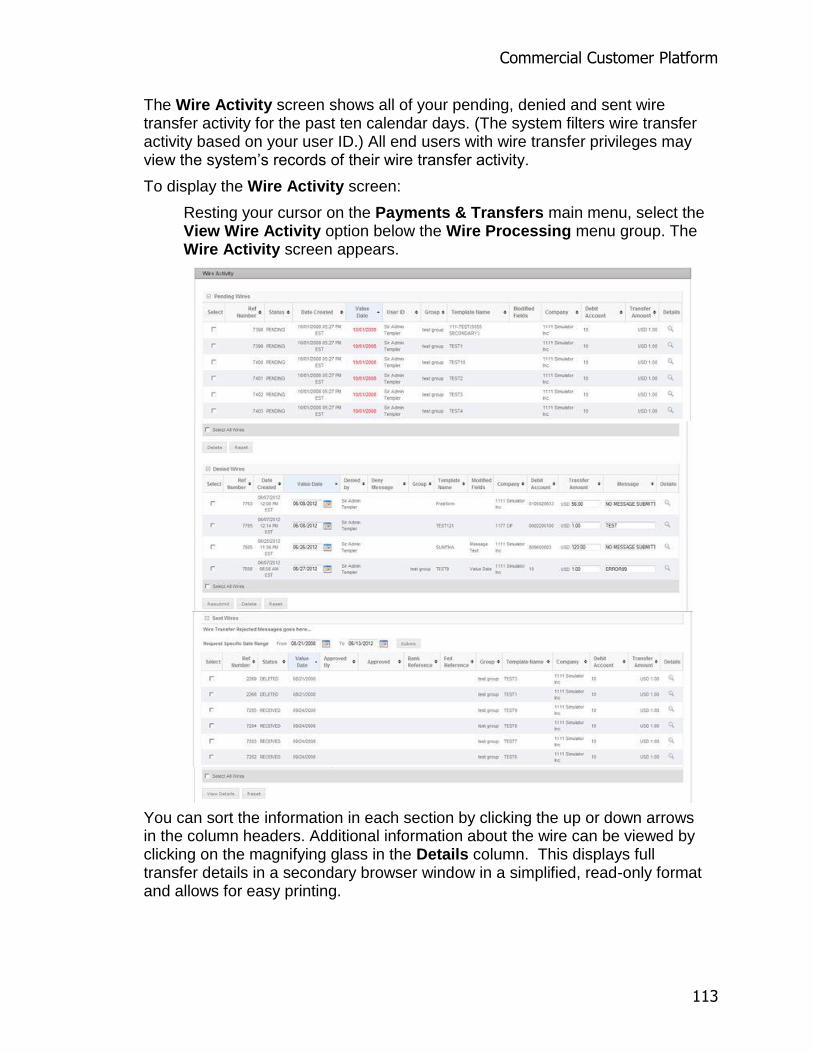
Commercial Customer Platform
113
The Wire Activity screen shows all of your pending, denied and sent wire transfer activity for the past ten calendar days. (The system filters wire transfer activity based on your user ID.) All end users with wire transfer privileges may view the system’s records of their wire transfer activity.
To display the Wire Activity screen:
Resting your cursor on the Payments & Transfers main menu, select the View Wire Activity option below the Wire Processing menu group. The Wire Activity screen appears.
You can sort the information in each section by clicking the up or down arrows in the column headers. Additional information about the wire can be viewed by clicking on the magnifying glass in the Details column. This displays full transfer details in a secondary browser window in a simplified, read-only format and allows for easy printing.
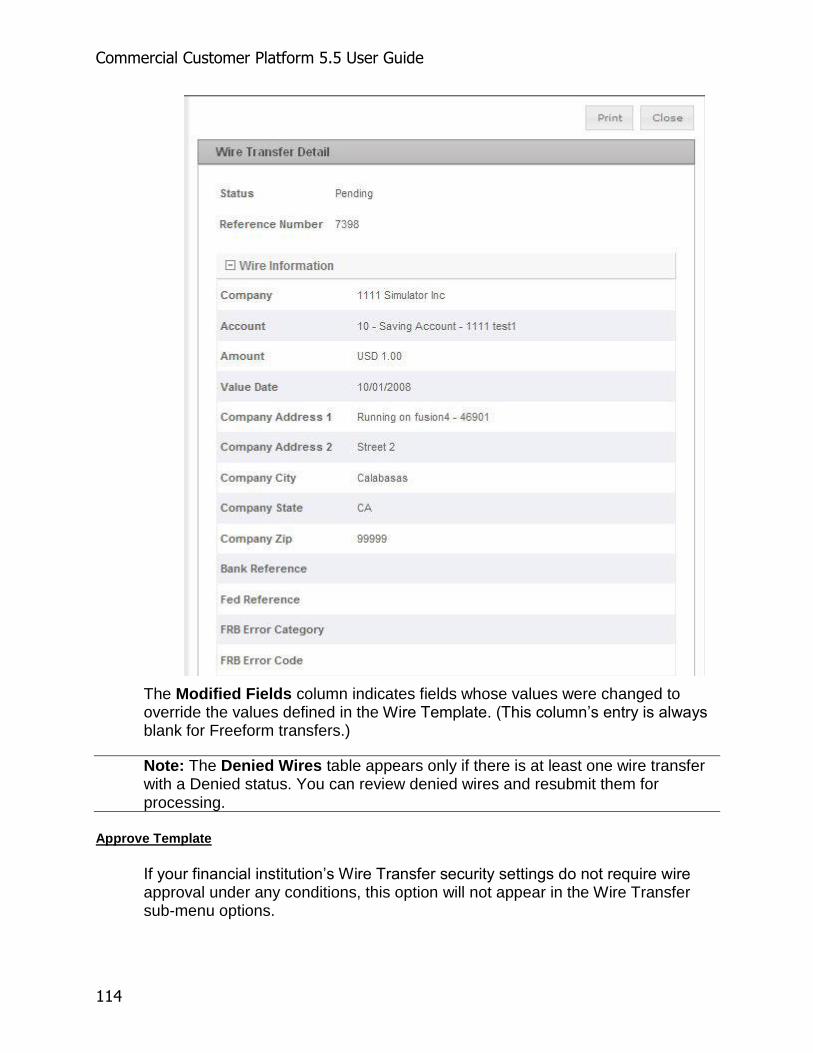
Commercial Customer Platform 5.5 User Guide
114
The Modified Fields column indicates fields whose values were changed to override the values defined in the Wire Template. (This column’s entry is always blank for Freeform transfers.)
Note: The Denied Wires table appears only if there is at least one wire transfer with a Denied status. You can review denied wires and resubmit them for processing.
Approve Template
If your financial institution’s Wire Transfer security settings do not require wire approval under any conditions, this option will not appear in the Wire Transfer sub-menu options.

Commercial Customer Platform
115
If your financial institution’s Wire Transfer security settings require wire approval, an administrator must approve templates before they can be used. Each template is assigned a status of Pending when it is first created and whenever it is modified. Company administrators and wire administrators can use this screen to review and approve or deny pending templates. (If a template is denied approval, the originator can make changes and resubmit it.)
To display the Approve Template screen:
Rest your cursor on the Payments &Transfers option and then click the Template Approval option under the Wire Transfer group. The Approve Template screen displays.
For any template, click the magnifying glass in the Details column to see full details in a secondary browser window. The new window shows template data in a simplified, read-only format similar to the Maintain Template screen.
After reviewing the templates, you can approve or deny them. Check the Select box next to each template that you want to approve and click the Approve button; check the Select box next to each template that you want to deny and click the Deny button.
After a template is approved, it may be used throughout the Wire Transfer service. After a template is denied, the originator (the user who created or most recently modified the template) can make further changes and resubmit the template for approval.
Maintain Template
A template is required for each non-freeform wire transfer. The system is designed to store these templates so that you can save time by defining them once and reusing them later.
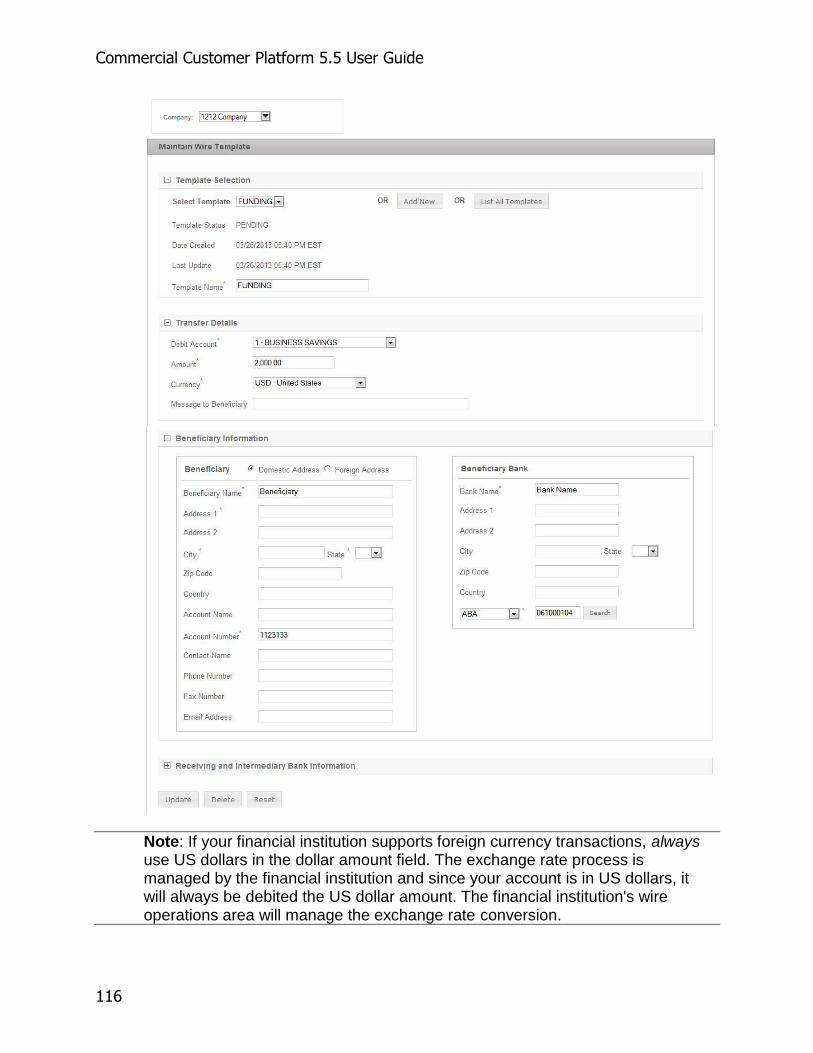
Commercial Customer Platform 5.5 User Guide
116
Note: If your financial institution supports foreign currency transactions, always use US dollars in the dollar amount field. The exchange rate process is managed by the financial institution and since your account is in US dollars, it will always be debited the US dollar amount. The financial institution's wire operations area will manage the exchange rate conversion.

Commercial Customer Platform
117
Rest your cursor on the Payments & Transfers option on the main menu and then click Maintain Template. The Maintain Template screen displays.
Select a Company to populate the Debit Account drop-down.
You can select a Saved Template, Add New Template or List all templates.
Create a New Template
1. Clicking the Add New button clears fields so you can create a new template.
2. Enter the name of the new template in the Template Name field.
3. In the Transfer Details section, select a Debit Account from the drop-down list. The debit account list is populated based on the Company selected above.
4. Enter the Amount, Currency (if applicable) and Message to Beneficiary (optional) fields.
5. Then enter the Beneficiary Name and Account information. In the Beneficiary Information section, there are two radio button options for entering a Beneficiary Address -- Domestic Address and Foreign Address. The Domestic Address entry contains separate fields for the City, State, Zip Code and Country. If your beneficiary address does not fit into these individual fields, and/or you need to enter a non-domestic phone number, select the Foreign Address option. In place of separate City, State, Zip Code and Country fields, the Foreign option allows for three free-form address lines of 35 characters each for you to enter the beneficiary address information. It will also support a non-domestic phone number. This entry selection can be used even if your wire is not a foreign wire, but you need more flexibility to enter the complete beneficiary address and phone information.
6. Complete the Beneficiary and Beneficiary Bank sections by entering Beneficiary Name and Account Number, Beneficiary Bank Name and identifier (ABA,SWIFT, DDA drop-down). Note: if bank ID is not an ABA, then a Receiving Bank is required.
7. (Optional) Fill in any or all of the remaining fields in the Beneficiary and Beneficiary Bank sections.
Note: If your financial institution has enabled the 'Require Beneficiary Address' option, then Address 1, City and State are also required.
8. (Optional) Fill in the fields in the Receiving Bank and Intermediary Bank sections.
9. Click the Add button. The new template is stored using the name in the Template Name field.
If your financial institution’s Wire Transfer security settings require approval before using new or updated templates, the new template is assigned a status

Commercial Customer Platform 5.5 User Guide
118
of Pending. If this is the case, a company administrator or wire administrator must approve the new template before it can be used.
Update a Template
1. Select the Template Name from the drop-down list. The selected template’s information appears on the screen.
2. Make any necessary changes. Click the Reset button at any time if you need to restore all of the fields to their previously saved values.
3. Click the Update button.
If your financial institution’s Wire Transfer security settings require approval before using new or updated templates, the updated template is assigned a status of Pending. If this is the case, a company administrator or wire administrator must approve the updated template before it can be used.
Delete a Template
1. Select the template from the drop-down list. The selected template’s information appears on the screen.
2. Verify that the correct template is selected.
3. Click the Delete button. A dialog box appears, prompting for confirmation.
4. Click the OK button to confirm, or click Cancel to leave the template unchanged.
Maintain Template Group
The Maintain Template Group function lets you create, modify and delete template groups. Template groups are named collections of predefined wire transfer templates that are bundled for convenience. A typical use for a template group is to collect together several templates that are usually initiated at or around the same time on a recurring basis (e.g., suppliers’ bills that are paid via wire transfer on the same day every month).
Note: If a wire template that is part of a group is modified then that template will disappear and not be part of the group if it requires approval. The template will re-display when it gets approved. Also, if your financial institution changes the address requirements of wires and a template in the template group in out of compliance with the new requirements, that template will need to be modified before initiating the template group.
To display the Maintain Template Group screen:
Rest your cursor on the Payments & Transfers main menu and select the Maintain Template Group option under the Wire Transfer group. The Maintain Template Group screen appears.
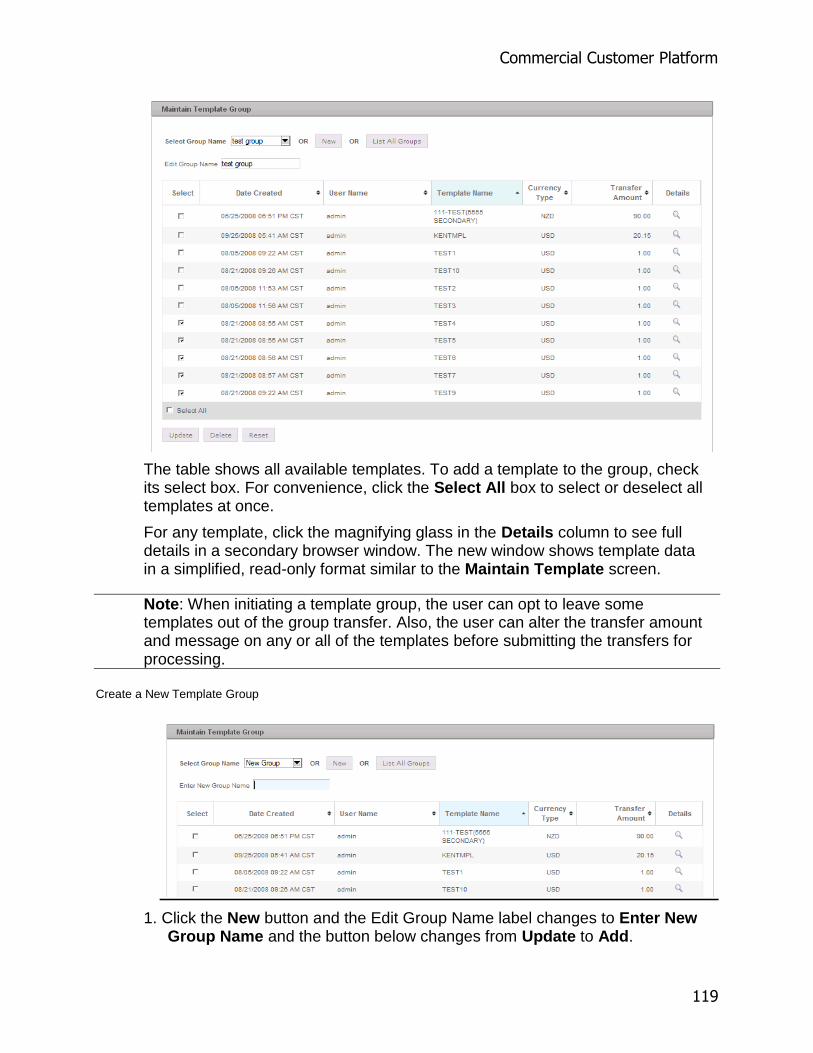
Commercial Customer Platform
119
The table shows all available templates. To add a template to the group, check its select box. For convenience, click the Select All box to select or deselect all templates at once.
For any template, click the magnifying glass in the Details column to see full details in a secondary browser window. The new window shows template data in a simplified, read-only format similar to the Maintain Template screen.
Note: When initiating a template group, the user can opt to leave some templates out of the group transfer. Also, the user can alter the transfer amount and message on any or all of the templates before submitting the transfers for processing.
Create a New Template Group
1. Click the New button and the Edit Group Name label changes to Enter New Group Name and the button below changes from Update to Add.
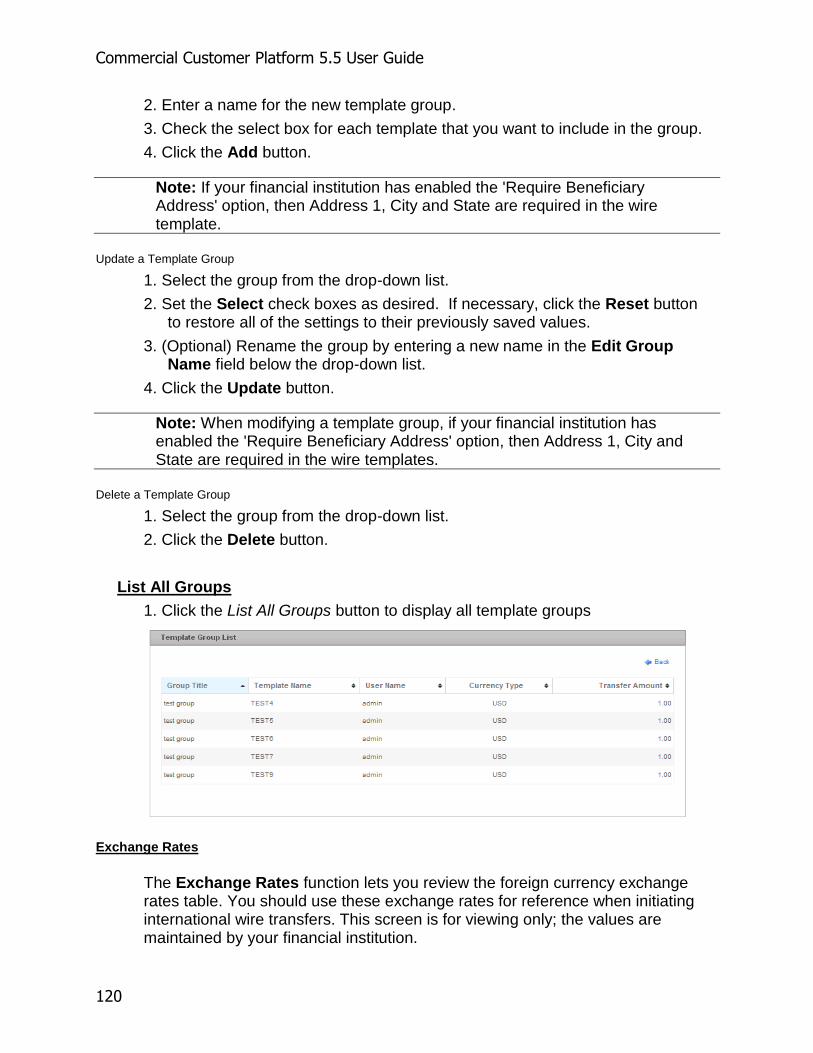
Commercial Customer Platform 5.5 User Guide
120
2. Enter a name for the new template group.
3. Check the select box for each template that you want to include in the group.
4. Click the Add button.
Note: If your financial institution has enabled the 'Require Beneficiary Address' option, then Address 1, City and State are required in the wire template.
Update a Template Group
1. Select the group from the drop-down list.
2. Set the Select check boxes as desired. If necessary, click the Reset button to restore all of the settings to their previously saved values.
3. (Optional) Rename the group by entering a new name in the Edit Group Name field below the drop-down list.
4. Click the Update button.
Note: When modifying a template group, if your financial institution has enabled the 'Require Beneficiary Address' option, then Address 1, City and State are required in the wire templates.
Delete a Template Group
1. Select the group from the drop-down list.
2. Click the Delete button.
List All Groups
1. Click the List All Groups button to display all template groups
Exchange Rates
The Exchange Rates function lets you review the foreign currency exchange rates table. You should use these exchange rates for reference when initiating international wire transfers. This screen is for viewing only; the values are maintained by your financial institution.

Commercial Customer Platform
121
To display the Exchange Rates screen:
Rest the cursor on the Payments & Transfers main menu and then click View Exchange Rates under the Wire Processing menu group. The Exchange Rates screen displays
.
The table shows one row of data for each type of currency. Each row specifies the Country of origin, Currency Unit (name) and the three-letter Currency symbol, plus the buy and sell rates for small and large orders.
Request Wire Investigation
The Request Wire Investigation function lets you send an email request to your financial institution for information about any wire transfer that you sent in the last two years.
To display the Request Wire Investigation screen:
Rest the cursor on the Payments & Transfers main menu and then click Request Wire Investigation under the Wire Processing menu group. The Request Wire Investigation screen displays.

Commercial Customer Platform 5.5 User Guide
122
The Company drop-down selection will populate the Account drop-down with accounts tied to that company.
You must give contact information for yourself, complete information about the wire transfer (originating account, amount, recipient and date) and also you must state what action is to be taken.
Fill out all of the required fields and click Send. Your financial institution will receive the request and should contact you.
Wire Transfer Detail
The Wire Details screen allows you to review the field specific details of a wire transfer or template .
To display the Wire Transfer Detail screen, select the magnifying glass from the Approve/View Wire Activity screen, View Wire Activity screen, Approve Template screen or Maintain Template Group screen.
Note: The population and display of some of the wire information fields is dependent on the level and stage of processing of the wire transfer or template.
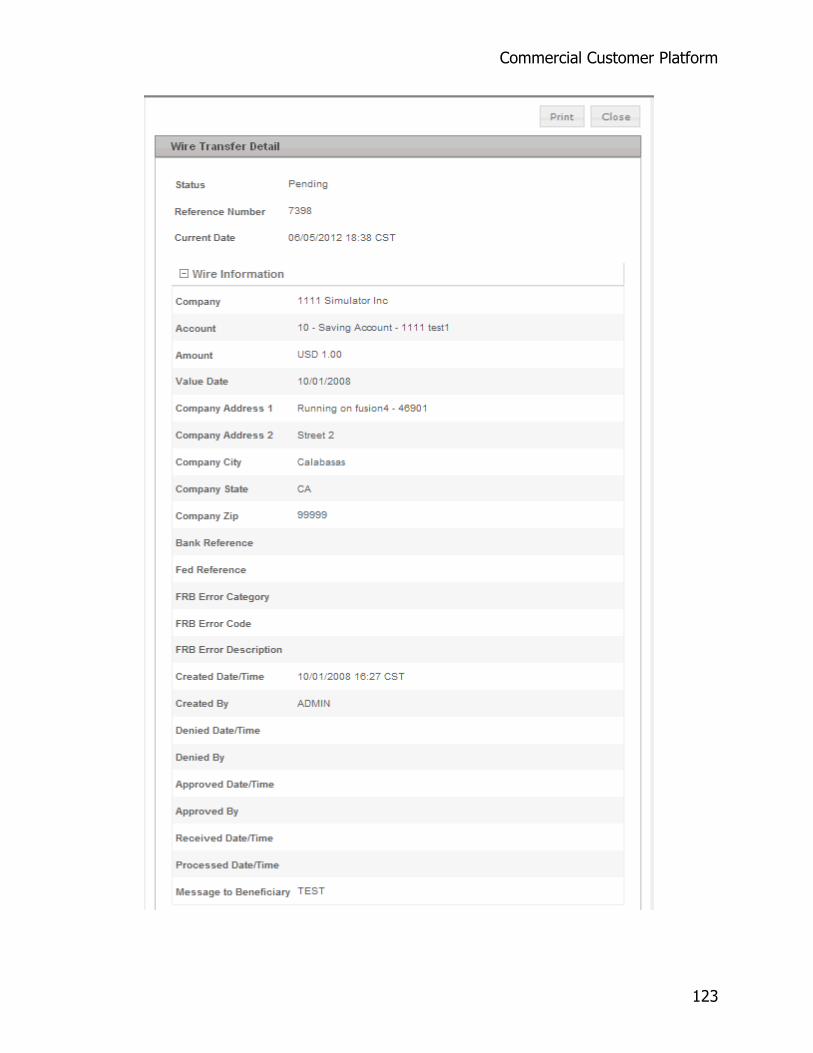
Commercial Customer Platform
123

Commercial Customer Platform 5.5 User Guide
124

Commercial Customer Platform
125
ACH (Automated Clearing House Origination)
ACH Clearing House Origination
An Automated Clearing House (ACH ) transfer is the electronic transmission of a file which contains information pertinent to the movement of funds between accounts. An ACH transfer generally consists of multiple transactions and is referred to as a "batch."
The steps for setting up and submitting an ACH batch are typically as follows:
1. Define participants (Maintain Participant)
2. Define batch attributes (Maintain Batch Template)
3. Assign participants to the batch (Assign Participant to Batch)
4. Submit the batch (Initiate Batch )
5. (Optional) Check on pending/recent activity (View ACH Activity)
6. (Optional) Edit and re-submit the batch (Update Batch)

Commercial Customer Platform 5.5 User Guide
126
The above steps are typical for an ACH user. For an ACH administrator, the main action occurs after batch has been submitted. If the batch requires approval for any reason (e.g., if it exceeds the user’s per-transaction or daily limits), it is given a status of Pending. The administrator then uses the View/Approve ACH Activity function either to approve the batch as-is or to deny it and send it back to the user for modification.
A batch may be used many times once the setup steps (1-3) are completed. In fact, you will need to redo the setup steps only when something changes (e.g., you need to add new participants or remove old ones); in typical usage, simply submitting an ACH batch (as in step 4) will be sufficient. Please note that participants may be used in more than one batch.
A Word About Daily ACH Limits
The financial institution may set daily ACH limits for its commercial customers, and each company administrator may set daily ACH limits for that company’s end users. As ACH batches and/or files are submitted to the financial institution, the system keeps track of the daily limits and ACH totals.
If your company exceeds the limit set by the financial institution, you must contact the financial institution and request an extension of the limit in order to continue.
If the end user exceeds the limit set by the company administrator, the system checks the over-limit rules specified for your company. If the restrict option is checked, the user cannot initiate a transfer. If the require approval option is checked, the system marks the status as "Pending" and allows the transfer if it is subsequently approved by the company administrator or a wire administrator.
ACH Example
We’ll use net payroll origination as a simple example to show how ACH is used.
First, the employees within a company are added as participants, using the Maintain Participant screen.
Next, a template is created using the Maintain Batch Template screen. It is possible that more than one template would be used. For example, if you want separate processing for exempt and non-exempt employees.
Now that there’s a template and a set of participants, you can set up an ACH batch by using the Assign Participant to Batch screen to add transactions (i.e., participants, with account info and dollar amounts) to the template.
The ACH batch is inactive until it is Initiated and the ACH file is created.
To process the net payroll amounts, select the template on the Initiate Batch screen, and then review all of the transactions and specify an effective date. When you are satisfied that the information is correct, you submit the batch. What happens next depends on whether the financial institution is running a manual processing system or an automated system.

Commercial Customer Platform
127
· Manual: The online banking system creates an ACH file immediately, and then sends an email message to the financial institution, indicating that an ACH file has been submitted for their approval and subsequent processing. The financial institution manually downloads the file, evaluates and processes it. If you are required to prefund your ACH credit batches, the batch will be pending at your financial institution until funds are verified and a financial institution Administrator has approved the batch.
· Automated: The ACH batch transactions stay in the database until the scheduled "collection" job occurs. The scheduled job collects all approved ACH transactions from the database, creates a file and transmits it to the financial institution’s real-time ACH server. If you are required to prefund your ACH credit batches, the batch will be pending at your financial institution until funds are verified and a financial institution Administrator has approved the batch.
Initiate ACH Batch
The Initiate ACH Batch function lets you set up an ACH batch and submit it for processing.
To display the Initiate ACH Batch screen:
Rest your cursor on the Payments & Transfers menu and then select the Initiate Batch option under the ACH Processing group. The Initiate ACH Batch screen appears.
Initiating a Batch

Commercial Customer Platform 5.5 User Guide
128
1. From the Template Name drop-down list, select the batch template that
you want to initiate. The ACH Class, Total Batch Debits and Total Batch
Credits display for that template.
2. Edit the effective date in the Effective Date field, using mm/dd/yyyy
format, or the calendar icon. You may enter a date up to 30 days in the
future and it must be a business day. Please note the effective date
defaults to the next processing day.
3. If desired, edit the batch data for any or all participants in the participants
table. (The edited information will be used for this batch only.)
4. For each participant, you can:
Check the Hold box to omit the participant from this batch
Change the Amount value
Change the Prenote setting
Edit the Addenda message
5. If you have started making changes but cannot complete them or cannot
submit the batch immediately, click the Save button. The batch will be
saved in its current state, and later on you can go into the Update Batch
function to complete your editing and submit the batch.
6. Click the Initiate button to create the file. An email message is
automatically sent to the financial institution indicating that an ACH file has
been submitted for their approval and subsequent processing.
7. Click the Reset button at any time to reset all fields to their previously
saved values. Note, you can sort the table by clicking the up and down
arrows in any of the column headers.
1.
Note: If the restrict initiation option is selected, an ACH batch that exceeds either the company limits or the end user limits will be prevented. Also, your

Commercial Customer Platform
129
financial institution may specify that approval is required on all ACH submittals, regardless of any defined limits.
Note: If you are enabled for ACH Prefunding you must initiate unbalanced batches.
ACH Initiation/Send Credit and Debit Limits
Daily Limit (credit): Specifies the maximum daily amount the user can initiate for ACH Credit origination files.
Daily Limit (debit): Specifies the maximum daily amount the user can initiate for ACH Debit origination files.
Limit Per Batch (credit): Specifies the maximum Credit amount of funds the user can transfer in any single ACH Batch.
Limit Per Batch (debit): Specifies the maximum Debit amount of funds the user can transfer in any single ACH Batch.
Daily Limit Used (credit): Specifies the amount of your daily ACH Credit limit that has been used for the day.
Daily Limit Used (debit): Specifies the amount of your daily ACH Debit limit that has been used for the day.
If approval is required (for any reason), a message will display on the screen with further instructions.
Note: If a Token Challenge is enabled for ACH, and Approval is not required, upon selecting the initiate action you will be asked to enter a Security Code on the Review ACH Batch screen.
Update ACH Batch
The Update ACH Batch function lets you make changes to ACH batches with a saved or deleted status.
An ACH batch is eligible for editing if:
An Administrator denied the batch,
It was saved during an editing session in the Initiate Batch function, or
You are required to prefund your credit batch and the batch has been Denied by a financial institution administrator.
To display the Update ACH Batch screen:

Commercial Customer Platform 5.5 User Guide
130
Rest your cursor on the Payments & Transfers menu option and then select the Update Batch option listed under the ACH Processing group. The Update ACH Batch screen displays.
The Template Name drop-down list contains all batches that are eligible for editing. When you choose a batch from this list, the screen is populated with the batch data. If you are required to prefund batches, balanced templates that were created prior to prefunding enablement will fail upon initiation.
This function provides the same editing options for batch data as does the Initiate Batch function. After editing, you can click the Save button to save the batch in its current state (its status will be changed to Saved, but the altered data will be retained) or you may click Initiate to submit the batch for processing.
You can delete the selected batch by clicking the Delete button. Be careful when using this option! The deleted batch cannot be recovered later, so any manually edited data will be lost permanently.
Note: If you are enabled for ACH Prefunding you must initiate unbalanced batches.
ACH Initiation/Send Credit and Debit Limits
Daily Limit (credit): Specifies the maximum daily amount the user can initiate for ACH Credit origination files.
Daily Limit (debit): Specifies the maximum daily amount the user can initiate for ACH Debit origination files.
Limit Per Batch (credit): Specifies the maximum Credit amount of funds the user can transfer in any single ACH Batch.
Limit Per Batch (debit): Specifies the maximum Debit amount of funds the user can transfer in any single ACH Batch.

Commercial Customer Platform
131
Daily Limit Used (credit): Specifies the amount of your daily ACH Credit limit that has been used for the day.
Daily Limit Used (debit): Specifies the amount of your daily ACH Debit limit that has been used for the day.
If approval is required (for any reason), a message will display on the screen with further instructions.
Note: If Token Challenge is enabled for ACH, and Approval is not required, upon selecting the initiate action you will be asked to enter a Security Code on the Review ACH Batch screen.
Re-presented Check
The Re-presented Check Entry, a.k.a. 'RCK' feature allows you to submit RCK items that have been returned because of insufficient or uncollected funds. Note that RCK initiated batches will be added to the Approve/View ACH Activity screen pending 'Approval'. To display the Re-presented Check screen:
Rest your cursor on the Payments & Transfers menu option and then select the Re-present Check option under the ACH Processing group. The Select Re-presented Check Batch page displays with a table of Saved Batches and the option to add a new check batch.
Saved Batches will display a status of Denied or Saved. Denied RCK items can only be edited and resubmitted from the Re-presented Check screen. You may edit or add new RCK items from a Saved RCK batch, and then initiate for processing.

Commercial Customer Platform 5.5 User Guide
132
The Saved Batches section will also display the Payee and Company to which the Offset Account is associated. Adding a New Check Batch To add a new check batch (enter a new check to re-present), click the Add New Batch button above the Saved Batches table. This displays the Re-presented Checks screen which is designed to resemble a check. This data entry screen will allow you to add multiple RCK entries to a batch, maintain existing entries, and save work to return to for future modifications. Adding a Re-presented Check requires:
The name of the party who issued the check (may not be a consumer) The check number The original date of the check The amount The issuing party's account number and routing number
Enter this information into the fields on the check image. When finished, click the Add button. The entry information will display in the Re-presented Check Batch Details for Batch ID #### below the check image.
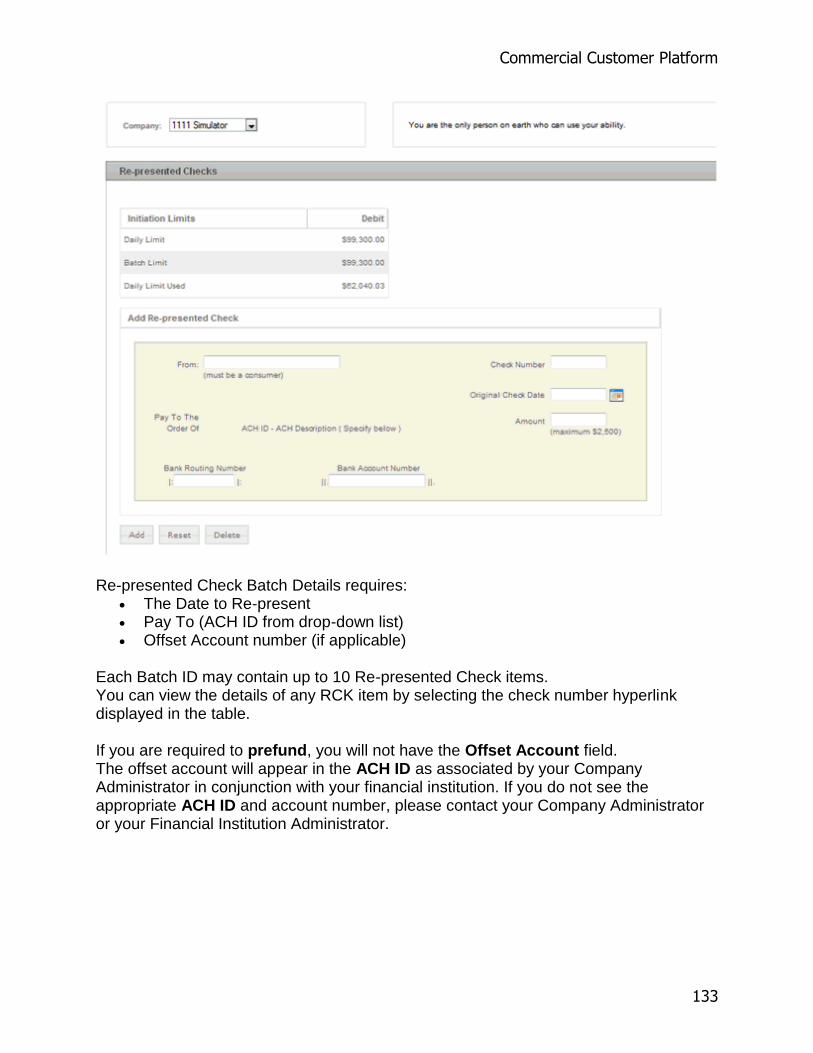
Commercial Customer Platform
133
Re-presented Check Batch Details requires:
The Date to Re-present Pay To (ACH ID from drop-down list) Offset Account number (if applicable)
Each Batch ID may contain up to 10 Re-presented Check items. You can view the details of any RCK item by selecting the check number hyperlink displayed in the table. If you are required to prefund, you will not have the Offset Account field. The offset account will appear in the ACH ID as associated by your Company Administrator in conjunction with your financial institution. If you do not see the appropriate ACH ID and account number, please contact your Company Administrator or your Financial Institution Administrator.

Commercial Customer Platform 5.5 User Guide
134
Daily Limit: Specifies the maximum daily amount the user can initiate for ACH Debit origination files.
Batch Limit: Specifies the maximum debit amount of funds the user can transfer in any single ACH Batch.
Daily Limit Used: Specifies the amount of your daily ACH debit limit that has been used for the day.
Note: If a Token Challenge is enabled for ACH, and Approval is not required, upon selecting the initiate action you will be asked to enter a Security Code on the Review Re-presented Check screen.
Send ACH File
The Send ACH File function allows you to send a complete ACH file to your financial institution. Note that batches contained within the uploaded file will be stored the same as initiated, and added to the system pending ‘Approval'.
To display the Send ACH File screen:
Rest your cursor on the Payments & Transfers menu and then select the Send ACH File option under the ACH Processing group. The Send ACH File screen displays. The Company drop-down list displays at the top of the page. Select the company, if applicable.

Commercial Customer Platform
135
You must have the ACH file available either on a local drive or on a network-accessible drive. If you know the full pathname of the file, type it in. For convenience, click the Browse… button to open a standard Windows dialog box that allows you to search your local and network drives to locate the file.
Note: Uploaded ACH files are subject to the same limit requirements as ACH batches. Unbalanced files cannot be uploaded unless the financial institution enables this feature.
Pre-Validation Process:
Verifies the daily credit/debit limits for the company and/or user has not been exceeded.
Verifies the ACH file contains balanced batch(es), if applicable. Verifies the ACH Batch(es) has a valid effective date. Verifies that the business user has access to the offset account in the
ACH file (if applicable). Verifies that the Company tied to the file's offset account is selected (if
applicable).
ACH Initiation/Send Credit and Debit Limits
Daily Limit (credit): Specifies the maximum daily amount the user can initiate for ACH Credit origination files.
Daily Limit (debit): Specifies the maximum daily amount the user can initiate for ACH Debit origination files.

Commercial Customer Platform 5.5 User Guide
136
Limit Per Batch (credit): Specifies the maximum Credit amount of funds the user can transfer in any single ACH Batch.
Limit Per Batch (debit): Specifies the maximum Debit amount of funds the user can transfer in any single ACH Batch.
Daily Limit Used (credit): Specifies the amount of your daily ACH Credit limit that has been used for the day.
Daily Limit Used (debit): Specifies the amount of your daily ACH Debit limit that has been used for the day.
If approval is required (for any reason), a message will display on the screen with further instructions.
If the ACH file passes the pre-validation process, the user will be presented with a verification screen showing the Credit/Debit Totals, Number of Entries, Effective date and the Number of Batch(es).
Note: If Token Challenge is enabled for ACH, and Approval is not required, upon selecting the upload action you will be asked to enter a Security Code on the Send ACH File Verification screen.
Once the user submits the ACH file to be completed, the user will be presented with a confirmation message with a Reference Number. The user will be able to view the status of the Reference Number via the View ACH Activity or View/Approve ACH Activity screen. Should the ACH file fail during the backend validation, the system will generate an email to the user informing them that the file send failed. The user will be able to view the details of the error on the View ACH Activity or View/Approve ACH Activity screen by selecting the Reference Number hyperlink.
Note: The error screen shows full line-by-line details of up to fifty errors. (Keep in mind that some errors will "cascade" and cause numerous others to appear. Fixing that first error will often clear up many subsequent errors, so always look at the leading entry first.)
The Reference Number is not the Batch ID Number. The Batch ID's can be viewed by selecting the Reference Number hyperlink on the View ACH Activity or View/Approve ACH Activity screen.
Note: If you are enabled for ACH Prefunding, you must upload unbalanced batches. The 'Balanced ACH File' checkbox and label will not appear on the 'Send ACH File' screen. It is also recommended that you upload single batches, not multiple batches. Uploaded files must contain all credit or all debit unbalanced batches. Mixed batches will fail.
Commercial Customer Platform
137
If the Balanced ACH File checkbox is selected, the Company drop-down menu will appear. This will allow you to select the company that the file's offset account number is associated with. You can confirm the company/account number association on the Account Summary screen. If the file's offset account number is not associated with the selected company, you will receive an error message stating that the system could not locate any company account data.
Import ACH Data
The Import ACH Data function allows you to create new or update existing Batch Templates and Participant records using a file created by another application. You may import a Standard ACH file (formatted to NACHA specifications) to add new batches to the system. The Import ACH Data function may also be used to update existing batch templates and participates based on criteria defined in Delimited Map or Fixed Map instructions used when importing text files created by another application. To display the Import ACH Data screen:
Select the ACH option on the Funds Transfer menu and then click Import ACH Data. The Import ACH Data screen appears.
The Standard ACH map type is pre-defined based on NACHA file format and does not require you to develop the map layout. You will need to select a Company that the file's offset account is associated with. If the offset account number included in the file does not match any of the selected company accounts, the Offset Account field for the template will not have an account selected. Note: If you are enabled for ACH Prefunding, you must import unbalanced batches. If importing a balanced batch, the offset account will be removed.

Commercial Customer Platform 5.5 User Guide
138
Delimited and Fixed ACH Map types allow you to define the file layout so the Import process can identify the structure and intent of the file being imported. Import file layout definitions are stored and maintained as ACH Import Maps. Delimited Map – Use this map type to define the delimiter and where each piece of the participant’s data is located in the file. Fixed Map – Use this map type to define the start and end positions of the participant’s data within the file. You must have the ACH file available either on a local drive or on a network-accessible drive. If you know the full pathname of the file, type it in. For convenience, click the Browse… button under 'File Selection' to open a standard Windows dialog box that allows you to search your local and network drives to locate the file. The Map Type selected under Batch/Process Mode Selection section must match the appropriate map type selected/defined in the Map Selection section. Under the Batch/Process Mode Selection section select the appropriate Batch Template the import should affect. NOTE: For Add, Update and Delete Maps you must perform the import twice:
Import Delimited or Fixed file as an Add Only and select the appropriate Batch Template the import should affect.
Import Delimited or Fixed file as a Delete and Update and select the appropriate Batch Template the import should affect.
Delimited ACH Map
Creating a Delimited ACH Map allows the user to define the file layout so the Import process can identify the structure and intent of the file being imported. To display the Delimited ACH Map screen:
Rest your cursor on the Payments & Transfers menu and then select the Import ACH Data option under the ACH Processing group. The Import ACH Data page displays. To the right of the page will be two links -- Create New Fixed Map and Create New Delimited Map. Click the Create New Fixed Map link.
The Delimited ACH Map screen displays.

Commercial Customer Platform
139
The Delimited ACH Map function allows you to define the delimiter and where each piece of the participant’s data is located in the file.

Commercial Customer Platform 5.5 User Guide
140
Click on the Map Type option drop-down menu and select the appropriate action for the file being imported:
Add Only – This option allows the user to add participant records to the participant table and assign participant records to the user selected existing batch template.
Update Only – Based on matching criteria, this option changes any participant records that exist in the participant table with fields from the imported file.
Add and Update – This is a combination of the ‘Add Only’ and ‘Update Only’ processing modes.
The ‘Add’ process adds participant records to the participant table and assigns participant records to the user selected batch template.
The ‘Update’ process employs a user selected matching criteria to locate participant records that exist in the selected batch template. The records will be changed using the update fields from the imported file.
Delete and Update – This is a combination of the ‘Delete’ and ‘Update Only’ processing modes.
The ‘Delete’ process employs a user selected matching criteria to locate participant records that exist in the participant table based on the selected batch template, but do not exist in the file. This map type removes association of unmatched participants from the selected batch template.
The ‘Update’ process employs a user selected matching criteria to locate participant records that exist in the selected batch template. Matched participants will be changed using the update fields from the imported file.
Add, Update, and Delete – This option adds participants to the participant table, updates existing participants within the ACH participant table, and deletes participants from a selected batch template.
Note: If the imported file contains participant records that don't exist in the template, or if the record for update is not found based on matching criteria, then those participants are added to the participant table and assigned to the selected batch template. Note: The 'Delete' process will disassociate the participant from the selected batch template, the participant is not deleted from the participant table.
1. The Map Type allows you to define an action that will Add, Update or Delete participants in the participant database.
2. The Map Name allows you to describe the file being imported and will distinguish it from previous imports. Because the created maps are saved and are reusable, it is suggested that you create a map name that can be used to identify the type of map that was created. Note: special characters are not allowed in the map name.
3. The Delimiter drop-down list lets you select the appropriate delimiter used in the file you are importing.
4. End of Record ID – Select the appropriate record/line terminator from the drop-down list. Note: The End of Record Id and the Delimiter cannot be the same.
Commercial Customer Platform
141
5. Skip First Header Record – If the file you are importing contains a header, select Yes; if the file only contains data records and a header is not in the file, select No.
6. Total Number of Fields in Record/Line – Enter the number of columns/fields in the file.
7. Strip Quotes (“”) around Fields – Select Yes if the fields/columns in the file being imported contain quotes at the beginning and end of the fields/columns, select No if they do not.
8. Amount Field Contains Punctuation(s) – Select Yes if the file being imported contain punctuations ($,.) in the amount field/column; Select No if the amount field does not contain punctuations.
Note: Excel files will typically wrap text fields in quotes. If you are unsure whether the fields contain quotes, select Yes and the Import process will detect and remove if needed. When importing a Delimited file, for each record/field that can be imported in a file, there is a Field Name. The following fields are available for import:
Transaction Code FI Routing Number Account Number Amount Participant ID Participant Name Addenda Data
The Field Name actions are defined as Match, Update, and Replacement Value.
The Match column is used to locate the participant record that exists in the participant table and match with the participant data in the import file.
The Update column is used to update the information in the participant table with the data in the import file.
The Replacement Value is information either not in the file being imported or is a change that will affect all matched participants in the import file.
The Position Field allows the user to define the location of the Field Names within the imported file.
See Section 'Creating an ACH Map' under 'File Formats' on detailed information how to create an ACH Map.
Fixed ACH Map
To display the Fixed ACH Map screen:

Commercial Customer Platform 5.5 User Guide
142
Rest your cursor on the Payments & Transfers menu and then select the Import ACH Data option under the ACH Processing group. On the right side of the page are two links -- Create New Fixed Map and Create New Delimited Map. Click the Create New Fixed Map link.
The Fixed ACH Map screen displays.
The Fixed ACH Map function allows you to define the Record/Line Length and the Start and Length position lets you define where each piece of the participant’s data is located in the file.

Commercial Customer Platform
143
Click on the Map Type drop-down list and select the appropriate action for the file being imported:
Add Only – This option allows the user to add participant records to the participant table and assign participant records to the user selected existing batch template.
Update Only – Based on matching criteria, this option changes any participant
records that exist in the participant table with fields from the imported file.
Add and Update – This Map is a combination of the ‘Add Only’ and ‘Update Only’ processing modes.
The ‘Add’ process adds participant records to the participant table and
assigns participant records to the user selected batch template.
The ‘Update’ process employs a user selected matching criteria to locate participant records that exist in the selected batch template. The records are changed using the update fields from the imported file.
Delete and Update – This is a combination of the ‘Delete’ and ‘Update Only’
processing modes.
The ‘Delete’ process employs a user selected matching criteria to locate participant records that exist in the participant table based on the selected batch template, but do not exist in the file. This map type removes any association of unmatched participants from the selected batch template.
The ‘Update’ process uses a user selected matching criteria to locate
participant records that exist in the selected batch template. Matched participants are changed using the update fields from the imported file.
Add, Update, and Delete – This option add participants to the participant
table, update existing participant's within the ACH participant table and delete participants from a selected batch template.
Note: If the imported file contains participant records that don't exist in the template or the record for update is not found based on matching criteria, then those participants are added to the participant table and assigned to the selected batch template. Note: The 'Delete' process will disassociate the participant from the selected batch template, the participant is not deleted from the participant table.
1. The Map Type allows you to define a action that will Add, Update or Delete participants in the participant database.

Commercial Customer Platform 5.5 User Guide
144
2. The Map Name allows you to describe the file being imported and will distinguish it from previous imports. Because the created maps are saved and are re-useable, it is suggested that you create a map name that can be used to identify the type of map that was created. Note: Special characters are not allowed in the map name.
3. Skip First Header Record – if the file you are importing contains a header, select Yes; if the file only contains data records and a header is not in the file, select No.
4. Length of Record/line – Enter the record length in the fixed format file to be imported, carriage return must be included.
5. Amount Field Contains Punctuation(s) – Select Yes if the file being imported contain punctuations ($,.) in the amount field/column; Please select No if the amount field does not contain punctuation(s).
6. Start and Length Positions – The Map Type you selected will determine the requirements for completing if the map type is a Add, Match or Update.
Start – indicates where this field is located within the file being imported. This also means that the field would always start in the same position for each record line.
Length - indicates the length of the data for that field. The length indicates how long or how many characters the field contains. Please note that some field lengths are fixed and some can be variable with up to the maximum allowed.
When importing a Fixed Length file, for each record/field that can be imported in a file, there is a Field Name. The following fields are available for import:
Transaction Code FI Routing Number Account Number Amount Participant ID Participant Name Addenda Data
The Field Name actions are defined as Match, Update, and Replacement Value.
The Match column is used to locate the participant record that exists in the participant table and match with the participant data in the import file.
The Update column is used to update the information in the participant table with the data in the import file.
The Replacement Value is information either not in the file being imported or is a change that will affect all participants in the import file.
The Position Field allows the user to define the location of the Field Names within the imported file.
Commercial Customer Platform
145
See Section 'Creating an ACH Map' under 'File Formats' on detailed information how to create an ACH Map.
Approve/View ACH Activity
The Approve/View ACH Activity function lets you review recent and pending ACH activity. If you are an ACH administrator, you can approve, delete or deny pending batches. Uploaded batches will be displayed in the Completed ACH Activity table.
To display the Approve/View ACH Activity screen:
Rest your cursor over the Payments & Transfers main menu and then select the Approve/View ACH Activity option under the ACH Processing group.
The Approve/View ACH Activity screen displays.
Commercial Customer Platform 5.5 User Guide
146
The screen may contain the following tables, one for pending batches, one for denied batches, one for completed and uploaded batches. You can sort any table by clicking the up and down arrows in the column headers. The information in the tables defaults to sorting by effective date, allowing those financial institutions who do not use ACH File mover to manage each possible batch by effective date.
ACH Administrative Tasks
To approve a pending ACH submittal, check its Select box and click the Approve button.
Note: If a Token Challenge is enabled for ACH, and Approval is required, upon selecting the approve action you will be asked to enter a Security Code on the ACH Approval Review screen.
To deny a pending ACH submittal, check its Select box, fill in a Deny Message and click the Deny button.
To see details for any batch listed on the screen, click the magnifying glass in its Details column. The system launches a second browser window, from which you can view or print the batch data.

Commercial Customer Platform
147
Note: Only the initiator of a denied ACH transaction can delete that transaction. If you are required to prefund ACH activity, you will have FI Pending batches that may not be re-submitted while awaiting review and approval by your financial institution.
View ACH Activity
The ACH Activity function lets you view only that ACH activity which was initiated or uploaded by you. The screen can show tables for pending batches, denied batches, completed and uploaded batches, and imported ACH files.
To display the ACH Activity screen:
Rest your cursor on the Payments & Transfers main menu and then select the View ACH Activity option under the ACH Processing menu group. The ACH Activity screen appears.

Commercial Customer Platform 5.5 User Guide
148
To delete a pending ACH submittal, check its Select box and click the Delete button.
To resubmit a pending ACH submittal, check its Select box and click the Resubmit button. (This button may or may not be displayed depending on whether this option is available to you. You may only resubmit transactions that you created.) Note: If you are required to prefund ACH activity, you will have FI Pending batches that may not be re-submitted while awaiting review and approval by your financial institution.
You can sort either table by clicking the up and down arrows in the column headers.
If you have a large number of transaction records, you will be able to page through the list using First, Previous and Last buttons at the bottom of the table.
To see details for any batch listed on the screen, click the magnifying glass in its Details column. The system launches a second browser window from which you can view or print the batch data.

Commercial Customer Platform
149
Maintain ACH Participants
The ACH participant is the individual or organization that will be affected by the ACH transaction. The participant’s account may be debited or credited by an ACH transaction (e.g., a payroll deposit or a payment for services rendered).
Each participant entry contains the participant’s financial institution information and the transaction type – that is, the type of account and whether it will be debited or credited. This information is used to create the ACH transaction that is added to a batch.
A participant may have several entries, each one using that participant’s unique ID but indicating a different account or transaction type. If the participant has

Commercial Customer Platform 5.5 User Guide
150
multiple accounts, or requests more than one transaction type (e.g., a debit and credit on the same account or debits to two separate accounts), a participant entry must be created for each account or transaction.
Examples
1. If an employee divides his paycheck between checking and savings accounts, two separate participant entries must be created. The first entry would specify the savings account number, the "savings deposit" transaction type, and the amount. The second entry would specify the checking account number, the "checking deposit" transaction type, and the amount.
2. If an employee divides her paycheck into two separate financial institutions, two separate participant entries must be created. The first entry would specify the financial institution, the account number, the savings or checking deposit transaction type, and the amount. The second entry would specify the other financial institution, the account number, the savings or checking deposit transaction type, and the amount.
A Word About Prenotes
A prenote is a special testing mechanism for use when setting up a new ACH participant. It comes through as a special transaction type with a dollar value of $0.00. The purpose of sending a $0.00 transaction is that this will generate an ACH exception if unsuccessful, thereby notifying the financial institution that there is a problem with the setup. If successful, there is no adverse effect and both you and your financial institution can be confident that the setup is correct.
To display the Maintain Participant screen:
Rest your cursor on the Payments & Transfers main menu section and below the ACH menu group, select the Maintain Participant option. The Maintain Participant screen appears.
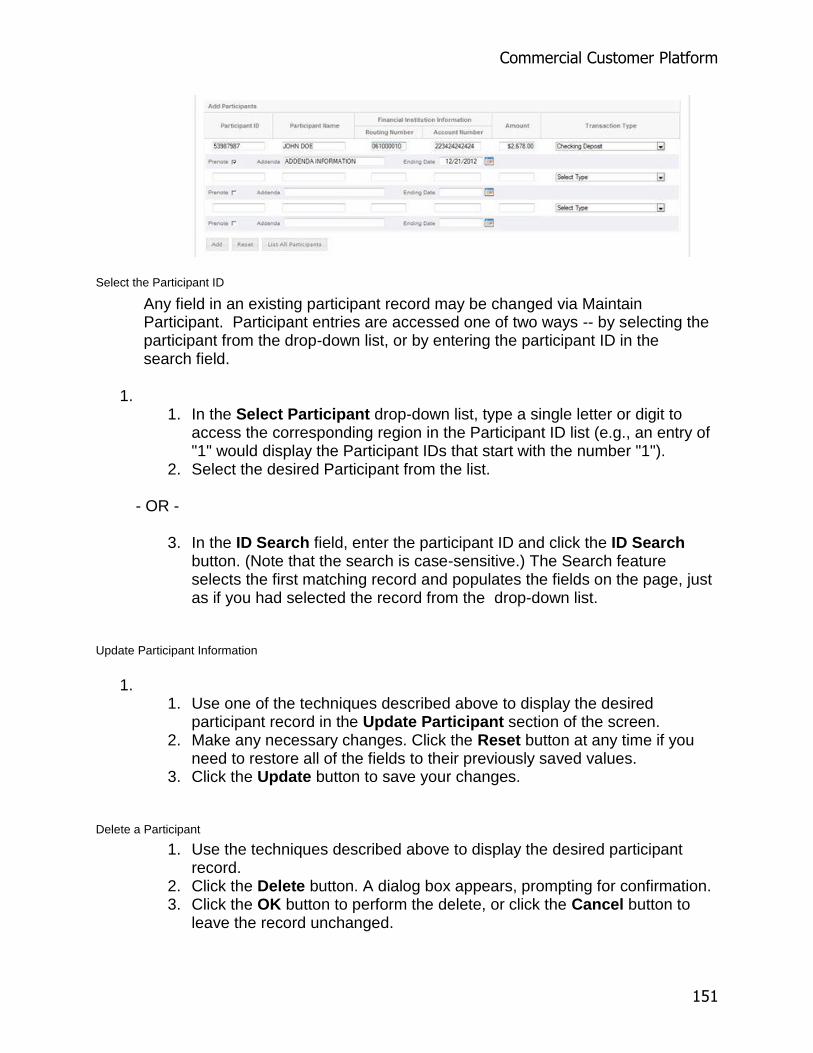
Commercial Customer Platform
151
Select the Participant ID
Any field in an existing participant record may be changed via Maintain Participant. Participant entries are accessed one of two ways -- by selecting the participant from the drop-down list, or by entering the participant ID in the search field.
1. 1. In the Select Participant drop-down list, type a single letter or digit to
access the corresponding region in the Participant ID list (e.g., an entry of "1" would display the Participant IDs that start with the number "1").
2. Select the desired Participant from the list.
- OR -
3. In the ID Search field, enter the participant ID and click the ID Search button. (Note that the search is case-sensitive.) The Search feature selects the first matching record and populates the fields on the page, just as if you had selected the record from the drop-down list.
Update Participant Information
1. 1. Use one of the techniques described above to display the desired
participant record in the Update Participant section of the screen. 2. Make any necessary changes. Click the Reset button at any time if you
need to restore all of the fields to their previously saved values. 3. Click the Update button to save your changes.
Delete a Participant
1. Use the techniques described above to display the desired participant record.
2. Click the Delete button. A dialog box appears, prompting for confirmation. 3. Click the OK button to perform the delete, or click the Cancel button to
leave the record unchanged.
Commercial Customer Platform 5.5 User Guide
152
Add Participants
1. In the Add Participants section of the screen, enter the participant ID in the first available Participant ID field.
2. The participant ID is a unique number assigned to each participant that is used to search for, and identify, the participant on the various ACH screens. An example of a participant ID is an employee’s social security number or a business’ Tax ID number.
3. Enter the participant name in the Participant Name field. 4. Enter the participant’s financial institution information in the Route
Number and Account Number fields. 5. Enter the transaction amount in the Amount field. This amount will display
as the initial setting for this participant whenever a batch is initiated and may be changed by the end user before the ACH file is created.
6. Select a transaction type from the Transaction Type drop-down list. This indicates how the participant’s account will be affected by the ACH transaction.
7. (Optional) Check the Prenote box if you want this participant to be set as a prenote transaction when first added to a batch. (The system will switch off the Prenote setting automatically after the batch is initiated.)
8. (Optional) Fill in a message in the Addenda field. This message will be included with the transaction when the ACH file is created.
9. (Optional) Set an Ending Date (in mm/dd/yyyy format or selected from the calendar) if the participant definition is intended to be used only for a fixed period of time.
Note: Up to three participants may be added at the same time; each row represents one participant’s complete information. To add another participant, repeat steps 1 through 9.
10. Click the Add button to save the participant information.
Maintain Batch Template
The Maintain Batch Template function lets you define the essential characteristics of the ACH batch -- the template name, the ACH transmission type and the offset account. This screen allows you to create new templates and also allows you to update or delete existing templates.
To display the Batch Template Maintenance screen:
Rest your cursor over the Payments & Transfers main menu an select the Maintain Batch Template option under the ACH menu group. The Maintain Batch Template screen appears.

Commercial Customer Platform
153
Maintain Batch Template The Maintain Batch Template option allows the end user to update an existing template’s information, add a new template or delete a template. As part of the template, you also define the essential characteristics of the ACH batch: the template name and the ACH transmission type. Using the Company drop-down list at the top of the page, select a company that is associated with the offset account you want for the template.
Add a Template
1. Click the Add New button. This will clear the template fields so you can enter the information for the new template.
2. Enter the template name in the Template Name input field.
3. Fill in a Template Description that explains the purpose of the template.
4. Select either PPD – Personal Payments or CCD – Corporate Payments from the ACH Batch Class drop-down list.
5. Select an ACH ID. The ACH ID is used to identify the originator of the ACH batch. The ACH ID will contain the offsetting account number.

Commercial Customer Platform 5.5 User Guide
154
Note: If your financial institution accepts unbalanced ACH files, you will see the Create offsetting transaction checkbox. You have the option of creating an offset transaction.
6. (optional) If you have checked the Create offsetting transaction checkbox, the Offset Account drop-down list will be active. Select the account that will either receive funds transferred in or provide funds transferred out. When required to prefund, you will create unbalanced templates and the Offset Account field will not be available.
7. Click the Add button to save the template.
Update a Template
1. Select the template from Select Template drop-down list. The selected template’s information appears in the Template Information section.
2. Make any necessary changes. Click the Reset button at any time if you need to restore all of the fields to their previously saved values.
3. Click the Update button to save the changes to the template.
Delete a Template
1. Select the template from Select Template drop-down list. The selected template’s information appears in the Template Information section.
2. Click the Delete button. A dialog box appears, prompting for confirmation.

Commercial Customer Platform
155
3. Click the OK button to perform the delete, or click the Cancel button to leave the record unchanged.
List All Templates
Clicking this button displays all templates in a table view. You may click on any column header to re-sort the display.
Assign Participants To Batch
The Assign Participants To Batch function lets you associate participants with templates, bringing together the definitions created earlier. Each ACH transaction includes a reference to the participant, how the account is affected, and the amount.
To display the Assign Participants To Batch screen:
Rest your cursor on the Payments & Transfers main menu and then select the Assign Participants to Batch option under the ACH Processing menu group. The Assign Participants To Batch screen appears.

Commercial Customer Platform 5.5 User Guide
156
1. From the Template Name drop-down list, select the template that you want to modify. The template’s complete information is displayed in the table. You can sort the table by clicking the up or down arrows in the column headers.
2. Check the box in the Select column adjacent to the participant you want to add to the template.
3. You can click the Reset button at any time to reset all fields to their previously saved values.
4. Click the Update button to save your selections.
Tip: Use the Select All check box to select or deselect all participants quickly.
Reverse ACH Transaction
The Reverse ACH Transaction function lets you submit a request to cancel out a previously-submitted ACH transaction . You cannot directly nullify a transaction into the ACH system, so what this function actually does is to generate an email message to the financial institution.
To access the Reverse ACH Transaction feature:
Rest your cursor on the Payments & Transfers main menu option and then select the Reverse ACH Transaction option under the ACH Processing menu group. The Reverse ACH Transaction screen appears.
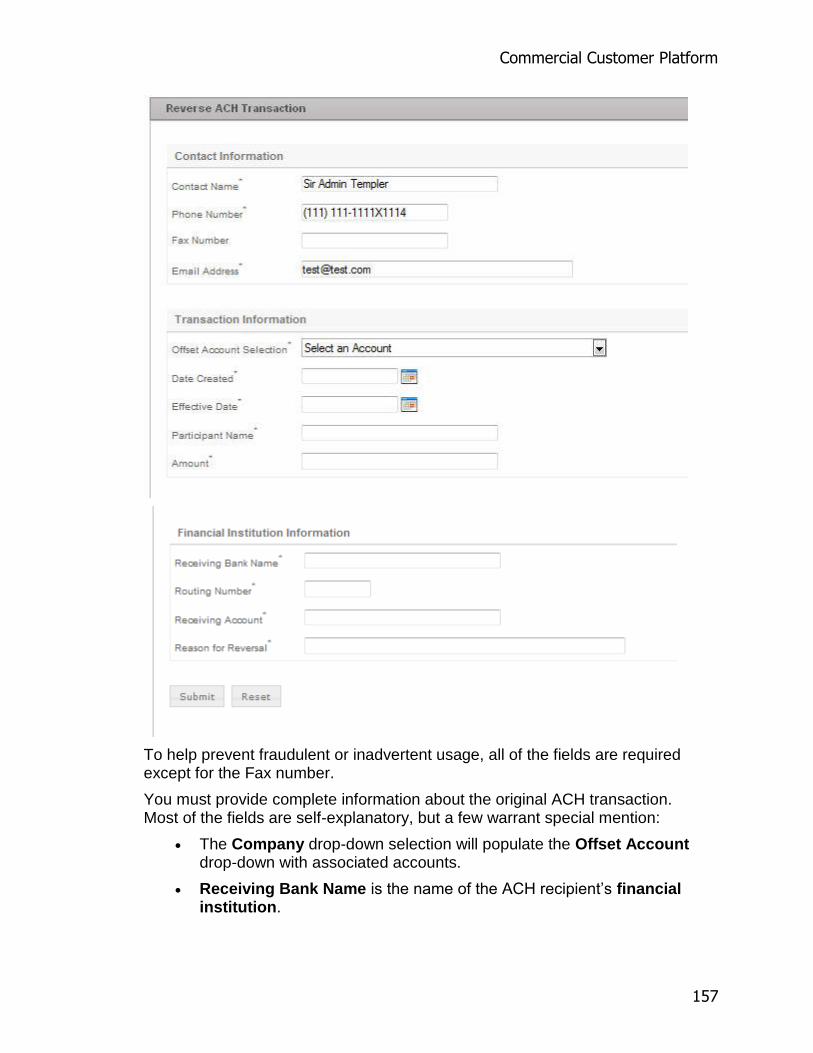
Commercial Customer Platform
157
To help prevent fraudulent or inadvertent usage, all of the fields are required except for the Fax number.
You must provide complete information about the original ACH transaction. Most of the fields are self-explanatory, but a few warrant special mention:
The Company drop-down selection will populate the Offset Account drop-down with associated accounts.
Receiving Bank Name is the name of the ACH recipient’s financial institution.

Commercial Customer Platform 5.5 User Guide
158
Routing Number is the routing (ABA) number of the ACH recipient’s financial institution.
Fill out all of the fields and click the Submit button to send the request to your financial institution.
Federal Tax Payments
Add Federal Tax Payments
Many businesses are required to use Electronic Federal Tax Payment System (EFTPS ) as the method to submit their tax payments.
Our system provides tools that let you manage your EFTPS usage in much the same way that you manage ACH and Wire Transfer usage.
The Federal Tax Payments service lets you create a payment file that can be submitted to your financial institution.
To Create a Federal Tax Payment:
Rest the cursor on the Payments & Transfers main menu and select the Add Tax Payment option under the Federal Tax Payments group. The Add Federal Tax Payment screen appears.

Commercial Customer Platform
159
Depending on the Tax Type selected, the necessary amount fields will display.
1. Select the Company from the drop-down menu to populate the Debit Account field with associated accounts.
2. Select the Taxpayer Name - Tax ID (Tax Identification Number) you want to pay.
3. Select the Debit Account from the drop-down list.

Commercial Customer Platform 5.5 User Guide
160
4. Enter the Tax Payment Effective Date, using mm/dd/yyyy format or select from the calendar icon.
5. (Optional) Check the Create Offset Transaction box if you want the EFTPS file to be balanced. If your financial institution requires balanced transactions, this box will not appear and an offset transaction will automatically be created.
6. Use the month and date drop-down menus to select the Tax Period Ending Date.
7. Use the Tax Type drop-down list to select the tax to which this payment applies.
If you selected Form 720 – Quarterly Excise Tax from the Tax Type drop-down list, select the Excise Tax Type.
8. Enter the Tax Amount. Some forms require specific additional information; if this is the case, those entry fields will display.
Form 941: Requires Social Security Amount; Medicare Amount; Withholding Amount
Form CT-1: Requires FICA Amount; Industry Amount; Supplemental Amount (the three fields should equal the total tax payment amount.)
9. Click the Add button to submit the payment.
Note: If a Token Challenge is enabled for Tax Payments, and Approval is not required, upon selecting the add action you will be asked to enter a Security Code on the Add Federal Tax Payment Review screen.
Federal Tax Payment Activity
The Federal Tax Payment Activity (EFTPS) function lets you review recent and pending Federal Tax Payment activity. Tax payments have a Pending status while they are awaiting administrator approval.
To display the Federal Tax Payment Activity screen:
Rest your cursor on the Payments & Transfers main menu option and select the View Tax Payments option from the Federal Tax Payments group. The Federal Tax Payment Activity screen appears.

Commercial Customer Platform
161
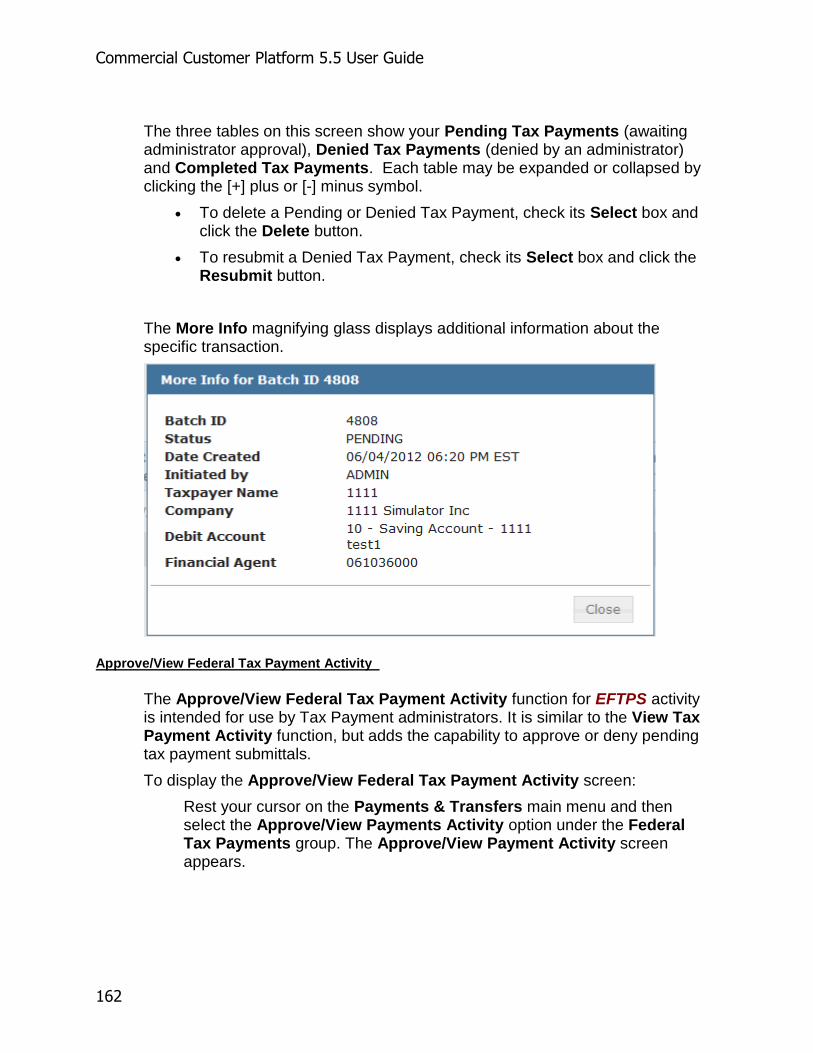
Commercial Customer Platform 5.5 User Guide
162
The three tables on this screen show your Pending Tax Payments (awaiting administrator approval), Denied Tax Payments (denied by an administrator) and Completed Tax Payments. Each table may be expanded or collapsed by clicking the [+] plus or [-] minus symbol.
To delete a Pending or Denied Tax Payment, check its Select box and click the Delete button.
To resubmit a Denied Tax Payment, check its Select box and click the Resubmit button.
The More Info magnifying glass displays additional information about the specific transaction.
Approve/View Federal Tax Payment Activity
The Approve/View Federal Tax Payment Activity function for EFTPS activity is intended for use by Tax Payment administrators. It is similar to the View Tax Payment Activity function, but adds the capability to approve or deny pending tax payment submittals.
To display the Approve/View Federal Tax Payment Activity screen:
Rest your cursor on the Payments & Transfers main menu and then select the Approve/View Payments Activity option under the Federal Tax Payments group. The Approve/View Payment Activity screen appears.

Commercial Customer Platform
163
1. To approve a pending Tax Payment submittal, check its Select box and click the Approve button.
2. You can click the magnifying glass icon under the More Info column to see more information related to the tax payment.
3. To delete a pending Tax Payments submittal, check its Select box and click the Delete button.
4. To deny a pending Tax Payments submittal, check its Select box, fill in the Deny message and click the Deny button.
Note: If Token Challenge is enabled for Tax Payments, and Approval is required, upon selecting the approve action you will be asked to enter a Security Code on the Approve/View Federal Tax Payment Review screen.
Bill Pay
Bill Pay This service is documented separately within the Bill Pay Online Help.
Sweeps
Manage Sweeps
The Manage Sweeps function provides the ability to set up automated sweeps on accounts, to keep their balances within certain limits. When a limit is

Commercial Customer Platform 5.5 User Guide
164
reached, the system transfers money between the specified accounts (just enough to bring the monitored account back to the threshold amount) and sends an email message to indicate the activity.
The Manage Sweeps function operates by running an automated program up to five times a day. The financial institution can define the times the sweeps will occur. If no sweeps are defined by the financial institution, the default times are 4:00am and 12:00pm. The program checks all account balances against the sweep definitions and the online banking system; it then initiates transfers as needed. (The balance-checking program is the same one used for Balance Alerts.)
To display the Manage Sweeps screen, from the Payments & Transfers menu, select the Manage Sweeps option under the Account Transfer group.
A Company drop down will be available on the page. Each company selection will update the Account to Check and Account to Adjust drop-down lists with accounts that are associated with that company. Only accounts that you have permission to access will appear. By default, the primary company will appear first in the Company drop-down menu. Any additional companies will be listed after in alphabetical order. Please note that sweeps cannot be made across multiple companies. Sweeps can only be initiated inter-company. Manage Sweeps supports Saving, Checking, and Line of Credit account types. Line of Credit accounts can be used as the account to adjust ONLY, and NOT the account to check.
Note: If the available balance of the account to adjust is not sufficient to support the entire amount of the transfer, the system will not perform the transfer. No funds will be transferred.
The Current Sweep(s) section shows all sweeps currently in effect for the selected company. You can add new sweep definitions, edit the existing definitions or delete definitions.
Commercial Customer Platform
165
Note: Be careful when defining "Rises Above" sweeps! It is possible to create a recurring loop if an account’s balance is right around the threshold amount. If the account receives interest payments or other additions daily, it may exceed the threshold daily and be swept daily as well. Such activity is not beneficial and may require administrative attention.
Add a Sweep Definition
To add a new sweep definition, fill out the fields in the Add A Sweep section of the screen.
1. Select the Company that you would like to create a sweep for. Each company selection will update the Account to Check and Account to Adjust drop down menus with accounts that are associated with that company.
2. Select an account from the Account to Check drop-down list. This is the account that will be monitored against the threshold value specified in the Threshold/Target Amount field.
3. Select a condition from the Condition drop-down list. If you choose Rises Above, the monitored account will have money swept out if its balance exceeds the threshold. If you choose Falls Below, the monitored account will have money swept in if its balance drops below the threshold.
4. Specify the threshold amount in the Threshold/Target Amount field.
5. Select an account from the Account to Adjust drop-down list. This account will receive money swept from the monitored account for Rises Above sweeps, and will contribute money to the monitored account for Falls Below sweeps.
Note: Line of Credit accounts can be used as the account to adjust ONLY, and NOT the account to check.
6. Enter the Email Address of the person who is to be notified when this sweep occurs.
7. Click the Add button.
Note: Failure notifications for Sweeps will be sent each time a scheduled or recurring transfer is run where the Sweep condition has been met but the system was unable to process the adjustment. Sweeps support Savings, Checking and Line of Credit account types
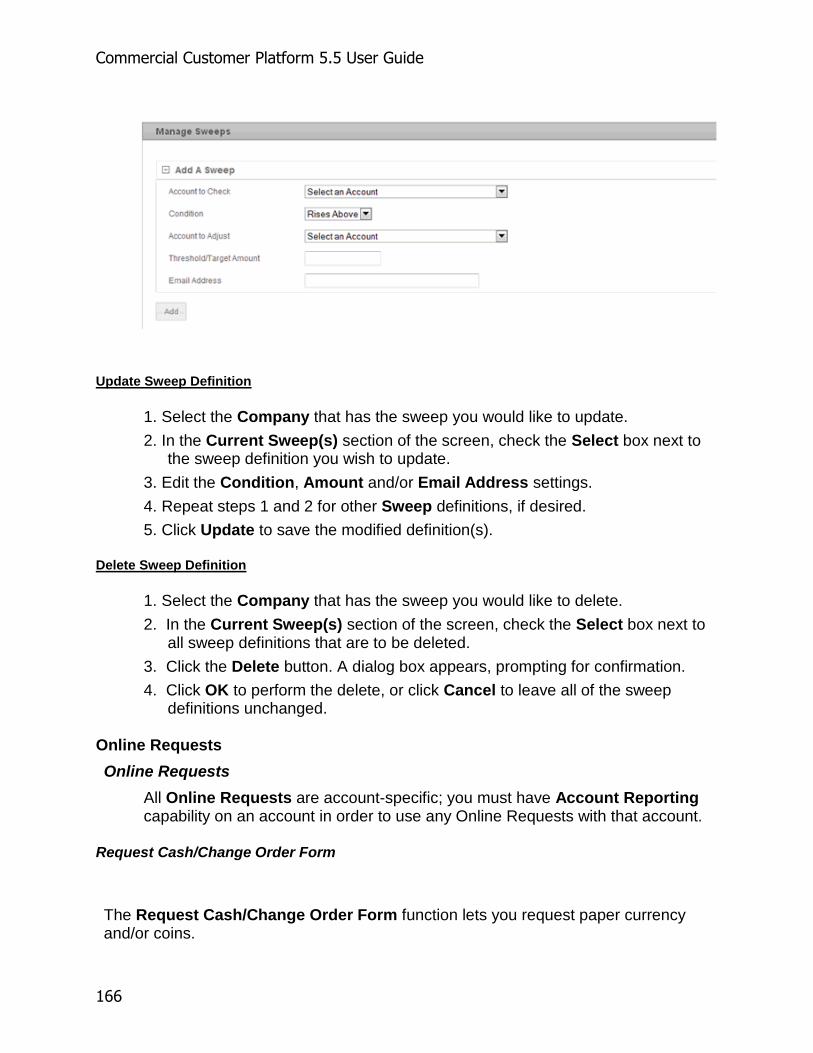
Commercial Customer Platform 5.5 User Guide
166
Update Sweep Definition
1. Select the Company that has the sweep you would like to update.
2. In the Current Sweep(s) section of the screen, check the Select box next to the sweep definition you wish to update.
3. Edit the Condition, Amount and/or Email Address settings.
4. Repeat steps 1 and 2 for other Sweep definitions, if desired.
5. Click Update to save the modified definition(s).
Delete Sweep Definition
1. Select the Company that has the sweep you would like to delete.
2. In the Current Sweep(s) section of the screen, check the Select box next to all sweep definitions that are to be deleted.
3. Click the Delete button. A dialog box appears, prompting for confirmation.
4. Click OK to perform the delete, or click Cancel to leave all of the sweep definitions unchanged.
Online Requests
Online Requests
All Online Requests are account-specific; you must have Account Reporting capability on an account in order to use any Online Requests with that account.
Request Cash/Change Order Form
The Request Cash/Change Order Form function lets you request paper currency and/or coins.

Commercial Customer Platform
167
To display the Request Cash/Change Order Form screen:
Rest the cursor on the Online Requests option and click Request Cash/Change Order. The Request Cash/Change Order Form screen appears.
Commercial Customer Platform 5.5 User Guide
168
1. The upper section of the form identifies the person the financial institution should contact if they have any questions regarding the request. Review the Contact Name, Phone Number and Email Address, you may change them if necessary. Enter a Fax number if
2. Select an account from the Account drop-down list. Accounts are populated based on the Company selected. This account will be debited for the amount of cash requested (Grand Total).
3. Fill in the desired number or units for each type of paper currency and coin. The Total fields and Grand Total field are updated automatically to show the dollar value of the requested cash.
4. Click the Submit button. A dialog box appears with a recap of the information to be sent to the financial institution; click OK to submit the request or click Cancel to return to the Request Cash/Change Order Form screen.
Reorder Checks
The Reorder Check function lets you place online orders for checks to be delivered to you directly or picked up at your financial institution branch location.
To display the Reorder Checks screen, select the Reorder Checks option under the Forms group within the Online Requests menu.
1. The upper section of the form identifies the person the financial institution should contact if they have any questions regarding the order. Review the Contact Name, Contact Phone and Email Address for accuracy. You may change these if necessary.
2. From the Account Number drop-down list, select the account to which the request pertains. Accounts are populated based on the Company selected.
3. The Quantity/Units allows you to choose Checks or Boxes and enter the number of units you wish to order. (Note: Your financial institution may have set a minimum order size.)
4. You may specify a Starting Check Number or check the Continue sequence from last order box to have the new checks numbered consecutively from the end of the previous order.
5. Select the Delivery Information radio button for your preferred delivery method. The financial institution can send the checks to the account branch for pickup or mail them directly to you.
6. When you are finished with your order, click the Submit button. A dialog box appears with a recap of the information to be sent to your financial institution. Click OK to submit the request or click Cancel to return to the Reorder Check screen. The Reset button can be used to clear entered information and reset the page to its default settings.
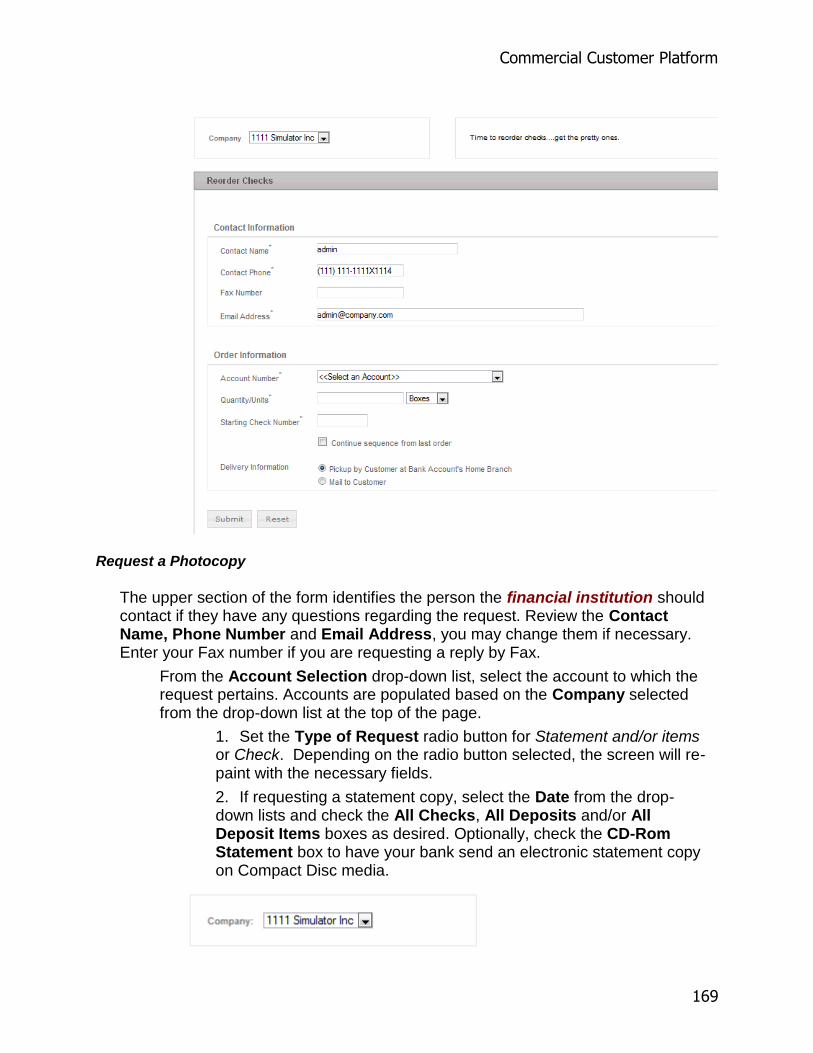
Commercial Customer Platform
169
Request a Photocopy
The upper section of the form identifies the person the financial institution should contact if they have any questions regarding the request. Review the Contact Name, Phone Number and Email Address, you may change them if necessary. Enter your Fax number if you are requesting a reply by Fax.
From the Account Selection drop-down list, select the account to which the request pertains. Accounts are populated based on the Company selected from the drop-down list at the top of the page.
1. Set the Type of Request radio button for Statement and/or items or Check. Depending on the radio button selected, the screen will re-paint with the necessary fields.
2. If requesting a statement copy, select the Date from the drop-down lists and check the All Checks, All Deposits and/or All Deposit Items boxes as desired. Optionally, check the CD-Rom Statement box to have your bank send an electronic statement copy on Compact Disc media.
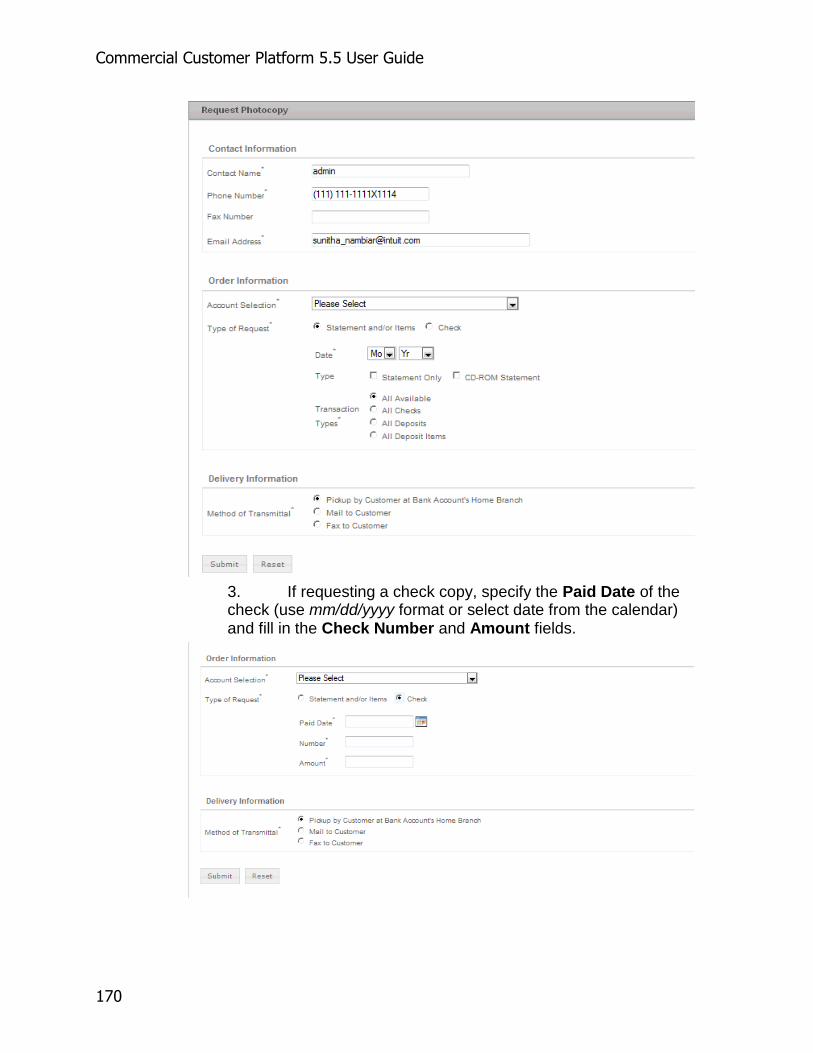
Commercial Customer Platform 5.5 User Guide
170
3. If requesting a check copy, specify the Paid Date of the check (use mm/dd/yyyy format or select date from the calendar) and fill in the Check Number and Amount fields.

Commercial Customer Platform
171
4. Set the Delivery Information radio button for delivery method. The financial institution can send the copy to the account branch for pickup, mail the copy directly to you or FAX it directly to you.
5. Click the Submit button. A dialog box appears with a recap of the information to be sent to the financial institution; click OK to submit the request or click Cancel to return to the Request Photocopy screen.
Request Account Research
To display the Request Account Research screen:
Rest the cursor on the Online Requests option and click the Request Account Research option under the Forms group. The Request Account Research screen appears.
This form is designed to allow one specific research request per submission. The contact information is always required; beyond that, fill in whichever fields are relevant to your research needs.
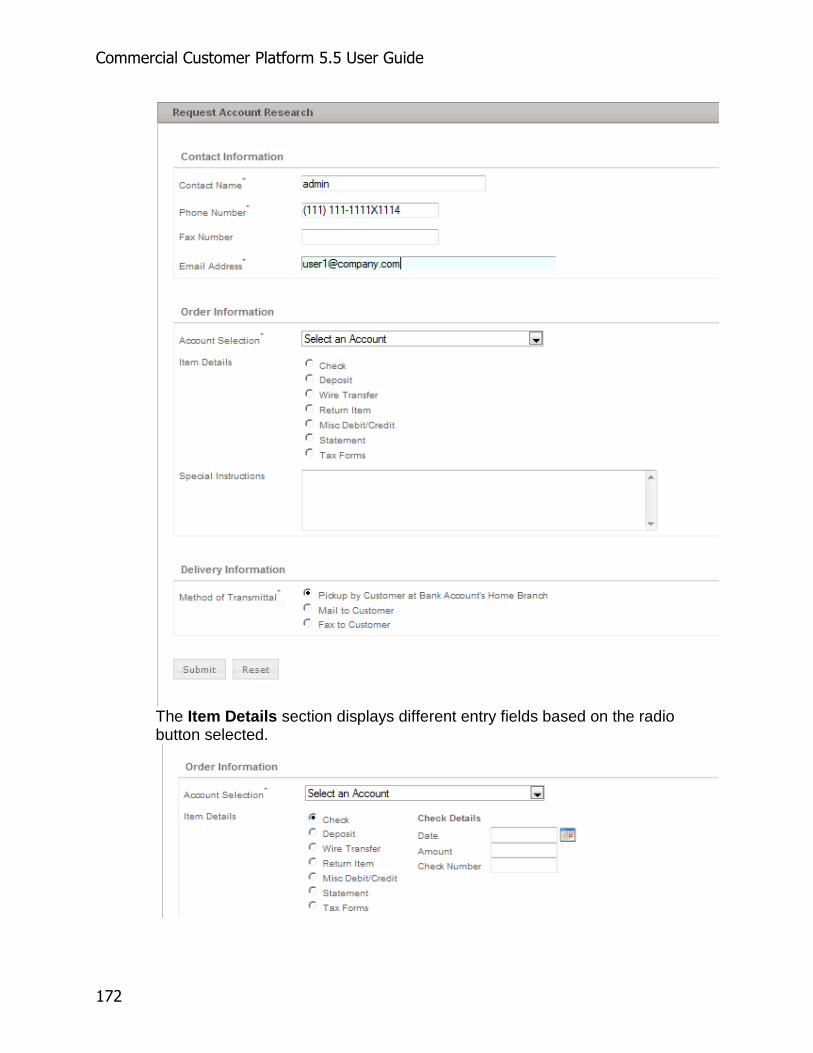
Commercial Customer Platform 5.5 User Guide
172
The Item Details section displays different entry fields based on the radio button selected.
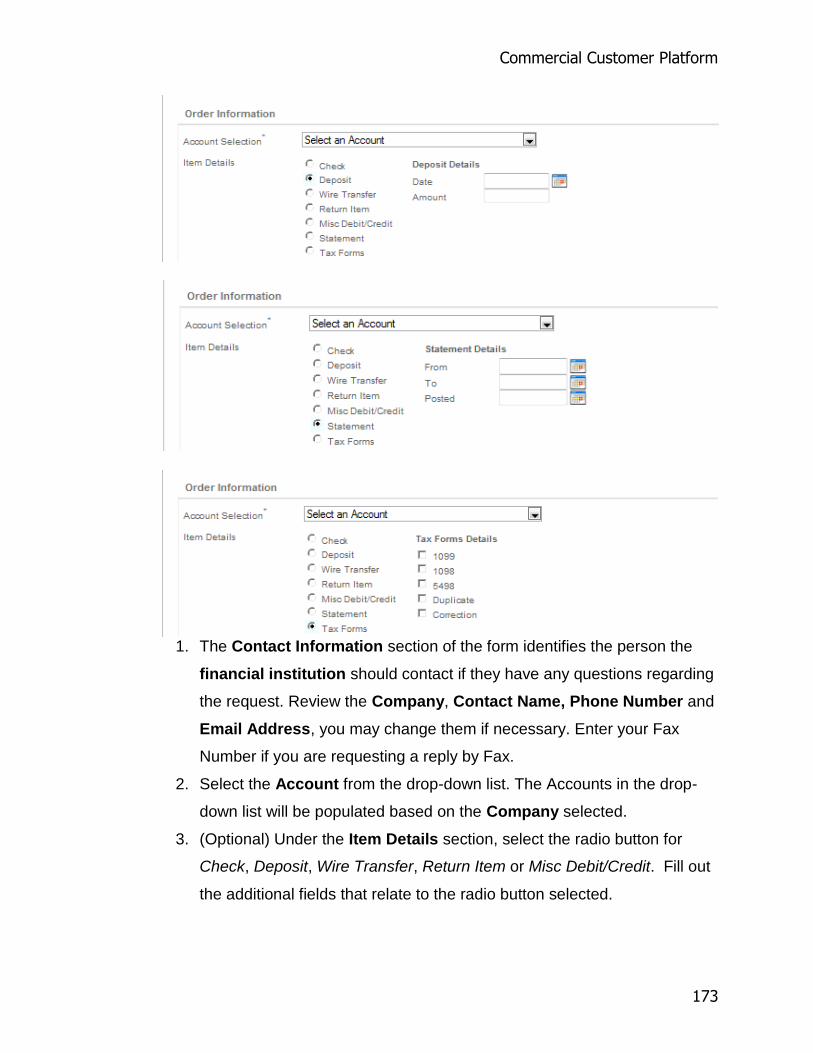
Commercial Customer Platform
173
1. The Contact Information section of the form identifies the person the
financial institution should contact if they have any questions regarding
the request. Review the Company, Contact Name, Phone Number and
Email Address, you may change them if necessary. Enter your Fax
Number if you are requesting a reply by Fax.
2. Select the Account from the drop-down list. The Accounts in the drop-
down list will be populated based on the Company selected.
3. (Optional) Under the Item Details section, select the radio button for
Check, Deposit, Wire Transfer, Return Item or Misc Debit/Credit. Fill out
the additional fields that relate to the radio button selected.

Commercial Customer Platform 5.5 User Guide
174
4. (Optional) If requesting a statement, fill in the From, To and Posted
dates (using mm/dd/yyyy format).
5. (Optional) If requesting tax forms, check the Tax Forms box and check
the 1099, 5498, 1098, Duplicate and/or Correction boxes as
appropriate.
6. (Optional) Add freeform text in the Special Instructions area, if desired.
Be as specific as possible to help the financial institution give the best
service.
7. Set the Delivery Information radio button for delivery method. The
financial institution can send the materials to the account branch for
pickup, mail them directly to you or FAX them directly to you.
8. Click the Submit button. A dialog box appears with a recap of the
information to be sent to the financial institution; click OK to submit the
request or click Cancel to return to the Request Account Research
screen.
Request Bill Pay Research
The Bill Pay Research function lets you request account documents to be delivered via a choice of methods.
To display the Bill Pay Research screen:
Rest the cursor on the Online Services option and click the Request Bill Pay Research option under the Forms group. The Request Bill Pay Research screen displays.

Commercial Customer Platform
175
1. The upper section of the form identifies the person the financial institution should contact if they have any questions regarding the request. Review the Contact Name, Company Name, Contact Phone and Email Address, you may change them if necessary. Enter your Fax number if you are requesting a reply by Fax.
2. In the Account Information section, select the account from the Account Selection drop-down list and fill in the Payment Date, Amount and Payee fields.
3. Set the Delivery Information radio button for delivery method. The financial institution can send the materials to the account branch for pickup, mail them directly to you or FAX them directly to you.
4. (Optional) Add freeform text in the Special Instructions area, if desired. Be as specific as possible to help the financial institution give the best service.
5. Click the Submit button. A dialog box appears with a recap of the information to be sent to the financial institution; click OK to submit the request or click Cancel to return to the Request Bill Pay Research screen.

Commercial Customer Platform 5.5 User Guide
176
Suppress Paper Statements
The Suppress Paper Statements function lets you request to have your paper statements turned off from printing and being mailed to you. Your request will be sent to your financial institution. To display the Suppress Paper Statement screen:
Rest the cursor on the Online Requests option and click the Suppress Paper Statements option under the Forms group. The Suppress Paper Statements screen displays.
Note: Only the Company Administrator, established by your financial institution when your Company was added, will have the ability to access this service and submit a request to the financial institution.

Commercial Customer Platform
177
1. Enter the Contact Information, this will allow your financial institution to more efficiently reply to your request. A Originating

Commercial Customer Platform 5.5 User Guide
178
Contact, Phone Number and Email Address are all required, you may update them if necessary. Enter your Fax number if you are requesting a reply by Fax in the subject or message sections of this screen. Click the Reset button at any time to clear the fields and start over.
2. Select the Preferred Method of Contact.
3. Enter the Subject line if you are including a message to your financial institution related to your request. The subject and message fields are optional.
4. In the Available Accounts section, select the accounts for which you would like to stop receiving paper statements. You may also use the select all check box to select all accounts.
5. Click the Submit button. A confirmation screen appears with a recap of the information sent to the financial institution.
The Email function is used as a direct link between you and your financial institution.
To display the Email screen, click the Email menu option at the top right of the page. The Email screen displays.
1. The Originating Contact, Company Name, Phone Number and Email Address fields are pre-filled. You may change them if necessary.
2. If you prefer to be contacted by Fax, enter your Fax number and then select the Fax Number option under the Preferred Method of Contact.
3. The Preferred Method of Contact will default to Phone Number. If you prefer Email or Fax, be sure to change the selection here.
4. Enter the subject line of the email. (Limit 40 characters.)
5. In the Message field, enter the text of the email.
6. Click the Submit button to send the email message to your financial institution. A confirmation screen displays to let you know that your email message was sent.
7. Click the Reset button at any time to clear the information you have entered.

Commercial Customer Platform
179

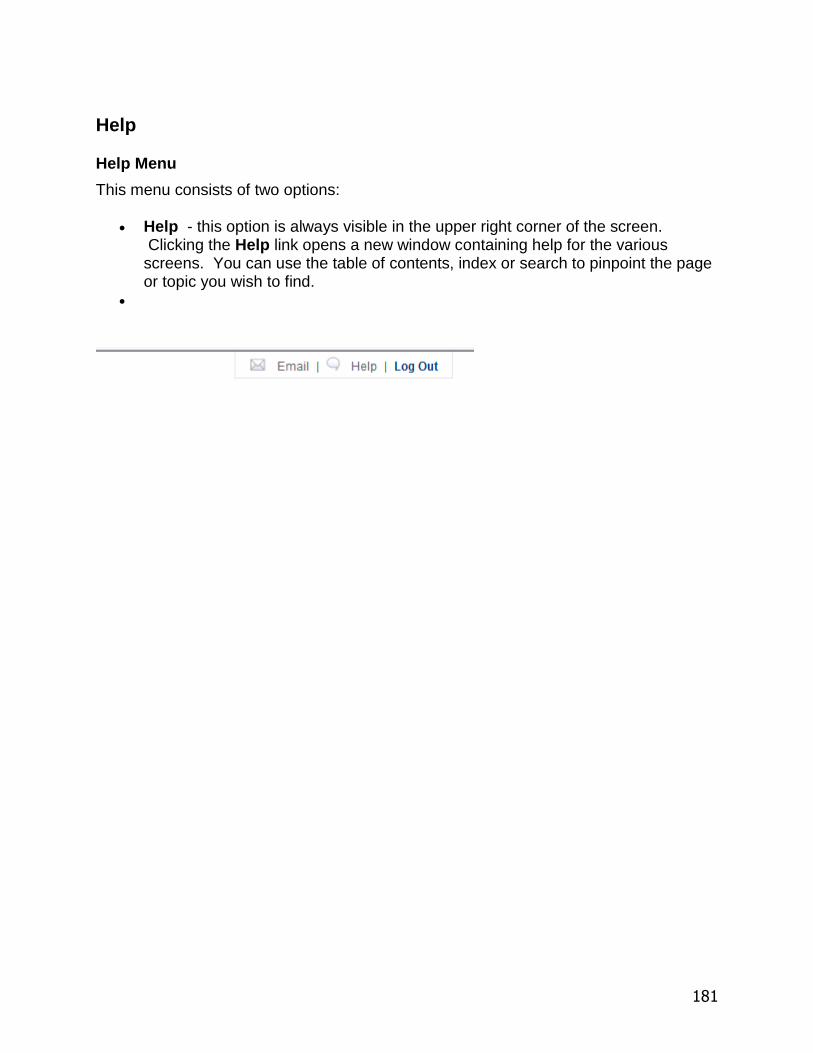
181
Help
Help Menu
This menu consists of two options:
Help - this option is always visible in the upper right corner of the screen. Clicking the Help link opens a new window containing help for the various screens. You can use the table of contents, index or search to pinpoint the page or topic you wish to find.


183
Frequently Asked Questions
Internet Browser Errors
Q. What do the Internet browser Error Messages mean?
The following list defines common browser Error Messages:
403 Forbidden/Access Denied (Connection Refused by Host) - The Web site you requested requires special access permission.
404 Not Found - The browser could not find the specific document that you requested on the host computer. To resolve this error, check the Uniform Resource Locator (URL) syntax (some URLs are case sensitive). In addition, the page may have been removed, had its name changed, or have been moved to a new location.
Bad File Request - The form or the Hypertext Markup Language (HTML) code for an online form has an error.
Failed DNS Lookup - The Web site's URL could not be translated into a valid Internet protocol (IP) address. This error is common on commercial sites because the computers responsible for translating the IP addresses are overloaded. Try again later when there may be less Internet traffic. This can also be caused by a URL syntax error (the URL has incorrect format).
File Contains no Data - The browser found the site, but nothing in the specific file. There is a possible "packet loss" on the internet route to the server.
Helper Application not Found - You have attempted to download a file that needs a helper program, and your browser cannot find the program. On the browser's preferences or options menu, make sure the correct directory and file name are entered for the helper program. If you do not have a helper program, save the file to disk and obtain the helper program.
Not Found - The link no longer exists.
Site Unavailable - Too many users are trying to access the site, the site is down for maintenance, there is noise on the line, or the site no longer exists. This can also be caused by a user URL syntax error.
TCP Error Encountered While Sending Request to Server - This error is caused by erroneous data on the line between you and the requested site. This may be hardware related. Report the error to your network administrator and try again later.
Unable to Locate Host - The URL did not return anything, the site is unavailable, or the Internet connection was dropped. Check the hardware connections and URL syntax.
Customer Platform - General
Q. What is the difference between a Super User and an Administrative User on the Customer Platform?
A Super User is set up for the financial institution at the time the Company profile is established. This user has access to all functionality as well as the ability to set up subsequent users with equal or lesser functionality. The Super User sets up Administrative Users; functionality will be limited as defined by the Super User.
Q. Why can’t company administrators see all of the users of the company?

Commercial Customer Platform 5.5 User Guide
184
The company Super User Administrators (created by the financial institution) are the only end users that can see ALL users of that company. The Company Admin may assign other subordinate users to also be Administrators (to add additional users, do Activity Reporting etc.) however a subordinate user who is also an Administrator will only be able to see and modify permissions for users who are not Administrators of any kind. Only the Company Super User Administrator can make another user an Administrator. In the Administrative Platform, all references to cut off times for ACH and wires are in Pacific time. Plans are not known for accommodating other time zones.
Q. Does login information include any "personal" info such as name, account number, social security number, etc.?
No. The financial institution defines the Company ID, and no personal information is required by Business Banking to log in.
Q. What are the requirements for the User Password?
Passwords are usually 6-16 characters and may include letters or numbers. Special password characteristics may be imposed by the financial institution to provide a greater degree of security. These requirements may include minimum and maximum length, upper and lower case alpha characters, numeric, or special characters (e.g. “!” “@” “#” etc.). Password requirements are determined by your financial institution.
Q. After the maximum number of failed login attempts, what message does the end user receive?
The message instructs the users to contact their financial institution. The financial institution determines the maximum number of failed login attempts that are allowed.
Q. Who can reset passwords?
A financial institution Administrator can reset the Company password in the Customer Maintenance area. The Company Administrator can change the Company Password or an End User Password.
Q. How do the Account Descriptions work and how many characters are allowed?
Changing the account description (nickname) will rename the account everywhere it appears in the product, including the dropdown boxes for transactions. The user can enter up to 32 characters for the account description.
Q. What does the term “Float” mean?
Float refers to the time interval, or delay, between the start and completion of a specific phase or process (check or electronic deposits, clearings etc.) that occurs along the cash flow timeline.
Q. What is the difference between how end users with batch processing create a report and customers with online processing create a report?
Batch end users cannot sort transactions by transaction type because the host (batch database) is not providing transaction codes. For these financial institutions, there are only debits and credits. Online customers can sort by multiple transaction types because the DATA PROCESSING VENDORS provide that information.
Q. In Online Services --> Photocopy Request, can the option for CD-ROM Statement be removed from the form?
Currently, this is not configurable so it cannot be removed from the form.
Q. What Personal Financial Management software packages can be used with the online business banking system?
QuickBooks - Current year plus 2 earlier versions
Quicken - Current year plus 2 earlier versions

Frequently Asked Questions
185
Microsoft Money - Support for MS Money was discontinued in January 2011. Microsoft announced plans to release versions of Money Plus Deluxe and Money Plus Home & Business that will not require online activation. This version will allow you to keep your Money files and transactional history, but will not allow access to online services or premium services.
Comma Delimited
HTML
Q. Does the online business banking product use cookies?
Yes, non - persistent cookies (also called session cookies). That means that cookie information is not permanently stored on the end user's computer. If the multifactor authentication feature is enabled for the customer, a persistent cookie is stored to identify the computer at login.
Stop Payments
Q. What is the difference between Stop Payments for Batch clients and Stop Payments for Real-Time (Online) clients?
When an end user submits a stop payment at a financial institution that has online processing, the stop payment is processed immediately through the DATA PROCESSING VENDOR. If the financial institution has batch or hybrid processing, the stop payment request is in the form of an email sent to the financial institution. The financial institution then manually processes the stop payment.
Q. Do all Online Data Processing Vendors (DATA PROCESSING VENDORS) support online Stop Pays?
No, the functionality is DATA PROCESSING VENDOR dependent.
Limits and Approvals
Q. How do Limits and Approval functions work?
For the ACH, Wire Transfer and Tax Payments features, the system allows the financial institution to modify behavior for each Customer. By default, approval is not required for wire transfers, ACH batch or tax payments, as long as their dollar amounts do not exceed the initiating user’s per-transaction/batch limit and the user’s daily running total (including the new transaction or batch) is still below his/her daily limit. The online banking system does not, by default, require approval on Wire Transfer Template creation or update; new or modified templates may be used immediately under the default rules.
The online banking system does require approval on any wire transfer, ACH batch or tax payment that exceeds the user’s per-transaction/batch limit. The system similarly requires approval on any wire transfer, ACH batch or tax payment that would push the user’s daily running total over his/her daily limit. In addition, the company daily limit is strictly enforced and cannot be waived or defeated by any mechanism built into the system – if a company needs to exceed its daily limit, a company representative must contact the financial institution and make special arrangements.
Q. When setting up a customer, are daily limits required for ACH, wires, and EFTPS ?
Yes, if that functionality is being granted by the financial institution to the Company.
Q. Why would a company admin receive two emails notifying that there is an ACH to approve?
If the financial institution selected both “Require Approval” and “Require Approval by Other User”, an email will be sent out for each condition. That is, when an ACH is submitted, the system will recognize that the ACH transaction needs to be approved as well as needs to be approved by another user and will send an email for each.
Q. What does the Restrict function do?

Commercial Customer Platform 5.5 User Guide
186
If the “Restrict Initiation if User Limits are Exceeded” box is checked, no transactions exceeding transfer limits can be initiated. This applies to per-transaction limits as well as daily limits.
ACH/File Processing
Q. What is an unbalanced ACH file?
An unbalanced file is created when a financial institution allows its customer to create ACH files that do not have an offsetting entry that automatically credits/debits the customer’s offset account for the debit and/or credit transactions on the file.
It could be all credits, all debits or a mixture of debits and credits that probably do not balance. The financial institution makes manual entries to credit/debit the customer’s account for the activity.
If your FI has required that you prefund ACH Activity, you will be required to submit unbalanced batches via Initiate Batch and Send ACH File.
Q. What is the difference between a balanced and an unbalanced ACH file?
Balanced files contain an offsetting entry that automatically credits/debits the customer’s offset account for the debit and/or credit transactions on the file.
financial institutions who allow unbalanced files may not get offsetting transactions in their ACH files, and may have to makes manual entries to credit/debit the customer’s account for the activity.
Most financial institutions require balanced files since the files are self-posting, manual entry mistakes are eliminated and, if the file is in balance, no transactions are missing
If the Allow Unbalanced Files option is selected in Customer Maintenance, when the user creates a template they will have the option to bypass selecting an account. If one is not selected, the Batch will be listed without an offset throughout the Business Banking/ACH module. If this option is NOT selected, the user MUST select an account from the list when creating a Batch Template .
Note: It is not the relationship of credit and debit transactions that has anything to do with a balanced file. If there are one or more credit transactions in the file, an offset debit is created to charge the customer’s offset account for them. If there are one or more debit transactions in the file, an offset credit is created to credit the customer’s offset account for them.
In a balanced file the offset is not a single net entry. If there are debits, there is a credit offset. If there are credits, there is a debit offset. They are mutually exclusive.
Q. What is the difference between Send a file and Importing a file?
Importing and Send ACH File both involve customers who use financial software to create batch information. When a customer Uploads an ACH file, they are actually “giving” Business Banking a file in NACHA format that the financial institution can then download and process. If a customer Imports a file, they are simply importing the participant information from their PC. Business Banking will actually create the NACHA formatted file when/if transactions are initiated and they will be based on the Imported information
Q. Does the financial institution have to approve all batches?
If the financial institution has Online Processing, all wire and ACH batches must be approved in order to be processed. If the financial institution has batch processing, the financial institution only needs to approve the batch if they are downloading the files and processing them themselves. Note: Uploaded batches are automatically considered “Approved.”
Q. What if the end user doesn’t see any accounts in the “Offset Account” Field?

Frequently Asked Questions
187
If the financial institution is allowing unbalanced files, this would cause the absence of the offset account in the Offset Account field. If the financial institution requires balanced files and accounts still are not listed in the "Offset Account" field, the financial institution should try selecting Refresh Account in Maintenance>>Customer Maintenance. This will request a new listing of accounts available from the host. If the accounts are still not visible, contact Digital Insight Customer Service.
Q. Does the ACH function check funds availability?
No, it does not check for funds availability.
Q. Do ACH and Wire debits memo post to the account at the time of initiation?
Business Banking does not memo post the offsetting transactions upon initiation. The accounts do not reflect the transactions until they have been posted to the account by the host. Unlike ACH, Wires offsetting transactions need to be manually posted by the financial institution. Business Banking does not automatically create the offsetting transaction.
When processing files on the financial institution Admin Platform, why is there a status field that shows "Approved". Obviously the file was approved by the customer to able get to the Administrative Platform.
Wires, ACH, and Tax Payment files can have five statuses: "Pending", "Denied", "Deleted", "Approved", and "Downloaded". To remain consistent throughout the application the status is always displayed.
Q. How long will files and transactions appear in “Show Backup”?
The Show Backup area of File Processing for ACH, Wires, Tax Payments and Uploaded ACH files will show the last 10 days worth of transactions.
Q. Does a file display in the Customer Platform indefinitely until it is approved or denied by the financial institution?
Unprocessed batches remain in the system indefinitely. Processed batches roll off after 10 days.
Q. How do effective dates for ACH credit and debits work?
Business Banking does not allow same day effective dates because you cannot create a same day ACH. According to NACHA rules, debits can be effective one day and credits two days in the future.
Q. How many days does it take for an ACH to post?
This is dependent on how the financial institution processes their ACH transactions. If a financial institution wants to exceed the NACHA limits on effective dates (one day for debits, two days for credits) they would need to have a system that could warehouse those items on their behalf. This is accomplished either through their DATA PROCESSING VENDOR or a third party software package.
Q. Can a batch contain files with different effective dates?
Yes.
Q. How does the ACH import function affect participants and batch templates?
Import ACH files allows companies to create participant data based on any already existing NACHA formatted file. It prevents them from having to re-key information if they already have a file from either their previous Business Banking system or any existing accounts payable/payroll system.
Q. When a customer submits ACHs, Wires, and EFTPSs, does the financial institution have to debit the account themselves or does our software send this directly to the Data Processing Vendor?

Commercial Customer Platform 5.5 User Guide
188
As long as the financial institution requires balanced files, then for ACH/ EFTPS the application creates offsetting transactions. Wire transfers currently do not have the option of creating offset transactions unless the financial institution has a product called MTS which is middleware between Business Banking/their DATA PROCESSING VENDOR and FedLine.
Q. Why are PPD and CCD options in the dropdown menu in Batch template Maintenance but not PPD+ and CCD+? Does Business Banking support these class codes?
Yes. The “plus” in PPD and CCD refers to the addenda record and when the user enters information in the Addenda field, the class code will become CCD+ or PPD+.
Q. Does Business Banking support the CTX class code?
No. CTX is a class code that accommodates 9999 lines of addenda and is used by large corporate customers. The Business Banking system does not support it at this time.
Q. Where does the batch ID come from?
The batch ID is generated by Business Banking.
Q. Does the ACH reversal function automatically reverse an ACH?
No, it merely sends an e-mail to the financial institution and the financial institution must perform the reversal.
Q. Where does the financial institution establish cutoff times for ACH and Wire Transfers?
The financial institution sets the time under the ACH and Wire transfer sections of Policies. Remember that these times are currently set to Pacific Standard Time so financial institutions in time zones other than PST must enter the cutoffs accordingly.
If you are required to prefund your ACH activity, your cutoff time may be earlier than the standard ACH cutoff time. If you are unsure, please contact your FI Administrator.
Wires
Q. Some financial institutions use a Wire Transfer system called QUICKWIRE to interface and post WIRES to their CORE AS400. Does Business Banking interface with QUICKWIRE if it is in a particular format such as NACHA or Fed Wire format?
Wire download files created by Business Banking are in a Fed Wire file format, which is compatible with most wire processing systems. Interfaces are also available to BankServ and Fundtech
Q. What is the difference between Receiving bank and Intermediary bank in wire templates?
The receiving bank is the financial institution to which the originator 's bank sends the wire. Usually, the receiving bank and the beneficiary bank are the same.
An Intermediary bank is needed when there has to be a bank between the receiving bank and the Beneficiary Bank. Some financial institutions (Originating Banks) send all their wires through one financial institution (Receiving Bank) who then send it on to an International Correspondent (Intermediary Bank) for final credit to the beneficiary bank.
Q. Does the Wire Transfer function check funds availability?
No. A user can submit a wire request for an amount that exceeds the account available balance. The wire request is just that – a request. When a user submits the request, an email goes to the financial institution and the wire is processed manually.
Q. How does the end user know the status of a wire request?
The status of a transaction can be checked using the Transfer Activity screen.
Q. Can a customer recall a wire in Business Banking once it has been submitted?
Frequently Asked Questions
189
No. The customer must contact the financial institution.
Q. How are Wires archived?
Like other transaction types, wires can be viewed in the Activity Log for the current week plus 4 weeks.
Q. Can international wires be done?
Yes.
Q. Does Business Banking verify the ABA Number for transactions that require it?
Business Banking verifies the ABA number against a database of valid ABA numbers that is updated regularly.
Q. How can the financial institution be notified of wires that require processing?
The financial institution controls notification of pending wires using the Suppress E-mail Notification option in the FI’s Policies settings.
Q. What would cause the error "Invalid Date" when a financial institution is uploading a wire file to FedLine?
Possible cause: On FedLine, banks must change daily the Cycle Date Rollover parameter to the current business day. Confirm that the parameter has been manually changed. If the financial institution has questions about Cycle Date Rollover, they should contact the Fed customer service center.
Federal Tax Payments
Q. How does an end user determine which region they should send their Tax Payments to?
When a business applies to the government for EFTPS, or Electronic Federal Tax Payments Service, its setup information denotes which region the company belongs to. In order to determine which region a business may fall into, the company will need to download this guide: http://www.fms.treas.gov/eftps/eftpshandbook.pdf
They can also call the EFTPS hotline at 1.800.945.8400.
The company can determine, by state, which region it should send its payment to. There are two financial institution s that accept EFTPS --one for each region. The region names are North (Chicago) and South (Atlanta).
Q. Can both Federal and State Tax Payments be made?
Currently only federal tax payments can be made. For more information about State Tax Payments, please contact your company or bank administrator.
Email/Alerts
Q. How can a financial institution view all of the established messages at the same time?
Select the ‘List’ button on the Messages main page. This will show you all the messages that have been entered.
Q. Who can receive emails?
You can send email directly to the Company Administrator of one, several or all companies. To select several companies to send a message to, simply hold down the Ctrl key and click the company names to send to.
Q. What is the benefit of saving email messages?
If the financial institution regularly notifies customers via email about things like Holidays, scheduled system maintenance etc, saving a standard email and reusing it can be a time-saver.

Commercial Customer Platform 5.5 User Guide
190
Q. How is the ‘From’ email address set?
The financial institution administrative user inputs the email address at Workflow Email Routing. The email address entered here will appear in the ‘Reply E-mail Address’ space in the recipient’s message. The email address is usually a generic mailbox name such as ‘[email protected]’ so that users who reply to the message don’t have the email address of a specific financial institution employee.
Q. How do the Sweeps/Balance Alerts work in a real-time environment? Does the online banking system continuously ping the host?
The financial institution can define up to five times a day that the product will ping the host to look at the balances. If the balance meets the condition defined by the customer , the online banking system will automatically distribute a balance alert, and/or transfer funds and distribute a transfer notification.
Q. What is the email content for Alerts and Sweeps?
This is an example if a balance alert:
The balance in your Certificate Of Deposit account is currently above $50.00 (created 06/20/2001 10:55 AM by user AUSER)
Enhanced Login Security
Q: What is Enhanced Login Security?
Enhanced Login Security is a new online security feature that provides additional protection from fraud and identity theft. By recognizing your login identification and your computer, Enhanced Login Security verifies that you are authorized to have access to the online system.
Q: Am I required to use the Enhanced Login Security feature?
Yes, once this feature is enabled for your business by your financial institution, you will be challenged at login if the system does not recognize your computer. Enhanced Login Security helps prevent unauthorized access to the online system, protecting the functions and financial information related to your banking accounts.
Q. What does challenge mean?
If the system does not recognize your computer, you will be challenged for additional authentication information known only by you. Two challenge options are used: security access codes and security questions. Depending on the option your financial institution chooses, you will be sent a security code when you are challenged or presented with security questions that you have selected and answered in the past. With either option, you must answer the challenge correctly to be authenticated and allowed access to the system.
Q. How does Enhanced Login Security work?
The system will give you the opportunity to enroll each computer that you use for online banking. Once you have added the extra login security to your computer, you will see no difference to the login functionality. However, if you login from a different computer than the one you have enrolled, you will be presented with the challenge in order to login.
We recommend that you only enroll computers that are secure and can only be accessed by authorized individuals. For example: you would not want to enroll a computer that was located within a public area, or used by many people. Please note that if you use multiple browsers within the same computer you will need to enroll each browser separately.
Q. What does it mean to enroll my computer?
When you enroll your computer for this service, you allow the system to place a code, called a cookie, on your computer. The cookie contains a unique identifier that is used in combination with your login identification. At every subsequent login attempt after enrollment, the system will look

Frequently Asked Questions
191
for this cookie and validate that it matches the login identification that you entered. This cookie is used by the system only to validate your computer’s identity and does not contain any personal information.
Q. Must I enroll a computer I do not use regularly?
No. However, you must answer the security challenge correctly to be authenticated and allowed access to the system. We recommend that you do not enroll public computers when the system presents the opportunity.
Q. What should I do if I want to unenroll a computer that I have previously enrolled?
If you discontinue using a specific computer to access the system, we suggest that you unenroll that computer from this service. This can be done by logging into your account from the computer that you want to unenroll and select the Unenroll Computers option from the Administration --> My Profile main menu. This will remove the secure cookie from that browser. If an attempt is made to log into the system with the unenrolled computer, a challenge will be presented before access is granted.
Q. Can I unenroll a computer from a different computer?
Yes, however you will have to unenroll all of your computers. This can be done by accessing the Unenroll Computers option from the Administration --> My Profile main menu.
Q. Can I log in from multiple computers and browsers?
Yes. You can log in from as many different computers and browsers as you like. However, if you log in from a computer that the system does not recognize, you will be challenged for further authentication and will be given the opportunity to enroll that computer.
Note: If you use multiple browsers on the same computer you will need to enroll each browser separately.
Q. Why do I keep getting challenged when I log in from a computer browser that I have already enrolled?
This is probably happening because the cookie that we placed within your browser is being deleted. We recommend that you do not delete these cookies if you do not want to be challenged at each login.
Q. I share my computer with someone that also uses the online banking system. Can both of us still log in from the same computer browser?
Yes. You can use the same computer to log in since the “cookies” placed on the computer are specific to each user ID.
Q. What is a security access code or One-Time Passcode?
A security access code is a temporary code provided by the system that is unique to you and is used in the process to authenticate your identity.
Note: A security code may not accompany your security questions. Please contact your financial institution if you have any questions.
Q. When will I receive a One-Time Passcode challenge?
If the One-Time Passcode feature is enabled by your financial institution, you will receive a security challenge each time your Company ID, Company Password, User ID and User Password has been successfully authenticated from a computer that is not recognized.
You may also receive a security challenge by clicking on the word here in the phrase ‘click here to request a new One-Time Passcode’ when it is presented during the authentication process.
Also, if the change questions button is enabled by your financial institution and is clicked, you will receive a new security access code.

Commercial Customer Platform 5.5 User Guide
192
Q. Will my One-Time Passcode expire?
Yes. Your One-Time Passcode will expire if your session times out or within 30 minutes, whichever is less. The expired security code entry will count as a bad login attempt.
Q. Can I reuse a One-Time Passcode?
No. Each One-Time Passcode is unique and valid for a single use only. If a One-Time Passcode has been used previously, a new security access code must be generated and entered to gain access to the system.
Q. Will I be required to provide a One-Time Passcode the first time I am challenged?
At your financial institution's discretion you will be allowed to bypass the process a certain number of times by clicking on the remind me later button, as long as you don’t exceed the number of bypass logins permitted by your financial institution. If you exceed the number of bypass logins allowed, you will be required to provide a One-Time Passcode to access the system.
Q. Can I still log into the online system from anywhere?
Yes. This service does not prevent you from logging in from any computer. If we do not recognize the computer that you are using, then you will be challenged for a security access code before being allowed access.
Q. How many times will I be allowed to bypass the process of providing a security code?
The number of bypass logins allowed is defined by your financial institution. Please contact your financial institution for assistance.
Q. What are security questions?
The Security Question feature is an authentication feature based on predefined questions, a certain number of which are answered by you in advance. Therefore, answers should contain information known only to you, and correctly answering the questions presented by the system will authenticate your identity.
Q. How do I setup security questions?
If the Security Question feature is enabled by your financial institution, during the setup process the system will ask you to select and answer five questions when you first access the system. The system will store your question and answer combinations for use if it becomes necessary to authenticate your identity during a login attempt.
Q. Do I need to set up all five security questions?
Yes. You must select and answer five questions, carefully following the setup instructions presented on the computer screen during the process.
Q. How will I be challenged and what do I do when I am challenged?
Each time you log in on a computer the system does not recognize, you will be challenged with two questions, randomly selected by the system from the five security questions that you answered during setup. You will be given a series of instructions and presented with options by the system. Correctly answering the questions and completing the process will authenticate you as a valid user and permit access to the system.
Q. Can I still log into the online system from anywhere?
Yes. This service does not prevent you from logging in from any computer. If we do not recognize the computer that you are using then you will be challenged for a Security Access Code before being allowed access
Tokens
Frequently Asked Questions
193
Q. Do I need to activate my token again if enabled for a new token service?
No. You only need to activate the token one time. This is accomplished within the application. Once activated, the same token is used whenever you receive a token challenge.
Q. Do I need another token if my financial institution enables additional services?
No. Once activated, the same token is used for all token supported services.
Q. Do I need to activate the token again if I log in from a different computer?
No. You only need to activate the token one time, regardless of which computer is used.
Q. Can I use my token to log into the application?
Yes, if your financial institution has enabled tokens for use at login.
Q. What should I do if I lose my token?
Contact your company administrator who, in turn, should contact the financial institution. If you don't have or know the serial number, it can be found on the User List under the Add/Change/Remove Users function, once the token has been activated.

195
File Formats
File Formats
The Business Banking system has the capability to export data for use in other software, and also can import data from other software via formatted files.
This Appendix gives specifications for files that the Business Banking system can use.
ACH Upload File Validation
The Business Banking system will accept valid ACH files as input. The rules governing the format for these files are published as NACHA standards.
The Business Banking system adheres to those published standards, so this topic will not specify an input file format. Instead it will explain the validation that the system performs whenever a customer uploads an ACH file. The following table shows all of the details, on a record-by-record basis:
Record Type Field Validation Literal
Required Skip in Import
Defined as Mandatory Or Required Field
by NACHA Validation Based On
File Header Record Type Code Check Literal "1"
Y M**
Priority Code Check Literal "01" Y R****
Immediate Destination
Numeric digits only, plus correct check digit
N Y M**
Immediate Origin Numeric digits only
N Y M** This field may be mutually defined between the ODFI and Originator .
File Creation Date Check Date Y Y M**
YYMMDD
File Creation Time Check Time N Y O***
HHMM
File Id Modifier Check Alphanumeric Y N M**
Record Size Check Literal "094" Y M** Section 3.4 of
Appendix Three of the NACHA rules stipulate that if these fields are not these values the file will be rejected
Blocking Factor Check Literal "10"
Y M**
Format Code Check Literal "1"
Y M**
Destination Name Check Alphanumeric, no specific value
N Y O***
Origin Name Check Alphanumeric, no specific value
N Y O***

Commercial Customer Platform 5.5 User Guide
196
Reference Code Check Alphanumeric N Y O***
Batch Header Record Type Code Check Literal "5"
Y M**
Service Class Code Check Service Class Code
“200”, “220”, “225”
Y Y M** Service Class Code 280 -
ACH Automated Accounting Advices are
not supported by cash
management
Company Name Check Alphanumeric Y M**
Company Discretion Data Check Alphanumeric
N O***
Company Identification
Check Alphanumeric, no specific value
Y M**
Standard Entry Class Code Check Standard Entry Class Code
“ CCD ”, “PPD”
Y M** Other standard entry class codes will be evaluated through our enhancement process
Company Entry Description Check Alphanumeric
Y M**
Company Descriptive Date Check Alphanumeric
N O***
Effective Entry Date
Year <50 assumed to be 20XX, otherwise 19XX
Y Y R****
Originator Status Code Check Originator Status Code “1”
Y M**
ODFI Identification
Check against ACH Orig ABA# maintained in CM Admin. The check digit (9th number) of the ACH Orig ABA should be ignored.
Y Y M** Ensures that the FI is
named as the ODFI
Batch Number Ascending from previous batch, but not necessarily consecutive
Y M**
Entry Detail Record Type Code Check Literal "6"
Y M**
Transaction Code
"22", "27", "32", "37", "23", "28", "33", "38", credit transactions accepted only with Service Class Code "200" or "220", debits with "200" or "225"
Y M** Other transaction codes will be evaluated through our enhancment process
Receiving DFI Identification Check Numeric
Y M**
Check Digit Check-digit verification on Receiving DFI ID
Y M**

File Formats
197
DFI Account Number Check Alphanumeric
Y R****
Amount Check Numeric Y M**
Identification Number Check Alphanumeric
N O***
Receiving Company Name Check Alphanumeric
N O***
Discretionary Data Check Alphanumeric N O***
Addenda Record Indicator Check Numeric
Y M**
Number of Addenda Records CTX only (Not yet available)
Y M**
Trace Number
ODFI portion must match ODFI id in Batch Header record; Entry Detail Sequence Number must be ascending in order
Y
Y
M** Section 3.5 of Appendix Three
Addenda Record Type Code Check Literal "7"
Y
M**
Addenda Type Code Check Literal "05"
Y
M**
Payment Related Information Check Alphanumeric
N
O***
Addenda Sequence Number
Ascending in order and consecutive in sequence, first addenda record must be "1"
Y
M**
Section 2.3 Appendix Two
Entry Detail Sequence Number
Check Entry Detail Sequence Number
Y
M**
Section 2.3 Appendix Two
Must match trace number in current entry detail record
Y
Batch Control Record Type Code Check Literal "8"
Y
M**
Service Class Code Match corresponding field in Batch Header record
Y
Y
M**
Batch Entry/Addenda Count
Match total # of detail and addenda records in batch
Y
M** These validations ensure that the batch is in balance and no data has been lost during the transmission of the file. If any of these validation do not pass the file is consider to be out of
Batch Entry Hash Match computed hash of Entry Detail records in batch
Y
M**
Batch Total Debit Amount
Match computed total of debit Entry Detail records in batch
Y
M**
Batch Total Credit Amount
Match computed total of credit Entry Detail records in batch
Y
M**

Commercial Customer Platform 5.5 User Guide
198
balance and will be rejected. (Section 3.5 Appendix Three NACHA Rules)
Company Identification
Match corresponding field in Batch Header record
Y
R****
Message Authentic Code Check Alphanumeric
N
O***
Originating DFI Ident
Match corresponding field in Batch Header record
Y
M** These validations ensure that the batch is in balance and no data has been lost during the transmission of the file. If any of these validation do not pass the file is consider to be out of balance and will be rejected. (Section 3.5 Appendix Three NACHA Rules) Batch Number
Match corresponding field in Batch Header record
Y
M**
File Control Record Type Code Check Literal "9"
Y
M**
File Batch Count Match computed number of batches Y
M** These
validations ensure that the file is in balance and no data has been lost during the transmission of the file. If any of these validation do not pass the file is consider to be out of balance and will be rejected. (Section 3.4 Appendix Three NACHA Rules)
File Block Count Match number of 940 byte (10 record) blocks in file
Y
M**
File Entry/Addenda Count
Match total # of detail and addenda records in file
Y
M**
File Entry Hash Match computed hash of Entry Detail records in file
Y
M**
File Total Debit Amount
Match computed total of debit Entry Detail records in file
Y
M**
File Total Credit Amount
Match computed total of credit Entry Detail records in file
Y
M**
**"Mandatory For ACH Processing - A "Mandatory" field is necessary to ensure the proper routing and/or posting of an ACH entry. Any "Mandatory" field not included in an ACH record will cause that entry, batch, or file to be rejected by the ACH Operator..." (Section 2.3 Appendix Two NACHA Rules)

File Formats
199
***Optional for ACH Processing - The inclusion or omission of an "Optional" data dield is at the discretion of the Origiantor and ODFI. (Section 2.3 Appendix Two NACHA Rules)
****Required for ACH Processing - Data classified as "Required" should be included by the Originator and ODFI to avoid processing and control problems at the RDFI . (Section 2.3 Appendix Two NACHA Rules)
Standard Entry Class Codes Record format location: Batch Header
PPD - Prearranged Payment or Deposit - The ACH payment format by which consumers may authorize credits or debits to their accounts by a company or Financial Institution. These are normally recurring payments in fixed amounts.
CCD - Cash Concentration or Disbursement - The ACH payment format used for concentration of funds between or within companies. A single 94-character record contains the standard entry class indicating the type of transaction, routing and transit numbers of the ODFI and RDFI and the originator and receiver account numbers. CCD is the only corporate ACH format that does not have space for additional addenda information, but it does contain space for a reference number.
RCK - A SEC for Re-presented Check Entry – A single entry ACH debit application used by Originators to re-present a check that has been processed through the check collection system and returned because of insufficient or uncollected funds.
CTX – A SEC for Corporate Trade Exchange – The transfer of funds within a trading partner relationship in which a full ANSI ASC X12 message or payment related UN/EDIFACT information is sent with the funds transfer.
TEL – A SEC for Telephone-Initiated Entry – A single entry debit transaction to a consumer’s account pursuant to an oral authorization obtained from the consumer via the telephone.
WEB - A SEC for Internet-Initiated Entry – An ACH debit application to a consumer’s account pursuant to an authorization that is obtained from the Receiver via the Internet.
ARC - A SEC for Accounts Receivable Entry – An application that enables an Originator to convert to a single entry ACH debit a consumer check received via the U.S. mail or at a drop box location for the payment of goods or services.
Transaction Codes Record Format Location: Entry Detail Record Demand Credit Records (for checking, NOW, and share draft accounts) 22 - Automated Deposit 23 - Prenotification of Demand Credit Authorization; Death Notification (non-dollar); Automated Enrollment Entry (non-dollar) 24 - Zero dollar with remittance data (for CCD and CTX entries only); Acknowledgment Entries (ACK and ATX entries only) Demand Debit Records (for checking, NOW, and share draft accounts) 27 - Automated Payment 28 - Prenotification of Demand Debit Authorization (non-dollar) 29 - Zero dollar with remittance data (for CCD and CTX entries only)
Commercial Customer Platform 5.5 User Guide
200
Savings Account Credit Records 32 - Automated Deposit 33 - Prenotification of Savings Credit Authorization; Death Notification (non-dollar); Automated Enrollment Entry (non-dollar) 34 - Zero dollar with remittance data (for CCD and CTX entries only); Acknowledgment Entries (ACK and ATX entries only) Savings Account Debit Records 37 - Automated Payment 38 - Prenotification of Savings Debit Authorization (non-dollar) 39 - Zero dollar with remittance data (for CCD and CTX entries only) Financial Institution General Ledger Credit Records 42 - Automated General Ledger Deposit (Credit) 43 - Prenotification of General Ledger Credit Authorization (non-dollar) 44 - Zero dollar with remittance data (for CCD and CTX entries only) Financial Institution General Ledger Debit Records 47 - Automated General Ledger Payment (Debit) 48 - Prenotification of General Ledger Debit Authorization (non-dollar) 49 - Zero dollar with remittance data (for CCD and CTX only) Loan Account Credit Records 52 - Automated Loan Account Deposit (Credit) 53 - Prenotification of Loan Account Credit Authorization (non-dollar) 54 - Zero dollar with remittance data (for CCD and CTX entries only) Transaction Code Usage/Purpose Information 42 – General Ledger Credit - Deposit Funds 43 – General Ledger Credit Prenote - Prenotification/Authorization ($0 Deposit) 47 – General Ledger Debit – Withdraw Funds 48 – General Ledger Debit Prenote - Prenotification/Authorization ($0 Withdraw) Allows the ACH originator to make payments directly to (General Ledger Credit) or collect payments directly from (General Ledger Debit) a General Ledger Account. For example, an FI could request that a vendor submit ACH payments using transaction code 42 so the payment posts automatically to their General Ledger. The Prenote allows originator to verify, with a zero dollar file, that all the information in the file is correct. ________________________ 52 – Loan Account Credit – Deposit Funds 53 – Loan Account Prenote - Prenotification/Authorization ($0 Deposit) Allows the ACH originator to send payments or credits to a loan account. The Prenote allows originator to verify, with a zero dollar file, that all the information in the file is correct (i.e. routing and loan account number). ________________________
File Formats
201
24 – Zero Dollar Remittance Demand Credit 29 – Zero Dollar Remittance Demand Debit 34 – Zero Dollar Remittance Savings Credit 39 – Zero Dollar Remittance Savings Debit 44 – Zero Dollar Remittance GL Credit 49 – Zero Dollar Remittance GL Debit 54 – Zero Dollar Remittance Loan Credit These transactions are live zero dollar payments which contain payment related remittance information. A zero dollar payment may be made in the following situation: Customer XYZ has been issued a credit invoice on Account 12345 for $100 and a payment invoice on Account 56789 for $100. The net payment for Customer XYZ is $0. Customer XYZ may choose to make a payment of $0 with two remittance details: 1. Account 12345 for $100 Credit and 2. Account 56789 for $100 debit. Zero dollar payment transactions do not transfer funds but are forwarded to business customer by its financial institution with all other payments, since the remittance information contains payment related information to be applied to the business customer's accounts. Zero dollar payments may also be used to test business customer’s ability to receive a payment and remittance from a customer and properly translate the content prior to live dollar transactions. All remittance information sent with these 'test' zero dollar payment transactions MUST also contain zero dollar payment amounts. Create a Delimited ACH Map
These are the step-by-step instructions for creating then importing a Delimited ACH text file. Instructions for importing Standard ACH files may be found in the Help menu. The Delimited ACH Map allows you to define the file layout so the Import process can identify the structure and intent of the file being imported. Import file layout definitions are stored and maintained as ACH Import Maps. The Delimited Map function allows you to define the delimiter and where each piece of the participant’s data is located in the file.
The Map Type allows you to define a map that will Add, Update or Delete participants in the participant database.
Map Name allows you to describe the file being imported and will be distinguish it from previous imports. Because the created maps are saved and are re-useable, you should create a map name that can be used to identify the type of map that was created.
Note: Special characters are not allowed in the map name.

Commercial Customer Platform 5.5 User Guide
202
The Delimiter drop down menu lets you select the appropriate delimiter used in
the file you are importing, i.e. comma separated values (CSV) choose the comma (‘,’). The allowed delimiters are as follows:
Comma (,) Colon (:) Semi-Colon (;) Backslash (\) Forward Slash (/) Pipe (|)
End of Record ID – Select the appropriate record/line terminator from the drop
down menu. For example, in comma delimited or CSV files the record/line terminator is a “New Line” character which is automatically created when being imported.
Skip First Header Record – If the file you are importing contains a header,
select Yes; if the file only contains data records and a header is not in the file, select No.
Total Number of Fields in Record/line – Enter the number of columns/fields in
the file. For Example, if you file contains a column for Name, Address, Routing Number, Account Number, Transaction Code and Employee ID, the number of columns/fields would be 6.
Strip Quotes (“”) around Fields – Select Yes if the fields/columns in the file
being imported contain quotes at the beginning and end of the fields/columns, select No if they do not.
Amount Field Contains Punctuation(s) – Select Yes if the file being imported
contain punctuations ($,.) in the amount field/column; Select No if the amount field does not contain punctuation(s).
Note: The 'Delimiter' and the 'End of Record Id' cannot be the same. Note: Excel files will typically wrap text fields in quotes. If you are unsure whether the fields contain quotes, select Yes and the Import process will detect and remove if needed. Click on the Map Type option drop down menu and select the appropriate action for the file being imported:
Add Only – Maps with this option will allow the user to add participant records to the participant table and assign participant records to the user selected existing batch template
File Formats
203
Update Only – Based on matching criteria, maps with this option will change any participant records that exist in the Business Banking participant table with fields from the imported file.
Add and Update – This Map is a combination of the ‘Add Only’ and ‘Update Only’ processing modes.
The ‘Add’ process will add participant records to the participant table and assign participant records to the user selected batch template.
The ‘Update’ process will employ a user selected matching criteria to locate participant records that exist in the selected batch template. The records will be changed using the update fields from the imported file.
Delete and Update – This Map is a combination of the ‘Delete’ and ‘Update
Only’ processing modes. The ‘Delete’ process will employ a user selected matching criteria to
locate participant records that exist in the Business Banking participant table based on the selected batch template but do not exist in the file. This map type will remove association of unmatched participants from the selected batch template.
The ‘Update’ process will use a user selected matching criteria to locate participant records that exist in the selected batch template. Matched participants will be changed using the update fields from the imported file.
Add, Update, and Delete – Maps with this option add participants to the
participant table, update existing participant's within the ACH participant table and delete participants from a selected batch template.
NOTE: For Add, Update and Delete Maps you must perform the import twice:
1. Import Delimited or Fixed file as an Add Only and select the appropriate Batch Template the import should affect.
2. Import Delimited or Fixed file as a Delete and Update and select the appropriate Batch Template the import should affect.
Note: If the imported file contains participant records that don't exist in the template or the record for update is not found based on matching criteria, then those participants are added to the participant table and assigned to the selected batch template. Note: The 'Delete' process will disassociate the participant from the selected batch template, the participant is not deleted from the participant table. When importing a Delimited file, for each record/field that can be imported in a file, there is a Field Name. The fields available for Import are:
Tran Code (Numeric - 2 digits) FI Routing Number (Numeric - check digit calculation)

Commercial Customer Platform 5.5 User Guide
204
Account Number (Alphameric - 17 maximum digits - see table below) Amount (Numeric - 10 maximum digits, 14 maximum digits if punctuations are in
the file) Participant ID (Alphameric - 15 maximum digits – see table below) Participant Name (Alphameric – 22 maximum digits – see table below) Addenda Data (Alphameric – 80 maximum digits – see table below)
The following are allowed characters in the fields that are designated as Alphameric, all else, are numeric fields:
a-z (Alpha – lower case) A-Z (Alpha – upper case) 0-9 (Numeric) SPACE (space or blank can be used, but cannot be all spaces or blanks on
selected fields) “.” (period) “(“ (left parenthesis) “)” (right parenthesis) “$” (dollar sign) “-” (hyphen) “?” (question mark) “@” (at sign) “#” (pound sign) “!” (exclamation mark) “%” (percent sign) “_” (under score) “~” (tilde) “=” (equals sign) “+" (plus sign)
The Field Name actions are defined as Match, Update, and Replacement Value.
The Match column is used to indicate what data fields in the file being imported will be used to match to an existing participant record in the participant table.
The Update column is used to update the information in the participant table with the data in the import file.
The Replacement Value is information either not in the file being imported or is a change that will affect all matched participants in the import file.
The Position Field allows the user to define the location of the Field Names within the imported file.
Note: The match and update fields cannot be the same. Add Only Map Type:
1. Define the first 6 Field Positions in the Position column (Addenda is optional). 2. Please note that the Match and Update columns are not editable, all positions
needs to be defined for a Add Only map. 3. Do not define a Replacement Values.

File Formats
205
Add and Update Map Type:
1. Define the first 6 Field Positions in the Position column (Addenda is optional) 2. Check at least one of the field boxes in the Update column, i.e. if you are
updating the Amount for each employee in a Direct Deposit file, you would check the Update box for the Amount field.
3. Select the field(s) to Match based on the following criteria: If matching with the Participant ID, Participant Name, or Account Number
only one Match is required, criteria to ensure the correct participant(s) are updated.
If matching with the FI Routing Number you must select an additional field to Match.
Note: If you assign a Replacement Value, that value will apply to all matched participants within the import file including adding participants.
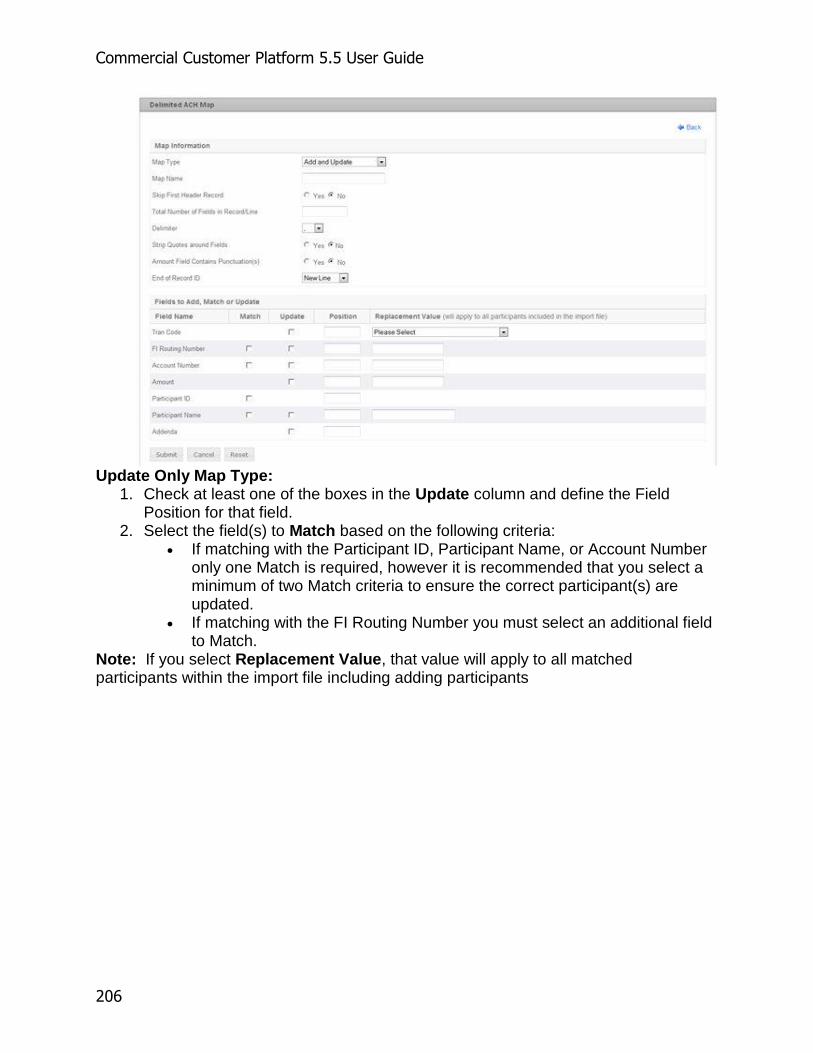
Commercial Customer Platform 5.5 User Guide
206
Update Only Map Type:
1. Check at least one of the boxes in the Update column and define the Field Position for that field.
2. Select the field(s) to Match based on the following criteria: If matching with the Participant ID, Participant Name, or Account Number
only one Match is required, however it is recommended that you select a minimum of two Match criteria to ensure the correct participant(s) are updated.
If matching with the FI Routing Number you must select an additional field to Match.
Note: If you select Replacement Value, that value will apply to all matched participants within the import file including adding participants

File Formats
207
Delete and Update Map Type:
1. Check at least one of the boxes in the Update column and define the Field Position for that field.
2. Select the field(s) to Match based on the following criteria: If matching with the Participant ID, Participant Name, or Account Number
only one Match is required, however it is recommended that you select a minimum of two Match criteria's to ensure the correct participant(s) are updated.
If matching with the FI Routing Number you must select an additional field to Match.
Note: If you select Replacement Value, that value will apply to all matched participants within the import file. Participants are removed from the selected batch template; they will not be deleted from the participant table.
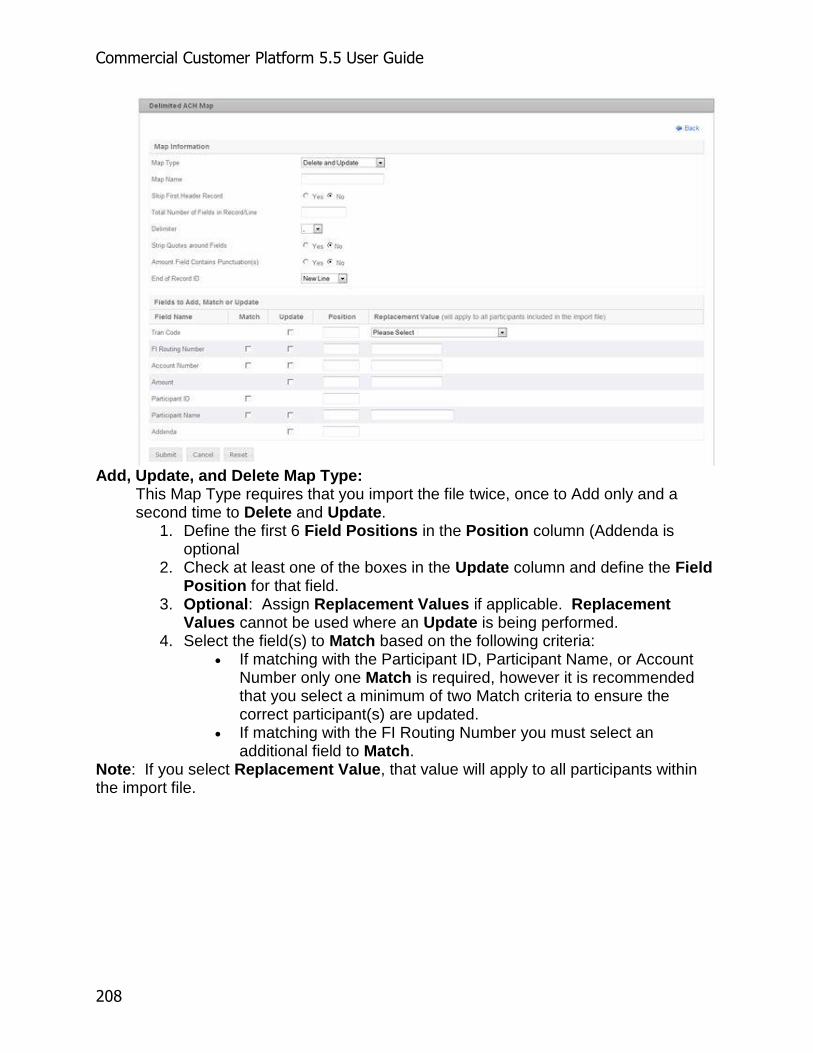
Commercial Customer Platform 5.5 User Guide
208
Add, Update, and Delete Map Type:
This Map Type requires that you import the file twice, once to Add only and a second time to Delete and Update.
1. Define the first 6 Field Positions in the Position column (Addenda is optional
2. Check at least one of the boxes in the Update column and define the Field Position for that field.
3. Optional: Assign Replacement Values if applicable. Replacement Values cannot be used where an Update is being performed.
4. Select the field(s) to Match based on the following criteria: If matching with the Participant ID, Participant Name, or Account
Number only one Match is required, however it is recommended that you select a minimum of two Match criteria to ensure the correct participant(s) are updated.
If matching with the FI Routing Number you must select an additional field to Match.
Note: If you select Replacement Value, that value will apply to all participants within the import file.
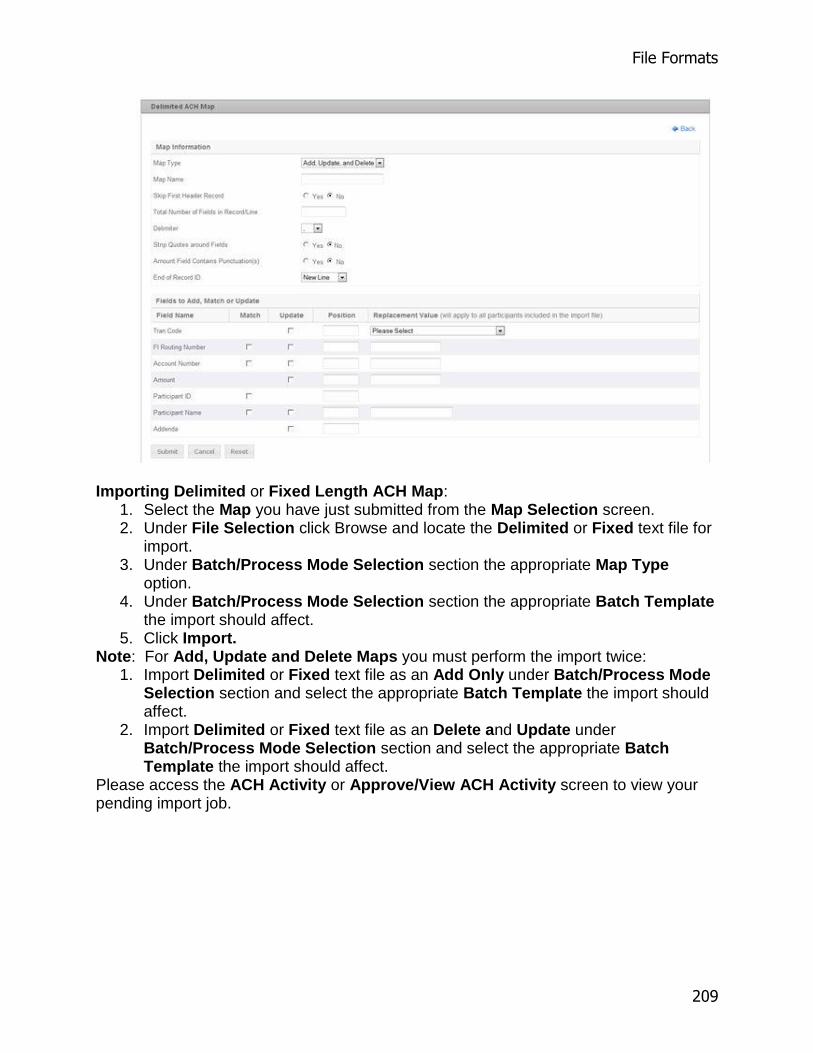
File Formats
209
Importing Delimited or Fixed Length ACH Map:
1. Select the Map you have just submitted from the Map Selection screen. 2. Under File Selection click Browse and locate the Delimited or Fixed text file for
import. 3. Under Batch/Process Mode Selection section the appropriate Map Type
option. 4. Under Batch/Process Mode Selection section the appropriate Batch Template
the import should affect. 5. Click Import.
Note: For Add, Update and Delete Maps you must perform the import twice: 1. Import Delimited or Fixed text file as an Add Only under Batch/Process Mode
Selection section and select the appropriate Batch Template the import should affect.
2. Import Delimited or Fixed text file as an Delete and Update under Batch/Process Mode Selection section and select the appropriate Batch Template the import should affect.
Please access the ACH Activity or Approve/View ACH Activity screen to view your pending import job.

Commercial Customer Platform 5.5 User Guide
210
A confirmation screen will be displayed with the Reference number of the Import.
Navigate to the ACH Activity or Approve/View ACH Activity screen: You will be able to preview, approve or cancel the Pending Delimited/Fixed Import Jobs. Cancel will delete pending activity and removes the job from the preview. Approval will commit the changes to the participants and selected batch templates. Note: Pending Jobs will be deleted after 24 hours. Select the View ACH Activity option from the Payments & Transfers main menu and verify the delimited import file is available for approval. The imported file can be located using the reference number and appears in the Pending Delimited/Fixed Import Jobs section with a status of Waiting for Approval.

File Formats
211
Once you have previewed and verified the changes, select the check box for the Import job and then click the Approve button. The completion of the Approval process will store the changes to the participant table and move the Pending Delimited/Fixed Import Job to the Complete Delimited or Fixed Import Jobs section with an approved status.
Create a Fixed ACH Map
These are the step-by-step instructions for creating then importing a Fixed ACH text file. Instructions for importing Standard ACH files may be found in the Help menu. The Fixed ACH Map allows you to define the file layout so the Import process can identify the structure and intent of the file being imported. Import file layout definitions are stored and maintained as ACH Import Maps. The Fixed ACH Map allows you to define the start and end positions of the participant’s data within the file.
1. The Map Type allows you to define a action that will Add, Update or Delete participants in the participant database.
2. Map Name allows you to describe the file being imported and will be distinguish it from previous imports. Because the created maps are saved and are re-useable, the user should create a map name that can be used to identify the type of map that was created. Note: Special characters are not allowed in the map name.
3. Skip First Header Record – if the file you are importing contains a header, select Yes; if the file only contains data records and a header is not in the file, select No.
4. Length of Record/line – Enter the record length in the fixed format file to be imported, carriage return must be included.
5. Amount Field Contains Punctuation(s) – Select Yes if the file being imported contain punctuations ($,.) in the amount field/column; Select No if the amount field does not contain punctuation(s).
Commercial Customer Platform 5.5 User Guide
212
6. Start and Length Positions – The Map Type you selected will determine the requirements for completing if the map type is a Add, Match or Update.
Click on the Map Type option drop down menu and select the appropriate action for the file being imported:
Add Only – Maps with this option will allow the user to add participant records to the participant table and assign participant records to the user selected existing batch template
Update Only – Based on matching criteria, maps with this option will change any
participant records that exist in the Business Banking participant table with fields from the imported file.
Add and Update – This Map is a combination of the ‘Add Only’ and ‘Update
Only’ processing modes. The ‘Add’ process will add participant records to the participant table and
assign participant records to the user selected batch template. The ‘Update’ process will employ a user selected matching criteria to
locate participant records that exist in the selected batch template. The records will be changed using the update fields from the imported file.
Delete and Update – This Map is a combination of the ‘Delete’ and ‘Update
Only’ processing modes. The ‘Delete’ process will employ a user selected matching criteria to
locate participant records that exist in the Business Banking participant table based on the selected batch template but do not exist in the file. This map type will remove association of unmatched participants from the selected batch template.
The ‘Update’ process will use a user selected matching criteria to locate participant records that exist in the selected batch template. Matched participants will be changed using the update fields from the imported file.
Add, Update, and Delete – Maps with this option add participants to the
participant table, update existing participant's within the ACH participant table and delete participants from a selected batch template.
NOTE: For Add, Update and Delete Maps you must perform the import twice:
1. Import Delimited or Fixed file as an Add Only and select the appropriate Batch Template the import should affect.
2. Import Delimited or Fixed file as a Delete and Update and select the appropriate Batch Template the import should affect.
Note: If the imported file contains participant records that don't exist in the template or the record for update is not found based on matching criteria, then those participants are added to the participant table and assigned to the selected batch template.

File Formats
213
Note: The 'Delete' process will disassociate the participant from the selected batch template, the participant is not deleted from the participant table. When importing a Delimited or Fixed Length file, for each record/field that can be imported in a file, there is a Field Name. The fields available for Import are:
Tran Code (Numeric - 2 digits) FI Routing Number (Numeric - check digit calculation) Account Number (Alphameric - 17 maximum digits - see table below) Amount (Numeric - 10 maximum digits, 14 maximum digits if punctuations are in
the file) Participant ID (Alphameric - 15 maximum digits – see table below) Participant Name (Alphameric – 22 maximum digits – see table below) Addenda Data (Alphameric – 80 maximum digits – see table below)
The following are allowed characters in the fields that are designated as Alphameric, all else, are numeric fields:
a-z (Alpha – lower case) A-Z (Alpha – upper case) 0-9 (Numeric) SPACE (space or blank can be used, but cannot be all spaces or blanks on
selected fields) “.” (period) “(“ (left parenthesis) “)” (right parenthesis) “$” (dollar sign) “-” (hyphen) “?” (question mark) “@” (at sign) “#” (pound sign) “!” (exclamation mark) “%” (percent sign) “_” (under score) “~” (tilde) “=” (equals sign) “+" (plus sign)
The Field Name actions are defined as Match, Update, and Replacement Value.
The Match column is used to locate the participant record that exists in the participant table and match with the participant data in the import file.
The Update column is used to update the information in the participant table with the data in the import file.
The Replacement Value is information either not in the file being imported or is a change that will affect all matched participants in the import file.

Commercial Customer Platform 5.5 User Guide
214
The Position Field allows the user to define the location of the Field Names within the imported file.
Add Only Map Type:
1. Define the first 6 Field Positions in the Position column (Addenda is optional). 2. Please note that the Match and Update columns are not editable, only Start and
Length Positions needs to be defined for a Add only map. 3. Do not define a Replacement Values.
Add and Update Map Type:
1. Define the Start and Length Positions for the first 6 Field Positions in the Position column (Addenda is optional).
2. Check at least one of the field boxes in the Update column, i.e. if you are updating the Amount for each employee in a Direct Deposit file, you would check the Update box for the Amount field.
3. Select the field(s) to Match based on the following criteria: If matching with the Participant ID, Participant Name, or Account Number
only one Match is required, however it is recommended that you select a minimum of two Match criteria to ensure the correct participant(s) are updated.
If matching with the FI Routing Number, you must select an additional field to Match.
Note: If you assign a Replacement Value, that value will apply to all matched participants within the import file.

File Formats
215
Update Only Map Type:
1. Check at least one of the boxes in the Update column and define the Start and Length Positions for that field.
2. Check either or both the Participant Name and/or Participant ID in the Match column and define the Start and Length Positions for each field selected in the Match column.
3. Select the field(s) to Match based on the following criteria: If matching with the Participant ID, Participant Name, or Account Number
only one Match is required, however it is recommended that you select a minimum of two Match criteria's to ensure the correct participant(s) are updated.
If matching with the FI Routing Number you must select an additional field to Match.
Note: If you select Replacement Value, that value will apply to all participants within the import file.
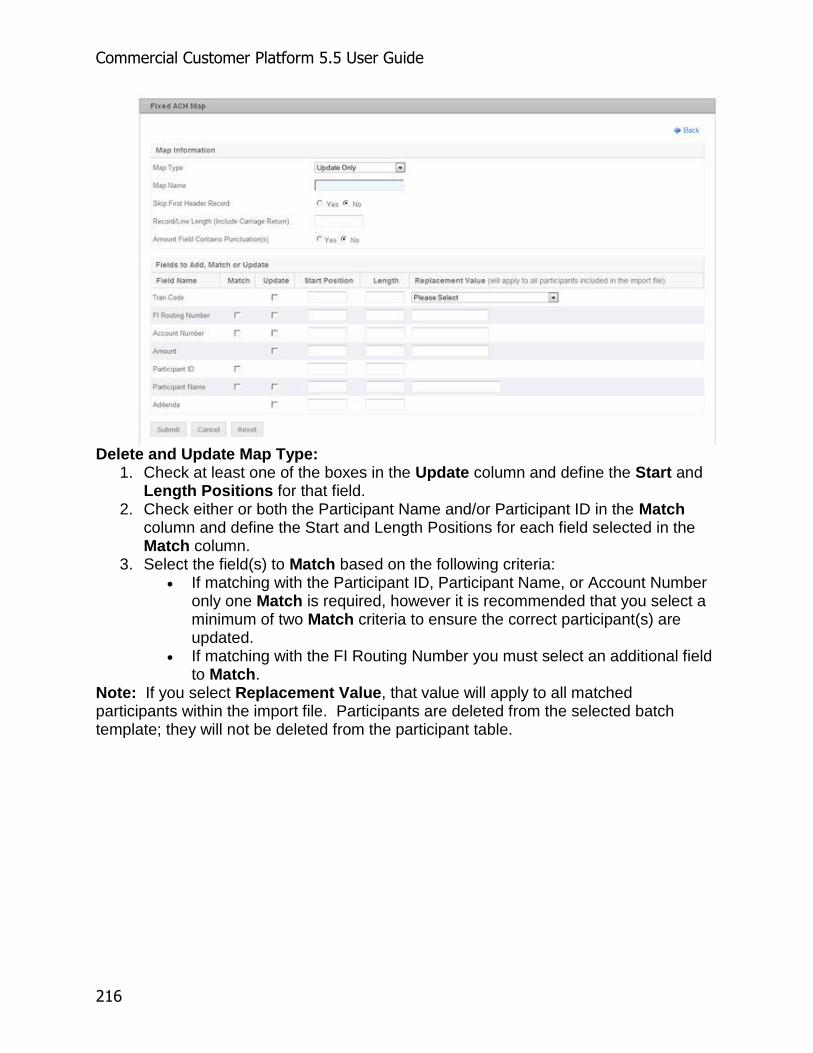
Commercial Customer Platform 5.5 User Guide
216
Delete and Update Map Type:
1. Check at least one of the boxes in the Update column and define the Start and Length Positions for that field.
2. Check either or both the Participant Name and/or Participant ID in the Match column and define the Start and Length Positions for each field selected in the Match column.
3. Select the field(s) to Match based on the following criteria: If matching with the Participant ID, Participant Name, or Account Number
only one Match is required, however it is recommended that you select a minimum of two Match criteria to ensure the correct participant(s) are updated.
If matching with the FI Routing Number you must select an additional field to Match.
Note: If you select Replacement Value, that value will apply to all matched participants within the import file. Participants are deleted from the selected batch template; they will not be deleted from the participant table.

File Formats
217
Add, Update, and Delete Map Type:
This Map Type requires that you import the file twice, once to Add Only and a second time to Delete and Update.
1. Define the Start and Length Positions for the first 6 Field Positions in the Position column (Addenda is optional).
2. Check at least one of the boxes in the Update column. 3. Optional: Assign Replacement Values if applicable. Replacement Values
cannot be used where an Update is being performed. 4. Select the field(s) to Match based on the following criteria:
If matching with the Participant ID, Participant Name, or Account Number only one Match is required, however it is recommended that you select a minimum of two Match criteria's to ensure the correct participant(s) are updated.
If matching with the FI Routing Number you must select an additional field to Match.
Note: If you select Replacement Value, that value will apply to all matched participants within the import file.

Commercial Customer Platform 5.5 User Guide
218
Importing Fixed Length ACH Map:
1. Select the Map you have just submitted from the Map Selection screen. 2. Under File Selection click Browse and locate the Delimited or Fixed text file for
import. 3. Under Batch/Process Mode Selection section the appropriate Map Type
option. 4. Under Batch/Process Mode Selection section the appropriate Batch Template
the import should affect. 5. Click Import.
Note: For Add, Update and Delete Maps you must perform the import twice:
1. Import Delimited or Fixed text file as an Add Only under Batch/Process Mode Selection section and select the appropriate Batch Template the import should affect.
2. Import Delimited or Fixed text file as a Delete and Update under Batch/Process Mode Selection section and select the appropriate Batch Template the import should affect.
Please access the ACH Activity or Approve/View ACH Activity screen to view your pending import job.
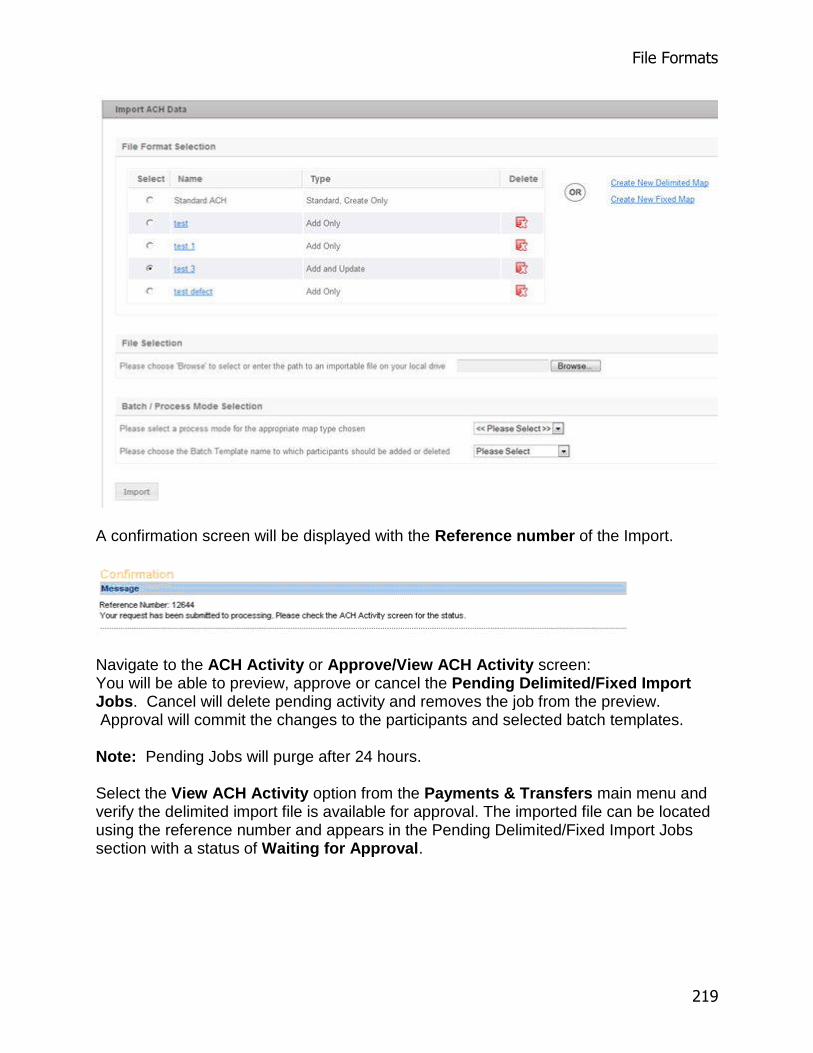
File Formats
219
A confirmation screen will be displayed with the Reference number of the Import.
Navigate to the ACH Activity or Approve/View ACH Activity screen: You will be able to preview, approve or cancel the Pending Delimited/Fixed Import Jobs. Cancel will delete pending activity and removes the job from the preview. Approval will commit the changes to the participants and selected batch templates. Note: Pending Jobs will purge after 24 hours. Select the View ACH Activity option from the Payments & Transfers main menu and verify the delimited import file is available for approval. The imported file can be located using the reference number and appears in the Pending Delimited/Fixed Import Jobs section with a status of Waiting for Approval.

Commercial Customer Platform 5.5 User Guide
220
Once you have previewed and verified the changes, select the check box for the Import job and then click the Approve button. The completion of the Approval process will store the changes to the participant table and move the Pending Delimited/Fixed Import Job to the Complete Delimited or Fixed Import Jobs section with an approved status. ARP File Formats Processing Method A
Issues Upload - Processing Method A
MICASH Fixed Column Length (AKA Proprietary ARP File Format)
Field Data Element
Name
Field Inclusion
Requirement Validation / Contents Length Position
1 Record Code Required Not Checked / "C" 1 001-001
2 Bank Number Required Not Checked /
Numeric 3 002-004
3 Constant Filler Required Not Checked / "00" 2 005-006
4 Account Number Required Numeric 10* 007-016
5 Filler Required Not Checked / " " 1 017-017
6 Transaction
Type Required 'R' = Register
‘V’ = Void 1 018-018
7 Action Indicator Required 'A' = Add
‘D’ = Delete 1 019-019
8 Filler Required Not Checked / " " 1 020-020

File Formats
221
9 Check Serial
Number Required Numeric
0nnnnnnnnn 10 021-030
10 Check Amount Required $$$$$$$$¢¢ or
$$$$$$$.¢¢ 10 031-040
11 Check Issue
Date Required MMDDYY 6 041-046
12 User Data Optional
Alphanumeric / Blank/Special
Characters 20 047-066
13 Filler Required Not Checked 14 067-080
* The Account Number field may be configured up to a maximum length of 19 characters. Please contact your financial institution for more information. Additional file format requirements:
All numeric fields must be zero filled if not used, or right-justified zero padded to the maximum length. Field #9 Check Serial Number is only 9 numerals in length 0nnnnnnnnn. Field #12 may contain A-Z, a-z, 0-9, in addition to the following special characters .,)($-?@#!%&_;:~|=+' as well as empty spaces. The use of quotes ("), forward slash (/), back slash (\) are not allowed in this format. Field #13 should be blank filled.
Sample file: C099000001162411 RA 05000020010999999.99050502firstaccount C099000401502696 VA 00007520080000078945050502accoutnotrailingzero C099000101439194 RD
00000000090000000001050102accountnottrailingzero
Method A- ASCII Text - Comma Delimited
Field Data Element
Name
Field Inclusion
Requirement Contents Maximum
Length
1 Account Number Required Numeric 10*
2 Check Issue
Date Required MMDDYY
Or MMDDYYYY 6 or 8
3 Check Serial
Number Required Numeric 10
4 Check Amount Required
$$$$$$$$¢¢ Or
$$$$$$$$.¢¢ 10
5 Payee Optional
Alphanumeric / Blanks/ Special
Characters 40
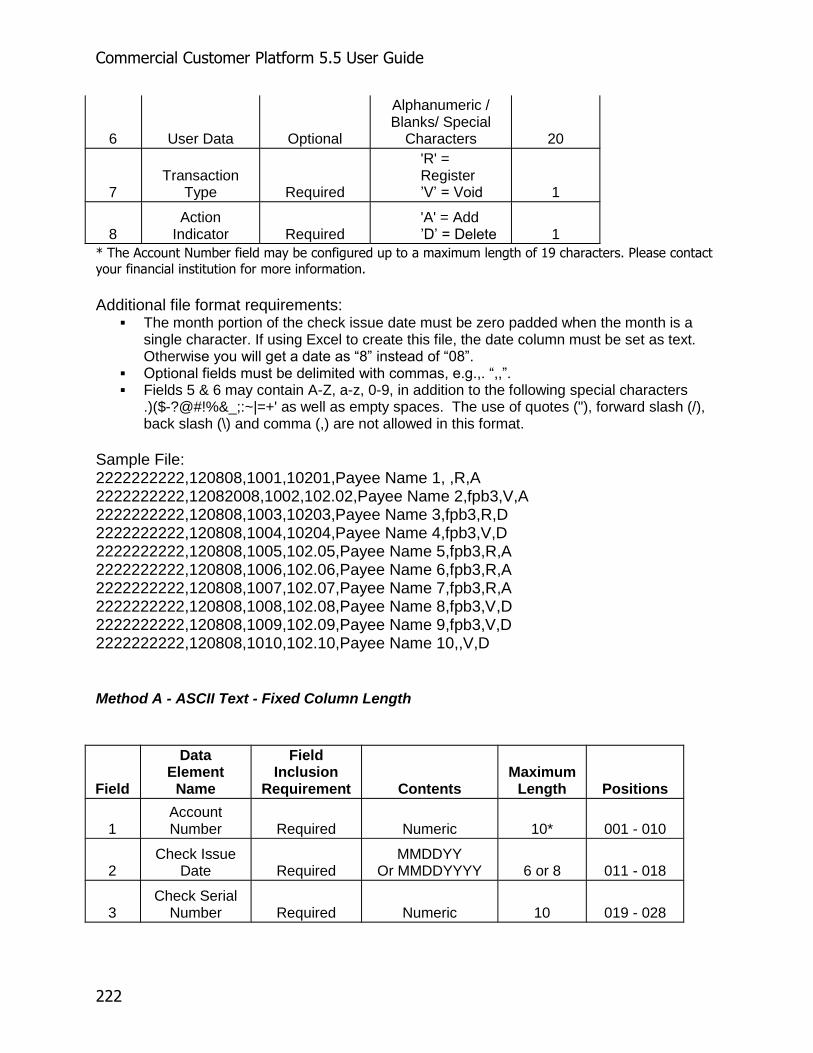
Commercial Customer Platform 5.5 User Guide
222
6 User Data Optional
Alphanumeric / Blanks/ Special
Characters 20
7 Transaction
Type Required
'R' = Register ’V’ = Void 1
8 Action
Indicator Required 'A' = Add ’D’ = Delete 1
* The Account Number field may be configured up to a maximum length of 19 characters. Please contact
your financial institution for more information.
Additional file format requirements:
The month portion of the check issue date must be zero padded when the month is a single character. If using Excel to create this file, the date column must be set as text. Otherwise you will get a date as “8” instead of “08”.
Optional fields must be delimited with commas, e.g.,. “,,”. Fields 5 & 6 may contain A-Z, a-z, 0-9, in addition to the following special characters
.)($-?@#!%&_;:~|=+' as well as empty spaces. The use of quotes ("), forward slash (/), back slash (\) and comma (,) are not allowed in this format.
Sample File: 2222222222,120808,1001,10201,Payee Name 1, ,R,A 2222222222,12082008,1002,102.02,Payee Name 2,fpb3,V,A 2222222222,120808,1003,10203,Payee Name 3,fpb3,R,D 2222222222,120808,1004,10204,Payee Name 4,fpb3,V,D 2222222222,120808,1005,102.05,Payee Name 5,fpb3,R,A 2222222222,120808,1006,102.06,Payee Name 6,fpb3,R,A 2222222222,120808,1007,102.07,Payee Name 7,fpb3,R,A 2222222222,120808,1008,102.08,Payee Name 8,fpb3,V,D 2222222222,120808,1009,102.09,Payee Name 9,fpb3,V,D 2222222222,120808,1010,102.10,Payee Name 10,,V,D
Method A - ASCII Text - Fixed Column Length
Field
Data Element
Name
Field Inclusion
Requirement Contents Maximum
Length Positions
1 Account Number Required Numeric 10* 001 - 010
2 Check Issue
Date Required MMDDYY
Or MMDDYYYY 6 or 8 011 - 018
3 Check Serial
Number Required Numeric 10 019 - 028
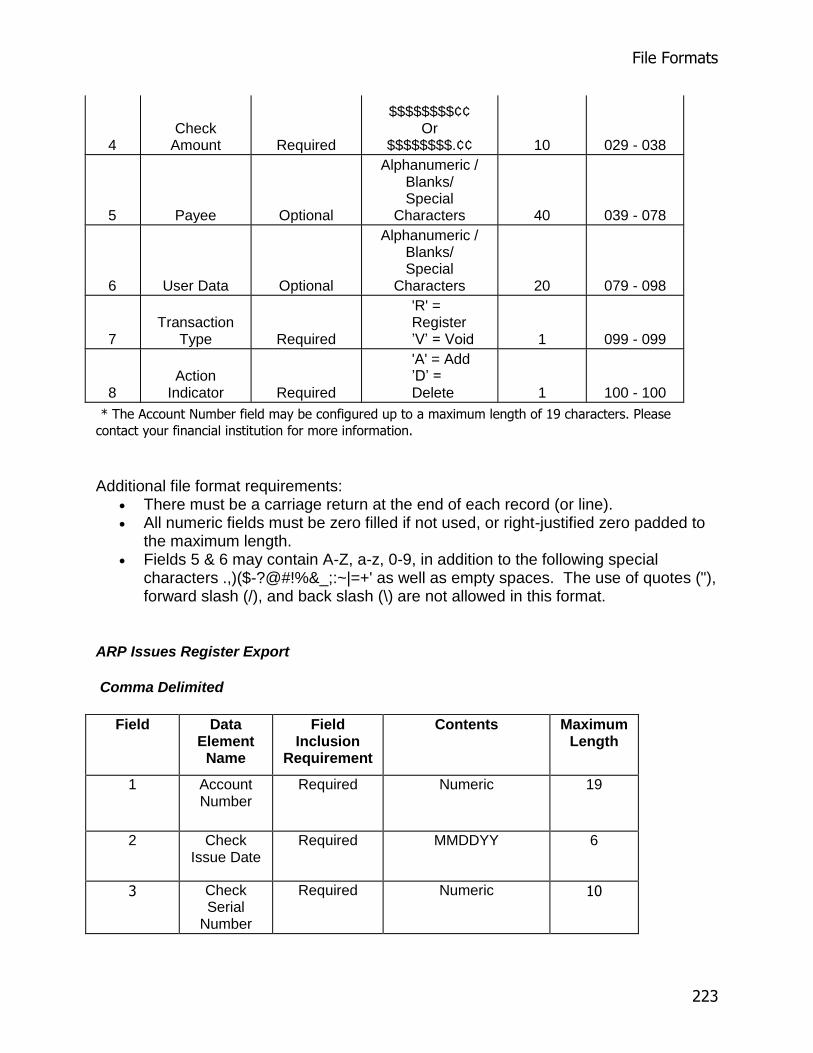
File Formats
223
4 Check
Amount Required
$$$$$$$$¢¢ Or
$$$$$$$$.¢¢ 10 029 - 038
5 Payee Optional
Alphanumeric / Blanks/ Special
Characters 40 039 - 078
6 User Data Optional
Alphanumeric / Blanks/ Special
Characters 20 079 - 098
7 Transaction
Type Required
'R' = Register ’V’ = Void 1 099 - 099
8 Action
Indicator Required
'A' = Add ’D’ = Delete 1 100 - 100
* The Account Number field may be configured up to a maximum length of 19 characters. Please
contact your financial institution for more information. Additional file format requirements:
There must be a carriage return at the end of each record (or line). All numeric fields must be zero filled if not used, or right-justified zero padded to
the maximum length. Fields 5 & 6 may contain A-Z, a-z, 0-9, in addition to the following special
characters .,)($-?@#!%&_;:~|=+' as well as empty spaces. The use of quotes ("), forward slash (/), and back slash (\) are not allowed in this format.
ARP Issues Register Export
Comma Delimited
Field Data Element
Name
Field Inclusion
Requirement
Contents Maximum Length
1 Account Number
Required Numeric 19
2 Check Issue Date
Required MMDDYY 6
3 Check Serial
Number
Required Numeric 10

Commercial Customer Platform 5.5 User Guide
224
4 Check Amount
Required $$$$$$$$.¢¢ 10
5 Payee Optional Alphanumeric / Blanks 40
6 User Data Optional Alphanumeric / Blanks /
20
7 Status Required 0 = Outstanding 1 = Paid
2 = Paid No Issue 3 = Duplicate Paid
4 = Paid Void 5= Void
6 = Deleted 7 = Stop Pay
8 = Paid Over Stop 9 = Stale
10 = Amount Mismatch
11 = Amount Max 12 = Unknown 99 = Not Found
2
ARP File Formats Processing Method B
Issues Upload - Processing Method B
MICASH Fixed Column Length (AKA Proprietary ARP File Format)
Field Data Element
Name
Field Inclusion
Requirement Validation / Contents Length Position
1 Record Code Required Not Checked / "C" 1 001-001
2 Bank Number Required Not Checked /
Numeric 3 002-004
3 Constant Filler Required Not Checked / "00" 2 005-006
4 Account Number Required Numeric 10* 007-016
5 Filler Required Not Checked / " " 1 017-017
6 Transaction
Type Required 'R' = Register
‘V’ = Void 1 018-018
7 Action Indicator Required 'A' = Add
‘D’ = Delete 1 019-019
8 Filler Required Not Checked / " " 1 020-020
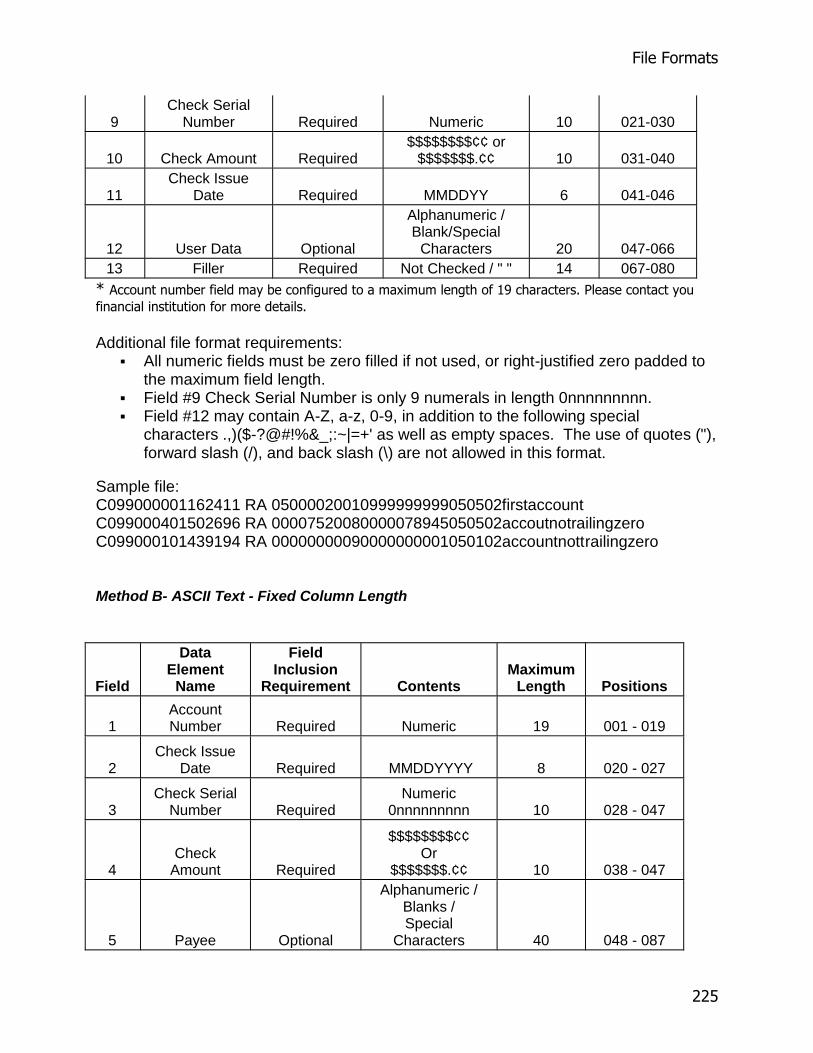
File Formats
225
9 Check Serial
Number Required Numeric 10 021-030
10 Check Amount Required $$$$$$$$¢¢ or
$$$$$$$.¢¢ 10 031-040
11 Check Issue
Date Required MMDDYY 6 041-046
12 User Data Optional
Alphanumeric / Blank/Special
Characters 20 047-066
13 Filler Required Not Checked / " " 14 067-080
* Account number field may be configured to a maximum length of 19 characters. Please contact you
financial institution for more details. Additional file format requirements:
All numeric fields must be zero filled if not used, or right-justified zero padded to the maximum field length.
Field #9 Check Serial Number is only 9 numerals in length 0nnnnnnnnn. Field #12 may contain A-Z, a-z, 0-9, in addition to the following special
characters .,)($-?@#!%&_;:~|=+' as well as empty spaces. The use of quotes ("), forward slash (/), and back slash (\) are not allowed in this format.
Sample file: C099000001162411 RA 05000020010999999999050502firstaccount C099000401502696 RA 00007520080000078945050502accoutnotrailingzero C099000101439194 RA 00000000090000000001050102accountnottrailingzero
Method B- ASCII Text - Fixed Column Length
Field
Data Element
Name
Field Inclusion
Requirement Contents Maximum
Length Positions
1 Account Number Required Numeric 19 001 - 019
2 Check Issue
Date Required MMDDYYYY 8 020 - 027
3 Check Serial
Number Required Numeric
0nnnnnnnnn 10 028 - 047
4 Check
Amount Required
$$$$$$$$¢¢ Or
$$$$$$$.¢¢ 10 038 - 047
5 Payee Optional
Alphanumeric / Blanks / Special
Characters 40 048 - 087

Commercial Customer Platform 5.5 User Guide
226
6 User Data Optional
Alphanumeric / Blanks / Special
Characters 20 088 - 107
7 Transaction
Type Required
'R' = Register ’V’ = Void 1 108 - 108
8 Action
Indicator Required
'A' = Add ’D’ = Delete 1 109 - 109
Additional file format requirements:
All numeric fields must be zero filled if not used, or right-justified zero padded to the maximum length.
Field #2 Check Issue Date must be MMDDYYYY. Zero pad the month if needed. Field #3 Check Serial Number has a length of 10 but must not exceed 9 numeric
values 0nnnnnnnnn. Fields #5 & #6 may contain A-Z, a-z, 0-9, in addition to the following special
characters .,)($-?@#!%&_;:~|=+' as well as empty spaces. The use of quotes ("), forward slash (/), and back slash (\) are not allowed in this format.
Sample File: 22222222222222222220505200201234567890912345678this is a test for fixed column lengh400versio0duedate111502RA 22222222222222222220505200201234567890012345678this is a test for fixed column lengh400versio0duedate111502RA 22222222222222222220505200201234567890012345678this is a test for fixed column lengh400versio0duedate111502RA 22222222222222222220505200201234567890012345678this is a test for fixed column lengh400versio0duedate111502RA 22222222222222222220505200201234567890012345678this is a test for fixed column lengh400versio0duedate111502RA
Method B - ASCII - Text Comma Delimited
Field Data Element
Name
Field Inclusion
Requirement Contents Maximum
Length
1 Account Number Required Numeric 19
2 Check Issue
Date Required MMDDYY
Or MMDDYYYY 6 or 8
3 Check Serial
Number Required Numeric 10

File Formats
227
4 Check Amount Required
$$$$$$$$¢¢ Or
$$$$$$$$.¢¢ 10
5 Payee Optional
Alphanumeric / Blanks/ Special
Characters 40
6 User Data Optional
Alphanumeric / Blanks/ Special
Characters 20
7 Transaction
Type Required 'R' = Register
’V’ = Void 1
8 Action
Indicator Required 'A' = Add
’D’ = Delete 1
Additional file format requirements:
The month portion of the check issue date must be zero padded when the month is a single character. If using Excel to create this file, the date column must be set as text. Otherwise you will get a date as “8” instead of “08”
Optional fields must be delimited with commas, e.g. “,,”. Fields 5 & 6 may contain A-Z, a-z, 0-9 .)($-?@#!%&_;:~|=+' as well as empty spaces.
The use of quotes ("), forward slash (/), back slash (\), and commas (,) are not allowed in this format.
Sample File: 2222222222,080803,1001,10201,Payee Name 1, ,R,A 2222222222,08082003,1002,102.02,Payee Name 2,fpb3,V,A 2222222222,080803,1003,10203,Payee Name 3,fpb3,R,D 2222222222,080803,1004,10204,Payee Name 4,fpb3,V,D 2222222222,080803,1005,102.05,Payee Name 5,fpb3,R,A 2222222222,080803,1006,102.06,Payee Name 6,fpb3,R,A 2222222222,080803,1007,102.07,Payee Name 7,,R,A
Glossary
Automated Clearing House ( ACH ) - The ACH is a network of regional associations, inter-bank associations, and private-sector processors. ACH payments are processed and settled electronically, thereby increasing reliability, efficiency and cost effectiveness. ACH payments are generally settled in one day or greater.
Batch - An ACH batch consists of a template (see below) and a collection of transactions having the same purpose and effective date to be performed, and may also include addenda information.
Cash Concentration - The movement of funds from outlying depository locations to a central bank account where they can be utilized and managed most effectively.
Cash Concentration or Disbursement ( CCD ) - The ACH payment format used for concentration of funds between or within companies. A single 94-character record contains the standard entry class indicating the type of transaction , routing and transit numbers of the ODFI and RDFI and the originator and receiver account numbers. CCD is the only corporate ACH format that does not have space for additional addenda information, but it does contain space for a reference number.
Commercial Customer Platform 5.5 User Guide
228
Clearing House Interbank Payments System (CHIPS) - An independent, large dollar funds transfer network operated by the New York Automated Clearing House (NYACH).
Company administrator the customer , or a person assigned by the customer, who will have administration responsibilities in the Commercial Customer Platform of Cash Management.
Customer a bank’s customer, a thrift’s customer, or a credit union’s member.
Customer Information File number (CIF #) the identification number, used by the Financial Institution administrator , to access the customer’s information stored in the financial institution’s host computer.
End user an employee of the customer that is given access to Cash Management by the company administrator .
FedWire - The Federal Reserve funds transfer system. FedWire transactions involve the immediate, same day settlement of funds. FedWire instructions are irrevocable.
Financial Institution (FI) a bank, thrift, or credit union.
Financial Institution administrator an employee of the financial institution that is given access to the Administration Platform of Cash Management by the financial institution super-user.
Financial Institution super-user the financial institution employee responsible for assigning Administration Platform access to financial institution administrators. Digital Insight will work with your financial institution to determine the financial institution super-user(s) and provide them with super-user access information.
Float - Time interval, or delay, between the start and completion of a specific phase or process (check or electronic deposits, clearings etc.) that occurs along the cash flow timeline.
Initiate Batch - The Cash Management end user initiates an ACH batch by reviewing the transfer information and assigning a settlement date. Once all of the information is deemed correct by the user, the system creates a formatted NACHA file with all of the batch information.
Memo Posting - Posting electronic transactions early in the day when the actual debits or credits will not be posted until later in the day.
NACHA File - The file that is actually transmitted to the clearing house for processing is called a NACHA file.
National Automated Clearing House (NACHA) - A membership organization that provides marketing and education assistance and establishes the rules, standards and procedures that enable financial institutions to exchange ACH payments on a national basis.
Non-Repetitive (Free Form) Wire Transfers - All information contained within the wire instruction is different each time the transaction takes place.
On-Us Transactions - Those items, either check or electronic, paid or deposited to and drawn or debited on accounts from the same financial institution.
Originating Depository financial institution (ODFI) - The FI issuing an ACH file(s) on behalf of its client.
Originator - The originator is the individual or organization that is initiating the ACH transmission. For our purposes, the originator is the Commercial Customer using the Cash Management system.
Participant - The participant is the individual or organization that will be affected by the ACH transaction (payee or draftee). An ACH transaction may debit or credit a participant's account, e.g., a payroll deposit or a payment for services rendered. The participant information is referenced by the ACH transaction.

File Formats
229
Payable Through Draft (PTD) - A payment instrument resembling a check that is drawn against a payor and not the bank. A draft is handled like a check through the clearing system, but the responsibility for paying the draft lies with the drawee. Companies use PTDs to preserve the right to review items prior to payment. (Example: Insurance companies viewing a car's damage before issuing a claim check.)
Positive Pay - A service used to combat check fraud. The FI pays only those items with serial numbers and dollar amounts matching the company's issue file.
Prearranged Payment or Deposit ( PPD ) - The ACH payment format by which consumers may authorize credits or debits to their accounts by a company or financial institution. These are normally recurring payments in fixed amounts.
Prenotifications (Prenotes) - Optional, zero-dollar entries that are sent to the ACH System and then the receiving financial institution to verify instructions prior to sending live entries.
Receiving Depository Financial Institution (RDFI) - The FI that receives the ACH debits or credits on behalf of an individual, or business client.
Society for Worldwide Interbank Financial Telecommunications (S.W.I.F.T) - The major international Interbank telecommunications network that transmits international payment instructions as well as other financial messages.
Template - The template contains the essential characteristics of the ACH batch, such as the name of the template, the type (class code) of ACH transmission (CCD or PPD), and the offset account. Although Cash Management only lists CCD & PPD, Cash Management will create the appropriate CCD+/PPD+ ACH Batch if a participant with an addendum is associated with this batch.
Transaction - An ACH transaction is an entry within the NACHA file that indicates how the participant's account should be affected. The transaction includes a reference to the participant, how the account is affected, and the amount.
Transit Routing Number - The MICR line on a check contains the transit routing number, which the depository bank uses to route the check back to the drawee bank.
Zero Balance Account ( ZBA ) - A disbursement account on which checks are written even though the balances in the accounts are maintained at zero. Debits are covered by a transfer of funds from a master account at the same bank.


231
Glossary
A
ACH: The ACH is a network of regional associations, inter-bank associations, and private-sector processors. ACH payments are processed and settled electronically, thereby increasing reliability, efficiency and cost effectiveness. ACH payments are generally settled in one day or greater.
ACH Batch: An ACH batch consists of a template (see below) and a collection of transactions having the same purpose and effective date to be performed, and may also include addenda information.
ACH Transaction: An ACH transaction is an entry within the NACHA file that indicates how the participant's account should be affected. The transaction includes a reference to the participant, how the account is affected, and the amount.
Automated Clearing House (ACH): The ACH is a network of regional associations, inter-bank associations, and private-sector processors. ACH payments are processed and settled electronically, thereby increasing reliability, efficiency and cost effectiveness. ACH payments are generally settled in one day or greater.
B
Batch Template: The template contains the essential characteristics of the ACH batch, such as the name of the template, the type (class code) of ACH transmission (CCD or PPD), and the offset account. Although AXIS Cash Management only lists CCD & PPD, the application will create the appropriate CCD+/PPD+ ACH Batch if a participant with an addendum is associated with this batch.
C
Cash Concentration: The movement of funds from outlying depository locations to a central bank account where they can be utilized and managed most effectively.
Cash Concentration or Disbursement (CCD): The ACH payment format used for concentration of funds between or within companies. A single 94-character record contains the standard entry class indicating the type of transaction, routing and transit numbers of the ODFI and RDFI and the originator and receiver account numbers. CCD is the only corporate ACH format that does not have space for additional addenda information, but it does contain space for a reference number.
CCD: The ACH payment format used for concentration of funds between or within companies. A single 94-character record contains the standard entry class indicating the type of transaction, routing and transit numbers of the ODFI and RDFI and the originator and receiver account numbers. CCD is the only corporate

Commercial Customer Platform 5.5 User Guide
232
ACH format that does not have space for additional addenda information, but it does contain space for a reference number.
CHIPS:
Clearing House Interbank Payments System (CHIPS): An independent, large dollar funds transfer network operated by the New York Automated Clearing House (NYACH).
Company Administrator: the customer, or a person assigned by the customer, who will have administration responsibilities in the Commercial Customer Platform of the application.
Customer: a bank's customer, a thrift's customer, or a credit union's member.
Customer Information File (CIF#): the identification number, used by the Financial Institution administrator, to access the customer's information stored in the financial institution's host computer.
E
EFTPS: Electronic Federal Tax Payment System is a government program to pay federal tax obligations electronically.
End User: an employee of the customer that is given access to application by the company administrator or a user administrator.
F
FedWire: The Federal Reserve funds transfer system. FedWire transactions involve the immediate, same day settlement of funds. FedWire instructions are irrevocable.
FI (Financial Instituiton): a bank, thrift, or credit union
Financial Institution: a bank, thrift, or credit union
Financial institution administrator: an employee of the financial institution that is given access to the Administration Platform of the application by the financial institution super-user.
Float: Time interval, or delay, between the start and completion of a specific phase or process (check or electronic deposits, clearings etc.) that occurs along the cash flow timeline.
Freeform Wire: All information contained within the wire instruction is different each time the transaction takes place.
G
Go ID Token Authentication: Token based multi-factor authentication available for Wire Transfer, ACH and EFTPS.

Glossary
233
I
Initiate Batch: The Cash Management end user initiates an ACH batch by reviewing the transfer information and assigning a settlement date. Once all of the information is deemed correct by the user, the system creates a formatted NACHA file with all of the batch information.
M
Memo Posting: Posting electronic transactions early in the day when the actual debits or credits will not be posted until later in the day.
N
NACHA: A membership organization that provides marketing and education assistance and establishes the rules, standards and procedures that enable financial institutions to exchange ACH payments on a national basis.
NACHA File: The file that is actually transmitted to the clearing house for processing is called a NACHA file.
National Automated Clearing House (NACHA): A membership organization that provides marketing and education assistance and establishes the rules, standards and procedures that enable financial institutions to exchange ACH payments on a national basis.
O
ODFI: Originating depository financial institution, The FI issuing an ACH file(s) on behalf of its client.
On-Us Transactions: Those items, either check or electronic, paid or deposited to and drawn or debited on accounts from the same financial institution.
P
Participant: The participant is the individual or organization that will be affected by the ACH transaction (payee or draftee). An ACH transaction may debit or credit a participant's account, e.g., a payroll deposit or a payment for services rendered. The participant information is referenced by the ACH transaction.
Payable Through Draft (PTD): A payment instrument resembling a check that is drawn against a payor and not the bank. A draft is handled like a check through the clearing system, but the responsibility for paying the draft lies with the drawee. Companies use PTDs to preserve the right to review items prior to payment. (Example: Insurance companies viewing a car's damage before issuing a claim check.)
Commercial Customer Platform 5.5 User Guide
234
Positive Pay: A service used to combat check fraud. The FI pays only those items with serial numbers and dollar amounts matching the company's issue file.
PPD: Prearranged Payment or Deposit, the ACH payment format by which consumers may authorize credits or debits to their accounts by a company or financial institution. These are normally recurring payments in fixed amounts.
Prenote: Optional, zero-dollar entries that are sent to the ACH System and then the receiving financial institution to verify instructions prior to sending live entries.
R
RDFI: Receiving Depository Financial Institution, the FI that receives the ACH debits or credits on behalf of an individual, or business client.
S
SWIFT: Society for Worldwide Interbank Financial Telecommunications (S.W.I.F.T) - The major international Interbank telecommunications network that transmits international payment instructions as well as other financial messages.
T
Transit Routing Number: The MICR line on a check contains the transit routing number, which the depository bank uses to route the check back to the drawee bank.
Z
ZBA: A disbursement account on which checks are written even though the balances in the accounts are maintained at zero. Debits are covered by a transfer of funds from a master account at the same bank.