combat life saver lesson 13 administer first aid to a nerve agent casualty compiled and edited by,...
TRANSCRIPT

Combat Life SaverCombat Life Saver
LESSON 13LESSON 13ADMINISTER FIRST AID TO AADMINISTER FIRST AID TO A
NERVE AGENT CASUALTYNERVE AGENT CASUALTY
Compiled and edited by,2LT John C. Miller, PA-C

LESSON 13LESSON 13ADMINISTER FIRST AID TO AADMINISTER FIRST AID TO A
NERVE AGENT CASUALTYNERVE AGENT CASUALTY
INTRODUCTIONINTRODUCTION
A soldier showing signs of mild nerve agent poisoning A soldier showing signs of mild nerve agent poisoning will normally be able to take care of himself. A soldier will normally be able to take care of himself. A soldier showing signs of moderate to severe nerve agent showing signs of moderate to severe nerve agent poisoning, however, will not be able to adequately poisoning, however, will not be able to adequately help himself and must have assistance.help himself and must have assistance.

ADMINISTER FIRST AID TO AADMINISTER FIRST AID TO ANERVE AGENT CASUALTYNERVE AGENT CASUALTY
• TASKTASK
Identify the buddy-aid procedures for treating a nerve Identify the buddy-aid procedures for treating a nerve agent casualty.agent casualty.
• CONDITIONSCONDITIONS
Given multiple-choice examination items pertaining to Given multiple-choice examination items pertaining to nerve agent poisoning, buddy-aid treatment, and nerve agent poisoning, buddy-aid treatment, and decontamination.decontamination.
• STANDARDSTANDARD
Score 70 or more points on the 100-point written Score 70 or more points on the 100-point written examination.examination.

TAKE PROTECTIVE MEASURESTAKE PROTECTIVE MEASURES
• Anytime you believe you have been or will be Anytime you believe you have been or will be exposed to a chemical agent, your first action must exposed to a chemical agent, your first action must be to protect yourself. You cannot continue with your be to protect yourself. You cannot continue with your mission or administer aid to casualties if you are mission or administer aid to casualties if you are overcome by the chemical warfare agent.overcome by the chemical warfare agent.
• Put on your protective mask immediately and give the Put on your protective mask immediately and give the alarm.alarm.

TAKE PROTECTIVE MEASURESTAKE PROTECTIVE MEASURES
• If you have signs and symptoms of mild nerve agent If you have signs and symptoms of mild nerve agent poisoning (unexplained runny nose, sudden poisoning (unexplained runny nose, sudden headache, dizziness, drooling, tightness in the chest, headache, dizziness, drooling, tightness in the chest, muscular twitching, stomach cramps, nausea, and/or muscular twitching, stomach cramps, nausea, and/or reduced vision), administer reduced vision), administer oneone set of nerve agent set of nerve agent autoinjectors to yourself and decontaminate your autoinjectors to yourself and decontaminate your exposed skin.exposed skin.
• Put on the rest of your protective clothing.Put on the rest of your protective clothing.

IDENTIFY SIGNS OF SEVERE NERVE AGENTIDENTIFY SIGNS OF SEVERE NERVE AGENTPOISONINGPOISONING
• A casualty may progress from mild to moderate to A casualty may progress from mild to moderate to severe nerve agent poisoning signs. Signs of severe severe nerve agent poisoning signs. Signs of severe nerve agent poisoning include:nerve agent poisoning include:
• Strange and confused behavior.Strange and confused behavior.• Coughing, wheezing, and gurgling sounds while Coughing, wheezing, and gurgling sounds while
breathing.breathing.• Difficulty in breathing.Difficulty in breathing.• Severely pinpointed pupils.Severely pinpointed pupils.• Red eyes with tears present.Red eyes with tears present.
IDENTIFY SIGNS OF SEVERE NERVE AGENTIDENTIFY SIGNS OF SEVERE NERVE AGENTPOISONINGPOISONING
• Vomiting.Vomiting.• Severe muscular twitching and general weakness.Severe muscular twitching and general weakness.• Loss of bladder and bowel control.Loss of bladder and bowel control.• Decreased pulse rate.Decreased pulse rate.• Convulsion.Convulsion.• Paralysis.Paralysis.• Unconsciousness.Unconsciousness.• Respiratory failure (or respiratory arrest) [casualty Respiratory failure (or respiratory arrest) [casualty
stops breathing].stops breathing].

MASK THE CASUALTYMASK THE CASUALTY
• Put the casualty's mask on him immediately if he is Put the casualty's mask on him immediately if he is not masked. If he is already masked, check the seal.not masked. If he is already masked, check the seal.
• Position the casualty on his back.Position the casualty on his back. Squat, do not kneel, in a chemical environment. Pressing Squat, do not kneel, in a chemical environment. Pressing
your knee against the contaminated ground will reduce the your knee against the contaminated ground will reduce the protection time afforded by your protective clothing.protection time afforded by your protective clothing.
• Open the casualty's mask carrier and remove his Open the casualty's mask carrier and remove his protective mask.protective mask.
• Hold the mask with the lenses facing you.Hold the mask with the lenses facing you.

MASK THE CASUALTYMASK THE CASUALTY
• Put your thumbs on the outside of the cheek pouches Put your thumbs on the outside of the cheek pouches of the mask and your fingers on the inside of the of the mask and your fingers on the inside of the cheek pouches.cheek pouches.
• Spread the mask open and position it on the Spread the mask open and position it on the casualty's chin.casualty's chin.
• Put your thumbs through the two bottom straps of the Put your thumbs through the two bottom straps of the head harness.head harness.
• Cup the casualty's head with the fingers of both Cup the casualty's head with the fingers of both hands and lift his head slightly.hands and lift his head slightly.
• Slide the head harness over the casualty's head by Slide the head harness over the casualty's head by moving your thumbs toward the back of the casualty's moving your thumbs toward the back of the casualty's head and down behind his ears.head and down behind his ears.

MASK THE CASUALTYMASK THE CASUALTY
• Make sure the two bottom straps of the head harness Make sure the two bottom straps of the head harness are below the casualty's ears, the temple straps are are below the casualty's ears, the temple straps are above his ears, and the head pad is centered in the above his ears, and the head pad is centered in the middle of the back of his head.middle of the back of his head. The head harness should not need to be adjusted. If the The head harness should not need to be adjusted. If the
straps do need to be tightened, tighten them using short, straps do need to be tightened, tighten them using short, firm, jerks.firm, jerks.
• Check the seal of the mask against the casualty's Check the seal of the mask against the casualty's face.face. If the casualty can follow instructions, have him clear his If the casualty can follow instructions, have him clear his
mask by covering the outlet valve and voicemitter and mask by covering the outlet valve and voicemitter and exhaling forcefully, then covering the inlet valves and exhaling forcefully, then covering the inlet valves and inhaling.inhaling.

MASK THE CASUALTYMASK THE CASUALTY
If the casualty cannot follow instructions, cover the mask's If the casualty cannot follow instructions, cover the mask's inlet valves. If the mask collapses when the casualty inhales, inlet valves. If the mask collapses when the casualty inhales, it is properly sealed. If it does not collapse, reseat the mask. it is properly sealed. If it does not collapse, reseat the mask. If the soldier is not breathing, you cannot determine whether If the soldier is not breathing, you cannot determine whether the mask is properly sealed.the mask is properly sealed.
• Make sure the buckles are lying flat and the straps Make sure the buckles are lying flat and the straps form a straight line with the tabs.form a straight line with the tabs.
• Pull the protective hood over the casualty's head, Pull the protective hood over the casualty's head, neck, and shoulders.neck, and shoulders.

ADMINISTER THREE NERVE AGENTADMINISTER THREE NERVE AGENTANTIDOTE KITS AND CANAANTIDOTE KITS AND CANA
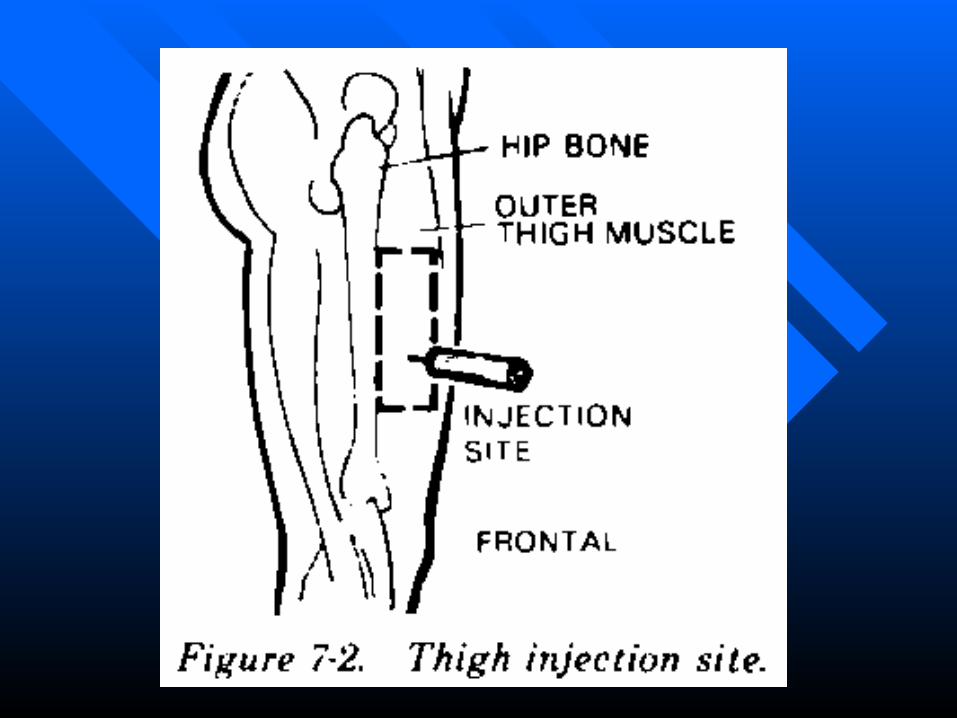
• Select Injection SiteSelect Injection Site• The normal injection site is the outer part of the The normal injection site is the outer part of the
casualty's thigh at least the width of one hand below casualty's thigh at least the width of one hand below the hip joint and at least the width of one hand above the hip joint and at least the width of one hand above the knee.the knee.
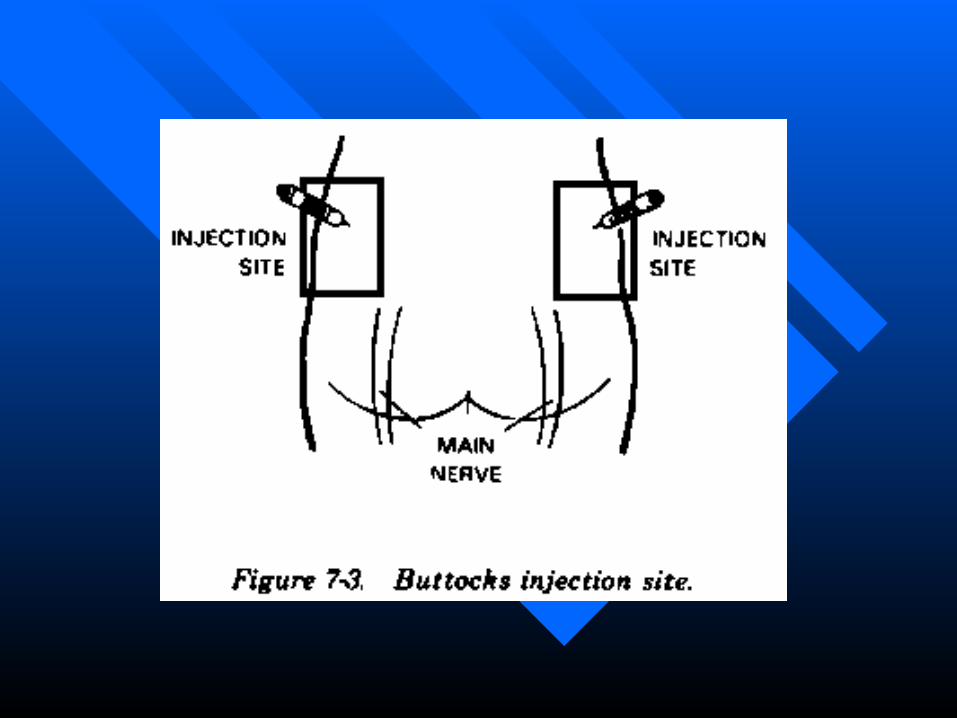
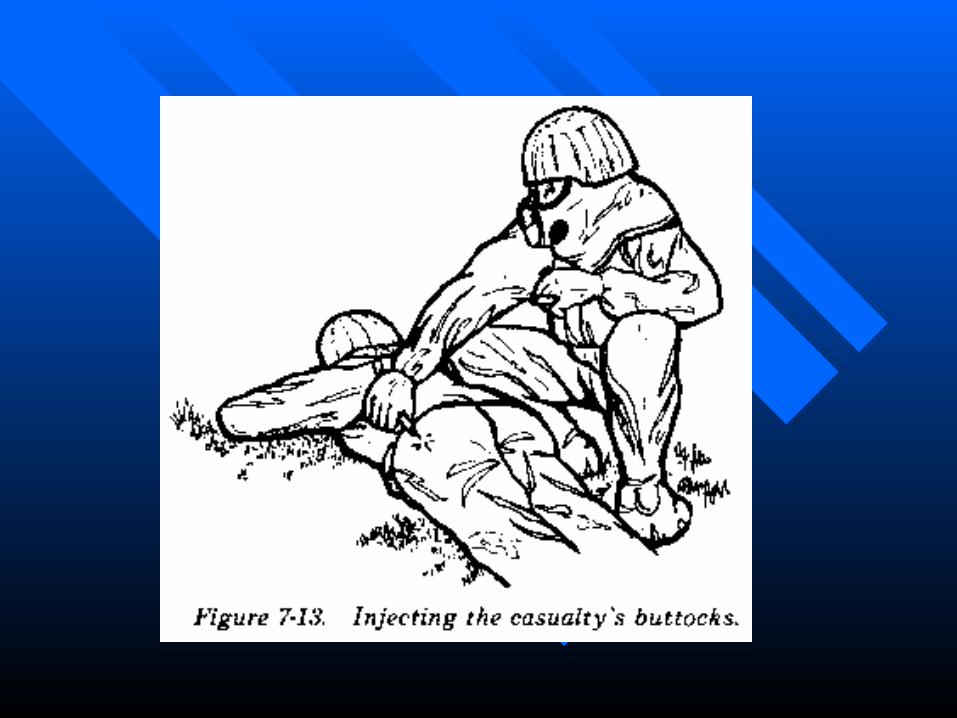
• If the casualty is very thin, roll the casualty onto his If the casualty is very thin, roll the casualty onto his stomach or side and select a site on the upper, outer stomach or side and select a site on the upper, outer quadrant of the casualty's buttocks. Lift his jacket if it quadrant of the casualty's buttocks. Lift his jacket if it is covering the site.is covering the site.
ADMINISTER THREE NERVE AGENTADMINISTER THREE NERVE AGENTANTIDOTE KITS AND CANAANTIDOTE KITS AND CANA
• Administer AtropineAdminister Atropine• Remove one Mark I nerve agent antidote kit from the Remove one Mark I nerve agent antidote kit from the
inside pocket of the casualty's mask carrier. inside pocket of the casualty's mask carrier. If the temperature is near or below freezing, the If the temperature is near or below freezing, the
autoinjectors may be carried next to the casualty's body.autoinjectors may be carried next to the casualty's body.
• Hold the kit by the clip in your nondominant hand at Hold the kit by the clip in your nondominant hand at eye level with the larger (2-PAM chloride) autoinjector eye level with the larger (2-PAM chloride) autoinjector on top.on top.
• Feel the injection site with your free hand to make Feel the injection site with your free hand to make sure the site is free from buttons or other obstructions sure the site is free from buttons or other obstructions which could damage the needle.which could damage the needle.


ADMINISTER THREE NERVE AGENTADMINISTER THREE NERVE AGENTANTIDOTE KITS AND CANAANTIDOTE KITS AND CANA
• Grasp the body of the lower (smaller) autoinjector Grasp the body of the lower (smaller) autoinjector with the thumb and two fingers of your dominant with the thumb and two fingers of your dominant hand.hand. Do not touch the green (needle) end of the autoinjector Do not touch the green (needle) end of the autoinjector
since the pressure could cause the needle to function.since the pressure could cause the needle to function.
• Pull the atropine autoinjector out of the clip with a Pull the atropine autoinjector out of the clip with a smooth motion.smooth motion.
• Form a fist around the autoinjector and place the Form a fist around the autoinjector and place the green end of the autoinjector against the injection site green end of the autoinjector against the injection site (thigh or buttocks) at a 90 degree angle to the (thigh or buttocks) at a 90 degree angle to the surface of the site.surface of the site.


ADMINISTER THREE NERVE AGENTADMINISTER THREE NERVE AGENTANTIDOTE KITS AND CANAANTIDOTE KITS AND CANA
• Apply firm even pressure to the autoinjector until the Apply firm even pressure to the autoinjector until the needle functions (clicks), penetrates the clothing, and needle functions (clicks), penetrates the clothing, and automatically injects the medication into the automatically injects the medication into the casualty's muscle.casualty's muscle. Do not use a jabbing motion to inject the antidote into the Do not use a jabbing motion to inject the antidote into the
muscle. muscle.
• Hold the autoinjector in place for at least 10 seconds.Hold the autoinjector in place for at least 10 seconds.• Pull the autoinjector out of the casualty's body at the Pull the autoinjector out of the casualty's body at the
same 90 degree angle.same 90 degree angle.• Place the used atropine autoinjector between two Place the used atropine autoinjector between two
fingers of the hand holding the kit with the needle fingers of the hand holding the kit with the needle pointing away from your hand.pointing away from your hand.

ADMINISTER THREE NERVE AGENTADMINISTER THREE NERVE AGENTANTIDOTE KITS AND CANAANTIDOTE KITS AND CANA
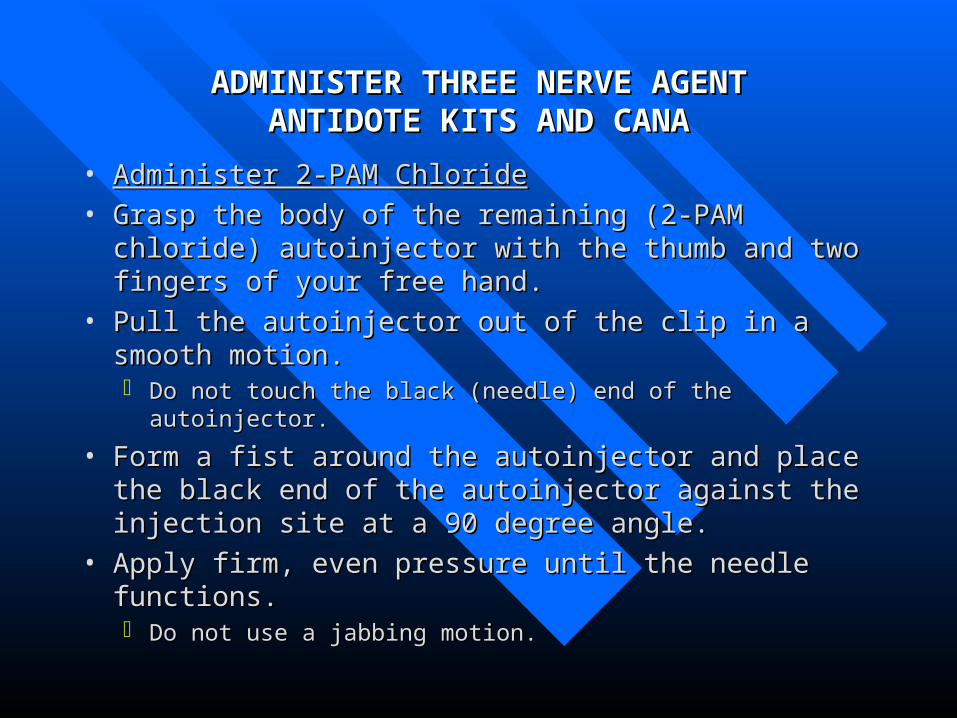
• Administer 2-PAM ChlorideAdminister 2-PAM Chloride• Grasp the body of the remaining (2-PAM chloride) Grasp the body of the remaining (2-PAM chloride)
autoinjector with the thumb and two fingers of your autoinjector with the thumb and two fingers of your free hand.free hand.
• Pull the autoinjector out of the clip in a smooth Pull the autoinjector out of the clip in a smooth motion. motion. Do not touch the black (needle) end of the autoinjector.Do not touch the black (needle) end of the autoinjector.
• Form a fist around the autoinjector and place the Form a fist around the autoinjector and place the black end of the autoinjector against the injection site black end of the autoinjector against the injection site at a 90 degree angle.at a 90 degree angle.
• Apply firm, even pressure until the needle functions.Apply firm, even pressure until the needle functions. Do not use a jabbing motion.Do not use a jabbing motion.


ADMINISTER THREE NERVE AGENTADMINISTER THREE NERVE AGENTANTIDOTE KITS AND CANAANTIDOTE KITS AND CANA
• Hold the autoinjector in place for at least 10 seconds.Hold the autoinjector in place for at least 10 seconds.• Pull the autoinjector out of the casualty's body at the Pull the autoinjector out of the casualty's body at the
same 90 degree angle.same 90 degree angle.• Drop the empty plastic clip without dropping the Drop the empty plastic clip without dropping the
autoinjectors.autoinjectors.• Lay the used autoinjectors on the casualty's chest or Lay the used autoinjectors on the casualty's chest or
back.back.• Administer Second and Third KitsAdminister Second and Third Kits• Administer the second Mark I kit using the same Administer the second Mark I kit using the same
procedures as for the first kit.procedures as for the first kit.
ADMINISTER THREE NERVE AGENTADMINISTER THREE NERVE AGENTANTIDOTE KITS AND CANAANTIDOTE KITS AND CANA
• Administer the third kit of autoinjectors.Administer the third kit of autoinjectors.• There is no waiting period between kits.There is no waiting period between kits.
If the casualty already administered one set of injectors to If the casualty already administered one set of injectors to himself (used autoinjectors attached to pocket flap), you will himself (used autoinjectors attached to pocket flap), you will only administer the two additional Mark I kits.only administer the two additional Mark I kits.
• The CANA is NOT for use as self-aid. If you know The CANA is NOT for use as self-aid. If you know who you are, where you are, and what you are doing, who you are, where you are, and what you are doing, you do not need CANA.you do not need CANA.
• Administer the CANA immediately after the third Administer the CANA immediately after the third MARK I to prevent convulsions.MARK I to prevent convulsions.
ADMINISTER THREE NERVE AGENTADMINISTER THREE NERVE AGENTANTIDOTE KITS AND CANAANTIDOTE KITS AND CANA
• Grasp the CANA autoinjector with your dominant Grasp the CANA autoinjector with your dominant hand with the needle end extending beyond your hand with the needle end extending beyond your thumb and two fingers.thumb and two fingers.
• With your other hand, pull the safety cap off the With your other hand, pull the safety cap off the autoinjector base.autoinjector base.
• The injector is now armed.The injector is now armed.• DO NOT DO NOT touch the black (needle) end because you touch the black (needle) end because you
may accidently inject yourself.may accidently inject yourself.• Position the black (needle) end of the autoinjector Position the black (needle) end of the autoinjector
against the casualty's injection site (thigh or against the casualty's injection site (thigh or buttocks).buttocks).


ADMINISTER THREE NERVE AGENTADMINISTER THREE NERVE AGENTANTIDOTE KITS AND CANAANTIDOTE KITS AND CANA
• Apply firm, even pressure (not a jabbing motion) to Apply firm, even pressure (not a jabbing motion) to the injector until it pushes the needle into the the injector until it pushes the needle into the casualty's thigh (or buttocks). Make sure you do not casualty's thigh (or buttocks). Make sure you do not hit the casualty's mask carrier or any objects in the hit the casualty's mask carrier or any objects in the individual's pockets.individual's pockets.
• Hold the injector firmly in place for at least 10 Hold the injector firmly in place for at least 10 seconds.seconds.
• Carefully remove the CANA autoinjector from the Carefully remove the CANA autoinjector from the casualty's injection site.casualty's injection site.
• Drop the safety cap. (The cap can be disposed of Drop the safety cap. (The cap can be disposed of earlier.)earlier.)
ADMINISTER THREE NERVE AGENTADMINISTER THREE NERVE AGENTANTIDOTE KITS AND CANAANTIDOTE KITS AND CANA
• Secure Used AutoinjectorsSecure Used Autoinjectors• Attach used autoinjectors, atropine, PAM chloride, Attach used autoinjectors, atropine, PAM chloride,
and CANA to the casualty's clothing, usually the left and CANA to the casualty's clothing, usually the left pocket flap.pocket flap.

DECONTAMINATE EXPOSED SKINDECONTAMINATE EXPOSED SKIN
• Obtain M291 KitObtain M291 Kit• Obtain the M291 decontamination kit from the Obtain the M291 decontamination kit from the
casualty's mask carrier.casualty's mask carrier.• The M291 Skin Decontaminating Kit is provided to The M291 Skin Decontaminating Kit is provided to
service members for skin decontamination. This kit service members for skin decontamination. This kit may also be used to decontaminate selected may also be used to decontaminate selected individual equipment, such as load bearing individual equipment, such as load bearing equipment, protective gloves, mask, hood, and equipment, protective gloves, mask, hood, and weapon.weapon.
• Seek overhead cover or use a poncho for protection Seek overhead cover or use a poncho for protection against further contamination.against further contamination.
DECONTAMINATE EXPOSED SKINDECONTAMINATE EXPOSED SKIN
• Decontaminate HandsDecontaminate Hands• Remove one skin decontaminating packet from the Remove one skin decontaminating packet from the
carrying pouch.carrying pouch.• Tear open quickly at notch. Although any notch may Tear open quickly at notch. Although any notch may
be used to open the packet, opening at the TEAR be used to open the packet, opening at the TEAR LINE will place applicator pad in a position that is LINE will place applicator pad in a position that is easier to use.easier to use.
• Remove applicator pad from packet and discard Remove applicator pad from packet and discard empty packet.empty packet.
• Unfold applicator pad and slip finger(s) into handle.Unfold applicator pad and slip finger(s) into handle.

DECONTAMINATE EXPOSED SKINDECONTAMINATE EXPOSED SKIN
• Thoroughly scrub exposed skin on the casualty's Thoroughly scrub exposed skin on the casualty's hands (back of hand, palm, and fingers) until hands (back of hand, palm, and fingers) until completely covered with black powder from the completely covered with black powder from the applicator pad.applicator pad.
• Decontaminate FaceDecontaminate Face• Thoroughly scrub exposed skin of the casualty's face Thoroughly scrub exposed skin of the casualty's face
until completely covered with black powder from the until completely covered with black powder from the applicator pad.applicator pad. Have casualty hold his breath, close his eyes. Grasp his Have casualty hold his breath, close his eyes. Grasp his
mask beneath chin, and pull hood and mask away from chin mask beneath chin, and pull hood and mask away from chin enough to allow one hand between the mask and the face. enough to allow one hand between the mask and the face. Hold mask in this position until you discard the applicator Hold mask in this position until you discard the applicator pad.pad.

DECONTAMINATE EXPOSED SKINDECONTAMINATE EXPOSED SKIN
Scrub up and down across face beginning at from of one ear Scrub up and down across face beginning at from of one ear to nose to other ear.to nose to other ear.
Scrub across face to corner of nose.Scrub across face to corner of nose. Scrub extra stroke at corner of nose.Scrub extra stroke at corner of nose. Scrub across nose and tip of nose to other corner of nose.Scrub across nose and tip of nose to other corner of nose. Scrub extra stroke at corner of nose.Scrub extra stroke at corner of nose. Scrub across face to other ear.Scrub across face to other ear.

DECONTAMINATE EXPOSED SKINDECONTAMINATE EXPOSED SKIN
Next scrub up and down across face to mouth to other end Next scrub up and down across face to mouth to other end of jawbone.of jawbone.
Scrub across cheek to corner of mouth.Scrub across cheek to corner of mouth. Scrub extra stroke at corner of mouth.Scrub extra stroke at corner of mouth. Scrub across closed mouth to center of upper lip.Scrub across closed mouth to center of upper lip. Scrub extra stroke above upper lip.Scrub extra stroke above upper lip. Scrub across closed mouth to other corner of mouth.Scrub across closed mouth to other corner of mouth. Scrub extra stroke at corner of mouth.Scrub extra stroke at corner of mouth. Scrub across cheek to end of jawbone.Scrub across cheek to end of jawbone.

DECONTAMINATE EXPOSED SKINDECONTAMINATE EXPOSED SKIN
Next, scrub up and down across face to chin and to other Next, scrub up and down across face to chin and to other end of jawbone.end of jawbone.
Scrub across the under jaw to chin, cupping.Scrub across the under jaw to chin, cupping. Scrub extra stroke at center of chin.Scrub extra stroke at center of chin. Scrub across the under jaw to the end of the jawbone.Scrub across the under jaw to the end of the jawbone. Turn your hand out, and quickly wipe the inside of the mask Turn your hand out, and quickly wipe the inside of the mask
that touches the face.that touches the face. Discard applicator pad.Discard applicator pad. Immediately seal mask, clear, and check it.Immediately seal mask, clear, and check it. Remove second skin decontaminating packet from carrying Remove second skin decontaminating packet from carrying
pouch.pouch. Tear open quickly at notch.Tear open quickly at notch. Remove applicator pad from packet and discard empty Remove applicator pad from packet and discard empty
packet.packet.
DECONTAMINATE EXPOSED SKINDECONTAMINATE EXPOSED SKIN
• Decontaminate NeckDecontaminate Neck If the casualty was already masked when becoming If the casualty was already masked when becoming
contaminated, without breaking the seal between the face contaminated, without breaking the seal between the face and mask, thoroughly scrub skin of neck and ears until and mask, thoroughly scrub skin of neck and ears until completely covered with black powder.completely covered with black powder.
Redo hands until completely covered with black powder.Redo hands until completely covered with black powder. Discard applicator pad.Discard applicator pad. Put the protective gloves on the casualty.Put the protective gloves on the casualty. Fasten casualty's hood.Fasten casualty's hood. Remove powder with soap and water when operational Remove powder with soap and water when operational
conditions permit. It does not matter how long the powder conditions permit. It does not matter how long the powder stays on your skin.stays on your skin.
Bury the used pads and packets if circumstances permit.Bury the used pads and packets if circumstances permit.
ADMINISTER FIRST AID TO AADMINISTER FIRST AID TO ANERVE AGENT CASUALTYNERVE AGENT CASUALTY
CLOSINGCLOSING
Masking the casualty, administering three Mark 1 kits Masking the casualty, administering three Mark 1 kits and CANA, and decontaminating exposed skin are and CANA, and decontaminating exposed skin are initial treatment measures for a nerve agent casualty. initial treatment measures for a nerve agent casualty. The medical phase of the combat lifesaver course The medical phase of the combat lifesaver course presents additional treatment procedures for severe presents additional treatment procedures for severe nerve agent casualties and treatment for victims of nerve agent casualties and treatment for victims of other types of chemical agents. This lesson is tested other types of chemical agents. This lesson is tested on the written examination.on the written examination.

QuestionsQuestions