color sign printer - primeralabel.euprimeralabel.eu/manuals/pictura310s-en.pdf · to the remainder...
TRANSCRIPT

CCoolloorr SSiiggnn PPrriinntteerrUser’s Manual

Notices
The information in this document is subject tochange without notice.
THE PRINTER MANUFACTURER MAKES NOWARRANTY OF ANY KIND WITH REGARD TOTHIS MATERIAL, INCLUDING, BUT NOTLIMITED TO, THE IMPLIED WARRANTIES OFMERCHANTABILITY AND FITNESS FOR APARTICULAR PURPOSE.
The printer manufacturer shall not be liable forerrors contained herein or for incidental damagesin connection with the furnishing, performance, oruse of this material.
This document contains proprietary informationwhich is protected by copyright. All rights arereserved. No part of this document may bephotocopied, reproduced, or translated intoanother language without the prior written consentof the printer manufacturer.
The Color Sign Printer has had the followingpatents issued:
5,378,0725,480,242
Trademark Acknowledgements
IBM is a registered trademark of InternationalBusiness Machines Corporation. Windows is aregistered trademark of Microsoft Corporation.Apple and Macintosh are registered trademarks ofApple Computer, Inc. ColorSync, QuickDraw,System 7, LocalTalk, and TrueType are trademarksof Apple Computer, Inc. Adobe, Adobe Illustrator,and Type Manager are trademarks and PostScriptis a registered trademark of Adobe Systems,Incorporated. All other trademarks are theproperty of their respective owners.
Printing History
Edition 1.0, #970724
© Copyright 1997 All rights reserved.
iii

For Users in the United States:
This equipment has been tested and found tocomply with the limits for a Class A digital device,pursuant to Part 15 of the FCC Rules. These limitsare designed to provide reasonable protectionagainst harmful interference in a residentialinstallation. This equipment generates, uses, andcan radiate radio frequency energy and, if notinstalled and used in accordance with theinstructions, may cause harmful interference toradio communications. However, there is noguarantee that interference will not occur in aparticular installation. If this equipment doescause harmful interference to radio or televisionreception, which can be determined by turning theequipment off and on, the user is encouraged to tryto correct the interference by one or more of thefollowing measures: Re-orient or relocate the receiving antenna. Increase the separation between the equipment
and receiver. Connect the equipment into an outlet on a circuit
different from that to which the receiver isconnected.
Consult the dealer or an experienced radio/TVtechnician for help.
Use of a shielded cable is required to comply withthe Class A limits of Part 15 of the FCC Rules.
You are cautioned that any changes ormodifications not expressly approved in thismanual could void your authority to operateand/or obtain warranty service for this equipment.
For Users in Canada:
This digital apparatus does not exceed the Class Alimits for radio noise for digital apparatus set outon the Radio Interference Regulations of theCanadian Department of Communications.
Le present appareil numerique nÕemet pas debruits radioelectriques depassant les limitesapplicables aux appareils numeriques de la class Aprescrites dans le Reglement sur le brouillageradioelectrique edicte par le ministere desCommunications du Canada.
iv

v
Table ofContents
Section 1: IntroductionA. How Your Color Sign Printer Works .........1B. Special Features ............................................2
Section 2: Safety Precautions .........................3
Section 3: Getting StartedA. Choosing a Good Location ..........................8B. About Moisture Condensation ...................8C. Unpacking and Inspection ..........................8D. Identifying the Parts .....................................9E. Removing the Ribbon Cartridge ..............10
Section 4: Ribbons and Print MediaA. Introduction..................................................12B. About Ribbons ............................................12C. Loading Ribbon into the
Ribbon Cartridge ........................................14D. Placing the Ribbon Cartridge
into the Printer ............................................15E. About Print Media.......................................16F. Specialty Supplies and Applications .......17G. Loading Print Media into the
Supply Tray .................................................18H. Inserting the Media Tray Assembly
into the Printer .............................................20I. Important Print Media Information..........21
Section 5: Powering Up the PrinterA. Applying Power .........................................23B. Running the Self Test .................................24
Section 6: Using the Color Sign Printerwith an IBM-PC or Compatible
A. Connecting the Color Sign Printer toYour PC ........................................................26
B. Installing the Windows GDI Printer Driver Software............................................27
C. Installing the 32-Bit Print Spoolerfor Windows 95 ...........................................30
D Configuring Your ComputerÕsParallel Port ..................................................32
E. Setting Up the Windows GDI PrinterDriver ...........................................................35
Section 7: Using the Color Sign Printerwith a Macintosh
A. Connecting the Color Sign Printer to your Macintosh ...........................................41
B. Installing the Color QuickDraw Printer Driver Software .............................42
C. Choosing the QuickDrawPrinter Driver ..............................................44
D. Setting Up the QuickDrawPrinter Driver ..............................................45

vi
Section 8: Using the Print Backgrounder forMacintosh
A. Introduction..................................................54B. Installing the Backgrounder ......................54C. Printing with the Backgrounder ...............54D. The Backgrounder Status Window ..........55E. Backgrounder Menus .................................55F. Problems During a Background Print .....57G. Batch Printing...............................................58
Section 9: Printing with Your Color SignPrinter
A. Interpreting the LED Indicator Lights......59B. Printing a Process Color Image
with a Paneled Ribbon................................60C. Printing a Process Color Image
with Spot-Color Resin Ribbons .................61D. Printing a One Color Image with
a Spot-Color Resin Ribbon .........................63E. Printing a Multi-Spot-Color Image
with Spot-Color Resin Ribbons .................64
Section 10: MaintenanceA. Supplies Required .......................................66B. Cleaning the Printhead...............................67C. Cleaning the PrinterÕs Case........................68D. Cleaning the Inside of the Printer .............68E. Clearing a Print Media Jam........................68F. Clearing a Ribbon Jam ................................69G. Cleaning the Drive Roller...........................69H. Cleaning the In-Feed Rollers .....................70
Section 11: TroubleshootingA. General Troubleshooting for the
Color Sign Printer........................................71B. Troubleshooting for the Color Sign
PrinterÕs Macintosh Printer Driverand Backgrounder Software ......................82
Section 12: Technical Specifications ...........84
Appendix A: Interfacing InformationA. Introduction .................................................86B. Centronics-type Parallel Interface ............86C. Mini 8-Pin Serial Interface .........................87
Index ..................................................................88

1Introduction
Thank you forchoosing theColor SignPrinter. The ColorSign Printer hasbeen designed toprovide you withstunning, high-quality coloroutput onoutdoor-durablevinyl, paper,transparency filmor even T-shirttransfer paper. Itoffers manyfeatures whichmake printingfull-color signs,labels, decals,proofs, layouts,and heat transfersvery fast, easyand exciting.
A. How Your Color Sign Printer Works
The Color Sign Printer utilizes two different, yetclosely related printing technologies to achieve itsremarkable output Ñ thermal transfer and dye-sublimation.
Thermal Transfer
Thermal transfer is a process which uses either aresin-based or a wax-based ribbon roll as a carrierfor transferring color to either ribbonsÕ appropriatetype of print media (see Section 4 for moreinformation on these ribbons and the appropriateprint media for each). Such ribbons are available insingle spot colors and/or in a paneled form whichincludes each of the yellow, magenta, and cyanprocess colors on the same ribbon roll. Byproviding each of the process colors, paneledribbons allow you to conveniently produce full-color images automatically, from a single ribbon.
As the ribbon and print media pass simultaneouslybeneath the Color Sign PrinterÕs printhead,thousands of thermal elements within theprinthead melt the colored inks, thus transferringthousands of tiny colored dots from the ribbononto the print media. If using a paneled ribbon, theprint media automatically makes a separate passfor each colored panel on the ribbon. By combiningdifferent colored dots from each ribbon panel indifferent combinations (this process is calledÒditheringÓ), the Color Sign Printer is able to printup to 16.7 million colors.
Dye-Sublimation
Dye-sublimation is similar to thermal transfer inthat it still involves a paneled, multi-pass processbeneath the same thermal printhead. Thedifference, however, lies within the special dye-sublimation ribbon and print media and in thetransfer process itself.
Unlike a thermal transfer ribbon, each coloredpanel on a dye-sublimation ribbon is composed ofa colored dye rather than a colored ink. When thedyes on the ribbon are heated beneath the thermalprinthead, they vaporize and diffuse into thesurface of the special dye-receptive print media. Byvarying the heat intensity of each thermal elementwithin the printhead, the Color Sign Printer is ableto change the value and hue of each transferred dotof color. This results in the blending of one coloreddot into the next, producing continuous-tone,photo-realistic, color-accurate images with nodithering.
1

B. Special Features
With its dual function thermal transfer/dye-sublimation color printing capability, the ColorSign Printer offers you incredible printingversatility. Its wax thermal transfer mode deliversfast, inexpensive color output or proofs on paperstock, while its resin thermal transfer mode printsoutdoor-durable labels, signs, and decals on long-lasting vinyl print media. And with its dye-sublimation mode, you get continuous-tone, photo-quality output no other color printing technologycan match.
Switching back and forth between these printingmethods is easy. All you do is load either thethermal transfer ribbon with the appropriate printmedia or the dye-sublimation ribbon with its printmedia, and select the appropriate printing choicefrom within the included software printer driver.The entire change-over process only takes about 15to 20 seconds.
And, best of all, operation is simple and straightforward. The Color Sign Printer will print from anyIBM-PC¨ or compatible running Windows¨
3.1x/Windows 95 or any Macintosh¨/PowerPCªwhich has system software 7.0 or higher, a Geo-compatible serial port, and which supports ColorQuickDrawª. This means that you can use theprinter with virtually any software packagerunning under these operating environmentswithout any special set-up or configuration beyondthe initial installation of the specific software driverand interface cable.
To begin using the Color Sign Printer, please referto the remainder of this manual. This UserÕsManual is your complete step-by-step guide tosetting up and printing with your powerful, newColor Sign Printer.
2

2SafetyPrecautions
3
Before operating the unit, please read the following safety precautions carefully.
Warnings
CAUTION!
TO PREVENT FIRE OR SHOCK HAZARD, DO NOT EXPOSE THE UNITTO RAIN OR MOISTURE. TO REDUCE THE RISK OF ELECTRICSHOCK, DO NOT REMOVE FRONT, TOP, SIDE, OR REAR PANELS. NOUSER-SERVICEABLE PARTS INSIDE. REFER SERVICING TOQUALIFIED SERVICE PERSONNEL.
Operate the unit only on 120 VAC, 60 Hz, if operating within the UnitedStates or Canada. For printers that have been shipped outside of the UnitedStates and Canada, operate the unit only on 230/250 VAC. If you have anydoubt as to whether you have a unit with the correct voltage rating for yourcountryÕs power supply, DO NOT ATTEMPT TO USE THE UNIT. Contactyour dealer or the factory.
Stop operation immediately if any liquid or solid object should fall into thecabinet. Unplug the unit and have it checked by qualified service personnel.
Do not disassemble the cabinet. Refer servicing only to qualified personnel.
Sicherheits-ma§nahmen
Vor Inbetriebnahme bitte die folgenden Sicherheitsma§nahmen beachten.
Sicherheitshinweise
VORSICHT!
ZUR VERHTUNG VON FEUERGEFAHR ODER STROMSCHLGENDAS GERT VOR REGEN ODER FEUCHTIGKEIT SCHTZEN. UM DIEGEFAHR VON STROMSCHLGEN ZU VERHINDERN, KEINEGERATEABDECKUNGEN ABNEHMEN. DAS GERT ENTHLTKEINE TEILE, DIE VOM BENUTZER GEWARTET WERDEN KNNEN.WARTUNGSARBEITEN DRFEN NUR VON QUALIFIZIERTEMFACHPERSONAL DURCHGEFHRT WERDEN.
Innerhalb der USA und Kanada das Gert nur mit 120 V Wechselstrom und60 Hz betreiben. Drucker, die au§erhalb der USA oder Kanada verwendetwerden, drfen nur mit 230/250 V Wechselstrom betrieben werden. WennSie nicht sicher sind, ob Ihr Gert fr die in Ihrem Land verwendeteNennspannung ausgelegt ist, DAS GERT NICHT IN BETRIEBNEHMEN. Wenden Sie sich in diesem Fall an Ihren Hndler oder denHersteller des Gertes.
Den Betrieb sofort unterbrechen, wenn ein Gegenstand in das Gehusegefallen oder Flssigkeit eingedrungen ist. Den Netzstecker ziehen und dasGert von qualifiziertem Wartungspersonal berprfen lassen.
Keine Gehuseteile abnehmen. Wartungsarbeiten nur von qualifiziertemFachpersonal durchfhren lassen.

4
Consignesde scurit
Avant dÕutiliser lÕappareil, prire de lire attentivement les consignes de scuritsuivantes.
AvertissementsATTENTION !
POUR EVITER TOUT RISQUE DÕINCENDIE OU DÕELECTROCUTION, NEPAS EXPOSER LÕAPPAREIL A LA PLUIE OU A LÕHUMIDITE. POUR EVITERTOUTE DECHARGE ELECTRIQUE, NE PAS RETIRER LES PANNEAUXAVANT, SUPERIEUR, LATERAUX OU ARRIERE. NE PAS TENTER DEREPARER SOI-MEME LES PIECES A LÕINTERIEUR DE LÕAPPAREIL.CONFIER LÕENTRETIEN DE LÕAPPAREIL A UN PERSONNEL QUALIFIE.
Faire fonctionner lÕappareil uniquement sur courant alternatif de 120 V, 60 Hzaux Etats-Unis ou au Canada. Pour les imprimantes expdies en-dehors desEtats-Unis et du Canada, faire fonctionner lÕappareil uniquement sur courantalternatif de 230/250 V. En cas de doute sur la tension nominale du blocdÕalimentation local, NE PAS TENTER DÕUTILISER LÕAPPAREIL.Contacter le distributeur ou lÕusine.
Arrter immdiatement le fonctionnement si un liquide ou un solide venait sÕinfiltrer lÕintrieur de lÕarmoire. Dbrancher lÕappareil et le faire vrifierpar un personnel qualifi.
Ne pas dmonter lÕarmoire. Confier lÕentretien de lÕappareil un personnelqualifi.
Antes de operar la unidad, por favor, lea detenidamente las siguientesprecauciones de seguridad.
Advertencias
ÁPRECAUCION!
PARA EVITAR PELIGROS DE INCENDIO O CHOQUE ELECTRICO, NOEXPONGA LA UNIDAD A LA LLUVIA NI A LA HUMEDAD. PARAREDUCIR EL RIESGO DE CHOQUE ELECTRICO, NO QUITE LOSPANELES DELANTERO, SUPERIOR, LATERALES NI TRASERO. ELINTERIOR NO TIENE PIEZAS REPARABLES POR EL USUARIO. PARASERVICIO DE REPARACION Y MANTENIMIENTO, SOLICITE LAATENCION DE UN TECNICO DE SERVICIO AUTORIZADO.
Opere la unidad slo a 120 VCA, 60 Hz, si la opera dentro de los EstadosUnidos o Canad. Para las impresoras que han sido enviadas fuera de losEstados Unidos y Canad, opere la unidad slo a 230/250 VCA. Si no estseguro de que su unidad est especificada con el rgimen correcto de voltajepara la corriente de su pas, NO INTENTE USAR LA UNIDAD. Pngase encontacto con su distribuidor o con la fbrica.
Detenga la operacin inmediatamente si algn lquido u objeto slido cayeraen el armario. Desenchufe la unidad y hgala revisar por un tcnico deservicio autorizado.
No desarme el armario. Para servicio de mantenimiento, solicite la atencinde un tcnico autorizado.
Precaucionesde seguridad

PrecauesdeSegurana
5
Precauzioniper laSicurezza
Prima di dare inizio al funzionamento dellÕunit siete pregati di leggereattentamente le seguenti precauzioni di sicurezza.
Avvertenze
ATTENZIONE!
ONDE EVITARE IL PERICOLO DI INCENDIO O SCOSSA ELETTRICA,NON ESPORRE LÕUNITË ALLA PIOGGIA OD UMIDITË. EVITARE DIRIMUOVERE I PANNELLI ANTERIORE, SUPERIORE, LATERALE OPOSTERIORE PER RIDURRE IL RISCHIO DI SCOSSA ELETTRICA. LAMANUTENZIONE DELLE PARTI INTERNE DELLÕUNITË NON é DICOMPETENZA DELLÕUTENTE. AI FINI DELLA RIPARAZIONERIVOLGERSI AL PERSONALE DI COMPETENZA.
Negli Stati Uniti e Canada lÕunit funziona solo con alimentazione a 120VAC, 60 Hz. Le stampanti destinate ad altri paesi funzionano solo conalimentazione di 230/250 VAC. Qualora non abbiate la certezza che iltrasformatore e la spina di cui disponete siano quelli adeguati allÕalimentazione erogata nel vostro paese, NON USARE LÕUNITË. Rivolgersipiuttosto al rivenditore o la fabbrica del luogo.
Arrestare immediatamente il funzionamento dellÕunit qualora si verifichiun versamento di liquido o la caduta di un oggetto solido al suo interno.Staccare la spina e rivolgersi al personale di assistenza qualificato.
Non smontare la struttura dellÕalloggiamento. Le riparazioni vannoeffettuate solo dal personale di competenza.
Antes de operar a unidade, por favor leia cuidadosamente as seguintesprecaues de segurana.
Advertncias
CUIDADO!
PARA EVITAR O PERIGO DE INCæNDIO OU CHOQUE ELTRICO,NÌO EXPONHA A UNIDADE Ë CHUVA OU UMIDADE. PARAREDUZIR O RISCO DE CHOQUE ELTRICO, NÌO REMOVA OSPAINIS DIANTEIRO, SUPERIOR, LATERAIS OU TRASEIRO. NÌO HçPEAS NO INTERIOR QUE POSSAM SER CONSERTADAS PELOUSUçRIO. PARA MANUTENÌO, PEA ASSISTæNCIA A UMTCNICO QUALIFICADO.
Opere a unidade somente em 120 VAC, 60 Hz, se estiver operando nosEstados Unidos ou Canad. Para impressoras enviadas para fora dos EstadosUnidos e Canad, opere a unidade somente em 230/250 VAC. Se voc tiverdvidas a respeito da graduao correta de voltagem para a alimentao deenergia do seu pas, NÌO TENTE USAR ESTA UNIDADE. Entre emcontato com seu revendedor ou com a fbrica.
Se qualquer lquido ou objeto cair dentro do gabinete, pre a operaoimediatamente. Desligue a unidade da tomada e chame um tcnicoqualificado.
No desmonte o gabinete. Para manuteno, pea assistncia somente a umtcnico qualificado.

6

7
3GettingStarted
A. Choosing a Good Location
Place the unit in a location with adequate aircirculation to prevent internal heat build up.
1. Use the dimensions specified in Section 12 as aguideline for the minimum clearances to the unit.
2. Do not place the unit in a location where theventilation holes located on the rear of the unitcould become blocked.
3. Do not install unit near heat sources, such asradiators or air ducts, or in a place subject to directsun-light, excessive dust, mechanical vibration, orshock.
B. About Moisture Condensation
If the unit is brought directly from a cold to a warmlocation, or is placed in a very damp room,moisture may condense inside the unit. Should thisoccur, print quality may not be optimum. Leave theunit turned off in a warm, dry room for severalhours before using. This will allow the moisture toevaporate.
C. Unpacking and Inspection
While unpacking your printer, inspect the carton toensure that no damage has occurred duringshipping. Make sure that all supplied accessoriesare included with your unit. The following itemsshould be included within the Color Sign PrinterÕspackaging: Printer Power Cord Interface Cable Media Supply Tray Media Tray Cover Ribbon Cartridge 3-Color Resin Ribbon (50 Prints) #300-Series White Calendered Vinyl (50 Sheets) Printer Driver Diskette (3.5Ó) 32-Bit Print Spooler Diskette (3.5Ó); for use in
Windows 95 only Warranty Statement and Registration Card This manual and other printed information
Save the carton and packing materials. They willcome in handy when transporting the unit.
8

D. Identifying the Parts
This illustration shows the features found on thefront of your Color Sign Printer.
The On-Line Button takes the printer on- and off-line. When the printer is on-line, the on-line LEDlight will turn ON. When the printer is off-line, theon-line light will turn OFF. The printer must haveits on-line light ON in order to print. Whenflashing, the on-line light also serves to indicate anumber of other printer conditions. Suchconditions are discussed in Section 9-A of thismanual.
The Cancel Button cancels the print job currentlybeing printed. After a print job is canceled, bothLED lights will once again turn ON. Any printmedia remaining in the printer after the cancelbutton is pressed will automatically be ejected.
The Cover Release Button opens the printerÕs TopCover allowing you to load and/or change printribbons.
The Media Tray Assembly is where blank printmedia is loaded and where finished output isejected.
9
Cover ReleaseButton
Cancel Button
On-line Button
Cancel LED
On-line LEDMedia TrayAssembly
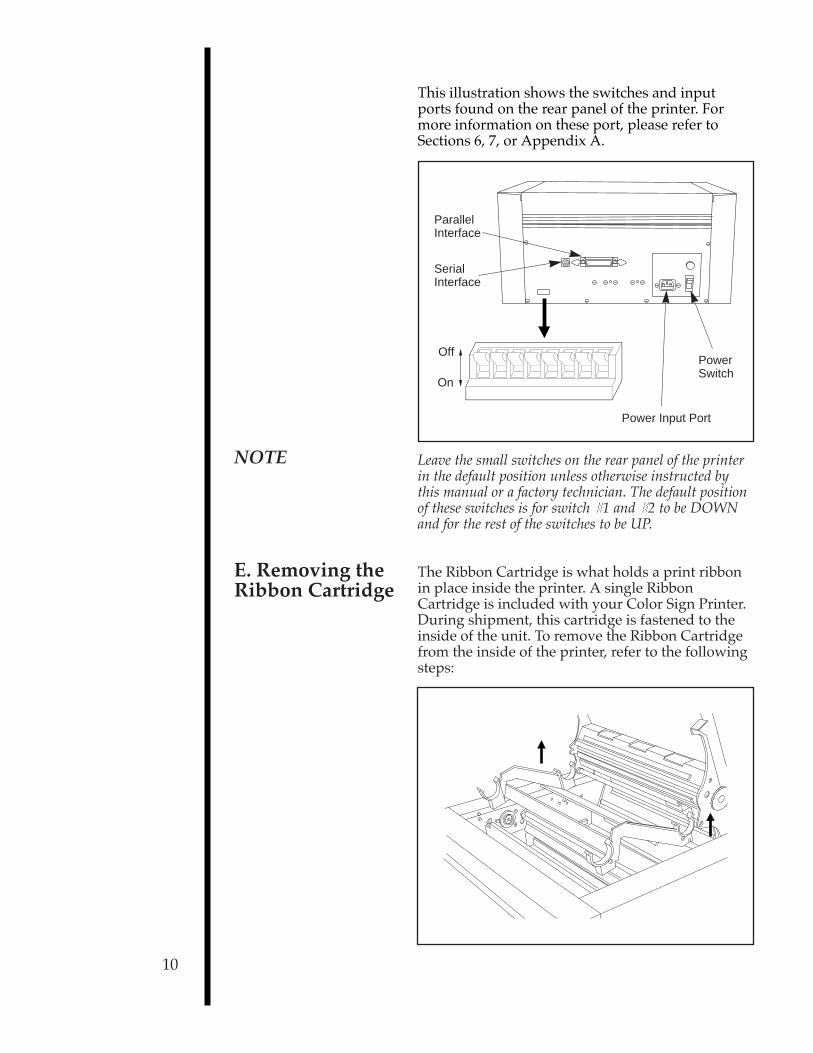
This illustration shows the switches and inputports found on the rear panel of the printer. Formore information on these port, please refer toSections 6, 7, or Appendix A.
NOTE Leave the small switches on the rear panel of the printerin the default position unless otherwise instructed bythis manual or a factory technician. The default positionof these switches is for switch #1 and #2 to be DOWNand for the rest of the switches to be UP.
E. Removing the Ribbon Cartridge
The Ribbon Cartridge is what holds a print ribbonin place inside the printer. A single RibbonCartridge is included with your Color Sign Printer.During shipment, this cartridge is fastened to theinside of the unit. To remove the Ribbon Cartridgefrom the inside of the printer, refer to the followingsteps:
10
ParallelInterface
SerialInterface
Power Input Port
On
OffPowerSwitch

1. Press the Cover Release Button. Allow thecover to swing up and open.
2. With the cover open, you can see the RibbonCartridge.
3. Remove the shipping tape from both sides ofthe cartridge. GRASPING EACH SIDE OF THECARTRIDGE, lift it straight up and carefullyremove it from the printer.
You are now ready to go on to Section 4 to learnabout print ribbons, print media, and how each isloaded into the printer.
11

4Ribbons andPrint Media
A. Introduction The Color Sign Printer is able to produce a varietyof output by using a variety of different printribbons. Each of these ribbons is unique, and eachrequires its own compatible print media. To make iteasy for you to remember which ribbons are to beused with which print media and which type ofoutput each set of print supplies will produce, theColor Sign PrinterÕs print supplies are divided intothree separate categories Ñ dye-sublimation, resinthermal transfer, and wax thermal transfer.
This section describes the ribbon and print mediain each of these categories and explains how toinstall these print supplies into your printer. Thissection also explains the Color Sign PrinterÕsspecialty supplies which can be used to createpositive film for screens, fabric transfers, and evenphoto coffee mugs.
B. About Ribbons Dye-Sublimation
For photo-quality, full-color printing with nodithering, the Color Sign Printer offers both a 3-color (C,M,Y,O) and a 4-color (C,M,Y,K) dye-sublimation ribbon. The 3-color dye-sublimationribbon, called FotoShieldª, provides the threeprocess colors of yellow, magenta, and cyan alongwith a clear overlay panel which makes printedimages more durable. Due to its increased printlongevity and fade resistance, this ribbon is idealfor printing digital photographs or indoor, photo-quality signage.
The 4-color dye-sublimation ribbon also providesthe three process colors of yellow, magenta, andcyan but provides a black panel in place of anoverlay panel. With its added black panel, thisribbon is ideal for printing pre-press proofs,layouts, or any other image which requires trueblack text or graphics.
NOTE Since the 4-color ribbon does not include a protectiveoverlay, the longevity of its printed images will besignificantly less than that of the 3-color FotoShieldribbon. If maximum dye-sublimation print longevity isrequired, you must use the 3-color FotoShield ribbonwith overlay.
The 3-color and 4-color dye-sublimation ribbonsproduce 50 prints and provide a maximumprintable area of 11.95Ó x 17.4Ó (304 x 442mm). Dye-sublimation ribbons are distinguished by theirGRAY plastic cores and can be use only inconjunction with the Color Sign PrinterÕs specialdye-receptive paper (see Part E of this section formore information on dye-sublimation paper).12

Resin Thermal Transfer
For long lasting, outdoor-durable printing, theColor Sign Printer offers both a 3-color (C,M,Y)resin thermal transfer ribbon and a variety of spotcolor resin ribbons. The 3-color resin ribbon allowsyou to automatically print full process colorimages. The spot color resin ribbons allow you toprint single or multi-spot-color jobs. Please notethat process color output from the 3-color ribbonwill dither. Due to the nature of resin inks, resinribbons are ideal for creating highly-durable signs,labels, or decals for use in more challengingenvironments.
A single 3-color resin ribbon is included with yourprinter. This will allow you to begin printingimmediately. 3-color resin ribbons produce 50prints and have a maximum printable area of up to11.95Ó x 22Ó (304 x 559mm) when used with theextended length vinyl. The spot color resin ribbonsproduce about 200 prints and have a maximumprintable area of up to 11.95Ó x 24Ó (304 x 610mm).Resin thermal transfer ribbons are distinguished bytheir WHITE plastic cores and should be used onlyin conjunction with the #300-Series polyester andvinyl print media (see Part E of this section formore information on #300-Series print media).
Wax Thermal Transfer
For quick, inexpensive full-color printing, theColor Sign Printer offers a 4-color (C,M,Y,K) waxthermal transfer ribbon. Like the 4-color dye-sublimation ribbon, this ribbon provides all of theprocess colors including the black panel. With itslow cost and fast print speed, the 4-color waxribbon is ideal for printing proofs of your designsor for printing low-durability, temporary indoorsignage. It is also the ribbon required for printingonto the your printerÕs special T-shirt transferpaper (see Part F of this section for moreinformation on specialty supplies).
The 4-color wax ribbon produces 80 prints andprovides a maximum printable area of 11.95Ó x17.4Ó (304 x 442mm). Wax thermal transfer ribbonsare distinguished by their TAN cardboard coresand should be use only in conjunction with thewax thermal transfer paper (see Part E of thissection for more information on wax thermalpaper).
A monochrome wax thermal ribbon (K) is alsoavailable for printing monochrome images ontopaper or onto transparency film for making
13

positive film for screens. This ribbon produces 200prints and provides a maximum printable area of11.95Ó x 17.4Ó (304 x 442mm).
For added convenience, the Color Sign Printer alsoaccepts smaller A/A4 Super-size 4-color waxthermal and dye-sublimation ribbons. Theseribbons produce 50 prints and are perfect forprinting smaller format images in sizes up to8.8Ó x 11.3Ó (224 x 287mm). Use these ribbons onlywith the Color Sign PrinterÕs A/A4 Super-size(9Ó x 14Ó/229 x 356mm) wax thermal or dye-sublimation papers. Note that A/A4 Super-sizeprint supplies are not available for resin thermalprinting. For current selection and availability onall of the Color Sign Printer ribbons, please contactyour nearest reseller or the printer manufacturerÕssupplies department.
C. Loading Ribboninto the Ribbon Cartridge
Whether using the Ribbon Cartridge supplied withyour printer or using other cartridges purchasedseparately, all Color Sign Printer Ribbon Cartridgescan be used with any of the different print ribbons.As you purchase additional print ribbons, you mayalso wish to purchase additional Ribbon Cartridgesfor each. This makes the process of switchingribbons much faster and much more convenient.Follow these steps to load a print ribbon into aRibbon Cartridge:
1. Remove the ribbon from its packaging. Do nottouch the colored portion of the ribbon. Oil or dirtfrom your hands can impair print quality. Handlethe ribbon only by the ends of its ribbon cores.
2. The supply end of the ribbon is the end withthe fresh, unused ribbon on it. The take-up end ofthe ribbon is the other end.
14
Supply
Take-up

3. Place the supply end of the ribbon into thesupply end of the Ribbon Cartridge as indicated.Make certain that the ribbon is fed fromunderneath the supply end of the ribbon roll, up and over the top of the take-up end of theribbon roll.
IMPORTANT! DO NOT REVERSE THE RIBBON. DAMAGE MAYOCCUR TO THE THERMAL PRINTHEAD!
Once the ribbon is installed into the RibbonCartridge, it can then be placed into the printer.
D. Placing theRibbon Cartridgeinto the Printer
1. Press the Cover Release Button. Allow thecover to swing up and open.
2. With the cover open,place the loaded RibbonCartridge into the printer.Be certain that the supplyend of the RibbonCartridge is towards therear of the printer.
3. Close the cover. Whenyou start to print, thenotches on the RibbonDrive Hub and the take-up roll will automaticallyengage.
15
Take-up End
Supply End

E. About Print Media
Dye-Sublimation
For dye-sublimation printing, a special dye-receptive paper is required. This paper isspecifically designed for printing with the ColorSign PrinterÕs dye-sublimation ribbons and mustbe used in order to print dye-sublimation output. Itis available in a B/A3 Super-size (12Ó x 20Ó/305 x508mm) and comes packaged in 50 sheetquantities. When using dye-sublimation paper,keep in mind that there are two distinct types ofthis paper available: one is for use only with the 3-color FotoShield dye-sublimation ribbon, and theother is for use only with the 4-color dye-sublimation ribbon. Each of these specific papers islabeled accordingly and should not be usedinterchangeably. When printing with either paper,print only on the white, glossy side.
Resin Thermal Transfer
For resin thermal transfer printing, special #300-Series vinyl and polyester print media areavailable. This print media is specifically designedfor use with the Color Sign Printer. Both the vinyland the polyester are optimized to feed and printconsistently and are also carefully packaged indust-free plastic bags to help prevent dust fromcontaminating your output. For these reasons, it ishighly recommended that you use only #300-Seriesprint media when printing resin thermal output.
#300-Series vinyl has a permanent adhesivebacking and is available in both a white cast and awhite or clear calendered. For your convenience, 50 sheets of the white calendered vinyl areincluded with your printer so you can immediatelybegin printing with the included 3-color resinribbon. Standard packages of #300-Series vinylinclude 100 sheets.
With the Color Sign PrinterÕs wide selection ofresin ribbon colors, the white or clear vinylsshould, in most cases, provide you with a goodsolution for printing a near limitless range ofbackground colors. If you do need a colored vinyl,however, it is recommended that you use onlyAvery XL1000 Series cast vinyl or Avery MX-4000Series calendered vinyl. If possible, it is alsorecommended that the top and bottom .55Ó (14mm)of this vinyl be stripped from the backing, just as isdone with the #300-Series vinyl. This will assuremore consistent feeding and printing. Other brandsof vinyl may feed through the printer, but sincevinyls vary so much from one to another, theprinter manufacturer will not be responsible for the results.
16

#300-Series polyester has a permanent adhesivebacking and is available with either a brushed goldor brushed silver metallic finish. These polyestermaterials are packaged in 100 sheet quantities andare perfect for printing inexpensive plaques andnameplates.
All #300-Series print media is available in a B/A3Super-size (12Ó x 20Ó/305 x 508mm). This printmedia provides a maximum printable area of11.95Ó x 17.4Ó (304 x 447mm). If a longer print areais required, an extended 12Ó x 26Ó (305 x 660mm)length is also available, but only in the whitecalendered vinyl. This extended print mediaprovides a maximum printable area of 11.95Ó x 22Ó(304 x 559mm) when used with the 3-color resinribbon or of 11.95Ó x 24Ó (304 x 610mm) when usedwith the spot color resin ribbons.
Wax Thermal Transfer
For wax thermal transfer printing, a premiumgrade wax thermal transfer paper is available. Thispaper is an ultra-smooth, coated paper stockoptimized for wax thermal printing. It is availablein a B/A3 Super-size (12Ó x 20Ó/305 x 508mm) andcomes packaged in 50 sheet quantities. Due to itsexceptional smoothness and extended length, thispaper is ideal for any type of larger format, full-color graphics printing. This paper can be printedon either side.
IMPORTANT! Always store the Color Sign PrinterÕs blank print mediain its original packaging and place on a smooth, flatsurface when not in use. Print media must not beexposed to excess dust, heat, direct sunlight, or moistureand must not be allowed to curl or bend.
F. Specialty Supplies and Applications
Transparency Film
With a wax thermal transfer ribbon installed, theColor Sign Printer is capable of printing ontospecially coated sheets of transparency film. Thisfilm is available in a B/A3 Super-size (12Ó x 20Ó/305 x 508mm) and comes packaged in 50 sheetquantities. When used with the opaquemonochrome wax thermal ribbon, transparencyfilm is ideal for creating positive film for screens.
Heat Transfers
A special T-shirt transfer paper is available whichallows the Color Sign Printer to print custom, full-color heat transfers. This paper is available in aB/A3 Super-size (12Ó x 20Ó/305 x 508mm) and is
17

for use only with the Color Sign PrinterÕs waxthermal transfer ribbons. Printed images can betransferred to T-shirts, aprons, banners,sweatshirts, mouse pads, caps, and more. A specialFotoMUG! Transfer Kit is also available, whichallows you to transfer photo-quality imagesprinted with the standard dye-sublimationsupplies to coated ceramic coffee mugs. Alltransferred images are permanent and machinewashable.
NOTE When printing images that will be transferred to a mug,the overlay of the 3-color FotoShield dye-sublimationribbon must not be applied. See Section 6-E or 7-D forinformation on how to disable this overlay.
For current selection and availability on all of theColor Sign PrinterÕs print media and specialtysupplies, please contact your nearest reseller or theprinter manufacturerÕs supplies department.
G. Loading Print Media into the Supply Tray
The Color Sign Printer has an adjustable MediaTray Assembly which consists of two separateparts: the Supply Tray and the Tray Cover.
18
Tray Cover
Supply Tray

The Supply Tray stores the blank media to beprinted. The Tray Cover rests on top of the SupplyTray and protects print media within the SupplyTray from dust or other contaminants. The TrayCover also helps guide media during the printingprocess and catches finished output after it isprinted. If you intend to use a variety of printmedia, you may wish to purchase additionalMedia Tray Assemblies. Additional trays not onlyoffer an ideal place to store blank print media, theyalso make the process of switching betweendifferent print media faster and more convenient.
Refer to the following steps to load print mediainto the Supply Tray:
1. Before loading any media, depress the springloaded panel of the Supply Tray until it is latchedin its ÒdownÓ position. This panel will unlatch andreturn to its ÒupÓ position when inserted into theprinter.
2. Remove a stack of print media from itspackaging. Please note that no more than about 50 sheets of print media should be loaded at atime. Do not attempt to load more than thisamount.
3. Fan the stack of print media to assure that noneof the sheets are sticking together. Then, neatlystack the media and check to see that it is free ofbent edges. Handle the print media only along theedges and DO NOT TOUCH THE PRINTABLESIDE. Oil or dirt from your hands can impair printquality.
19

4. Place the print media Ñ PRINT SIDE FACINGDOWN Ñ between the media guides of the SupplyTray. When inserted properly, the backing side ofthe print media will be facing up. Adjust the mediaguides snugly against the media stack. This willassure consistent feeding and printing.
NOTE Do not attempt to load print media on which you havealready printed or which is not factory approved.Printing onto such media may damage the printer.
Once print media is loaded into the Supply Tray,the Media Tray Assembly can then be inserted intothe printer. Although the separate parts of theMedia Tray Assembly can be loaded into theprinter one at a time, it is easiest to load the MediaTray when it is fully assembled. Refer to thefollowing steps to assemble and insert the MediaTray Assembly into the printer.
1. Place the assemblyÕs Tray Cover onto theSupply Tray so the extensions on the front edges ofthe Tray Cover engage the securing notches onboth sides of the Supply Tray.
20
H. Inserting theMedia TrayAssembly intothe Printer

2. Grasp the fully assembled Media TrayAssembly and slide it into the printer until themounting posts on both sides of the Supply Trayengage the securing notches on both sides of theprinterÕs front interior.
As the Media Tray Assembly is inserted into theprinter, you should hear its spring loaded panelautomatically unlatch and spring back to its ÒupÓposition. This panel forces the media stack againstthe printerÕs feed rollers to assure consistentfeeding.
I. Important Print Media Information
Now that you have successfully installed printmedia into your printer, you should be aware ofsome very important print media information. Thisinformation will make printing onto all the variousmedia sizes much easier and will help you avoidsome rather simple mistakes.
After installing print media, you must also selectthe appropriate paper size option for that mediafrom within the Color Sign PrinterÕs printer driversetup window (see Section 6-E or 7-D for moreinformation on the Color Sign PrinterÕs printerdriver). This will let the Color Sign Printer knowwhich print media size is currently loaded into theprinter. Although a number of paper size optionsare listed and supported in the printer driver, themain paper size options are Super A/A4, SuperB/A3, and Super B/A3 Long.
When choosing the appropriate paper size optionfrom within the printer driver, simply select thepaper size option that corresponds to the printmedia size currently installed in the printer. If, forexample, you are printing onto B/A3 Super-size(12Ó x 20Ó/305 x 508mm) print media, choose the 21
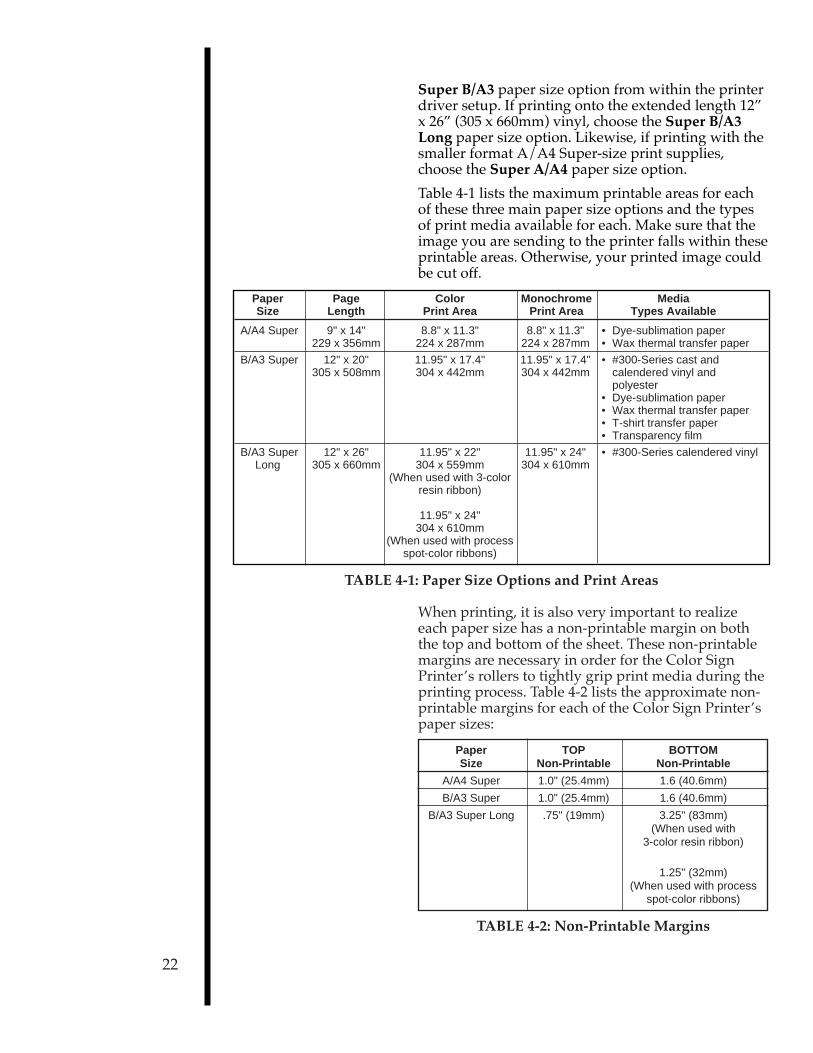
Super B/A3 paper size option from within the printerdriver setup. If printing onto the extended length 12Óx 26Ó (305 x 660mm) vinyl, choose the Super B/A3Long paper size option. Likewise, if printing with thesmaller format A/A4 Super-size print supplies,choose the Super A/A4 paper size option.
Table 4-1 lists the maximum printable areas for eachof these three main paper size options and the typesof print media available for each. Make sure that theimage you are sending to the printer falls within theseprintable areas. Otherwise, your printed image couldbe cut off.
Paper Page Color Monochrome Media Size Length Print Area Print Area Types Available
A/A4 Super 9" x 14" 8.8" x 11.3" 8.8" x 11.3" • Dye-sublimation paper229 x 356mm 224 x 287mm 224 x 287mm • Wax thermal transfer paper
B/A3 Super 12" x 20" 11.95" x 17.4" 11.95" x 17.4" • #300-Series cast and 305 x 508mm 304 x 442mm 304 x 442mm calendered vinyl and
polyester• Dye-sublimation paper• Wax thermal transfer paper• T-shirt transfer paper• Transparency film
B/A3 Super 12" x 26" 11.95" x 22" 11.95" x 24" • #300-Series calendered vinylLong 305 x 660mm 304 x 559mm 304 x 610mm
(When used with 3-colorresin ribbon)
11.95" x 24"304 x 610mm
(When used with processspot-color ribbons)
TABLE 4-1: Paper Size Options and Print Areas
When printing, it is also very important to realizeeach paper size has a non-printable margin on boththe top and bottom of the sheet. These non-printablemargins are necessary in order for the Color SignPrinterÕs rollers to tightly grip print media during theprinting process. Table 4-2 lists the approximate non-printable margins for each of the Color Sign PrinterÕspaper sizes:
Paper TOP BOTTOMSize Non-Printable Non-Printable
A/A4 Super 1.0" (25.4mm) 1.6 (40.6mm)
B/A3 Super 1.0" (25.4mm) 1.6 (40.6mm)
B/A3 Super Long .75" (19mm) 3.25" (83mm)(When used with
3-color resin ribbon)
1.25" (32mm)(When used with process
spot-color ribbons)
TABLE 4-2: Non-Printable Margins
22

5PoweringUp thePrinter
A. Applying Power1. Locate the powercord supplied with yourprinter.
2. With the printerspower switch turnedOFF, place one end ofthe power cord into thepower port on the rearpanel of the printer.
3. Place the other endof the power cord intoan available wall outlet.
4. Once the powercord is connected, pressthe power switchlocated on the rearpanel of the printer toturn the power ON.
23

B. Running the Self Testthe Self Test
Now that print supplies are installed and power isapplied, a self test should be performed to checkfor proper operation of the printer. The Color SignPrinter is capable of doing a specific self test printfor 3-color resin, wax thermal transfer, and dye-sublimation. To tell your printer which type of selftest you would like it to print, simply configure thesmall switches on the printerÕs rear panelaccordingly.
If you have a 3-color resin ribbon and #300-Seriesprint media installed, leave all switches set at theirdefault position of switches 1 and 2 DOWN andthe rest of the switches UP.
If you have a wax thermal transfer ribbon andprint media installed, flip all switches UP and turnthe printer power OFF and ON to reset the printer.
If you have #200-Series dye-sublimation suppliesinstalled, flip only switch 2 down and turn theprinter power OFF and ON to reset the printer.
Once you have selected the type of self test youwould like to print, refer to the following steps toinitiate the self test print.
1. Make sure the appropriate supplies areproperly loaded, that power is ON, and that theTop Cover is shut.
2. Press and release the cancel button. Notice theon-line light turns off momentarily just after thecancel button is pressed.
3. Immediately after pressing the cancel button,while the on-line light is momentarily off, pressand hold the on-line button until the printer beginsto feed a sheet of print media.
24

4. Release the on-line button when you hear theprinterÕs engine begin to cycle. The Color SignPrinter will print the self test image. A sample ofthis image is shown below.
Self Test Example(Approximately 30% of actual size)
25
PROGRAM VERSION
C 1.26 02/27/95

6Using theColor SignPrinter withan IBM-PCorCompatible
The Color Sign Printer is designed to be used withnearly any high-end IBM-PC or compatiblerunning Windows 3.1x or Windows 95. For bestperformance, a minimum of a Pentiumª classcomputer with 32 megabytes of RAM or higherand a hard disk with at least 200 megabytes of freespace is recommended. Note that processing speedwill increase if additional RAM is added.
The Color Sign Printer is equipped with aCentronics parallel interface port. This port is themeans through which the printer receives datafrom your computer. To connect the Color SignPrinter to your computer, simply obtain a shielded,bi-directional parallel cable and refer to thefollowing steps.
NOTE When connecting the Color Sign Printer to yourcomputer, it is very important to always use a high-quality interface cable suitable for the Color SignPrinterÕs high-speed rate of data transmission. Asuitable interface cable is a shielded, bi-directionalparallel cable (preferably an I-EEE 1284 type cable) andshould be no longer than 6 feet in length. Also, for bestresults, DO NOT connect the Color Sign Printerthrough a switch box, as this can interfere with the flowof print data.
1. Connect theCentronics-type parallelside to the Color SignPrinter. Snap thefastening clips intoplace.
26
A. Connectingthe Color SignPrinter to Your PC
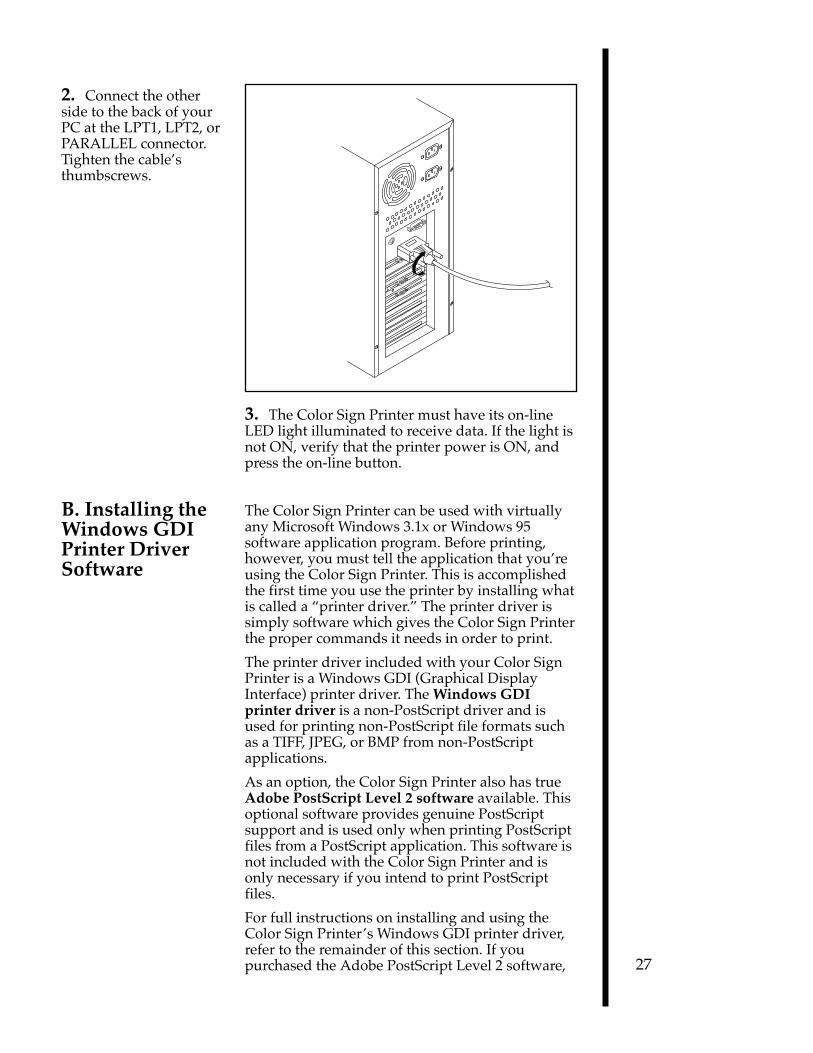
2. Connect the otherside to the back of yourPC at the LPT1, LPT2, orPARALLEL connector.Tighten the cableÕsthumbscrews.
3. The Color Sign Printer must have its on-lineLED light illuminated to receive data. If the light isnot ON, verify that the printer power is ON, andpress the on-line button.
The Color Sign Printer can be used with virtuallyany Microsoft Windows 3.1x or Windows 95software application program. Before printing,however, you must tell the application that youÕreusing the Color Sign Printer. This is accomplishedthe first time you use the printer by installing whatis called a Òprinter driver.Ó The printer driver issimply software which gives the Color Sign Printerthe proper commands it needs in order to print.
The printer driver included with your Color SignPrinter is a Windows GDI (Graphical DisplayInterface) printer driver. The Windows GDIprinter driver is a non-PostScript driver and isused for printing non-PostScript file formats suchas a TIFF, JPEG, or BMP from non-PostScriptapplications.
As an option, the Color Sign Printer also has trueAdobe PostScript Level 2 software available. Thisoptional software provides genuine PostScriptsupport and is used only when printing PostScriptfiles from a PostScript application. This software isnot included with the Color Sign Printer and isonly necessary if you intend to print PostScriptfiles.
For full instructions on installing and using theColor Sign PrinterÕs Windows GDI printer driver,refer to the remainder of this section. If youpurchased the Adobe PostScript Level 2 software, 27
B. Installing theWindows GDIPrinter DriverSoftware

refer to the UserÕs Manual included with thatsoftware for complete instructions. Please note thatthe Windows GDI printer driver packaged with theColor Sign Printer must be installed prior toinstalling and using the PostScript software.
NOTE This section of the OperatorÕs Manual assumes that youare already familiar with Windows and know how itoperates. If you are not yet familiar with Windows,consult the appropriate Microsoft documentation tobecome familiar with the basics of Windows beforeproceeding.
Windows 95
To install the GDI printer driver into Windows 95,refer to the following:
1. Insert the printer driver diskette into yourcomputerÕs disk drive.
2. Click the Startbutton, point toSettings, and selectPrinters.
3. Double-click on theAdd Printer icon.
4. Follow the on-screen instructions to completeinstallation. When prompted, do not haveWindows print a test print, since you most likelyperformed a printer self test in Section 5-B. Onceinstalled, the ÒColor Sign PrinterÓ icon will appearin the Printers folder. See Part E of this section forinformation on printer driver settings and options.
28

NOTE Before installing updated printer driver versions,always delete the existing printer driver version fromyour system. To do this, simply select the printer drivericon from within the Printers folder, and press theDelete key.
Windows 3.1x
To install the GDI printer driver into Windows3.1x, refer to the following:
1. After starting Windows, go to the Mainprogram group and select Control Panel.
2. From the Control Panel, select Printers.
3. Select Use Print Manager from the bottom leftof the Printers window.
4. Select the Add>> button.
5. Highlight the Install Unlisted or UpdatedPrinter option from List of Printers.
6. Select the Install button.
7. Insert the supplied Printer Driver diskette intoyour computerÕs disk drive. If you insert thediskette in a drive other than the A: drivedisplayed in the Install Driver dialog box, youmust change the drive designation. Select the OKbutton.
8. ÒColor Sign PrinterÓ should now be listed inthe Add Unlisted or Updated Printer dialog box.Select the OK button. Your PCÕs disk drive willnow load the printer driver. Depending upon yourcomputer, loading will take about 10 to 20 seconds.
9. Select the Set As Default Printer button in thePrinters window. The Color Sign Printer has nowbeen selected as your default (main) printer. If youwish to use another printer later, you must de-select the Color Sign Printer and switch back to theother printerÕs driver.
10. Finally, select the Connect button. Check thatthe box called Fast Printing Direct to Port isselected. Then, increase the Transmission retryvalue from 45 to 900. Click on OK and close out ofthe Printers window. See Part E of this section forinformation on printer driver settings and options.
29

The Color Sign Printer ships with a print utilityprogram called the 32-Bit Print Spooler. This printspooler is for use only with Windows 95. Onceinstalled, the print spooler is able to process yourprint jobs and send them to the printer atconsistently faster speeds than if sending print jobsthrough the system spooler of Windows 95. Inorder for the 32-Bit Print Spooler to functionproperly, however, you must be sure yourcomputerÕs parallel port is configured accordingto the instructions in Part D of this section.
The 32-Bit Print Spooler installs just like any otherstandard Windows 95 application program. Toinstall the 32-Bit Print Spooler, refer to thefollowing:
1. Insert the 32-BitPrint Spooler disketteinto your computerÕsdisk drive.
2. Click the Startbutton, point toSettings, and selectControl Panel.
3. Double-click on theAdd/Remove Programsicon.
4. Follow the on-screen instructions to completeinstallation. Once installed, the 32-Bit Print Spoolericon, shown below, will appear in the Programsgroup of the Start menu.
NOTE Before installing updated 32-Bit Print Spooler versions,always uninstall the existing print spooler version fromyour system. To do this, simply select 32-Bit PrintSpooler from the list of programs in the Add/RemovePrograms Properties window and click on theAdd/Remove button.
30
C. Installing the32-Bit PrintSpooler forWindows 95
To print with the 32-Bit Print Spooler, you mustselect the Fast 32-bit Spooler option from withinthe printer driver setup window (see Part E of thissection for further printer driver setupinformation). When this option is selected, the 32-Bit Print Spooler will automatically open and closewith the start and finish of each print job.
NOTE You can also manually open the 32-Bit Print Spoolersimply by selecting its icon from the Programs group ofthe Start menu.
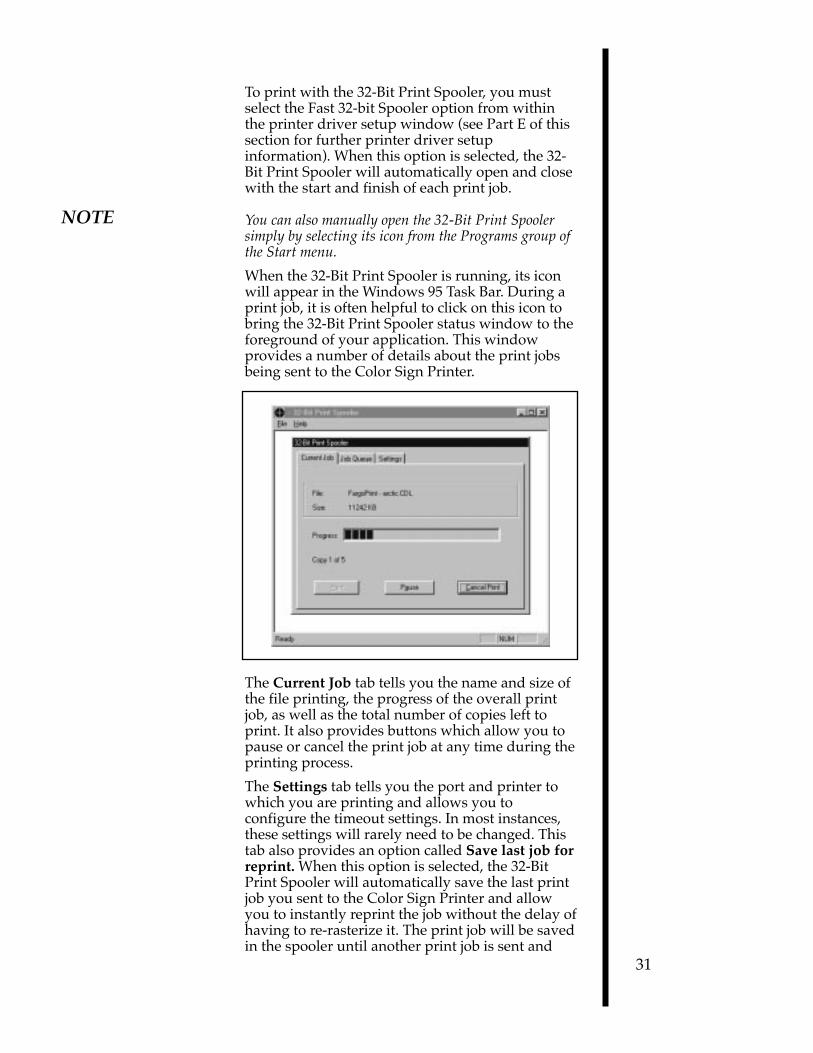
When the 32-Bit Print Spooler is running, its iconwill appear in the Windows 95 Task Bar. During aprint job, it is often helpful to click on this icon tobring the 32-Bit Print Spooler status window to theforeground of your application. This windowprovides a number of details about the print jobsbeing sent to the Color Sign Printer.
The Current Job tab tells you the name and size ofthe file printing, the progress of the overall printjob, as well as the total number of copies left toprint. It also provides buttons which allow you topause or cancel the print job at any time during theprinting process.
The Settings tab tells you the port and printer towhich you are printing and allows you toconfigure the timeout settings. In most instances,these settings will rarely need to be changed. Thistab also provides an option called Save last job forreprint. When this option is selected, the 32-BitPrint Spooler will automatically save the last printjob you sent to the Color Sign Printer and allowyou to instantly reprint the job without the delay ofhaving to re-rasterize it. The print job will be savedin the spooler until another print job is sent and
31

saved over it. If you do not wish to save the lastprint job for reprint, deselect this option. To print asaved job, simply select the Print button from thespoolerÕs Current Job tab.
The Job Queue tab appears only when a print jobis being sent to the printer. This tab tells you thename and status of each job in the queue andshows you the order in which the jobs will print ifyou have sent multiple jobs to the printer. A controlbutton is also provided which allows you to deleteevery job listed in the queue. To delete the jobcurrently being printed, simply select the CancelPrint button under the Current Job tab.
D. Configuring Your ComputerÕs Parallel Port
As described in Part C of this section, the ColorSign Printer includes a software applicationprogram called the 32-Bit Print Spooler. In order touse the 32-Bit Print Spooler, you must be usingWindows 95, and your computerÕs parallel portmode must be set to ECP with a DMA channelassigned. Although this may sound complicated,most computerÕs allow you to verify or changethese settings quite easily. The follow steps willguide you through the general process of verifyingand/or changing your parallel port settings.
NOTE If your computerÕs parallel port is not ECP compatibleor if you are printing from Windows 3.1x, you will notbe able to use the Color Sign PrinterÕs 32-Bit PrintSpooler. Instead, print using the Write Direct To Portoption within the Color Sign PrinterÕs printer driver, orprint directly through the print manager of Windows3.1x or the system spooler of Windows 95. If printingthrough the system spooler of Windows 95, see page 73for important printing tips.
1. Click on the Startbutton, point toSettings, and selectControl Panel.
32

2. Double-click on theSystem icon, select theDevice Manager tab,select View devices bytype, and double-clickon the Ports listing.
3. If your LPT port isset to ÒECP PrinterPort,Ó double-click onthis line, select theResources tab, andverify that the Resourcesettings box has a linewhich says ÒDirectMemory Access,Ó asshown here. Thismeans that an availableDMA channel isassigned. If you haveboth an ECP PrinterPort setting and a DMAchannel assigned, skipto step 7. If you haveneither of these settings,go to step 4. If you have anECP Printer Port settingbut do not have anavailable DMA channelshowing, go to step 6.
4. If, in Device Manager, your LPT port is set toÒPrinter PortÓ instead of ÒECP Printer Port,Ó youmust change the parallel port mode through yoursystem ÒBIOSÓ or setup screen. The system BIOS isgenerally entered by holding down a specifickeyboard character while your computer is bootingup. This keyboard character will differ dependingon which brand of computer you have, but is oftenspecified on screen during initial startup. Forexample, a line such as ÒPress <DEL> key if youwant to run SETUPÉÓ may appear. Once you haveentered the BIOS, use the on-screen directions to
33

34
locate the parallel port option and change it to ECP.When changed, save the BIOS settings and reboot(some computers require you to reboot twice).Then, as described in steps 1-3, go back to DeviceManager in Windows 95, and verify that the LPTport registers as ECP and that a DMA channel isavailable.
5. If, in Device Manager,your LPT port still registersas ÒPrinter Port,Ó double-click on the Printer Portline, select the Driver tab,and click on the ChangeDriver button. Then, selectthe Show all devices optionand choose the ECP PrinterPort option from underModels as shown here. Thiswill force Windows 95 torecognize your parallel portas ECP.
6. If, in Device Manager, your LPT port registersas ÒECP Printer PortÓ but an available ÒDirectMemory AccessÓ channel is still not showing underthe Resources tab, you will not be able to use the32-Bit Print Spooler. Instead, leave your parallelport set to ECP, and print with the Write Direct ToPort option selected within the Color Sign PrinterÕsprinter driver (see Part E of this section for moreprinter driver information).
IMPORTANT! Since the process of verifying and/or changing yourcomputerÕs parallel port to ECP is largely dependent onyour brand of computer, please refer to your appropriatecomputer documentation or contact the computermanufacturer for more information on this process.
7. Once you are sure that your computerÕsparallel port mode is set to ECP and that a DMAchannel is available, you are ready to print with the32-Bit Print Spooler. Before printing, select the Fast32-Bit Spooler option from within the printerdriver setup window along with all otherappropriate printer driver options (see Part E ofthis section for more printer driver information).
8. If your printer does not seem to print properlywith the 32-Bit Print Spooler even after you haveproperly setup your computerÕs parallel port, youmay have an outdated parallel port driver. For thisreason, the latest Microsoft¨ port driver is includedon your printer driver diskette. To install this newdriver, simply insert the printer driver diskette intoyour computerÕs disk drive, open the Windows 95

Explorer, select the Ò31/2 FloppyÓ drive, anddouble-click on the file called PRNT5UPD.EXE.The updated parallel port driver will automaticallyinstall. Once it is installed, restart your computerand try your print job again.
If you are unable to set your computer as describedin this setup procedure or if you have problemsprinting through the 32-Bit Print Spooler, refer tothe troubleshooting tip, ÒIÕm having problemsprinting from Windows 95Ó on page 73 foradditional information.
E. Setting Up theWindows GDI Printer Driver
Before you can print to your Color Sign Printer,you will need to set the printer driver up with theappropriate print options for your specific printjob. Refer to the following steps to change or verifyyour printer driver options.
1. If using Windows 3.1x, go back to the ControlPanel and the Printers group using steps 1 and 2on page 29. If using Windows 95, Click the Startbutton, point to Settings, and select Printers. Then,click on the Color Sign Printer icon with the rightmouse button and select Properties. The Propertieswindow will appear.
2. In Windows 3.1x, select the Setup button. InWindows 95, click on the Details tab of theProperties window and select the Setup button.
NOTE Most applications allow you to change these sameprinter driver options from their ÒPrintÓ and/orÒPrinter SetupÓ screens. This means that you donÕthave to go back to the main printer setup window eachtime you want to change a setting or option in theprinter driver. These applications will usually give youthe same choices and options, but in a slightly alteredformat.
35

3. The Color SignPrinter Setup screenappears. Change theoptions as follows:
Paper Size
Click on the Paper Size down arrow. A list of papersize selections will appear. Select the paper sizeoption that matches the print media size currentlyinstalled in the printer. See Section 4-E and 4-I foradditional paper size information.
Ribbon Type
Click on the Ribbon Type down arrow. A list ofribbon type options will appear. Select the optionappropriate for the ribbon type currently installedin the printer. The following table explains each ofthese options. See Section 4-B for additional ribboninformation.
36
Monochrome Wax Select if using the monochrome black wax thermal ribbon.3 Color Wax Select if using the 4-color wax thermal ribbon and wish to print
with only the first three yellow, magenta, and cyan color panels. Skipping the black panel increases print speed but will produce a ÒcompositeÓ black instead of a ÒtrueÓ black.
4 Color Wax Select if using the 4-color wax thermal ribbon.Monochrome Dye Sub This ribbon type is currently not available.3 Color Dye Sub Select if using the 4-color dye-sublimation ribbon and wish to
print with only the first three yellow, magenta, and cyan color panels. Skipping the black panel increases print speed but will produce a ÒcompositeÓ black instead of a ÒtrueÓ black.
4 Color Dye Sub Select if using the 4-color dye-sublimation ribbon.3 Color Dye Sub w/O Select if using the 3-color FotoShield dye-sublimation ribbon
with overlay.Monochrome Resin Select if using a spot-color resin ribbon to print a single or
multi-spot-color sign. See Section 9-D or 9-E for more information on this printing process.

NOTE When printing process color signage with the resinthermal print ribbons, the main reason for using theseparate spot process color ribbons (Y,M,C,K), asopposed to the 3-color paneled resin ribbon, is to gain anextra 2Ó (51mm) in printable length. This additionallength is achieved only when printing with the extended12Ó x 26Ó (305 x 660mm) calendered vinyl.
Color Matching
Click on the Color Matching down arrow andselect the appropriate color matching option. SelectNone if you are more interested in print speedrather than print color, if you have already colorcorrected your image for printing, or if you areusing some other third party color matchingsoftware.
Select Algebraic if you would like the printerdriver to make very simple, yet fast, color balanceadjustments. This option gives you more naturallooking images without actually utilizing anyspecific color matching software and withoutslowing down the processing speed of the printerdriver.
Select the FargoColorª option to enable colormatching profiles written specifically for yourprinter. The FargoColor option automaticallyadjusts the color of your image according topreconfigured printer profiles and default systemprofiles. This results in a very precise color matchcompliant with ICC standards.
NOTE The FargoColor option is intended to match color huesas closely as possible. This means that although highlydetailed, photographic images may be accuratelymatched, you may notice that some solid colors mayappear slightly muted.
37
Processed 3 Color Select if using the yellow, magenta, and cyan spot color ribbons Resin to print a full process color image. Skipping the black ribbon
increases print speed but will produce a ÒcompositeÓ black instead of a ÒtrueÓ black. See Section 9-C for more information on this printing process.
Processed Select if using the yellow, magenta, cyan, and black spot color 4 Color Resin ribbons to print a full process color image. See Section 9-C for
more information on this printing process.Paneled 3 Color Select if using the 3-color resin ribbon. This ribbon prints full-Resin color images with no ribbon changes.Paneled 4 Color Select if using the 3-color resin ribbon with a black spot-color Resin resin ribbon. This provides full-color printing with a ÒtrueÓ
black, while only requiring one ribbon change.

Since the default system profiles provided aregeneric, the colors of some monitors may still varyslightly from your output. As a solution, raw printerprofiles are included in case you would like tocombine your custom monitor profiles with theprinter profiles. This can be done through many ofthe third-party color matching utility programscurrently available.
Dither Pattern
This option allows you to choose between two typesof dither patterns: Fine or Coarse. The Fine ditherprovides a print in which the dots of color are veryclose together, giving you increased clarity if theimage is to be viewed up close. The Coarse ditherprovides a print where the dots are slightly largerand spaced further apart. This is a good option toselect if you are printing images which may beviewed from further away. The Coarse option is alsoeffective in hiding print imperfections if you areworking in a particularly dusty environment. Sincedye-sublimation images do not have a ditherpattern, the dither pattern options are onlyselectable when printing with the resin thermaltransfer or the wax thermal transfer print supplies.
Intensity
This control sets the lightness or darkness of theprinted image. Click and drag on the slideÕs box, orclick on the left and right arrows to change theamount of heat used in the printing process.
Overlay
This option only applies when printing with the3-color FotoShield dye-sublimation ribbon (C,M,Y,O).Deselect this option if you wish to print dye-sublimation output without applying the ribbonÕsclear overlay panel. Please note that image durabilitywill be minimal if this overlay is not applied. In mostcases, the only time the overlay should not be appliedwhen using this ribbon type is if you intend to heattransfer printed images to coated ceramic coffeemugs.
K Panel Text Mode
This option only applies when printing with a4-color ribbon (C,M,Y,K). Select this option if youwish to print all gray scale TrueType text with theribbonÕs black panel only. Normally, when printinggray scale or black text, the Color Sign Printer laysdown all four of the ribbonÕs color panels. By layingdown only the black panel, the Color Sign Printer isable to print black text with greater sharpness anddefinition. Processing time may increase when thisoption is selected. Please note that some applicationsmay not support this option.38

Enhance Fine Text
This option only applies when printing with a dye-sublimation ribbon type. When selected, thisoption allows the Color Sign Printer to apply asoftware-based spatial filter. This filter brings outthe fine detail of smaller text and lines and allowsthem to print with much greater definition andclarity. Image processing time will increase whenusing this option.
Write Direct to Port
Selecting this option provides the fastest printprocessing if printing through a standard parallelport which is not ECP compatible, if printingexclusively from Windows 3.1x, or if havingdifficulty printing with the included 32-Bit PrintSpooler. When selected, this option allows theprinter driver to bypass the Windows 3.1x PrintManager or the system spooler of Windows 95 andto send all print data directly to the Color SignPrinter. This option devotes all of your systemresources to the current print job, therebyincreasing overall print speed. When the print jobis finished, your system resources will again bereleased and devoted to the normal function ofyour on-screen applications.
Depending upon the processing speed and brandof your computer, you may or may not need toselect this option when printing with the ColorSign Printer. For most computers with a non-ECPcompatible parallel port, selecting this option willenhance the speed of the rasterizing and printingprocess. In this case, the Write Direct to Portoption should be selected. For some computers,however, this option may not be supported by theparticular brand of PC and should not be selected.
Fast 32-bit Spooler
Select this option for consistently faster printprocessing under Windows 95. This option is onlyselectable if operating under Windows 95 and ifthe included 32-Bit Print Spooler software has beeninstalled. When selected, this option allows theprinter driver to send all print jobs to the ColorSign PrinterÕs 32-Bit Print Spooler rather than tothe Windows 95 print spooler. See Part C of thissection for complete details on the 32-Bit PrintSpooler. This option and the 32-Bit Print Spoolersoftware will not function in Windows 3.1x.
39

NOTE When printing with the Fast 32-Bit Print Spooler or theWrite Direct to Port option selected, the Print to Fileoption found within many Windows applicationprograms is not supported. The Print to File option issupported only when printing through the Windowssystem print spooler.
Perfed Paper
Select this option only if printing onto A-Long orA4-Long wax thermal transfer paper ortransparency film with perfed extensions.
Orientation
Select either Portrait or Landscape. Selectingportrait causes the image to print in a vertical pageorientation. Selecting Landscape causes the imageto print in a horizontal page orientation. An iconillustrating the printed page helps you rememberthe difference between the two.
After your selections have been made, close out ofthe printer setup window. All printer driveroptions you selected will stay the same until youchange them. Refer to Section 9 to start printing.
40

7Using theColor SignPrinter witha Macintosh
41
The Color Sign Printer is designed to be used withany Macintosh which supports Color QuickDraw,which is running system software 7.0 or higher,and which has a Geo-compatible serial port.Current GeoPortª compatible computers includeall PowerPCÕs and Mac AVÕs. Please note that thefollowing system requirements are recommended: 68040 based Macintosh or PowerPC 32 Mb RAM or higher 200 Mb free hard disk space or higher Geo-compatible serial port System software 7.0 or higher Adobe Type Managerª and/or
System 7/TrueTypeª fonts
To connect the Color Sign Printer to yourcomputer, simply obtain a high-speed serial cableand refer to the following steps.
NOTE If you intend to use the Color Sign Printer with aMacintosh which does not have a GeoPort you will notbe able to utilize the printerÕs serial port. Instead, youmust install one of the manufacturerÕs high-speedcentronics parallel interface boards into an available 7ÓNuBusª slot on your computerÕs main board. If youhave not already obtained this interface board, call theprinter manufacturerÕs supplies department.
1. Connect one end ofthe serial cable to theColor Sign PrinterÕshigh-speed serial port.
A. Connectingthe Color SignPrinter to yourMacintosh

2. Connect the otherend to your computerÕsPrinter or Modem port.
3. The Color SignPrinter must have itson-line LED lightilluminated to receivedata. If the light is notON, verify that theprinter power is ON,and press the on-linebutton.
NOTE When connecting the Color Sign Printer to yourcomputer, it is very important to always use a high-quality interface cable suitable for the Color SignPrinterÕs high-speed rate of data transmission. Asuitable interface cable should be shielded and should beno longer than 6 feet in length.
The Color Sign Printer can be used with virtuallyany Macintosh software application program.Before printing, however, you must tell theapplication that youÕre using the Color SignPrinter. This is accomplished the first time you usethe printer by installing what is called a Òprinterdriver.Ó The printer driver is simply softwarewhich gives the Color Sign Printer the propercommands it needs in order to print.
The printer driver included with your Color SignPrinter is a Macintosh Color QuickDraw printerdriver. The QuickDraw printer driver is a non-PostScript driver and is used for printing non-PostScript file formats such as a TIFF, JPEG, orPICT from non-PostScript applications.
As an option, the Color Sign Printer also has trueAdobe PostScript Level 2 software available. Thisoptional software provides genuine PostScriptsupport and is used only when printing PostScriptfiles from a PostScript application. This software isnot included with the Color Sign Printer and isonly necessary if you intend to print PostScriptfiles.
For full instructions on installing and using theColor Sign PrinterÕs QuickDraw printer driver,refer to the remainder of this section. If youpurchased the Adobe PostScript Level 2 software,refer to the UserÕs Manual included with thatsoftware for complete instructions. Please note that
42
B. Installing the ColorQuickDrawPrinter DriverSoftware

the QuickDraw printer driver packaged with theColor Sign Printer must be installed prior toinstalling and using the PostScript software.
NOTE This section of the OperatorÕs Manual assumes that youare already familiar with the Macintosh operatingsystem and know how it operates. If you are not yetfamiliar with it, consult the appropriate Appledocumentation to become familiar with the basics ofMacintosh before proceeding.
Please refer to the following steps to install theColor Sign PrinterÕs Color QuickDraw printerdriver:
1. Insert the supplied printer driver diskette intoyour computerÕs disk drive.
2. The Color SignPrinter Installerwindow willautomatically open.
3. Double click on the READ ME file(s) to get thelatest information about the driver and theinstallation process. Carefully read the documentas it will help you get the best results from theprinter driver software. Select Quit from the Filemenu when you are done reading.
4. Double click onthe Color Sign Printericon. The Installerdialog box appears.
43

5. When the installer window appears, select theoptions you would like the installer program toinstall. In most instances, the default selections willsuffice. For a description of each of these options,refer to the notes found in the box directly abovethese options (use the up and down arrows toscroll through the notes). Once the desired optionsare selected, click on Install. The appropriate fileswill automatically install onto your computer.Insert additional install disks as prompted. An alertbox will display when installation is complete.
C. Choosing theQuickDraw Printer Driver
The Chooser is a Desk Accessory in the Applemenu. Before you can use the Color Sign Printer,you need to select the Color Sign Printer printerdriver using the Chooser. This instructs yourMacintosh to send print jobs to the Color SignPrinter instead of to some other printer you mayalready have connected to your system. Refer tothe following steps to select the Color Sign Printerprinter driver:
1. Select Chooser from the Apple menu.
2. The Chooserdisplays an icon for allthe printer driversinstalled in the SystemFolder. Among these,you should see the iconfor the Color SignPrinter printer driveryou just installed. If youdo not see the icon, gothrough the installationprocedure again makingsure the Install driverand prefs option isselected. Once youlocate the Color SignPrinter icon, click on theicon to select it.
3. Select either Modem or Printer Port to indicateto which port the serial interface cable wasconnected, and set AppleTalk to Inactive. (If youhave the optional high-speed Centronics parallelinterface board installed, select Hurdler II CPI asthe appropriate output port.)
4. If you chose to install the Background PrintUtility during the installation procedure, selecteither On or Off to enable or disable the Color SignPrinterÕs Background Printing function. Whenenabled, this function allows you to work in the
44

foreground of your application while printing inthe background. Refer to Section 8 for moreinformation on background printing. If you chosenot to install the Backgrounder, the ChooserÕsBackground Printing option will be inactive andgrayed out.
5. Once your selections have been made, click onthe box in the upper left-hand corner of theChooser to close it.
The next time you open the Chooser, the selecteddriver will no longer be highlighted. The Chooserremembers which driver is the current one butdoes not display it when opened.
D. Setting Up the QuickDraw Printer Driver
Once the printer driver has been successfullyinstalled and selected within the Chooser, you willneed to set the driver up with the appropriate printoptions for your specific print job. To change orverify your printer driver options, select PageSetup from the File menu, and configure the driveraccording to the following:
NOTE Most applications allow you to change these sameprinter driver options from their own Page Setupscreens. This means that you donÕt have to go back to themain printer setup window each time you want tochange a setting or option in the printer driver. Theseapplications will usually give you the same choices andoptions, but in a slightly altered format.
Paper Size
Click on the Paper Size box. A list of paper sizeselections will appear. Select the paper size optionthat matches the print media size currentlyinstalled in the printer. See Section 4-E and 4-I foradditional paper size information.
45

Ribbon Type
Click on the Ribbon Type box. A list of ribbon typeoptions will appear. Select the option appropriatefor the ribbon type currently installed in the printer.The following table explains each of these options.See Section 4-B for additional ribbon information.
Monochrome Select if using the monochrome black wax thermal ribbon.
3 Color Wax Select if using the 4-color wax thermal ribbon and wish to print with only the first three yellow, magenta, and cyan color panels. Skipping the black panel increases print speed but will produce a ÒcompositeÓ black instead of a ÒtrueÓ black.
4 Color Wax Select if using the 4-color wax thermal ribbon.3 Color Dye Sub Select if using the 4-color dye-sublimation ribbon and
wish to print with only the first three yellow, magenta, and cyan color panels. Skipping the black panel increases print speed but will produce a ÒcompositeÓ black instead of a ÒtrueÓ black.
4 Color Dye Sub Select if using the 4-color dye-sublimation ribbon.B & W Dye Sub This ribbon type is currently not available.Mono Resin Select if using a spot-color resin ribbon to print a single
or multi-spot-color sign. See Section 9-D or 9-E formore information on this printing process.
Process 3 Color Resin Select if using the yellow, magenta, and cyan spot color ribbons to print a full process color image. Skipping the black ribbon increases print speed but will produce a ÒcompositeÓ black instead of a ÒtrueÓ black. See Section 9-C for more information on this printing process.
Process 4 Color Resin Select if using the yellow, magenta, cyan, and black spot color ribbons to print a full process color image. See Section 9-C for more information on this printing process.
Paneled 3 Color Resin Select if using the 3-color resin ribbon. This ribbon prints full-color images with no ribbon changes.
Paneled 4 Color Resin Select if using the 3-color resin ribbon with a black spot-color resin ribbon. This provides full-color printing with a ÒtrueÓ black, while only requiring one ribbon change.
CMYO Dye Sub Select if using the 3-color FotoShield dye-sublimation ribbon with overlay.
NOTE When printing process color signage with the resin thermalprint ribbons, the main reason for using the separate spotprocess color ribbons (Y,M,C,K), as opposed to the 3-colorpaneled resin ribbon, is to gain an extra 2Ó (51mm) inprintable length. This additional length is achieved onlywhen printing with the extended 12Ó x 26Ó (305 x 660mm)calendered vinyl.
46

Orientation
Select the appropriate icon according to theorientation of your particular image.
Print Quality
The Print quality option determines the resolutionat which the document will be printed. Draftprovides a quick print at screen resolution (72 dpi).High uses the maximum resolution supported bythe Color Sign Printer which is 300 x 300 dpi. Highquality prints take longer to print and require morememory.
Enlarge/reduce
This option alters the size of the printed imagebetween the integers of 25% and 400%. A setting of100% indicates the document will be printed atactual size. Please note that significantly enlargingor reducing the image may cause the image toappear pixelated or ÒjaggyÓ when printed.
Expert Options
The Color Sign PrinterÕs driver has some optionsthat rarely need to be changed. These options arecontained within a separate Expert options dialogbox accessed from Page Setup by clicking on theExpert button.
Save temp files for re-print
When this option is selected, the driver willautomatically save the last print job you sent to theColor Sign Printer and allow you to instantlyreprint the job without the delay of having to re-rasterize it. The print job will be saved untilanother print job is sent and saved over it. If youdo not wish to save the last print job for reprint,deselect this option. To print a saved job, simplyselect the Re-Print button from the Print dialogbox.
47

32 bit QuickDraw
Selecting this option increases the maximumnumber of colors the printer driver can print from256 to 16.7 million and, in most cases, shouldalways be selected.
Mirrored
When the Mirrored box is checked, the printerdriver will print the image in a reversed format,making the printed image appear as if you wereviewing it in a mirror. This is useful when printingimages for heat transfers.
Perfed Paper
Select this option only if printing onto A-Long orA4-Long wax thermal transfer paper ortransparency film with perfed extensions.
Print within margins
Most color printers cannot print over the entirepiece of paper. There is often a non-printablemargin that the printer mechanism physicallycannot reach. Some applications do not take thisnon-printable margin into account when printingthe document. The top left corner of the documenton screen is positioned at the top left corner of thepaper when printed. Selecting the Print withinmargins option in such applications forces thedocument to print at the top left corner of theprintable area. Normally, you should not have tochoose this option, since the application usuallyadds its margins to the non-printable margin of theprinter.
Better bitmap scaling
When selected, this option reduces the distortionthat can be seen sometimes in bitmaps and bit-mapped fonts when printed on a high-resolutionprinter. Bit mapped images are often stored andprinted at screen resolution, 72 dots per inch (dpi).When a 72-dpi bitmap is printed on a high-resolution printer, the number of dots in the imagemust be increased. Each dot on the printer issmaller than a pixel on the screen; therefore, dotsmust be added to maintain the overall size.
The Color Sign Printer has a resolution of 300 dpi,so for every dot in the original bitmap, the drivertheoretically has to put 4.2 dots across and downthe page. Of course, the printer cannot putfractions of a dot on the paper. The driver thereforeincreases the number of dots by four, or sometimesby five, to even out the fractions.
48

Making the dots four or five times larger, however,can make the bitmaps look ragged. The Betterbitmap scaling option works by enlarging the sizeof the print enough for all 72-dpi bitmaps to beprinted with an integer dot increase. If this optionis selected, however, the image printed will bereduced in size by 4%.
Enhance Fine Text
This option only applies when printing with a dye-sublimation ribbon type. When selected, thisoption allows the Color Sign Printer to apply asoftware-based spatial filter. This filter brings outthe fine detail of smaller text and lines and allowsthem to print with much greater definition andclarity. Image processing time will increase whenusing this option.
Text anti-aliasing
This option is only available when printing withthe dye-sublimation ribbon type. When selected,this option will improve the quality of printed textwhen using scalable fonts (System 7 TrueType orPostscript Type 1 fonts with Adobe Type Manager).Image processing time will increase when usingthis option.
Color bitmap smoothing
This option is only available when printing withthe dye-sublimation ribbon type. When selected,this option will improve the appearance of lowerresolution images (less than 100 DPI). Imageprocessing time will be increased when using thisoption.
Black text on black pass only
This option only applies when printing with a4-color ribbon (C,M,Y,K). Select this option if youwish to print all gray scale TrueType text with theribbonÕs black panel only. Normally, when printinggray scale or black text, the Color Sign Printer laysdown all four of the ribbonÕs color panels. Bylaying down only the black panel, the Color SignPrinter is able to print black text with greatersharpness and definition. Processing time mayincrease when this option is selected. Please notethat some applications may not support thisoption.
Overlay
This option only applies when printing with the3-color FotoShield dye-sublimation ribbon(C,M,Y,O). Deselect this option if you wish to printdye-sublimation output without applying the
49

ribbonÕs clear overlay panel. Please note that imagedurability will be minimal if this overlay is notapplied. In most cases, the only time the overlayshould not be applied when using this ribbon typeis if you intend to heat transfer printed images tocoated ceramic coffee mugs.
Dither Pattern
This option allows you to choose between twotypes of dither patterns: Fine or Coarse. The Finedither provides a print in which the dots of colorare very close together, giving you increased clarityif the image is to be viewed up close. The Coarsedither provides a print where the dots are slightlylarger and spaced further apart. This is a goodoption to select if you are printing images whichmay be viewed from further away. The Coarseoption is also effective in hiding printimperfections if you are working in a particularlydusty environment. Since dye-sublimation imagesdo not have a dither pattern, the dither patternoptions are only selectable when printing with theresin thermal transfer or the wax thermal transferprint supplies.
Intensity
This control sets the lightness or darkness of theprinted image. Click and drag on the slideÕs box, orclick on the left and right arrows to change theamount of heat used in the printing process.
Color matching
Click on the Color Matching box and select theappropriate color matching option. Select None ifyou are more interested in print speed rather thanprint color, if you have already color corrected yourimage for printing, or if you are using some otherthird party color matching software.
When the Gamma method is selected, you canaccess the gamma correction method by clicking onOptions. Through gamma correction, the printerdriver allows you to individually increase ordecrease the intensity of the red, green, and bluecomponents of the print. A graphicalrepresentation of each gamma curve follows. Acurve that bends inward (produced with a Gammafactor less than 1.0) darkens that color component.A curve that bends outward lightens it. A GammaFactor of 1.0 produces a straight line that does notadjust the color component at all.
The Gamma correction values affect every color onthe printed page, lightening or darkening theRed/Green/Blue values in each of those colors as
50
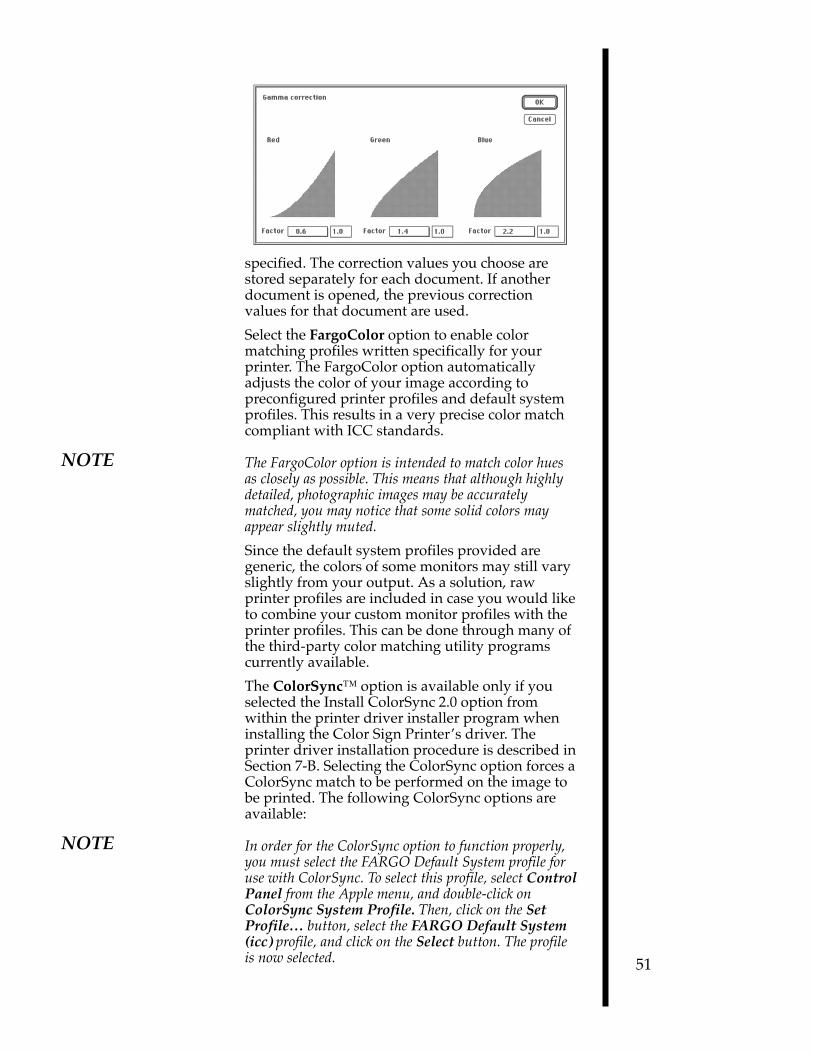
specified. The correction values you choose arestored separately for each document. If anotherdocument is opened, the previous correctionvalues for that document are used.
Select the FargoColor option to enable colormatching profiles written specifically for yourprinter. The FargoColor option automaticallyadjusts the color of your image according topreconfigured printer profiles and default systemprofiles. This results in a very precise color matchcompliant with ICC standards.
NOTE The FargoColor option is intended to match color huesas closely as possible. This means that although highlydetailed, photographic images may be accuratelymatched, you may notice that some solid colors mayappear slightly muted.
Since the default system profiles provided aregeneric, the colors of some monitors may still varyslightly from your output. As a solution, rawprinter profiles are included in case you would liketo combine your custom monitor profiles with theprinter profiles. This can be done through many ofthe third-party color matching utility programscurrently available.
The ColorSyncª option is available only if youselected the Install ColorSync 2.0 option fromwithin the printer driver installer program wheninstalling the Color Sign PrinterÕs driver. Theprinter driver installation procedure is described inSection 7-B. Selecting the ColorSync option forces aColorSync match to be performed on the image tobe printed. The following ColorSync options areavailable:
NOTE In order for the ColorSync option to function properly,you must select the FARGO Default System profile foruse with ColorSync. To select this profile, select ControlPanel from the Apple menu, and double-click onColorSync System Profile. Then, click on the SetProfileÉ button, select the FARGO Default System(icc) profile, and click on the Select button. The profileis now selected. 51
?@@@@@@@@@@@@@@@@@@@@@@@@@@@@@@@@@@@@@@@@@@@@@@@@@@@@@@@@@@@@@@@@@@@@@@@@@@@@@@@@@@@@@@@@@@@@@@@@@@@@@@@@@@@@@@@@@@@@@@@@@@@@@@@@@@@@@@@@@@@@@@@@@@@@@@@@@@@@@@@@@@@@@@@@@@@@@@@@@@@@@@@@@@@@@@@@@@@@@@@@@@@@@@@@@@@@@@@@@@@@@@@@@@@@@@@@@@@@@@@@@@@@@@@@@@@@@@@@@@@@@@@@@@@@@@@@@@@@@@@@@@@@@@@@@@@@@@@@@@@@@@@@@@@@@@@@@@@@@@@@@@@@@@@@@@@@@@@@@@@@@@@@@@@@@@@@@@@@@@@@@@@@@@@@@@@@@@@@@@@@@@@@@@@@@@@@@@@@@@@@@@@@@@@@@@@@@@@@@@@@@@@@@@@@@@@@@@@@@@@@@@@@@@@@@@@@@@@@@@@@@@@@@@@@@@@@@@@@@@@@@@@@@@@@@@@@@@@@@@@@@@@@@@@@@@@@@@@@@@@@@@@@@@@@@@@@@@@@@@@@@@@@@@@@@@@@@@@@@@@@@@@@@@@@@@@@@@@@@@@@@@@@@@@@@?@ @@?@ @@?@e@@@@@@@@@@@@@@@@@@@@@@@@@@@@@@@@@@@@@@@@@@@@@@@@@@@@@@@@@@@@@@@@@@@@@@@@@@@@@@@@@@@@@@@@@@@@@@@@@@@@@@@@@@@@@@@@@@@@@@@@@@@@@@@@@@@@@@@@@@@@@@@@@@@@@@@@@@@@@@@@@@@@@@@@@@@@@@@@@@@@@@@@@@@@@@@@@@@@@@@@@@@@@@@@@@@@@@@@@@@@@@@@@@@@@@@@@@@@@@@@@@@@@@@@@@@@@@@@@@@@@@@@@@@@@@@@@@@@@@@@@@@@@@@@@@@@@@@@@@@@@@@@@@@@@@@@@@@@@@@@@@@@@@@@@@@@@@@@@@@@@@@@@@@@@@@@@@@@@@@@@@@@@@@@@@@@@@@@@@@@@@@@@@@@@@@@@@@@@@@@@@@@@@@@@@@@@@@@@@@@@@@@@@@@@@@@@@@@@@@@@@@@@@@@@@@@@@@@@@@@@@@@@@@@@@@@@@@@@@@@@@@@@@@@@@@@@@@@@@@@@@@@@@@@@@@@@@@@@@@@@@@@@@@@@@@@@@@@@@@@@@@@@@@@@@@@@@@@@@@@@@@@@@@@@@@@@@@@@@@@@@@?@@?@e@@@@@@@@@@@@@@@@@@@@@@@@@@@@@@@@@@@@@@@@@@@@@@@@@@@@@@@@@@@@@@@@@@@@@@@@@@@@@@@@@@@@@@@@@@@@@@@@@@@@@@@@@@@@@@@@@@@@@@@@@@@@@@@@@@@@@@@@@@@@@@@@@@@@@@@@@@@@@@@@@@@@@@@@@@@@@@@@@@@@@@@@@@@@@@@@@@@@@@@@@@@@@@@@@@@@@@@@@@@@@@@@@@@@@@@@@@@@@@@@@@@@@@@@@@@@@@@@@@@@@@@@@@@@@@@@@@@@@@@@@@@@@@@@@@@@@@@@@@@@@@@@@@@@@@@@@@@@@@@@@@@@@@@@@@@@@@@@@@@@@@@@@@@@@@@@@@@@@@@@@@@@@@@@@@@@@@@@@@@@@@@@@@@@@@@@@@@@@@@@@@@@@@@@@@@@@@@@@@@@@@@@@@@@@@@@@@@@@@@@@@@@@@@@@@@@@@@@@@@@@@@@@@@@@@@@@@@@@@@@@@@@@@@@@@@@@@@@@@@@@@@@@@@@@@@@@@@@@@@@@@@@@@@@@@@@@@@@@@@@@@@@@@@@@@@@@@@@@@@@@@@@@@@@@@@@@@@@@@@@@@H?@@?@e@@ ?@e@@?@e@@ ?@e@@?@e@@ ?@e@@?@e@@ ?@e@@?@e@@ ?@e@@?@e@@ ?@e@@?@e@@ ?@e@@?@e@@ ?@e@@?@e@@ ?@e@@?@e@@ ?@e@@?@e@@ ?@e@@?@e@@ ?@e@@?@e@@ ?@e@@?@e@@ ?@e@@?@e@@hf?W2@@6X? @@e?@@? ?O2@@@@@@@@@@@@@@@@@@@@@@@@@@@@@@@@@@@@@@@@@@@@@@@@@@@@@@@@6K? ?@e@@?@e@@hf?7@??I/? ?J@@L? ?W2@@@@@@@@@@@@@@@@@@@@@@@@@@@@@@@@@@@@@@@@@@@@@@@@@@@@@@@@@@@@6X?hf?@e@@?@e@@hf?@@?f?W2@@6X??@@@@@@@@6X??@@@@@@@@6X??W2@@6X?f?W2@6XeW2@@6Xe@6T2@?@6T2@?W2@@6XeW2@6X??@@@@??@@??W2@@6X??@@@@6X? W&@@@@@@@@@@@@@@@@@@@@@@@@@@@@@@@@@@@@@@@@@@@@@@@@@@@@@@@@@@@@@@)Xhf?@e@@?@e@@hf?@@?f?*U??@1??@@??@@??@1??@@??@@??@1??*U??@1?f?7@?I/e7@e@1e@@(Me@@(Me7@e@1e7@?I/??N@@H??@@??7@??@1??@@??@1? 7@@@0M I4@@@1hf?@e@@?@e@@hf?@@?@@@??S@@@@@??@@??@@??@@??@@??@@??@@??S@@@@@?f?@@?f@@e@@e@@H?e@@H?e@@e@@e@@g@@e?@@??@@??@@??@@??@@? ?J@@@??O2@@@@@@@@@@@@@@@@@@@@@@@@@@@@@@@@@@@@@@@@@@@@@@@@@@@@6K??@@@L?he?@e@@?@e@@hf?@@?N@@??7@??@@??@@??@@??@@??@@??@@??@@??7@??@@?f?@@?f@@e@@e@@f@@f@@@@@@e@@g@@e?@@??@@??@@??@@??@@? ?7@@5?@(M? ?I'@?3@@1?he?@e@@?@e@@hf?@@??@@??@@??@@??@@??@@??@@??@@??@@??@@??@@??@@?f?@@?f@@e@@e@@f@@f@@g@@g@@e?@@??@@??@@??@@??@@? ?@@@HJ(Y V'LN@@@?he?@e@@?@e@@hf?3@??@5??3@??@@??@@??@@??@@??@@??@@??@@??3@??@@?f?3@?O.e3@e@5e@@f@@[email protected]@?O.?e3@L??@@??3@??@5??@@??@@? ?@@@?7H? ?N1?@@@?he?@e@@?@e@@hf?V4@@0Y??V4@@@@??@@??@@??@@??@@??@@??@@??V4@@@@?f?V4@0YeV4@@0Ye@@f@@fV4@@0YeV4@0Y?eV4@??@@??V4@@0Y??@@??@@? ?@@@?@ @?@@@?he?@e@@?@e@@ ?@@@?@ ?W2@@6X??@@??W2( @?@@@?he?@e@@?@e@@ ?@@@?@ ?7@??@1??@@?W&(Y @?@@@?he?@e@@?@e@@ ?@@@?@ ?@@??@@??@@W&(Y? @?@@@?he?@e@@?@e@@ ?@@@?@ ?@@??@@??@@@(Y @?@@@?he?@e@@?@e@@ ?@@@?@ ?@@??@@??@@@ @?@@@?he?@e@@?@e@@ ?@@@?@ ?@@??@@??@@@)X @?@@@?he?@e@@?@e@@ ?@@@?@ ?@@??@@??@@V')X? @?@@@?he?@e@@?@e@@ ?@@@?@ ?3@??@5??@@?V')X @?@@@?he?@e@@?@e@@ ?@@@?@ ?V4@@0Y??@@??V4) @?@@@?he?@e@@?@e@@ ?@@@?@ @?@@@?he?@e@@?@e@@ ?@@@?@ @?@@@?he?@e@@?@e@@ ?@@@?3L? ?J5?@@@?he?@e@@?@e@@ ?@@@LN)X W&HJ@@@?he?@e@@?@e@@ ?3@@1?@)K? ?O&@?7@@5?he?@e@@?@e@@ ?N@@@??I4@@@@@@@@@@@@@@@@@@@@@@@@@@@@@@@@@@@@@@@@@@@@@@@@@@@@0M??@@@H?he?@e@@?@e@@ 3@@@6K O2@@@5hf?@e@@?@e@@ V'@@@@@@@@@@@@@@@@@@@@@@@@@@@@@@@@@@@@@@@@@@@@@@@@@@@@@@@@@@@@@@(Yhf?@e@@?@e@@ ?V4@@@@@@@@@@@@@@@@@@@@@@@@@@@@@@@@@@@@@@@@@@@@@@@@@@@@@@@@@@@@0Y?hf?@e@@?@e@@ ?I4@@@@@@@@@@@@@@@@@@@@@@@@@@@@@@@@@@@@@@@@@@@@@@@@@@@@@@@@0M? ?@e@@?@e@@ ?@e@@?@e@@ ?@e@@?@e@@ ?@e@@?@e@@ ?@e@@?@e@@ ?@e@@?@e@@ ?@e@@?@e@@ ?@e@@?@e@@ ?@e@@?@e@@ ?O2@@@@@@@@@@@@@@@@@@@@@@@@@@@@@@@@@@@@@@@@@@@@@@@@@@@@6K? ?@e@@?@e@@ @(M? ?I'@ ?@e@@?@e@@ ?J(Y V'L? ?@e@@?@e@@ ?7H? ?N1? ?@e@@?@e@@ ?@ @? ?@e@@?@e@@ ?@hW2@@6X ?@@?h@? ?@e@@?@e@@ ?@h7@eI/ ?@@?h@? ?@e@@?@e@@ ?@h@@gW2@@6Xe@@@@6XeW2@6X??W2@@6X??@@?h@? ?@e@@?@e@@ ?@h@@g*Ue@1e@@e@1e7@?I/??7@??@1??@@?h@? ?@e@@?@e@@ ?@h@@gS@@@@@e@@e@@e@@f?@@??@@??@@?h@? ?@e@@?@e@@ ?@h@@g7@e@@e@@e@@e@@f?@@@@@@??@@?h@? ?@e@@?@e@@ ?@h@@g@@e@@e@@e@@e@@f?@@?f?@@?h@? ?@e@@?@e@@ ?@[email protected]@e@@e@@e@@e3@?O.??3@??O.??@@?h@? ?@e@@?@e@@ ?@hV4@@0YeV4@@@@e@@e@@eV4@0Y??V4@@0Y??@@?h@? ?@e@@?@e@@ ?@ @? ?@e@@?@e@@ ?@ @? ?@e@@?@e@@ ?3L? ?J5? ?@e@@?@e@@ ?N)X W&H? ?@e@@?@e@@ @)K? ?O&@ ?@e@@?@e@@ ?I4@@@@@@@@@@@@@@@@@@@@@@@@@@@@@@@@@@@@@@@@@@@@@@@@@@@@0M? ?@e@@?@e@@ ?@e@@?@e@@ ?@e@@?@e@@ ?@e@@?@e@@ ?@e@@?@e@@ ?@e@@?@e@@ ?@e@@?@e@@ ?@e@@?@e@@ ?@e@@?@e@@ ?@e@@?@e@@ ?@e@@?@e@@ ?@e@@?@e@@ ?@e@@?@e@@ ?@e@@?@e@@ ?@e@@?@e@@ ?@e@@?@e@@ ?@e@@?@e@@ ?@e@@?@e@@ ?@e@@?@e@@ ?@e@@?@e@@ ?@e@@?@e@@ ?@e@@?@e@@ ?@e@@?@e@@ ?@e@@?@e@@ ?@e@@?@e@@ ?@@@@6X?hf?@@? ?W2@@6X? ?@@@@6X??@@? ?@e@@?@e@@ ?@@??@1?hf?@@? ?7@??I/? ?@@??@1??@@? ?@e@@?@e@@ ?@@??@@??W2@@6X??W2@@@@? ?@@?f?@6T2@?W2@@6X??W2@@6X??@@@@6X? ?@@??@@??@@??@@??@@??W2@@6X? ?@e@@?@e@@ ?@@??@5??7@??@1??7@??@@? ?@@?f?@@(M??7@??@1??7@??@1??@@??@1? ?@@??@5??@@??@@??@@??7@??@1? ?@e@@?@e@@ ?@@@@@e?@@??@@??@@??@@? ?@@?@@@??@@He?@@??@@??@@??@@??@@??@@? ?@@@@@e?@@??@@??@@??@@??@@? ?@e@@?@e@@ ?@@??@1??@@@@@@??@@??@@? ?@@?N@@??@@?e?@@@@@@??@@@@@@??@@??@@? ?@@??@1??@@??@@??@@??@@@@@@? ?@e@@?@e@@ ?@@??@@??@@?f?@@??@@? ?@@??@@??@@?e?@@?f?@@?f?@@??@@? ?@@??@@??@@??@@??@@??@@? ?@e@@?@e@@ ?@@??@@??3@??O.??3@??@@? ?3@??@5??@@?e?3@??O.??3@??O.??@@??@@? ?@@??@5??@@??3@??@@??3@??O.? ?@e@@?@e@@ ?@@??@@??V4@@0Y??V4@@@@? ?V4@@0Y??@@?e?V4@@0Y??V4@@0Y??@@??@@? ?@@@@0Y??@@??V4@@@@??V4@@0Y? ?@e@@?@e@@ ?@e@@?@e@@ ?@e@@?@e@@ ?@e@@?@e@@ ?@e@@?@e@@ ?@e@@?@e@@ ?@e@@?@e@@ ?@e@@?@e@@ ?@e@@?@e@@ ?@e@@?@e@@ ?@e@@?@e@@ ?@e@@?@e@@ ?@e@@?@e@@ ?@e@@?@e@@ ?@e@@?@e@@ W. ?@e@@?@e@@ ?W-X ?W&U ?@e@@?@e@@ W. W&?, W-T&?, ?@e@@?@e@@ *U ?W&?@U ?W-T&?@?@U ?@e@@?@e@@ S, W&?@?, W&?@?@?@?, ?@e@@?@e@@ ?W&U ?W&?@?@U ?W-T&?@?@?@?@U ?@e@@?@e@@ W&?, W-T&?@?@?, W&?@?@?@?@?@?, ?@e@@?@e@@ ?W&?@U ?W&?@?@?@?@U ?W-T&?@?@?@?@?@?@U ?@e@@?@e@@ ?*?@?, W&?@?@?@?@?, W&?@?@?@?@?@?@?@?, ?@e@@?@e@@ ?S@?@U ?W&?@?@?@?@?@U ?W-T&?@?@?@?@?@?@?@?@U ?@e@@?@e@@ W&?@?, W&?@?@?@?@?@?, W&?@?@?@?@?@?@?@?@?@?, ?@e@@?@e@@ ?W&?@?@U ?W&?@?@?@?@?@?@U ?W-T&?@?@?@?@?@?@?@?@?@?@U ?@e@@?@e@@ W&?@?@?, W-T&?@?@?@?@?@?@?, W&?@?@?@?@?@?@?@?@?@?@?@?, ?@e@@?@e@@ ?W&?@?@?@U ?W&?@?@?@?@?@?@?@?@U ?W-T&?@?@?@?@?@?@?@?@?@?@?@?@U ?@e@@?@e@@ ?*?@?@?@?, W&?@?@?@?@?@?@?@?@?, W&?@?@?@?@?@?@?@?@?@?@?@?@?@?, ?@e@@?@e@@ ?S@?@?@?@U ?W&?@?@?@?@?@?@?@?@?@U ?W-T&?@?@?@?@?@?@?@?@?@?@?@?@?@?@U ?@e@@?@e@@ W&?@?@?@?, W&?@?@?@?@?@?@?@?@?@?, W&?@?@?@?@?@?@?@?@?@?@?@?@?@?@?@?, ?@e@@?@e@@ ?W&?@?@?@?@U ?W&?@?@?@?@?@?@?@?@?@?@U ?W&?@?@?@?@?@?@?@?@?@?@?@?@?@?@?@?@U ?@e@@?@e@@ W&?@?@?@?@?, W-T&?@?@?@?@?@?@?@?@?@?@?, W-T&?@?@?@?@?@?@?@?@?@?@?@?@?@?@?@?@?, ?@e@@?@e@@ *?@?@?@?@?@U ?W&?@?@?@?@?@?@?@?@?@?@?@?@U ?W&?@?@?@?@?@?@?@?@?@?@?@?@?@?@?@?@?@?@U ?@e@@?@e@@ S@?@?@?@?@?, W&?@?@?@?@?@?@?@?@?@?@?@?@?, W-T&?@?@?@?@?@?@?@?@?@?@?@?@?@?@?@?@?@?@?, ?@e@@?@e@@ ?W&?@?@?@?@?@U ?W&?@?@?@?@?@?@?@?@?@?@?@?@?@U ?W&?@?@?@?@?@?@?@?@?@?@?@?@?@?@?@?@?@?@?@?@U ?@e@@?@e@@ W&?@?@?@?@?@?, W&?@?@?@?@?@?@?@?@?@?@?@?@?@?, W&?@?@?@?@?@?@?@?@?@?@?@?@?@?@?@?@?@?@?@?@?, ?@e@@?@e@@ ?W&?@?@?@?@?@?@U ?W&?@?@?@?@?@?@?@?@?@?@?@?@?@?@U ?W-T&?@?@?@?@?@?@?@?@?@?@?@?@?@?@?@?@?@?@?@?@?@U ?@e@@?@e@@ W&?@?@?@?@?@?@?, W-T&?@?@?@?@?@?@?@?@?@?@?@?@?@?@?, W&?@?@?@?@?@?@?@?@?@?@?@?@?@?@?@?@?@?@?@?@?@?@?, ?@e@@?@e@@ *?@?@?@?@?@?@?@U ?W&?@?@?@?@?@?@?@?@?@?@?@?@?@?@?@?@U ?W&?@?@?@?@?@?@?@?@?@?@?@?@?@?@?@?@?@?@?@?@?@?@?@U ?@e@@?@e@@ S@?@?@?@?@?@?@?, W&?@?@?@?@?@?@?@?@?@?@?@?@?@?@?@?@?, W-T&?@?@?@?@?@?@?@?@?@?@?@?@?@?@?@?@?@?@?@?@?@?@?@?, ?@e@@?@e@@ ?W&?@?@?@?@?@?@?@U ?W&?@?@?@?@?@?@?@?@?@?@?@?@?@?@?@?@?@U ?W&?@?@?@?@?@?@?@?@?@?@?@?@?@?@?@?@?@?@?@?@?@?@?@?@?@U ?@e@@?@e@@ W&?@?@?@?@?@?@?@?, W&?@?@?@?@?@?@?@?@?@?@?@?@?@?@?@?@?@?, W&?@?@?@?@?@?@?@?@?@?@?@?@?@?@?@?@?@?@?@?@?@?@?@?@?@?, ?@e@@?@e@@ ?W&?@?@?@?@?@?@?@?@U ?W&?@?@?@?@?@?@?@?@?@?@?@?@?@?@?@?@?@?@U ?W-T&?@?@?@?@?@?@?@?@?@?@?@?@?@?@?@?@?@?@?@?@?@?@?@?@?@?@U ?@e@@?@e@@ W&?@?@?@?@?@?@?@?@?, W&?@?@?@?@?@?@?@?@?@?@?@?@?@?@?@?@?@?@?, W&?@?@?@?@?@?@?@?@?@?@?@?@?@?@?@?@?@?@?@?@?@?@?@?@?@?@?@?, ?@e@@?@e@@ *?@?@?@?@?@?@?@?@?@U ?W&?@?@?@?@?@?@?@?@?@?@?@?@?@?@?@?@?@?@?@U ?W&?@?@?@?@?@?@?@?@?@?@?@?@?@?@?@?@?@?@?@?@?@?@?@?@?@?@?@?@U ?@e@@?@e@@ S@?@?@?@?@?@?@?@?@?, W-T&?@?@?@?@?@?@?@?@?@?@?@?@?@?@?@?@?@?@?@?, W-T&?@?@?@?@?@?@?@?@?@?@?@?@?@?@?@?@?@?@?@?@?@?@?@?@?@?@?@?@?, ?@e@@?@e@@ ?W&?@?@?@?@?@?@?@?@?@U ?W&?@?@?@?@?@?@?@?@?@?@?@?@?@?@?@?@?@?@?@?@?@U ?W&?@?@?@?@?@?@?@?@?@?@?@?@?@?@?@?@?@?@?@?@?@?@?@?@?@?@?@?@?@?@U ?@e@@?@e@@ W&?@?@?@?@?@?@?@?@?@?, W&?@?@?@?@?@?@?@?@?@?@?@?@?@?@?@?@?@?@?@?@?@?, W&?@?@?@?@?@?@?@?@?@?@?@?@?@?@?@?@?@?@?@?@?@?@?@?@?@?@?@?@?@?@?, ?@e@@?@e@@ ?W&?@?@?@?@?@?@?@?@?@?@U ?W&?@?@?@?@?@?@?@?@?@?@?@?@?@?@?@?@?@?@?@?@?@?@U ?W&?@?@?@?@?@?@?@?@?@?@?@?@?@?@?@?@?@?@?@?@?@?@?@?@?@?@?@?@?@?@?@U ?@e@@?@e@@ W&?@?@?@?@?@?@?@?@?@?@?, W&?@?@?@?@?@?@?@?@?@?@?@?@?@?@?@?@?@?@?@?@?@?@?, W-T&?@?@?@?@?@?@?@?@?@?@?@?@?@?@?@?@?@?@?@?@?@?@?@?@?@?@?@?@?@?@?@?, ?@e@@?@e@@ *?@?@?@?@?@?@?@?@?@?@?@U ?W&?@?@?@?@?@?@?@?@?@?@?@?@?@?@?@?@?@?@?@?@?@?@?@U ?W&?@?@?@?@?@?@?@?@?@?@?@?@?@?@?@?@?@?@?@?@?@?@?@?@?@?@?@?@?@?@?@?@?@U ?@e@@?@e@@ S@?@?@?@?@?@?@?@?@?@?@?, W&?@?@?@?@?@?@?@?@?@?@?@?@?@?@?@?@?@?@?@?@?@?@?@?, W&?@?@?@?@?@?@?@?@?@?@?@?@?@?@?@?@?@?@?@?@?@?@?@?@?@?@?@?@?@?@?@?@?@?, ?@e@@?@e@@ ?W&?@?@?@?@?@?@?@?@?@?@?@U ?W&?@?@?@?@?@?@?@?@?@?@?@?@?@?@?@?@?@?@?@?@?@?@?@?@U ?W&?@?@?@?@?@?@?@?@?@?@?@?@?@?@?@?@?@?@?@?@?@?@?@?@?@?@?@?@?@?@?@?@?@?@U ?@e@@?@e@@ W&?@?@?@?@?@?@?@?@?@?@?@?, W&?@?@?@?@?@?@?@?@?@?@?@?@?@?@?@?@?@?@?@?@?@?@?@?@?, W&?@?@?@?@?@?@?@?@?@?@?@?@?@?@?@?@?@?@?@?@?@?@?@?@?@?@?@?@?@?@?@?@?@?@?, ?@e@@?@e@@ ?W&?@?@?@?@?@?@?@?@?@?@?@?@U ?W-T&?@?@?@?@?@?@?@?@?@?@?@?@?@?@?@?@?@?@?@?@?@?@?@?@?@U ?W-T&?@?@?@?@?@?@?@?@?@?@?@?@?@?@?@?@?@?@?@?@?@?@?@?@?@?@?@?@?@?@?@?@?@?@?@U ?@e@@?@e@@ W&?@?@?@?@?@?@?@?@?@?@?@?@?, W&?@?@?@?@?@?@?@?@?@?@?@?@?@?@?@?@?@?@?@?@?@?@?@?@?@?@?, W&?@?@?@?@?@?@?@?@?@?@?@?@?@?@?@?@?@?@?@?@?@?@?@?@?@?@?@?@?@?@?@?@?@?@?@?@?, ?@e@@?@e@@ ?W&?@?@?@?@?@?@?@?@?@?@?@?@?@U ?W&?@?@?@?@?@?@?@?@?@?@?@?@?@?@?@?@?@?@?@?@?@?@?@?@?@?@?@U ?W&?@?@?@?@?@?@?@?@?@?@?@?@?@?@?@?@?@?@?@?@?@?@?@?@?@?@?@?@?@?@?@?@?@?@?@?@?@U ?@e@@?@e@@ ?*?@?@?@?@?@?@?@?@?@?@?@?@?@?, W&?@?@?@?@?@?@?@?@?@?@?@?@?@?@?@?@?@?@?@?@?@?@?@?@?@?@?@?, W&?@?@?@?@?@?@?@?@?@?@?@?@?@?@?@?@?@?@?@?@?@?@?@?@?@?@?@?@?@?@?@?@?@?@?@?@?@?, ?@e@@?@e@@ ?S@?@?@?@?@?@?@?@?@?@?@?@?@?@U ?W&?@?@?@?@?@?@?@?@?@?@?@?@?@?@?@?@?@?@?@?@?@?@?@?@?@?@?@?@U ?W&?@?@?@?@?@?@?@?@?@?@?@?@?@?@?@?@?@?@?@?@?@?@?@?@?@?@?@?@?@?@?@?@?@?@?@?@?@?@U ?@e@@?@e@@ W&?@?@?@?@?@?@?@?@?@?@?@?@?@?, W&?@?@?@?@?@?@?@?@?@?@?@?@?@?@?@?@?@?@?@?@?@?@?@?@?@?@?@?@?, W&?@?@?@?@?@?@?@?@?@?@?@?@?@?@?@?@?@?@?@?@?@?@?@?@?@?@?@?@?@?@?@?@?@?@?@?@?@?@?, ?@e@@?@e@@ ?W&?@?@?@?@?@?@?@?@?@?@?@?@?@?@U ?W&?@?@?@?@?@?@?@?@?@?@?@?@?@?@?@?@?@?@?@?@?@?@?@?@?@?@?@?@?@U ?W&?@?@?@?@?@?@?@?@?@?@?@?@?@?@?@?@?@?@?@?@?@?@?@?@?@?@?@?@?@?@?@?@?@?@?@?@?@?@?@U ?@e@@?@e@@ W&?@?@?@?@?@?@?@?@?@?@?@?@?@?@?, W&?@?@?@?@?@?@?@?@?@?@?@?@?@?@?@?@?@?@?@?@?@?@?@?@?@?@?@?@?@?, W-T&?@?@?@?@?@?@?@?@?@?@?@?@?@?@?@?@?@?@?@?@?@?@?@?@?@?@?@?@?@?@?@?@?@?@?@?@?@?@?@?, ?@e@@?@e@@ ?W&?@?@?@?@?@?@?@?@?@?@?@?@?@?@?@U ?W&?@?@?@?@?@?@?@?@?@?@?@?@?@?@?@?@?@?@?@?@?@?@?@?@?@?@?@?@?@?@U ?W&?@?@?@?@?@?@?@?@?@?@?@?@?@?@?@?@?@?@?@?@?@?@?@?@?@?@?@?@?@?@?@?@?@?@?@?@?@?@?@?@?@U ?@e@@?@e@@ W&?@?@?@?@?@?@?@?@?@?@?@?@?@?@?@?, W&?@?@?@?@?@?@?@?@?@?@?@?@?@?@?@?@?@?@?@?@?@?@?@?@?@?@?@?@?@?@?, W&?@?@?@?@?@?@?@?@?@?@?@?@?@?@?@?@?@?@?@?@?@?@?@?@?@?@?@?@?@?@?@?@?@?@?@?@?@?@?@?@?@?, ?@e@@?@e@@ *?@?@?@?@?@?@?@?@?@?@?@?@?@?@?@?@U ?W&?@?@?@?@?@?@?@?@?@?@?@?@?@?@?@?@?@?@?@?@?@?@?@?@?@?@?@?@?@?@?@U ?W&?@?@?@?@?@?@?@?@?@?@?@?@?@?@?@?@?@?@?@?@?@?@?@?@?@?@?@?@?@?@?@?@?@?@?@?@?@?@?@?@?@?@U ?@e@@?@e@@ S@?@?@?@?@?@?@?@?@?@?@?@?@?@?@?@?, W&?@?@?@?@?@?@?@?@?@?@?@?@?@?@?@?@?@?@?@?@?@?@?@?@?@?@?@?@?@?@?@?, W&?@?@?@?@?@?@?@?@?@?@?@?@?@?@?@?@?@?@?@?@?@?@?@?@?@?@?@?@?@?@?@?@?@?@?@?@?@?@?@?@?@?@?, ?@e@@?@e@@ ?W&?@?@?@?@?@?@?@?@?@?@?@?@?@?@?@?@U ?W-T&?@?@?@?@?@?@?@?@?@?@?@?@?@?@?@?@?@?@?@?@?@?@?@?@?@?@?@?@?@?@?@?@U ?W&?@?@?@?@?@?@?@?@?@?@?@?@?@?@?@?@?@?@?@?@?@?@?@?@?@?@?@?@?@?@?@?@?@?@?@?@?@?@?@?@?@?@?@U ?@e@@?@e@@ W&?@?@?@?@?@?@?@?@?@?@?@?@?@?@?@?@?, W&?@?@?@?@?@?@?@?@?@?@?@?@?@?@?@?@?@?@?@?@?@?@?@?@?@?@?@?@?@?@?@?@?@?, W&?@?@?@?@?@?@?@?@?@?@?@?@?@?@?@?@?@?@?@?@?@?@?@?@?@?@?@?@?@?@?@?@?@?@?@?@?@?@?@?@?@?@?@?, ?@e@@?@e@@ ?W&?@?@?@?@?@?@?@?@?@?@?@?@?@?@?@?@?@U ?W&?@?@?@?@?@?@?@?@?@?@?@?@?@?@?@?@?@?@?@?@?@?@?@?@?@?@?@?@?@?@?@?@?@?@U ?W&?@?@?@?@?@?@?@?@?@?@?@?@?@?@?@?@?@?@?@?@?@?@?@?@?@?@?@?@?@?@?@?@?@?@?@?@?@?@?@?@?@?@?@?@U ?@e@@?@e@@ W&?@?@?@?@?@?@?@?@?@?@?@?@?@?@?@?@?@?, W&?@?@?@?@?@?@?@?@?@?@?@?@?@?@?@?@?@?@?@?@?@?@?@?@?@?@?@?@?@?@?@?@?@?@?, W&?@?@?@?@?@?@?@?@?@?@?@?@?@?@?@?@?@?@?@?@?@?@?@?@?@?@?@?@?@?@?@?@?@?@?@?@?@?@?@?@?@?@?@?@?, ?@e@@?@e@@ ?W&?@?@?@?@?@?@?@?@?@?@?@?@?@?@?@?@?@?@U ?W&?@?@?@?@?@?@?@?@?@?@?@?@?@?@?@?@?@?@?@?@?@?@?@?@?@?@?@?@?@?@?@?@?@?@?@U ?W&?@?@?@?@?@?@?@?@?@?@?@?@?@?@?@?@?@?@?@?@?@?@?@?@?@?@?@?@?@?@?@?@?@?@?@?@?@?@?@?@?@?@?@?@?@U ?@e@@?@e@@ W&?@?@?@?@?@?@?@?@?@?@?@?@?@?@?@?@?@?@?, W&?@?@?@?@?@?@?@?@?@?@?@?@?@?@?@?@?@?@?@?@?@?@?@?@?@?@?@?@?@?@?@?@?@?@?@?, W&?@?@?@?@?@?@?@?@?@?@?@?@?@?@?@?@?@?@?@?@?@?@?@?@?@?@?@?@?@?@?@?@?@?@?@?@?@?@?@?@?@?@?@?@?@?, ?@e@@?@e@@ *?@?@?@?@?@?@?@?@?@?@?@?@?@?@?@?@?@?@?@U ?W&?@?@?@?@?@?@?@?@?@?@?@?@?@?@?@?@?@?@?@?@?@?@?@?@?@?@?@?@?@?@?@?@?@?@?@?@U ?W&?@?@?@?@?@?@?@?@?@?@?@?@?@?@?@?@?@?@?@?@?@?@?@?@?@?@?@?@?@?@?@?@?@?@?@?@?@?@?@?@?@?@?@?@?@?@U ?@e@@?@e@@ S@?@?@?@?@?@?@?@?@?@?@?@?@?@?@?@?@?@?@?, W&?@?@?@?@?@?@?@?@?@?@?@?@?@?@?@?@?@?@?@?@?@?@?@?@?@?@?@?@?@?@?@?@?@?@?@?@?, W&?@?@?@?@?@?@?@?@?@?@?@?@?@?@?@?@?@?@?@?@?@?@?@?@?@?@?@?@?@?@?@?@?@?@?@?@?@?@?@?@?@?@?@?@?@?@?, ?@e@@?@e@@ ?W&?@?@?@?@?@?@?@?@?@?@?@?@?@?@?@?@?@?@?@U ?W&?@?@?@?@?@?@?@?@?@?@?@?@?@?@?@?@?@?@?@?@?@?@?@?@?@?@?@?@?@?@?@?@?@?@?@?@?@U ?W&?@?@?@?@?@?@?@?@?@?@?@?@?@?@?@?@?@?@?@?@?@?@?@?@?@?@?@?@?@?@?@?@?@?@?@?@?@?@?@?@?@?@?@?@?@?@?@U ?@e@@?@e@@ W&?@?@?@?@?@?@?@?@?@?@?@?@?@?@?@?@?@?@?@?, W&?@?@?@?@?@?@?@?@?@?@?@?@?@?@?@?@?@?@?@?@?@?@?@?@?@?@?@?@?@?@?@?@?@?@?@?@?@?, W&?@?@?@?@?@?@?@?@?@?@?@?@?@?@?@?@?@?@?@?@?@?@?@?@?@?@?@?@?@?@?@?@?@?@?@?@?@?@?@?@?@?@?@?@?@?@?@?, ?@e@@?@e@@ ?W&?@?@?@?@?@?@?@?@?@?@?@?@?@?@?@?@?@?@?@?@U ?W&?@?@?@?@?@?@?@?@?@?@?@?@?@?@?@?@?@?@?@?@?@?@?@?@?@?@?@?@?@?@?@?@?@?@?@?@?@?@U ?W&?@?@?@?@?@?@?@?@?@?@?@?@?@?@?@?@?@?@?@?@?@?@?@?@?@?@?@?@?@?@?@?@?@?@?@?@?@?@?@?@?@?@?@?@?@?@?@?@U ?@e@@?@e@@ W&?@?@?@?@?@?@?@?@?@?@?@?@?@?@?@?@?@?@?@?@?, W&?@?@?@?@?@?@?@?@?@?@?@?@?@?@?@?@?@?@?@?@?@?@?@?@?@?@?@?@?@?@?@?@?@?@?@?@?@?@?, W&?@?@?@?@?@?@?@?@?@?@?@?@?@?@?@?@?@?@?@?@?@?@?@?@?@?@?@?@?@?@?@?@?@?@?@?@?@?@?@?@?@?@?@?@?@?@?@?@?, ?@e@@?@e@@ ?W&?@?@?@?@?@?@?@?@?@?@?@?@?@?@?@?@?@?@?@?@?@U ?W&?@?@?@?@?@?@?@?@?@?@?@?@?@?@?@?@?@?@?@?@?@?@?@?@?@?@?@?@?@?@?@?@?@?@?@?@?@?@?@U ?W&?@?@?@?@?@?@?@?@?@?@?@?@?@?@?@?@?@?@?@?@?@?@?@?@?@?@?@?@?@?@?@?@?@?@?@?@?@?@?@?@?@?@?@?@?@?@?@?@?@U ?@e@@?@e@@ W&?@?@?@?@?@?@?@?@?@?@?@?@?@?@?@?@?@?@?@?@?@?, W&?@?@?@?@?@?@?@?@?@?@?@?@?@?@?@?@?@?@?@?@?@?@?@?@?@?@?@?@?@?@?@?@?@?@?@?@?@?@?@?, W&?@?@?@?@?@?@?@?@?@?@?@?@?@?@?@?@?@?@?@?@?@?@?@?@?@?@?@?@?@?@?@?@?@?@?@?@?@?@?@?@?@?@?@?@?@?@?@?@?@?, ?@e@@?@e@@ ?W&?@?@?@?@?@?@?@?@?@?@?@?@?@?@?@?@?@?@?@?@?@?@U ?W&?@?@?@?@?@?@?@?@?@?@?@?@?@?@?@?@?@?@?@?@?@?@?@?@?@?@?@?@?@?@?@?@?@?@?@?@?@?@?@?@U ?W&?@?@?@?@?@?@?@?@?@?@?@?@?@?@?@?@?@?@?@?@?@?@?@?@?@?@?@?@?@?@?@?@?@?@?@?@?@?@?@?@?@?@?@?@?@?@?@?@?@?@U ?@e@@?@e@@ W&?@?@?@?@?@?@?@?@?@?@?@?@?@?@?@?@?@?@?@?@?@?@?, W&?@?@?@?@?@?@?@?@?@?@?@?@?@?@?@?@?@?@?@?@?@?@?@?@?@?@?@?@?@?@?@?@?@?@?@?@?@?@?@?@?, W&?@?@?@?@?@?@?@?@?@?@?@?@?@?@?@?@?@?@?@?@?@?@?@?@?@?@?@?@?@?@?@?@?@?@?@?@?@?@?@?@?@?@?@?@?@?@?@?@?@?@?, ?@e@@?@e@@ *?@?@?@?@?@?@?@?@?@?@?@?@?@?@?@?@?@?@?@?@?@?@?@U ?W&?@?@?@?@?@?@?@?@?@?@?@?@?@?@?@?@?@?@?@?@?@?@?@?@?@?@?@?@?@?@?@?@?@?@?@?@?@?@?@?@?@U ?W&?@?@?@?@?@?@?@?@?@?@?@?@?@?@?@?@?@?@?@?@?@?@?@?@?@?@?@?@?@?@?@?@?@?@?@?@?@?@?@?@?@?@?@?@?@?@?@?@?@?@?@U ?@e@@?@e@@ S@?@?@?@?@?@?@?@?@?@?@?@?@?@?@?@?@?@?@?@?@?@?@?, W&?@?@?@?@?@?@?@?@?@?@?@?@?@?@?@?@?@?@?@?@?@?@?@?@?@?@?@?@?@?@?@?@?@?@?@?@?@?@?@?@?@?, W&?@?@?@?@?@?@?@?@?@?@?@?@?@?@?@?@?@?@?@?@?@?@?@?@?@?@?@?@?@?@?@?@?@?@?@?@?@?@?@?@?@?@?@?@?@?@?@?@?@?@?@?, ?@e@@?@e@@ ?W&?@?@?@?@?@?@?@?@?@?@?@?@?@?@?@?@?@?@?@?@?@?@?@U ?W&?@?@?@?@?@?@?@?@?@?@?@?@?@?@?@?@?@?@?@?@?@?@?@?@?@?@?@?@?@?@?@?@?@?@?@?@?@?@?@?@?@?@U ?W&?@?@?@?@?@?@?@?@?@?@?@?@?@?@?@?@?@?@?@?@?@?@?@?@?@?@?@?@?@?@?@?@?@?@?@?@?@?@?@?@?@?@?@?@?@?@?@?@?@?@?@?@U ?@e@@?@e@@ W&?@?@?@?@?@?@?@?@?@?@?@?@?@?@?@?@?@?@?@?@?@?@?@?, W&?@?@?@?@?@?@?@?@?@?@?@?@?@?@?@?@?@?@?@?@?@?@?@?@?@?@?@?@?@?@?@?@?@?@?@?@?@?@?@?@?@?@?, W&?@?@?@?@?@?@?@?@?@?@?@?@?@?@?@?@?@?@?@?@?@?@?@?@?@?@?@?@?@?@?@?@?@?@?@?@?@?@?@?@?@?@?@?@?@?@?@?@?@?@?@?@?, ?@e@@?@e@@ ?W&?@?@?@?@?@?@?@?@?@?@?@?@?@?@?@?@?@?@?@?@?@?@?@?@U ?W&?@?@?@?@?@?@?@?@?@?@?@?@?@?@?@?@?@?@?@?@?@?@?@?@?@?@?@?@?@?@?@?@?@?@?@?@?@?@?@?@?@?@?@U ?W&?@?@?@?@?@?@?@?@?@?@?@?@?@?@?@?@?@?@?@?@?@?@?@?@?@?@?@?@?@?@?@?@?@?@?@?@?@?@?@?@?@?@?@?@?@?@?@?@?@?@?@?@?@U ?@e@@?@e@@ W&?@?@?@?@?@?@?@?@?@?@?@?@?@?@?@?@?@?@?@?@?@?@?@?@?, W&?@?@?@?@?@?@?@?@?@?@?@?@?@?@?@?@?@?@?@?@?@?@?@?@?@?@?@?@?@?@?@?@?@?@?@?@?@?@?@?@?@?@?@?, ?*?@?@?@?@?@?@?@?@?@?@?@?@?@?@?@?@?@?@?@?@?@?@?@?@?@?@?@?@?@?@?@?@?@?@?@?@?@?@?@?@?@?@?@?@?@?@?@?@?@?@?@?@?@?, ?@e@@?@e@@ ?W&?@?@?@?@?@?@?@?@?@?@?@?@?@?@?@?@?@?@?@?@?@?@?@?@?@U ?W&?@?@?@?@?@?@?@?@?@?@?@?@?@?@?@?@?@?@?@?@?@?@?@?@?@?@?@?@?@?@?@?@?@?@?@?@?@?@?@?@?@?@?@?@U ?S@?@?@?@?@?@?@?@?@?@?@?@?@?@?@?@?@?@?@?@?@?@?@?@?@?@?@?@?@?@?@?@?@?@?@?@?@?@?@?@?@?@?@?@?@?@?@?@?@?@?@?@?@?@U ?@e@@?@e@@ W&?@?@?@?@?@?@?@?@?@?@?@?@?@?@?@?@?@?@?@?@?@?@?@?@?@?, W&?@?@?@?@?@?@?@?@?@?@?@?@?@?@?@?@?@?@?@?@?@?@?@?@?@?@?@?@?@?@?@?@?@?@?@?@?@?@?@?@?@?@?@?@?, W&?@?@?@?@?@?@?@?@?@?@?@?@?@?@?@?@?@?@?@?@?@?@?@?@?@?@?@?@?@?@?@?@?@?@?@?@?@?@?@?@?@?@?@?@?@?@?@?@?@?@?@?@?@?, ?@e@@?@e@@ ?W&?@?@?@?@?@?@?@?@?@?@?@?@?@?@?@?@?@?@?@?@?@?@?@?@?@?@U ?W&?@?@?@?@?@?@?@?@?@?@?@?@?@?@?@?@?@?@?@?@?@?@?@?@?@?@?@?@?@?@?@?@?@?@?@?@?@?@?@?@?@?@?@?@?@U ?W&?@?@?@?@?@?@?@?@?@?@?@?@?@?@?@?@?@?@?@?@?@?@?@?@?@?@?@?@?@?@?@?@?@?@?@?@?@?@?@?@?@?@?@?@?@?@?@?@?@?@?@?@?@?@U ?@e@@?@e@@ W&?@?@?@?@?@?@?@?@?@?@?@?@?@?@?@?@?@?@?@?@?@?@?@?@?@?@?, W&?@?@?@?@?@?@?@?@?@?@?@?@?@?@?@?@?@?@?@?@?@?@?@?@?@?@?@?@?@?@?@?@?@?@?@?@?@?@?@?@?@?@?@?@?@?, W&?@?@?@?@?@?@?@?@?@?@?@?@?@?@?@?@?@?@?@?@?@?@?@?@?@?@?@?@?@?@?@?@?@?@?@?@?@?@?@?@?@?@?@?@?@?@?@?@?@?@?@?@?@?@?, ?@e@@?@e@@ ?W&?@?@?@?@?@?@?@?@?@?@?@?@?@?@?@?@?@?@?@?@?@?@?@?@?@?@?@U ?W&?@?@?@?@?@?@?@?@?@?@?@?@?@?@?@?@?@?@?@?@?@?@?@?@?@?@?@?@?@?@?@?@?@?@?@?@?@?@?@?@?@?@?@?@?@?@U ?W&?@?@?@?@?@?@?@?@?@?@?@?@?@?@?@?@?@?@?@?@?@?@?@?@?@?@?@?@?@?@?@?@?@?@?@?@?@?@?@?@?@?@?@?@?@?@?@?@?@?@?@?@?@?@?@U ?@e@@?@e@@ W&?@?@?@?@?@?@?@?@?@?@?@?@?@?@?@?@?@?@?@?@?@?@?@?@?@?@?@?, W&?@?@?@?@?@?@?@?@?@?@?@?@?@?@?@?@?@?@?@?@?@?@?@?@?@?@?@?@?@?@?@?@?@?@?@?@?@?@?@?@?@?@?@?@?@?@?, W&?@?@?@?@?@?@?@?@?@?@?@?@?@?@?@?@?@?@?@?@?@?@?@?@?@?@?@?@?@?@?@?@?@?@?@?@?@?@?@?@?@?@?@?@?@?@?@?@?@?@?@?@?@?@?@?, ?@e@@?@e@@ ?W&?@?@?@?@?@?@?@?@?@?@?@?@?@?@?@?@?@?@?@?@?@?@?@?@?@?@?@?@U ?W&?@?@?@?@?@?@?@?@?@?@?@?@?@?@?@?@?@?@?@?@?@?@?@?@?@?@?@?@?@?@?@?@?@?@?@?@?@?@?@?@?@?@?@?@?@?@?@U *?@?@?@?@?@?@?@?@?@?@?@?@?@?@?@?@?@?@?@?@?@?@?@?@?@?@?@?@?@?@?@?@?@?@?@?@?@?@?@?@?@?@?@?@?@?@?@?@?@?@?@?@?@?@?@?@U ?@e@@?@e@@ W&?@?@?@?@?@?@?@?@?@?@?@?@?@?@?@?@?@?@?@?@?@?@?@?@?@?@?@?@?, W&?@?@?@?@?@?@?@?@?@?@?@?@?@?@?@?@?@?@?@?@?@?@?@?@?@?@?@?@?@?@?@?@?@?@?@?@?@?@?@?@?@?@?@?@?@?@?@?, S@?@?@?@?@?@?@?@?@?@?@?@?@?@?@?@?@?@?@?@?@?@?@?@?@?@?@?@?@?@?@?@?@?@?@?@?@?@?@?@?@?@?@?@?@?@?@?@?@?@?@?@?@?@?@?@?, ?@e@@?@e@@ ?W&?@?@?@?@?@?@?@?@?@?@?@?@?@?@?@?@?@?@?@?@?@?@?@?@?@?@?@?@?@U ?W&?@?@?@?@?@?@?@?@?@?@?@?@?@?@?@?@?@?@?@?@?@?@?@?@?@?@?@?@?@?@?@?@?@?@?@?@?@?@?@?@?@?@?@?@?@?@?@?@U ?W&?@?@?@?@?@?@?@?@?@?@?@?@?@?@?@?@?@?@?@?@?@?@?@?@?@?@?@?@?@?@?@?@?@?@?@?@?@?@?@?@?@?@?@?@?@?@?@?@?@?@?@?@?@?@?@?@U ?@e@@?@e@@ W&?@?@?@?@?@?@?@?@?@?@?@?@?@?@?@?@?@?@?@?@?@?@?@?@?@?@?@?@?@?, W&?@?@?@?@?@?@?@?@?@?@?@?@?@?@?@?@?@?@?@?@?@?@?@?@?@?@?@?@?@?@?@?@?@?@?@?@?@?@?@?@?@?@?@?@?@?@?@?@?, W&?@?@?@?@?@?@?@?@?@?@?@?@?@?@?@?@?@?@?@?@?@?@?@?@?@?@?@?@?@?@?@?@?@?@?@?@?@?@?@?@?@?@?@?@?@?@?@?@?@?@?@?@?@?@?@?@?, ?@e@@?@e@@ *?@?@?@?@?@?@?@?@?@?@?@?@?@?@?@?@?@?@?@?@?@?@?@?@?@?@?@?@?@?@U ?W&?@?@?@?@?@?@?@?@?@?@?@?@?@?@?@?@?@?@?@?@?@?@?@?@?@?@?@?@?@?@?@?@?@?@?@?@?@?@?@?@?@?@?@?@?@?@?@?@?@U ?W&?@?@?@?@?@?@?@?@?@?@?@?@?@?@?@?@?@?@?@?@?@?@?@?@?@?@?@?@?@?@?@?@?@?@?@?@?@?@?@?@?@?@?@?@?@?@?@?@?@?@?@?@?@?@?@?@?@U ?@e@@?@e@@ S@?@?@?@?@?@?@?@?@?@?@?@?@?@?@?@?@?@?@?@?@?@?@?@?@?@?@?@?@?@?, W&?@?@?@?@?@?@?@?@?@?@?@?@?@?@?@?@?@?@?@?@?@?@?@?@?@?@?@?@?@?@?@?@?@?@?@?@?@?@?@?@?@?@?@?@?@?@?@?@?@?, ?*?@?@?@?@?@?@?@?@?@?@?@?@?@?@?@?@?@?@?@?@?@?@?@?@?@?@?@?@?@?@?@?@?@?@?@?@?@?@?@?@?@?@?@?@?@?@?@?@?@?@?@?@?@?@?@?@?@?, ?@e@@?@e@@ ?W&?@?@?@?@?@?@?@?@?@?@?@?@?@?@?@?@?@?@?@?@?@?@?@?@?@?@?@?@?@?@U ?W&?@?@?@?@?@?@?@?@?@?@?@?@?@?@?@?@?@?@?@?@?@?@?@?@?@?@?@?@?@?@?@?@?@?@?@?@?@?@?@?@?@?@?@?@?@?@?@?@?@?@U ?S@?@?@?@?@?@?@?@?@?@?@?@?@?@?@?@?@?@?@?@?@?@?@?@?@?@?@?@?@?@?@?@?@?@?@?@?@?@?@?@?@?@?@?@?@?@?@?@?@?@?@?@?@?@?@?@?@?@U ?@e@@?@e@@ W&?@?@?@?@?@?@?@?@?@?@?@?@?@?@?@?@?@?@?@?@?@?@?@?@?@?@?@?@?@?@?, W&?@?@?@?@?@?@?@?@?@?@?@?@?@?@?@?@?@?@?@?@?@?@?@?@?@?@?@?@?@?@?@?@?@?@?@?@?@?@?@?@?@?@?@?@?@?@?@?@?@?@?, W&?@?@?@?@?@?@?@?@?@?@?@?@?@?@?@?@?@?@?@?@?@?@?@?@?@?@?@?@?@?@?@?@?@?@?@?@?@?@?@?@?@?@?@?@?@?@?@?@?@?@?@?@?@?@?@?@?@?, ?@e@@?@e@@ ?W&?@?@?@?@?@?@?@?@?@?@?@?@?@?@?@?@?@?@?@?@?@?@?@?@?@?@?@?@?@?@?@U ?W&?@?@?@?@?@?@?@?@?@?@?@?@?@?@?@?@?@?@?@?@?@?@?@?@?@?@?@?@?@?@?@?@?@?@?@?@?@?@?@?@?@?@?@?@?@?@?@?@?@?@?@U ?W&?@?@?@?@?@?@?@?@?@?@?@?@?@?@?@?@?@?@?@?@?@?@?@?@?@?@?@?@?@?@?@?@?@?@?@?@?@?@?@?@?@?@?@?@?@?@?@?@?@?@?@?@?@?@?@?@?@?@U ?@e@@?@e@@ W&?@?@?@?@?@?@?@?@?@?@?@?@?@?@?@?@?@?@?@?@?@?@?@?@?@?@?@?@?@?@?@?, ?*?@?@?@?@?@?@?@?@?@?@?@?@?@?@?@?@?@?@?@?@?@?@?@?@?@?@?@?@?@?@?@?@?@?@?@?@?@?@?@?@?@?@?@?@?@?@?@?@?@?@?@?, ?*?@?@?@?@?@?@?@?@?@?@?@?@?@?@?@?@?@?@?@?@?@?@?@?@?@?@?@?@?@?@?@?@?@?@?@?@?@?@?@?@?@?@?@?@?@?@?@?@?@?@?@?@?@?@?@?@?@?@?, ?@e@@?@e@@ ?W&?@?@?@?@?@?@?@?@?@?@?@?@?@?@?@?@?@?@?@?@?@?@?@?@?@?@?@?@?@?@?@?@U ?S@?@?@?@?@?@?@?@?@?@?@?@?@?@?@?@?@?@?@?@?@?@?@?@?@?@?@?@?@?@?@?@?@?@?@?@?@?@?@?@?@?@?@?@?@?@?@?@?@?@?@?@U ?S@?@?@?@?@?@?@?@?@?@?@?@?@?@?@?@?@?@?@?@?@?@?@?@?@?@?@?@?@?@?@?@?@?@?@?@?@?@?@?@?@?@?@?@?@?@?@?@?@?@?@?@?@?@?@?@?@?@?@U ?@e@@?@e@@ W&?@?@?@?@?@?@?@?@?@?@?@?@?@?@?@?@?@?@?@?@?@?@?@?@?@?@?@?@?@?@?@?@?, W&?@?@?@?@?@?@?@?@?@?@?@?@?@?@?@?@?@?@?@?@?@?@?@?@?@?@?@?@?@?@?@?@?@?@?@?@?@?@?@?@?@?@?@?@?@?@?@?@?@?@?@?, W&?@?@?@?@?@?@?@?@?@?@?@?@?@?@?@?@?@?@?@?@?@?@?@?@?@?@?@?@?@?@?@?@?@?@?@?@?@?@?@?@?@?@?@?@?@?@?@?@?@?@?@?@?@?@?@?@?@?@?, ?@e@@?@e@@ ?W&?@?@?@?@?@?@?@?@?@?@?@?@?@?@?@?@?@?@?@?@?@?@?@?@?@?@?@?@?@?@?@?@?@U ?W&?@?@?@?@?@?@?@?@?@?@?@?@?@?@?@?@?@?@?@?@?@?@?@?@?@?@?@?@?@?@?@?@?@?@?@?@?@?@?@?@?@?@?@?@?@?@?@?@?@?@?@?@U ?W&?@?@?@?@?@?@?@?@?@?@?@?@?@?@?@?@?@?@?@?@?@?@?@?@?@?@?@?@?@?@?@?@?@?@?@?@?@?@?@?@?@?@?@?@?@?@?@?@?@?@?@?@?@?@?@?@?@?@?@U ?@e@@?@e@@ W&?@?@?@?@?@?@?@?@?@?@?@?@?@?@?@?@?@?@?@?@?@?@?@?@?@?@?@?@?@?@?@?@?@?, W&?@?@?@?@?@?@?@?@?@?@?@?@?@?@?@?@?@?@?@?@?@?@?@?@?@?@?@?@?@?@?@?@?@?@?@?@?@?@?@?@?@?@?@?@?@?@?@?@?@?@?@?@?, ?*?@?@?@?@?@?@?@?@?@?@?@?@?@?@?@?@?@?@?@?@?@?@?@?@?@?@?@?@?@?@?@?@?@?@?@?@?@?@?@?@?@?@?@?@?@?@?@?@?@?@?@?@?@?@?@?@?@?@?@?, ?@e@@?@e@@ ?W&?@?@?@?@?@?@?@?@?@?@?@?@?@?@?@?@?@?@?@?@?@?@?@?@?@?@?@?@?@?@?@?@?@?@U ?W&?@?@?@?@?@?@?@?@?@?@?@?@?@?@?@?@?@?@?@?@?@?@?@?@?@?@?@?@?@?@?@?@?@?@?@?@?@?@?@?@?@?@?@?@?@?@?@?@?@?@?@?@?@U ?S@?@?@?@?@?@?@?@?@?@?@?@?@?@?@?@?@?@?@?@?@?@?@?@?@?@?@?@?@?@?@?@?@?@?@?@?@?@?@?@?@?@?@?@?@?@?@?@?@?@?@?@?@?@?@?@?@?@?@?@U ?@e@@?@e@@ W&?@?@?@?@?@?@?@?@?@?@?@?@?@?@?@?@?@?@?@?@?@?@?@?@?@?@?@?@?@?@?@?@?@?@?, W&?@?@?@?@?@?@?@?@?@?@?@?@?@?@?@?@?@?@?@?@?@?@?@?@?@?@?@?@?@?@?@?@?@?@?@?@?@?@?@?@?@?@?@?@?@?@?@?@?@?@?@?@?@?, W&?@?@?@?@?@?@?@?@?@?@?@?@?@?@?@?@?@?@?@?@?@?@?@?@?@?@?@?@?@?@?@?@?@?@?@?@?@?@?@?@?@?@?@?@?@?@?@?@?@?@?@?@?@?@?@?@?@?@?@?, ?@e@@?@e@@ ?W-T&?@?@?@?@?@?@?@?@?@?@?@?@?@?@?@?@?@?@?@?@?@?@?@?@?@?@?@?@?@?@?@?@?@?@?@U ?W&?@?@?@?@?@?@?@?@?@?@?@?@?@?@?@?@?@?@?@?@?@?@?@?@?@?@?@?@?@?@?@?@?@?@?@?@?@?@?@?@?@?@?@?@?@?@?@?@?@?@?@?@?@?@U *?@?@?@?@?@?@?@?@?@?@?@?@?@?@?@?@?@?@?@?@?@?@?@?@?@?@?@?@?@?@?@?@?@?@?@?@?@?@?@?@?@?@?@?@?@?@?@?@?@?@?@?@?@?@?@?@?@?@?@?@U ?@e@@?@e@@ W&?@?@?@?@?@?@?@?@?@?@?@?@?@?@?@?@?@?@?@?@?@?@?@?@?@?@?@?@?@?@?@?@?@?@?@?@?, W&?@?@?@?@?@?@?@?@?@?@?@?@?@?@?@?@?@?@?@?@?@?@?@?@?@?@?@?@?@?@?@?@?@?@?@?@?@?@?@?@?@?@?@?@?@?@?@?@?@?@?@?@?@?@?, S@?@?@?@?@?@?@?@?@?@?@?@?@?@?@?@?@?@?@?@?@?@?@?@?@?@?@?@?@?@?@?@?@?@?@?@?@?@?@?@?@?@?@?@?@?@?@?@?@?@?@?@?@?@?@?@?@?@?@?@?, ?@e@@?@e@@ ?W&?@?@?@?@?@?@?@?@?@?@?@?@?@?@?@?@?@?@?@?@?@?@?@?@?@?@?@?@?@?@?@?@?@?@?@?@?@U ?W&?@?@?@?@?@?@?@?@?@?@?@?@?@?@?@?@?@?@?@?@?@?@?@?@?@?@?@?@?@?@?@?@?@?@?@?@?@?@?@?@?@?@?@?@?@?@?@?@?@?@?@?@?@?@?@U ?W&?@?@?@?@?@?@?@?@?@?@?@?@?@?@?@?@?@?@?@?@?@?@?@?@?@?@?@?@?@?@?@?@?@?@?@?@?@?@?@?@?@?@?@?@?@?@?@?@?@?@?@?@?@?@?@?@?@?@?@?@U ?@e@@?@e@@ W&?@?@?@?@?@?@?@?@?@?@?@?@?@?@?@?@?@?@?@?@?@?@?@?@?@?@?@?@?@?@?@?@?@?@?@?@?@?, ?*?@?@?@?@?@?@?@?@?@?@?@?@?@?@?@?@?@?@?@?@?@?@?@?@?@?@?@?@?@?@?@?@?@?@?@?@?@?@?@?@?@?@?@?@?@?@?@?@?@?@?@?@?@?@?@?, ?*?@?@?@?@?@?@?@?@?@?@?@?@?@?@?@?@?@?@?@?@?@?@?@?@?@?@?@?@?@?@?@?@?@?@?@?@?@?@?@?@?@?@?@?@?@?@?@?@?@?@?@?@?@?@?@?@?@?@?@?@?, ?@e@@?@e@@ ?W&?@?@?@?@?@?@?@?@?@?@?@?@?@?@?@?@?@?@?@?@?@?@?@?@?@?@?@?@?@?@?@?@?@?@?@?@?@?@U ?S@?@?@?@?@?@?@?@?@?@?@?@?@?@?@?@?@?@?@?@?@?@?@?@?@?@?@?@?@?@?@?@?@?@?@?@?@?@?@?@?@?@?@?@?@?@?@?@?@?@?@?@?@?@?@?@U ?S@?@?@?@?@?@?@?@?@?@?@?@?@?@?@?@?@?@?@?@?@?@?@?@?@?@?@?@?@?@?@?@?@?@?@?@?@?@?@?@?@?@?@?@?@?@?@?@?@?@?@?@?@?@?@?@?@?@?@?@?@U ?@e@@?@e@@ W&?@?@?@?@?@?@?@?@?@?@?@?@?@?@?@?@?@?@?@?@?@?@?@?@?@?@?@?@?@?@?@?@?@?@?@?@?@?@?, W&?@?@?@?@?@?@?@?@?@?@?@?@?@?@?@?@?@?@?@?@?@?@?@?@?@?@?@?@?@?@?@?@?@?@?@?@?@?@?@?@?@?@?@?@?@?@?@?@?@?@?@?@?@?@?@?, W&?@?@?@?@?@?@?@?@?@?@?@?@?@?@?@?@?@?@?@?@?@?@?@?@?@?@?@?@?@?@?@?@?@?@?@?@?@?@?@?@?@?@?@?@?@?@?@?@?@?@?@?@?@?@?@?@?@?@?@?@?, ?@e@@?@e@@ ?W&?@?@?@?@?@?@?@?@?@?@?@?@?@?@?@?@?@?@?@?@?@?@?@?@?@?@?@?@?@?@?@?@?@?@?@?@?@?@?@U ?W&?@?@?@?@?@?@?@?@?@?@?@?@?@?@?@?@?@?@?@?@?@?@?@?@?@?@?@?@?@?@?@?@?@?@?@?@?@?@?@?@?@?@?@?@?@?@?@?@?@?@?@?@?@?@?@?@U *?@?@?@?@?@?@?@?@?@?@?@?@?@?@?@?@?@?@?@?@?@?@?@?@?@?@?@?@?@?@?@?@?@?@?@?@?@?@?@?@?@?@?@?@?@?@?@?@?@?@?@?@?@?@?@?@?@?@?@?@?@U ?@e@@?@e@@ W&?@?@?@?@?@?@?@?@?@?@?@?@?@?@?@?@?@?@?@?@?@?@?@?@?@?@?@?@?@?@?@?@?@?@?@?@?@?@?@?, W&?@?@?@?@?@?@?@?@?@?@?@?@?@?@?@?@?@?@?@?@?@?@?@?@?@?@?@?@?@?@?@?@?@?@?@?@?@?@?@?@?@?@?@?@?@?@?@?@?@?@?@?@?@?@?@?@?, S@?@?@?@?@?@?@?@?@?@?@?@?@?@?@?@?@?@?@?@?@?@?@?@?@?@?@?@?@?@?@?@?@?@?@?@?@?@?@?@?@?@?@?@?@?@?@?@?@?@?@?@?@?@?@?@?@?@?@?@?@?, ?@e@@?@e@@ ?W&?@?@?@?@?@?@?@?@?@?@?@?@?@?@?@?@?@?@?@?@?@?@?@?@?@?@?@?@?@?@?@?@?@?@?@?@?@?@?@?@U ?W&?@?@?@?@?@?@?@?@?@?@?@?@?@?@?@?@?@?@?@?@?@?@?@?@?@?@?@?@?@?@?@?@?@?@?@?@?@?@?@?@?@?@?@?@?@?@?@?@?@?@?@?@?@?@?@?@?@U ?W&?@?@?@?@?@?@?@?@?@?@?@?@?@?@?@?@?@?@?@?@?@?@?@?@?@?@?@?@?@?@?@?@?@?@?@?@?@?@?@?@?@?@?@?@?@?@?@?@?@?@?@?@?@?@?@?@?@?@?@?@?@U ?@e@@?@e@@ W&?@?@?@?@?@?@?@?@?@?@?@?@?@?@?@?@?@?@?@?@?@?@?@?@?@?@?@?@?@?@?@?@?@?@?@?@?@?@?@?@?, W&?@?@?@?@?@?@?@?@?@?@?@?@?@?@?@?@?@?@?@?@?@?@?@?@?@?@?@?@?@?@?@?@?@?@?@?@?@?@?@?@?@?@?@?@?@?@?@?@?@?@?@?@?@?@?@?@?@?, ?*?@?@?@?@?@?@?@?@?@?@?@?@?@?@?@?@?@?@?@?@?@?@?@?@?@?@?@?@?@?@?@?@?@?@?@?@?@?@?@?@?@?@?@?@?@?@?@?@?@?@?@?@?@?@?@?@?@?@?@?@?@?, ?@e@@?@e@@ ?W&?@?@?@?@?@?@?@?@?@?@?@?@?@?@?@?@?@?@?@?@?@?@?@?@?@?@?@?@?@?@?@?@?@?@?@?@?@?@?@?@?@U *?@?@?@?@?@?@?@?@?@?@?@?@?@?@?@?@?@?@?@?@?@?@?@?@?@?@?@?@?@?@?@?@?@?@?@?@?@?@?@?@?@?@?@?@?@?@?@?@?@?@?@?@?@?@?@?@?@?@U ?S@?@?@?@?@?@?@?@?@?@?@?@?@?@?@?@?@?@?@?@?@?@?@?@?@?@?@?@?@?@?@?@?@?@?@?@?@?@?@?@?@?@?@?@?@?@?@?@?@?@?@?@?@?@?@?@?@?@?@?@?@?@U ?@e@@?@e@@ W&?@?@?@?@?@?@?@?@?@?@?@?@?@?@?@?@?@?@?@?@?@?@?@?@?@?@?@?@?@?@?@?@?@?@?@?@?@?@?@?@?@?, S@?@?@?@?@?@?@?@?@?@?@?@?@?@?@?@?@?@?@?@?@?@?@?@?@?@?@?@?@?@?@?@?@?@?@?@?@?@?@?@?@?@?@?@?@?@?@?@?@?@?@?@?@?@?@?@?@?@?, ?*?@?@?@?@?@?@?@?@?@?@?@?@?@?@?@?@?@?@?@?@?@?@?@?@?@?@?@?@?@?@?@?@?@?@?@?@?@?@?@?@?@?@?@?@?@?@?@?@?@?@?@?@?@?@?@?@?@?@?@?@?@?, ?@e@@?@e@@ ?W-T&?@?@?@?@?@?@?@?@?@?@?@?@?@?@?@?@?@?@?@?@?@?@?@?@?@?@?@?@?@?@?@?@?@?@?@?@?@?@?@?@?@?@U ?W&?@?@?@?@?@?@?@?@?@?@?@?@?@?@?@?@?@?@?@?@?@?@?@?@?@?@?@?@?@?@?@?@?@?@?@?@?@?@?@?@?@?@?@?@?@?@?@?@?@?@?@?@?@?@?@?@?@?@U ?S@?@?@?@?@?@?@?@?@?@?@?@?@?@?@?@?@?@?@?@?@?@?@?@?@?@?@?@?@?@?@?@?@?@?@?@?@?@?@?@?@?@?@?@?@?@?@?@?@?@?@?@?@?@?@?@?@?@?@?@?@?@U ?@e@@?@e@@ W&?@?@?@?@?@?@?@?@?@?@?@?@?@?@?@?@?@?@?@?@?@?@?@?@?@?@?@?@?@?@?@?@?@?@?@?@?@?@?@?@?@?@?@?, W&?@?@?@?@?@?@?@?@?@?@?@?@?@?@?@?@?@?@?@?@?@?@?@?@?@?@?@?@?@?@?@?@?@?@?@?@?@?@?@?@?@?@?@?@?@?@?@?@?@?@?@?@?@?@?@?@?@?@?, W&?@?@?@?@?@?@?@?@?@?@?@?@?@?@?@?@?@?@?@?@?@?@?@?@?@?@?@?@?@?@?@?@?@?@?@?@?@?@?@?@?@?@?@?@?@?@?@?@?@?@?@?@?@?@?@?@?@?@?@?@?@?, ?@e@@?@e@@ ?W&?@?@?@?@?@?@?@?@?@?@?@?@?@?@?@?@?@?@?@?@?@?@?@?@?@?@?@?@?@?@?@?@?@?@?@?@?@?@?@?@?@?@?@?@U ?W&?@?@?@?@?@?@?@?@?@?@?@?@?@?@?@?@?@?@?@?@?@?@?@?@?@?@?@?@?@?@?@?@?@?@?@?@?@?@?@?@?@?@?@?@?@?@?@?@?@?@?@?@?@?@?@?@?@?@?@U *?@?@?@?@?@?@?@?@?@?@?@?@?@?@?@?@?@?@?@?@?@?@?@?@?@?@?@?@?@?@?@?@?@?@?@?@?@?@?@?@?@?@?@?@?@?@?@?@?@?@?@?@?@?@?@?@?@?@?@?@?@?@U ?@e@@?@e@@ W&?@?@?@?@?@?@?@?@?@?@?@?@?@?@?@?@?@?@?@?@?@?@?@?@?@?@?@?@?@?@?@?@?@?@?@?@?@?@?@?@?@?@?@?@?, ?*?@?@?@?@?@?@?@?@?@?@?@?@?@?@?@?@?@?@?@?@?@?@?@?@?@?@?@?@?@?@?@?@?@?@?@?@?@?@?@?@?@?@?@?@?@?@?@?@?@?@?@?@?@?@?@?@?@?@?@?, S@?@?@?@?@?@?@?@?@?@?@?@?@?@?@?@?@?@?@?@?@?@?@?@?@?@?@?@?@?@?@?@?@?@?@?@?@?@?@?@?@?@?@?@?@?@?@?@?@?@?@?@?@?@?@?@?@?@?@?@?@?@?, ?@e@@?@e@@ ?W&?@?@?@?@?@?@?@?@?@?@?@?@?@?@?@?@?@?@?@?@?@?@?@?@?@?@?@?@?@?@?@?@?@?@?@?@?@?@?@?@?@?@?@?@?@U ?S@?@?@?@?@?@?@?@?@?@?@?@?@?@?@?@?@?@?@?@?@?@?@?@?@?@?@?@?@?@?@?@?@?@?@?@?@?@?@?@?@?@?@?@?@?@?@?@?@?@?@?@?@?@?@?@?@?@?@?@U *?@?@?@?@?@?@?@?@?@?@?@?@?@?@?@?@?@?@?@?@?@?@?@?@?@?@?@?@?@?@?@?@?@?@?@?@?@?@?@?@?@?@?@?@?@?@?@?@?@?@?@?@?@?@?@?@?@?@?@?@?@?@U ?@e@@?@e@@ W-T&?@?@?@?@?@?@?@?@?@?@?@?@?@?@?@?@?@?@?@?@?@?@?@?@?@?@?@?@?@?@?@?@?@?@?@?@?@?@?@?@?@?@?@?@?@?, W&?@?@?@?@?@?@?@?@?@?@?@?@?@?@?@?@?@?@?@?@?@?@?@?@?@?@?@?@?@?@?@?@?@?@?@?@?@?@?@?@?@?@?@?@?@?@?@?@?@?@?@?@?@?@?@?@?@?@?@?, S@?@?@?@?@?@?@?@?@?@?@?@?@?@?@?@?@?@?@?@?@?@?@?@?@?@?@?@?@?@?@?@?@?@?@?@?@?@?@?@?@?@?@?@?@?@?@?@?@?@?@?@?@?@?@?@?@?@?@?@?@?@?, ?@e@@?@e@@ ?W&?@?@?@?@?@?@?@?@?@?@?@?@?@?@?@?@?@?@?@?@?@?@?@?@?@?@?@?@?@?@?@?@?@?@?@?@?@?@?@?@?@?@?@?@?@?@?@U ?W&?@?@?@?@?@?@?@?@?@?@?@?@?@?@?@?@?@?@?@?@?@?@?@?@?@?@?@?@?@?@?@?@?@?@?@?@?@?@?@?@?@?@?@?@?@?@?@?@?@?@?@?@?@?@?@?@?@?@?@?@U *?@?@?@?@?@?@?@?@?@?@?@?@?@?@?@?@?@?@?@?@?@?@?@?@?@?@?@?@?@?@?@?@?@?@?@?@?@?@?@?@?@?@?@?@?@?@?@?@?@?@?@?@?@?@?@?@?@?@?@?@?@?@U ?@e@@?@e@@ W&?@?@?@?@?@?@?@?@?@?@?@?@?@?@?@?@?@?@?@?@?@?@?@?@?@?@?@?@?@?@?@?@?@?@?@?@?@?@?@?@?@?@?@?@?@?@?@?, W&?@?@?@?@?@?@?@?@?@?@?@?@?@?@?@?@?@?@?@?@?@?@?@?@?@?@?@?@?@?@?@?@?@?@?@?@?@?@?@?@?@?@?@?@?@?@?@?@?@?@?@?@?@?@?@?@?@?@?@?@?, S@?@?@?@?@?@?@?@?@?@?@?@?@?@?@?@?@?@?@?@?@?@?@?@?@?@?@?@?@?@?@?@?@?@?@?@?@?@?@?@?@?@?@?@?@?@?@?@?@?@?@?@?@?@?@?@?@?@?@?@?@?@?, ?@e@@?@e@@ ?W-T&?@?@?@?@?@?@?@?@?@?@?@?@?@?@?@?@?@?@?@?@?@?@?@?@?@?@?@?@?@?@?@?@?@?@?@?@?@?@?@?@?@?@?@?@?@?@?@?@U *?@?@?@?@?@?@?@?@?@?@?@?@?@?@?@?@?@?@?@?@?@?@?@?@?@?@?@?@?@?@?@?@?@?@?@?@?@?@?@?@?@?@?@?@?@?@?@?@?@?@?@?@?@?@?@?@?@?@?@?@?@U *?@?@?@?@?@?@?@?@?@?@?@?@?@?@?@?@?@?@?@?@?@?@?@?@?@?@?@?@?@?@?@?@?@?@?@?@?@?@?@?@?@?@?@?@?@?@?@?@?@?@?@?@?@?@?@?@?@?@?@?@?@?@U ?@e@@?@e@@ W&?@?@?@?@?@?@?@?@?@?@?@?@?@?@?@?@?@?@?@?@?@?@?@?@?@?@?@?@?@?@?@?@?@?@?@?@?@?@?@?@?@?@?@?@?@?@?@?@?@?, S@?@?@?@?@?@?@?@?@?@?@?@?@?@?@?@?@?@?@?@?@?@?@?@?@?@?@?@?@?@?@?@?@?@?@?@?@?@?@?@?@?@?@?@?@?@?@?@?@?@?@?@?@?@?@?@?@?@?@?@?@?, S@?@?@?@?@?@?@?@?@?@?@?@?@?@?@?@?@?@?@?@?@?@?@?@?@?@?@?@?@?@?@?@?@?@?@?@?@?@?@?@?@?@?@?@?@?@?@?@?@?@?@?@?@?@?@?@?@?@?@?@?@?@?, ?@e@@?@e@@ ?W&?@?@?@?@?@?@?@?@?@?@?@?@?@?@?@?@?@?@?@?@?@?@?@?@?@?@?@?@?@?@?@?@?@?@?@?@?@?@?@?@?@?@?@?@?@?@?@?@?@?@U ?W&?@?@?@?@?@?@?@?@?@?@?@?@?@?@?@?@?@?@?@?@?@?@?@?@?@?@?@?@?@?@?@?@?@?@?@?@?@?@?@?@?@?@?@?@?@?@?@?@?@?@?@?@?@?@?@?@?@?@?@?@?@U ?W&?@?@?@?@?@?@?@?@?@?@?@?@?@?@?@?@?@?@?@?@?@?@?@?@?@?@?@?@?@?@?@?@?@?@?@?@?@?@?@?@?@?@?@?@?@?@?@?@?@?@?@?@?@?@?@?@?@?@?@?@?@?@U ?@e@@?@e@@ W-T&?@?@?@?@?@?@?@?@?@?@?@?@?@?@?@?@?@?@?@?@?@?@?@?@?@?@?@?@?@?@?@?@?@?@?@?@?@?@?@?@?@?@?@?@?@?@?@?@?@?@?, ?*?@?@?@?@?@?@?@?@?@?@?@?@?@?@?@?@?@?@?@?@?@?@?@?@?@?@?@?@?@?@?@?@?@?@?@?@?@?@?@?@?@?@?@?@?@?@?@?@?@?@?@?@?@?@?@?@?@?@?@?@?@?, ?*?@?@?@?@?@?@?@?@?@?@?@?@?@?@?@?@?@?@?@?@?@?@?@?@?@?@?@?@?@?@?@?@?@?@?@?@?@?@?@?@?@?@?@?@?@?@?@?@?@?@?@?@?@?@?@?@?@?@?@?@?@?@?, ?@e@@?@e@@ ?W&?@?@?@?@?@?@?@?@?@?@?@?@?@?@?@?@?@?@?@?@?@?@?@?@?@?@?@?@?@?@?@?@?@?@?@?@?@?@?@?@?@?@?@?@?@?@?@?@?@?@?@?@U ?S@?@?@?@?@?@?@?@?@?@?@?@?@?@?@?@?@?@?@?@?@?@?@?@?@?@?@?@?@?@?@?@?@?@?@?@?@?@?@?@?@?@?@?@?@?@?@?@?@?@?@?@?@?@?@?@?@?@?@?@?@?@U ?S@?@?@?@?@?@?@?@?@?@?@?@?@?@?@?@?@?@?@?@?@?@?@?@?@?@?@?@?@?@?@?@?@?@?@?@?@?@?@?@?@?@?@?@?@?@?@?@?@?@?@?@?@?@?@?@?@?@?@?@?@?@?@U ?@e@@?@e@@ W-T&?@?@?@?@?@?@?@?@?@?@?@?@?@?@?@?@?@?@?@?@?@?@?@?@?@?@?@?@?@?@?@?@?@?@?@?@?@?@?@?@?@?@?@?@?@?@?@?@?@?@?@?@?, W&?@?@?@?@?@?@?@?@?@?@?@?@?@?@?@?@?@?@?@?@?@?@?@?@?@?@?@?@?@?@?@?@?@?@?@?@?@?@?@?@?@?@?@?@?@?@?@?@?@?@?@?@?@?@?@?@?@?@?@?@?@?, ?*?@?@?@?@?@?@?@?@?@?@?@?@?@?@?@?@?@?@?@?@?@?@?@?@?@?@?@?@?@?@?@?@?@?@?@?@?@?@?@?@?@?@?@?@?@?@?@?@?@?@?@?@?@?@?@?@?@?@?@?@?@?@?, ?@e@@?@e@@ ?W-T&?@?@?@?@?@?@?@?@?@?@?@?@?@?@?@?@?@?@?@?@?@?@?@?@?@?@?@?@?@?@?@?@?@?@?@?@?@?@?@?@?@?@?@?@?@?@?@?@?@?@?@?@?@?@U *?@?@?@?@?@?@?@?@?@?@?@?@?@?@?@?@?@?@?@?@?@?@?@?@?@?@?@?@?@?@?@?@?@?@?@?@?@?@?@?@?@?@?@?@?@?@?@?@?@?@?@?@?@?@?@?@?@?@?@?@?@?@U ?S@?@?@?@?@?@?@?@?@?@?@?@?@?@?@?@?@?@?@?@?@?@?@?@?@?@?@?@?@?@?@?@?@?@?@?@?@?@?@?@?@?@?@?@?@?@?@?@?@?@?@?@?@?@?@?@?@?@?@?@?@?@?@U ?@e@@?@e@@ W&?@?@?@?@?@?@?@?@?@?@?@?@?@?@?@?@?@?@?@?@?@?@?@?@?@?@?@?@?@?@?@?@?@?@?@?@?@?@?@?@?@?@?@?@?@?@?@?@?@?@?@?@?@?@?@?, S@?@?@?@?@?@?@?@?@?@?@?@?@?@?@?@?@?@?@?@?@?@?@?@?@?@?@?@?@?@?@?@?@?@?@?@?@?@?@?@?@?@?@?@?@?@?@?@?@?@?@?@?@?@?@?@?@?@?@?@?@?@?, ?*?@?@?@?@?@?@?@?@?@?@?@?@?@?@?@?@?@?@?@?@?@?@?@?@?@?@?@?@?@?@?@?@?@?@?@?@?@?@?@?@?@?@?@?@?@?@?@?@?@?@?@?@?@?@?@?@?@?@?@?@?@?@?, ?@e@@?@e@@ ?W-T-T&?@?@?@?@?@?@?@?@?@?@?@?@?@?@?@?@?@?@?@?@?@?@?@?@?@?@?@?@?@?@?@?@?@?@?@?@?@?@?@?@?@?@?@?@?@?@?@?@?@?@?@?@?@?@?@?@U ?W&?@?@?@?@?@?@?@?@?@?@?@?@?@?@?@?@?@?@?@?@?@?@?@?@?@?@?@?@?@?@?@?@?@?@?@?@?@?@?@?@?@?@?@?@?@?@?@?@?@?@?@?@?@?@?@?@?@?@?@?@?@?@U ?S@?@?@?@?@?@?@?@?@?@?@?@?@?@?@?@?@?@?@?@?@?@?@?@?@?@?@?@?@?@?@?@?@?@?@?@?@?@?@?@?@?@?@?@?@?@?@?@?@?@?@?@?@?@?@?@?@?@?@?@?@?@?@U ?@e@@?@e@@ ?@?.R+R+R+R+R+R+R+R+R+R+R+R+R+R+R+R+R+R+R+R+R+R+R+R+R+R+R+R+R+R+R+R+R+R+R+R+R+R+R+R+R+R+R+R+R+R+R+R+R+R+R+R+R+R+R+R+R+R+R/ ?.R+R+R+R+R+R+R+R+R+R+R+R+R+R+R+R+R+R+R+R+R+R+R+R+R+R+R+R+R+R+R+R+R+R+R+R+R+R+R+R+R+R+R+R+R+R+R+R+R+R+R+R+R+R+R+R+R+R+R+R+R+R+R/ ?.R+R+R+R+R+R+R+R+R+R+R+R+R+R+R+R+R+R+R+R+R+R+R+R+R+R+R+R+R+R+R+R+R+R+R+R+R+R+R+R+R+R+R+R+R+R+R+R+R+R+R+R+R+R+R+R+R+R+R+R+R+R+R/ ?@e@@?@e@@ ?@e@@?@e@@ ?@e@@?@e@@ ?@e@@?@e@@ ?@e@@?@e@@ ?@e@@?@e@@ ?@e@@?@e@@ ?@e@@?@e@@ ?@e@@?@e@@ ?@e@@?@e@@ ?@e@@?@e@@ ?@e@@?@e@@ ?@e@@?@e@@ ?@e@@?@e@@ ?@e@@?@e@@ ?@e@@?@e@@ ?@e@@?@e@@ ?@@@@@@@@@@@@@@@@@@@@@@@@@@@@@@@@@@@@@@@@? @@@@@@@@@@@@@@@@@@@@@@@@@@@@@@@@@@@@@@@@ @@@@@@@@@@@@@@@@@@@@@@@@@@@@@@@@@@@@@@@@he?@e@@?@e@@ ?@@@@@@@@@@@@@@@@@@@@@@@@@@@@@@@@@@@@@@@@@@@@@@@@@@@@@@@@@@@@@@@@@@@@@@@@@@@f?@ @? @@@@@@@@@@@@@@@@@@@@@@@@@@@@@@@@@@@@@@@@@@@@@@@@@@@@@@@@@@@@@@@@@@@@@@@@@@@?f@? ?@ @@@@@@@@@@@@@@@@@@@@@@@@@@@@@@@@@@@@@@@@@@@@@@@@@@@@@@@@@@@@@@@@@@@@@@@@@@@?f@? ?@he?@e@@?@e@@ ?@ ?@L?e?@ @? @? @Lf@? ?@ @? @Lf@? ?@he?@e@@?@e@@ ?@ ?@1?e?@ @? @? @1f@? ?@ @? @1f@? ?@he?@e@@?@e@@ ?@ ?@@?e?@ @? @? @@f@? ?@ @? @@f@? ?@he?@e@@?@e@@he?@@@@@ @@ ?@ ?@@?e?@ @? @@@@@? ?@@? @? @@f@? ?@ @@@@@? ?@@? @? @@f@? ?@he?@e@@?@e@@he?@@? ?J@@L? ?@ ?W2@@6X?gW2@@ ?@@?e?@f?W2@hW2@@6X @? @@ J@@L @? ?W2@he?W2@ @@f@?fW2@?g?W2@@6X? ?@ @@ J@@L @? W2@@6XgW2@@6X @@f@?fW2@?g?W2@@6X? ?@he?@e@@?@e@@he?@@?fW2@@6XeW2@6X??@@@@??W2@@6X??@6T2@g?@ ?7@??@1?f?W&(M? ?@@?e?@f?*@@h7@e@1 @? @@f?W2@@6X??W2@6Xe@@@@eW2@@6Xe@6T2@?g@? ?*@@heW&@@ @@f@?f*@@?g?7@??@1? ?@ @@f?W2@@6X??W2@6Xe@@@@eW2@@6Xe@6T2@?g@? [email protected]@1 @@f@?f*@@?g?7@??@1? ?@he?@e@@?@e@@he?@@?f*Ue@1e7@?I/??N@@H??7@??@1??@@(M?g?@ ?@@??@@?f?7@Y ?@@?e?@f?N@@h@@e@@ @? @@f?*U??@1??7@?I/eN@@He7@e@1e@@(Mh@? ?N@@h?W.Y@@ @@f@?fN@@?g?@@??@@? ?@ @@f?*U??@1??7@?I/eN@@He7@e@1e@@(Mh@? @@he@@ @@f@?fN@@?g?@@??@@? ?@he?@e@@?@e@@he?@@@@?eS@@@@@e@@g@@e?@@??@@??@@Hh?@ ?@@??@@?f?@@@@6X? ?@@?e?@g@@h@@e@@ @? @@@@e?S@@@@@??@@?f?@@?e@@e@@e@@H?h@? @@hW.Y?@@ @@f@?f?@@?g?@@??@@? ?@ @@@@e?S@@@@@??@@?f?@@?e@@e@@e@@H?h@? ?J@5h?J@5 @@f@?f?@@?g?@@??@@? ?@he?@e@@?@e@@he?@@?f7@e@@e@@g@@e?@@??@@??@@?h?@ ?@@??@@?f?@@??@1? ?@@?e?@g@@h@@e@@ @? @@f?7@??@@??@@?f?@@?e@@e@@e@@he@? @@h7Ye@@L? @@f@?f?@@?g?@@??@@? ?@ @@f?7@??@@??@@?f?@@?e@@e@@e@@he@? W&(YhW&(Y @@f@?f?@@?g?@@??@@? ?@he?@e@@?@e@@he?@@?f@@e@@e@@g@@e?@@??@@??@@?h?@ ?@@??@@?f?@@??@@? ?@@?e?@g@@h@@e@@ @? @@f?@@??@@??@@?f?@@?e@@e@@e@@he@? @@h@@@@@@@? @@f@?f?@@?g?@@??@@? ?@ @@f?@@??@@??@@?f?@@?e@@e@@e@@he@? ?W&(Y?g?W&(Y? @@f@?f?@@?g?@@??@@? ?@he?@e@@?@e@@he?@@?f3@e@@e3@?O.?e3@L??3@??@5??@@?h?@ ?@@??@@?f?@@??@@? ?@@?e?@g@@h@@e@@ @? @@f?3@??@@??3@?O.e?3@Le3@e@5e@@he@? @@hf@@H? @@f@?f?@@?g?@@??@@? ?@ @@f?3@??@@??3@?O.e?3@Le3@e@5e@@he@? W&(YhW&(Y @@f@?f?@@?g?@@??@@? ?@he?@e@@?@e@@he?@@?fV4@@@@eV4@0Y?eV4@??V4@@0Y??@@?h?@ ?3@??@5??@@??3@??@5? ?@@?e?@g@@f@@e3@e@5 @? @@f?V4@@@@??V4@0Ye?V4@eV4@@0Ye@@he@? @@f@@g@@ @@f@?f?@@?e?@@??3@??@5? ?@ @@f?V4@@@@??V4@0Ye?V4@eV4@@0Ye@@he@? 7@Y?f@@e7@Y? @@f@?f?@@?e?@@??3@??@5? ?@he?@e@@?@e@@ ?@ ?V4@@0Y??@@??V4@@0Y? ?@@?e?@g@@f@@eV4@@0Y @? @? @@f@@g@@ @@f@?f?@@?e?@@??V4@@0Y? ?@ @? @@@@@@e@@e@@@@@@ @@f@?f?@@?e?@@??V4@@0Y? ?@he?@e@@?@e@@ ?@ ?@@?e?@ @? @? @@f@? ?@ @? @@f@? ?@he?@e@@?@e@@ ?@ ?@@?e?@ @? @? @@f@? ?@ @? @@f@? ?@he?@e@@?@e@@ ?@ ?@@?e?@ @? @? @@f@? ?@ @? @@f@? ?@he?@e@@?@e@@ ?@ ?@@?e?@ @? @? @@f@? ?@ @? @@f@? ?@he?@e@@?@e@@ ?@@@@@@@@@@@@@@@@@@@@@@@@@@@@@@@@@@@@@@@@@@@@@@@@@@@@@@@@@@@@@@@@@@@@@@@@@@@@?e?@ @? @@@@@@@@@@@@@@@@@@@@@@@@@@@@@@@@@@@@@@@@@@@@@@@@@@@@@@@@@@@@@@@@@@@@@@@@@@@@f@? ?@ @@@@@@@@@@@@@@@@@@@@@@@@@@@@@@@@@@@@@@@@@@@@@@@@@@@@@@@@@@@@@@@@@@@@@@@@@@@@f@? ?@he?@e@@?@e@@ I4@@@@@@@@@@@@@@@@@@@@@@@@@@@@@@@@@@@@@@@@@@@@@@@@@@@@@@@@@@@@@@@@@@@@@@@@@?e?@ @? ?I4@@@@@@@@@@@@@@@@@@@@@@@@@@@@@@@@@@@@@@@@@@@@@@@@@@@@@@@@@@@@@@@@@@@@@@@@@f@? ?@ ?I4@@@@@@@@@@@@@@@@@@@@@@@@@@@@@@@@@@@@@@@@@@@@@@@@@@@@@@@@@@@@@@@@@@@@@@@@@f@? ?@he?@e@@?@e@@ ?@@@@@@@@@@@@@@@@@@@@@@@@@@@@@@@@@@@@@@@@? @@@@@@@@@@@@@@@@@@@@@@@@@@@@@@@@@@@@@@@@ @@@@@@@@@@@@@@@@@@@@@@@@@@@@@@@@@@@@@@@@he?@e@@?@e@@ ?@e@@?@e@@ ?@e@@?@e@@ ?@e@@?@e@@ ?@e@@?@e@@ ?@e@@?@e@@ ?@e@@?@e@@ ?@e@@?@e@@ ?@e@@?@e@@ ?@e@@?@e@@@@@@@@@@@@@@@@@@@@@@@@@@@@@@@@@@@@@@@@@@@@@@@@@@@@@@@@@@@@@@@@@@@@@@@@@@@@@@@@@@@@@@@@@@@@@@@@@@@@@@@@@@@@@@@@@@@@@@@@@@@@@@@@@@@@@@@@@@@@@@@@@@@@@@@@@@@@@@@@@@@@@@@@@@@@@@@@@@@@@@@@@@@@@@@@@@@@@@@@@@@@@@@@@@@@@@@@@@@@@@@@@@@@@@@@@@@@@@@@@@@@@@@@@@@@@@@@@@@@@@@@@@@@@@@@@@@@@@@@@@@@@@@@@@@@@@@@@@@@@@@@@@@@@@@@@@@@@@@@@@@@@@@@@@@@@@@@@@@@@@@@@@@@@@@@@@@@@@@@@@@@@@@@@@@@@@@@@@@@@@@@@@@@@@@@@@@@@@@@@@@@@@@@@@@@@@@@@@@@@@@@@@@@@@@@@@@@@@@@@@@@@@@@@@@@@@@@@@@@@@@@@@@@@@@@@@@@@@@@@@@@@@@@@@@@@@@@@@@@@@@@@@@@@@@@@@@@@@@@@@@@@@@@@@@@@@@@@@@@@@@@@@@@@@@@@@@@@@@@@@@@@@@@@@@@@@@@@@@@@@e@@?@e@M @@?@ @@?@@@@@@@@@@@@@@@@@@@@@@@@@@@@@@@@@@@@@@@@@@@@@@@@@@@@@@@@@@@@@@@@@@@@@@@@@@@@@@@@@@@@@@@@@@@@@@@@@@@@@@@@@@@@@@@@@@@@@@@@@@@@@@@@@@@@@@@@@@@@@@@@@@@@@@@@@@@@@@@@@@@@@@@@@@@@@@@@@@@@@@@@@@@@@@@@@@@@@@@@@@@@@@@@@@@@@@@@@@@@@@@@@@@@@@@@@@@@@@@@@@@@@@@@@@@@@@@@@@@@@@@@@@@@@@@@@@@@@@@@@@@@@@@@@@@@@@@@@@@@@@@@@@@@@@@@@@@@@@@@@@@@@@@@@@@@@@@@@@@@@@@@@@@@@@@@@@@@@@@@@@@@@@@@@@@@@@@@@@@@@@@@@@@@@@@@@@@@@@@@@@@@@@@@@@@@@@@@@@@@@@@@@@@@@@@@@@@@@@@@@@@@@@@@@@@@@@@@@@@@@@@@@@@@@@@@@@@@@@@@@@@@@@@@@@@@@@@@@@@@@@@@@@@@@@@@@@@@@@@@@@@@@@@@@@@@@@@@@@@@@@@@@@@@@@@@@@@@@@@@@@@@@@@@@@@@@@@@@@@@@@@@@@@@@?@@@@@@@@@@@@@@@@@@@@@@@@@@@@@@@@@@@@@@@@@@@@@@@@@@@@@@@@@@@@@@@@@@@@@@@@@@@@@@@@@@@@@@@@@@@@@@@@@@@@@@@@@@@@@@@@@@@@@@@@@@@@@@@@@@@@@@@@@@@@@@@@@@@@@@@@@@@@@@@@@@@@@@@@@@@@@@@@@@@@@@@@@@@@@@@@@@@@@@@@@@@@@@@@@@@@@@@@@@@@@@@@@@@@@@@@@@@@@@@@@@@@@@@@@@@@@@@@@@@@@@@@@@@@@@@@@@@@@@@@@@@@@@@@@@@@@@@@@@@@@@@@@@@@@@@@@@@@@@@@@@@@@@@@@@@@@@@@@@@@@@@@@@@@@@@@@@@@@@@@@@@@@@@@@@@@@@@@@@@@@@@@@@@@@@@@@@@@@@@@@@@@@@@@@@@@@@@@@@@@@@@@@@@@@@@@@@@@@@@@@@@@@@@@@@@@@@@@@@@@@@@@@@@@@@@@@@@@@@@@@@@@@@@@@@@@@@@@@@@@@@@@@@@@@@@@@@@@@@@@@@@@@@@@@@@@@@@@@@@@@@@@@@@@@@@@@@@@@@@@@@@@@@@@@@@@@@@@@@@@@@@@@@@@@

Perceptual: All the colors of a given sourceprofile are scaled to fit within the range of colorsthat can be printed. The colors maintain theirrelative positions, so the relationship betweencolors is maintained.
Solid Color Relative: All colors that fall withinthe range of both source and printer profiles areleft unchanged. This type of color matchingallows some colors to be exactly the same. Adisadvantage of this type of matching is thatmany colors may map to a single color resultingin tone compression.
Saturation: The relative saturation of colors ismaintained from the source to the printer. Colorsoutside the range of the printer are converted tocolors with the same saturation, but differentlightness.
ColorSync also supports three different Qualitylevels: Best, Normal, and Draft. The better thequality, the longer the image will take to process.Choose these options accordingly.
Put temporary files on
This option allows you to specify the volumewhere the large temporary printer data files arestored. The files can be up to 75 megabytes in size.This option does not relocate where the Spool Filesare saved. Spool Files are always saved on theStartup volume.
Cal... (Calibrate Button)
This option allows you to recalibrate your printerÕsribbon sensor if the need should ever arise. Formore information on the printerÕs ribbon sensorand on the calibration process, please refer to theend of Section 11-A. In most instances, thiscalibration procedure should not be necessary.
52

The Calibrate option also allows you to send asimple self test print to the printer by clicking onthe Send button for either the Wax Test Image or12Ó Dye Test Image. Be sure the appropriateB/A3-Super size print supplies are installed for thetype of test print you select. The 12Ó Dye Testworks only with the 4-color (C,M,Y,K) dye-sublimation ribbon. This self test procedure can behelpful in assuring that your computer iseffectively communicating with your printer andthat your printer is functioning properly. If youwould like to bypass your computer and print aself test directly from the printer, see the self testprocedure described in Section 5-B.
After your selections have been made, select theOK button to save your printer driver selectionsand to exit the Page Setup window. All printerdriver options you selected will stay the same untilyou change them. Refer to Section 9 to startprinting.
53

8Using thePrintBackgrounderfor Macintosh
A. Introduction The Color Sign Printer printer driver for Macintoshprovides a background print utility called the PrintBackgrounder. This print utility is turned on or offthrough the Chooser. When the Backgrounder isturned on, it allows you to conveniently continueworking in the foreground of your applicationwhile printing in the background. WhenBackgrounder is turned off, all print jobs areprocessed immediately in the foreground of yourapplication. The Backgrounder offers many helpfulfeatures which are described further in this section.
B. Installing the Backgrounder
The Backgrounder is installed by selecting theInstall Background Print Utility option fromwithin the printer driverÕs installer program. Thisoption is NOT selected by default, so if you did notselect the Backgrounder option when installing theprinter driver, it is most likely not installed. Toinstall the Backgrounder, simply go through theprinter driver installation procedure described inSection 7-B making sure that the InstallBackground Print Utility option is selected. TheBackgrounder installs into the Extensions folder ofyour startup drive. Once installed, Backgrounderwill automatically open and close with the startand finish of each print job. To manually openBackgrounder, double-click on the PrintBackgrounder icon within the Extensions folder.
C. Printing with the Backgrounder
With the Backgrounder turned on in the Chooser,select Print from the File menu to print your image.A message appears telling you the image is beingspooled to disk for Background/Later processing.Once the message disappears, backgroundprocessing has begun so your application is free tobe used for other work.
The print job is processed automatically by theBackgrounder. Other documents can be printedand, in turn, will be processed by Backgrounder.While Backgrounder is running, you can quit thecurrent application and start another withoutdisturbing your print jobs. Backgrounder processesall print jobs in the order in which they were sentto the printer.
54

Status of currently processing print job
Print job in which a print error has occurred
List ofqueuedprintjobs
“On hold”print job
D. The Backgrounder Status Window
The Backgrounder status window gives youdetailed information about the status of the printjob currently processing and about each print jobwaiting in the queue. The status of the jobcurrently processing displays at the top of thestatus window. The message indicates how muchof the job has been processed and displays anyother relevant information. This line is blank if, forexample, you manually start Backgrounder and nojob is currently being processed.
The list of queued jobs displays below the currentjob in the order in which they were sent to theprinter. Some applications, however, may put eachpage of the document into a separate spool file,creating a different job in the queue for each page.Print jobs are always added to the bottom of thequeue. When the job currently processing iscomplete, the spool file for that job is deleted fromthe hard disk, and the top-most job in the queue isthen processed.
Jobs that are Òon holdÓ are displayed at the bottomof the job list in italic font. A job goes on holdwhen it has been canceled or when an error isdetected during processing. An overall statusmessage about the Backgrounder displays in thelower left corner of the window. The normalmessage is ÒAvailable,Ó indicating that theBackgrounder can process jobs immediately or addthem to the queue.
E. Backgrounder Menus
File menu
Open Status Window and Close Status Window:Opens and closes the Backgrounder statuswindow. The Backgrounder continues to work ifthe status window is closed.
Log Files: The Backgrounder has the ability tocreate and maintain a sequential history file, or Logfile, of Backgrounder print jobs. This Log file can
55

be enabled and manipulated with the followingcommands of the File menu:
New Log File: Selects a new file in which tomaintain your ongoing Backgrounder printinglog.
Save Copy of Log as: Saves the current Log fileto a new file name or location of yourspecification.
Start Recording Log: Begins logging printhistory. Before the Log file is started, you areasked to specify a Log file in which to save yourprocessed print job entries. When loggingbegins, this option dims.
Stop Recording Log: Stops logging print history.This option dims once print logging stops.
Get Info: Provides additional information aboutthe currently selected print job. Click on theprocessing job or any job in the queue, beforeselecting Get Info. Double-clicking on a job in thestatus window is a shortcut for Get Info.
Quit: Exits the Backgrounder. Note that you cannotquit while a job is being processed (see StopProcessing on the following page). All jobs in thequeue are retained and processed whenBackgrounder is next started.
NOTE The spool files are stored in the ÒSpool Folder,Ó insidethe ÒSystem Folder.Ó If these files are deleted, thecorresponding print jobs will be lost, and must beprinted again.
Admin menu
Stop Processing: Stops the Backgrounder fromprocessing any jobs, although it will still receivethem and add them to the queue. A dialog box isdisplayed if Stop Processing is selected whileBackgrounder is processing a job, asking when thejob should be put on hold. The Backgrounderstatus box in the lower left-hand corner of thewindow indicates that Backgrounder has stopped.
You cannot quit from Backgrounder while it isprocessing a job. Stop Processing must first beselected to cancel the processing job and stopBackgrounder. When Backgrounder stops, themenu changes to Continue Processing. When thisoption is selected, the server starts processing thetop job in the queue.
Preferences: Presents a dialog box containingoptions for fine-tuning the Backgrounder.Background printing priority determines howmuch time your Mac spends processing the image,
56

and how much time it spends in the foregroundapplication (interpreting mouse clicks, key presses,etc.). When the priority is set to High,Backgrounder processes the image faster, but theforeground application may become lessresponsive. With the priority set to Low,Backgrounder takes longer to process the image,yet the responsiveness of the other applications isimproved.
Jobs menu
All commands in the Jobs menu act on thecurrently selected job.
Hold: Prevents an individual job from beingprocessed. Jobs that are Òon holdÓ are displayed initalic font at the bottom of the queue. Placing a jobon hold is useful if you wish to create a print job atpresent, yet save its processing until later.
If Hold is selected on the job currently processing,the job is canceled before it is placed on hold.Canceling the current job can take some time, sincethe printer software may be performing a lengthytask that cannot be interrupted.
Remove Hold: Moves the job from the holdsection of the list and places it at the bottom of thewaiting queue.
Delete: Permanently removes the selected printjob. The corresponding spool file is deleted fromthe Spool Folder. Use this command only whenyou are sure that you do not wish to process thejob. Note that the job currently processing cannotbe deleted (this happens automatically when it isprinted successfully).
Move Job Up and Move Job Down: Adjusts theposition of the selected job in the queue, allowingyou to prioritize jobs. The queue is processed intop-to-bottom order.
F. Problems During a Background Print
Errors that are detected during a background printmust be reported. The Backgrounder, however,cannot simply present a dialog box as soon as theerror occurs, since the dialog could obscure workthat is being done in the foreground. Error dialogsappear immediately, however, if the Backgrounderis in the foreground when the error is detected.
If operating in the background, Backgrounderstops processing until it is brought to the front.When Backgrounder detects an error, it beeps andvisually indicates an error condition. This errorcondition is signaled by alternately flashingbetween the Application menu and the
57

Backgrounder icon. A small diamond symbol isalso displayed next to the Backgrounder iconwithin the Application menu.
Complete and save any work in the foregroundapplication before bringing the Backgrounder tothe front. Once Backgrounder is in the foreground,the error dialog displays and processing continuesor is canceled. Some errors force Backgrounder tostop processing all jobs.
G. Batch Printing When configured properly, the Backgrounder canbe used to process a large print run when thecomputer is not normally in use (for example,during a lunch break or overnight). This type ofprinting is called ÒbatchÓ printing. To create a batchprint, open Backgrounder by double-clicking on itsicon within the Extensions folder. OnceBackgrounder is running, select Stop Processingfrom BackgrounderÕs Admin menu. Then, print therequired print jobs making sure Backgrounder isturned on in the Chooser.
The print jobs will be queued in Backgrounder inthe order in which they were sent. Spool files foreach of these print jobs will be created and storedon the hard disk and will remain on the hard diskuntil Backgrounder starts processing. Be aware thatthese spool files take up space on your hard diskand that you must leave at least 100 Mb of freehard disk space to print to the Color Sign Printer.When you choose to process your batch of printjobs, simply choose Start Processing from theAdmin menu. Be sure the Color Sign Printer hasenough supplies installed to print all of the printjobs stored within Backgrounder.
58

9Printingwith YourColor SignPrinter
A. Interpreting the LED Indicator Lights
The Color Sign Printer communicates severaldifferent print conditions through the cancel andon-line LED indicator lights on the printerÕs frontpanel. It is very important that you understandwhat the various LED sequences mean in order toeffectively operate the printer. Please refer to thefollowing for an explanation of each LEDsequence. Both the cancel and on-line LEDÕs are solid.
This indicates that either the printer is ready toreceive a print job or that it is in the middle ofprinting and experiencing no problems.
The cancel and on-line LEDÕs are alternatelyflashing.
This LED sequence only occurs when printingwith spot-color resin ribbons. This sequenceindicates that the printer has received printinformation and is ready to print. While theprinter is in this mode, you can open theprinterÕs cover to check that you have theappropriate resin ribbon installed or to switchresin ribbon colors. Do not open the cover of theprinter or switch ribbons during any other LEDsequence if in the middle of a print job! With thecover closed, press the cancel button to advancethe ribbon (if necessary). Press the on-linebutton to begin printing with the currentlyinstalled ribbon.
Both the cancel and on-line LEDÕs are flashingsimultaneously.
This LED sequence only occurs when theMonochrome Resin ribbon type option isselected and you are printing multiple copies ofa single-spot-color sign. This sequence indicatesthat the printer is receiving additional print dataduring this very specific type of print job. Whenthis sequence occurs, the printer is giving youtwo choices: 1. You can continue to print on thesheet of vinyl currently in the printer bypressing the on-line button. ÑorÑ 2. You caneject the current sheet of vinyl and beginprinting on a new sheet by pressing the cancelbutton. Once you have made your choice andhave pressed the appropriate button, the printerwill then switch to the alternately flashing LEDsequence. This indicates that the printer is nowready to print the data it is receiving.
59
The on-line LED is flashing quickly.
This indicates that you may be out of printmedia or print ribbon. Replace media asrequired. This can also indicate that print mediais not properly feeding. If, for any reason, theprinter is unable to feed media or advance theribbon after several seconds of trying, it will timeout and the on-line light will flash. Correct theproblem and press the on-line button tocontinue printing. If you experience a severemedia jam, you may need to cancel and restartyour print job. See the troubleshooting tip, ÒTheon-line LED light is flashing rapidly,Ó in Section11-A for additional information on thiscondition.
The on-line LED is flashing (or pulsing)slowly.
This indicates a data transmission error. See thetroubleshooting tip, ÒThe on-line LED light isflashing (pulsing) slowly,Ó in Section 11-A foradditional information on this condition.
To print a process color image using the 3-colorresin ribbon or any of the wax thermal or dye-sublimation ribbons, refer to the following steps.
1. Go to your graphics application program.
2. Open or create the image file you wish to print.For best results, use 24-bit color, 300 dpi (or higher)images. If your design includes photos or bitmapimages, print at an image size of approximately100%. Over-enlarging such an image or printinglower dpi images will cause your printed image toappear jaggy or pixelized when printed. Also,always prepare and save color images in an RGBcolor mode, not CMYK, when using the Color SignPrinterÕs standard printer driver. The Color SignPrinterÕs printer driver software must be givenRGB images in order to print colors accurately.
3. After you have opened or created an image,select Printer Setup or Page Setup from theapplicationÕs File menu and verify that theappropriate printer driver options are selected. Besure to select the appropriate Paper Size andRibbon Type option (see Section 6-E or 7-D). Oncethe driver is set, select Print from the File menu toprint your image.
4. The Color Sign PrinterÕs RIP (raster imageprocessing) begins. Depending upon thecomplexity of the image and the processing speedof your computer, it will take from just a few
60
B. Printing aProcess ColorImage with aPaneled Ribbon

seconds to several minutes for printing to begin.Generally, photos and complicated graphics takelonger to RIP.
5. Once rasterization is complete, the Color SignPrinter will feed in a sheet of print media andbegin printing. The Color Sign Printer alwaysprints the Yellow panel first followed by theMagenta panel and the Cyan panel. If the installedribbon includes a Black panel or an Overlay panel,this panel will print last. Wait until all panels haveprinted and the sheet is fully ejected before tryingto pull it out of the printer.
In order to print a full 24Ó (610mm) image on theextended 12Ó x 26Ó (305 x 660mm) calenderedvinyl, you must use the separate spot-color resinribbons of Yellow, Magenta, Cyan, and Black(Y,M,C,K). In most cases, this is the only reasonyou would want to print a process color imageusing these separate spot-color resin ribbonsinstead of the 3-color paneled resin ribbon.
The Color Sign Printer allows you to print aprocess color sign by using either three (Y,M,C) orfour (Y,M,C,K) of these spot-color ribbons. Theonly difference is that a three color print processwill produce full-color output with a ÒcompositeÓblack, where as a four color print process willproduce full-color output with a ÒtrueÓ black. Thebenefit of the three color print process is thatimages print up to 25% faster and are up to 20%less expensive since the black ribbon is not used.
To print a process color sign using the separatespot-color resin ribbons of yellow, magenta, cyan,and black, refer to the following steps.
1. Load the yellow ribbon into the printer andclose the printerÕs cover.
2. Go to your graphics application program.
3. Open or create the image file you wish to print.For best results, use 24-bit color, 300 dpi (or higher)images. If your design includes photos or bitmapimages, print at an image size of approximately100%. Over-enlarging such an image or printinglower dpi images will cause your printed image toappear jaggy or pixelized when printed. Also,always prepare and save color images in an RGBcolor mode, not CMYK, when using the Color SignPrinterÕs standard printer driver. The Color SignPrinterÕs printer driver software must be givenRGB images in order to print colors accurately.
61
C. Printing aProcess ColorImage with Spot-Color ResinRibbons

4. Select Print Setup or Page Setup from the Filemenu of your program.
5. Select Processed 4 Color Resin from the RibbonType option to print with the printerÕs 4-color printprocess or Processed 3 Color Resin to print withthe 3-color print process. The introduction at thebeginning of this section explains the differencebetween the two. While in the Print Setup window,also check that all of the other appropriate printerdriver options are selected. Once all appropriateoptions are selected, exit the setup window.
6. Select Print from the File menu of yourprogram to print your image.
7. The Color Sign PrinterÕs RIP (raster imageprocessing) begins. Depending upon thecomplexity of the image and the processing speedof your computer, it will take from several secondsto several minutes for printing to begin. Generally,photos and complex graphics take longer to rasterthan images composed primarily of text or simplegraphics.
8. Once rasterization is complete, a sheet of printmedia will feed into the printer and out onto theMedia Tray Cover, then it will retract back into theprinter and pause. When the printer pauses, thecancel and on-line LED lights will begin alternatelyflashing, signaling that the printer is ready to print.
9. Press the on-line button to begin printing withthe yellow ribbon. When the yellow pass hasfinished printing, the vinyl will again retract backinto the printer and then pause. Once the sheet isfully retracted, the cancel and on-line LED lightswill begin alternately flashing. At this time, openthe printerÕs cover, remove the yellow ribbon, loadthe magenta ribbon, and close the cover. Do notopen the cover of the printer before the cancel andon-line lights begin flashing or after they havestopped! This will cancel your print job. Whileprinting, you can only open the printerÕs cover orchange ribbons when the cancel and on-line lightsare alternately flashing.
10. Once the magenta ribbon is installed and theprinter cover is closed, press the on-line button tobegin printing the magenta pass.
11. Repeat this cycle for the remaining ribboncolors. Remember, the ribbon order for printingprocess color signage is Yellow, Magenta, Cyan,and Black. If printing with the 3-color printprocess, the print media will automatically ejectafter the cyan pass has finished printing. If printing
62

with the 4-color print process, the print media willautomatically eject after the black pass has finishedprinting.
This section offers an example of how to print astandard spot color sign which has only one color.Refer to the following steps to begin printing.
1. Go to your graphics application program.
2. Open or create the image you wish to print.Depending upon your application program, youmay need to change the color of your single colorimage to black in order to achieve an entirely solidcolor when printed. The reason for this is that ifyou were to send a color other than black (blue orred for example), a gray scale interpretation of thatcolor could be sent to the printer giving youroutput a grainy or ÒditheredÓ quality instead of asolid, saturated quality.
3. Select Print Setup or Page Setup from the Filemenu of your program.
4. Select Monochrome Resin from the RibbonType options. While in the Print Setup window,also check that all of the other appropriate printerdriver options are selected. Once all appropriateoptions are selected, exit the setup window.
5. Select Print from the File menu to print yourimage.
6. The Color Sign PrinterÕs RIP (raster imageprocessing) begins. Depending upon thecomplexity of the image and the processing speedof your computer, it will take from several secondsto several minutes for printing to begin. Generally,photos and complex graphics take longer to rasterthan images composed primarily of text or simplegraphics.
7. Once rasterization is complete, a sheet of printmedia will feed into the printer and out onto theMedia Tray Cover, then it will retract back into theprinter and pause. When the printer pauses, thecancel and on-line LED lights will begin alternatelyflashing, signaling that the printer is ready to print.
8. When these lights begin flashing, you have twochoices: 1. You may press the on-line button tobegin printing with the currently installed ribbon.ÑorÑ 2. You may open the cover of the printer toverify that the proper ribbon is installed or to loadanother ribbon altogether. In either case, theprinterÕs cover must be closed and you must press
63
D. Printing a One Color Imagewith a Spot-Color ResinRibbon

the on-line button to begin printing. Do not openthe cover of the printer before the cancel and on-line lights begin flashing or after they havestopped! This will cancel your print job. Whileprinting, you can only open the printerÕs cover orchange ribbons when the cancel and on-line lightsare alternately flashing.
9. After your single-color image has printed, theprint media will again be retracted back into theprinter. The reason for this is explained in Part E ofthis section. To eject your finished single-color signfrom the printer, press the printerÕs cancel button.
In addition to printing process color or one colorsignage, the Color Sign Printer is also able to printseveral separate spot colors onto a single sheetusing any combination or number of resin ribboncolors. To do this, you simply place each color ofyour digital image on a separate ÒlayerÓ withinyour design and send each layer to the printer as aseparate print job. To separate and print yourimage by layers, please refer to your specificgraphics application program documentation. Tooperate your Color Sign Printer during this printprocess, please refer to the following steps.
1. Load the appropriate spot color ribbon into theprinter.
2. Select Print Setup or Page Setup from the Filemenu of your program.
3. Select Monochrome Resin from the RibbonType options. While in the Print Setup window,also check that all of the other appropriate printerdriver options are selected. Once all appropriateoptions are selected, exit the setup window.
4. Send the first layer of your image to the printerby selecting Print from your programÕs File menu.Depending upon your application program, youmay need to change the color of that layer to blackin order to achieve an entirely solid color whenprinted. The reason for this is that if you were tosend a color other than black (blue or red forexample), a gray scale interpretation of that colorcould be sent to the printer giving your output agrainy or ÒditheredÓ quality instead of a solid,saturated quality.
5. The Color Sign PrinterÕs RIP (raster imageprocessing) begins. Depending upon thecomplexity of the image and the processing speedof you computer, it will take from several secondsto several minutes for printing to begin. Generally,
64
E. Printing aMulti-Spot-Color Imagewith Spot-ColorResin Ribbons

photos and complex graphics take longer to rasterthan images composed primarily of text or simplegraphics.
6. Once rasterization is complete, a sheet of printmedia will feed into the printer and out onto theMedia Tray Cover, then it will retract back into theprinter and pause. When the printer pauses thecancel and on-line LED lights will begin alternatelyflashing.
7. When these lights begin flashing, you have twochoices: 1. You may press the on-line button tobegin printing with the currently installed ribbon.ÑorÑ 2. You may open the cover of the printer toverify that the proper ribbon is installed or to loadanother ribbon altogether. In either case, theprinterÕs cover must be closed and you must pressthe on-line button to begin printing. Do not openthe cover of the printer before the cancel and on-line lights begin flashing or after they havestopped! This will cancel your print job. Whileprinting, you can only open the printerÕs cover orchange ribbons when the cancel and on-line lightsare alternately flashing.
8. After the first color pass has printed, the printmedia will again retract back into the printer andpause, however, the cancel and on-line lights willremain solid. Do not open the printerÕs lid tochange ribbons at this time! Remember, you canonly open the printerÕs cover or change ribbonÕswhen the cancel and on-line lights are alternatelyflashing.
9. Send the second layer of your image to theprinter by selecting Print from the programÕs Filemenu.
10. Once the image is finished rastering, thecancel and on-line lights will once again beginalternately flashing.
11. Open the printerÕs cover, remove the firstlayerÕs ribbon color, load the second layerÕs ribboncolor, and close the cover.
12. Press the on-line button to begin printing thesecond layer.
13. When the second pass is finished printing, theprint media will again retract and the printer willwait for the next layer to be sent. If you are onlyprinting two layers, press the cancel button to ejectyour finished sign. If you are printing more thantwo layers, continue this process for eachadditional layer of your design.
65

10Maintenance
The Color SignPrinter is built torequire a minimumamount ofmaintenance.Nevertheless, thereare a few proceduresyou can perform on aregular basis or asneeded to ensure thebest possibleperformance.
A. Supplies Required
For the procedures listed in this section, you willneed the following items: Isopropyl alcohol Soft, lint-free cloth Small vacuum cleaner (if available)
Or, to make these maintenance procedures moreconvenient, a Printer Cleaning Kit is available fromyour authorized reseller or the printermanufacturer. This optional kit includes thefollowing: Printhead Cleaning Pens pre-moistened with
99.99% isopropyl alcohol for cleaning yourprinterÕs printhead.
Cleaning Pads pre-moistened with 99.99%isopropyl alcohol for cleaning your printerÕsrollers and general inside area.
66
Isopropylalcohol
Soft, lint-freecloth
Smallvacuumcleaner
PrinterCleaning Kit

Use the following illustration to locate the itemsdiscussed in this section:
B. Cleaning the Printhead
This procedure is performed if you notice a streakrunning the length of the page where color was nottransferred.
1. Open the printerÕs Top Cover by pressing theCover Release Button.
2. Remove the Ribbon Cartridge from the printer.
3. Use a Printhead Cleaning Pen from the PrinterCleaning Kit or a soft, lint-free cloth slightlymoistened with isopropyl alcohol to wipe dust andother accumulated particles off the surface of theprinthead. If using a cloth, be extremely carefulnot to use too much alcohol. It must not be allowedto drip into the printer!
4. Allow the printhead to thoroughly dry beforere-installing the Ribbon Cartridge.
5. Re-install the Ribbon Cartridge, and shut thecover. If a streak persists, Contact TechnicalSupport for further assistance (see Section 11 forTechnical Support information).
67
PrintheadCover
Printhead
Ribbon Guard
Media Supply Tray
Media Tray Cover
Drive Roller
Printhead

IMPORTANT! Never use a sharp tool or a metal object of any kind toclean the printhead. You will damage the printhead!
C. Cleaning the PrinterÕs Case
Your Color Sign Printer has a durable casing thatshould retain its luster and appearance for manyyears. Clean it with a Cleaning Pad from thePrinter Cleaning Kit or a soft, lint-free cloth slightlymoistened with water or a mild soap. Do not useexcess water or cleaning solvents of any kind.Never spray the cabinet with a cleaner. Rather,spray the cloth first, and then wipe down theprinter.
D. Cleaning the Inside of the Printer
As you use your Color Sign Printer, dust and paperparticles will accumulate inside the printerÕs case.These particles are attracted to the underside of theribbon by static produced during printing and cancause voids on the printed image. Periodically, usethe following procedure to remove dust and paperparticles.
1. Open the printerÕs Top Cover by pressing theCover Release Button.
2. Remove the Ribbon Cartridge from the printer.
3. Remove the Media Tray Assembly and removeits print media.
4. If you have access to a very small vacuumcleaner (most computer stores sell devices just forthis purpose), use it to vacuum out all visible areasinside the printer. If you donÕt have such a device,use a Cleaning Pad from the Printer Cleaning Kitor a soft, lint-free cloth slightly moistened withisopropyl alcohol to thoroughly wipe out the entireinterior of the printer. Also, wipe out the inside ofthe Media Supply Tray. Be extremely careful not tolet any alcohol drip inside the printerÕs case.
5. Re-install the Media Tray Assembly and RibbonCartridge, and close the printerÕs cover.
E. Clearing a Print Media Jam
If a sheet of print media becomes jammed insidethe printer, remove it through the following steps.
1. Leave the power on and open the cover of theprinter by pressing the Cover Release Button.
2. Remove the Ribbon Cartridge.
3. Press cancel button to advance the print media.Press the on-line button to reverse it.
68
4. Press the cancel button to clear its input buffermemory. Select the Cancel button (or equivalent) inyour application program. Start the print overagain.
F. Clearing a Ribbon Jam
If the ribbon becomes jammed in the printerÕsdrive roller (visible when you open the printerÕstop cover), use the following procedure to correctthe problem.
1. Leave the power on and open the cover of theprinter by pressing the Cover Release Button.
2. Remove the ribbon take-up core (the side withused ribbon on it) from the Ribbon Cartridge.
3. Gently pull the ribbon up and out of the printerwhile pressing and holding down the printerÕson-line button. This will rotate the drive rollerbackwards and eject the ribbon while you arepulling gently upwards.
4. If any ink is visible on the drive roller, clean itaccording to the steps in Part G of this section.
G. Cleaning the Drive Roller
Periodically, you should clean the printerÕs driveroller. This helps to prevent jams and registrationproblems and helps maintain uninterruptedservice. Also perform this procedure if you noticeany ink on the drive roller. Use the following stepsto clean the roller.
1. Remove the Ribbon Cartridge.
2. Locate the drive roller. It is the long, blackrubber roller in the center of the printerÕs interior.
3. Use a Cleaning Pad from the Printer CleaningKit or a soft, lint-free cloth slightly moistened withisopropyl alcohol to thoroughly wipe the rollerclean. While wiping, press the cancel and on-linebuttons to rotate the roller. Be extremely carefulnot to let any alcohol drip inside the printerÕscase!
4. After the roller is clean and completely dry,replace the Ribbon Cartridge and close theprinterÕs cover.
69

H. Cleaning the In-Feed Rollers
The In-Feed Rollers are visible when the printerÕsMedia Tray Assembly is removed. These rollersserve to pull print media out of the Supply Trayand feed it up into the printer. This procedureshould be performed only if your printerconsistently seems to be having difficulty pullingin blank print media from the Media Supply Tray.If you do not experience such difficulty, you do notneed to clean these rollers. Use the following stepsto clean the In-Feed Rollers.
1. Remove the Media Tray Assembly from theprinter.
2. Looking straight into the printerÕs frontopening, locate the two gray In-Feed Rollers.
3. Use a Cleaning Pad from the Printer CleaningKit or a soft, lint-free cloth slightly moistened withisopropyl alcohol to thoroughly wipe the rollersclean. While wiping, manually rotate the rollerswith your fingertips.
4. After the rollers are clean and completely dry,replace the Media Tray Assembly.
70

11Troubleshooting
If you have difficulty operating your Color SignPrinter, the troubleshooting suggestions in thissection should, in most cases, solve the problem. Ifyou still have difficulty after trying thesesuggestions, call Technical Support. Customer andtechnical support representatives are availableMonday through Friday, 7:30 AM to 5:30 PMCentral Standard Time. To contact a technicalsupport representative, call (612) 941-8121 or FAX(612) 941-1852. You may also leave a message 24-hours a day if you would like to have arepresentative call you back the next business day.
Technical support and printer driver upgrades canalways be obtained free of charge by connecting tothe factoryÕs Bulletin Board or to their World WideWeb Home Page. The Bulletin Board number is(612) 942-7958. The World Wide Web Home Pageaddress is http://www.fargo.com. If you wouldlike to e-mail a question, mail [email protected].
Symptoms: Nothing happens or an error message comesup in the application program. Make sure that the power cord is plugged in
securely on both ends and that the printer isturned on. Confirm power is applied. The greenLED above both the cancel and the on-linebuttons should be illuminated.
Make certain that the printer cable is securelyconnected. An error message in the softwareapplication telling you that the printer is notresponding is often due to a missing or defectiveparallel interface cable.
If your computer seems to raster the image andsend it to the printer, but the printer does notreact at all, you may be in need of more harddisk space for the size of your image. Youshould have enough space on your hard disk forat least double the size of the file you are tryingto print.
This indicates an error has occurred with the printmedia or with the print ribbon. If such an erroroccurs before the Color Sign Printer actually startsto print, the error is recoverable. Correct theproblem and press the on-line button to resumeprinting. If the error occurs after the Color SignPrinter starts printing, you must correct theproblem, reset the printer by pressing the printerÕscancel button, and cancel and resend the print job
71
A. GeneralTroubleshootingfor the ColorSign Printer
The printerdoesnÕt work at all.
The on-line LEDlight is flashingrapidly.

from your application. Refer to the following listfor possible causes to this printer error condition. Check that you have properly loaded print
media and a print ribbon and that you have notrun out of either. Replace media as required (seeSection 4).
Make sure the Ribbon Type option selected inthe printer driver matches the type of ribboncurrently installed in the Color Sign Printer (seeSection 6-E or 7-D for Ribbon Type information).
Check that you have loaded compatible printsupplies according to the descriptions given inSection 4. Remember, dye-sublimation, resinthermal, and wax thermal supplies are notinterchangeable.
Check to see if the print media is jammed or is notfeeding effectively from the Media Supply Tray. Ifjammed, clear according to Section 10-E. If notfeeding, separate the print media to assure it isnot sticking together. You may also need to cleanthe In-Feed Rollers according to Section 10-H.
Check to see if the ribbon is jammed down intothe Drive Roller. If so, clear the jam according toSection 10-F.
This indicates a data transmission error. In otherwords, the Color Sign Printer is not properlyreceiving the print data. If such an error occurs,you must correct the problem, reset the printer bypressing the printerÕs cancel button, and cancel andresend the print job from your application. Refer tothe following list for possible causes to this printererror condition. If you have canceled the printer during a print
job, is the computer still trying to send the printjob? If so, cancel the print job in the software andresend it.
This condition can sometimes be caused byusing a substandard interface cable. Always usehigh-quality serial cable for Macintosh or ashielded, bi-directional parallel cable (preferablyan I-EEE 1284 type cable) for Windows. For bestresults, interface cables should be no longer than6 feet in length.
Do you have the Color Sign Printer connectedthrough a switch box? If so, connect the ColorSign Printer directly to your computer. Do notconnect the Color Sign Printer through a switchbox, as this can interfere with the flow of printdata.
72
The on-line LEDlight is flashing(pulsing) slowly.

If flashing slowly and you are printing from aMacintosh, you may have the printer connectedto a serial port which has been added on to yourcomputerÕs main board. Such add-on ports maynot be fast enough to sustain the printerÕs high-speed rate of data transmission. To solve thisproblem, connect the printer to one of yourcomputerÕs built-in ports such as the Printer orModem port. Keep in mind, however, that youmust be using a Geo-compatible serial port.
If using the print manager of Windows 3.1x orthe standard print spooler of Windows 95, andyour printer starts printing and stops, you mayneed to increase your Transmission Retry Valuefrom 45 to 900. To do this in Windows 3.1x, go toControl Panel, click on the Printers icon, andselect the Connect button. To do this inWindows 95, click the Start button, point toSettings, and select Printers. When the Printerswindow appears, click on the Color Sign Printericon with the right mouse button and select theProperties option. Then, click on the Details tab.
Print with either the 32-Bit Print Spooler or theWrite Direct to Port option selected from withinthe printer driver setup (see Section 6-C, D, andE for more information on these options). Inmost cases, one or the other of these options willprovide the best results when printing fromWindows 95.
Due to the wide variety of PC hardware andsoftware configurations, however, some systemsmay print more effectively through the systemspooler of Windows 95. If you choose not toprint with either the 32-Bit Print Spooler or theWrite Direct to Port option selected, but insteadwish to print through the system spooler ofWindows 95, the following tip will help youoptimize your system for printing:
1. Click the Start button, point to Settings, andselect Printers. When the Printers windowappears, click on the Color Sign Printer iconusing the right mouse button and select theProperties option.
2. Select the Details tab, then select the SpoolSettings button.
3. Select the Print directly to the printer optionand click on OK.
4. Again from the Details tab, select the PortSettings button.
73
IÕm havingproblems printingfrom Windows 95.

5. Deselect both the Check Port state beforeprinting option and the Spool MS-DOS printjobs option, and click on OK.
6. Lastly, increase the Transmission retry valueof the Details tab from 45 to 900. Click on OK toclose the Properties window.
Symptoms: The Color Sign Printer stops printing andthe Printer on-line LED light is flashing. Check that you have properly loaded print
media and a print ribbon according to theinstructions in Section 4. Be sure the print mediais loaded with the print side facing down.
Check that you have loaded compatible printsupplies according to the descriptions given inSection 4. Remember, dye-sublimation, resinthermal, and wax thermal supplies are notinterchangeable.
If the print media is not feeding effectively fromthe Media Supply Tray, separate the print mediato assure it is not sticking together. You may alsoneed to clean the In-Feed Rollers according toSection 10-H.
Clear all jams according to Section 10.
Symptoms: Random lines appear in output that travelthe entire length of the print, from top to bottom. Most likely due to dust or other debris on the
printhead. Review the proper procedures forprinthead cleaning in Section 10-B.
Symptoms: Small spots appear randomly on the printwith no ink or different colors of ink. Most likely due to dust inside the printer.
Review the procedures in Section 10-D forcleaning the inside of the printer.
Can also be caused by dust accumulation on theribbon or print media. Always store printsupplies in the original packaging or in someother suitable dust-free environment when notin use.
74
The print mediaor ribbon isjammed.
My prints havethin lines in them.
My prints haveblotches or spotsin them.

Be sure you have the appropriate suppliesinstalled. Do not, for example, use dye-sublimation ribbon or paper if you have a waxthermal transfer ribbon type option selected inyour printer driver setup, or vice versa. The dye-sublimation, resin thermal and wax thermalprint methods require their own separate andspecific set of supplies. Review Section 4 forcomplete information on all print supplies.
Print media is upside down. Be certain that youare loading print media with the print sidefacing down. The print side of the Color SignPrinterÕs media is always the smoother, white,glossy side or the non-backing side if using#300-Series media.
Wax thermal paper or #300-Series media is notof a good enough quality. For best results,always use factory-brand print media since it isspecifically designed for use with the Color SignPrinter.
You are using too much heat or not enough heatto properly transfer ink. Adjust the Intensitycontrol in the Color Sign PrinterÕs printer driverup or down as needed.
Symptoms: Prints do not look smooth or continuous,but rather grainy and unclear. Some applications have selections you must
enable in order for the Color Sign Printer to useits own dither patterns. For best output, youshould always use the Color Sign PrinterÕsdither patterns. Refer to your applicationprogramÕs instruction manual or contact thesoftware manufacturer for details on how suchselections are enabled.
For best photo-realistic output, you shouldalways use high resolution 24 bit images. Ifscanning an image, always scan the image at a24 bit color setting, at the same approximate sizeat which you will be printing, and at 300 dpi. Ifyou stretch or Òblow upÓ a small or lowresolution image, you will always get apixelated or grainy effect when printing.
75
My prints havepoor or fadedprint quality.
My Dye-Sublimationprints look verydithered orpixelated.

Symptoms: Printer sounds like everything is fine, but noimage. You may have loaded the ribbon upside down.
Open the printerÕs top cover and check that theribbon is loaded properly according to Section 4.Give the printhead a thorough cleaning (seeSection 10-B for printhead cleaning instructions).Be careful not to damage the printhead.
The ribbon may have been loaded backwards.This causes no harm. Just turn it around so thatthe supply end is towards the back of the printerand the take-up is towards the front.
Symptoms: Printer starts to make noise like everythingis fine, but no print media feeds. Be sure the media is properly inserted into the
Media Supply Tray and that you have not over-loaded the tray. Load no more than about 50sheets of print media at a time.
YouÕre trying to feed media thatÕs too thick ortoo heavy. Always use factory-approved printmedia designed for use with the Color SignPrinter.
Before inserting, separate the print media toassure it is not sticking together
The In-Feed Rollers are extremely dirty. Refer toSection 10-H for cleaning instructions.
Remember, there is an unprintable area at thebottom of all media. Refer to Section 4-I for themaximum printable area of each print mediasize, or reduce the image size from within thesoftware program youÕre using.
Check that the correct Paper Size option isselected in the printer driver. Improper papersize settings will always send your image to thewrong area of the page (see Section 4-I forimportant print media information).
76
The print mediafeeds and acts likeit is printing, butnothing isprinted.
The print mediawonÕt feed andthe On-Line LEDstarts blinking.
My image gets cutoff at the bottom(or on the right-hand side inLandscape mode).
Symptoms: The printer seems to ÒstutterÓ or printunusually slow and when the print is finished, it has adark strip across the first inch of the print while the restof the print is much lighter. Or, there are many thinlines across the width of the print. Windows: Print using the Color Sign PrinterÕs
Fast 32-Bit Print Spooler for Windows 95. Whenusing this spooler, be sure that your computerÕsparallel port mode is set to ECP and that a DMAchannel is assigned. See Section 6-C and D forinstructions on using this spooler.
Windows: This signifies that your computer isnot sending data to the printer fast enough.Select the Write Direct to Port option in theColor Sign PrinterÕs printer driver setup if youare unable to use the 32-Bit Print Spooler.Selecting this option will bypass the systemprint spooler and devote all of your systemresources to the current print job. This optionwill increase the rate of data transmission butwill tie-up your system until the print job iscomplete.
Windows: See ÒIÕm having problems printingfrom Windows 95Ó on page 73.
Windows: If using the print manager ofWindows 3.1x or the standard print spooler ofWindows 95, and your printer starts printingand stops, you may need to increase yourTransmission Retry Value from 45 to 900. To dothis in Windows 3.1x, go to Control Panel, clickon the Printers icon, and select the Connectbutton. To do this in Windows 95, click the Startbutton, point to Settings, and select Printers.When the Printers window appears, click on theColor Sign Printer icon with the right mousebutton and select the Properties option. Then,click on the Details tab.
Windows: Install a high speed Parallel Port Cardinto your computer. Such a card will improveyour parallel port speed by 2-10 times, while stillallowing you to use the system print spooler.
Macintosh: You may have the printer connectedto a serial port which has been added on to yourcomputerÕs main board. Such add-on ports maynot be fast enough to sustain the Color SignPrinterÕs high-speed rate of data transmission.When this happens the printer will seem toÒstutterÓ as it waits for more data to be sentdown from your computer. To solve thisproblem, connect the Color Sign Printer to one ofyour computerÕs built-in ports such as the
77
My prints havethin lines or adark band acrossthe width of theprint.

Printer or Modem port. Be sure the port to whichyou connect the Color Sign Printer is Geo-compatible.
Mac and Windows: This condition can alsooccur if using a substandard interface cable. Tosolve this problem, connect the printer to yourcomputer using a shielded, bi-directionalinterface cable no longer than 6 feet in length.
Mac and Windows: This symptom could also becaused by interruptions in the printer driver. Youshould not have your screen saver or energysaver mode enabled, nor should you run anotherprogram while printing. Such action willinterrupt the printer driver and will slightlyaffect print speed and quality.
Be sure to ÒfanÓ the media before loading. Statictends to attract two sheets together. This isespecially true with transparency film or #300-Series cast vinyl or polyester.
This signifies a data transmission error. Thiscould be caused by a faulty or substandardprinter cable or port. Try switching to a different,higher quality cable. For best results, use ashielded, bi-directional cable no longer than 6feet in length.
If using a switch box, connect your printerdirectly to your computer.
Symptoms: The Color Sign Printer is not printing eachribbon panel in the proper Yellow-Magenta-Cyan-Black/Overlay panel order, and, as a result, my full-coloroutput is printing completely off-color on all or part ofthe sheet. Check that the Ribbon Type option in the printer
driver is set according to the ribbon currentlyinstalled (see Section 4-B and Section 6-E or 7-D).Also make sure that you are not using aB/A3-Super size ribbon with the smallerA/A4-Super size print media. If you have theprint supplies configured properly, and the errorpersists, your printerÕs ribbon sensor is mostlikely in need of adjustment. Refer to thefollowing steps to adjust the ribbon sensor.
1. Open the Top Cover, and manually wind theribbon forward until the beginning of theribbonÕs magenta (red) panel touches the ribbontake-up core (the core with the used ribbon on
78
Two sheets ofprint media feedat the same time.
My prints areÒscrambledÓ orlook like barcodes.
The ribbon sensorneeds adjustment.

it). This will properly place the panel over theribbon sensor.
2. Remove the Side Cover on the right-handside of the printer by loosening the two screwslocated on the inside top of this cover and liftingthe cover straight up (see illustration onpage 81).
3. Close the Top Cover and verify that theprinter is properly connected to your computer.
Continue here if printing from WindowsÉ4. Go to a DOS prompt and type the followingcommand:
C:\MODE LPT1,,P <press Enter>
5. Insert the printer driver diskette into yourcomputerÕs disk drive.
6. From the DOS prompt, type one of thefollowing commands according to the type ofribbon you have installed in the printer. Typingsuch a command will send the sensor calibrationdata to your printer.
For the Resin Thermal or Wax Thermal ribbons,type:
C:\COPY A:WAX4.FZP/B LPT1 <press Enter>
For the A/A4-Super Dye Sub ribbon, type: C:\COPY A:DYE8-5.FZP/B LPT1<press Enter>
For the B/A3-Super Dye Sub ribbon, type: C:\COPY A:DYE12.FZP/B LPT1<press Enter>
Continue here if printing from MacintoshÉ4. Go into the Chooser and select the ColorSign Printer driver and the port to which theprinter is attached (Printer Port, Modem Port,Hurdler).
79

5. Go to printer driver setup window (seeSection 7-D) by selecting Page Setup from theFile menu. Click on the Expert button and thenon the CalÉ button of the Expert Options dialogbox. The printerÕs ribbon sensor calibrationwindow appears (see also Section 7-D for moreinformation on the ribbon sensor calibrationwindow).
6. Click on the appropriate Send button todownload the proper ribbon sensor calibrationsequence for the ribbon you currently haveinstalled in your printer.
Select SEND Wax Ribbon Test to adjust theribbon sensor if you have a resin thermal or waxthermal transfer ribbon installed.
Select SEND 9Ó Dye Ribbon Test to adjust theribbon sensor if you have the A/A4-Super (9Ó x14Ó) dye-sublimation ribbon installed.
Select SEND 12Ó Dye Ribbon Test to adjust theribbon sensor if you have the B/A3-Super (12Ó x20Ó) dye-sublimation ribbon installed.
7. After the data is sent, you will hear theprinter cycle the printhead. Then, the printerÕscancel LED light or on-line LED light will flash.This indicates that the ribbon sensor is in need ofadjustment.
8. To adjust the ribbon sensor, locate the foursmall holes toward the bottom of the printerÕsmetal chassis. Each of these holes has a specificfunction. Hole #1 adjusts the overalllightness/darkness of the printed page andshould NOT be adjusted. Hole #2 recalibratesthe ribbon sensor for the resin thermal and waxthermal ribbons. Hole #3 recalibrates the ribbonsensor for the A/A4-Super size (9Ó x 14Ó) dye-
80

sublimation ribbon. Hole #4 recalibrates theribbon sensor for the B/A3-Super size (12Ó x20Ó) dye-sublimation ribbon.
9. Using a small flat-head screw driver, gentlyrotate the screw in the appropriate hole. Do notpush on the screw since this may damage it.Rotate the screw just a fraction of a turn eitherclockwise or counter clockwise until both of theprinter LED lights stop flashing. When both LEDlights remain solid, the ribbon sensor calibrationis complete. Reassemble the printer and try yourprint job again.
81

If you are having difficulty using the Color SignPrinterÕs Macintosh QuickDraw driver, runthrough the following check list.
Is the printer plugged into the wall outlet? Arethe LED lights on? Is the printer selected in theChooser? Is the printer connected to yourMacintosh? Is the connection solid? Does theprinter have proper print media and ribboninstalled?
If printing to the Backgrounder, be sure it isrunning and that it is available for processing.
As a last resort, save what you are working on,close all applications, and do a system restart.This clears the memory of the Macintosh. If youare using the Backgrounder, be sure it is openedbefore you open any other application. Now, tryyour print job again.
Close all Desk Accessories and documentwindows, other than the one from which youwish to print. Turn off any options in theapplication that consume memory, such as ÒUseavailable memory for speed.Ó Save what you areworking on, quit from the application, and re-start to clean up the memory of the Macintosh.
Use the Backgrounder for processing a batchprint (see Section 8-G). As a last resort youshould remove any INIT and CDEV files in yourSystem Folder that you donÕt need.
When the driver is printing, it stores the pages tobe printed from the document in a temporary file.This file is in the System Folder and is called theÒSpool FileÓ (some applications may re-name thefile or put it in a different folder). In some cases, thespool file can become very large, particularly if theimages are complex, such as scanned photographs.The following points help reduce the risk ofrunning low on disk space: Always start up from the hard disk. The driver
creates the spool file on the current startup disk.A floppy disk will not have sufficient space on it.
82
The printer driverindicates that it isprinting, but thereis no responsefrom Color SignPrinter.
The driverdisplays an errormessage sayingthere isinsufficientmemory fromwhich to print.
The driverdisplays an errormessage sayingthere is notenough room onthe disk.
B. Troubleshootingfor the Color SignPrinterÕsMacintosh PrinterDriver andBackgrounderSoftware
An error dialog boxappears when youtry to print sayingthe printer is notready.

The driver puts all the pages to be printed into asingle spool file. If you have only a little spaceleft on the hard disk, you can print each pagefrom the document individually, using the Fromand To fields in the Print dialog box.
Clear off more hard disk space and try yourprint job again.
Background printing shares the processor in theMacintosh with the foreground application. Theamount of time allocated to processing the jobmay be adjusted with the Preferences commandin the Admin menu of the Backgrounder. Sometypes of images (such as very large files) canmake the Macintosh less responsive.
Install Adobe Type Manager, or use a System 7TrueType font.
If you are using Adobe Type Manager, tryincreasing the font cache to more than 256K (usethe Control Panel). Try closing other documents,and increasing the available memory for theapplication before printing again.
If printing with dye-sublimation supplies, selectthe Text anti-aliasing option in the Expertoptions of the Page Setup dialog box.
Select the Enhance Fine Text option in theExpert options of the Page Setup dialog box.
Select the Text anti-aliasing option in the Expertoptions of the Page Setup dialog box.
Some applications have an option to enable ordisable Òfractional character spacingÓ. It is oftenfound in a Preferences dialog box or as part ofthe page setup dialog box. It should always beselected to ensure that the driver can positiontext accurately.
Try disabling unnecessary extensions (i.e. thosewhich are not completely necessary to run yoursystem or your Color Sign Printer). To disableextensions, remove them from the Extensionsfolder and restart. To isolate the extensioncausing the problem, try removing suspectextensions one-half at a time while printing tothe Color Sign Printer.
83
The foregroundapplication is lessresponsive whileprinting in thebackground.
Text is Òjagged,Óparticularly atvery large sizes.
Dye-SublimationText is Òjagged,Óespecially at smallsizes.
Text is incorrectlyformatted.
Prints are comingout black andwhite only, orimages are garbledor wonÕt print atall.

12TechnicalSpecifications
Print Methods Dye-Sublimation/Resin Thermal Transfer/Wax Thermal Transfer
Resolution 300 x 300 DPI
Colors Up to 16.7 million
Print Speed Dye-Sublimation Process Color: Approximately 12 minutes per 20Ó page (C,M,Y,K)Resin Process Color: Approximately 6 minutes per 20Ó page (C,M,Y)Wax Process Color: Approximately 4 minutes per 20Ó page (C,M,Y,K)Resin Spot-Color: Approximately 2 minutes per 20Ó page
Interfaces Dual Interface: Centronics-type parallel, high-speed serial (Geo-compatible serial port required for Macintosh)
Printer Drivers Windows 3.1 GDI, Macintosh Color QuickDrawª (PowerPC native) Optional CPSI-based Adobe PostScript Level 2 (WindowsPostScript supports wax thermal and dye-sublimation print methods only)
RibbonsDye-Sublimation: 3-color FotoShield (C,M,Y,O), 4-color (C,M,Y,K)Resin Thermal: 3-color (C,M,Y), spot-color ribbon colors include
Cyan, Magenta, Yellow, Black, Red, Blue, White, Orange, and Green. Metallic Gold, Silver, and other selected Pantone spot-colors also available.
Wax Thermal: 4-color (C,M,Y,K), 1-color (K)
Print Media TypesDye-Sublimation: Dye-sublimation receiver sheetsResin Thermal: #300-Series Vinyl and Polyester:
2 Mil Premium Clear Cast Vinyl2 Mil Premium White Cast Vinyl4 Mil Premium White Calendered VinylBrushed Gold PolyesterBrushed Silver Polyester
Wax Thermal: Plain paper, transparency film, T-shirt transfer paper
Print Media SizeDye-Sublimation: B/A3 Super-size (12Ó x 20Ó/305 x 508mm),
A/A4 Super-size (9Ó x 14Ó/229 x 356mm)Resin Thermal: B/A3 Super-size (12Ó x 20Ó/305 x 508mm),
Extended B/A3 Super-size (12Ó x 26Ó/305 x 660mm)Wax Thermal: B/A3 Super-size (12Ó x 20Ó/305 x 508mm),
A/A4 Super-size (9Ó x 14Ó/229 x 356mm)
84

Printable AreaMedia Size Color Print Area Mono Print AreaA/A4 Super 8.8Ó x 11.3Ó (224 x 287mm) 8.8Ó x 11.3Ó (224 x 287mm)B/A3 Super 11.95Ó x 17.4Ó (304 x 442mm) 11.95Ó x 17.4Ó (304 x 442mm)Extended B/A3 Super 11.95Ó x 22Ó (304 x 559mm) 11.95Ó x 24Ó (304 x 610mm)
Dimensions 17.1ÓW x 8.25ÓH x 14.75ÓD(26.5Ó D with Media Tray installed); 43.5cmW x 21cmH x 37.5cmD(67.3cmD with Media Tray installed)
Weight 42 lbs. (19kg)
TemperatureOperating: 5¡C to 35¡CStorage: -20¡C to 55¡C
(5¡C to 35¡C guaranteed for Ink Ribbon; -5¡C to 45¡C for up to one month is normally acceptable but not guaranteed)
Humidity Operating: 20% to 80% (RH non-condensation)Storage: 15% to 85% (RH non-condensation)
Power 110/120 VAC, 50/60 Hz, or 220/240, 220-250 VAC,50/60 Hz, or 100 VAC, 50/60 Hz
Safety USA Ñ UL1950Canada Ñ CSA C2.2Europe Ñ TV-GS (IEC-950)
EMI USA Ñ FCC Class ACanada Ñ CRC c1374, Class AEurope Ñ CISPR 22-B and EN55022, Class B; TV-EMC
CE Self certified based on IEC 801-2,-3,-4, CISPR 22-B andIEC-950 certification
Warranty One Year, Parts and Labor
85

Appendix
AInterfacingInformation
A. Introduction The Color Sign Printer is equipped with both astandard 8-bit Centronics-type parallel interfaceport and a high-speed serial interface port. Thesecommunication ports are the means through whichthe printer receives data from your computer. Thissection describes the pin assignments and signalspecifications for each of these ports.
B. Centronics-type Parallel Interface
The Centronics-type parallel interface is the mostwidely used printer interface due to its simplicity,speed and standardization throughout thecomputer industry. The printerÕs parallel interfaceconnector is a standard 36-pin Amp type with twometal-wire retaining clips. It mates with a standardcomputer to printer parallel cable. For best results,always use a shielded parallel cable (preferably anI-EEE 1284 type cable) which is less than 6 feet inlength.
Pin assignments are as follows:
TABLE A-1: Parallel Interface Pin Assignments
86
14
25 13
PIN 136 18
PIN 119
WIRE DIAGRAMDB36P DB25P
1 1
2 2
3 3
4 4
5 5
6 6
7 7
8 8
9 9
10 10
11 11
12 12
13 13
14 14
32 15
31 16
36 17
19 THROUGH 30 19 THROUGH 25
SHELL SHELL

C. Mini 8-Pin Serial Interface
The mini 8-pin serial interface connector is thestandard interface used by Macintosh. Due to theColor Sign PrinterÕs high-speed rate of datatransmission, its serial interface port communicatesonly with Macintosh GeoPorts. If your Macintoshdoes not have a Geo-compatible serial port, youwill not be able to use the Color Sign PrinterÕsserial port. The Color Sign PrinterÕs serial portmates with a standard computer to printer serialcable. Always use a high-quality serial cable whichis less than 6 feet in length.
Pin assignments are as follows:
TABLE A-2: Serial Interface Pin Assignments
87
Pin Signal Signal Number Name Description
1 HSKo External Clock Output± 2V < Vout < ± 3.6V;Rout < 450Ω
2 HSKi Not Connected
3 TxD- Not Connected
4 GND Signal ground.Connected to logic andchassis ground.
5 RxD- Receive data (inverted);Vih = 0.2V; Vil = -0.2V;Rin > 12KΩ
6 TxD+ Not Connected
7 GPi Not Connected
8 RxD+ Receive data. Receiveduninverted at SCC’s RxD.Vih = 0.2V; Vil = -0.2V;Rin > 12KΩ
8 7 6
5 4 3
2 1
Index
32-bit Print Spooler ...........................................................3032-bit QuickDraw ..............................................................48Better bitmap scaling ........................................................48Black text on black pass only ..........................................49CalÉ (Calibrate Button)...................................................52Cancel Button .......................................................................9Cancel LED Light...........................................................9, 59Chooser ................................................................................44Color bitmap smoothing ..................................................49Color Matching ............................................................37, 50ColorSync ............................................................................51Cover Release Button..........................................................9Dither Pattern ...............................................................38, 50Drive roller..........................................................................69Dye-Sublimation .....................................................1, 12, 16ECP .......................................................................................32Enhance Fine Text........................................................39, 49Enlarge/reduce....................................................................47Expert Options ...................................................................47FargoColor.....................................................................37, 51Fast 32-bit Spooler .............................................................39GeoPort ................................................................................41Heat Transfers ....................................................................17In-Feed Roller.....................................................................70Intensity.........................................................................38, 50K-Panel Text Mode............................................................38Media Tray Assembly...................................................9, 18Mirrored ..............................................................................48On-line Button .....................................................................9On-line LED Light.............................................9, 59, 71, 72Orientation....................................................................40, 47Overlay ..........................................................................38, 49Paneled Ribbon............................................................12, 60Paper Size......................................................................36, 45Parallel Port.............................................................26, 32, 86Perfed Paper..................................................................40, 48Polyester ..............................................................................17PostScript ......................................................................27, 42Power....................................................................................23Print Backgrounder ...........................................................54Print Media .........................................................................16Print Quality .......................................................................47Print within margins.........................................................48Printable area......................................................................22Printer driver ................................................................27, 42Printhead .............................................................................67Printing ................................................................................59Put temporary files on ......................................................52QuickDraw..........................................................................42Resin Thermal Transfer..............................................13, 16Ribbon Cartridge .........................................................10, 14Ribbon sensor adjustment...............................................78Ribbon Type .................................................................36, 46
88

Ribbons................................................................................12Save temp files for re-print..............................................47Self Test ...............................................................................24Serial port......................................................................41, 87Spot Color Resin Ribbon ...............................13, 61, 63, 64Supply Tray ........................................................................19Text anti-aliasing ...............................................................49Thermal Transfer .................................................................1Transparency Film.............................................................17Tray Cover...........................................................................19Vinyl.....................................................................................16Wax Thermal Transfer ................................................13, 17Write Direct to Port ...........................................................39
89

Printed In The United States of AmericaP/N 510201