color powerpoint instructions pptx template. divider slide with text box deleted. 19 • this slide...
TRANSCRIPT

ColorPowerPoint Instructions
Your name hereYOUR TITLE HERE
DATE OF PRESENTATION HERE
Revised May 2018
• This is BNSF’s updated PowerPoint template.• The template is used for all BNSF presentations, both
internal and external, • Proper utilization of the presentation template will project a
professional image of the company to your audience while maintaining the BNSF brand.
Color PowerPoint Template-General Information

• The 2017 PowerPoint template slide size is now widescreen (16:9) which matches the widescreen projectors installed in most conference rooms.
• All presentations created using the new BNSF template are automatically set to widescreen slide size. To ensure presentations display correctly, please do not alter the slide size.
Important note: earlier presentations created using the standard slide size will require modification to view correctly in widescreen mode. This typically includes resizing, moving and adjusting graphics, photographs and text.
Color PowerPoint Template-General Information
• The color PowerPoint presentation should only be used for digital presentations – and should never be printed.
• In the event a printed presentation is absolutely necessary, please use the NEW black and white template (described later in this deck).
Color PowerPoint Template – General Information
4
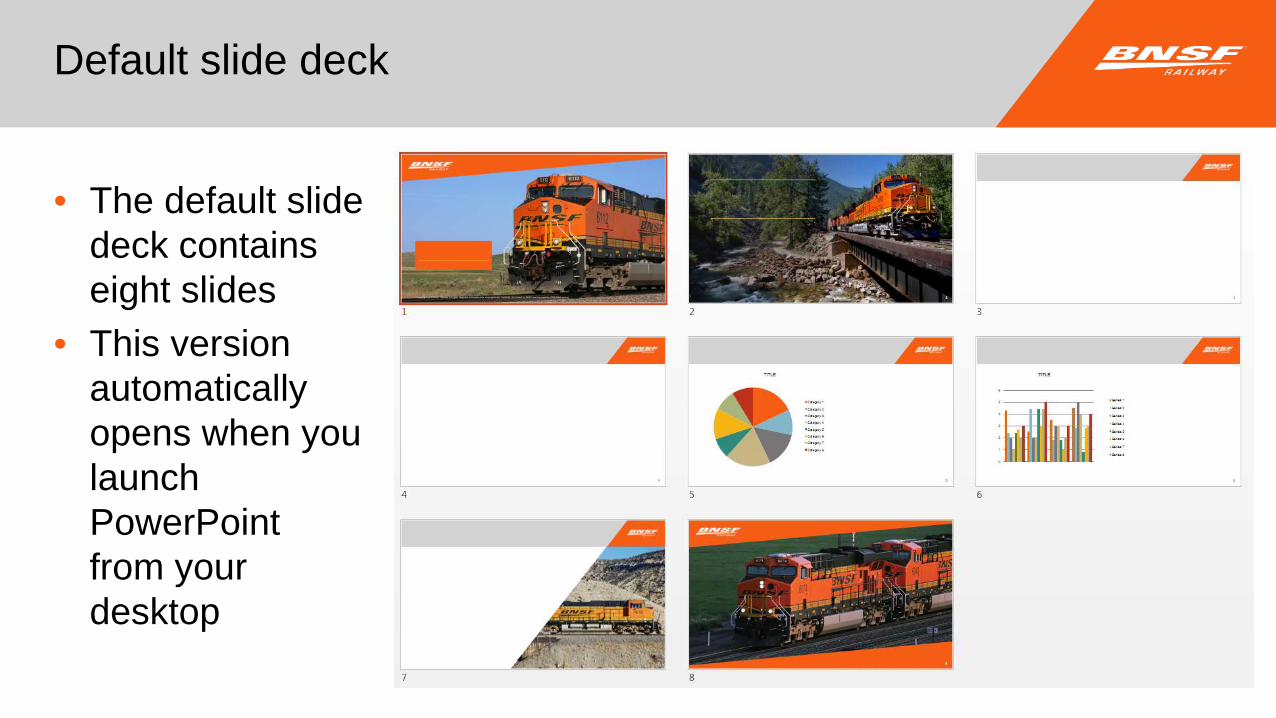
• The default slide deck contains eight slides
• This version automatically opens when you launch PowerPoint from your desktop
Default slide deck

• Select a slide in your presentation. – It may be a new slide, a slide that contains content or a slide
that has a different layout applied to it
Choosing a slide layout

• Click “Layout”– A dropdown menu will appear
Choosing a slide layout
• Choose the slide layout you want to appear on the slide

• Slide design options– Cover– Title and content – Header– General section divider– Blank – End slide
Choosing a slide layout – slide design choices

• New slide choices (business-specific divider slides must be downloaded separately – see subsequent information) :– Divider slides with a variety of scenic shots
depicting various commodities that move on the railroad (see starred items).
• Use Divider slides to create breaks within a presentation. These slides contain a text box that may be customized.
• Multiple section divider slides may be used in a single presentation.
• Divider slide use is not restricted to the commodity featured on the slide.
Choosing a slide layout – slide design choices

• Business specific divider slides are available to download from the BNSF branding site
Alternative business-specific divider slides
• Download the file and save it.
• Each time you need a slide from this deck, you will copy and paste it into the deck you are creating.

• Alternative title and end slides are available to download from the BNSF branding site
Alternative title and end slides
• Download the file and save it.
• Each time you need a slide from this deck, you will copy and paste it into the deck you are creating.

Copying a slide from deck-to-deck
• Open the alternative slide deck • Choose the slide you want to
copy from the slide viewer on the left side of the page (not the slide available for editing)

Copying a slide from deck-to-deck
• Right-click on the slide and select copy

Copying a slide from deck-to-deck
• Go to the deck you are creating (the one you want to insert the slide into)
• Click between two slides on the left navigation panel until you see the red bar (do not choose a slide, choose between the slides)
• Right-click on the slide and select copy picture
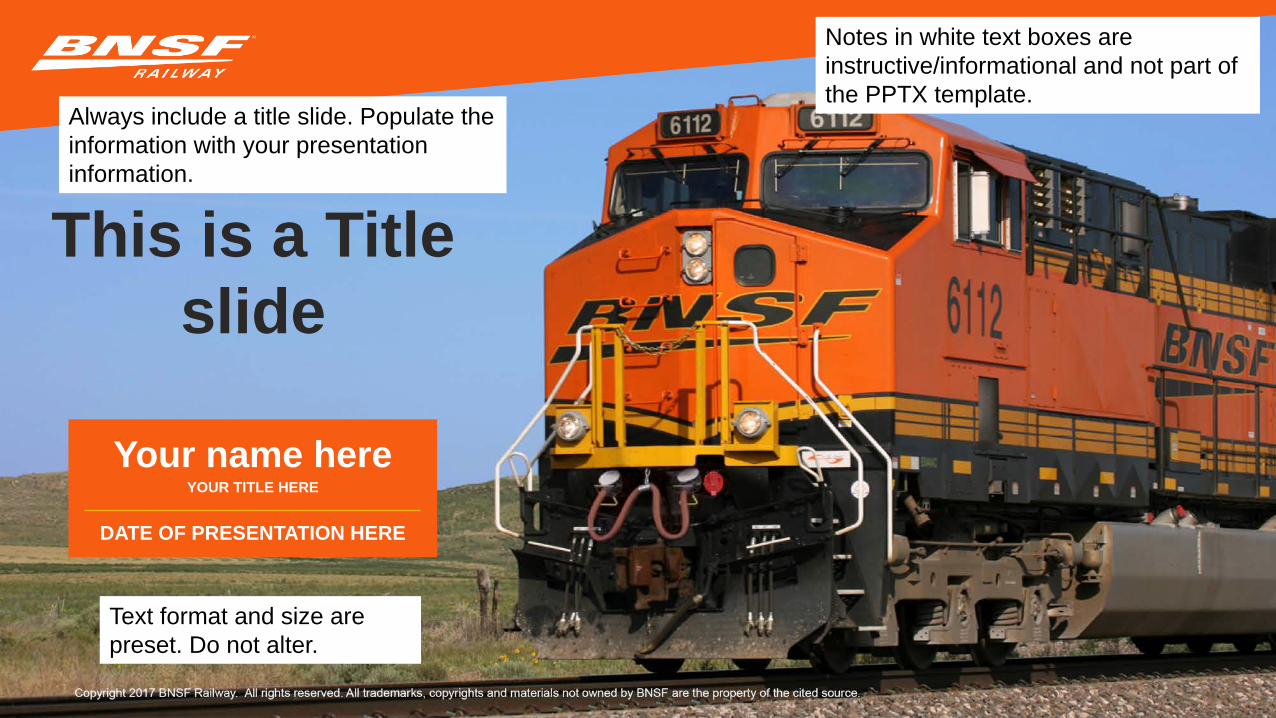
This is a Title slide
Your name hereYOUR TITLE HERE
DATE OF PRESENTATION HERE
Always include a title slide. Populate the information with your presentation information.
Text format and size are preset. Do not alter.
Notes in white text boxes are instructive/informational and not part of the PPTX template.

16
• First level of text is auto-sized to Arial 28 pt.– Subsequent levels of text auto-size smaller with each indent.
• Third level– Fourth Level
Slide for text and graphics

Divider SlideGeneral
17
Use Divider slides to create breaks within a presentation.
Notes in white text boxes are instructive/informational and not part of the PPTX template.

Divider slide with text box deleted.

19
• This slide contains text and a photograph
• Use these lines to describe the photograph or situation.
Slide for text and graphics
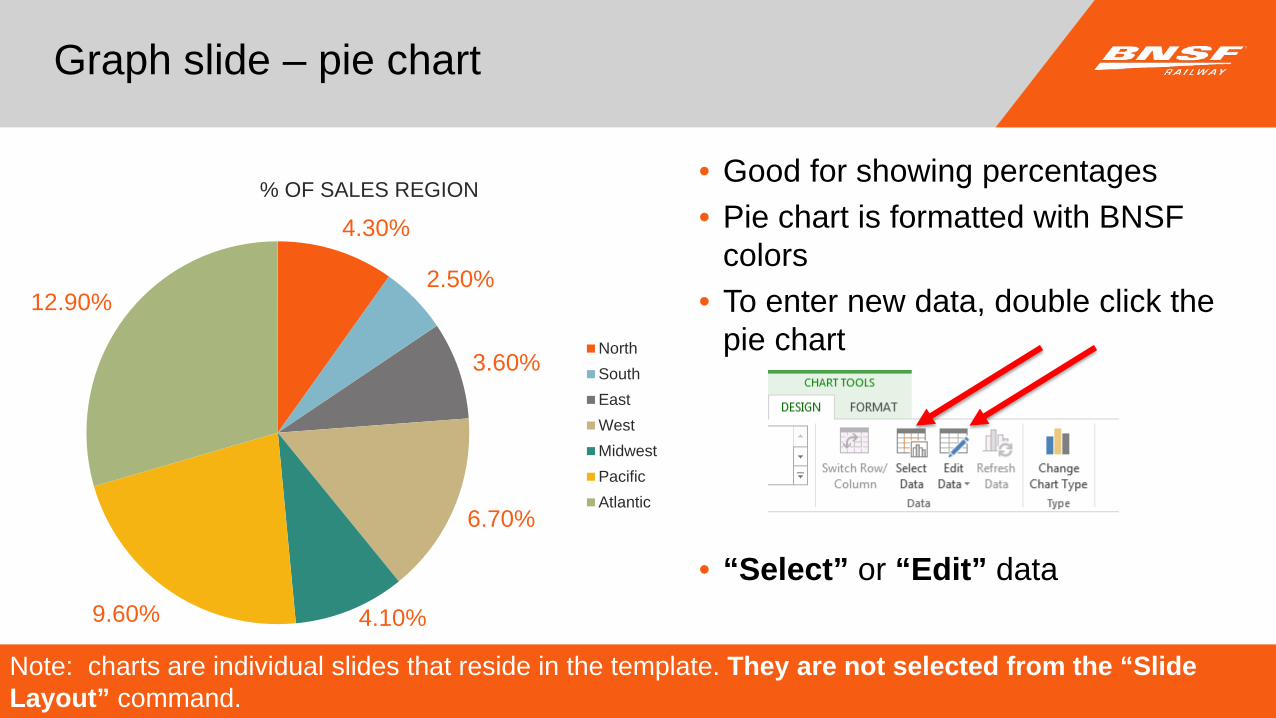
• Good for showing percentages• Pie chart is formatted with BNSF
colors• To enter new data, double click the
pie chart
• “Select” or “Edit” data
Graph slide – pie chart
4.30%
2.50%
3.60%
6.70%
4.10%9.60%
12.90%
% OF SALES REGION
NorthSouthEastWestMidwestPacificAtlantic
20Note: charts are individual slides that reside in the template. They are not selected from the “Slide Layout” command.
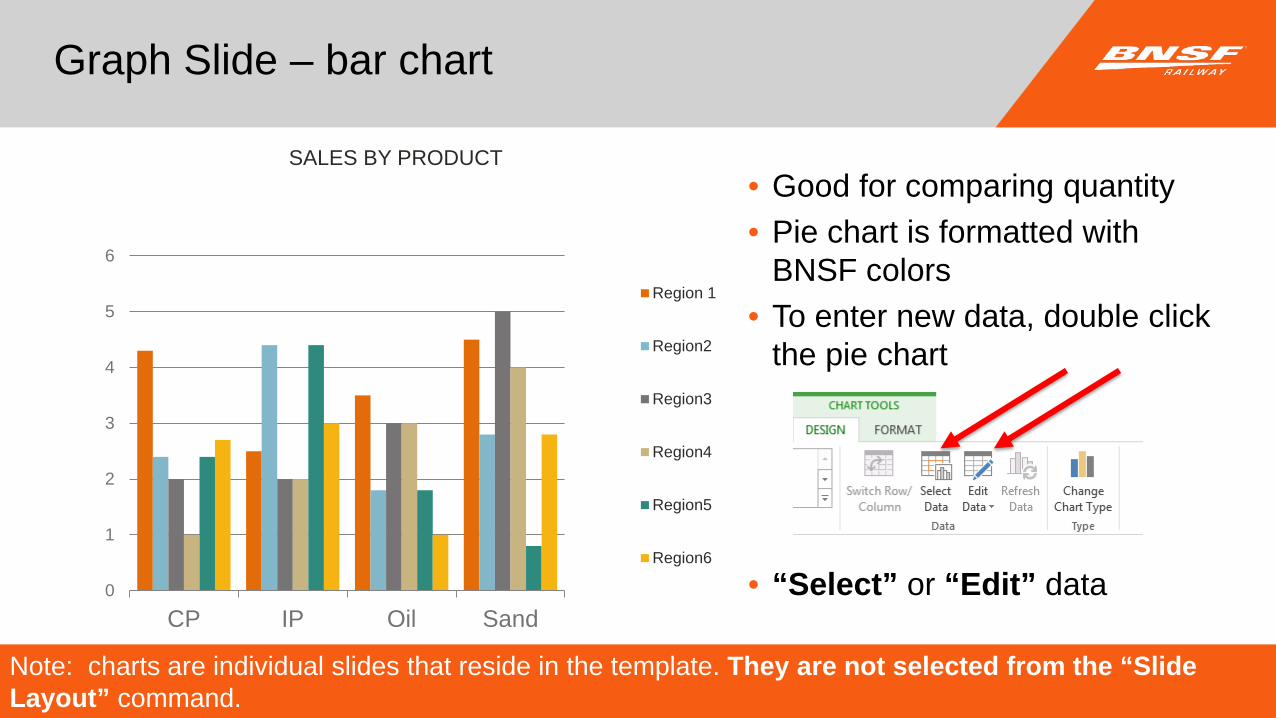
Graph Slide – bar chart
0
1
2
3
4
5
6
CP IP Oil Sand
SALES BY PRODUCT
Region 1
Region2
Region3
Region4
Region5
Region6
21Note: charts are individual slides that reside in the template. They are not selected from the “Slide Layout” command.
• Good for comparing quantity• Pie chart is formatted with
BNSF colors• To enter new data, double click
the pie chart
• “Select” or “Edit” data
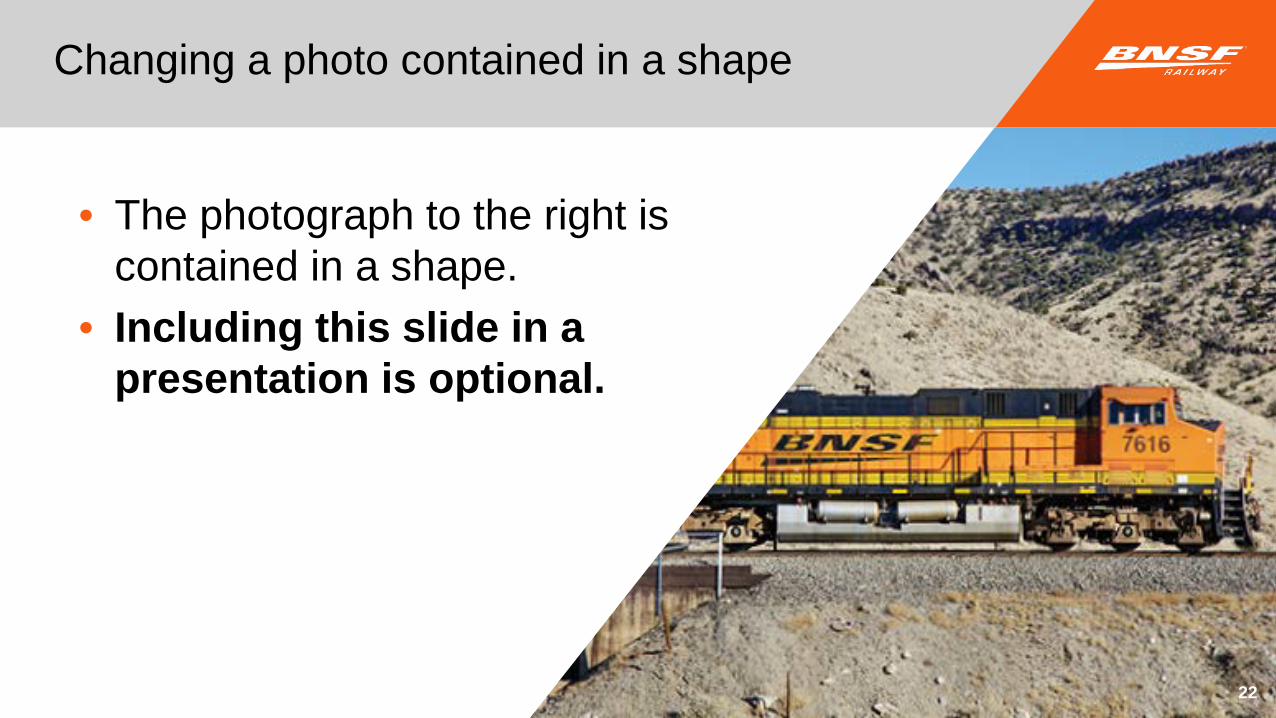
Changing a photo contained in a shape
22
• The photograph to the right is contained in a shape.
• Including this slide in a presentation is optional.
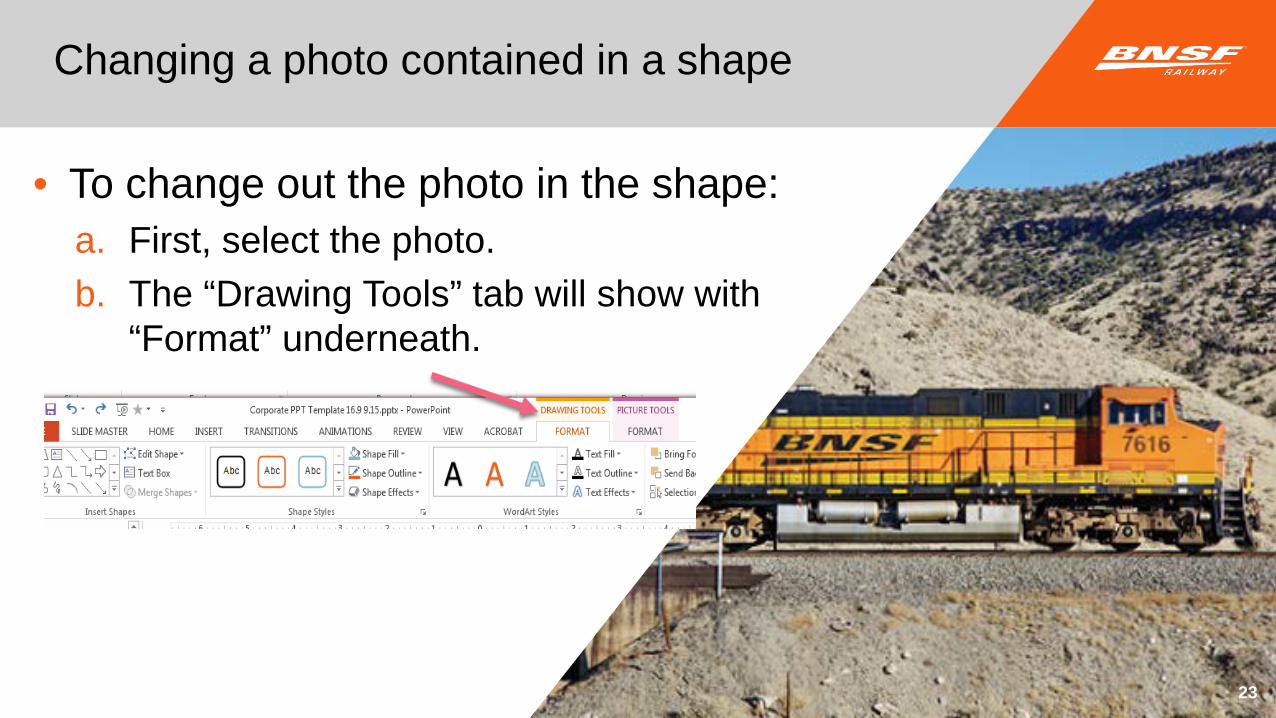
Changing a photo contained in a shape
23
• To change out the photo in the shape:a. First, select the photo.b. The “Drawing Tools” tab will show with
“Format” underneath.

Changing a photo contained in a shape
24
• To change out the photo in the shape:c. Select “Shape Fill” from the drop down
menu, then select “Picture”.

Changing a photo contained in a shape
25
• To change out the photo in the shape:d. Select “Browse” to insert a photo from a
file on your computer.

26
This is an end (or closing) slide. Its use is optional.
An alternative would be to simply use the BNSF logo to close a presentation.