col l ect i ons modul e - pestpac...
TRANSCRIPT
Collections Module
The Collections Module within PestPac allows you easily to keep track of your accounts receivable and place overdue accounts in the Collection Manager where you can add notes, send out letters, move accounts through collection stages and more. This document will go over how to track your accounts receivable and collections within PestPac including: ● Company Setup
● Collection Stages Lookup Table
● All options in the Manage Collections Menu
● Processing payments for overdue accounts ● Printer setup defaults & billing messages ● Adding and using letters within the Collection Manager. Definitions -Collection Manager: A utility found under the Tools Menu in PestPac that allows you to perform several actions including: add and update accounts to/in collections, review past due accounts, send letters and statements and send accounts to a third-party collection agency.
- Collection Stage: A number assigned to a Bill-To that indicates how overdue a customer is. A typical number range is between 0 – 6 where 0 indicates that the customer is up to date on their account and 6 indicates that the account has been sent to a third-party collection agency (if you use one)
- Stage Change: Moving an account from one Collection Stage to another
- Credit Status: The standing a customer has based on how overdue the account is. You can choose from the following options on a Bill-To:
-Normal: Account is in good standing (usually <60 days)
-Alert: Account is slightly overdue (usually 60-120 days)
-Hold: Account is very overdue and no services will be performed until payment is made (usually >120 days)
-Collection: The account has been sent to a third-party collection agency and no services will be performed until payment is made.
-Offset Days: The amount of days that an account needs to be in one Collection Stage before moving to the next Collection Stage Company Setup From the Company Menu, select Company Setup and then click on the blue Collections link.
3600 State Route 66, Suite 400 • Neptune, NJ 07753 • 800.762.0301 • 732.938.7950 • fax: 732.938.7951

Select what you would like to happen when you receive payment from overdue accounts by selecting
one of the following radio buttons: ● Do Not Update
● Remove from Collections
● Update Based on Stage Change Rules
-If “Do Not Update” is selected, then no updating of the Collection Stage will automatically take place when a payment is made. -If “Remove from Collections” is selected, when payment is received, the account will automatically be changed to Credit Stage 0. -If “Update Based on Stage Change Rules” is selected, when payment is received, the customer’s collection stage will be updated based on the offset days that are set up in the Collection Stages Lookup Table. Using this option helps keep total control of your collections, as you do not have to remember to go to the account to put them in the correct stage.
● If you would like to verify any changes to the Collection Stage/Collection Status before they are
made, check the “Prompt to Take Account off Credit Hold/Alert of Change Collection Stage” checkbox. The user will receive a prompt after
entering a payment for a customer that is in the Collection Manager. This will allow users to put
the account in any stage you choose. Leaving this unchecked may help prevent user error.
● If you would like to use a default note code when entering in notes via the Collection Manager, select it from the dropdown in the “Use Collection Note Code” field.
● Allow Applied Credit Memos and Adjustments to Update Collection Stage- Check this option if you want a credit memo or adjustment applied to an invoice to move the account to the correct stage. Leave this unchecked if you only want payments to move the account back to the correct stage.
Collection Stages Lookup Table
The Collection Stages Lookup Table allows you to define how many days a customer has to be in one Collection
Stage in order to be moved to the next Collection Stage.
3600 State Route 66, Suite 400 • Neptune, NJ 07753 • 800.762.0301 • 732.938.7950 • fax: 732.938.7951
You can also define what Credit Status goes with which Collection Stage. To begin, from the Company Menu, select Lookup Tables and then Collection Stages.
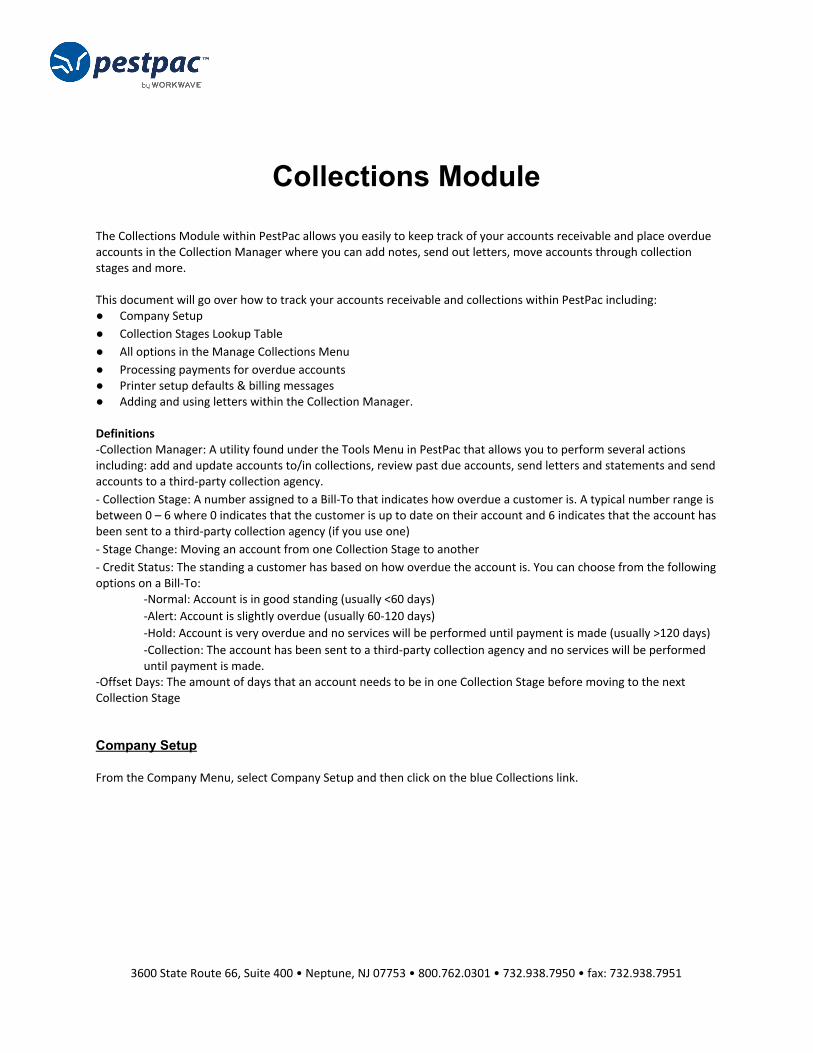
Click on the gold Add button to add a new Collection Stage. It will bring you to the screen below:
● Stage: This field will automatically populate based on whether or not you already have any Collection Stages set up. This field is not editable.
● Offset Days: Enter the number of days that an account needs to be in the previous stage before moving on to this stage. In the example above, the account would need to be in stage 0 for 30 days before moving on to stage 1.
● Credit Status: Select the default credit status for this collection stage. ● Letter: You can select a default letter to use for each stage when sending out collection letters. ● Set Bill-to to Pending Send to Collection Agency. This option will only show if you have one of our third party
selection agencies checked to use in Company Setup. You can send the account to this third party collections company once it hits this particular stage.
● Message to Appear on Bottom of Statements: If Collection Stage Message is selected under Statement Defaults on the Printer Setup page, enter the message that you would want to print at the bottom of the statements that print out for customers who are currently in this stage of the Collection Manager.
● Exclude bill-to types from this collection stage: You can use this field if you have any bill-to types that you do not want to go into a certain stage or higher. For example: If you do not want your commercial accounts to ever go to Stage 5 or beyond, you can end the bill-to type for commercial in this field. Please note: This is a cross browser only feature
● Click on Save when finished. Add all of the Collection Stages that you intend to use for your customers. Sample Collection Stages may be: - Stage 1: Offset days 30 and Credit Status Normal - Stage 2: Offset days 30 and Credit Status Alert - Stage 3: Offset days 30 and Credit Status Hold (no work can be performed) - Stage 4: Offset days 30 and Credit Status Collection (no work can be performed)
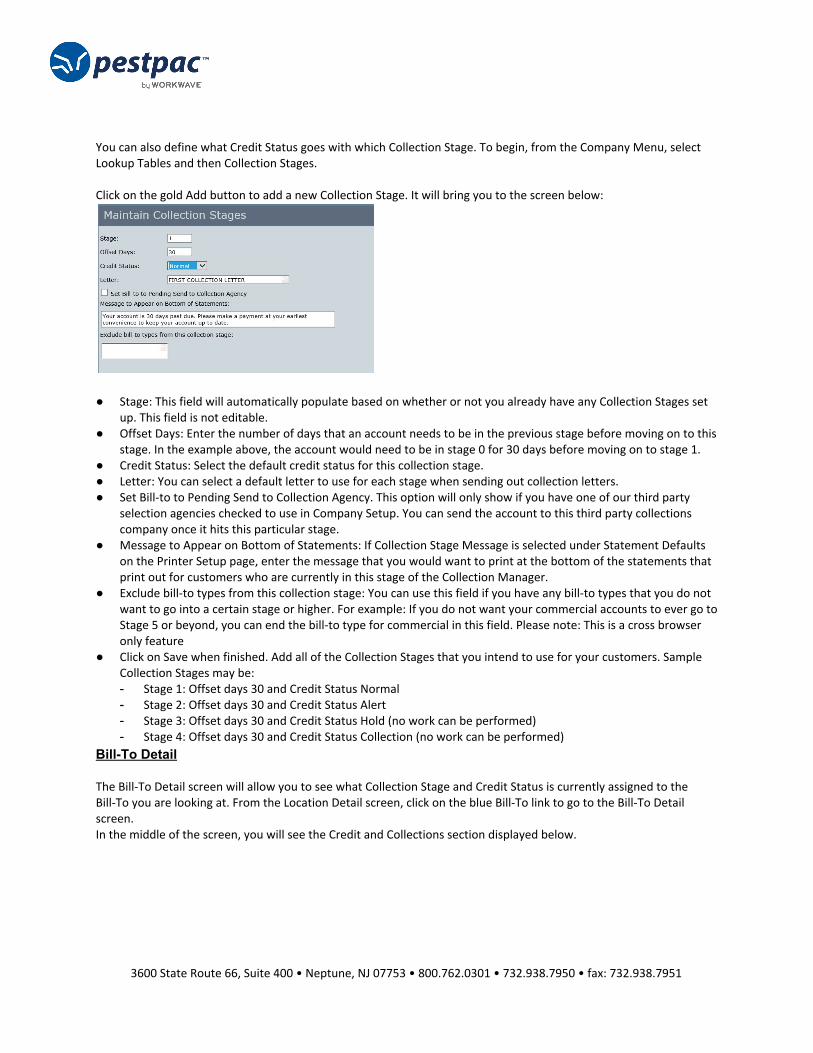
Bill-To Detail The Bill-To Detail screen will allow you to see what Collection Stage and Credit Status is currently assigned to the Bill-To you are looking at. From the Location Detail screen, click on the blue Bill-To link to go to the Bill-To Detail screen. In the middle of the screen, you will see the Credit and Collections section displayed below.
3600 State Route 66, Suite 400 • Neptune, NJ 07753 • 800.762.0301 • 732.938.7950 • fax: 732.938.7951
In this example, the Credit Status for the account is Normal and the Collection Stage is 0. This indicates that this account is NOT included in the Collection Manager and is in good standing. In order for a Bill-To to be included in the Collection Manager if it does have a late outstanding balance, the “Include Account in Collection Manager” checkbox must be checked. This box is checked by default when you add a new Bill-To. If you do not want a specific Bill-To included in the Collection Manager, this box must be unchecked.
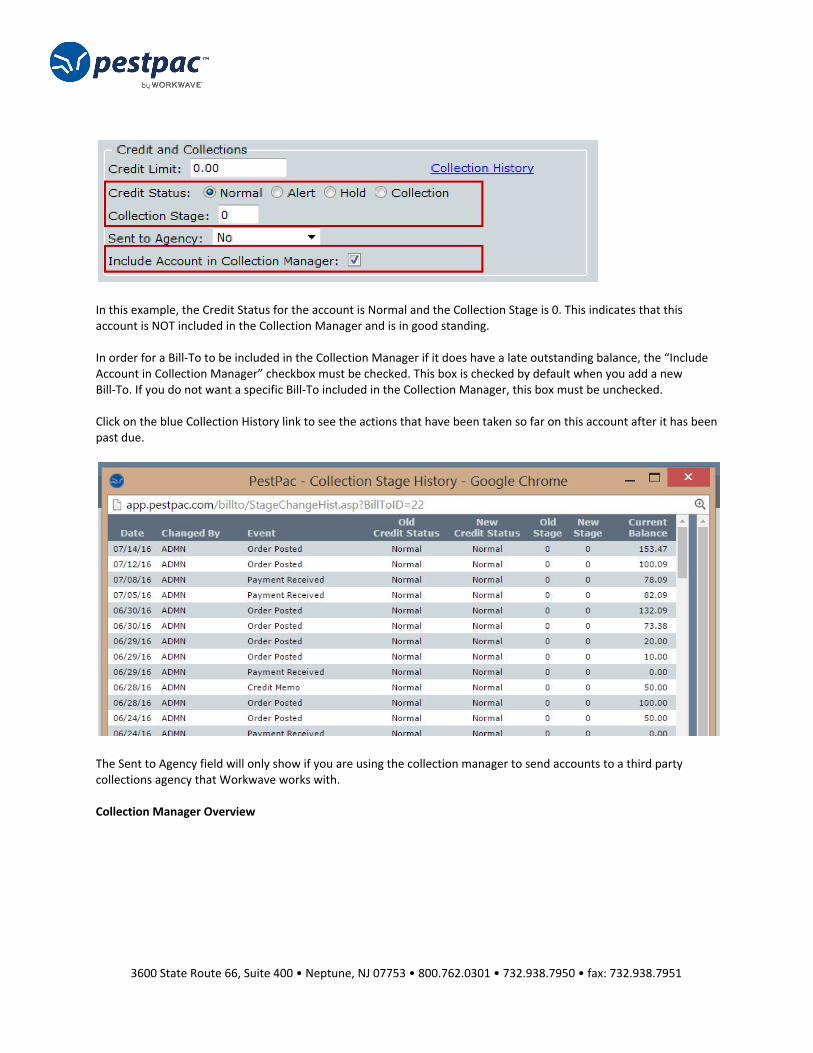
Click on the blue Collection History link to see the actions that have been taken so far on this account after it has been past due.
The Sent to Agency field will only show if you are using the collection manager to send accounts to a third party collections agency that Workwave works with.
Collection Manager Overview
3600 State Route 66, Suite 400 • Neptune, NJ 07753 • 800.762.0301 • 732.938.7950 • fax: 732.938.7951
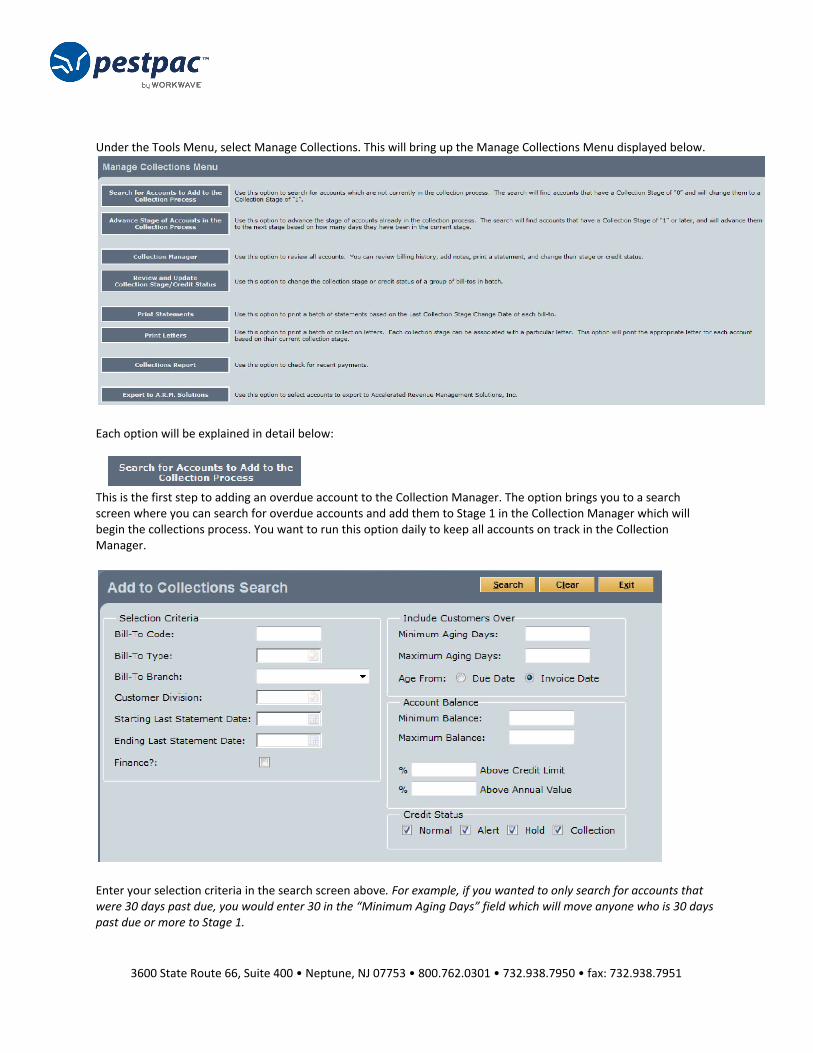
Under the Tools Menu, select Manage Collections. This will bring up the Manage Collections Menu displayed below.
Each option will be explained in detail below:
This is the first step to adding an overdue account to the Collection Manager. The option brings you to a search screen where you can search for overdue accounts and add them to Stage 1 in the Collection Manager which will begin the collections process. You want to run this option daily to keep all accounts on track in the Collection Manager.
Enter your selection criteria in the search screen above. For example, if you wanted to only search for accounts that were 30 days past due, you would enter 30 in the “Minimum Aging Days” field which will move anyone who is 30 days past due or more to Stage 1.
3600 State Route 66, Suite 400 • Neptune, NJ 07753 • 800.762.0301 • 732.938.7950 • fax: 732.938.7951
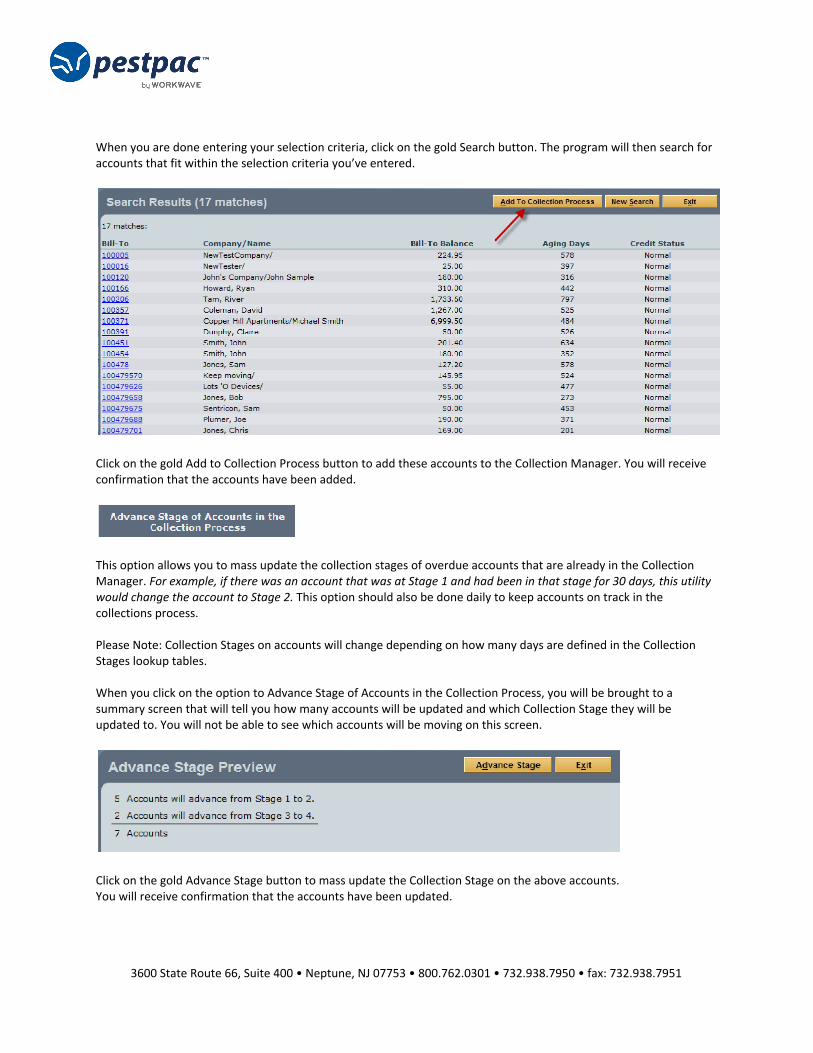
When you are done entering your selection criteria, click on the gold Search button. The program will then search for accounts that fit within the selection criteria you’ve entered.
Click on the gold Add to Collection Process button to add these accounts to the Collection Manager. You will receive confirmation that the accounts have been added.
This option allows you to mass update the collection stages of overdue accounts that are already in the Collection Manager. For example, if there was an account that was at Stage 1 and had been in that stage for 30 days, this utility would change the account to Stage 2. This option should also be done daily to keep accounts on track in the collections process.
Please Note: Collection Stages on accounts will change depending on how many days are defined in the Collection Stages lookup tables.
When you click on the option to Advance Stage of Accounts in the Collection Process, you will be brought to a summary screen that will tell you how many accounts will be updated and which Collection Stage they will be updated to. You will not be able to see which accounts will be moving on this screen.
Click on the gold Advance Stage button to mass update the Collection Stage on the above accounts. You will receive confirmation that the accounts have been updated.
3600 State Route 66, Suite 400 • Neptune, NJ 07753 • 800.762.0301 • 732.938.7950 • fax: 732.938.7951

Please Note: You MUST run this utility regularly to keep your accounts in the correct collection stage. PestPac does not automatically run this utility for you. It is recommended that you run this utility every day along with searching for accounts to add to the collections process.
The Collection Manager allows you to review all accounts that are in the collection process. You will first be brought to a search screen where you can search for customer accounts to review.
Enter in your selection criteria for accounts you want to view, then click on the gold Search button.
If you want to look at accounts whose collection stage was changed today, then click on the gold Today button.
You will then see a listing of accounts that met your selection criteria.
When you click on an account, its invoice and payment history will show below. From this screen, you can use the gold buttons at the bottom to make a payment, print a statement, print a ledger and and/review notes on the
3600 State Route 66, Suite 400 • Neptune, NJ 07753 • 800.762.0301 • 732.938.7950 • fax: 732.938.7951

account. Please note that if you add notes via this screen, they will show as Bill-To notes.
This utility allows you to change the collection stage or credit status to a group of Bill-Tos in a batch format. Once you click on the button, you will be brought to a screen that lists whether or not you already have accounts in the batch. To add accounts, click on the gold Add button.
You will then go to a selection criteria screen where you can search for accounts to move in mass to a specific stage or status. Under the credit status change section, you can select whether to mass update all accounts (based on your selection criteria) to Normal, Alert, Hold or Collection. Under the Collection Stage section, you can update all accounts (based on your selection criteria) to a specific collection stage. Under the Sent to Collection Agency Status, you can update all accounts (based on your selection criteria to a specific status. Click on the gold Search button when finished.
3600 State Route 66, Suite 400 • Neptune, NJ 07753 • 800.762.0301 • 732.938.7950 • fax: 732.938.7951
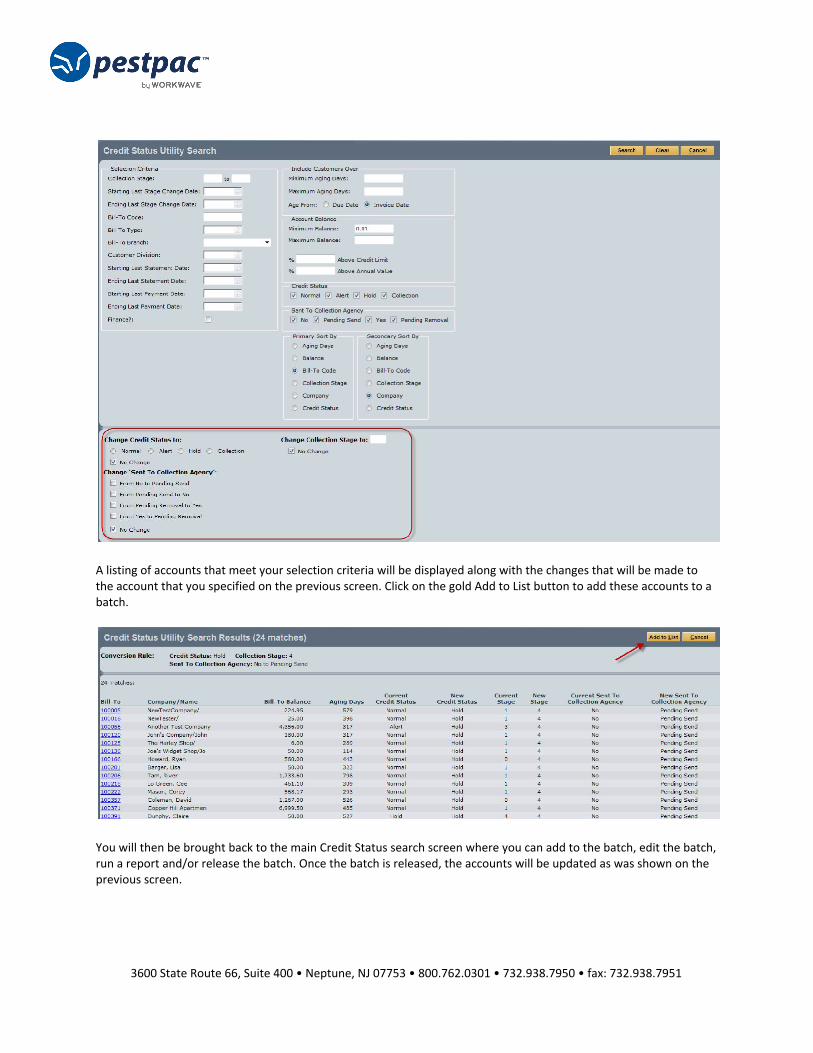
A listing of accounts that meet your selection criteria will be displayed along with the changes that will be made to the account that you specified on the previous screen. Click on the gold Add to List button to add these accounts to a batch.
You will then be brought back to the main Credit Status search screen where you can add to the batch, edit the batch, run a report and/or release the batch. Once the batch is released, the accounts will be updated as was shown on the previous screen.
3600 State Route 66, Suite 400 • Neptune, NJ 07753 • 800.762.0301 • 732.938.7950 • fax: 732.938.7951
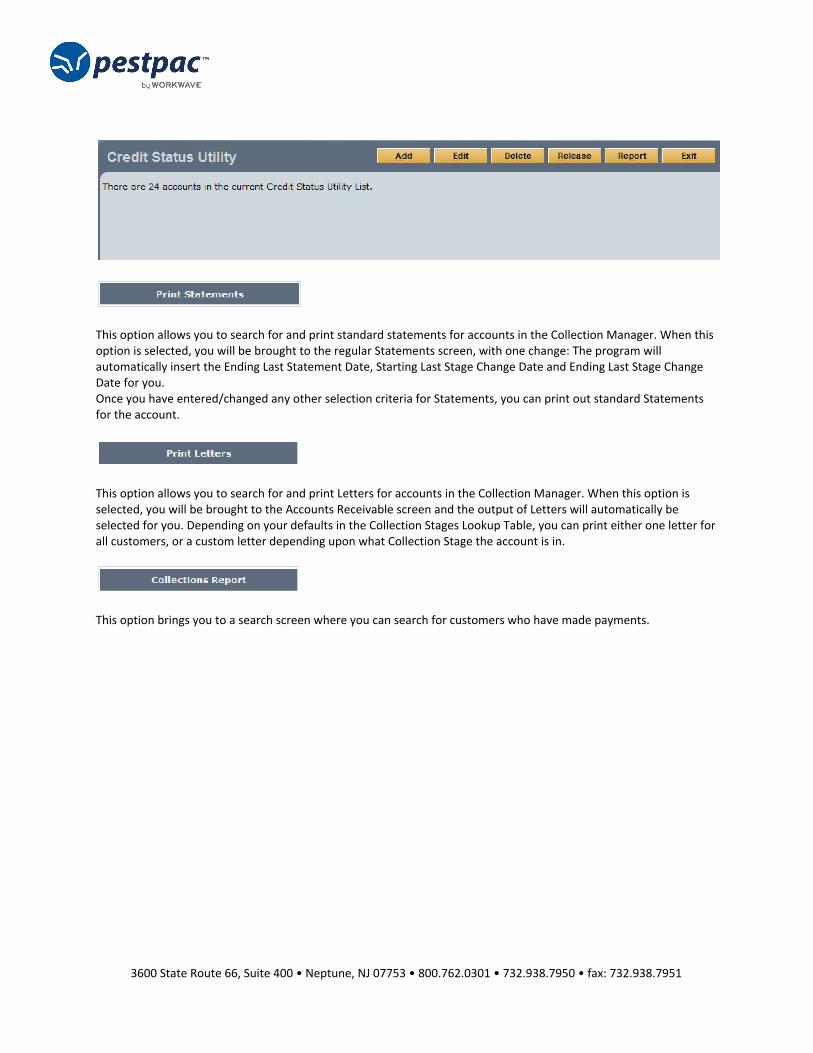
This option allows you to search for and print standard statements for accounts in the Collection Manager. When this option is selected, you will be brought to the regular Statements screen, with one change: The program will automatically insert the Ending Last Statement Date, Starting Last Stage Change Date and Ending Last Stage Change Date for you. Once you have entered/changed any other selection criteria for Statements, you can print out standard Statements for the account.
This option allows you to search for and print Letters for accounts in the Collection Manager. When this option is selected, you will be brought to the Accounts Receivable screen and the output of Letters will automatically be selected for you. Depending on your defaults in the Collection Stages Lookup Table, you can print either one letter for all customers, or a custom letter depending upon what Collection Stage the account is in.
This option brings you to a search screen where you can search for customers who have made payments.
3600 State Route 66, Suite 400 • Neptune, NJ 07753 • 800.762.0301 • 732.938.7950 • fax: 732.938.7951
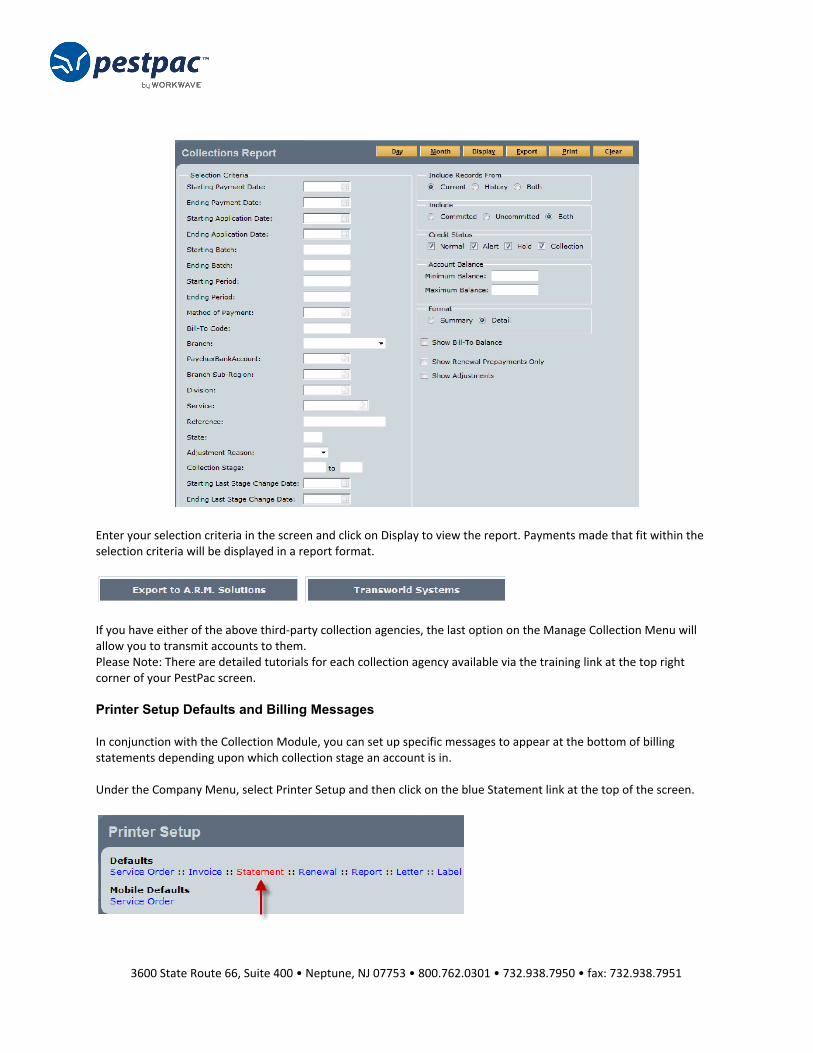
Enter your selection criteria in the screen and click on Display to view the report. Payments made that fit within the selection criteria will be displayed in a report format.
If you have either of the above third-party collection agencies, the last option on the Manage Collection Menu will allow you to transmit accounts to them. Please Note: There are detailed tutorials for each collection agency available via the training link at the top right corner of your PestPac screen.
Printer Setup Defaults and Billing Messages
In conjunction with the Collection Module, you can set up specific messages to appear at the bottom of billing statements depending upon which collection stage an account is in. Under the Company Menu, select Printer Setup and then click on the blue Statement link at the top of the screen.
3600 State Route 66, Suite 400 • Neptune, NJ 07753 • 800.762.0301 • 732.938.7950 • fax: 732.938.7951
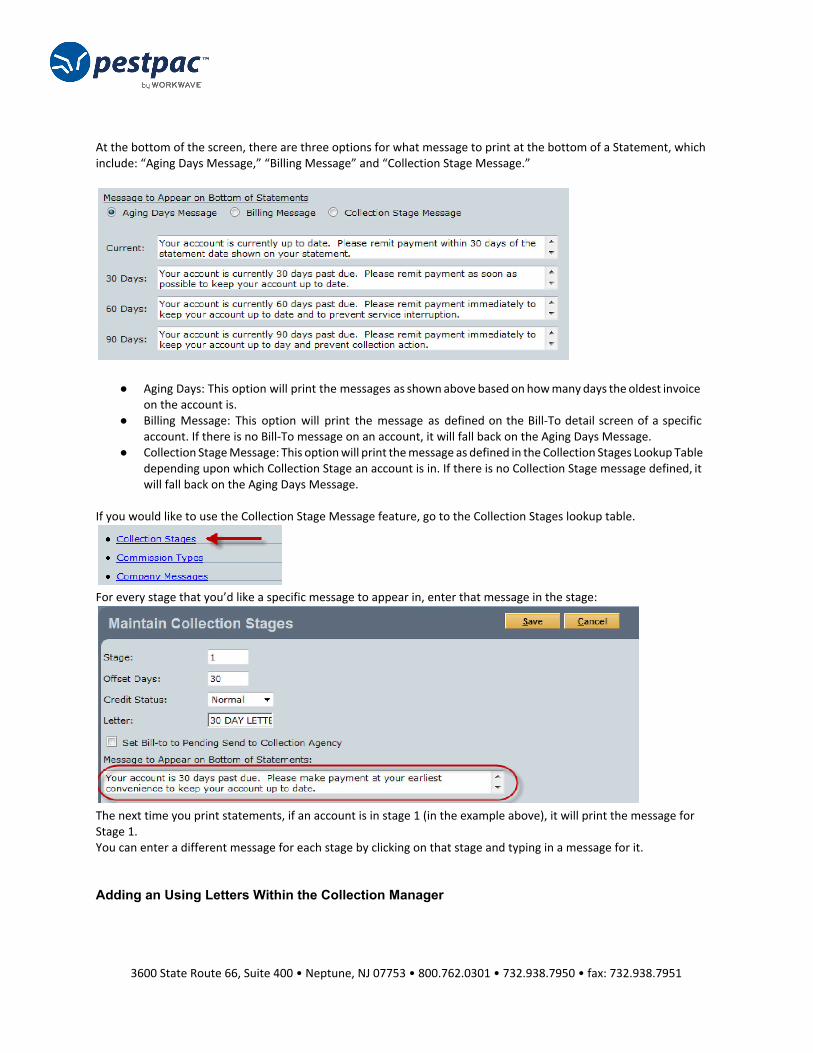
At the bottom of the screen, there are three options for what message to print at the bottom of a Statement, which include: “Aging Days Message,” “Billing Message” and “Collection Stage Message.”
● Aging Days: This option will print the messages as shown above based on how many days the oldest invoice on the account is.
● Billing Message: This option will print the message as defined on the Bill-To detail screen of a specific account. If there is no Bill-To message on an account, it will fall back on the Aging Days Message.
● Collection Stage Message: This option will print the message as defined in the Collection Stages Lookup Table depending upon which Collection Stage an account is in. If there is no Collection Stage message defined, it will fall back on the Aging Days Message.
If you would like to use the Collection Stage Message feature, go to the Collection Stages lookup table.
For every stage that you’d like a specific message to appear in, enter that message in the stage:
The next time you print statements, if an account is in stage 1 (in the example above), it will print the message for Stage 1. You can enter a different message for each stage by clicking on that stage and typing in a message for it.
Adding an Using Letters Within the Collection Manager
3600 State Route 66, Suite 400 • Neptune, NJ 07753 • 800.762.0301 • 732.938.7950 • fax: 732.938.7951
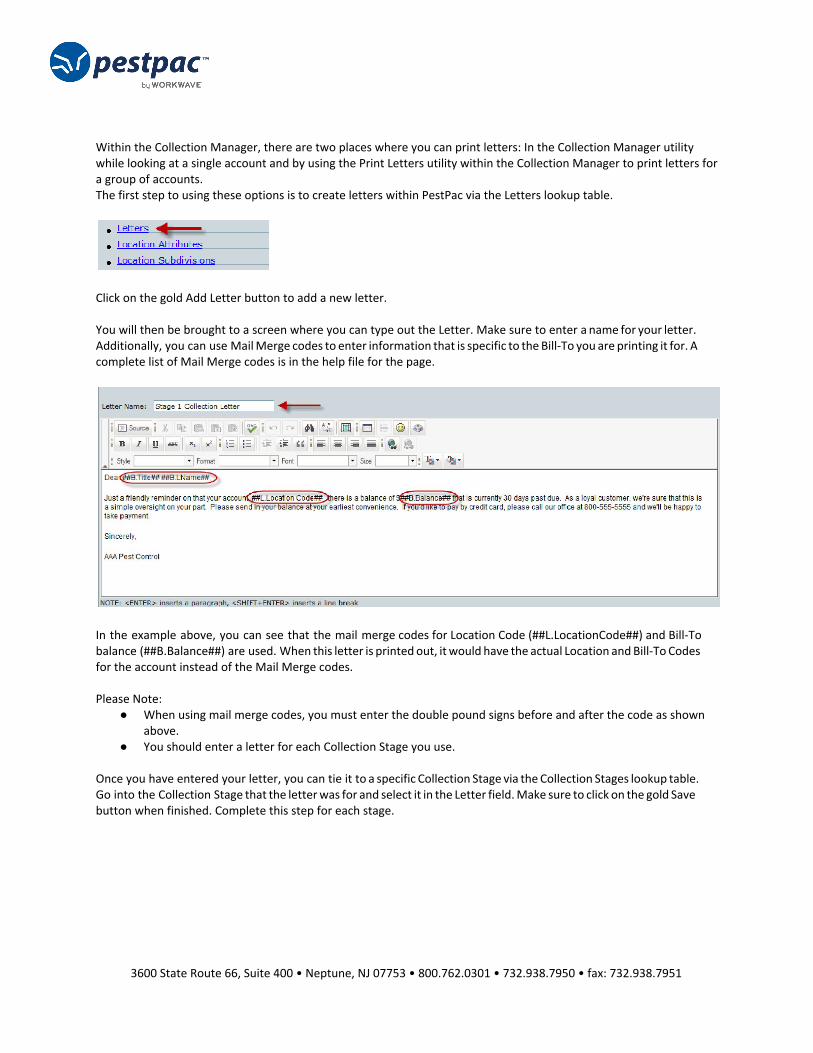
Within the Collection Manager, there are two places where you can print letters: In the Collection Manager utility while looking at a single account and by using the Print Letters utility within the Collection Manager to print letters for a group of accounts. The first step to using these options is to create letters within PestPac via the Letters lookup table.
Click on the gold Add Letter button to add a new letter.
You will then be brought to a screen where you can type out the Letter. Make sure to enter a name for your letter. Additionally, you can use Mail Merge codes to enter information that is specific to the Bill-To you are printing it for. A complete list of Mail Merge codes is in the help file for the page.
In the example above, you can see that the mail merge codes for Location Code (##L.LocationCode##) and Bill-To balance (##B.Balance##) are used. When this letter is printed out, it would have the actual Location and Bill-To Codes for the account instead of the Mail Merge codes.
Please Note: ● When using mail merge codes, you must enter the double pound signs before and after the code as shown
above. ● You should enter a letter for each Collection Stage you use.
Once you have entered your letter, you can tie it to a specific Collection Stage via the Collection Stages lookup table. Go into the Collection Stage that the letter was for and select it in the Letter field. Make sure to click on the gold Save button when finished. Complete this step for each stage.
3600 State Route 66, Suite 400 • Neptune, NJ 07753 • 800.762.0301 • 732.938.7950 • fax: 732.938.7951
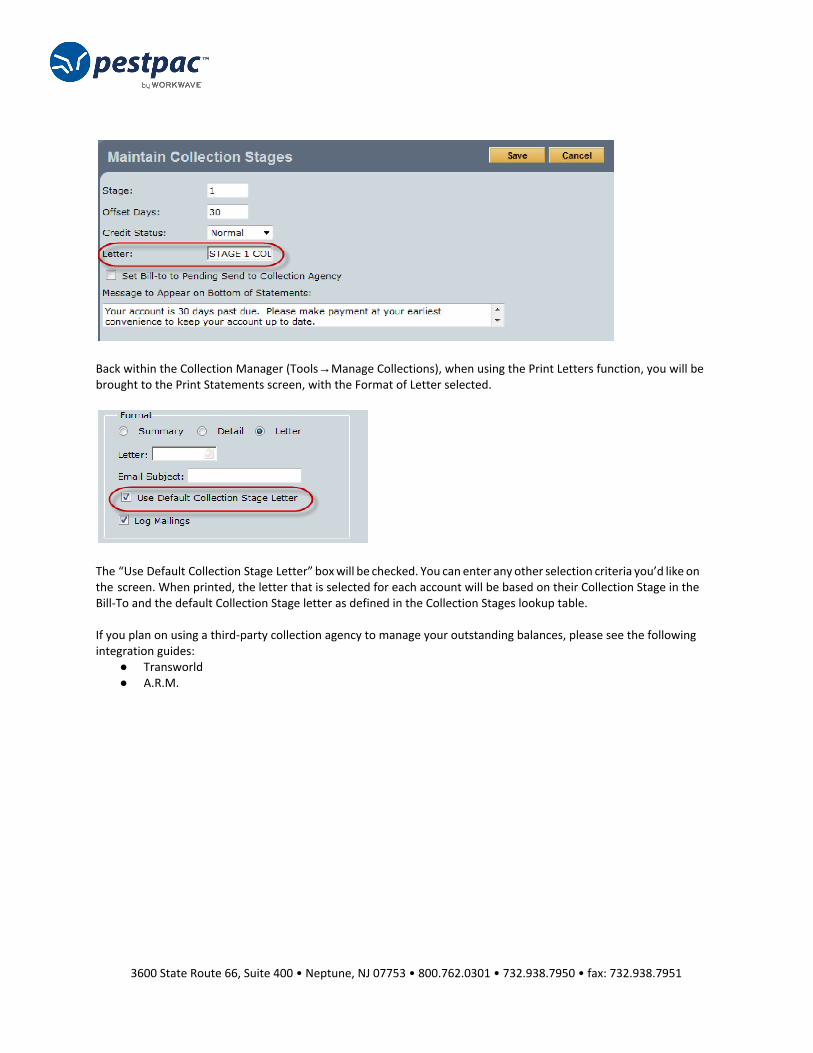
Back within the Collection Manager (Tools→Manage Collections), when using the Print Letters function, you will be brought to the Print Statements screen, with the Format of Letter selected.
The “Use Default Collection Stage Letter” box will be checked. You can enter any other selection criteria you’d like on the screen. When printed, the letter that is selected for each account will be based on their Collection Stage in the Bill-To and the default Collection Stage letter as defined in the Collection Stages lookup table.
If you plan on using a third-party collection agency to manage your outstanding balances, please see the following integration guides:
● Transworld ● A.R.M.
3600 State Route 66, Suite 400 • Neptune, NJ 07753 • 800.762.0301 • 732.938.7950 • fax: 732.938.7951