cognos web reports - yavapai college cognos connection two tabs public folders ontain y’s reports...
TRANSCRIPT

1
Cognos Web Reports
Training Manual

2
Contents Cognos & ODS ............................................................................................................................................... 3
Login & Logout .............................................................................................................................................. 4
YC Portal login ........................................................................................................................................... 4
Back Door Login – Not Using the Portal .................................................................................................... 5
Need help with login credentials? ............................................................................................................ 6
Logoff from Cognos ................................................................................................................................... 6
Browsers ....................................................................................................................................................... 7
Add YC as Trusted Sites ................................................................................................................................. 8
Turn on Pop-up Blocker ................................................................................................................................ 9
Cognos Connection ..................................................................................................................................... 10
Cognos Navigation ...................................................................................................................................... 11
Set My Preferences ..................................................................................................................................... 12
Run & View Reports .................................................................................................................................... 13
Sample Report ......................................................................................................................................... 14
Closing a Report .......................................................................................................................................... 15
Report Search .............................................................................................................................................. 15
The Enrollment Dashboard ......................................................................................................................... 16
Run Report with Options ............................................................................................................................ 17
My Folders .................................................................................................................................................. 19
Creating a Report View in My Folders .................................................................................................... 19
Creating a Shortcut in My Folders .......................................................................................................... 20
Report View versus Shortcut .................................................................................................................. 21
Scheduling a Report .................................................................................................................................... 22
Organizing My Folders ................................................................................................................................ 25
Create a Subfolder .................................................................................................................................. 25
Moving Reports to Subfolders .................................................................................................................... 26
Renaming Reports ....................................................................................................................................... 28

3
Cognos & ODS
Banner contains over 1,000 oracle tables from the
Student Information System. ODS (Operational
Data Store) is a data repository that combines data
from Banner tables into many tables called views.
Cognos is an “Enterprise Reporting” tool using the
views in ODS to create reports that are stored in
secured folders for easy access.
Since ODS contains Banner data which is used for
Cognos reports, data integrity is critical for
accurate reporting of information to the
institution, state, and federal agencies.

4
Login & Logout
Users may log into Cognos via Yavapai College’s portal or using the “Back Door” URL.
YC Portal login 1. Log in to the YC Portal http://www.yc.edu.
2. Enter your username and password.
3. Click on the login button or press enter key.
4. At the top of the ribbon, locate My Services.
5. Select Cognos Main Menu from the drop down list.
6. Click on My home to access Cognos reports.
Your screen will look different than this image since the contents are customized based on your role
& security.

5
Back Door Login – Not Using the Portal
Access Cognos by opening your Internet Explorer browser and typing the following URL address: http://reagan.yc.edu and click on the Cognos Reporting System link.
1. Enter your user id and password.
2. Click the OK button.

6
Need help with login credentials?
Contact YC Help Desk
Phone
Prescott Campus
Bldg 6
Ext. 2168
928.776.2168
Verde Valley Campus
928.649.5558
Email [email protected]
Internet Navigate directly to the Help
Desk/ITS webpage to submit the form
Logoff from Cognos
Due to security issues, it is very important to properly end your Cognos session and close the browser
window.
Always use the Log Off menu option at the top menu bar.

7
Browsers
Internet Explorer 11 (IE)
YC’s portal link will open and load Cognos into a new window
IE is the default browser for YC’s home page, portal and Cognos
Cognos will timeout after long periods of inactivity, which results in having to log back into
Cognos
If you are a heavy Cognos user, it is recommended accessing Cognos via the direct connection or
through the “back door”
Cognos is an IBM product that only supports the IE browser
Sometimes Internet explorer requires you to hold down the CTRL key when running reports formatted
for Excel to allow your report to display in a pop-up window

8
Add YC as Trusted Sites Cognos reports require pop-ups and
therefore requires YC sites to be trusted.
Preferred Method – Turn pop-ups on and add YC to trusted sites
Can control pop-ups through the Tools Menu
Can create a list of allowed sites that IE will allow pop-ups. This will prevent pop-ups from other web sites
1. Click on the Tools Menu Gear icon 2. Select Internet options 3. Click on the Security tab 4. Select Trusted sites 5. Click on the “Sites” button 6. In “Add this website to the zone”
field, type https://*yc.edu 7. Uncheck “Require server verification
(https) for all sites in this zone 8. Click Add
9. Click Close
10. Click OK

9
Turn on Pop-up Blocker Continued
11. Click on the Privacy tab 12. Check Turn on Pop-up Blocker 13. Click on the “Settings” button 14. In “Address of website to allow:”
field, type https://*yc.edu 15. Check “Show notification bar
when a pop-up is blocked. 16. Click Close
17. Click OK

10
Cognos Connection
Two Tabs
Public Folders
Contain YC’s reports organized by departments into folders and subfolders
My Folders
Contain your customized folders, Shortcuts to reports and report view links to reports
You will not see all the folders displayed here on this screen, since your folders & reports are filtered
based on your security settings.

11
Cognos Navigation
Next Page – Navigate to next page of Cognos reports or folders.
Previous Page – Navigate to previous page of Cognos reports or folders
My Preferences – Allows you to define personalized page settings
Search – Search Cognos directory of reports
Detail Reports – Includes report comments or descriptions
List Reports – List of reports without comments
Folder – Folder or subfolder containing Cognos reports
Cognos Report types icons -
Excel – report format will be in excel 2007 format
HTML – report format will be displayed in browser (html format)
Report View – the report is run from a master report in a different folder location
PDF – report will be in a pdf format
CSV – report will be in a csv format
XML – report will be in an xml format
12
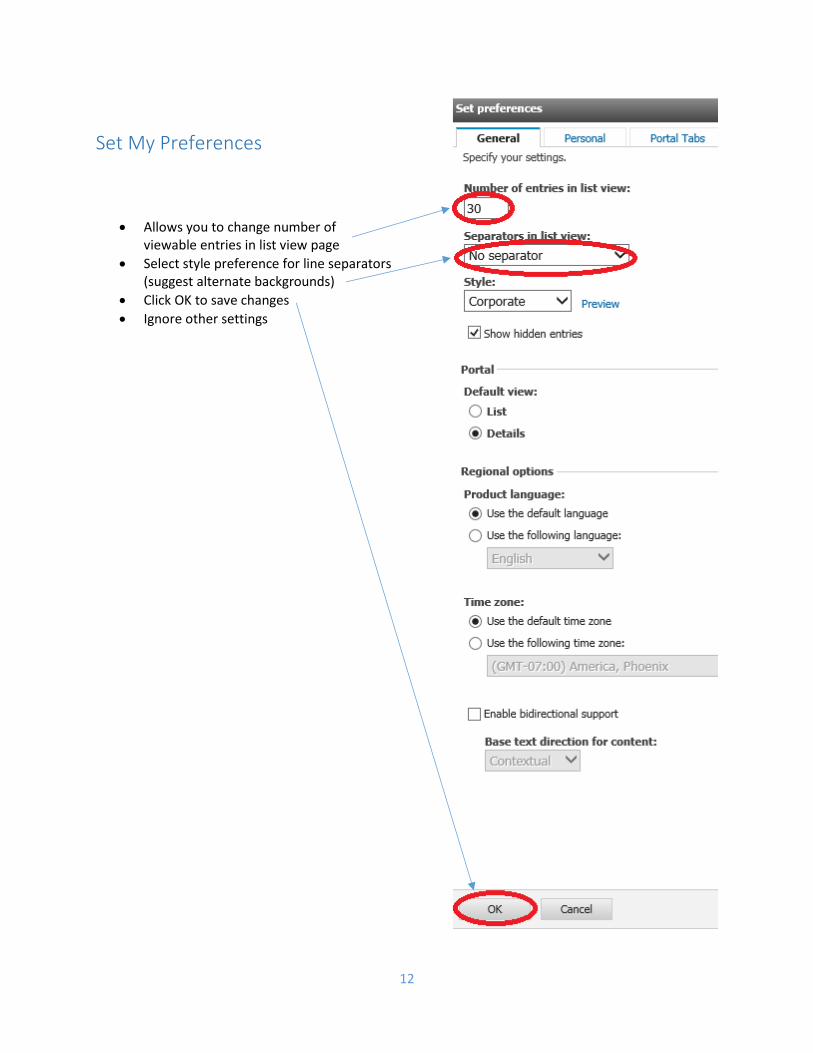
Set My Preferences
Allows you to change number of viewable entries in list view page
Select style preference for line separators (suggest alternate backgrounds)
Click OK to save changes
Ignore other settings

13
Run & View Reports
Navigate to the folder where a report is stored
Click on the report title to run the report
As you click on subfolders you leave a trail of “bread crumbs” (folder names – Public Folders > Student > Class Schedule Reports). You can click on any folder name in the “bread crumb trail” to jump to the contents of that folder
Most reports include prompt options in a drop down list. This particular report prompts for an academic
period.
Once an academic period is selected the Finish button is highlighted and available to run the report.

14
Sample Report
Cancelled Courses Report in HTML (“web page”) format
Reports typically contain a Report Header and a footer with date and time
Reports can contain multiple pages and even multiple reports
Student Rights and Privacy of Records – Cognos reports are not to be shared with third parties.

15
Closing a Report
After reviewing you report, click on the return icon to close the report and return to the Cognos
directory. Do not click on the “X” in the browser window to close a report.
Report Search Navigate to the top level of Public Folders
In the Search Text Box, type “dashboard home page” and click the search icon or press Enter key
A list of possible reports or folders containing the report will be displayed. You can see the breadcrumb path of the report by hovering over the …> icon. You can run the report from the search results screen by clicking on the report title.

16
The Enrollment Dashboard A Dashboard report is a special link of Cognos report used for summarizing and analyzing data. It is created by combining several detail and summary reports. It is one of the most complex report types we have created at YC. The Enrollment Dashboard Home Page report compares enrollment statistics for the current term to the same term last year. The data is displayed in an easy to use and read interface and contains drill down capabilities. Each drill thru report opens in a new window, so you must close the window in order to exit that report. Only the main page has the return link to exit the report.

17
Run Report with Options Another method to running reports allows user to select delivery options and output format. Navigate to the folder Public Folders > TRAINING > 1. Cognos Basic Trng > Enrollment Reports. Click on the run
with options icon under the Actions column for report “Report View of Universal Roster – V2”.
In the format menu, select Excel 2007 to display the report in an Excel spreadsheet. You can try other formats: (HTML (webpage), PDF, etc. You can select several delivery options for receiving the report Click on the radio button next to send me the report by email Click the run button to run the report with your custom options

18
Continued After entering the values on the prompt page, the report will run in the background. The report will show up in your mail box as an attachment to an email, with the report title in the subject line.

19
My Folders My Folders can be used for creating report links to your favorite reports for quick and easy access. Report links are links or pointers to an existing entry report. If the source entry report is modified, your report link will contain the report changes.
If the source entry report is moved to another directory path or the report is deleted, you report link will
be broken. Thus your report view will not run.
Creating a Report View in My Folders
1. Navigate to the source report’s location (in Public Folders>…)
2. Click the Report View icon under the actions column
3. Click on “Select My Folders” link
4. Click on Finish button

20
Creating a Shortcut in My Folders
1. Navigate to the source report’s location (in Public Folders>…) 2. Under the Actions column, click more… icon
3. The Action menu will appear. Select “Create a shortcut to this entry…”

21
Continued
4. Click on “Select
My Folders” link 5. Click on Finish
button
Report View versus Shortcut
Changes to report options cannot be made using a shortcut. If you wish to keep the existing options, use
the shortcut. If you want to change the format, language, or delivery method of a report link or want to
setup a schedule for running you report use a Report View.
22
Scheduling a Report
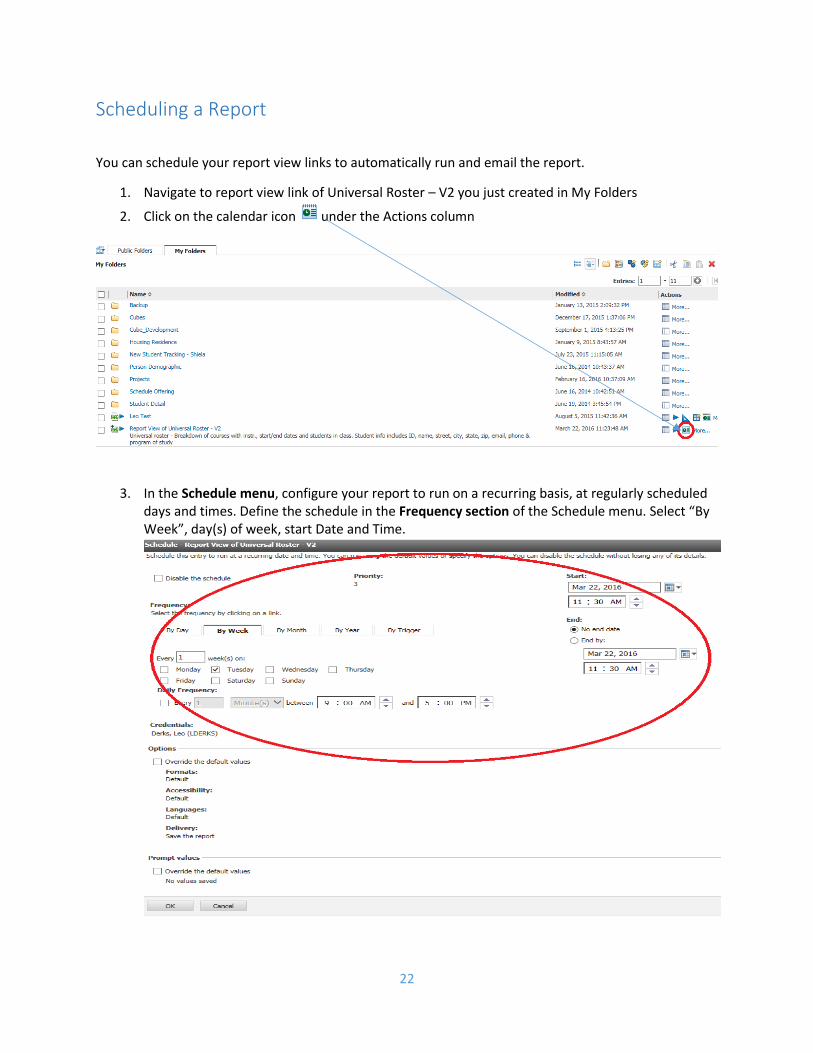
You can schedule your report view links to automatically run and email the report.
1. Navigate to report view link of Universal Roster – V2 you just created in My Folders
2. Click on the calendar icon under the Actions column
3. In the Schedule menu, configure your report to run on a recurring basis, at regularly scheduled days and times. Define the schedule in the Frequency section of the Schedule menu. Select “By Week”, day(s) of week, start Date and Time.

23
Continued
4. Click Override the default values in the Prompt Values section 5. Click Set… to bring up the pop-up prompt window to define and save prompt values 6. Click Finish (you will return to the Schedule menu)
7. Check “Send a link to the report by email” 8. Click Edit the options… to bring up the “Set the email options menu”

24
Continued
9. Type in email addresses in To: or CC: fields
10. Check the “Attach the Report” box 11. Click OK button to save the email delivery options and you will be returned to the Schedule
menu page 12. After verifying your settings, click the OK button on the Schedule menu page
The report will run in the background, according to the scheduled day and time. The email subject line will contain: “Report: <report title>”. The report will be an email attachment.
25
Organizing My Folders
If you accumulate many reports over time in My Folders, you may want to consider organizing your reports into subfolders. For example, you may want to organize your reports by: reports run on schedule versus reports that are run manually.
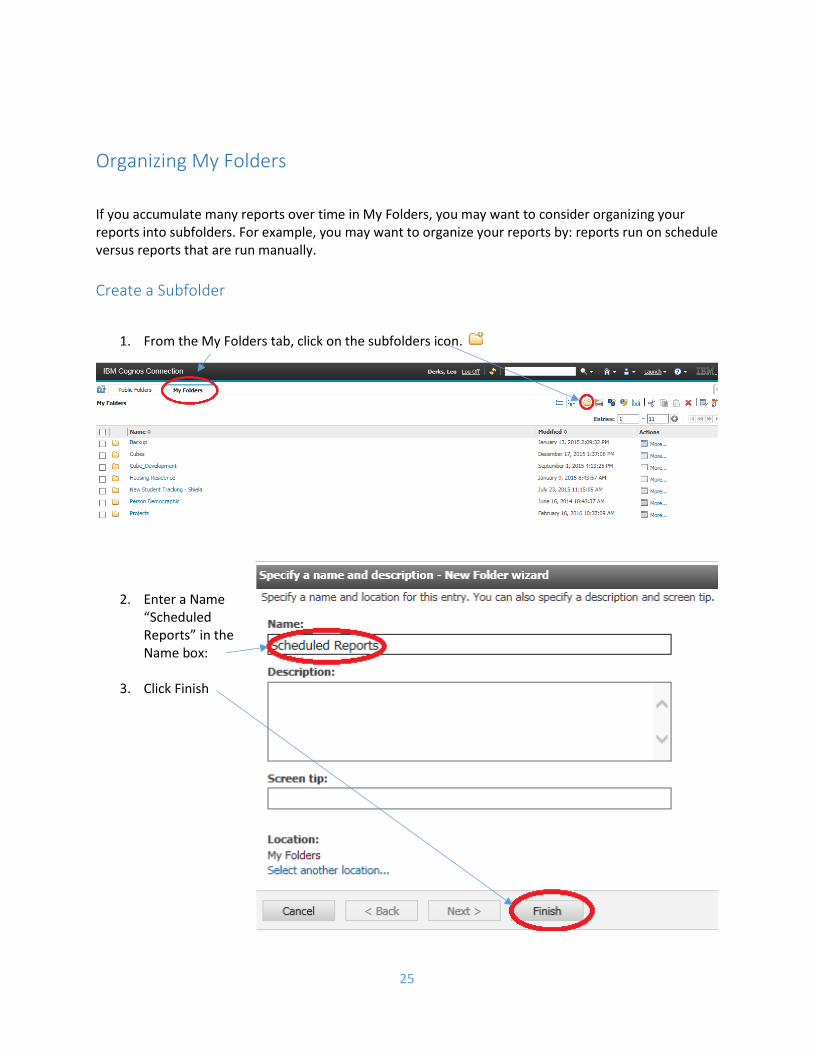
Create a Subfolder
1. From the My Folders tab, click on the subfolders icon.
2. Enter a Name “Scheduled Reports” in the Name box:
3. Click Finish
26
Moving Reports to Subfolders
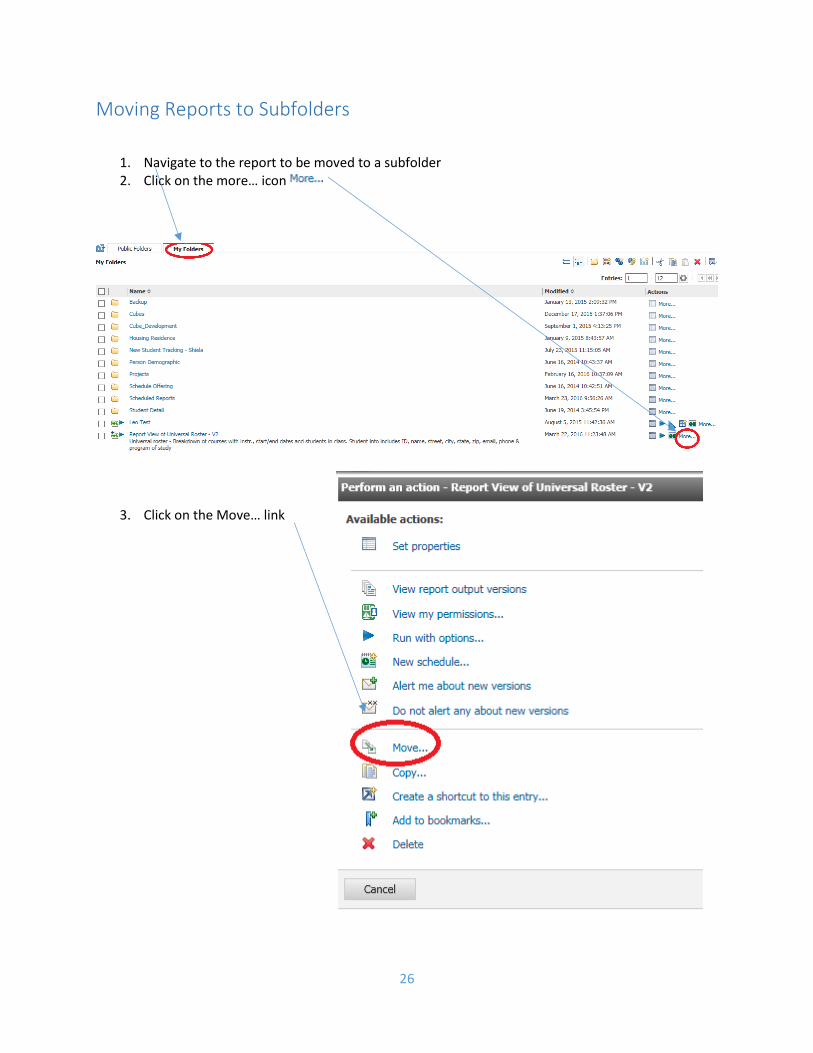
1. Navigate to the report to be moved to a subfolder 2. Click on the more… icon
3. Click on the Move… link

27
Continued
4. Select the radio button location subfolder where you wish to move your report
5. Click OK
Only move reports located from “My Folders” directory to your subfolders.

28
Renaming Reports
You may want to remove the report view prefix by renaming report. To do so:
1. Navigate to the report to be moved to a subfolder
2. Click on the set properties icon
3. Change the Name: box entry of Report View of Universal Roster – V2 to Universal Roster – V2 4. Click the OK button
Only rename reports located in your “My Folders” directory.