cogat op practicematerials covers - home - prior … · test 7: figure matrices, levels 9–12 part...
TRANSCRIPT

Cognitive Abilities Test™
Practice Activities
Form
7
Cog
Nonverbal Tests
Level 9
Teacher Guide

Test 7: Figure Matrices, Levels 9–12 Part 1: Overview of Figure Matrices
An analogy draws parallels between objects or ideas, for example, “up is to down as left is to right.” Analogies can be about simple things “A tadpole is like a fish” or complex concepts “Friendships are like glass. Once broken, they are hard to fix.” Successful learners habitually reason by analogy. Good analogies allow them to use what they already know to understand or remember new ideas. Reasoning by analogy requires attending carefully to how two things are similar and then applying these relationships to something new.
The Figure Matrices test is like the Picture Analogies and Number Analogies tests except the questions use figures or shapes rather than pictures of objects or activities.
In this test, students are asked to solve problems that look like this:
Which answer choice shows what would happen if the new arrow changed in the same way as the first arrow?

When practicing the Figure Matrices questions, encourage students to use these strategies.
• Carefully examine the first two figures and think of a rule (and say it silently) that describes the relationships between them. For example, flip the first figure to get the second one.
• Apply the rule to the third figure to determine the missing figure.
• Test the rule on each answer choice, eliminating answer pictures that do not fit the rule.
• Look for a more precise rule if more than one answer choice fits the rule.
Students at this level tend to make the following common mistakes.
• Students may choose an answer choice that looks like the figure in the bottom row. For example, in the sample question above, students might select the first answer choice.
• Students might infer the wrong relationship between the first two figures. Putting the rule into words will help them to be more precise.
• Students may overlook or forget a critical feature of the figures in the top row. Using
language to describe the rules will help them remember them.
• Students might select an answer choice before checking all the answer choices.

Part 2: Figure Matrices Practice Test Script
The following script covers many issues that will help students do their best on the test. Read aloud the text printed in blue italics: these are directions to the students. Directions for you are in parentheses and should NOT be read aloud. Feel free to modify the script to ensure that students understand what they are supposed to do and how to do it.
It may be helpful to make copies of the practice questions in order to display them one at a time on an overhead projector. If this is not possible, hold up a copy of the student practice booklet and point to different parts of each practice question as you discuss them with the class.
(Make sure each student has a practice booklet. Then SAY:)
Open your practice booklet to page 1.
(Check that all students have the correct page.)
P1
Let’s do the first practice question.
(Point to the large box that has pictures inside of it as you SAY:)
The large box has two rows. We must decide which answer choice goes in the space with the question mark.
(Point to the top row of the large box as you SAY:)
Look at the shapes in the top row. The first picture is a triangle, and the second picture is two triangles. How do the first and second pictures go together?
(Encourage responses.)
The second picture looks like the triangle in the first picture, but it is cut in half.
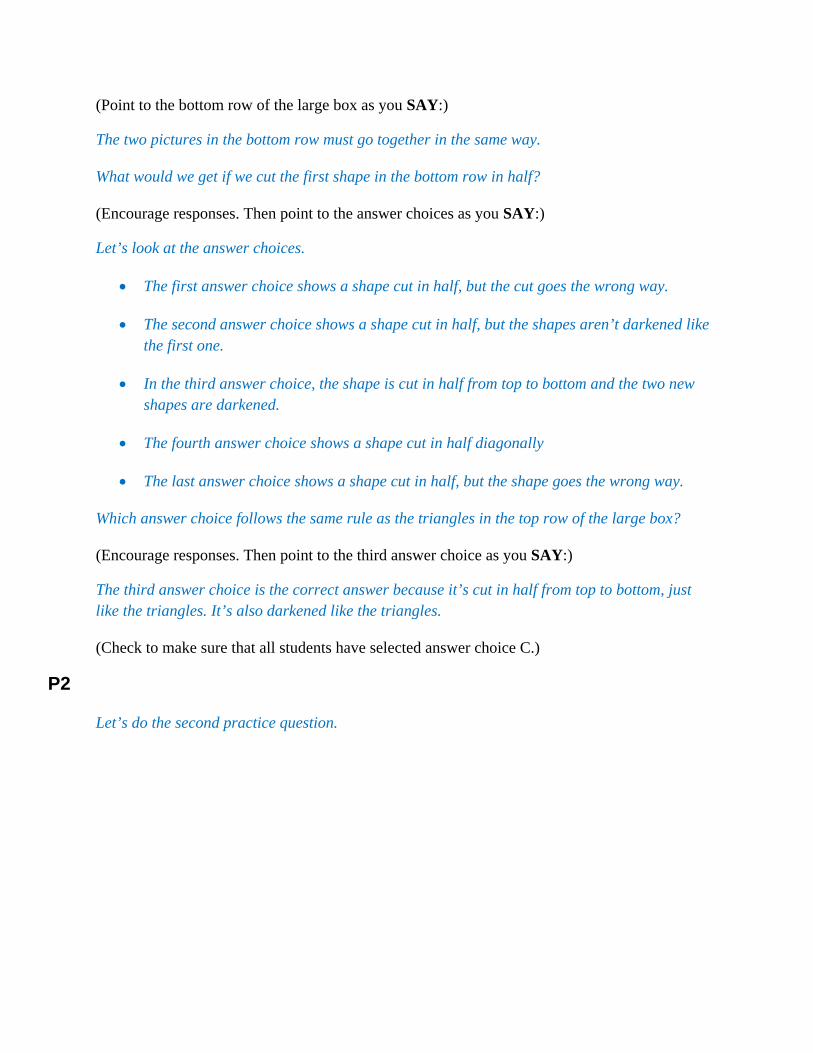
(Point to the bottom row of the large box as you SAY:)
The two pictures in the bottom row must go together in the same way.
What would we get if we cut the first shape in the bottom row in half?
(Encourage responses. Then point to the answer choices as you SAY:)
Let’s look at the answer choices.
• The first answer choice shows a shape cut in half, but the cut goes the wrong way.
• The second answer choice shows a shape cut in half, but the shapes aren’t darkened like the first one.
• In the third answer choice, the shape is cut in half from top to bottom and the two new shapes are darkened.
• The fourth answer choice shows a shape cut in half diagonally
• The last answer choice shows a shape cut in half, but the shape goes the wrong way.
Which answer choice follows the same rule as the triangles in the top row of the large box?
(Encourage responses. Then point to the third answer choice as you SAY:)
The third answer choice is the correct answer because it’s cut in half from top to bottom, just like the triangles. It’s also darkened like the triangles.
(Check to make sure that all students have selected answer choice C.)
P2
Let’s do the second practice question.

(Point to the large box as you SAY:)
The large box has two rows. We must decide which answer choice goes in the space with the question mark.
(Point to the top row as you SAY:)
Look at the top row of the large box. The first picture shows a white square and a dark square. The second picture shows a dark square and a white square.
How do these pictures go together?
(Encourage responses.)
The squares in the second picture are the same but are in the opposite order.
(Point to the bottom row as you SAY:)
The shapes in the bottom row must go together in the same way.
In the first picture we see a dark circle and a white circle. What shapes should go in the space with the question mark?
(Encourage students to say the rule. Then point to the answer choices as you SAY:)
Which answer choice shows that?
(Encourage responses. Then point to the first answer choice as you SAY:)
The two circles are in the opposite order than they are in the first picture in the bottom row. This is just what happened to the squares in the top row. So the first answer choice is correct.
(Check to make sure that all students have selected answer choice J.)

P3
Let’s do the third practice question.
(Point to the top row as you SAY:)
Look at the two shapes in the top row of the question. How do these shapes go together?
(Encourage responses.)
The second shape looks like the first one but with the middle cut out.
(Point to the bottom row of the question as you SAY:)
The two shapes in the bottom row of the question must go together in the same way.
Look at the dark square in the bottom row. How would the square look if we cut out the middle?
(Encourage responses. Then point to the answer choices as you SAY:)
Which answer choice shows that?
(Encourage responses. Then point to the second, fourth, and fifth answer choices as you SAY:)
These three answer choices have the middle cut out, so which do we choose? We need to find another rule so we can decide which answer choice is correct.
(Point back to the top row as you SAY:)
Do you notice anything else about the part that was cut out of this shape?
(Encourage responses.)
The part that was cut out is the same shape as the part that is still there. So which answer choice should we choose?

(Encourage responses. Then point to the second answer choice as you SAY:)
We should choose the second answer choice. It is a square with a cut-out that is also a square.
(Check to make sure that all students have selected answer choice B.)
Turn to the next page.
P4
Let’s do the fourth practice question.
(Point to the top row of the question as you SAY:)
Look at the pictures in the top row. Both pictures show squares with hearts in three corners. How do these pictures go together?
(Encourage responses. Note that there are several different rules that would produce this change. For example, the single heart moves to the empty space. Or the single heart switches corners. Or the entire picture was flipped about the vertical axis.)
The second picture looks like the first one but it has been flipped over.
(Demonstrate with your hand. If necessary, draw 3 hearts on a transparent sheet and flip it. Then point to the bottom row as you SAY:)
The two pictures in the bottom row must go together in the same way. What would happen if we flipped the picture in the first box?
(Encourage responses. Then point to the answer choices as you SAY:)
Which answer choice shows that?
(Encourage responses.)
The fourth answer choice shows the three hearts flipped over.
Are there any other rules that would work for this question?
(Try other rules that students suggest. Then check to make sure that all students have selected answer choice M.)
P5
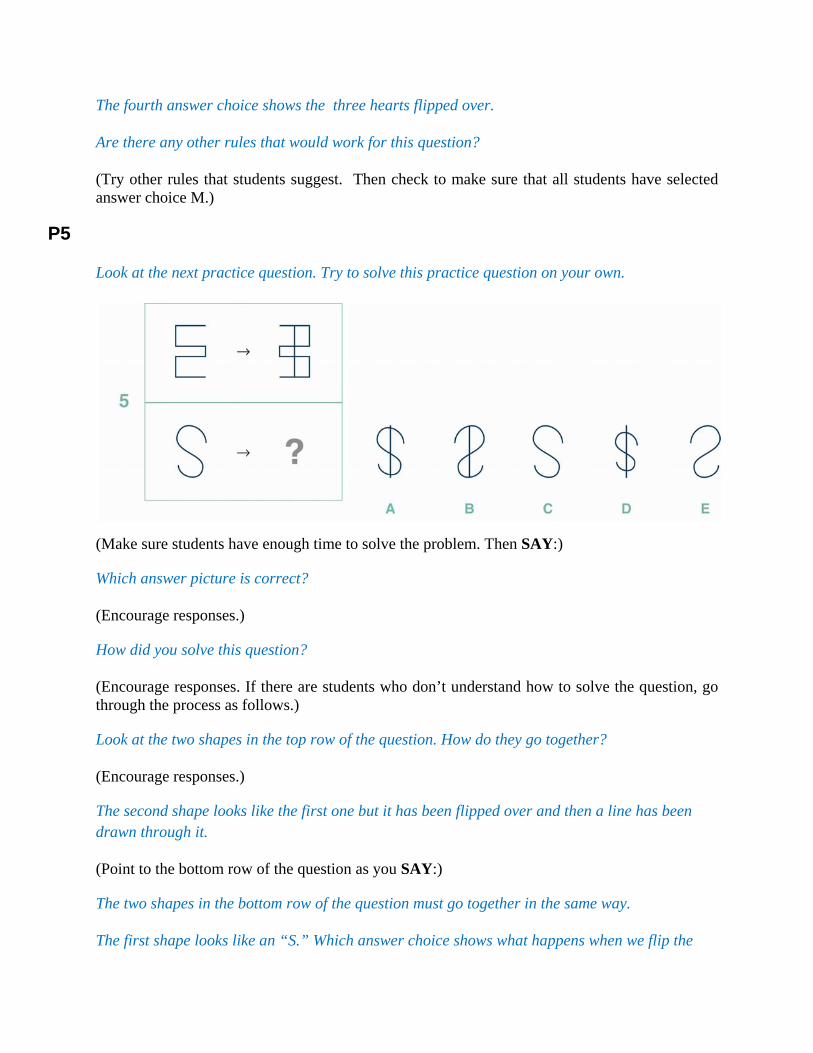
Look at the next practice question. Try to solve this practice question on your own.
(Make sure students have enough time to solve the problem. Then SAY:)
Which answer picture is correct?
(Encourage responses.)
How did you solve this question?
(Encourage responses. If there are students who don’t understand how to solve the question, go through the process as follows.)
Look at the two shapes in the top row of the question. How do they go together?
(Encourage responses.)
The second shape looks like the first one but it has been flipped over and then a line has been drawn through it.
(Point to the bottom row of the question as you SAY:)
The two shapes in the bottom row of the question must go together in the same way.
The first shape looks like an “S.” Which answer choice shows what happens when we flip the

“S” and draw a line through it?
(Encourage responses. Then point to the second answer choice as you SAY:)
The second answer choice shows the “S” flipped over with a line drawn through it.
(Check to make sure that all students have selected answer choice B.)
P6
Let’s do the last practice question.
(Point to the top row as you SAY:)
Look at the boxes in the two pictures in the top row of the question. Each box is divided into four boxes with shapes inside. How are the pictures the same? How do they differ?
(Allow students time to study the pictures. Then encourage responses. Try to get students to focus on what changes and what stays the same between the two pictures.)
The second picture looks like the first except the square and triangle changed places inside the box. The diamond and the circle stayed in the same place.
(Point to the bottom row of the question as you SAY:)
The two pictures in the bottom row of the question must go together in the same way. So what shapes must stay the same?
(Encourage responses. Point to the two “X’s” as you SAY:)
The two “X’”s must stay in the same place in the answer. Which answer choices show this?
(Encourage responses.)

Only the second and fourth answer choices show the “X’s” in the same place. This tells us that the other answer choices cannot be correct. We do not need to look at them again.
What must happen to the other two shapes in the picture? Do you remember the rule?
(Encourage responses.)
Those shapes must switch places. Which answer choice shows this?
(Encourage responses. Then point to the fourth answer choice as you SAY:)
The fourth answer choice shows what happens.
(Check to make sure that all students have selected answer choice M.)

Test 8: Paper Folding, Level 9 Part 1: Overview of Paper Folding
The Paper Folding test is modeled after a similar task that Binet used with young children. The test requires that the student imagine what happens to a sheet of paper after it is folded and a piece is cut out of it. The first pictures show how the paper is folded. The student must understand how these pictures describe the folding of an actual piece of paper. Then a circle (or other shape) is cut through all the layers of paper at that point. The student must then reverse the process to infer how the piece of paper will look when it is unfolded. Logical thinking can assist in solving most questions. For example, if the paper is folded in half and a hole is cut through both layers, then the unfolded paper must have two holes.
These practice activities are designed to teach students (a) how to imagine the correspondence between the pictures in the test booklet and the actual folding, cutting, and unfolding of a piece of paper and (b) how to use logical thinking to help them solve the problems. This practice can also help them move from concrete, perceptual strategies to more logical strategies for answering the questions.
Accurate testing requires that students understand the diagrams in the questions, which can be confusing. Therefore, the practice session begins with demonstrations that use real paper to help explain the diagrams. Whenever students are confused by a question, it is helpful to ask them to solve the question using an actual piece of paper.
In this test, students are asked to solve problems that look like this:
The paper is folded in half and a circle is cut out of it.
Which picture shows how the paper will look when it is unfolded?

When practicing the Paper Folding questions, encourage students to use these strategies.
• Imagine how the cut-out will be reflected on the other side of the paper each time it is unfolded.
• Use logical reasoning to say how many holes or cut-outs should be on the unfolded paper. For example, if the paper is folded once and a hole is cut in it, then there will be a hole in each layer of the paper. So there will be two holes in the unfolded paper.
• Examine all of the answer choices before picking one.
• When confused, model the problem using a square sheet of paper.
Students at this level tend to make the following common mistakes.
• Students might select the first answer that looks right without considering others answers.
• Students may ignore the angle of the fold. Diagonal folds can be particularly challenging for some students.
• Students might forget to reason about the approximate location of the holes when unfolding the paper.
• Students may ignore the number of holes that must appear on the answer. For example, in
the sample question above, the student might forget that there were two layers of paper that were cut and select the second answer choice.

Part 2: Paper Folding Practice Test Script
The following script covers many issues that will help students do their best on the test. Read aloud the text printed in blue italics: these are directions to the students. Directions for you are in parentheses and should NOT be read aloud. Feel free to modify the script to ensure that students understand what they are supposed to do and how do it.
It may be helpful to make copies of the practice questions in order to display them one at a time on an overhead projector. If this is not possible, hold up a copy of the student practice booklet and point to different parts of each practice question as you discuss them with the class.
(Find a SQUARE piece of paper and scissors. Crease the paper down the middle so it folds easily. Hold up the piece of paper as you SAY:)
Watch me fold this square piece of paper in half and cut a hole.
(Fold the paper in half and cut a hole in the location shown in the first practice question below.)
How will the paper look if I unfold it?
(Encourage responses. Then unfold the paper and show the students how it looks.)
(Make sure each student has a practice booklet. Then SAY:)
Open your practice booklet to page 3.
(Check that all students have the correct page.)
Each of these questions shows a piece of paper being folded. Then, a piece is cut out of the folded paper. You must imagine how the paper will look when it is unfolded.
P1
Let’s do the first practice question.
(Point to the pictures in the top row as you SAY:)

Wrong fold angle/placement
of holes
Wrong # of holes
Wrong fold angle/placement
of holes
Wrong # of holes
Look at the pictures in the top row. The first picture shows a square piece of paper. The next two pictures show it get folded in half. The fourth picture shows a large hole cut through the middle of the folded paper. This is like what I just showed you.
What will the paper look like when we unfold it?
(Encourage responses.)
After one fold, the hole is cut through two layers of paper, so the answer should have two holes: One hole where we made the cut, and one on the other side of the fold.
(Point to the answer choices as you SAY:)
Which answer choice shows how the paper will look when it is unfolded?
(Encourage responses. Then show the paper from the demonstration with the answer.)
This looks like the fourth answer choice. So answer choice D is the correct answer.
(Check to make sure that all students have selected answer choice D. If students suggest other answers, use the feedback in the figure above to point out what they are missing.)
P2
Let’s do the second practice question.
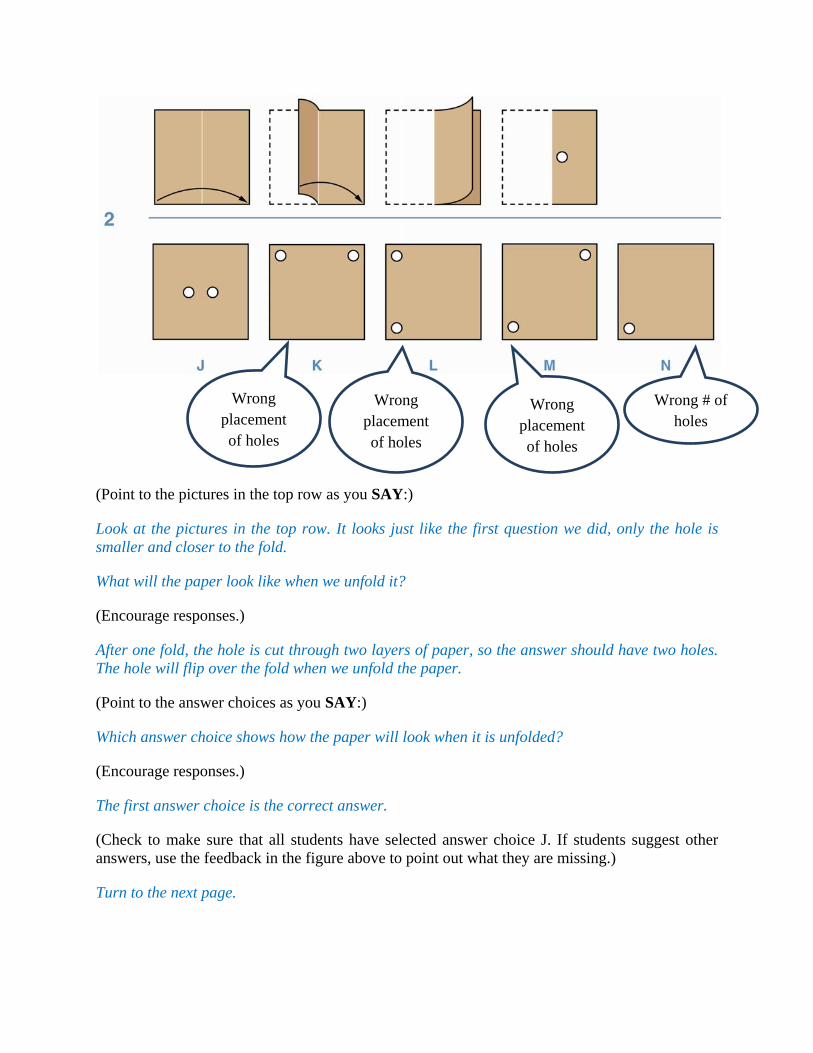
Wrong placement of holes
Wrong # of holes
Wrong placement of holes
Wrong placement of holes
(Point to the pictures in the top row as you SAY:)
Look at the pictures in the top row. It looks just like the first question we did, only the hole is smaller and closer to the fold.
What will the paper look like when we unfold it?
(Encourage responses.)
After one fold, the hole is cut through two layers of paper, so the answer should have two holes. The hole will flip over the fold when we unfold the paper.
(Point to the answer choices as you SAY:)
Which answer choice shows how the paper will look when it is unfolded?
(Encourage responses.)
The first answer choice is the correct answer.
(Check to make sure that all students have selected answer choice J. If students suggest other answers, use the feedback in the figure above to point out what they are missing.)
Turn to the next page.

P3
Let’s do the third practice question.
What will the paper look like when we unfold it?
Wrong placement of holes
Triangle must flip
Wrong placement of
holes
Wrong # of holes
(Encourage responses.)
After one fold, the hole is cut through two layers of paper, so the answer should have two holes. One hole is where we made the cut and the other is across the fold. Since the cut is a triangle, it will flip over when we unfold the paper.
(Demonstrate how this happens. Then point to the answer choices and SAY:)
Which answer choice shows how the paper will look when it is unfolded?
(Encourage responses.)
The last answer choice is the correct answer.
(Check to make sure that all students have selected answer choice E. If students suggest other answers, use the feedback in the figure above to point out what they are missing. This question is difficult. If students are confused by the explanation, illustrate using a real paper example.)
P4
Let’s do the fourth practice question.

Wrong
placement of holes
Wrong flip Wrong flip Wrong # of holes
What will the paper look like when we unfold it?
(Encourage responses.)
After one fold, the three holes are cut through two layers of paper, so how many holes should the answer have?
(Encourage responses.)
The answer should have six holes. What will happen to the pattern of the holes?
(Encourage responses.)
The pattern of holes on the hidden part of the paper will point in the opposite direction when we unfold the paper.
(Point to the answer choices as you SAY:)
Which answer choice shows how the paper will look when it is unfolded?
(Encourage responses.)
The third answer choice is the correct answer.
(Check to make sure that all students have selected answer choice L. If students suggest other answers, use the feedback in the figure above to point out what they are missing.)
Turn to the next page.

P5
Look at the next practice question. Try to solve this practice question on your own.
(Make sure students have enough time to solve the problem. Then SAY:)
What will the paper look like when we unfold it?
Wrong # of holes
Wrong # of holes Wrong # of
holes, holes can’t be on fold
Wrong # of holes
(Encourage responses.)
How did you solve this question?
(Encourage responses. If there are students who don’t understand how to solve the question, go through the process as follows.)
After two folds, the hole is cut through four layers of paper, so the answer should have four holes. The holes will flip over the fold each time we unfold the paper. (Demonstrate if necessary.)
The last answer choice shows what the paper will look like when it is unfolded. So answer choice E is the correct answer.
(Check to make sure that all students have selected answer choice E. If students suggest other answers, use the feedback in the figure above to point out what they are missing.)

P6
Look at the last practice question. Try to solve this practice question on your own.
(Make sure students have enough time to solve the problem. Then SAY:)
What will the paper look like when we unfold it?
Wrong # of holes & fold
angle
Wrong # of holes
Wrong # of holes
Wrong # of holes
(Encourage responses.)
How did you solve this question?
(Encourage responses. If there are students who don’t understand how to solve the question, go through the process as follows.)
After two folds, the two holes are cut through four layers of paper, so the answer should have two holes on each of the four parts of the paper, or eight holes. The holes will flip over the fold each time we unfold the paper.
What will the paper look like after we unfold it the first time?
(Encourage responses.)
The paper will be folded in half like it is in the second picture in the top row. Where will the holes be on this piece of paper that is folded in half?
(Encourage responses.)

They will make the pattern shown in answer choice K, but on the half-sheet of paper.
Now imagine unfolding the paper a second time so that it makes a square again. Now what pattern will the holes make?
(Encourage responses.)
The fourth answer choice shows what the paper will look like when it is unfolded. So answer choice M is the correct answer.
(Check to make sure that all students have selected answer choice M. If students suggest other answers, use the feedback in the figure above to point out what they are missing.)

Test 9: Figure Classification, Levels 9–12 Part 1: Overview of Figure Classification
The Figure Classification test requires the student to find the object that is most similar to three initial objects. Students must discover rules that describe how the objects are alike then test these rules until they find a set of rules that fit one and only one answer choice. Each question uses a new set of rules that create a novel problem, so during this practice test students should focus on learning general techniques for testing classification rules, not memorizing specific rules.
In this test, students will solve questions that look like this:
How are these shapes like each other?
Which one of these shapes belongs in the same group?
When practicing the Figure Classification questions, encourage students to use these strategies.
• Think of (and say silently) a rule that describes the similarities among the first three pictures. For example, all of the shapes have stripes.
• Test the rule on each answer choice, eliminating answers choices that do not fit the rule.
• Look for a more precise rule if more than one answer choice fits the rule.
Students at this level tend to make the following common mistakes.
• Students might overlook a critical feature of the first three pictures. For example, in the sample above, the student may notice the exterior shape, but ignore the shading.
• Students may choose an answer based on only part of the first three pictures. For example, the student might select the first or third answer choice because it has the same shape as one of the first three pictures.
• Students might select an answer choice before checking all the answer choices.
Part 2: Figure Classification Practice Test Script
The following script covers many issues that will help students do their best on the test. Read aloud the text printed in blue italics: these are directions to the students. Directions for you are in parentheses and should NOT be read aloud. Feel free to modify the script to ensure that students understand what they are supposed to do and how to do it.
It may be helpful to make copies of the practice questions in order to display them one at a time on an overhead projector. If this is not possible, hold up a copy of the student practice booklet and point to different parts of each practice question as you discuss them with the class.
(Make sure each student has a practice booklet. Then SAY:)
Open your practice booklet to page 6.
(Check that all students have the correct page.)
To answer these questions, look for how the first three shapes are like each other. Then find the answer choice that is most like the first three shapes.
P1
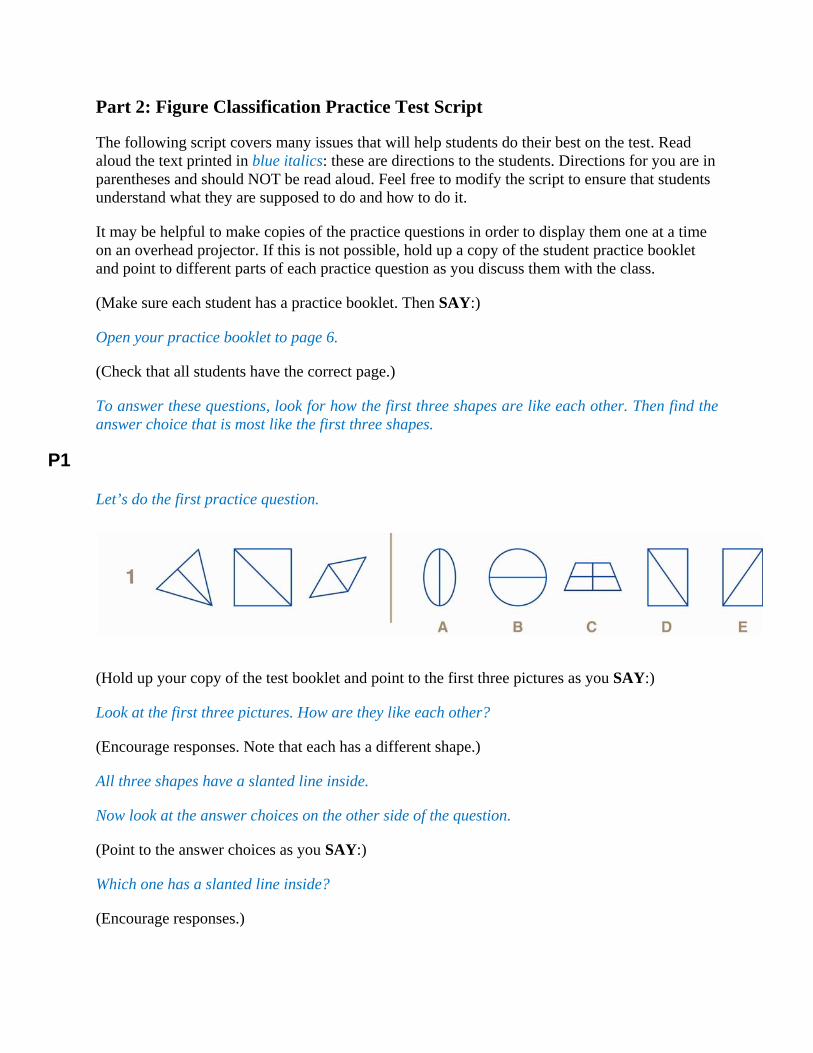
Let’s do the first practice question.
(Hold up your copy of the test booklet and point to the first three pictures as you SAY:)
Look at the first three pictures. How are they like each other?
(Encourage responses. Note that each has a different shape.)
All three shapes have a slanted line inside.
Now look at the answer choices on the other side of the question.
(Point to the answer choices as you SAY:)
Which one has a slanted line inside?
(Encourage responses.)

The last two answer choices both have slanted lines inside. We need another rule to decide which answer is correct. Let’s go back and look at the pictures on the left again. How else are the first three pictures the same?
(Encourage responses.)
The line inside each shape slants to the left. Which answer choice fits this rule?
(Encourage responses. Then point to the fourth answer choice as you SAY:)
The fourth answer choice has a line inside that slants to the left.
(Check to make sure that all students have selected answer choice D.)
P2
Let’s do the second practice question.
(Hold up your copy of the test booklet and point to the first three pictures as you SAY:)
Look at the first three pictures. How are these three pictures like each other?
(Encourage responses.)
All three have a square and a triangle inside.
Now look at the answer choices on the other side of the question.
(Point to the answer choices as you SAY:)
Which ones have a square and a triangle?
(Encourage responses. Then point to the first and third answer choices as you SAY:)
The first and third answer choices both have a square and a triangle. We need another rule to decide which one is correct.
(Point back to the first three pictures as you SAY:)
How else are the first three pictures the same?
(Encourage responses.)

The square and triangle are next to each other in all three pictures. So which answer choice should we choose?
The third answer choice is the best answer. It has a triangle and a square next to each other.
(Check to make sure that all students have selected answer choice L.)
P3
Let’s do the next practice question.
Look at the first three pictures. How are they like each other?
(Encourage responses.)
All three have a big shape in the middle and two small shapes that are the same: one on the top and one on the bottom.
Now look at the answer choices on the other side of the question.
(Point to the answer choices as you SAY:)
Which ones have a big shape in the middle and small shapes on the top and bottom?
(Encourage responses. Then point to the second, third, and fourth answer choices as you SAY:)
These three do. We need to find another rule to decide which answer choice is correct.
(Point back to the first three pictures as you SAY:)
How else are these three pictures the same?
(Encourage responses.)
The small shapes are the same shape as the big shape and they go the same direction as the big shape. Which answer choice shows this?
(Encourage responses. Then point to the fourth answer choice as you SAY:)
The fourth answer choice is correct. It has a big shape (a pentagon) and two smaller ones on the top and bottom that are the same shape and go the same direction.

(Check to make sure that all students have selected answer choice D. If any students have selected answer choice C, SAY:)
Notice that the third answer choice is wrong because the shape on top is upside down.
P4
Look at the next practice question. Try to solve this practice question on your own.
(Make sure students have enough time to solve the problem. Then SAY:)
Which answer picture is most like the first three shapes?
(Encourage responses.)
How did you solve this question?
(Encourage responses. If there are students who don’t understand how to solve the question, go through the process as follows.)
How are the first three pictures like each other?
(Encourage responses.)
All three look like a shape divided in half.
Now look at the answer choices on the other side of the question.
(Point to the answer choices as you SAY:)
Which ones look like a shape divided in half?
(Encourage responses. Then point to the first, second, third and fifth answer choices and SAY:)
These are divided, but not in half.
(Point to the fourth answer choice as you SAY:)
Only this one looks right. The fourth answer choice shows a shape (a hexagon) divided in half.
(Check to make sure that all students have selected answer choice M.)

P5
Look at the next practice question. Try to solve this practice question on your own.
(Make sure students have enough time to solve the problem. Then SAY:)
Which answer picture is most like the first three shapes?
(Encourage responses.)
How did you solve this question?
(Encourage responses. If there are students who don’t understand how to solve the question, go through the process as follows.)
How are the first three pictures like each other?
(Encourage responses.)
Sometimes it is hard to tell how they are like each other until you look at the answer choices. Look at the answer choices on the other side of the question.
(Point to the answer choices as you SAY:)
Does anyone see a rule we can use to choose an answer?
(Encourage responses. Then point to the second answer choice as you SAY:)
This one has all sharp corners.
(Point back to the first three shapes as you SAY:)
So do all the shapes on the left.
(Point back to the answer choices as you SAY:)
All the other answer choices have some rounded corners. With this rule, we find only one answer. The second answer choice is the correct answer.
(Check that students understand. Explain further if there is any confusion. Check to make sure that all students have selected answer choice B.)

Turn to the next page.
P6
Look at the last practice question. Try to solve this practice question on your own.
(Make sure students have enough time to solve the problem. Then SAY:)
Which answer picture is most like the first three shapes?
(Encourage responses.)
How did you solve this question?
(Encourage responses. If there are students who don’t understand how to solve the question, go through the process as follows.)
How are the first three pictures like each other?
(Encourage responses.)
There are a few different rules we can see:
• All three pictures have a triangle, a circle, and a rectangle.
• The shapes are white, dark, and striped.
• The stripes are vertical in all three pictures.
Now look at the answer choices on the other side of the question.
(Point to the answer choices as you SAY:)
Which answer choice follows all three rules?
(Encourage responses. Then point to the first answer choice as you SAY:)
The first answer choice is the correct answer. It has the correct shapes, the correct colors, and the stripes are vertical. If we check the other answer choices we can see that none of them follow all three rules.
(Check to make sure that all students have selected answer choice J.)