coders workshop: api first mobile development featuring angular and node
TRANSCRIPT

1
API-Driven App Development


Why do we do this workshop?
4

Apigee is always free for developers
Free Hosted Accounts 25GB storage limit, 10M push notifications/month no API/bandwidth limit Commercial use OK
5

Paid plans available for large companies if you need to deploy on your own servers or SLAs, 4 nines, multi-region, phone support, more storage, etc.
6

Apigee SMB
7
Who are you?
8


Agenda
Section 1 Node.js Crash Course Section 2 RESTful API Best Practices Section 3 Intro to Apigee127 Section 4 Intro to AngularJS and Ionic
10

Agenda
Section 5 Intro to mBaaS Section 6 Putting It All Together Section 7 { OKTOBERFEST: IPAs }
11

Node.js Crash Course

Why node.js?
• Javascript running on the server
• Asynchronous, event-driven
• HTTP is a first-class citizen of the Node world
• Exploding in popularity
13

Who is using Node.js?
14

Node.js success stories
• LinkedIn moved to Node.js from Rails for their mobile traffic, reducing the number of servers from 30 to 3 (90% reduction) and the new system was up to 20x faster.
• PayPal measured a 2x increase in developer productivity, where it took half the number of developers to deliver an application when compared to Java, and it was delivered in less time15

Node.js success stories
• WalMart Labs had a bumper launch with Node.js in 2013, where they put all of their Mobile traffic through Node.js on Black Friday.
• Servers didn’t go over 1% CPU utilization and the team did a deploy with 200,000,000 users online.
16


Node.js Event Loop
18

The world’s simplest web server
19


Modules must be installed
22

Installing modules
• Individual modules must be installed using the NPM command line
• Once installed (node_modules folder), they are added to the app using require(‘module name’)
23

Installing multiple modules
• When a Node.js app launches, it looks for a file, package.json, in the same folder as the main JS file to determine if all of its ‘pieces’ are present
• Using npm install will install all of the listed dependencies at one time.24

Best Practices in RESTful API Design

In the beginning…
26

SOAP and XML-RPC
27
<?xml version="1.0" encoding="UTF-8"?> <soapenv:Envelope xmlns:soapenv="http://schemas.xmlsoap.org/soap/envelope/" xmlns:xsd="http://www.w3.org/2001/XMLSchema" xmlns:xsi="http://www.w3.org/2001/XMLSchema-instance"> <soapenv:Header> <ns1:RequestHeader soapenv:actor="http://schemas.xmlsoap.org/soap/actor/next" soapenv:mustUnderstand="0" xmlns:ns1="https://www.google.com/apis/ads/publisher/v201403"> <ns1:networkCode>123456</ns1:networkCode> <ns1:applicationName>DfpApi-Java-2.1.0-dfp_test</ns1:applicationName> </ns1:RequestHeader> </soapenv:Header> <soapenv:Body> <getAdUnitsByStatement xmlns="https://www.google.com/apis/ads/publisher/v201403"> <filterStatement> <query>WHERE parentId IS NULL LIMIT 500</query> </filterStatement> </getAdUnitsByStatement> </soapenv:Body> </soapenv:Envelope>

The dawn of REST
28

Representational State Transfer
29
• Resources and resource identifiers
• Transport and semantic independence
• Statelessness
• Interface/contract uniformity
• Metadata and shared understanding of data types
• Self-descriptive messages
• Hypertext as the Engine of Application State (HATEOAS)

What could be easier?
30
GET https://www.googleapis.com/adexchangebuyer/v1.3/accounts
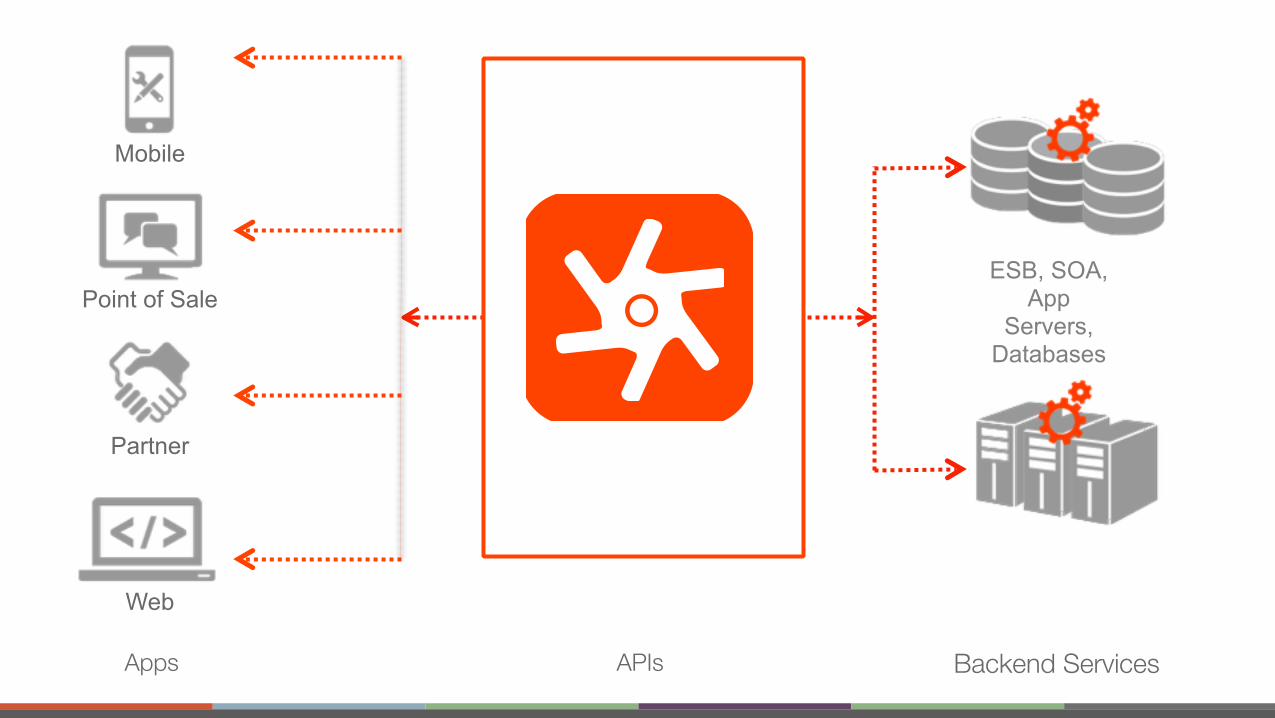
Web
Point of Sale
Partner
Mobile
ESB, SOA, App
Servers, Databases
Apps Backend ServicesAPIs

Teaching a dog to REST

Reluctant API Design
/getDog /getAllDogs /petDog /feedDog /createRecurringDogWalk /giveCommand /healthCheck /getRecurringDogWalkSchedule /getLocation /teachTrick
33

Reluctant API Design
/getAllDogs
/petDog
/feedDog
/createRecurringWakeUp
/giveCommand
/checkHealth
/getRecurringWakeUpSchedule
/getLocation
/getDog
/newDog
/getNewDogsSince
/getSittingDogs
/setDogStateTo/saveDog
/getAllLeashedDogs
/verifyVeterinarianLocation
/createRecurringMedication
/doDirectOwnerDiscipline
/doCheckupWithVeterinarian
/getRecurringFeedingSchedule
/getHungerLevel
/getSquirrelsChasingPuppies
/newDogForOwner
/getNewDogsAtKennelSince
/getSittingDogsAtPark
/setLeashedDogStateTo
/saveMommaDogsPuppies
34

It happens in the real world
35

Design for adoption
36

Resource modeling
We only need two base URLs for a resource
A collection
A resource
37
/dogs
/dogs/1234

Three’s company
38
/owners/5678/dogs

Sweep complexity behind the “?”
39
/dogs?color=red&state=running&location=park

Actions are resources
40
/convert?from=EUR&to=CNY&amount=100
(hypothetical)
/droplets/{droplet_id}/reboot
DigitalOcean
/search?q=watermelon&type=post

Never EVER
Never Break The Client. EVER.
41
unless…

Versioning schemes
42
/2010-04-01/Accounts/
/services/data/v30.0/limits
/v2.0/me
/v2/users/{userid}/checkins

Intro to Apigee 127


Installing Apigee 127
• Apigee 127 is installed using the command line – note that you may have to use sudo on a Mac npm install -g apigee-127
• Using the -g option installs Apigee 127 as a globally available app – this is recommended45

Starting an Apigee-127 Skeleton Project
• a127 project create <project name>
• cd <project name>
• a127 project edit
• a127 project start (run this in a different tab/window)
46

Disable Response Validation
• Open config/default.yaml
• Change to validateResponse: false
47

Creating an Apigee 127 Project
• Using the command line, navigate to the place where you want to create a new project a127 project create api-workshop
48

Apigee 127 App Structure
49

Try it out
• Navigate inside the project folder, then execute the command a127 project start
• Open a browser window and navigate to: http://localhost:10010/hello?name=YOUR-NAME-HERE
50

Launching the Editor
• Launch the local Swagger editor by running a127 project edit
51

How Do Controllers Work?
• All controllers are stored in the api/controllers folder • The name of the controller (.js file) must match the
x-swagger-router-controller: value in the swagger doc 52

How Do Controllers Work?
• Each controller exports an array of name/value pairings where the name corresponds to the operationId: in the swagger document and the value is the function within the controller
53

Intro to AngularJS & Ionic

npm install -g cordova ionic
55
Install Ionic & Cordova

What is AngularJS?
• JS Model-View-Controller (MVC) framework • Declarative UI programming • Imperative logic programming • DOM manipulation decoupled from app logic • Many built-in directives to handle DOM manipulation • Single page app development
56

57

58

Model-View-Controller (MVC)
Model • Data stored as JavaScript variables • Set/updated in the view and/or controller
View • What the user sees and interacts with • HTML template files
Controller • Defines business logic • Written in JavaScript
59
$scope.name = ‘Alex’;
<p>Hello, {{name}}!</p>
if (!$scope.name) { $scope.name = ‘Stranger’;
}

So What?
• Clear, succinct and modular component structure
• Easy to build/collaborate on large apps
• Extensible (dependency injection)
• Improves testability
• Two-way data bindings
60

One-way Data Binding (traditional)
61
Source: https://docs.angularjs.org/guide/databinding

Two-way Data Binding (AngularJS)
62
Source: https://docs.angularjs.org/guide/databinding

Ionic
• Hybrid mobile app framework (no native development required)
• Mobile-optimized Angular constructs (directives, events)
• Leverages AngularJS and Apache Cordova
• Build once, deploy everywhere iOS, Android, Kindle, Windows Phone?, Blackberry???
• Performant!63

Create Ionic Skeleton App
64
ionic start myApp blank

Super Simple Ionic Hello World App
65
http://j.mp/ionic-hello
• Add a two-way data-binding to template
• Create a controller
• Add a value to the model
• Inject the controller into the app
• Update the model with an input field

Intro to API BaaS

API BaaS
67
Apache Usergrid
4+ years in OSS 500+ stars 200+ forks 35 contributors

Why use a BaaS?
68
• Data Store • Push Notifications • File/Asset Storage • Social Graph • User Management • Geolocation • Error/Crash Monitoring


Apigee Edge
70

API BaaS
• Locate your org name in the upper lefthand corner of the API BaaS portal
• For the workshop, you’ll be using the sandbox app • Your database is located at http://api.usergrid.com/YOURORGNAME/sandbox
71

Database Model
Restaurants name: "AZ Bread Company”
address: "315 W Elliot Rd” city: “Tempe" state: “AZ" phone: "+1-480-831-1300" category: "Breakfast & Brunch" location: { “latitude": 33.348763010085996, "longitude": -111.94435105010001 } restID: 20
72
Reviews title: "All around good food"
body: "Can't complain about a very consistent joint. Get there early on a Friday though, because it tends to fill up quickly."
rating: 4 restID: 5, reviewer: "johnnyapples"

Populate the database
• In your browser, go to the following URL, changing YOURORGNAME to your own org name and a location (city or address) of your choice
http://grewis-test.apigee.net/api-restaurants/setup/YOURORGNAME?location=Phoenix,AZ
73

Exercise - a127
• Define an API to return a list of restaurants
74
j.mp/api-to-app-swagger-01

Exercise - a127
• Create the restaurants controller “restaurants.js” in the controllers folder
75
j.mp/api-to-app-restaurants-01

Putting It All Together

Starter Project
• Download the starter project
77
j.mp/ionic-starter-files

Exercise
• Add the following to app.js j.mp/ionic-app-js-01
• Add the following to controllers.js j.mp/ionic-controllers-js-01
78

Exercise
• Create an API definition to return all of the reviews for a specific restaurant
79
j.mp/api-to-app-swagger-02

Exercise
• Create the corresponding controller for the reviews API (use restID as the unique key)
80
j.mp/api-to-app-restaurants-02

Exercise
• Add the following to app.js j.mp/ionic-app-js-02
• Add the following to controllers.js j.mp/ionic-controllers-js-02
• Add the following to services.js j.mp/ionic-services-js-01
81

Exercise
• Add the following to directives.js j.mp/ionic-directives-js-01
• Test the app. Tap/click on a restaurant to move to the details page
82

Exercise
• Create an API definition to allow a user to POST a new review
83
j.mp/api-to-app-swagger-03

Exercise
• Create the corresponding controller for the reviews API (use restID as the unique key)
84
j.mp/app-to-api-reviews

Exercise
• Add the following to app.js j.mp/ionic-app-js-03
• Add the following to controllers.js j.mp/ionic-controllers-js-03
• Test the app and add a review
85

Exercise
• Add the following to controllers.js j.mp/ionic-controllers-js-04
• Test the app
86

Exercise
• If all else has failed… j.mp/api-to-app-final-files
• You'll need to change YOURORGNAME in the restaurants.js and reviews.js files in a127-API/api/controllers/
87

Deploying the APIs

Using Apigee Edge
An a127 account is needed to deploy to the Apigee Edge platform. An a127 app can also be deployed to AWS, Heroku or anywhere that a Node.js app can run.
89

Apigee Edge
• Log into your Apigee account at http://accounts.apigee.com
• Click on API Management to access your account
90

Creating an a127 account
• Create an a127 account a127 account create {NAMEYOURACCOUNT}
• Select apigee as the provider and follow the prompts (see the next slide)
91

Create an a127 accounta127 account create Apigee [?] Provider? apigee [?] Do you already have an account on apigee? Yes [?] Base URI? [Just hit Return] [?] Organization? YOURORGNAME [?] User Id? YOUREMAILADDRESS [?] Password? **************** [?] Environment? test [?] Virtual Hosts? [Just hit Return]
[?] Create account service? Yes [?] Service Type? RemoteProxy [?] Service name? RemoteProxy [or whatever you want to name it]
92

Deploying
• To deploy to Apigee Edge, ensure that you are in the root of your a127 project directory a127 project deploy
• After the upload is complete copy the URI of your APIs
93

Deploying
• If the upload times out — which can happen due to the server needing to run npm install — you can chose to have it upload your node_modules using the -u modifier a127 project deploy -u
94

Congratulations!
• Open the API Management console and choose API Proxies from the API menu
• Click on your API to view info about it such as the base URL
95

Got docs?
• a127 docs: https://github.com/apigee-127/a127-documentation/wiki
• API BaaS docs: http://apigee.com/docs/api-baas
96

Get more training
Advanced class? Training for your company? Still free! [email protected] or [email protected]

Congratulations! We don’t accept tips but I do accept tweets!
Greg Rewis
[email protected] @garazi
Alex Muramoto
[email protected] @alexmuramoto

Appendix: API Management

Sad, but true…
100

Using Volos
• Volos provides a way to leverage common features such as OAuth 2.0, Caching, and Quota management into your APIs
• OAuth 2.0 supports bearer tokens and all standard grant types –Uses Redis or the Apigee platform for data storage
• Quota counts API calls and rejects them when the defined limit is exceeded during the specified time period
• Caching can be in memory, using Redis or the Apigee platform101

Implementing a Cache
• In the swagger spec, add the following to the x-volos-resources key to apply a 10 second cache
• Apply the cache to the /restaurants API by adding the following code
102

Implementing a Cache
• Using the Chrome Developer Tools (Cmd+Opt+I on Mac, F12 on Windows), call the /restaurants API then click on restaurants in the Network tab to see the Cache being set
103

Adding a Quota
• Add the following to x-volos-resources to set a limit of 2 calls per hour*
• Apply the quota to the POST operation of the restaurants API
104* this is a completely silly example, but at least you can see it happen easily

Adding a Quota
• Refresh the /restaurants API a few times and watch as the limit is applied using the Chrome Developer Tools
105

A Word of Caution
• Our example is letting us hit the request more than twice because it is allowing the request as long as the cache is still valid
• The order of the policies determines their order of execution – in other words, if you reverse the cache and quota order in the Swagger document, quota will be enforced first and you will only be able to make two requests each hour
• Go ahead… give it a try!106

Adding oAuth2• To use Apigee Edge for oAuth we’ll first need to generate a client id and client secret • Open the Apigee Edge Dashboard https://accounts.apigee.com/accounts/dashboard/
• Launch the API Management portal • Go to Publish > Developer Apps
107

Adding oAuth2
• Click on the Remote Proxy app or whatever you named your service.
• Use the Show buttons to reveal your Consumer Key and Consumer Secret
108

Adding oAuth2
• Implementing oAuth in a127 requires several additions/changes to your Swagger doc.
• Please visit the following page and follow the steps, starting with step 4.
109
j.mp/adding-Apigee-oAuth

Obtaining an Access Token
• Using Postman (or any REST client), POST to the /accesstoken API
• Set the Header to Content-Type: application/json
• Pass the credentials as a raw JSON
110

Access Token
• Copy the returned access_token value to pass with requests to the /restaurants API
111

Passing an Access Token
• The access token must be passed in the request header as the value of the Authorization header
• The token is passed together with the Bearer keyword
112

Token Expiry
• When a token expires (like it might have happened to you, if you were too slow), a new token must be issued
• Change the tokenLifetime in the Swagger document to something more reasonable!
• 1 hour = 3600000 • 1 day = 86400000 • 1 week = 604800000
• Repeat the steps to request a token — then change the token in the /restaurants request
113

Thank you