coda cold-mount® system operation guide
TRANSCRIPT

Coda, Inc. • 30 Industrial Avenue • Mahwah, NJ 07430 Phone: 201-825-7400 Fax: 201-825-8133 Email: [email protected] www.codamount.com Cold-Mount ® is a registered trademark of Coda Inc.
Cold-Mount® System Operation Manual January 2006
Coda Cold-Mount® System Operation Guide
Coda, Inc. • 30 Industrial Avenue • Mahwah, NJ 07430 Phone: 201-825-7400 Fax: 201-825-8133 Email: [email protected] www.codamount.com Cold-Mount ® is a registered trademark of Coda Inc.
Cold-Mount® System Operation Manual January 2006
Cold-Mount® System Operation Guide Index
INSTRUCTIONS • Machine Set-Up • Location and Function of Controls • Setting the Roller Pressure, Alignment and Gap • Mounting a Print (Basic Cold-Mount® Procedure) • Laminating a Print with a Sheeted Laminate • Using the Roll Feed System
PRODUCTS • Cold-Mount® System • Cold-Mount® Adhesive Coated Boards • Cold-Mount® Adhesives • Cold-Mount® Laminates • Accessories

Coda, Inc. • 30 Industrial Avenue • Mahwah, NJ 07430 Phone: 201-825-7400 Fax: 201-825-8133 Email: [email protected] www.codamount.com Cold-Mount ® is a registered trademark of Coda Inc.
Cold-Mount® System Operation Manual January 2006
Machine Set-Up
When the crated machine is delivered be sure to inspect for any shipping damage that may have occurred. If there is any damage notify the carrier and Coda, Inc. immediately. Remove the cardboard carton and unbolt the machine from the wooden base. Locate the machine in an area with enough space to work with your materials. It is important to use the laminator in a clean room as dirt and dust will stick to exposed adhesive. Adhesives and laminates perform best in a room with a temperature of 70 degrees F or higher.
Figure 1
In the crate is a cardboard box containing the footswitch and pressure adjustment tool (shown in figure 5). Place the footswitch on the floor near the in-feed of the machine. You will find a convenient location for the foot switch once you begin working with the system.
Coda, Inc. • 30 Industrial Avenue • Mahwah, NJ 07430 Phone: 201-825-7400 Fax: 201-825-8133 Email: [email protected] www.codamount.com Cold-Mount ® is a registered trademark of Coda Inc.
Cold-Mount® System Operation Manual January 2006
Figure 2
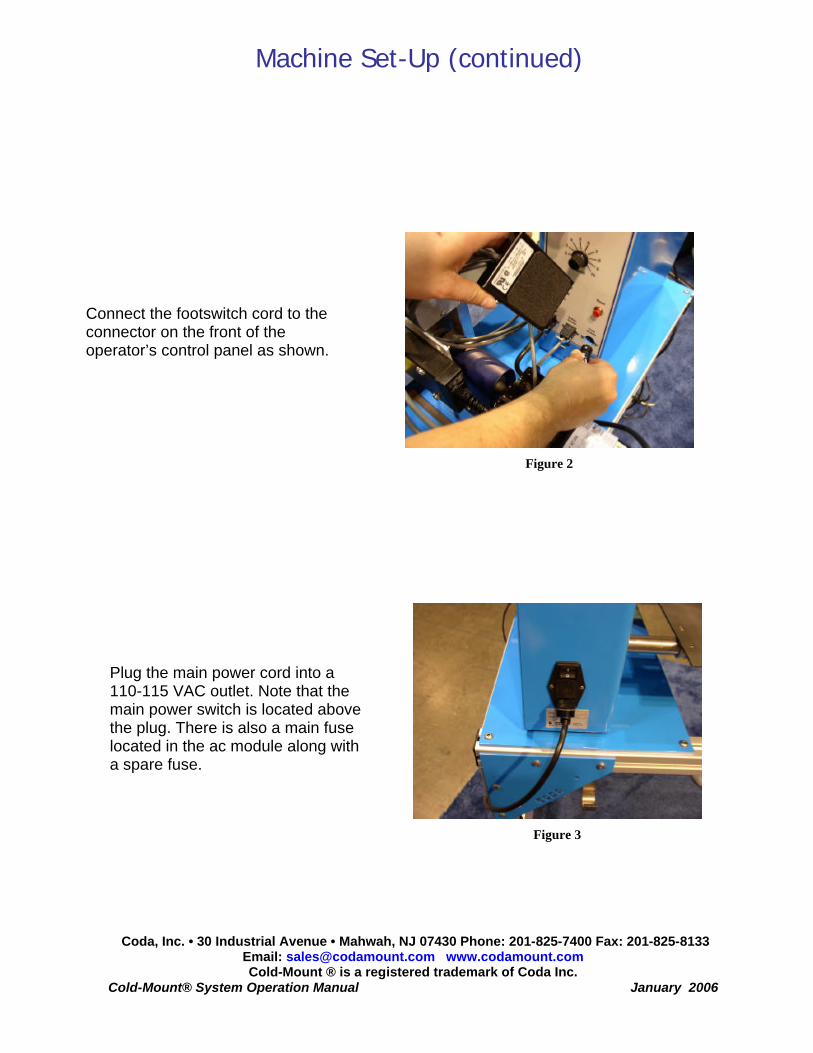
Connect the footswitch cord to the connector on the front of the operator’s control panel as shown.
Figure 3
Machine Set-Up (continued)
Plug the main power cord into a 110-115 VAC outlet. Note that the main power switch is located above the plug. There is also a main fuse located in the ac module along with a spare fuse.

Coda, Inc. • 30 Industrial Avenue • Mahwah, NJ 07430 Phone: 201-825-7400 Fax: 201-825-8133 Email: [email protected] www.codamount.com Cold-Mount ® is a registered trademark of Coda Inc.
Cold-Mount® System Operation Manual January 2006
Location and Function of Controls
Figure 4
? Power ON-OFF Indicator – Indicates that power is being applied to the control board.
? Manual Mode – When power is applied and Reset has
been pressed the machine will run at the speed set by the Speed Dial.
? Foot Mode - When power is applied and Reset has
been pressed the machine will run at the speed set by the Speed Dial whenever the footswitch is depressed.
? Reset – Machine will stop when the electric eye is
interrupted. The Reset must be pressed to re-activate the machine.
? Emergency Stop – This button is located in the upper
left of the control box. Rotate and pull up to allow the machine to run. Push in for emergency STOP.
? SPEED – Controls the speed of the machine and has
an integrated ON-OFF position. Note: The motor starts running when the speed is at about 2 on the Speed Dial.
Coda, Inc. • 30 Industrial Avenue • Mahwah, NJ 07430 Phone: 201-825-7400 Fax: 201-825-8133 Email: [email protected] www.codamount.com Cold-Mount ® is a registered trademark of Coda Inc.
Cold-Mount® System Operation Manual January 2006
Setting the Spring Pressure
Figure 5
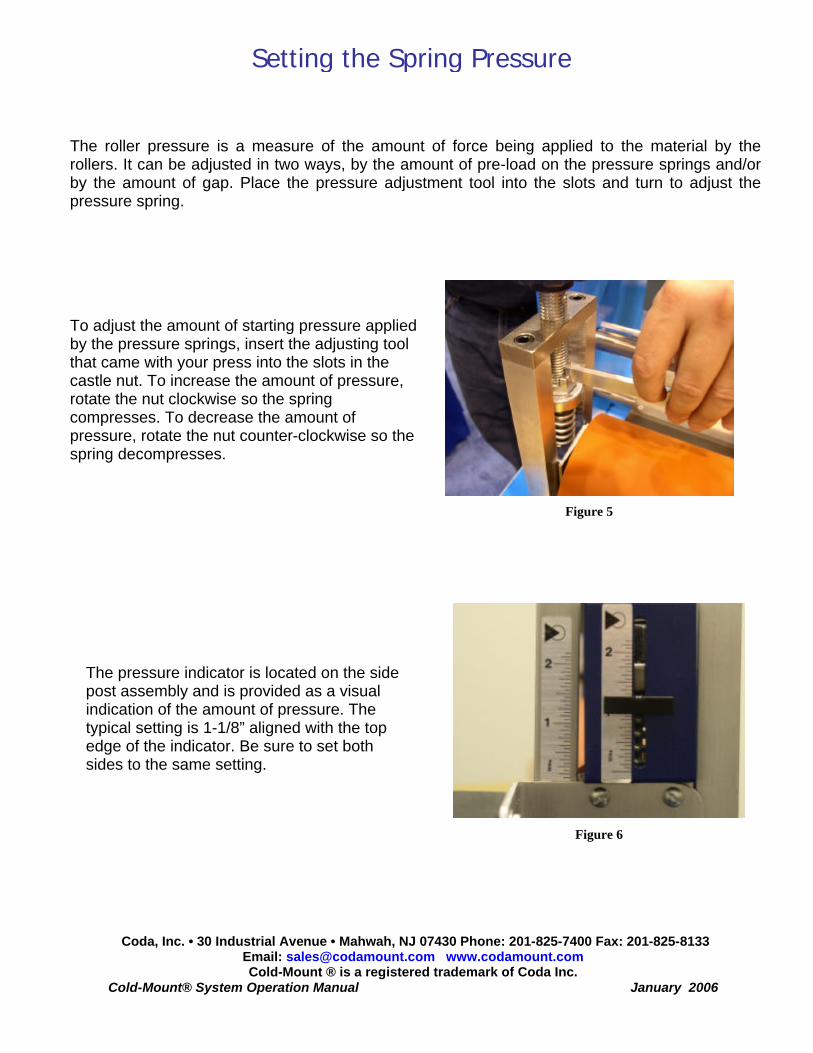
To adjust the amount of starting pressure applied by the pressure springs, insert the adjusting tool that came with your press into the slots in the castle nut. To increase the amount of pressure, rotate the nut clockwise so the spring compresses. To decrease the amount of pressure, rotate the nut counter-clockwise so the spring decompresses.
The roller pressure is a measure of the amount of force being applied to the material by the rollers. It can be adjusted in two ways, by the amount of pre-load on the pressure springs and/or by the amount of gap. Place the pressure adjustment tool into the slots and turn to adjust the pressure spring.
Figure 6
The pressure indicator is located on the side post assembly and is provided as a visual indication of the amount of pressure. The typical setting is 1-1/8” aligned with the top edge of the indicator. Be sure to set both sides to the same setting.

Coda, Inc. • 30 Industrial Avenue • Mahwah, NJ 07430 Phone: 201-825-7400 Fax: 201-825-8133 Email: [email protected] www.codamount.com Cold-Mount ® is a registered trademark of Coda Inc.
Cold-Mount® System Operation Manual January 2006
Adjusting the Rollers for Even Pressure
Figure 7
Using the gap adjusting knobs, lower the right side of the top roller so that it almost touches the bottom roller. Then do the same on the left side.
Figure 8
Next make the fine adjustment on the right by turning the gap adjusting knob clockwise until the rollers just touch. Then do the same on the left side until the rollers are parallel.
Coda, Inc. • 30 Industrial Avenue • Mahwah, NJ 07430 Phone: 201-825-7400 Fax: 201-825-8133 Email: [email protected] www.codamount.com Cold-Mount ® is a registered trademark of Coda Inc.
Cold-Mount® System Operation Manual January 2006
Roller Alignment Procedure
Figure 9
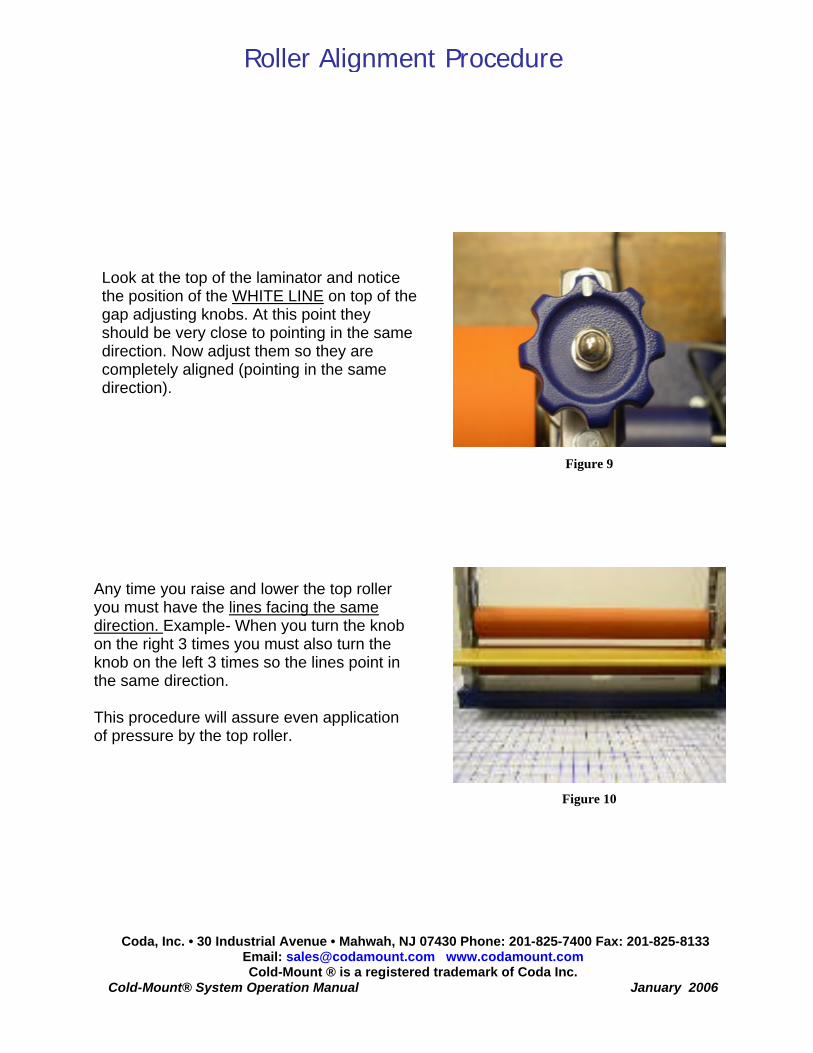
Any time you raise and lower the top roller you must have the lines facing the same direction. Example- When you turn the knob on the right 3 times you must also turn the knob on the left 3 times so the lines point in the same direction. This procedure will assure even application of pressure by the top roller.
Figure 10
Look at the top of the laminator and notice the position of the WHITE LINE on top of the gap adjusting knobs. At this point they should be very close to pointing in the same direction. Now adjust them so they are completely aligned (pointing in the same direction).
Coda, Inc. • 30 Industrial Avenue • Mahwah, NJ 07430 Phone: 201-825-7400 Fax: 201-825-8133 Email: [email protected] www.codamount.com Cold-Mount ® is a registered trademark of Coda Inc.
Cold-Mount® System Operation Manual January 2006
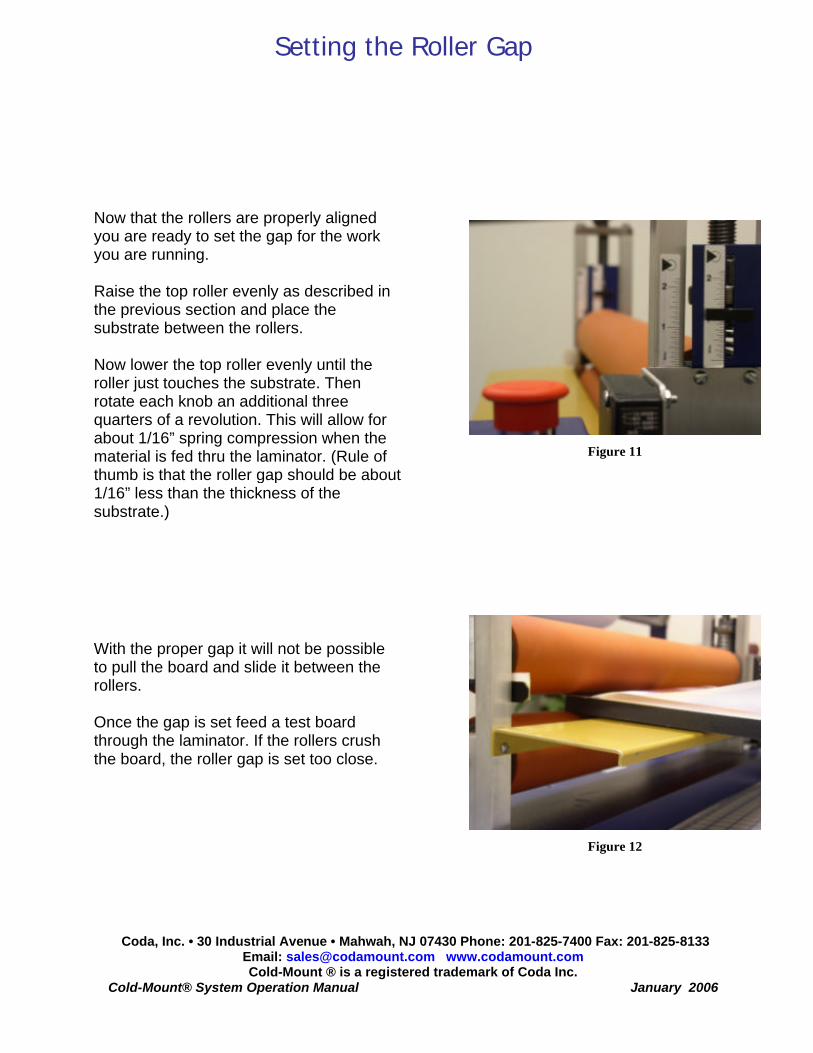
Setting the Roller Gap
Figure 11
Figure 12
With the proper gap it will not be possible to pull the board and slide it between the rollers. Once the gap is set feed a test board through the laminator. If the rollers crush the board, the roller gap is set too close.
Now that the rollers are properly aligned you are ready to set the gap for the work you are running. Raise the top roller evenly as described in the previous section and place the substrate between the rollers. Now lower the top roller evenly until the roller just touches the substrate. Then rotate each knob an additional three quarters of a revolution. This will allow for about 1/16” spring compression when the material is fed thru the laminator. (Rule of thumb is that the roller gap should be about 1/16” less than the thickness of the substrate.)

Coda, Inc. • 30 Industrial Avenue • Mahwah, NJ 07430 Phone: 201-825-7400 Fax: 201-825-8133 Email: [email protected] www.codamount.com Cold-Mount ® is a registered trademark of Coda Inc.
Cold-Mount® System Operation Manual January 2006
Figure 15
Basic Cold-Mount® Procedure
Using an adhesive coated board, peel the release liner back about 1-½” from the top of the substrate, then fold and put a sharp crease in the release liner.
Figure 13
Figure 14
Line the print up with the edges of the substrate. Lightly tack print along top ½” of substrate, working from the center out or from one side to the other, so as not to trap air. (Do NOT press along the crease in the release liner.)
Insert the tacked end of print about ½” into the laminator. (Do not catch release liner in the laminator.) As you start the laminator, hold the print at a 45 degree angle above the top roller.

Coda, Inc. • 30 Industrial Avenue • Mahwah, NJ 07430 Phone: 201-825-7400 Fax: 201-825-8133 Email: [email protected] www.codamount.com Cold-Mount ® is a registered trademark of Coda Inc.
Cold-Mount® System Operation Manual January 2006
Basic Cold-Mount® Procedure (continued)
Figure 16
Use hand tension to wrap the print around the top roller. Make sure there are no gaps between the print and the roller.
Figure 17
Peel off the release liner. Run the print and the substrate through the laminator, taking care not to let the print flop down on the adhesive.
Figure 18
Always keep an even tight tension on the print to avoid any wrinkling. The print will come out perfectly mounted.

Coda, Inc. • 30 Industrial Avenue • Mahwah, NJ 07430 Phone: 201-825-7400 Fax: 201-825-8133 Email: [email protected] www.codamount.com Cold-Mount ® is a registered trademark of Coda Inc.
Cold-Mount® System Operation Manual January 2006
Congratulations you have successfully mounted a print!
Figure 19
All boards with the same thickness can now be mounted one after the other without further adjustment. If mounting onto a substrate of a different thickness, the gap must be re-adjusted. Be sure to check all adjustments prior to running new jobs.
Coda, Inc. • 30 Industrial Avenue • Mahwah, NJ 07430 Phone: 201-825-7400 Fax: 201-825-8133 Email: [email protected] www.codamount.com Cold-Mount ® is a registered trademark of Coda Inc.
Cold-Mount® System Operation Manual January 2006
Laminating a Print with a Sheeted Laminate
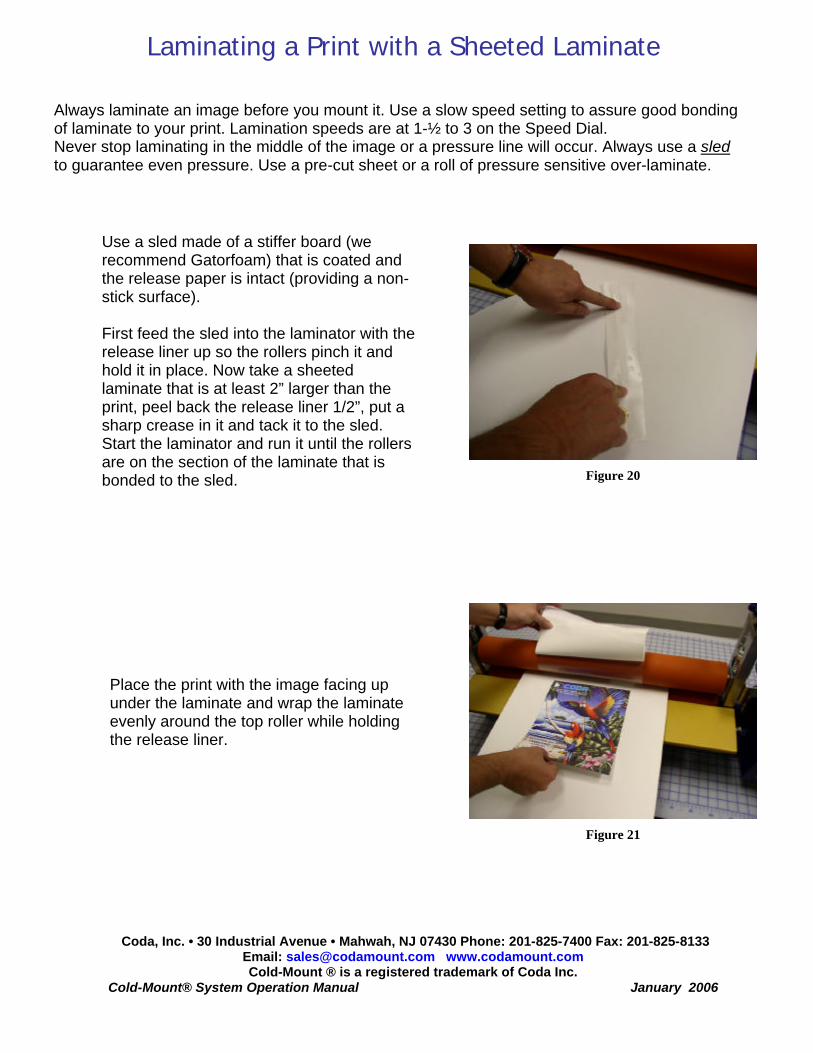
Use a sled made of a stiffer board (we recommend Gatorfoam) that is coated and the release paper is intact (providing a non-stick surface). First feed the sled into the laminator with the release liner up so the rollers pinch it and hold it in place. Now take a sheeted laminate that is at least 2” larger than the print, peel back the release liner 1/2”, put a sharp crease in it and tack it to the sled. Start the laminator and run it until the rollers are on the section of the laminate that is bonded to the sled.
Figure 20
Figure 21
Always laminate an image before you mount it. Use a slow speed setting to assure good bonding of laminate to your print. Lamination speeds are at 1-½ to 3 on the Speed Dial. Never stop laminating in the middle of the image or a pressure line will occur. Always use a sled to guarantee even pressure. Use a pre-cut sheet or a roll of pressure sensitive over-laminate.
Place the print with the image facing up under the laminate and wrap the laminate evenly around the top roller while holding the release liner.

Coda, Inc. • 30 Industrial Avenue • Mahwah, NJ 07430 Phone: 201-825-7400 Fax: 201-825-8133 Email: [email protected] www.codamount.com Cold-Mount ® is a registered trademark of Coda Inc.
Cold-Mount® System Operation Manual January 2006
Laminating a Print with a Sheeted Laminate (continued)
Figure 22
Start the laminator while holding the release liner and run it as slow as possible. Running slow applies the pressure for a longer period of time across the entire width which will result in a better adhesion of the laminate to the print.
Be sure to hold the release liner, peeling it back slowly as the laminate is fed into the laminator. Be careful not to allow the release liner to feed into the laminator and get pinched between the rollers.
Figure 23
Coda, Inc. • 30 Industrial Avenue • Mahwah, NJ 07430 Phone: 201-825-7400 Fax: 201-825-8133 Email: [email protected] www.codamount.com Cold-Mount ® is a registered trademark of Coda Inc.
Cold-Mount® System Operation Manual January 2006
Laminating a Print with a Sheeted Laminate (continued)
Figure 24
Figure 25
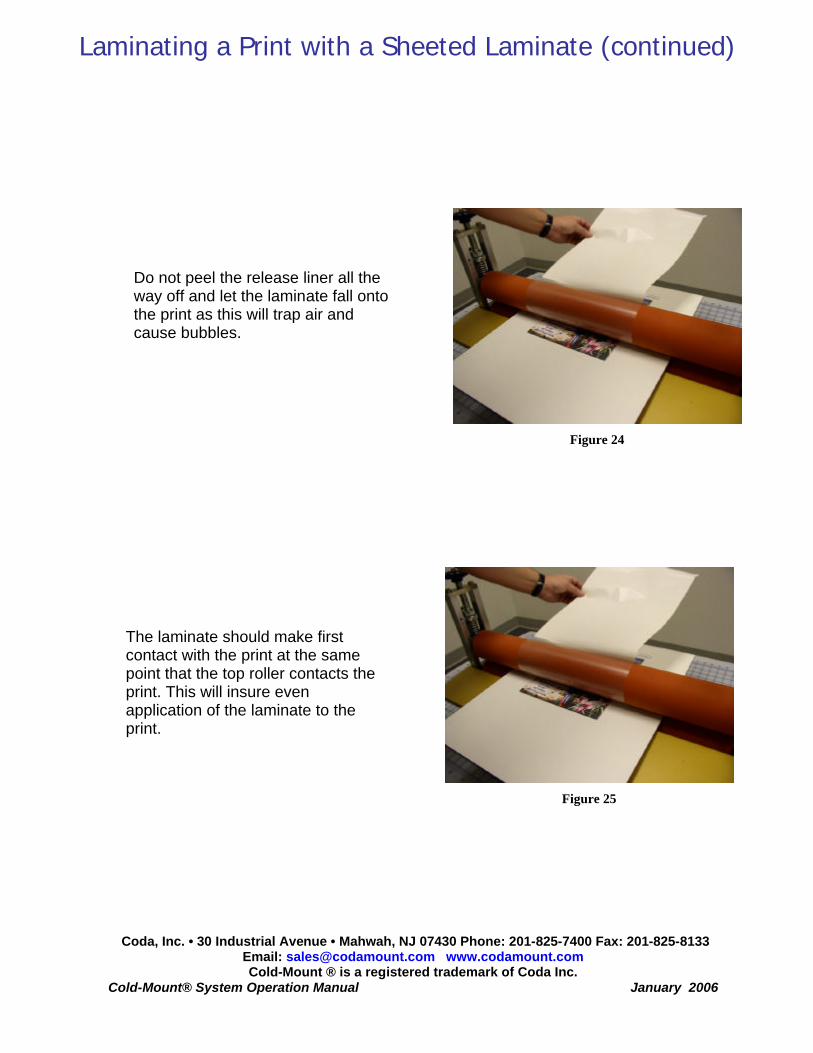
The laminate should make first contact with the print at the same point that the top roller contacts the print. This will insure even application of the laminate to the print.
Do not peel the release liner all the way off and let the laminate fall onto the print as this will trap air and cause bubbles.

Coda, Inc. • 30 Industrial Avenue • Mahwah, NJ 07430 Phone: 201-825-7400 Fax: 201-825-8133 Email: [email protected] www.codamount.com Cold-Mount ® is a registered trademark of Coda Inc.
Cold-Mount® System Operation Manual January 2006
Laminating a Print with a Sheeted Laminate (continued)
Figure 26
Figure 27
Remove the laminated print from the sled by lifting it. The print should be easy to remove as it is sticking to the release liner on the sled.
Place the image on a cutting matt and trim to size.

Coda, Inc. • 30 Industrial Avenue • Mahwah, NJ 07430 Phone: 201-825-7400 Fax: 201-825-8133 Email: [email protected] www.codamount.com Cold-Mount ® is a registered trademark of Coda Inc.
Cold-Mount® System Operation Manual January 2006
Using the Roll Feed System
The Roll Feed System can be used to apply a laminate or an adhesive. The procedure is basically the same except that when applying a laminate a slow continuous speed is required.
Figure 28
Select the material you want to apply and place it on the feed-bar. The material should unwind from the bottom of the roll with the release liner facing up.
Figure 29
Put a blank core on the take-up then position the feed-bar and take-up on the machine making sure the drive pins are properly engaged in the slots on the end of the feed-bar.

Coda, Inc. • 30 Industrial Avenue • Mahwah, NJ 07430 Phone: 201-825-7400 Fax: 201-825-8133 Email: [email protected] www.codamount.com Cold-Mount ® is a registered trademark of Coda Inc.
Cold-Mount® System Operation Manual January 2006
Using the Roll Feed System
Figure 30
Thread the material under the peel roller then separate the release liner.
Figure 31
Drape the material over the top roller and tape the release liner to the take-up core.

Coda, Inc. • 30 Industrial Avenue • Mahwah, NJ 07430 Phone: 201-825-7400 Fax: 201-825-8133 Email: [email protected] www.codamount.com Cold-Mount ® is a registered trademark of Coda Inc.
Cold-Mount® System Operation Manual January 2006
Using the Roll Feed System
Figure 32
Tighten the drag brake to create a slight tension on the feed material.
Figure 33
Tighten the clutch to create some pull on the release liner.
Coda, Inc. • 30 Industrial Avenue • Mahwah, NJ 07430 Phone: 201-825-7400 Fax: 201-825-8133 Email: [email protected] www.codamount.com Cold-Mount ® is a registered trademark of Coda Inc.
Cold-Mount® System Operation Manual January 2006
Figure 35
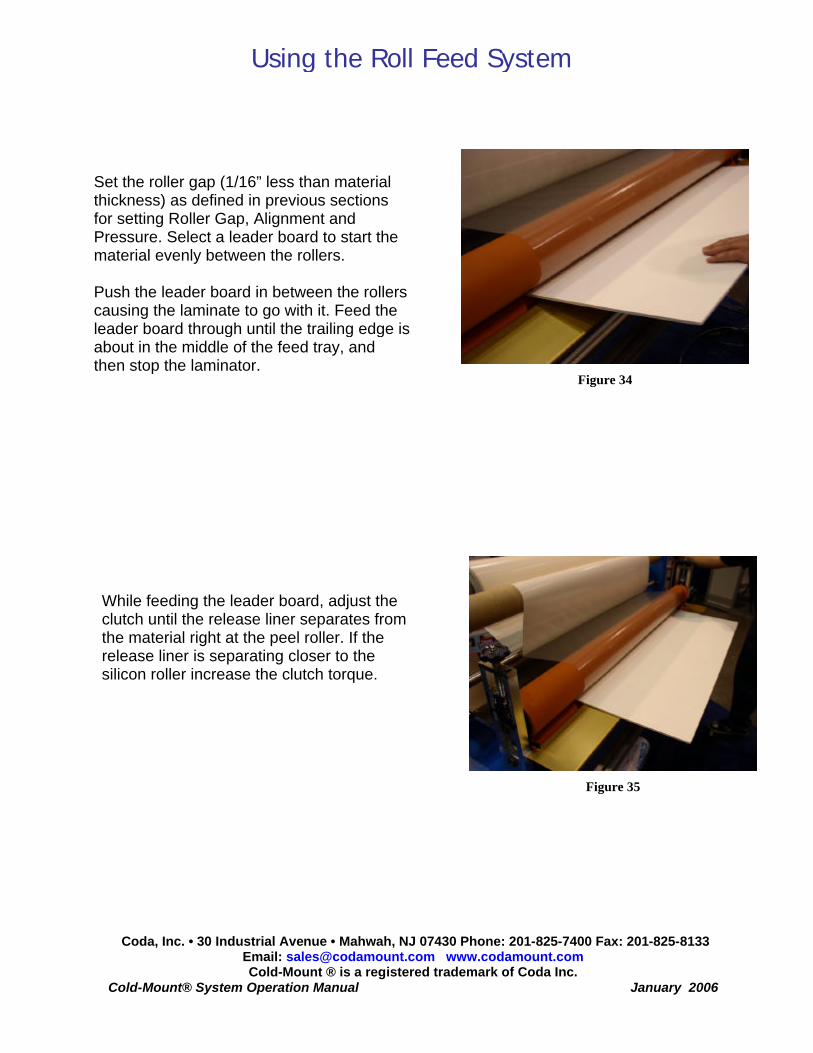
While feeding the leader board, adjust the clutch until the release liner separates from the material right at the peel roller. If the release liner is separating closer to the silicon roller increase the clutch torque.
Using the Roll Feed System
Set the roller gap (1/16” less than material thickness) as defined in previous sections for setting Roller Gap, Alignment and Pressure. Select a leader board to start the material evenly between the rollers. Push the leader board in between the rollers causing the laminate to go with it. Feed the leader board through until the trailing edge is about in the middle of the feed tray, and then stop the laminator.
Figure 34

Coda, Inc. • 30 Industrial Avenue • Mahwah, NJ 07430 Phone: 201-825-7400 Fax: 201-825-8133 Email: [email protected] www.codamount.com Cold-Mount ® is a registered trademark of Coda Inc.
Cold-Mount® System Operation Manual January 2006
Using the Roll Feed System
Figure 36
Infeed
Now place the output on the leader board then start the machine while feeding the leading edge of the output evenly into the rollers.
Slice the material along the edge of the leader board then remove the leader from the board and discard it. Place the leader board in a safe spot for future use. Continue to run the machine until the entire piece is laminated.
Figure 37
Outfeed

Coda, Inc. • 30 Industrial Avenue • Mahwah, NJ 07430 Phone: 201-825-7400 Fax: 201-825-8133 Email: [email protected] www.codamount.com Cold-Mount ® is a registered trademark of Coda Inc.
Cold-Mount® System Operation Manual January 2006
Coda Cold-Mount® System
Figure 38
The Cold-Mount® System is a system comprised of Coda’s Cold-Mount® laminator, floor stand and scrap rewind. The base is made from extruded aluminum with total-locking casters. This provides a solid, portable mounting system. In addition there is an automatic scrap rewind with tension control. This feature enables the operator to rewind the release liner hands free. It is very useful for laminating long, wide outputs such as banners and signs.
Figure 40
Laminating Roll Media
Figure 39
Media Feed Attachment

Coda, Inc. • 30 Industrial Avenue • Mahwah, NJ 07430 Phone: 201-825-7400 Fax: 201-825-8133 Email: [email protected] www.codamount.com Cold-Mount ® is a registered trademark of Coda Inc.
Cold-Mount® System Operation Manual January 2006
Coda Cold Pressure Sensitive Laminates
Figure 41
Figure 42
Coda, Inc. has a variety of roll and sheet laminates:
All laminates can be cut to your specific size requirements.
Contact Coda for an Overlam sample
pack.
• Glossy • Lustre • Matte • Canvas • E-Lam

Coda, Inc. • 30 Industrial Avenue • Mahwah, NJ 07430 Phone: 201-825-7400 Fax: 201-825-8133 Email: [email protected] www.codamount.com Cold-Mount ® is a registered trademark of Coda Inc.
Cold-Mount® System Operation Manual January 2006
Coda Mounting Adhesives
Figure 43
Figure 44
Coda’s high performance mounting adhesives are available in rolls:
• Double Release (DR) * • Single Release Clear (SR) • Single Release White • Cold-Mount 1 (CM1) • Transparency (Optically Clear)
* DR also available in cut sheets.

Coda, Inc. • 30 Industrial Avenue • Mahwah, NJ 07430 Phone: 201-825-7400 Fax: 201-825-8133 Email: [email protected] www.codamount.com Cold-Mount ® is a registered trademark of Coda Inc.
Cold-Mount® System Operation Manual January 2006
Coda Pre-Coated Boards
Figure 45
Figure 46
Coda has a wide variety of adhesive coated boards. These are high quality, popular substrates:
Finished display mounts called Stand-Outs and Mural Mounts are also available (shown above in figures 52 and 54).
Contact Coda for a board sample pack.
Figure 47
• Gatorfoam • Styrene • Codafoam • Foam Core • Hardboard • Cardboard

Coda, Inc. • 30 Industrial Avenue • Mahwah, NJ 07430 Phone: 201-825-7400 Fax: 201-825-8133 Email: [email protected] www.codamount.com Cold-Mount ® is a registered trademark of Coda Inc.
Cold-Mount® System Operation Manual January 2006
Coda Accessories
Figure 48
Figure 49
• Shortcut Safety Print Trimmer. Lengths available: 28”, 40”, 52”, and 64”. • Coda Cutting Mat (100 mil thick). Sizes available: 36” x 60” and 48” x 96”.
• Sure Clean Print Roller with a pad of roller cleaning sheets.