cmt 330 three knife trimmer installation and operator's manual · cmt 330 three knife trimmer...
TRANSCRIPT

THE CHALLENGE MACHINERY COMPANY
CMT 330
Three-Knife Trimmer Installation and Operator's Manual The Challenge Machinery Company 6125 Norton Center Drive Norton Shores, MI 49441 USA ChallengeMachinery.com
SERIAL No.: _____________
F.033B / JUL 2011

07/11
CMT 330 Three Knife Trimmer ii Contents
NOTICE Service documentation is supplied to Chal-lenge external customers for informational purposes only. Service documentation is intended for use by certified, product-trained personnel only. Challenge does not warrant or represent that such documenta-tion is complete, nor does Challenge repre-sent or warrant that it will notify or provide to such customer any future changes to this documentation. Customer performed ser-vice of equipment may affect the warranty offered by Challenge with respect to such equipment. If the customer services this equipment, modules, components or parts thereof, the customer releases Challenge from any and all liability for the customer actions, and the customer agrees to in-demnify, defend and hold Challenge harm-less from any third party claims which arise directly or indirectly from such service. Prepared by:
The Challenge Machinery Company 6125 Norton Center Drive
Norton Shores, MI 49441 USA Phone: 231.799.8484 Fax: 231.798.1275
ChallengeMachinery.com
©2002-2018 by The Challenge Machinery Company. All rights reserved.
Challenge® is a registered trademark of The Challenge Machinery Company.
07/11
CMT 330 Three Knife Trimmer iii Contents
Contents Description Page
1 Introduction 1-1 1.1 Warranty Information ................................ 1-2 1.2 Warning Label Definitions ......................... 1-3 1.3 Note Definitions ......................................... 1-3 1.4 Safety ........................................................ 1-3 1.5 Power Lockout Procedure ......................... 1-4 1.6 Packing List ............................................... 1-5 1.7 Specifications ............................................ 1-8 1.8 General Locations ...................................1-10
2 Installation Guide 2-1 2.1 Shipping Claims ........................................ 2-2 2.2 Unpacking ................................................. 2-2 2.3 Moving ....................................................... 2-2 2.4 Option Setup ............................................. 2-2 2.5 Power Hookup........................................... 2-8 2.6 Air Hookup ..............................................2-10 2.7 Cleaning ..................................................2-10
3 Operator's Guide 3-1 3.1 Programming ............................................. 3-2 3.2 User Interface Map ................................... 3-5 3.3 Power up ................................................... 3-6 3.4 Improper Wiring......................................... 3-6 3.5 Run Mode .................................................. 3-6 3.6 Job Mode .................................................. 3-7 3.7 Status Messages.....................................3-10 3.8 Example Job ...........................................3-13 3.9 Serial Communication .............................3-15
4 Routine Tasks 4-1 4.1 Under Book Air Blast ................................. 4-2 4.2 Waste Bins ................................................ 4-2 4.3 Cut Stick / Cut Plates ................................ 4-3 4.4 Knives ....................................................... 4-4 4.5 Check Pressure Switch ............................. 4-9 4.6 Safety Systems Check .............................. 4-9
5 Book Quality 5-1 5.1 Burr Marks ................................................. 5-2 5.2 Jagged Bottom Cover ............................... 5-2 5.3 Burr Marks/Jagged Cover ......................... 5-2 5.4 Rectangular Crease Lines ........................ 5-3
5.5 Linear Crease Lines ................................. 5-3 5.6 Draw ......................................................... 5-3 5.7 All Sheets Not Cut .................................... 5-4 5.8 Book Not Square ...................................... 5-4

07/11
CMT 330 Three Knife Trimmer iv Contents
Notes:
07/11
CMT 330 Three Knife Trimmer 1-1 Introduction
Section Contents
TITLE PAGE 1.1 Warranty Information ................................ 1-2 1.2 Warning Label Definitions ......................... 1-3 1.3 Note Definitions ......................................... 1-3 1.4 Safety ........................................................ 1-3 1.5 Power Lockout Procedure ......................... 1-4 1.6 Packing List ............................................... 1-5
1.6.1 Basic Machine/Options ....................... 1-5 1.6.2 Standard Accessories ........................ 1-6 1.6.3 Optional Items .................................... 1-7 1.6.4 Consumables...................................... 1-7
1.7 Specifications ............................................ 1-8 1.7.1 Book Size Chart ................................. 1-9
1.8 General Locations ...................................1-10 1.8.1 Front Views ....................................... 1-10 1.8.2 Back View ......................................... 1-11 1.8.3 Exit Conveyor ................................... 1-12 1.8.4 Tilt In-feed Conveyor ........................ 1-13 1.8.5 Elevator ............................................ 1-14 1.8.6 Site Specifications ............................ 1-15
Introduction
The introduction section of this manual is in-tended to provide installers and operators with basic information. Safety recommendations are made, and machine options and specifications are listed.
1 Introduction
07/11
CMT 330 Three Knife Trimmer 1-2 Warranty Information
1.1 Warranty Information
READ THIS MANUAL BEFORE OPERATING! Follow all precautions and instructions. For parts and service contact the Authorized Chal-lenge Dealer from whom the machine was pur-chased. Always give the SERIAL NUMBER and MODEL of your machine to ensure the cor-rect parts are sent.
* WARRANTY INFORMATION *
PLEASE REVIEW THE ENCLOSED WARRANTY INFORMATION SHEET
It is very important that you read and under-stand the conditions outlined in the Warranty Information Sheet attached to the outside of the shipping container of your machine. The War-ranty Information Sheet must be filled out com-pletely and returned to THE CHALLENGE MACHINERY COMPANY in order for the war-
ranty to be issued for this machine.
NOTICE: Failure to use dry, non-lubricated compressed air that meets or exceeds the re-quirements given in Section 2.6 may cause damage to the machine and will result in THE WARRANTY BEING VOIDED.
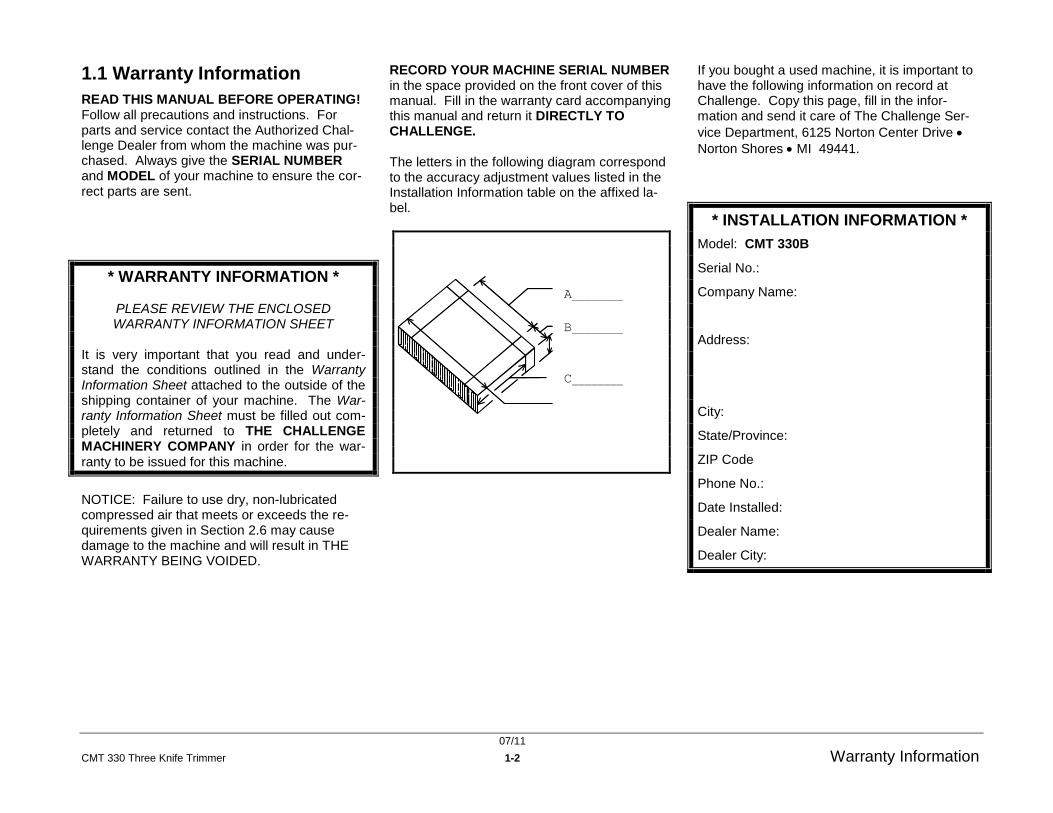
RECORD YOUR MACHINE SERIAL NUMBER in the space provided on the front cover of this manual. Fill in the warranty card accompanying this manual and return it DIRECTLY TO CHALLENGE. The letters in the following diagram correspond to the accuracy adjustment values listed in the Installation Information table on the affixed la-bel.
A________
B________
C________
If you bought a used machine, it is important to have the following information on record at Challenge. Copy this page, fill in the infor-mation and send it care of The Challenge Ser-
vice Department, 6125 Norton Center Drive
Norton Shores MI 49441.
* INSTALLATION INFORMATION *
Model: CMT 330B
Serial No.:
Company Name:
Address:
City:
State/Province:
ZIP Code
Phone No.:
Date Installed:
Dealer Name:
Dealer City:

07/11
CMT 330 Three Knife Trimmer 1-3 Warning Label Definitions
1.2 Warning Label Definitions
Warning labels are posted throughout the ma-chine to indicate areas where physical injury may occur.
Read the instruction manual. The instruction manual should be read and understood before operat-ing this machine.
Do not operate with more than one person! One person only should operate this machine at a time.
Cut / Crush Hazard! Do not operate with covers re-moved. Do not disable safety devices.
Crush Hazard! Do not operate with covers re-moved. Do not disable safety devices.
Crush / Entanglement Hazard! Do not operate with covers or guards removed.
Electrical Shock Hazard! Disconnect power before removing cover.
Electrical Shock Hazard! Disconnect power before removing cover.
1.3 Note Definitions
The formats of three specific types of notes found throughout this manual indicate the level of danger or importance associated with the task presented. The format of warning notes, caution notes, and regular notes imply a certain level of danger. The following examples give a description. Associate the text format with its level of danger or importance.
Warning Definition:
WARNING A warning indicates an operating or maintenance pro-cedure, practice, or condition that, if not strictly ob-served, could result in injury or loss of life.
Caution Definition:
CAUTION A Caution indicates an operating or maintenance procedure, practice, or condition that, if not strictly observed could re-sult in damage to, or destruction of, equipment.
Note Definition:
Note: A regular note indicates an operating or maintenance procedure, practice, or condition that is necessary to ac-complish a task efficiently.
1.4 Safety
Before installing or operating any equipment, it is important to take precautions. Read and thoroughly understand the safety precautions outlined below.
This machine is designed for one-person operation. Never operate the machine with more than one person.
Safe use of this machine is the respon-sibility of the operator. Use good judg-ment and common sense when working with and around the machine and its accessories.
Read and understand all instructions thoroughly before using the machine. If questions remain, contact your Author-ized Challenge Dealer. Failure to un-derstand the operating instructions may result in personal injury.
Only trained and authorized individuals should operate this machine.
Only trained and authorized service technicians should service this ma-chine.
Do not alter safety guards or devices. They are there for your protection. Se-vere laceration or dismemberment may result if safety devices are altered.
Disconnect power and lock out before performing any maintenance. See Sec-tion 1.5 , Power Lockout Procedure.
Observe all caution and instruction la-bels on this machine.
Be extremely careful when handling and changing knives. Severe lacera-tions or dismemberment could result from careless handling procedures.
Perform the Safety Systems Check giv-en on page 4-9 before each shift be-gins.

07/11
CMT 330 Three Knife Trimmer 1-4 Power Lockout Procedure
Keep all conveyors and elevator acces-sories clear of foreign objects. Do not manually place foreign objects within the machine. Cutting anything other than qualifying perfect bound books could result in serious damage to the machine and create safety hazards. A qualifying perfect bound book will fall in-to the size range described in the speci-fications on page 1-8.
Make sure all applicable accessories are securely bolted to the main ma-chine. Tip hazards may result from un-secured accessories.
If the machine operates abnormally, consult a Challenge authorized service agent.
1.5 Power Lockout Procedure
For maximum safety while making ADJUSTMENTS or REPAIRS to your machine, lock out the main power disconnect switch. The switch should be moved to the OFF position and a padlock securely fastened through the loop. The person adjusting or servicing the ma-chine should hold the key.
Figure 1-1. Main Power Disconnect
07/11
CMT 330 Three Knife Trimmer 1-5 Packing List
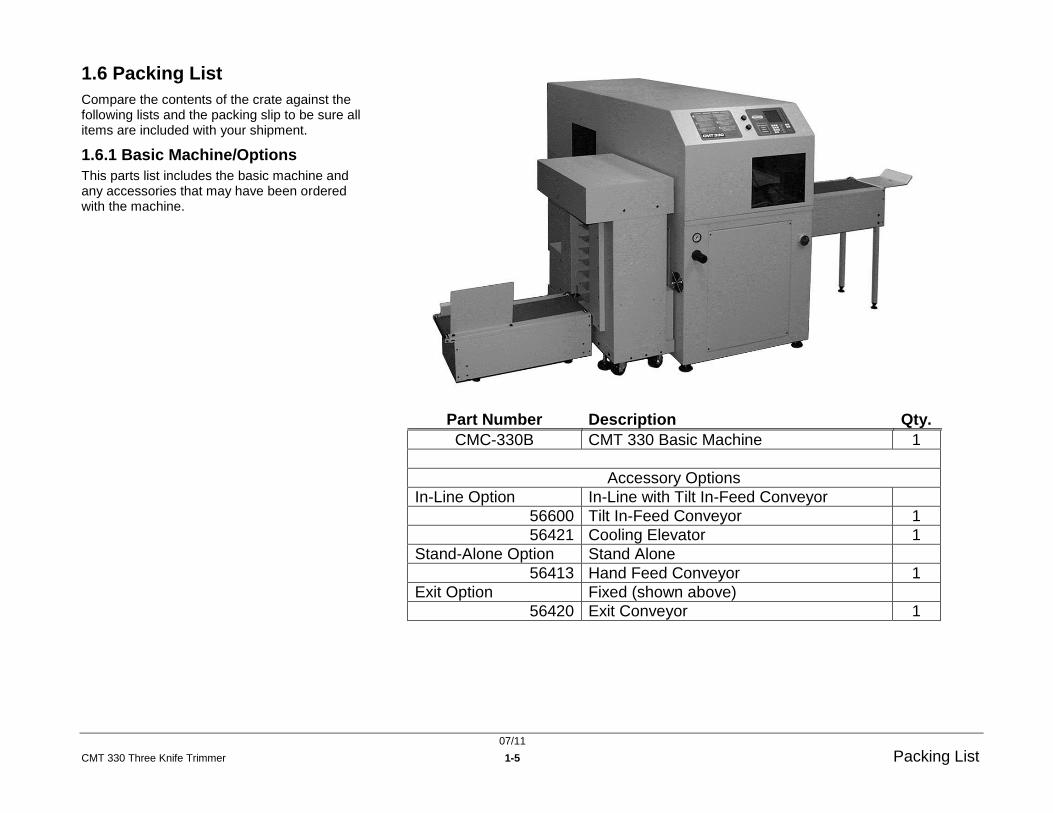
1.6 Packing List
Compare the contents of the crate against the following lists and the packing slip to be sure all items are included with your shipment.
1.6.1 Basic Machine/Options
This parts list includes the basic machine and any accessories that may have been ordered with the machine.
Part Number Description Qty.
CMC-330B CMT 330 Basic Machine 1
Accessory Options
In-Line Option In-Line with Tilt In-Feed Conveyor
56600 Tilt In-Feed Conveyor 1
56421 Cooling Elevator 1
Stand-Alone Option Stand Alone
56413 Hand Feed Conveyor 1
Exit Option Fixed (shown above)
56420 Exit Conveyor 1

07/11
CMT 330 Three Knife Trimmer 1-6 Packing List
1.6.2 Standard Accessories
The following list contains pre-installed, stand-ard accessories for the CMT 330.
Item Part Number Description Qty.
1 5064 Cut Stick Puller 1
2 56028 Knife Lifter 1
3 56143 Waste Bin 3
4 56246 HSS Knife Set (scabbard not shown) 2
5 56303 Cut Stick 1
6 56305 Cut Plate 2
7 H-6910-605 Knife Bolt- 3/8-16 x 5/8 BHCS 18
8 W-180 7/32" T-Handle Hex Wrench 1
07/11
CMT 330 Three Knife Trimmer 1-7 Packing List
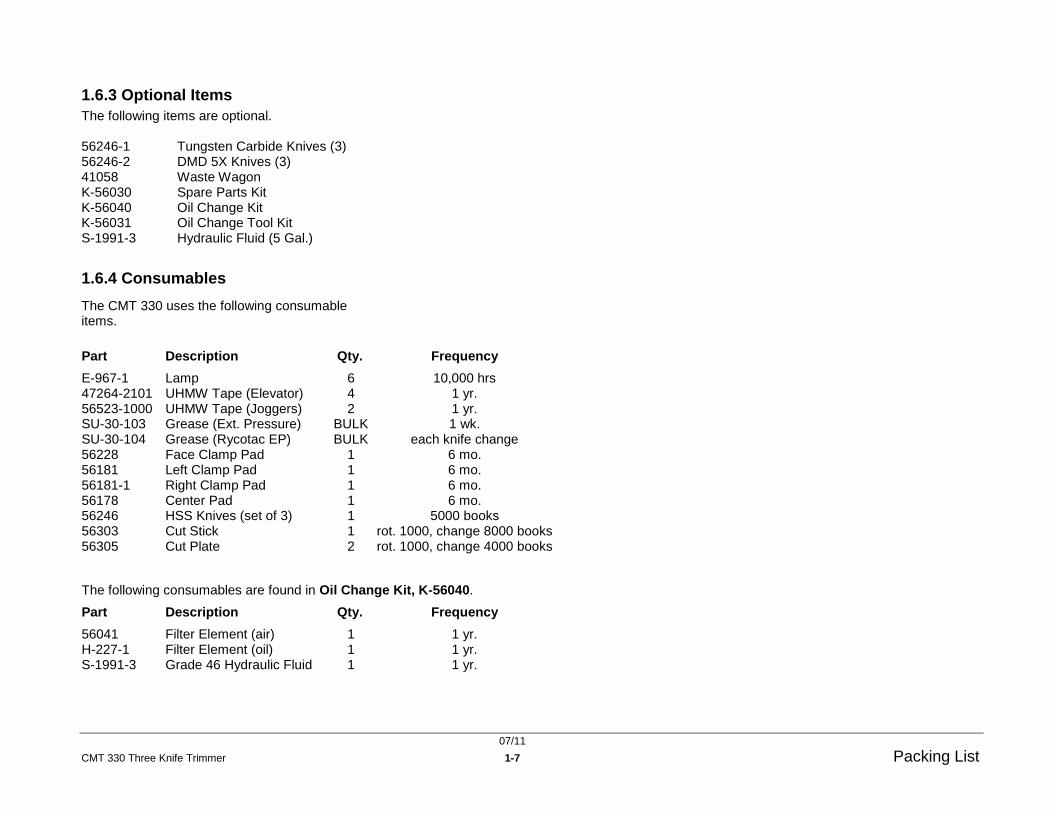
Part Description Qty. Frequency
E-967-1 Lamp 6 10,000 hrs 47264-2101 UHMW Tape (Elevator) 4 1 yr. 56523-1000 UHMW Tape (Joggers) 2 1 yr. SU-30-103 Grease (Ext. Pressure) BULK 1 wk. SU-30-104 Grease (Rycotac EP) BULK each knife change 56228 Face Clamp Pad 1 6 mo. 56181 Left Clamp Pad 1 6 mo. 56181-1 Right Clamp Pad 1 6 mo. 56178 Center Pad 1 6 mo. 56246 HSS Knives (set of 3) 1 5000 books 56303 Cut Stick 1 rot. 1000, change 8000 books 56305 Cut Plate 2 rot. 1000, change 4000 books
The following consumables are found in Oil Change Kit, K-56040.
Part Description Qty. Frequency
56041 Filter Element (air) 1 1 yr. H-227-1 Filter Element (oil) 1 1 yr. S-1991-3 Grade 46 Hydraulic Fluid 1 1 yr.
1.6.3 Optional Items
The following items are optional. 56246-1 Tungsten Carbide Knives (3) 56246-2 DMD 5X Knives (3) 41058 Waste Wagon K-56030 Spare Parts Kit K-56040 Oil Change Kit K-56031 Oil Change Tool Kit S-1991-3 Hydraulic Fluid (5 Gal.)
1.6.4 Consumables
The CMT 330 uses the following consumable items.

07/11
CMT 330 Three Knife Trimmer 1-8 Specifications
1.7 Specifications
WARNING The CMT 330 was designed specifically for use with the Challenge in-feed and exit accessories listed in this table. If any other accessories are used, it is the pur-chaser's responsibility to comply with ANSI B65.4 Safe-ty Standard for Three-knife Trimmers. Failure to com-ply with this standard could result in personal injury or death.
CAUTION The CMT 330 was specifically designed to trim perfect bound books only. Trimming other materials with the CMT 330 may result in safety hazards or damage to the machine.
For trimmable book sizes, see section 1.7.1 . See manuals F.501 and F.502, for specifica-tions for the Book Pile Feeder and the Vertical Stacker. Multiple Book Mode: Note that up to 3 books may be stacked in multiple book mode. The total thickness is not to exceed 1-1/4 in. (32 mm). Larger pile thicknesses may be cut, but the trim may be less accurate and more out-of-square. Always test before running books out-side the published specifications. Sound Emission: A-weighted sound pressure level measured in an enclosed room at operator level (6 feet/183 cm): Machine in idle state: 60 dB Machine trimming: 74 dB NOTE: Challenge reserves the right to make changes to any product or specification without notice and without in-curring responsibility to existing units.
Description US Units Metric Units
Perfect bound books only
Max. start book 13 (spine) x 9.5 in. 330 (spine) x 241 mm
Min. start book (bottom cover) 7 (spine) x 6.75 in. 177.8 (spine) x 171.4 mm
Min. start book (w/feeder) 7 (spine) x 6.75 in. (single book mode) 7 x 7 in. (multi-book mode)
177.8 (spine) x 171.4 mm 177.8 x 177.8 mm
Min. finish book 5.82 (spine) x 4 in. 147.8 (spine) x 101.6 mm
Max. face trim (fore-edge) 5.5 in. 140mm
Book thickness range 0.048-2.000 in. 1.22-50.8 mm
Min. Trim 0.125 in. 3.2 mm
CMT 330 Basic Machine
Width 34.5 in. 876 mm
Depth 84 in. 2134 mm
Height 61 in 1549 mm
Net Weight 2540 lb. 1140 kg
Shipping Weight 2850 lb. 1300 kg
Floor Loading 60 PSI 4.2 kg/cm2
Waste Bin Capacity 3 @ 14.75 gal. per bin 3 @ 55.8 L per bin
Oil Capacity 5 gal. 19 L
Air Consumption 5 CFM @ 80 PSI 142 LPM @ 5.5 Bar
Knife Re-grind 1/4 in. 6.4 mm
60 Hz Requirements 208/230 V, 20 A, 3 phase
50 Hz Requirements 380/415 V, 10 kW, 3 phase, 12 A
Memory 99 jobs
Time to change book size 15 sec.
Throughput up to 400 books/hr.
56420 Exit Conveyor (85 lb/39 kg net) (210 lb/95 kg ship) (6.76 PSI/.48 kg/cm2 load)
Depth 12.14 in. 308.4 mm
Width 47 in. 1194 mm
Height 39.5 in. 1003 mm
56421 Cooling Elevator (335 lb/152 kg net) (470 lb/214 kg ship) (11.86 PSI/.83 kg/cm2 load)
Depth 21.5 in. 546 mm
Width 37.03 in. 941 mm
Height 45.5 in. 1156 mm
56600 Tilt In-feed Conveyor (150 lb/68 kg net) (230 lb/105 kg ship) (5.62 PSI/.40 kg/cm2 load)
Depth 28.62 in. 727 mm
Width 39.38 in. 1000 mm
Height 26 in. 660 mm
Mates w/ binder @ exit heights
17.5-25.5 in. 445-648 mm

07/11
CMT 330 Three Knife Trimmer 1-9 Specifications
1.7.1 Book Size Chart
The physical parts of a book are defined as fol-lows and will be referenced as such throughout this manual. Book dimensions are referenced as (spine length) X (top or bottom edge length). Spine: The edge of a book where the pages are bound together. Top edge: Also know as the head, the top edge is the edge of the book that is facing away from the reader. Bottom edge: Also known as the foot, the bot-tom edge is the edge of the book that is facing toward the reader. Face: The face or fore-edge is the edge of the book from which it is opened. Book block: A book block is the printed and collated form of a book that does not include the cover. It contains all front and end matter as well as the text block. Untrimmed book: An untrimmed book is a book block that has been bound with a cover but has not yet been trimmed to finish size. Trimmed book: A trimmed book has been bound and trimmed to a finish size. Figure 1-2 can be used to determine if a specific book layout can be trimmed using the CMT 330. From Error! Reference source not found., see that (x) is the bottom trim and (h) is the height of the book. The book size must fall within the shaded region of the chart but never exactly on the sloped line. The CMT 330 software will not allow a book to be cut outside this range. The operator should
be aware of these size constraints before books are printed. The CMT 330 will not allow only one top or bottom edge to be trimmed.
Figure 1-2. Trimmable Book Sizes
Figure 1-3 CMT 330B Throughput Chart

07/11
CMT 330 Three Knife Trimmer 1-10 General Locations
1.8 General Locations
Become familiar with general machine loca-tions. This manual frequently refers to these locations. In order to understand the instruc-tions presented, it is necessary to have a work-ing knowledge of machine locations.
Note: The word "rear" refers to the general direction closer to the back end of the machine. "Back" refers only to the backside of the machine.
1.8.1 Front Views
The front views shown in Figure 1-4 and Figure 1-5 locate the front, back, right, and left sides of the machine. Remember these references while reading instructions in this manual. Refer back to these figures as necessary. Figure 1-4. Right Front View
Figure 1-5. Left Front View

07/11
CMT 330 Three Knife Trimmer 1-11 General Locations
1.8.2 Back View
Important locations at the back of the machine are shown in Figure 1-6.
Figure 1-6. Back View

07/11
CMT 330 Three Knife Trimmer 1-12 General Locations
1.8.3 Exit Conveyor
Part Number: 56420 Important locations are shown in Figure 1-7.
Figure 1-7. Exit Conveyor Locations

07/11
CMT 330 Three Knife Trimmer 1-13 General Locations
1.8.4 Tilt In-feed Conveyor
Part No.: 56600 Important locations are shown in Figure 1-8.
Figure 1-8. Tilt In-feed Conveyor

07/11
CMT 330 Three Knife Trimmer 1-14 General Locations
1.8.5 Elevator
Part Number: 56421 Important locations are shown in Figure 1-9.
Figure 1-9. Elevator Locations

07/11
CMT 330 Three Knife Trimmer 1-15 General Locations
1.8.6 Site Specifications
The installation site must have adequate space and utilities to support the trimmer with its setup options. It requires a supply of compressed air and electricity. Refer to section 1.7 Specifica-tions on page 1-8 to verify that the site can ac-commodate these requirements. Use the fol-lowing figures to determine floor space require-ments for the option to be installed. 1.8.6.1 In-Line Option
This In-Line option is used when automated transport of books from a binder to the trimmer is required and book size changes are frequent. It includes the CMT 330 basic machine, two conveyors, and an elevator. See Figure 1-10 for space requirements. Note the locations of the air and power hook-up locations. Air and power lines should be dropped from the ceiling in order to have clear access to the waste bins using a rolling cart.
Figure 1-10. In-Line Option 2
07/11
CMT 330 Three Knife Trimmer 1-16 General Locations
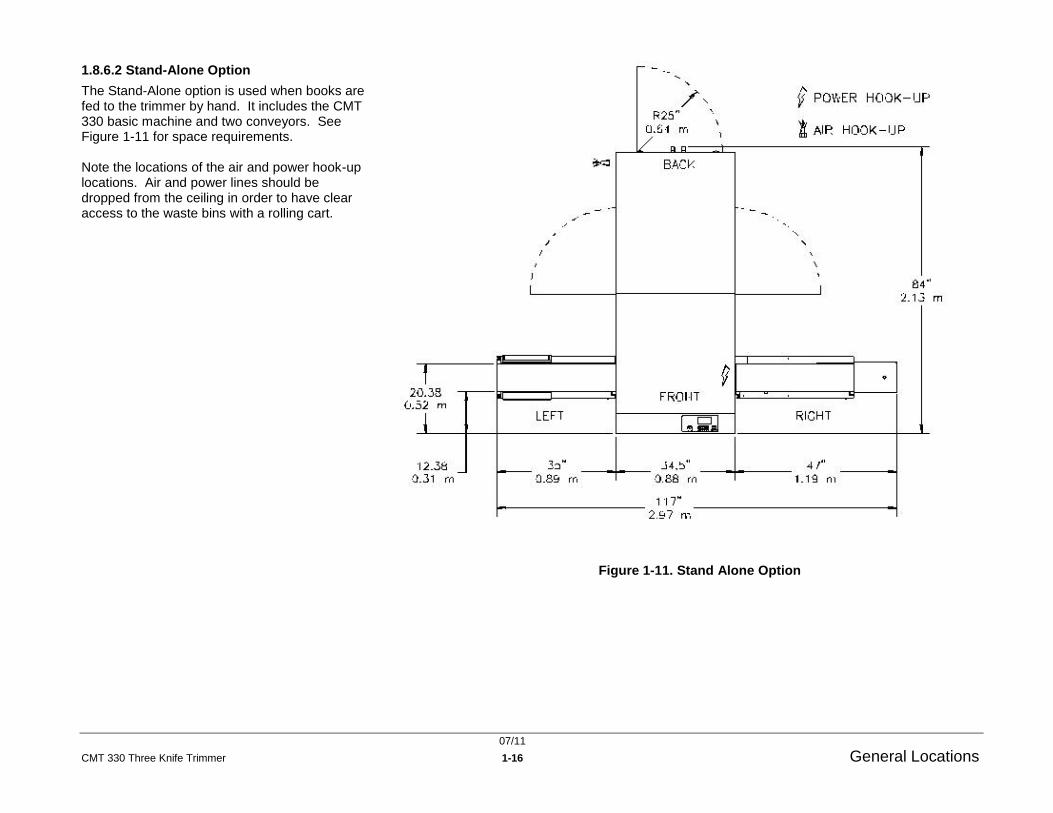
1.8.6.2 Stand-Alone Option
The Stand-Alone option is used when books are fed to the trimmer by hand. It includes the CMT 330 basic machine and two conveyors. See Figure 1-11 for space requirements. Note the locations of the air and power hook-up locations. Air and power lines should be dropped from the ceiling in order to have clear access to the waste bins with a rolling cart.
Figure 1-11. Stand Alone Option

07/11
CMT 330 Three Knife Trimmer 2-1 Installation Guide
Section Contents
TITLE PAGE 2.1 Shipping Claims ........................................ 2-2 2.2 Unpacking ................................................. 2-2 2.3 Moving ....................................................... 2-2 2.4 Option Setup ............................................. 2-2
2.4.1 In-Line Option ..................................... 2-3 2.4.2 Stand-Alone Option ............................ 2-7
2.5 Power Hookup........................................... 2-8 2.5.1 Power Hookup Procedure .................. 2-8
2.6 Air Hookup ..............................................2-10 2.7 Cleaning ..................................................2-10
Introduction
The installation guide provides information and instructions essential to the proper setup of each of the CMT 330 and its accessory options. These applications include one option for In-Line operation and one option for Stand-Alone operation.
2 Installation Guide

07/11
CMT 330 Three Knife Trimmer 2-2 Shipping Claims
2.1 Shipping Claims
The CMT 330 has been packed to prevent damage during shipment. Claims for damage or loss are the responsibility of the recipient. Inspect all shipments as soon as they are re-ceived. If there is any noticeable damage, note it on the freight bill. Visual and/or hidden dam-age must be reported to the claims department of the carrier within 15 days. Contact your dealer if you need any assistance. Check the contents of the crate against both the packing list on page 1-5 and the freight bill. Make sure there are no missing items.
2.2 Unpacking
Remove the packing materials and four lag bolts. One lag bolt is located in the frame, be-hind each of the lower side doors as shown in Figure 2-1.
Figure 2-1. Lag Bolt Locations
Remove Lag Bolts
1. Remove four screws from each of the two front side doors using a 1/8" hex wrench.
2. Using a 9/16" open-ended wrench, re-move the lag bolts from the two front lo-cations shown in Figure 2-1.
3. Pull open the two lower rear doors and remove the waste bins.
4. Remove the two lag bolts from the two rear locations shown in Figure 2-1.
5. Reinstall the waste bins and close the rear doors.
6. Reinstall the two front side doors.
Use a forklift to remove the machine from the skid and place it as close as possible to its in-stallation location. The machine has accessory power cables and air hoses wrapped-up and placed inside the machine. Be careful not to pinch or entangle these in the forks while lifting.
Figure 2-2. Fork Location for Lifting
2.3 Moving
Once the machine is near its final location, it can be rolled into place.
WARNING Do not roll on a graded surface. Roll only on a flat sur-face. Personal injury could result.
It may be necessary to raise the six leveling pads in order to roll the machine. A pad is lo-cated under each corner of the machine. Each of the remaining two pads is located under the middle of each side of the machine. Using ei-ther a 3/4" open-ended wrench or an adjustable wrench, turn the leveling pad counterclockwise to raise it.
Figure 2-3. Leveling Pads
Push the CMT 330 into position. Do not lower the leveling pads at this time. Its final position may require slight adjustment depending upon the setup.
2.4 Option Setup
The CMT 330 can be used either In-Line with a perfect binder or as a Stand-Alone three knife trimmer. The following table lists the accesso-ries required for each application. In-Line option: 56600 Tilt In-feed Conveyor 56421 Cooling Elevator 56420 Exit Conveyor Stand-Alone option:
56413 Hand-feed Conveyor 56420 Exit Conveyor
07/11
CMT 330 Three Knife Trimmer 2-3 Option Setup
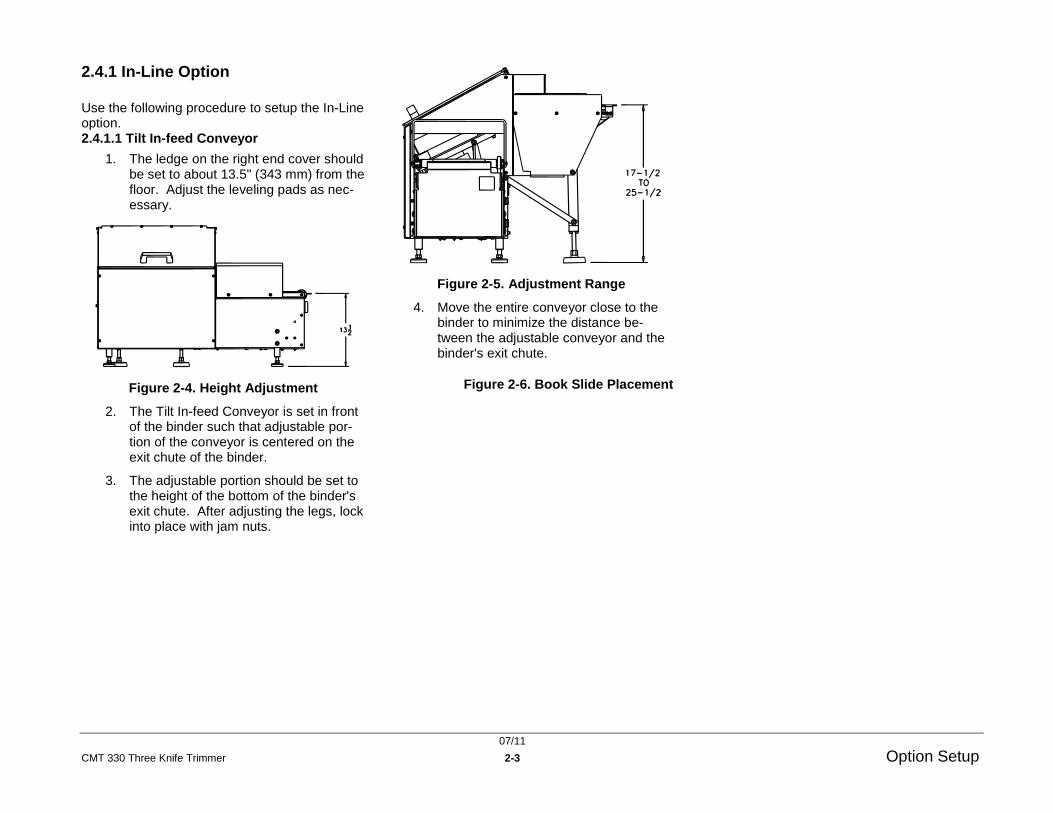
2.4.1 In-Line Option
Use the following procedure to setup the In-Line option. 2.4.1.1 Tilt In-feed Conveyor
1. The ledge on the right end cover should be set to about 13.5" (343 mm) from the floor. Adjust the leveling pads as nec-essary.
Figure 2-4. Height Adjustment
2. The Tilt In-feed Conveyor is set in front of the binder such that adjustable por-tion of the conveyor is centered on the exit chute of the binder.
3. The adjustable portion should be set to the height of the bottom of the binder's exit chute. After adjusting the legs, lock into place with jam nuts.
Figure 2-5. Adjustment Range
4. Move the entire conveyor close to the binder to minimize the distance be-tween the adjustable conveyor and the binder's exit chute.
Figure 2-6. Book Slide Placement

07/11
CMT 330 Three Knife Trimmer 2-4 Option Setup
2.4.1.2 Elevator
1. The top shelf should be 36" (914 mm) from the floor as shown in Figure 2-9. Adjust the leveling pads as necessary.
2. Align the elevator with the in-feed con-veyor by sliding the opening of the clear plastic cover over the in-feed convey-or's plastic cover.
Figure 2-7. Elevator Placement
2.4.1.3 Trimmer
1. Install the scanner bracket onto the left front door of the trimmer. Make sure the top of the bracket is flush with the trimmer's in-feed conveyor belt.
2. Remove the lower front door of the trimmer and locate the loose photoelec-tric sensor. Remove the nuts from the sensor and push the sensor through the split cap bushing in the left side of the trimmer's base. Attach the sensor as shown in Figure 2-8. Attach the option-al bar code scanner and sensor if appli-cable.
Figure 2-8. Scanner Bracket Installation
3. Remove the two sets of screws and washers from the holes in the right side of the top cover of the elevator (Figure 2-9). Save them for later use.
4. Move the trimmer next to the elevator such that the two holes in the right side of the top cover of the elevator (Figure 2-9) line up with the two slots on the left side of the trimmer's sheet metal enclo-sure.
5. Adjust the trimmer's leveling pads such that the top of the table is 36" (914mm) off the floor. Raise the two pads at the center of the machine.
Figure 2-9. Elevator Mounting
6. Open the trimmer's front door and use a level on the table inside the machine. Level the front end of the machine by adjusting the leveling pads. Keep the final table height at 36".
7. Open the rear doors and repeat step 4 on the rear end of the machine.
8. Check the front end of the machine with the level to make sure the front is still level. Adjust as necessary.
9. After leveling the machine, lower the two pads at the center of the machine.
10. Lock all (6) leveling pads in place by tightening the jam nuts against the in-side of the machine's base as in Figure 2-10. The nuts are accessed from in-side the machine.

07/11
CMT 330 Three Knife Trimmer 2-5 Option Setup
Figure 2-10. Tighten Jam Nuts
11. Align the two long slots in the trimmer's enclosure with the two mounting holes in the top cover of the elevator.
12. Using the hardware removed in step 1, reach through the trimmer's front door and fasten the trimmer to the elevator.
13. Connect shop air to the port at the rear of the trimmer. Refer to 2.6

07/11
CMT 330 Three Knife Trimmer 2-6 Option Setup
Air Hookup on page 2-10.
At this point, the setup should look like Fig-ure 2-11.
Figure 2-11. Current Progress
2.4.1.4 Exit Conveyor
Before proceeding, go to Section 2.5 Power Hookup on page 2-8. Main power must be con-nected to the machine before proceeding.
1. Remove (4) sets of screws and wash-ers from the power panel door of the Trimmer. Save them for later use.
2. Make sure the exit conveyor's leveling pads are set to 33-7/8" as shown in Figure 2-12. Adjust as necessary.
Figure 2-12. Exit Conveyor Leveling Pads
3. Move the exit conveyor to the right-hand side of the trimmer such that the slots in the conveyor mounting brackets line up with the holes in the power pan-el door as shown in Figure 2-13.
4. Fasten the conveyor to the trimmer us-ing the hardware from step 1.
Figure 2-13. Exit Conveyor Placement
The completed setup should look like Figure 2-14. The accessory cables and hoses can now be connected to the trimmer.
Figure 2-14. Completed Setup
2.4.1.5 Hookup Accessory Cables
Power cables must now be connected to each conveyor. Two air hoses and one power cable must also be connected to the elevator. Access the cables and hoses stored inside the machine through the front door.

07/11
CMT 330 Three Knife Trimmer 2-7 Option Setup
In-feed Conveyor
1. Unwrap the two cables labeled In-feed Conveyor.
2. Route the cable behind the hydraulic power unit and under the left-hand side of the machine base.
3. Connect the cables to the sockets on the backside of the in-feed conveyor. Lock into place by threading the con-nector collar onto the socket.
4. Connect the yellow cable from the Cool-ing Elevator to the in-feed conveyor.
5. If the Tilt In-feed Conveyor is being used, connect the air hose with the red cap to the port on the conveyor. Also,
Cooling Elevator
1. Unwrap the cable labeled Cooling Ele-vator.
2. Route the cable behind the hydraulic power unit and under the left-hand side of the machine base.
3. Connect the cable to the socket on the backside of the elevator. Lock into place by threading the connector collar onto the socket.
4. Unwrap the two coiled hoses with quick disconnect fittings that have yellow and black caps. Route them with the cable from step 3.
5. Push the hose connector with the black cap into the fitting on the elevator with black label above it.
6. Push the hose connector with the yel-low cap into the fitting on the elevator with yellow label above it.
Exit Conveyor
1. Unwrap the cable labeled Exit Convey-or.
2. Route the cable under the power panel enclosure and out the right-hand side of the trimmer base.
3. Connect the cable to the socket on the backside of exit conveyor. Lock into place by threading the connector collar onto the socket.
2.4.2 Stand-Alone Option
This option uses the hand-feed conveyor and exit conveyor options to make the CMT 330 a Stand-Alone trimmer. The gate opening in the hand-feed conveyor is set slightly larger than the thickness of books to be cut. Books are stacked onto the conveyor. The conveyor feeds them into the trimmer where they are cut. Finally, the books are de-livered to exit conveyor where they are shingled out as necessary. Follow these steps to setup the Stand-Alone option. 2.4.2.1 Trimmer
1. Make sure there is adequate floor space for this setup. Figure 2-15 illus-trates how much space this setup will require.
2. Move the trimmer to the appropriate lo-cation.
3. Complete steps 5-10, and 13 in sec-tion2.4.1.3 on page 2-4.
4. Complete section 2.5 Power Hookup on page 2-8.
Figure 2-15. Stand Alone Space Claim
2.4.2.2 Exit Conveyor
Complete section 2.4.1.4 Exit Conveyor on page 2-6. 2.4.2.3 Hand Feed Conveyor
1. Remove (4) sets of screws and wash-ers fastened to the center of the door on the left-hand side of the trimmer as shown in Figure 2-17. Save them for later use.
2. Make sure the hand-feed conveyor's leveling pads are set at 1-1/2" as shown in Figure 2-16.
Figure 2-16. Hand-feed Leveling Pads

07/11
CMT 330 Three Knife Trimmer 2-8 Power Hookup
3. Move the hand-feed conveyor to the left-hand side of the trimmer such that the slots in the conveyor mounting brackets line up with the holes in the Trimmer's left-hand door as shown in Figure 2-17 and Figure 2-18.
Figure 2-17. Hand Feed Mounting
Figure 2-18. Stand Alone Application
4. Fasten the conveyor to the trimmer us-ing the hardware from step 1.
2.4.2.4 Hookup Accessory Cables
Power cables must now be connected to each conveyor. Remove the lower front door from the trimmer to access the cables and hoses stored inside the machine.
Hand Feed Conveyor
1. Unwrap the cable labeled In-feed Con-veyor.
2. Route the cable behind the hydraulic power unit and under the left-hand side of the machine base.
3. Connect the cable to the socket on the backside of Hand-feed Conveyor. Lock into place by threading the connector collar onto the socket.
Exit Conveyor
To setup the exit conveyor, follow the instruc-tions in section 2.4.2.4 Hookup Accessory Ca-bles / Exit Conveyor on page 2-7.
2.5 Power Hookup
This section describes how to hookup main power to the CMT 330. An adequate power supply must be provided to the machine. See section 1.7 Specifications on page 1-8 for pow-er requirements. It should be on its own circuit with a lockable, disconnect switch. Too many machines on the same circuit will reduce power to each machine. Insufficient voltage may cause overheating, loss of cutting/clamping force, and in extreme cases, failure to operate. Test the line voltage when the shop is at actual working levels. The following table lists recommended wire siz-es for different voltage options. If a wire is run
over 75 feet (23 meters), the next size wire should be used.
Recommended Wire Sizes for Main Power Hookup
V
Circuit Size A
Wire Size # AWG
Metric Wire mm2
380/415 15 12 2.5
230 30 10 4
208 30 10 4
2.5.1 Power Hookup Procedure
The following procedure describes how to hookup main power to the CMT 330. After power is hooked up, running the machine will verify if wires are correctly connected to the terminal block on the power panel.
WARNING Shock Hazard! Always disconnect power at main dis-connect switch before working on the trimmer. Lock it out to prevent accidental power up. See Power Lockout Procedure on page 1-4.
1. Locate the power panel door at the
front, right-hand side of the machine.
Figure 2-19. General Locations
2. Remove the four screws that mount the door to the machine and set the door aside. The terminal block is located at the lower, left-hand corner of the power

07/11
CMT 330 Three Knife Trimmer 2-9 Power Hookup
panel. The ground screw is located be-neath the terminal block as shown in Figure 2-20.
3. Remove the four screws that mount the lower front door to the machine and set the door aside.
4. Route the power cable under the right-hand side of the machine and behind the power panel enclosure.
5. Locate the cable hole in the back of the power panel enclosure. Mount a strain relief in this hole. Access this hole through the front door of the machine.
6. Route the cable through the strain relief and through the access hole in the power panel.
7. Fasten the ground lead to the ground terminal lug, labeled GND in Figure 2-20.
Figure 2-20. Power Panel
8. Fasten the three power leads to the three terminals L1, L2, and L3 (Figure 2-20) on the main power terminal block.
9. Replace all panel doors. Make sure the shop air hose in connected to the ma-chine and shop air is switched on. Open the lower, rear door and switch the main, air disconnect valve to the on
(I) position and close the door.
10. Unlock and switch on (I) the main pow-
er disconnect.
11. Switch on (I) the machine's power.
12. Press the green start button key on the console, shown in Figure 2-21. The hydraulic motor should turn on. The machine was shipped with all three knives in the down position. If power is hooked up correctly, the knives will au-tomatically raise to the up position. If power is incorrectly connected, the knives will remain in the down position. Continue at step 13 if the knives do not move to the up position. If the knives move, skip to step 17.
Figure 2-21. CMT 330 Console
13. Switch off (O) the machine's main pow-
er switch.
14. Switch off (O) the main power discon-
nect switch and lock it out.
15. Remove the power panel door at the right-hand side of the machine.
16. Exchange any two of the main power leads at the terminals L1, L2, or L3.
17. Repeat steps 9-12.

07/11
CMT 330 Three Knife Trimmer 2-10 Air Hookup
2.6 Air Hookup
The CMT 330 requires 80-90 PSI regulated, dry, non-lubricated compressed air at a mini-mum of 5 cubic feet per minute (at 80-90 PSI). The recommended minimum air quality rating is ISO 8573.1 Class 2.4.2 (see chart on next page).
Air Quality Classifications ISO 8573.1 2001
SOLIDS ISO QUALITY
CLASS
Particle size in microns
1 0.1
2 1
3 5
4 15
5 40
6 -
WATER @ 100 psig Pressure Dew Point
ISO QUALITY CLASS
°C
°F
1 -70 -94
2 -40 -40
3 -20 -4
4 +3 +38
5 +7 +45
6 +10 +50
OIL Including Liquid and Vapor
ISO QUALITY CLASS
Mg/m3
ppm
1 0.01 0.008
2 0.1 0.08
3 1 0.8
4 5 4
5 25 21
6 - -
NOTICE: Failure to use dry, non-lubricated compressed air that meets or exceeds the above requirements may cause damage to the machine and will result in THE WARRANTY BEING VOIDED.
The main air connector shown in Figure 2-22 is a female 3/8 NPT port. A facilities maintenance technician should connect shop air using a male 3/8 NPT fitting using either Teflon thread tape or a liquid, pipe sealing compound.
Figure 2-22. Main Air Connector
Using a flexible hose to connect the machine to shop air is preferred in case the location of the machine needs adjustment later. A line dropped from the ceiling is also preferred. Hav-ing the line off the floor enables the operator to wheel a cart to the lower left rear door for waste bin removal
2.7 Cleaning
It may be necessary to clean the machines after installation. They may be cleaned with a solu-tion of dish soap and water. Do not use petro-leum or acid based solvents to clean the ma-chine. Damage may result.

07/11
CMT 330 Three Knife Trimmer 2-11 Cleaning
NOTES:
07/11
CMT 330 Three Knife Trimmer 3-1 Operator's Guide
Section Contents
TITLE PAGE 3.1 Programming ............................................. 3-2
3.1.1 Console Descriptions ......................... 3-2 3.1.2 Key Descriptions ................................ 3-3 3.1.3 Using the Keypad ............................... 3-4
3.2 User Interface Map ................................... 3-5 3.3 Power up ................................................... 3-6 3.4 Improper Wiring......................................... 3-6 3.5 Run Mode .................................................. 3-6 3.6 Job Mode .................................................. 3-7
3.6.1 Creating a Job .................................... 3-7 3.6.2 Editing a Job Name ............................ 3-7 3.6.3 Lock/Unlock a Job .............................. 3-7 3.6.4 Erasing a Job...................................... 3-7 3.6.5 Editing a New Job .............................. 3-7 3.6.6 Editing an Existing Job ....................... 3-7 3.6.7 Job Options ........................................ 3-8 3.6.8 Running a Job .................................... 3-9 3.6.9 Closing a Job ...................................... 3-9
3.7 Status Messages.....................................3-10 3.8 Example Job ...........................................3-13 3.9 Serial Communication .............................3-15
Introduction
The operator's guide provides instructions es-sential to operating the CMT 330 with each ac-cessory option. These instructions include pro-gramming instructions and book size changeo-ver, tasks.
3 Operator's Guide
07/11
CMT 330 Three Knife Trimmer 3-2 Programming
3.1 Programming
The programming section gives detailed de-scriptions of how to efficiently program and store jobs within the CMT 330 computer.
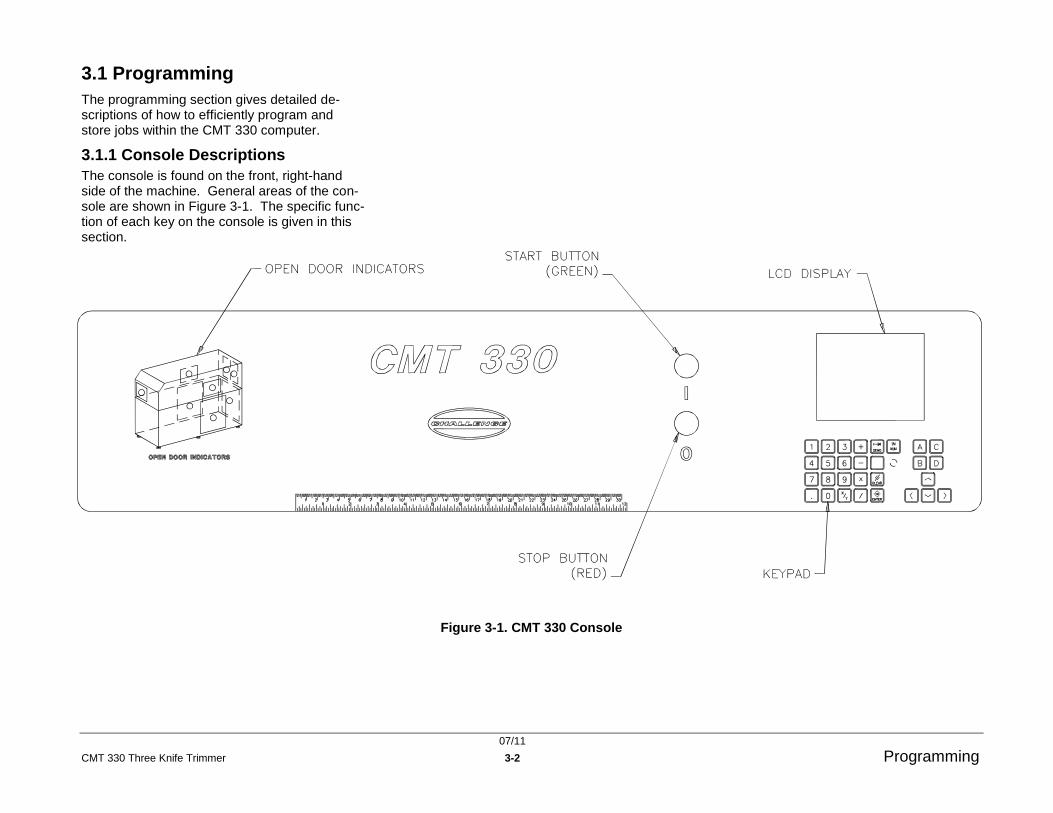
3.1.1 Console Descriptions
The console is found on the front, right-hand side of the machine. General areas of the con-sole are shown in Figure 3-1. The specific func-tion of each key on the console is given in this section.
Figure 3-1. CMT 330 Console

07/11
CMT 330 Three Knife Trimmer 3-3 Programming
Safety Warnings
Multi-language safety instructions with symbols are listed in this area of the console. Each op-erator should read and understand the instruc-tions listed. If the operator does not understand these instructions, he should ask his supervisor for clarification.
IN/mm Scale
The IN/mm scale can be used for measuring the size of the start book while programming a job. The scale can also be used to verify the size of a trimmed book.
Start Button
The green start button is used to switch on the hydraulic pump and begin to trim books. A re-mote start button is located at the back of the machine.
Stop Button
The red stop button is used to switch off the hydraulic pump and stop trimming books. A remote stop button is located at the back of the machine.
LCD Screen
The LCD screen is used to program and view jobs. It also lists any errors or messages. A message is displayed on the screen when the status light on top of the machine blinks.
Keypad
The keypad is used to enter values into a pro-gram, scroll through programs, and navigate through maintenance screens.
3.1.2 Key Descriptions
Number Keys
Number keys are used to write number values on the display.
Decimal Point
This decimal key is used to write a decimal point on the display.
Priority Add Key
The priority add key is used to input fractional numbers when combined with a whole number. An underscore (_) is displayed on the screen after the key is pressed. 1_1/2 is an example of a number entered using the priority add key. This is equivalent to 1.500.
Addition Key
The plus key is used to add numbers in the dis-play.
Subtraction Key
The minus is used to subtract numbers in the display.
Multiplication Key
The multiply key is used to multiply numbers in the display.
Division Key
The forward slash key is used to divide num-bers in the display.
Send Key
The send key is used to instruct the computer to change the machine setup to match newly en-tered book dimensions.
Clear Key
The clear key is used to clear an entry value or clear an status message.

07/11
CMT 330 Three Knife Trimmer 3-4 Programming
Enter Key
The enter key selects items in menu screens and processes data that has been entered in the other modes.
IN/mm Key
The units key is used to toggle between decimal inch, fractional inches, and mm units of length.
Soft Keys
The soft keys, or letter keys, are used to select screen menu options listed at the bottom of the display screen. The keys include the letters A, B, C, and D.
Up Arrow Key
The up arrow key is used to move the screen cursor up. It is also used to scroll forwards through the alphabet while naming a job.
Down Arrow Key
The down arrow key is used to move the screen cursor down. It is also used to scroll backwards through the alphabet while naming a job.
Right Arrow Key
The right arrow key is used to move the screen cursor right. It is also used to move the cursor to the right while naming a job.
Left Arrow Key
The left arrow key is used to move the screen cursor left. It is also used to move the cursor to the left while naming a job.
3.1.3 Using the Keypad
The following information briefly describes effi-cient ways to use the functions of the keypad.
Entering Fractions
Fractions are entered using the priority add key. The underscore symbol, _, is displayed when the key is pressed. This instructs the computer to add the fractional portion of the entry before performing the remaining math. This eliminates the need for parentheses.
Example: 3X2_3/4=8.250. If you use a plus instead of the priority add, the result would be 3X2+3/4=6.750.
Entering Math
Rather than using a separate calculator, the CMT 330's computer can calculate lengths as you enter values. However, you should be fa-miliar with the order of numerical operations if you intend to use this feature. Multiplication and division operations are always performed before addition and subtraction.
Example: You wish to enter a dimension, which is 8 inches, minus (2 times 1 and 5/32 inches), plus 1/2 inch. This sentence can be entered as: 8-2X1_5/32+1/2. The result is 6.188.

07/11
CMT 330 Three Knife Trimmer 3-5 User Interface Map
3.2 User Interface Map
The following chart illustrates the organization of user interface screens encountered in the CMT 330 software.
Figure 3-2. CMT 330 User Interface Map

07/11
CMT 330 Three Knife Trimmer 3-6 Power up
3.3 Power up
When the CMT 330 is switched on, the power up screen will appear.
>
Book Transport
Gripper must move to
Preset. Please press
the START button
Revision X.X
C)Light
B)Job
Figure 3-3. Start up Screen
Press and hold the green start button until the hydraulic motor starts. The following message will be displayed.
PLEASE WAIT
The book transport
gripper is moving to
the home location
Figure 3-4. Start Prompt
The gripper will not move for approximately 3 seconds. The gripper will then move to approx-imately 1 inch in front of home position, back past home, then to home.
3.4 Improper Wiring
If the knives do not move to the up position after power up, then the three phase power is hooked up incorrectly. The following message is displayed.
Waiting for knives
to lift. If this
message is displayed
for more than 10sec
verify the Hydraulic
motor rotation. (See
user manual -POWER
HOOKUP- section)"
Figure 3-5. Power Hook Up Warning
See section 2.5.1 Power Hookup Procedure or page 2-8 to correct the wiring.
3.5 Run Mode
After the gripper reaches the home location, the Run screen will appear if there are no jobs stored in memory. Otherwise, the machine will initialize at the last job that was run. The con-veyors will then start. The CMT 330 will sense incoming books and trim until the last book of that size is done. S-Cut ON Run
J-Extend
Stack = 1
9.000
0.500
0.250
6.000
11.000
A)Maint. C)Light
B)Job D)Exit
Figure 3-6. Run Screen
07/11
CMT 330 Three Knife Trimmer 3-7 Job Mode
3.6 Job Mode
The CMT 330 can be programmed for up to 99 different jobs. A job is a particular book size including trim dimensions and options. Enter the Job screen by pressing the soft-key B. In the Job screen, all previously programmed job numbers will be displayed with their name and lock status. Locked jobs are indicated by a pad-lock symbol after their name. A plus sign at the bottom of the job list indicates there are more programmed jobs that are not displayed. Press-ing the down arrow key will step through all jobs one at a time. Pressing the left arrow key and the down arrow key simultaneously will move the cursor down the list nine at a time. >
1 Name1
2 Name2
5 Name5
11
12
18 Name18
25
33 Name33
+
Select Job & Enter
A)Lock C)Erase
D)Exit
Figure 3-7. Job Screen
3.6.1 Creating a Job
To create a job, enter an unused job number between 1 and 99 inclusive. The job number is created with a blank name.
3.6.2 Editing a Job Name
The job name is edited in the job mode screen. To edit the name, use the up/down arrow keys to move the cursor to the appropriate job num-ber. Then press the right arrow key to move the cursor to the desired character position and edit the character by pressing the up or down arrow keys to toggle between characters of the alpha-bet. Numbers can be entered directly by using the number keys. Pressing the clear key clears the current character. When finished, you may edit the current job by pressing the enter key, go to a different job, or exit job mode.
3.6.3 Lock/Unlock a Job
Locking a job prevents it from being edited. In the Job screen, the soft-key “A” will display
Lock or Unlock depending on the status of the
job. If a job is locked, the padlock symbol will be displayed at the right of the job name. To change the lock status of a job, move the cursor to the appropriate job using the up/down arrow keys, and press the soft-key “A” (Lock/Unlock). The locking function may also be accessed through the Job Options menu (section 3.6.7 ) in the Job Run screen as shown in Figure 3-8.
3.6.4 Erasing a Job
Erasing a job will permanently remove it from memory. Use the arrow keys to select a job to be erased. Press the soft-key ”C” (Erase).
Clear channel # is displayed, followed by
Yes and No. Use the up/down arrow key to
select either yes or no, then press enter. Note that locked jobs cannot be erased.
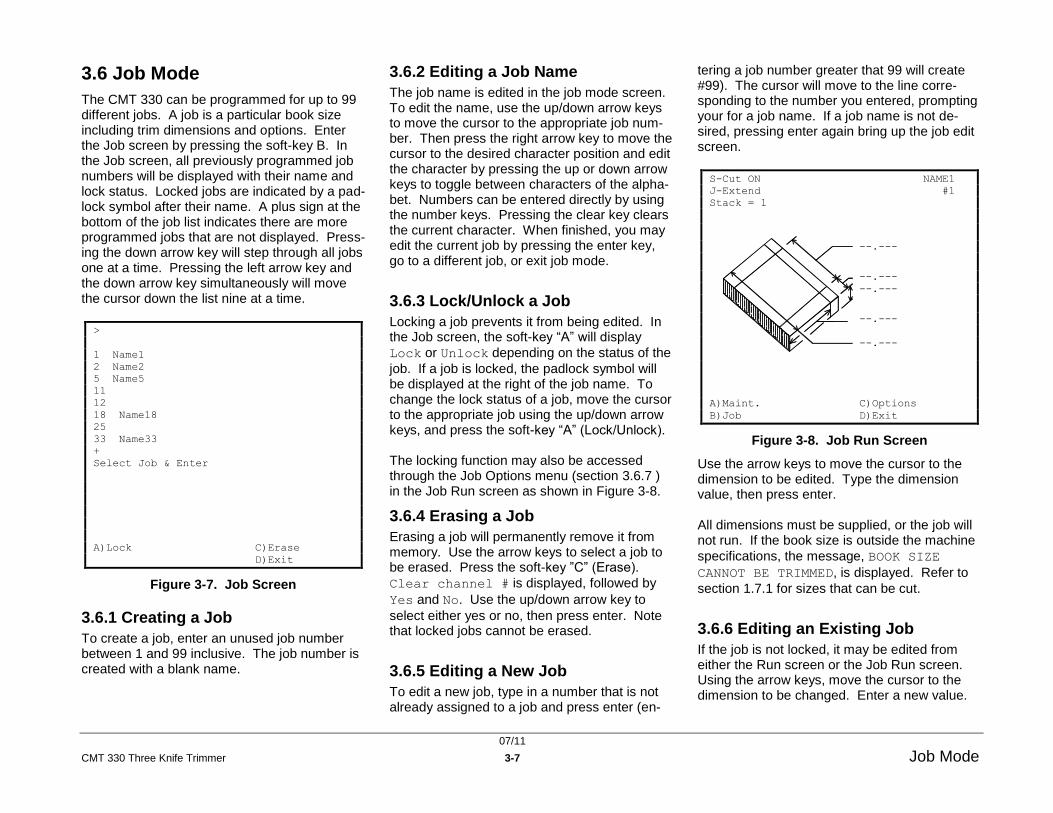
3.6.5 Editing a New Job
To edit a new job, type in a number that is not already assigned to a job and press enter (en-
tering a job number greater that 99 will create #99). The cursor will move to the line corre-sponding to the number you entered, prompting your for a job name. If a job name is not de-sired, pressing enter again bring up the job edit screen. S-Cut ON NAME1
J-Extend #1
Stack = 1
--.---
--.---
--.---
--.---
--.---
A)Maint. C)Options
B)Job D)Exit
Figure 3-8. Job Run Screen
Use the arrow keys to move the cursor to the dimension to be edited. Type the dimension value, then press enter. All dimensions must be supplied, or the job will not run. If the book size is outside the machine
specifications, the message, BOOK SIZE
CANNOT BE TRIMMED, is displayed. Refer to
section 1.7.1 for sizes that can be cut.
3.6.6 Editing an Existing Job
If the job is not locked, it may be edited from either the Run screen or the Job Run screen. Using the arrow keys, move the cursor to the dimension to be changed. Enter a new value.

07/11
CMT 330 Three Knife Trimmer 3-8 Job Mode
If the job is locked, it must be unlocked before editing. See section Lock/Unlock a Job.
3.6.7 Job Options
Each job has three options that are listed in the upper left corner of the display. These are Side Cut (ON/OFF), Jogger (Extend/Retract), and Stack number (1-3). To edit these options press the C key from the Job Run screen shown in Figure 3-8.
Options
------------------------
Side Cut
Jogger
Stack Num
Select & Press Enter
A)Lock
D)Exit
Figure 3-9. Job Options Screen
Use the up/down arrow keys to select the option and press enter to set the option.
3.6.7.1 Side Cut
When Side Cut is set to On, both the sides (top and bottom) and the face of the book are cut. When the Side Cut option is set to Off, only the face is cut. The side cut menu screen is shown below.
Side Cut
------------------------
ON
OFF
Select & Press Enter
A)Maint.
B)Job D)Exit
Figure 3-10. Side Cut Option Screen
3.6.7.2 Jogger
This parameter sets the jogger to remain ex-tended as a book leaves the jogging station or retract immediately. In the jogger screen, use the up/down arrow keys to toggle the required jogger action and press enter.
Jogger
------------------------
Extend
Retract
Select & Press Enter
A)Maint.
B)Job D)Exit
Figure 3-11. Jogger Option Screen
When cutting very thin books with overhanging covers, the jogger option should be set to Ex-tend. Otherwise, it should be set to Retract.
07/11
CMT 330 Three Knife Trimmer 3-9 Job Mode
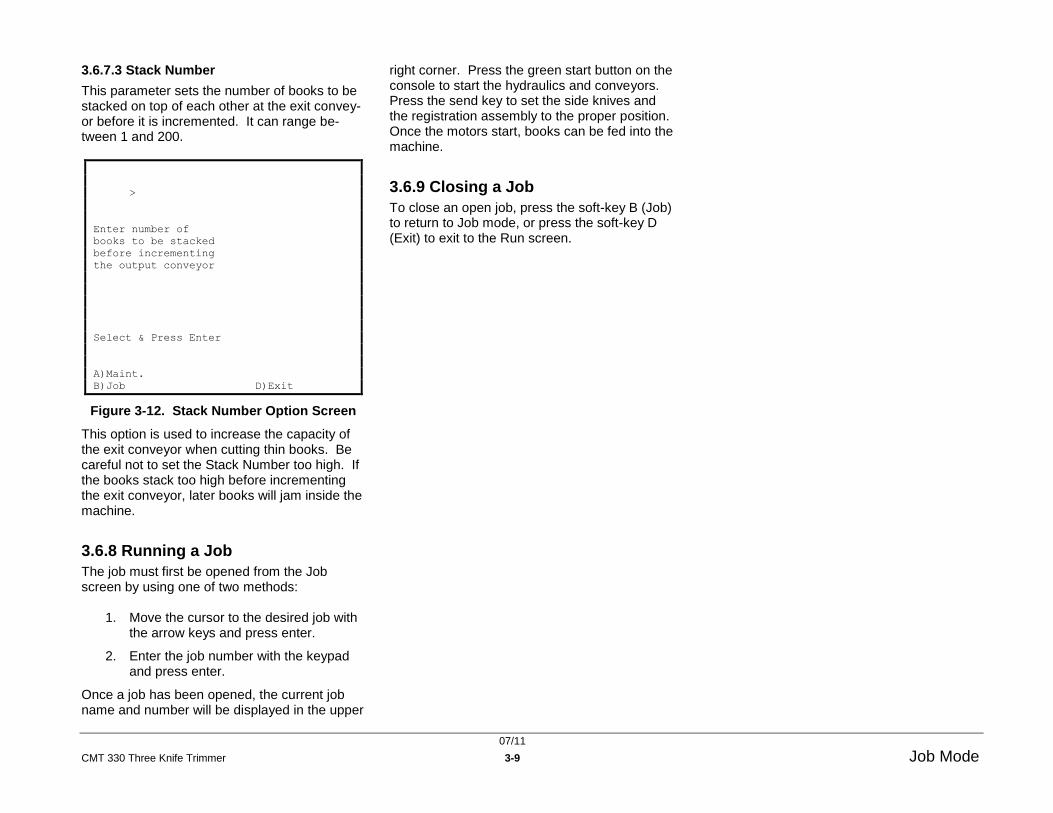
3.6.7.3 Stack Number
This parameter sets the number of books to be stacked on top of each other at the exit convey-or before it is incremented. It can range be-tween 1 and 200.
>
Enter number of
books to be stacked
before incrementing
the output conveyor
Select & Press Enter
A)Maint.
B)Job D)Exit
Figure 3-12. Stack Number Option Screen
This option is used to increase the capacity of the exit conveyor when cutting thin books. Be careful not to set the Stack Number too high. If the books stack too high before incrementing the exit conveyor, later books will jam inside the machine.
3.6.8 Running a Job
The job must first be opened from the Job screen by using one of two methods:
1. Move the cursor to the desired job with the arrow keys and press enter.
2. Enter the job number with the keypad and press enter.
Once a job has been opened, the current job name and number will be displayed in the upper
right corner. Press the green start button on the console to start the hydraulics and conveyors. Press the send key to set the side knives and the registration assembly to the proper position. Once the motors start, books can be fed into the machine.
3.6.9 Closing a Job
To close an open job, press the soft-key B (Job) to return to Job mode, or press the soft-key D (Exit) to exit to the Run screen.

07/11
CMT 330 Three Knife Trimmer 3-10 Status Messages
3.7 Status Messages
Message Description ^ WASTE BIN FULL The face knife waste bin sensor is covered. < WASTE BIN FULL The right side waste bin sensor is covered. > WASTE BIN FULL The left side waste bin sensor is covered. Book jam between CMT-330 and elevator
Book was covering upper elevator sensor when the book was trying to lift.
Book elevator FAILED to lift to the proper level
The shelf level proximity sensor did not activate properly or in time. This con be caused by either a misadjusted or a faulty proximity sensor.
Center clamp error Down when it should be up
The proximity sensor on the center clamp did not turn on. This fault can be caused by either the air cylinder not returning or a faulty proximity sensor.
Center clamp error Up when it should be down
The proximity sensor on the center clamp did not turn off. This fault can be caused by either the air cylinder not coming down or a faulty proximity sensor.
Clamp/knife down The side knife was down while the side knives or registration assembly was moving. DATA IS OUT OF RANGE This error message displays when the operator tries to send either the knives or the reg-
istration assembly to a position that is out of range. Elevator book jam. Check book in elevator sen-sor.
Book did not clear the sensor in time.
F-knife latch error OFF when it should be ON
The face knife latch proximity did not activate. This can be caused by a misadjusted or faulty sensor, or the the air cylinder did not pull in.
F-knife latch error ON when it should be OFF
The face knife latch proximity sensor did not de-activate. This can be caused by a misad-justed or faulty proximity sensor, or the air cylinder did not extend.
F-Knife at down limit failed to move
This message displays when the face knife fails to leave the down proximity sensor. It may be caused by either the cut valve not de-energizing or a faulty down limit proximity sensor.
F-Knife at up limit, Failed to move
This message displays when the face knife fails to leave the up proximity sensor. There are four possible reasons for this failure: The dump valve did not energize, the hydraulic cushion valve did not energize, the knife down valve did not energize, or the side knife up proximity is faulty.
F-Knife down FAILURE timed out before reaching down limit
This message displays when the face knife leaves the up limit but does not reach the down limit in time. If the knife went down, the proximity sensor is either faulty or misad-justed. If the knives only moved down slightly, either the dump valve or the proportional valve may not have energized.
F-Knife up FAILURE timed out before reaching up limit
This message displays when the face knife does not reach the up limit in time. The prox-imity sensor is either misadjusted or faulty.
F-Slow down Failure The slow down proximity sensor did not respond before the down proximity sensor. The face knife slow down proximity sensor is either misadjusted or faulty.
07/11
CMT 330 Three Knife Trimmer 3-11 Status Messages
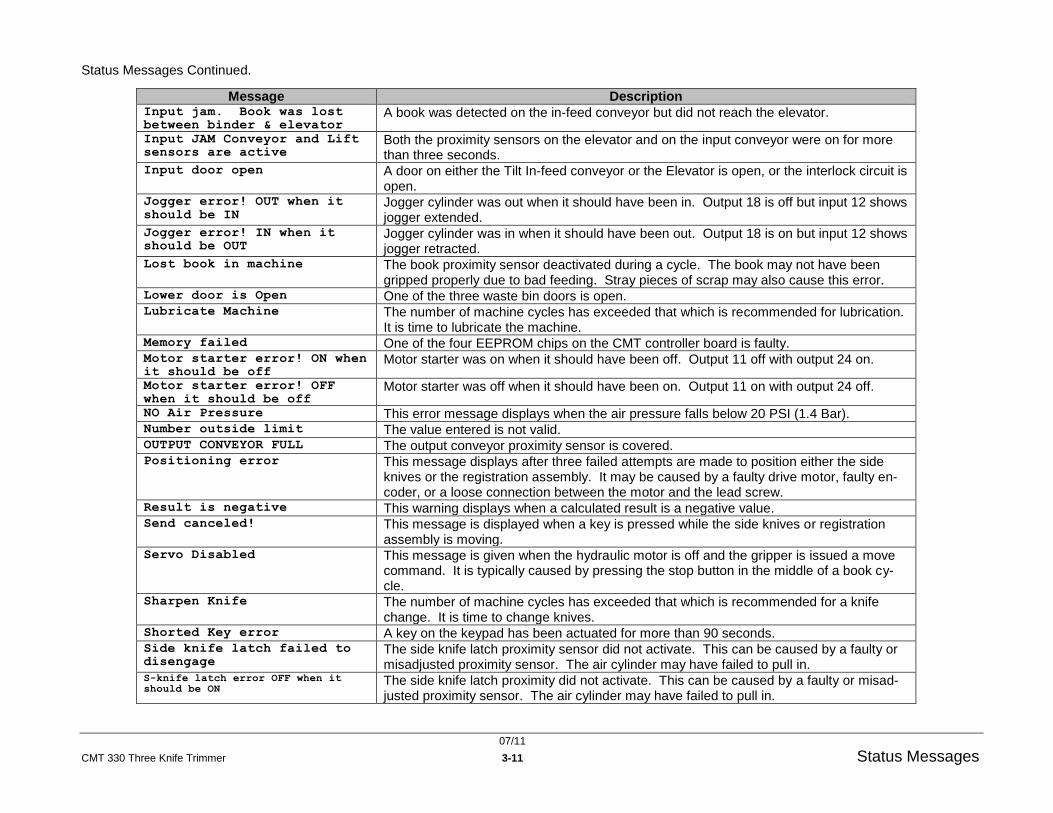
Status Messages Continued.
Message Description Input jam. Book was lost between binder & elevator
A book was detected on the in-feed conveyor but did not reach the elevator.
Input JAM Conveyor and Lift sensors are active
Both the proximity sensors on the elevator and on the input conveyor were on for more than three seconds.
Input door open A door on either the Tilt In-feed conveyor or the Elevator is open, or the interlock circuit is open.
Jogger error! OUT when it should be IN
Jogger cylinder was out when it should have been in. Output 18 is off but input 12 shows jogger extended.
Jogger error! IN when it should be OUT
Jogger cylinder was in when it should have been out. Output 18 is on but input 12 shows jogger retracted.
Lost book in machine The book proximity sensor deactivated during a cycle. The book may not have been gripped properly due to bad feeding. Stray pieces of scrap may also cause this error.
Lower door is Open One of the three waste bin doors is open. Lubricate Machine The number of machine cycles has exceeded that which is recommended for lubrication.
It is time to lubricate the machine. Memory failed One of the four EEPROM chips on the CMT controller board is faulty. Motor starter error! ON when it should be off
Motor starter was on when it should have been off. Output 11 off with output 24 on.
Motor starter error! OFF when it should be off
Motor starter was off when it should have been on. Output 11 on with output 24 off.
NO Air Pressure This error message displays when the air pressure falls below 20 PSI (1.4 Bar). Number outside limit The value entered is not valid. OUTPUT CONVEYOR FULL The output conveyor proximity sensor is covered. Positioning error This message displays after three failed attempts are made to position either the side
knives or the registration assembly. It may be caused by a faulty drive motor, faulty en-coder, or a loose connection between the motor and the lead screw.
Result is negative This warning displays when a calculated result is a negative value. Send canceled! This message is displayed when a key is pressed while the side knives or registration
assembly is moving. Servo Disabled This message is given when the hydraulic motor is off and the gripper is issued a move
command. It is typically caused by pressing the stop button in the middle of a book cy-cle.
Sharpen Knife The number of machine cycles has exceeded that which is recommended for a knife change. It is time to change knives.
Shorted Key error A key on the keypad has been actuated for more than 90 seconds. Side knife latch failed to disengage
The side knife latch proximity sensor did not activate. This can be caused by a faulty or misadjusted proximity sensor. The air cylinder may have failed to pull in.
S-knife latch error OFF when it should be ON
The side knife latch proximity did not activate. This can be caused by a faulty or misad-justed proximity sensor. The air cylinder may have failed to pull in.

07/11
CMT 330 Three Knife Trimmer 3-12 Status Messages
Status Messages Continued.
Message Description S-knife latch error ON when it should be OFF
The side knife latch proximity sensor did not de-activate. This can be caused be a faulty sensor. The air cylinder may have failed to extend.
S-Knife at down limit Failed to move
This error message displays when the side knives do not leave the down proximity switch. Either the cut valve did not de-energize, or the down limit proximity sensor may be faulty.
Serial Communication Port Failed The external control port is not working properly. Serial error no response from the servomotor
The servo control port is not working properly.
Servo Port Failed RS-232 port controlling the servo drive failed. Servo Relay Error! ON when it should be off
Output 11 is off and input 23 is on.
Servo Relay Error! OFF when it should be on
Output 11 is on and input 23 is off.
S-Knife at up limit, Failed to move
This message is displayed when the side knives do not leave the up proximity sensor. There are at least four reasons for this failure: the dump valve did not energize, the pro-portional valve did not energize, the knife down valve did not energize, or the side knife up proximity sensor is faulty.
S-Knife down FAILURE timed out before reaching down limit
This message is displayed when the side knives leave the up limit but do not reach the down limit in time. If the knives did come down, the proximity sensor may be faulty or misadjusted. If the knives only moved down slightly, either the unload valve or the pro-portional valve may not have energized.
Start Button Held in at power up Either the start button or remote cut button is being held in. Either button may be faulty. S-Knife up FAILURE timed out before reaching up limit
This message displayed when the side knives do not reach the up limit in time. Either a faulty or misadjusted up proximity sensor may cause this error.
S-Slow down Failure The slow down proximity did not respond before the down proximity sensor. Either a faulty or misadjust side knife slow down proximity sensor may cause this error.
Stop button pressed Either a stop button is pressed or one is faulty. Upper door is Open One of the upper doors is open.
07/11
CMT 330 Three Knife Trimmer 3-13 Example Job
3.8 Example Job
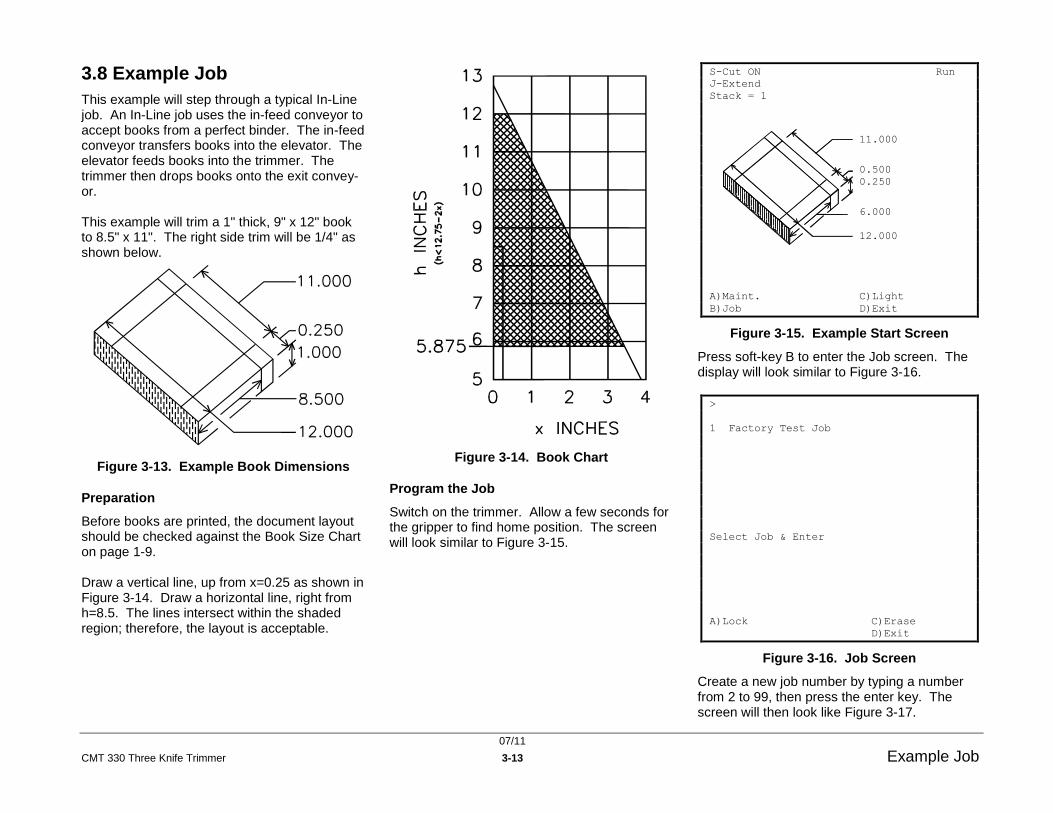
This example will step through a typical In-Line job. An In-Line job uses the in-feed conveyor to accept books from a perfect binder. The in-feed conveyor transfers books into the elevator. The elevator feeds books into the trimmer. The trimmer then drops books onto the exit convey-or. This example will trim a 1" thick, 9" x 12" book to 8.5" x 11". The right side trim will be 1/4" as shown below.
Figure 3-13. Example Book Dimensions
Preparation
Before books are printed, the document layout should be checked against the Book Size Chart on page 1-9. Draw a vertical line, up from x=0.25 as shown in Figure 3-14. Draw a horizontal line, right from h=8.5. The lines intersect within the shaded region; therefore, the layout is acceptable.
Figure 3-14. Book Chart
Program the Job
Switch on the trimmer. Allow a few seconds for the gripper to find home position. The screen will look similar to Figure 3-15.
S-Cut ON Run
J-Extend
Stack = 1
11.000
0.500
0.250
6.000
12.000
A)Maint. C)Light
B)Job D)Exit
Figure 3-15. Example Start Screen
Press soft-key B to enter the Job screen. The display will look similar to Figure 3-16. >
1 Factory Test Job
Select Job & Enter
A)Lock C)Erase
D)Exit
Figure 3-16. Job Screen
Create a new job number by typing a number from 2 to 99, then press the enter key. The screen will then look like Figure 3-17.

07/11
CMT 330 Three Knife Trimmer 3-14 Example Job
>
1 Factory Test Job
2>
Select Job & Enter
A)Lock C)Erase
D)Exit
Figure 3-17. Job Number
Name the job. Use the right arrow key to move the cursor at least one space to the right. Use the up/down arrow keys to cycle through the alphabet. After arriving at the desired letter, symbol, or number, press the right arrow key to move to the next character field. Continue until the name is complete. The screen looks similar to Figure 3-18. >
1 Factory Test Job
2>Example Job_
Select Job & Enter
A)Lock C)Erase
D)Exit
Figure 3-18. Job Name
After the job has been named, press the enter key to enter the book dimensions into the job. The screen looks similar to Figure 3-19. S-Cut ON Example Job
J-Extend #2
Stack = 1
11.000
0.250
1.000
8.500
12.000
A)Maint. C)Options
B)Job D)Exit
Figure 3-19. Job Run Screen
After all values have been entered, press the send key. The side knives will move into posi-tion followed by the registration assembly. The job can now run. Before running books through the binder, press and hold the green start button on the console. Release the button when the hydraulics and conveyors start. Begin running books.

07/11
CMT 330 Three Knife Trimmer 3-15 Serial Communication
3.9 Serial Communication
Note: Approximate time per book with size change 26 seconds Approximate time per book no size change 13 seconds 1. Physical connection
1.1 Standard PC Comm port to CMT330. --- DB9 male/Female Null Mode Cable
9600 baud 1 stop bit 8 data bits no Parity no Flow control
2. Message Format 2.1 All messages start with ASCII --
1010FF 2.2 All messages end with a Longitudinal
Redundancy Check (LRC) Value. This value is calculated from the first byte of the Start sequence to the last byte if the data after the messages has been con-verted from ASCII to hex. Example 1010FF (0x31,0x30,0x31,0x30,0x46,0x46) be-comes (0x10,0x10,0xFF).
2.3 All message are formatted as follows
Text Start------------------------------------1010FF Sequence number--------------------------00-FF Message type-------------------------------see following information Data length----------------------------------00-FF Message type sub code 1------------------see following information Sub code 1 data length (Optional) Message type sub code 2 Sub code 2 data length
(Optional) Message type sub code (n) Sub code n data length (LRC)----------------------------------------XOR of the first byte to the last (ASCII Carriage Return)------------------0x0d (ASCII Line Feed)-------------------------0x0a
3. Error Detection
3.1 All messages are responded to with an positive or Negative acknowledgment 1) Positive Acknowledgement (ACK)—
10100600(CR)(LF) 2) Negative Acknowledgement(NAK)--
-10101500(CR)(LF) 3.2 The receiver shall send a (NAK) re-
sponse if the calculated LRC does not match the incoming value.
3.3 The receiver shall send a NAK re-sponse if the header is not 1010FF.
3.4 If a NAK is received the sender shall wait 150ms before retransmitting the message.
3.5 After 3 NAK’s in a row an unrecovera-ble error should be declared.
3.6 An ACK shall be sent in 50ms after a good message is received. After 250ms NAK is assumed.
4. Command Codes and Sub Codes 4.1 Host command - Wake Up (00)
4.1.1 Sub Code (10) request Ma-chine information and reset message sequence number.
Example --- 1010FF02000110EC(CR)(LF)
4.2 CMT330 - Response to Wake Up (60) 4.2.1 Sub Code (10) Description of
product “trimmer “ 4.2.2 Sub Code (11) Software level
“3.3”
4.2.3 Sub Code (12) Brand “Challenge”
Example- 1010FF02601910087472696D6D6572201102030312094368616C6C656E67658F(CR)(LF)
4.3 CMT330 - Serial Initialize (55) 4.3.1 Sub Code (01) Ready to Com-
municate Sent at power On
Example-1010FF01550101AB
4.4 Host command - (66) 4.4.1 Sub code (10) Start
Enable Process Example-1010FF026601108A(CR)(LF) 4.4.2 Sub code (11) Temp Stop
Hold Process Example-1010FF026601118B(CR)(LF)
4.5 Host Command- (04) 4.5.1 Sub Code (21) Job number (1-
99) 4.5.2 Sub Code (22) Bottom Trim
(0.1inch – max) (X 1000 no decimal point) 0.100in=0064
4.5.3 Sub Code (23) Trimmed Book Height (5.875-12.000in) (16F3-2EE0)
4.5.4 Sub Code (24) Trimmed Book Width (4.000-9.000in) (0FA0-251C)
4.5.5 Sub Code (25) Book Thickness (0.100-2.000)(0064-07D0)
4.5.6 Sub Code (26) PreTrimmed Book Height (7.000-12.500)(1B58-30D4)
Example- 1010FF0204172101032202006423022AF824022328250201F4260230D445(CR)(LF)

07/11
CMT 330 Three Knife Trimmer 3-16 Serial Communication
4.5.7 Sub Code (30) Current Job Da-ta Request will respond with code (64) data
Example-1010FF02040130C8(CR)(LF)
4.6 Host command- (03) 4.6.1 Sub Code (13) Initiate/Eject
Book Example-1010FF01030113EF(CR)(LF)

07/11
CMT 330 Three Knife Trimmer 4-1 Routine Tasks
Section Contents
TITLE PAGE 4.1 Under Book Air Blast ................................. 4-2 4.2 Waste Bins ................................................ 4-2 4.3 Cut Stick / Cut Plates ................................ 4-3
4.3.1 Changing the Cut Stick ....................... 4-3 4.3.2 Changing the Cut Plates .................... 4-4
4.4 Knives ....................................................... 4-4 4.4.1 Knife Change ...................................... 4-4 4.4.2 Knife Adjustment ................................ 4-7 4.4.3 Knife Sharpening Rules ...................... 4-8
4.5 Check Pressure Switch ............................. 4-9 4.6 Safety Systems Check .............................. 4-9
4.6.1 Safety Check-off Sheet .................... 4-11
Introduction
Certain tasks will be performed on a regular basis but not necessarily on a set schedule. The safety systems check, however, should be done before each shift. The waste bins must be emptied when full. The knives should be re-placed when cut quality becomes unacceptable. Performing as many of these tasks before a shift begins prevents down time while a job is in progress and ensures safe operation of the ma-chine.
4 Routine Tasks

07/11
CMT 330 Three Knife Trimmer 4-2 Under Book Air Blast
4.1 Under Book Air Blast
The under cover air blast may require adjust-ment depending on the thickness of books be-ing trimmed. The blast reduces scratching of the bottom cover as the books moves through the machine. The valve is located on the left-hand side of the machine.
Figure 4-1. Underside Air Blast
For thicker books, adjust the valve counter-clockwise. Adjust the valve clockwise for thin-ner books.
4.2 Waste Bins
The three waste bins may actually require emp-tying in the middle of a shift, but it is a good idea to do it before a shift begins. When the waste bins are near capacity during a job run, the CMT 330 continues cutting. The status indica-tor light on top of the machine blinks slowly, and
the screen displays a message stating that the waste bins are full. Use the following procedure to change waste bins. If running, stop the machine's cutting mode by
pressing the red stop button on the console shown in
1. Figure 4-2. To preserve the status of
each book in the job, press the stop button after the gripper transport re-leases a trimmed book, but before it clamps the next untrimmed book. If the untrimmed book is clamped by the grip-per transport and not trimmed, it will be ejected onto the Exit Conveyor when the machine is restarted. The book can be manually placed onto the In-feed conveyor to be trimmed later.
Figure 4-2. Stop Button Location
2. Wheel a cart to any of the three waste bin locations. One is located at both the rear, right-hand and left hand sides of the machine. The remaining waste bin is located at the back of the ma-chine. Figure 4-3 and Figure 4-4 show the waste bin locations.
Figure 4-3. Waste Bin Locations

07/11
CMT 330 Three Knife Trimmer 4-3 Cut Stick / Cut Plates
Figure 4-4. Waste Bin Location
3. Open a door. Tilt and lift the waste bin from the base of the machine.
4. Place the waste bins on the cart and repeat for the remaining bins.
5. After emptying and placing the bins back into the trimmer, close the doors securely. The machine will not operate if a door is ajar.
Hint! Static can accumulate on the plastic waste bins. This can occasionally cause trimmings to cling to the handles of the bin. The Bin Full sensor is at this location, so trimmings blocking the sensor will cause the Waste Bin Full status even if the bin is not full. To prevent this from happening, lightly spray the inside of each bin with an anti-static spray. This need only be done on occasion.
Using additional waste bins may reduce down time. To order additional waste bins, use Chal-lenge part number, 56143.
4.3 Cut Stick / Cut Plates
The cut stick and cut plates should either be changed or rotated with every knife change. They may also require changing at other times if
deep grooves or jagged edges can be seen along the score marks. Cut stick/plate wear effects cut quality.
4.3.1 Changing the Cut Stick
The cut stick can be rotated 8 times before dis-posal. It is located under the face knife, ac-cessed through set of double doors at the back of the machine. The cut stick puller provided with the machine is used to remove the cut stick. The cut stick and other tools are located on the inside of the left rear door that is shown in Figure 4-3. The cut stick puller has a finger hold and hook as shown in Figure 4-5.
Figure 4-5. Cut Stick Puller
1. Switch off (O) main power at the front
of the machine and lock out the main power disconnect switch as described in section 1.5 Power Lockout Procedure on page 1-4.
2. Open the set of double doors at the back of the machine.
3. Remove the black plastic waste chute from the table by lifting and tilting to-ward the outside of the machine.
4. Hook the Cut Stick Puller over one of the ends of the cut stick with a finger in the loop of the puller. Keep the Cut Stick Puller In-Line with the cut stick.
5. Pull the Cut Stick Puller at a slight angle over the cut stick until the end of the cut stick comes out of the table.
Figure 4-6. Pull at slight angle
6. Remove the remaining cut stick from the table by hand.
7. Inspect the cut stick for wear. It may be used 8 times (twice on each surface) before disposal. To use a surface twice, reinstall the cut stick by turning it such that end that came out of the right end of the slot goes into the left end of the slot. If a surface has been used twice, rotate the stick to an unused sur-face before reinstalling. If all (4) sur-faces have been used twice, replace the stick with a new one.
Figure 4-7. Cut Stick Rotation
8. Reinstall the waste chute.
9. Securely close the set of double doors at the back of the machine.

07/11
CMT 330 Three Knife Trimmer 4-4 Knives
10. Unlock the main power disconnect and resume operation.
Refer to section 1.6.2 Standard Accessories to obtain the part number for replacement cut sticks.
4.3.2 Changing the Cut Plates
The cut plates can be rotated once before dis-posal. One is located underneath each side knife. They are accessed by opening the sliding doors on each side of the machine. A flat screwdriver is helpful but not necessary when removing cut plates.
1. Send the book height cutting dimension to 6 inches so the side knives move to the center of the machine.
2. Switch off (O) main power at the front
of the machine and lock out the main power disconnect switch as described in section 1.5 Power Lockout Procedure on page 1-4.
3. Open a sliding door on either the left or right side of the machine.
4. Remove the black plastic waste chute from the table by lifting and tilting to-ward the outside of the machine.
5. Lift and wiggle the edge of the cut plate until it slides off the four pins in the ta-ble. Alternatively, slide the end of a screwdriver between the slot in the ta-ble and the cut plate. Rock the screw-driver. Alternate between each of the two slots until the cut plate is free. Fig-ure 4-8 shows the location of the slots.
Figure 4-8. Slots Under Cut Plates
6. Inspect the cut plate for wear. It may be used two times (once on each sur-face) before disposal. If only one side of the plate is used, turn the plate over and reinstall it with the smooth side up. Replace the cut plate with a new one if both sides are used.
7. Reinstall the waste chute.
8. Securely close the double doors at the back of the machine.
9. Repeat steps 3 through 8 with the re-maining cut plate.
10. Unlock the main power disconnect and resume operation.
Refer to section 1.6.2 Standard Accessories to obtain the part number for replacement cut plates.
Hint! Depending on what locations on the cut plates are most worn, they may be able to be rotated 180o before they are turned over. By using this method of rotation, each cut plate may be used four times.
Hint! Save your old cut plates to use when trimming out of the ordinary sizes.
4.4 Knives
The knives should be changed when cut quality becomes unacceptable. By default, the com-
puter will issue a Sharpen Knife alarm after 2500 cuts. This is a good general-purpose val-ue, but the most appropriate number will vary depending on the type of paper stock being cut. Refer to the Operator's Guide for instructions on changing the value for the Sharpen Knife alarm.
CAUTION The knives must be adjusted after every knife change. Improper knife adjustment may cause damage to the ma-chine.
4.4.1 Knife Change
A stable rolling cart, approximately 36" tall, the knife lifter, the T-handle hex wrench, an empty scabbard, and a set of sharp knives are re-quired to perform a knife change.
CAUTION All three knives are a set. They must be sharpened as a set. Damage or poor performance may result if knives are not from the same set.
WARNING Changing knives can be very dangerous unless safety precautions are observed and extreme care is taken when handling knives. Keep handling of unprotected knives to an absolute minimum. Have the scabbard nearby and insert knife immediately. Warn people of any unprotected knife.
WARNING Knife changing is a ONE PERSON OPERATION! More than one person changing a knife creates safety haz-ards.
WARNING Even used knives are extremely sharp! Use extreme care when handling new/re-ground knives and used knives.

07/11
CMT 330 Three Knife Trimmer 4-5 Knives
The following procedure should be used to change knives.
1. Switch off (O) main power at the front
of the machine and lock out the main power disconnect switch as described in section 1.5 Power Lockout Procedure on page 1-4.
2. Place three empty scabbards on the rolling cart. The knives may be re-moved or installed in any order.
3. The knives are located behind the plas-tic doors shown in Figure 4-9 and Fig-ure 4-10.
Figure 4-9. Knife Locations
Figure 4-10. Left Side Knife Location
4. Open the door and remove the waste chute to access the knife.
5. Using the T-handle hex wrench, remove the two knife bolts that are in open slots in the knife bar. They are the second and fifth bolts from either end of the knife. Set the bolts aside and save for knife installation.
Figure 4-11. Knife Bolt Locations
6. Place the knife lifter on top of the knife bar and align each lifter handle with the holes from which the two knife bolts were removed in the previous step. Turn the handles clockwise until the lift-er is securely fastened to the knife bar as in Figure 4-12.
Figure 4-12. Knife Removal
7. Use the T-handle wrench to remove the remaining (4) knife bolts. Save the bolts with the two previously removed.
WARNING Make certain to have a scabbard on the cart, prepared to receive a knife. The screws should be removed from the scabbard. The protecting edge of the scabbard should be facing the person changing the knife when he is placing the knife in it. Make sure the cart is near-by. Do not carry the knife across obstructed or slippery floors. Warn people nearby that a knife is being re-moved.
8. Slowly turn the knife lifter handles coun-
terclockwise only until the knife is re-leased from the machine. DO NOT turn the handles any more than what is re-quired to free the knife.
9. When the knife is free, move it down and clear of the knife bar.
10. Hold the knife lifter with knife at a safe distance from the body. Other people

07/11
CMT 330 Three Knife Trimmer 4-6 Knives
should not be nearby. Carry the lifter to the cart containing the prepared scab-bard.
11. Place the knife lifter with knife into the scabbard such that the edge of the knife is in the scabbard slot.
12. Carefully turn the knife lifter handles counterclockwise and disconnect the lifter from the knife while the knife-edge remains in the scabbard slot.
13. Align the two knife-bolt holes with the holes in the scabbard such that no por-tion of the knife-edge remains exposed.
14. Place a scabbard screw into each hole and turn them clockwise to tighten.
15. Use a wrench to secure the knife to its scabbard.
16. Set the knife aside.
17. Repeat steps 4 through 16 with the re-mainder of the knives.
With all knives removed, the replacement knives may be installed.
CAUTION All three knives are a set. They must be sharpened as a set. Damage or poor performance may result if knives are not from the same set.
WARNING Changing knives can be very dangerous unless safety precautions are observed and extreme care is taken when handling knives. Keep handling of unprotected knives to an absolute minimum. Have the scabbard nearby and insert knife immediately. Warn people of any unprotected knife.
WARNING Knife changing is a ONE PERSON OPERATION! More than one person changing a knife creates safety haz-ards.
WARNING Even used knives are extremely sharp! Use extreme care when handling new/re-ground knives and used knives.
18. Make sure main power is still turned off
(O) at the front of the machine and is
locked out at the main power discon-nect switch as described in section 1.5 Power Lockout Procedure on page 1-4. Make sure all the waste chutes are still removed from the machine.
19. Turn both knife depth adjustment handles clockwise until they stop. They are accessed through the rear, left sliding door and back double doors.
Figure 4-13. Knife Adjustment Knobs
20. Place a scabbard containing a re-placement knife on the cart. Move the cart as close as possible to where the knife is to be installed. The knives may be installed in any order.
21. After the cart is located, make sure the scabbard containing the replacement knife has its protected edge facing the installer. Have the knife lifter nearby.
22. Carefully remove the two screws that fasten the knife to its scabbard.
23. Place the knife lifter on the knife and align the left handle with the second hole from the left end of the knife.
24. Align the right handle with the second hole from the right end of the knife.
25. Turn the lifter handles clockwise until the ends of the handles touch the scab-bard under the knife.
26. Turn the handles counterclockwise 1/2 turn so the ends of the handles will not interfere with the clamp inside the ma-chine.
27. Hold the knife lifter with knife at a safe distance from the body. Other people should not be nearby. Carry the lifter to the installation location.
28. Place the knife behind the knife bar while aligning the lifter handles to the open bolt slots in the knife bar as shown in Figure 4-14.

07/11
CMT 330 Three Knife Trimmer 4-7 Knives
Figure 4-14. Knife Installation
29. Lift the knife into the knife bar such that the lifter handles are at the extreme top of the slot.
CAUTION The knife lifter handles must be at the extreme top of the slot. If they are not, it will be difficult to adjust the cutting depth of the knives. Damage to the cut plates may result.
30. Turn the lifter handles clockwise and
securely fasten the lifter and knife to the knife bar. Make certain the knife does not move down as the handles are tightened.
31. Place 4 knife bolts into the 4 available holes in the knife and use the T-handle wrench to secure them as shown in Figure 4-14.
32. Turn the lifter handles counterclockwise and remove the lifter from the machine.
33. Place 2 knife bolts into the holes from which the knife lifter handles were re-moved. Use the T-handle wrench to secure them. Viewed through the in-spection holes, the blade should be in-serted against the stops.
34. Repeat steps 18 through 33 to install the remaining two knives.
Once the knives have been installed, they must be adjusted.
4.4.2 Knife Adjustment
The knives require adjustment after every knife change. The face knife is adjusted inde-pendently from the side knives. The side knives are adjusted simultaneously. To properly adjust the side knives, the side knives must be proper-ly installed. They should have been installed to the top of the slots of the knife bar. If one side knife cuts through and the other does not, the knives were not properly installed. Use the following procedure to adjust the depth at which the knives cut. ½” thick scrap or extra books are recommended for use when adjusting the knives. No tools are needed.
WARNING Knife adjustment is a ONE PERSON OPERATION! More than one person adjusting the knives creates safety hazards.
Face Knife Adjustment
1. At the console, enter maintenance mode and choose Knife Adjust.
2. Open the set of double doors at the back of the machine.
3. Remove the waste chute by lifting it and pulling it toward the outside of the ma-chine.
4. Find the face knife adjustment knob in the upper right-hand corner of the open-ing as shown in Figure 4-15.
Figure 4-15. Knife Adjustment Knobs
5. If the knives were just replaced, the face knife adjustment knob should be turned to the full down position. If it is not, do so by turning the knob clockwise until it stops.
6. Turn the face knife adjustment knob back out about three full revolutions counterclockwise.
7. Place the face side of a scrap book un-derneath the knife with the binding fac-ing the inside of the machine.
8. Securely close the set of double doors.
9. Press and hold the green button on the right-hand side of the double doors. The hydraulic motor turns on, and in about 1 second, the machine cuts the book.
INSPECT. HOLES

07/11
CMT 330 Three Knife Trimmer 4-8 Knives
10. Open the set of double doors and check the book. If the bottom cover of the book is not fully cut. Turn the face knife adjustment knob 1/4 revolution counter-clockwise. Repeat steps 7 through 10 until the bottom cover is cut fully. All doors must be closed for the machine to cut.
11. Now complete the Side Knife Adjust-ment procedure.
Side Knife Adjustment
1. The computer should still be in Knife Adjust mode.
2. If the knives were just replaced, the side knives adjustment knob should be turned to the full down position. If it is not, do so by turning the knob clockwise until it stops.
3. Turn the side knives adjustment knob about three full revolutions counter-clockwise.
4. Securely close the doors.
5. Open the sliding door at the left-hand rear of the machine. Place a scrap book underneath the knife with the binding facing the front of the machine.
6. Securely close the sliding door.
7. Press and hold the green button until the machine cuts the book. If the bot-tom cover and binding of the book are not fully cut, turn the side knives ad-justment knob 1/4 revolution counter-clockwise and repeat steps 5 through 7. All doors must be closed for the ma-chine to cut. Continue with the next step if the book is fully cut.
8. Open the sliding door at the right rear-hand side of the machine.
9. Place a book under the knife with the binding facing the front of the machine.
10. Securely close the sliding door.
11. Press and hold the green button on the right-hand side of the double doors at the back of the machine until the book is cut. If the bottom cover and binding are not fully cut, turn the side knives ad-justment knob 1/4 revolution counter-clockwise and repeat steps 8 through 11. All doors must be closed for the machine to cut. If the book is fully cut, the knife adjustment procedure is com-plete.
12. Reinstall all waste chutes.
13. Securely close all doors and resume normal operation at the console.
4.4.3 Knife Sharpening Rules
The CMT 330's knives must be sharpened as a matching set. A total of 1/4" (6.4mm) of materi-al may be removed due to grinding. Beyond this, the machine will not fully cut through a book.
Figure 4-16. Knife Height Range
The knives must not be sharpened to less than 2.50 in. (63.5 mm) of knife height as shown in Figure 4-16.

07/11
CMT 330 Three Knife Trimmer 4-9 Check Pressure Switch
4.5 Check Pressure Switch
The main air pressure switch should be checked for proper operation each month. The main air pressure switch is used to verify that main air is connected and switched on. If this switch fails, damage to the machine could re-sult.
1. Switch on power, open lower back door.
2. Switch off main air valve.
3. Close the door.
4. Go to the console and read the LCD display. The message, "No air pres-sure," should be displayed.
5. Open lower back door.
6. Switch on main air valve.
7. Close the door.
8. Go to the console and read the LCD display. The message, "No air pres-sure," should not be displayed.
4.6 Safety Systems Check
Test Frequency: Daily
CAUTION Only one person should perform this test at a time.
Use the following procedures to test the safety devices throughout the machine. If the machine fails any safety system test, DO NOT USE the machine. Have the machine serviced by an authorized service technician.
Console Stop Button:
1. Switch on the main power.
2. Press the green start button at the con-sole to start the hydraulic motor.
3. Press the clear button, and wait for the machine to reset itself.
4. Press the red stop button at the con-sole. The hydraulic motor should shut off.
Knife Change Operator Stop Button:
1. Press the green start button at the con-sole to start the hydraulic motor.
2. Press the red stop button at the back of the machine. The hydraulic motor should shut off.
Front Sliding Door Interlock:
1. Press the green start button at the con-sole to start the hydraulic motor.
2. Open the front sliding door. The hy-draulic motor should shut off.
3. Close the door.
Right rear Sliding Door Interlock:
1. Press the green start button at the con-sole to start the hydraulic motor.
2. Open the right rear sliding door. The hydraulic motor should shut off.
3. Close the door.
Left rear Sliding Door Interlock:
1. Press the green start button at the con-sole to start the hydraulic motor.
2. Open the left rear sliding door. The hy-draulic motor should shut off.
3. Close the door.
Back Double Door Interlocks:
1. Press the green start button at the con-sole to start the hydraulic motor.
2. Open the left-hand door in the set of double doors at the back of the ma-chine. The hydraulic motor should shut off.
3. Close the door.
4. Press the green start button at the con-sole to start the hydraulic motor.
5. Open the right-hand door in the set of double doors at the back of the ma-chine. The hydraulic motor should shut off.
Right rear Door Interlock:
1. Press the green start button at the con-sole to start the hydraulic motor.
2. Open the right rear door. The hydraulic motor should shut off.
3. Close the door.

07/11
CMT 330 Three Knife Trimmer 4-10 Safety Systems Check
Left rear Door Interlock:
1. Press the green start button at the con-sole to start the hydraulic motor.
2. Open the left rear door. The hydraulic motor should shut off.
3. Close the door.
Lower Back Door Interlock:
1. Press the green start button at the con-sole to start the hydraulic motor.
2. Open the lower back door. The hydrau-lic motor should shut off.
3. Close the door.
Use the table on the following page to record the initials of the person performing the tests and the date the tests are performed. Make photocopies of the check-off sheet as neces-sary.

07/11
CMT 330 Three Knife Trimmer 4-11 Safety Systems Check
4.6.1 Safety Check-off Sheet
Use this sheet to sign tester's initials and test dates for performing the Safety Systems Check on page 4-9 of the Installation and Operator's Manual.
Machine Model: CMT 330 Serial Number: __________________________
TESTER DATE TESTER DATE TESTER DATE
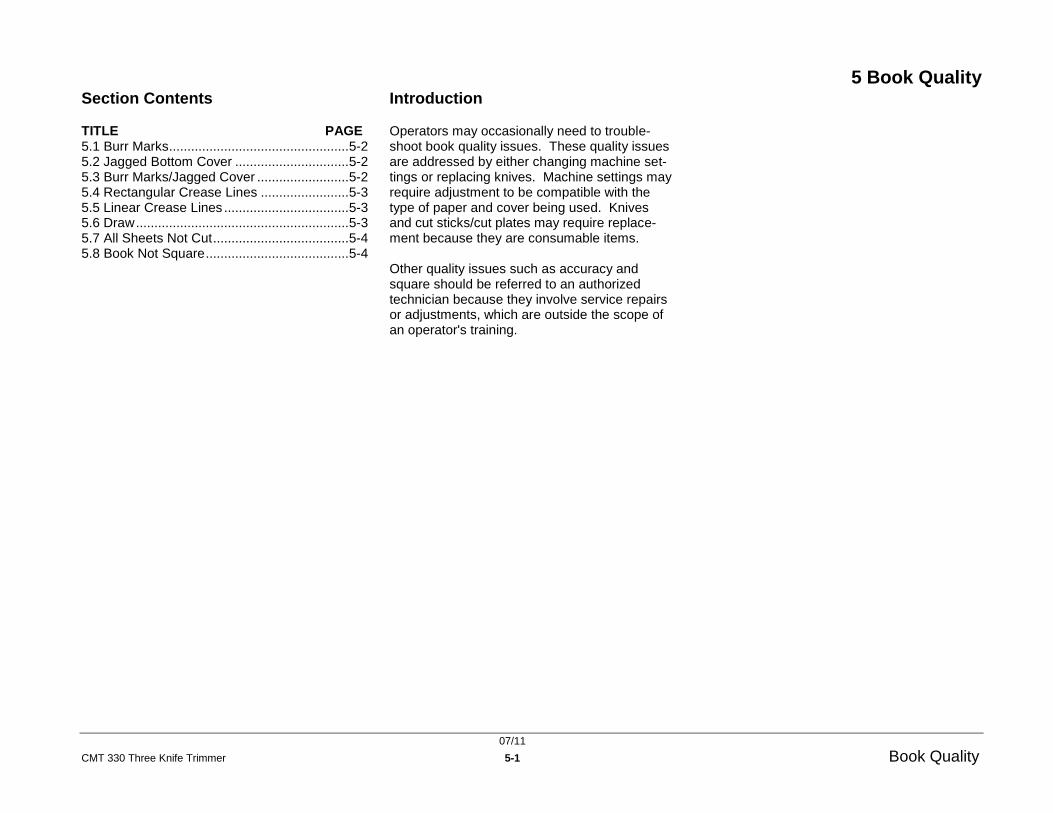
07/11
CMT 330 Three Knife Trimmer 5-1 Book Quality
Section Contents
TITLE PAGE 5.1 Burr Marks ................................................. 5-2 5.2 Jagged Bottom Cover ............................... 5-2 5.3 Burr Marks/Jagged Cover ......................... 5-2 5.4 Rectangular Crease Lines ........................ 5-3 5.5 Linear Crease Lines .................................. 5-3 5.6 Draw .......................................................... 5-3 5.7 All Sheets Not Cut ..................................... 5-4 5.8 Book Not Square ....................................... 5-4
Introduction
Operators may occasionally need to trouble-shoot book quality issues. These quality issues are addressed by either changing machine set-tings or replacing knives. Machine settings may require adjustment to be compatible with the type of paper and cover being used. Knives and cut sticks/cut plates may require replace-ment because they are consumable items. Other quality issues such as accuracy and square should be referred to an authorized technician because they involve service repairs or adjustments, which are outside the scope of an operator's training.
5 Book Quality

07/11
CMT 330 Three Knife Trimmer 5-2 Burr Marks
5.1 Burr Marks
Description
Burr marks are found on books cut with a knife whose cutting edge has been burred. Figure 5-1 illustrates the appearance of burr marks.
Figure 5-1. Burr Marks
Possible Causes
1. Burrs on knives can occur from improp-er knife handling.
2. Burrs may also occur from cutting hard, irregular materials.
Solutions
If the any knife is burred, replace all three knives and maintain as a set.
CAUTION All three knives must be sharpened as a set. Damage to the cut plates may result from using knives sharpened sepa-rately.
5.2 Jagged Bottom Cover
Description
Books can appear as though the bottom few sheets and cover were torn apart rather than sharply cut. Tearing of the bottom sheets and cover occur when deep score marks develop in the cut stick or cut plates. The cover is pushed into the score mark, folded over and torn.
Figure 5-2. Jagged Cover
Possible Causes
1. The knife may be dull.
2. The cut stick/cut plates may be worn.
Solutions
If the problem is on the face of the book, the cut stick may need rotation or replacement. The knives may also re-quire replacement.
If the problem is on the top or bottom faces of the book, the cut plates may need rotation or replacement. The knives may also require replacement.
5.3 Burr Marks/Jagged Cover
Description
A jagged bottom cover may also accompany burr marks. A burred knife may not fully cut into the cut stick or cut plate. As a result, it will leave a jaggedly cut bottom cover.
Figure 5-3. Burr Marks/Jagged Cover
Possible Causes
The knife is burred, and the cut stick/cut plates are worn.
Solutions
If the problem is on the face of the book, replace the knives. Rotate or re-place the cut stick.
If the problem is on the top or bottom faces of the book, replace the knives. Rotate or replace the cut plates.

07/11
CMT 330 Three Knife Trimmer 5-3 Rectangular Crease Lines
5.4 Rectangular Crease Lines
Description
Indentations or crease lines may appear in a rectangular pattern in the center of the book.
Figure 5-4. Crease Lines on Cover
Possible Causes
The gripper has too much clamp pres-sure for the stock being cut.
Solutions
Reduce the gripper clamp pressure by turning the control dial counterclock-wise. Reduce the pressure until crease lines disappear on test books. The gripper adjustment gauge only reads gripper pressure while the gripper is holding the book.
5.5 Linear Crease Lines
Description
Indentations or crease lines may appear in a rectangular pattern in the near the edges of the book.
Figure 5-5. Linear Crease Lines
Possible Causes
The clamps have too much clamp pres-sure for the stock being cut.
Solutions
Reduce the clamp pressure by turning the control dial counterclockwise. Re-duce the pressure until crease lines disappear on test books.
Worn cut plates may create these lines on the bottom cover. Turn or change the cut plates.
Note: Reducing the clamp pressure too much will cause other quality problems such as draw. Only reduce clamp pressure by necessary amounts.
5.6 Draw
Description
The cut face appears to have a slope because all of the sheets are cut at different lengths.
Figure 5-6. Draw
Possible Causes
Clamp pressure may be too low.
The knife may be dull.
Solutions
Check clamp pressure. Clamp pres-sure should be 80-90 PSI. Turn control dial clockwise to increase clamp pres-sure. Make sure shop air is 80-90 PSI.
If the problem is on the face of the book, replace all three knives. Rotate or replace the cut stick.
If the problem is on the top or bottom faces of the book, replace the knives. Rotate or replace the cut plates.
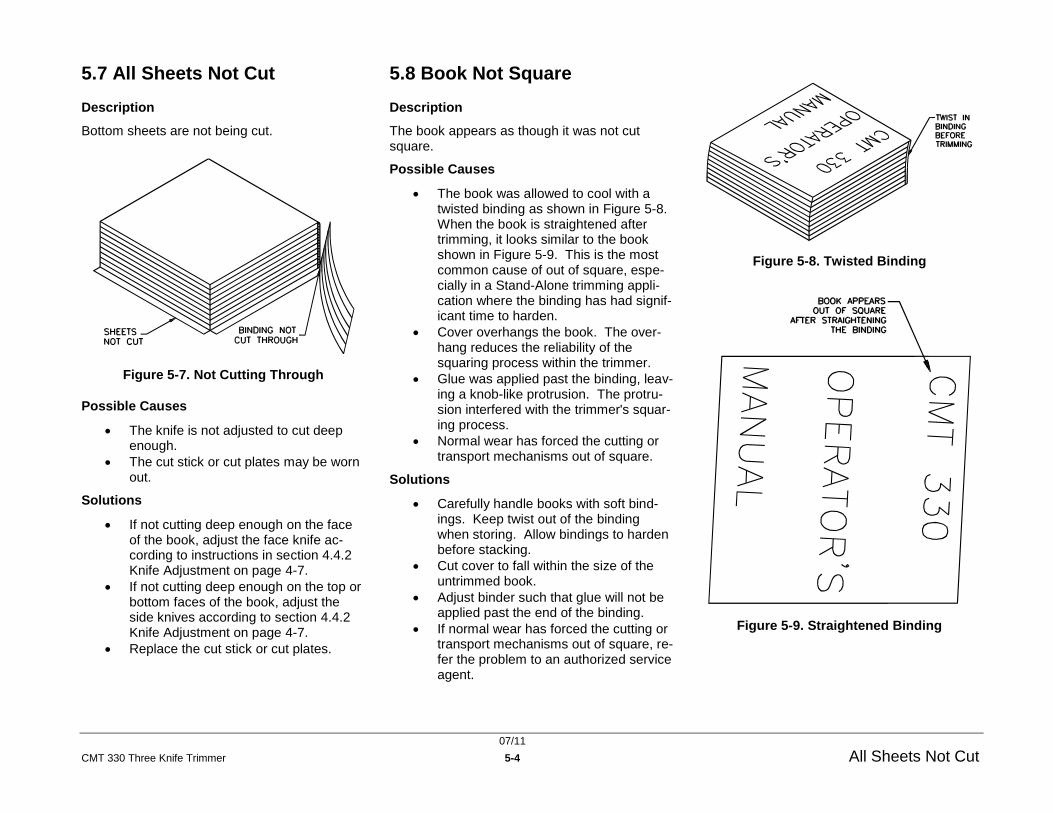
07/11
CMT 330 Three Knife Trimmer 5-4 All Sheets Not Cut
5.7 All Sheets Not Cut
Description
Bottom sheets are not being cut.
Figure 5-7. Not Cutting Through
Possible Causes
The knife is not adjusted to cut deep enough.
The cut stick or cut plates may be worn out.
Solutions
If not cutting deep enough on the face of the book, adjust the face knife ac-cording to instructions in section 4.4.2 Knife Adjustment on page 4-7.
If not cutting deep enough on the top or bottom faces of the book, adjust the side knives according to section 4.4.2 Knife Adjustment on page 4-7.
Replace the cut stick or cut plates.
5.8 Book Not Square
Description
The book appears as though it was not cut square.
Possible Causes
The book was allowed to cool with a twisted binding as shown in Figure 5-8. When the book is straightened after trimming, it looks similar to the book shown in Figure 5-9. This is the most common cause of out of square, espe-cially in a Stand-Alone trimming appli-cation where the binding has had signif-icant time to harden.
Cover overhangs the book. The over-hang reduces the reliability of the squaring process within the trimmer.
Glue was applied past the binding, leav-ing a knob-like protrusion. The protru-sion interfered with the trimmer's squar-ing process.
Normal wear has forced the cutting or transport mechanisms out of square.
Solutions
Carefully handle books with soft bind-ings. Keep twist out of the binding when storing. Allow bindings to harden before stacking.
Cut cover to fall within the size of the untrimmed book.
Adjust binder such that glue will not be applied past the end of the binding.
If normal wear has forced the cutting or transport mechanisms out of square, re-fer the problem to an authorized service agent.
Figure 5-8. Twisted Binding
Figure 5-9. Straightened Binding

07/11
CMT 330 Three Knife Trimmer 5-5 Book Not Square
in. fractional in. mm 0.016 1/64 0.40 0.031 1/32 0.79 0.047 3/64 1.19 0.063 1/16 1.59 0.078 5/64 1.98 0.094 3/32 2.38 0.109 7/64 2.78 0.125 1/8 3.18 0.141 9/64 3.57 0.156 5/32 3.97 0.172 11/64 4.37 0.188 3/16 4.76 0.203 13/64 5.16 0.219 7/32 5.56 0.234 15/64 5.95 0.250 1/4 6.35 0.266 17/64 6.75 0.281 9/32 7.14 0.297 19/64 7.54 0.313 5/16 7.94 0.328 21/64 8.33
Inch / Metric Conversion Chart in. Fractional in. mm
0.344 11/32 8.73 0.359 23/64 9.13 0.375 3/8 9.53 0.391 25/64 9.92 0.406 13/32 10.32 0.422 27/64 10.72 0.438 7/16 11.11 0.453 29/64 11.51 0.469 15/32 11.91 0.484 31/64 12.30 0.500 1/2 12.70 0.516 33/64 13.10 0.531 17/32 13.49 0.547 35/64 13.89 0.563 9/16 14.29 0.578 37/64 14.68 0.594 19/32 15.08 0.609 39/64 15.48 0.625 5/8 15.88 0.641 41/64 16.27 0.656 21/32 16.67
in. fractional in. mm 0.672 43/64 17.07 0.688 11/16 17.46 0.703 45/64 17.86 0.719 23/32 18.26 0.734 47/64 18.65 0.750 3/4 19.05 0.766 49/64 19.45 0.781 25/32 19.84 0.797 51/64 20.24 0.813 13/16 20.64 0.828 53/64 21.03 0.844 27/32 21.43 0.859 55/64 21.83 0.875 7/8 22.23 0.891 57/64 22.62 0.906 29/32 23.02 0.922 59/64 23.42 0.938 15/16 23.81 0.953 61/64 24.21 0.969 31/32 24.61 0.984 63/64 25.00 1.000 64/64 25.40
© 2002-2018 by The Challenge Machinery Company. All rights reserved. Printed in the USA F.033 / CMT 330B / JUL 2011