cm live deal documentation · cm live deal is a joomla! extension providing ability to list deals...
TRANSCRIPT

CM Live Deal DocumentationRelease 1.0.0-beta
CMExtension
August 03, 2014


Contents
1 Overview 31.1 Technical Requirements . . . . . . . . . . . . . . . . . . . . . . . . . . . . . . . . . . . . . . . . . 31.2 Features . . . . . . . . . . . . . . . . . . . . . . . . . . . . . . . . . . . . . . . . . . . . . . . . . . 3
2 Installation 5
3 Configuration 73.1 Users component . . . . . . . . . . . . . . . . . . . . . . . . . . . . . . . . . . . . . . . . . . . . . 73.2 Media Manager component . . . . . . . . . . . . . . . . . . . . . . . . . . . . . . . . . . . . . . . 93.3 CM Live Deal component . . . . . . . . . . . . . . . . . . . . . . . . . . . . . . . . . . . . . . . . 113.4 Menu item for merchant registration page . . . . . . . . . . . . . . . . . . . . . . . . . . . . . . . . 163.5 CMLD Merchant plugin . . . . . . . . . . . . . . . . . . . . . . . . . . . . . . . . . . . . . . . . . 193.6 CM Live Deal Search module . . . . . . . . . . . . . . . . . . . . . . . . . . . . . . . . . . . . . . 22
4 Coupon template 29
5 Categories 31
6 Cities 33
7 Merchants 377.1 New merchant registration . . . . . . . . . . . . . . . . . . . . . . . . . . . . . . . . . . . . . . . . 377.2 Create new merchant . . . . . . . . . . . . . . . . . . . . . . . . . . . . . . . . . . . . . . . . . . . 397.3 Edit profile . . . . . . . . . . . . . . . . . . . . . . . . . . . . . . . . . . . . . . . . . . . . . . . . 437.4 Manage merchants . . . . . . . . . . . . . . . . . . . . . . . . . . . . . . . . . . . . . . . . . . . . 45
8 Deals 478.1 Create new deal in back-end . . . . . . . . . . . . . . . . . . . . . . . . . . . . . . . . . . . . . . . 478.2 Create new deal in front-end . . . . . . . . . . . . . . . . . . . . . . . . . . . . . . . . . . . . . . . 508.3 Deal list . . . . . . . . . . . . . . . . . . . . . . . . . . . . . . . . . . . . . . . . . . . . . . . . . . 53
9 Coupons 559.1 User gets coupon . . . . . . . . . . . . . . . . . . . . . . . . . . . . . . . . . . . . . . . . . . . . . 559.2 User’s coupon list . . . . . . . . . . . . . . . . . . . . . . . . . . . . . . . . . . . . . . . . . . . . 559.3 Administratiors manage coupons . . . . . . . . . . . . . . . . . . . . . . . . . . . . . . . . . . . . 569.4 Merchant’s customer list . . . . . . . . . . . . . . . . . . . . . . . . . . . . . . . . . . . . . . . . . 58
10 Merchant’s images 61
i

11 User statistics 6311.1 User statistics . . . . . . . . . . . . . . . . . . . . . . . . . . . . . . . . . . . . . . . . . . . . . . . 6311.2 User visits . . . . . . . . . . . . . . . . . . . . . . . . . . . . . . . . . . . . . . . . . . . . . . . . 6311.3 Configuration . . . . . . . . . . . . . . . . . . . . . . . . . . . . . . . . . . . . . . . . . . . . . . . 63
12 Search for nearby deals 6712.1 Get GeoLite2 City database . . . . . . . . . . . . . . . . . . . . . . . . . . . . . . . . . . . . . . . 6712.2 Configure CM Live Deal component . . . . . . . . . . . . . . . . . . . . . . . . . . . . . . . . . . 6712.3 Search in front-end . . . . . . . . . . . . . . . . . . . . . . . . . . . . . . . . . . . . . . . . . . . . 69
13 Translation 7113.1 Installation . . . . . . . . . . . . . . . . . . . . . . . . . . . . . . . . . . . . . . . . . . . . . . . . 7113.2 Preparation . . . . . . . . . . . . . . . . . . . . . . . . . . . . . . . . . . . . . . . . . . . . . . . . 7213.3 Translate . . . . . . . . . . . . . . . . . . . . . . . . . . . . . . . . . . . . . . . . . . . . . . . . . 72
ii

CM Live Deal Documentation, Release 1.0.0-beta
This documentation gives you instruction how to install and setup CM Live Deal on your Joomla! website.
Contents 1

CM Live Deal Documentation, Release 1.0.0-beta
2 Contents

CHAPTER 1
Overview
CM Live Deal is a Joomla! extension providing ability to list deals or discount offers.
The offer in CM Live Deal is limited-time and real-time offer which is created by site administrator or merchant. Offercan be started or stopped by merchant at any time.
User can browse for the deals in his/her city and claim the deals without paying to website. After getting coupon, usercan print it or show it to merchant to redeem and receive discount from merchant.
1.1 Technical Requirements
• Joomla! 3.x.x: CM Live Deal is NOT compatible with Joomla! 1.x.x or 2.x.x, only Joomla! 3.x.x is supported.Please check Joomla! 3’s Technical Requirements for more information.
• Bootstrap 2: CM Live Deal is NOT compatible with Bootstrap 3. Bootstrap 2 is available by default in Joomla!3.x.x. Bootstrap 2 must be loaded on your site by Joomla! or by your template.
1.2 Features
For merchants:
• Easy sign-up: User can register for a Joomla! user account and a merchant account at the same time.
• Easy profile management: Merchants can manage Joomla! profile and merchant profile in the same place.
• Create unlimited deals.
• Start and stop deals at any time: Create deals when merchants need traffic and customers, stop deals whenmerchants satisfy their traffic needs.
• Know how much their deals attract customers by impression and click values.
• Manage their coupons. Mark coupons as redeemed.
• Know if user is a trusted customer (user will come to redeem coupon).
• Know if user is a return customer.
• Upload photos of their stores, products,... to promote for their businesses.
For users:
• Search for deals by keyword, category and city.
3

CM Live Deal Documentation, Release 1.0.0-beta
• Get coupon just in few clicks.
• Manage claimed/captured coupons.
• Do not need to pay to get coupon, only need to pay directly to merchant, no more asking website owner forrefund.
• Do not need to wait until deal reaches its minimum claim/purchase quantity like traditional “groupon” sites.
• No daily mail: Users are not bothered by marketing emails every day, they only find deals when they need andcome to merchants to redeem instantly.
For site owners:
• Create unlimited categories and sub-categories (powered by Joomla!’s Categories component).
• Easy to manage merchants and cities via Google Maps.
• Easy to manage the uploaded photos of merchants.
• Get coordinates by location address or by clicking and moving marker on Google Maps, no need for copy-pastecoordinates from Google Maps website.
• Manually create new coupon.
• Integration with Jooma!’s Group: charging merchants for subscription/membership for posting deals on websiteby integrating with third party extensions of Joomla! (eg. Akeeba Subscription or PayPlans).
• Responsive website: with the power of Bootstrap, website is responsive and nicely displayed on mobile devices,saving the cost for developing and maintaining iOS and Android applications.
4 Chapter 1. Overview

CHAPTER 2
Installation
This section will show you how to install CM Live Deal on your Joomla! 3.x.x website.
We strongly recommend to backup your site before installing any new extension on your site.
Log into your Joomla! back-end. On the top menu, you navigate to Extensions -> Extension Manager to accessExtension Manager.
You see the page like the screenshot below.
Click “Browse” button and select the package of CM Live Deal that you downloaded from our website, click “Upload& Install” button to upload the package to your server to install.
5

CM Live Deal Documentation, Release 1.0.0-beta
If the installation is successful, you will receive the message “Installing package was successful.”
Now the component CM Live Deal, the plugin CMLD Merchant and the module CM Live Deal Search are installedon your site. You can now start using them.
6 Chapter 2. Installation

CHAPTER 3
Configuration
This section will give you instructions to setup Joomla! and CM Live Deal. If this is the first time you use CM LiveDeal, we suggest that you should follow this guide step by step.
3.1 Users component
The merchants in CM Live Deal component are actually Joomla! users that are in a specific user group.
In your back-end, you navigate to Users -> Groups.
You can see the list of current user groups on your site. Click “New” button in the toolbar to create a new user group.
7

CM Live Deal Documentation, Release 1.0.0-beta
You give your new user group a name by entering the name in “Group Title” field. You select a parent group in “GroupParent” option. Because merchant is just a registered user so you can select “Registered” as the parent group, you canalways select a different group if you are already familiar with Jooma!’s user group and access level.
After creating the user group, you can see it displayed in the group list as the screenshot below.
8 Chapter 3. Configuration

CM Live Deal Documentation, Release 1.0.0-beta
3.2 Media Manager component
Merchant can upload image to your site. You need to configure where the images are stored and what image extensionsare allowed to upload.
In your back-end, you navigate to Content -> Media Manager to access Media Manager component.
You can see the page similar to the screenshot below.
3.2. Media Manager component 9

CM Live Deal Documentation, Release 1.0.0-beta
You click “Options” button on the toolbar to configure the component.
CM Live Deal uses the configuration of Media Manager in uploading merchant’s photo. You can adjust the defaultsettings of Media Manager to suit your needs. If you don’t have any special requirement, you can keep the defaultsettings.
In Media Manager’s main view (Content -> Media Manager), you create a new folder to store all merchants’s photosby clicking “Creat New Folder” button, enter the folder name and click “Create Folder” button.
10 Chapter 3. Configuration

CM Live Deal Documentation, Release 1.0.0-beta
You will receive “Create Complete” message if the folder is created successfully.
3.3 CM Live Deal component
In your back-end, go to Components -> CM Live Deal to access CM Live Deal component.
3.3. CM Live Deal component 11

CM Live Deal Documentation, Release 1.0.0-beta
The dashboard is displayed by default.
On the toolbar there is a button “Options”, you click this button to configure the component.
On the configuration page, the settings are grouped into 5 tabs: Layout, Merchant, Deal, Coupon and Permissions.
12 Chapter 3. Configuration

CM Live Deal Documentation, Release 1.0.0-beta
3.3.1 Layout
• Image’s width (management): Image thumbnail’s width (pixel) in deal list table (in back-end and in merchant’smanagement area in front-end). Default value is 50px.
• Map’s height: The height of Google’s maps, used in both front-end and back-end. Default value is 400px.
• Map’s zoom level: Default Google Maps’s zoom level. Default value is 15.
• Map’s default location: The default location of Google Maps when the map is displayed, used in both front-endand back-end. You can click on the map or move the marker to the location you want.
• Date format: Date format that is used in front-end.
3.3. CM Live Deal component 13

CM Live Deal Documentation, Release 1.0.0-beta
• Time format: Time format that is used in front-end.
3.3.2 Merchant
• Merchant’s user group: Joomla! user group that merchant are assigned to. Only users in the selected groupcan submit new deal and edit merchant’s profile. You need to select the group that you create in the above step.
• Add merchant to group: Options for adding merchant to merchant’s Joomla! user group after registration.
– Add automatically after registration: After user registers for a merchant account, user is added to themerchant group automatically.
– Add manually by administrators: After user registers for a merchant account, user is not added to themerchant group. Administrator needs to review user’s registration and add user to the group manually.
• Block merchant: After user registers for a merchant account, user’s Joomla! account is blocked and user cannot login, administrator needs to unblock the account after reviewing the registration.
• New merchant notification: Send email to administrators when there is a new merchant registration.
• Image folder: Folder where the images that are uploaded by merchants are stored. You can only select thefolders which are in the image folder that you set in Media Manager component. You can select the folder thatyou create in Media Manager in the above step of Media Manager.
• Display user’s stats: Display coupon owner’s statistics in merchant’s coupon list. This info lets merchant knowif coupon owner is a serious customer.
• Display user’s visits: Display coupon owner’s visits to merchant’s. This info lets merchant know if couponowner is a returned customer.
14 Chapter 3. Configuration

CM Live Deal Documentation, Release 1.0.0-beta
3.3.3 Deal
• New deal notification: Send email to administrators when there is a new deal submitted.
• Search radius from user’s location: The radius in kilometer to search for nearby deals of user. Default is 5kilometers. This value is used when user searches for deals in his/her location by using the search module.
• Location cookie’s lifetime: Detect user’s location requires reading the database file and make the server slow.User’s location can be stored in cookie and reused later to reduce the file reads from server. With this optionyou can set how many days this cookie is available. Default value is 7 (days). You can disable storing cookie byusing 0 value. You can view Search for nearby deals for more information.
3.3.4 Coupon
• Coupon code’s length: The number of characters in a coupon code. Default value is 5.
• Coupon’s characters: The character’s types in coupon code. Default is alphanumeric. Coupon code’s charac-ters are always uppercase.
– Latin alphabetic characters only (from A to Z): for example, “GWLCA”.
– Latin numeric characters only (from 0 to 9): for example, “83061”.
– Latin alphabetic and numeric: for example, “F52H2”.
3.3. CM Live Deal component 15

CM Live Deal Documentation, Release 1.0.0-beta
3.3.5 Permissions
On the left side there are tabs for user groups. On the right side, we have the options of the permissions that the usersin the selected group can do.
You select your merchant group and configure the following permissions:
• Configure: Denied
• Access Administration Interface: Denied
• Create: Allowed
• Delete: Allowed
• Edit: Denied
• Edit State: Allowed
• Edit Own: Allowed
3.4 Menu item for merchant registration page
CMLD Merchant plugin has an option for merchant registration page, we need to have this page before setting up theplugin.
In your back-end, you navigate to Menus menu item and select a menu that you want to create the registration page.The below screenshots uses “Main Menu” menu.
16 Chapter 3. Configuration

CM Live Deal Documentation, Release 1.0.0-beta
After selecting the menu, you are taken to the list of current menu items in that menu.
You click the “New” button on the toolbar to add a new menu item, then you are taken to the page as the screenshotbelow.
You click the “Select” button of “Menu Item Type” field to select menu item’s type, a popup will be displayed. Youselect “Registration Form” of “Users Manager” and the popup is closed.
3.4. Menu item for merchant registration page 17

CM Live Deal Documentation, Release 1.0.0-beta
You enter the name of this new menu item and then save.
This new menu item is now displayed in your menu item list.
18 Chapter 3. Configuration

CM Live Deal Documentation, Release 1.0.0-beta
3.5 CMLD Merchant plugin
CMLD Merchant (CM Live Deal - Merchant) is a Joomla! plugin to insert custom profile fields into Joomla! userprofile. CMLD Merchant plugin provides the needed fields for merchant profile.
To configure the plugin, you need to access Extensions -> Plugin Manager.
You can search for the plugin by using keyword “merchant”, “CM Live Deal”, etc... The plugin name is “User - CMLive Deal’s merchant profile”
You click on the plugin name to edit the plugin’s setting.
3.5. CMLD Merchant plugin 19

CM Live Deal Documentation, Release 1.0.0-beta
• Registration page: You select the menu item of merchant registration page that you create in the above step.
• Status: You set the status to “Enabled”.
For profile fields, you have 3 options:
• Required: Field is displayed and user must enter value.
• Optional: Field is displayed and user can leave field empty.
• Disabled: Field is not displayed in profile form.
After saving the plugin, you receive the message “Plugin successfully saved”.
You can visit the page for merchant registration in your front-end to check if the merchant’s profile fields are displayedthere. The page could look like the following screenshot.
20 Chapter 3. Configuration

CM Live Deal Documentation, Release 1.0.0-beta
3.5. CMLD Merchant plugin 21

CM Live Deal Documentation, Release 1.0.0-beta
3.6 CM Live Deal Search module
To configure your Search module, you go to Extensions -> Module Manager.
Joomla! creates a new module for you automatically after you install the package of CM Live Deal. You can see CMLive Deal - Search module in your module list.
Click on the module name to edit its settings. You can give the module a new name by modifying “Title” field. Inthe “Module” tab, you set “Status” to “Published” and select the position you want to put this module in “Position”option.
In “Options” tab, you can configure the main settings of the module.
22 Chapter 3. Configuration

CM Live Deal Documentation, Release 1.0.0-beta
• Display: How search form is displayed, there are 3 styles, “Inline”, “Horizontal”, “Vertical”. You can see howsearch form looks like in these styles in the screenshot below.
• Keyword field’s CSS: Custom CSS classes for keyword input field.
• Category list’s CSS: Custom CSS classes for category dropdown list.
• City list’s CSS: Custom CSS classes for city dropdown list.
• Search button’s CSS: Custom CSS classes for search button.
• Clear button’s CSS: Custom CSS classes for clear button.
• Display Clear button: Display or hide clear button.
• Button’s label:
– Use icon: Use only icons for search and clear buttons.
– Use text: Use only text for search and clear buttons.
– Use icon and text: Use both icon and text for search and clear buttons.
CSS fields are useful if you want to customize the element of search form to match your template’s style. This requiresyour skills in HTML and CSS.
In “Menu Assignment” tab, you configure what pages the module is displayed on.
3.6. CM Live Deal Search module 23

CM Live Deal Documentation, Release 1.0.0-beta
After adjusting the settings, you can save the module and then you will receive “Module successfully saved” message.If you change the module’s name, you can see its name is updated in the module list.
You can check on your front-end to see if the module is displayed properly. The below screenshot is how the inlinesearch form is displayed in “banner” positon of Joomla!’s‘ default Protostar template.
24 Chapter 3. Configuration

CM Live Deal Documentation, Release 1.0.0-beta
Examples (the settings on the left side, the result on the right side)
Example of how inline search form is displayed. The Clear button is displayed and the buttons have only icons. Thefields are customized by using “input-medium” class of Bootstrap.
Example of how horizontal search form is displayed. The Clear button is not displayed and the Search button has onlytext. The fields are customized by using “input-medium” class of Bootstrap.
3.6. CM Live Deal Search module 25

CM Live Deal Documentation, Release 1.0.0-beta
Example of how vertical search form is displayed. The Clear button is displayed and is customized by “btn-warning”class of Boostrap. The Search button is customized by “btn-success” class of Bootstrap. Icon and text are both usedin the buttons. The fields are customized by using “input-medium” class of Bootstrap.
26 Chapter 3. Configuration

CM Live Deal Documentation, Release 1.0.0-beta
3.6. CM Live Deal Search module 27

CM Live Deal Documentation, Release 1.0.0-beta
28 Chapter 3. Configuration

CHAPTER 4
Coupon template
After capturing a deal, a coupon for the deal is available for user. User can print coupon or show it on his/her phone tomerchant.
To design how coupon on your site looks like, go to Components -> CM Live Deal.
On the toolbar, you click “Coupon template”.
29

CM Live Deal Documentation, Release 1.0.0-beta
In the form, you can use HTML and CSS to design your coupon.
To display the information of deal on your coupon, you can use the following tags (shortcodes):
• {code}: Coupon code.
• {deal}: Deal’s name.
• {description}: Deal’s description.
• {terms}: Deal’s fine print.
• {merchant}: Merchant’s name.
• {address}: Merchant’s address.
• {phone}: Merchant’s phone.
• {captured}: Date when the coupon is captured.
• {expired}: Date when the coupon is expired.
When coupon is showed to user, the tags are replaced by deal’s information.
30 Chapter 4. Coupon template

CHAPTER 5
Categories
The deals in CM Live Can can be assigned to categories. With categories, users can search for the interesting dealseasily.
In your back-end, go to Components -> CM Live Deal to access CM Live Deal component.
On the toolbar, you click “Categories” to access the list of categories in Category Manager.
31

CM Live Deal Documentation, Release 1.0.0-beta
Click “New” button on the toolbar to create a new category.
There are only 3 fields that you need to set:
• Title: The name of your new category.
• Parent: The parent category of your new category.
• Status: Status of the category, you always set it to “Published” most of the time.
After saving the new category, it is displayed in your category list.
32 Chapter 5. Categories
CHAPTER 6
Cities
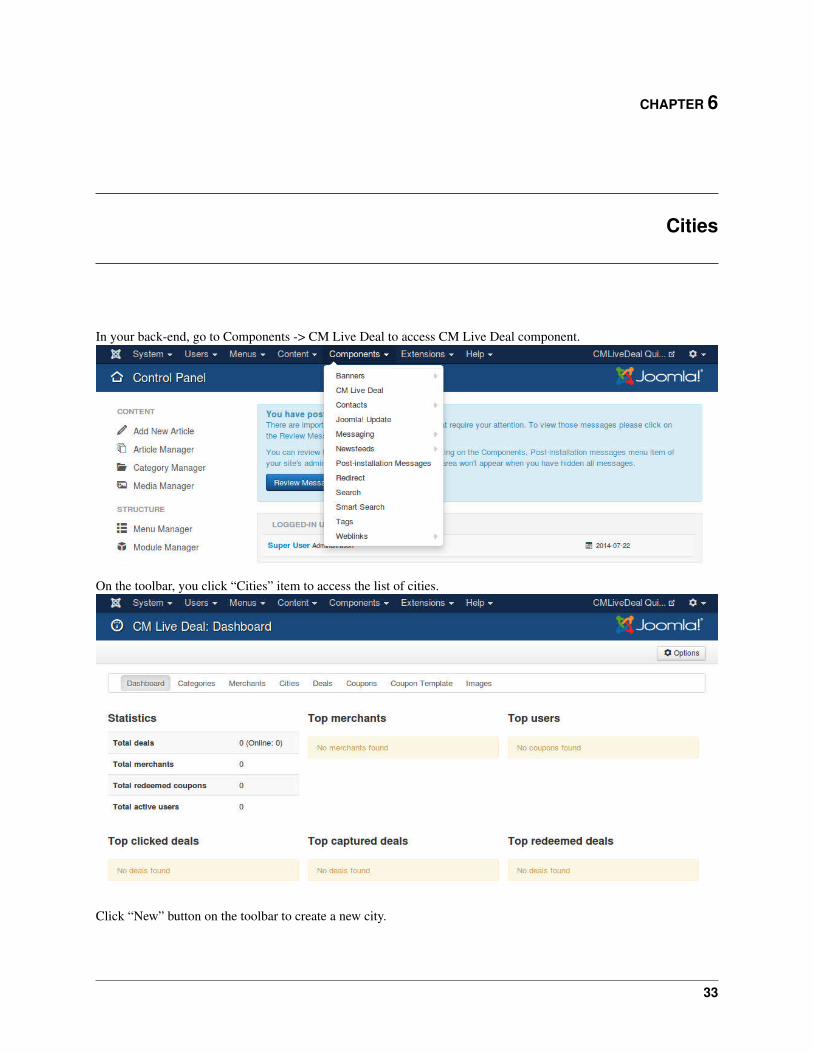
In your back-end, go to Components -> CM Live Deal to access CM Live Deal component.
On the toolbar, you click “Cities” item to access the list of cities.
Click “New” button on the toolbar to create a new city.
33

CM Live Deal Documentation, Release 1.0.0-beta
The form to create new city (and to edit existing city) has the following fields:
• Name: The city’s name.
• Radius: The radius in kilometer to collect deals from the city’s position. The deals which are in this radius areconsidered to belong to this city. After entering your value in this field, you can click somewhere else on thepage to update the new value to the Google Maps on the page.
• Location: A Google Maps to select your city’s location. You can move the marker to select the location. Youcan see an circle on the map, this circle’s center is the Google Maps marker and the circle’s radius is the radiusof the “Radius” field, the deals which are in this circle are considered to belong to this city.
• Status: Status of the city.
• Created Date: The date the city is created.
• Created by: The person who creates the city.
• Modified Date: The date the city is modified the last time.
• Modified by: The person who does the last modification.
• ID: The ID of the city.
34 Chapter 6. Cities

CM Live Deal Documentation, Release 1.0.0-beta
After saving the new city, it is displayed in your city list.
35

CM Live Deal Documentation, Release 1.0.0-beta
36 Chapter 6. Cities

CHAPTER 7
Merchants
This section will give you instructions to register a new merchant in front-end and manually create a new merchant inback-end.
This section uses the result of the setup in Configuration section.
7.1 New merchant registration
Access your menu item for merchant registration that you create in Configuration section, fill the form and click theRegister button.
37

CM Live Deal Documentation, Release 1.0.0-beta
38 Chapter 7. Merchants

CM Live Deal Documentation, Release 1.0.0-beta
If in CM Live Deal’s Configuration, you set
• “Merchant’s user group” option to “Merchants” user group (create in Configuration section).
• “Add merchant to group” option to “Add automatically after registration”.
• “Block merchant” to “No”.
Then your new merchant is displayed in User -> User Manager similar to the screenshot below.
7.2 Create new merchant
As an administrator, you can always create a new user account in back-end.
Access User -> User Manager, click “New” button to add a new user.
In “Account Details” tab, you provide basic account information for user.
7.2. Create new merchant 39

CM Live Deal Documentation, Release 1.0.0-beta
In “Assigned User Groups”, “Registered” group is selected by default, you need to select the group for your merchants.In the below screenshot, “Merchants” group that we create in Configuration section is selected.
40 Chapter 7. Merchants

CM Live Deal Documentation, Release 1.0.0-beta
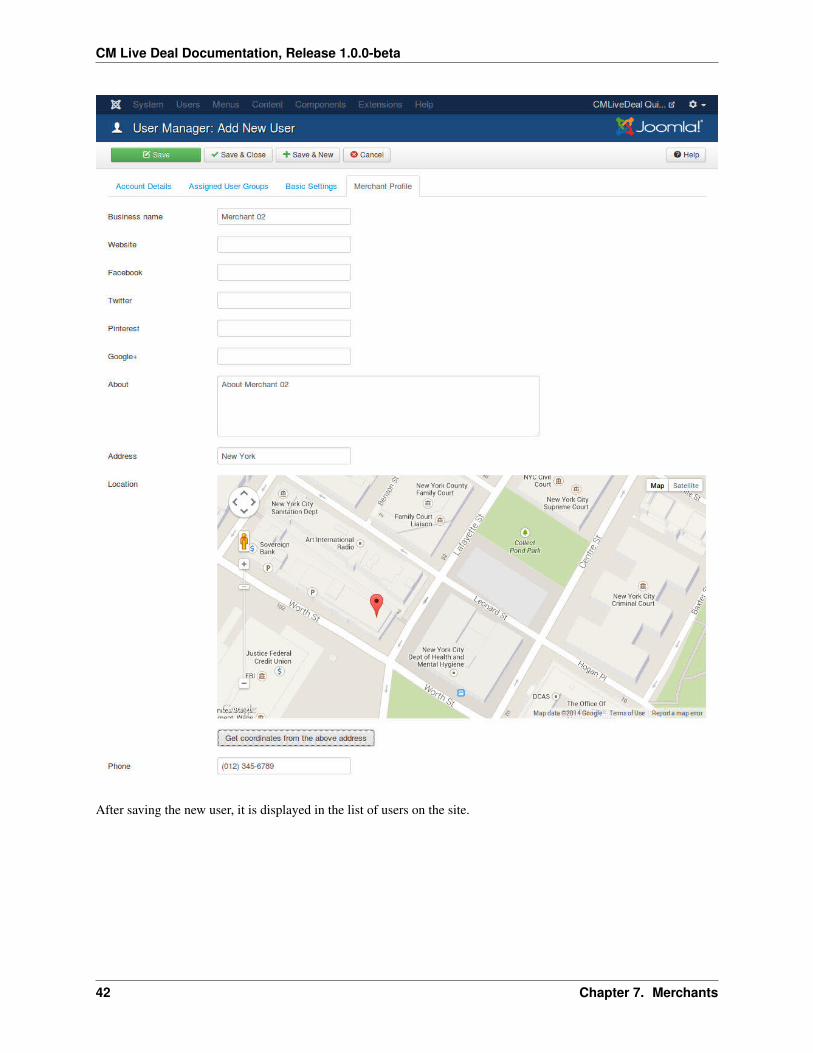
In “Merchant Profile” tab, you enter the details of merchant’s business.
7.2. Create new merchant 41
CM Live Deal Documentation, Release 1.0.0-beta
After saving the new user, it is displayed in the list of users on the site.
42 Chapter 7. Merchants

CM Live Deal Documentation, Release 1.0.0-beta
7.3 Edit profile
To allow users to edit their profiles, you need to create a menu item for “Edit User Profile”
Create a new menu item in a menu that you want, select User Manager -> Edit User Profile as the menu item type.
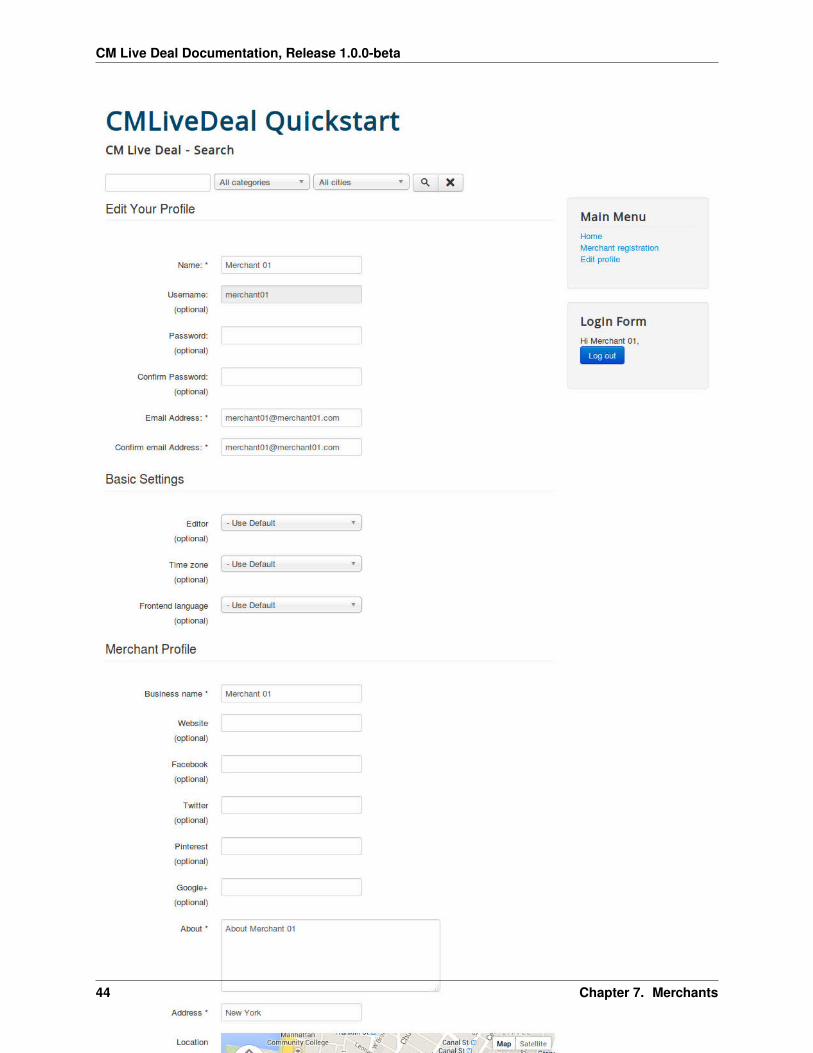
Access the new menu item in front-end, login with a merchant account, you can see the form to edit profile whichincludes merchant’s profile fields.
7.3. Edit profile 43
CM Live Deal Documentation, Release 1.0.0-beta
44 Chapter 7. Merchants

CM Live Deal Documentation, Release 1.0.0-beta
As an administrator, you can always edit any user’s profile in User Manager.
7.4 Manage merchants
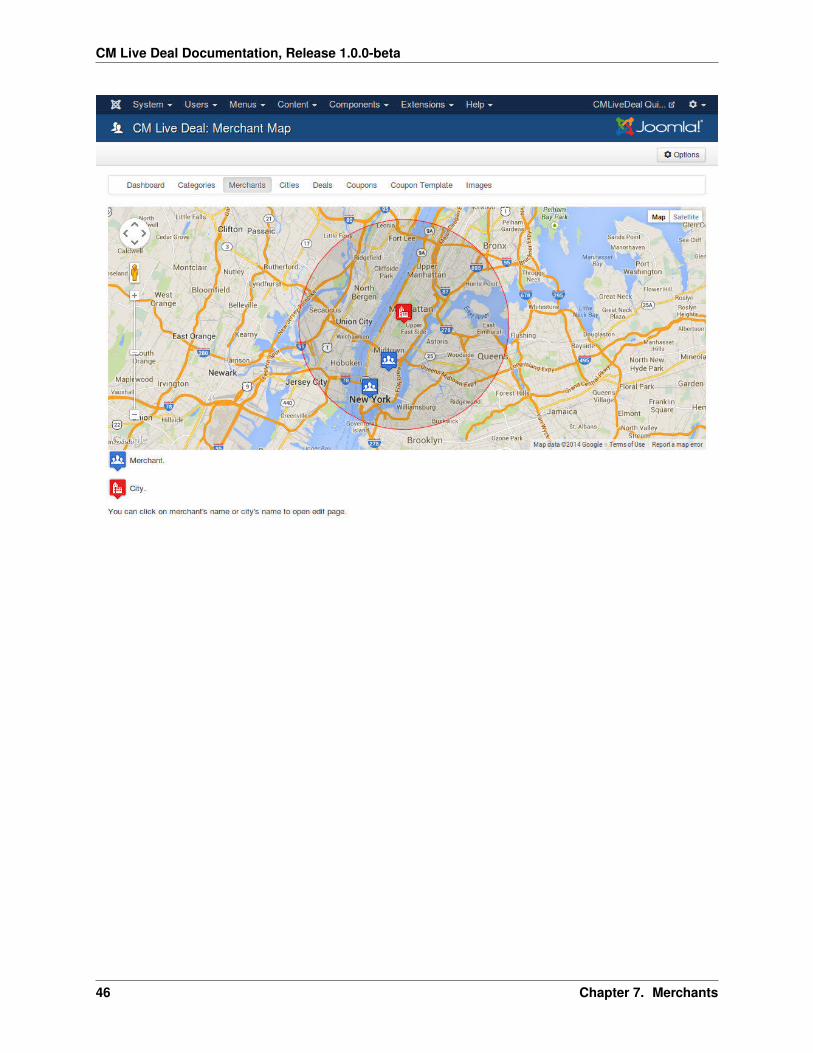
In your back-end, go to Components -> CM Live Deal to access CM Live Deal component.
On the toolbar, you click “Merchants” item to access the merchant map.
With this Google Maps, you can see the cities and the merchants in every city. Every city has a circle, if the merchantis in the circle of a city that means the merchant’s deals can be listed in the deal list when users search for deals in thatcity.
If there is any merchant that is not in the circle of any city, you should create a new city for that merchant, or extendthe radius of the nearest city, unless the deals of these merchants are not searchable.
7.4. Manage merchants 45
CM Live Deal Documentation, Release 1.0.0-beta
46 Chapter 7. Merchants

CHAPTER 8
Deals
8.1 Create new deal in back-end
To create a new deal in your Joomla!’s back-end as an administrator, you go to Components -> CM Live Deal to accessCM Live Deal component.
On the toolbar, you click “Deals” item to access the list of deals.
47

CM Live Deal Documentation, Release 1.0.0-beta
Click “New” button on the toolbar to create a new deal.
The form to create/edit deal looks like the screenshot below.
48 Chapter 8. Deals

CM Live Deal Documentation, Release 1.0.0-beta
You need to enter your deal’s details: name, description, fine print, starting date and ending date. You also need toselect a merchant and a category for your deal.
To assign an image to your deal, you click “Select” button to open image popup. Before selecting/uploading a newimage, you must select a merchant first, this merchant will be the owner of any image you upload while you arecreating/modifying the deal, unless you select a different merchant. You can only assign 1 image to a deal.
If you want to publish the deal, you need to set “Status” to “Published” and “Approval” to “Yes”. However the deal isvisible to users or not also depends on starting and ending time.
“Approval” is for marking that if administrator has already reviewed and approved the deal which is submitted bymerchant in front-end. When deal is approved, merchant can’t change deal details any more, he/she only can modifystarting and ending date.
Other fields in the form:
• Impressions: The number of times this deal is displayed in deal list.
• Clicks: The number of times users click this deal to view its detail.
• Created Date: The date the deal is created.
• Created by: The person who creates the deal.
• Modified Date: The date the deal is modified the last time.
• Modified by: The person who does the last modification.
• ID: The ID of the deal.
After saving the deal, it is displayed in your deal list.
8.1. Create new deal in back-end 49

CM Live Deal Documentation, Release 1.0.0-beta
8.2 Create new deal in front-end
8.2.1 Merchant’s deal list
To allow merchants access the list of their deals, you need to create a new menu item for “Deal Management” page.
Create a new menu item, select CM Live Deal -> Deal Management as the menu item type.
In your front-end, login as a merchant and access the new menu item, you can see the list of merchant’s deals.
50 Chapter 8. Deals

CM Live Deal Documentation, Release 1.0.0-beta
The list has 6 columns:
• Title: Displays deal name and the name of the category which the deal is in.
• Impressions: How many times the deal is showed in deal list to users.
• Clicks: How many times users click the deal to view its details.
• Captured: How many coupons of the deal that users have captured.
• Redeemed: The number of redeemed coupons of the deal.
• Approved: The deal is approved by administrators or is still in review.
Click on deal name to edit the deal. If deal is already approved, merchant can only change starting and ending dates.If the deal is not approved yet, merchant still can modify the deal’s details.
8.2.2 Submit new deal
In deal list, merchant can click “New deal” button to submit a new deal.
The form has the following fields:
• Title: The deal’s name.
• Category: The category which the deal is in.
• Image: Merchant can click “Select” button to open a popup and select an uploaded image, merchant can alsoupload a new image.
• Description: The deal’s description.
• Fine print: The deal’s terms and conditions.
• Starting time: When the deal starts public to users.
• Ending time: When the deal expires and is not visible to users any more.
8.2. Create new deal in front-end 51

CM Live Deal Documentation, Release 1.0.0-beta
You will receive message “Item successfully submitted.” if deal is saved successfully.
52 Chapter 8. Deals

CM Live Deal Documentation, Release 1.0.0-beta
8.2.3 Deal Submission page
Instead of accessing Deal Management page and click “New deal” button to create a new deal. You can also create amenu item for “Deal Submission” page and let merchants directly access and create new deal.
8.3 Deal list
Deal list is where users browse and find the deals that they are interested in.
In your back-end, you create a new menu item for “Deal List” page. You can check the menu item in front-end, thedeal list is similar to the below screenshot.
8.3. Deal list 53

CM Live Deal Documentation, Release 1.0.0-beta
54 Chapter 8. Deals

CHAPTER 9
Coupons
9.1 User gets coupon
While browsing deal list, user can click on any deal that they are interested in. If user likes a deal and decides to try it,he/she can click “Get coupon” button capture a coupon of the deal. User must be log into the site first before getting acoupon.
“Get coupon” button is not available if the current user is a merchant and the deal is his/her deal.
“Get coupon” button is not clickable if user has already captured a coupon of the deal in the past.
After capturing a coupon, user is taken to the list of his/her coupons, on this page user can have the coupon code andcan access the captured coupon to print it..
9.2 User’s coupon list
You can create a menu item for “User’s Coupons” to let users access their coupon list in front-end.
55

CM Live Deal Documentation, Release 1.0.0-beta
To have a user friendly URL for coupon page. You need to have a menu item for “Coupon download” view. Thismenu item should be used as a hidden menu item, it is not visible in your front-end. To do this you create a new menu,create a new menu item for “Coupon download” page in this new menu, as long as you don’t assign this new menuto a menu module and display the module in your front-end, “Coupon download” menu item is not displayed in yourfront-end.
9.3 Administratiors manage coupons
In your back-end, go to Components -> CM Live Deal to access CM Live Deal component.
On the toolbar, you click “Coupons” to access the list of coupons.
56 Chapter 9. Coupons

CM Live Deal Documentation, Release 1.0.0-beta
You can edit an existing coupon be clicking on its code. You can also create a new coupon with your own customcoupon code and assign it to a specific user.
In the edit form, there are the following fields:
• Code: Coupon code.
• User: The user who owns this coupon.
9.3. Administratiors manage coupons 57

CM Live Deal Documentation, Release 1.0.0-beta
• Deal: The deal which this coupon belongs to.
• Redeemed: Should be “Yes” if coupon is already redeemed by user.
• Redeemed date: When this coupon is redeemed.
• Created Date: The date the coupon is created.
• Created by: The person who creates the coupon.
• Modified Date: The date the coupon is modified the last time.
• Modified by: The person who does the last modification.
• ID: The ID of the coupon.
9.4 Merchant’s customer list
Merchant can manage the coupons of his/her deals in “Customers” page. You can create a menu item for it in MenuManager.
Access the menu item in front-end, you can see the list of your coupons.
When user comes and redeems coupon, you can use this page to search for user’s coupon code
58 Chapter 9. Coupons

CM Live Deal Documentation, Release 1.0.0-beta
Click on coupon code, you are taken to the form to change coupon’s redeemed status and redeemed date.
9.4. Merchant’s customer list 59

CM Live Deal Documentation, Release 1.0.0-beta
60 Chapter 9. Coupons

CHAPTER 10
Merchant’s images
You can manage the images which are uploaded by merchants.
In your Joomla! back-end, go to Components -> CM Live Deal.
On the toolbar, you click “Images”.
In image list, you can search for images by file name, owner (merchant). To delete images you select them in the list
61

CM Live Deal Documentation, Release 1.0.0-beta
and click “Delete” button on the toolbar, the selected images will be removed from the list and the image files are alsodeleted from your server.
62 Chapter 10. Merchant’s images

CHAPTER 11
User statistics
User statistics help merchant know if a customer is a serious customer and if he/she already came to merchant in thepast.
11.1 User statistics
This information of a user has 2 values:
• How many coupons the user captured (1)
• How many coupons the user came to merchant and redeemed (2)
If (2) value is equal to (1) value, this means the user always comes to redeem the coupons that he/she captures on thesite. This is a serious customer, if he/she is happy at the merchant’s place, there are many chances that he/she willcome back.
If (1) value is much greater than (2) value, the merchant shouldn’t expect that the user will come to the merchant toredeem the current coupon.
11.2 User visits
If the owner of coupon is a return customer, this means the customer enjoyed the products or the services of merchantand now he/she comes back again.
11.3 Configuration
To enable the statistics, in your Joomla! back-end you go to Components -> CM Live Deal.
63

CM Live Deal Documentation, Release 1.0.0-beta
On the toolbar there is a button “Options”, you click this button to configure the component.
Switch to “Merchant” tab and set “Display user’s stats” and “Display user’s stats” options to “Yes”.
64 Chapter 11. User statistics

CM Live Deal Documentation, Release 1.0.0-beta
In your Joomla! front-end, go to the menu item of Customers view, you can see that the statistics are displayed in thecoupon list, the descriptions for these statistics are also displayed to help merchants understand.
11.3. Configuration 65

CM Live Deal Documentation, Release 1.0.0-beta
66 Chapter 11. User statistics
CHAPTER 12
Search for nearby deals
By using CM Live Deal Search module, user can search for deals in all cities, in a specific city or deals near user.
You can check CM Live Deal Search module section to know how to setup the search module.
To detect user’s location, CM Live Deal uses GeoLite2 data created by MaxMind, available fromhttp://www.maxmind.com.
12.1 Get GeoLite2 City database
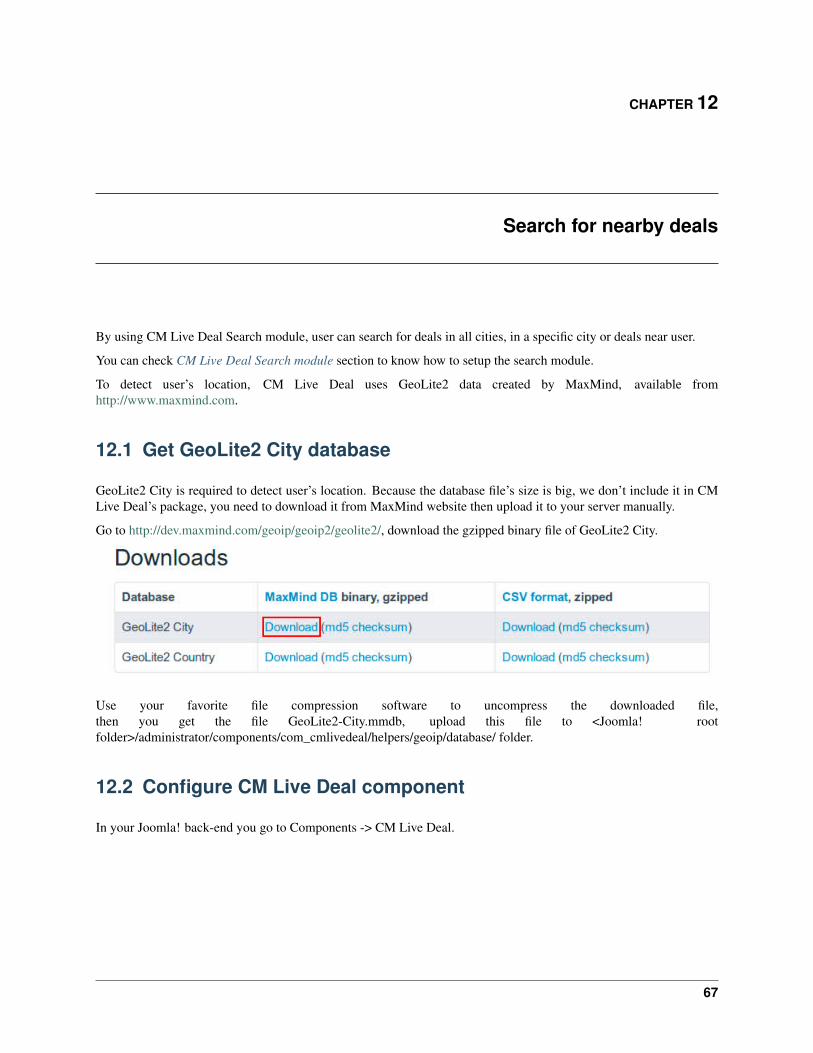
GeoLite2 City is required to detect user’s location. Because the database file’s size is big, we don’t include it in CMLive Deal’s package, you need to download it from MaxMind website then upload it to your server manually.
Go to http://dev.maxmind.com/geoip/geoip2/geolite2/, download the gzipped binary file of GeoLite2 City.
Use your favorite file compression software to uncompress the downloaded file,then you get the file GeoLite2-City.mmdb, upload this file to <Joomla! rootfolder>/administrator/components/com_cmlivedeal/helpers/geoip/database/ folder.
12.2 Configure CM Live Deal component
In your Joomla! back-end you go to Components -> CM Live Deal.
67

CM Live Deal Documentation, Release 1.0.0-beta
On the toolbar, you click “Options” button.
Go to “Deal” tab and set the radius (in kilometer) to search for nearby deals from user’s location and the cookielifetime.
• Search radius from user’s location: The radius in kilometer to search for nearby deals of user. Default is 5kilometers. This value is used when user searches for deals in his/her location by using the search module.
68 Chapter 12. Search for nearby deals

CM Live Deal Documentation, Release 1.0.0-beta
• Location cookie’s lifetime: Detect user’s location requires reading the database file and make the server slow.User’s location can be stored in cookie and reused later to reduce file reads from server. With this option youcan set how many days this cookie is available. Default value is 7 (days). You can disable storing cookie byusing 0 value.
12.3 Search in front-end
Go to your front-end where the search module is displayed. Now if you select “Your location” in the city list andsearch, you will get the deals near you in the result.
If the database file doesn’t exist, this function doesn’t work.
If your location can not be detected (not in MaxMind’s database), you will see the error message “We can’t detect yourcurrent location.”.
12.3. Search in front-end 69

CM Live Deal Documentation, Release 1.0.0-beta
70 Chapter 12. Search for nearby deals

CHAPTER 13
Translation
CM Live Deal only comes with English by default however you can always translate CM Live Deal to other languages.
13.1 Installation
Before translating CM Live Deal to another language, you need to know install that new language.
In your Joomla! back-end, you go to Extensions -> Language Manager.
You can see the list of installed languages on your site. Click “Install Language” button on the toolbar to install a newlanguage.
Search for the language you want to install, select it in the list and click “Install” button.
71
CM Live Deal Documentation, Release 1.0.0-beta
After installing new language, go back to the installed language list, you can see your new language in the list.
You need to remember the language tag of your new language. In the above screenshot, French language package isinstalled, and “fr-FR” is the language tag of French.
13.2 Preparation
You can use your favorite FTP software or file managers available in your hosting control panel to navigate to <Joomla!root folder>/components/com_cmlivedeal/language/ folder. In this folder you can see the folder “en-GB”, this is wherethe language files of English are stored.
In this “language” folder, you create a new folder for your new language, the name of the folder is the language tag.Follow the above example, you create a new folder “fr-FR”.
Go to “en-GB” folder, copy “en-GB.com_cmlivedeal.ini” file in this folder to the new language folder that you justcreate (“fr-FR” as in the example).
In the new language folder folder, rename “en-GB.com_cmlivedeal.ini” to “xx-YY.com_cmlivedeal.ini”, “xx-YY” isthe language tag of your new language, eg “fr-FR”.
13.3 Translate
Open “xx-YY.com_cmlivedeal.ini” with a text editor and translate the English strings in this file to your new language.
Important note: Joomla! language INI files must be saved as UTF-8 without the Byte Order Mark (BOM). For moreinformation on Byte Order Mark see http://unicode.org/faq/utf_bom.html#BOM
72 Chapter 13. Translation

CM Live Deal Documentation, Release 1.0.0-beta
The above instruction is for translating the front-end of CM Live Deal component. To translate the back-end and otherextensions, you need to repeat the above steps for the following folders:
• CM Live Deal component’s back-end: <Joomla! root folder>/administrator/components/com_cmlivedeal/language/
• CMLD Merchant plugin: <Joomla! root folder>/modules/mod_cmlivedeal_search/language/
• CM Live Deal Search module: <Joomla! root folder>/plugins/user/cmldmerchant/language/
13.3. Translate 73