cloudera’s enterprise data hub on the aws cloud · pdf file ·...
TRANSCRIPT
Cloudera’s Enterprise Data Hub on the AWS Cloud
Quick Start Reference Deployment
Shivansh Singh and Tony Vattathil
Amazon Web Services
October 2014
Last update: August 2017 (revisions)
This guide is also available in HTML format at
https://docs.aws.amazon.com/quickstart/latest/cloudera/.
Amazon Web Services – Cloudera’s EDH on the AWS Cloud August 2017
Page 2 of 35
Contents
Overview .................................................................................................................................... 3
Cloudera EDH on AWS .......................................................................................................... 3
Quick Links ............................................................................................................................ 4
Cost and Licenses ................................................................................................................... 4
AWS Services.......................................................................................................................... 5
Architecture Overview ........................................................................................................... 5
EDH Cluster in a Public Subnet ......................................................................................... 7
EDH Cluster in a Private Subnet ........................................................................................8
Deployment Scenarios............................................................................................................... 9
Deployment Steps ..................................................................................................................... 9
What We’ll Cover ................................................................................................................... 9
Step 1. Prepare an AWS Account ......................................................................................... 10
Step 2. Launch the Quick Start ............................................................................................ 13
Step 3. Configure the Cluster and EDH Services ................................................................ 17
Step 4. Deploy the EDH Cluster .......................................................................................... 19
Option 1: Deploy Using Cloudera Director Server (Recommended) .............................. 19
Option 2: Deploy Using the CLI, No Server ..................................................................... 23
Accessing the Cluster with Cloudera Manager .................................................................... 25
Managing the Cluster with Cloudera Director .................................................................... 27
Storage Configuration ............................................................................................................ 28
Backup ..................................................................................................................................... 29
Operating System and AMI ..................................................................................................... 29
Security ................................................................................................................................... 30
AWS Identity and Access Management (IAM) ................................................................... 30
OS Security .......................................................................................................................... 30
Security Groups ................................................................................................................... 30
Additional Resources .............................................................................................................. 31
Appendix: Security Group Specifics ........................................................................................ 33
Send Us Feedback ................................................................................................................... 34
Document Revisions................................................................................................................ 34

Amazon Web Services – Cloudera’s EDH on the AWS Cloud August 2017
Page 3 of 35
About This Guide This Quick Start reference deployment guide includes architectural considerations and
configuration steps for deploying Cloudera’s Enterprise Data Hub (EDH) on the Amazon
Web Services (AWS) Cloud. It discusses best practices for deploying Cloudera’s EDH on
AWS using services such as Amazon Elastic Compute Cloud (Amazon EC2) and Amazon
Virtual Private Cloud (Amazon VPC). It also provide links to automated AWS
CloudFormation templates that you can leverage for your deployment or launch directly
into your AWS account. This deployment uses Cloudera Director to deploy EDH
automatically into a configuration of your choice. It supports Cloudera Director 2.5.
The guide is for IT infrastructure architects, administrators, and DevOps professionals who
are planning to implement or extend their Cloudera EDH workloads on the AWS cloud.
Quick Starts are automated reference deployments for key enterprise workloads on the
AWS Cloud. Each Quick Start launches, configures, and runs the AWS compute, network,
storage, and other services required to deploy a specific workload on AWS, using AWS best
practices for security and availability.
Overview
Cloudera EDH on AWS Cloudera’s Enterprise Data Hub (EDH) allows you to store your data with the flexibility to
run a variety of enterprise workloads—including batch processing, interactive SQL,
enterprise search, and advanced analytics—while utilizing robust security, governance, data
protection, and management.
AWS provides customers with the ability to set up the infrastructure to support EDH in a
flexible, scalable, and cost-effective manner. This reference deployment will assist you in
building an EDH cluster on AWS by integrating Cloudera Director with an automated
deployment initiated by AWS CloudFormation.
This guide is meant primarily for the deployment of the Cloudera’s EDH cluster on AWS.
For additional administration and support topics related to Cloudera’s Enterprise Data
Hub, visit Cloudera Support.

Amazon Web Services – Cloudera’s EDH on the AWS Cloud August 2017
Page 4 of 35
Quick Links The links in this section are for your convenience. Before you launch the Quick Start, please
review the architecture, configuration, network security, and other considerations discussed
in this guide.
If you have an AWS account, and you’re already familiar with AWS services and
Cloudera, you can launch the Quick Start to deploy Cloudera EDH into a new virtual
private cloud (VPC) in your AWS account. The deployment takes approximately 30
minutes. If you’re new to AWS or Cloudera, please review the implementation details
and follow the step-by-step instructions provided later in this guide. Launch art
If you want to take a look under the covers, you can view the AWS CloudFormation
template that automates the deployment. You can customize the template during
launch, or download and extend it for other projects.
Cost and Licenses This deployment uses Cloudera Director to deploy EDH automatically into a configuration
of your choice. You are responsible for the cost of the AWS services used while running this
Quick Start reference deployment. There is no additional cost for using the Quick Start.
This reference deployment allows you to scale your cluster to any number of nodes. The
instance type you select to meet your memory and compute requirements, and the number
of nodes in your cluster will affect your cost. Prices are subject to change. See the pricing
pages for each AWS service you will be using for full details.
This deployment activates a 60-day trial of Cloudera Enterprise. To upgrade your version,
see Managing Licenses on the Cloudera website.
View template (for new VPC)
Launch (for new VPC)
Launch (for existing VPC)
View template (for existing VPC)

Amazon Web Services – Cloudera’s EDH on the AWS Cloud August 2017
Page 5 of 35
AWS Services The core AWS components used by this Quick Start include the following AWS services. (If
you are new to AWS, see the Getting Started section of the AWS documentation.)
Amazon EC2 – The Amazon Elastic Compute Cloud (Amazon EC2) service enables you
to launch virtual machine instances with a variety of operating systems. You can choose
from existing Amazon Machine Images (AMIs) or import your own virtual machine
images.
Amazon VPC – The Amazon Virtual Private Cloud (Amazon VPC) service lets you
provision a private, isolated section of the AWS Cloud where you can launch AWS
services and other resources in a virtual network that you define. You have complete
control over your virtual networking environment, including selection of your own IP
address range, creation of subnets, and configuration of route tables and network
gateways.
NAT gateways – The Network Address Translation (NAT) Gateway service is a highly
available AWS managed service that makes it easy to connect instances in a private VPC
subnet to the Internet. With NAT gateways, you don’t have to manage NAT instances,
and the bandwidth available is no longer limited to the NAT instance size.
AWS CloudFormation – AWS CloudFormation lets you to create and manage a
collection of related AWS resources, and provision and update them in an orderly and
predictable way. You use a template to describe all the AWS resources (for example, EC2
instances) that you want. You don't have to individually create and configure the
resources or figure out dependencies—AWS CloudFormation handles all of that.
IAM – AWS Identity and Access Management (IAM) enables you to securely control
access to AWS services and resources for your users. With IAM, you can centrally
manage users, security credentials such as access keys, and permissions that control
which AWS resources users can access.
Architecture Overview AWS CloudFormation provides an easy way to create and manage a collection of related
AWS resources, provisioning and updating them in an orderly and predictable fashion.
This Quick Start deploys and configures the following components:
A VPC configured with four subnets, two public and the two private.
A NAT gateway configured in the public subnet to allow outbound Internet access for
the instances deployed in the private subnet. The gateway is configured with an Elastic
IP address.

Amazon Web Services – Cloudera’s EDH on the AWS Cloud August 2017
Page 6 of 35
Note If you choose the option to create a new VPC, the Quick Start creates and
configures the VPC, the two private and two public subnets, and the NAT gateway for
you. If you choose the option to deploy Cloudera EDH into an existing VPC, the Quick
Start requires the described configuration.
A Linux server instance deployed in the public subnet for downloading Cloudera
Director and various configuration files and scripts.
An IAM instance role with fine-grained permissions for access to AWS services
necessary for the deployment process.
Security groups for each instance or function to restrict access to only necessary
protocols and ports.
A placement group to provide a logical grouping of instances and enable applications to
participate in a low-latency, 10 Gbps network (optional).
A fully customizable EDH cluster, including worker nodes, edge nodes, and
management nodes that you define based on your compute and storage requirements.
In this reference architecture, we support two options for deploying Cloudera’s Enterprise
Data Hub within a VPC. One option is to launch all the nodes within a public subnet that
provides direct Internet access. The second option is to deploy all the nodes within a private
subnet. The reference deployment builds both public and private subnets, and the cluster
can be deployed in either subnet using the configuration file.

Amazon Web Services – Cloudera’s EDH on the AWS Cloud August 2017
Page 7 of 35
EDH Cluster in a Public Subnet
This option builds the following environment in the AWS Cloud.
Figure 1: Public subnet topology
A public subnet cluster topology includes an EC2 instance (referred to as the cluster
launcher instance), which is launched within the public subnet. An Elastic IP address is
assigned to the instance, and a security group that allows SSH access to the instance is
created. The cluster launcher instance then builds the EDH cluster by launching all the
Hadoop-related EC2 instances within the public subnet. In this topology, all the launched
instances have direct access to the Internet.

Amazon Web Services – Cloudera’s EDH on the AWS Cloud August 2017
Page 8 of 35
EDH Cluster in a Private Subnet
Figure 2: Private subnet topology
A private subnet cluster topology launches the cluster launcher instance, which is in the
public subnet. An Elastic IP address is assigned to the instance, and a security group that
allows SSH access to the instance is created. All other Hadoop-related EC2 instances are
created within the private subnet. In this topology, the EC2 instances within the EDH
cluster do not have direct access to the Internet. Instead, they access the Internet through
the NAT gateway. In this topology, the only publicly accessible component is the cluster
launcher in the public subnet.

Amazon Web Services – Cloudera’s EDH on the AWS Cloud August 2017
Page 9 of 35
Deployment Scenarios This Quick Start provides two deployment options:
Deploy Cloudera EDH into a new VPC (end-to-end deployment). This option
builds a new AWS environment consisting of the VPC, subnets, NAT gateways,
security groups, and other infrastructure components, and then deploys Cloudera
EDH into that new VPC.
Deploy Cloudera EDH into an existing VPC. This option provisions Cloudera in
your existing AWS infrastructure.
The Quick Start provides separate templates for these options. It also lets you configure
additional settings such as CIDR blocks and instance types, as discussed later in this guide.
Deployment Steps This Quick Start enables you to set up a fully customizable Hadoop cluster on demand.
Building a scalable, on-demand infrastructure on AWS provides a cost-effective solution for
handling large-scale compute and storage requirements.
This Quick Start uses Cloudera Director, which helps enable the delivery of an enterprise-
class, elastic, self-service experience for the Enterprise Data Hub on a cloud infrastructure.
The flexible architecture allows you to choose the most appropriate network, compute, and
storage infrastructure for your environment. You can deploy the Quick Start into an existing
VPC or create a new VPC for the Cloudera EDH cluster.
What We’ll Cover The procedure for deploying Cloudera EDH on AWS consists of the following steps. For
detailed instructions, follow the links for each step.
Step 1. Prepare an AWS account
This involves signing up for an AWS account, choosing a region, creating a key pair, and
requesting increases for account limits, if necessary.
Step 2. Launch the Quick Start
In this step, you’ll launch the AWS CloudFormation template into your AWS account,
specify parameter values, and create the stack. The Quick Start provides separate
templates for end-to-end deployment and deployment into an existing VPC.

Amazon Web Services – Cloudera’s EDH on the AWS Cloud August 2017
Page 10 of 35
Step 3. Configure the cluster and EDH services
This step involves customizing the EDH deployment by choosing private or public
subnets, EC2 instance types, the number of nodes in the cluster, and other parameters.
Cloudera Director server provides a simple user interface to build complex topologies,
and includes features such as dynamic scaling, cloning, and repeated deployments on
AWS. Starting with the release of Cloudera Director 1.5.1, you can access the Cloudera
Director server UI in a browser, without having to connect to any of the instances by
using SSH. You can provision complex deployments that involve multiple instance
types, security groups, placement groups, and other features by using this web interface.
See the Cloudera Director documentation for additional details.
Note Previous versions of Cloudera Director required modifying the configuration
files aws.simple.conf and aws.reference.conf by connecting via SSH to the launcher
nodes. This is no longer necessary.
Step 4. Deploy the EDH cluster
In this step, you will configure your cluster and launch the cluster by using the Cloudera
Director server web UI. The reference deployment installs both the Cloudera Director
client and the Cloudera Director server on the cluster launcher node. Optionally, you
may connect to the launcher node by using SSH to modify or deploy the cluster via the
Cloudera Director client.
Step 1. Prepare an AWS Account 1. If you don’t already have an AWS account, create one at http://aws.amazon.com by
following the on-screen instructions. Part of the sign-up process involves receiving a
phone call and entering a PIN using the phone keypad.
2. Use the region selector in the navigation bar to choose the AWS Region where you want
to deploy the EDH cluster on AWS.
Amazon EC2 locations are composed of regions and Availability Zones. Regions are
dispersed and located in separate geographic areas. We recommend that you check the
availability of AWS services before you choose a region. Otherwise, deployment will fail.

Amazon Web Services – Cloudera’s EDH on the AWS Cloud August 2017
Page 11 of 35
Figure 3: Choosing an AWS Region
Tip Consider choosing a region closest to your data center or corporate network to reduce network latency between systems running on AWS and the systems and users on your corporate network.
3. Create a key pair in your preferred region. To do this, in the navigation pane of the
Amazon EC2 console, choose Key Pairs, Create Key Pair, type a name, and then
choose Create.
Figure 4: Creating a key pair

Amazon Web Services – Cloudera’s EDH on the AWS Cloud August 2017
Page 12 of 35
Amazon EC2 uses public-key cryptography to encrypt and decrypt login information. To
be able to log into your instances, you must create a key pair. On Linux, we use the key
pair to authenticate SSH login.
4. If necessary, request a service limit increase for the Amazon EC2 instance types that you
intend to deploy. Depending on the instance type, the default limit for the number of
instances that can be run varies from 2 to 20 instances. You may check the default
instance limits on the Amazon EC2 FAQ page. If you have existing deployments that
leverage the instance type you need, or if you plan on exceeding this default with this
reference deployment, you will need to request an Amazon Amazon EC2 instance
service limit increase. It might take a few days for the new service limit to become
effective. For more information, see Amazon EC2 Service Limits in the AWS
documentation.
Figure 5: Requesting a Service Limit Increase

Amazon Web Services – Cloudera’s EDH on the AWS Cloud August 2017
Page 13 of 35
Step 2. Launch the Quick Start In this step, you will launch an AWS CloudFormation template that automates the
following:
Configures the VPC that provides the base AWS network infrastructure for your EDH
deployment.
Creates the network resources needed for EDH deployment, including public and
private subnets within the VPC, a NAT gateway launched within the public subnet,
security groups, and an IAM role.
Starts an EC2 instance running Linux (Red Hat) in the public subnet. This instance
serves as a launcher node for the Cloudera cluster, and initiates cluster deployment.
Downloads Cloudera Director along with the necessary scripts and configuration files.
Cloudera Director is used to configure the EDH cluster.
All the steps are fully automated by AWS CloudFormation. The template that deploys
Cloudera EDH into an existing VPC skips the VPC and network configuration steps.
Note Starting with version 1.5.1, Cloudera Director supports key pairs that are
generated on the fly. The previous deployment model involved passing the key pair used
during launch to the cluster launcher node. In the current deployment model, a key pair
is generated dynamically on the cluster launcher node via AWS Command Line
Interface (AWS CLI) and is used to launch the EDH cluster.
1. Choose one of the following options to launch the AWS CloudFormation template into
your AWS account. For help choosing an option, see Deployment Scenarios earlier in
this guide.
Option 1
Deploy Cloudera EDH into a
new VPC on AWS
Option 2
Deploy Cloudera EDH into an
existing VPC on AWS
The template is launched in the US West (Oregon) region by default. You can change the
region by using the region selector in the navigation bar.
This stack takes approximately 30 minutes to create.
Launch Launch

Amazon Web Services – Cloudera’s EDH on the AWS Cloud August 2017
Page 14 of 35
Note You are responsible for the cost of the AWS services used while running this
Quick Start reference deployment. There is no additional cost for using this Quick Start.
Prices are subject to change. See the pricing pages for each AWS service you will be
using in this Quick Start for full details.
2. On the Select Template page, keep the default URL for the AWS CloudFormation
template source, and then choose Next.
3. On the Specify Details page, review the parameters for the template. Provide values
for the parameters that require your input. You can also customize the remaining
parameter values. The AWS CloudFormation template uses these to generate a cluster
configuration file. When you’re done, choose Next.
In the following tables, parameters are listed by category and described separately for
the two deployment options:
– Parameters for deploying Cloudera EDH into a new VPC
– Parameters for deploying Cloudera EDH into an existing VPC
Option 1: Parameters for deploying Cloudera EDH into a new VPC
View the template for new VPC
Network Configuration:
Parameter label (name) Default Description
Availability Zones
(AvailabilityZones)
Requires input Availability Zones for the subnets where the cluster
launcher node will be deployed. The Quick Start uses
two Availability Zones and preserves the logical order
you specify.
VPC CIDR
(VPCCIDR)
10.0.0.0/16 CIDR block for the VPC to create.
Private Subnet 1 CIDR
(PrivateSubnet1CIDR)
10.0.0.0/19 CIDR block for private subnet 1 located in Availability
Zone 1.
Private Subnet 2 CIDR
(PrivateSubnet2CIDR)
10.0.32.0/19 CIDR block for private subnet 2 located in Availability
Zone 2.
Public Subnet 1 CIDR
(PublicSubnet1CIDR)
10.0.128.0/20 CIDR block for public subnet 1 located in Availability
Zone 1.
Public Subnet 2 CIDR
(PublicSubnet2CIDR)
10.0.144.0/20 CIDR block for public subnet 2 located in Availability
Zone 2.
Permitted IP range
(RemoteAccessCIDR)
Requires input CIDR block for SSH access into the EDH launcher
instance. We recommend that you set this value to a
trusted CIDR block.

Amazon Web Services – Cloudera’s EDH on the AWS Cloud August 2017
Page 15 of 35
Cloudera Launcher Configuration:
Parameter label (name) Default Description
Key Name
(KeyName)
Requires input An existing public/private key pair, which allows you
to connect securely to your instance after it launches.
This is the key pair you created in step 1, when you
prepared your AWS account.
Cluster Launcher
Instance Type
(ClusterLauncherType)
m4.large EC2 instance type for the EDH launcher instance.
AWS Quick Start Configuration:
Parameter label (name) Default Description
AWS Quick Start S3
Bucket Name
(QSS3BucketName)
quickstart-reference S3 bucket for the Quick Start templates and scripts.
You can specify your own bucket if you copy all of the
assets and submodules into it, if you want to override
the Quick Start behavior for your own implementation.
The bucket name can include numbers, lowercase
letters, uppercase letters, and hyphens, but should not
start or end with a hyphen.
AWS Quick Start S3 Key
Prefix
(QSS3KeyPrefix)
cloudera/latest/ The S3 key name prefix used to simulate a folder for
your copy of Quick Start assets, if you want to override
the Quick Start behavior for your own implementation.
This prefix can include numbers, lowercase letters,
uppercase letters, hyphens, and forward slashes.
Option 2: Parameters for deploying Cloudera EDH into an existing VPC
View the template for existing VPC
Network Configuration:
Parameter label (name) Default Description
VPC Id
(VPC)
Requires input ID of the existing VPC where you want to deploy the
Cloudera nodes.
Private Subnet Id
(PrivateSubnet)
Requires input ID of an existing private subnet where Cloudera nodes
will be deployed in your VPC.
Public Subnet Id
(PublicSubnet)
Requires input ID of an existing public subnet where the cluster
launcher will be deployed in your VPC.
Public Subnet CIDR
(PublicSubnet1CIDR)
Requires input CIDR block of the existing public subnet where the
cluster launcher will be deployed in your VPC.
Private Subnet CIDR
(PrivSubCIDR)
Requires input CIDR block of the existing private subnet where
Cloudera nodes will be deployed in your VPC.

Amazon Web Services – Cloudera’s EDH on the AWS Cloud August 2017
Page 16 of 35
Parameter label (name) Default Description
Permitted IP range
(RemoteAccessCIDR)
Requires input CIDR block for SSH access into the EDH launcher
instance. We recommend that you set this value to a
trusted CIDR block.
Cloudera Launcher Setup:
Parameter label (name) Default Description
Key Name
(KeyName)
Requires input An existing public/private key pair, which allows you
to connect securely to your instance after it launches.
This is the key pair you created in step 1, when you
prepared your AWS account.
Cluster Launcher
Instance Type
(ClusterLauncherType)
m4.large EC2 instance type for the EDH launcher instance.
AWS Quick Start Configuration:
Parameter label (name) Default Description
AWS Quick Start S3
Bucket Name
(QSS3BucketName)
quickstart-reference S3 bucket for the Quick Start templates and scripts.
You can specify your own bucket if you copy all of the
assets and submodules into it, if you want to override
the Quick Start behavior for your own implementation.
The bucket name can include numbers, lowercase
letters, uppercase letters, and hyphens, but should not
start or end with a hyphen.
AWS Quick Start S3 Key
Prefix
(QSS3KeyPrefix)
cloudera/latest/ The S3 key name prefix for your copy of Quick Start
assets, if you want to override the Quick Start behavior
for your own implementation. This prefix can include
numbers, lowercase letters, uppercase letters,
hyphens, and forward slashes.
After the cluster launcher instance is deployed, you can make additional changes to the
EDH deployment by using the Cloudera Director server web UI or by modifying the
configuration file manually.
4. On the Options page, you can specify tags (key-value pairs) for resources in your stack
and set additional options. When you’re done, choose Next.
5. On the Review page, review and confirm the settings. Under Capabilities, select the
check box to acknowledge that the template will create IAM resources.
6. Choose Create to deploy the stack.

Amazon Web Services – Cloudera’s EDH on the AWS Cloud August 2017
Page 17 of 35
7. Monitor the status of the stack. When the status field displays CREATE_COMPLETE
and the launcher instance has been created successfully, as shown in Figure 6, you can
continue to the next step to configure the cluster.
Figure 6: Successful creation of launcher instance
Step 3. Configure the Cluster and EDH Services In this step, you will use SSH tunneling to connect to Cloudera Director, which is running
on the cluster launcher instance you created in step 2, and configure EDH services.
1. Find the SSH command to connect to the cluster launcher instance.
To do this, on the EC2 dashboard, click the Connect tab under EC Instances, as
shown in Figure 7. You will need your private key to launch the instance.
Figure 7: Connecting to the cluster launcher using SSH
Amazon Web Services – Cloudera’s EDH on the AWS Cloud August 2017
Page 18 of 35
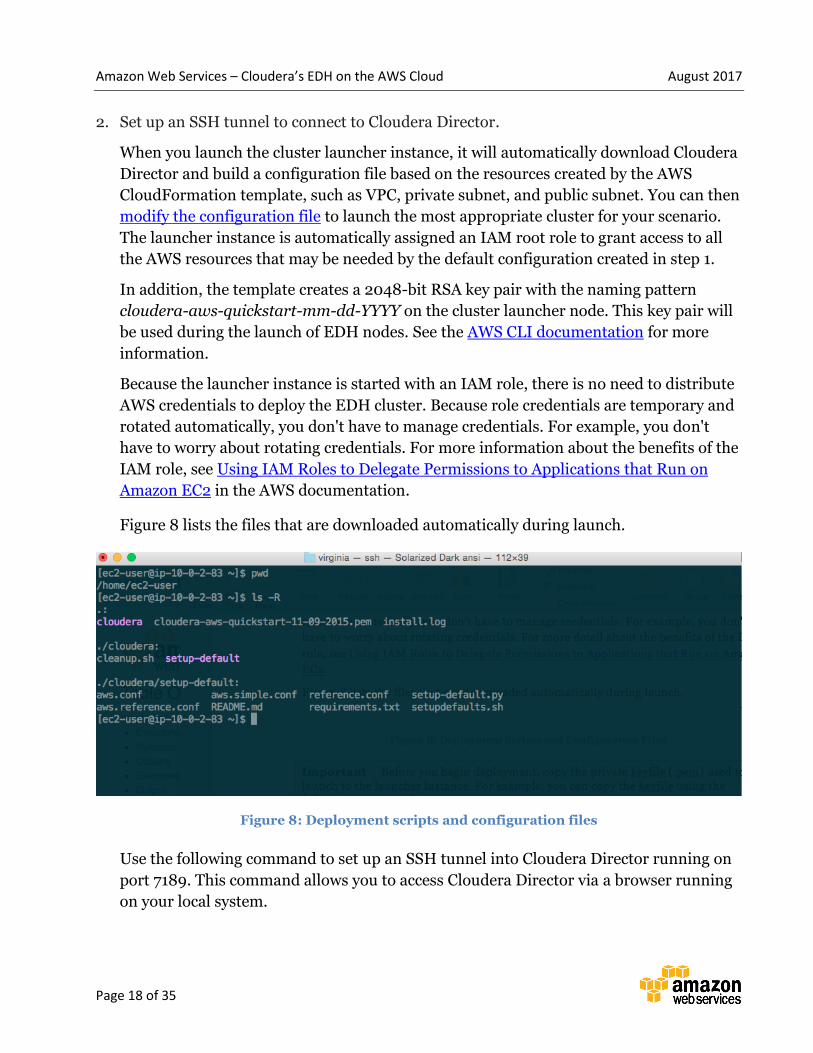
2. Set up an SSH tunnel to connect to Cloudera Director.
When you launch the cluster launcher instance, it will automatically download Cloudera
Director and build a configuration file based on the resources created by the AWS
CloudFormation template, such as VPC, private subnet, and public subnet. You can then
modify the configuration file to launch the most appropriate cluster for your scenario.
The launcher instance is automatically assigned an IAM root role to grant access to all
the AWS resources that may be needed by the default configuration created in step 1.
In addition, the template creates a 2048-bit RSA key pair with the naming pattern
cloudera-aws-quickstart-mm-dd-YYYY on the cluster launcher node. This key pair will
be used during the launch of EDH nodes. See the AWS CLI documentation for more
information.
Because the launcher instance is started with an IAM role, there is no need to distribute
AWS credentials to deploy the EDH cluster. Because role credentials are temporary and
rotated automatically, you don't have to manage credentials. For example, you don't
have to worry about rotating credentials. For more information about the benefits of the
IAM role, see Using IAM Roles to Delegate Permissions to Applications that Run on
Amazon EC2 in the AWS documentation.
Figure 8 lists the files that are downloaded automatically during launch.
Figure 8: Deployment scripts and configuration files
Use the following command to set up an SSH tunnel into Cloudera Director running on
port 7189. This command allows you to access Cloudera Director via a browser running
on your local system.

Amazon Web Services – Cloudera’s EDH on the AWS Cloud August 2017
Page 19 of 35
ssh -i "mykeyfile.pem" -L 7189:localhost:7189 [email protected]
If you want to use the Cloudera Director client and deploy manually, use the following
SSH command and bootstrap the cluster via the command line interface:
ssh -i "mykeyfile.pem" [email protected]
Important Note that the auto-generated key pair file is necessary to connect to the
new nodes being launched by using SSH. However, the cluster laucher node needs the
key pair that was used during the initial AWS CloudFormation template launch. The
SSH command above refers to the key pair used during the AWS CloudFormation
launch, and not to the auto-generated key pair file.
3. Modify the configuration of the cluster.
The Quick Start builds two baseline configuration files that are customizable during
deployment (either manually or through the Cloudera Director server web UI):
aws.simple.conf for configuring simple clusters
aws.reference.conf for configuring complex clusters
You can make additional changes to the deployment configuration (for example, you can
choose instance types, node count, subnet type, EDH services, or installation versions)
by further modifying the configuration file or by using the web UI. The configuration
files include baseline values based on the various resources (such as VPC ID and subnet
ID) created during the launch of the Cloudera stack. By default, all Cloudera nodes are
launched in the private subnet for security reasons. For more information about
configuration parameters, see the Cloudera Director User Guide.
Step 4. Deploy the EDH Cluster Cloudera Director supports two options for cluster deployment:
Option 1 (recommended): You can deploy using the Cloudera Director server to manage
multiple clusters. Cloudera Director provides a simple interface to deploy, scale, and
terminate clusters, and helps you manage the cluster.
Option 2: You can deploy using the CLI and manage the nodes manually.
Option 1: Deploy Using Cloudera Director Server (Recommended) The Cloudera Director server deployment provides a web UI to deploy clusters of any
topology—simple or complex. By default, this Quick Start automatically installs and starts
Amazon Web Services – Cloudera’s EDH on the AWS Cloud August 2017
Page 20 of 35
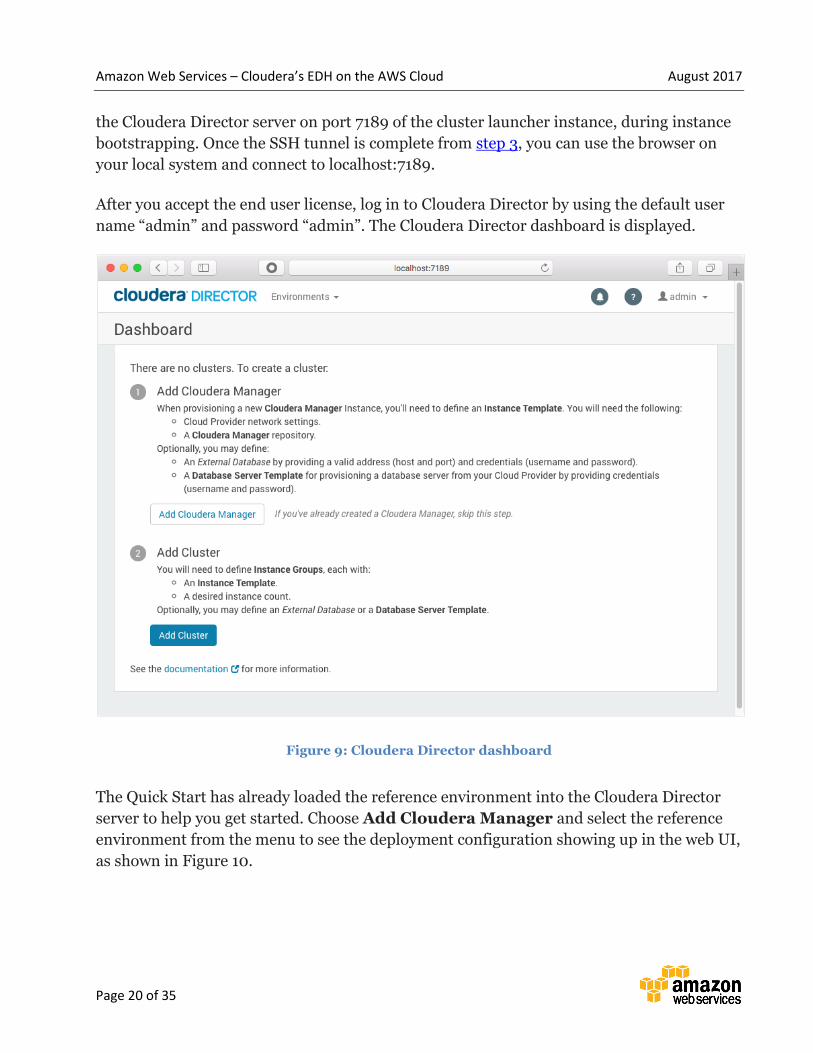
the Cloudera Director server on port 7189 of the cluster launcher instance, during instance
bootstrapping. Once the SSH tunnel is complete from step 3, you can use the browser on
your local system and connect to localhost:7189.
After you accept the end user license, log in to Cloudera Director by using the default user
name “admin” and password “admin”. The Cloudera Director dashboard is displayed.
Figure 9: Cloudera Director dashboard
The Quick Start has already loaded the reference environment into the Cloudera Director
server to help you get started. Choose Add Cloudera Manager and select the reference
environment from the menu to see the deployment configuration showing up in the web UI,
as shown in Figure 10.

Amazon Web Services – Cloudera’s EDH on the AWS Cloud August 2017
Page 21 of 35
Figure 10: Adding Cloudera Manager through the Cloudera Director Web UI
Make the following selections to determine how Cloudera Manager will be set up:
Provide a name for the Cloudera Manager deployment.
Select an instance template based on the instance type desired for the instance that will
host the Cloudera Manager installation.
Select a license type. If you have a Cloudera Enterprise license, you can enter it now,
either directly or by file upload. If you do not have a license, select either the Enterprise
Trial or Express option.
Choose whether you wish Cloudera Manager to use its embedded database server or an
external one, which may either already exist or may be created by Cloudera Director in
Amazon RDS.

Amazon Web Services – Cloudera’s EDH on the AWS Cloud August 2017
Page 22 of 35
After you make any necessary modifications to the deployment configuration, choose
Continue. Cloudera Director begins launching and configuring a Cloudera Manager
instance while presenting the configuration for the EDH cluster.
Figure 11: Adding Cloudera cluster nodes
Make the following selections to determine how the EDH cluster will be set up:
Provide a name for the cluster.
Choose the version of CDH, Cloudera’s Enterprise Data Hub distribution, to install. The
default is to use the latest available version of CDH released along with Cloudera
Director.
Select the variety of services to install in the EDH, from a minimal core set to all
available services.

Amazon Web Services – Cloudera’s EDH on the AWS Cloud August 2017
Page 23 of 35
Select the number and instance template for the instance groups that Cloudera Director
will allocate in Amazon EC2. Each instance in an instance group has the same variety of
roles (service components). A minimal cluster should use the given groups with their
default roles. Be sure to select the number of workers desired; in all cases, stay above the
default minimum count for each instance group.
After you make any necessary modifications to the cluster configuration, choose Continue.
Cloudera Director will display progress bars tracking the progress of Cloudera Manager and
EDH cluster creation. When progress is complete, your EDH cluster is ready for use.
Option 2: Deploy Using the CLI, No Server
To deploy the EDH cluster, run the cloudera-director executable using one of the
configuration files, as follows.
For a simple cluster:
cloudera-director bootstrap aws.simple.conf
For an advanced cluster:
cloudera-director bootstrap aws.reference.conf
Figure 12 shows a typical sequence of a completed EDH deployment using Cloudera
Director.

Amazon Web Services – Cloudera’s EDH on the AWS Cloud August 2017
Page 24 of 35
Figure 12: EDH deployment sequence
Cloudera Director also supports other command arguments, such as terminate and
status.
For example, for a simple cluster:
cloudera-director status aws.simple.conf

Amazon Web Services – Cloudera’s EDH on the AWS Cloud August 2017
Page 25 of 35
For an advanced cluster:
cloudera-director status aws.reference.conf
Figure 13: EDH deployment sequence with status query
Accessing the Cluster with Cloudera Manager Once the EDH cluster has been launched, you can connect to Cloudera Manager to access
the cluster and add any services or maintenance operations. You can connect to Cloudera
Manager from a local host by forwarding the local port to the remote IP/port where
Cloudera Manager is running. You can find the private IP address of the instance running
Cloudera Manager by viewing information about it in Cloudera Director. Figure 14 shows
an example.

Amazon Web Services – Cloudera’s EDH on the AWS Cloud August 2017
Page 26 of 35
Figure 14: Finding the private IP address of the instance
In Figure 14, Cloudera Manager is running on the instance with private IP 10.0.23.184 on
port 7180. We can forward localhost:7180 to Cloudera Manager using the public IP of the
cluster launcher instance with the following command:
ssh -i mykeyfile.pem -L 7180:10.0.23.184:7180 \
ec2-user@cluster-launcher-public-ip
When port forwarding is complete, open the browser on the local host, go to
http://localhost:7180 and log in with admin/admin, as shown in Figure 15.

Amazon Web Services – Cloudera’s EDH on the AWS Cloud August 2017
Page 27 of 35
Figure 15: Connecting to Cloudera Manager
Managing the Cluster with Cloudera Director For ongoing management of the cluster or to launch additional clusters, you can use
Cloudera Director’s web interface.
From Cloudera Director’s web interface, you can clone the cluster you just created,
dynamically scale the cluster, or launch new clusters. You can also view all your clusters
from a central dashboard.

Amazon Web Services – Cloudera’s EDH on the AWS Cloud August 2017
Page 28 of 35
Figure 16: Cloudera Director
Storage Configuration This deployment uses disk storage attached to EC2 instances as the primary storage for
HDFS data.
Some EC2 instance types use only instance stores, which are attached to an instance and
provide temporary block-level storage. The size of an instance store ranges from 4 GiB to up
to 48 TiB, and varies by instance type according to the following table.
Instance type Instance store volumes
c3.4xlarge 2 x 160 GiB SSD (320 GiB)
c3.8xlarge 2 x 320 GiB SSD (640 GiB)
d2.xlarge 2 x 2,000 GiB HDD (6 TiB)
d2.2xlarge 6 x 2,000 GiB HDD (12 TiB)
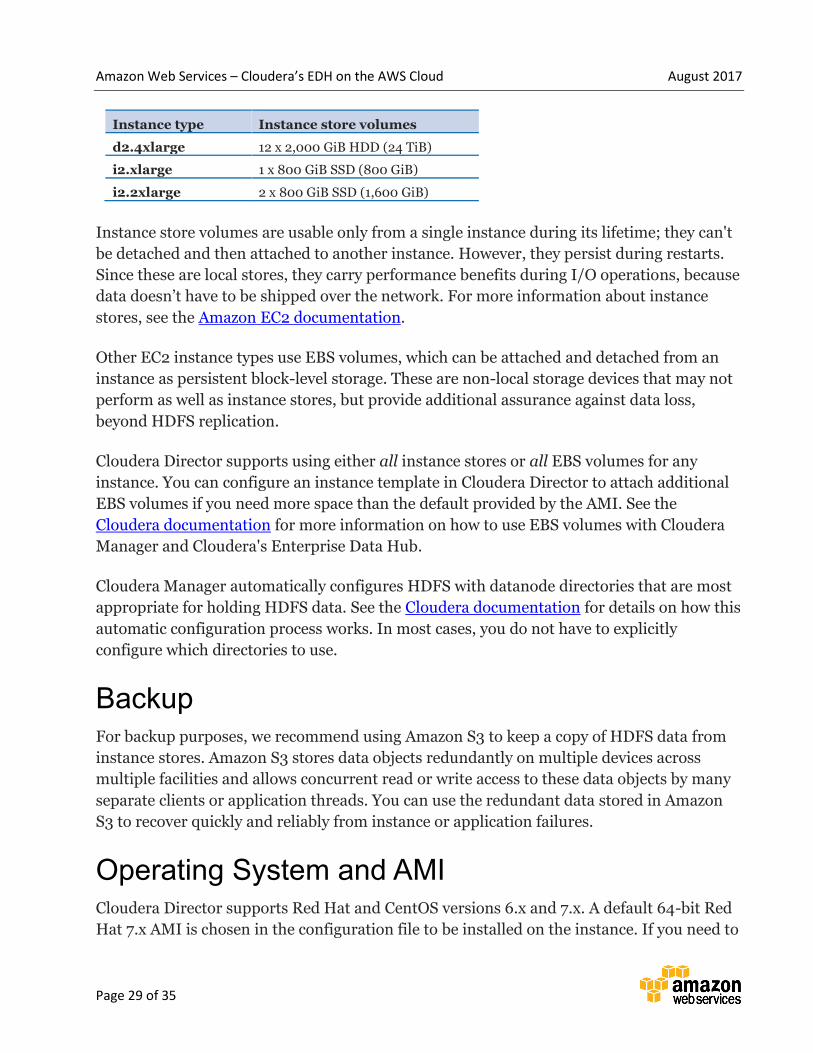
Amazon Web Services – Cloudera’s EDH on the AWS Cloud August 2017
Page 29 of 35
Instance type Instance store volumes
d2.4xlarge 12 x 2,000 GiB HDD (24 TiB)
i2.xlarge 1 x 800 GiB SSD (800 GiB)
i2.2xlarge 2 x 800 GiB SSD (1,600 GiB)
Instance store volumes are usable only from a single instance during its lifetime; they can't
be detached and then attached to another instance. However, they persist during restarts.
Since these are local stores, they carry performance benefits during I/O operations, because
data doesn’t have to be shipped over the network. For more information about instance
stores, see the Amazon EC2 documentation.
Other EC2 instance types use EBS volumes, which can be attached and detached from an
instance as persistent block-level storage. These are non-local storage devices that may not
perform as well as instance stores, but provide additional assurance against data loss,
beyond HDFS replication.
Cloudera Director supports using either all instance stores or all EBS volumes for any
instance. You can configure an instance template in Cloudera Director to attach additional
EBS volumes if you need more space than the default provided by the AMI. See the
Cloudera documentation for more information on how to use EBS volumes with Cloudera
Manager and Cloudera's Enterprise Data Hub.
Cloudera Manager automatically configures HDFS with datanode directories that are most
appropriate for holding HDFS data. See the Cloudera documentation for details on how this
automatic configuration process works. In most cases, you do not have to explicitly
configure which directories to use.
Backup For backup purposes, we recommend using Amazon S3 to keep a copy of HDFS data from
instance stores. Amazon S3 stores data objects redundantly on multiple devices across
multiple facilities and allows concurrent read or write access to these data objects by many
separate clients or application threads. You can use the redundant data stored in Amazon
S3 to recover quickly and reliably from instance or application failures.
Operating System and AMI Cloudera Director supports Red Hat and CentOS versions 6.x and 7.x. A default 64-bit Red
Hat 7.x AMI is chosen in the configuration file to be installed on the instance. If you need to

Amazon Web Services – Cloudera’s EDH on the AWS Cloud August 2017
Page 30 of 35
install other versions, please refer to the Cloudera Director documentation on OS support
and customize the AMI. For a list of different AMIs across regions, visit Red Hat and
Amazon Web Services.
Security The AWS Cloud provides a scalable, highly reliable platform that helps enable customers to
deploy applications and data quickly and securely.
When you build systems on the AWS infrastructure, security responsibilities are shared
between you and AWS. This shared model can reduce your operational burden as AWS
operates, manages, and controls the components from the host operating system and
virtualization layer down to the physical security of the facilities in which the services
operate. In turn, you assume responsibility and management of the guest operating system
(including updates and security patches), other associated applications, as well as the
configuration of the AWS-provided security group firewall. For more information about
security on AWS, visit the AWS Security Center.
AWS Identity and Access Management (IAM) This deployment leverages an IAM role with least privileged access. It is not necessary or
recommended to store SSH keys or secret keys or access keys on the provisioned instances.
OS Security The root user on cluster nodes can be accessed only by using the SSH key specified during
the deployment process. AWS doesn’t store these SSH keys, so if you lose your SSH key you
can lose access to these instances.
Operating system patches are your responsibility and should be performed on a periodic
basis.
Security Groups A security group acts as a firewall that controls the traffic for one or more instances. When
you launch an instance, you associate one or more security groups with the instance. You
add rules to each security group that allow traffic to or from its associated instances. You
can modify the rules for a security group at any time. The new rules are automatically
applied to all instances that are associated with the security group.
The security groups created and assigned to the individual instances as part of this solution
are restricted as much as possible while allowing access to the various functions needed by

Amazon Web Services – Cloudera’s EDH on the AWS Cloud August 2017
Page 31 of 35
Hadoop. We recommend reviewing security groups to further restrict access as needed once
the EDH cluster is up and running.
Additional Resources
AWS services
Getting Started
http://docs.aws.amazon.com/gettingstarted/latest/awsgsg-intro/intro.html
AWS CloudFormation
http://aws.amazon.com/documentation/cloudformation/
Amazon EC2
– User’s guide:
http://docs.aws.amazon.com/ec2/
– Regions and Availability Zones:
http://docs.aws.amazon.com/AWSEC2/latest/UserGuide/using-regions-
availability-zones.html
– Key pairs:
http://docs.aws.amazon.com/AWSEC2/latest/UserGuide/ec2-key-pairs.html
– Instance stores:
http://docs.aws.amazon.com/AWSEC2/latest/UserGuide/InstanceStorage.html#ins
tance-storage-concepts
– FAQ:
http://aws.amazon.com/ec2/faqs
Amazon Identity and Access Management
– User’s guide:
http://aws.amazon.com/documentation/iam/
– Benefits of the IAM role:
http://docs.aws.amazon.com/IAM/latest/UserGuide/role-usecase-ec2app.html
Amazon VPC
– Documentation:
http://aws.amazon.com/documentation/vpc/
– NAT gateways:
http://docs.aws.amazon.com/AmazonVPC/latest/UserGuide/vpc-nat-gateway.html
Amazon Web Services – Cloudera’s EDH on the AWS Cloud August 2017
Page 32 of 35
– Comparison of NAT instances and NAT gateways:
http://docs.aws.amazon.com/AmazonVPC/latest/UserGuide/vpc-nat-
comparison.html
AWS Security Center
http://aws.amazon.com/security/
Red Hat and AWS
http://aws.amazon.com/partners/redhat/
Cloudera
Cloudera website
https://www.cloudera.com
Cloudera documentation
https://www.cloudera.com/documentation.html
Cloudera Director
Online HTML: https://www.cloudera.com/documentation/director/latest.html
PDF: https://www.cloudera.com/content/www/en-
us/documentation/director/latest/PDF/cloudera-director.pdf
Cloudera Support
https://www.cloudera.com/more/services-and-support.html
Managing licenses
https://www.cloudera.com/documentation/enterprise/latest/topics/cm_ag_licenses.ht
ml
Quick Start reference deployments
AWS Quick Start home page
https://aws.amazon.com/quickstart/
Amazon Web Services – Cloudera’s EDH on the AWS Cloud August 2017
Page 33 of 35
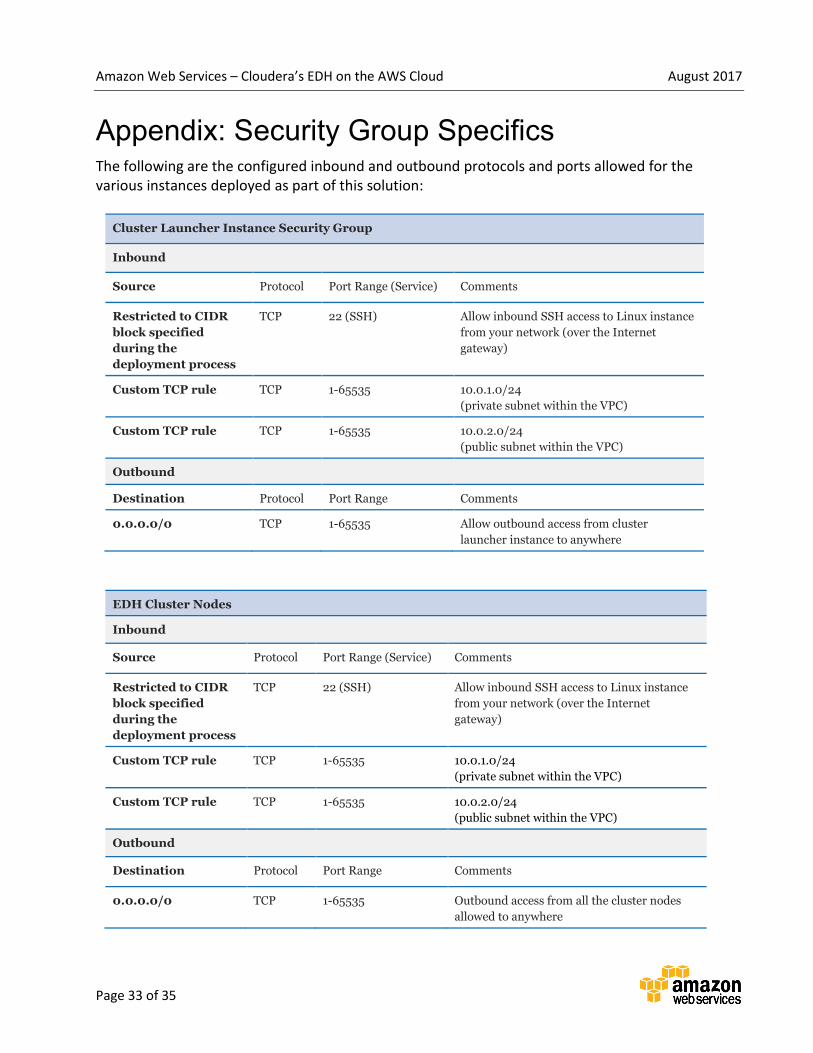
Appendix: Security Group Specifics The following are the configured inbound and outbound protocols and ports allowed for the various instances deployed as part of this solution:
Cluster Launcher Instance Security Group
Inbound
Source Protocol Port Range (Service) Comments
Restricted to CIDR
block specified
during the
deployment process
TCP 22 (SSH) Allow inbound SSH access to Linux instance
from your network (over the Internet
gateway)
Custom TCP rule TCP 1-65535 10.0.1.0/24
(private subnet within the VPC)
Custom TCP rule TCP 1-65535 10.0.2.0/24
(public subnet within the VPC)
Outbound
Destination Protocol Port Range Comments
0.0.0.0/0 TCP 1-65535 Allow outbound access from cluster
launcher instance to anywhere
EDH Cluster Nodes
Inbound
Source Protocol Port Range (Service) Comments
Restricted to CIDR
block specified
during the
deployment process
TCP 22 (SSH) Allow inbound SSH access to Linux instance
from your network (over the Internet
gateway)
Custom TCP rule TCP 1-65535 10.0.1.0/24
(private subnet within the VPC)
Custom TCP rule TCP 1-65535 10.0.2.0/24
(public subnet within the VPC)
Outbound
Destination Protocol Port Range Comments
0.0.0.0/0 TCP 1-65535 Outbound access from all the cluster nodes
allowed to anywhere
Amazon Web Services – Cloudera’s EDH on the AWS Cloud August 2017
Page 34 of 35
Send Us Feedback You can visit our GitHub repository to download the templates and scripts for this Quick
Start, to post your feedback, and to share your customizations with others.
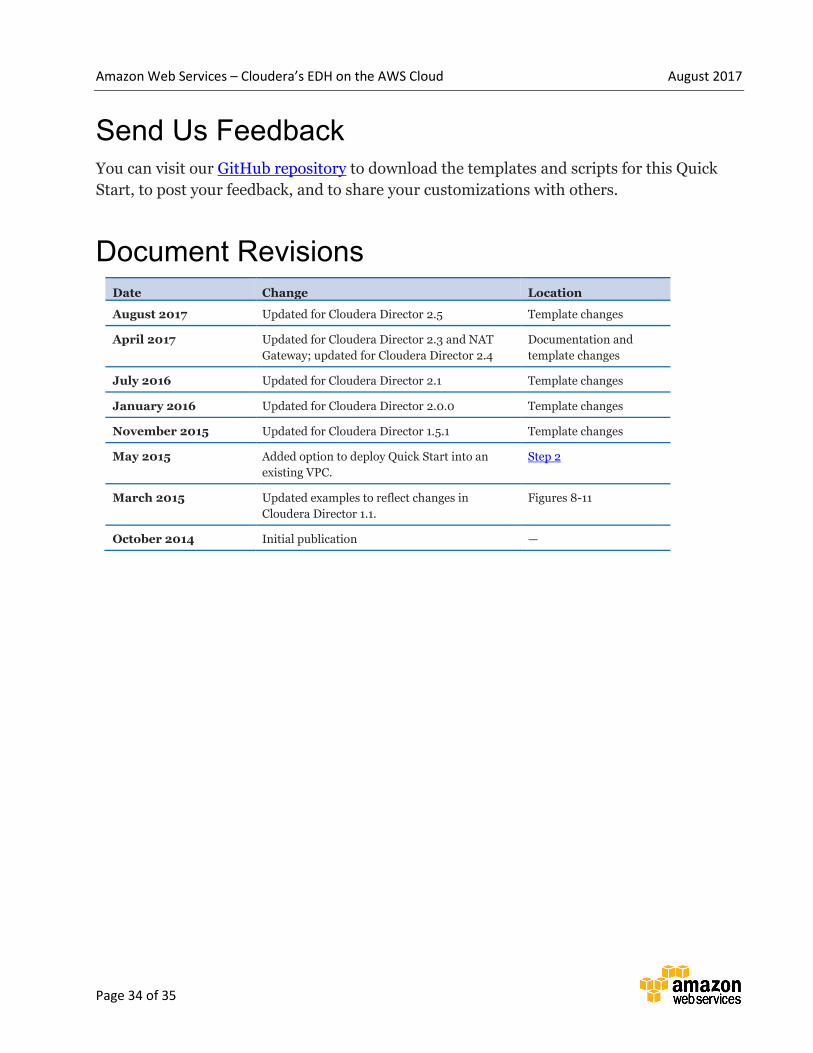
Document Revisions
Date Change Location
August 2017 Updated for Cloudera Director 2.5 Template changes
April 2017 Updated for Cloudera Director 2.3 and NAT
Gateway; updated for Cloudera Director 2.4
Documentation and
template changes
July 2016 Updated for Cloudera Director 2.1 Template changes
January 2016 Updated for Cloudera Director 2.0.0 Template changes
November 2015 Updated for Cloudera Director 1.5.1 Template changes
May 2015 Added option to deploy Quick Start into an
existing VPC.
Step 2
March 2015 Updated examples to reflect changes in
Cloudera Director 1.1.
Figures 8-11
October 2014 Initial publication —
Amazon Web Services – Cloudera’s EDH on the AWS Cloud August 2017
Page 35 of 35
© 2017, Amazon Web Services, Inc. or its affiliates. All rights reserved.
Notices
This document is provided for informational purposes only. It represents AWS’s current product offerings
and practices as of the date of issue of this document, which are subject to change without notice. Customers
are responsible for making their own independent assessment of the information in this document and any
use of AWS’s products or services, each of which is provided “as is” without warranty of any kind, whether
express or implied. This document does not create any warranties, representations, contractual
commitments, conditions or assurances from AWS, its affiliates, suppliers or licensors. The responsibilities
and liabilities of AWS to its customers are controlled by AWS agreements, and this document is not part of,
nor does it modify, any agreement between AWS and its customers.
The software included with this paper is licensed under the Apache License, Version 2.0 (the "License"). You
may not use this file except in compliance with the License. A copy of the License is located at
http://aws.amazon.com/apache2.0/ or in the "license" file accompanying this file. This code is distributed on
an "AS IS" BASIS, WITHOUT WARRANTIES OR CONDITIONS OF ANY KIND, either express or implied.
See the License for the specific language governing permissions and limitations under the License.