clockwise manual - starinstarin.info/product info/advanced network devices/manuals/archive... · to...
TRANSCRIPT

[2012]
2012 ADVANCED NETWORK DEVICES
3820 NORTH VENTURA DR.
ARLINGTON HEIGHTS, IL 60004
U.S.A
ALL RIGHTS RESERVED
Clockwise Manual
Clockwise Manual
2
TABLE OF CONTENTS
INTRODUCTION ......................................................................................................................................................................... 4
Header................................................................................................................................................................................................ 4
Priority Setting ................................................................................................................................................................................... 5
DEVICES TAB .............................................................................................................................................................................. 6
Accessing Endpoints ........................................................................................................................................................................... 6
Device List and Grouping ................................................................................................................................................................... 8
Graphics Builder ................................................................................................................................................................................. 8
CLOCK TAB ............................................................................................................................................................................... 10
Sound Scheduling ............................................................................................................................................................................. 10
Scheduling options ........................................................................................................................................................................... 10
Abbreviated version of the scheduling tool ...................................................................................................................................... 10
Full scheduling tool .......................................................................................................................................................................... 11
EVENTS TAB ............................................................................................................................................................................. 13
Add an event .................................................................................................................................................................................... 14
Edit an Event .................................................................................................................................................................................... 15
Import/Export functionality ............................................................................................................................................................. 16
ALERT TAB ............................................................................................................................................................................... 16
Setting up an Alert ........................................................................................................................................................................... 17
Import/Export functionality ............................................................................................................................................................. 18
RSS/TWITTER FEED TAB ........................................................................................................................................................... 19
Setting up a feed .............................................................................................................................................................................. 19
How to test the feed ......................................................................................................................................................................... 19
STOPWATCH TAB ..................................................................................................................................................................... 20
TIMER TAB ............................................................................................................................................................................... 22
SCOREBOARD TAB ................................................................................................................................................................... 23
Time keeping .................................................................................................................................................................................... 23
Scorekeeping .................................................................................................................................................................................... 24

Clockwise Manual
3
LIVE SOUND TAB ...................................................................................................................................................................... 26
Paging—traditional paging system ................................................................................................................................................. 26
Two way intercom ............................................................................................................................................................................ 26
Monitor ............................................................................................................................................................................................ 27
PC AUDIO ................................................................................................................................................................................ 28
SOUND LIBRARY TAB ............................................................................................................................................................... 29
Previewing sounds ........................................................................................................................................................................... 29
Adding new Sound files to clockwise ................................................................................................................................................ 30
APPENDICIES ........................................................................................................................................................................... 31

Clockwise Manual
4
INTRODUCTION
This manual will walk you through, tab by tab, the full functionality of the program. When you open the
installed clockwise application, it will open on the “Devices” tab. Before learning the tab content please take
a look at the top portion of the application (Figure 1.1). This is the header and accessible throughout all
tabs.
Note: Confirm Internet connectivity prior to opening the Clockwise software to ensure the application is able
to communicate with the Advanced Network Devices endpoints on your network and auto-populate the
“Devices” tab in Clockwise.
HEADER
a. The button or buttons that are colored indicates the enabled/running functions: Clock, Events, Stopwatch, and Timer.
b. Displays the current time showing on all devices.
c. Sound that is scheduled to play next.
d. Last played sound.
e. Mutes all sounds generated by Clockwise. Devices can still play sounds from other sources
f. Display of Last played sound
Note: When the scheduled sound begins to play the image brightens and a red bar scrolls across the image
(see Figure 1.2 below)
g. Forces your PC clock to update itself with a time server. Note that this feature requires elevated credentials on Windows Vista
and later operating systems.
Figure 1.1
a.
b.
c.
f.
g. h.
d. e.

Clockwise Manual
5
h. When checked, this feature overrides preset volumes of any chimes from the Clock tab. Override volume is adjustable via
volume slide.
a. Display of last played sound. Click the sound image to play the sound.
PRIORITY SETTING
Several of the tabs have a priority setting; think of this as choosing which items are most important. This takes effect when two
actions are scheduled at the same time.
The priority is set on a scale from 1-99; the lower the number the higher the priority. If there are two items with that are set
equal, most recent action will be executed.
Figure 1.2
Figure 1.3
Example:
To ensure that you’re passing period countdown begins on schedule rather than continuing the news feed, set the series
priority of the passing period as “10” and the newsfeed as priority “50.” Reserve the highest priority, “1” for emergency
events.

Clockwise Manual
6
DEVICES TAB
The Devices Tab contains basic information about all the AND endpoints detected on the network. The devices description is listed first. This description is settable in either the Speaker’s on-board Speaker Settings menu via the Name parameter in the General settings or in a configuration file via the descr field of the SIPConfig tag. Other information such as the device’s IP address, up time, firmware, and SIP extension are available as well. Devices can be sorted by any of the columns by clicking on the column headings. Any created groups of devices are listed as well.
ACCESSING ENDPOINTS
Double-click on a device to open its web page in a browser. Right click on a device to bring up a context menu. (See Figure 11.1) Reboot Speaker – Cycle power on the selected device. Test Tone… - Send a 1 kHz tone at the specified volume and for the specified duration to the selected device. Display Text Message… - Send the specified message to the selected device(s). Play Sound… - Play a sound on the selected device(s). Add an Event - Add a new event for the selected device(s). Set Brightness – Set the display brightness on the selected device(s), 0-100, where 100 is the brightest and 0 is off. View device status page – Open the device’s web page in a browser. View device settings page – Open the device’s stored configuration settings web page in a browser. Countdown Timer… - Send a countdown timer to the selected device(s).
a. b. c.
\
\
\
\
\
\
d.
Figure 11.1

Clockwise Manual
7
a. Click “Refresh” to update the information on the device list. Devices listen in red are no longer responding. This may
indicate they are off or no longer connected to the same network.
b. Click on “Graphics Builder” to draw custom images for the device display (See Figure 11.3).
c. To Add Group: Click “Create Group” and then a new window called “Group Editor” will pop up (Figure 11.2). Check the
boxes next to the device names that you want in the group. Then type the name of the group in the text box and click
“Ok”. These groups are accessible in other tabs in order to perform group actions on the desired list of devices.
d. To edit a group: Click “Edit Group”. The Group Editor will pop up. This window allows you to check or uncheck devices
and to edit the name. When finished click “OK’”
Figure 8.2—Shows the “Group Editor” window that pops up
Example: You want to create a group for all 4th grade classrooms 1. Click “Create Group” 2. Type 4th Grade Classrooms in the “Name” field 3. Check all the devices that are in 4th grade classrooms 4. Click “Ok”
Figure 11.2

Clockwise Manual
8
DEVICE LIST AND GROUPING
Located at the bottom portion of most tabs is a device list. This is where you select the devices in your network that you want the particular event, feature, or sound to run on. This list is auto-populated when the software is opened. It actively looks for devices it can communicate with on the network. As devices are removed (i.e. you remove one IPClock from the wall) that device will be displayed in red to indicate it is no longer available.
a. To select a device, place a check mark in the box to the left of the device that you want the particular event, feature, or sound to run on. You can select as many devices as desired.
b. For communicating with the entire network, click the button “Check All” to select all devices on the list. To uncheck all checked devices click “Uncheck All”.
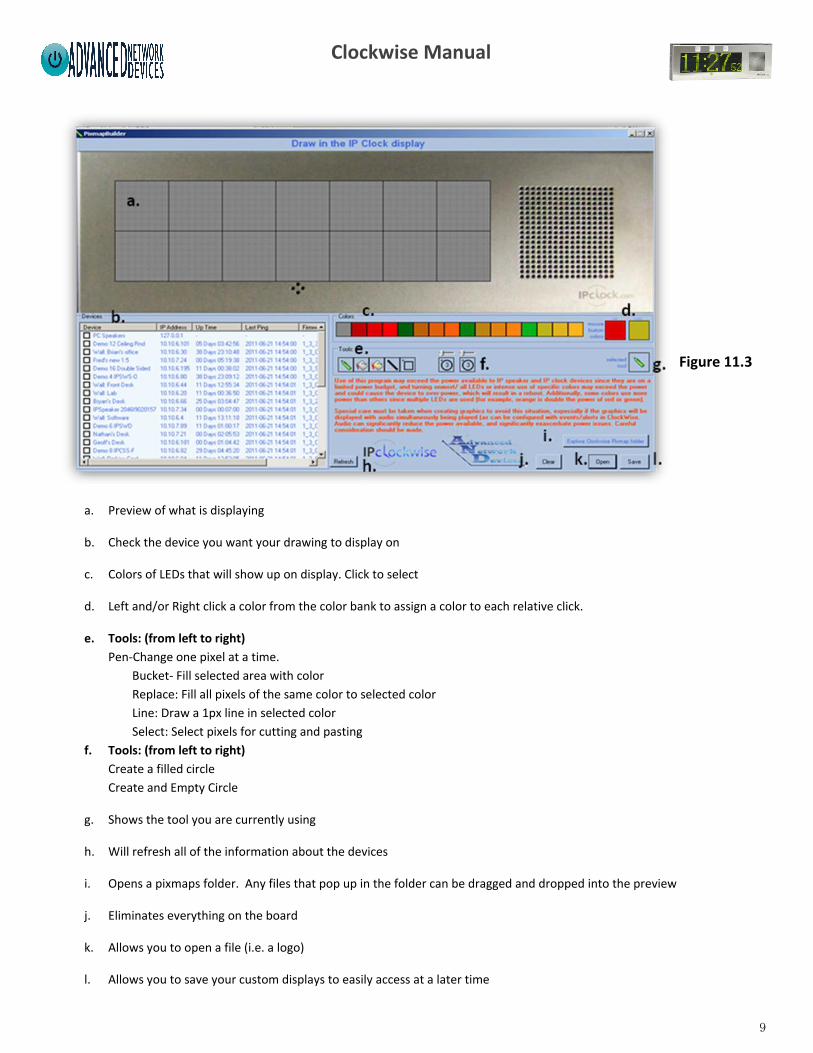
GRAPHICS BUILDER
Figure 1.4
a.
b.
Clockwise Manual
9
a. Preview of what is displaying
b. Check the device you want your drawing to display on
c. Colors of LEDs that will show up on display. Click to select
d. Left and/or Right click a color from the color bank to assign a color to each relative click.
e. Tools: (from left to right)
Pen-Change one pixel at a time.
Bucket- Fill selected area with color
Replace: Fill all pixels of the same color to selected color
Line: Draw a 1px line in selected color
Select: Select pixels for cutting and pasting
f. Tools: (from left to right)
Create a filled circle
Create and Empty Circle
g. Shows the tool you are currently using
h. Will refresh all of the information about the devices
i. Opens a pixmaps folder. Any files that pop up in the folder can be dragged and dropped into the preview
j. Eliminates everything on the board
k. Allows you to open a file (i.e. a logo)
l. Allows you to save your custom displays to easily access at a later time
Figure 11.3

Clockwise Manual
10
CLOCK TAB
The Clock Tab is used to send periodic sounds to a speaker or group of speaker on the hour, half-hour, and/or quarter-hour.
SOUND SCHEDULING
1. Clockwise Sounds: The Clockwise software comes with a library of pre-recorded sounds and full programs that can be
loaded on to your computer at download. Once the sounds are loaded they are accessible from the themed category
buttons in the middle of the screen
Click on the subcategory and then chose the program within that category for the full program detail.
a. The sound bar contains all of the downloadable, themed categories of sounds.
b. Pre-recorded sounds
2. Load your own sounds: The AND device and clockwise software will support most .wav files, from clips to full sounds.
Save the file locally then drag and drop the new .wav file into the scheduling tool.
SCHEDULING OPTIONS
There are two ways to schedule chimes, bells, and other sounds.
1. Abbreviated Version: This gives you the ability to schedule sounds on the quarter hour defined by morning, day, evening
and night for a total of 16 sound options in a 24 hour period.
2. Full Version: There is also a full scheduling tool that gives you the ability to play a different sound every 15 minutes for a
total of 96 different sounds in a 24 hour period
ABBREVIATED VERSION OF THE SCHEDULING TOOL
This is your best option when looking for a uniform sound throughout a standard 24 hour time period.
Figure 2.2
Figure 2.1 b.
a.

Clockwise Manual
11
1. Define “morning”, “day”, “evening” and “night” based on when you would like the sounds to change
2. Set the corresponding “brightness” and “Volume”. This is also schedulable by “morning”, “day”, “night” and “evening”
3. Now you can begin to add sounds by:
a. Dragging and dropping from one box to another (useful when using the same sound for multiple time slots (i.e.
on the ½ hour and on the hour)
b. Double clicking on the box you would like to select a file for and browsing within your hard drive for previously
saved files
c. Choosing a pre-made schedule from the categories and then sub-categories that you loaded with the clockwise
software sounds
FULL SCHEDULING TOOL
This is the tool that allows you to schedule a different sound on each of the 96 fifteen minute intervals in a 24 hour day.
1. Click the “Program Details” button in the upper right hand corner to open the full scheduling window
Example:
If you want a traditional westminster chime to play both before the school day starts (8am), after the
school day ends (3pm), but traditional school bells during the school day you would set.
Morning: 6am (westminster / full brightness)
Day: 8am (traditional school bells / full brightness)
Evening: 3:15pm (westminster/ full brightness)
Nights: 8pm (westminster / LEDs Dimmed)
Defined “Morning”
Sound 1
Sound 2
Tips & Tricks:
To conserve energy you want the LED to dim once the building should be empty (8pm) this is why in the previous
step we set “evening” to 8pm. While you may want to use the same sounds (westminster) you can lower the
brightness. You will need the clocks to return to full brightness at 6am when practices begin so again while the
chimes might stay the same “morning” was set at 6am to again adjust the brightness settings)
Clockwise Manual
12
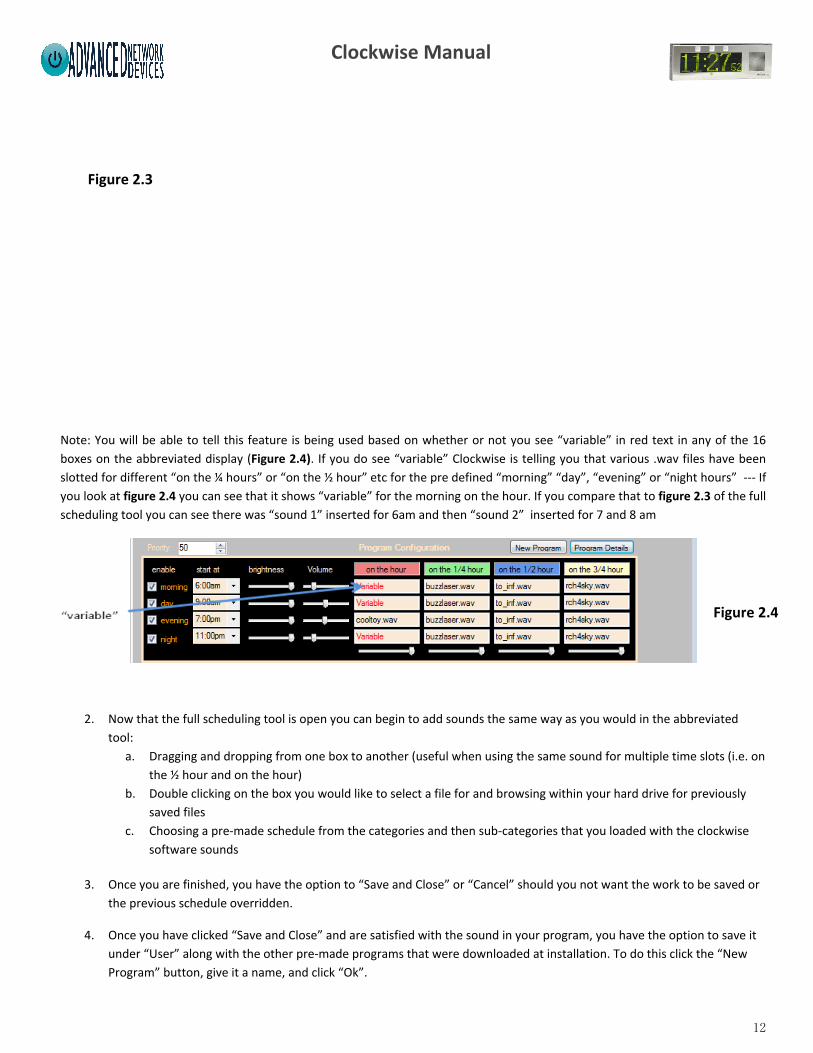
Note: You will be able to tell this feature is being used based on whether or not you see “variable” in red text in any of the 16
boxes on the abbreviated display (Figure 2.4). If you do see “variable” Clockwise is telling you that various .wav files have been
slotted for different “on the ¼ hours” or “on the ½ hour” etc for the pre defined “morning” “day”, “evening” or “night hours” --- If
you look at figure 2.4 you can see that it shows “variable” for the morning on the hour. If you compare that to figure 2.3 of the full
scheduling tool you can see there was “sound 1” inserted for 6am and then “sound 2” inserted for 7 and 8 am
2. Now that the full scheduling tool is open you can begin to add sounds the same way as you would in the abbreviated
tool:
a. Dragging and dropping from one box to another (useful when using the same sound for multiple time slots (i.e. on
the ½ hour and on the hour)
b. Double clicking on the box you would like to select a file for and browsing within your hard drive for previously
saved files
c. Choosing a pre-made schedule from the categories and then sub-categories that you loaded with the clockwise
software sounds
3. Once you are finished, you have the option to “Save and Close” or “Cancel” should you not want the work to be saved or
the previous schedule overridden.
4. Once you have clicked “Save and Close” and are satisfied with the sound in your program, you have the option to save it
under “User” along with the other pre-made programs that were downloaded at installation. To do this click the “New
Program” button, give it a name, and click “Ok”.
Figure 2.4
Figure 2.3

Clockwise Manual
13
EVENTS TAB
This is the tab in which you will enter all scheduled items outside of the bell scheduling/chimes on the clock tab. You are able to
schedule scrolling and static text, audio, and timers.
a. Turns off all alarms/events but will not delete them
Tips & Tricks:
If at any point you would like to return to the previous program (i.e. you chose to start with the pre-made
Traditional Westminster program and make a few changes and accidently deleted the ½ hour sounds rather than
the intended ¼ hour sounds) you can click “restore factory defaults” and the program will return to the to the
original sound and schedule.
Figure 3.1
a. b. e. d. c.
f.

Clockwise Manual
14
b. Turns on all alarms/events
c. Saves your current alarms/events in an external .DDC file
d. Imports a .DDC file from disk and loads those events instead of the current events.
e. Adds a new alarm/event to the list (Note: When alarms are enabled they are colored orange)
f. Right click on an event to enable, disable, delete, run now, or edit
ADD AN EVENT
1. Click the “Add an Event” button (this will bring up the new window shown in Figure 3.2)
2. Enter a name into the label field
3. Begin to fill out the criteria of the event: Audio, Text, and Timer. It can be one or any combination of the three of these items (i.e. you would enter in and set up the Twitter, RSS, and Google search term feed in the RSS / Twitter feeds Tab (see section 10). However you would then come here to schedule when it would run and across which device)
4. Select the:
• Frequency - “one time”, “weekly”, etc from the drop down menu
• Start Date
• Time - from the drop down menu
5. Run the event by placing a check mark next to desired devices.
6. Click “Test” to preview it on an AND device you are able to see (we recommend setting up clockwise in a location when you
have access to a device) or click “Save” to add to the schedule of events
Tips & Tricks: Easily sort through events by clicking on any of the headings to organize them by criteria
Clockwise Manual
15
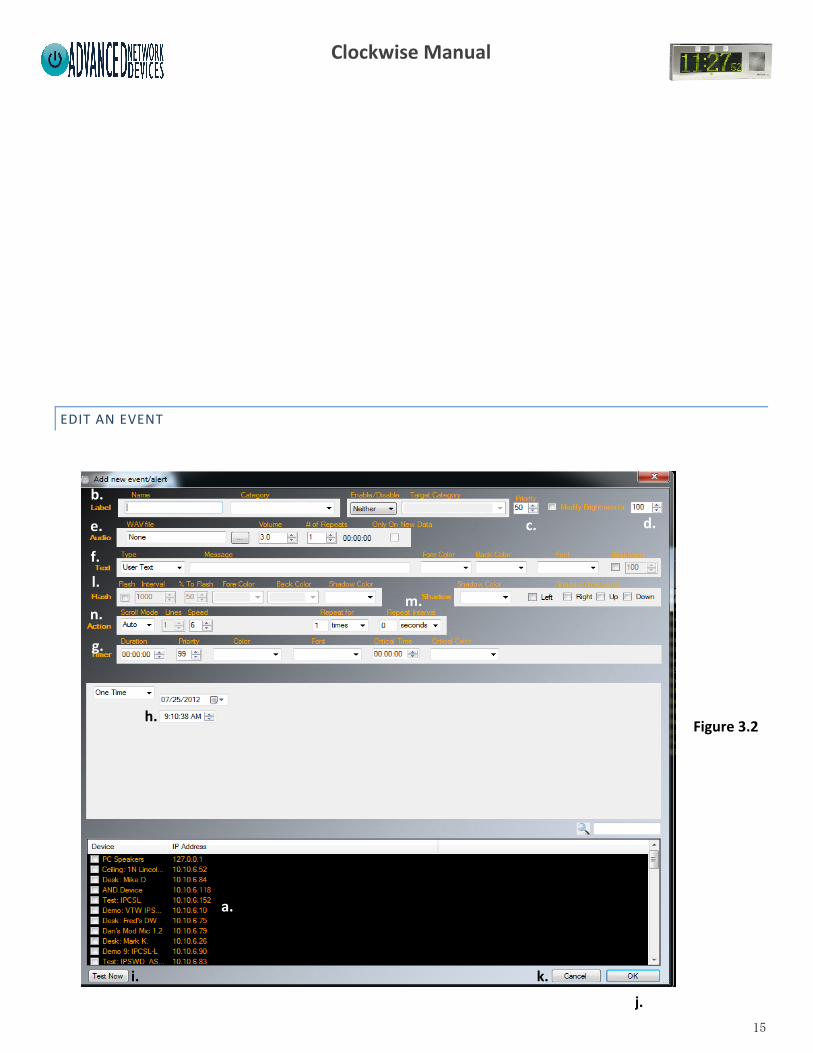
EDIT AN EVENT
l.
n. g.
h.
Figure 3.2
j.
b.
e. c. d.
f.
m.
k.
l.
h.
n.
g.
i.
a.
Clockwise Manual
16
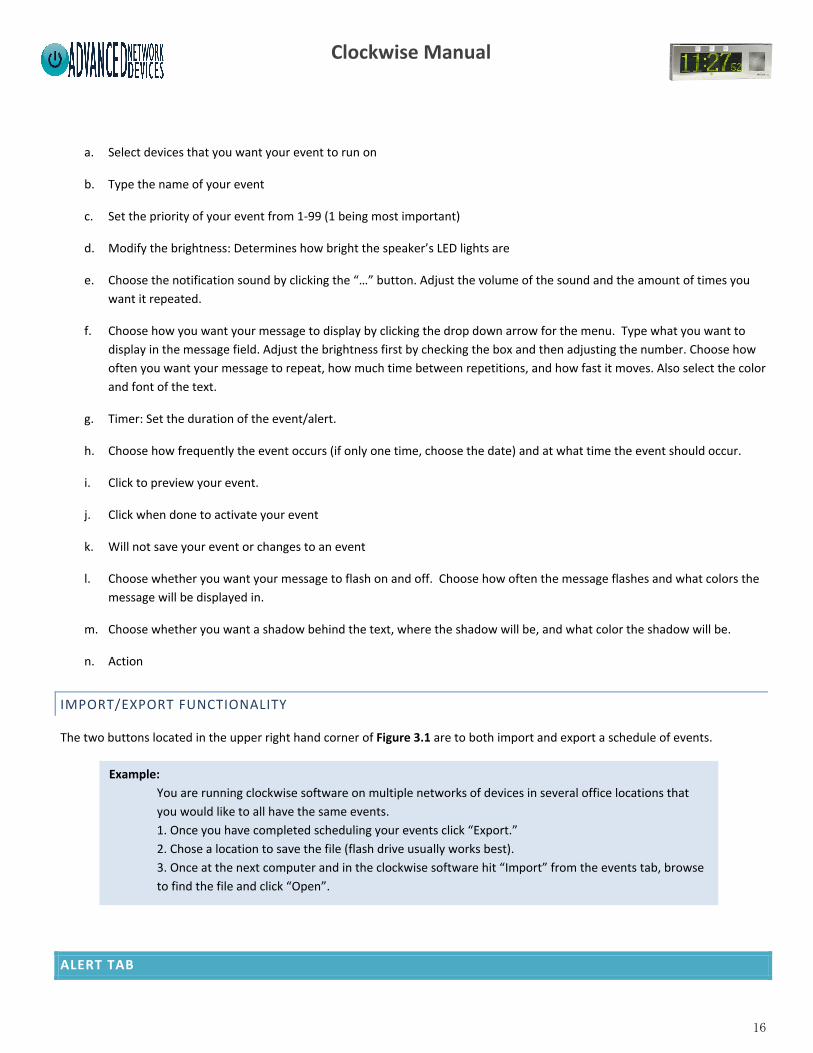
a. Select devices that you want your event to run on
b. Type the name of your event
c. Set the priority of your event from 1-99 (1 being most important)
d. Modify the brightness: Determines how bright the speaker’s LED lights are
e. Choose the notification sound by clicking the “…” button. Adjust the volume of the sound and the amount of times you
want it repeated.
f. Choose how you want your message to display by clicking the drop down arrow for the menu. Type what you want to
display in the message field. Adjust the brightness first by checking the box and then adjusting the number. Choose how
often you want your message to repeat, how much time between repetitions, and how fast it moves. Also select the color
and font of the text.
g. Timer: Set the duration of the event/alert.
h. Choose how frequently the event occurs (if only one time, choose the date) and at what time the event should occur.
i. Click to preview your event.
j. Click when done to activate your event
k. Will not save your event or changes to an event
l. Choose whether you want your message to flash on and off. Choose how often the message flashes and what colors the
message will be displayed in.
m. Choose whether you want a shadow behind the text, where the shadow will be, and what color the shadow will be.
n. Action
IMPORT/EXPORT FUNCTIONALITY
The two buttons located in the upper right hand corner of Figure 3.1 are to both import and export a schedule of events.
ALERT TAB
Example:
You are running clockwise software on multiple networks of devices in several office locations that
you would like to all have the same events.
1. Once you have completed scheduling your events click “Export.”
2. Chose a location to save the file (flash drive usually works best).
3. Once at the next computer and in the clockwise software hit “Import” from the events tab, browse
to find the file and click “Open”.
a.
i.
k.
Clockwise Manual
17
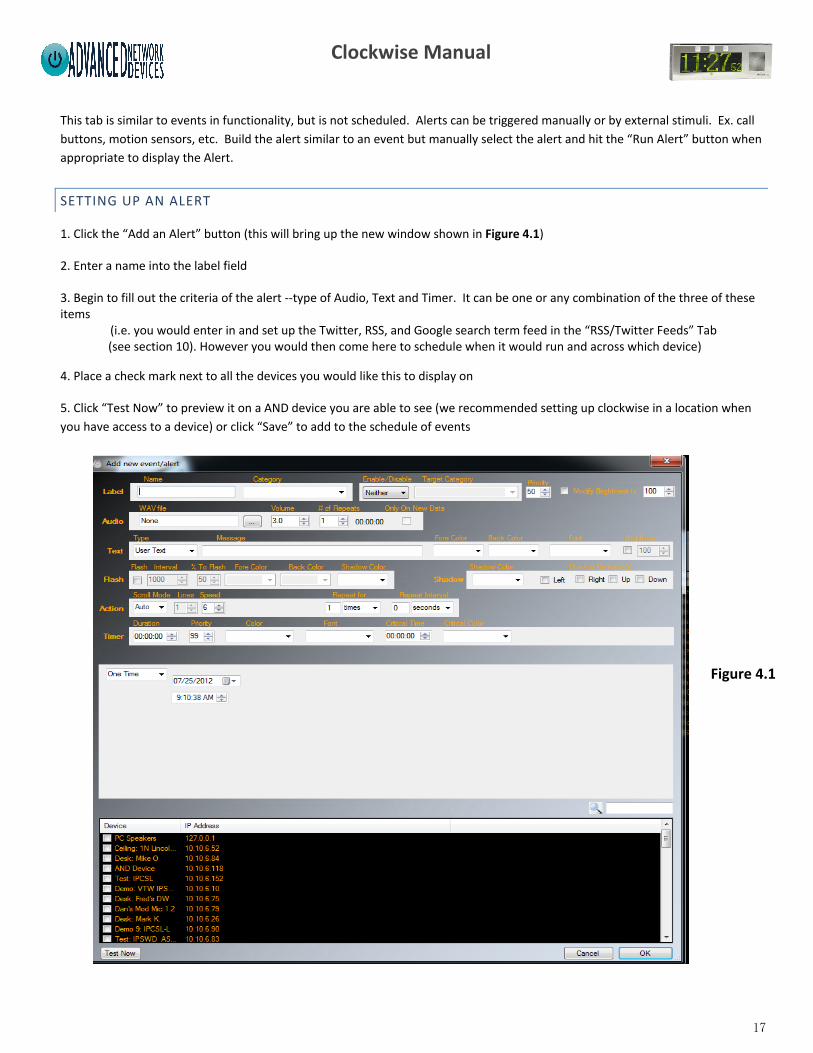
This tab is similar to events in functionality, but is not scheduled. Alerts can be triggered manually or by external stimuli. Ex. call
buttons, motion sensors, etc. Build the alert similar to an event but manually select the alert and hit the “Run Alert” button when
appropriate to display the Alert.
SETTING UP AN ALERT
1. Click the “Add an Alert” button (this will bring up the new window shown in Figure 4.1)
2. Enter a name into the label field
3. Begin to fill out the criteria of the alert --type of Audio, Text and Timer. It can be one or any combination of the three of these items
(i.e. you would enter in and set up the Twitter, RSS, and Google search term feed in the “RSS/Twitter Feeds” Tab (see section 10). However you would then come here to schedule when it would run and across which device)
4. Place a check mark next to all the devices you would like this to display on
5. Click “Test Now” to preview it on a AND device you are able to see (we recommended setting up clockwise in a location when
you have access to a device) or click “Save” to add to the schedule of events
Figure 4.1

Clockwise Manual
18
IMPORT/EXPORT FUNCTIONALITY
The two buttons located in the upper right hand corner of Figure 4.2 are to both import and export a set of alerts.
a. Save your current alarms and export to an external .DDC file
b. Import a .DDC file from a disk and load those alerts instead of the current alerts.
c. Add a new alert to the list
d. Click to run the pre-programmed alert
e. Right click on an event to enable, disable, delete, run now, or edit an alert
Tips & Tricks:
Sort through events by clicking on any of the headings to organize by criteria
Example:
You are running clockwise software on multiple networks of devices in several office locations that
you would like to all have the same alerts.
1. Once you have completed scheduling your alerts click “Export.”
2. Chose a location to save the file (flash drive usually works best).
3. Once at the next computer and in the clockwise software hit “Import” from the events tab, browse
to find the file and click “Open.”
Figure 4.2
a. b. c. d.
e.
Clockwise Manual
19
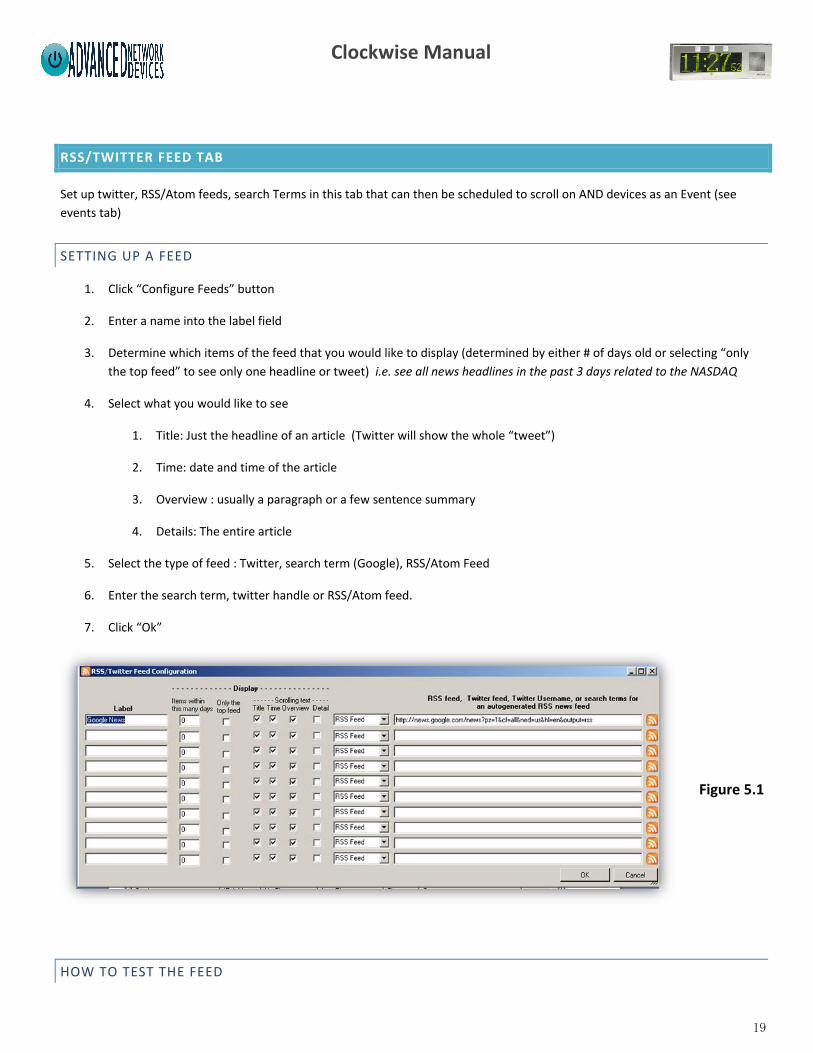
RSS/TWITTER FEED TAB
Set up twitter, RSS/Atom feeds, search Terms in this tab that can then be scheduled to scroll on AND devices as an Event (see
events tab)
SETTING UP A FEED
1. Click “Configure Feeds” button
2. Enter a name into the label field
3. Determine which items of the feed that you would like to display (determined by either # of days old or selecting “only
the top feed” to see only one headline or tweet) i.e. see all news headlines in the past 3 days related to the NASDAQ
4. Select what you would like to see
1. Title: Just the headline of an article (Twitter will show the whole “tweet”)
2. Time: date and time of the article
3. Overview : usually a paragraph or a few sentence summary
4. Details: The entire article
5. Select the type of feed : Twitter, search term (Google), RSS/Atom Feed
6. Enter the search term, twitter handle or RSS/Atom feed.
7. Click “Ok”
HOW TO TEST THE FEED
Figure 5.1

Clockwise Manual
20
1. Select the feed (previously entered in “Configure Feeds”) from the drop down box
2. Select the Device to display test
3. Click the “test the feed” button
The items that are in the feed will be displayed in a queue.
a. Allows you to set up RSS/Twitter Feeds
b. Click this button to test the feed that is selected in the drop down box above.
STOPWATCH TAB
a.
b.
c.
d.
e.
Figure 5.2
a. b.

Clockwise Manual
21
a. Set the priority of the stopwatch to determine when it will display on the selected device.
b. Set a time interval in which you want the sound to play. The format for the counter is hours:minutes:seconds. Either type in the
interval or adjust it with the up and down arrows.
c. Adjust the volume between numbers 1 and 9.
d. Click the drop down arrow to pick the color of the stop watch display
e. Click the “…” button to browse your computer’s sound files to set the sound that will play on the interval you have chosen
f. Click to start your stopwatch
g. Select the device on which you want the message to display. Either individually select the devices or to select all, click the
“Check All” button
a. This displays the time that is shown on your devices
b. Stop and reset your stopwatch if you have made any changes to your settings in order for them to take effect.
Tips & Tricks:
Set the priority at 1 if you want it to display full time.
Figure 6.1
Figure 6.2
g.
Clockwise Manual
22
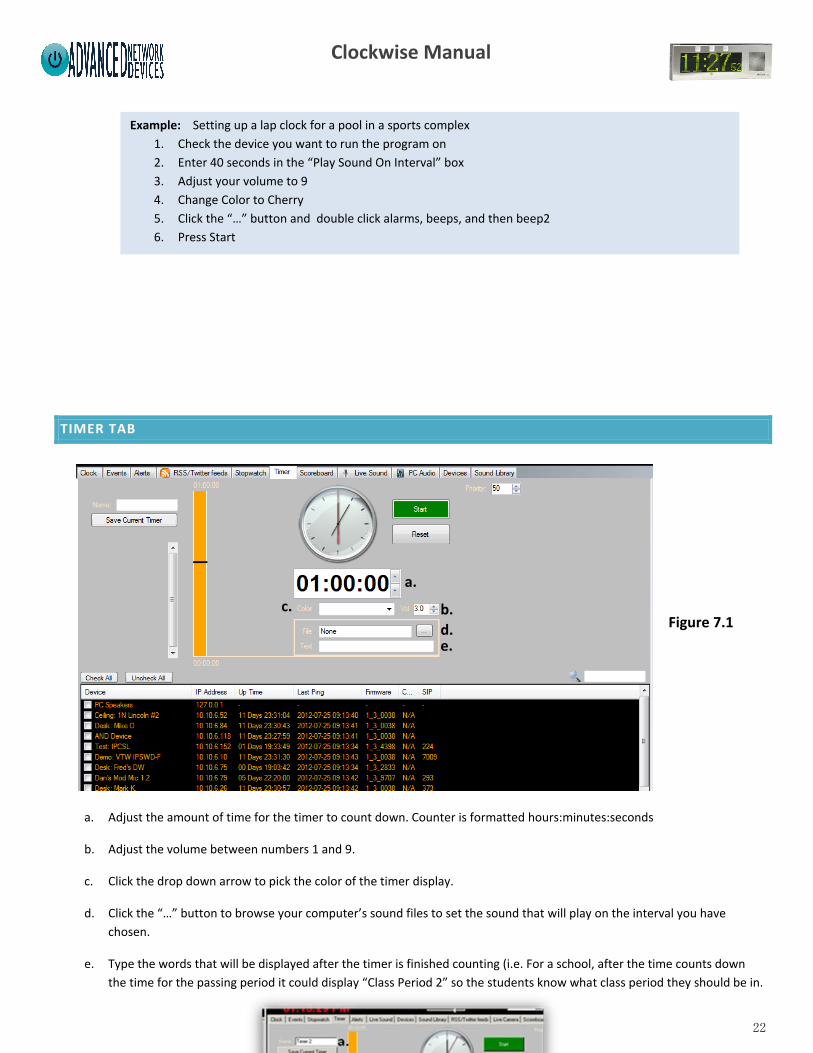
TIMER TAB
a. Adjust the amount of time for the timer to count down. Counter is formatted hours:minutes:seconds
b. Adjust the volume between numbers 1 and 9.
c. Click the drop down arrow to pick the color of the timer display.
d. Click the “…” button to browse your computer’s sound files to set the sound that will play on the interval you have
chosen.
e. Type the words that will be displayed after the timer is finished counting (i.e. For a school, after the time counts down
the time for the passing period it could display “Class Period 2” so the students know what class period they should be in.
Example: Setting up a lap clock for a pool in a sports complex
1. Check the device you want to run the program on
2. Enter 40 seconds in the “Play Sound On Interval” box
3. Adjust your volume to 9
4. Change Color to Cherry
5. Click the “…” button and double click alarms, beeps, and then beep2
6. Press Start
Figure 7.1
a.
b. c.
d. e.

Clockwise Manual
23
a. Save the current timer as a preset by naming the timer in the textbox and then clicking “Save Current Timer”. This allows
you to easily begin the timer by selecting the preset name then clicking “Start”.
b. The list of saved timers
a. Left click to add a notification and right click to delete. Scroll over the notification time line with your mouse to show
current time. Once you have added a notification, a box will appear with sound files. Click on the preferred file and click
open. Once a notification is set, there will be a black horizontal line at that point in time.
SCOREBOARD TAB
TIME KEEPING
1. Select device to display the score
Example: The students have a test that they are allocated one hour to finish.
1. Check the device you want to run the program on
2. Enter the time to one hour.
3. Set the color to green and the volume to 6
4. Click the “…” button. Then double click notifications, school bells, and then school bell 1
5. Click on the 45 minute mark and insert a sound to tell the students that they have 15 minutes left
6. Then type ‘Test is complete please put down your pencils’ in the text field.
7. Save the current time as “Test”
8. Click Start when students begin test.
Figure 7.2
Figure 7.3

Clockwise Manual
24
2. Type the amount of time into the large display at the middle currently showing “00:00” (MM: SS)
3. Select if you would like it to count up or down with the toggle button. (if it is displaying count down, click to count up. If it is
displaying count up, click to count down)
3. Hit “Start” and “Stop” to run the time
SCOREKEEPING
1. Enter the score increments into the text fields to control the “+#’ Buttons” (i.e. for a football game you would set to 3, 6,
1 for field goal, touchdown, and extra point (hit twice for safety)
Figure 8.1- Overview of the scoreboard
Tips & Tricks:
1. If the score is displaying on a device and you would like to clear it to use the device for other functionality,
uncheck the particular device you would like to clear or click “Uncheck All” to clear all devices.
2. Neither the game clock nor team possession displays on the clock.
Figure 8.1
.1
Figure 8.2
.1 a.
b. c.
d.

Clockwise Manual
25
a. Click on this to switch the direction the game clock counts.
b. Starts the clock
c. Stops the clock but does not reset it.
d. Can manually be adjusted by typing in the desired time
Figure 8.3-- Horn A, B, and C each can be set to have different sounds. Click on the “…” button to choose a sound. Once a sound is
selected, simply click on the Horn A, B, or C button to sound the horn.
a. You can change the score either using the up and down arrows or by typing in the number.
b. The three buttons below the score can be customized to whatever number you want by using the editing boxes below.
Adjust the number in the box below and then with one click you can add multiple points at a time. (i.e. +3 for 3 pointers
in a basketball game)
c. The possession button below each team’s score is highlighted in red when the team has possession.
Figure 8.3
.1
Figure 8.4
.1
Clockwise Manual
26
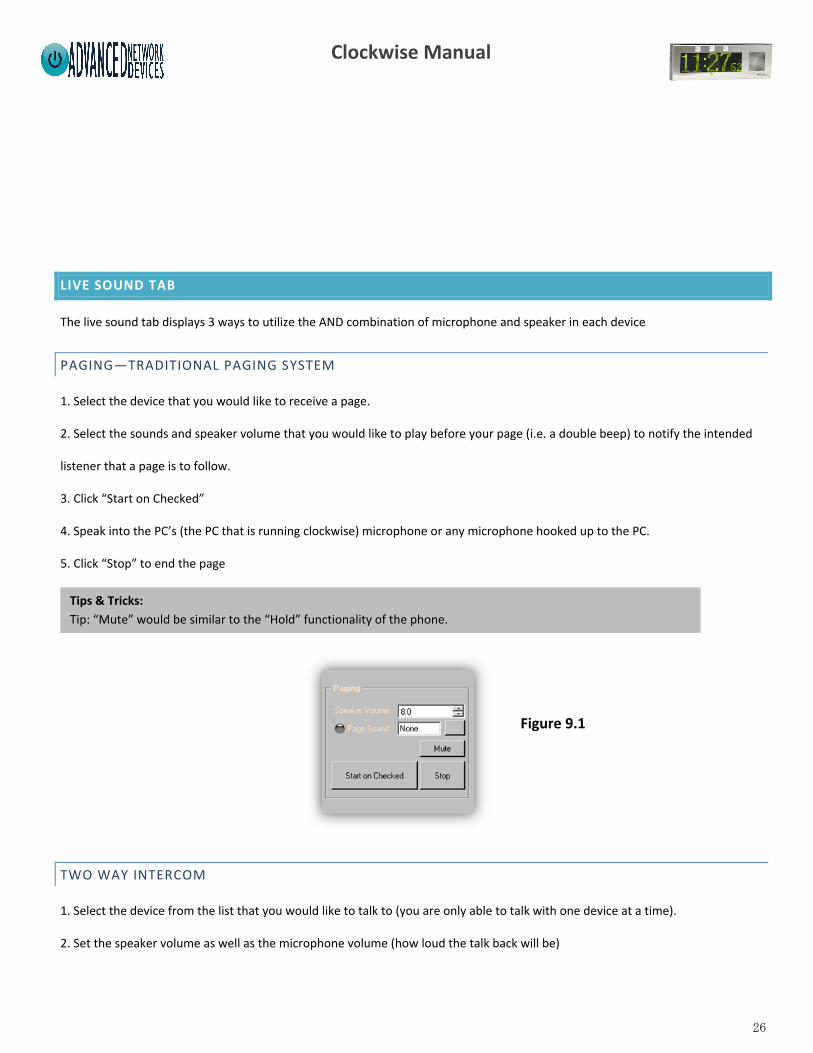
LIVE SOUND TAB
The live sound tab displays 3 ways to utilize the AND combination of microphone and speaker in each device
PAGING—TRADITIONAL PAGING SYSTEM
1. Select the device that you would like to receive a page.
2. Select the sounds and speaker volume that you would like to play before your page (i.e. a double beep) to notify the intended
listener that a page is to follow.
3. Click “Start on Checked”
4. Speak into the PC’s (the PC that is running clockwise) microphone or any microphone hooked up to the PC.
5. Click “Stop” to end the page
TWO WAY INTERCOM
1. Select the device from the list that you would like to talk to (you are only able to talk with one device at a time).
2. Set the speaker volume as well as the microphone volume (how loud the talk back will be)
Tips & Tricks:
Tip: “Mute” would be similar to the “Hold” functionality of the phone.
Figure 9.1
Figure 7.1

Clockwise Manual
27
3. Click “Start on Checked” -- This action will automatically set up a connection between the two devices allowing for two-way
communication. Optional button installation allows for push to talk communication.
4. Speak into the PC’s microphone or any microphone hooked up to the PC.
5. Click “Stop” to end two way intercom
MONITOR
Monitors sounds via a device’s microphones and transmits them to ClockWise for display via the computer’s speakers. It is conceptually the opposite of paging.
1. Select the device from the list that you would like to listen to (you are only able to monitor one device at a time).
2. Set the device microphone volume (how loud you want the sound to be)
3. Click “Start on Checked” to start
4. Click “Stop” to end
Example:
You have an office with 20 devices. When the office building is closed security could use this functionality to
listen to each of the devices from the front desk to detect sound. If a device detects sound you then know
there is an intruder in the building.
Tips & Tricks:
Tip: “Mute” would be similar to the “Hold” functionality of the phone.
Figure 9.2
Figure 9.2
Clockwise Manual
28
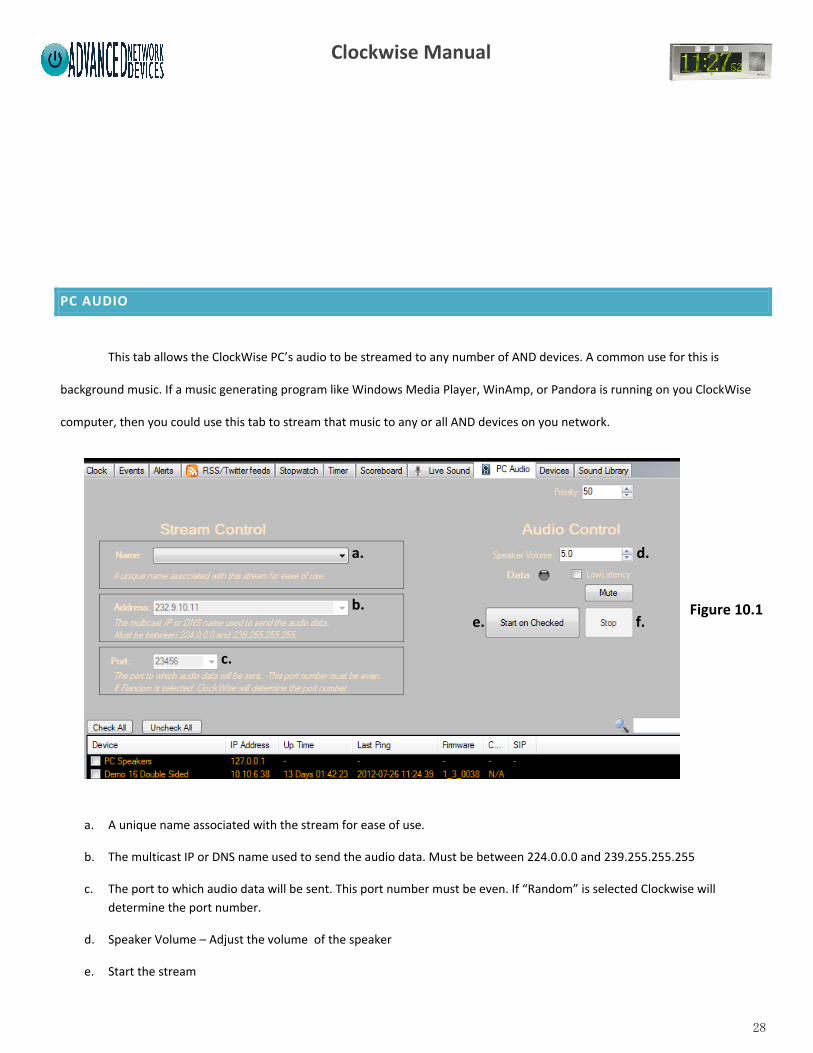
PC AUDIO
This tab allows the ClockWise PC’s audio to be streamed to any number of AND devices. A common use for this is
background music. If a music generating program like Windows Media Player, WinAmp, or Pandora is running on you ClockWise
computer, then you could use this tab to stream that music to any or all AND devices on you network.
a. A unique name associated with the stream for ease of use.
b. The multicast IP or DNS name used to send the audio data. Must be between 224.0.0.0 and 239.255.255.255
c. The port to which audio data will be sent. This port number must be even. If “Random” is selected Clockwise will
determine the port number.
d. Speaker Volume – Adjust the volume of the speaker
e. Start the stream
a.
b.
c.
d.
e. f. Figure 10.1

Clockwise Manual
29
f. Stop the stream
SOUND LIBRARY TAB
This is a means for importing sounds into clockwise as well as a way to preview sounds to be used in events, alerts, or bell
scheduling/clock chimes function.
PREVIEWING SOUNDS
1. Choose a category on the left
2. Then choose a sub category
3. Select a sound file on the right as well as the device(s) that you would like it to play on.
Note: Sound will immediately start upon selection, click the “Stop” button to stop sound.
a. Opens a document that has information about getting more sounds
b. Adjust volume by moving the slide (move slide to the right to increase)
c. Opens the folder where the sounds are saved
Figure 12.1
a. b. c. d.
e.
f. g. h.
Clockwise Manual
30
d. Set the priority of your event (from 1-99; 1 being most important)
e. Stops playing the sound
f. Categories of sounds
g. Sub Categories of sounds
h. Sound files
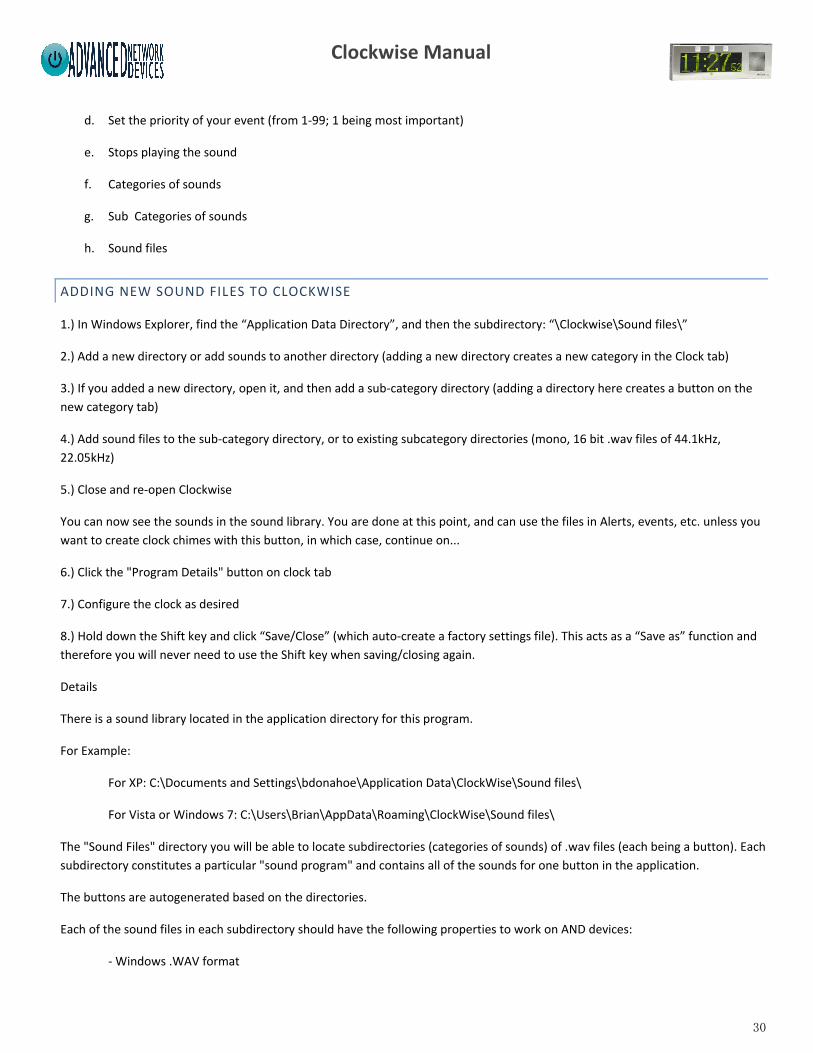
ADDING NEW SOUND FILES TO CLOCKWISE
1.) In Windows Explorer, find the “Application Data Directory”, and then the subdirectory: “\Clockwise\Sound files\”
2.) Add a new directory or add sounds to another directory (adding a new directory creates a new category in the Clock tab)
3.) If you added a new directory, open it, and then add a sub-category directory (adding a directory here creates a button on the
new category tab)
4.) Add sound files to the sub-category directory, or to existing subcategory directories (mono, 16 bit .wav files of 44.1kHz,
22.05kHz)
5.) Close and re-open Clockwise
You can now see the sounds in the sound library. You are done at this point, and can use the files in Alerts, events, etc. unless you
want to create clock chimes with this button, in which case, continue on...
6.) Click the "Program Details" button on clock tab
7.) Configure the clock as desired
8.) Hold down the Shift key and click “Save/Close” (which auto-create a factory settings file). This acts as a “Save as” function and
therefore you will never need to use the Shift key when saving/closing again.
Details
There is a sound library located in the application directory for this program.
For Example:
For XP: C:\Documents and Settings\bdonahoe\Application Data\ClockWise\Sound files\
For Vista or Windows 7: C:\Users\Brian\AppData\Roaming\ClockWise\Sound files\
The "Sound Files" directory you will be able to locate subdirectories (categories of sounds) of .wav files (each being a button). Each
subdirectory constitutes a particular "sound program" and contains all of the sounds for one button in the application.
The buttons are autogenerated based on the directories.
Each of the sound files in each subdirectory should have the following properties to work on AND devices:
- Windows .WAV format

Clockwise Manual
31
- 44.1kHz or 22.05kHz sampling rate
- mono
- 16 bit or 8-bit 8kHz u-law
These sound programs / buttons will only be recognized at startup of the application. Therefore close and re-open Clockwise if you
have added a program.
Other formats are supported for PC-only applications, but the above format will work best for the network devices.
The top level directory (the category) automatically creates a tab (a group of sounds category) in the application. If this directory is
deleted, the tab and all of the associated buttons (i.e. sound programs) will disappear upon restart of the program.
For functioning clock chimes, each subdirectory of sounds will also require a "factory_settings.txt" file. To create a
“factory_settings.txt” file, either copy one from a different directory already containing a “factory_settings.txt” file (and edit it
appropriately), or create one automatically by configuring a detailed program. This can be done by clicking "Program Details" and
creating a full program (see “Full Scheduling Tool”). After the program is configured hold down the Shift key while clicking
“Save/Close”. This action will auto create the “factory_settings.txt” file based on the previous program configuration.
While sound files can be loaded from anywhere on your computer, factory settings they must reside in this subdirectory.
APPENDICIES