clinical skills - cardiff university · clinical skills next? venepuncture aims and objectives ......
TRANSCRIPT
Venepuncture
Clinical Skills and Simulation teamVersion 1.1 October 2015
Venepuncture
Clinical Skills
Next
?
Venepuncture
Aims and Objectives
The aim of this module is to facilitate learning regarding the purpose and procedure ofvenepuncture.
Learning Outcomes
At the end of this session the student should be able to:
Explain the need for venepuncture
Identify the need for care in handling blood samples
Describe the process and importance of labelling blood samples
Demonstrate, to a level expected of the students stage of training, a degree of competencein the procedural steps of venepuncture
Aims and Objectives
NextBack
Venepuncture
Introduction
Venepuncture is a common procedure, performed in order to obtain venous blood for investigative or diagnosticpurposes. Results may be compared to an age appropriate range of 'normal' values and to the patient`s previousresults.
As all blood is potentially infective and sharps are used for this procedure, local guidelines for PPE and disposal ofsharps should be followed.
This module will focus on the adult patient and as such a medium sized needle (21 gauge, green) is required. Thisprovides the required flow rate so that a moderate amount of blood may be obtained and stored in samplebottles without clotting.
Introduction
NextBack
Venepuncture
Introduction
There are many blood tests (too many to list here), but fortunately there are far fewer bottles than tests. Somecommon tests are:-
urea and electrolytes
full blood count
clotting studies
cross match (you are NOT permitted to take a blood sample for cross match until you have undergone yourblood transfusion training)
You must ensure the correct bottle (colour coded bottle top) is used for each test. The volume of blood requiredper test varies and is marked on the blood bottle itself.
Introduction
NextBack
Venepuncture
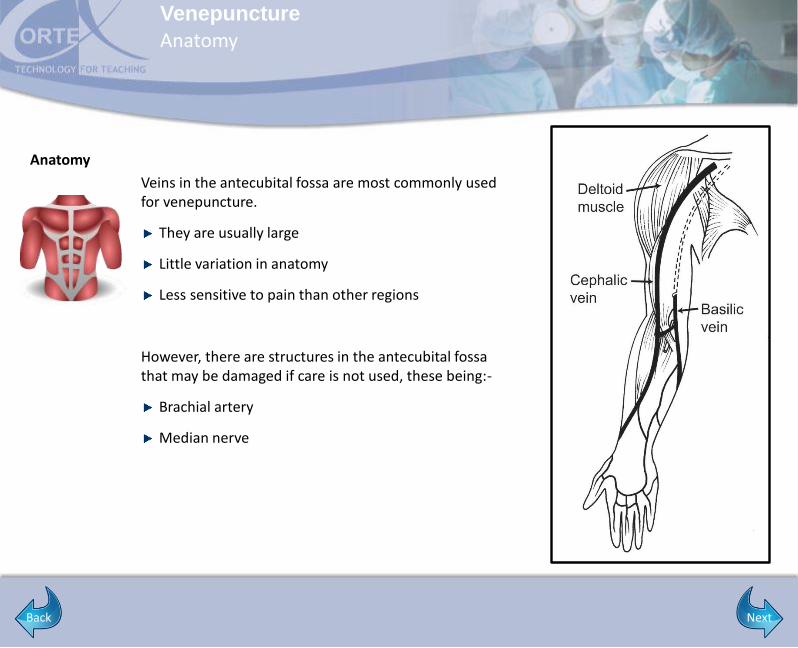
Anatomy
Veins in the antecubital fossa are most commonly used for venepuncture.
They are usually large
Little variation in anatomy
Less sensitive to pain than other regions
However, there are structures in the antecubital fossa that may be damaged if care is not used, these being:-
Brachial artery
Median nerve
Anatomy
NextBack
Venepuncture
Anatomy
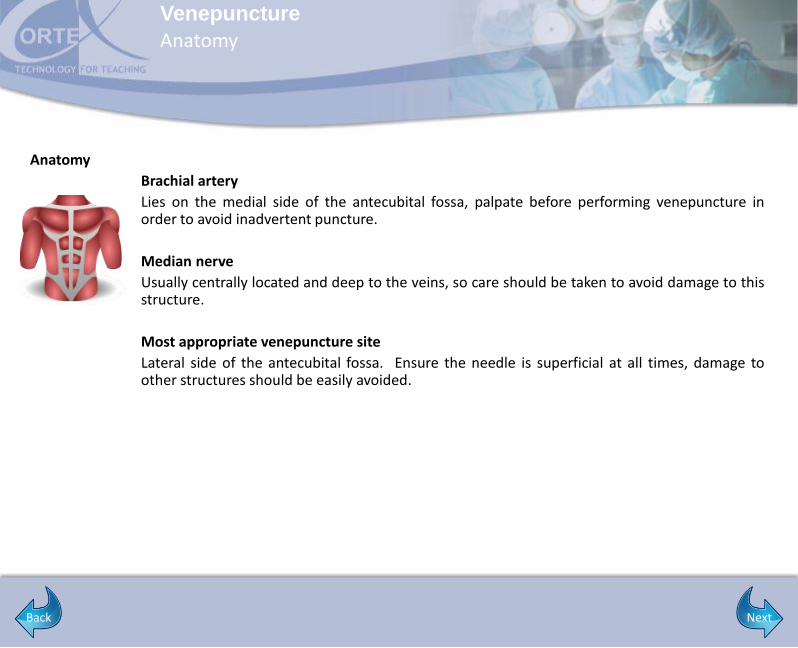
Brachial artery
Lies on the medial side of the antecubital fossa, palpate before performing venepuncture inorder to avoid inadvertent puncture.
Median nerve
Usually centrally located and deep to the veins, so care should be taken to avoid damage to thisstructure.
Most appropriate venepuncture site
Lateral side of the antecubital fossa. Ensure the needle is superficial at all times, damage toother structures should be easily avoided.
Anatomy
NextBack
Venepuncture
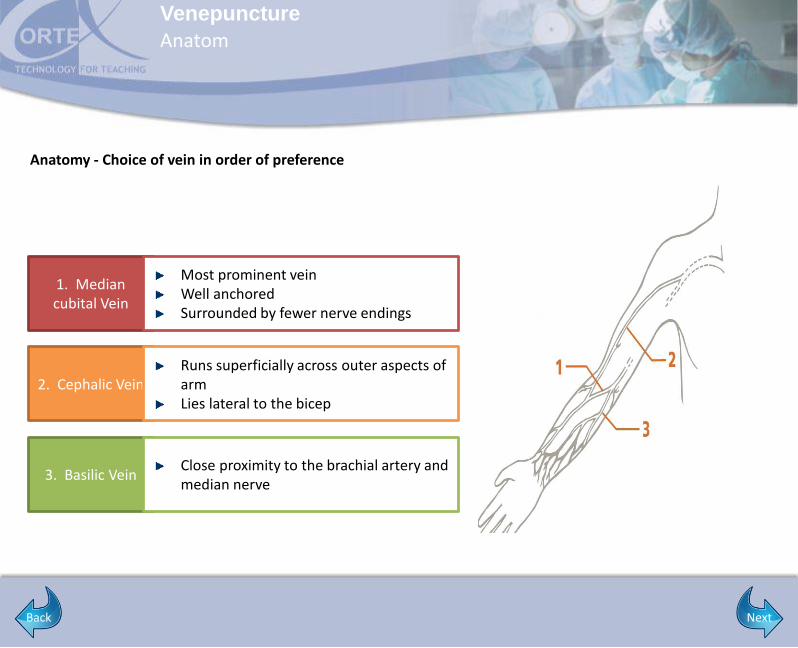
Anatomy - Choice of vein in order of preference
Anatom
1. Median cubital Vein
Most prominent veinWell anchoredSurrounded by fewer nerve endings
2. Cephalic VeinRuns superficially across outer aspects of armLies lateral to the bicep
3. Basilic VeinClose proximity to the brachial artery and median nerve
NextBack
Venepuncture
Sites to avoid
In an arm with IV cannula in-situ. The blood sample will be affected by the composition ofthe fluids being given via the cannula. If it is unavoidable and you have to use an arm withan IV canula in-situ you may be required to stop the infusion for a short time before takingthe sample
Avoid using an arm with an arterio-venous fistula present. The fistula is an artificialcommunication between the artery and vein and provides quick access for dialysis. Damageto this structure may prevent the patient from undergoing dialysis
Avoid affected arm in CVA patient (may lack sensation thus potential risk of damagingsurrounding structures)
Avoid affected side in mastectomy patients
Inflammation
Infection
Ezcema
Haematomas
Sites to avoid
NextBack
Venepuncture
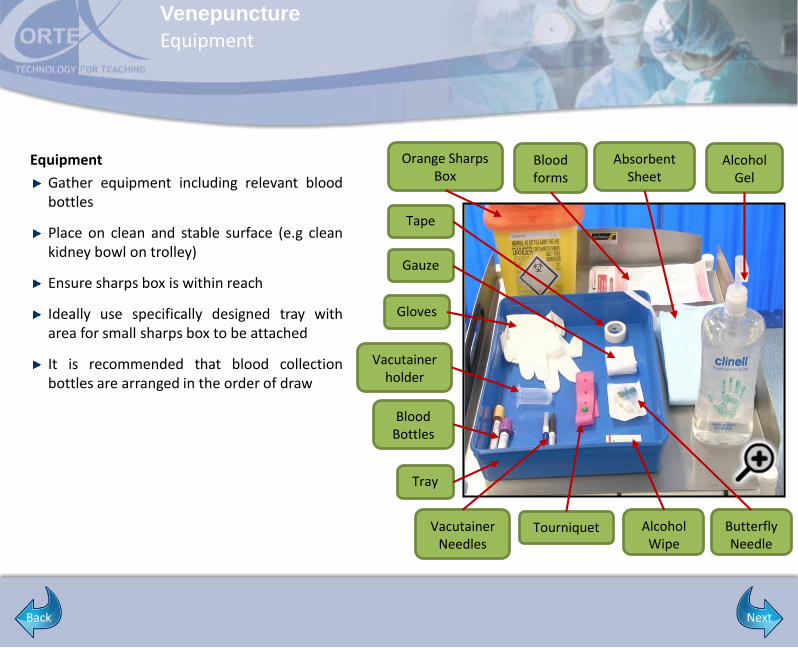
Equipment
Gather equipment including relevant bloodbottles
Place on clean and stable surface (e.g cleankidney bowl on trolley)
Ensure sharps box is within reach
Ideally use specifically designed tray witharea for small sharps box to be attached
It is recommended that blood collectionbottles are arranged in the order of draw
Equipment
Orange Sharps Box
Vacutainer holder
Blood Bottles
Gloves
Vacutainer Needles
Tray
Tourniquet
Alcohol Gel
Alcohol Wipe
Butterfly Needle
Absorbent Sheet
Blood forms
Tape
Gauze
NextBack
Venepuncture
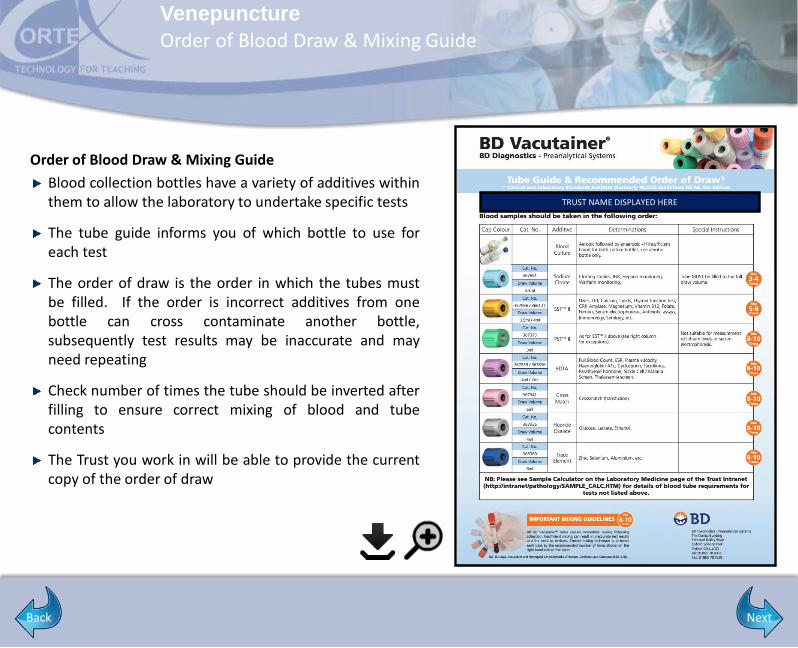
Order of Blood Draw & Mixing Guide
Blood collection bottles have a variety of additives withinthem to allow the laboratory to undertake specific tests
The tube guide informs you of which bottle to use foreach test
The order of draw is the order in which the tubes mustbe filled. If the order is incorrect additives from onebottle can cross contaminate another bottle,subsequently test results may be inaccurate and mayneed repeating
Check number of times the tube should be inverted afterfilling to ensure correct mixing of blood and tubecontents
The Trust you work in will be able to provide the currentcopy of the order of draw
Order of Blood Draw & Mixing Guide
TRUST NAME DISPLAYED HERE
NextBack
Venepuncture
Patient Communication
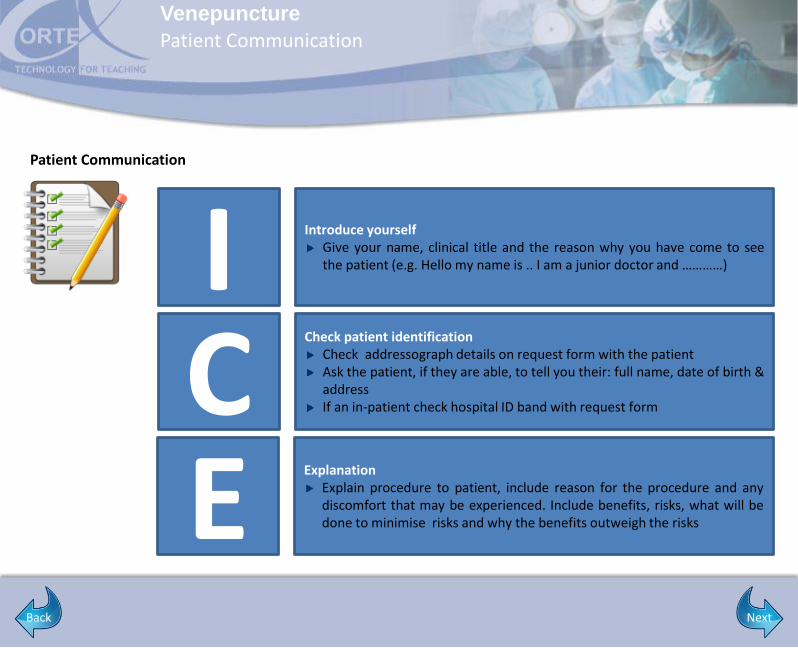
Patient Communication
EExplanation
Explain procedure to patient, include reason for the procedure and anydiscomfort that may be experienced. Include benefits, risks, what will bedone to minimise risks and why the benefits outweigh the risks
CCheck patient identification
Check addressograph details on request form with the patientAsk the patient, if they are able, to tell you their: full name, date of birth &addressIf an in-patient check hospital ID band with request form
I Introduce yourselfGive your name, clinical title and the reason why you have come to seethe patient (e.g. Hello my name is .. I am a junior doctor and …………)
NextBack
Venepuncture
Patient Communication
Patient Communication
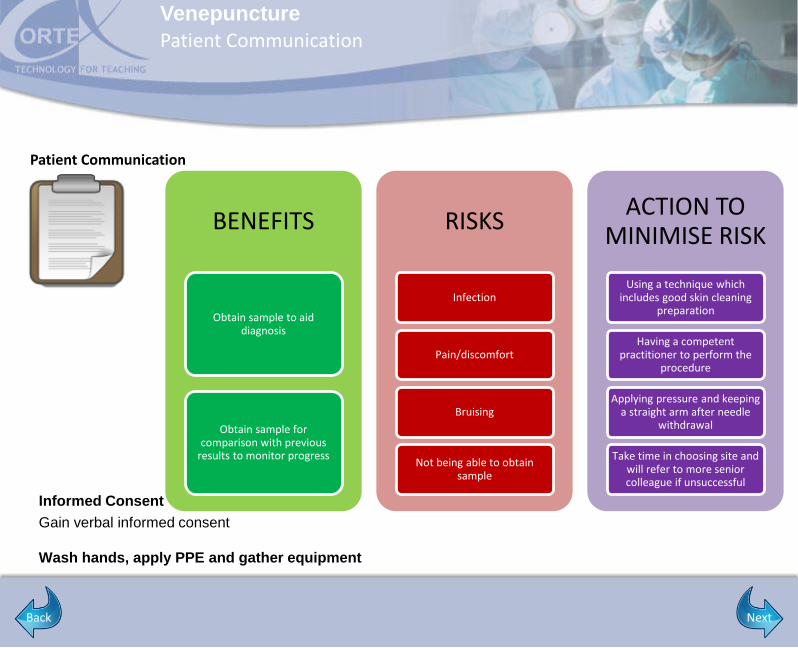
BENEFITS
Obtain sample to aid diagnosis
Obtain sample for comparison with previous
results to monitor progress
RISKS
Infection
Pain/discomfort
Bruising
Not being able to obtain sample
ACTION TO MINIMISE RISK
Using a technique which includes good skin cleaning
preparation
Having a competent practitioner to perform the
procedure
Applying pressure and keeping a straight arm after needle
withdrawal
Take time in choosing site and will refer to more senior colleague if unsuccessful
Informed Consent
Gain verbal informed consent
Wash hands, apply PPE and gather equipment
NextBack
Venepuncture
Procedure
Position your patient
Patient should be sitting or lying down.
You will need to ascertain how the patient feels about blood being taken, some may feel
Faint
Dizzy
Or may be needle phobic
If the patient has previously experienced any of the above or thinks that they may, it is advisableto lie them down. Ensure that you have adequate lighting.
Procedure
NextBack
Venepuncture
Procedure
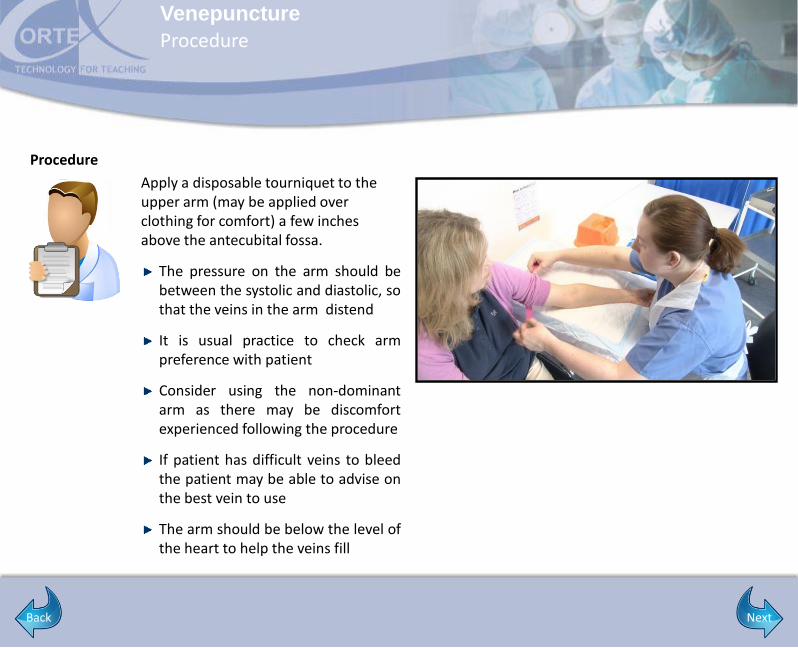
Apply a disposable tourniquet to the upper arm (may be applied over clothing for comfort) a few inches above the antecubital fossa.
The pressure on the arm should bebetween the systolic and diastolic, sothat the veins in the arm distend
It is usual practice to check armpreference with patient
Consider using the non-dominantarm as there may be discomfortexperienced following the procedure
If patient has difficult veins to bleedthe patient may be able to advise onthe best vein to use
The arm should be below the level ofthe heart to help the veins fill
Procedure
NextBack
Venepuncture
Procedure
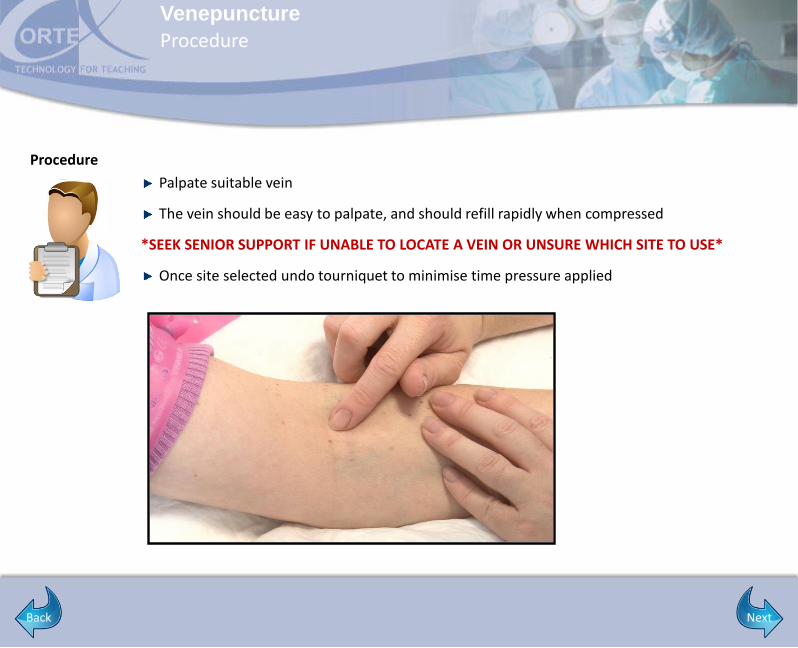
Palpate suitable vein
The vein should be easy to palpate, and should refill rapidly when compressed
*SEEK SENIOR SUPPORT IF UNABLE TO LOCATE A VEIN OR UNSURE WHICH SITE TO USE*
Once site selected undo tourniquet to minimise time pressure applied
Procedure
NextBack
Venepuncture
What to do if you are unable to find a vein
Check all sites and take your time
Check both arms and hands if necessary. Take your time in choosing your site before needle insertion. It isbetter to choose the optimal site the first time to minimise the chance of having to repeat the procedure.
Tap
Gently tapping the area releases local histamines which leads to vasodilation and make veins more prominent.
Clench hand into a fist
Ask the patient to make a fist with their hand and release. Repeat a few times. This causes the muscles tocontract and relax, and acts as a pump forcing blood into the veins. Be aware that fist clenching with venousocclusion can cause a false raised potassium measurement which may mask hypokalaemia in the patient.
Warm
If the patient is cold the veins may constrict and be more difficult to bleed. Either wait until they warm up orapply a warm compress to assist vasodilation making the veins easier to see and palpate.
Hydrate
If the patient is even mildly dehydrated the circulating volume will be reduced and thus veins may be harder tosee and palpate.
Unable to Find a Vein
NextBack

Venepuncture
Venepuncture
Assemble equipment byremoving the white capfrom needle. This endattaches to the vacutainerholder and punctures thevacutainer bottles
Remember that a sharpneedle is under the softgrey covering. Be aware ofrisk of needle stick injury
Insert this end into plasticvacutainer holder andscrew into place. Do NOTremove needle sheathuntil you are ready toinsert needle intopatient`s vein
Procedure
NextBack
Venepuncture
Venepuncture
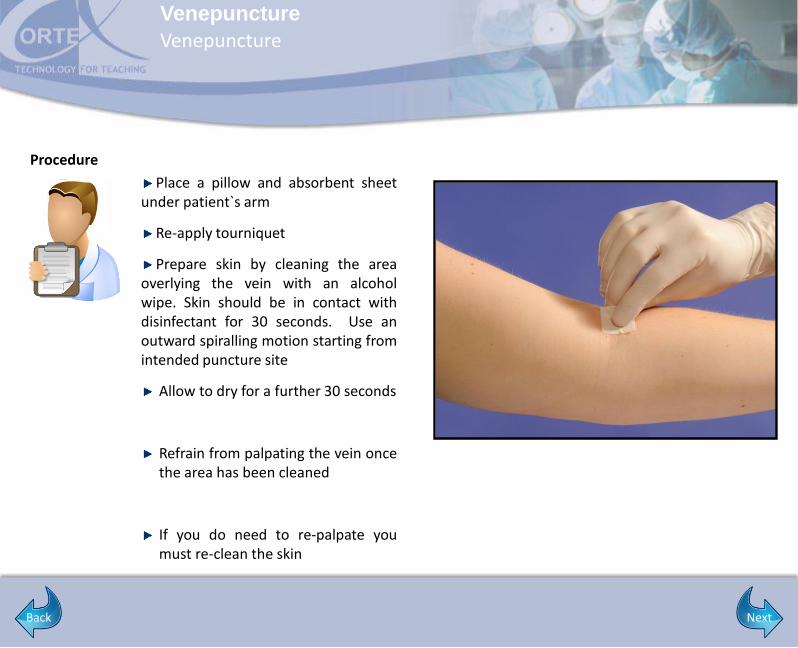
Place a pillow and absorbent sheetunder patient`s arm
Re-apply tourniquet
Prepare skin by cleaning the areaoverlying the vein with an alcoholwipe. Skin should be in contact withdisinfectant for 30 seconds. Use anoutward spiralling motion starting fromintended puncture site
Allow to dry for a further 30 seconds
Refrain from palpating the vein oncethe area has been cleaned
If you do need to re-palpate youmust re-clean the skin
Procedure
NextBack
Venepuncture
Venepuncture
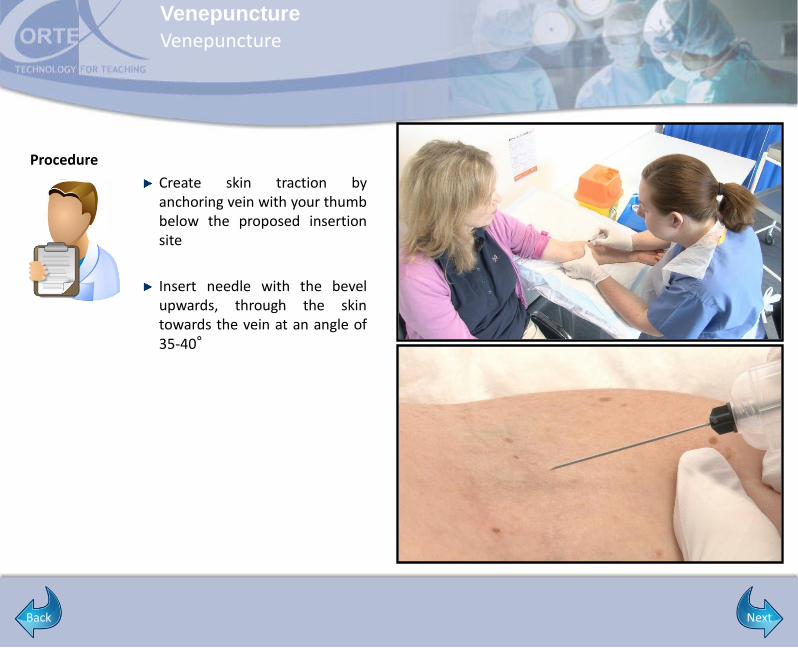
Create skin traction byanchoring vein with your thumbbelow the proposed insertionsite
Insert needle with the bevelupwards, through the skintowards the vein at an angle of35-40°
Procedure
NextBack
Venepuncture
Procedure
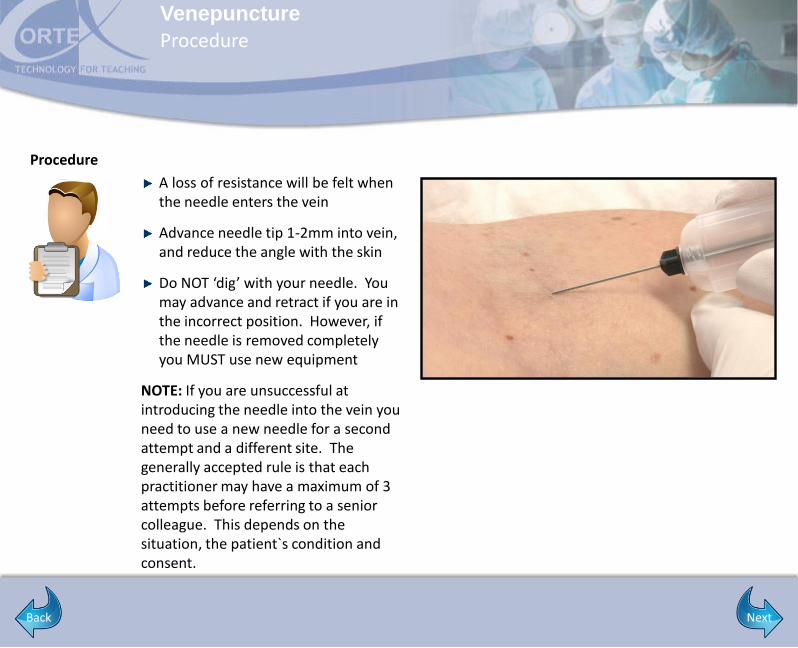
A loss of resistance will be felt when the needle enters the vein
Advance needle tip 1-2mm into vein, and reduce the angle with the skin
Do NOT ‘dig’ with your needle. You may advance and retract if you are in the incorrect position. However, if the needle is removed completely you MUST use new equipment
NOTE: If you are unsuccessful at introducing the needle into the vein you need to use a new needle for a second attempt and a different site. The generally accepted rule is that each practitioner may have a maximum of 3 attempts before referring to a senior colleague. This depends on the situation, the patient`s condition and consent.
Procedure
NextBack
Venepuncture
Procedure
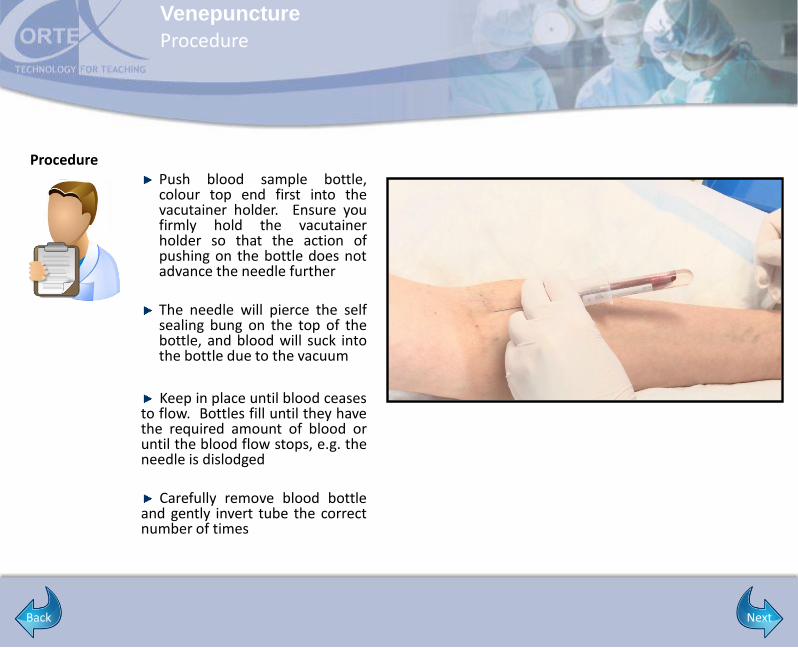
Push blood sample bottle,colour top end first into thevacutainer holder. Ensure youfirmly hold the vacutainerholder so that the action ofpushing on the bottle does notadvance the needle further
The needle will pierce the selfsealing bung on the top of thebottle, and blood will suck intothe bottle due to the vacuum
Keep in place until blood ceasesto flow. Bottles fill until they havethe required amount of blood oruntil the blood flow stops, e.g. theneedle is dislodged
Carefully remove blood bottleand gently invert tube the correctnumber of times
Procedure
NextBack
Venepuncture
Procedure
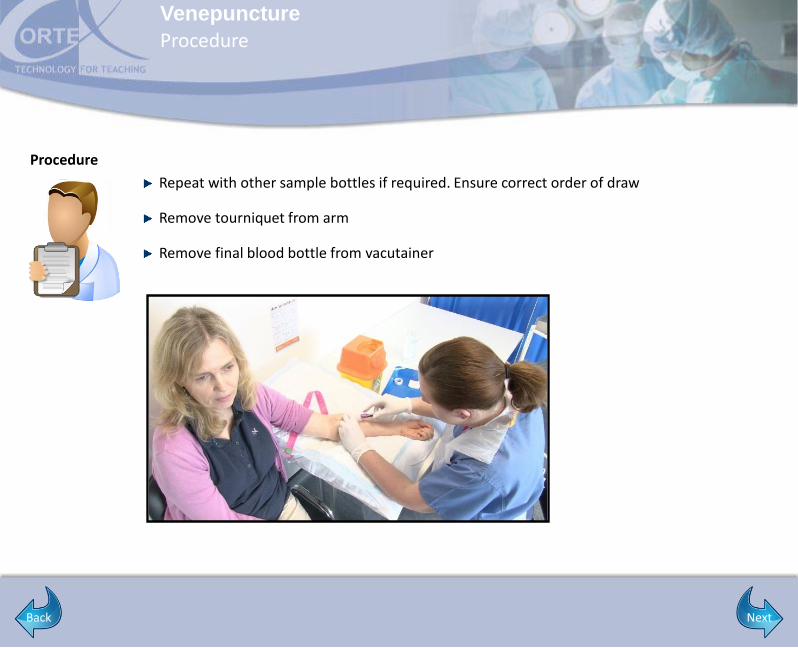
Repeat with other sample bottles if required. Ensure correct order of draw
Remove tourniquet from arm
Remove final blood bottle from vacutainer
Procedure
NextBack
Venepuncture
Procedure
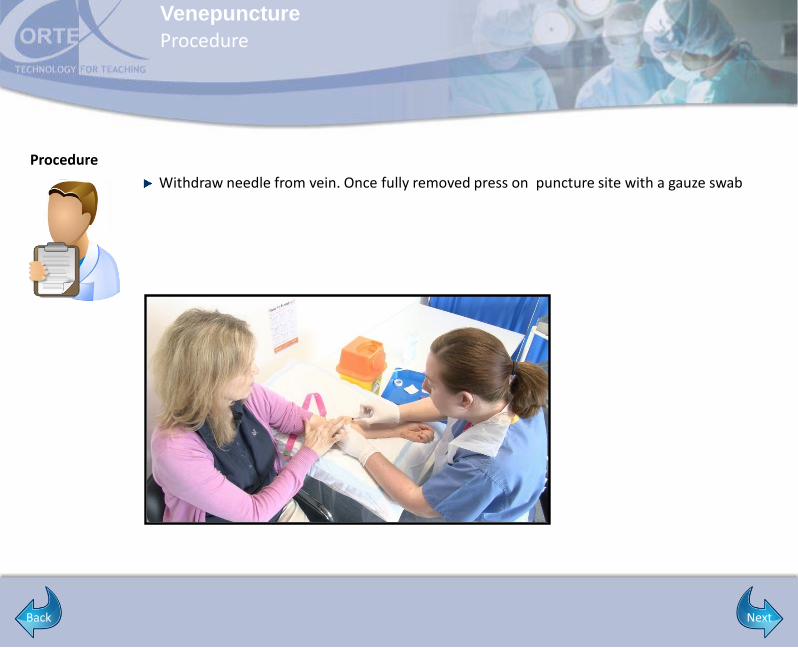
Withdraw needle from vein. Once fully removed press on puncture site with a gauze swab
Procedure
NextBack
Venepuncture
Procedure
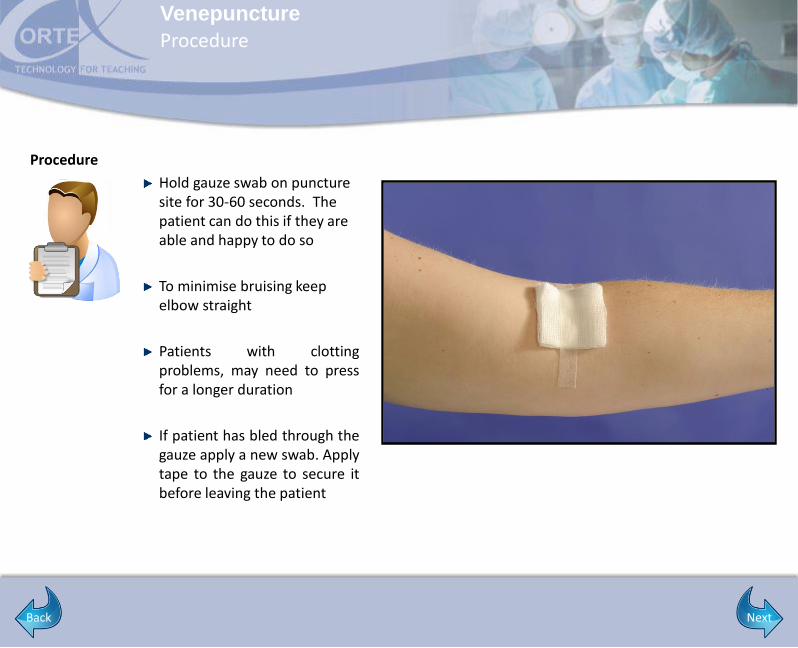
Hold gauze swab on puncture site for 30-60 seconds. The patient can do this if they are able and happy to do so
To minimise bruising keep elbow straight
Patients with clottingproblems, may need to pressfor a longer duration
If patient has bled through thegauze apply a new swab. Applytape to the gauze to secure itbefore leaving the patient
Procedure
NextBack

Venepuncture
Procedure
Dispose of sharps immediately and safely into a sharps box
Dispose gloves and apron into a clinical waste bag, as per hospital policy
Return unused equipment and clean your tray/trolley
Wash your hands
Label blood sample bottles whileyou are with patient
Place blood bottles into clear bagsof appropriate request forms, sealand send directly to laboratory
Procedure
NextBack
Venepuncture
Procedure
You must document the procedure in the patients medical notes. Your entry must include:
Date & time
Verbal consent obtained
Site used
Equipment used e.g vacutainer system, butterfly needle
Number of attempts
Type of samples obtained. As a student it is advisable to note who requested the samples
Problems or complications
Advice given to patient
Your signature, job role and bleep/extension number. If you work in a Trust which provides staff ID stamps you must also add this
Documentation
NextBack
Venepuncture
Tips
Once the vein is punctured keep the non-dominant hand as still as possible. Even slightmovement will displace the needle from the vein. This is more of a problem if large volumesof blood are required. If you find this difficult, try using a “Butterfly” to aspirate the blood.This is a small needle with side flaps which give an appearance of a butterfly and it hasattached tubing running from the needle. The needle can be fixed to the skin via the plastic“Butterfly”, which enables both hands to be freed up for attachment of the blood bottle tothe vacutainer without needle displacement.
For some samples (notably calcium estimates), a tourniquet should not be used during bloodaspiration. Plasma calcium is largely bound to serum albumin, which concentrates in venousblood when a tourniquet is applied. This may lead to an over-estimation of the plasmacalcium levels. Use the tourniquet to identify the vein, insert the needle, then release thetourniquet before aspirating the blood. You are more likely to be successful if the arm isbelow the level of the heart, allowing gravity to dilate the arm veins.
Tips
NextBack
Venepuncture
Other Important Things
Four important things the WHO does not want us to do…….
1. Re-sheath a used needle with two hands i.e. holding sheath in one hand and needle in the other.
2. Recap used vacutainer needles and disassemble them from the holder.
3. Re-use tourniquets and vacutainer holders.
4. Work alone with patients who may move unexpectedly and thus increase the risk of needle stick injury e.g. confused patients and paediatric patients.
Important things Cardiff University wants you to remember…….
1. As medical students you must practice under supervision.
2. Venepuncture is a practical skill that the GMC requires you to do competently. You must be signed off as competent in your practical skills log before graduating.
3. Performing a cross match blood sample is another practical skill that the GMC requires you to do competently before graduating. However you must successfully undertake your blood transfusion training before performing this procedure.
Other Important Things
NextBack
Venepuncture
Video Summary
(Not available in PDF)
Video Summary
NextBack
Venepuncture
Checklist
Introduce yourself, explain procedure to the patient and seek consent
Apply tourniquet to upper arm
Select vein
Apply gloves and apron
Clean patient’s skin carefully using appropriate preparation and allow to dry
Do not re-palpate vein or touch skin at puncture site
Create skin traction by anchoring vein with your thumb below the proposed insertion site
Insert needle smoothly at an angle of 35-40°
Level off needle when puncture of the vein wall is felt
If possible, advance needle a further 1-2 mm into vein
Do not exert pressure on needle .
Withdraw required amount of blood using Vacutainer system
Release tourniquet
Place sterile gauze swab over puncture point
Checklist
NextBack
Venepuncture
Checklist
Do not apply pressure until needle is fully removed
Apply pressure until bleeding stops
Invert tubes to allow adequate mixing
Label bottles with relevant details
Inspect puncture point before applying dressing. Check for known allergies
Apply adhesive plaster or alternative dressing
Discard waste in correct containers, e.g. sharps into sharps box
Wash hands
Checklist
NextBack
Venepuncture
World Health Organisation (2010) WHO guidelines on drawing blood:
best practices in phlebotomy
http://www.who.int/injection_safety/phleb_final_screen_ready.pdf
Akunjee et al (2012) Clinical Skills Explained Cambridge: Scion Publishing Ltd
References
References
Back