clearswift secure gateways
TRANSCRIPT

AppEmailVMWareGuide.book Page 1 Thursday, April 15, 2010 4:20 PM
CLEARSWIFT SECURE Gateways
Installation GuideRevision 1.1

AppEmailVMWareGuide.book Page 2 Thursday, April 15, 2010 4:20 PM
Revision 1.1, April 2010 Published by Clearswift Ltd.
© 1995—2010 Clearswift Ltd. All rights reserved.
The materials contained herein are the sole property of Clearswift Ltd. No part of this publication may be reproduced or disseminated ortransmitted in any form or by any means electronic, mechanical, photocopying, recording, or otherwise stored in any retrievable system orotherwise used in any manner whatsoever, in part or in whole, without the express permission of Clearswift Ltd.
Information in this document may contain references to fictional persons, companies, products and events for illustrative purposes. Anysimilarities to real persons, companies, products and events are coincidental and Clearswift shall not be liable for any loss suffered as a resultof such similarities.
The Clearswift Logo and Clearswift product names are trademarks of Clearswift Ltd. All other trademarks are the property of their respectiveowners. Clearswift Ltd. (registered number 3367495) is registered in Britain with registered offices at 1310 Waterside, Arlington Business Park,Theale, Reading, Berkshire RG7 4SA, England. Users should ensure that they comply with all national legislation regarding the export, import,and use of cryptography.
Clearswift reserves the right to change any part of this document at any time.
Licensed under US Patent No. 5,623,600
Protected by UK Patent No. 2,366,706
www.clearswift.com
AMERICA EUROPE ASIA PACIFIC & JAPAN
United StatesClearswift Corporation161 Gaither DriveCenterpointeSuite 101Mt. Laurel, NJ 08054UNITED STATESTel: +1 856-359-2360Fax: +1 888-888-6884
United KingdomClearswift Limited1310 WatersideArlington Business ParkTheale, ReadingBerkshire, RG7 4SATel: +44 (0) 118 903 8903Fax: +44 (0) 118 903 9000
GermanyClearswift GmbHAmsinckstrasse 6720097 HamburgTel: +49 40 23 999-0Fax: +49 40 23 999-100
SpainClearswift Espana S.L.Cerro de los Gamos 1, Edif. 128224 Pozuelo de AlarconMadridTel: +34 91 790 1219 / +34 91 790 1220Fax: +34 91 790 1112
AustraliaClearswift5th Floor165 Walker StreetNorth SydneyNew South Wales, 2060Tel: +61 2 9424 1200Fax: +61 2 9424 1201
JapanClearswift K.K.7F Hanai Bldg.1-2-9 ShibakouenMinato-ku, Tokyo105-0011Tel: +81 (3) 5777 2248Fax:+81 (3) 5777 2249

AppEmailVMWareGuide.book Page i Thursday, April 15, 2010 4:20 PM
Contents
PREFACE
About this guide . . . . . . . . . . . . . . . . . . . . . . . . . . . . . . . . . . . . . . . . . . . . . . . . . . . . . . . . . . . . . . . . . . . . . iiiRelated documentation. . . . . . . . . . . . . . . . . . . . . . . . . . . . . . . . . . . . . . . . . . . . . . . . . . . . . . . . . . . . . . . . ivAccessibility . . . . . . . . . . . . . . . . . . . . . . . . . . . . . . . . . . . . . . . . . . . . . . . . . . . . . . . . . . . . . . . . . . . . . . . . . iv
INSTALLATION PREPARATION
Prerequisites. . . . . . . . . . . . . . . . . . . . . . . . . . . . . . . . . . . . . . . . . . . . . . . . . . . . . . . . . . . . . . . . . . . . . . . . 1-1Types of installation . . . . . . . . . . . . . . . . . . . . . . . . . . . . . . . . . . . . . . . . . . . . . . . . . . . . . . . . . . . . . . . . . 1-2
CREATING A VIRTUAL MACHINE ENVIRONMENT
Creating a virtual machine environment on a VMware ESX/ESXi server. . . . . . . . . . . . . . . . . . . . 2-1Creating a virtual machine environment on a Microsoft Hyper-V server . . . . . . . . . . . . . . . . . . . . 2-8
INSTALLATION
Installing the Clearswift Gateway via the ISO image . . . . . . . . . . . . . . . . . . . . . . . . . . . . . . . . . . . . . 3-1Installing the Clearswift Gateway via the VMware image . . . . . . . . . . . . . . . . . . . . . . . . . . . . . . . . 3-5
CONFIGURING THE IP ADDRESS
CLEARSWIFT SECURE Gateways Installation Guide i

AppEmailVMWareGuide.book Page ii Thursday, April 15, 2010 4:20 PM
ii CLEARSWIFT SECURE Gateways Installation Guide

AppEmailVMWareGuide.book Page iii Thursday, April 15, 2010 4:20 PM
Preface
This guide describes the process of installing the Clearswift Email Gateway and the Clearswift WebGateway. The available installation options for both Gateways are as follows:
• Pre-installed Dell hardware.• Installation on VMware via VMware image.• Installation on customer specific hardware.• Installation of VMware via ISO image.• Installation of Hyper-V via ISO image.
About this guideThis guide provides the prerequisite information you need to install and configure the ClearswiftGateway. On completion, the Getting Started wizard will guide you through the installation processand the Clearswift Gateway setup.
The information in this guide supplements that contained in the online help (for further information,see Related documentation later in this Preface).
ReadershipThis guide assumes that readers/server administrators have a working knowledge of VMware orMicrosoft Hyper-V, if required.
ConventionsThis guide uses the following conventions:
Convention Indicates
Italics Abbreviation or acronym; cross-reference to related information; or first use intext of a term defined in the Glossary.
Bold type Menus, names, and options displayed on screens, or terms in a definition list.
This type Path names, file names, and extensions; commands or text to be entered in filesor dialog boxes; text displayed by the system; or extracts of program code.
Underline A URL for a site on the World Wide Web.
<variable> A value you must supply, for example, in a command line.
[<variable>] An optional value you can supply, for example, in a command line.
A note giving information that emphasizes or supplements important points inthe text or information that may apply only in special cases.
CLEARSWIFT SECURE Gateways Installation Guide iii

Preface
AppEmailVMWareGuide.book Page iv Thursday, April 15, 2010 4:20 PM
Related documentationUse this guide in conjunction with:
• Getting Started Guide
The Getting Started Guide provides instructions for guiding you through the set up process. Youshould read this document in conjunction with the Installation Guide before you install andconfigure the Clearswift Gateway.
This document is available from the online help.
• Online Help
The online help provides important information on new features supported by overview andconceptual information on the key features of the Clearswift Gateway. It also explains theprocedures for using them, and describes their properties and settings.
To access the online help, click the Help button on the Clearswift Gateway Taskbar.
• Knowledge Base
The Knowledge Base provides supplementary information on various features and functionalityof the Clearswift Gateway.
The Knowledge Base is available from our Web site at http://kb.clearswift.com.
AccessibilityThe descriptions in this guide assume the left mouse button to be the primary button and the rightmouse button to be secondary. Be aware of this if you have customized your mouse buttons.
A caution alerting you to actions that could result in the loss of data.
Convention Indicates
iv CLEARSWIFT SECURE Gateways Installation Guide
AppEmailVMWareGuide.book Page 1 Thursday, April 15, 2010 4:20 PM
Installation Preparation
This guide provides instructions for installing the Clearswift Gateway in a virtual environment oronto customer specific hardware. It describes how you create a virtual environment, and guides youthrough the installation and configuration of the Clearswift Email Gateway and the Clearswift WebGateway.
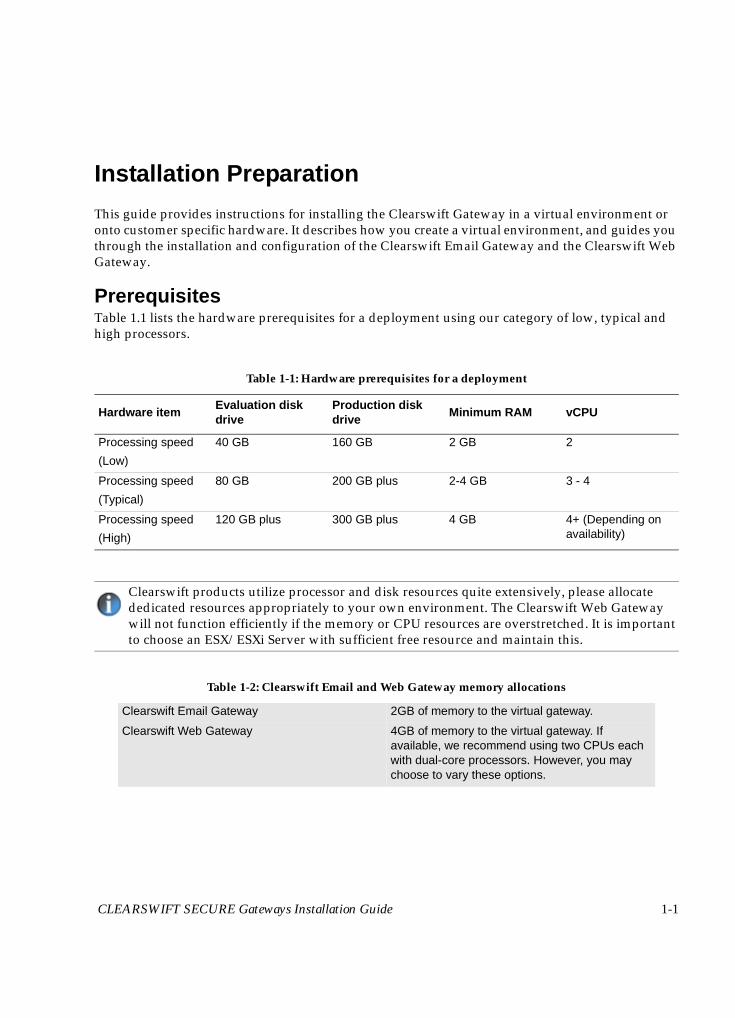
PrerequisitesTable 1.1 lists the hardware prerequisites for a deployment using our category of low, typical andhigh processors.
Table 1-1: Hardware prerequisites for a deployment
Hardware itemEvaluation diskdrive
Production diskdrive
Minimum RAM vCPU
Processing speed
(Low)
40 GB 160 GB 2 GB 2
Processing speed
(Typical)
80 GB 200 GB plus 2-4 GB 3 - 4
Processing speed
(High)
120 GB plus 300 GB plus 4 GB 4+ (Depending onavailability)
Clearswift products utilize processor and disk resources quite extensively, please allocatededicated resources appropriately to your own environment. The Clearswift Web Gatewaywill not function efficiently if the memory or CPU resources are overstretched. It is importantto choose an ESX/ESXi Server with sufficient free resource and maintain this.
Table 1-2: Clearswift Email and Web Gateway memory allocations
Clearswift Email Gateway 2GB of memory to the virtual gateway.
Clearswift Web Gateway 4GB of memory to the virtual gateway. Ifavailable, we recommend using two CPUs eachwith dual-core processors. However, you maychoose to vary these options.
CLEARSWIFT SECURE Gateways Installation Guide 1-1

Installation Preparation
AppEmailVMWareGuide.book Page 2 Thursday, April 15, 2010 4:20 PM
Types of installationFigure 1.1 shows the difference between a VMware and an ISO image CLEARSWIFT SECUREGateway installation.
Figure 1-1: Types of installation
The types of installation available are:
1. Install the CLEARSWIFT SECURE Gateway on pre-installed Dell hardware2. Install the CLEARSWIFT SECURE Gateway via VMware image on VMware3. Install the CLEARSWIFT SECURE Gateway on customer specific hardware4. Install the CLEARSWIFT SECURE Gateway on VMware via ISO image5. Install the CLEARSWIFT SECURE Gateway on Hyper-V server via ISO image
1-2 CLEARSWIFT SECURE Gateways Installation Guide

Installation Preparation
AppEmailVMWareGuide.book Page 3 Thursday, April 15, 2010 4:20 PM
Installation types1. To install the CLEARSWIFT SECURE Gateway on pre-installed Dell hardware
On delivery, your Dell hardware is pre-installed. You may choose to:
a. Reconfigure the IP Address, if required. For details see, Configuring the IP address on page 4-1,then
b. Install the Clearswift Gateway using the Getting Started Guide.
2. To install the CLEARSWIFT SECURE Gateway on VMware via the VMware image
a. Install the Clearswift Gateway via the VMware image. For details see, Installing the ClearswiftGateway via the VMware image on page 3-5.
b. Reconfigure the IP Address, if required. For details see, Configuring the IP address on page 4-1.c. Start the Getting Started Setup wizard using the Getting Started Guide.
3. To install the CLEARSWIFT SECURE Gateway on customer specific hardware
Clearswift has tested the installation on a number of Dell, IBM, HP, Fujitsu and Hitachi servers.To check if your server is supported, see the Clearswift Knowledge Base athttp://kb.clearswift.com/
a. Install the Clearswift Gateway via the ISO image. For details see, Installing the ClearswiftGateway via the ISO image on page 3-1.
b. Reconfigure the IP Address, if required. For details see, Configuring the IP address on page 4-1.c. Start the Getting Started Setup wizard using the Getting Started Guide.
4. To install the CLEARSWIFT SECURE Gateway on VMware via the ISO image
a. Create a virtual machine environment on a VMware ESX/ESXI server. For details see,Creating a virtual machine environment on page 2-1.
b. Install the Clearswift Gateway via the ISO image. For details see, Installing the ClearswiftGateway via the ISO image on page 3-1.
c. Reconfigure the IP Address, if required. For details see, Configuring the IP address on page 4-1.d. Start the Getting Started Setup wizard using the Getting Started Guide.
5. To install the CLEARSWIFT SECURE Gateway on a Hyper-V server via the ISO image
a. Create a virtual machine environment on a Microsoft Hyper-V server. For details see,Creating a virtual machine environment on a Microsoft Hyper-V server on page 2-8.
b. Install the Clearswift Gateway via the ISO image. For details see, Installing the ClearswiftGateway via the ISO image on page 3-1.
c. Reconfigure the IP Address, if required. For details see, Configuring the IP address on page 4-1.d. Start the Getting Started Setup wizard using the Getting Started Guide.
If you are reinstalling the Clearswift Gateway, see item 3.
CLEARSWIFT SECURE Gateways Installation Guide 1-3

Installation Preparation
AppEmailVMWareGuide.book Page 4 Thursday, April 15, 2010 4:20 PM
1-4 CLEARSWIFT SECURE Gateways Installation Guide

Creating a virtual machine environment
AppEmailVMWareGuide.book Page 1 Thursday, April 15, 2010 4:20 PM
Creating a virtual machine environment
You can create a virtual machine environment for:
• VMware ESX/ESXi server• Microsoft Hyper-V server
Creating a virtual machine environment on a VMwareESX/ESXi server
To create a virtual machine environment:
1. Create a new virtual gateway. This can be created by connecting to the VMware VirtualInfrastructure Client then selecting the new Virtual machine option.
Figure 2-1: Creating a virtual machine
These instructions are applicable when you are using a VMware ESX/ESXi server version 3 orlater. If you experience any problems, you should contact your normal support provider.
CLEARSWIFT SECURE Gateways Installation Guide 2-1

Creating a virtual machine environment
AppEmailVMWareGuide.book Page 2 Thursday, April 15, 2010 4:20 PM
2. The New Virtual Machine Wizard is displayed. To proceed, you need to run and follow the New VirtualMachine Wizard instructions.Select typical, to create a typical virtual machine.
Figure 2-2: Selecting the appropriate configuration
2-2 CLEARSWIFT SECURE Gateways Installation Guide

Creating a virtual machine environment
AppEmailVMWareGuide.book Page 3 Thursday, April 15, 2010 4:20 PM
3. Enter a name for the virtual machine. It is recommended that you select a meaningful name, forexample, Clearswift Email Gateway or Clearswift Web Gateway.
4. Select a Datastore. This option specifies the location of the virtual machine files.5. Enter the guest operating system to be used with the virtual machine.
• For the typical Clearswift Email Gateway installation, select Linux, with the Version set toOther Linux or Other Linux (32 bit).
Figure 2-3: Choosing the guest operating system (ESX/ESXi virtual machine)
CLEARSWIFT SECURE Gateways Installation Guide 2-3
Creating a virtual machine environment
AppEmailVMWareGuide.book Page 4 Thursday, April 15, 2010 4:20 PM
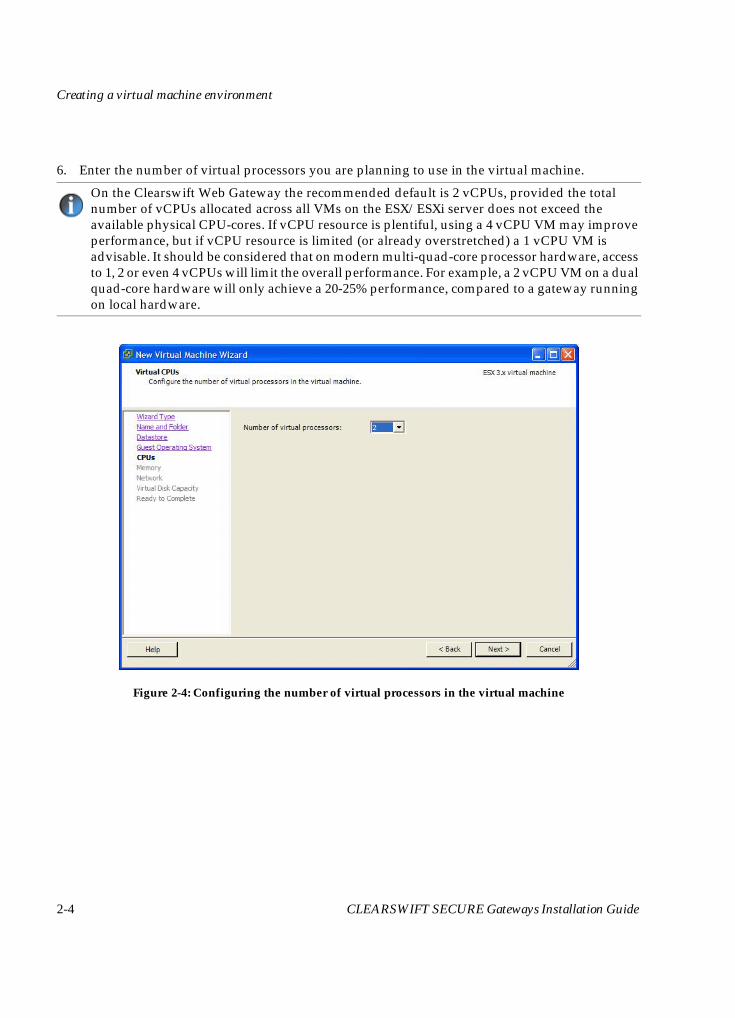
6. Enter the number of virtual processors you are planning to use in the virtual machine.
Figure 2-4: Configuring the number of virtual processors in the virtual machine
On the Clearswift Web Gateway the recommended default is 2 vCPUs, provided the totalnumber of vCPUs allocated across all VMs on the ESX/ESXi server does not exceed theavailable physical CPU-cores. If vCPU resource is plentiful, using a 4 vCPU VM may improveperformance, but if vCPU resource is limited (or already overstretched) a 1 vCPU VM isadvisable. It should be considered that on modern multi-quad-core processor hardware, accessto 1, 2 or even 4 vCPUs will limit the overall performance. For example, a 2 vCPU VM on a dualquad-core hardware will only achieve a 20-25% performance, compared to a gateway runningon local hardware.
2-4 CLEARSWIFT SECURE Gateways Installation Guide
Creating a virtual machine environment
AppEmailVMWareGuide.book Page 5 Thursday, April 15, 2010 4:20 PM
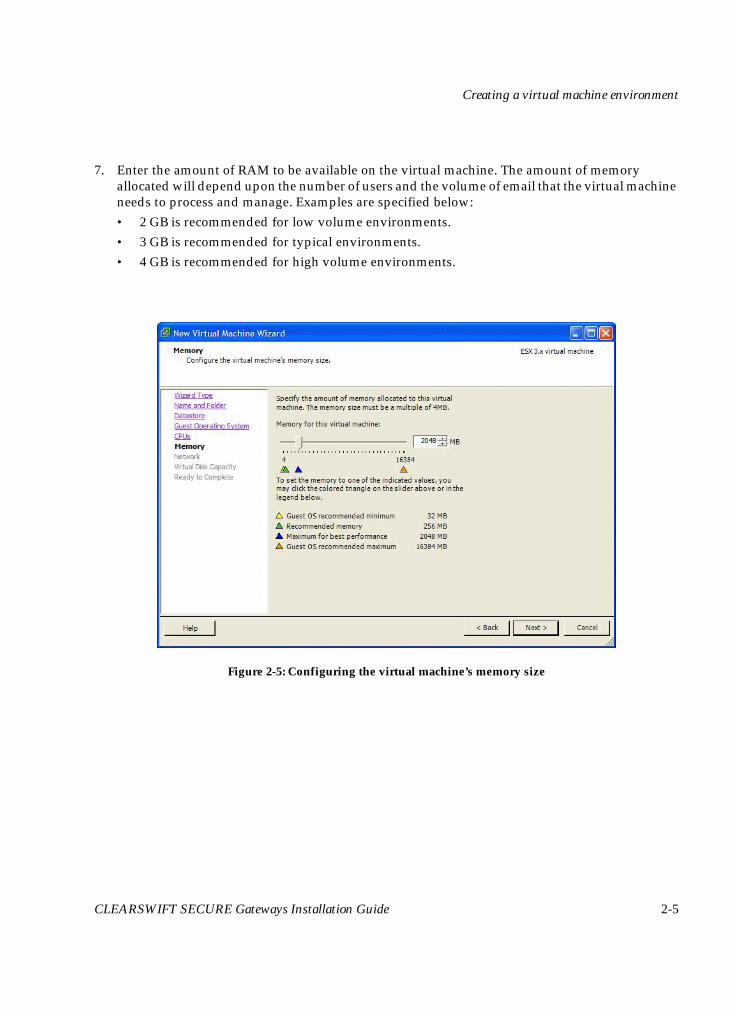
7. Enter the amount of RAM to be available on the virtual machine. The amount of memoryallocated will depend upon the number of users and the volume of email that the virtual machineneeds to process and manage. Examples are specified below:• 2 GB is recommended for low volume environments.• 3 GB is recommended for typical environments.• 4 GB is recommended for high volume environments.
Figure 2-5: Configuring the virtual machine’s memory size
CLEARSWIFT SECURE Gateways Installation Guide 2-5

Creating a virtual machine environment
AppEmailVMWareGuide.book Page 6 Thursday, April 15, 2010 4:20 PM
8. Enter the Network Interface Card (NIC) details.The Clearswift Gateway requires one NIC to be configured. If required, a second card can beadded.
Figure 2-6: Selecting network connections which will be used by the virtual machine
9. Enter the amount of disk space to be allocated on the virtual machine.
Table 2-1: Disk space usage table
Usage GB
Low 160
Typical 200
High 300
The size of the virtual disk space cannot be increased after installation. To avoidperformance issues, you must allow sufficient disk space for all future requirements.
2-6 CLEARSWIFT SECURE Gateways Installation Guide

Creating a virtual machine environment
AppEmailVMWareGuide.book Page 7 Thursday, April 15, 2010 4:20 PM
10. Check the installation details, then click Finish.
Figure 2-7: Checking installation details
11. After creating the virtual machine, you must modify its properties to ensure that the installationCD can be used to install the Clearswift Gateway.To modify the virtual machine properties:
a. Select the CD/DVD drive and browse to the ISO file downloaded from the Clearswiftwebsite.
b. Select the Connect at Power on check box.c. Click OK.
12. Install the Clearswift Gateway via the ISO. For details see Chapter 3, Installing the ClearswiftGateway via the ISO image on page 3-1.
CLEARSWIFT SECURE Gateways Installation Guide 2-7

Creating a virtual machine environment
AppEmailVMWareGuide.book Page 8 Thursday, April 15, 2010 4:20 PM
Creating a virtual machine environment on a MicrosoftHyper-V server
To create a virtual machine environment:
1. Create a new virtual gateway. This can be created by connecting to the Virtual InfrastructureClient then selecting the new Virtual machine option.
Figure 2-8: Creating a virtual machine
2. The New Virtual Machine Wizard is displayed. To proceed, you need to run and follow the New VirtualMachine Wizard instructions.
The instructions for using Hyper-V Manager are applicable when you are using MicrosoftHyper-V on a Windows 2008 server.
If you are using Microsoft Hyper-V Server 2008, Hyper-V Manager must be run from aWindows 2008-based server; it cannot run directly on the standalone Hyper-V server.
If you experience any problems, you should contact your normal support provider.
The Clearswift Web Gateway is not supported in the Microsoft Hyper-V server environment.If you choose to install a Clearswift Web Gateway in the Microsoft Hyper-V environment, itshould only be used for evaluation purposes.
2-8 CLEARSWIFT SECURE Gateways Installation Guide

Creating a virtual machine environment
AppEmailVMWareGuide.book Page 9 Thursday, April 15, 2010 4:20 PM
Figure 2-9: Specifying the Name and Location of the Virtual Machine
3. Enter a name for the virtual machine. It is recommended that you select a meaningful name, forexample, Clearswift Email Gateway.
4. Select an existing folder or create a new folder to specify the location of the virtual machine files.If no folder is selected, the Virtual Machine will be stored in the default folder configured for thisserver.
CLEARSWIFT SECURE Gateways Installation Guide 2-9
Creating a virtual machine environment
AppEmailVMWareGuide.book Page 10 Thursday, April 15, 2010 4:20 PM
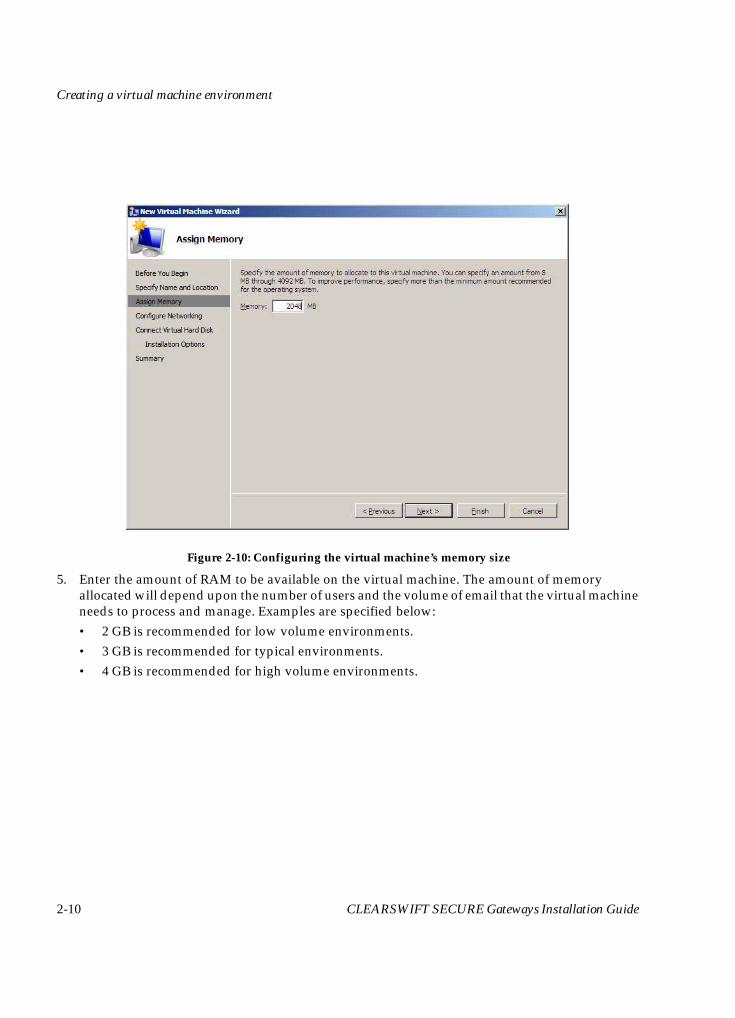
Figure 2-10: Configuring the virtual machine’s memory size
5. Enter the amount of RAM to be available on the virtual machine. The amount of memoryallocated will depend upon the number of users and the volume of email that the virtual machineneeds to process and manage. Examples are specified below:• 2 GB is recommended for low volume environments.• 3 GB is recommended for typical environments.• 4 GB is recommended for high volume environments.
2-10 CLEARSWIFT SECURE Gateways Installation Guide

Creating a virtual machine environment
AppEmailVMWareGuide.book Page 11 Thursday, April 15, 2010 4:20 PM
Figure 2-11: Selecting network connections which will be used by the virtual machine
6. It is recommended that you leave the Connection as Not Connected.
CLEARSWIFT SECURE Gateways Installation Guide 2-11

Creating a virtual machine environment
AppEmailVMWareGuide.book Page 12 Thursday, April 15, 2010 4:20 PM
Figure 2-12: Specifying the storage to install an Operating System
7. Specify the Name and Location of the virtual hard disk. Enter the amount of disk space (Size) tobe allocated on the virtual machine.
Table 2-2: Disk space usage table
Usage GB
Low 160
Typical 200
High 300
The size of the virtual disk space can be increased after installation. To avoid performanceissues, it is important to allow sufficient disk space for all future requirements.
2-12 CLEARSWIFT SECURE Gateways Installation Guide
Creating a virtual machine environment
AppEmailVMWareGuide.book Page 13 Thursday, April 15, 2010 4:20 PM
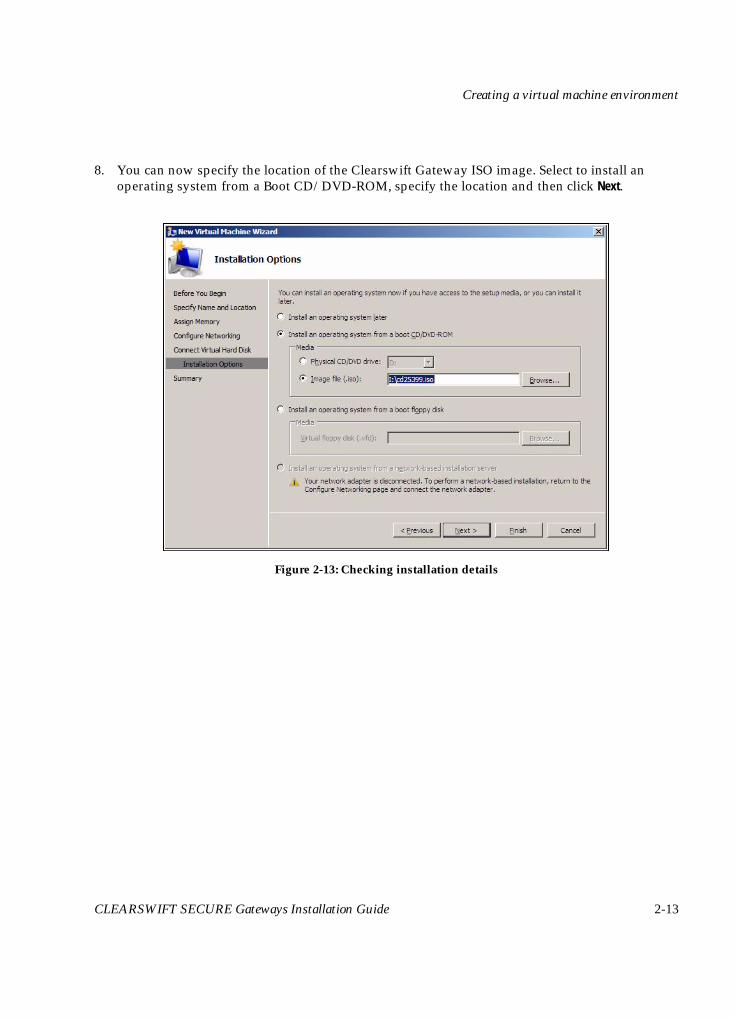
8. You can now specify the location of the Clearswift Gateway ISO image. Select to install anoperating system from a Boot CD/DVD-ROM, specify the location and then click Next.
Figure 2-13: Checking installation details
CLEARSWIFT SECURE Gateways Installation Guide 2-13

Creating a virtual machine environment
AppEmailVMWareGuide.book Page 14 Thursday, April 15, 2010 4:20 PM
9. Check the installation details, then click Finish.
Figure 2-14: Checking installation details
2-14 CLEARSWIFT SECURE Gateways Installation Guide

Creating a virtual machine environment
AppEmailVMWareGuide.book Page 15 Thursday, April 15, 2010 4:20 PM
10. A Legacy Network Adapter must be added to your virtual machine.Enter the Network Interface Card (NIC) details. The Clearswift Gateway requires one NIC to beconfigured. If required, a second card can be added.
In the virtual machine settings you need to use a Legacy Network adapter instead of the standardadapter:
a. Remove the Standard Network Adapter.b. Go to Add Hardware and add a Legacy Network Adapter.
c. Select the new legacy adapter and connect it to a network.
Figure 2-15: Adding a Legacy Network Adapter
11. Select the Legacy Network Adapter to be added to your virtual machine.
CLEARSWIFT SECURE Gateways Installation Guide 2-15
Creating a virtual machine environment
AppEmailVMWareGuide.book Page 16 Thursday, April 15, 2010 4:20 PM
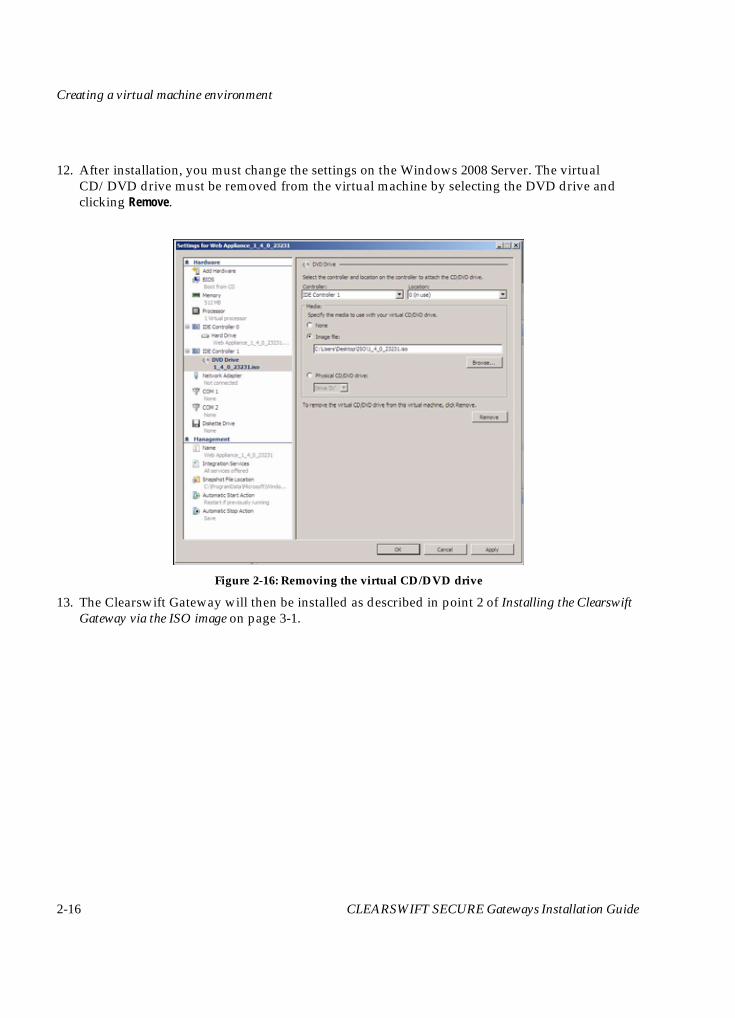
12. After installation, you must change the settings on the Windows 2008 Server. The virtualCD/DVD drive must be removed from the virtual machine by selecting the DVD drive andclicking Remove.
Figure 2-16: Removing the virtual CD/DVD drive
13. The Clearswift Gateway will then be installed as described in point 2 of Installing the ClearswiftGateway via the ISO image on page 3-1.
2-16 CLEARSWIFT SECURE Gateways Installation Guide

AppEmailVMWareGuide.book Page 1 Thursday, April 15, 2010 4:20 PM
Installation
The CLEARSWIFT SECURE Gateway installation is available in two formats, these are:
• CLEARSWIFT SECURE Gateway via the ISO image.• CLEARSWIFT SECURE Gateway via the VMware image.The Clearswift Gateway ISO and VMware image are available from the Clearswift website.
Installing the Clearswift Gateway via the ISO imageTo install the Clearswift Gateway:
1. To start the installation, insert and run the Clearswift Gateway Gold CD. When the Gatewayreboots, a GNU GRUB menu eventually appears, displaying only one option which the systemselects automatically:
Clearswift Gateway Gold CD
2. During the installation, the following information is required:a. Disk controller type
Select the controller type that the installation script has located, for example, sda. In theexample below, a sda device has been located.
Figure 3-1: sda example
CLEARSWIFT SECURE Gateways Installation Guide 3-1

Installation
AppEmailVMWareGuide.book Page 2 Thursday, April 15, 2010 4:20 PM
b. File system type
Select a root file system type. The options available are:
– EXT3– XFS– REISERFS (default)It is strongly recommended that you use ReiserFS.
c. Partition tables
The Clearswift Gateway installation will stop when the partition tables have been built. ClickReturn to continue.
d. Factory partition
The factory default Clearswift Gateway system is copied to the factory partition on theGateway machine. On completion, the installation is stopped.
Figure 3-2: System partly built example
3-2 CLEARSWIFT SECURE Gateways Installation Guide
Installation
AppEmailVMWareGuide.book Page 3 Thursday, April 15, 2010 4:20 PM
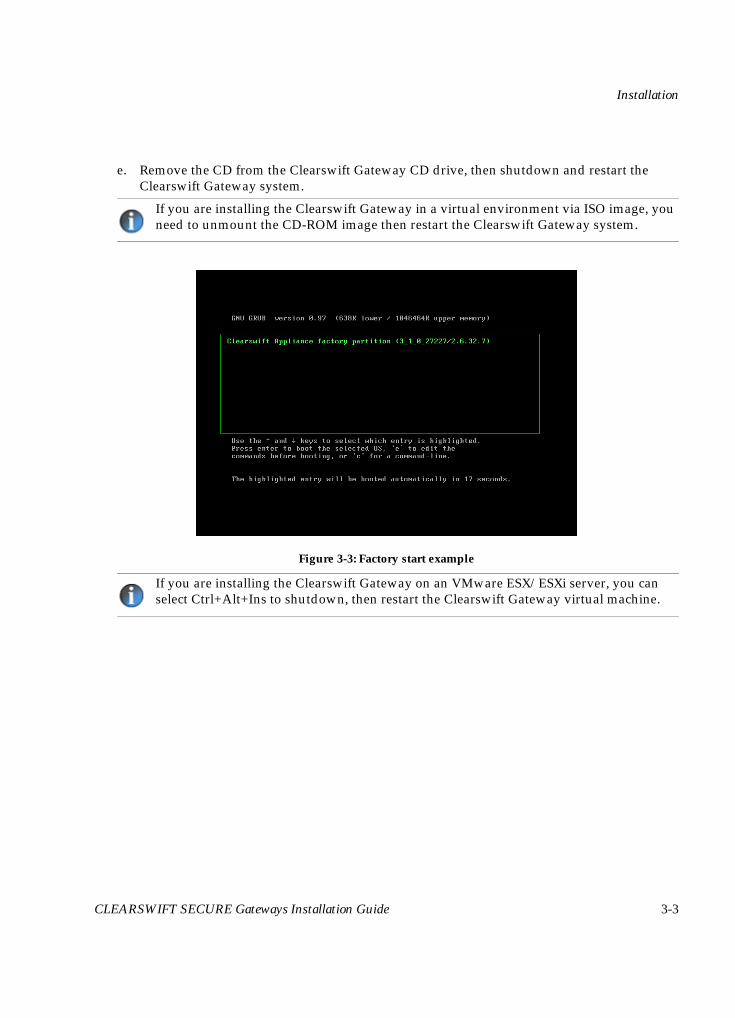
e. Remove the CD from the Clearswift Gateway CD drive, then shutdown and restart theClearswift Gateway system.
Figure 3-3: Factory start example
If you are installing the Clearswift Gateway in a virtual environment via ISO image, youneed to unmount the CD-ROM image then restart the Clearswift Gateway system.
If you are installing the Clearswift Gateway on an VMware ESX/ESXi server, you canselect Ctrl+Alt+Ins to shutdown, then restart the Clearswift Gateway virtual machine.
CLEARSWIFT SECURE Gateways Installation Guide 3-3

Installation
AppEmailVMWareGuide.book Page 4 Thursday, April 15, 2010 4:20 PM
f. The Gateway machine will restart using the factory default Clearswift Gateway system.During the second phase of the installation, the Gateway will continue to self-configure, thenautomatically shutdown before restarting.
Figure 3-4: Installation Phase 2 complete example
On completion, an Installation phase 2 complete prompt is displayed.
g. After completion, the Clearswift Gateway system will reboot. During this process, theconsole screen will be blank for a couple of minutes, while the Gateway Services are started.
When using standardized virtualized hardware you may see a warning message. Thewarning is prompted by the number of network cards being used, and the interface nameof your wireless card, for example, eth1 not being installed on the Clearswift Gatewayvirtual machine. This warning can be ignored.
• If you want to change the location of the IP Address you must configure the IP Addressbefore you start the Getting Started Setup wizard. For details see, Configuring the IP addresson page 4-1.
• If you are using the default IP Address settings in the Getting Started Setup wizard, see theGetting Started Guide.
3-4 CLEARSWIFT SECURE Gateways Installation Guide

Installation
AppEmailVMWareGuide.book Page 5 Thursday, April 15, 2010 4:20 PM
Installing the Clearswift Gateway via the VMware image
To install the Clearswift Gateway from the VMware image:
a. Download the VMware image from the Clearswift website.
b. Unzip the VMware image. The image consists of three files, these are:– OVF descriptor file– VMDK disk image– MD5 file
c. Import the VMware image into the Virtual Gateway wizard.
To import the VMware image into the Import Virtual Gateway wizard:
1. From the VMware Infrastructure Client or VMware Virtual Center select File then Deploy OVFTemplate. The Import Virtual Gateway wizard is opened.
These instructions are applicable when you are using an VMware ESX/ESXi server version 4or later. If you experience any problems, you should contact your normal support provider.
• Before installation, it is recommended that you check the MD5 file.• After installation, you can modify the allocated Central Processing Unit (CPU) and RAM
resource allowances, but you cannot change the allocated disk allowance.• If you do not want to use the default disk allowance, you must install the VMware using a
Clearswift Gateway ISO image.
CLEARSWIFT SECURE Gateways Installation Guide 3-5
Installation
AppEmailVMWareGuide.book Page 6 Thursday, April 15, 2010 4:20 PM
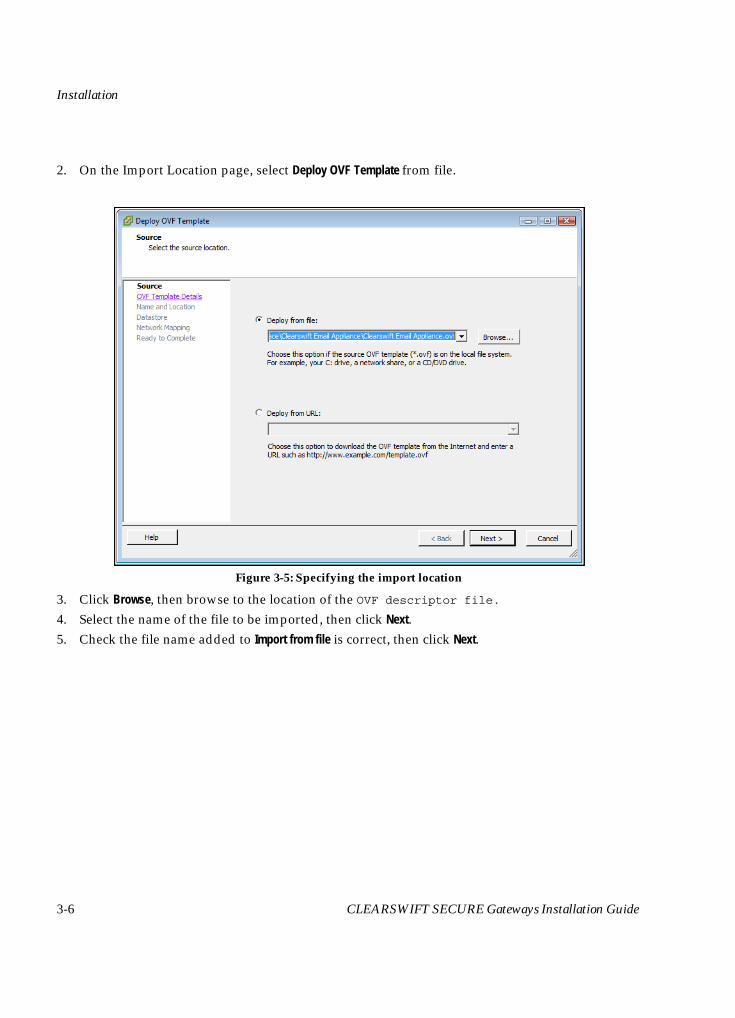
2. On the Import Location page, select Deploy OVF Template from file.
Figure 3-5: Specifying the import location
3. Click Browse, then browse to the location of the OVF descriptor file.
4. Select the name of the file to be imported, then click Next.5. Check the file name added to Import from file is correct, then click Next.
3-6 CLEARSWIFT SECURE Gateways Installation Guide

Installation
AppEmailVMWareGuide.book Page 7 Thursday, April 15, 2010 4:20 PM
6. On the Select a Name and Location for this Virtual Appliance page, enter a unique name for the virtualClearswift Gateway.
7. Click Next.
Figure 3-6: Entering a unique name
CLEARSWIFT SECURE Gateways Installation Guide 3-7

Installation
AppEmailVMWareGuide.book Page 8 Thursday, April 15, 2010 4:20 PM
8. On the Choose a Datastore for the Virtual Appliance page, select a datastore in which to store the filesfor the Clearswift Gateway.
Figure 3-7: Choosing a datastore
9. Check the selected datastore details, and Click Next.
10. On the Ready to Complete Virtual Appliance Import page, it is recommended that you check the settingslisted for the import.
11. Click Finish, to import the Clearswift Gateway.
It is recommended that you confirm the network and resource pool configurations.
• If you want to change the location of the IP Address you must configure the IP Addressbefore you start the Getting Started Setup wizard. For details see, Configuring the IP addresson page 4-1.
• If you are using the default IP Address settings in the Getting Started Setup wizard, see theGetting Started Guide.
3-8 CLEARSWIFT SECURE Gateways Installation Guide

Configuring the IP address
AppEmailVMWareGuide.book Page 1 Thursday, April 15, 2010 4:20 PM
Configuring the IP address
After the installation of the CLEARSWIFT SECURE Gateway, the IP address may need to bereconfigured to complete the installation instructions. By default, an IP address is allocated duringinstallation. The IP address can be configured in administrator mode prior to running the GettingStarted Setup wizard.
To configure the IP Address:
1. Open the virtual machine console, then press Return until the following Console login prompt isdisplayed:
Login: console
2. Login to the Console Interface at the Console login prompt using the name console and thepassword console. The Clearswift Gateway Console Interface is displayed.
3. From the Console Interface menu, select NIC1 Configure primary adapter (NIC1).
4. Enter the IP Address. The current values are, for example,NIC 1 IP address:10.20.30.40.
5. On the Save NIC Settings dialog select Yes, and then exit from the Console Interface.6. From the Console Interface menu, select Routes IP Route Management.7. From the menu, select Set Default Gateway, and set the default gateway as, for example, 10.20.30.1.
8. Save Console Interface settings then start the Getting Started Setup wizard.On the computer connected to the Clearswift Web Gateway, enter https://10.20.30.40into Internet Explorer or Mozilla Firefox.
If you experience any problems you should contact your normal support provider.
To select options in a Console Interface dialog, use the arrow keys to highlight the requiredoption. Use the TAB key to select the main action at the bottom of the dialog.
When you have entered the required IP address, press the TAB key to highlight OK, andpress Enter.
To save settings, follow step 5 above. If you check the system status from the console or goback into the default gateway or NIC parameters the previous values will be cleared. Inthis instance, you will need to reset the values again.
You cannot run the Getting Started Setup wizard until you have configured the host IP addresson the virtual machine environment. For guidance, see the Getting Started Guide
CLEARSWIFT SECURE Gateways Installation Guide 4-1
Configuring the IP address
AppEmailVMWareGuide.book Page 2 Thursday, April 15, 2010 4:20 PM
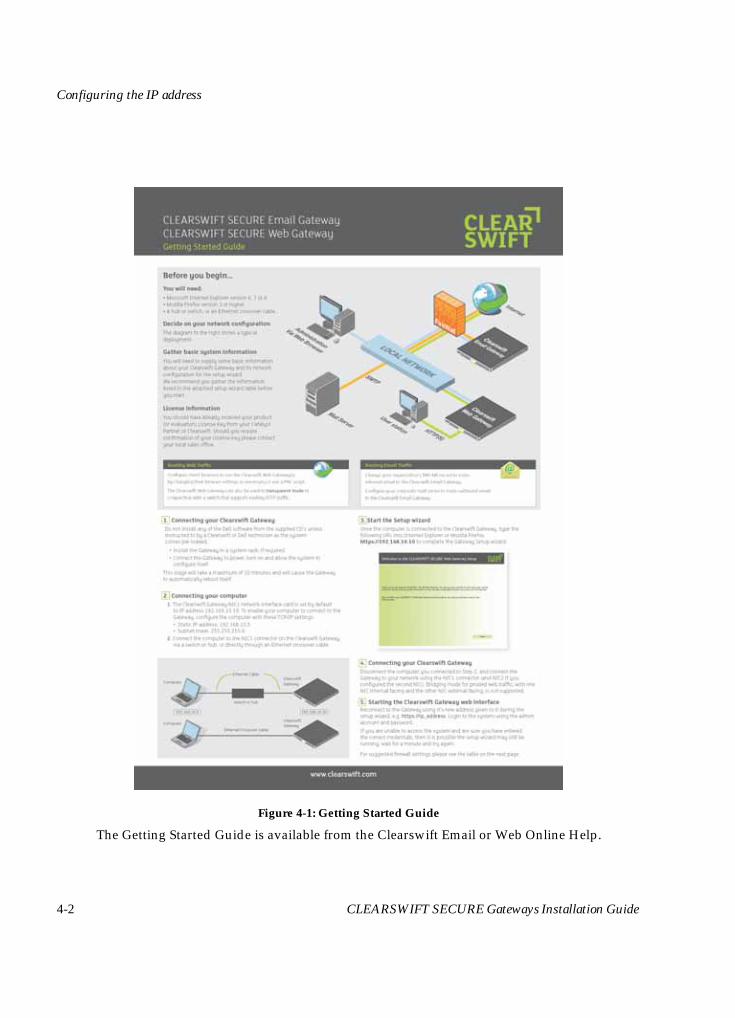
Figure 4-1: Getting Started Guide
The Getting Started Guide is available from the Clearswift Email or Web Online Help.
4-2 CLEARSWIFT SECURE Gateways Installation Guide