clear coverage auto authorization service 3/7/2011 for the most current manual please visit the...
TRANSCRIPT

1
3/7/2011
For the most current manual please visit the Health Alliance website at www.healthalliance.org
Clear Coverage Auto‐Authorization Service:
Performing Auto Authorization in the
Clear Coverage Auto‐Authorization Service portal
About this Guide
This guide provides information about submitting a Prior Authorization (PA) Request to Health Alliance Medical
Plans for certain imaging and procedure types through Clear Coverage.
Through Clear Coverage, you will be able to create, search, and learn the status of the submitted PA.
What is Auto Authorization?
Clear Coverage, a web based application, offers the ability to submit an Authorization Request/Prior
Authorization (PA) to Health Alliance Medical Plans for imaging and procedure types and receive an immediate,
real‐time response to that request.
What’s in this guide?
This guide contains the following sections:
Services offered through Clear Coverage page 2
Getting Support for Clear Coverage page 3
Minimum Requirements page 4
Overview page 5
Create a New Authorization Request page 9
Medical Review Outcomes page 25
Troubleshooting page 32

2
3/7/2011
For the most current manual please visit the Health Alliance website at www.healthalliance.org
Services for which Clear Coverage should be used to request authorization
Abdominoplasty & Panniculectomy Mandibular Osteotomy Autologous Chondrocyte Transplantation Maxillary Osteotomy Biventricular Pacing (Cardiac Resynchronization) Meniscal Allograft Transplantation BRACAnalysis Blepharoplasty & Eyebrow Lift MRI Scans Bone Anchored Hearing Assist Device Myringotomy/Tympanostomy Bone Morphogenetic Protein Nasal Endoscopy
Breast Reconstruction & Implant Replacement OncotypeDx® Breast Cancer Recurrence Test
Cardiac Catheter Radiofrequency Ablation Penile Implant Cardiac Catheterization Photorefractive keratectomy Carpal Tunnel Release Polysomnogram Cataract Surgery Proton Beam Therapy Cochlear Implant PTCA, Stents Colonoscopy Radial keratomy Cryosurgical Ablation of Renal Cell Tumor Radiofrequency Ablation Hepatic Tumor CT Coronary Angiography Radiofrequency Facet Denervation CT Scans Reduction Mammoplasty Cyberknife Stereotactic Radiosurgery Treatment Robotically Assisted Surgery Endovenous Laser/Radiofrequency Ablation Varicose Veins Spinal Cord Stimulator Insertion
Erectile Dysfunction Spinal Manipulation Esophageal pH Monitoring Stress Echocardiography External Counterpulsation for Angina Surgical Maze Procedure FMR1 gene related disorders TACE Gastric Electrical Stimulation Testicular Implant HFE hereditary hemochromatosis Tonsillectomy/Adenoidectomy HNPCC hereditary nonpolyposis colorectal cancer Total Joint Replacement-Hip Hip Resurfacing Arthroplasty Total Joint Replacement-Knee Hyperbaric Oxygen Therapy Transmyocardial Laser Vascularization Implantable Cardioverter/Defibrillator Unattended Sleep Study Insertable Loop Recorder UPPP Interstim, Implantable Sacral Nerve Stimulator Uterine Artery Embolization Intra-hepatic Radioactive Microspheres Vertebroplasty/Kyphoplasty Intrastromal Corneal Ring Segment Video Capsule Enteroscopy Laser in-situ keratomileusis Wearable Cardiac Defibrillator Laser Treatment Psoriasis Lung Volume Reduction Surgery 3/7/2011
*Please check specific prior authorization lists. *Not all service areas require prior authorization for all of the above services. *Not all procedures and tests that need prior authorization are located in Clear Coverage

3
3/7/2011
For the most current manual please visit the Health Alliance website at www.healthalliance.org
Turnaround time
As a provider, you will receive immediate authorizations for services that meet InterQual criteria. Those prior authorizations that do not meet the criteria will be “pended” and manually reviewed by Health Alliance Medical Plans within 1-5 business days. You, as the provider can decrease this time by including all relevant information with the request and promptly following up with any requests for additional information.
Special instructions
- The link to Clear Coverage is on the Health Alliance Medical Plans website www.healthalliance.org . You will need to log in to the website to access Clear Coverage.
- You must have a Health Alliance login to access Clear Coverage online. The log-in will be the same as your Health Alliance website login. If you do not have a login, please contact a Provider Service Coordinator at 1-800-851-3379 ext. 4668 to obtain the appropriate form for a login request.
Getting Support for Clear Coverage
For any questions about Clear Coverage or if your practice needs to request a new user login for Clear Coverage, or an employee with a user login has left your practice (that user id should be canceled):
Please contact a Provider Service Coordinator at 1-800-851-3379 ext. 4668 For clinical questions please contact the Health Alliance Quality and Medical Management Department at [email protected] Please be sure to include your name, provider office you are calling from, call back number, and your question. You may also call 1-800-851-3379 ext. 8061.

4
3/7/2011
For the most current manual please visit the Health Alliance website at www.healthalliance.org
Minimum Requirements for Clear Coverage
The following details the requirements to access the Clear Coverage application.
Browser Support
To access Clear Coverage, you will need a web/internet browser with Macromedia Flash Version 10 installed. Most browsers will already have this installed, but you can check what version you have installed by going to the following URL.
http://www.macromedia.com/software/flash/about/ If you do not have Flash installed, or have an older version than version 10, you will need upgrade to a newer version of Macromedia Flash. Note that for Internet Explorer, a minimum version of IE 6 is also required.
Adobe Reader
Clear Coverage generates PDF files. In order to view and print PDF files, Adobe Acrobat Reader is required.
http://www.Adobe.com/AcrobatReader
Screen Resolution
Clear Coverage requires a screen resolution of 1024 x 768 pixels. The application will function with smaller
screen resolutions but the user will have difficulty scrolling to all the buttons. To use Clear Coverage, use a
monitor that supports a screen size of 1024 x 768, and change the resolution of your screen to 1024 x 768 or
greater.
Reliable High Speed Internet Connection
Clear Coverage requires a reliable, high‐speed internet connection such as a business internet cable
subscription, business DSL, or other business class network connection. Clear Coverage is not designed for use
over dial‐up or sporadic internet connections.

5
3/7/2011
For the most current manual please visit the Health Alliance website at www.healthalliance.org
Overview of Creating an Authorization Request
There following are the basic steps to create a new Authorization Request:
Step Information Provided
1. Select the Patient
Who is the patient who requires this service?
2. Select the Clinician
Who is the physician who is requesting the service?
3. Add Diagnosis (ICD-9) code(s)
What are the primary diagnoses for this service for this patient?
4. Select the Procedure or Test to be performed
Which services need to be performed? (CT scan, MRI, etc)
4A. Perform the Medical Review Provide answers to questions to determine medical necessity of the service
5. Select Service Information
Where will this service be performed?
6. Add Additional Notes Additional information about the case
Clear Coverage walks you through each of these steps to successfully submit an authorization.
The next sections will go into each of these steps in detail, as well as how to log in, create the PA
(prior authorization), and submit the PA.
6
3/7/2011
For the most current manual please visit the Health Alliance website at www.healthalliance.org
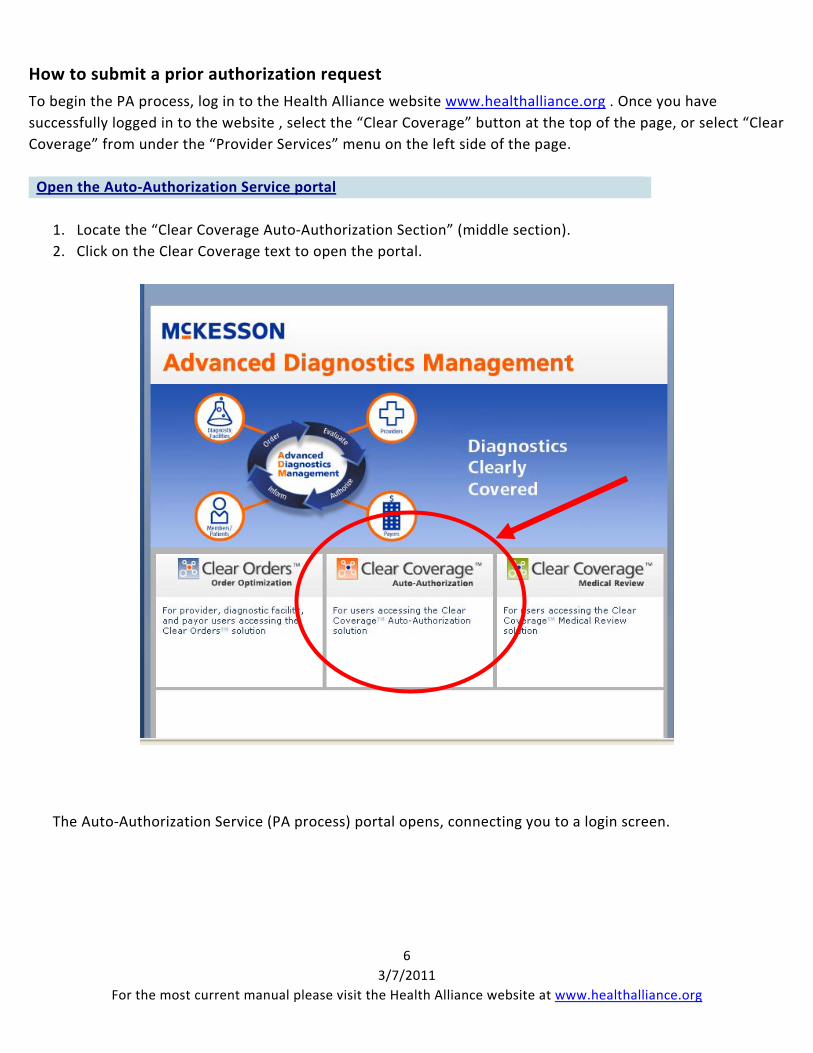
How to submit a prior authorization request
To begin the PA process, log in to the Health Alliance website www.healthalliance.org . Once you have
successfully logged in to the website , select the “Clear Coverage” button at the top of the page, or select “Clear
Coverage” from under the “Provider Services” menu on the left side of the page.
Open the Auto‐Authorization Service portal
1. Locate the “Clear Coverage Auto‐Authorization Section” (middle section).
2. Click on the Clear Coverage text to open the portal.
The Auto‐Authorization Service (PA process) portal opens, connecting you to a login screen.

7
3/7/2011
For the most current manual please visit the Health Alliance website at www.healthalliance.org
Login to the Auto‐Authorization Service portal
As a User of the Auto‐Authorization service, you have been assigned a user name and password. If you do
not have one, please contact a Provider Service Coordinator at 1‐800‐851‐3379 ext. 4668. Your User Name is
NOT case‐sensitive. Your Password IS case sensitive.
ACTIONS
1. Enter your UUsseerr NNaammee and PPaasssswwoorrdd in the appropriate fields.
2. There may be a “facility” field with a dropdown box, this indicates there are multiple locations for your
clinic. Please choose the appropriate location.
3. Click on the “Login>” button.
The first time you log in, the System may ask you to change your password, with the message “Your
Password has Expired. Please enter a new Password.”
4. Enter a new password that is at least 8 characters in length, with:
At least 1 uppercase letter
At least 1 lower letter
At least 1 number
5. Then re‐enter the new password.
6. If this is your first time logging in, scroll down to review the license agreements and click “Accept”.

8
3/7/2011
For the most current manual please visit the Health Alliance website at www.healthalliance.org
About the Clear Coverage Application: Overview
Clear Coverage provides TTaabbss and AAccccoorrddiioonnss to move through the application. In order to switch between
tabs, just click on the tab.
The Clear Coverage “New Authorization Request” Tab has two sides. The left side contains information to
search for patients, physicians, diagnosis codes, tests, and service providers (accordions). The right side
contains the information that has been added to the authorization request.
Left Side Right Side

9
3/7/2011
For the most current manual please visit the Health Alliance website at www.healthalliance.org
Create a New Authorization Request
The portal first opens‐up to the “HOME” tab.
ACTIONS
1. Click on the “New Authorization Request” tab to access the workflow.
In the “New Authorization Request” tab you are brought to the “Patient Search” feature as seen below.

10
3/7/2011
For the most current manual please visit the Health Alliance website at www.healthalliance.org
Step 1: Patient Search
Creating an authorization request starts with selecting the Patient. Using the Search function, the fastest way to select a patient is by using their Member ID number.
ACTIONS
1. Enter:
a. The patient’s 11 digit subscriber ID. I.e. (“94099988801”). Do NOT include the member suffix:
“940999888‐01” will not work.
2. Click on the “Search” button.
3. Click on the radio button for whom the prior authorization is being requested
a. Verify the eligibility of the patient in the far right column.
4. Click on the “Use Selected Patient” button on the bottom right corner
a. The selected patient’s information is moved into the PPaattiieenntt IInnffoorrmmaattiioonn accordion below, which
initiates a New Authorization request.
1a
4
3
2

11
3/7/2011
For the most current manual please visit the Health Alliance website at www.healthalliance.org
5. Click on the “Add to Request” button
a. The Patient Information is added to the Authorization Request on the right side of the window.
b. You are automatically moved to the next accordion – CClliinniiccaall IInnffoorrmmaattiioonn ..
Step 2: Clinical Information
Now, select the clinician/ordering provider requesting the authorization. The facility name and facility ID
will auto populate.
Field Definitions:
1. Facility Name: This is the facility/practice to which the clinician/ordering provider belongs. This is associated with
the tax ID. This value is auto populated.
2. Facility ID: Tax ID of the above facility. This value is auto populated.
3. Requesting Clinician: The ordering clinician/physician who is requesting the procedure.
4. Requesting Clinician ID: NPI of the above Clinician. This value is auto populated.
5. Date of Service: This defaults to the current date and can be backdated only 10 business days. You can click on
the calendar icon to change the date. If approved, the PA is valid for 90 days.
5.

12
3/7/2011
For the most current manual please visit the Health Alliance website at www.healthalliance.org
ACTIONS
1. Select the Requesting Clinician. Click on “Select Other Clinician” link.
2. Click on the “Show in‐Network Only” box and you will be able to select from all Health Alliance providers
that are in‐network for the members plan. Note: if you do not click this box, you will see all providers in
Clear Coverage. Click on search.
1.

13
3/7/2011
For the most current manual please visit the Health Alliance website at www.healthalliance.org
3. You may also enter the clinicians last and first name and click on Search. If you click on the provider
name, you can view the phone number, NPI and address.
4. Click on the radio button next to the provider’s name you want to select.
5. Check the “Add Selected to Preferred Clinician List” check box in the lower left corner to add to your
“Requesting Clinician” dropdown box. The information will then be added to the drop down box.
6. Click on the “Use Selected” in the lower right corner to add the selected Clinician to your PA request as
the requesting clinician.
7. Date of service defaults to today’s date. If the service is scheduled, put the date of the scheduled
service, if it is not scheduled, leave as today’s date.
8. Click on the “Add to Request” button. This moves the Clinical Information into the right side of the page
and moves you to the next accordion – Diagnosis (step 3).
Step 3: Propose a Diagnosis
The DDiiaaggnnoossiiss accordion allows you to choose one or more diagnoses that are appropriate for the service for
which you are requesting authorization (PA). The diagnosis can be identified by searching in the “Diagnosis
Lookup” field, listing any results matching the keywords.
7

14
3/7/2011
For the most current manual please visit the Health Alliance website at www.healthalliance.org
ACTIONS
1. Search for the diagnosis using one of the following methods:
a. Enter part of the clinical diagnosis description (e.g. “lumbago”)
b. Enter ICD‐9 code (e.g. “724.4”) Diagnosis options will appear as you enter keywords in the Lookup.
2. In order to ensure that the most specific diagnosis/ICD‐9 is recorded in the Authorization Request, Clear
Coverage makes the distinction between two types of diagnoses:
Billable – an appropriate diagnosis to use for an Authorization Request
Not Billable – a more specific diagnosis is needed for an Authorization Request.
3. The icon denotes that within this diagnosis folder there is a subset of specific, billable diagnoses.
Click on the arrow in order to access the subset of additional codes that are billable
4. When you find the appropriate billable diagnosis code, click the “Add” button next to the diagnosis.
a. The diagnosis is added into the authorization request on the right side of the page.
5. Repeat Procedure steps 1‐2 to include additional diagnoses, if desired.
a. If you select the wrong diagnosis, click on the trash icon next to the diagnosis to delete the
selection from your list and choose again.
6. Click the “Next” button to move to the next accordion – Procedure/Test.
1
2
3
4
6

15
3/7/2011
For the most current manual please visit the Health Alliance website at www.healthalliance.org
Step 4: Procedure/Test Selection
The Procedure/TTeesstt accordion allows you to select the service for which you are submitting an Authorization
Request.
ACTIONS
1. To find the procedure or test for which you wish to request authorization:
a. Type in the CPT code in the “Procedure/Test Lookup” Box (e.g. “74182”) OR
b. Type a portion of the test name in the “Procedure/Test Lookup” Box (e.g. “MRI Shoulder”)
If the CPT code or description does not appear, reference the medical policy or technology topic links on
the Health Alliance website to determine prior authorization. The list of services loaded in Clear
Coverage appear on page 2 of this document.
2. Select the CPT procedure by clicking the “Add” button. The selected CPT procedure is added to the right
side of the page.
a. If you select the wrong test, click on the trash icon next to the test to delete the selection from
your list and choose again.
3. Repeat steps 1‐3 until you have added all of the tests you need authorized for this patient.
4. After having selected the CPT code associated with the imaging procedure, the next step is to
complete the medical necessity review, Step 4a.
*Multiple tests can be chosen for the same member on this screen. Each request will be have a unique
reference/authorization number.
1
2

16
3/7/2011
For the most current manual please visit the Health Alliance website at www.healthalliance.org
The “Coverage” column listing the “Medical Review Required” indicates that the procedure code requires prior
authorization. This service can be auto‐authorized if the test is recommended based on medical review. Please
see below for meanings.
Coverage Meaning / Action to Take
“Covered” This service does not require prior authorization and cannot be added
to an Authorization Request.
ACTION: You do not need to submit an authorization request and can
stop this process.
“Medical
Review
Required”
This service can be auto‐authorized if the test is recommended based on
medical review.
ACTION: Add the service and Perform Medical Review (See Next
Section)
“Authorization
Required”
This service cannot be auto‐authorized, but medical review is required.
The request will be evaluated by the Payor’s Utilization Management
team. Proceed with the authorization.
ACTION: Add the service and Perform Medical Review (See Next
Section)
Step 4A: Perform Medical Review
Clear Coverage uses a question and answer approach to access the medical necessity of the authorization
request. This medical review requires you to answer all the questions as prompted by the system. If criteria are
met, immediate authorization is provided.
If you do not perform medical review, you will not be eligible to receive an auto authorization, and the case will
be pended for manual review to Health Alliance Medical Plans.
ACTIONS
1. Click on the “Required to Submit” button in the Authorization Request on the right hand side to launch
the Medical Review Questions. You may have to use the scroll bar to the far right in order to see the
“Required to Submit” button.

17
3/7/2011
For the most current manual please visit the Health Alliance website at www.healthalliance.org
2. Provide responses that are appropriate for your specific patient and clinical situation. Move through the
questions from the tabs (Q1, Q2, etc) and continue to the next question until all questions have been
completed.
ACTIONS CONTINUED
3. Upon completion of the Q&A session of the Medical Review, you will receive a recommendation on the
medical appropriateness of the test based upon the best current evidence available:
i.
ii. There may be alternate actions suggested, such as switching to a more appropriate test, or removing the
test you requested. These are covered in more detail in the “Medical Review Outcomes” section of this
guide starting on page 27.
4. Choose the radio button next to the appropriate option. If the recommendation is “not recommended”,
the case will be pended for review by Health Alliance. Please provide additional notes and records.
NOTE, if three or more attempts are made for the same service, it will automaticallly pend and sends to
Health Alliance.
5. Click Finish.
6. Notice under Medical Review in the Authorization Request on theright side of the page, the “Required to
Submit” button has now changed to
1
18
3/7/2011
For the most current manual please visit the Health Alliance website at www.healthalliance.org
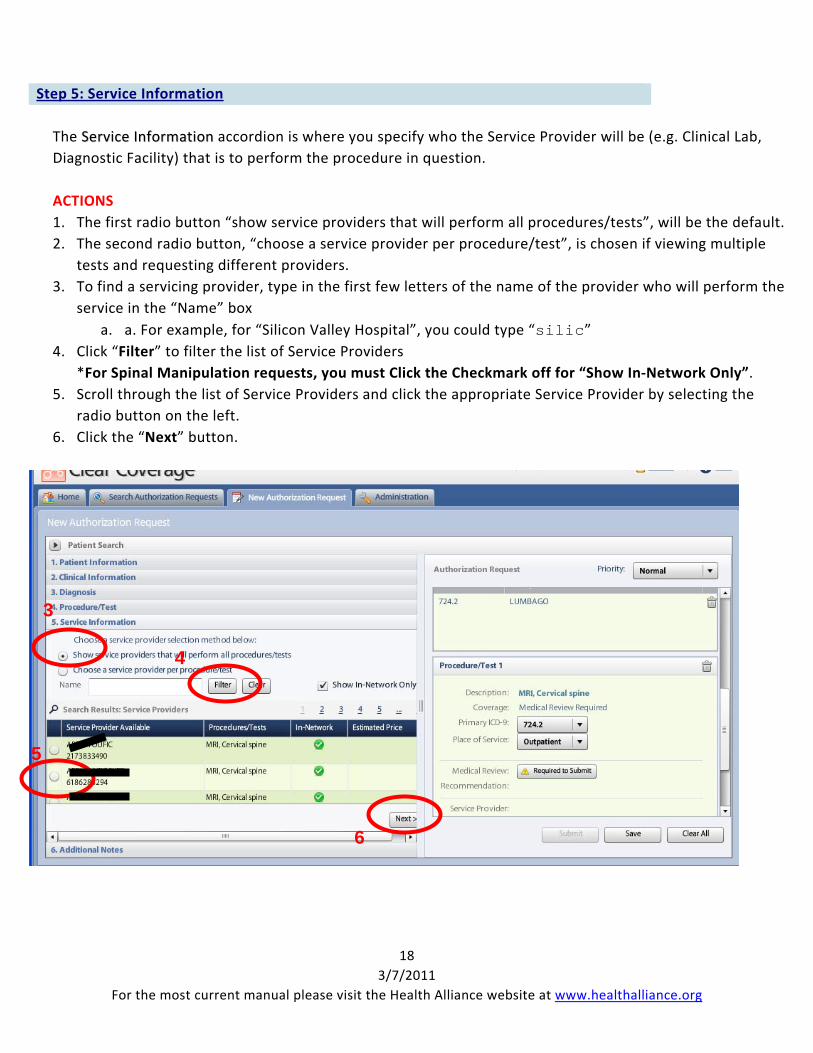
Step 5: Service Information
The SSeerrvviiccee IInnffoorrmmaattiioonn accordion is where you specify who the Service Provider will be (e.g. Clinical Lab,
Diagnostic Facility) that is to perform the procedure in question.
ACTIONS
1. The first radio button “show service providers that will perform all procedures/tests”, will be the default.
2. The second radio button, “choose a service provider per procedure/test”, is chosen if viewing multiple
tests and requesting different providers.
3. To find a servicing provider, type in the first few letters of the name of the provider who will perform the
service in the “Name” box
a. a. For example, for “Silicon Valley Hospital”, you could type “silic” 4. Click “Filter” to filter the list of Service Providers
*For Spinal Manipulation requests, you must Click the Checkmark off for “Show In‐Network Only”.
5. Scroll through the list of Service Providers and click the appropriate Service Provider by selecting the
radio button on the left.
6. Click the “Next” button.
3
4
5
6

19
3/7/2011
For the most current manual please visit the Health Alliance website at www.healthalliance.org
Step 6: Add Notes
The AAdddd NNootteess section allows you to provide any additional notes to support your Authorization Request.
Documents can not be attached until the case has been submitted (step #7)
ACTIONS
1. Add any additional notes to support the request (additional medical evidence, etc)
2. Click on “Add Note” button to record the notes in the Medical Review. Portions of the electronic medical
record can be copied and pasted in the notes section.
20
3/7/2011
For the most current manual please visit the Health Alliance website at www.healthalliance.org
Step 7: Submit the Authorization Request
ACTIONS
1. Double check that all 6 Sections of the Authorization Request are filled out and complete.
2. Is Medical Review Complete? Make sure you have performed Medical Review if your test coverage was
“Medical Review Required” or “Authorization Required”.
3. Click on the “Submit” button
a. You will be prompted for a phone number where you can be reached. A callback phone number is
required to submit the authorization.
b. You will then receive an Automatic response to the request:
i. Your request will either be Approved (Auto‐Authorized) or Pended.
ii. Whether approved or pended, your request will have a unique ID beginning with the letter
“C.” You will use this letter to reference your request. See below for example.
c. Note: If the Submit button is not enabled, see the Troubleshooting section of this guide.
4. You may print a copy of the Authorization Request by clicking on the “View Authorization Request (PDF)”
button. This generates a PDF file that you can then print by selecting “File… Print” from the application
menu.
5. An attachment can be attached to the authorization. Click to add a note, provide a note or comment, and
browse attachments to add additional documentation.
6. You will be given an option to create another Authorization Request.
a. Click on the “No” button to return to the “Search Authorization Requests” tab
b. Click on the “Yes” button to perform another Authorization Request using the same patient,
physician, and diagnosis (if you leave those checkboxes selected).

21
3/7/2011
For the most current manual please visit the Health Alliance website at www.healthalliance.org

22
3/7/2011
For the most current manual please visit the Health Alliance website at www.healthalliance.org
Printed Authorization Request
This PDF contains all the information that you built into the Authorization Request, including the
answers to the Medical Necessity review of the procedure in question.

23
3/7/2011
For the most current manual please visit the Health Alliance website at www.healthalliance.org
(You may want to print the form out to submit to the servicing provider as a notification of authorization. If you are
printing this to serve as a proof of authorization, you may only want to print out the first 2 pages, and not all of the
clinical information.)
D: Logging out of Clear Coverage
Once you have completed your work within the Auto‐Authorization Service portal, you can logout of the
system. If you do not do so, the system will automatically log you out after a few minutes of inactivity.

24
3/7/2011
For the most current manual please visit the Health Alliance website at www.healthalliance.org
Procedure
1. Click on the “Logout” button on the upper right‐hand corner of the window
Medical Review Details This section covers additional features of medical review that will enhance your use of Clear Coverage
Sticky Notes
Sticky Notes appear next to specific questions, and specific
answers in the Medical Review process. Just click on a
stick note to see the information. A sticky note may define
a technical term used in the question, or explain the
reason for the question.
Changing Answers to Medical Review
If you have mistakenly answered any particular question incorrectly, you may go back to the tab for
that question and click on the appropriate radio button. Note: if you back track 3 times, your request
will automatically pend to Health Alliance Medical Plans for review internally. Once you click on the
“Finish” button, your answers become “saved”. You can always re‐enter medical review and re‐answer
the questions, until you have submitted the request. After the request has been submitted, changes
to the Medical Review are not possible.

25
3/7/2011
For the most current manual please visit the Health Alliance website at www.healthalliance.org
Medical Review Outcomes At the end of Medical Review, you will get different outcomes. Those outcomes are:
Outcome Meaning Actions
The test requested is
medically appropriate
If coverage for this test was
“Medical Review Required”,
this request will Auto‐
Authorize.
, and “Replace
With…”
The test is appropriate, but
there are additional test(s)
that are appropriate in
addition to the test selected
Determine if you wish to add
the additional tests.
,
“Recommended Action…”
The test selected does not
meet the medical
appropriateness criteria of
the guideline
Determine if you wish to go
forward with the test (will
not auto‐authorize), or if you
want to choose an
alternative action.
, “Evidence
Does Not Support”
Given your answers in medical
review, there is no clinical
evidence to support performing
the test.
Determine if you wish to go
forward with the test (will
not auto‐authorize)
,
“Insufficient Evidence”
There is a beginning body of
evidence to suggest that the
test may be appropriate, but
there is simply not enough
evidence at present to support
performing the test.
Determine if you wish to go
forward with the test (will
not auto‐authorize)
,
“ More than one test is
recommended”
The test is appropriate, but
there are additional test(s)
that are appropriate in
addition to the test selected
Determine if you wish to add
the additional tests.
On the following pages, an example of each one of these cases is displayed, along with the actions and
outcomes for each.

26
3/7/2011
For the most current manual please visit the Health Alliance website at www.healthalliance.org
Result: Recommended
If you get “Result: Recommended”, just click finish and proceed with the Authorization Request starting
with step 5: Service Information.
27
3/7/2011
For the most current manual please visit the Health Alliance website at www.healthalliance.org
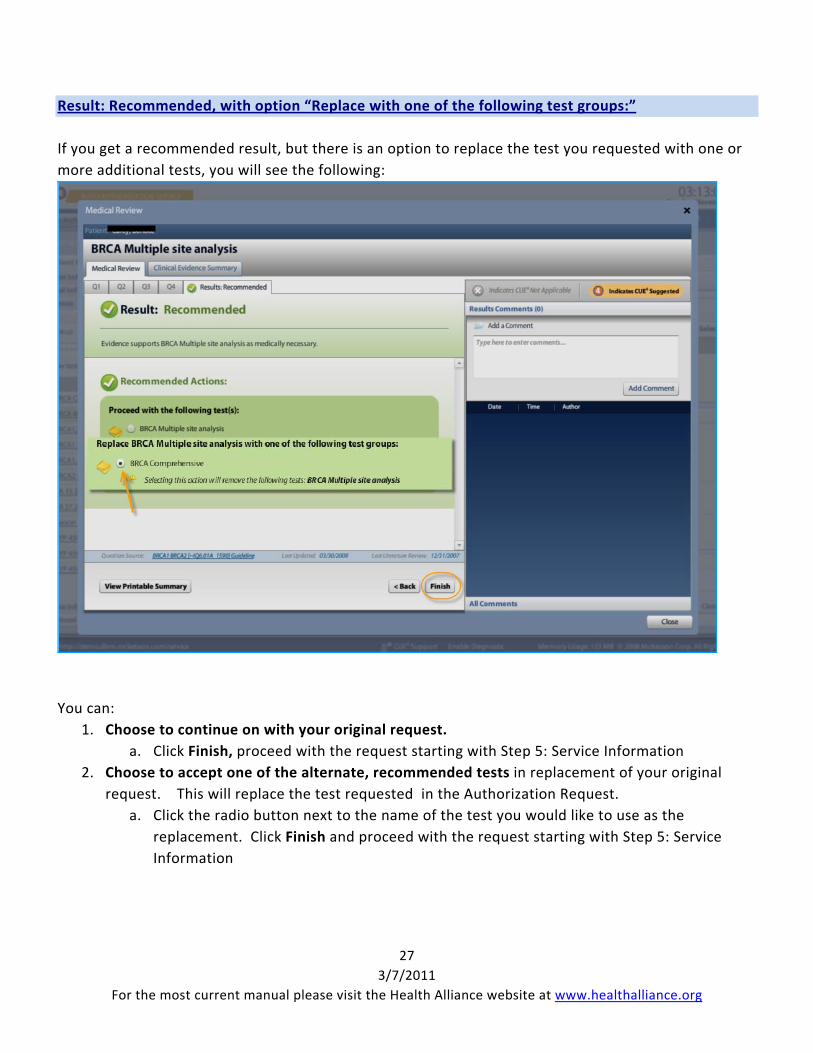
Result: Recommended, with option “Replace with one of the following test groups:”
If you get a recommended result, but there is an option to replace the test you requested with one or
more additional tests, you will see the following:
You can:
1. Choose to continue on with your original request.
a. Click Finish, proceed with the request starting with Step 5: Service Information
2. Choose to accept one of the alternate, recommended tests in replacement of your original
request. This will replace the test requested in the Authorization Request.
a. Click the radio button next to the name of the test you would like to use as the
replacement. Click Finish and proceed with the request starting with Step 5: Service
Information

28
3/7/2011
For the most current manual please visit the Health Alliance website at www.healthalliance.org
Result: Not Recommended, with option “Replace with one of the following test groups”:
Here, the original test requested is not recommended given the answers provided, but there is an
alternate test that is medically appropriate.
You can:
1. Choose to accept one of the alternate, recommended tests in replacement of your original
request. This will replace the test requested in the Authorization Request. Click finish then
proceed with the request starting with Step 5: Service Information.
2. Choose to continue on with your original request.
a. Click the radio button “Continue with….” next to the name of the original test you
submitted. If this procedure was eligible for Auto‐Authorization, the test will not Auto‐
Authorize because this test is not recommended given the outcome Medical Review.

29
3/7/2011
For the most current manual please visit the Health Alliance website at www.healthalliance.org
b. click finish, continue with completing the authorization starting with step 5, choosing the
servicing provider.
Result: Not Recommended, The Evidence Does Not Support OR Insufficient Evidence
Here, the original test requested is not recommended given the answers provided.
You can:
1. Choose to remove the original test. This will remove the test requested from the
Authorization Request. Click Finish.
You will then need to choose a different test and continue with the request.
2. Choose to continue on with your original request.
a. Click the radio button next to “Continue on with….” next to the name of the original test
you submitted. If this procedure was eligible for Auto‐Authorization, the test will not
Auto‐Authorize because this test is not recommended given the outcome Medical
Review.
b. click finish, continue with completing the authorization starting with step 5, choosing the
servicing provider.

30
3/7/2011
For the most current manual please visit the Health Alliance website at www.healthalliance.org

31
3/7/2011
For the most current manual please visit the Health Alliance website at www.healthalliance.org
Result: Conditionally Recommended
Here it is recommended to add another test.

32
3/7/2011
For the most current manual please visit the Health Alliance website at www.healthalliance.org
You can:
1. Replace the test by selecting the radio button next to the test, click finish, proceed with request
starting with step 5.
2. Add a test by clicking the radio button next to the test, click finish, then complete the medical
review for the test added, then proceed with step 5: Service Information.
3. Continue with original request by selecting the radio button next to the test, click finish, and
proceed with request starting with step 5: Service Information
Faxing in additional information
1. To fax in additional information you must first submit the request.
2. Once submitted return to your home page and refresh the data.
3. Double click on the authorization associated with the additional information you have.
4. This will pop open your request on the left side of the screen. At the bottom you will see three
different options: add note, print, and cancel request.
5. Click the dropdown arrow next to “print” and select “fax coversheet” and follow the directions.
Troubleshooting
The Submit Button is Disabled / Grayed Out
In order to Submit an Authorization Request, the following information needs to be present in the
Authorization Request on the right hand side of the application:
1. Eligible Member
2. Clinician
3. At least one ICD‐9 code in the Diagnosis section
4. At least one procedure (coverage status must be one of “Authorization Required”, “Medical
Review Required”, or “Authorized Instantly”)
a. Each procedure must have the primary ICD‐9 code set to one of the ICD‐9 codes. Double
check each procedure to make sure an ICD‐9 code is associated with each one.
5. A Service Provider associated with each Procedure/Test
a. Each procedure must have a service provider associated. Double check each procedure
to make sure an ICD‐9 code is associated with each one. If a procedure is added or
changed after the Service Provider is selected, it will not have a Service Provider assigned
to it.

33
3/7/2011
For the most current manual please visit the Health Alliance website at www.healthalliance.org
Important: Even though it won’t prevent submission, make sure to include your callback phone number
in the Notes section!
I can’t find the member that I am looking for
If you can’t find the member you’re looking for, it may be one of two things:
1. The member is not an eligible member
Clear Coverage should contain all eligible members, but will not contain all previously eligible
members.
2. The search criteria need to be changed. Try clearing the search, and entering just the person’s last name, or just the person’s first name, or
just their 9 digit subscriber number. You will need to narrow the search down to less than 40
results, so last name “Smith” will not be enough to find the patient.
If you still cannot find the member you are looking for, please call Health Alliance Medical Plans
Customer Service at 1‐800‐851‐3379