clause logic service (cls) · the purpose of this user manual is to provide instructions and...
TRANSCRIPT

OUSD Acquisition & Sustainment
Defense Pricing & Contracting
Contracting eBusiness
_____________________________
_____
Clause Logic Service
(CLS)
User Guide
7 January 2019

CLS USER GUIDE
Table of Contents
Contents
1 Introduction ............................................................................................................................... 11
1.1 Purpose ..................................................................................................................................... 11
2 CLS Startup ................................................................................................................................ 11
2.1 Prerequisites ............................................................................................................................. 11 2.1.1 Roles ................................................................................................................................ 11 2.1.1.1 Contract Specialist ............................................................................................................ 11 2.1.1.2 Reviewer .......................................................................................................................... 12 2.1.1.3 Administrator .................................................................................................................... 12 2.1.2 Workload Transfer ................................................................................................................. 12
2.2 Accessing Clause Logic Service (CLS) ................................................................................... 14
3 CLS Page ................................................................................................................................... 17
3.1 Session Tab ............................................................................................................................... 18 3.1.1 New Clause Set ..................................................................................................................... 20 3.1.2 Auto-Answer .......................................................................................................................... 33
3.2 Questions Tab ........................................................................................................................... 36
3.3 Clauses Tab ............................................................................................................................... 45 3.3.1 Manually Added Clauses .................................................................................................. 49
3.4 Help Tab ..................................................................................................................................... 56 3.4.1 Navigation Pane .................................................................................................................. 56
4 Acronyms .................................................................................................................................. 58

11 | P a g e
CLS USER GUIDE
1 Introduction
The operational enterprise web service Clause Logic Service (CLS) (using the Procurement Data Standard)
is used by procurement personnel or system-to-system during the procurement process to allow for
consistent inclusion of provisions and clauses in procurement actions. CLS ensures the selection of
provisions and clauses based on a standard set of system logic rules for the current Federal Acquisition
Regulation (FAR), Defense Federal Acquisition Regulation Supplement (DFARS), and DFARS
Deviations.
Agency/Service local clauses will not be incorporated into CLS until they have gone through the rule-
making process (PGI 201.301). Once approved and they appear in the Agency/Service’s chapter of Title
48, logic rules will be created and the clause(s) will be made available in CLS.
Users can access CLS via a web service connection to their Contract Writing System (CWS) or directly
from a website.
1.1 Purpose
The purpose of this user manual is to provide instructions and guidance for using the CLS. The logic
behind CLS is to provide provisions and clauses required for your procurement based on the answers the
user provides to the questions. Prescriptions are provided, via hyperlink, under each answer in the Q&A
session. This is to assist the user in determining if that answer is the correct for the specific supply/service
being acquired. This will ensure best use of tool and accurate clause set for the solicitation/award.
2 CLS Startup
2.1 Prerequisites
2.1.1 Roles
Access permissions to the CLS User interface are based on functional roles assigned to the user (e.g.,
Contract Specialist, Reviewer, and Administrator).
2.1.1.1 Contract Specialist
The Contract Specialist role has the following capabilities:
Answer questions related to a specific contract. Initiate a new Question and Answer (Q&A) session for solicitations and awards. Save a Q&A session for a defined retention time (default 60 days) or cancel a session without saving
it. Select from a previously saved Q&A session, stored within the defined retention time for display. Resume a saved user session at the point it was previously saved, retaining previously edited or
filled in text.
Create a copy of a previously saved Q&A session to serve as a starting point for a new
The Reviewer and Administrator roles are not currently available but will be deployed in a future version.

12 | P a g e
CLS USER GUIDE
solicitation or award retaining all previous answers.
Review a document in the History tab. Manually add clauses.
2.1.1.2 Reviewer
The Reviewer role, which is not currently implemented, has the following capabilities:
Generate reports based upon actions taken by users within his/her organizational hierarchy. View the Q&A transcripts of any stored session initiated by any user within his/her
organizational hierarchy.
2.1.1.3 Administrator
The Administrator role, which is not currently implemented, has the following capabilities:
Identify an organizational hierarchy for inclusion of users with Reviewer and Contract Specialist
user roles grouped within his/her organization.
Set the retention time for saved Q&A sessions in days for his/her organization. Generate reports based upon actions taken by users within his/her organizational hierarchy.
2.1.2 Workload Transfer
A user’s documents can be transferred to a designated user with the following steps.
To select the user whose documents will be transferred (source user), select their ID from the
“From” drop-down list. This will enable the “To” drop-down list. See Figure 2.1.2-1.
Figure 2.1.2-1. Workload Transfer Window with Documents
To select the user to transfer the documents to (destination user), select their ID from the “To” drop-down
list. This will enable the source user document list.

13 | P a g e
CLS USER GUIDE
Select all the documents that should be transferred from the source user document list. See Figure 2.1.2-2.
Figure 2.1.2-2. Workload Transfer Window with Documents Selected
Click Transfer →to transfer the source user’s documents to the destination user. The destination
user’s document list automatically updates to include the files that were transferred, as shown in
Figure 2.1.2-3.

14 | P a g e
CLS USER GUIDE
Figure 2.1.2-3. Workload Transfer Window with Transfer Completed
2.2 Accessing Clause Logic Service (CLS)
CLS is accessible either through Wide Area Workflow (WAWF) or the user’s contract writing system
(CWS). The user will need to create an account in WAWF to request access to CLS. All 1102s are
automatically given access to CLS. If you are not an 1102 you will need to request access to CLS in the
WAWF environment.
This is the screen that pops up when the user accesses WAWF. Click the √Accept icon at the bottom.
Click on the Certificate Login button.

15 | P a g e
CLS USER GUIDE
Select the ID certificate and click on Ok.
Sometimes the below pop-up appears; if so, click Run.
When the user logs in the CLS icon will be visible in the PIEE screen. If you are an 1102 and it does not
appear contact the WAWF Help Desk.

16 | P a g e
CLS USER GUIDE
Click on the CLS icon.
On the Warning and Disclaimer page, click Acknowledge to open a CLS session.
Figure 2.2-1. CLS Warning and Disclaimer Page
As described in the Warning, the CLS buttons should be used to navigate within the application, not the browser buttons.

17 | P a g e
CLS USER GUIDE
If CLS has been updated since the last log-in, a pop-up window appears with a New Update message, as
shown in Figure 2-2-2. Click Dismiss to close the window.
Figure 2.2-2. New Update Pop-up Window
An Upcoming Outage pop-up window displays if there is an upcoming outage, as shown in Figure 2.2-3. Details of
the outage are found in the Notices and Updates link at the bottom of the CLS page. Click Dismiss to continue to the
CLS page.
Figure 2.2-3. Upcoming Outage Pop-up Window
3 CLS Page
The top-right of the CLS page shows the user and user’s role, and a Logout button, shown in Figure 3.1.
Figure 3-1. User, Role, and Logout
Click Logout to leave CLS. If the session has not been saved, a Save Session pop-up window appears,
shown in Figure 3-2. Select Yes, No, or Cancel.

18 | P a g e
CLS USER GUIDE
Figure 3-2. Save Session Pop-up Window
The CLS page contains four tabs: Session, Questions, Clauses, and Help. Click to save the
session. A pop-up window appears with a message that the session has been saved, as shown in Figure 3-3.
Click Close to remove the window.
Figure 3-3. Saved Session Pop-up Window
3.1 Session Tab
Figure 3.1-1 below shows the Session tab of the CLS page. The left-hand column lists the following links:
About Clause Logic Service – This feature will be added in a future deployment. Help Desk Utilities – This feature will be added in a future deployment. The following links are
listed at the bottom of the page:
Notices and Updates – Clause Logic Service Notices and Updates contains two tabs: o Scheduled Outages lists maintenance and patching dates and reasons. o Notices and Updates contain versions, status, and release dates of Federal Acquisition
Circular (FAC) Update, Defense Acquisition Circular (DAC) Update, Clause Logic Service
User Interface, Clause Logic Request Schema, Clause Logic Response Schema, Federal Acquisition Regulation (FAR) and Defense Federal Acquisition Regulation (DFAR) Rules,
Questions Matrix, Document Creation Extensible Markup Language (XML), Procurement Question and Answer XML, and Procurement Question and Answer Schema.
Privacy & Security Notice – Clause Logic Service Security, Privacy, and Disclaimer Notices External Links Disclaimer – U.S. Department of Defense External Link Disclaimer Accessibility/Section 508 – U.S. Department of Defense Section 508 Web Policy – Office of the Under Secretary of Defense for Acquisition, Technology and Logistics Help Desk – For questions about the Clause Logic Service, please send an email to:

19 | P a g e
CLS USER GUIDE
Window Theme – Selection of Overcast, Dark Hive, Smoothness, and Trontastic
The first table contains the Users Information: User, Organization, Role, Permissions, and Last Login.
The lower half of the screen contains the user’s session information, which has three tabs: Clause
Sessions in Progress, History, and Q&A Masters (disabled). Elements in the Clause Sessions in
Progress include:
Show Number of Entries drop-down menu – Selection of number of entries to show (i.e., 10, 25, 50, 100)
Search for Document Number: Textbox for document number for search Document Number – Document identification number
Details – Place the mouse pointer over to open the Conditions pop-up window.
Days Until Expired – Number of days until the document will expire (default 60 days) Last Update – Date and time of the last time the session or document was saved Submitted to Clause Logic Service – Yes or No [identifies that the document has been sent to the
CLS Application Program Interface (API) for validation]
Resubmit Required – The document indicated needs to be resubmitted Contains Errors – Yes or No (Yes is denoted in a red box) Copy Document – Click Create Copy of xxx to create a copy of the listed document

20 | P a g e
CLS USER GUIDE
Figure 3.1-1. CLS Page, Session Tab
The History tab shown in Figure 3.1-2 contains a list of completed documents. Completed documents
are documents that have all questions answered, answers validated, and clause results exported for that
document. The elements displayed in the history table can be sorted by clicking the element title in the
table heading.
Document Number – Document number or Identifier (ID) Status – Document status: Complete – Clauses Exported and/or Expired Archive Date –Date the document was archived Action – Review or Revert to In Progress. Click Review to review a completed document.
Completed documents may not be updated. Click Revert to In Progress to change an expired
document to In Progress status in order to continue development.
Copy Document – Copy a Document. Expired document cannot be copied.
Figure 3.1-2. History Tab
The Q&A Masters tab (next to the History tab) will contain a list of documents that can be used as a
template for creating new documents. This function will only be available to the CLS Agency/Service
Administrator.
3.1.1 New Clause Set
21 | P a g e
CLS USER GUIDE
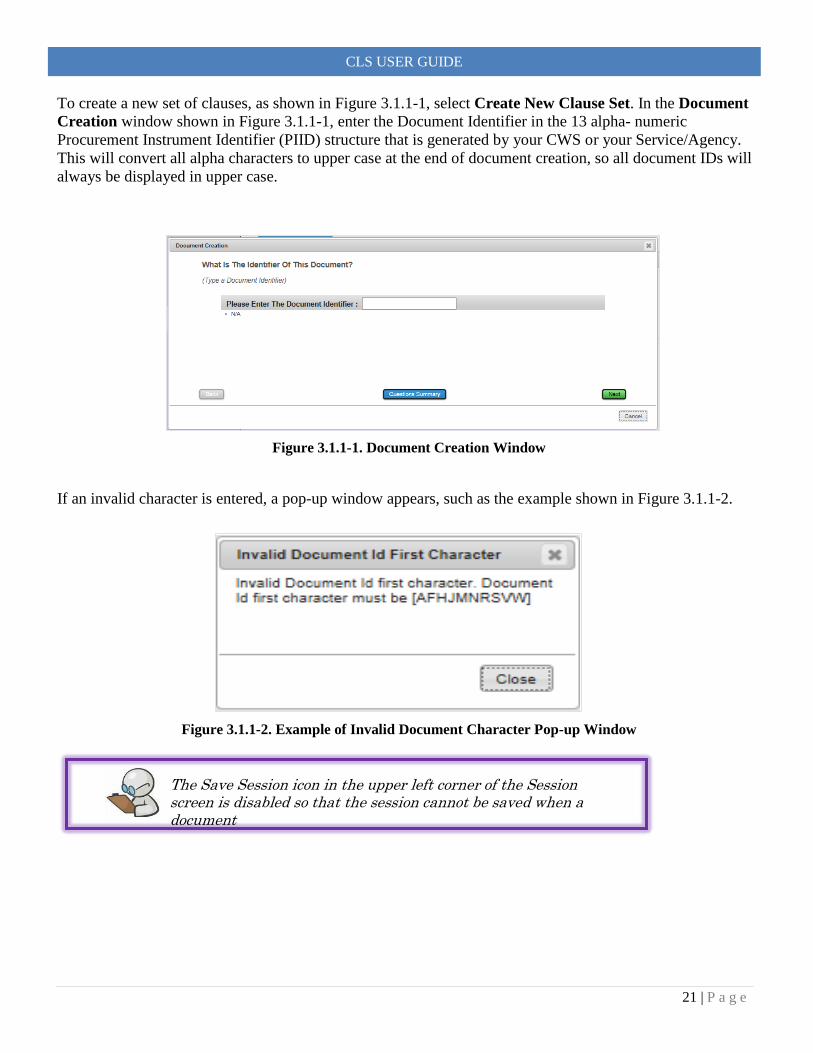
To create a new set of clauses, as shown in Figure 3.1.1-1, select Create New Clause Set. In the Document
Creation window shown in Figure 3.1.1-1, enter the Document Identifier in the 13 alpha- numeric
Procurement Instrument Identifier (PIID) structure that is generated by your CWS or your Service/Agency.
This will convert all alpha characters to upper case at the end of document creation, so all document IDs will
always be displayed in upper case.
Figure 3.1.1-1. Document Creation Window
If an invalid character is entered, a pop-up window appears, such as the example shown in Figure 3.1.1-2.
Figure 3.1.1-2. Example of Invalid Document Character Pop-up Window
The Save Session icon in the upper left corner of the Session screen is disabled so that the session cannot be saved when a document

22 | P a g e
CLS USER GUIDE
If an invalid length is entered, a pop-up window appears, such as the example shown in Figure 3.1.1-3.
Figure 3.1.1-3. Example of Invalid Document Length Pop-up Window
If a duplicate Document Identifier (PIID) is entered, a warning appears, as shown in Figure 3.1.1-4. Each
PIID must be unique to the user.
Figure 3.1.1-4. Example of Duplicate PIID Entry Pop-up Window
After providing a Document Identifier, a series of questions and answers are presented that define the
conditions under which the clause set is created. Conditions are high-level criteria such as Solicitation or
Award, Commercial or Non-Commercial, Estimated Value used in the Under SAT/Over SAT calculations,
etc., which affect the question and answer workflow as details about the created document are provided. A
reference number is located in the upper right corner of the window. An example of the Question and Answer
window is shown in Figure 3.1.1-5. As shown in the example, some questions allow selection of only one
answer.

23 | P a g e
CLS USER GUIDE
Figure 3.1.1-5. Question and Answer Example
Some questions allow selection of multiple answers, as shown in Figure 3.1.1-6. Scrollbars are provided on a
case-by-case basis to allow viewing of all available answers.
Figure 3.1.1-6. Questions with Multiple Answers
Select to navigate back to the previously answered question in order to edit the answers.
Presentation of questions and answers during Document Creation follow the same screen layout and
functionality providing the in-depth details of a document. Select during document creation to
abandon document creation, discard all answered questions, and return to the Session Tab view. At any time
while answering questions, select in order to see a list of questions that have been answered in
the Document Creation process, as shown in Figure 3.1.1-7.

24 | P a g e
CLS USER GUIDE
Figure 3.1.1-7. Answered Questions Example
If all questions have not yet been answered in the Document Creation process, scroll down in the Questions
Summary view to see the next question that needs to be answered, as shown in Figure 3.1.1-8.
Figure 3.1.1-8. Questions Summary View

25 | P a g e
CLS USER GUIDE
Questions may require text, decimal or integer input. Rudimentary error checking is performed to prevent
errors such as entering alphabetic characters in decimal or integer fields, as shown in Figure 3.1.1-9.
Figure 3.1.1-9. Input Error Checking
When applicable, hyperlinked prescriptions are provided for answers. Toggle to view/hide the prescriptions,
as shown in Figure 3.1.1-10.
Figure 3.1.1-10. Prescriptions for Answers
If you do not understand any of the answers read the associated prescriptions before selecting one.

26 | P a g e
CLS USER GUIDE
Select a prescription hyperlink to open a dialog that displays the prescription text, as shown in Figure 3.1.1-
11.
Figure 3.1.1-11. Prescription Dialog

27 | P a g e
CLS USER GUIDE
After all questions in the Document Creation process have been answered, the final screen displays, as shown
in Figure 3.1.1-12. Select to review the answers or .
Figure 3.1.1-12. Question and Answer Final Window
Selecting opens the Questions Summary View (shown in Figure 3.1.1.13). In this window,
review the questions and answers, update answers to questions, clear all answers to all questions, or accept all
answers and create a document.

28 | P a g e
CLS USER GUIDE
Figure 3.1.1-13 Questions Summary View

29 | P a g e
CLS USER GUIDE
After a document is created, the table of Clause Sessions in Progress is updated to reflect the new document,
as shown in Figure 3.1.1.14. Click on the Document Number hyperlink to begin answering detailed questions
about the acquisition. It is imperative to answer the questions based on the specific procurement action in
order for the tool to best select the applicable provisions and clauses.
Figure 3.1.1-14. Clause Sessions in Progress
Place the mouse pointer over next to the Document Number in the Details column in order to see the
conditions that were entered during Document Creation. A Conditions pop-up window opens (shown in
Figure 3.1.1-15), which summarizes the conditions that were applied to the document during the Document
Creation process. Moving the mouse pointer away from automatically closes the pop- up window. The
Conditions pop- up window is available for all documents.
Figure 3.1.1-15. Conditions Pop-up Window

30 | P a g e
CLS USER GUIDE
Selecting the Document Number hyperlink from the Clause Sessions in Progress table displays the first of a
series of questions and answers which provide details about the document (shown in Figure 3.1.1- 16).
Figure 3.1.1-16. Display of Document’s Questions and Answers
The title of the document being worked is displayed in the upper right corner of the CLS window, directly
below the User/Role/Logout display. Use the hover on the icon at any time while answering questions in
order to see the Conditions pop-up window, shown in Figure 3.1.1-17. This window summarizes the
conditions that were applied to the document during the Document Creation process, which affect the
question/answer flow.

31 | P a g e
CLS USER GUIDE
Figure 3.1.1-17. Document’s Conditions Pop-up Window

32 | P a g e
CLS USER GUIDE
The Clause Sessions in Progress Tab in the lower table updates to display the Document Number
information, as shown in Figure 3.1.1-18. The display lists in progress Q&A sessions, stored within the
defined retention time (default 60 days).
Figure 3.1.1-18. CLS Page, Session Tab, Updated Clause Session in Progress Table
To create a copy of a document, click Create Copy of xxx. A pop-up window, shown in Figure 3.1.1-19,
appears. Enter a Document ID and click Create to create a copy or Cancel to return to the Clause Session in
Progress tab. Note that the format of the Document ID for a copied document must comply with Document
ID naming conventions as described in paragraph 3.1.1. A document copy contains all answers from the
original document that can then be edited in the copied document for a different acquisition action.
Figure 3.1.1-19. Create Copy Pop-up Window

33 | P a g e
CLS USER GUIDE
The Clause Sessions In Progress window displays the copy of the document, as shown in Figure 3.1.1-
20.
Figure 3.1.1-20. Clause Session Create Copy Window
Click the Document Number to open the Questions tab for the selected Document Number.
3.1.2 Auto-Answer
Documents provided through the Auto-Answer web service are shown in a user’s documents list. Auto-
answered documents are differentiated from documents created solely through the CLS UI by the entry in
the Document Source column. Documents created solely through the CLS UI have a Document Source
entry of CLS UI while auto-answered documents have an entry that reflects the originator of the document
as received by the Auto-Answer web service – e.g., Air Force documents may show CON_IT_AF as the
Document Source, as shown in Figure 3.1.2-1. The figure shows the Auto-Answer-populated table, with
the document, its source of CON_IT-AF, and its export status. The Clauses Exported column shows that
the first two documents were exported.

34 | P a g e
CLS USER GUIDE
Figure 3.1.2-1. Table Showing Auto-Answer Document with Source and Export Status
Access auto-answered documents in the same manner as documents created solely through the CLS UI.
Select the Document Identifier to begin working on an auto-answered document. When an auto-answered
document that has not yet been opened through the CLS UI is selected, the Auto-Answer Document
Creation Question Summary window displays, as shown in Figure 3.1.2-2. Click Auto-Answer
Document Creation Question Summary to acknowledge the summary before continuing work on the
document.
Figure 3.1.2-2. Auto-Answer Document Creation Summary Window
After acknowledging the document creation question summary, the Auto-Answer Document Creation

35 | P a g e
CLS USER GUIDE
Question Summary window closes. To open a document, select the document from the user’s document
list. Questions for which an answer has been provided through Auto-Answer show a document icon to the
immediate left of Update in the Questions Summary view as shown in Figure 3.1.2-3. Answer any
questions that have not already been answered through Auto-Answer. In the Questions and Answers
Summary shown in Figure 3.1.2-3, this designates an answer was provided by Auto-Answer, with a pop-
up message providing the source.
Figure 3.1.2-3. Auto-Answer-provided Questions and Answers Window
When work is completed on an auto-answered document, the clauses can be exported in xml format for
retrieval through the Auto-Answer web service. Selecting Export Clauses on the Clauses Summary view
allows you to save the clause for Auto-Retrieval through the Auto-Answer web service or choose to save a
local copy of the clause in any of the other available formats shown in Figure 3.1.21-4. Auto-answered
documents that are ready to have clauses retrieved show “Clauses Exported” in the Clauses Exported
column of the user’s document list as shown in Figure 3.1.2-1
Figure 3.1.2-4 shows the Select the format for exported clauses window for the identified document.
The document is available for auto-retrieval. To save the document locally, choose one of the listed
formats: Word (.docx), PDF (.pdf), Excel (.xlsx), or XML (.xml). The UI-exported clauses always include
the XML format that is saved into the database for Auto-Answer to retrieve.

36 | P a g e
CLS USER GUIDE
Figure 3.1.2-4. Format of Exported Clauses Window
3.2 Questions Tab
In the Contract Writing System’s requested return XML, the Request Number is the Document ID (PIID). The Request Number is not returned.

37 | P a g e
CLS USER GUIDE
The Questions tab is shown in Figure 3.2-1.
Figure 3.2-1. CLS Page, Questions Tab

38
CLS USER GUIDE
The left-hand column lists the following question sections:
Basic Information – these questions may include period of performance; locations; whether options are applicable; type of contract; requiring activity
Business Type – questions to determine small business selection/classes Supplies – Note: If only Supplies is selected during document creation, Services does not
appear in the Questions tab.
Services– Note: If only Services is selected during document creation, Supplies does not
appear in the Questions tab.
Labor Performance Requirements Contract Type – Firm Fix, Cost, Incentives, or Fees Funding – questions regarding incremental funding, liquidated funds, fund sources, payment type,
advance payments Pricing Shipping and F.O.B – questions regarding shipping, transportation, delivery locations Inspection and Acceptance – questions regarding who is responsible for inspection/acceptance,
location of inspection/acceptance, warranties Waivers Exemptions Exceptions – questions regarding whether there are any applicable waivers Patent Clauses
The checkbox located to the left of the section name provides an indicator of whether a section has been
completed and/or validated. A thin black checkmark ) is displayed when the section is completed, and
a green checkmark ) indicating the section passed validation or a red X ) indicating that the section
failed validation is displayed after the session has been validated. When a document validates with
warnings, an orange checkmark ) indicates the section or question has a warning.
Warnings that are applicable to the entire document, or warnings that cannot be mapped to a specific
question are displayed at the top of the Basic section as shown in Figure 3.2-2.
If you receive a red “X” please return to that section to ensure all questions are answered completely. If
this does not correct the error, please contact the helpdesk and include a screenshot of the error.

39
CLS USER GUIDE
Figure 3.2-2. Document Validation Warning
Warnings that can be mapped to a specific question are displayed above the question as shown in Figure
3.2-3.
Figure 3.2-3. Document Validation Warning for Specific Question

40
CLS USER GUIDE
Click the section name to open the associated questions. The questions are presented dynamically based
upon the user-supplied answers. Follow-on questions are displayed only after the user has supplied the
associated baseline answer. The prescription number is available to be viewed below each possible
answer by toggling View Prescriptions.
The Clause Cart is located on the right-side of the page. The cart is populated after the session is
validated, as noted in the red box shown in Figure 3.2-1.
The questions are located in the center of the page, with the associated prescription numbers listed under
the questions. Instructions are provided below each question to direct how the question is to be answered
– e.g., Select one or more, Select only one, enter a value. Use the scroll bar to move up and down on the
list of questions.
Click Back or Next to move between the question pages. Note: Back is limited to going back one
question, i.e., from the currently displayed unanswered question to the previously answered question.
Once the previously answered question is displayed, any selected answers are no longer selected, and
Back is disabled on that page. A pop-up window is displayed over the disabled Back button as shown in
Figure 3.2-4.
Figure 3.2-4. Pop-up Window for Disabled Back Button
Select a Prescription Number to open a pop-up window displaying its full text, as shown in Figure 3.2-5.
The prescription paragraph is listed for referential purposes, but the entire prescription shows the
paragraph within the context of the entire prescription. Click Close to exit the window.
Figure 3.2-5. Prescription Pop-up Window

41
CLS USER GUIDE
When all questions for a section have been answered, a notification is shown and a checkmark placed
beside the section name in the left-hand column, as shown in Figure 3.2-6.
Figure 3.2-6. CLS Page, Session Tab, Updated Clause Session in Progress
Table
Click Questions Summary to display a summary of the section’s questions and answers, as shown in Figure 3.2-7.
7. Click Clear Section to delete all previously answered questions from the section or Update to modify
the answers. Updating a branch question ) may require answering a new series of questions and may
delete previously answered questions. Updating a non-branching question ) does not affect other
answers. Click Answer ) to complete an unanswered question.
Figure 3.2-7. Question Summary Page (Partial view)

42
CLS USER GUIDE
If a question is unanswered and Next is selected, a pop-up window appears (Figure 3.2-8) as a
reminder to provide an answer. Click Ok and complete the answer.
Figure 3.2-8. Provide an Answer Pop-up Window
Click Save Session to save the questions and responses from the session, a pop-up window appears
(Figure 3.2-9) as a confirmation the session was saved. Click Close to acknowledge the session was
saved.
Figure 3.2-9. Session Saved Pop-up Window
Click Validate Session. The Warning dialog shown in Figure 3.2-10 displays: “WARNING: Re-
validating this session will delete all manually added clauses and fill-in text!” If the Contract Specialist
selects Cancel, then the session validation is not performed: the warning dialog closes, and the user is
presented with the view shown prior to selecting Validate Session. If the Contract Specialist selects Ok,
then the session validation is performed.
Figure 3.2-10. Validate Session Warning

43
CLS USER GUIDE
The Validate Session pop-up window appears while CLS connects to the CLS Business Rules Engine
to validate the session, as shown in Figure 3.2-11. Document validation removes all manually added
clauses.
Figure 3.2-11. Validate Session Pop-up Window
If the CLS API Server (clause repository) cannot be reached, a pop-up window appears, as shown in Figure
3.2-12.
Figure 3.2-12. Clause Logic Service Server Unreachable Pop-up Window
When validating a session, an error message may display that applies to an incorrect answer for a
question, as shown in Figure 3.2-13.
Figure 3.2-13. Example of an Error Message for an Incorrect Answer to a Question
Correct the answer to complete the session’s validation. If additional information is needed in order to
resolve an error, use the Help Desk link to contact customer support.

44
CLS USER GUIDE
After validation, the Question tab displays green checkmarks and a populated Clause Cart, as shown
in Figure 3.2-14. The Clause Cart displays the applicable clause numbers, titles, and effective dates.
The clauses can be sorted by clicking the applicable column heading.
Figure 3.2-14. Questions Tab with Summary and Populated Clause Cart
When a session is validated, the user is asked about saving the response XML received from the validation.
Click Save Request and a pop-up window appears as shown in Figure 3.2-15. Select Open, Save, or
Cancel. Click the down arrow to select Save, Save As, or Save and Open.
Figure 3.2-15. Save Request Pop-up Windows
If Save is selected, a pop-up window may appear to Open, Open folder, or View downloads, as shown
in Figure 3.2-16.
Figure 3.2-16. Save Pop-up Windows

45
CLS USER GUIDE
3.3 Clauses Tab
The Clauses tab displays a complete set of clauses after all questions in all applicable sections
have been answered and the session has been validated. Figure 3.3-1 displays the Clauses tab.
Figure 3.3-1. CLS Page, Clauses Tab (Partial view)
The Clauses tab contains the following data element types. Click an element title in the table heading to
sort the displayed clause data elements.
Number – Clause number Title – Complete clause title Alternate – Yes or No (identifies whether the clause noted is an Alternate) Deviation – Yes or No (identifies whether the clause noted is a Deviation) Effective Date – Month and year in which the clause is effective
Fill-in – Click to open the clause’s window. Figures 3.3-2 shows the three types of fill-
ins: text, checkbox, and table.

46
CLS USER GUIDE
Text Checkbox Table
Figure 3.3-2. Clause Fill-in Pop-up Windows
Click Ok and the Fill-In column icon becomes to denote that a fill-in clause has been
viewed and filled in.
By REF Indicator – Yes or No (indicates if a clause is designated as Include By Reference) Full Text – Yes or No (indicates if a clause is designated as Include By Full Text) Prescription # – the Prescription number associated with the clause (hyperlink). Click the number
to view a pop-up containing the Prescription text
Uniform Contract Format (UCF) Section Provision or Clause – P for Provision or C for Clause Clause Status – Elective or Required Decision
When the Clauses tab is selected, a new warning dialog displays stating: “WARNING: Re-validating
this session will delete all manually added clauses and fill-in text!” This warning is shown in Figure 3.2-
10.
To delete an Elective Clause from the list, click Elective in the Clause Status column for the Clause
Number to be deleted. Figure 3.3-3 shows Delete Elective Clause pop-up window. Click Delete to
delete an elective clause or Cancel to return to the Clauses tab.

47
CLS USER GUIDE
Figure 3.3-3. Delete Elective Clause Pop-up Window
The Review Deleted Clauses capability is enabled after clauses have been deleted. Click Review Deleted
Clauses to view the clauses that have been deleted. Figure 3.3-4 shows the Review Deleted Clauses
window. Click Undelete in the Clause Status column for the Clause Number to be restored. Click Close
to return to the Clauses tab.
Figure 3.3-4. Review Deleted Clauses Window

48
CLS USER GUIDE
Click Export Clauses to archive the document to Document History. If the document contains
incomplete fill-in provisions or clauses an Incomplete Fill-Ins pop-up window appears (as shown in
Figure 3.3-5) warning that the exported data contains blanks.
Figure 3.3-5. Export Clauses Pop-up Window
Select the format of the exported clauses for the document (i.e., Word [.docx], PDF [.pdf], Excel
[.xlsx], XML [.xml]), as shown in Figure 3.3-6.
Figure 3.3-6. Export Clauses Format Window
If the document is complete, an Export Clauses pop-up window displays, as shown in Figure 3.3-7.
Figure 3.3-7. Export Clauses Pop-up Window
Select Move to History to archive the document or Keep As Work in Progress.

49
CLS USER GUIDE
Figure 3.3-10. Pop-up Window to Open or Save an Exported
CLSExport File
The archived document is moved to the History tab of the Session tab, as shown in Figure 3.3-11.
Figure 3.3-11. History Tab with Archived Document
3.3.1 Manually Added Clauses
Clauses can be added manually in the Clauses tab. However, validating a session removes all manually
added clauses. Figure 3.3.1.-1 shows the hover on pop-up warning that appears over Validate Session.
Figure 3.3.1-1. Pop-up Warning about Removal of Manually Added Clauses at Session Validation
The Add Clauses capability is not available until the session has been validated. In Figure 3.3.1-2, the
hover on the pop-up indicates that Add Clauses is not available as the Pricing section of the document
has not been validated.
Figure 3.3.1-2. Pop-up for Unavailable Add Clauses Capability
The hover over the pop-up shown in Figure 3.3.1-3 provides the notice that all questions must be
answered and validated before adding manual clauses because session validation removes the
A complete and accurate set of recommended clauses will not be available until all questions in all applicable sections have been answered and the session has been validated.
Manually add clauses AFTER the session is validated. Otherwise the validation process will remove those clauses.

50
CLS USER GUIDE
manually added clauses. The manually added clauses are removed during session validation because
validating a session may impact which clauses are available to be manually added. Removing all
manually added clauses avoids the possibility of duplicate and conflicting clauses.
Figure 3.3.1-3. Pop-up stating Pre-requisites for Adding Manual Clauses
Select Add Clauses in the Clauses Summary window to view the Select Clauses dialog which allows
clauses to be manually added, shown in Figure 3.3.1-4. If a clause has already been provided through
session validation, and that clause does not have any variations, then that clause is not presented in the
clause selection table. If a base clause or any variations of a base clause have already been provided
through session validation but that clause contains additional variations, then the base clause number is
presented in the Select Clauses table. Add a clause or a variation of the clause by selecting the clause
number link. The checkboxes to the left of each clause number link are disabled because they are only
used to indicate which clauses or variations of clauses have already been selected.
Figure 3.3.1-4. Select Clauses Dialog Window
Figure 3.3.1-5 shows an example where the link for clause 52.219-9 has been selected. The Manual
Clause Selection dialog is presented, showing the base clause and all variations available for selection.
Select clauses by checking the checkboxes in the Select column.

51
CLS USER GUIDE
Figure 3.3.1-5. Example of Manual Clause Selection dialog for Clause 52.219-9
The example in Figure 3.3.1-6 shows the selection of two clause variations. Select Save to save the
clause selections and close the dialog. Select Add To Clause in the Select Clause dialog to add the
clauses to the document.
Figure 3.3.1-6. Selection of Two Clause Variations
Once a clause or variations have been saved from the Manual Clause Selection dialog, the Select
Clauses dialog is re-presented and shows which clauses were manually added by listing them in the
Manually Added Clauses textbox and by showing a checkmark next to the clause number link (see
Figure 3.3.1-7). In this example, the checkmark shows that base clause 52.219-9 or some variation of
52.219-9 has been selected, while the Manually Added Clauses textbox lists which of the specific
variations were selected.

52
CLS USER GUIDE
Figure 3.3.1-7. Select Clauses Dialog Showing Manually-Added Clauses
Selecting to add a clause that has no variations opens the Manual Clause Selection dialog showing only
the base clause. Figure 3.3.1-8 shows an example where selecting Save saves the selection of base
clause 52.219-11 and closes the dialog, but the clause is not added to the document. The clause is added
to the document when Add To Clause Set is selected on the Select Clauses dialog.
Figure 3.3.1-8. Manual Clause Selection Dialog Showing Only Base Clause
Figure 3.3.1-9 contains the Select Clauses table updated to show that clause 52.219-11 has been manually
added. Select Add To Clause Set to invoke a call to the Clause Logic Service API in order to retrieve the
clauses to add to the document.

53
CLS USER GUIDE
Figure 3.3.1-9. Select Clauses Table with Manually Updated Clause 52.219-11
Select Add To Clause Set. The dialog shown in Figure 3.3.1-10 is presented while the clauses are
retrieved from the Clause Logic Service API.
Figure 3.3.1-10. Dialog shown as Clauses are Retrieved from the Clause Logic Service API
After the manually added clauses have been returned from the Clause Logic Service API, the
clauses are presented in the Clause Summary View table. In Figure 3.3.1-11, the clauses have been
sorted on the Clause Status column so that the manually added clauses are at the top of the table.
Figure 3.3.1-11. Clause Summary View Table Showing Manually Added Tables
On the Select Clauses dialog, select Save Add Clauses Request to save the Clause Logic Service API
Request XML to the local machine, shown in Figure 3.3.1-12.

54
CLS USER GUIDE
Figure 3.3.1-12. Saving the Clause Logic Service API Request XML to Local Machine
After clauses have been manually added, select Add Clauses to open a clause link that has be previously
selected. The clauses that have already been selected are displayed as ghosted and are unable to be
selected in the table of variations, shown in Figure 3.3.1-14.
Figure 3.3.1-14. Display of Previously Selected Clause Link
Delete manual clauses through the same process as deleting optional clauses. Each clause to be deleted
must first be reviewed, as noted in this hover over the pop-up shown in Figure 3.3.1-15.
Figure 3.3.1-15. Pop-up for Reviewing Clause before Deleting.

55
CLS USER GUIDE
Select Manual in the Clause Status column of the Clause Summary view to open the Delete Manually
Added Clause dialog. This dialog allows a clause to be deleted from the document and the clause
summary table, as shown in Figure 3.3.1-16. This is similar to the dialog that opens when Optional
clauses are selected for deletion.
Figure 3.3.1-16. Delete Manually Added Clause Dialog
Deleted clauses are removed from the document and the clause summary table. To undelete clauses, select
Review Deleted Clauses, which is only selectable when clauses have been deleted, as shown in Figure
3.3.1-17.
Figure 3.3.1-17. Undeleting Clauses from the Document and the Clause Summary Table

56
CLS USER GUIDE
Select Deleted Clauses to open the Review Deleted Clauses dialog shown in Figure 3.3.1-18. To
undelete Manual and Optional clauses, select Undelete.
Figure 3.3.1-18. Undelete Manual and Optional Clauses in Review Deleted Clauses Dialog
3.4 Help Tab
Figure 3.4-1 displays the Help tab, which contains the Clause Logic Service User Interface User
Manual. The manual contains instructions and screenshots of the User Interface CLS functions.
Figure 3.4-1. CLS Page, Help Tab
NOTE: The manual in CLS (above) is for both functional and technical users.
This manual “CLS User Guide” is based on the function user.
3.4.1 Navigation Pane
The Navigation Pane, shown in Figure 3.4.1-1, is for future administrative functions to toggle
Question Numbering and setting Logging levels.

57
CLS USER GUIDE
Turning on Question Numbering displays Question IDs and Next Question IDs next to each question
and each answer in the Questions Summary, Answer Question, and Update Question views under the
Questions tab.
Figure 3.4.1-1. CLS Page, Help Tab, Navigation Pane

lviii
CLS USER GUIDE
4 Acronyms
The acronyms used in this document are defined below:
API Application Program Interface
CAC Common Access Card
CLS Clause Logic Service
CWS Contract Writing System
DAC Defense Acquisition Circular
DFAR Defense Federal Acquisition Regulation
DFARS Defense Federal Acquisition Regulation Supplement
DLA Defense Logistics Agency
DoD Department of Defense
DPC Defense Pricing & Contracting (fka Defense Procurement & Acquisition Policy)
FAC Federal Acquisition Circular
FAR Federal Acquisition Regulation
FARS Federal Acquisition Regulation Supplement
GEX Global Exchange Service
ID Identification
PGI Procedures, Guidance, and Information
PIID Procurement Instrument Identifier
Q&A Question and Answer
UCF Uniform Contract Format
UI User Interface
U.S. United States
XML Extensible Markup Language