cisco webex contact center management portal …...contact. inboundmaximum activecontacts themaximum...
TRANSCRIPT

Cisco Webex Contact Center Management Portal User GuideFirst Published: 2019-02-26
Americas HeadquartersCisco Systems, Inc.170 West Tasman DriveSan Jose, CA 95134-1706USAhttp://www.cisco.comTel: 408 526-4000
800 553-NETS (6387)Fax: 408 527-0883

© 2020 Cisco Systems, Inc. All rights reserved.
C O N T E N T S
Introduction to Cisco Webex Contact Center Management Portal 1C H A P T E R 1
Webex Contact Center Overview 1
About Sites, Teams, Entry Points, and Queues 2
Webex Contact Center Management Portal 2
Webex Contact Center Modules 3
About Time Zones 4
Getting Started 5C H A P T E R 2
Webex Contact Center Management Portal Prerequisites 5
Log in to the Webex Contact Center Management Portal 6
About Webex Contact Center Management Portal Components 6
About Dashboard Reports 8
Acknowledge Supervisory Alerts 9
About Broadcast Messages 10
Change User Interface Colors for Management Portal 10
Create a Custom Theme for Management Portal User Interface 10
View and Regenerate Your API Key 11
Access Audit Trail Reports 11
Access Release Notes 12
Provisioning 13C H A P T E R 3
Tenant Settings 13
General Settings 14
Provisioning 16
Settings 17
Module Permissions 21
Cisco Webex Contact Center Management Portal User Guideiii

Other Permissions 24
Entry Points and Queues 26
Create an Entry Point or an Outdial Entry Point 27
View the Details of an Entry Point or an Outdial Entry Point 29
Edit an Entry Point or an Outdial Entry Point 31
Copy an Entry Point or an Outdial Entry Point 34
Create a Queue or an Outdial Queue 36
View the Details of a Queue or an Outdial Queue 40
Edit a Queue or an Outdial Queue 43
Copy a Queue or an Outdial Queue 46
Deactivate an Entry Point or a Queue 50
Activate an Entry Point or a Queue 51
Sites 51
Create a Site 51
Block an Area Code 52
View the Details of a Site 53
Edit a Site 54
Deactivate a Site 55
Activating a Site 55
Teams 56
Create a Team 56
View the Details of a Team 58
Edit a Team 60
Deactivate a Team 62
Activate a Team 62
Users 62
View the Details of a User 63
Edit a User 64
Export Provisioned Items for a User 66
Revoke API Key for a User 67
Upload Agent Update Template 67
User Profiles 68
Manage a User Profile 68
General Settings 69
Cisco Webex Contact Center Management Portal User Guideiv
Contents

Module Settings 69
Access Rights 72
View the Details of a User Profile 73
Edit a User Profile 74
Deactivate a User Profile 74
Activate a User Profile 75
Copy a User Profile 75
Work Types 75
Create a Work Type 76
Edit a Work Type 76
Deactivate a Work Type 77
Activate a Work Type 77
Agent Profiles 78
Create an Agent Profile 78
General Information 79
Auxiliary Codes 79
Collaboration 81
Dial Plan 82
Agent DN Validation 84
Agent Viewable Statistics 84
Agent Thresholds 85
View the Details of an Agent Profile 86
Edit an Agent Profile 87
Copy an Agent Profile 87
Deactivate an Agent Profile 88
Activate an Agent Profile 88
Address Books 89
Create an Address Book 89
Edit an Address Book 90
Delete an Address Book 91
Outdial Automatic Number Identification (ANI) 91
Create an Outdial Automatic Number Identification (ANI) 91
Edit an Outdial Automatic Number Identification (ANI) 92
Delete an Outdial Automatic Number Identification (ANI) 93
Cisco Webex Contact Center Management Portal User Guidev
Contents

Dial Plans 93
Create a Dial Plan 94
Edit a Dial Plan 95
Delete a Dial Plan 96
Call-Associated Data Variables 96
Create a CAD Variable 97
Edit a CAD Variable 98
Multimedia Profiles 98
Create a Multimedia Profile 99
View the Details of a Multimedia Profile 100
Edit a Multimedia Profile 101
Deactivate a Multimedia Profile 102
Activate a Multimedia Profile 102
Skill Definitions 103
Skill Profiles 105
Threshold Rules 105
Manage Dial Numbers to Entry Point Mapping 109
Map a Dial Number to an Entry Point 109
Edit a Dial Number to Entry Point Mapping 110
Delete a Dial Number to Entry Point Mapping 110
Bulk Add or Remove Dial Number to Entry Point Mappings 111
Manage Entry Point or Queue Groups 111
Upload Agent Update Template 112
Download Agent Update Template 113
Reports for the Provisioned Items 113
Manage Reports for the Provisioned Items 115
Create Idle or Wrap-up Codes 115
Idle or Wrap-Up Codes 117
Edit Idle or Wrap-Up Codes 117
Delete Idle or Wrap-up Codes 118
Activate Idle or Wrap-up Codes 118
Contact Routing 119C H A P T E R 4
About Contact Routing 119
Cisco Webex Contact Center Management Portal User Guidevi
Contents

Basic Contact Routing 120
About Skills-Based Routing 120
About Queue Reshuffling 121
About Global Routing Strategies 121
About Queue Precedence 122
About Team Capacity Strategies 122
About Multimedia 122
About Web Callback 123
Working with Call Control Scripts 123
Creating a Call Control Script 124
Call Control Block Descriptions 125
Start Block 125
Play Block 126
Menu Block 126
Condition Block 127
Counter Block 128
Collect Digits Block 128
Set Variable Block 129
Fetch Variable Block 129
EP/Queue Block 130
Reset Counter Block 130
Callback Block 130
Queue Call Block 131
End Call Block 131
Copying or Modifying a Call Control Script 131
Uploading a Custom Control Script 132
Updating a Custom Control Script 132
Uploading and Updating a Custom Control Script Image File 133
Viewing and Exporting References to a Control Script 134
Uploading and Updating Resource Files 134
Uploading a Resource File 134
Playing or Downloading a .wav File 135
Updating a Resource File 135
Copying a Resource File 135
Cisco Webex Contact Center Management Portal User Guidevii
Contents

Exporting the References to a Media File 136
Creating a Predefined Email Template 136
Creating a Predefined Chat Response 137
Viewing, Creating, Modifying, and Deleting Routing Strategies 138
Viewing Routing Strategies for an Entry Point or Queue 138
Viewing Current Routing Strategies 140
Viewing Global Routing Strategies 141
Understanding Time Values in Routing Strategies 141
Create a Routing Strategy 142
Assigning Call Control Scripts and Parameters 151
Assigning Skill Requirements to Incoming Calls 153
Specifying Call Distribution Settings 154
About Team Types 154
Assigning Teams and Skill-Relaxation Settings to Groups 155
Editing a Group of Teams or Skill Relaxation Settings 157
Deleting a Group of Teams or Skill Relaxation Settings 157
Modifying a Routing Strategy 158
Deleting and Restoring Routing Strategies 158
Deleting a Non-Global Routing Strategy 159
Deleting a Global Routing Strategy 159
Restoring or Permanently Deleting a Routing Strategy 159
Restoring or Permanently Deleting a Global Routing Strategy 160
Scheduling Team Capacity 161
Viewing Scheduled Team Capacity Strategies 161
Creating or Modifying a Scheduled Team Capacity Strategy 162
Deleting a Scheduled Team Capacity Strategy 164
Specifying Queue Precedence 165
Audio on Hold 165
Call Monitoring 167C H A P T E R 5
Monitor Calls 167
Monitoring Overview 167
Monitoring Calls 168
Coaching an Agent 169
Cisco Webex Contact Center Management Portal User Guideviii
Contents

Barging in on a Call 170
Viewing Call Monitoring Information 170
Working with Monitoring Schedules 173
Creating or Editing a Monitoring Schedule 173
Activating and Deactivating Monitoring Schedules 174
Exporting the Monitoring Schedule List 175
Deleting a Monitoring Schedule 175
Call Recording 177C H A P T E R 6
Call Recording 177
Creating or Editing a Recording Schedule 178
Deleting a Recording Schedule 180
Recording Management 181C H A P T E R 7
Searching for and Playing Recordings 181
Assigning and Removing Tags 183
Search Attributes 183
Creating and Exporting Tags 183
Creating and Modifying Custom Attributes 184
Others Page 184
Viewing and Changing the Security Key Schedule 184
Viewing the Pruning Details 185
Troubleshooting 187C H A P T E R 8
Troubleshooting Management Portal Problems 187
Management Portal Problems 187
Reporting Management Portal Issues to Customer Support 189
Troubleshooting CJP Agent Desktop Problems 189
Network Interuptions 189
Agent Desktop Application Problems 189
Audio Problems 191
Reporting Agent Desktop Issues to Customer Support 191
Webex Contact Center Report Parameters 193C H A P T E R 9
Cisco Webex Contact Center Management Portal User Guideix
Contents

Call Report Parameters 193
Agent Report Parameters 208
Historical Skill Report Parameters 230
Historical Threshold Alerts Report Parameters 232
Usage Metrics Report Parameters 233
Cisco Webex Contact Center Management Portal User Guidex
Contents

C H A P T E R 1Introduction to Cisco Webex Contact CenterManagement Portal
• Webex Contact Center Overview, on page 1• About Sites, Teams, Entry Points, and Queues, on page 2• Webex Contact Center Management Portal, on page 2• Webex Contact Center Modules, on page 3• About Time Zones, on page 4
Webex Contact Center OverviewContact centers of multisourcing enterprises leverage a combination of sourcing solutions, including captive,outsourced, and offshore. The typical multisource contact-center environment is organizationally complex,consisting of sites located all over the world, and staffed by direct company employees and/or outsourcedagents.
In this environment, most locations operate independently and use disparate contact center technologies,including routing, administrative solutions, and reporting tools. This combination of tools and technologiesmakes both management and quality monitoring across different locations extremely challenging.
Cisco’s Webex Contact Center offers a unique solution that combines contact center and IP technologies ina global call management service. The Webex Contact Center solution is built on the Cisco Midpoint CallManagement ® technology — A centralized control point for managing and monitoring calls and contactsacross a heterogeneous contact center environment.
Offered as a cloud service, Webex Contact Center provides enterprises with full control over their globalcontact center queues and creates the appearance of a single, unified contact center environment. Calls, chats,and emails are distributed to the contact center sites where agents are available. When agents are occupied,contacts are queued centrally so they can be serviced by the next available agent irrespective of the physicallocation of the agent.
In the voice context, by queuing calls centrally, enterprises can offload the queuing function from theirpremises-based equipment, thus achieving substantial cost savings in telecom hardware, toll charges, andbandwidth use. More importantly, a call can be directed to the next available agent at any site. And becausethe endpoint of the call can be anywhere around the globe,Webex Contact Center seamlessly integrates remoteagents and at-home agents into the enterprise’s multisource contact center environment.
Cisco Webex Contact Center Management Portal User Guide1

About Sites, Teams, Entry Points, and QueuesAWebex Contact Center tenant is an enterprise that has contact centers at one or more sites. The enterprisealso has entry points for incoming contacts that are associated with queues. Incoming contacts can be toll-freenumbers for voice calls, designated email addresses for emails, or chats with agents. For example, an enterprisethat is named Acme might have an entry point that is named Welcome. Welcome classifies contacts intoAcmeBilling and distributes to teams of agents in Chicago, Manila, and Bangalore.
Each Webex Contact Center tenant profile consists of sites, teams, entry points, and queues.
• A site is a physical contact center location under the control of the enterprise or an outsourcer. Forexample, Acme might have sites in Chicago, Manila, and Bangalore.
• A team is a group of agents at a specific site who handle a particular type of contact. For example, Acmemight have teams at their Chicago site that are named Chi_Billing, Chi_Sales andChi_GoldCustomerService, and teams at their Bangalore site named Bgl_Billing,Bgl_GoldCustomerService, and Bgl_Experts. Agents can be assigned to more than one team, but anagent can service only one team at a time.
• An entry point is the initial landing place for the customer contacts on theWebex Contact Center system.For the voice contacts, typically one or more toll-free or dial numbers can be associated with an entrypoint. IVR call treatment is performed while a call is in the entry point.
• A queue is where active contacts are kept while they await handling by an agent. Contacts are movedfrom the entry point into a queue and are distributed to agents.
Tenants that use the outdial feature are also configured with at least one outdial entry point and one outdialqueue.
Telecom managers, contact center managers, and other representatives of the enterprise who are authorizedto access theWebex Contact Center service are provided with a view of contact center activity at their enterprisethrough the Webex Contact Center Management Portal.
In addition to sites, teams, entry points, and queues, the Provisioning module of the Webex Contact CenterManagement Portal provides an interface for adding agents and assigning them to teams. Each agent isconfigured with an agent profile—A value that is assigned to an agent to determine the agent’s permissionlevels and Agent Desktop behaviors, including which wrap-up and idle codes are available to the agent. Thus,you should add wrap-up and idle codes before defining agent profiles, and define agent profiles before definingagents. If your enterprise is provisioned with the optional skills-based routing feature, you should also addskills and skill profiles before defining teams and agents.
Webex Contact Center Management PortalTheWebex Contact CenterManagement Portal is accessed through a web browser. The Portal provides accessto Webex Contact Center modules that enable authorized users to view real-time and historical contact centerdata, silently monitor interactions directed to destination sites, create agent accounts and other contact centerresources, and control contact treatment and distribution by creating and editing scheduled contact routingstrategies and team capacity strategies.
In addition, the Webex Contact Center Management Portal landing page displays graphs of real-time andhistorical call activity and current agent status.
Cisco Webex Contact Center Management Portal User Guide2
Introduction to Cisco Webex Contact Center Management PortalAbout Sites, Teams, Entry Points, and Queues

Access to Webex Contact Center modules and functionality is restricted based on the user profiles assignedto users.
For information about accessing and working with theWebex Contact Center Management Portal, seeWebexContact Center Management Portal Prerequisites, on page 5 .
Webex Contact Center ModulesAfter signing in to the Management Portal, click the module on the navigation bar that you want to access. Ifthe navigation bar is collapsed, click the navigation button on the upper-left side of the Management Portallanding page to expand it. Each module is briefly described in the following table. If you can't see a modulein your interface, then either you don’t have the appropriate permission to access the module, or it’s an optionalmodule that your enterprise doesn’t have license to.
The modules that authorized users can access through the Webex Contact Center Management Portal aredescribed in the following table.
DescriptionModule
Enables authorized users to create, view, and edit the settings that are provisionedfor the enterprise. It provides access to Audit Trail, Agent Skill Report, ProvisionedItems Report, and Provisioned Skills Report.
Provisioning
Enables authorized users to segment, profile, and visualize the data in contact centersystems. It also helps to identify the key variables that impact productivity anddesired business outcomes. For more information, seeWebex Contact CenterAnalyzer User Guide.
Reporting andAnalytics
Enables authorized users of the Analyzer module to incorporate customer data intothe Webex Contact Center environment for custom routing.
Business Rules
Enables authorized users to access the interface for handling customer contacts.Agent Desktop
Provides a web-based user interface for managing and configuring contact handlingstrategies. Authorized users can create and schedule global routing and team capacitystrategies and alter them in real time in response to changes in business dynamics.For more information, see Contact Routing, on page 119.
Routing Strategy
Enables authorized users to silently monitor the quality of service being deliveredacross their multisource contact centers. The power of the Webex Contact Centerservice lies in the unique ability to monitor any call across any site. Through asimplified web interface, users can select the queue, team, site, or agent they wantto silently monitor. Authorized users can provide instructions to the monitored agentwithout being heard by the caller, and can join a call being monitored and participatein the conversation. For more information, see Monitor Calls, on page 167.
Call Monitoring
Optional module that enables authorized users to record calls.Call Recording
Optional module that enables authorized users to search for and play calls recordedthrough the Webex Contact Center Call Recording feature. For more information,see Recording Management, on page 181.
RecordingManagement
Cisco Webex Contact Center Management Portal User Guide3
Introduction to Cisco Webex Contact Center Management PortalWebex Contact Center Modules

DescriptionModule
Enables authorized users to view details about provisioning changes made for theirenterprise and export the data to a data analysis tool, such as Microsoft Excel. Formore information, see Access Audit Trail Reports, on page 11.
Audit Trail
Enables authorized users to view and download release notes. For details, see AccessRelease Notes, on page 12.
Release Notes
About Time ZonesAll dates and times displayed on the Webex Contact Center Management Portal and in the Webex ContactCenter modules reflect the time zone that is provisioned for the enterprise with the following exceptions:
• Dates and times displayed on the main pages of the Real-Time Reports and Call Monitoring modulesreflect the browser time.
• Time values in routing strategies are based on the time zone that is provisioned for the entry point orqueue. If no time zone is specified, the time zone is provisioned for the enterprise.
Dates are converted to UTC time when they are saved to the database, so the system behavior, such astime-of-day routing, is applied universally across the multi-site contact center network, regardless of whichtime zones the sites are located in. The system filters the historical reports based on the enterprise time zone.
To specify a different time zone for displaying the time values in routing strategies, see Understanding TimeValues in Routing Strategies, on page 141.
Cisco Webex Contact Center Management Portal User Guide4
Introduction to Cisco Webex Contact Center Management PortalAbout Time Zones

C H A P T E R 2Getting Started
• Webex Contact Center Management Portal Prerequisites, on page 5• Log in to the Webex Contact Center Management Portal, on page 6• About Webex Contact Center Management Portal Components, on page 6• About Dashboard Reports, on page 8• Acknowledge Supervisory Alerts, on page 9• About Broadcast Messages, on page 10• Change User Interface Colors for Management Portal , on page 10• Create a Custom Theme for Management Portal User Interface, on page 10• View and Regenerate Your API Key, on page 11• Access Audit Trail Reports, on page 11• Access Release Notes, on page 12
Webex Contact Center Management Portal PrerequisitesThe Webex Contact Center Management Portal requires the following setup:
• Microsoft Windows 10:
• Chrome V76.0.3809 and higher
• Firefox ESR 68 and higher
• Microsoft Edge V42.17134 and higher
• Mac OS X:
• Chrome V76.0.3809 and higher
• Firefox ESR 68 and higher
• Chromebook:
• Chromium v73 and higher
• Chrome V76.0.3809 and higher
Also, ensure the following browser options are configured:
Cisco Webex Contact Center Management Portal User Guide5

• Browser cache is cleared before deploying the current release of Agent Desktop for the first time.
• Cookies are enabled.
• Security level is set to Medium.
• Show Pictures option is enabled.
• Disable Pop-up Blocker is disabled.
• Javascript is enabled.
Log in to the Webex Contact Center Management PortalLogin to the Webex Contact Center Management Portal through a web browser using your login credentials.You can access the modules and functionalities that your administrator grants access to.
To log in to the Webex Contact Center Management Portal:
Procedure
Step 1 Open https://portal.cjp.cisco.com.Step 2 Enter your user name and password.
The password is case-sensitive.
Step 3 Click Sign In.
The Management Portal landing page appears. For more information, see About Webex Contact CenterManagement Portal Components, on page 6.
After you log out, close all Webex Contact Center windows before logging in again.Note
About Webex Contact Center Management Portal ComponentsThe Webex Contact Center Management Portal landing page has multiple components that you can accessbased on your authorization.
The following table describes the components of the Management Portal landing page:
Cisco Webex Contact Center Management Portal User Guide6
Getting StartedLog in to the Webex Contact Center Management Portal

DescriptionComponent
Displays the modules that you are authorized toaccess. For more information, see Webex ContactCenter Modules, on page 3
You can see either the name of the module or, if thenavigation bar is collapsed, an icon that representsthe module. Hover the mouse pointer over an icon todisplay the module name.
To expand or collapse the navigation bar, click thebutton on the upper-left side of the landing page.
Navigation bar
Displays the number of calls that are currently in IVR,in queue, connected, and the number of currentlyavailable agents.
The rest of this panel displays four charts. Three ofthem provide real-time statistics for the current callactivity, interval call activity, and site-level agentactivity. The fourth chart provides historical statistics.
You can click the icon at the top of a chart to displaythe corresponding report in the Reporting andAnalytics module window.
To change the size of a chart, point to a corner or edgeand when the mouse pointer changes to a two-headedarrow, drag the corner or edge to shrink or enlargethe chart.
To restore the original size of resized charts, clickReset Widgets.
Dashboard
Displays systemmessages. For more information, seeAbout Broadcast Messages, on page 10.
Messages button
Displays alerts from the agents. It is visible only ifyour enterprise subscribes to Supervisory Alerts. Formore information, see Acknowledge SupervisoryAlerts, on page 9.
Alerts button
Cisco Webex Contact Center Management Portal User Guide7
Getting StartedAbout Webex Contact Center Management Portal Components

DescriptionComponent
Expands and collapses a panel where you can do thefollowing:
• Select a different user interface skin. For moreinformation, see Change User Interface Colorsfor Management Portal , on page 10.
• Customize the user interface banner color andimages that are used on the Management Portalpages. For more information, see Create aCustom Theme for Management Portal UserInterface, on page 10.
• Change the time zone in which the time valuesin routing strategies are displayed. For moreinformation, see Understanding Time Values inRouting Strategies, on page 141.
• View and update the API key assigned to youruser account. For more information, seeViewand Regenerate Your API Key, on page 11.
Settings button
Displays the following options in a drop-down:
• Help: Opens the Management Portal online helpdocument in a separate window.
• Logout: Logs you out of the Management Portalafter closing all the open modules.
Your name button
About Dashboard ReportsThe Webex Contact Center Management Portal provides a Dashboard that displays reports that gives youinformation about the number of contacts that are handled, average handled time, average service level, andin queues. Contact Center Overview Dashboard displays the following reports:
• Average Service Level—Indicates the percentage of contacts that were handled within configured servicelevel for the queue.
• Total Contacts Handled—Indicates the number of contacts (voice, email, and chat) that got handled.
• Total Contacts Abandoned—Indicates the number of contacts (voice, email, and chat) that got abandoned.
• Average Handled Time—Indicates the average time of total contacts (voice, email, and chat) that gothandled.
• Longest Contact in Queue—Indicates the contact (voice, email, and chat) that had the longest queue waittime.
Cisco Webex Contact Center Management Portal User Guide8
Getting StartedAbout Dashboard Reports

• Contact Details in Queue—For real-time, shows the contact (voice, email, and chat) details that arecurrently in queue. For historical, shows the contact (voice, email, and chat) details broken down byqueue.
• You can customize the dashboard by using these filters, such as Queue Name, Channel Type, Interval,and Duration.
• For more information on each report, see the Type of Records Available in Each Repository section inCisco Webex Contact Center Analyzer User Guide.
Note
Acknowledge Supervisory AlertsAgents can use the Supervisory Alerts feature to send a midcall monitor request during a call to all logged-insupervisors. Supervisors who are authorized for midcall monitoring and supervisory alert can receive thealerts. Supervisors should also have access to the queue, site, and team of the requesting agent to respond tothe alerts. In addition, Permit Monitoring must be enabled for the queue of the requesting agent.
The Supervisory Alert feature is available only if your enterprise subscribes for the feature.Note
When an alert arrives, the Alerts button displays the number of unacknowledged alerts that are associatedwith the on-going calls. When a supervisor acknowleges the alert or the call that is associated with the alertends, the count automatically decreases.
To acknowledge an alert message from an agent:
Procedure
Step 1 Click Alerts in the Management Portal landing page.The Agent Supervisory Alerts dialog box opens.
Step 2 Click the agent message.The Call Monitoring module appears. For more information, see Monitor Calls, on page 167
Step 3 In the Management Portal Home page, in the Agent Supervisory Alerts window, click Acknowledge for themessage you want to acknowledge.
Step 4 In the Acknowledge dialog box, click OK.Step 5 In the Delete Acknowledge dialog box, click OK.
The Agent Supervisory Alerts window updates automatically in 30 seconds. To manually update the data,click Reload.
Cisco Webex Contact Center Management Portal User Guide9
Getting StartedAcknowledge Supervisory Alerts

About Broadcast MessagesTheWebex Contact Center Portal displays broadcast messages, that inform the users of the system unavailabilitydue to a scheduled system maintenance.
When a broadcast message arrives, theMessage button displays the number of messages that have not expired.
To read a message, click theMessage button to open the message window and then click a message to readit. Click the button again to close the window.
Change User Interface Colors for Management PortalYou can set of colors or skins in the selection panel and in the banner on the pages:
Procedure
Step 1 Click the gear icon beside your name in the upper-right corner in the Management Portal landing page.The settings panel appears.
Step 2 Click the tab displaying the wrench icon, and select a skin.The colors change immediately.
Step 3 To restore the default color set, click the reset icon at the bottom.
Create a Custom Theme for Management Portal User InterfaceYou can customize the banner color and images for theManagement Portal user interface by creating a customtheme. You should have proper authorization for customizing the user interface.
To create a custom theme:
Procedure
Step 1 Click the gears icon in the upper-right side of the Management Portal landing page.The settings panel appears.
Step 2 Click the Custom Theme settings tab.Step 3 In Banner Color, enter the HTML (hexadecimal) code for a color or click the small box on the right and
select a color.Step 4 (Optional) Click the folder button for each listed image type, navigate to the image file in your system that
you want to use and click Open. The supported file types are PNG, JPG, JPEG, and GIF.Step 5 Click Save.
The user interface is updated with the new theme.
Cisco Webex Contact Center Management Portal User Guide10
Getting StartedAbout Broadcast Messages

Click Reset to revert your changes.
View and Regenerate Your API KeyTo view or regenerate your API key:
Procedure
Step 1 Click the gears icon in the upper-right corner of the Management Portal landing page.The settings panel appears.
Step 2 Click the API Key Details tabs.The API key is displayed.
Step 3 To regenerate your API key, click the Regenerate Key button.
Access Audit Trail ReportsThe Audit Trail page provides an interface where you can view details about the provisioning module changesmade to your account in the last seven days. You can also download the details in a Microsoft Excel or anAdobe PDF file. You should be authorized to view the reports.
To display an audit trail report:
Procedure
Step 1 From the Management Portal navigation bar, select Audit Trail.The Audit Trail page appears.
Step 2 Select the filters:
DescriptionCall Status
Select the entity from the drop-down. Entities are theitems in the provisioning database tables.
Entity
Select the action performed on the selected entity,such as Create, Delete, and Update.
Action
Select a date range of seven days or less from thecalender controls.
Time Period
Step 3 Click Apply Filters.Step 4 (Optional) Click Download PDF or Download EXCEL to download the report.
Cisco Webex Contact Center Management Portal User Guide11
Getting StartedView and Regenerate Your API Key
Access Release NotesThe Release Notes module has documents that describe recent enhancements, bug fixes, and open issuesrelevant to Webex Contact Center. You should be authorized to access this module.
To access release notes:
Procedure
Step 1 From the Management Portal navigation bar, select Release Notes.
The Release Notes page appears.
Step 2 Click the required release note.
You can open, save, or download the file depending on which browser you are using and your browser settings.
Cisco Webex Contact Center Management Portal User Guide12
Getting StartedAccess Release Notes
C H A P T E R 3Provisioning
• Tenant Settings, on page 13• Entry Points and Queues, on page 26• Sites, on page 51• Teams, on page 56• Users, on page 62• User Profiles, on page 68• Work Types, on page 75• Agent Profiles, on page 78• Address Books, on page 89• Outdial Automatic Number Identification (ANI), on page 91• Dial Plans, on page 93• Call-Associated Data Variables, on page 96• Multimedia Profiles, on page 98• Skill Definitions, on page 103• Skill Profiles, on page 105• Threshold Rules, on page 105• Manage Dial Numbers to Entry Point Mapping, on page 109• Manage Entry Point or Queue Groups, on page 111• Upload Agent Update Template, on page 112• Download Agent Update Template, on page 113• Reports for the Provisioned Items, on page 113• Create Idle or Wrap-up Codes, on page 115
Tenant SettingsYou can use the Webex Contact Center Management Portal to configure the tenants that your administratorprovisions for your enterprise. To view the tenant settings provisioned for your enterprise, click your enterprisename under the Provisioning module in the navigation bar.
Click any of the following tenant settings to configure it:
• General Settings, on page 14
• Provisioning, on page 16
Cisco Webex Contact Center Management Portal User Guide13

• Settings, on page 17
• Module Permissions, on page 21
• Other Permissions, on page 24
General SettingsThe General Settings tab displays the following settings.
In the following table, the cross mark (X) at the Tenant column indicates the settings that the authorized usersof your enterprise specify. Similarly the X mark in the Partner column identifies the settings that the partneradministrator specifies. The X in the Webex Contact Center column identifies the settings that the WebexContact Center administrator specifies.
Webex ContactCenter
PartnerTenantDescriptionSetting
Tenant Details
XXXThe name of yourenterprise.
Name
XXX(Optional) Thedescription for yourenterprise.
Description
XXThe value touniquely identifyyour enterprise.
Login Domain
XXXThe time zone thatyou provision foryour enterprise. Formore information,see About TimeZones, on page 4.
Time Zone
XThe location of theXML configurationfile for yourenterprise
TenantConfiguration XMLURL
Cisco Webex Contact Center Management Portal User Guide14
ProvisioningGeneral Settings

Webex ContactCenter
PartnerTenantDescriptionSetting
XThe location of theaudio file that playswhile a call is in thequeue. The audiofilename is availablein the RoutingStrategy module.The systemconcatenates thefilename to the pathspecified in thisfield.
Note: If a tenant'sIVR Park URLchanges, you mustupdate all therelevant routingstrategies for thetenant with the newurl.
IVR Park URL
The status of thetenant. You cannotchange the status ofthe tenant.
Status
Address Details
XXXThe address of theprimary contact ofthe tenant.
Street
City
State
Country
Zip Code
Tenant Contact Details
XXXThe first name of thetenant administrator.
First Name
XXXThe last name of thetenant administrator.
Last Name
XXThe email address ofthe tenantadministrator.
Cisco Webex Contact Center Management Portal User Guide15
ProvisioningGeneral Settings

Webex ContactCenter
PartnerTenantDescriptionSetting
XXXThe work phonenumber of the tenantadministrator.
Work
XXXThe mobile phonenumber of the tenantadministrator.
Mobile
Currently we do notsupport this feature.
Watson AnalyticsDetails
You can also modify the settings by clicking Edit at the bottom of the page.
ProvisioningThe Provisioning tab displays the following settings. The partner administrator and theWebex Contact Centeradministrator specify these settings:
DescriptionSetting
System Profile
Allows the supervisors to manage the humanresources. Supervisors can proactively analyze andadjust for daily realities and make smarter decisionsto manage resources for optimizing service levels.
Workforce Options enable one or more of thefollowing Workforce Optimization options for yourenterprise:
• Quality Management
• Workforce Management
• WFO Analytics
• Workforce Analytics with Transcriptions
• Workforce Optimization Bundle
The availability of these features depends on yourlicense. Contact your organization administrator formore information.
Workforce Options
Cisco Webex Contact Center Management Portal User Guide16
ProvisioningProvisioning
DescriptionSetting
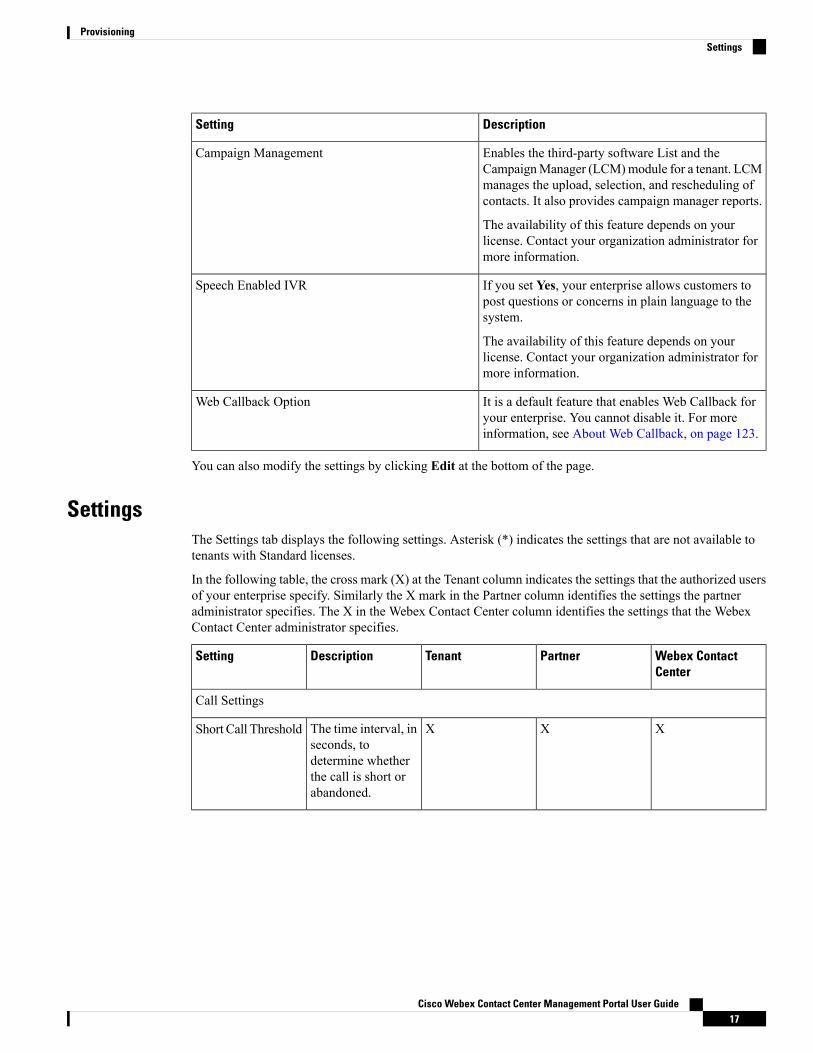
Enables the third-party software List and theCampaignManager (LCM)module for a tenant. LCMmanages the upload, selection, and rescheduling ofcontacts. It also provides campaign manager reports.
The availability of this feature depends on yourlicense. Contact your organization administrator formore information.
Campaign Management
If you set Yes, your enterprise allows customers topost questions or concerns in plain language to thesystem.
The availability of this feature depends on yourlicense. Contact your organization administrator formore information.
Speech Enabled IVR
It is a default feature that enables Web Callback foryour enterprise. You cannot disable it. For moreinformation, see About Web Callback, on page 123.
Web Callback Option
You can also modify the settings by clicking Edit at the bottom of the page.
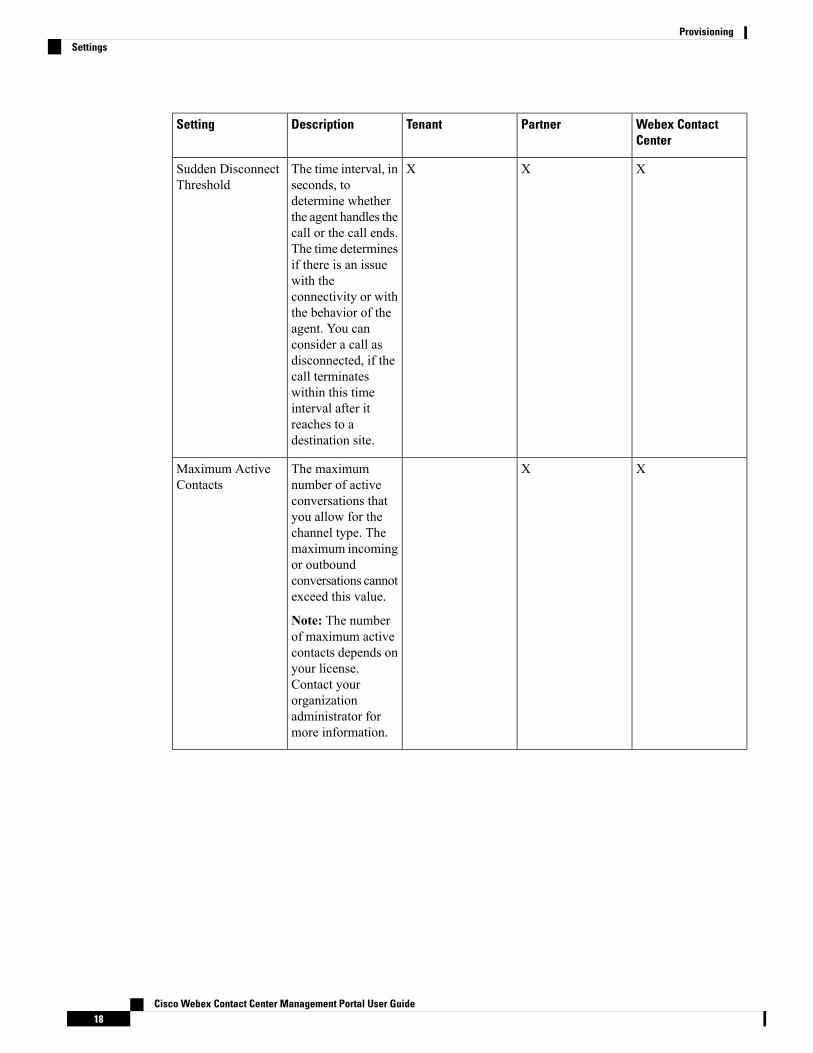
SettingsThe Settings tab displays the following settings. Asterisk (*) indicates the settings that are not available totenants with Standard licenses.
In the following table, the cross mark (X) at the Tenant column indicates the settings that the authorized usersof your enterprise specify. Similarly the X mark in the Partner column identifies the settings the partneradministrator specifies. The X in the Webex Contact Center column identifies the settings that the WebexContact Center administrator specifies.
Webex ContactCenter
PartnerTenantDescriptionSetting
Call Settings
XXXThe time interval, inseconds, todetermine whetherthe call is short orabandoned.
Short Call Threshold
Cisco Webex Contact Center Management Portal User Guide17
ProvisioningSettings
Webex ContactCenter
PartnerTenantDescriptionSetting
XXXThe time interval, inseconds, todetermine whetherthe agent handles thecall or the call ends.The time determinesif there is an issuewith theconnectivity or withthe behavior of theagent. You canconsider a call asdisconnected, if thecall terminateswithin this timeinterval after itreaches to adestination site.
Sudden DisconnectThreshold
XXThe maximumnumber of activeconversations thatyou allow for thechannel type. Themaximum incomingor outboundconversations cannotexceed this value.
Note: The numberof maximum activecontacts depends onyour license.Contact yourorganizationadministrator formore information.
Maximum ActiveContacts
Cisco Webex Contact Center Management Portal User Guide18
ProvisioningSettings
Webex ContactCenter
PartnerTenantDescriptionSetting
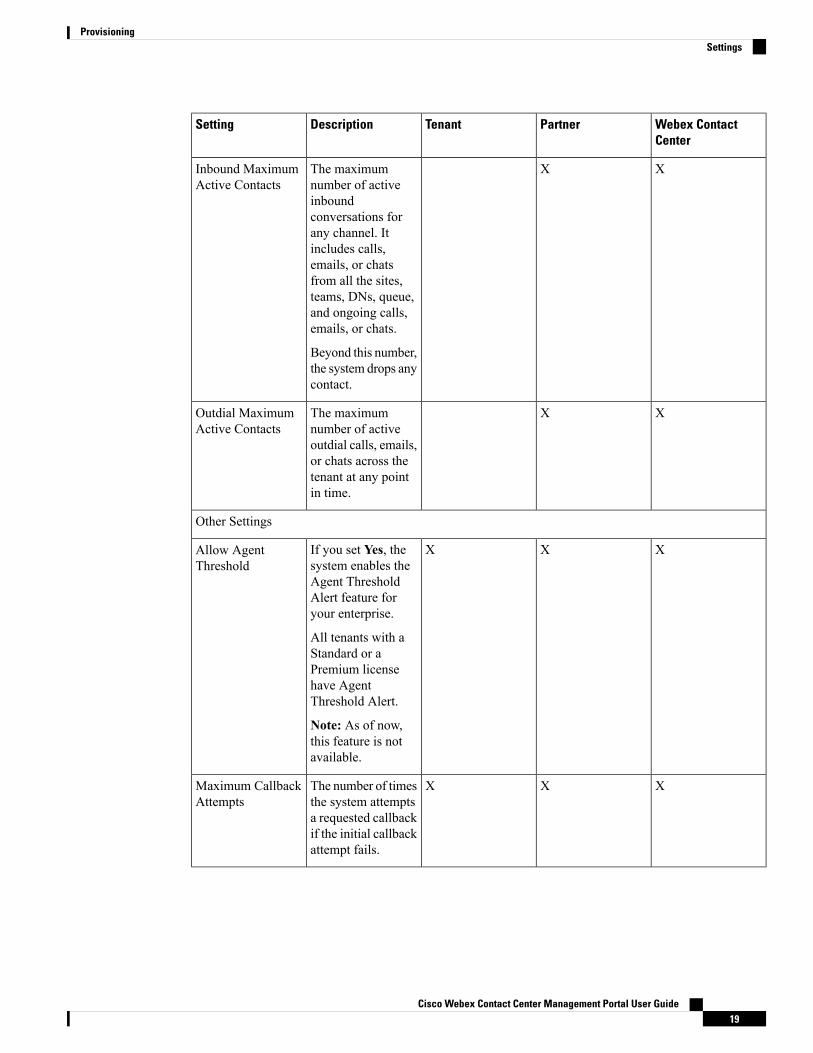
XXThe maximumnumber of activeinboundconversations forany channel. Itincludes calls,emails, or chatsfrom all the sites,teams, DNs, queue,and ongoing calls,emails, or chats.
Beyond this number,the system drops anycontact.
Inbound MaximumActive Contacts
XXThe maximumnumber of activeoutdial calls, emails,or chats across thetenant at any pointin time.
Outdial MaximumActive Contacts
Other Settings
XXXIf you set Yes, thesystem enables theAgent ThresholdAlert feature foryour enterprise.
All tenants with aStandard or aPremium licensehave AgentThreshold Alert.
Note: As of now,this feature is notavailable.
Allow AgentThreshold
XXXThe number of timesthe system attemptsa requested callbackif the initial callbackattempt fails.
Maximum CallbackAttempts
Cisco Webex Contact Center Management Portal User Guide19
ProvisioningSettings

Webex ContactCenter
PartnerTenantDescriptionSetting
XXXThe number ofseconds between thecallback attempts incase the initialcallback attemptfails.
Retry CallbackInterval
XXXIf you set Yes,agents can pause andresume recording acall. For example,the agent can pausea call recordingwhile obtainingsensitiveinformation from thecustomer, such ascredit cardinformation.
If you set No, youcan later enable thisfeature forindividual queues.
Note: You can usethis feature only ifyour administratorenables the PrivacyShield feature foryour enterprise. Formore information,contact youradministrator.
For moreinformation, seeCreate an EntryPoint or an OutdialEntry Point.
Pause/ResumeEnabled
XXXThis settingspecifies the time forwhich the systempauses the callrecording. After thetime has elapsed, thesystemautomatically startsrecording the call.
Recording PauseDuration
Cisco Webex Contact Center Management Portal User Guide20
ProvisioningSettings
Webex ContactCenter
PartnerTenantDescriptionSetting
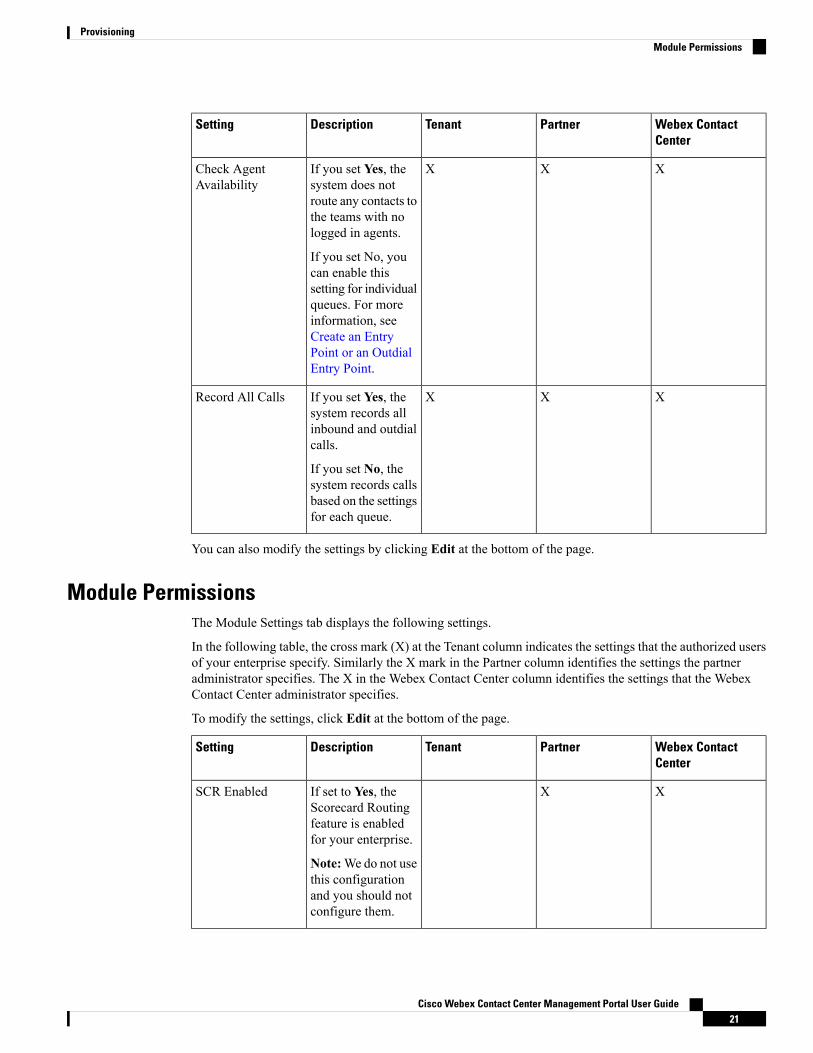
XXXIf you set Yes, thesystem does notroute any contacts tothe teams with nologged in agents.
If you set No, youcan enable thissetting for individualqueues. For moreinformation, seeCreate an EntryPoint or an OutdialEntry Point.
Check AgentAvailability
XXXIf you set Yes, thesystem records allinbound and outdialcalls.
If you set No, thesystem records callsbased on the settingsfor each queue.
Record All Calls
You can also modify the settings by clicking Edit at the bottom of the page.
Module PermissionsThe Module Settings tab displays the following settings.
In the following table, the cross mark (X) at the Tenant column indicates the settings that the authorized usersof your enterprise specify. Similarly the X mark in the Partner column identifies the settings the partneradministrator specifies. The X in the Webex Contact Center column identifies the settings that the WebexContact Center administrator specifies.
To modify the settings, click Edit at the bottom of the page.
Webex ContactCenter
PartnerTenantDescriptionSetting
XXIf set to Yes, theScorecard Routingfeature is enabledfor your enterprise.
Note:We do not usethis configurationand you should notconfigure them.
SCR Enabled
Cisco Webex Contact Center Management Portal User Guide21
ProvisioningModule Permissions

Webex ContactCenter
PartnerTenantDescriptionSetting
XXSet Yes to enablethe Skills-BasedRouting (SBR)feature for yourenterprise.
SBR Enabled
XXThe maximumnumber of skills thatyou can define foryour enterprise.
Maximum Skills
XXThe maximumnumber of text skillsthat you can definefor your enterprise.
Maximum TextSkills
Set Yes to enablethe Multimediafeature for yourenterprise. For moreinformation, seeAbout Multimedia,on page 122.
Multimedia Enabled
XXThe maximumnumber of channelsthat you can specifyfor a multimediaprofile. You can usethis feature, only ifyour administratorenables theMultimedia featurefor your enterprise.For moreinformation, seeMultimedia Profiles,on page 98.
MaximumChannelsPer Profile
Cisco Webex Contact Center Management Portal User Guide22
ProvisioningModule Permissions

Webex ContactCenter
PartnerTenantDescriptionSetting
XXSet Yes to enablethe Callback callcontrol block for callcontrol scripts. Formore information,see Callback Block,on page 130.
A Yes setting hereautomaticallyenables WebCallback Enabled.
Voice CallbackEnabled
XXSet Yes to enablethe Web Callbackfeature for yourenterprise.
Note:When youenable VoiceCallback Enabled,the systemautomaticallyenables WebCallback Enabled.You cannot disableit from here.
For moreinformation, seeAbout WebCallback, on page123.
Web CallbackEnabled
XXSet Yes to enablethe RecordingManagementmodule for yourenterprise.
RecordingManagementEnabled
XXXEnable theRecordingManagementmodule to specifythe recordingpruning strategy foryour enterprise.
Recording PruningStrategy
Cisco Webex Contact Center Management Portal User Guide23
ProvisioningModule Permissions

Webex ContactCenter
PartnerTenantDescriptionSetting
XXSpecify the value forthe selectedrecording pruningstrategy.
As of now onlyTime Based strategyis available. Thesystem calculatesthe Time Basedpruning strategy thatis based on yourAdditionalRecording Storagelicense.
For the Time Basedstrategy, define thenumber of days toretain therecordings. Thesystem deletes therecordings after thespecified number ofdays.
Pruning Value
XXSet Yes to enablethe Analytics andReports andBusiness Rulesmodules for yourenterprise.
Analytics Enabled
Other PermissionsThe Other Permissions tab displays the following settings.
In the following table, the cross mark (X) at the Tenant column indicates the settings that the authorized usersof your enterprise specify. Similarly the X mark in the Partner column identifies the settings the partneradministrator specifies. The X in the Webex Contact Center column identifies the settings that the WebexContact Center administrator specifies.
Cisco Webex Contact Center Management Portal User Guide24
ProvisioningOther Permissions

Webex ContactCenter
PartnerTenantDescriptionSetting
XXThe maximumnumber of activecall-associated data(CAD) variables thatyou can configure.For moreinformation, seeCall-AssociatedData Variables, onpage 96.
Number of CADVariables
XXThe maximumnumber of addressbooks that you canconfigure for yourenterprise. For moreinformation, seeCreate an AddressBook, on page 89.
Maximum AddressBooks
XXThe maximumnumber of entrypoints and queuesthat you canconfigure for yourenterprise.
Maximum EntryPoints and Queues
XXIf you set Yes, thesystem enables theSupervisory Alertfeature for yourenterprise. For moreinformation, seeAcknowledgeSupervisory Alerts,on page 9.
Currently, we do notsupport SupervisoryAlert.
Permit Alert
XXXIf you set Yes, thesystem routescontacts to thatagent in the queuewho is the last to login to Agent Desktop.
Last Agent Routing
Cisco Webex Contact Center Management Portal User Guide25
ProvisioningOther Permissions

Webex ContactCenter
PartnerTenantDescriptionSetting
XXXIf you set Yes, thesystem creates thefollowing files foreach recorded call:
• One with theaudio of boththe customerand the agent.
• One with theaudio of onlythe customer.
• One with theaudio of onlythe agent.
Currently, EnabledLeg Recording is acustom setting.
Enabled LegRecording
XXXIf you set Yes, thesystem associatesthe entry points andqueues with timezones.
If you do not specifyany time zone, thesystem provisions atime zone for yourenterprise.
Multiple Time ZoneEnabled
You can also modify the settings by clicking Edit at the bottom of the page.
Entry Points and QueuesEntry points and queues are types of virtual teams. A virtual team is a holding place for incoming customerrequests.
Use the Webex Contact Center Management portal to create entry points and queues. You can create entrypoints and queues depending on how the Webex Contact Center administrator has configured your profile.
Entry Points
An entry point is the initial landing place for customer chats, calls, or emails in the Webex Contact Centersystem. For the customer calls, you can associate one or more toll-free or dial numbers with a given entrypoint. The system uses IVR call treatment for a call while it is in the entry point.
Cisco Webex Contact Center Management Portal User Guide26
ProvisioningEntry Points and Queues
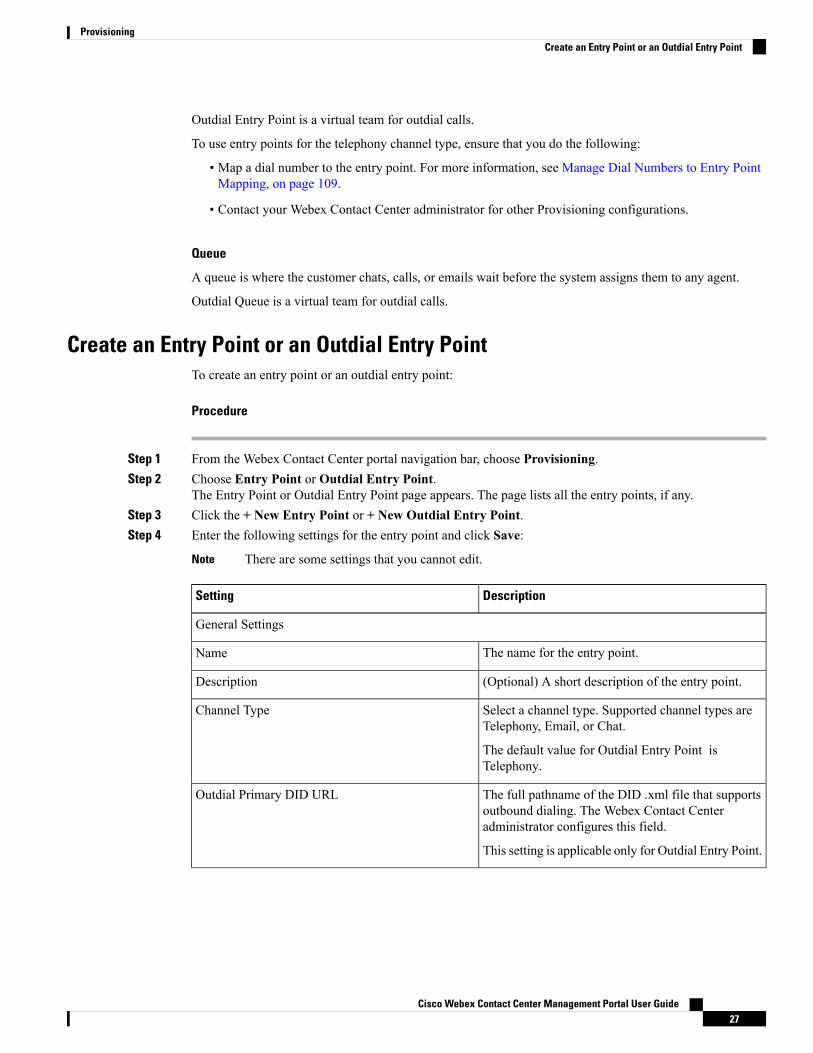
Outdial Entry Point is a virtual team for outdial calls.
To use entry points for the telephony channel type, ensure that you do the following:
• Map a dial number to the entry point. For more information, see Manage Dial Numbers to Entry PointMapping, on page 109.
• Contact your Webex Contact Center administrator for other Provisioning configurations.
Queue
A queue is where the customer chats, calls, or emails wait before the system assigns them to any agent.
Outdial Queue is a virtual team for outdial calls.
Create an Entry Point or an Outdial Entry PointTo create an entry point or an outdial entry point:
Procedure
Step 1 From the Webex Contact Center portal navigation bar, choose Provisioning.Step 2 Choose Entry Point or Outdial Entry Point.
The Entry Point or Outdial Entry Point page appears. The page lists all the entry points, if any.Step 3 Click the + New Entry Point or + New Outdial Entry Point.Step 4 Enter the following settings for the entry point and click Save:
There are some settings that you cannot edit.Note
DescriptionSetting
General Settings
The name for the entry point.Name
(Optional) A short description of the entry point.Description
Select a channel type. Supported channel types areTelephony, Email, or Chat.
The default value for Outdial Entry Point isTelephony.
Channel Type
The full pathname of the DID .xml file that supportsoutbound dialing. The Webex Contact Centeradministrator configures this field.
This setting is applicable only for Outdial Entry Point.
Outdial Primary DID URL
Cisco Webex Contact Center Management Portal User Guide27
ProvisioningCreate an Entry Point or an Outdial Entry Point

DescriptionSetting
The full pathname of the backup DID .xml file. TheWebex Contact Center administrator configures thisfield.
This setting is applicable only for Outdial Entry Point.
Outdial Backup DID URL
Advanced Settings
Enter the time that a customer request can be in aqueue before the system flags it as outside the servicelevel. If the agent completes a customer servicerequest within this time interval, the system considersit within the service level.
Service Level Threshold
Enter the maximum number of simultaneous calls thatyou allow for this entry point. The system busies outany call that are beyond this number.
This setting is available for the Telephony channeltype.
Maximum Active Calls
Enter the maximum number of simultaneous chatsthat you allow for this entry point.
This setting is available for the Chat channel type.
Maximum Active Chats
Enter the maximum number of simultaneous emailsthat you allow for this entry point.
This setting is available for the Email channel type.
Maximum Active Emails
The system automatically populates this field withthe URL for this entry point or the default controlscript of the queue. It happens when you do notconfigure the control script using the Webex ContactCenter Routing Strategy module.
This setting is available for the Telephony channeltype.
Control Script URL
Currently we do not support this setting.IVR Requeue URL
Enter the destination phone number to which thesystem diverts the customer calls when they exceedthe Maximum Time in Queue that you have set in therouting strategy.
This setting is applicable only for the Telephonychannel type.
Overflow Number
Enter the unique alphanumeric string that maps thisentry point to the vendor.
Currently we do not support this setting.
Vendor ID
Cisco Webex Contact Center Management Portal User Guide28
ProvisioningCreate an Entry Point or an Outdial Entry Point

DescriptionSetting
(Optional) If your organization administrator enablesMultiple Time Zone for your enterprise, you can selectthe time zone of the entry point. Any routing strategyfor this entry point uses the time zone that you selecthere.
Time Zone (Routing Strategies Only)
DN List
Enter the DN pool list numbers if you want tointegrate this entry point with an external IVR.
This setting is available for the Telephony channeltype.
IVR DN List
The setting is for Scorecard Routing.
This setting is applicable for the Telephony channeltype in Entry Point .
Currently we do not support this setting.
Scorecard Routing Settings
View the Details of an Entry Point or an Outdial Entry PointTo view an entry point or an outdial entry point:
Procedure
Step 1 From the Webex Contact Center portal navigation bar, choose Provisioning.Step 2 Choose Entry Point or Outdial Entry Point.
The Entry Point or Outdial Entry Point page appears. The page lists all the entry points, if any.Step 3 Click the ellipsis icon beside an entry point and click View. You can view the following details:
DescriptionSetting
General Settings
The name for the entry point.Name
The short description of the entry point.Description
The type of settings, such as entry points, queues,outdial entry points, or outdial queues.
Type
The channel type. Supported channel types areTelephony, Email, or Chat.
For outdial entry points, by default, the channel typeis Telephony.
Channel Type
Cisco Webex Contact Center Management Portal User Guide29
ProvisioningView the Details of an Entry Point or an Outdial Entry Point

DescriptionSetting
The full pathname of the DID .xml file that supportsoutbound dialing.
This setting is applicable only for Outdial Entry Point.
Outdial Primary DID URL
The full pathname of the backup DID .xml file.
This setting is applicable only for Outdial Entry Point.
Outdial Backup DID URL
Advanced Settings
The time that a customer request can be in a queuebefore the system flags it as outside the service level.If the agent completes a customer service requestwithin this time interval, the system considers it withinthe service level.
Service Level Threshold
The maximum number of simultaneous calls that youallow for this entry point. The system busies out anycall that are beyond this number.
This setting is available for the Telephony channeltype.
Maximum Active Calls
Themaximum number of simultaneous chats that youallow for this entry point.
This setting is available for the Chat channel type.
Maximum Active Chats
The maximum number of simultaneous emails thatyou allow for this entry point.
This setting is available for the Email channel type.
Maximum Active Emails
The URL of the entry point or the default controlscript of the queue. The system automaticallypopulates the URL when you do not configure thecontrol script using the routing strategy module.
This setting is available only for the Telephonychannel type.
Control Script URL
Currently we do not support this setting.IVR Requeue URL
Enter the destination phone number to which thesystem distributes the customer calls when theyexceed the Maximum Time in Queue that you haveset in the routing strategy.
This setting is applicable only for the Telephonychannel type.
Overflow Number
Cisco Webex Contact Center Management Portal User Guide30
ProvisioningView the Details of an Entry Point or an Outdial Entry Point

DescriptionSetting
Enter the unique alphanumeric string that maps thisentry point to the vendor.
Currently we do not support this setting.
Vendor ID
(Optional) If you enableMultiple Time Zone for yourenterprise, you can select the time zone of the entrypoint. Any routing strategy for this entry point usesthe time zone that you select here.
Time Zone (Routing Strategies Only)
The map group of the entry point.
This setting is applicable only for Chat and Telephonychannel types in Entry Point.
Map Group
The billing group of the entry point.
This setting is applicable only for Chat and Telephonychannel types in Entry Point.
Billing Group
Chat Template
The template that you associate with this entry point.You can edit it from Cisco Webex Control Hub.
This setting is applicable for the Chat channel type.
Assigned Chat Template
Associated Queues
The queue that you associate with this entry point.Associated Queues
DN List
Enter the DN pool list numbers if you want tointegrate this entry point with an external IVR.
This setting is available for the Telephony channeltype.
IVR DN List
The setting is for Scorecard Routing.
This setting is applicable for the Telephony channeltype in Entry Point .
Currently we do not support this setting.
Scorecard Routing Settings
Edit an Entry Point or an Outdial Entry PointTo edit an entry point and an outdial entry point:
Cisco Webex Contact Center Management Portal User Guide31
ProvisioningEdit an Entry Point or an Outdial Entry Point

Procedure
Step 1 From theWebex Contact Center Portal navigation bar, selectProvisioning and then clickEntry Points/Queues.Step 2 Select Entry Point or Outdial Entry Point.
The Entry Point page appears. The page lists all the entry points, if any.Step 3 Click the ellipsis icon to the left of an entry point and click Edit.
The entry point or outdial entry point page appears.Step 4 You can edit the following fields:
DescriptionSetting
General Settings
The name for the entry point.Name
(Optional) A short description of the entry point.Description
The status of the entry point.Status
Advanced Settings
Enter the time that a customer request can be in aqueue before the system flags its as outside the servicelevel. If you complete the customer service requestwithin this time interval, the system considers it to bewithin the service level threshold.
Service Level Threshold
Enter the maximum number of simultaneous callsallowed for this entry point. The system busies outany call that are beyond this number.
This setting is available for the Telephony channeltype.
Maximum Active Calls
Enter the maximum number of simultaneous chatsallowed for this entry point.
This setting is available for the Chat channel type.
Maximum Active Chats
Enter the maximum number of simultaneous emailsallowed for this entry point.
This setting is available for the Email channel type.
Maximum Active Emails
The system automatically populates this field withthe URL for this entry point or the default controlscript of the queue. It happens when you do notconfigure the control script using the Webex ContactCenter Routing Strategy module.
This setting is available for the Telephony channeltype.
Control Script URL
Currently, we do not support this setting.IVR Requeue URL
Cisco Webex Contact Center Management Portal User Guide32
ProvisioningEdit an Entry Point or an Outdial Entry Point

DescriptionSetting
Enter the destination phone number to which thesystem distributes customer calls when they exceedthe Maximum Time in Queue that you have set in therouting strategy.
This setting is available for the Telephony channeltype.
Overflow Number
Enter the unique alphanumeric string that maps thisentry point to the vendor.
Currently, we do not support this setting.
Vendor ID
(Optional) The time zone for the entry point. Thisfeature is available if your administrator enablesMultiple Time Zone feature for your enterprise. Therouting strategy for this entry point uses the time zonethat you set here.
Time Zone (Routing Strategies Only)
DN List
Enter the DN pool list numbers if you want tointegrate this entry point with an external IVR.
This setting is available for the Telephony channeltype.
IVR DN List
The DNs that you map to the entry point. Click thebutton to display the list of the mapped DNs and selecta different DN to map to the entry point.
For more information to map a DN, see Manage DialNumbers to Entry Point Mapping, on page 109.
This setting is available for the Telephony channeltype.
DN
TheMap Group to which you have mapped this entrypoint.
For more information, see Manage Entry Point orQueue Groups, on page 111.
Map Group
The Billing Group to which you have mapped thisentry point.
For more information, see Manage Entry Point orQueue Groups, on page 111.
Billing Group
The chat template that you map to this entry point.
This setting is available for the Chat channel type inEntry Point.
Assigned Chat Template
Cisco Webex Contact Center Management Portal User Guide33
ProvisioningEdit an Entry Point or an Outdial Entry Point
DescriptionSetting
This read-only section displays the names of allqueues that are associated with the entry point in arouting strategy.
Associated Queues
The setting for Scorecard Routing.
This setting is available for the Telephony channeltype in Entry Point.
Currently, we do not support this setting.
Scorecard Routing Settings
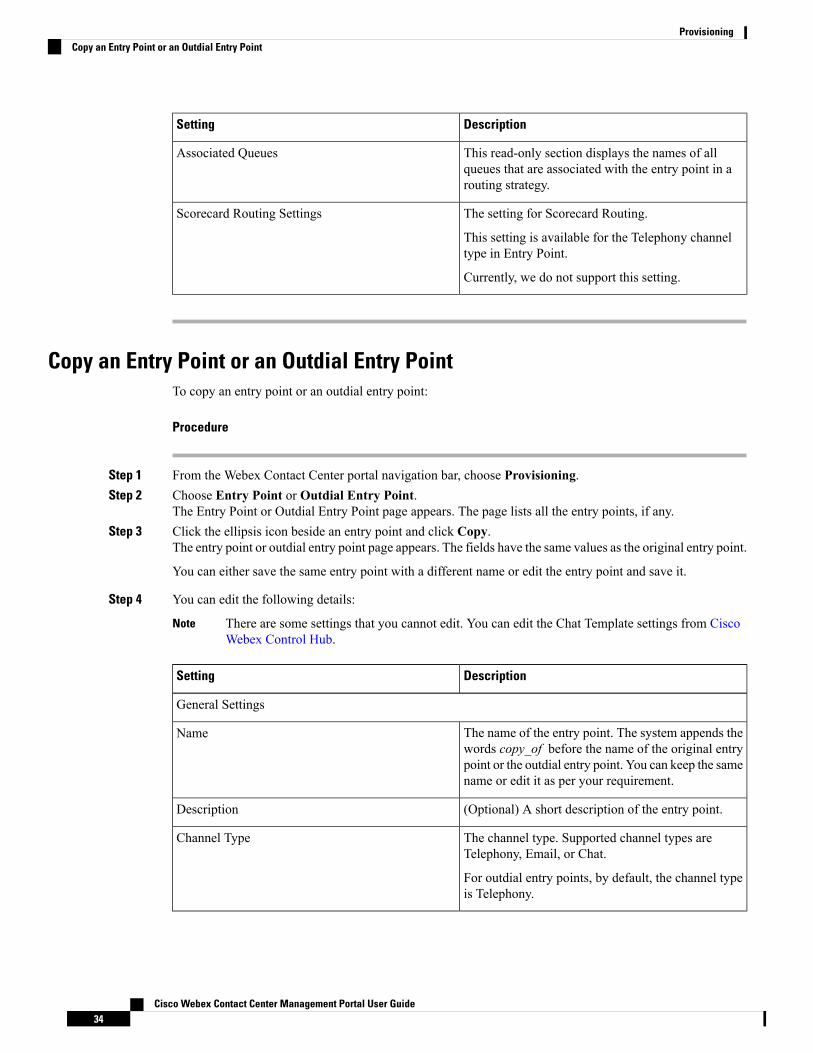
Copy an Entry Point or an Outdial Entry PointTo copy an entry point or an outdial entry point:
Procedure
Step 1 From the Webex Contact Center portal navigation bar, choose Provisioning.Step 2 Choose Entry Point or Outdial Entry Point.
The Entry Point or Outdial Entry Point page appears. The page lists all the entry points, if any.Step 3 Click the ellipsis icon beside an entry point and click Copy.
The entry point or outdial entry point page appears. The fields have the same values as the original entry point.
You can either save the same entry point with a different name or edit the entry point and save it.
Step 4 You can edit the following details:
There are some settings that you cannot edit. You can edit the Chat Template settings from CiscoWebex Control Hub.
Note
DescriptionSetting
General Settings
The name of the entry point. The system appends thewords copy_of before the name of the original entrypoint or the outdial entry point. You can keep the samename or edit it as per your requirement.
Name
(Optional) A short description of the entry point.Description
The channel type. Supported channel types areTelephony, Email, or Chat.
For outdial entry points, by default, the channel typeis Telephony.
Channel Type
Cisco Webex Contact Center Management Portal User Guide34
ProvisioningCopy an Entry Point or an Outdial Entry Point

DescriptionSetting
The full pathname of the DID .xml file that supportsoutbound dialing.
This setting is applicable only for Outdial Entry Point.
Outdial Primary DID URL
The full pathname of the backup DID .xml file.
This setting is applicable only for Outdial Entry Point.
Outdial Backup DID URL
Advanced Settings
The time that a customer request can be in a queuebefore the system flags it as outside the service level.If the agent completes a customer service requestwithin this time interval, the system considers it withinthe service level.
Service Level Threshold
The maximum number of simultaneous calls that youallow for this entry point. The system busies out anycall that are beyond this number.
This setting is available only for the Telephonychannel type.
Maximum Active Calls
Themaximum number of simultaneous chats that youallow for this entry point.
This setting is available only for the Chat channeltype.
Maximum Active Chats
The maximum number of simultaneous emails thatyou allow for this entry point.
This setting is available only for the Email channeltype.
Maximum Active Emails
The URL of the queue or the default control script ofthe queue. The system automatically populates theURL when you do not configure the control scriptusing the routing strategy module.
This setting is available for the Telephony channeltype.
Control Script URL
Currently we do not support this setting.IVR Requeue URL
The phone number to which the system diverts thecustomer calls when they exceed theMaximum Timein Queue setting for the routing strategy for this entrypoint.
This setting is applicable only for the Telephonychannel type.
Overflow Number
Cisco Webex Contact Center Management Portal User Guide35
ProvisioningCopy an Entry Point or an Outdial Entry Point

DescriptionSetting
The unique alphanumeric string that maps this entrypoint to the vendor.
Currently we do not support this setting.
Vendor ID
(Optional) If your organization administrator enablesMultiple Time Zone for your enterprise, you can selectthe time zone of the entry point. Any routing strategyfor this entry point uses the time zone that you selecthere.
Time Zone (Routing Strategies Only)
DN List
Enter the DN pool list numbers if you want tointegrate this entry point with an external IVR.
This setting is available only for the Telephonychannel type.
IVR DN List
The setting for Scorecard Routing.
This setting is applicable only for the Telephonychannel type in Entry Point.
Currently we do not support this setting.
Scorecard Routing Settings
Create a Queue or an Outdial QueueTo create a queue or an outdial queue:
Procedure
Step 1 In the Webex Contact Center portal navigation bar, click Provisioning.Step 2 Select Queue or Outdial Queue.
The Queue or Outdial Queue page appears. The page lists all the queues, if any.Step 3 Click the + New Queue or + New Outdial Queue.Step 4 Enter the following settings for the queue and click Save:
DescriptionSetting
General Settings
Enter the name for the queue.Name
(Optional) Enter a short description of the queue.Description
Cisco Webex Contact Center Management Portal User Guide36
ProvisioningCreate a Queue or an Outdial Queue

DescriptionSetting
(Read-only) This read-only field displays whether thesettings are for an entry point, a queue, an outdialentry point, or an outdial queue.
Type
This setting specifies whether the system can excludeteamswith no logged in agents for the relevant routingstrategies. This setting is not available for OutdialQueues.
If you enable the Check Agent Availability feature inthe Tenant settings, you cannot disable it from here.For more information, see Tenant Settings, on page13.
Check Agent Availability
The channel type for the queue.
For outdial entry points, the default channel type isTelephony.
Channel Type
Advanced Settings
Select Yes or No to specify whether you can monitorthe calls.
This setting is available only for the Telephonychannel type.
Permit Monitoring
Select Yes or No to specify whether the system canqueue the calls.
This setting is available only for the Telephonychannel type.
Permit Parking
Select Yes or No to specify whether the system canrecord the calls.
If you enable Record All Calls in the Tenant settings,you cannot disable Permit Monitoring from here. Formore information, see Other Permissions, on page24.
This setting is available only for the Telephonychannel type.
Permit Recording
Cisco Webex Contact Center Management Portal User Guide37
ProvisioningCreate a Queue or an Outdial Queue

DescriptionSetting
This setting is available only if you enable PermitRecording.
Select Yes or No to indicate whether the system canrecord all the calls for this queue.
If you enable Record All Calls in the Tenant settings,you cannot disable this setting from here. For moreinformation, see Other Permissions, on page 24.
This setting is available only for the Telephonychannel type.
Record All Calls
Select Yes or No to specify whether the agents canpause and resume a call recording. For example, theagent can pause call recording while discussingsensitive information from the customer, such as creditcard details.
If you enable the Pause/Resume Enabled feature inthe Tenant settings, the system overrides a No settinghere. For more information, see Tenant Settings, onpage 13.
Note: Agents can use this feature, only if yourorganization administrator enables the Privacy Shieldfeature in the Webex Contact Center serviceconfiguration.
Pause/Resume Enabled
This setting is available only if you set Pause/ResumeEnabled to Yes.
This setting specifies the time in seconds, after whichthe recording resumes automatically.
This setting is available only for the Telephonychannel type.
Recording Pause Duration
Enter the time that a customer request can be in aqueue before the system flags it as outside the servicelevel. If you complete a customer service requestwithin this time interval, the system considers it withinthe service level.
Service Level Threshold
Enter the maximum number of simultaneous callsallowed for this queue. The system busies out any callthat is beyond this number.
This setting is available only for the Telephonychannel type.
Maximum Active Calls
Cisco Webex Contact Center Management Portal User Guide38
ProvisioningCreate a Queue or an Outdial Queue

DescriptionSetting
Enter the maximum number of simultaneous chatsallowed for this queue.
This setting is available only for the Chat channeltype.
Maximum Active Chats
Enter the maximum number of simultaneous emailsallowed for this queue.
This setting is available only for the Email channeltype.
Maximum Active Emails
The URL for the queue or the default control scriptof the queue. If you do not use the routing strategymodule to configure the control script, the systemautomatically populates the URL.
This setting is available only for the Telephonychannel type.
Control Script URL
Currently we do not support this setting.
This setting is available only for the Telephonychannel type.
IVR Requeue URL
Enter the time after which the system distributes thequeued customer request to the overflow number thatyou provision for this queue. The value that you enteris the default value for the Maximum Time in Queuefield in the routing strategy for this queue. If you enterdifferent value while defining the routing strategyusing this queue, the systems ignores this value.
For an email queue, enter high value to avoidoverflow.
Maximum Time in Queue
Enter the destination phone number to which thesystem distributes the customer calls when theyexceed the Maximum Time in Queue that you haveset in the routing strategy.
This setting is applicable only for the Telephonychannel type.
Overflow Number
Enter the unique alphanumeric string that maps thisqueue to the vendor.
This setting is available only for the Telephonychannel type.
Currently we do not support this setting.
Vendor ID
Cisco Webex Contact Center Management Portal User Guide39
ProvisioningCreate a Queue or an Outdial Queue

DescriptionSetting
(Optional) If your organization administrator enablesMultiple Time Zone for your enterprise, you can selectthe time zone of the queue. Any routing strategy forthis queue uses the time zone that you select here.
Time Zone (Routing Strategies Only)
The setting for Scorecard Routing.
This setting is available only for the Telephonychannel type.
Currently we do not support this setting.
Scorecard Routing Settings
View the Details of a Queue or an Outdial QueueTo view a queue or an outdial queue:
Procedure
Step 1 From the Webex Contact Center portal navigation bar, choose Provisioning.Step 2 Choose Queue or Outdial Queue.
The Queue or Outdial Queue page appears. The page lists all the queues, if any.Step 3 Click the ellipsis icon beside a queue and click View. You can view the following details:
DescriptionSetting
General Settings
The name of the queue.Name
The description of the queue.Description
This field displays whether the settings are for an entrypoint, a queue, an outdial entry point, or an outdialqueue.
Type
This setting specifies whether the system can excludeteamswith no logged in agents for the relevant routingstrategies. This setting is not available for OutdialQueues.
Check Agent Availability
The channel type for the queue.
For outdial queues, the default channel type isTelephony.
Channel Type
Advanced Settings
Cisco Webex Contact Center Management Portal User Guide40
ProvisioningView the Details of a Queue or an Outdial Queue

DescriptionSetting
The setting specifies whether you can monitor thecalls or not.
This setting is available only for the Telephonychannel type.
Permit Monitoring
This setting specifies whether the system can queuethe calls or not.
This setting is available only for the Telephonychannel type.
Permit Parking
This setting specifies whether the system can recordthe calls or not.
This setting is available only for the Telephonychannel type.
Permit Recording
This setting specifies whether the system can recordall the calls for this queue or not.
This setting is available only for the Telephonychannel type.
Record All Calls
This setting specifies whether the agents can pauseand resume a call recording. For example, the agentcan pause call recording while discussing sensitiveinformation from the customer, such as credit carddetails.
Note:Agents can use this feature, only if yourWebexContact Center enables the Privacy Shield feature inthe Webex Contact Center service configuration.
Pause/Resume Enabled
This setting is available only if you set Pause/ResumeEnabled to Yes.
This setting specifies the time in seconds, after whichthe recording resumes automatically.
This setting is available for the Telephony channeltype.
Recording Pause Duration
This setting specifies the time that a customer requestcan be in a queue before the system flags it as outsidethe service level. If you complete a customer servicerequest within this time interval, the system considersit within the service level.
Service Level Threshold
The maximum number of simultaneous calls allowedfor this queue. The system busies out any call that isbeyond this number.
This setting is available for the Telephony channeltype.
Maximum Active Calls
Cisco Webex Contact Center Management Portal User Guide41
ProvisioningView the Details of a Queue or an Outdial Queue

DescriptionSetting
Themaximum number of simultaneous chats allowedfor this queue.
This setting is available for the Chat channel type.
Maximum Active Chats
Themaximumnumber of simultaneous emails allowedfor this queue.
This setting is available for the Email channel type.
Maximum Active Emails
The URL for the queue or the default control scriptof the queue. If you do not use the routing strategymodule to configure the control script, the systemautomatically populates the URL.
This setting is available for the Telephony channeltype.
Control Script URL
Currently we do not support this setting.
This setting is available only for the Telephonychannel type.
IVR Requeue URL
The time after which the system distributes the queuedcustomer request to the overflow number that youprovision for this queue. This value is the default valuefor the Maximum Time in Queue field in the routingstrategy for this queue.
For an email queue, enter high value to avoidoverflow.
Maximum Time in Queue
The phone number to which the system diverts thecustomer calls when they exceed theMaximum Timein Queue that you have set in the routing strategy.
This setting is applicable only for the Telephonychannel type.
Overflow Number
The unique alphanumeric string that maps this queueto the vendor.
This setting is available for the Telephony channeltype.
Currently we do not support this setting.
Vendor ID
The time zone of the queue. Any routing strategy forthis queue uses the time zone that you select here.
Time Zone (Routing Strategies Only)
Cisco Webex Contact Center Management Portal User Guide42
ProvisioningView the Details of a Queue or an Outdial Queue

DescriptionSetting
The setting for Scorecard Routing.
This setting is available for the Telephony channeltype.
Currently we do not support this setting.
Scorecard Routing Settings
Edit a Queue or an Outdial QueueTo edit a queue and an outdial queue:
Procedure
Step 1 From theWebex Contact Center Portal navigation bar, selectProvisioning and then clickEntry Points/Queues.Step 2 Select Queue or Outdial Queue.
The Queue or Outdial Queue page appears. The page lists all the queue, if any.Step 3 Click the ellipsis icon to the left of a queue and click Edit.
The Queue or Outdial Queue page appears.Step 4 You can edit the following fields:
There are some settings that you cannot edit. You can edit the Chat Template settings from CiscoWebex Control Hub.
Note
DescriptionSetting
General Settings
Edit the name of the queue.Name
(Optional) Edit the short description of the queue.Description
Edit the field to specify whether you can excludeteamswith no logged in agents for the relevant routingstrategies.
If you enable Check Agent Availability in the Tenantsettings, the system ignores a No setting here. Formore information, see Tenant Settings, on page 13.
Note: This setting is not available for Outdial Queues.
Check Agent Availability
Edit the status of the queue.Status
Advanced Settings
Cisco Webex Contact Center Management Portal User Guide43
ProvisioningEdit a Queue or an Outdial Queue

DescriptionSetting
Edit to specify whether you can monitor the calls ornot
This setting is available only for the Telephonychannel type.
Permit Monitoring
Edit to specify whether the system can queue the callsor not.
This setting is available only for the Telephonychannel type.
Permit Parking
Edit to specify whether you can record the calls ornot.
If you enable Record All Calls in the Tenant settings,the system ignores a No setting here. For moreinformation, see Other Permissions, on page 24.
This setting is available only for the Telephonychannel type.
Permit Recording
This setting is available only if you have set PermitRecording to Yes.
Edit to specify whether you can record all the callsfor this queue or not.
If you enable Record All Calls in the Tenant settings,this setting is not available. For more information, seeOther Permissions, on page 24.
This setting is available only for the Telephonychannel type.
Record All Calls
Edit to specify whether agents can pause and resumea call recording. For example, the agent can pause callrecording while obtaining sensitive information fromthe customer, such as credit card details.
If you enable Pause/Resume Enabled in the Tenantsettings, the system ignores a No here. For moreinformation, see Tenant Settings, on page 13.
Note:Agents can pause or resume a call, only if yourorganization administrator enables the Privacy Shieldfeature in your Webex Contact Center serviceconfiguration.
This setting is available only for the Telephonychannel type.
Pause/Resume Enabled
Cisco Webex Contact Center Management Portal User Guide44
ProvisioningEdit a Queue or an Outdial Queue

DescriptionSetting
This setting is available only if you enablePause/Resume Enabled.
Edit the time, in seconds, after which the recordingresumes automatically.
This setting is available only for the Telephonychannel type.
Recording Pause Duration
Edit the time, in seconds or hours (for emails), that acustomer request can be in a queue before the systemflags it as outside the service level. If the agentcompletes a customer service request within this timeinterval, the system considers it as within the servicelevel.
Service Level Threshold
Edit the maximum number of simultaneous callsallowed for this queue. The system busies out anycalls that are beyond this number.
This setting is available only for the Telephonychannel type.
Maximum Active Calls
Edit the maximum number of simultaneous chatsallowed for this queue.
This setting is available only for the Chat channeltype.
Maximum Active Chats
Edit the maximum number of simultaneous emailsallowed for this queue.
This setting is available only for the Email channeltype.
Maximum Active Emails
The URL for the queue or the default control scriptof the queue. If you do not use the routing strategymodule to configure the control script, the systemautomatically populates the URL.
This setting is available only for the Telephonychannel type.
Control Script URL
Currently, we do not support this setting.
This setting is available for the Telephony channeltype.
IVR Requeue URL
Cisco Webex Contact Center Management Portal User Guide45
ProvisioningEdit a Queue or an Outdial Queue

DescriptionSetting
Edit the time after which the system distributes aqueued call, chat, or email to the overflow numberthat you provision for this queue. It is the default valuefor theMaximumTime in Queue in a routing strategyfor this queue.
The system ignores this value if you enter differentvalue while defining a routing strategy using thisqueue.
For an email queue, enter high value to avoidoverflow.
Maximum Time in Queue
Edit the phone number to which the system divertscustomer calls when they exceed theMaximum Timein Queue that you have set in the routing strategy.
This setting is available only for the Telephonychannel type.
Overflow Number
Enter the unique alphanumeric string that maps thisqueue to the vendor.
This setting is available only for the Telephonychannel type.
Currently, we do not support this setting.
Vendor ID
(Optional) If your administrator enables the MultipleTime Zone feature for your enterprise, you can selectthe time zone of the queue. Any routing strategyrelated to this queue uses this timezone.
Time Zone (Routing Strategies Only)
The setting for Scorecard Routing.
This setting is available for the Telephony channeltype for Queues. It is not applicable for OutdialQueues.
Note: Currently, we do not support this setting.
Scorecard Routing Settings
Copy a Queue or an Outdial QueueTo copy a queue or an outdial queue:
Procedure
Step 1 In the Webex Contact Center portal navigation bar, click Provisioning.Step 2 Select Queue or Outdial Queue.
Cisco Webex Contact Center Management Portal User Guide46
ProvisioningCopy a Queue or an Outdial Queue

The Queue or Outdial Queue page appears. The page lists all the queues, if any.Step 3 Click the ellipsis icon beside a queue and click Copy.
The queue page appears. The fields have the same values as the original queue.
You can either save the same queue with a different name or edit the queue and save it.
Step 4 You can edit the following details:
There are some settings that you cannot edit. You can edit the Chat Template settings from CiscoWebex Control Hub.
Note
DescriptionSetting
General Settings
The name of the queue. The system appends the wordscopy_of before the name of the original queue or theoutdial queue. You can keep the same name or edit itas per your requirement.
Name
(Optional) A short description of the queue.Description
This setting specifies whether the system can excludeteamswith no logged in agents for the relevant routingstrategies. This setting is not available for OutdialQueue.
If you enable Check Agent Availability in Tenantsettings, the system ignores a No setting here. Formore information, see Tenant Settings, on page 13.
Check Agent Availability
The channel type. Supported channel types areTelephony, Email, or Chat.
For outdial queues, the default value is Telephony.
Channel Type
Advanced Settings
Specify whether you can monitor the calls or not.
This setting is available only for the Telephonychannel type.
Permit Monitoring
Specify whether the system can queue the calls or not.
This setting is available for the Telephony channeltype.
Permit Parking
Cisco Webex Contact Center Management Portal User Guide47
ProvisioningCopy a Queue or an Outdial Queue

DescriptionSetting
Specify whether the system can record the calls ornot.
If you set Record All Calls field to Yes in the Tenantsettings, the system overrides a No setting here. Formore information, see Other Permissions, on page24.
This setting is available for the Telephony channeltype.
Permit Recording
This setting is available only if you set PermitRecording to Yes.
Select Yes or No to indicate whether the system canrecord all the calls for this queue.
If you set Record All Calls field in the Tenant settingsto Yes, this setting is not available. For moreinformation, see Other Permissions, on page 24.
This setting is available for the Telephony channeltype.
Record All Calls
Specify whether the agents can pause and resume acall recording. For example, the agent can pause callrecording while discussing sensitive information fromthe customer, such as credit card details.
If you enable Pause/Resume Enabled in the Tenantsettings, the system ignores a No setting here. Formore information, see Tenant Settings, on page 13.
Note: Agents can pause or resume a call only if yourWebex Contact Center administrator enables thePrivacy Shield feature in the Webex Contact Centerservice configuration.
This setting is available only for the Telephonychannel type.
Pause/Resume Enabled
This setting is available only if you enablePause/Resume Enabled.
The time in seconds, after which the recordingresumes automatically.
This setting is available only for the Telephonychannel type.
Recording Pause Duration
The time that a customer request can be in a queuebefore the system flags it as outside the service level.If you complete a customer service request within thistime interval, the system considers it within the servicelevel.
Service Level Threshold
Cisco Webex Contact Center Management Portal User Guide48
ProvisioningCopy a Queue or an Outdial Queue
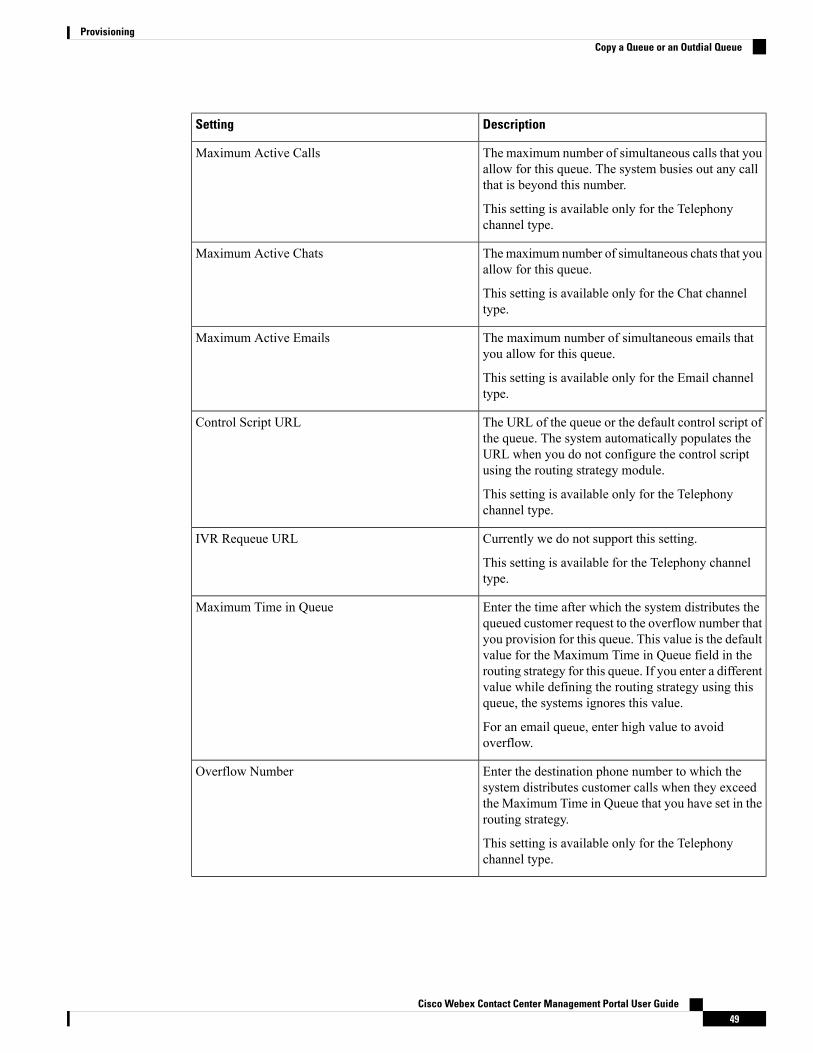
DescriptionSetting
The maximum number of simultaneous calls that youallow for this queue. The system busies out any callthat is beyond this number.
This setting is available only for the Telephonychannel type.
Maximum Active Calls
Themaximum number of simultaneous chats that youallow for this queue.
This setting is available only for the Chat channeltype.
Maximum Active Chats
The maximum number of simultaneous emails thatyou allow for this queue.
This setting is available only for the Email channeltype.
Maximum Active Emails
The URL of the queue or the default control script ofthe queue. The system automatically populates theURL when you do not configure the control scriptusing the routing strategy module.
This setting is available only for the Telephonychannel type.
Control Script URL
Currently we do not support this setting.
This setting is available for the Telephony channeltype.
IVR Requeue URL
Enter the time after which the system distributes thequeued customer request to the overflow number thatyou provision for this queue. This value is the defaultvalue for the Maximum Time in Queue field in therouting strategy for this queue. If you enter a differentvalue while defining the routing strategy using thisqueue, the systems ignores this value.
For an email queue, enter high value to avoidoverflow.
Maximum Time in Queue
Enter the destination phone number to which thesystem distributes customer calls when they exceedthe Maximum Time in Queue that you have set in therouting strategy.
This setting is available only for the Telephonychannel type.
Overflow Number
Cisco Webex Contact Center Management Portal User Guide49
ProvisioningCopy a Queue or an Outdial Queue

DescriptionSetting
Enter the unique alphanumeric string that maps thisqueue to the vendor.
This setting is available only for the Telephonychannel type.
Currently we do not support this setting.
Vendor ID
(Optional) If your administrator enablesMultiple TimeZone for your enterprise, you can select the time zoneof the queue. Any routing strategy for this queue usesthe time zone that you select here.
Time Zone (Routing Strategies Only)
The setting for Scorecard Routing. This setting isavailable only for the Telephony channel type.
Currently, we do not support this feature.
Scorecard Routing Settings
Deactivate an Entry Point or a QueueYou cannot deactivate an entry point or queue if you associate it with any other entities such as, dial numbersor any other routing strategy.When you try to deactivate such entry points or queues, you get an error message.Click the information icon at the end of the message to view the list of all the associated entities.
After you deactivate an entry point or queue, you can still see it in the Entry Points/Queues page as Not Active.Historical reports also display details of the deactivated entry points or queues.
In the Entry Points/Queues page, you can click the ellipsis icon and then the restore icon to reactivate an entrypoint or queue.
To deactivate an entry point or queue:
Procedure
Step 1 From the Webex Contact Center Portal navigation bar, choose Provisioning.Step 2 Choose Entry Points/Queues and then select the type of entry point or queue you want to deactivate.
The page for the type of entry point or queue page appears. The page displays the list of existing entry pointsor queues.
Step 3 Click the ellipsis icon to the left of an entry point or queue and click Delete.
The Heads Up! dialog box appears. Click Yes to confirm.
Cisco Webex Contact Center Management Portal User Guide50
ProvisioningDeactivate an Entry Point or a Queue

Activate an Entry Point or a Queue
Procedure
Step 1 From the Webex Contact Center Portal navigation bar, choose ProvisioningStep 2 Choose Entry Points/Queues and then select the type of entry point or queue you want to activate.
The page for the type of entry point or queue page appears. The page displays the list of existing entry pointsor queues.
Step 3 Click the ellipsis icon beside the entry point or queue with the status Not Active and click Restore.The Confirm Activate? dialog box appears.
Step 4 Click Yes to confirm.The status of entry point or queue changes to Active.
SitesA site is a physical contact center location under the control of your enterprise. For example, enterprise Acmecan have sites in Chicago, Manila, and Bangalore with agents to handle customer contacts.
When you create a site, the system automatically adds a team and a multimedia profile to the new site. Youcan change the team name and other settings, but cannot change the team type from Capacity based to Agentbased. Do not delete the team without adding another team for the new site.
Create a SiteTo create a site:
Procedure
Step 1 From the Webex Contact Center Portal navigation bar, choose Provisioning.Step 2 Choose Site.
The Sites page appears. The page lists all the site, if any.Step 3 Click + New Site.
The Site page appears.Step 4 Enter the following details and click Save:
DescriptionSettings
General Settings
Enter a name for the siteName
Cisco Webex Contact Center Management Portal User Guide51
ProvisioningActivate an Entry Point or a Queue

DescriptionSettings
Enter the geographical coordinates of the site.Latitude
Longitude
Advanced Settings
This setting is available, if your administrator enablesMultimedia for your enterprise.
Select a multimedia profile for the site. If you do notassign, the system assigns theDefault_Telephony_Profile. For more information,see Multimedia Profiles, on page 98.
Multimedia Profile
Select Yes or No to specify whether to block therouting of calls to this site for the area codes.
When you select Yes, the Area Codes To Block fieldappears. Click the icon below the Area Codes ToBlock field to display the Choose Area Codes. Selectthe area codes that you want to block. For moreinformation, see Block an Area Code, on page 52.
Block Area Codes
Block an Area CodeYou can block area code when you create a new site or edit an existing site. To block an area based on theircodes:
Procedure
Step 1 From the Webex Contact Center Portal navigation bar, choose Provisioning.Step 2 Choose Site.
The Sites page appears. The page lists all the site, if any.Step 3 Do one of the following:
• Click + New Site. See Create a Site, on page 51.• Click the ellipsis icon beside a site that you want to edit and click Edit. See Edit a Site, on page 54.
Step 4 Set Block Area Codes to Yes.The Area Codes to Block text box appears.
Step 5 Click the edit icon in the text box.The Choose Area Codes panel appears.
Step 6 In the Choose Area Codes, enter the following details, and click Save:
Cisco Webex Contact Center Management Portal User Guide52
ProvisioningBlock an Area Code

DescriptionSetting
Select the state from the drop-down.
Note: You can select multiple states. For each stateyou select, you have to enter area codes.
State
Enter the area code. You can enter multiple areacodes.
Area Codes
You can see the area codes and the corresponding states in the Selected Area code Details panel.Step 7 (Optional) Click Delete under Action, if you want to delete area codes.
View the Details of a SiteTo view the details of a site:
Procedure
Step 1 From the Webex Contact Center Portal navigation bar, choose ProvisioningStep 2 Choose Site.
The Site page appears. This page displays a list of sites.
Step 3 Click the ellipsis icon beside the site you want to view, and click View.Step 4 You can view the following settings:
DescriptionSetting
General Settings
The name of the site. Generally, it is the name of thegeographical location.
Name
The geographical coordinates of the site.Latitude
Longitude
Advanced Settings
The status of the site.Status
The multimedia profile for the site. If you do notassign a profile to the site, the system assigns theDefault_Telephony_Profile. This setting is available,if the administrator enables Multimedia for yourenterprise. For more information, see MultimediaProfiles, on page 98.
Multimedia Profile
Cisco Webex Contact Center Management Portal User Guide53
ProvisioningView the Details of a Site
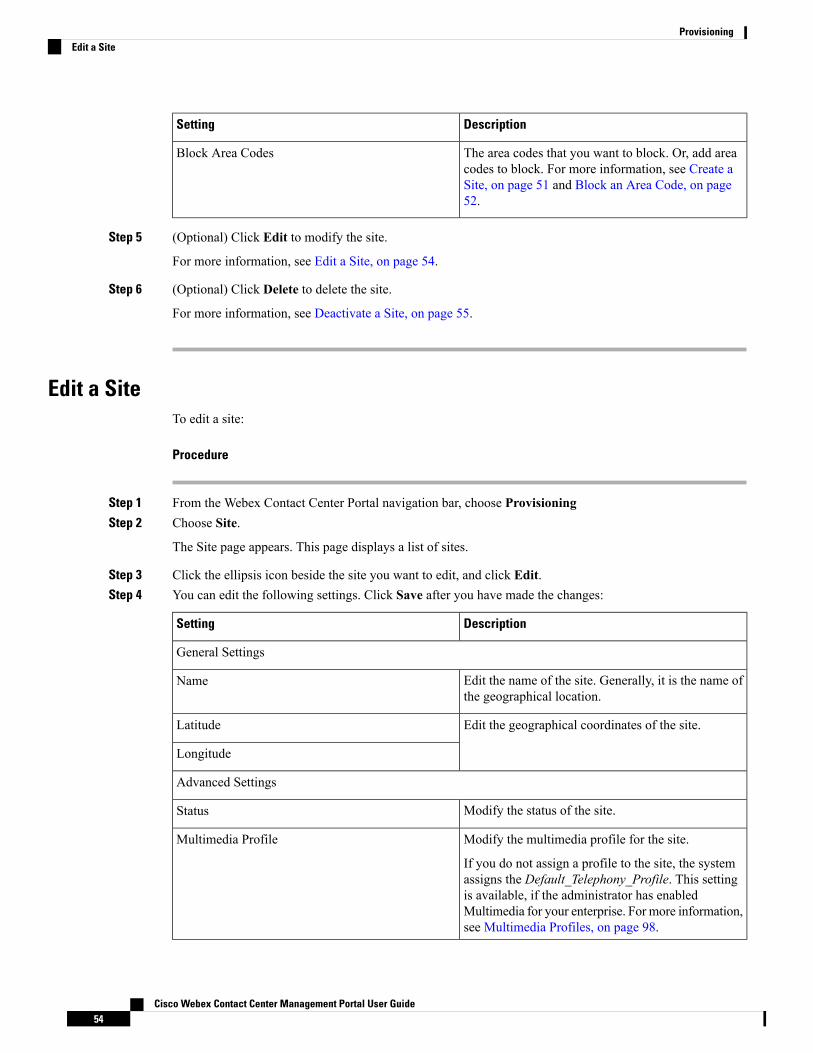
DescriptionSetting
The area codes that you want to block. Or, add areacodes to block. For more information, see Create aSite, on page 51 and Block an Area Code, on page52.
Block Area Codes
Step 5 (Optional) Click Edit to modify the site.
For more information, see Edit a Site, on page 54.
Step 6 (Optional) Click Delete to delete the site.
For more information, see Deactivate a Site, on page 55.
Edit a SiteTo edit a site:
Procedure
Step 1 From the Webex Contact Center Portal navigation bar, choose ProvisioningStep 2 Choose Site.
The Site page appears. This page displays a list of sites.
Step 3 Click the ellipsis icon beside the site you want to edit, and click Edit.Step 4 You can edit the following settings. Click Save after you have made the changes:
DescriptionSetting
General Settings
Edit the name of the site. Generally, it is the name ofthe geographical location.
Name
Edit the geographical coordinates of the site.Latitude
Longitude
Advanced Settings
Modify the status of the site.Status
Modify the multimedia profile for the site.
If you do not assign a profile to the site, the systemassigns the Default_Telephony_Profile. This settingis available, if the administrator has enabledMultimedia for your enterprise. For more information,see Multimedia Profiles, on page 98.
Multimedia Profile
Cisco Webex Contact Center Management Portal User Guide54
ProvisioningEdit a Site

DescriptionSetting
Modify the area codes that you want to block. Or, addarea codes to block. For more information, see Createa Site, on page 51 and Block an Area Code, on page52.
Block Area Codes
Deactivate a SiteYou cannot deactivate a site if there are any agents or active teams that are associated with the site. Whenyou try to deactivate such a site, a message informs you that you cannot deactivate the site. You can click theinformation icon in the message to view the list of entities that you have associated with this site.
After you deactivate a site, you can still see it in the Sites page as Not Active sites. Historical reports alsodisplay details of the deactivated sites.
To deactivate a site:
Procedure
Step 1 From the Webex Contact Center Portal navigation bar, choose ProvisioningStep 2 Choose Site.
The Site page appears. This page displays a list of sites.
Step 3 Click the ellipsis icon beside the site you want to deactivate, and click Delete.Step 4 The Heads Up! dialog box appears. Click Yes to confirm.
The status of the site changes to Not Active.
Activating a Site
Procedure
Step 1 From the Webex Contact Center Portal navigation bar, select Provisioning .Step 2 Click Site.
The Sites page appears. This page lists all the sites.Step 3 Click the ellipsis icon beside the site that you want to activate and click Restore.
The Confirm Activate? dialog box appears.Step 4 Click Yes to confirm.
The status of the site changes to Active.
Cisco Webex Contact Center Management Portal User Guide55
ProvisioningDeactivate a Site

TeamsA team is a group of people who support a specific group of functions. For example, supporting the Goldcustomers or managing billing, and so on. A team consists of agents and is associated with a specific site.
Create a TeamTo create a team:
Procedure
Step 1 From the Webex Contact Center Portal navigation bar, choose Provisioning.Step 2 Choose Teams.
The Teams page appears. This page displays a list of teams.
Step 3 Click + New Team.The Team page appears.
Step 4 Enter the following details and click Save.
DescriptionSetting
General Settings
Select the site from the drop-down. You cannot editthe site later.
Site
Enter the name for the team. Generally, use namesthat indicate the function of the team, such as Billingor Customer Support.
Name
Choose the team type from the following:
• Agent Based: You assign a specific number ofagents to the team.
• Capacity Based: You do not assign any specificnumber of agents to the team. You usecapacity-based teams for voice mailboxes oragent groups that are not managed by theWebexContact Center system.
The capacity setting determines the capacity ofsuch teams. But, the team capacity strategy inthe Routing Strategy module overwrites thecapacity setting. Formore information, see AboutTeam Types, on page 154.
Type
Cisco Webex Contact Center Management Portal User Guide56
ProvisioningTeams

DescriptionSetting
Select the status of the team to indicate whether theteam is available to handle customer contacts. Youcannot change the team status if the team is part ofany routing strategy.
Team Status
This setting appears on the Edit page to specifywhether the team is Active or Not Active.
Status
Advanced Settings
Enter the dial number where the system distributesthe calls for this team. This setting is applicable onlyfor capacity-based teams.
DN
The priority of the team. Currently we do not supportthis feature.
Priority
Enter the maximum number of simultaneous contactsthat this team can handle. The system routes anycontacts beyond this number as per the routingstrategy. And, if there are no routing strategies, thenthe system queues the contacts.
This setting is applicable only for capacity-basedteams.
You can create scheduled team capacity strategies tooverride this setting for dynamic contact centerconditions. If you do not create any team capacitystrategy for a capacity-based team, the system usesthis capacity value. For more information, seeScheduling Team Capacity, on page 161.
Capacity
(Optional) If your enterprise uses the optionalSkills-Based Routing feature, you can select a skillprofile for this team. For more information, see SkillProfiles, on page 105.
You cannot assign a skill profile to a capacity-basedteam.
Skill Profile
(Optional) If your organization administrator enablesMultimedia for your enterprise, you can select amultimedia profile for this team. For moreinformation, seeMultimedia Profiles, on page 98.Thisprofile overrides the multimedia profile that youassign to the site of this team.
You cannot assign a multimedia profile to acapacity-based team.
Multimedia Profile
Cisco Webex Contact Center Management Portal User Guide57
ProvisioningCreate a Team

DescriptionSetting
Assign agents to the team from the drop-down list.You can only assign the agents that your organizationadministrator provisions for your enterprise. For moreinformation, seeView the Details of a User, on page63.
This setting is applicable only for agent-based teams.
Agents
View the Details of a TeamTo view a team:
Procedure
Step 1 From the Webex Contact Center Portal navigation bar, choose Provisioning.Step 2 Choose Teams.
The Teams page appears. This page displays a list of teams.
Step 3 Click the ellipsis icon beside the team you want to view the details for and click View. You can view thefollowing settings:
DescriptionSetting
General Settings
Select the site from the drop-down. You cannot editthe site later.
Site
Enter the name for the team. Generally, use namesthat indicate the function of the team, such as Billingor Customer Support.
Name
Cisco Webex Contact Center Management Portal User Guide58
ProvisioningView the Details of a Team

DescriptionSetting
Choose the team type from the following:
• Agent Based: You assign a specific number ofagents to the team.
• Capacity Based: You do not assign any specificnumber of agents to the team. You usecapacity-based teams for voice mailboxes oragent groups that are not managed by theWebexContact Center system.
The capacity setting determines the capacity ofsuch teams. But, the team capacity strategy inthe Routing Strategy module overwrites thecapacity setting. Formore information, see AboutTeam Types, on page 154.
Type
Select the status of the team to indicate whether theteam is available to handle customer contacts. Youcannot change the team status if the team is part ofany routing strategy.
Team Status
This setting appears on the Edit page to specifywhether the team is Active or Not Active.
Status
Advanced Settings
Enter the dial number where the system distributesthe calls for this team. This setting is applicable onlyfor capacity-based teams.
DN
The priority of the team. Currently we do not supportthis feature.
Priority
Enter the maximum number of simultaneous contactsthat this team can handle. The system routes anycontacts beyond this number as per the routingstrategy. And, if there are no routing strategies, thenthe system queues the contacts.
This setting is applicable only for capacity-basedteams.
You can create scheduled team capacity strategies tooverride this setting for dynamic contact centerconditions. If you do not create any team capacitystrategy for a capacity-based team, the system usesthis capacity value. For more information, seeScheduling Team Capacity, on page 161.
Capacity
Cisco Webex Contact Center Management Portal User Guide59
ProvisioningView the Details of a Team

DescriptionSetting
(Optional) If your enterprise uses the optionalSkills-Based Routing feature, you can select a skillprofile for this team. For more information, see SkillProfiles, on page 105.
You cannot assign a skill profile to a capacity-basedteam.
Skill Profile
(Optional) If your organization administrator enablesMultimedia for your enterprise, you can select amultimedia profile for this team. For moreinformation, seeMultimedia Profiles, on page 98.Thisprofile overrides the multimedia profile that youassign to the site of this team.
You cannot assign a multimedia profile to acapacity-based team.
Multimedia Profile
Assign agents to the team from the drop-down list.You can only assign the agents that your organizationadministrator provisions for your enterprise. For moreinformation, seeView the Details of a User, on page63.
This setting is applicable only for agent-based teams.
Agents
Edit a TeamTo edit a team:
Procedure
Step 1 From the Webex Contact Center Portal navigation bar, choose Provisioning.Step 2 Choose Teams.
The Teams page appears. This page displays a list of teams.
Step 3 Click the ellipsis icon beside the team you want to edit and click Edit. You can edit the following settings:
DescriptionSetting
General Settings
Edit the team name. Generally, use names that indicatethe function of the team, such as Billing or CustomerSupport.
Name
Cisco Webex Contact Center Management Portal User Guide60
ProvisioningEdit a Team
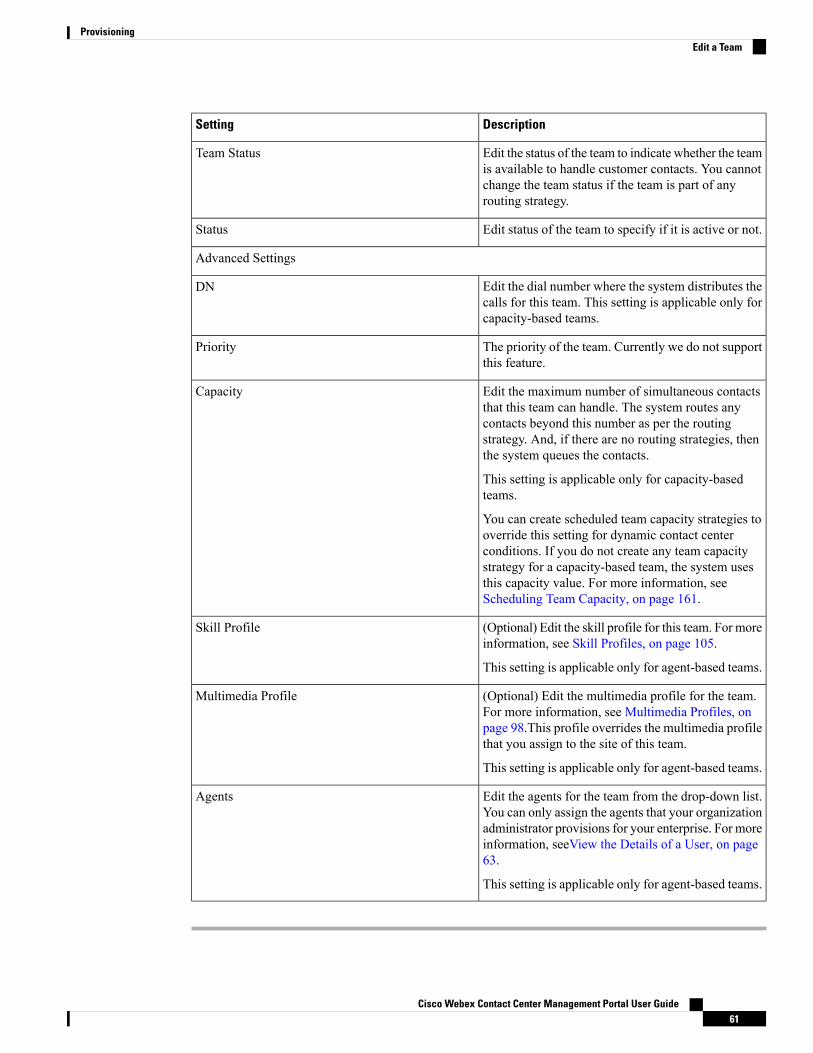
DescriptionSetting
Edit the status of the team to indicate whether the teamis available to handle customer contacts. You cannotchange the team status if the team is part of anyrouting strategy.
Team Status
Edit status of the team to specify if it is active or not.Status
Advanced Settings
Edit the dial number where the system distributes thecalls for this team. This setting is applicable only forcapacity-based teams.
DN
The priority of the team. Currently we do not supportthis feature.
Priority
Edit the maximum number of simultaneous contactsthat this team can handle. The system routes anycontacts beyond this number as per the routingstrategy. And, if there are no routing strategies, thenthe system queues the contacts.
This setting is applicable only for capacity-basedteams.
You can create scheduled team capacity strategies tooverride this setting for dynamic contact centerconditions. If you do not create any team capacitystrategy for a capacity-based team, the system usesthis capacity value. For more information, seeScheduling Team Capacity, on page 161.
Capacity
(Optional) Edit the skill profile for this team. For moreinformation, see Skill Profiles, on page 105.
This setting is applicable only for agent-based teams.
Skill Profile
(Optional) Edit the multimedia profile for the team.For more information, see Multimedia Profiles, onpage 98.This profile overrides the multimedia profilethat you assign to the site of this team.
This setting is applicable only for agent-based teams.
Multimedia Profile
Edit the agents for the team from the drop-down list.You can only assign the agents that your organizationadministrator provisions for your enterprise. For moreinformation, seeView the Details of a User, on page63.
This setting is applicable only for agent-based teams.
Agents
Cisco Webex Contact Center Management Portal User Guide61
ProvisioningEdit a Team
Deactivate a TeamYou cannot deactivate a team if there are any agents or active routing strategies that are associated with theteam. When you try to deactivate such a team, a message informs you that you cannot deactivate the team.You can click the information icon in the message to view the list of entities that you have associated withthis team.
After you deactivate a team, you can still see it in the Teams page as Not Active teams. Historical reports alsodisplay details of the deactivated teams.
To deactivate a team:
Procedure
Step 1 From the Webex Contact Center Portal navigation bar, choose Provisioning.Step 2 Choose Team.
The Teams page appears. This page displays a list of teams.
Step 3 Click the ellipsis icon beside the team you want to deactivate, and click Delete.Step 4 The Heads Up! dialog box appears. Click Yes to confirm.
The status of the team changes to Not Active.
Activate a Team
Procedure
Step 1 From the Webex Contact Center Portal navigation bar, select Provisioning.Step 2 Click Team.
The Teams page appears. This page lists all the teams.Step 3 Click the ellipsis icon beside the team that you want to activate and click Restore.
The Confirm Activate? dialog box appears.Step 4 Click Yes to confirm.
The status of the team changes to Active.
UsersUsers are the contact center supervisors, managers, and agents who are responsible for day-to-day operations.Their user profile specifies the level of access to the modules of Webex Contact Center Management Portalmodules. They use the Management Portal to access the modules for real-time visibility and to control theresources that they are responsible for.
Cisco Webex Contact Center Management Portal User Guide62
ProvisioningDeactivate a Team

An agent user account must include a user profile that grants access to the Agent Desktop module, and mustalso include an agent profile, described in Agent Profiles, on page 78. Agents use the Webex Contact CenterAgent Desktop to manage customer interactions.
You can create and delete users from Cisco Webex Control Hub.Note
View the Details of a UserTo view the details of a user:
Procedure
Step 1 From the Webex Contact Center Portal navigation bar, select Provisioning .Step 2 Click Users.
The Users page appears. This page lists all the users in your enterprise.Step 3 Click the ellipsis icon beside the user that you want to view and click View.
The User page appears. The page displays the details of the user.Step 4 You can view the following details:
DescriptionSetting
General Settings
The name you use to log in to the Webex ContactCenter Management Portal.
Username
The first name of the user.First Name
The last name of the user.Last Name
The email address of the user.Email
The address details of the user.Country
State
City
Street
The work phone number of the user.Work
The mobile phone number of the user. The systemdisplays the number as a string, without dashes, forexample: 4155551212.
Mobile
The postal code of the user.Zip Code
Cisco Webex Contact Center Management Portal User Guide63
ProvisioningView the Details of a User
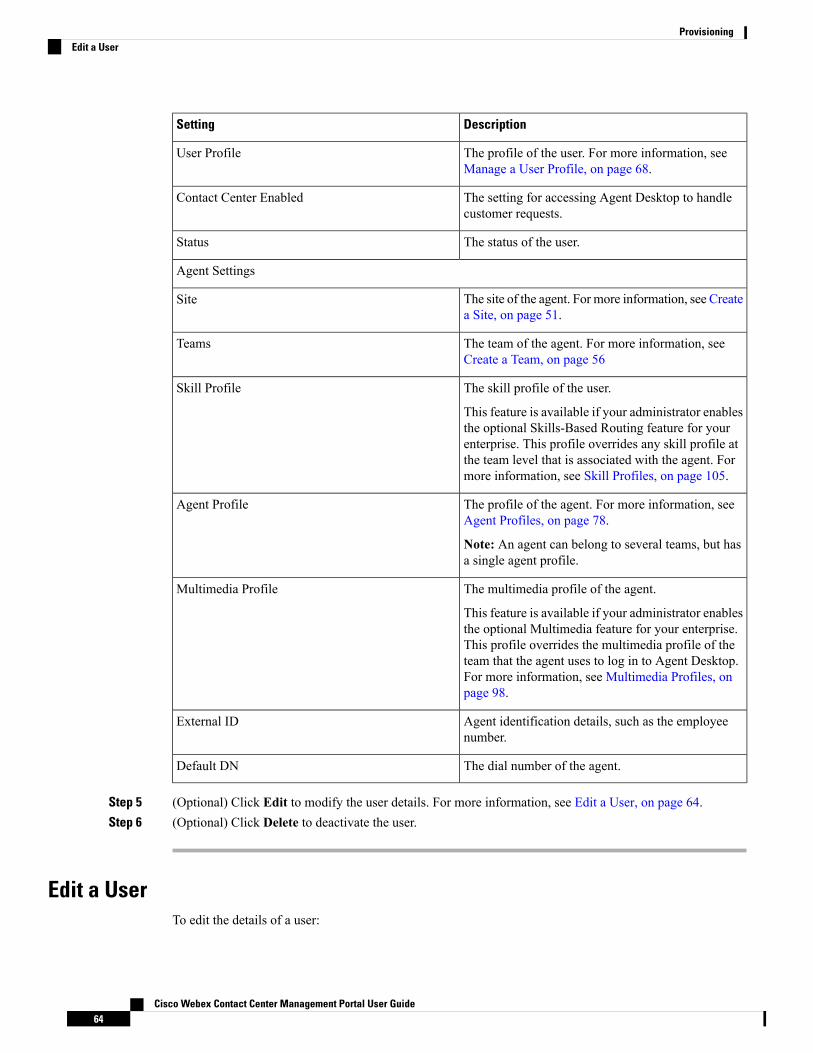
DescriptionSetting
The profile of the user. For more information, seeManage a User Profile, on page 68.
User Profile
The setting for accessing Agent Desktop to handlecustomer requests.
Contact Center Enabled
The status of the user.Status
Agent Settings
The site of the agent. For more information, see Createa Site, on page 51.
Site
The team of the agent. For more information, seeCreate a Team, on page 56
Teams
The skill profile of the user.
This feature is available if your administrator enablesthe optional Skills-Based Routing feature for yourenterprise. This profile overrides any skill profile atthe team level that is associated with the agent. Formore information, see Skill Profiles, on page 105.
Skill Profile
The profile of the agent. For more information, seeAgent Profiles, on page 78.
Note: An agent can belong to several teams, but hasa single agent profile.
Agent Profile
The multimedia profile of the agent.
This feature is available if your administrator enablesthe optional Multimedia feature for your enterprise.This profile overrides the multimedia profile of theteam that the agent uses to log in to Agent Desktop.For more information, see Multimedia Profiles, onpage 98.
Multimedia Profile
Agent identification details, such as the employeenumber.
External ID
The dial number of the agent.Default DN
Step 5 (Optional) Click Edit to modify the user details. For more information, see Edit a User, on page 64.Step 6 (Optional) Click Delete to deactivate the user.
Edit a UserTo edit the details of a user:
Cisco Webex Contact Center Management Portal User Guide64
ProvisioningEdit a User

Procedure
Step 1 From the Webex Contact Center Portal navigation bar, choose Provisioning.Step 2 Click Users.
The Users page appears. This page lists all the users in your enterprise.Step 3 Click the ellipsis icon beside the user you want to edit and click Edit. You can edit the following settings:
DescriptionSetting
General Settings
Edit the address of the user.Country
State
City
Street
Edit the work phone number of the user.Work
Edit the mobile phone number of the user.Mobile
Edit the postal code of the user.Zip Code
Edit the profile of the user. For more information, see Manage a User Profile, onpage 68.
User Profile
Select Yes to provide access to Agent Desktop.Contact CenterEnabled
Edit the status of the user.Status
Agent Settings
The site of the agent. For more information, see Create a Site, on page 51.Site
The teams to which the agent belongs to. To assign the agent to one or more teams,select the teams from the drop-down list.
Teams
Edit the skill profile of the agent. Select a profile from the drop-down.
This feature is applicable if your administrator enables the optional Skills-BasedRouting feature for your enterprise. This profile overrides any skill profile at theteam level that is associated with the agent. For more information, see Skill Profiles,on page 105.
Skill Profile
Edit the profile of the agent. Select a profile from the drop-down. For moreinformation, see Agent Profiles, on page 78.
Note: An agent can belong to several teams, but has a single agent profile.
Agent Profile
Cisco Webex Contact Center Management Portal User Guide65
ProvisioningEdit a User

DescriptionSetting
Edit the multimedia profile of the agent. Select a profile from the drop-down.
This feature is applicable if your administrator enables the optional Multimediafeature for your enterprise. This profile overrides the multimedia profile of the teamthat the agent uses to log in to Agent Desktop. For more information, seeMultimediaProfiles, on page 98.
Multimedia Profile
(Optional) Edit the dial number of the agent. If there is no dial number for the agent,you can add a dial number.
Default DN
(Optional) Edit identification details of the agent, such as the employee number.External ID
You can edit the following settings from Cisco Webex Control Hub:Note
DescriptionSetting
General Settings
The name the user uses to log in toWebex Contact Center.Username
The first name of the user.FirstName
The last name of the user.LastName
The email address of the user.Email
Export Provisioned Items for a UserTo export the details of the items that you have provisioned for a user:
Procedure
Step 1 From the Webex Contact Center Portal navigation bar, click Provisioning.Step 2 Click Users.
The Users page appears. This page lists all the users in your enterprise.Step 3 Click the ellipsis icon beside a username and click Excel or PDF. The report has details about the following
items:
DescriptionSetting
The details about the entry points that you map to theuser.
Active Inbound Entry Point Details
The details about the outdial entry points that youmapto the user.
Outdial Entry Points
Cisco Webex Contact Center Management Portal User Guide66
ProvisioningExport Provisioned Items for a User

DescriptionSetting
The details about the queues that you map to the user.Inbound Queues
The details about the outdial queues that you map tothe user.
Outdial Queues
The details about the sites that you map to the user.Sites
The details about the teams that you map to the user.Teams
The details about the agents that you map to the user.Agents
Revoke API Key for a UserTo revoke API key for a user:
Procedure
Step 1 From the Webex Contact Center Portal navigation bar, choose Provisioning.Step 2 Click Users.
The Users page appears. This page lists all the users in your enterprise.Step 3 Click the ellipsis icon beside the required user and click Revoke API Key.
A message appears that you have successfully revoked the API Key for the user.
If you do not map an API key to the profile of that user, an error message appears that the user does not havean API key.
Upload Agent Update Template
Before you begin
Download and save the details of the agents in the Agent Update Template. For more information, see DownloadAgent Update Template, on page 113.
To upload the details of multiple agents simultaneously:
Procedure
Step 1 From the Webex Contact Center Portal navigation bar, choose Provisioning.Step 2 Click Users.
The Users page appears.Step 3 Click Bulk Update.
The Bulk Upload dialog-box appears.
Cisco Webex Contact Center Management Portal User Guide67
ProvisioningRevoke API Key for a User
Step 4 Browse the Agent Update template from your local system and choose the template.Step 5 Click Upload.Step 6 (Optional) Check the status of the upload from Bulk Operations Status in Provisioning.
User ProfilesWhen you create a user from Control Hub or change the license or role of a user, the system automaticallymaps the following profiles in Webex Contact Center.
The mapping of Standard and Premium licenses from Control Hub to Webex Contact Center ManagementPortal is as follows:
• Standard Agent—Standard Agent User Profile
• Premium Agent—Premium Agent User Profile
• Supervisor—Supervisor Profile
• Administrator—Administrator Profile
The mapping of Cloud Connect user profile from Control Hub to Webex Contact Center Management Portalis as follows:
• Analyzer User—Analyzer User Profile
• Analyzer Administrator—Analyzer Administrator Profile
From Management Portal, you can also assign a user with a custom profile. The Profile Type of the customprofile must be same as the role of the user on Control Hub. For example, a Premium License user with aSupervisor role can be a custom profile of the type Supervisor. For more information on license privileges,see General Settings, on page 69.
Manage a User ProfileTo create a user profile:
Procedure
Step 1 From the Webex Contact Center Portal navigation bar, choose ProvisioningStep 2 Choose User Profiles.
The User Profiles page appears. This page displays a list of user profiles.
Step 3 Click the + New User Profile.The User Profile page appears.
Step 4 Enter the details in the following tabs and click Save in each tab.
• General Settings, on page 69
• Module Settings, on page 69
Cisco Webex Contact Center Management Portal User Guide68
ProvisioningUser Profiles

• Access Rights, on page 72
General SettingsYou can configure the following settings from the General Settings tab while configuring a new user profileor editing an existing user profile:
DescriptionSetting
Enter a name for the user profile.
When you copy a user profile, the system appends the words copy_of before the name of theoriginal user profile. You can keep the same name or edit it as per your requirement.
Name
(Optional) Enter a description of the profile.Description
Select a type to determine the privilege level for this profile.
For Webex Contact Center, generic profile and module mapping are as follows:
• Standard Agent—Has access to Agent Desktop module.
• Premium Agent—Has access to Agent Desktop and Multimedia module.
• Supervisor—Has access to all modules except the managing tenants in Provisioning.
• Administrator—Has access to all modules.
For Cloud Connect, generic profile and module mapping are as follows:
• Analyzer User Profile—Has access to Reporting and Analytics module.
• Analyzer Administrator Profile—Has access to Reporting andAnalytics, and Provisioning(Manage Entry Points/Queues, Manage Teams, Manage User Profiles, andManage Users)modules.
You cannot edit the profile type later.
ProfileType
You can view and change this setting only when you edit or copy a user profile.Status
Module SettingsYou can control the access of the user profile to Webex Contact Center modules from the Module Settingstab while configuring a new user profile. You can also change the setting when you edit or copy a user profile.However, you cannot change the Module Access settings when you copy an existing user profile.
When you select All for Module Access then the profile has access to all the modules. Select Specific if youwant to assign selective modules to the user profile, and then select from the following modules:
DescriptionSetting
Provides access to Agent Desktop.Agent Desktop
Provides access to release notes.Release Notes
Cisco Webex Contact Center Management Portal User Guide69
ProvisioningGeneral Settings

DescriptionSetting
Enables you to silently monitor the quality of servicethat you deliver to customers across multisourcecontact centers. Through a simplified web interface,you can select the queue, team, site, or agent you wantto silently monitor.
You can enable the following settings for this module:
• Barge-In: Allows you to join any call that youaremonitoring and participate in the conversationbetween the agent and the customer.
• Mid-Call Monitor: Allows you to monitor anongoing call between and agent and a customer.
• Whisper Coach: Allows you, while you aremonitoring a call, to speak to the agent who ishandling the call without the customer hearingthe conversation.
• Restricted Monitor Only: Prevents users fromviewing and editing monitoring schedules thatthey did not create.
• View Blind Monitor Requests: Allows you tosee the blind monitoring requests of other users.
Call Monitoring
Provides access to the Webex Contact CenterReporting and Analytics module. It is a reporting andanalytics application that you use to segment, profile,and visualize the data in contact center systems. Thismodule also helps to identify key variables that impactproductivity and desired business outcomes. You canuse this module to configure and modify the Analyzerschemas.
Reporting and Analytics
You can view this module only when you enableViewor Edit for the Reporting and Analytics module.
Enables you to incorporate customer data into theWebex Contact Center environment for customrouting and other generic implementation.
Business Rules
Enables you to record any active Webex ContactCenter call. Through a web interface, you can selectthe call for any queue, team, site, agent, and theduration you want to record.
Call Recording
Cisco Webex Contact Center Management Portal User Guide70
ProvisioningModule Settings

DescriptionSetting
Provides access to the web-based user interface formanaging and configuring call-handling strategies.You can create and schedule global call-routing andteam capacity strategies and alter them in real time inresponse to changes in business dynamics. You canenable the following permissions for the RoutingStrategy module:
• Manage Call Flow Script: Enables you to uploadand update call control scripts. A control scriptdefines how you handle the calls.
• ManageMedia Files: Enables you to upload andupdate resources to use in routing strategies.
Routing Strategy
Cisco Webex Contact Center Management Portal User Guide71
ProvisioningModule Settings

DescriptionSetting
Provides access to the Provisioning module, whichallows you to view the settings that the administratorprovisions for your enterprise. Depending on the Viewor Edit access for the following items, you can usemanage them from the Provisioning module.
• Manage Entry Points/Queues: Allows you tomanage Webex Contact Center entry points andqueues.
• Manage Sites: Allows you to manage WebexContact Center sites.
• Manage Teams: Allows you to manage WebexContact Center teams.
• Manage Users: Allows you to manage WebexContact Center users.
• Manage User Profiles: Allows you to manageWebex Contact Center user profiles.
• DN Mapping: Allows you to map DNs to entrypoints.
• Manage Dial Plans: Allows you to create andedit dial plans.
• Audit Trail: Allows you to access the Audit Trailinterface. Use this interface to view the detailsabout the provisioning changes for yourenterprise.
• Branding: Provides access to the CustomThemesettings on theManagement Portal landing page.You can customize the banner color and imagesfor the Management Portal pages.
• Manage Tenants: Allows you to edit some of thetenant settings in the Provisioning module.
• Revoke API Key: Allows you to revoke the APIkey of a user.
Provisioning
Access RightsYou can configure the following settings from the Access Rights tab while configuring a new user profile orediting an existing user profile:
Cisco Webex Contact Center Management Portal User Guide72
ProvisioningAccess Rights

DescriptionSetting
From the drop-down, select the specific entities whichyou can access. You can select All to provide accessto all entities of that type.
Note:The Cloud Connect Deployments field appearsonly for Cloud Connect users. Deployments that youhave already configured appears in the drop-downlist. The Queues and Sites drop-down list appearsaccording to the deployments that you select.
Entry Points
Cloud Connect Deployments
Queues
Sites
Teams
The Report and Dashboard Permissions consists of:
PermissionsReports and Dashboards Folders
By default you have View Only permission.Root Folder
By default you have View Only permission.
Note: You can edit only the Business Reports forCloud Connect users.
Standard Reports
You have View Only permission. You can changethis permission to either Edit or None.
Custom Reports and Dashboards
You have View Only permission. You can changethis permission to either Edit or None.
Sample Dashboards
You have View Only permission. You can changethis permission to either Edit or None.
Misc Folder
View the Details of a User ProfileTo view the details of a user profile:
Procedure
Step 1 From the Webex Contact Center Portal navigation bar, choose ProvisioningStep 2 Choose User Profile.
The User Profiles page appears. This page displays a list of user profiles.
Step 3 Click the ellipsis icon beside a user profile and click View.The User Profile page appears.
Step 4 You can view the following details:
• General Settings, on page 69
• Module Settings, on page 69
Cisco Webex Contact Center Management Portal User Guide73
ProvisioningView the Details of a User Profile
• Access Rights, on page 72
Edit a User ProfileTo edit a user profile:
Procedure
Step 1 From the Webex Contact Center Portal navigation bar, choose ProvisioningStep 2 Choose User Profiles.
The User Profiles page appears. This page displays a list of user profiles.
Step 3 Click the ellipsis icon beside a user profile that you want to edit and click Edit.The User Profile page appears.
Step 4 You can edit the details in the following tabs and click Save in each tab:
• General Settings, on page 69
• Module Settings, on page 69
• Access Rights, on page 72
Deactivate a User Profile
Before you begin
Ensure that you do not associate the user profile to any entity before deactivating the user profile.
To deactivate a user profile:
Procedure
Step 1 From the Webex Contact Center Portal navigation bar, choose ProvisioningStep 2 Choose User Profiles.
The User Profiles page appears. This page displays a list of user profiles.
Step 3 Click the ellipsis icon beside a user profile and click Delete.The Heads Up! dialog box appears.
Step 4 Click Yes to confirm.The status of the user profile changes to Not Active.
Cisco Webex Contact Center Management Portal User Guide74
ProvisioningEdit a User Profile

Activate a User Profile
Procedure
Step 1 From the Webex Contact Center Portal navigation bar, choose ProvisioningStep 2 Choose User Profiles.
The User Profiles page appears. This page displays a list of user profiles.
Step 3 Click the ellipsis icon beside the user profile you want to activate and click Restore.The Confirm Activate? dialog box appears.
Step 4 Click Yes to confirm.The status of the user profile changes to Active.
Copy a User ProfileYou can copy an existing user profile, update the details, and save it with a different name.
To edit a user profile:
Procedure
Step 1 From the Webex Contact Center Portal navigation bar, choose Provisioning.Step 2 Choose User Profiles.
The User Profiles page appears. This page displays a list of user profiles.
Step 3 Click the ellipsis icon beside a user profile that you want to copy, and click the Copy.The User Profile page appears.
Step 4 Enter the details in the following tabs and click Save in each tab.
• General Settings, on page 69
• Module Settings, on page 69
• Access Rights, on page 72
Work TypesWhen you create an idle or wrap-up code, you associate it with a work type. Work types group idle andwrap-up codes in auxiliary reports.
Cisco Webex Contact Center Management Portal User Guide75
ProvisioningActivate a User Profile

Create a Work TypeTo create a work type:
Procedure
Step 1 From the Webex Contact Center Portal navigation bar, choose Provisioning.Step 2 ChooseWork Types.
The Work Types page appears. This page displays a list of work types.
Step 3 Click + New Work Type.The Work Type page appears.
Step 4 Enter the following details and click Save:
DescriptionSetting
Enter a name for the work type.Name
(Optional) Enter a description of the work type.Description
Specify the type of auxiliary code you can associatethe work type with.
Type
Edit a Work TypeTo edit a work type:
Procedure
Step 1 From the Webex Contact Center Portal navigation bar, choose Provisioning.Step 2 ChooseWork Types.
The Work Types page appears. This page displays a list of work types.
Step 3 Click the ellipsis icon beside the work type that you want to edit and click Edit. Except the Type, you canedit the following settings:
DescriptionSetting
Edit the name for the work type.Name
(Optionally) Edit the description of the work type.Description
Edit status of the team to specify if it is active or not.
You cannot assign auxiliary code to an inactive worktype.
Status
Cisco Webex Contact Center Management Portal User Guide76
ProvisioningCreate a Work Type

DescriptionSetting
Specify the type of auxiliary code you can associatethe work type with.
Type
Deactivate a Work TypeYou cannot deactivate a work type if there are any auxiliary codes that are associated with the work type.When you try to deactivate such a work type, a message informs you that you cannot deactivate the worktype. You can click the information icon in the message to view the list of entities that you have associatedwith this work type.
After you deactivate a work type, you can still see it in the Work Types page as Not Active work types.Historical reports also display details of the deactivated work types.
To deactivate a work type:
Procedure
Step 1 From the Webex Contact Center Portal navigation bar, choose Provisioning.Step 2 ChooseWork Types.
The Work Types page appears. This page displays a list of work types.
Step 3 Click the ellipsis icon beside the work type that you want to deactivate and click Delete.The Heads Up! dialog box appears.
Step 4 Click Yes to confirm.The status of the work type changes to Not Active.
Activate a Work TypeTo activate a work type:
Procedure
Step 1 From the Webex Contact Center Portal navigation bar, choose Provisioning.Step 2 ChooseWork Types.
The Work Types page appears. This page displays a list of work types.
Step 3 Click the ellipsis icon beside the work type that you want to activate and click Restore.The Confirm Activate? dialog box appears.
Step 4 Click Yes to confirm.
Cisco Webex Contact Center Management Portal User Guide77
ProvisioningDeactivate a Work Type

The status of the work type changes to Active.
Agent ProfilesAn agent profile is a group of permissions and Agent Desktop behaviors that you assign to specific agents.Each agent profile specifies the following permissions and settings:
• Queue Transfer
• Agent Consult and Transfer
• Wrap Up and Idle Codes
• Wrap-up timeout values
• Agent auto available
• Dialing capabilities
• Dial number capabilities
• Access to the agent personal statistics
Create an Agent ProfileTo create an agent profile:
Procedure
Step 1 From the Webex Contact Center Portal navigation bar, choose ProvisioningStep 2 Choose Agent Profiles.
The Agent Profiles page appears. This page displays a list of agent profiles.
Step 3 Click the + New Agent Profile and enter the following settings:
• General Information, on page 79
• Auxiliary Codes, on page 79
• Collaboration, on page 81
• Dial Plan, on page 82
• Agent DN Validation, on page 84
• Agent Viewable Statistics, on page 84
• Agent Thresholds, on page 85
Cisco Webex Contact Center Management Portal User Guide78
ProvisioningAgent Profiles
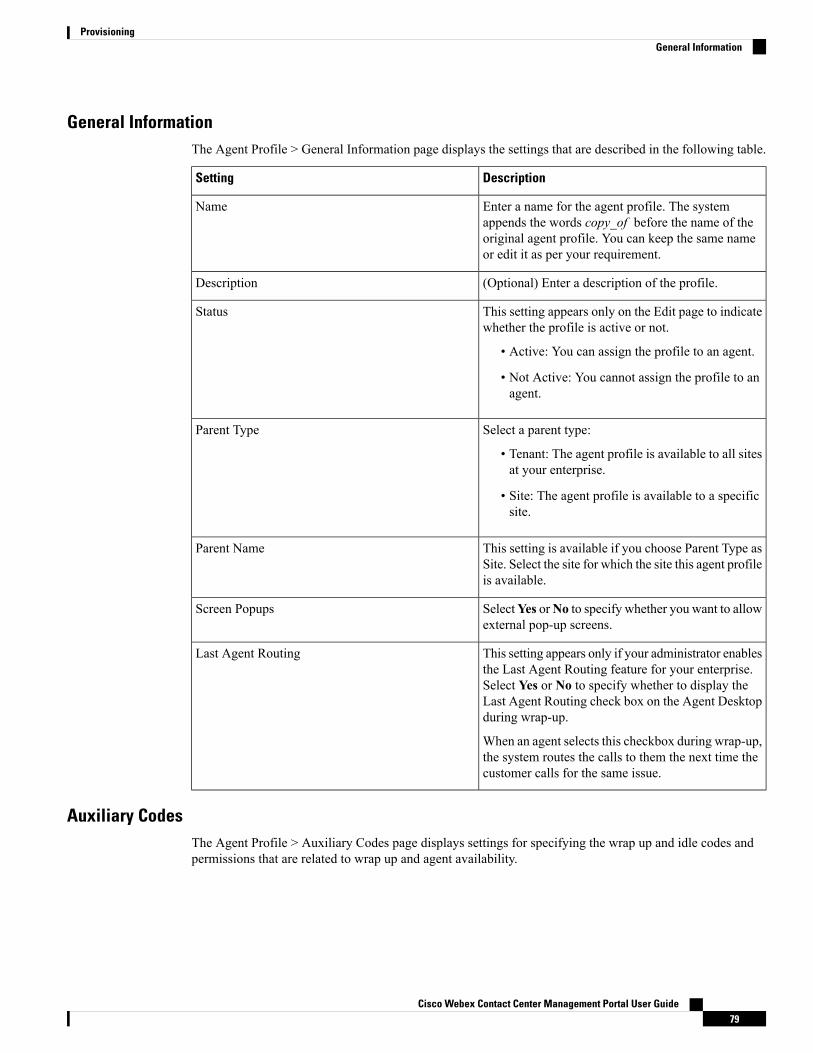
General InformationThe Agent Profile > General Information page displays the settings that are described in the following table.
DescriptionSetting
Enter a name for the agent profile. The systemappends the words copy_of before the name of theoriginal agent profile. You can keep the same nameor edit it as per your requirement.
Name
(Optional) Enter a description of the profile.Description
This setting appears only on the Edit page to indicatewhether the profile is active or not.
• Active: You can assign the profile to an agent.
• Not Active: You cannot assign the profile to anagent.
Status
Select a parent type:
• Tenant: The agent profile is available to all sitesat your enterprise.
• Site: The agent profile is available to a specificsite.
Parent Type
This setting is available if you choose Parent Type asSite. Select the site for which the site this agent profileis available.
Parent Name
SelectYes orNo to specify whether you want to allowexternal pop-up screens.
Screen Popups
This setting appears only if your administrator enablesthe Last Agent Routing feature for your enterprise.Select Yes or No to specify whether to display theLast Agent Routing check box on the Agent Desktopduring wrap-up.
When an agent selects this checkbox during wrap-up,the system routes the calls to them the next time thecustomer calls for the same issue.
Last Agent Routing
Auxiliary CodesThe Agent Profile > Auxiliary Codes page displays settings for specifying the wrap up and idle codes andpermissions that are related to wrap up and agent availability.
Cisco Webex Contact Center Management Portal User Guide79
ProvisioningGeneral Information

DescriptionSetting
When you select Auto Wrap Up with Time Out Ofand enter the time, the system automatically entersthe default wrap-up code after an agent completes aconversation. The agent, however, can select adifferent code within the time period that you specifyhere.
SelectManual Wrap Up if you want the agent toselect a wrap-up code after completing a call. Notimeout is associated with manual wrap-up.
Wrap Up Settings
Select Yes if you want the agent to go into theAvailable state after completing and wrapping up anoutdial call. The agent can also manually select anIdle state from the STATUS NOW drop-down listbefore selecting a wrap-up code.
Select No if you want the agent to go into the Idlestate after completing and wrapping up an outdial call.
Agent Available After Outdial
Select Yes if you want agents to cancel the autowrap-up time and extend the wrap-up time.
When this option set to Yes, the system displays theCancel Auto Wrap Up option when the agent is inauto wrap-up mode.
Allow Auto Wrap Up Extension
Specify the wrap-up codes that the agents can selectwhen they wrap up a contact:
• Select All to make all wrap-up codes available.
• Select Specific to make specific codes available;then select codes from the drop-down list. Toremove a code, click X on the left side of thelisted code name.
Youmust add the default wrap-up code in the SelectedCodes list. The system uses the default code whenyou have enabled Auto Wrap Up in the profile of theagent. Such agents do not enter wrap-up codes.
Wrap Up Codes
Cisco Webex Contact Center Management Portal User Guide80
ProvisioningAuxiliary Codes

DescriptionSetting
Specify the Idle codes that the agents can select inAgent Desktop:
• Select All to make all idle codes available.
• Select Specific to make specific codes available;then select codes from the drop-down list. Toremove a code, click X on the left side of thelisted code name.
You must add the default idle code in the Selectedlist. The system uses default codes in the followingscenarios:
• When the agent initially logs in.
• After the agent makes an outdial call, if you haveenabled AutoWrap Up in the profile of the agent.
Idle Codes
CollaborationThe Agent Profile > Collaboration page displays the settings that are described in the following table.
DescriptionSetting
Specify the entry points or queues that the agents canselect from the Queue drop-down list on the AgentDesktop:
• Select All to make all entry points and queuesavailable.
• Select Specific to make specific entry points andqueues available; then select entry points andqueues from the drop-down list.
• SelectNone if you do not want to make any entrypoints or queues available as transfer targets.
Entry Point/Queue Transfer Targets
Cisco Webex Contact Center Management Portal User Guide81
ProvisioningCollaboration

DescriptionSetting
Specify the teams that the agents can select from theAgent drop-down list on the Agent Desktop.
Agents can consult with, conference with, and transfercalls to the agents from the teams that they select.
• Select All to make the agents on all teamsavailable.
• Select Specific to make agents on specific teamsavailable; then select teams from the drop-down.
• Select None if you do not want to make anyteams available for consultation, conference, orcall transfer.
Buddy Teams
Select Yes if you want the agent to be able to selecta queue in the Queue drop-down as a target for aconsultation. The target must be an inbound WebexContact Center queue.
• If the agent selects an entry point as the target,the system disables the Consult button.
• The system supports Consult to Queue only forqueues that have teams serving them. If the agentattempts to consult to a queue that only redirectsto another entry point or queue, the systemdisplays a Consult Failed message.
Consult To Queue
Dial PlanThe Agent Profile > Dial Plans page displays the following settings.
DescriptionSetting
If you want the agent to be able to make outdial calls,select Yes.
If you do not want the agent to make outdial calls,select No. This setting prevents the dialpad fromappearing on the Agent Desktop.
Note: To display the dialpad, you must have anappropriate setup. Contact your administrator for thesetup.
Outdial Enabled
If you set Outdial Enabled to Yes, select the outdialentry point that the agent can use to make outdial calls.
Outdial Entry Points
Cisco Webex Contact Center Management Portal User Guide82
ProvisioningDial Plan

DescriptionSetting
Select the address book that includes the speed-dialnumbers that the agent can select to make outdial andconsult calls.
If you set Outdial Enabled to No and you select anaddress book, the agent can select a name from theaddress book for consults and transfers, but cannotmake outdial calls.
Select None if you do not want to make an addressbook available to the agent.
See Create an Address Book, on page 89 for moreinformation.
Address Book
If you want the agent to be able to make ad-hocoutdial calls, select Yes.
If you specify No, the agent cannot make ad-hocoutdial calls. However, if you set Outdial Enabled toYes, the agent can make an outdial call, but only byeither selecting an entry from the address book ortyping a name from the address book in the Start anew call field on the dialpad.
Dial Plan Enabled
This setting appears only if you set Dial Plan Enabledto Yes. Select the dial plans that determine the inputsthat the system accepts in the Start a new call field.Two system-supplied dial plans are available. Youradministrator can also create other dial plans for yourenterprise. The dial plans are:
• US accepts input text such as the following:
18005551234 1-800-555-1234 1 (800)
555-1234
• Any Format accepts any sequence ofalphanumeric characters, hyphens, parentheses,and spaces, plus, non-sequential, underscores,and periods. The input cannot begin with anunderscore or period. The system strips hyphens,spaces, and parentheses, but not the periods andunderscores. You can use this format for anyphone number as well as for the first part of ane-mail address or SIP URI. For example:
123 5551234 555-1234 1-800-FLOWERS (800)
555-1234 John.Smith
Select Dial Plan
Cisco Webex Contact Center Management Portal User Guide83
ProvisioningDial Plan

DescriptionSetting
This setting appears only if you set Outdial Enabledto Yes. Optionally, select the list of phone numbersthat the agent can select before making an outdial call.The system uses the number that you select as thecaller ID for the call. For more information, see Createan Outdial Automatic Number Identification (ANI),on page 91.
Outdial ANI
Agent DN ValidationThe Agent Profile > Agent DN Validation page displays the following settings.
DescriptionSetting
Select Unrestricted to allow agents to use any DNto log in to the Agent Desktop.
To restrict the DN that the agent can enter, select oneof the following:
• Provisioned Value restricts the login DN to thedefault value that you provision for the agent.
Note: If you do not provision any DN value, theagent can enter any DN value.
• Validation Criteria restricts the login DN to theformat specified in the Validation Criteria setting.
Validation for Agent DN
This setting appears only if you select ValidationCriteria in the Validation For Agent DN. Select theformats for the DN:
• Select All to restrict the DN to all availableformats.
• Select Specific and then select formats from theSelect Validation Criteria drop-down. For moreinformation, see Dial Plan, on page 82.
Validation Criteria
Agent Viewable StatisticsThe Agent Profile > Agent Viewable Statistics page displays the following settings.
DescriptionSetting
Select Yes or No to specify whether you want theagents view their personal statistics in Agent Desktop.
Agent Statistics
Cisco Webex Contact Center Management Portal User Guide84
ProvisioningAgent DN Validation
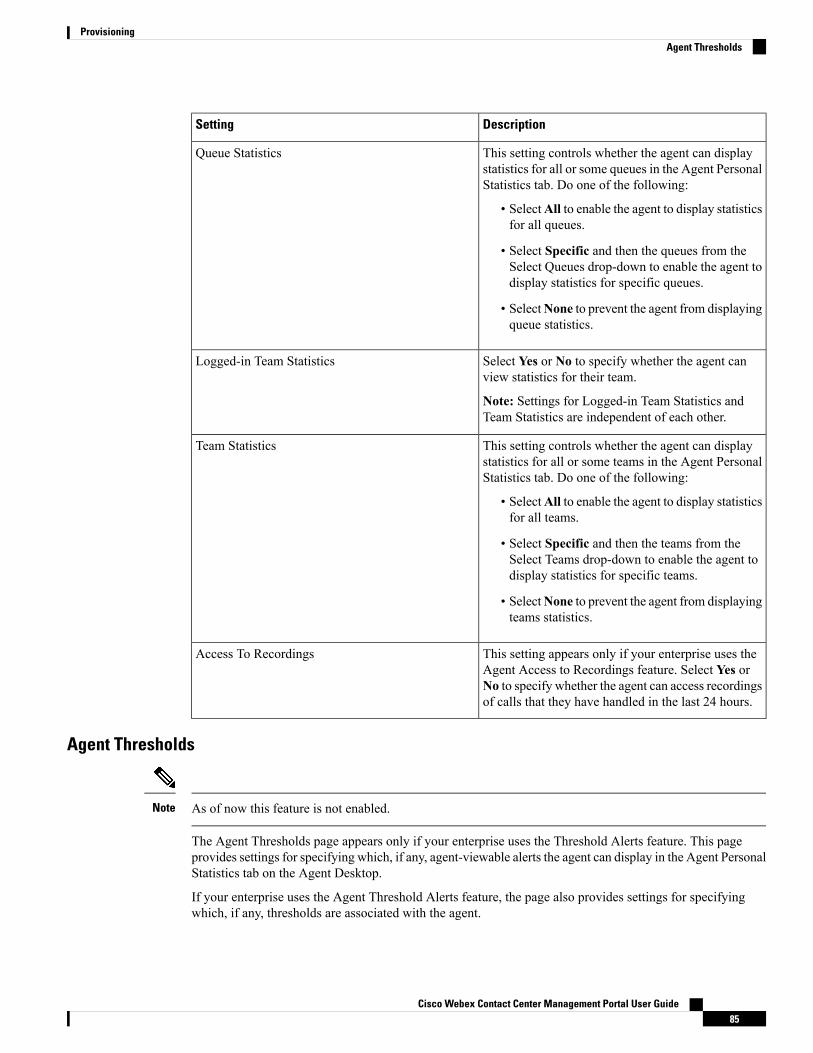
DescriptionSetting
This setting controls whether the agent can displaystatistics for all or some queues in the Agent PersonalStatistics tab. Do one of the following:
• SelectAll to enable the agent to display statisticsfor all queues.
• Select Specific and then the queues from theSelect Queues drop-down to enable the agent todisplay statistics for specific queues.
• SelectNone to prevent the agent from displayingqueue statistics.
Queue Statistics
Select Yes or No to specify whether the agent canview statistics for their team.
Note: Settings for Logged-in Team Statistics andTeam Statistics are independent of each other.
Logged-in Team Statistics
This setting controls whether the agent can displaystatistics for all or some teams in the Agent PersonalStatistics tab. Do one of the following:
• SelectAll to enable the agent to display statisticsfor all teams.
• Select Specific and then the teams from theSelect Teams drop-down to enable the agent todisplay statistics for specific teams.
• SelectNone to prevent the agent from displayingteams statistics.
Team Statistics
This setting appears only if your enterprise uses theAgent Access to Recordings feature. Select Yes orNo to specify whether the agent can access recordingsof calls that they have handled in the last 24 hours.
Access To Recordings
Agent Thresholds
As of now this feature is not enabled.Note
The Agent Thresholds page appears only if your enterprise uses the Threshold Alerts feature. This pageprovides settings for specifying which, if any, agent-viewable alerts the agent can display in the Agent PersonalStatistics tab on the Agent Desktop.
If your enterprise uses the Agent Threshold Alerts feature, the page also provides settings for specifyingwhich, if any, thresholds are associated with the agent.
Cisco Webex Contact Center Management Portal User Guide85
ProvisioningAgent Thresholds

For more information, see Threshold Rules, on page 105.
DescriptionSetting
Specify the alerts that you want the agent to receiveby selecting rules from the drop-down.
When an agent breaches a threshold rule, the systemgenerates an alert and displays it in the Agent PersonalStatistics tab in Agent Desktop.
Agent Viewable Threshold Alerts
Select Yes or No to specify whether you want theagent and the supervisor to receive alerts when theagent breaches specified threshold rules.
If the agent breaches a selected rule, the systemgenerates the alert and displays it in the AgentThreshold Alerts section of the Agent PersonalStatistics tab. The supervisor also receives the alertin their Webex Contact Center Management Portal.
Enable Agent Threshold Alerts
This is available if you enable threshold alerts. If agentviewable threshold alerts are available, select the rulesfor triggering the alerts from the drop-down.
Threshold Alerts
View the Details of an Agent ProfileTo view an agent profile:
Procedure
Step 1 From the Webex Contact Center Portal navigation bar, choose Provisioning.Step 2 Choose Agent Profiles.
The Agent Profiles page appears. This page displays a list of agent profiles.
Step 3 Click the ellipsis icon beside the agent profile you want to view and click View. You can view the followingdetails:
• General Information, on page 79
• Auxiliary Codes, on page 79
• Collaboration, on page 81
• Dial Plan, on page 82
• Agent DN Validation, on page 84
• Agent Viewable Statistics, on page 84
• Agent Thresholds, on page 85
Cisco Webex Contact Center Management Portal User Guide86
ProvisioningView the Details of an Agent Profile

Step 4 (Optional) Click Edit in each tab to edit the settings.
Edit an Agent Profile
Procedure
Step 1 From the Webex Contact Center Portal navigation bar, choose Provisioning.Step 2 Choose Agent Profiles.
The Agent Profiles page appears. This page displays a list of agent profiles.
Step 3 Click the ellipsis icon beside the agent profile you want to edit and click Edit. You can edit the followingdetails:
• General Information, on page 79
• Auxiliary Codes, on page 79
• Collaboration, on page 81
• Dial Plan, on page 82
• Agent DN Validation, on page 84
• Agent Viewable Statistics, on page 84
• Agent Thresholds, on page 85
Copy an Agent ProfileTo copy an agent profile:
Procedure
Step 1 From the Webex Contact Center Portal navigation bar, choose Provisioning.Step 2 Choose Agent Profiles.
The Agent Profiles page appears. This page displays a list of agent profiles.
Step 3 Click the ellipsis icon beside the agent profile you want to copy and click Copy. You can edit the followingdetails in the copied agent profile:
• General Information, on page 79
• Auxiliary Codes, on page 79
• Collaboration, on page 81
Cisco Webex Contact Center Management Portal User Guide87
ProvisioningEdit an Agent Profile

• Dial Plan, on page 82
• Agent DN Validation, on page 84
• Agent Viewable Statistics, on page 84
• Agent Thresholds, on page 85
Step 4 (Optional) Click Edit in each tab to edit the settings.
Deactivate an Agent ProfileYou cannot deactivate an agent profile if you associate it with any other entities such as, dial numbers or anyother routing strategy. When you try to deactivate such agent profiles, you get an error message. Click theinformation icon at the end of the message to view the list of all the associated entities.
After you deactivate an agent profile, you can still see it in the Agent Profiles page as Not Active. Historicalreports also display details of the deactivated agent profile.
To deactivate an agent profile:
Procedure
Step 1 From the Webex Contact Center Portal navigation bar, choose ProvisioningStep 2 Choose Agent Profiles.
The Agent Profiles page appears. This page displays a list of agent profiles.
Step 3 Click the ellipsis icon beside an agent profile and click Delete.The Heads Up! dialog box appears.
Step 4 Click Yes to confirm.The status of the agent profile changes to Not Active.
Activate an Agent ProfileTo activate an agent profile:
Procedure
Step 1 From the Webex Contact Center Portal navigation bar, choose ProvisioningStep 2 Choose Agent Profiles.
The Agent Profiles page appears. This page displays a list of agent profiles.
Step 3 Click the ellipsis icon beside an agent profile with the status Not Active and click Restore.The Confirm Activate? dialog box appears.
Step 4 Click Yes to confirm.
Cisco Webex Contact Center Management Portal User Guide88
ProvisioningDeactivate an Agent Profile

The status of the agent profile changes to Active.
Address BooksAddress books contain entries with phone numbers. Instead of manually entering a number when they starta call, agents can use the address book to select an entry to dial. Agents can access an address book when youadd it to their Agent Profile. For more information, see Dial Plan, on page 82 in Agent Profiles, on page 78.
You can create address books that are available to all sites or only to a specific site. The Maximum AddressBooks value in the tenant settings for your enterprise determines the number of address books you can create.For more information, see Tenant Settings, on page 13.
Create an Address BookTo create a new address book:
Procedure
Step 1 From the Webex Contact Center Portal navigation bar, choose Provisioning.Step 2 Choose Address Book.
The Address Book page appears. This page displays a list of address books.
Step 3 Click + New Address Book.
The maximum number of entries in the Address Book is 150.Note
Step 4 Enter the following details and click Save.
DescriptionSetting
Enter a name for the address book.Name
(Optional) Enter the description of the address book.Description
Select a parent type:
• Tenant: The address book is available to all sitesat your enterprise.
• Site: The address book is only available for aspecific site.
Parent Type
Select the site for the address book. This field isavailable only if you select Parent Type as Site.
Parent Name
Step 5 (Optional) In Entry List, click the + icon to add new entries to the address book.The Add Address Book dialog box appears.
Step 6 In the Add Address Book dialog box enter the following details:
Cisco Webex Contact Center Management Portal User Guide89
ProvisioningAddress Books
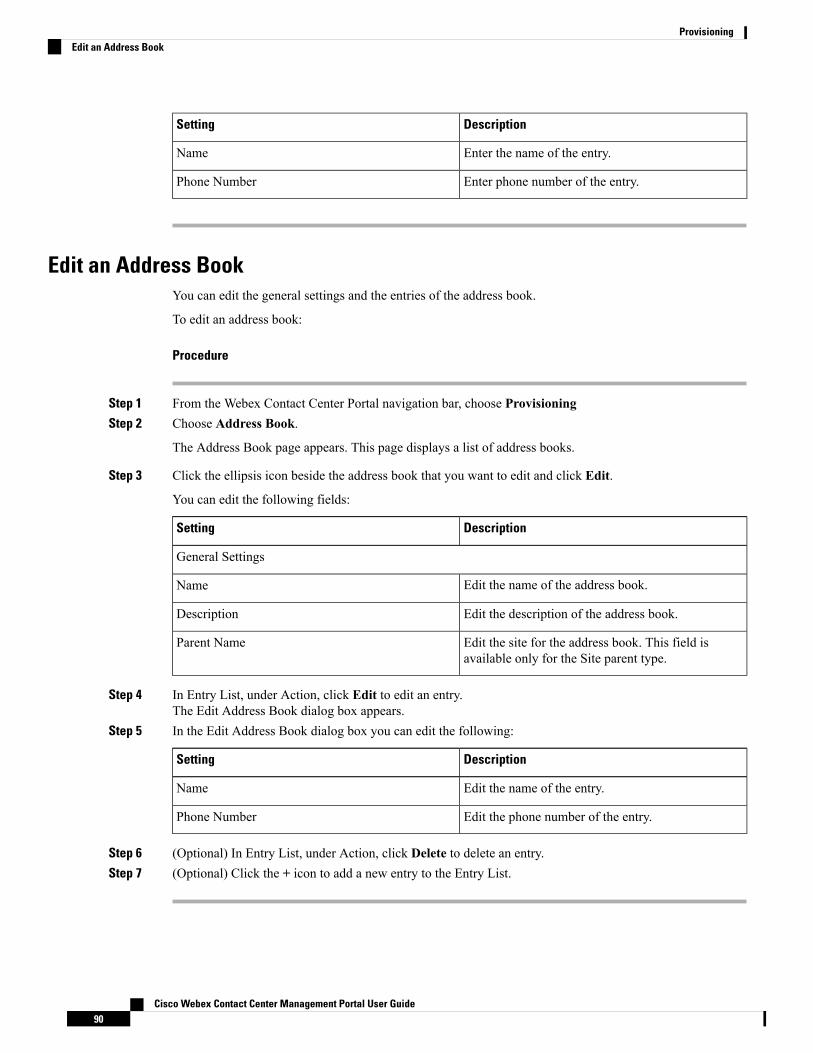
DescriptionSetting
Enter the name of the entry.Name
Enter phone number of the entry.Phone Number
Edit an Address BookYou can edit the general settings and the entries of the address book.
To edit an address book:
Procedure
Step 1 From the Webex Contact Center Portal navigation bar, choose ProvisioningStep 2 Choose Address Book.
The Address Book page appears. This page displays a list of address books.
Step 3 Click the ellipsis icon beside the address book that you want to edit and click Edit.
You can edit the following fields:
DescriptionSetting
General Settings
Edit the name of the address book.Name
Edit the description of the address book.Description
Edit the site for the address book. This field isavailable only for the Site parent type.
Parent Name
Step 4 In Entry List, under Action, click Edit to edit an entry.The Edit Address Book dialog box appears.
Step 5 In the Edit Address Book dialog box you can edit the following:
DescriptionSetting
Edit the name of the entry.Name
Edit the phone number of the entry.Phone Number
Step 6 (Optional) In Entry List, under Action, click Delete to delete an entry.Step 7 (Optional) Click the + icon to add a new entry to the Entry List.
Cisco Webex Contact Center Management Portal User Guide90
ProvisioningEdit an Address Book

Delete an Address BookYou cannot delete an address book if you associate it with any other entities such as, agent profile. When youtry to delete such address books, you get an error message. Click the information icon at the end of the messageto view the list of all the associated entities.
To delete an address book.
Procedure
Step 1 From the Webex Contact Center Portal navigation bar, choose ProvisioningStep 2 Choose Address Book.
The Address Book page appears. This page displays a list of address books.
Step 3 Click the ellipsis icon beside the address book that you want to delete and click Delete.The Heads Up! dialog box appears.
Step 4 Click Yes to confirm.
Outdial Automatic Number Identification (ANI)The Outdial Automatic Number Identification (ANI) feature allows an agent to select a phone number as theircaller ID for an outdial call.
You make an outdial ANI list available to the agent by adding it to an agent profile and then assigning theagent profile to the agent. For more information, see Agent Profiles, on page 78.
Create an Outdial Automatic Number Identification (ANI)To create an outdial ANI:
Procedure
Step 1 From the Webex Contact Center Portal navigation bar, choose Provisioning.Step 2 Choose Outdial ANI.
The Outdial ANI page appears. This page displays a list of Outdial ANIs.
Step 3 Click + New Outdial ANI.Step 4 Enter the following details and click Save.
DescriptionSetting
Enter a name for the Outdial ANI.Name
(Optional) Enter the description of theOutdial ANI.Description
Cisco Webex Contact Center Management Portal User Guide91
ProvisioningDelete an Address Book

Step 5 (Optional) In the , click the + icon to add new entries to the Outdial ANI.The Add Outdial ANI dialog box appears.
Step 6 In the Add Outdial ANI dialog box enter the following details:
DescriptionSetting
Enter the name of the entry.Name
Enter phone number of the entry.Number
Edit an Outdial Automatic Number Identification (ANI)To edit an outdial ANI:
Procedure
Step 1 From the Webex Contact Center Portal navigation bar, choose ProvisioningStep 2 Choose Outdial ANI.
The Outdial ANI page appears. This page displays a list of all Outdial ANIs.
Step 3 Click the ellipsis icon beside the Outdial ANI that you want to edit and click Edit.
You can edit the following fields:
DescriptionSetting
General Settings
Edit the name of the Outdial ANI.Name
Edit the description of the Outdial ANI.Description
Step 4 In Outdial ANI Entry List, under Action, click Edit to edit an entry.The Edit Outdial ANI dialog box appears.
Step 5 In the Edit Outdial ANI dialog box, you can edit the following:
DescriptionSetting
Edit the name of the entry.Name
Edit the phone number of the entry.Number
Step 6 (Optional) In the Entry List, under Action, click Delete to delete an entry.Step 7 (Optional) Click the + icon to add a new entry to the Entry List.
Cisco Webex Contact Center Management Portal User Guide92
ProvisioningEdit an Outdial Automatic Number Identification (ANI)

Delete an Outdial Automatic Number Identification (ANI)
You cannot delete an Outdial ANI if you associate it with any entity.Note
To delete an outdial ANI:
Procedure
Step 1 From the Webex Contact Center Portal navigation bar, choose ProvisioningStep 2 Choose Outdial ANI.
The Outdial ANI page appears. This page displays a list of Outdial ANIs.
Step 3 Click the ellipsis icon beside the Outdial ANI that you want to delete and click Delete.The Heads Up! dialog box appears.
Step 4 Click Yes to confirm.
Dial PlansIf an agent is assigned a profile in which the Dial Plan setting is enabled, the agent can make outdial calls byentering valid text in the Start a new call field of the dialpad on the Agent Desktop. The system validates thetext entered by the agent based on criteria specified in the Dial Settings section of the agent profile.
In order for the dialpad to be enabled on the Agent Desktop, your service must be set up for Outdial.Note
Dial plans can also be used to validate the DN an agent uses to log in to the Agent Desktop, as specified inthe Agent DN Validation Settings section of the agent profile.
Example:
When you add a dial plan, you must create a regular expression to specify the required format for the phonenumber entered in the Start a new call field on the Agent Desktop or to validate the DN an agent uses to login. Optionally, you can also specify a prefix and stripped characters.
The system-supplied US dial plan accepts input text such as the following:
• 18005551234
• 1-800-555-1234
• 1 (800) 555-1234
• 18005551234,,,222
In the last example (18005551234,,,222), commas are inserted before an extension number to indicate pauses.
Cisco Webex Contact Center Management Portal User Guide93
ProvisioningDelete an Outdial Automatic Number Identification (ANI)
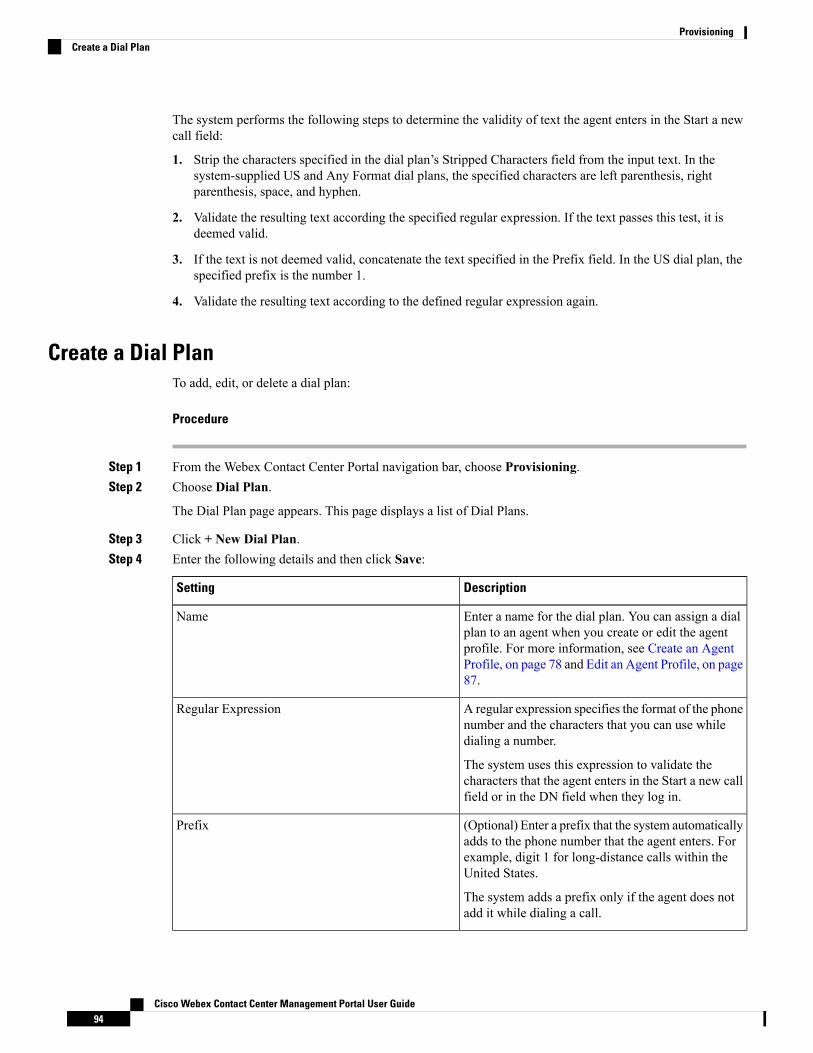
The system performs the following steps to determine the validity of text the agent enters in the Start a newcall field:
1. Strip the characters specified in the dial plan’s Stripped Characters field from the input text. In thesystem-supplied US and Any Format dial plans, the specified characters are left parenthesis, rightparenthesis, space, and hyphen.
2. Validate the resulting text according the specified regular expression. If the text passes this test, it isdeemed valid.
3. If the text is not deemed valid, concatenate the text specified in the Prefix field. In the US dial plan, thespecified prefix is the number 1.
4. Validate the resulting text according to the defined regular expression again.
Create a Dial PlanTo add, edit, or delete a dial plan:
Procedure
Step 1 From the Webex Contact Center Portal navigation bar, choose Provisioning.Step 2 Choose Dial Plan.
The Dial Plan page appears. This page displays a list of Dial Plans.
Step 3 Click + New Dial Plan.Step 4 Enter the following details and then click Save:
DescriptionSetting
Enter a name for the dial plan. You can assign a dialplan to an agent when you create or edit the agentprofile. For more information, see Create an AgentProfile, on page 78 and Edit an Agent Profile, on page87.
Name
A regular expression specifies the format of the phonenumber and the characters that you can use whiledialing a number.
The system uses this expression to validate thecharacters that the agent enters in the Start a new callfield or in the DN field when they log in.
Regular Expression
(Optional) Enter a prefix that the system automaticallyadds to the phone number that the agent enters. Forexample, digit 1 for long-distance calls within theUnited States.
The system adds a prefix only if the agent does notadd it while dialing a call.
Prefix
Cisco Webex Contact Center Management Portal User Guide94
ProvisioningCreate a Dial Plan
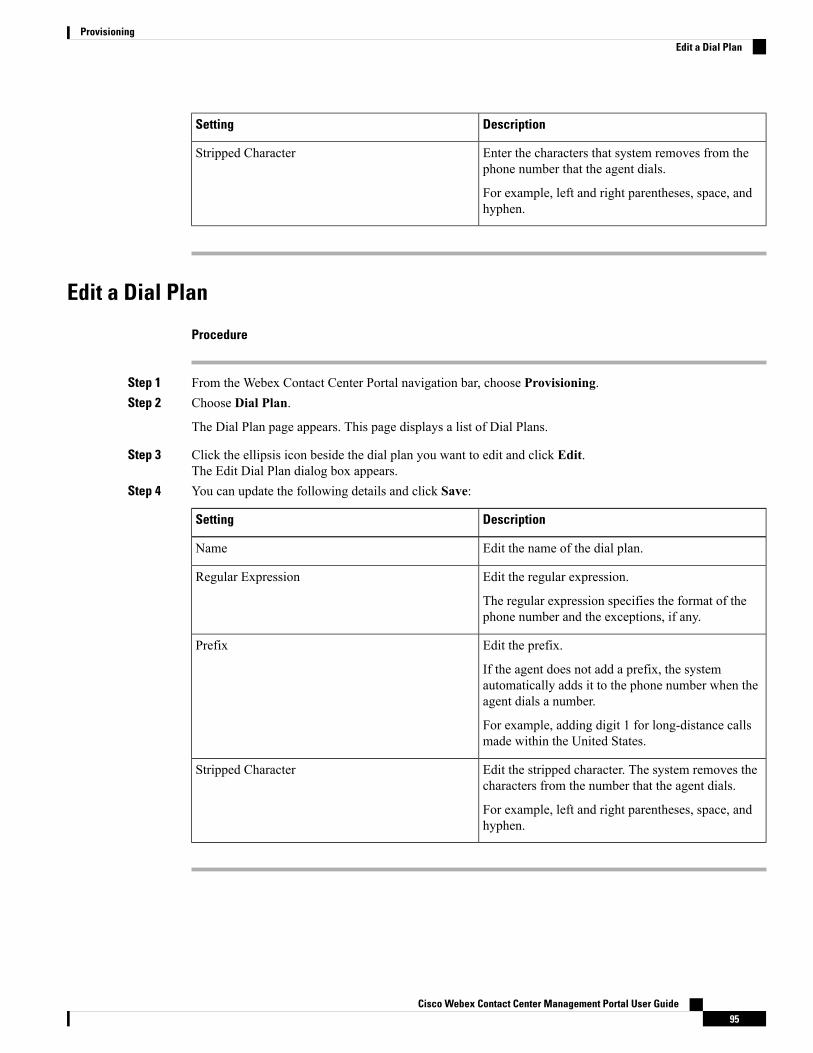
DescriptionSetting
Enter the characters that system removes from thephone number that the agent dials.
For example, left and right parentheses, space, andhyphen.
Stripped Character
Edit a Dial Plan
Procedure
Step 1 From the Webex Contact Center Portal navigation bar, choose Provisioning.Step 2 Choose Dial Plan.
The Dial Plan page appears. This page displays a list of Dial Plans.
Step 3 Click the ellipsis icon beside the dial plan you want to edit and click Edit.The Edit Dial Plan dialog box appears.
Step 4 You can update the following details and click Save:
DescriptionSetting
Edit the name of the dial plan.Name
Edit the regular expression.
The regular expression specifies the format of thephone number and the exceptions, if any.
Regular Expression
Edit the prefix.
If the agent does not add a prefix, the systemautomatically adds it to the phone number when theagent dials a number.
For example, adding digit 1 for long-distance callsmade within the United States.
Prefix
Edit the stripped character. The system removes thecharacters from the number that the agent dials.
For example, left and right parentheses, space, andhyphen.
Stripped Character
Cisco Webex Contact Center Management Portal User Guide95
ProvisioningEdit a Dial Plan

Delete a Dial Plan
Before you begin
Ensure that you do not associate the dial to any entity before deleting the dial plan. If you cannot delete a dialplan, contact your organization administrator.
To delete a dial plan:
Procedure
Step 1 From the Webex Contact Center Portal navigation bar, choose ProvisioningStep 2 Choose Dial Plan.
The Dial Plan page appears. This page displays a list of all dial plans.
Step 3 Click the ellipsis icon beside the dial plan you want to delete and click Delete.The Heads Up! dialog box appears.
Step 4 Click Yes to confirm.
Call-Associated Data VariablesYou define Call-associated data (CAD) variables using the Provisioning module for use in call control scriptsto collect one of the following types of data values:
• Caller-entered data: The data that the customer enters using IVR during a call, such as the account number.
• Agent-entered data: The data the agent enters, such as a case number or any action code.
The system stores the CAD values in the cumulative call detail records (CCDRs). Webex ContactCenterManagement Portal users can display and export to Excel or .csv files. Note the following:
• The system stores a CAD variable that is used in a call control script only if the variable name matchesthe name of an active CAD variable that the organization administrator provisions for your enterprise.You can view a list of the CAD variables used in a call control script in the Call Control section of theCreate Routing Strategy or Edit Routing Strategy page. For more information, see Assigning Call ControlScripts and Parameters, on page 151.
• The system saves an agent-entered CAD value after the agent completes the Wrap-up state for that call.If due to some reason Agent Desktop connectivity is lost, the system does not store the CAD value thatis entered by the agent. When an agent transfers a call, then the CAD variable that the last agent entersis saved.
Note that:
• CAD variable values are visible to all individuals who have access to historical records on theManagementPortal. You should not store secure data such as credit card numbers, PINs, and social security numbersshould not be stored through use of CAD variables.
Cisco Webex Contact Center Management Portal User Guide96
ProvisioningDelete a Dial Plan
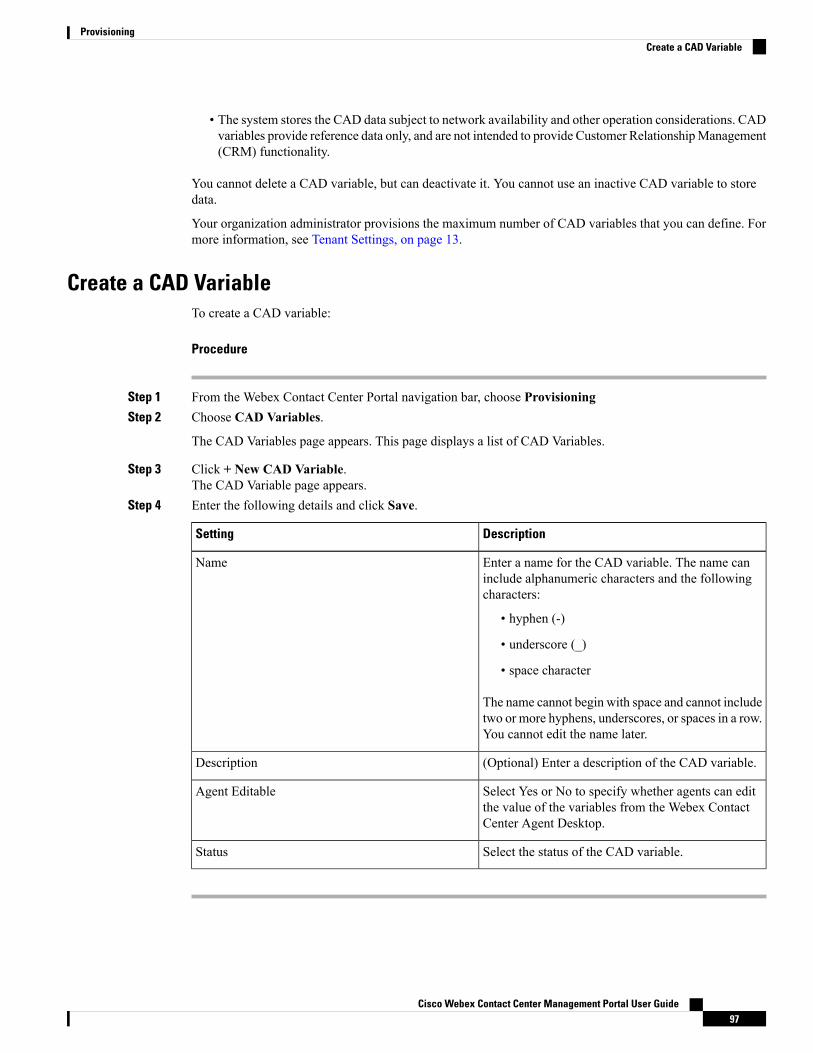
• The system stores the CAD data subject to network availability and other operation considerations. CADvariables provide reference data only, and are not intended to provide Customer RelationshipManagement(CRM) functionality.
You cannot delete a CAD variable, but can deactivate it. You cannot use an inactive CAD variable to storedata.
Your organization administrator provisions the maximum number of CAD variables that you can define. Formore information, see Tenant Settings, on page 13.
Create a CAD VariableTo create a CAD variable:
Procedure
Step 1 From the Webex Contact Center Portal navigation bar, choose ProvisioningStep 2 Choose CAD Variables.
The CAD Variables page appears. This page displays a list of CAD Variables.
Step 3 Click + New CAD Variable.The CAD Variable page appears.
Step 4 Enter the following details and click Save.
DescriptionSetting
Enter a name for the CAD variable. The name caninclude alphanumeric characters and the followingcharacters:
• hyphen (-)
• underscore (_)
• space character
The name cannot begin with space and cannot includetwo or more hyphens, underscores, or spaces in a row.You cannot edit the name later.
Name
(Optional) Enter a description of the CAD variable.Description
Select Yes or No to specify whether agents can editthe value of the variables from the Webex ContactCenter Agent Desktop.
Agent Editable
Select the status of the CAD variable.Status
Cisco Webex Contact Center Management Portal User Guide97
ProvisioningCreate a CAD Variable

Edit a CAD VariableTo edit a CAD variable:
Procedure
Step 1 From the Webex Contact Center Portal navigation bar, choose ProvisioningStep 2 Choose CAD Variables.
The CAD Variables page appears. This page displays a list of CAD Variables.
Step 3 Click the ellipsis icon beside any CAD variable and click Edit.The CAD variable appears.
Step 4 You can edit the following details and click Save.
DescriptionSetting
(Optional) Edit the description of the CAD variable.Description
Edit the settings to specify whether the agents can editthe value of the variable from the Webex ContactCenter Agent Desktop.
Agent Editable
Edit the status of the variable.Status
Multimedia ProfilesIf your administrator enables multimedia for your enterprise, you can assign each agent with a multimediaprofile. Each profile specifies the number of each type of media, such as email, chat, or telephone, the agentcan handle simultaneously.
You can assign multimedia profiles to sites, teams, or individual agents. By default, the system assigns theDefault_Telephony_Profile to every site. You cannot edit or delete this profile, but can re-assign a differentmultimedia profile to the site.
All the teams under a site have the same multimedia profile as that of the site, unless you assign a differentprofile to the teams. Similarly, all the agents under the teams have the same profile as that of the team, unlessyou change the profile for the agents.
Procedure
Step 1 On the Webex Contact Center Portal navigation bar, choose ProvisioningStep 2 ChooseMultimedia Profiles.
The Multimedia Profiles page appears. This page displays a list of multimedia profiles.
Cisco Webex Contact Center Management Portal User Guide98
ProvisioningEdit a CAD Variable

Step 3 To delete a profile, click the ellipsis button to the left of a listed profile and select Delete. You cannot deletea profile that is assigned to a site, team, or agent.
Step 4 To add a profile, click New Multimedia Profile.
- OR -
• To view or edit a profile, click the ellipsis button to the left of a listed profile and select View or Edit.
Step 5 If you are adding or editing a profile, specify or change the settings on the page that appears, and then clickSave. Settings are described in the following table.
DescriptionSetting
Profile Details
Enter a name for the multimedia profile.Name
Optionally, enter a description of the profile.Description
If set to Yes, multiple realtime contacts can be routedto the agent at the same time.
If set to No, only one realtime contact can be routedto the agent at a time. For example, the agent cannotreceive a chat contact while handling a voice contact.
Allow agents to simultaneously handle multiplerealtime interactions
Displayed on the View and Edit pages to specifywhether the profile is Active or Not Active.
Status
Media Details
For eachmedia type, specify the number of concurrentcontacts of that type an agent can handle or specify 0if no contacts of that type can be sent to the agent.Currently, only email, chat, and telephonymedia typesare available.
For Voice, you can specify only 0 or 1.
The maximum number of media channels isdetermined by the Maximum Channels Per Profileprovisioned on the Module Permissions page of thetenant settings for your enterprise. For moreinformation, see Tenant Settings, on page 13.
Voice
Fax
Chat
Video
Others
Create a Multimedia ProfileTo configure a multimedia profile:
Cisco Webex Contact Center Management Portal User Guide99
ProvisioningCreate a Multimedia Profile

Procedure
Step 1 From the Webex Contact Center Portal navigation bar, choose ProvisioningStep 2 ChooseMultimedia Profiles.
The Multimedia Profiles page appears. This page displays a list of multimedia profiles.
Step 3 Click + New Multimedia Profile.The Multimedia Profile page appears.
Step 4 Enter the following details and click Save.
DescriptionSetting
Profile Details
Enter a name for the multimedia profile.Name
(Optional) Enter a description of the profile.Description
Media Details
For each media type, enter the number of contacts ofthat type an agent can handle simultaneously. Enter0 if you do not want your agent to handle that mediatype.
Note: Currently we support only Email, Chat, andTelephony media type.
For Telephony media type, you can only havemaximum one contact.
You can define the maximum number of media typesin Maximum Channels Per Profile in the ModulePermissions page of the tenant settings for yourenterprise. For more information, see Tenant Settings,on page 13.
Voice
Fax
Chat
Video
Others
View the Details of a Multimedia ProfileTo view the details of a multimedia profile:
Procedure
Step 1 From the Webex Contact Center Portal navigation bar, choose ProvisioningStep 2 ChooseMultimedia Profiles.
The Multimedia Profiles page appears. This page displays a list of multimedia profiles.
Cisco Webex Contact Center Management Portal User Guide100
ProvisioningView the Details of a Multimedia Profile

Step 3 Click the ellipsis icon beside a multimedia profile and click View. You can view the following details:
DescriptionSetting
Profile Details
The name of the multimedia profile.Name
The description of the profile.Description
The status of the profile.Status
Media Details
The number of contacts for each of the media type.Voice
Fax
Chat
Video
Others
Step 4 (Optional) Click Edit to change the settings. For more information, see Edit a Multimedia Profile, on page101.
Step 5 (Optional) ClickDelete to deactivate the settings. For more information, see Deactivate a Multimedia Profile,on page 102.
Edit a Multimedia ProfileTo view and edit a multimedia profile:
Procedure
Step 1 From the Webex Contact Center Portal navigation bar, choose ProvisioningStep 2 ChooseMultimedia Profiles.
The Multimedia Profiles page appears. This page displays a list of multimedia profiles.
Step 3 Click the ellipsis icon beside a multimedia profile and click Edit.The Multimedia Profile page with the details of the profile appears.
Step 4 You can edit the following details and click Save.
DescriptionSetting
Profile Details
Edit the name of the multimedia profile.Name
Cisco Webex Contact Center Management Portal User Guide101
ProvisioningEdit a Multimedia Profile

DescriptionSetting
(Optional) Edit the description of the profile.Description
Change the status of the profile.Status
Media Details
Edit the number of contacts for each of the mediatype.
Note: Currently we support only Email, Chat, andTelephony media type.
For Telephony media type, you can only havemaximum one contact.
Voice
Fax
Chat
Video
Others
Deactivate a Multimedia Profile
You cannot deactivate a Multimedia profile if you associate it with any entity.Note
To delete a multimedia profile:
Procedure
Step 1 From the Webex Contact Center Portal navigation bar, choose ProvisioningStep 2 ChooseMultimedia Profiles.
The Multimedia Profiles page appears. This page displays a list of multimedia profiles.
Step 3 Click the ellipsis icon beside the multimedia profile that you want to deactivate, and click Delete.The Heads Up! page appears.
Step 4 Click Yes to confirm.
Activate a Multimedia Profile
Procedure
Step 1 From the Webex Contact Center Portal navigation bar, choose Provisioning
Cisco Webex Contact Center Management Portal User Guide102
ProvisioningDeactivate a Multimedia Profile
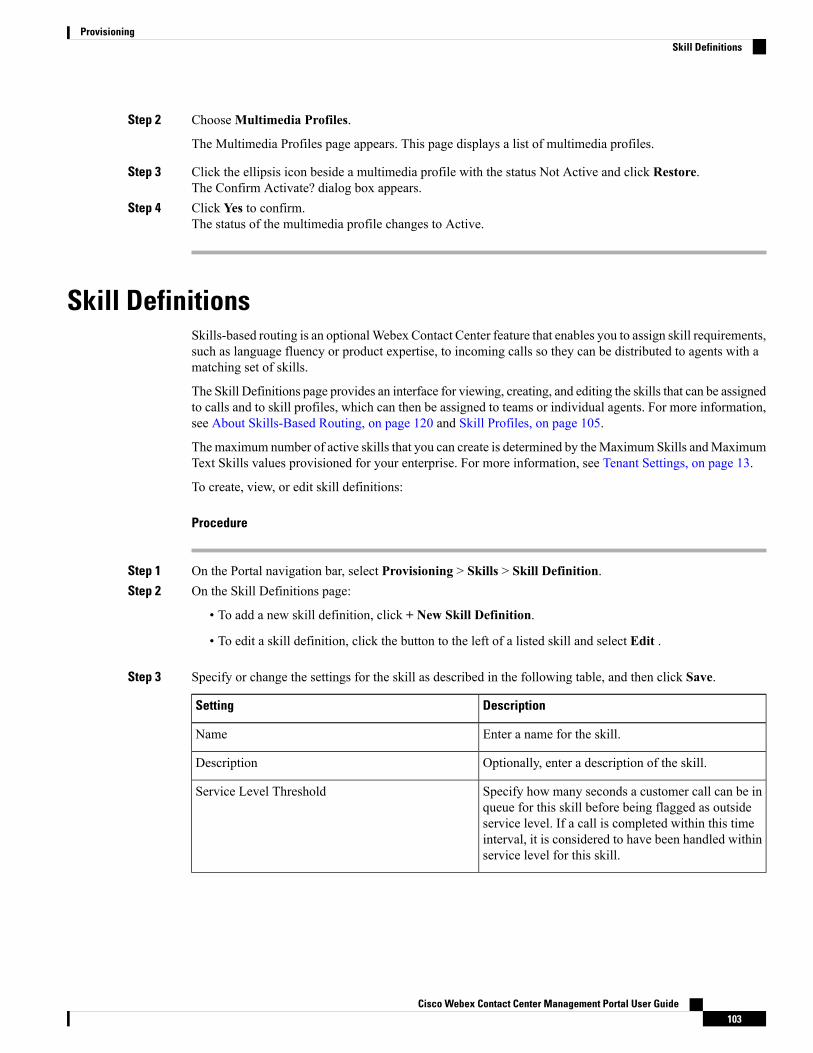
Step 2 ChooseMultimedia Profiles.
The Multimedia Profiles page appears. This page displays a list of multimedia profiles.
Step 3 Click the ellipsis icon beside a multimedia profile with the status Not Active and click Restore.The Confirm Activate? dialog box appears.
Step 4 Click Yes to confirm.The status of the multimedia profile changes to Active.
Skill DefinitionsSkills-based routing is an optionalWebex Contact Center feature that enables you to assign skill requirements,such as language fluency or product expertise, to incoming calls so they can be distributed to agents with amatching set of skills.
The Skill Definitions page provides an interface for viewing, creating, and editing the skills that can be assignedto calls and to skill profiles, which can then be assigned to teams or individual agents. For more information,see About Skills-Based Routing, on page 120 and Skill Profiles, on page 105.
The maximum number of active skills that you can create is determined by theMaximum Skills andMaximumText Skills values provisioned for your enterprise. For more information, see Tenant Settings, on page 13.
To create, view, or edit skill definitions:
Procedure
Step 1 On the Portal navigation bar, select Provisioning > Skills > Skill Definition.Step 2 On the Skill Definitions page:
• To add a new skill definition, click + New Skill Definition.
• To edit a skill definition, click the button to the left of a listed skill and select Edit .
Step 3 Specify or change the settings for the skill as described in the following table, and then click Save.
DescriptionSetting
Enter a name for the skill.Name
Optionally, enter a description of the skill.Description
Specify how many seconds a customer call can be inqueue for this skill before being flagged as outsideservice level. If a call is completed within this timeinterval, it is considered to have been handled withinservice level for this skill.
Service Level Threshold
Cisco Webex Contact Center Management Portal User Guide103
ProvisioningSkill Definitions
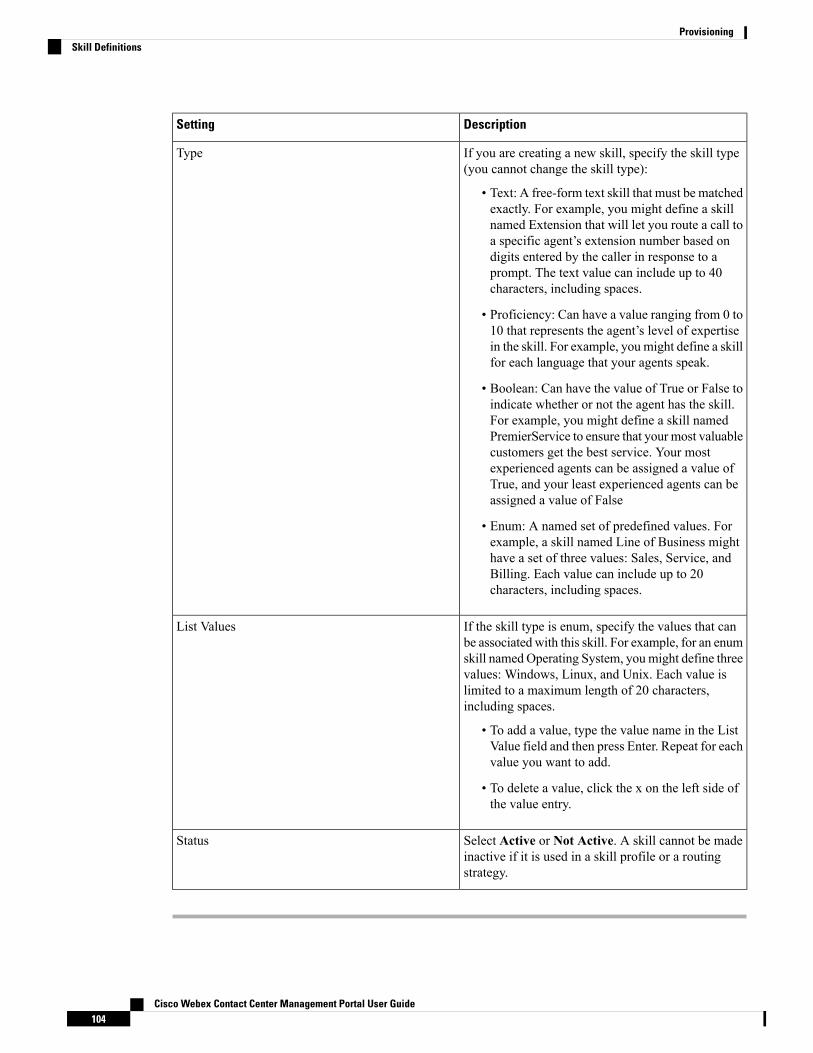
DescriptionSetting
If you are creating a new skill, specify the skill type(you cannot change the skill type):
• Text: A free-form text skill that must be matchedexactly. For example, you might define a skillnamed Extension that will let you route a call toa specific agent’s extension number based ondigits entered by the caller in response to aprompt. The text value can include up to 40characters, including spaces.
• Proficiency: Can have a value ranging from 0 to10 that represents the agent’s level of expertisein the skill. For example, you might define a skillfor each language that your agents speak.
• Boolean: Can have the value of True or False toindicate whether or not the agent has the skill.For example, you might define a skill namedPremierService to ensure that your most valuablecustomers get the best service. Your mostexperienced agents can be assigned a value ofTrue, and your least experienced agents can beassigned a value of False
• Enum: A named set of predefined values. Forexample, a skill named Line of Business mighthave a set of three values: Sales, Service, andBilling. Each value can include up to 20characters, including spaces.
Type
If the skill type is enum, specify the values that canbe associated with this skill. For example, for an enumskill named Operating System, youmight define threevalues: Windows, Linux, and Unix. Each value islimited to a maximum length of 20 characters,including spaces.
• To add a value, type the value name in the ListValue field and then press Enter. Repeat for eachvalue you want to add.
• To delete a value, click the x on the left side ofthe value entry.
List Values
Select Active or Not Active. A skill cannot be madeinactive if it is used in a skill profile or a routingstrategy.
Status
Cisco Webex Contact Center Management Portal User Guide104
ProvisioningSkill Definitions

Skill ProfilesA skill profile is a set of skills, each with an assigned value, that can be assigned to an agent-based team orto an individual agent. For example, a skill of English might be assigned a high level of proficiency in oneskill profile and a lower level in another profile.
If a skill profile is assigned to a team, all agents logged in to that team are associated with that skill profileunless the agent is assigned a specific skill profile.
To create, copy, or edit a skill profile:
Procedure
Step 1 On the Webex Contact Center Portal navigation bar, select Provisioning > Skills > Skill Profiles.Step 2 On the Skill Profiles page:
• To add a skill profile, click + New Skill Profile.
• To copy or edit the settings for a skill profile, click the button to the left of a listed skill profile and selectCopy or Edit .
Step 3 Enter or change the name and optional description of the skill profile on the Add, Copy, or Edit page.Step 4 Select or clear the check box to the left the name of each skill you want to add to or remove from the skill
profile, and specify the value of each selected skill as described in the following table.
Do this to specify the skill valueFor this skill type
Drag the slider to a number between 0 and 10 toindicate how proficient the agent is in this skill.
Proficiency
Click one of the radio buttons to specify whether theagent has this skill (True) or does not have the skill(False).
Boolean
Enter a maximum of 40 characters (including spaces).Text
Select the check box next to each list value thatrepresents a skill the agent has.
Enum
Step 5 Click Save to save the skill profile.
Threshold Rules
This feature is not available.Note
Cisco Webex Contact Center Management Portal User Guide105
ProvisioningSkill Profiles

If your enterprise uses the Threshold Alerts feature, authorized users can create threshold rules to monitoragent and call data.
A threshold alert can be displayed in the Agent Personal Statistics tab on the Agent Desktop if Agent Viewableis set to Yes for the threshold rule and the threshold alert is selected in the agent profile assigned to the agent.For more information, see Agent Profiles, on page 78.
Threshold rules can be configured for the call and agent metrics listed in the following table. For each rule,you specify a value that will trigger the alert and one of the following operands:
Greater than>
Greater than or equal to>=
Less than<
Less than or equal to<=
Equal to=
Trigger Value TypeEntity TypeMetric
Call Metrics
CountQueueAbandoned Calls
DurationQueueAverage Queue Time
DurationQueueAverage Speed of Answer
CountQueueBlind Transferred Calls
CountEntry PointIVR Calls
DurationQueueLongest Time in Queue
CountQueueNumber of Calls in Queue
CountQueueOverflow Calls
PercentageQueueService Level Threshold
CountEntry Point or QueueShort Calls
CountQueueTransferred Calls
Agent Metrics
CountSite or TeamAvailable Agents
CountSite or TeamConnected Agents
DurationAgentCurrent Available Time
DurationAgentCurrent Connected Time
DurationAgentCurrent Hold Time
Cisco Webex Contact Center Management Portal User Guide106
ProvisioningThreshold Rules

Trigger Value TypeEntity TypeMetric
DurationAgentCurrent Idle Time
DurationAgentCurrent Wrap-up Time
DurationSite or TeamIB Average Handle Time
CountSite or TeamIdle Agents
CountSite or TeamNot Responding Agents
CountSite or TeamNumber of Agents in Outdial
CountSite or TeamNumber of Logged in Agents
DurationSite or TeamOB Average Handle Time
PercentageSite or TeamOccupancy
DurationAgentTotal Available Time
DurationAgentTotal Idle Time
The maximum number of threshold rules that you can create is determined by the Maximum Threshold Rulesvalue provisioned for your enterprise. For more information, see Tenant Settings, on page 13.
To view, edit, or create a threshold rule:
Procedure
Step 1 On the Webex Contact Center Portal navigation bar, select Provisioning > Threshold Rules.Step 2 On the Threshold Rules page:
• To add a new rule, click + New Threshold Rule.
• To view, copy or edit the settings for a threshold rule, click the ellipsis button to the left of a listed ruleand select Copy or Edit.
• To delete a threshold rule, click the ellipsis button to the left of a listed rule and select Delete. Then, inthe confirmation dialog box, click OK.
Step 3 If you are adding, copying, or editing a threshold rule, specify or change the settings for the rule as describedin the following table, and then click Save.
DescriptionSetting
General Settings
Enter a name for the rule.Name
Enter a short description of the rule.Description
Cisco Webex Contact Center Management Portal User Guide107
ProvisioningThreshold Rules

DescriptionSetting
Select Yes or No to specify whether an alert can besent to agents when the threshold rule is breached. IfYes, this rule will be available for selection on theAgent Profiles > Agent Thresholds page when youcreate or edit an agent profile (see Agent Profiles, onpage 78).
Agent Viewable
Select the entity type that the threshold rule will applyto: Entry Point, Queue, Site, Team, or (if yourenterprise uses the Agent Threshold Alerts feature)Agent.
Entity Type
This setting appears on the Edit page to specifywhether the threshold is Active or Not Active.
Status
Entity Information
Specify whether this is an agent threshold or a callthreshold.
Metric Type
Select the entry point, queue, site, or team that therule will apply to. This setting is not applicable if theentity type is Agent.
Entity
Threshold Information
Select a value from the drop-down list. The listdisplays only those metrics that are applicable to theselected entity type.
Threshold Metric
Operand. Select a value from the drop-down list:
> (greater than) >= (greater than or equal to) < (lessthan) <= (less than or equal to) = (equal to)
Operand
Specify the value that will trigger a threshold alert.The value type (duration, count, or percentage) isbased on the metric selected.
The trigger value must be greater than 0 for all metricsexcept Available Agents, Connected Agents, Numberof Agents in Outdial, and Number of Logged inAgents.
Trigger Value
Specify the interval, in seconds, during which thesystem will generate only one alert for the thresholdrule check.
Trigger Interval
Email Information
Cisco Webex Contact Center Management Portal User Guide108
ProvisioningThreshold Rules

DescriptionSetting
If you want an email alert or text message to be sentto an individual when the threshold is triggered, enterthe email address in either the Notification Receiversor the Text Notification Receivers field, and then pressEnter. Repeat for each address you want to add.
To remove an address, click the x on the left side ofthe listed address.
Notification Receivers
Text Notification Receivers
Manage Dial Numbers to Entry Point MappingThe DN to Entry Point Mappings page is an interface for managing the mappings between Dial Numbers(DN) and entry points.
To use an entry point you must map a dial number to the entry point.
You can also add and remove multiple DN mappings using a .csv file. For for more information, see BulkAdd or Remove Dial Number to Entry Point Mappings, on page 111.
Map a Dial Number to an Entry PointTo map a DN to an entry point individually:
Procedure
Step 1 From the Webex Contact Center Portal navigation bar, click Provisioning.Step 2 Click DN to Entry Point Mapping.
The DN to Entry Point Mapping appears. This page lists all the available mappings.Step 3 Click + New DN to EP Mapping.
The DN to Entry Point Mapping page appears.Step 4 Enter the following settings and click Save:
DescriptionSetting
Enter the ingress toll-free or DID number. The formatmust match with the number that you receive fromthe inbound carrier. You can only enter numbers.
If your organization administrator enables WebexCalling, you can select a DN from the drop-down. .You can configure the DNs from Control Hub. Formore information on configuring DN from ControlHub, see https://help.webex.com/preview/en-us/7ewb6v/Configure-Dial-Number-for-Cisco-Webex-Contact-Center.
DN
Cisco Webex Contact Center Management Portal User Guide109
ProvisioningManage Dial Numbers to Entry Point Mapping

DescriptionSetting
Select the entry point to which you want to map theDN. If you want to map the entry point later, selectNone from the drop-down.
Entry Point
The changes take effect after the system automatically synchronizes the associated files per hour.Note
Edit a Dial Number to Entry Point MappingTo edit the mapping of a dial number to an entry point:
Procedure
Step 1 From the Webex Contact Center Portal navigation bar, click Provisioning.Step 2 Click DN to Entry Point Mapping.
Alternately, you can also do the following:
• Search the search the dial number that you have mapped to an entry point from the Select Entry Pointdrop-down.
• Select Not Mapped from the Select Entry Point drop-down to view all the dial numbers that you havenot mapped to any entry points. Then you can edit the dial number to map them to an entry point.
The DN to Entry Point Mapping appears. This page lists all the available mappings.Step 3 (Optional) To export the dial numbers and their related entry points as a CSV file, click Export as CSV.Step 4 Click the icon beside the dial number that you want to edit and click Edit.
The DN to Entry Point Mapping appears.Step 5 Edit the entry point for the dial number and click Save.
Delete a Dial Number to Entry Point MappingTo edit the mapping of a dial number to an entry point:
Procedure
Step 1 From the Webex Contact Center Portal navigation bar, click Provisioning.Step 2 Click DN to Entry Point Mapping.
The DN to Entry Point Mapping appears. This page lists all the available mappings.Step 3 Click the icon beside the dial number that you want to edit and clickDelete. Alternately you can use the Select
Entry Point drop-down to search the dial number that you have mapped to an entry point.The Heads Up! dialog box appears.
Cisco Webex Contact Center Management Portal User Guide110
ProvisioningEdit a Dial Number to Entry Point Mapping
Step 4 Click Yes to confirm the delete.
Bulk Add or Remove Dial Number to Entry Point MappingsTo add or remove dial number to entry point mappings in bulk:
Before you begin
Create a CSV file with new-line separated entries and save it in your local system. Each line must include acomma-separated dial number and entry point ID pair. For example:
8005551234,AVx90dWsbxpvzWSp3TSo
Procedure
Step 1 From the Webex Contact Center Portal navigation bar, choose Provisioning.Step 2 Click DN to Entry Point Mapping.
The DN to Entry Point Mapping appears. This page lists all the available mappings.Step 3 Click Bulk Upload.Step 4 Do one of the following:
• Add New DN Mappings: To add new dial number and entry point mappings in bulk.• Remove Existing DN Mappings: To overrite the existing mappings with new mappings in bulk.
Step 5 Upload the new CSV file from your local system and click Upload.
Manage Entry Point or Queue GroupsThe Entry Point or Queue Group is an interface for creating groups to use with the Map View and BillingReport. After you add an Entry Point or Queue group, you can assign the group to an entry point or a queue.
For more information, see Create an Entry Point or an Outdial Entry Point, on page 27 and Create a Queueor an Outdial Queue, on page 36.
To view, add, edit, or delete an entry point or queue group:
Procedure
Step 1 From the Webex Contact Center Portal navigation bar, click Provisioning.Step 2 Click Entry Point/Queue Group.
The Entry Point/Queue Group page appears. The page lists all the entry point or queue groups, if any.Step 3 You can do the following:
• To add a new group, click the + New EntryPoint/Queue Group.
• To edit an existing entry point or queue group, click the button to the left of a group and click Edit.
Cisco Webex Contact Center Management Portal User Guide111
ProvisioningBulk Add or Remove Dial Number to Entry Point Mappings
• To delete an existing entry point or queue group, click the button to the left of a group and click Delete.
The Heads Up! dialog box appears. Click Yes to confirm.
Step 4 If you are adding or editing an entry point or queue group, update the following fields and click Save.
DescriptionSetting
Enter the name of the group.Name
Select the group type:
• Billing: The system adds the group to the BillingGroup drop-down in the configuration for entrypoints and queues.
• Map: The system adds the group to the MapGroup drop-down in the configuration for entrypoints and queues.
For more information, see Create an Entry Point oran Outdial Entry Point, on page 27 and Create aQueue or an Outdial Queue, on page 36.
You cannot change the Type for an exiting entry pointor queue group.
Type
Select the status of the group.
This setting is available when you edit an entry pointor a queue group.
You cannot deactivate an entry point or queue groupif that is the only entry point or queue group for yourtenant.
Status
Upload Agent Update TemplateBefore you begin
Download and save the details of the agents in the Agent Update Template. For more information, see DownloadAgent Update Template, on page 113.
To upload the details of multiple agents simultaneously:
Procedure
Step 1 From the Webex Contact Center Portal navigation bar, choose Provisioning.Step 2 Click Users.
The Users page appears.
Cisco Webex Contact Center Management Portal User Guide112
ProvisioningUpload Agent Update Template

Step 3 Click Bulk Update.The Bulk Upload dialog-box appears.
Step 4 Browse the Agent Update template from your local system and choose the template.Step 5 Click Upload.Step 6 (Optional) Check the status of the upload from Bulk Operations Status in Provisioning.
Download Agent Update TemplateTo download the agent update template:
Procedure
Step 1 From the Webex Contact Center Portal navigation bar, choose ProvisioningStep 2 Choose Templates and then Agent Update Template.
The Opening AgentBulkUpdate.csv dialog box appears.Step 3 You can do one of the following:
• Open the file.• Save the file in your local system.
Reports for the Provisioned ItemsYou can generate reports about the active resources that the Webex Contact Center administrator provisionsfor your enterprise, using the Webex Contact Center portal. You can view the following reports:
DescriptionReport
The details of the sites for your enterprise.
For more information, see About Sites, Teams, EntryPoints, and Queues, on page 2
Site Report
The details of the teams for your enterprise.
For more information, see About Sites, Teams, EntryPoints, and Queues, on page 2
Team Report
The details of the agents for your enterprise.
For more information, see Agent Profiles, on page78.
Agent Report
The details of the entry points for your enterprise.
For more information, see Entry Points and Queues,on page 26.
Inbound EP Report
Cisco Webex Contact Center Management Portal User Guide113
ProvisioningDownload Agent Update Template
DescriptionReport
The details of the queues for your enterprise.
For more information, see Entry Points and Queues,on page 26.
Inbound Queues Report
The details of the outdial entry points for yourenterprise.
For more information, see Entry Points and Queues,on page 26.
Outdial EP Report
The details of the outdial queues for your enterprise.
For more information, see Entry Points and Queues,on page 26.
Outdial Queues Report
The details of the agent profiles for your enterprise.
For more information, see Agent Profiles, on page78.
Agent Profile Report
The details of the skills that are available for yourenterprise.
This report is available if your enterprise uses theSkill-Based Routing.
For more information on how to define the skills foryour enterprise, see Skill Definitions, on page 103.
Currently we do not support Skill-BasedRouting.
Note
Skill Report
The details of the mapping of the skills and thecorresponding profiles.
This report is available if your enterprise uses theSkill-Based Routing.
For more information on how to define the profilesfor the skills, see Skill Profiles, on page 105.
Skill Profile Report
The details about the mapping of the routing strategieswith the entry points, queues, and teams.
For more information on how to define routingstrategies, see About Contact Routing, on page 119.
Routing Report
Cisco Webex Contact Center Management Portal User Guide114
ProvisioningReports for the Provisioned Items

DescriptionReport
The details about the agents and their correspondingskills.
This report is available if your enterprise uses theSkill-Based Routing.
For more information on how to define the skills foryour enterprise and Agent profiles, see SkillDefinitions, on page 103 and Agent Profiles, on page78.
Note: Currently we do not support Skill-BasedRouting.
Agent Skills Report
Manage Reports for the Provisioned ItemsTo email the report or download the report for any provisioned item:
Procedure
Step 1 In the Webex Contact Center portal navigation bar, click Provisioning.Step 2 Click Reports.
A drop-down with the type of reports that are available appears.Step 3 Select the required type of report.
For more information on the types of the reports, see Reports for the Provisioned Items, on page 113.
The report page appears.Step 4 Do one of the following:
• Download the report as either an Excel sheet or PDF.• Email the report to your email address.
For the Routing Report, you have to select the type of the routing strategy for which you want togenerate the report. The options are:
• Current
• Active
• All
Note
Create Idle or Wrap-up CodesTo create an idle or wrap-up code or to edit or delete a wrap-up or idle code that has been created for yourenterprise:
Cisco Webex Contact Center Management Portal User Guide115
ProvisioningManage Reports for the Provisioned Items

Procedure
Step 1 From the Webex Contact Center Portal navigation bar, choose ProvisioningStep 2 Choose Auxiliary Codes.
The Aux Codes page appears. By default the system displays the Idle Codes. To view the list of list of wrap-upcodes, selectWrap Up Codes at the top of the page.
Step 3 Click + New Idle Code or + New Wrap Up Code.The Aux Codes Idle Codes or Aux Codes Wrap Up Codes page appears.
Step 4 Enter the following details and click Save.
DescriptionSetting
Enter the code name.Name
(Optional) Enter a description of the code.Description
SelectYes orNo to indicate whether this is the defaultcode.
• If this is the first idle or wrap-up code for yourorganization, you must make it the default. Youcan modify it later after you create more codes.
• When you make a code default, the systemoverrides the existing default code. At one point,there can be only one default code each for Idleand Wrap Up.
You must assign the default idle and wrap-up codesin agent profiles. For more information, see AgentProfiles, on page 78.
• The default wrap-up code is used when theagent’s profile specifies Auto Wrap Up. Suchagents do not enter wrap-up codes. Instead, theyautomatically go into the Available state aftercompleting an incoming call and automaticallygo into the Idle state after making an outdial call.
• The default idle code is used when the agentinitially logs in and after the agent makes anoutdial call if the agent’s profile specifies AutoWrap Up.
Is Default
Select the work type you want to associate with thiscode.
Work Type
Step 5 To display a list of wrap-up codes, selectWrap Up Codes at the top of the page.Step 6 On the Idle Codes or Wrap Up Codes List page:
• To add a new code, click New Idle Code or New Wrap Up Code.
Cisco Webex Contact Center Management Portal User Guide116
ProvisioningCreate Idle or Wrap-up Codes

• To edit the settings for a code, click the ellipsis button to the left of a listed code and select Edit.
• To delete a code, click the ellipsis button to the left of a listed code and select Delete. Then, in theconfirmation dialog box, click OK.
Idle or Wrap-Up CodesAgents select Idle or Wrap-Up codes in Webex Contact Center Agent Desktop to indicate their unavailabilityor status of the customer contacts. Idle codes typically indicate why an agent is not available to take customercontacts, such as during lunch break or meeting. Wrap-up codes indicate the result of the customer contacts,for example, the agent escalated the contact, or sold any service.
You associate each idle or wrap-up code with a work type. Work types are values that the system uses togroup idle and wrap-up codes in auxiliary reports. For more information, see Create a Work Type, on page76.
Agents can use an Idle or Wrap-Up code when you assign the code to their profile. You must add at least oneidle code and one wrap-up code in an agent profile. For more information, see Agent Profiles, on page 78.
If your enterprise uses the outdial feature, it is recommended that you create aWrap-Up code such as OutdialFailed. Agents can use this code when they are in the Wrap Up state after initiating an outdial call that failsto connect.
Note
Edit Idle or Wrap-Up Codes
Procedure
Step 1 From the Webex Contact Center Portal navigation bar, choose ProvisioningStep 2 Choose Templates and then Agent Update Template.
The Opening AgentBulkUpdate.csv dialog box appears.Step 3 Enter the following details and click Save.
DescriptionSetting
Enter the code name.Name
(Optional) Enter a description of the code.Description
Cisco Webex Contact Center Management Portal User Guide117
ProvisioningIdle or Wrap-Up Codes

DescriptionSetting
Select Yes or No to indicate whether this code is thedefault code.
• If this code is the first idle or wrap-up code thatyou create, you must make it the default code.You can modify it later after you create othercodes.
You must include the default idle and wrap-up codesin agent profiles. For more information, see AgentProfiles, on page 78.
• The system uses the default wrap-up code whenthe profile of the agent specifies Auto Wrap Up.Such agents do not enter wrap-up codes. Instead,they automatically go into the Available stateafter completing an incoming call andautomatically go into the Idle state after makingan outdial call.
• The system uses the default idle code when theagent profile has Auto Wrap enabled.
Is Default
Select Yes or No to indicate whether this code is thesystem code. The multimedia subsystem uses theSystem auxiliary codes.
Is System Auxiliary Code
Select the work type that you want to associate withthis code.
Work Type
Delete Idle or Wrap-up Codes
Procedure
Activate Idle or Wrap-up Codes
Procedure
Cisco Webex Contact Center Management Portal User Guide118
ProvisioningDelete Idle or Wrap-up Codes

C H A P T E R 4Contact Routing
• About Contact Routing, on page 119• About Multimedia, on page 122• About Web Callback, on page 123• Working with Call Control Scripts, on page 123• Uploading and Updating Resource Files, on page 134• Viewing, Creating, Modifying, and Deleting Routing Strategies, on page 138
About Contact RoutingThe Routing Strategy module provides a flexible environment for routing contacts to the best resource,regardless of location. Each incoming contact arrives at an entry point, from where it’s sent to queue fordistribution among teams at contact center sites according to scheduled routing strategies, scheduled teamcapacity strategies, and queue precedence settings specified in the Routing Strategy module.
In addition, if your enterprise uses the outdial feature, each outdial call passes through an outdial entry pointand outdial queue according to routing strategies you specify in the Routing Strategy module.
Although the examples in the following sections refer to phone contacts, the same contact routing options areavailable to other media types.
Note
The following sections are covered:
• Basic Contact Routing, on page 120
• About Skills-Based Routing, on page 120
• About Queue Reshuffling, on page 121
• About Global Routing Strategies, on page 121
• About Queue Precedence, on page 122
• About Team Capacity Strategies, on page 122
Cisco Webex Contact Center Management Portal User Guide119
Basic Contact RoutingIn the following example, an incoming call arrives at an entry point where the caller is presented with threeoptions. After the caller selects an option, the call is sent to a queue, where it waits for an agent to becomeavailable on one of the teams servicing that queue.
Each entry point and queue is associated with one or more routing strategies, which control how calls getserviced at specified time intervals, including what call control script to use to treat the call and what audiofile to play when a call arrives or is waiting in queue.
In addition, the routing strategy for a queue specifies which teams receive calls and in what order, how longthe call can wait in queue (before it gets distributed to an overflow destination number), and fail-over settingsfor agents and teams. You can specify one of the following options for identifying an agent to service a call:
• Longest Available Agent—Incoming calls get directed to the agent who has been available for the longesttime.
• Load Balance—Incoming calls get distributed among a group of teams based on ratios specified in thestrategy.
• Priority Based—Incoming calls get distributed to agent teams based on a priority rating assigned to eachteam.
• Skill Based—Incoming calls get distributed to agents who possess a required set of skills, such as languagefluency or product expertise.
About Skills-Based RoutingSkills-Based Routing is an optional feature that matches the needs of callers with agents who have the skillsto best meet those needs. When calls arrive at an entry point, they are classified into subsets that can be routedonly to agents who possess a required set of skills, such as language fluency or product expertise.
Skill requirements are assigned to calls based on settings in the routing strategy for the entry point. The callsare then sent to a queue for distribution to agents who have been assigned a matching set of skills. If an agentdoesn’t become available within a time interval specified in the queue routing strategy, the skill requirementcan be removed or reduced.
The overall process for implementing skills-based routing involves the following steps:
Procedure
Step 1 Define skills. Four types of skills can be defined:
• A proficiency skill can have a value ranging from 0 to 10 that represents the agent's level of expertise inthe skill. For example, you might define a skill for each language that your agents speak.
• A boolean skill can have the value of true or false to indicate whether or not the agent has the skill. Forexample, to ensure that your most valuable customers get the best service, you might define a skill namedPremierService and assign it with a value of true to your most experienced agents.
• A text skill is a free-form text skill that must be matched exactly. For example, you might define a skillnamed Extension that will let you route a call to a specific agent's extension number based on digitsentered by the caller in response to a prompt.
Cisco Webex Contact Center Management Portal User Guide120
Contact RoutingBasic Contact Routing

• An enum skill is a named set of predefined values. For example, you might create a skill named Line ofBusiness that can have the values Sales, Service, and Billing; or a skill named Operating System thatcan have the values Linux, Windows, and UNIX.
Step 2 Define skill profiles. A skill profile is a set of skills that can be collectively assigned to a team or agent. Eachskill in the profile is assigned a specific value. For example, a skill of English might be assigned a high levelof proficiency in one skill profile and a lower level in another profile. For more information, see Skill Profiles,on page 105.
Step 3 Assign skill profiles to teams or agents. Each agent-based team can be assigned a skill profile. All agentslogged in to the team will be associated with that skill profile. However, an individual agent can also beassigned a skill profile, which overrides the skill profile of the team.For more information, see Create a Team, on page 56 and View the Details of a User, on page 63
Step 4 Create or upload a call control script that defines how to treat the call (see Working with Call Control Scripts,on page 123).
Step 5 Create the entry point and queue routing strategies. In the entry point routing strategy, you assign skillrequirements to calls based onmenu selections collected during call treatment defined in the call control script(see Assigning Skill Requirements to Incoming Calls, on page 153). The calls are then distributed to thespecified queue where they wait for an agent who has been assigned the required skills.
In the queue routing strategy, you specify options for identifying agents to service the incoming calls. If anagent with the required skills does not become available within a specified time interval, the skill requirementcan be removed or reduced.
For more information, see Create an Agent Profile, on page 78.
About Queue ReshufflingQueue Reshuffling feature can be used with all available contact routing methods. The reshuffling engineassociates a score to each contact in the queue based on various factors, such as the importance of the customeror the due time of a particular contact according to service level agreements (SLAs).
A score of between 0 and 1 is associated with each contact. For example, if there are two email contacts inqueue and one is due tomorrow, while the second one is due the day after, the engine can assign the first emaila score of 0.9 and the second a score of 0.8. This way, the email contact with the earliest due time will behandled first. The same logic can be applied when there are more than two contacts.
If contacts are waiting in queue for an available agent, the routing engine sorts the queue based on the scoreassociated with each contact. The contact with the highest score is assigned to the first available agent. Thequeue reshuffling engine can change the score for any or all contacts at any time.
You can implement queue reshuffling by working with Webex Contact Center Operations to assign scores tocontacts through IVR data dips or via an external entity. Alternatively, Professional Services can help set ascore through an API.
About Global Routing StrategiesA global routing strategy can be associated with more than one entry point or queue. When a contact arrives,the routing engine checks for a global routing strategy associated with the entry point or queue for the currenttime. If one exists, that global strategy becomes the current strategy, overriding any standard strategy associatedwith the entry point or queue.
Cisco Webex Contact Center Management Portal User Guide121
Contact RoutingAbout Queue Reshuffling

Creating a global routing strategy enables you to quickly and easily change the routing strategies for manyentry points or queues at once rather than separately changing each individual routing strategy in the eventof emergency.
About Queue PrecedenceA team can handle contacts from more than one queue. You can assign an agent to take contacts from morethan one queue by adding that agent's team to the routing strategies for multiple queues. To cause an agentteam to prioritize contacts from one queue ahead of contacts to other queues, you can set a priority for eachqueue by using the settings available on the Queue Precedence page.
About Team Capacity StrategiesYour enterprise can use agent-based teams or capacity-based teams or a mixture of both team types.Capacity-based teams do not have specific agents assigned to them, and the agents do not use the WebexContact Center Agent Desktop.
You can create scheduled team capacity strategies to override these settings in response to changing contactcenter conditions. If a team capacity strategy is not created for a capacity-based team, the system uses thecapacity value provisioned for the team. For details, see Scheduling Team Capacity, on page 161.
About MultimediaIf your enterprise uses chat and email routing offered by Webex Contact Center in addition to voice, thenMultimedia profiles are enabled. You will be able to associate sites and agents with multimedia profiles.
The overall process for implementing multimedia routing involves the following steps:
Procedure
Step 1 Define multimedia profiles. If your enterprise subscribes to the Webex Contact Center Multimedia feature,each agent is associated with a multimedia profile, which specifies how many of each media type the agentcan handle concurrently. For more information, see Multimedia Profiles, on page 98.
Step 2 Assign multimedia profiles to sites, teams, or agents. When Multimedia is enabled, every site is associatedwith a multimedia profile. Each agent-based team at a given site is associated with the profile assigned to thatsite unless the team is assigned a different multimedia profile. Similarly, each agent logged in to a team isassociated with the team's profile unless the agent is assigned a different multimedia profile. For moreinformation, see Sites, on page 51, Create a Team, on page 56, and Users, on page 62.
Step 3 Create separate entry points and queues for each media type. For more information, see Create an Entry Pointor an Outdial Entry Point, on page 27.
Step 4 Work with Webex Contact Center Operations to create routing strategies configured to use a specialized callcontrol script.
Step 5 Work with your specific CRM vendor to configure the multimedia interaction at the agent level.
Alternately you can configure the queue routing strategy to assign multimedia contacts (Chat, Email) to youragents.
Cisco Webex Contact Center Management Portal User Guide122
Contact RoutingAbout Queue Precedence

About Web CallbackThe Web Callback feature enables visitors to your enterprise's Web site to complete and submit a callbackrequest specifying a name, phone number, and callback time. The request is sent to the Webex Contact Centersystem for scheduling. When the callback time is reached, a call to the requester is initiated on an outboundentry point that is used exclusively for Web callbacks.
The routing strategy for Web Callback uses a specialized call control script that typically includes IVRtreatment that requires input from the callback requester to proceed.
• If the requester answers and responds to the voice prompts appropriately, then the call is connected toan available agent and the callback request is marked as processed.
• If the call fails (for example, the call is not answered or is answered by a recorded message or a busysignal), the callback is optionally rescheduled based on the maximum callback attempts allowed and theretry attempt interval provisioned for your enterprise.
• If the requester rejects the call, the callback request is marked as cancelled.
The overall process for implementing Web Callback involves the following tasks:
Procedure
Step 1 Creating a Web page to capture the Web callback details and posting them to the Webex Contact Center WebCallback service.
Step 2 Specifying the maximum callback attempts allowed and the retry attempt interval (see Module Permissions,on page 21 ).
Step 3 Creating the outdial entry points to use for Web callbacks (see Create an Entry Point or an Outdial EntryPoint, on page 27).
Step 4 Working with Webex Contact Center Operations to create routing strategies configured to use a specializedcall control script.
Working with Call Control ScriptsA call control script defines how a call is handled when it arrives at an entry point or queue. The ControlScripts page in the Routing Strategy module displays a list of call control scripts and provides authorizedusers with an interface for creating and editing control scripts.
After a control script is created, authorized users can associate it with a routing strategy for an entry point orqueue and specify values for any configurable parameters that are in the script, such as which sound file toplay when a call arrives, or the timeout value for entering digits in response to a prompt (see Assigning CallControl Scripts and Parameters, on page 151 ).
The following topics are covered:
Cisco Webex Contact Center Management Portal User Guide123
Contact RoutingAbout Web Callback
Creating a Call Control ScriptThe New button on the Control Scripts page provides access to the call flow builder interface where authorizedusers can create a control script for an entry point or queue.
To create a call control script:
Procedure
Step 1 Open the Routing Strategy module and click the Control Scripts button.
The page displays the list of control scripts and associated image files.
Step 2 Click New.
The New Call Flow page appears, displaying a Start block in the canvas area. The panel on the left side ofthe page displays the building blocks for constructing a call flow. You can drag a block from this panel to thecanvas to add it to the call flow.
Step 3 Enter a name and optionally, a description for the control script in the fields at the top of the page.
The name you enter will be displayed in the Control Script drop-down list for selection when users create oredit a routing strategy (see Assigning Call Control Scripts and Parameters, on page 151).
Step 4 Double-click the Start block and specify the call flow type (entry point or queue) and other parameters in thedialog box that opens. For a description of each parameter, see Start Block, on page 125 .
Step 5 Drag flow control blocks to the canvas to add them to the call flow. To remove a block from the canvas, clickthe x on the upper right side of the block.
Step 6 After adding a flow control block, double-click the block and enter the required parameters in the dialog boxthat opens. For a description of each block and its parameters, see Call Control Block Descriptions, on page125.
Step 7 To connect the blocks, drag each output connector to the appropriate input connector.
All blocks except the Start block have one input connector, represented by a black-filled circle at the top ofthe block. All blocks except the EP/Queue, Callback, Queue Call and End Call blocks have one or more outputconnectors, represented by empty circles at the bottom and sides of the block.
In the following example, the Start block is connected to a Menu block that plays an audio file prompting thecaller to enter one of two options. The Menu block in this example has four outputs: one for each of twobranches, plus Timeout and Invalid outputs, which are connected back to the Menu block's input connector.
Step 8 Each connector represents a call flow path. To specify a name for a path, click a green connector line and inthe dialog box that opens, enter a name and optional description.
Step 9 After you have finished adding and connecting blocks, click Save to save the control script.
The system automatically performs a validation. If errors are found, they are listed in a message at the top ofthe page. In the following example, a connection is missing for the Menu block's Timeout output. A controlscript cannot be saved until all errors are corrected.
Cisco Webex Contact Center Management Portal User Guide124
Contact RoutingCreating a Call Control Script
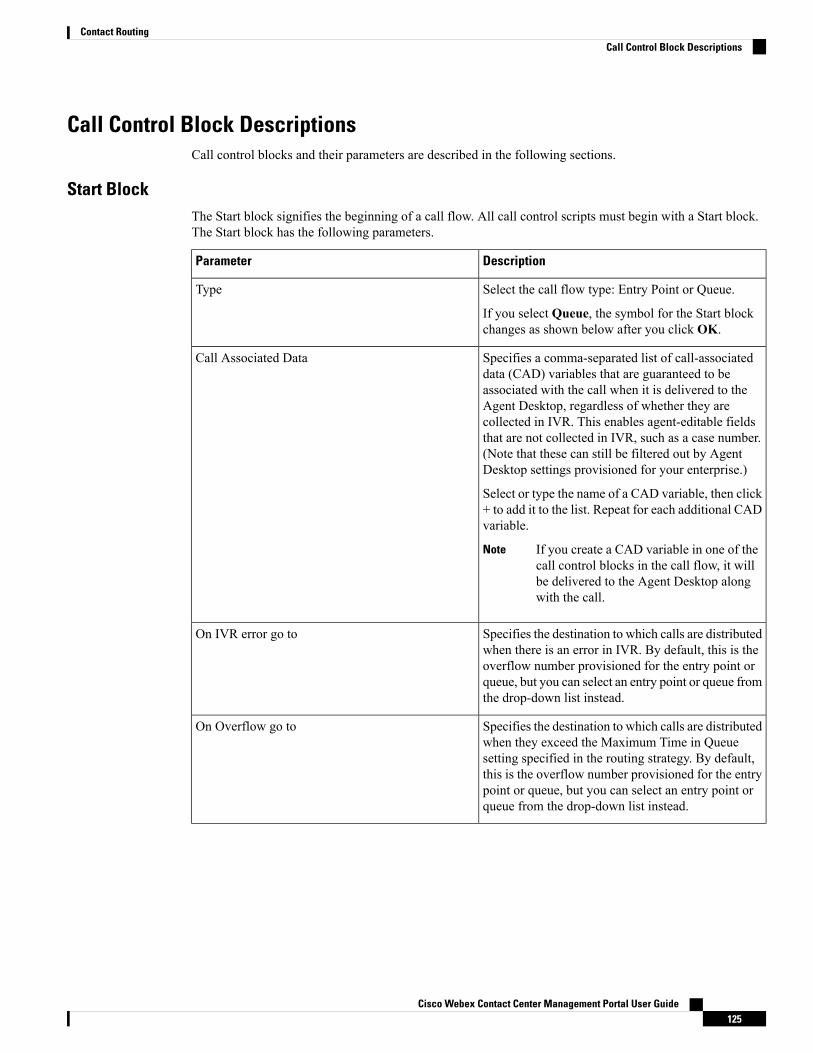
Call Control Block DescriptionsCall control blocks and their parameters are described in the following sections.
Start BlockThe Start block signifies the beginning of a call flow. All call control scripts must begin with a Start block.The Start block has the following parameters.
DescriptionParameter
Select the call flow type: Entry Point or Queue.
If you select Queue, the symbol for the Start blockchanges as shown below after you click OK.
Type
Specifies a comma-separated list of call-associateddata (CAD) variables that are guaranteed to beassociated with the call when it is delivered to theAgent Desktop, regardless of whether they arecollected in IVR. This enables agent-editable fieldsthat are not collected in IVR, such as a case number.(Note that these can still be filtered out by AgentDesktop settings provisioned for your enterprise.)
Select or type the name of a CAD variable, then click+ to add it to the list. Repeat for each additional CADvariable.
If you create a CAD variable in one of thecall control blocks in the call flow, it willbe delivered to the Agent Desktop alongwith the call.
Note
Call Associated Data
Specifies the destination to which calls are distributedwhen there is an error in IVR. By default, this is theoverflow number provisioned for the entry point orqueue, but you can select an entry point or queue fromthe drop-down list instead.
On IVR error go to
Specifies the destination to which calls are distributedwhen they exceed the Maximum Time in Queuesetting specified in the routing strategy. By default,this is the overflow number provisioned for the entrypoint or queue, but you can select an entry point orqueue from the drop-down list instead.
On Overflow go to
Cisco Webex Contact Center Management Portal User Guide125
Contact RoutingCall Control Block Descriptions

DescriptionParameter
This parameter appears only if an entry point or queueother than the provisioned overflow number is selectedfor the On Overflow go to parameter. If the valueentered here is smaller than the Maximum Calls inQueue provisioned for an entry point or queue, thenwhen the number of calls in queue reaches this value,they will be sent to the entry point or queue specifiedin the On Overflow go to parameter.
Maximum Calls
Optionally enter a description for the block.Description
Play BlockThe Play block plays an uninterruptible message to the caller and has the following parameters.
DescriptionParameter
Enter a name for the play block or accept the defaultname.
Name
Select an audio file to play as a prompt.Media
Optionally enter a description for the block.Description
Menu BlockThe Menu block plays an interruptible prompt, allowing the caller to enter a DTMF digit or symbol and takethe configured branch for the entered digit or symbol. A menu can have from 1 to 10 branches.
The Menu block has the following parameters and outputs.
DescriptionParameter
Enter a name for the menu or accept the default name.Name
Select an audio file to play as a prompt.Media
Specify the number of seconds to wait afterprompting. If the caller does not enter data before thetimeout, the call will take the Timeout path configuredin the control script.
Timeout
Select the number of output branches.Number of Branches
For each branch, select the DTMF digit or symbolthat must be entered for the call to take that branch.
Branch <N>
Optionally enter a description for the block.Description
Cisco Webex Contact Center Management Portal User Guide126
Contact RoutingPlay Block
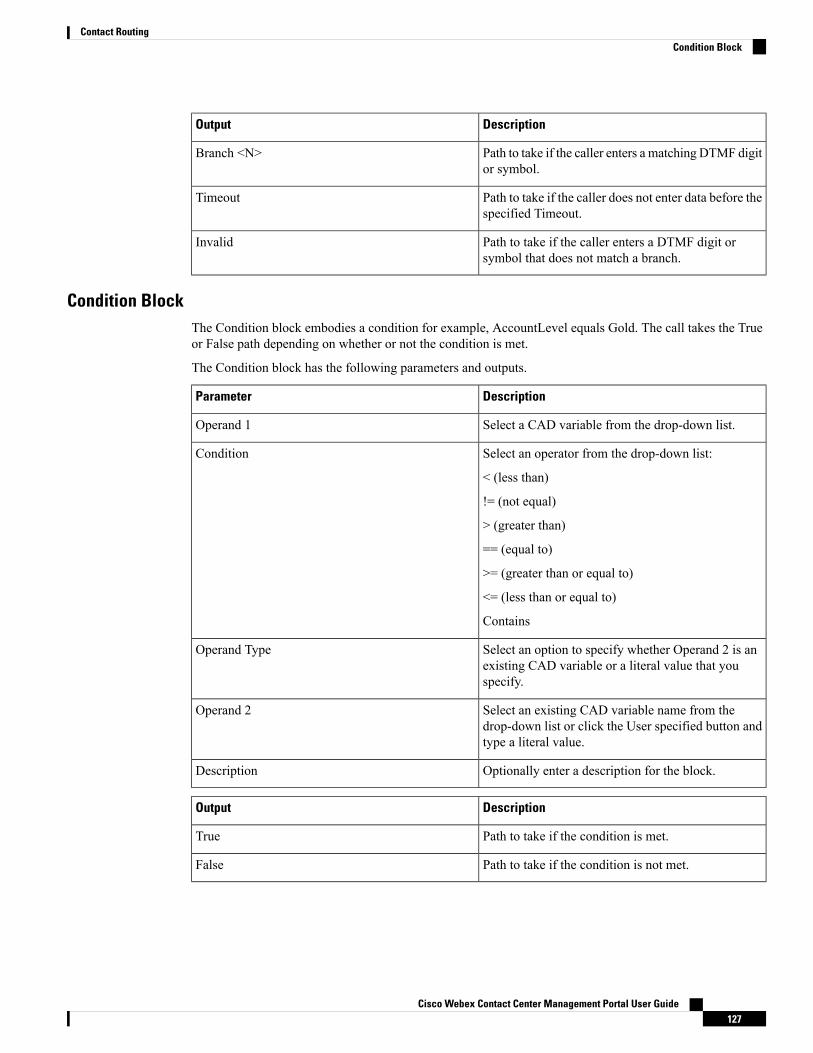
DescriptionOutput
Path to take if the caller enters a matching DTMF digitor symbol.
Branch <N>
Path to take if the caller does not enter data before thespecified Timeout.
Timeout
Path to take if the caller enters a DTMF digit orsymbol that does not match a branch.
Invalid
Condition BlockThe Condition block embodies a condition for example, AccountLevel equals Gold. The call takes the Trueor False path depending on whether or not the condition is met.
The Condition block has the following parameters and outputs.
DescriptionParameter
Select a CAD variable from the drop-down list.Operand 1
Select an operator from the drop-down list:
< (less than)
!= (not equal)
> (greater than)
== (equal to)
>= (greater than or equal to)
<= (less than or equal to)
Contains
Condition
Select an option to specify whether Operand 2 is anexisting CAD variable or a literal value that youspecify.
Operand Type
Select an existing CAD variable name from thedrop-down list or click the User specified button andtype a literal value.
Operand 2
Optionally enter a description for the block.Description
DescriptionOutput
Path to take if the condition is met.True
Path to take if the condition is not met.False
Cisco Webex Contact Center Management Portal User Guide127
Contact RoutingCondition Block

Counter BlockThe Counter block counts the number of times the call reaches this block. The Counter block has the followingparameters and outputs.
DescriptionParameter
Enter a name for the counter.Name
Enter the number of times the call can pass throughthis block before taking the alternate path.
Threshold
Optionally enter a description for the block.Description
DescriptionOutput
Path to take if the threshold is not reached.No
Path to take if the threshold is reached.Yes
Collect Digits BlockThe Collect Digits block plays an interruptible prompt and collects a DTMF string (digits 0 - 9) of a specifiedlength from the caller.
The # character signifies end of input.Note
The Collect Digits block has the following parameters and outputs.
DescriptionParameter
Select the name of the call-associated data (CAD)variable to which the entered data will be stored.
Call Associated Data
Select an audio file to play as a prompt.Media
Specify the number of additional seconds the user hasto enter the requested string after the audio messagehas finished playing or after the last key press,whichever comes later. If the timeout is reached, thecall takes the Timeout path configured in the controlscript.
Timeout
Specify the maximum DTMF string length.Maximum Number of Digits
Specify the minimum DTMF string length.Minimum Number of Digits
Optionally enter a description for the block.Description
Cisco Webex Contact Center Management Portal User Guide128
Contact RoutingCounter Block

DescriptionOutput
Path to take if the caller enters an acceptable DTMFstring.
OK
Path to take if the caller does not enter acceptable databefore the timeout is reached.
Timeout
Path to take if the caller enters a DTMF string that istoo long or too short.
Invalid
Set Variable BlockThe Set Variable block sets a variable and gives it a literal value. The Set Variable block has the followingparameters.
DescriptionParameter
Select or enter the name of a call associated data(CAD) variable.
CAD Name
Enter the value to set on the CAD variable.Value
Optionally enter a description for the block.Description
Fetch Variable BlockThe Fetch Variable block retrieves CAD values from an external source. For example, this block could beused to retrieve information from an external database based on an account number retrieved through apreceding Collect Digits block, and associate the retrieved information with the call.
The Fetch Variables block has the following parameters and outputs.
DescriptionParameter
Enter the URL from which the variables are to beretrieved.
URL
Specifies a comma-separated list of CAD variablesto be sent on the request.
Select the name of a CAD variable, then click + toadd it to the list. Repeat for each additional CADvariable.
Request Variables
Specifies a comma-separated list of CAD variablesto be returned from the external source.
Select or type the name of a CAD variable, then click+ to add it to the list. Repeat for each additional CADvariable.
Response Variables
Optionally enter a description for the block.Description
Cisco Webex Contact Center Management Portal User Guide129
Contact RoutingSet Variable Block

DescriptionOutput
Path to take if there is no response or if the responseis not valid.
Error
EP/Queue BlockThe EP/Queue block transfers control of the call to a queue or entry point and has the following parametersand no outputs.
DescriptionParameter
Enter a name for the block or accept the default name.Name
Select an entry point or queue from the drop-downlist.
If you select an entry point, the symbol for the callcontrol block changes as shown below after you clickOK.
EP/Queue
Optionally enter a description for the block.Description
Reset Counter BlockThe Reset Counter block resets the internal counter of a Counter block. The Reset Counter block has thefollowing parameters.
DescriptionParameter
Select the name of the counter to be reset.Counter
Optionally enter a description for the block.Description
Callback BlockThe Callback block is available only if the Voice Callback feature is enabled for your enterprise.
The Callback block sends a callback request to the Web callback entry point where it is queued until an agentis available. This block has the following parameters and no outputs.
DescriptionParameter
Enter a name for the block or accept the default name.Name
Select an outdial entry point for Web callback fromthe drop-down list.
Outdial EP
Select the CAD variable containing the callbacknumber, such as the ANI that came in with the call ora number collected in a Collect Digits block in thecall flow. If no selection is made, the caller's ANI willbe used.
Callback Number
Cisco Webex Contact Center Management Portal User Guide130
Contact RoutingEP/Queue Block
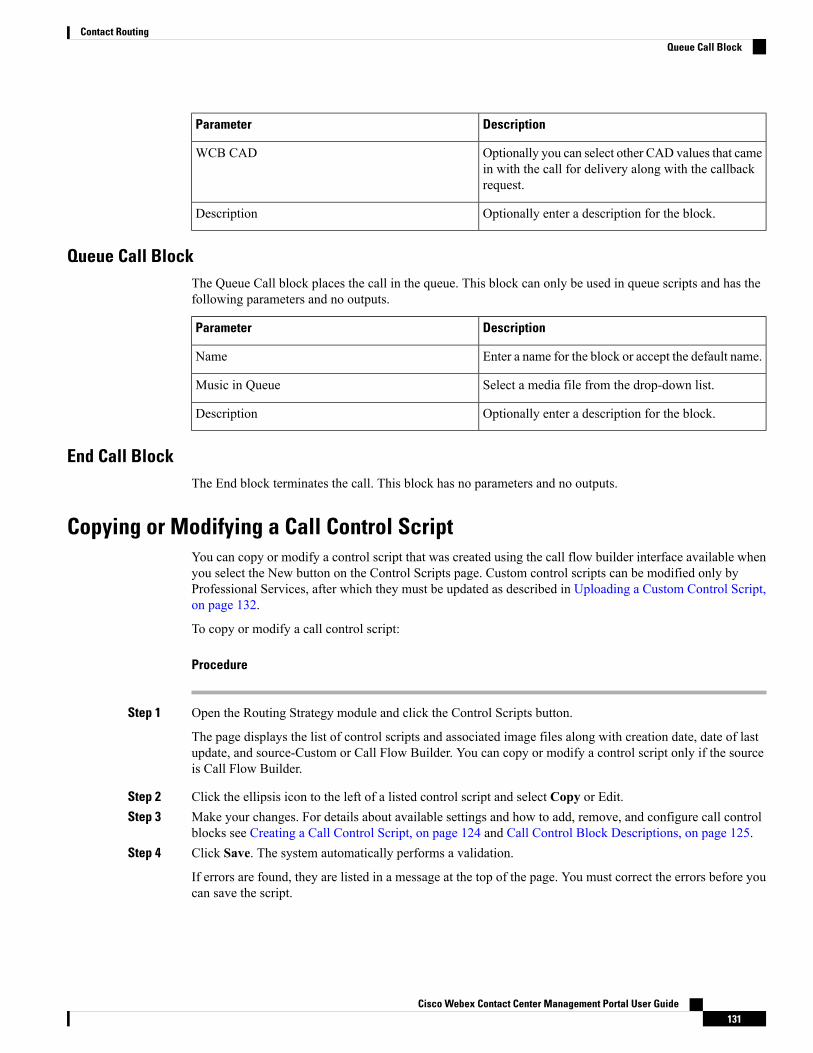
DescriptionParameter
Optionally you can select other CAD values that camein with the call for delivery along with the callbackrequest.
WCB CAD
Optionally enter a description for the block.Description
Queue Call BlockThe Queue Call block places the call in the queue. This block can only be used in queue scripts and has thefollowing parameters and no outputs.
DescriptionParameter
Enter a name for the block or accept the default name.Name
Select a media file from the drop-down list.Music in Queue
Optionally enter a description for the block.Description
End Call BlockThe End block terminates the call. This block has no parameters and no outputs.
Copying or Modifying a Call Control ScriptYou can copy or modify a control script that was created using the call flow builder interface available whenyou select the New button on the Control Scripts page. Custom control scripts can be modified only byProfessional Services, after which they must be updated as described in Uploading a Custom Control Script,on page 132.
To copy or modify a call control script:
Procedure
Step 1 Open the Routing Strategy module and click the Control Scripts button.
The page displays the list of control scripts and associated image files along with creation date, date of lastupdate, and source-Custom or Call Flow Builder. You can copy or modify a control script only if the sourceis Call Flow Builder.
Step 2 Click the ellipsis icon to the left of a listed control script and select Copy or Edit.Step 3 Make your changes. For details about available settings and how to add, remove, and configure call control
blocks see Creating a Call Control Script, on page 124 and Call Control Block Descriptions, on page 125.Step 4 Click Save. The system automatically performs a validation.
If errors are found, they are listed in a message at the top of the page. You must correct the errors before youcan save the script.
Cisco Webex Contact Center Management Portal User Guide131
Contact RoutingQueue Call Block

Step 5 If you are modifying a control script that has been assigned to a routing strategy, it must be reassigned to therouting strategy as follows:a) Click the Call Routing button on the menu bar, select the routing strategy to which the control script was
previously assigned, and click Edit.b) In the Call Control section of the page, re-select the control script from the drop-down list, edit parameters
if necessary, and then click Apply.c) Click Update to save your changes to the routing strategy.
Uploading a Custom Control ScriptCustom control scripts are created by Professional Services and must be uploaded to the CJP system beforethey can be assigned to routing strategies. If a custom control script changes, it must be re-uploaded to theCJP system in order for those changes to take effect.
To upload a custom control script:
Procedure
Step 1 Open the Routing Strategy module and click the Control Scripts button on the menu bar.
The page displays the list of scripts and associated image files.
Step 2 Click Upload. The Upload Control Script page appears.Step 3 Enter a name and optionally, a description for the script in the data fields.Step 4 Click the Browse button to the right of the Control Script File field and, in the dialog box that opens, navigate
to the script file in your system and click Open.
The dialog box closes and the File field displays the path and file name of the uploaded file. If you entered adifferent file name in the Control Script Name field, it is overwritten by the name of the file you uploaded.You can change the text in the Control Script Name field if you want to.
Step 5 Optionally upload the associated control script image file as follows: click the Browse button to the right ofthe Control Script Image field and, in the dialog box that opens, navigate to the image file in your system andclick Open. Only GIF and JPEG file formats are supported.
Step 6 Click Save. The script is uploaded and available for selection from the Control Scripts list (see Assigning CallControl Scripts and Parameters, on page 151 ).
To copy a custom control script, upload it as described, but enter a different name in the ControlScript Name field. The control script will be uploaded and saved under the new name.
Note
Updating a Custom Control ScriptTo update a custom control script:
Cisco Webex Contact Center Management Portal User Guide132
Contact RoutingUploading a Custom Control Script

Procedure
Step 1 Open the Routing Strategy module and click the Control Scripts button on the menu bar.Step 2 Click the ellipsis icon to the left of the custom control script that has been changed and select Edit. The Edit
Control Script page appears.Step 3 Leave the Name field unchanged and enter a new description if desired.Step 4 Click the Browse button in the Control Script File field and, in the dialog box that opens, navigate to the
control script file in your system and click Open.Step 5 Optionally, upload the associated control script image file as follows: click the Browse button in the Control
Script Image field and, in the dialog box that opens, navigate to the image file in your system and clickOpen.Only GIF and JPEG file formats are supported.
Step 6 Click Save to save your changes.Step 7 Click the Call Routing button on the menu bar, select the routing strategy to which the control script was
previously assigned, and click Edit.Step 8 In the Call Control section of the page, re-select the control script from the drop-down list, edit parameters if
necessary, and then click Apply.Step 9 Click Update to save your changes to the routing strategy.
Uploading and Updating a Custom Control Script Image FileYou can view the image file associated with a control script on the Control Scripts page or by clicking theImage link in the Call Control section of the Create Routing Strategy or Edit Routing Strategy page (seeAssigning Call Control Scripts and Parameters, on page 151). Only GIF and JPEG file formats are supported.
When a control script is created or modified using the call flow builder interface available through the Newbutton on the Control Scripts page, the associated image file is available in the Routing Strategy module whenthe control script is saved. However, image files associated with custom control scripts created by ProfessionalServices must be manually uploaded and updated.
To upload or update the image file associated with a custom control script:
Procedure
Step 1 Open the Routing Strategy module and click the Control Scripts button on the menu bar.
The page displays the list of uploaded scripts and associated image files.
Step 2 Click the Image button in the Image column that corresponds to the custom control script for which you wantto view, upload, or update the associated image file.
Step 3 Do one of the following:
• In the Call Flow Image dialog box, click the Browse button and in the dialog box that opens, navigateto the image file in your system and click Open.
-OR-
• Open the directory on your system where the image file is located and then drag and drop it into thedesignated area of the Call Flow Image dialog box.
Cisco Webex Contact Center Management Portal User Guide133
Contact RoutingUploading and Updating a Custom Control Script Image File

Step 4 In the Call Flow Image dialog box, click Save to upload the image.
Viewing and Exporting References to a Control ScriptYou can view or export a list showing the name of each routing strategy that references a specified controlscript along with the name of the associated entry point or queue. In the case of a global routing strategy, thelist shows 0 instead of the name of an entry point or queue.
To view or export references to a control script:
Procedure
Step 1 Open the Routing Strategy module and click the Control Scripts button on the menu bar.
The page displays the list of control scripts and associated image files.
Step 2 Click the horizontal ellipsis button to the left of a listed control script and select Excel or CSV.Step 3 In the dialog box that opens, specify whether to open or save the file.
Uploading and Updating Resource FilesYou can view the resouces by clickingRouting Strategy from the navigation panel in the left side of the CJPManagement Portal.
You can choose to see the audio files or the predefined emails.
Uploading a Resource FileIt is strongly recommended that you do not update resources that are currently being used by the system.
To update a resource file:
Procedure
Step 1 Open the Routing Strategy module and click the Resources button to display the list of uploaded resources.Step 2 Click the ellipsis button to the left of the resource you want to update and select Edit.Step 3 On the page that appears, click the Browse button.Step 4 In the dialog box that opens, navigate to the file in your system and click Open.Step 5 The dialog box closes, the File field displays the path and file name of the uploaded file, and the Resource
Name field displays the file name.Step 6 Click Save to overwrite the original resource with your changes.
Cisco Webex Contact Center Management Portal User Guide134
Contact RoutingViewing and Exporting References to a Control Script

Playing or Downloading a .wav FileTo play or download a .wav file that has been uploaded to the Management Portal:
Procedure
Step 1 Open the Routing Strategy module and click the Resources button to display the list of uploaded resources.Step 2 Click the ellipsis button to the left of the file name and select Play.Step 3 In the dialog box that opens, specify whether you want to open or save the file. When you click Open, the
media player installed on your computer opens and plays the file. If a compatible media player is not installed,a dialog box opens and prompts you to download a player.
Updating a Resource FileThe copy function enables you to create backup copies of prompts and other resource files. Only files withthe .wav extension can be copied.
To copy a resource file:
Procedure
Step 1 Open the Routing Strategy module and click the Resources button on the menu bar to display the list ofuploaded resources.
Step 2 Click the horizontal ellipsis button to the left of the resource you want to copy and select Copy.Step 3 Once the new page appears, enter a name for the copied file or leave the default name (Copy_ prepended to
the original name), and click Save to upload the copy to the Management Portal.
Copying a Resource FileThe copy function enables you to create backup copies of prompts and other resource files. Only files withthe .wav extension can be copied.
To copy a resource file:
Procedure
Step 1 Open the Routing Strategy module and click the Resources button on the menu bar to display the list ofuploaded resources.
Step 2 Click the horizontal ellipsis button to the left of the resource you want to copy and select Copy.Step 3 On the page that appears, enter a name for the copied file or leave the default name (Copy_ prepended to the
original name), and click Save to upload the copy to the Management Portal.
Cisco Webex Contact Center Management Portal User Guide135
Contact RoutingPlaying or Downloading a .wav File

Exporting the References to a Media FileYou can view or export a list showing the name of each routing strategy that references a specified media filealong with the name of the associated entry point or queue. In the case of a global routing strategy, the listshows 0 instead of the name of an entry point or queue.
To view or export the references to a media file:
Procedure
Step 1 Open the Routing Strategy module and click the Resources button to display the list of uploaded resourcefiles.
Step 2 Click the ellipsis button to the left of a listed .wav file and select Excel or CSV.Step 3 In the dialog box that opens, specify whether to open or save the file.
Creating a Predefined Email TemplateYou can predefine an email template that agents can use to communicate with customers. At a time, anorganization can have a single predefined template for email.
You can edit or delete the template by clicking the button beside the template in the Predefined Emails page.
You cannot use the predefined email templates for quick-reply emails.Note
To create a template:
Procedure
Step 1 Click the Routing Strategy module on the left panel.The list of routing strategies appears.
Step 2 Go to the Resources menu and click Predefined Emails.The Predefined Emails page appears.
Step 3 Click New.The New Predefined Email dialog box appears.
The New button is disabled if your organization already has a predefined email template.Note
Step 4 In the New Predefined Email dialog box do the following:a) Enter a name for the email template.b) Set the status for the template.
Set the status as Active, to use it as a default template for all email communications between agents andcustomers.
Set the status to Not Active, to save it as draft. You can later change the status to Active to use it.
Cisco Webex Contact Center Management Portal User Guide136
Contact RoutingExporting the References to a Media File

c) Enter the email body. You can use the formatting tools for the drafting the email body.d) (Optional) Add macros to the email body.
You can use the macro to add variables for Customer Name or Agent Name to the email. You can seta default value for the variable type you select. You can use the macros multiple times in the template asper your requirement.
To add the macro variables, place the cursor where you want the variable. Select the type of macro youwant to add and click the Insert to Text Editor button.
To set a default value for a macro, enter the default value in the field Default Value before inserting themacro to the text editor.
e) Click Save to save the email template. After you save, you can see the email template in the PredefinedEmails page.
Creating a Predefined Chat ResponseYou can define a set of chat responses that your agents can use to communicate with the customers. You canconfigure the chat responses for a specific queue or for all the queues. Currently we support six languages,which are:
• US English
• Japanese
• Italian
• French
• German
• Spanish
You can configure 50 response per language, per queue, so in total 300 responses per queue. Agents can seethe responses in their queue based on the language settings in their local browser. Thus, agents can see only50 responses at a time.
Procedure
Step 1 Click the Routing Strategy module on the left panel.Step 2 Click Resources and then click Predefined Chat Responses.
The Predefined Chat Responses page appears.Step 3 Click + New.
The Create Predefined Chat Responses page appears.Step 4 Enter the following details and click Save:
DescriptionSetting
The name of the predefined chat response. You canenter a name of maximum 40 characters.
Response Name
Cisco Webex Contact Center Management Portal User Guide137
Contact RoutingCreating a Predefined Chat Response

DescriptionSetting
The status of the predefined chat response. Deactivatethe status to hide it from the agents in Agent Desktop.
Status
Select the language of the predefined chat responsefrom the drop-down.
You cannot edit the language of the chat reponse.
Language
Select the queue for which you want to define the chatresponse. If you select All from the drop-down, allagents in all the queues in your organization can usethe chat response.
However, if any queue has reached the capacity of 50messages, the system displays an error message withthe names of the queues that have reached the limit.The system disables the queues that have reached thelimit and you cannot select them.
Queue
Enter the text for the chat response. You can enter amaximum of 150 characters.
Content
Viewing, Creating, Modifying, and Deleting Routing StrategiesFor each entry point and queue, you should create a set of default routing strategies that cover all time intervals.In addition, you can schedule an alternate strategy beyond the default strategy for any time interval. Forexample, Queue 1 could have a BusyHourStrategy for the normal day shift and an OffHoursStrategy fornon-business hours.
The normal daily schedule should be flagged as the default strategy. A non-default strategy, such as a holidayschedule, can then be created for a time interval that overlaps the default strategy. A strategy that is not flaggedas default will override a default strategy and be used as an exception to the default schedule. This means thatthe system first checks for a strategy that is not flagged as default, and if none exists, the default strategy isused.
When the default strategy is the current strategy (that is, the strategy that is currently running), the systemchecks every three minutes for a non-default strategy and if one is found, it becomes the current strategy.
If no strategy is specified for a time interval, and there is no default strategy for the time interval, the laststrategy used by the system may continue as the current strategy even though it has expired. In this case, thesystem checks every minute for a valid strategy and as soon as it finds one, that strategy becomes the currentstrategy.
Viewing Routing Strategies for an Entry Point or QueueTo view all routing strategies for an entry point or queue:
Cisco Webex Contact Center Management Portal User Guide138
Contact RoutingViewing, Creating, Modifying, and Deleting Routing Strategies

Procedure
Step 1 Click the Routing Strategy link from the Webex Contact Center Management portal's navigation bar.
The Routing Strategy page with a list of all routing strategies appears.
Step 2 Select an entry point or queue from the drop-down list to display the routing strategies for that entry point orqueue. The upper section of the list view displays a table that lists all routing strategies available for theselected entry point or queue. To see details for a strategy, click the button to the left of the routing strategyand click Edit.
The lower section of the page displays the Routing Strategy Mapping Details table:
• For an entry point, this table lists the destination queues and entry points based on the active routingstrategies defined for the selected entry point.
• For a queue, this table lists the teams to whom calls, chats, or emails are being distributed based on theactive routing strategies defined for the selected queue. Note that mapping details are not shown for aqueue routing strategy that just redirects the call to another entry point or queue.
The entities displayed in theMapping Details table are based on your access rights. For example,if calls for the Sales queue are being distributed to Team A and Team B, and you have accessrights only to Team A, then the mapping table will only show Team A as the destination forcalls coming into the Sales queue.
Note
Following is a description of each column in the list view page. Use the sort button at the end of the table tochronologically sort the strategies.
DescriptionColumn
The name assigned to the strategy when it was created. You cannot change the name afterthe strategy has been created.
Name
The identification number of the strategy. This number is automatically assigned by thesystem.
ID
Cisco Webex Contact Center Management Portal User Guide139
Contact RoutingViewing Routing Strategies for an Entry Point or Queue

DescriptionColumn
Indicates the status of the strategy.
• Current (appears in Red) means this is a snapshot of the currently running strategy.You cannot copy the current strategy, but you can modify any setting that does not affectexecution time or date. Changes to the strategy do not affect the recurring scheduledversion of the strategy.
You can delete the current strategy, but do not delete it before creating adifferent strategy for the same time interval. If you delete a strategy withouthaving another one in place, the last strategy used by the system becomes thedefault strategy even though the times and dates specified have expired. Ifthis occurs, either create a new strategy for the current time period, or copythe default strategy and correct the time settings.
Important
• Activemeans the strategy will become effective at the specified start time on the specifiedstart date. This is the default status.
• Not Activemeans the strategy will not become effective regardless of the specified starttime and date. This status lets you save a strategy for future use or as a draft to continueworking on later.
Status
Indicates whether the strategy is the default. A strategy that is not flagged as the defaultoverrides a default strategy and is used as an exception to the default schedule.
Default
Indicates the chat template used for the routing strategy.ChatTemplate
Specifies whether the strategy is scheduled to be repeated daily or only on specific days ofthe week.
Repetition
The date the strategy is scheduled to start.Start Date
The time the strategy is scheduled to start (in 24-hour format) for any given day in the specifieddate range.
Start Time
The time the strategy is scheduled to end (in 24-hour format) for any given day in the specifieddate range.
End Time
The date the strategy is scheduled to end.End Date
Viewing Current Routing StrategiesTo view a list of currently deployed routing strategies for multiple entry points or queues:
Procedure
Step 1 Click the Routing Strategy module, and from the menu bar select Current Routing Strategies.
Cisco Webex Contact Center Management Portal User Guide140
Contact RoutingViewing Current Routing Strategies
Step 2 From the left Filter panel, select Entry Point or Queue.Step 3 In the next field, select All to view current strategies for all entry points or queues, and then click Apply.
Details about the current routing strategies for the selected entry points or queues are listed in the table andan additional Control Script column displays the names of the call control scripts associated with the listedentry points or queues.
Viewing Global Routing StrategiesA global routing strategy can be associated with Telephony for multiple entry points or queues. To view alist of global routing strategies:
Procedure
Step 1 Click the Routing Strategy module, and from the menu bar select Global Routing Strategies.Step 2 In the Routing Type field, select Entry Point or Queue.
The page displays a list of all global routing strategies available for the selected entry point or queue.
Step 3 To export the data displayed in the table to a data analysis tool, click the horizontal ellipsis button on the rightside of the page and select Excel or CSV.
Step 4 To display details for a specific strategy, click the horizontal ellipsis icon to the left of a listed strategy andselect Edit.
For more information, see About Global Routing Strategies, on page 121. For how to create a global routingstrategy, see Create a Routing Strategy, on page 142.
Understanding Time Values in Routing StrategiesIf the Multiple Time Zone feature is enabled for your enterprise, entry points and queues can be provisionedwith time zones. In this case, time values in routing strategies are based on the time zone provisioned for theentry point or queue or, if no time zone is specified, the time zone provisioned for your enterprise (typicallyheadquarters).
If an entry point or queue is provisioned with a time zone, the time zone is displayed beneath the enterprisetime in the drop-down list that appears when you click your name button on the upper-right side of the routingstrategy page.
If theMultiple Time Zone feature is not enabled for your enterprise, time values in routing strategies are basedon the time zone provisioned for your enterprise.
If the time zone observes daylight saving time, the time is adjusted automatically when daylight saving timechanges.
You can display routing strategies in your preferred time zone as follows:
Cisco Webex Contact Center Management Portal User Guide141
Contact RoutingViewing Global Routing Strategies

Procedure
Step 1 Click the gears icon in the upper-right corner of the Portal landing page to display the three or four tabbedsettings panel.
Step 2 Click the tab displaying the gears icon, and under Time Zone, select a time zone from the Time Zone drop-downlist and click Apply.
Create a Routing StrategyYou can use the Webex Contact Center portal to create new routing strategies. You can also create a newstrategy by editing an existing one and changing the parameters as per the requirement.
Note the following points before creating new strategies:
• Always create an active strategy for every time interval. If an active strategy isn’t specified for a timeinterval, the default is used. If there’s no default strategy, the last strategy that is used by the system maycontinue as the current strategy although it has expired.
• An easy way to create a new strategy is to edit an existing one, select the entry points or queues that youwant to associate with. And then change the appropriate settings. If necessary, including the name ofanother routing strategy with the same name that exists for a selected entry point or queue.
• You can have only one routing strategy per chat or email entry point.
You can't have a global routing strategy for Chat or Email entry point.Note
• If the scheduled dates or times conflict with an existing active strategy, the system doesn’t allow you tosave an active strategy.
To create a routing strategy:
Procedure
Step 1 Click the Routing Strategy link from the Webex Contact Center portal's navigation bar.Step 2 To create a routing strategy:
• On the Routing Strategy page that appears, make a selection from the Select Entry Point/Queuedrop-down list.
• To create a global routing strategy, click the Routing button on the menu bar, select Global RoutingStrategies, and select the Entry Point or Queue button on the upper-left side of the page.
Step 3 Do one of the following from the list view:
• Click the New Strategy button.
Cisco Webex Contact Center Management Portal User Guide142
Contact RoutingCreate a Routing Strategy

Create a chat template before you create a Chat Routing Strategy. For more information, seeCreate a Chat Template.
You also can’t create more than one routing strategy for a Chat Template or Email entry pointor queue.
Note
- OR -
• You can copy an existing Telephony strategy only which is in Active status. To copy, click the entrymenu and then click Copy.
Step 4 Enter or modify the settings as described in the following tables and then click Save.
• Table 1: Describes general settings applicable in routing strategy:
• Table 2: Describes settings applicable in routing strategy for Telephony Entry Point:
• Table 3: Describes settings applicable in routing strategy for Telephony Queue:
• Table 4: Describes settings applicable in routing strategy for Email Entry Point and Queue:
• Table 5: Describes settings applicable in routing strategy for Chat:
Table 1: Describes general settings applicable in routing strategy:
DescriptionSetting
General Settings
Enter a name for the strategy, such as US Holiday or Weekends. You can’t edit thisfield after saving the strategy.
Name
Shows the tenant name.Enterprise Name
Select Active if you want the strategy to become effective on the start date you specifyin the Start Date field.
SelectNot Active if you want to save the strategy for future use or as a draft to continueworking on later.
The status is always active for chat and email routing strategies as you can configureonly one routing strategy per entry point or queue.
Status
Call Distribution (only applicable to queues)
Cisco Webex Contact Center Management Portal User Guide143
Contact RoutingCreate a Routing Strategy

DescriptionSetting
If this is an inbound queue routing strategy, specify the teams that you need to associatewith this strategy and organize them into groups. See Specifying Call DistributionSettings, on page 154 for details. In addition, do the following (as described in AssigningTeams and Skill-Relaxation Settings to Groups, on page 155):
• If the routing type is Load Balance, assign percentage spreads or capacities to eachteam in Group 1. You can add additional groups, but you can’t assign percentagespreads or capacities to the teams in those additional groups.
• If the routing type is Priority, assign priorities. Note that a specific priority can beassigned to only one teamwithin the strategy (for example, only one team can havea priority of 1 assigned to it).
• If the routing type is Skills Based, specify skill relaxation settings if appropriate.
If this is a routing strategy for an outdial queue, you must specify a team in the CallDistribution section. The specified team is only a placeholder and will not be used. Inaddition, be sure to create only one group for an outdial queue routing strategy.
Add Group
Table 2: Describes settings applicable in routing strategy for Telephony Entry Point:
DescriptionSetting
This field shows the entry point for which you’re creating the strategy. Select theentry points or queues that are associated with this routing strategy.
Entry Point
This field shows the queue for which you’re creating the strategy. Select the entrypoints or queues that are associated with this routing strategy.
Queue
Time Settings
Click in each of these fields and use the calendar controls to specify the start date(the date strategy becomes effective) and end date (the date strategy expires ).
Start Date
End Date
Enter in 24-hour format (0000–2400) the time of day you want the strategy to startand end.
Start Time
End Time
From the drop-down list, select All Days if you want to schedule the strategy forevery day or Weekdays if you want to schedule the strategy for Monday throughFriday only.
-OR-
Select each icon that represents a day on which you want to schedule the strategy.
Day of Week
Advanced Settings
Select the name of the audio (.wav) file to play for calls when they arrive or arewaiting in queue. This isn’t applicable for email and chat routing strategies.
Music on Hold
Cisco Webex Contact Center Management Portal User Guide144
Contact RoutingCreate a Routing Strategy

DescriptionSetting
If this is a standard Webex Contact Center queue routing strategy, enter the lengthof time, in seconds, after which a queued call should be distributed to the overflowdestination number provisioned for the queue. Cisco recommends setting this to1800 (30 minutes) or to three times the average queue length during busy hours.
If this is an email routing strategy, set this to a very high value to avoid overflow.
By default, this field is set to the value provisioned for the queue.
The cumulative total queue time specified for all groups in the CallDistribution section of the routing strategy shouldn’t be greater than thevalue specified here. See Specifying Call Distribution Settings, on page154 for more information.
Important
Maximum Time inQueue
If this is a standard Webex Contact Center queue routing strategy, specify themaximum number of times an attempt will be made to send a call to a team beforethe call is routed to the next available team. No further attempts will be made tosend the call to that team again.
Exceptions:
• This setting doesn’t apply to Skills Based routing strategies. For Skills Basedrouting, if the call is in the last group, the call overflows if no matching agentis found. If the call is in any other group, and if it’s sent to an agent who doesn’tanswer, the system continues to try other matching available agents any numberof times, without regard to this setting.
• In a load balance strategy using percentage allocation, a call isn’t distributedto a second team when the first team is unavailable. Instead, the system retriesthe first team's DN for the number of times specified for the strategy and thenoverflows the call.
Retries within the Team
This setting is available only if you’re creating a new strategy or copying an existingone.
Set to Yes if you want this to be the default routing strategy for the specified timeinterval for this entry point or queue.
Set to No if you’re creating an exception to the default schedule, such as a holiday.A strategy that isn’t flagged as default overrides the default strategy. That is, thesystem first checks for a strategy that isn’t flagged as default, and if none exists,the default strategy is used.
Flag as Default RoutingStrategy
-or-
Update as DefaultRouting Strategy
Call Control
Cisco Webex Contact Center Management Portal User Guide145
Contact RoutingCreate a Routing Strategy
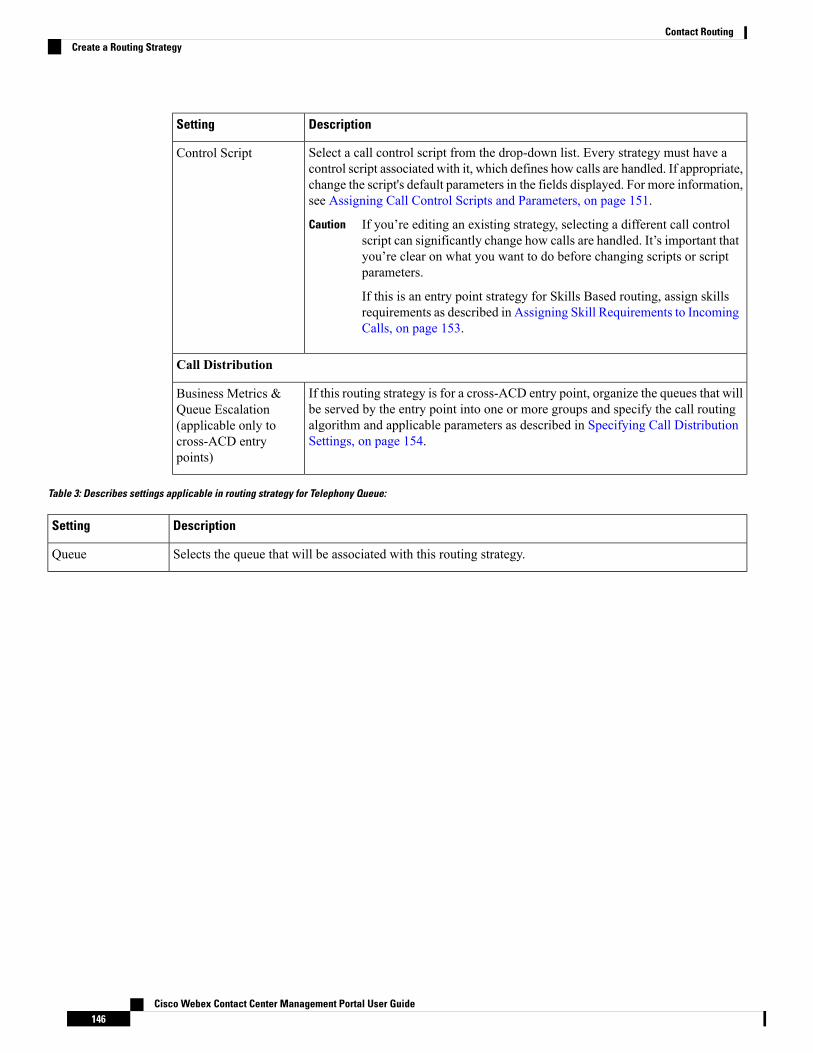
DescriptionSetting
Select a call control script from the drop-down list. Every strategy must have acontrol script associated with it, which defines how calls are handled. If appropriate,change the script's default parameters in the fields displayed. For more information,see Assigning Call Control Scripts and Parameters, on page 151.
If you’re editing an existing strategy, selecting a different call controlscript can significantly change how calls are handled. It’s important thatyou’re clear on what you want to do before changing scripts or scriptparameters.
If this is an entry point strategy for Skills Based routing, assign skillsrequirements as described in Assigning Skill Requirements to IncomingCalls, on page 153.
Caution
Control Script
Call Distribution
If this routing strategy is for a cross-ACD entry point, organize the queues that willbe served by the entry point into one or more groups and specify the call routingalgorithm and applicable parameters as described in Specifying Call DistributionSettings, on page 154.
Business Metrics &Queue Escalation(applicable only tocross-ACD entrypoints)
Table 3: Describes settings applicable in routing strategy for Telephony Queue:
DescriptionSetting
Selects the queue that will be associated with this routing strategy.Queue
Cisco Webex Contact Center Management Portal User Guide146
Contact RoutingCreate a Routing Strategy

DescriptionSetting
This option isn’t available for proxy queues:
• Longest Available Agent: Calls are routed to the agent who has been available for the longest timeover all teams assigned to the strategy in the Call Distribution section.
• Load Balance: Calls are routed to agents based on load-balancing conditions that you set in the Modeand Type fields and in the settings specified in the Call Distribution section.
• Mode: If you specified Load Balance in the Routing Type field, select one of the following valuesto specify how the call load will be handled:
• Percentage: Calls are routed to selected teams based on a percentage allocation that youspecify for each team in the Call Distribution section. The percentage spread total must equal100 across all teams selected for Group 1. For more information, see Specifying CallDistribution Settings, on page 154.
• Number: Calls are routed to selected teams based on the value you specify for each team inthe Call Distribution section. This value reflects the call capacity for that team. After thespecified number of calls are sent to a particular team, no additional calls will be sent to thatteam. In other words, this strategy allows you to specify an upper limit on the total numberof calls that are sent to a particular team. This allows you to meet any contractual obligationsto not exceed certain targets.
• Type: If you specified Load Balance in the Routing Type field, select one of the following valuesin the Type field:
• Dynamic: Calls routed dynamically result in a single virtual queue. Callers queue for thelongest available agent across all associated teams instead of being allocated immediately atthe time of call arrival to a team specified in the load balance strategy (based on current callconditions).
• Static: Calls are routed to specific teams on the basis of a predefined percentage or numericallocation at the time of call arrival. In static routing, calls are assigned to a team based on thenumber of calls specified for that team in the Call Distribution section (either a percentage ornumber of calls). In dynamic routing, calls are assigned to a team based on the current allocationof calls among the teams based on the day's tally.
• Priority Based: Calls are routed to agent teams based on a priority scheme that you set in the CallDistribution section.
• Skills Based: Calls are routed to agents based on skill requirements specified in the Call Distributionsection of the routing strategy for the entry point that sends calls to this queue. The Skills Based routingtype is available only if your enterprise is provisioned with the optional Skills Based Routing feature.
When you select Skills Based as the routing type, two additional settings appear for you to specify howto route a call when more than one agent with the required skill set is available:
• Longest Available Agent: The call will be routed to the agent who has been available the longest.
• Best Available Agent: When you select this setting, a Skill drop-down list appears. The call willbe routed to the agent with the highest proficiency in the skill you select in the drop-down list.
Routing Type
Time Settings (These are read-only for proxy queues.)
Cisco Webex Contact Center Management Portal User Guide147
Contact RoutingCreate a Routing Strategy
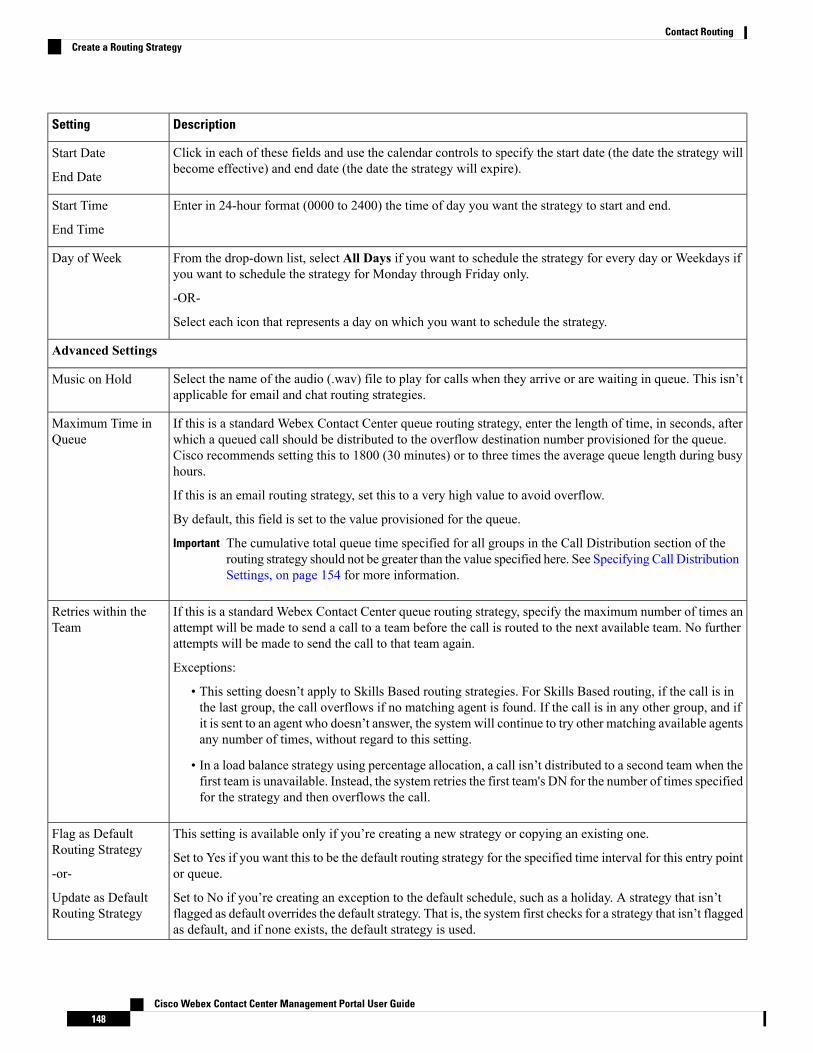
DescriptionSetting
Click in each of these fields and use the calendar controls to specify the start date (the date the strategy willbecome effective) and end date (the date the strategy will expire).
Start Date
End Date
Enter in 24-hour format (0000 to 2400) the time of day you want the strategy to start and end.Start Time
End Time
From the drop-down list, select All Days if you want to schedule the strategy for every day or Weekdays ifyou want to schedule the strategy for Monday through Friday only.
-OR-
Select each icon that represents a day on which you want to schedule the strategy.
Day of Week
Advanced Settings
Select the name of the audio (.wav) file to play for calls when they arrive or are waiting in queue. This isn’tapplicable for email and chat routing strategies.
Music on Hold
If this is a standard Webex Contact Center queue routing strategy, enter the length of time, in seconds, afterwhich a queued call should be distributed to the overflow destination number provisioned for the queue.Cisco recommends setting this to 1800 (30 minutes) or to three times the average queue length during busyhours.
If this is an email routing strategy, set this to a very high value to avoid overflow.
By default, this field is set to the value provisioned for the queue.
The cumulative total queue time specified for all groups in the Call Distribution section of therouting strategy should not be greater than the value specified here. See Specifying Call DistributionSettings, on page 154 for more information.
Important
Maximum Time inQueue
If this is a standard Webex Contact Center queue routing strategy, specify the maximum number of times anattempt will be made to send a call to a team before the call is routed to the next available team. No furtherattempts will be made to send the call to that team again.
Exceptions:
• This setting doesn’t apply to Skills Based routing strategies. For Skills Based routing, if the call is inthe last group, the call overflows if no matching agent is found. If the call is in any other group, and ifit is sent to an agent who doesn’t answer, the system will continue to try other matching available agentsany number of times, without regard to this setting.
• In a load balance strategy using percentage allocation, a call isn’t distributed to a second team when thefirst team is unavailable. Instead, the system retries the first team's DN for the number of times specifiedfor the strategy and then overflows the call.
Retries within theTeam
This setting is available only if you’re creating a new strategy or copying an existing one.
Set to Yes if you want this to be the default routing strategy for the specified time interval for this entry pointor queue.
Set to No if you’re creating an exception to the default schedule, such as a holiday. A strategy that isn’tflagged as default overrides the default strategy. That is, the system first checks for a strategy that isn’t flaggedas default, and if none exists, the default strategy is used.
Flag as DefaultRouting Strategy
-or-
Update as DefaultRouting Strategy
Cisco Webex Contact Center Management Portal User Guide148
Contact RoutingCreate a Routing Strategy
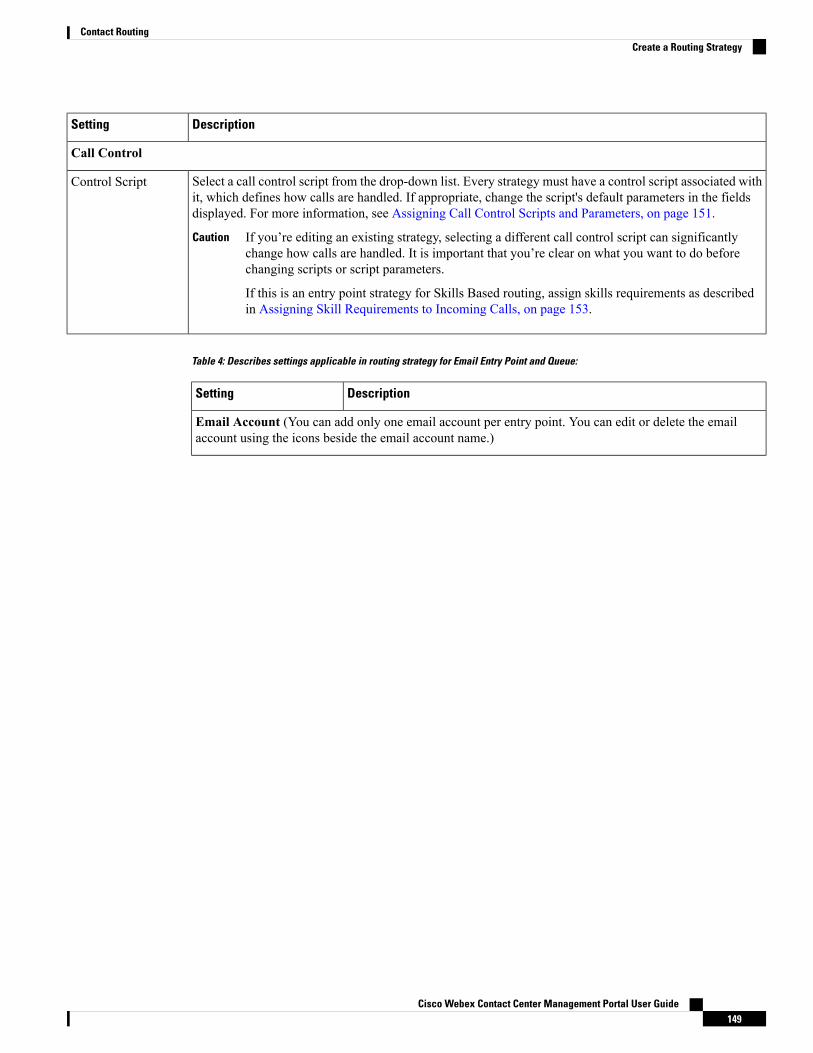
DescriptionSetting
Call Control
Select a call control script from the drop-down list. Every strategy must have a control script associated withit, which defines how calls are handled. If appropriate, change the script's default parameters in the fieldsdisplayed. For more information, see Assigning Call Control Scripts and Parameters, on page 151.
If you’re editing an existing strategy, selecting a different call control script can significantlychange how calls are handled. It is important that you’re clear on what you want to do beforechanging scripts or script parameters.
If this is an entry point strategy for Skills Based routing, assign skills requirements as describedin Assigning Skill Requirements to Incoming Calls, on page 153.
Caution
Control Script
Table 4: Describes settings applicable in routing strategy for Email Entry Point and Queue:
DescriptionSetting
Email Account (You can add only one email account per entry point. You can edit or delete the emailaccount using the icons beside the email account name.)
Cisco Webex Contact Center Management Portal User Guide149
Contact RoutingCreate a Routing Strategy

DescriptionSetting
Click the Add Email Account button to open the Add Email Account dialogbox. Enter the following details:
Email Address:Enter the email address to contact your organization.
Inbound Server Settings:Enter the following server details for incoming emails:
• Incoming Protocol
• Incoming Host
• Inbound Encryption
• Inbound Port Number
Outbound Server Settings:Enter the following server details for outgoing emails:
• SMTP Server
• Outbound Encryption
• Outbound Port Number
Server Authentication:Enter the username and password to connect to the email account.
Only secure access to mail servers are allowed, such as:Note
• SMTP/IMAP/POP over SSL
• SMTP/IMAP/POP over TLS
Advanced Email Account Settings:Enter the following additional advanced settings for the email account:
• Maximum Attachment Size
• Number of Attachment Limit
• Mail Delay
• Maximum Messages/Cycle
Add Email Account
Email Routing Rules (You can add up to 20 email routing rules. You can edit or delete the rule by usingthe icons beside the rule.)
Cisco Webex Contact Center Management Portal User Guide150
Contact RoutingCreate a Routing Strategy

DescriptionSetting
Click theAddRouting Rule button to open theAddRouting Rule dialog box.Enter the following details to add a rule:
Routing Rule Name:Enter the name for the rule.
IF Email Subject Contains:Enter the text in the email subject to set the condition for the rule. You canadd upto 10 conditions using the AND or OR operators. However, you canmix 'AND' and 'OR' condition in a rule.
Then:Select the email queue to which the email is queued if it satisfies anycondition.
Routing Rule
Select an email queue for the default routing rule in case none of the definedrules satisfy the criteria.
Default Routing Rule
Table 5: Describes settings applicable in routing strategy for Chat:
DescriptionSetting
Chat Routing Experience
Shows the name of the Chat Template used. To edit, you must log in to ControlHub.
Chat Template
Associate the preconfigured chat reasons. For more information, see Createa Chat Template.
Chat Reason MappingDetails
Assigning Call Control Scripts and ParametersCall control scripts define how a call is handled. If a control script is not assigned to a routing strategy, thedefault control script provisioned for the entry point or queue is used.
The Call Control settings for a routing strategy allow you to assign a control script to the routing strategy andset values for configurable parameters if any are specified in the control script.
If your enterprise uses the optional Skills-Based Routing feature, the Call Control settings for an entry pointstrategy can also include controls for specifying skill requirements for calls that arrive at the entry point, asdescribed in Assigning Skill Requirements to Incoming Calls, on page 153.
Note the following:
• Before you can assign a custom control script, it must be uploaded to the CJP system (see Uploading aCustom Control Script, on page 132).
• After a control script is available for selection, it can be assigned to new or existing routing strategies.
• If a control script is modified after being assigned to a routing strategy, it must subsequently be reassignedto the routing strategy. For more information, see Copying or Modifying a Call Control Script, on page131 and Uploading a Custom Control Script, on page 132.
Cisco Webex Contact Center Management Portal User Guide151
Contact RoutingAssigning Call Control Scripts and Parameters

Assigning a different control script to an existing routing strategy can significantly change how calls arehandled. Be sure that you are clear on what you want to do before changing a control script or control scriptparameters.
Caution
To assign a control script and control script parameters to a routing strategy:
Procedure
Step 1 Open the Routing Strategy module and on the Call Routing Strategy page, display the list view.Step 2 Select an entry point or queue from the Select Entry Point/Queue drop-down list.Step 3 Do one of the following:
• To create a new strategy, follow the instructions in Create a Routing Strategy, on page 142, and thenreturn to this procedure for instructions on assigning a control script to the strategy.
• To assign a control script to an existing strategy, from the list view, click the horizontal ellipsis buttonto the left of the listed strategy you want to modify and select Edit.
Step 4 In the Call Control section of the page, make a selection from the Control Script drop-down list. If an imageassociated with the control script is available, you can click the Image button to the right of the Control Scriptlist box to display it.
The configurable parameters for your selection are displayed beneath the control script name. You must seta value for every parameter.
If any call-associated data (CAD) variables are specified in the selected control script, their names are displayedin the Call-Associated Data list on the lower left side of the Call Control section. The system will capture datafor a CAD variable as part of the call record only if it matches the name of an inactive CAD variable provisionedfor your enterprise.
The color of a CAD variable name indicates the status of the variable.
Variable StatusColor
A matching active variable exists.Green
An inactive matching variable exists; the system doesnot store data for inactive variables.
Red
No matching variable exists; thus no data will bestored for the variable.
Black
Step 5 Specify a value for each parameter. To reset the parameter fields to the default values, click the Reset buttonbeneath the parameter fields.
Parameters for a proxy queue include site and team. For these parameters, you must select a dummysite and dummy team that is not agent-based.
Note
Step 6 If the control script uses skills-based routing, a Manage button is displayed to the right of the Reset button.For details about adding skill requirements to a routing strategy, see the next section Assigning SkillRequirements to Incoming Calls, on page 153.
Cisco Webex Contact Center Management Portal User Guide152
Contact RoutingAssigning Call Control Scripts and Parameters

Step 7 Click Apply to apply your control script and parameter settings.Step 8 To save your settings to the routing strategy, click Save.
Assigning Skill Requirements to Incoming CallsSkills-based routing is an optional CJP feature that matches the needs of callers with agents who have theskills to best meet those needs. When calls arrive at an entry point, they are assigned skill requirements basedon call paths specified in the call control script associated with the routing strategy for the entry point. Thecalls are then distributed to the specified queue for distribution to agents who possess a matching set of skills.
To assign skill requirements to incoming calls:
Procedure
Step 1 Display the routing strategy page for the entry point to which you want to assign or modify skill requirements.Step 2 In the Call Control section of the page, select the appropriate call control script and set any parameters as
described in Assigning Call Control Scripts and Parameters, on page 151.Step 3 Click the Manage button to display the Call Flow Paths window.Step 4 Click the check box to the left of a call path for which you want to assign skills, and then click the Edit Skills
button.Step 5 On the Skill Assignment Page that appears, click the Add Skill button, then select a skill from the drop-down
list, and then use the controls that are displayed to the right of the skill name to specify a value for the skill.
The controls for assigning a value to the skill vary depending on the skill type. The four skill types are describedin the table that follows. (For more information about skill types, see About Skills-Based Routing, on page120.)
Skill requirements specified for the Default path will be used for any path that does not have skillrequirements assigned to it.
Note
DescriptionSkill Type
Select the >= (greater than or equal to) button or the<= (less than or equal to) button, and then drag theslider to the right or left to assign a value between 0(lowest) and 10 (highest) that represents the requiredlevel of expertise in the skill.
Proficiency
Select True or False to indicate whether the agenthandling the call is required to have or required notto have this skill.
Boolean
Enter a value in the text box and select the is or isNOT button to indicate whether the agent handlingthe call must have or must not have a matching value.
Text
Select a value from the drop-down list.Enumeration
Cisco Webex Contact Center Management Portal User Guide153
Contact RoutingAssigning Skill Requirements to Incoming Calls

Step 6 To add another skill requirement for the selected path, repeat the previous step. To delete a skill requirementmapping, click the Delete button to the right of the setting for that skill.
Step 7 When you are finished adding skill requirements for the selected path, click the Save button to save yourchanges and close the Skills Assignment Page.
Step 8 To add skill requirements for another path, start again at step 4.Step 9 When you are finished, click the Apply button at the bottom of the Call Flow Paths window.Step 10 To save your settings to the routing strategy, click Save.
Specifying Call Distribution SettingsCall Distribution settings determine which teams receive calls, and in what order. These settings are availablein the Call Distribution section of the routing strategy for a standard CJP queue, enabling you to assign teamsto groups, which are assigned a priority based on the order in which they are created.
You assign a queue time to Group 2 and each subsequent group. When a call comes in, the teams in Group 1become available first. If the call is not handled within the queue time specified for Group 2, the teams inGroup 2 also become available. Teams in Group 2 and later serve as escalation groups; that is, their availabilityto handle overflow from Group 1 teams can considerably reduce the amount of time calls wait in queue.
In the case of priority-based routing, you assign a priority to each team in each group. Note that priorities areassigned across groups. Suppose, for example, that Group 1 has two teams with priorities 1 and 4, and Group2 has two teams with priorities 2 and 3. In this scenario, the system would try to send the call to team1, thento team4. If the call has not been answered within the queue time specified for Group 2, the teams in Group2 become available to handle the call, and the system will try the four teams based on their team prioritiesacross the two groups.
If a team is assigned to groups in the routing strategies for more than one queue, the system routes a call tothat team based on whichever queue (1) has that team earliest in its priority-based routing strategy and (2)has had a call waiting in queue the longest. Optionally, you can use the queue precedence function to assignthe order in which calls are routed from queues to teams on a per team basis as described in Specifying QueuePrecedence, on page 165.
If your enterprise uses the optional Skills-Based Routing feature, you can use settings in the Call Distributionsection to relax or remove skill requirements after specified time intervals.
In a routing strategy for an outdial queue, you must specify a team in the Call Distribution section; this is onlya placeholder and will not be used. In addition, you should specify only one group for an outdial queue routingstrategy.
Note
About Team TypesTwo team types can be displayed in the Team Type column of the Call Distribution table when you create ormodify a queue routing strategy: agent based and capacity based.
• Agent-based teams have a known number of agents assigned to them. Agents are set up and assigned toone or more teams in the Provisioning module. These agents use the CJP Agent Desktop to interfacewith the CJP system.
Cisco Webex Contact Center Management Portal User Guide154
Contact RoutingSpecifying Call Distribution Settings

• Capacity-based teams do not have specific agents assigned to them, and the agents do not use the CJPAgent Desktop. For example, an outsourcer might have teams that use a PBX or an ACD to handle calls.A capacity-based team might be used to represent a voice mailbox or an agent group that is not managedby the CJP system.
The capacity of these teams is based on the provisioned team capacity setting, which can be overwrittenby team capacity strategies (see Scheduling Team Capacity, on page 161). If the team’s actual capacityis higher than the value currently being used by the system, agents could be left with no calls to handle,and vice versa, making strategy design more challenging.
You can mix team types when creating a routing strategy, but remember that the accuracy of call routing tocapacity-based teams depends on the accuracy of the capacity number specified.
If a static load balancing strategy includes both agent-based and capacity-based teams, calls will not bedistributed to agent-based teams if the capacity for the capacity-based teams has been exhausted.
Note
Assigning Teams and Skill-Relaxation Settings to GroupsWhen you create a routing strategy for a queue, you must create a minimum of one group of teams; there isno maximum. The required settings for a group vary depending on the type of routing strategy the group iscreated for.
Be sure to create only one group for an outdial queue routing strategy.Note
If you are creating a group for a skills based routing strategy, you can specify skill-relaxation settings for thesecond and each subsequent group. Groups that specify skill-relaxation settings can include added teams butare not required to.
Skill-relaxation settings allow you to reduce or remove skill requirements assigned to a call in response toexcessive customer wait times, thus expanding the pool of agents available to serve the customer.
To create a group:
Procedure
Step 1 From the Create Routing Strategy or Edit Routing Strategy page, go to the Call Distribution section of thepage and click the Add Group button.
Step 2 In the Add Call Distribution Group dialog box that opens, select the check box next to each team you wantto include in the first group. You must select at least one team.
If the status of a team (displayed in the Status column) is Not Available, calls will not be distributedto that team until it becomes available. The system allows you to add such a team to a group forplanning purposes. For example, you might want to create a routing strategy for future use.
Note
Step 3 If you are creating a group for a load balance strategy, do one of the following:
• If the specified call distribution mode is Percentage, specify the percentage spread among the teams. Thespread must total 100.
Cisco Webex Contact Center Management Portal User Guide155
Contact RoutingAssigning Teams and Skill-Relaxation Settings to Groups

• If the mode is Number, enter the number of calls to be routed to each team.
This is a requirement only for Group 1. You do not specify a percentage spread or number for anyadditional groups.
Step 4 If you are creating a group for a priority-based strategy, assign a priority to each team in each group by makingselections from the drop-down list in the Priority column. Note that priorities are assigned across groups.
Step 5 Click Save Group to save the group.
After the group is successfully saved, the settings in the dialog box are cleared you can create an additionalgroup.
Step 6 To create a second group, select the team or teams you want to serve as overflow teams in the event that theGroup 1 teams are all busy, and select where to position the group in the call distribution sequence by selectinga value from the Add Group As drop-down. Specify the queue time as described in step Scheduling TeamCapacity, on page 161 and any additional information as required by the type of strategy you are creating orediting.
For a skills based strategy, adding a team to the second and subsequent groups is optional.
Step 7 If you are creating a group for a skills based strategy, you can specify skill-relaxation settings to remove orreduce some or all of the skill requirements assigned to the calls after a specified queue time. To do so, youmust know exactly which skill requirements were assigned to the calls in the routing strategy for the entrypoint that sends calls to this queue (see Assigning Skill Requirements to Incoming Calls, on page 153).
To specify skill-relaxation settings:
a. Click the Skill Relaxation tab at the top of the Add Call Distribution Group page and then click the AddSkill button. You can click this button multiple times to display relaxation settings for multiple skills.
To delete a displayed setting, click Delete button to the right of the setting.
a. Select a skill from the drop-down list.
b. If you selected a proficiency skill, select an option to indicate whether you want to increase, decrease, orremove the skill. If you selected Increase or Decrease, drag the slider to change the skill-level setting.
c. Specify queue time as described in the next step.
Step 8 Specify the queue time, in seconds. Queue time is the amount of time that calls in the previous group willremain in queue before teams in the next group become available to handle them or until skills are relaxed orremoved as specified in the Skill Relaxation tab. Only Group 2 and subsequent groups require a queue time.
Keep in mind that calls are directed to the overflow number after reaching the timeout value specifiedin the Maximum Time in Queue field. Therefore, it is important that you adjust that timeout valueso that it is greater than or equal to the total queue time (that is, the cumulative queue times for allgroups in the routing strategy).
Note
Step 9 Click Save Group.Step 10 To create another group, start again at step 6.Step 11 After you have created all the groups you want, click Close. The Call Distribution section displays a Group
header for each added group. Each header displays two or three buttons on the right side:a) Click the Expand button to expand a group section so you can see the settings for the group.b) Click the Edit buttton to open a dialog box where you can edit the group's settings.
Cisco Webex Contact Center Management Portal User Guide156
Contact RoutingAssigning Teams and Skill-Relaxation Settings to Groups
c) Click Delete to delete the group. This button is not displayed on Group 1 because the strategy must haveat least one group.
Editing a Group of Teams or Skill Relaxation SettingsTo edit a group:
Procedure
Step 1 Display the Edit Routing Strategy page for the relevant routing strategy (see Modifying a Routing Strategy,on page 158).
Step 2 In the Call Distribution section, do one of the following:
• Click the Delete button on the right side of the header for the group to delete the group. This button isnot displayed on Group 1 because you cannot delete the first group.
• Click the Edit button to open the Edit Call Distribution Group dialog box where you can edit the group'ssettings.
• Click the Add Group button at the top of the Call Distribution section to create a new group, as describedin Assigning Teams and Skill-Relaxation Settings to Groups, on page 155.
Step 3 If you are editing a group, the Edit dialog box display all teams available for selection as well as the teamsthat are currently selected for the group. You can select different teams or change the queue time.
If you are editing a group for a skill based strategy, click the Skill Relaxation tab where you can modify,delete, or add skill relaxation settings for the group.
Step 4 After making your changes in the Edit Call Distribution Group dialog box, click the Save Group button andthen click the Close button to close the dialog box.
Step 5 Click Save at the bottom of the page to save the changes to the routing strategy.
Deleting a Group of Teams or Skill Relaxation SettingsTo delete a group of teams:
Procedure
Step 1 Display the Edit Routing Strategy page for the appropriate routing strategy (seeModifying a Routing Strategy,on page 158).
Step 2 In the Call Distribution section, click the Delete button on the right side of the header for the group you wantto delete.
Step 3 Click Save to save this change to the routing strategy.
Cisco Webex Contact Center Management Portal User Guide157
Contact RoutingEditing a Group of Teams or Skill Relaxation Settings

Modifying a Routing StrategyBefore modifying a routing strategy, be aware of the following:
• Although you cannot copy the current strategy, you can modify any of its settings except those that affectexecution time or date. These changes have no effect on the recurring scheduled version of the strategy.
• When you modify the current strategy, your changes take effect immediately for new calls and remainin effect until the current strategy ends. If there are calls in the queue when the modifications are made,the existing queued calls will follow the original strategy unless you select theApply changes to currentcalls in queue check box to the right of the Save button.
• When you modify a strategy that is not the current strategy, your changes take effect according to thescheduled times specified in the strategy.
To modify a routing strategy:
Procedure
Step 1 Open the Routing Strategy module.Step 2 To modify a non-global routing strategy, on the Routing Strategy page, select an entry point or queue from
the Select Entry Point/Queue drop-down list.
The routing strategies for the selected entry point or queue are displayed. Click the horizontal ellipsis buttonto the left of the strategy you want to modify and select Edit.
Step 3 If you are modifying a global routing strategy:a) Click the Routing button on the menu bar, select Global Routing Strategies, select the Entry Point or
Queue button on the upper-left side page.b) If you are modifying a strategy for cross-ACD entry points or for proxy queues, set the CJP ACD field
to False.c) Click the horizontal ellipsis button to the left of a the strategy you want to modify and select Edit.
Step 4 Make your changes. For information about each setting, see the setting descriptions table in Create a RoutingStrategy, on page 142.
Step 5 If you are modifying the current strategy and want the changes to apply to calls currently in queue, select theApply changes to current calls in queue check box on the lower right side of the page. If this check box is notselected, the changes will apply only to new calls.
Step 6 Click Save to save your changes.
Deleting and Restoring Routing StrategiesWhen you delete a routing strategy, it is moved to the Deleted Routing Strategies or Deleted Global RoutingStrategies page where it can be restored or permanently deleted within 30 days. After 30 days, it will bepermanently deleted by the system.
Cisco Webex Contact Center Management Portal User Guide158
Contact RoutingModifying a Routing Strategy

When you delete a current strategy, the next strategy scheduled for that time period is activated. Do not deletea current strategy unless an alternate strategy has already been created.
Note
Deleting a Non-Global Routing StrategyTo delete a non-global routing strategy:
Procedure
Step 1 Open the Routing Strategy module and on the Call Routing Strategy page, click the List View button.Step 2 Select an entry point or queue from the Select Entry Point/Queue drop-down list.
The routing strategies for the selected entry point or queue are displayed.
Step 3 Click the ellipsis button to the left of the strategy you want to delete and select Delete. In the confirmationdialog box that opens, click OK.
The strategy is moved to the Deleted Routing Strategies page where it can be restored or permanently deleted(see Restoring or Permanently Deleting a Routing Strategy, on page 159).
Deleting a Global Routing StrategyTo delete a global routing strategy:
Procedure
Step 1 Open the Routing Strategy module, click the Call Routing button on the menu bar, and selectGlobal RoutingStrategies.
Step 2 On the Global Routing Strategy page, select the Entry Point or Queue button on the upper-left side page.Step 3 If you are deleting a strategy for cross-ACD entry points or for proxy queues, set theCJP ACD field to False.Step 4 Click the ellipsis button to the left of the strategy you want to delete and select Delete. In the confirmation
dialog box that opens, click OK.
The strategy is moved to the Deleted Global Routing Strategies page where it can be restored or permanentlydeleted. For more information, see Restoring or Permanently Deleting a Routing Strategy, on page 159.
Restoring or Permanently Deleting a Routing StrategyTo restore or permanently delete a non-global routing strategy:
Cisco Webex Contact Center Management Portal User Guide159
Contact RoutingDeleting a Non-Global Routing Strategy

Procedure
Step 1 Open the Routing Strategy module, click the Deleted Strategies button.Step 2 Make a selection from the Select Entry Point/Queue drop-down list.
The deleted routing strategies for the entry point or queue you selected are displayed.
Step 3 Click the ellipsis button to the left of the strategy you want to either restore or permanently delete and do oneof the following:
• To permanently delete the strategy, click Delete. Then, in the confirmation dialog box, click OK.
- OR -
• To restore the strategy, click Restore.
The Restore Routing Strategy page appears, displaying the settings for the routing strategy.
Step 4 If you are restoring a strategy, modify the settings if you want to, and then click Restore.
You cannot restore a deleted Chat Entry Point Routing Strategy, if a Routing Strategy is assignedto the Entry Point.
Note
If any settings conflict with an existing routing strategy, a message informs you. In this case, you must modifythe settings before the strategy can be restored.
Restoring or Permanently Deleting a Global Routing StrategyTo restore or permanently delete a global routing strategy:
Procedure
Step 1 Open the Routing Strategy module and select Global Routing Strategies.Step 2 On the Global Routing Strategy page, click the Deleted Global Strategies button.Step 3 On the page that appears, select the Entry Point or Queue button.Step 4 If you are restoring or permanently deleting a strategy for cross-ACD entry points or for proxy queues, set
the CJP ACD field to False.Step 5 Click the ellipsis button to the left of the strategy you want to either restore or permanently delete and do one
of the following:
• To permanently delete the strategy, click Delete. Then, in the confirmation dialog box, click OK.
- OR -
• To restore the strategy, click Restore.
The Restore Global Routing Strategy page appears, displaying the settings for the routing strategy.
Step 6 If you are restoring a strategy, modify the settings if you want to, and then click Restore.
Cisco Webex Contact Center Management Portal User Guide160
Contact RoutingRestoring or Permanently Deleting a Global Routing Strategy

You cannot restore a deleted Chat Entry Point Routing Strategy, if a Routing Strategy is assignedto the Entry Point.
Note
If any settings conflict with an existing routing strategy, a message informs you. In this case, you must modifythe settings before the strategy can be restored.
Scheduling Team CapacityA team's capacity setting represents the number of simultaneous calls the team can handle. Each capacity-basedteam is provisioned with a static capacity value of up to 10,000 (see Create a Team, on page 56 for moreinformation).
You can create scheduled team capacity strategies to override these settings in response to changing contactcenter conditions. If a team capacity strategy is not created for a team, the system uses the capacity valueprovisioned for the team.
Because teams can service multiple queues, team capacity is independent of the call routing strategies thatyou create for queues.
Viewing Scheduled Team Capacity StrategiesTo view existing team capacity strategies:
Procedure
Step 1 Open the Routing Strategy module and click the Team Capacity button on the menu bar.Step 2 If the scheduled team capacity strategies for the site you want to view are not currently displayed, make a
selection from the Site drop-down list.
The page displays a grid listing the scheduled team capacity strategies that have been created for the selectedsite. Following is a description of each column.
DescriptionColumn
The name assigned to the strategywhen it was created.Name
The identification number of the strategy. This numberis automatically assigned by the system.
ID
Cisco Webex Contact Center Management Portal User Guide161
Contact RoutingScheduling Team Capacity
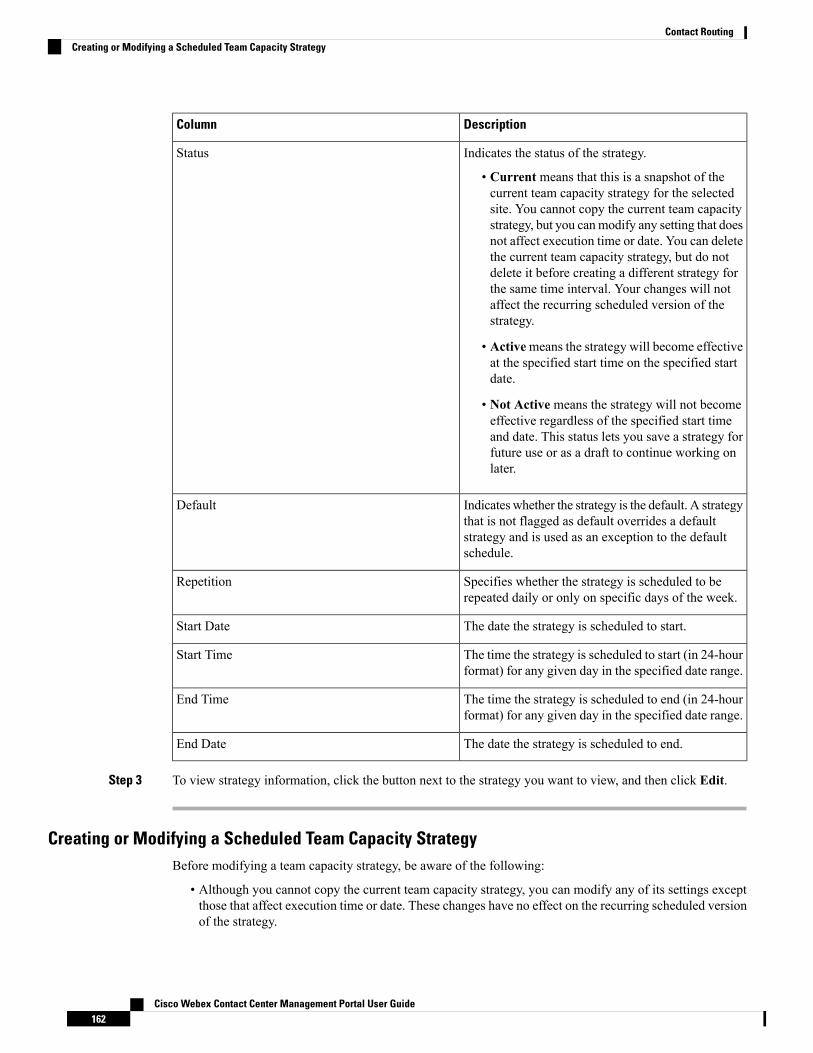
DescriptionColumn
Indicates the status of the strategy.
• Current means that this is a snapshot of thecurrent team capacity strategy for the selectedsite. You cannot copy the current team capacitystrategy, but you canmodify any setting that doesnot affect execution time or date. You can deletethe current team capacity strategy, but do notdelete it before creating a different strategy forthe same time interval. Your changes will notaffect the recurring scheduled version of thestrategy.
• Activemeans the strategy will become effectiveat the specified start time on the specified startdate.
• Not Active means the strategy will not becomeeffective regardless of the specified start timeand date. This status lets you save a strategy forfuture use or as a draft to continue working onlater.
Status
Indicates whether the strategy is the default. A strategythat is not flagged as default overrides a defaultstrategy and is used as an exception to the defaultschedule.
Default
Specifies whether the strategy is scheduled to berepeated daily or only on specific days of the week.
Repetition
The date the strategy is scheduled to start.Start Date
The time the strategy is scheduled to start (in 24-hourformat) for any given day in the specified date range.
Start Time
The time the strategy is scheduled to end (in 24-hourformat) for any given day in the specified date range.
End Time
The date the strategy is scheduled to end.End Date
Step 3 To view strategy information, click the button next to the strategy you want to view, and then click Edit.
Creating or Modifying a Scheduled Team Capacity StrategyBefore modifying a team capacity strategy, be aware of the following:
• Although you cannot copy the current team capacity strategy, you can modify any of its settings exceptthose that affect execution time or date. These changes have no effect on the recurring scheduled versionof the strategy.
Cisco Webex Contact Center Management Portal User Guide162
Contact RoutingCreating or Modifying a Scheduled Team Capacity Strategy

• When you modify the currently running strategy, your changes take effect immediately and remain ineffect until the current strategy ends.
• When you modify a strategy that is not the current strategy, your changes take effect according to thescheduled times specified in the strategy.
To create or modify a team capacity strategy:
Procedure
Step 1 Open the Routing Strategy module and click the Team Capacity button on the menu bar.Step 2 If the scheduled team capacity strategies for the site you want to view are not currently displayed, make a
selection from the Site drop-down list.
The team capacity strategies for the site you selected are displayed.
Step 3 Do one of the following:
• Click the New Strategy button.
- OR -
• Click the horizontal ellipsis button to the left of the listed strategy you want to modify or copy and selectEdit or Copy
Step 4 On the page that appears, specify the appropriate settings as described in the following table.
DescriptionSetting
General Settings
Enter a descriptive name for the strategy, such as USHoliday or Weekends.
Name
Enter a description for the strategy.Strategy Description
Select Yes if you want this to be the default teamcapacity strategy for this site.
A strategy that is not flagged as default overrides thedefault strategy and is used as an exception to thedefault schedule.The system first checks for a strategythat is not flagged as default, and if none exists, thedefault strategy is used. If no team capacity strategyexists for a team, the system uses the capacity valueprovisioned for the team.
Default
Select Active if you want the strategy to becomeeffective on the start date you specify in the StartDate field.
Select Not Active to save the strategy for future useor as a draft to continue working on later.
Status
Cisco Webex Contact Center Management Portal User Guide163
Contact RoutingCreating or Modifying a Scheduled Team Capacity Strategy

DescriptionSetting
Duration
Click in each of these fields and use the calendarcontrols to specify the start date (the date the strategybecomes effective) and end date (the date the strategyexpires).
Start Date End Date
Enter in 24-hour format (0000 to 2400) the time ofday the strategy will start.
Execution Start Time of Day
Enter in 24-hour format (0000 to 2400) the time ofday the strategy will end.
Execution End Time of Day
From the drop-down list, select All Days to schedulethe strategy for every day or Weekdays to schedulethe strategy for Monday through Friday only.
-OR-
Select each icon that represents a day on which youwant to schedule the strategy.
Day of Week
Team Capacity
This section lists each team associated with the site along with the team status either In Service or NotAvailable.
In the Capacity column, specify the capacity for each team of up to 10,000.
Step 5 Click Save (if you are creating a new strategy) or Update (if you are modifying a strategy).
Deleting a Scheduled Team Capacity Strategy
When you delete a current team capacity strategy, the next strategy scheduled for that time period is activated.Do not delete a current team capacity strategy unless an alternate one has already been created.
Caution
To delete a team capacity strategy:
Procedure
Step 1 Open the Routing Strategy module and click the Team Capacity button on the menu bar.Step 2 If the strategies for the site you want to view are not currently displayed, make a selection from the Site
drop-down list.
The team capacity strategies for the site you selected are displayed.
Cisco Webex Contact Center Management Portal User Guide164
Contact RoutingDeleting a Scheduled Team Capacity Strategy
Step 3 Click the horizontal ellipsis button to the left of the listed strategy you want to delete and select Delete.
Specifying Queue PrecedenceThe queue precedence function allows you to assign the order in which calls are routed from queues to teams,on a per-team basis. For example, suppose that TeamA can take calls from queues Billing and Sales. Youcould use queue precedence to assign a higher priority to the Billing queue, so when calls come in to thequeues, those from Billing will be routed to TeamA ahead of those from Sales.
If you assign a priority only to some of the queues, calls in those queues will take precedence over calls inthe queues for which no priority is specified.
This is an optional feature; you do not have to set up queue precedence for teams.Note
To set up a team routing scenario:
Procedure
Step 1 Open the Routing Strategy module and click the Queue Precedence button on the menu bar.
The Team Routing page appears, displaying a list of all queues belonging to the enterprise.
Step 2 Select a team from the Select Team drop-down list, which includes the names of all teams belonging to theenterprise.
The current queue priorities for the selected team are displayed in the Priority column.
Step 3 Assign a priority to as many queues as you want. A priority of 1 is highest. Queues for which no priority valueis specified have the lowest priority.
To assign a priority to a queue, click in the Priority field for the queue and enter a number in the text boxthat appears. Then click the check mark button to the right of the text box.
To delete an assigned priority, click in the Priority field for the queue and then click the delete button thatappears to the right of the text box.
Step 4 Click Save to save changes, which become effective immediately.
Audio on HoldWhen a call is queued on the CJP network, an audio file continues to play until the call is distributed to a teamwith available capacity. If the call is queued for longer than the length of the audio content, the audio fileloops back and restarts from the beginning.
Cisco recommends that the audio file include a brief delay message followed by music. The message shouldannounce the name of the associated queue, instruct the caller to hold for the next available agent, and includea warning that calls may be monitored.
Cisco Webex Contact Center Management Portal User Guide165
Contact RoutingSpecifying Queue Precedence

You can record one audio file for each strategy, so the message can vary by time of day, day of week, holidayschedule, and other factors.
Cisco Webex Contact Center Management Portal User Guide166
Contact RoutingAudio on Hold

C H A P T E R 5Call Monitoring
• Monitor Calls, on page 167
Monitor CallsThe Call Monitoring module enables authorized users to silently monitor any active call that is managed bythe CJP service at any time, across any site, and verify that customers are being served in a professionalmanner. Authorized users can also create monitoring schedules, coach an agent who is connected to a call byproviding comments that only the agent can hear, and barge in on calls as needed.
Monitoring OverviewThe CJP Call Monitoring module enables contact center managers to monitor the quality of service beingdelivered across their multi-source contact centers. Through a simplified Web interface, authorized users canselect a combination of one or more queues, sites, and teams, as well as a specific agent they want to monitor.After these criteria have been entered, the system places a request to monitor the next call that matches thecombination of all the criteria when the call is distributed to the destination site. Monitoring can be done ona continuous, one time only (ad hoc), or scheduled basis, and authorized users can monitor a call that is alreadyin progress.
The audio for the call is delivered through an inbound phone call using a phone number associated with theuser engaged in monitoring. Authorized supervisors can coach an agent during a connected call by providingcomments that only the agent can hear and can barge in on a call and become part of the conversation betweenthe agent and the customer.
Note the following:
• You cannot make a continuous monitoring request and an ad-hoc request for the same target at the sametime.
• If a scheduled request and a continuous request are made for the same target, the continuous requesttakes precedence. When the continuous request is paused or cancelled, the scheduled request is enabled.
• If a scheduled request and an ad-hoc request are made for the same target, the ad-hoc request takesprecedence. When the ad-hoc request is either cancelled or completed, the scheduled request is enabled.
• If you sign out of the CJP Management Portal while a monitoring request is still active, a message asksif you want to cancel the monitor request or continue monitoring.
Cisco Webex Contact Center Management Portal User Guide167

If you select Yes, any active mid-call, ad-hoc, or continuous monitoring requests will be cancelled afteryou log out and any scheduled requests will be suspended.
Monitoring CallsThe Call Monitoring page provides an interface for monitoring a call on a continuous or one-time only basis,and down to the agent level.
To monitor a call:
Procedure
Step 1 Open the Call Monitoring module.Step 2 In the Monitoring Filter panel on the left side of the page, specify one or more queues, sites, teams, and agents
you want to monitor. If you leave a Queue, Site, Team, or Agent list set to All, only those entities to whichyou have access will be included in the request.
Step 3 In the Callback Number field, enter the phone number where you want the audio to be sent. Enter all the digitsrequired to reach that phone, without hyphens or other special characters. For example, if the phone numberis 415-555-1234, you would enter 4155551234.
Step 4 Select the format for the callback number:
• U.S. Format (the default) interprets the phone number as 1 + area code + seven-digit phone number.
• Other indicates that the phone number format is other than U.S. format.
Step 5 If you want to prevent this monitoring session from being displayed on other users' Management Portals,select the Use Invisible Mode check box.
Step 6 Click one of the buttons described in the following table to submit your monitor request.
To do thisSelect this button
Monitor the next incoming call that fits the specifiedcriteria.
Monitor Next Call
Monitor a call that is already in progress andconnected to an agent. This button is available onlyif mid-call monitoring is authorized by your userprofile. If no call is in progress, the request fails.
Mid-Call Monitor
Continuously monitor calls that fit the specifiedcriteria. After you click this button, a dialog boxappears where you can enter the duration of themonitoring session in minutes or leave the default setto Unlimited. Then, clickMonitor to dismiss thedialog box and submit your request.
After the monitor duration has expired, thesystemmay take up to 5minutes to removethe monitor request, during which time oneadditional call might be delivered to you.
Note
Continuous Monitor
Cisco Webex Contact Center Management Portal User Guide168
Call MonitoringMonitoring Calls

Your request appears in the Monitor Requests list along with any pending requests from your colleagues.
When a call that matches the criteria you specified is distributed to the destination site, the audio is deliveredthrough a phone call to the number you specified. The monitored call appears in the Calls Being Monitoredlist.
For more information about the elements displayed on the CallMonitoring page, see Viewing CallMonitoringInformation, on page 170.
Step 7 If authorized by your user profile, you can click the Coach or Barge In button in the Action column to coachthe agent or barge in on the monitored call. For details, see Barging in on a Call, on page 170.
Step 8 When the call has ended, click Monitor Next Call to monitor the next call in the queue, or, if you selectedContinuous, the next call in the queue is automatically sent to you.
Step 9 Click the Cancel button to cancel monitoring activity for that request. If you selected Continuous, you canclick the Pause button to temporarily halt the calls sent to your number. Then you can click the Resume buttonto resume monitoring.
If an agent goes into the Not Responding state, the call goes back to queue and the caller hearsmusic on hold. If during this time, a supervisor is monitoring the call, the supervisor is disconnectedas well. If the supervisor is scheduled to monitor the call but has not yet picked up, the call disappearsfrom the Monitor Requests list and the phone stops ringing.
Note
Coaching an AgentIf theWhisper Coach feature is enabled in your user profile, you can speak to an agent who is being monitoredwithout being heard by the customer.
• The coaching session continues, even if the call is transferred to another agent, until the call either endsor is transferred to another number (agent-to-DN transfer).
• If the coached agent consults with another agent, you will hear music on hold and will not be able tocontinue coaching the agent until the caller is taken off hold.
While coaching an agent, you can barge in on the call if the Barge In feature is enabled in your user profile.
To silently coach an agent:
Procedure
Step 1 While you are monitoring a call (as described in Monitoring Calls, on page 168 and the call is connected toan agent, click the Coach button.
Do not click the Coach button if the call is waiting in a queue after having been transferred by the agent toanother queue. Doing so will cause your coach request to fail.
The Coach button is not available when the agent transfers the call to another number (DN transfer).
Step 2 Provide verbal instructions to the agent.Step 3 To remove yourself from the call, hang up. The call is removed from the Calls Being Monitored list.
Cisco Webex Contact Center Management Portal User Guide169
Call MonitoringCoaching an Agent

Barging in on a CallAuthorized users can use the Barge-In function to join a call they are monitoring and participate in theconversation between the agent and the customer unless the call is transferred to another number (agent-to-DNtransfer), after which the call is removed from the Calls Being Monitored list. To barge in on a call:
Procedure
Step 1 While you are monitoring or coaching a call, and the call is connected to an agent (and not waiting in a queue),click the Barge In button.
You are immediately connected to the call. The Barge In button disappears from the page.
Step 2 To remove yourself from the call, hang up. The call is removed from the Calls Being Monitored list.
Viewing Call Monitoring InformationTo view call monitoring information, click the Call Monitoring link on the CJP Management Portal.
The Call Monitoring page displays the following:
• Controls for requesting a monitoring session. For more information, see Monitoring Calls, on page 168.
• A chart of active and queued calls for the queue that is currently selected in the Monitoring Filter panelon the left side of the page.
• The Monitoring Requests/Calls Being Monitored table, which displays the two lists described in thefollowing sections.
If you resize the Call Monitoring window to a very narrow size, the MonitoringRequests/Calls Being Monitored table will be displayed at the bottom of thewindow. It might appear that the table is missing, but you can see it by scrollingto the bottom of the window.
Note
The Calls BeingMonitored list displays information about all calls currently beingmonitored in your enterprise.Following is a description of each column in the list.
When a monitored call is transferred to specific phone number (agent-to-DN transfer), it is removed from theCalls Being Monitored list and thus, the Coach and Barge In buttons are no longer available.
Note
DescriptionColumn
The queue that received the call.Queue
The contact center location to which the call wasdistributed.
Site
Cisco Webex Contact Center Management Portal User Guide170
Call MonitoringBarging in on a Call
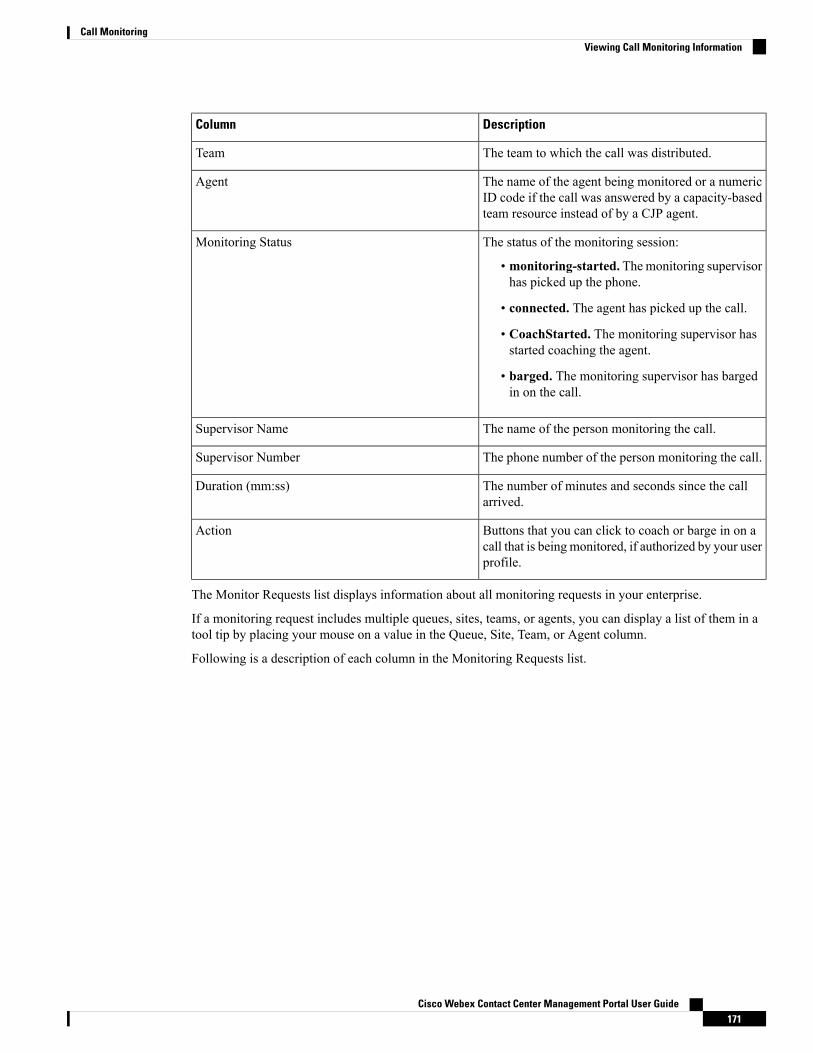
DescriptionColumn
The team to which the call was distributed.Team
The name of the agent being monitored or a numericID code if the call was answered by a capacity-basedteam resource instead of by a CJP agent.
Agent
The status of the monitoring session:
• monitoring-started. Themonitoring supervisorhas picked up the phone.
• connected. The agent has picked up the call.
• CoachStarted. The monitoring supervisor hasstarted coaching the agent.
• barged. The monitoring supervisor has bargedin on the call.
Monitoring Status
The name of the person monitoring the call.Supervisor Name
The phone number of the person monitoring the call.Supervisor Number
The number of minutes and seconds since the callarrived.
Duration (mm:ss)
Buttons that you can click to coach or barge in on acall that is being monitored, if authorized by your userprofile.
Action
The Monitor Requests list displays information about all monitoring requests in your enterprise.
If a monitoring request includes multiple queues, sites, teams, or agents, you can display a list of them in atool tip by placing your mouse on a value in the Queue, Site, Team, or Agent column.
Following is a description of each column in the Monitoring Requests list.
Cisco Webex Contact Center Management Portal User Guide171
Call MonitoringViewing Call Monitoring Information

DescriptionColumn
Three request types can appear in the list:
• Continuous. The specified target (queue, team,site, or agent) will be continuously monitoreduntil the request is paused or cancelled or untilthe monitoring duration is reached if themonitoring user specified a duration. You canpoint to the word Continuous to display a tooltipshowing the duration of the monitoring requestor Unlimited if no duration was specified.
• Scheduled. A call monitoring schedule for thespecified target has been set up and is running.
• Ad-Hoc. The next call that matches the specifiedcriteria will be monitored.
Request Type
The queues included in the request. If multiple queuesare included, you can display a list of them by pointingto the value displayed in the column.
Queue
The sites included in the request. If multiple sites areincluded, you can display a list of them by pointingto the value displayed in the column.
Site
The teams included in the request. If multiple teamsare included, you can display a list of them by pointingto the value displayed in the column.
Team
The agents included in the request. If multiple agentsare included, you can display a list of them by pointingto the value displayed in the column.
Agent
The status of the monitoring session:
• Request Pending. The request has beensubmitted.
• Monitoring. The supervisor has picked up thephone.
Monitoring Status
The name of the person who submitted the request.Supervisor Name
The phone number of the person who submitted therequest.
Supervisor Number
Buttons you can click to pause, resume, or cancel amonitoring request.
Action
Cisco Webex Contact Center Management Portal User Guide172
Call MonitoringViewing Call Monitoring Information
Working with Monitoring SchedulesThe Monitoring Schedules page in the Call Monitoring module enables authorized users to schedule callmonitoring requests at specific times of the day or week. Note the following:
• Unless otherwise authorized by your user profile, you can view and edit only those call monitoringschedules that you created.
• The start and end times specified in the Call Monitoring Schedule use the enterprise time. However, callsare actually monitored in local time. Be sure to adjust for this when specifying start and end times inyour monitoring schedules.
Creating or Editing a Monitoring ScheduleTo create a new monitoring schedule or edit an existing one:
Procedure
Step 1 Open the Call Monitoring module and click the Schedule button on the menu bar.Step 2 To create a new schedule:
• From the list view, click New Schedule.
- OR -
• From the calendar view, point to the schedule's beginning date and click the Create link that appears inthe upper-left corner of the date box.
Step 3 To copy or edit an existing schedule from the list view, click the button to the left of a listed schedule andselect Copy or Edit.
Step 4 On the page that appears, specify the appropriate settings as described in the following table, and then clickSave.
DescriptionSetting
Enter a name for the schedule.Name
To select the start date (the date the schedule becomeseffective) and end date (the date the schedule expires),click the appropriate calendar icon in the Start Dateor End Date field, and then select a date from thecalendar that appears.
Start Date End Date
Cisco Webex Contact Center Management Portal User Guide173
Call MonitoringWorking with Monitoring Schedules
DescriptionSetting
Enter in 24-hour format (0000 to 2400) the time ofday you want the schedule to start and end.
Be sure to adjust for the fact that the time you specifyin the Call Monitoring Schedule uses the enterprisetime. However, calls are actually monitored in localtime.
Pending monitor requests are checkedevery 'n' number of seconds as configuredfor your system. The default value is fiveminutes. When this checking functionstarts, each monitor request is checked andvalidated. If the request is past thescheduled deadline (that is, the End Timevalue), it is removed from the pendingmonitor requests list. Because of this addedfunctionality, the scheduled end time mayactually occur a few minutes later thanspecified.
Note
Start Time End Time
From the drop-down list, select All Days if you wantthe schedule to run every day or Weekdays if youwant the schedule to runMonday through Friday only.
-OR-
Select each icon that represents a day during whichyou want the schedule to run.
Day of Week
Select Active if you want the schedule to becomeeffective at the specified start time on the specifiedstart date. Otherwise, select Not Active.
Status
Enter the phone number of where you want the audiosent. Select U.S. Format if this number has the format:1 + area code + number. Select Other if not a U.S.format.
Callback Number
Select the queues, sites, teams, and agents you wantmonitored as part of this schedule.
Filter By
Activating and Deactivating Monitoring SchedulesYou can activate or deactivate a monitoring schedule by editing the Status field in the settings for the schedule,or you can simply click a button in the list view Monitoring Schedules page as follows:
Cisco Webex Contact Center Management Portal User Guide174
Call MonitoringActivating and Deactivating Monitoring Schedules

Procedure
Step 1 Open the Call Monitoring module and click the Schedule button on the menu bar.Step 2 Click the horizontal ellipsis button to the left of a listed schedule and select Activate or Deactivate.
Exporting the Monitoring Schedule ListTo export the monitoring schedule list to a data analysis tool such as Microsoft Excel:
Procedure
Step 1 Open the Call Monitoring module and then click the Schedule button on the menu bar.Step 2 In the list view, click the Action button on the upper-right side of the page header and select Excel or CSV.Step 3 In the dialog box that opens, either clickOpen to open the file, or click Save, navigate to the directory where
you want to save the file, and then click Save.
Deleting a Monitoring ScheduleTo delete a monitoring schedule:
Procedure
Step 1 Open the Call Monitoring module and click the Schedule button on the menu bar.Step 2 In the list view, click the horizontal ellipsis button to the left of a listed schedule and select Delete from the
drop-down list.Step 3 In the dialog box that opens, click Yes to confirm the deletion.
Cisco Webex Contact Center Management Portal User Guide175
Call MonitoringExporting the Monitoring Schedule List

Cisco Webex Contact Center Management Portal User Guide176
Call MonitoringDeleting a Monitoring Schedule

C H A P T E R 6Call Recording
The optional Call Recording module enables authorized users to record any active call that is managed by theCJP service.
Through a Web interface, authorized users can select which queue, team, site, and agent they want to record,and for what time period. After the recording schedules are created and saved, the system starts recording thenext call that matches the criteria.
Recordings are transferred daily to your enterprise's recording repository over a secure encrypted virtualprivate network (VPN). The recording repository is a standalone server housed at a location of your enterprise'schoosing, such as the contact center premise location or data facility. Your enterprise has full control over thelength of storage for these recordings.
The recordings are in standard .wav format and can be accessed directly by authorized individuals and reviewedusing standard third-party utilities. Additionally, you can use the features of the optional CJP RecordingManagement module to search for and play recorded files.
Calls sent to the overflow destination number are not available for review through the CJP RecordingManagement module.
Note
• Call Recording, on page 177• Creating or Editing a Recording Schedule, on page 178• Deleting a Recording Schedule, on page 180
Call RecordingThe optional Call Recording module enables authorized users to record any active call that is managed by theCJP service.
Through a Web interface, authorized users can select which queue, team, site, and agent they want to record,and for what time period. After the recording schedules are created and saved, the system starts recording thenext call that matches the criteria.
Recordings are transferred daily to your enterprise's recording repository over a secure encrypted virtualprivate network (VPN). The recording repository is a standalone server housed at a location of your enterprise'schoosing, such as the contact center premise location or data facility. Your enterprise has full control over thelength of storage for these recordings.
Cisco Webex Contact Center Management Portal User Guide177

The recordings are in standard .wav format and can be accessed directly by authorized individuals and reviewedusing standard third-party utilities. Additionally, you can use the features of the optional CJP RecordingManagement module to search for and play recorded files.
Calls sent to the overflow destination number are not available for review through the CJP RecordingManagement module.
Note
Creating or Editing a Recording ScheduleTo create or edit a call recording schedule:
Procedure
Step 1 Open the Call Recording module and on the page appears, select a queue from the Queue drop-down list.
All call recording schedules for that queue are displayed. From here, you can:
• Add a new schedule
• Edit or view an existing schedule
• Delete an existing schedule
• Copy an existing schedule
• Switch between a list view and calendar view of all schedules for this queue.
Step 2 To create a new schedule:
• From the list view, click New Schedule.
- OR -
• From the calendar view, point to the schedule’s beginning date and click the Create link that appears inthe upper-left corner of the date box.
Step 3 To copy or edit an existing schedule, from the list view, click the ellipsis button to the left of a listed scheduleand select Copy or Edit.
Step 4 On the page that appears, specify the appropriate settings as described in the following table, and then clickSave.
DescriptionSetting
Enter a name for the schedule.Name
To select the start date (the date the schedule becomeseffective) and end date (the date the schedule expires),click the appropriate calendar icon, and then select adate from the calendar that appears.
Start Date End Date
Cisco Webex Contact Center Management Portal User Guide178
Call RecordingCreating or Editing a Recording Schedule

DescriptionSetting
Enter in 24-hour format (0000 to 2400) the time ofday you want the schedule to start and end.
Start Time End Time
From the drop-down list, select All Days if you wantthe schedule to run every day or Weekdays if youwant the schedule to runMonday through Friday only.
-OR-
Select each icon that represents a day during whichyou want the schedule to run.
Days of Week
Select Active if you want the schedule to becomeeffective at the specified start time on the specifiedstart date. Otherwise, select Not Active.
Status
Select On if you want recording to stop when a callis transferred.
Stop Recording on Transferred Out Calls
SelectOn if you want the agent to have access to thePrivacy Shield icon during call recording so that theagent can pause and resume recording. For example,the agent might need to pause potential call recordingwhile obtaining a credit card number or otherprotected information. Be sure to instruct agentsregarding when to use this feature.
The Privacy Shield icon is displayed onthe Agent Desktop only if the PrivacyShield feature is enabled in your CJPservice configuration.
Note
Enable Pause Resume
If you set Enable Pause Resume to On, enter thenumber of seconds that recording will be paused ifthe user does not click the Turn Off Privacy Shieldbutton earlier.
Pause Duration (in Sec)
Specify the percentage of the total number of currentcalls you want recorded for this queue.
Percentage
Cisco Webex Contact Center Management Portal User Guide179
Call RecordingCreating or Editing a Recording Schedule

DescriptionSetting
Select the sites, teams, and agents you want to includein your recording schedule.
Outdial call recording is based on the site,team, and agent whomakes the outdial call.For example, if a recording schedule iscreated for the Outdial queue and a sitenamed Chicago, then only those outdialcalls made by teams under the Chicago sitewill be recorded, and not calls made fromother sites.
Note
Filter By
Deleting a Recording ScheduleTo delete a recording schedule:
Procedure
Step 1 Open the Call Recording module and in the list view, make a selection from the Select Queue drop-down list.
The recording schedules for the selected queue are displayed.
Step 2 Click the button to the left of a listed schedule and Delete .
Cisco Webex Contact Center Management Portal User Guide180
Call RecordingDeleting a Recording Schedule

C H A P T E R 7Recording Management
The optional CJP Recording Management module enables authorized users to search for and play audio filesrecorded through the CJP Call Recording feature. In addition, authorized users can create tags that can beassigned to audio files for use as search criteria, specify which CAD variables to store with recordings, createcustom attributes, and view recent Recording Management activity.
• Searching for and Playing Recordings, on page 181• Assigning and Removing Tags, on page 183• Search Attributes, on page 183• Others Page, on page 184• Viewing and Changing the Security Key Schedule, on page 184• Viewing the Pruning Details, on page 185
Searching for and Playing RecordingsTo search for and play a recording:
Procedure
Step 1 Open the Recording Management module and on the Search page, select one or more queues and sites or usethe default All settings.
• You can enter one or more characters in a list box to display only the listed entities that include thecharacter sequence you entered.
• The Queues, Sites, and other lists are populated based on your access privileges.
Step 2 After you select one or more sites, the teams and agents associated with the selected sites are displayed in theTeams and Agents lists. Select one or more teams and agents or use the default All settings.
• When you select one or more teams, only the agents associated with those teams are displayed in theAgents list. If no teams are selected, then all agents associated with the selected sites are displayed.
• If you want to exclude deleted agents from the search., click the Exclude Deleted Agents check box.
Step 3 To filter the search based on wrap-up codes, select one or more codes from theWrap Up Codes list.
Cisco Webex Contact Center Management Portal User Guide181

Step 4 If tags (text strings that can be assigned to recordings) have been defined and assigned to recordings, you canfilter the search based on tags by selecting them in the Tags list. For more information, see Assigning andRemoving Tags, on page 183and Creating and Exporting Tags, on page 183.
Step 5 To filter the list based on additional criteria, clicked the Advanced Search button, and in the dialog box thatopens:
• You can filter the search based on call-associated data (CAD) values by selecting the check box to theleft of one or more entries in theCADVariables list and entering a CAD value for each selected variable.
• If your Recording Management installation includes custom attributes, you can filter the search basedon custom attribute values by selecting the check box to the left of one or more entries in the CustomAttributes list and then entering a custom attribute value for each selected attribute.
• You can enter values in the fields displayed under Call Attributes to filter the search based on SessionID,DNIS (the number the caller dialed), orANI number (either the caller's phone number or, in the caseof an outdial call, the phone number of the agent who made the outdial call).
• You can enter values in the Recording Duration fields to specify the minimum and maximum lengthof recording to search for or select the Unlimited check box to search for a recording of any length.
Step 6 Use the calendar controls in the Date fields to specify a data range.Step 7 To search for audio files that were deleted less than 30 days ago, select the Search Deleted Files check box.
Note the following:
• Files that were manually deleted and files that have been deleted for 30 days or more are permanentlyremoved from the system.
• To play a deleted audio file, you must first restore it as described in step 9.
Step 8 To reset all lists and fields and start over again, click the Reset button.Step 9 Click the Search button to start the search.
If audio files meeting your search criteria are found, they are listed on the Search Results page. Otherwise,No records available message is displayed on the page.
To restore a deleted audio file, click the ellipsis button to the left of a listed recording and select Restore.
Click the plus button to the left of a listed recording to display additional details about the recording.
Click the ellipsis button to the left of a listed recording and select Stereo to play the audio of both the agentand caller.
If Leg Recording is enabled for your enterprise, three play buttons are available when you click the button.Select Agent to play just the agent audio; select Caller to play just the caller audio.
Click the ellipsis button to the left of a listed recording and select Delete .
Click the ellipsis button to the left of a listed recording and select Tags. For more information, see Assigningand Removing Tags, on page 183.
Click the ellipsis button to the left of a listed recording and select Tags to open a dialog box that displays thecustom attribute values.
Click Export button on the upper-left side of the results page.
Cisco Webex Contact Center Management Portal User Guide182
Recording ManagementSearching for and Playing Recordings

Assigning and Removing TagsYou can assign the same tag to multiple recordings and you can assign multiple tags to an individual recording.
To assign a tag to a recording or remove a tag from a recording:
Procedure
Step 1 Open the Recording Management module and on the Search page, perform a search for the recordings youwant to either assign tags to or remove tags from as described in Searching for and Playing Recordings, onpage 181).
Step 2 Click the ellipsis button to the left of a listed recording on the Search Results page and select Tags.
On the upper part of the dialog box that opens, the list of tags assigned to the recording is displayed on theright and a list of tags that are available is displayed on the left.
Step 3 To assign a tag to the recording, select a tag in list on the left and click the Assign Tag button to move it tothe list on the right.
Step 4 To remove a tag from the recording, select a tag in the list on the right and click the Remove Tag button tomove it to the list on the right.
Step 5 When you are finished, click Save.
Search AttributesThe Recording Management > Search Attributes page provides access to controls where you can performthe tasks described in the following topics:
• Creating and Exporting Tags, on page 183
• Creating and Modifying Custom Attributes, on page 184
Creating and Exporting TagsThe Tags section of theRecordingManagement > Search Attributes page enables authorized users to createand export a list of tags that can be assigned to recordings (see Assigning and Removing Tags, on page 183).
To create a tag or export a list of tags:
Procedure
Step 1 Open the Recording Management module and select Search Attributes on the menu bar.Step 2 In the Tags section of the page that appears, do one of the following:
• To create a tag, click Add and in the dialog box that opens, enter a name for the tag and click Save.
Cisco Webex Contact Center Management Portal User Guide183
Recording ManagementAssigning and Removing Tags

• To export the list of tags, click the Excel or CSV link beneath the tags list and in the dialog box thatopens, click Open to open the file, or click Save, navigate to the directory where you want to save thefile, and then click Save.
Creating and Modifying Custom AttributesThe Custom Attributes section of theRecordingManagement > Search Attributes page enables authorizedusers to create attributes that can be saved with recordings and later searched for.
To create a custom attribute:
Procedure
Step 1 Open the Recording Management module and select Search Attributes on the menu bar.Step 2 In the Custom Attributes section of the page that appears, click Add and in the dialog box that opens, enter
a name for the customer attribute and click Save.
Others PageThe Recording Management > Others page provides access to controls where you can perform the tasksdescribed in the following topics:
• Viewing and Changing the Security Key Schedule, on page 184
• Viewing the Pruning Details, on page 185
Viewing and Changing the Security Key ScheduleIf your installation includes the encryption option, each recording file for your enterprise is encrypted usinga public key that is randomly generated.When a user requests a recording file, the Recordings Server softwaredecrypts the file using a randomly generated private key. A new set of public and private keys can be generatedperiodically based on settings specified in the Security Keys tab.
If your user profile authorizes you to access the Security Keys page, you can view and change the schedulefor generating security key pairs:
Open the Recording Management module and click the Others button on the menu bar.
DescriptionSetting
Security Key Rotation Details
The date when a new security key pair was lastgenerated. For a new installation, the value in thisfield is N/A (not available).
Last Rotation Date
Cisco Webex Contact Center Management Portal User Guide184
Recording ManagementCreating and Modifying Custom Attributes

DescriptionSetting
The date when a new security key pair will begenerated.
Next Rotation Date
Configure Security Key Rotation
Select this check box if you want to specify a timeinterval for automatically generating a new securitykey pair, and then from the Rotate keys everydrop-down list, select Day,Week,Month, ThreeMonths, Six Months, or Year.
Enable Automatic Key Rotation
Select this button to generate a new key pairimmediately.
Rotate
Click this button to save your settings.Save
Viewing the Pruning DetailsIf your user profile authorizes you to access the Pruning Details settings, you can view the pruning strategysettings specified for your enterprise:
Open the Recording Management module and click the Others button on the menu bar.
The lower part of the page displays the Pruning Detail settings described in the following table.
Pruning ValuePruning Strategy
0—No pruning occurs.No Pruning
The number of months to retain recordings.Recordings made prior to the specified number ofmonths are deleted.
Note • A month is defined as 31 days, andone additional day is added to thetotal number of days before therecordings are deleted. Thus, 1 monthmeans 32 days; 2 months means 31days x 2 + 1 day = 63 days.
• For some enterprises, the value willbe displayed as days.
Time Based
The maximum number of minutes of recordings peragent. When the maximum number of minutes isreached, the oldest recordings are deleted to makeroom for new recordings.
Agent Minutes
Cisco Webex Contact Center Management Portal User Guide185
Recording ManagementViewing the Pruning Details

Pruning ValuePruning Strategy
The limit on the total recording size in megabytes.When the limit is reached the oldest recordings beyondthe specified storage value are deleted.
Storage Based
Cisco Webex Contact Center Management Portal User Guide186
Recording ManagementViewing the Pruning Details

C H A P T E R 8Troubleshooting
• Troubleshooting Management Portal Problems, on page 187• Troubleshooting CJP Agent Desktop Problems, on page 189
Troubleshooting Management Portal Problems
Management Portal ProblemsIf you experience a problemwhile using theManagement Portal, the followingmay help you solve the problem.
Description/WorkaroundProblem
Check to make sure that the correct user name andpassword are entered.
You cannot log in to the Management Portal.
You do not have the correct privileges to access thesemodules, entry points, or queues. Contact yourWebexContact Center administrator.
You cannot access a module from the ManagementPortal, or you cannot see some entry points or queues.
Make sure that the privacy setting for InternetExplorer is set to Medium.
The Management Portal does not display dataregarding agents or calls, or shows that no agents arelogged in.
Log out of the currentWebex Contact Center session.Close any remainingWebex Contact Center windowsand log in again.
Occasionally the message "Please Refresh the Page"appears in the Real-Time Reports module.
Maximize the window to display the tooltip near thecursor.
When you resize the Agent view of a real-time agentreport, tooltips for idle and wrap-up codes aresometimes displayed in the graph area instead of nearthe cursor.
Escalate to Customer Support.Too many abandoned calls are being reported.
Cisco Webex Contact Center Management Portal User Guide187

Description/WorkaroundProblem
The system has been unable to refresh the data in thechart since the time indicated in the message, typicallybecause of an intermittent network interruption orserver issue. If the problem persists for severalminutes, notify your system administrator.
While viewing a chart in a report or on a monitoringpage, you see the followingmessage "CommunicationInterruption on <date> at <time>".
Escalate to Customer Support.The real-time reports are not refreshing on theManagement Portal.
Escalate to Customer Support.The real-time report statistics are not displayed.
This discrepancy occurs when an agent logs out whilestill in the Wrap-up state without selecting a wrap-upcode. Instruct agents to always go into the Idle stateand then click the Log Out button to log out ratherthan closing the browser while logged in.
In a real-time agent report, the wrap-up count andnumber of entered wrap-up codes do not match.
Log out and then log in again to see the changes.Changes to the names of existing idle and wrap-upcodes do not appear immediately in agent reports.Instead, agent reports display the previous code namesbefore they were edited or N/A for a new code.
The Time Value is displayed in two cells instead ofone when exported to CSV format. This is because acomma separates the day from the date and time inthe Login Time field.
When exported to CSV format, data in the AgentView of a current snapshot agent report is displayedincorrectly.
By default, Excel displays the data in hh:mm format.However, you can double-click in the cell to see thedata in hh:mm:ss format.
When you export historical report data to MicrosoftExcel that includes date and time in the hh:mm:ssformat, Excel displays only the hours and minutes,and not the seconds.
This is transient for teams that log in for the first time.Normally, data is displayed in half-hour intervals frommidnight.
For a new team, data in the agent interval report isdisplayed in half-hour intervals from the time an agenton the team logs in after system restart.
After you save a custom report, wait 10-15 secondsbefore logging out.
In the Historical Reports module, occasionally theparameters for a customized default report are notsaved after you log out and log in again.
Ensure that you are using the correct DN and prefix.You cannot make a monitoring request.
Close the module and re-open it.Monitoring session left open for an hour or longerdisplays a blank page or unexpected behavior
If a monitoring request is made for a team and ifmultiple queues use the same team for routing, anyof the queue's calls for that team can be monitored.
Supervisor phone rings even when the monitoringrequest is for a different queue.
Escalate to Customer SupportA call ends, but the monitoring screen indicates thatthe call is still in progress.
Cisco Webex Contact Center Management Portal User Guide188
TroubleshootingManagement Portal Problems

Description/WorkaroundProblem
The agent needs to sign in again to view the changes.Signed in agents can not see changes made to Skillprofile.
Reporting Management Portal Issues to Customer SupportWhen escalating a Management Portal issue to Cisco CJP Customer Support, make sure to provide thefollowing information:
• The login and user name of the person experiencing the problem.
• The time that the issue was first observed.
• If the problem occurred in the Monitoring module, the number that the supervisor was attempting to calland a call session ID, if available.
Troubleshooting CJP Agent Desktop Problems
Network InteruptionsIf a network interruption occurs that lasts for less than two minutes, all the Agent Desktops display a"Reconnecting" message and then successfully reconnect.
If a network interruption lasts longer than two minutes, instruct agents to close the current Agent Desktopwindow, and then log in using the primary URL. If the login fails with the primary URL, instruct agents touse the backup application center login.
Escalate all network interruptions; report the time the problem occurred and the number of agents affected.
If the network to the primary application center is down, CJP Management Portal users cannot view anystatistics.
Agent Desktop Application ProblemsIf you experience a problem while using the Agent Desktop application, the following may help you solvethe problem.
Description/WorkaroundProblem
1. Check to make sure that cookies are enabled inInternet Explorer.
2. Ensure that the correct user name and passwordare entered in the login screen.
You are not able to log in to the Agent Desktop.
Check the format of the DN that you entered andmakesure the number is valid.
During login, the error message "Invalid phonenumber" appears after you click Go.
Cisco Webex Contact Center Management Portal User Guide189
TroubleshootingReporting Management Portal Issues to Customer Support

Description/WorkaroundProblem
If you close the browser window while on a call, youcannot log in again until you complete the call. If youclose the browser window while the call is on hold,the system automatically takes the call off hold.
You accidentally closed the browser window whileon a call.
Log in again. Avoid refreshing the window whilelogged in.
When you refresh the Agent Desktop window, youare logged out and the login screen is displayed
1. Check the volume setting on the phone and makesure that the ringer is set to "high."
2. Check the DN (dial number), including the dialingprefix, and make sure it is correct.
3. After resolving the problem, change your state toAvailable or Idle by clicking one of the buttonson the message that appeared when you enteredthe Not Responding state.
The status bar on the Agent Desktop displays "NotResponding" and your phone does not ring.
Log in to the Agent Desktop again. If you are unableto log in, escalate to Customer Support.
After reconnecting to the system following a networkinterruption, you are suddenly logged out.
Do not openmore than one Agent Desktop applicationat a time on the desktop.
Re-launching the Agent Desktop while logged in maycreate problems
This can happen when you leave the Agent Desktopopen for long periods of time. Close both the AgentDesktop and the browser after logging out of thesystem. If this does not help, end the process fromwithin the Windows Task Manager.
The Agent Desktop becomes very slow.
Log in to the Agent Desktop again.The Agent Desktop occasionally logs out agentsfollowing a network interruption.
Minimize the Agent Desktop, and then restore it fromthe taskbar.
The Agent Desktop is not completely displayed.
Make sure that in Internet Explorer, the Show Picturesoption is selected in the Advanced tab of the InternetOptions dialog box.
Launch pages and graphs are not displayed properly.
Make sure you are in the Available state and arelogged in to the correct team.
You are available but no calls are sent to you.
Report the incident to Customer Support.You are talking to a customer, but the Agent Desktopstatus bar displays Reserved.
Make sure that you entered the correct DN.Your agent softphone is not ringing, but the AgentDesktop status bar displays Not Responding.
Cisco Webex Contact Center Management Portal User Guide190
TroubleshootingAgent Desktop Application Problems

Description/WorkaroundProblem
Check to see if the PC network cable has beendisconnected or loosened. If you do not see a messageindicating that there has been a network problem,escalate to Customer Support.
The Agent Desktop status bar displays Re-connecting.
If Not Responding is displayed in the Agent Desktopstatus bar, change to the Available state and wait forthe next call.
You answer a call, but the call disconnects after 30seconds.
Open Windows Task Manager and end all browserprocesses.
The Internet Explorer browser freezes.
From the Internet Explorer Tools menu, disablepop-up blockers.
Pop-up blockers appear.
Report the incident to Customer Support.The Agent Desktop status bar displays a connectedstate while the phone is ringing.
Make sure you entered the correct DN and prefix.An outbound call fails.
The Reserved state is very transient. Call details aredisplayed as soon as the second agent answers thecall.
During a blind transfer, call details are not displayedon the Agent Desktop of the receiving agent whilethat agent is in the Reserved state.
Audio ProblemsThe following may help to resolve audio problems that could occur while using the Agent Desktop.
Description/WorkaroundProblem
Check the phone settings. If using a softphone, checkthe Microsoft Windows and softphone settings.
Echo or low volume
Bad connectivity, probably due to a network problem.Check to make sure that your PC is not also runningother software that uses audio. Escalate to CustomerSupport.
Jitter/Stutter audio
-OR-
High latency
Escalate to Customer Support.Cross talk
Make sure you are not on mute. If not, escalate toCustomer Support.
One-way audio
Reporting Agent Desktop Issues to Customer SupportWhen escalating an Agent Desktop issue to Cisco CJP Customer Support, make sure to provide the followinginformation:
• Ask the agent to provide a screen capture of the Agent Desktop screen.
Cisco Webex Contact Center Management Portal User Guide191
TroubleshootingAudio Problems

• Include the time that the issue was first observed.
Cisco Webex Contact Center Management Portal User Guide192
TroubleshootingReporting Agent Desktop Issues to Customer Support

C H A P T E R 9Webex Contact Center Report Parameters
• Call Report Parameters, on page 193• Agent Report Parameters, on page 208• Historical Skill Report Parameters, on page 230• Historical Threshold Alerts Report Parameters, on page 232• Usage Metrics Report Parameters, on page 233
Call Report ParametersThe parameters available in CJP real-time and historical call reports are described in the following table. Inthe table, CDR is an abbreviation for Call Detail Report.
ReportDescriptionParameter
Real-time Call Interval reports forQueues & Skills by Queue;Historical Call reports for Queues
The percentage of calls that wereabandoned during the reportinterval.
(Abandoned/Total) * 100
% Abandoned
Real-time Call Interval reports forQueues & Skills by Queue;Historical Call reports for Queues
The number of answered callsdivided by the number of calls thatentered the queue minus short callsmultiplied by 100.
(Answered/(Answered +Abandoned)) * 100
% Answered
Real-time Call Interval reports forQueues & Skills by Queue;Historical Call reports for Queues
The number of calls that wereabandoned during the reportinterval. An abandoned call is a callthat was terminated without beingdistributed to a destination site, butthat was in the system for longerthan the time specified by the ShortCall threshold provisioned for theenterprise.
Abandoned
Cisco Webex Contact Center Management Portal User Guide193
ReportDescriptionParameter
Real-time Call Interval reports forQueues & Skills by Queue;Historical Call reports for Queues
The cumulative amount of timecalls were in the system for longerthan the time specified by the ShortCall threshold, but terminatedbefore being distributed to an agentor other resource.
Abandoned Time
Real-time Call Interval reports forQueues & Skills by Queue;Historical Call reports for Queues
The number of calls that wereterminated while in queue withinthe Service Level thresholdprovisioned for the queue or skill(in a skills interval by queuereport).
Although this metric isvisible for outdial calls,it is not meaningful forsuch calls.
Note
Abandoned within SL
Real-time Call Interval reports forQueues & Skills by Queue;Historical Call reports for Queues,Sites, & Teams
The number of calls that wereeither answered or abandonedwithin the Service Level thresholdprovisioned for the queue or skill(in a skills interval by queuereport), divided by total calls(including abandoned calls)multiplied by 100.
((In Service Level + Abandonedwithin SL)/(Answered +Abandoned)) * 100
Although this metric isvisible for outdial calls,it is not meaningful forsuch calls.
Note
Adjusted Service Level %
CDRThe name of the agent who handledthe call or a numeric ID code if thecall was handled by acapacity-based team resourceinstead of by a CJP agent.
Agent
CDRThe time the agent picked up thephone and began talking with thecaller.
Agent Start Time
Cisco Webex Contact Center Management Portal User Guide194
Webex Contact Center Report ParametersCall Report Parameters

ReportDescriptionParameter
CDRThe ANI digits delivered with thecall. ANI, or Automatic NumberIdentification, is a service providedby the phone company that deliversthe caller's phone number alongwith the call.
ANI
Real-time Call Interval reports forQueues, Skills by Queue, Sites, &Teams; Historical Call reports forQueues, Sites, & Teams
The number of calls that wererouted from the queue to an agentor available resource and wereanswered by the agent or resource.
Answered
Real-time Call Interval reports forQueues, Skills by Queue, Sites, &Teams; Historical Call reports forQueues, Sites, & Teams
The cumulative amount of timebetween when calls entered thequeue and when they wereanswered (connected to an agent orother resource) during the reportinterval. Because answered time iscalculated after the call isanswered, answered time for callsthat are waiting to be answered isnot reflected in the report.
Answered Time
Call Snapshot reportThe number of logged-in agentswho are currently in the Availablestate.
Available Agents
Real-time Call Interval reports forQueues & Skills by Queue;Historical Call reports for Queues
The total amount of time that callswere in the system before theywereabandoned divided by the totalnumber of calls that wereabandoned:
Abandoned Time/Abandoned
Avg Abandoned Time
Real-time Call Interval reports forQueues, Skills by Queue, Sites, &Teams; Historical Call reports forQueues, Sites, & Teams
The total connected time dividedby the total number of calls thatwere answered during the reportinterval:
Connected Time/(Answered +Secondary Answered)
Avg Connected Time
Real-time Call Interval reports forQueues, Skills by Queue, Sites, &Teams; Historical Call reports forQueues, Sites, & Teams
The average length of time spenthandling a call (connected time pluswrap-up time), divided by numberof answered calls:
Connected Time+Wrap UpTime/(Answered + SecondaryAnswered)
Avg Handle Time
Cisco Webex Contact Center Management Portal User Guide195
Webex Contact Center Report ParametersCall Report Parameters

ReportDescriptionParameter
Real-timeCall Interval &HistoricalCall reports for Entry Points
The total amount of time that callswere in the IVR system divided bythe total number of calls that werein the IVR system.
Avg IVR Time
Real-time Call Interval reports forQueues & Skills by Queue;Historical Call reports for Queues.
The total amount of time that callswere in queue divided by the totalnumber of calls that were queued:
Queued Time/Queued
Avg Queued Time
Real-time Call Interval reports forQueues, Skills by Queue, Sites, &Teams; Historical Call reports forQueues, Sites, & Teams
The total answered time divided bythe total number of answered calls:
Answered Time/Answered
Avg Speed of Answer
Real-time Call Interval reports forQueues, Skills by Queue, Sites, &Teams; Historical Call reports forQueues, Sites, & Teams
The total amount of time agentsspent in the Wrap-up state dividedby the total number of answeredcalls:
Wrap Up Time/(Answered +Secondary Answered)
Avg Wrap Up Time
CDRThe number of times the call wastransferred out of the queue by theagent without consulting first.
Blind Transfer Count
Real-time Call Interval reports forQueues, Skills by Queue, Sites, &Teams; Historical Call reports forQueues, Sites, & Teams
The subset of transferred out callsthat were transferred by the agentto another agent or an external DNwithout the first agent consultingor conferencing with the party towhom the call was transferred.
Blind Transfers
CDRThe amount of time between whenthe call arrived at the entry point orqueue and when it was terminated.
Call Duration
CDRThe time the call was terminated.Call End Time
CDRThe time the call arrived at theentry point or queue.
Call Start Time
Real-time Call Interval reports forQueues, Skills by Queue, Sites, &Teams; Historical Call reports forQueues, Sites, & Teams
The number of calls that endedduring the report interval.Answered, abandoned, anddisconnected calls are included inthis count. Transferred and shortcalls are not.
Completed
Cisco Webex Contact Center Management Portal User Guide196
Webex Contact Center Report ParametersCall Report Parameters

ReportDescriptionParameter
CDRThe number of times the agentestablished a conference call withthe caller and another agent.
Conference Count
Real-time Call Interval reports forQueues, Skills by Queue, Sites, &Teams; Historical Call reports forQueues, Sites, & Teams
The number of times agentsinitiated a conference call to anagent or external number.
Conference Count
CDRThe amount of time an agent spentin conference with the caller andanother agent.
Conference Time
Call Snapshot reportThe number of calls currentlyconnected to an agent.
Connected
Real-time call interval reports forSites, Teams, Queues, & Skills byQueue; Historical Call reports forQueues, Sites, & Teams
The time interval between whencalls were answered by an agent orother resource and when they wereterminated. Because connected timeis not calculated until the call isterminated, the connected time fora call that is still in progress is notreflected in the report.
Connected Time
CDRThe total amount of time the callwas connected to an agent (talktime plus hold time).
Real-time Call Interval reports forQueues, Skills by Queue, Sites, &Teams; Historical Call reports forQueues, Sites, & Teams
The number of times agentsinitiated a consult with anotheragent or someone at an externalnumber while handling a call.
Consult Count
CDRThe number of times the agentconsulted another agent during thecall.
CDRThe number of times agents did notrespond to a consult invitation.
Consult Errors
CDRThe amount of time an agent spentconsulting with another agent whilehandling this call.
Consult Time
Real-time Call Interval reports forQueues, Skills by Queue, Sites, &Teams; Historical Call reports forQueues, Sites, & Teams
The number of timesconsult-to-queue requests wereanswered.
CTQ Answer Count
Cisco Webex Contact Center Management Portal User Guide197
Webex Contact Center Report ParametersCall Report Parameters

ReportDescriptionParameter
Historical Call reports for Queues,Sites, & Teams
The cumulative amount of timebetween when consult-to-queuerequests were answered and whenthe consultations ended.
CTQ Answer Time
Real-time Call Interval reports forQueues, Skills by Queue, Sites, &Teams; Historical Call reports forQueues, Sites, & Teams; CDR
The number of timesconsult-to-queue requests wereinitiated.
CTQ Request Count
Historical Call reports for Queues,Sites, & Teams; CDR
The cumulative amount of timebetween when consult-to-queuerequests were initiated and whenthe consultations ended.
CTQ Request Time
Call Snapshot reportThe percentage of calls in queuethat have not yet reached theService Level threshold provisionedfor the queue (in a queue report) orskill (in the skill rows of askills-by-queue report).
Note that although this metric isvisible for outdial calls, it is notmeaningful for such calls.
Current Service Level %
Real-time Call Interval reports forQueues, Skills by Queue, Sites, &Teams; Historical Call reports forQueues, Sites, & Teams
The number of calls that wereanswered (that is, connected to anagent or distributed to and acceptedby a destination site), but that werethen immediately disconnectedwithin the Sudden Disconnectthreshold provisioned for theenterprise.
Disconnected
All DN Canned reportThe number the caller dialed(DNIS).
DN
CDRThe DNIS digits delivered with thecall. DNIS, or Dialed NumberIdentification Service, is a serviceprovided by the phone companythat delivers a digit string indicatingthe number the caller dialed alongwith the call.
DNIS
CDRThe name of the entry pointassociated with the call.
Entry Point
Cisco Webex Contact Center Management Portal User Guide198
Webex Contact Center Report ParametersCall Report Parameters

ReportDescriptionParameter
Real-time Call Interval reports forQueues & Skills by Queue;Historical Call reports for Queues
The number of calls that enteredthis queue after having beenclassified into the queue from anentry point by the IVR call controlscript.
From Entry Point
Real-timeCall Interval &HistoricalCall reports for Entry Points
The number of calls that came into this entry point from anotherentry point.
Monitored Calls reportThe number of calls that weremonitored from beginning to end.
Full Monitored Calls
CDRThe amount of time spent handlingthe call (Connected Time + WrapUp Time).
Handle Time
Real-time Call Interval reports forQueues, Skills by Queue, Sites, &Teams; Historical Call reports forQueues, Sites, & Teams
The cumulative amount of timespent handling calls:
Connected Time + Wrap Up Time
CDRHow the call was handled. Possiblevalues:
• park. The call was queued inthe CJP network andsubsequently ended withoutbeing distributed to a site.
• park_and_transfer. The callwas queued in the CJPnetwork and subsequentlydistributed to a site.
• straight_transfer. The callwas distributed to a site uponarrival without being queuedin the CJP network.
• ivr. The call was handled bythe IVR but the callerdisconnected before the callwas transferred or parked.
• unknown. This is the defaultvalue when no other valueoverrides it.
Handle Type
Cisco Webex Contact Center Management Portal User Guide199
Webex Contact Center Report ParametersCall Report Parameters

ReportDescriptionParameter
CDRThe number of times the call wasput on hold.
Hold Count
Real-time Call Interval reports forQueues, Skills by Queue, Sites, &Teams; Historical Call reports forQueues, Sites, & Teams
The number of times a caller wasput on hold.
CDRThe amount of time the call was onhold in this queue (for a queueCDR) or in all underlying queues(for an entry point CDR).
Hold Time
Call Snapshot reportThe number of calls that arecurrently in the IVR system.
In IVR
Call Snapshot reportThe number of calls currently in thequeues that are covered in thereport. In the case of entry-pointreports, this is the number of callsthat are currently in queues fed bythe entry point.
In entry point and queue reports,you can click a number in thiscolumn to display the Age of Callsin Queue pie chart in a pop-upwindow. The chart displays thenumber of calls that have been inthe queue for the length of timerepresented by three time segments.The time segments are derived bydividing the Longest Time inQueue value by three, rounding theresulting value down to the nearest10 seconds, and then multiplyingthat value by 1, 2, and 3. Forexample, if the Longest Time inQueue value is 85 seconds, then85/3=28.3, which is rounded downto 20, and the chart displays timesegments of 20, 40, and 60 seconds.
In Queue
Cisco Webex Contact Center Management Portal User Guide200
Webex Contact Center Report ParametersCall Report Parameters

ReportDescriptionParameter
Real-time Call Interval reports forQueues & Skills by Queue;Historical Call reports for Queues,Sites, & Teams
The number of calls that wereanswered within the Service Levelthreshold provisioned for this queueor skill (in a skills interval by queuereport).
Although this metric isvisible for outdial calls,it is not meaningful forsuch calls.
Note
In Service Level
Monitored Calls reportThe number of calls that weremonitored using the Invisiblemode,which prevents the monitoringsession from being displayed onManagement Portals other than thatof the initiating supervisor.
Invisible Monitored Calls
Real-timeCall Interval &HistoricalCall reports for Entry Points
The number of calls that ended inthe IVR but were not short calls.(Call interval real-time andHistorical call reports for entrypoints)
IVR Ended
CDRThe amount of time the call was inthe IVR system.
IVR Time
Real-timeCall Interval &HistoricalCall reports for Entry Points
The cumulative amount of timecalls were in the IVR system.
Call Snapshot reportThe number of agents who arecurrently logged in to this team orto all teams at this site. At thequeue level, this is the number ofagents logged in to all teams at thesites serving this queue.
Logged-in Agents
Call Snapshot reportThe longest amount of time a callhas been in each queue covered inthe report.
Longest Call In Queue Time
Historical Call reports for QueuesThe longest amount of time a callwas in the queue waiting to beanswered.
Maximum Wait Time
Monitored Calls reportThe number of calls for whichmonitoring began after the call wasalready in progress.
Midcall Monitored Calls
Cisco Webex Contact Center Management Portal User Guide201
Webex Contact Center Report ParametersCall Report Parameters

ReportDescriptionParameter
CDRWhether or not the call wasmonitored, coached, or barged inon. Possible values:
• Not Monitored. The call wasnot monitored
• Monitored. The call wasmonitored.
• Whisper-Coach.While thecall was being monitored, themonitoring supervisor coachedthe agent, but did not barge inon the call.
• Barged-In.While the call wasbeing monitored, themonitoring supervisor bargedin on the call.The supervisormight have also coached theagent. (If the call was bothcoached and barged-in on, thevalue of this parameter isBarged-In).
For information about monitoring,see Monitor Calls, on page 167.
Monitor Flag
Real-timeCall Interval &HistoricalCall reports for Entry Points
The number of external calls thatcame in to the entry point.
New
All DN Canned reportThe number of calls that came intothe system via a specific dialednumber.
CDRThe number of times the call wastransferred by an agent.
No. of Transfers
Real-time Call Interval reports forQueues & Skills by Queue;Historical Call reports for Queues
The number of calls that were sentto the overflow number provisionedfor the queue and were answered.Typically, a call is sent to anoverflow number if it has beenqueued for longer than themaximum time specified in therouting strategy or because an erroroccurred when the call was sent toan agent. If the call is not answered,it is included in the Abandoned orDisconnected count when it ends.
Overflow
Cisco Webex Contact Center Management Portal User Guide202
Webex Contact Center Report ParametersCall Report Parameters

ReportDescriptionParameter
CDRThe name of the queue associatedwith the call.
Queue
Calls Monitored reportThe name of the queue that wasmonitored.
CDRThe amount of time the call was ina queue waiting to be sent to adestination site.
Queue Time
Real-time Call Interval reports forQueues & Skills by Queue;Historical Call reports for Queues
The number of calls that enteredthe queue during this interval.
Queued
Real-time Call Interval reports forQueues & Skills by Queue;Historical Call reports for Queues
The cumulative amount of timecalls were in queue, waiting to besent to an agent or other resource.Because queued time is calculatedafter the call leaves the queue, thequeued time for a call that is still inthe queue is not reflected in thereport.
Queued Time
CDRWhether or not the call wasrecorded by CJP through theoptional call recording feature.
Record Flag
Real-time Call Interval reports forQueues, Skills by Queue, Sites, &Teams; Historical Call reports forQueues, Sites, & Teams
The number of calls that left thisqueue after having been transferredby the agent to another queue. Forcalls to be requeued, the first agentclicks the Queue button, selects aqueue from the drop-down list, andclicks Transfer.
Requeued
CDRA sequence number identifyingeach leg of a call as it movesthrough the CJP system. Click anentry in this column to open awindow displaying the history ofthe call throughout its life cycle.
S No.
Real-time Call Interval reports forQueues, Skills by Queue, Sites, &Teams; Historical Call reports forQueues, Sites, & Teams
The number of calls that wereanswered by an agent after beingtransferred to the agent by anotheragent.
Secondary Answered
Cisco Webex Contact Center Management Portal User Guide203
Webex Contact Center Report ParametersCall Report Parameters

ReportDescriptionParameter
Real-time Call Interval reports forQueues & Skills by Queue;Historical Call reports for Queues,Sites, & Teams.
The number of calls that wereanswered within the Service Levelthreshold provisioned for the queueor skill (in a skills interval by queuereport), divided by total calls(including abandoned calls)multiplied by 100:
((In Service Level)/(Answered +Abandoned)) * 100
Although this metric isvisible for outdial calls,it is not meaningful forsuch calls.
Note
Service Level %
CDRA value assigned by the system thatuniquely identifies a call during itslife cycle.
Session ID
Real-timeCall Interval &HistoricalCall reports for Entry Points
The number of calls that wereterminated within the Short Callthreshold provisioned for theenterprise without being distributedto a destination site or connected toan agent.
Short
Real-time Call Interval reports forQueues & Skills by Queue;Historical Call reports for Queues
The number of calls that wereterminated within the Short Callthreshold provisioned for theenterprise without being connectedto an agent.
CDRThe contact center location towhich the call was distributed.
Site
Monitored Calls reportThe name of the site that wasmonitored.
CDRThe name of the team to which thecall was distributed.
Team
Monitored Calls reportThe name of the team that wasmonitored.
CDRWho terminated the call: Agent orCaller
Terminating Party
Cisco Webex Contact Center Management Portal User Guide204
Webex Contact Center Report ParametersCall Report Parameters

ReportDescriptionParameter
CDRTermination Type
Cisco Webex Contact Center Management Portal User Guide205
Webex Contact Center Report ParametersCall Report Parameters

ReportDescriptionParameter
How the call was terminated.Possible values:
• abandoned. The call wasterminated before beingdistributed to a destinationsite, but was in the system forlonger than the time specifiedin the Short Call thresholdprovisioned for the enterprise.
• agent_transfer. The call wastransferred from one agent toanother.
• transfer_error. The callcould not be transferred to theagent.
• normal. The call endednormally.
• reclassified. The call was sentto another entry point.
• transferred. The call wastransferred by an agent.
• self_service. The call ended inthe IVR.
• short_call. The call was neverconnected and the totalduration of the call was lessthan the specified Short Callthreshold.
• quick_disconnect. The callwas connected, but the agenttalk time for the call was lessthan the specified SuddenDisconnect threshold.
• overflow. The call wastransferred to the overflowdestination numberprovisioned for thequeue—typically because thecall was queued for longerthan themaximum queue timespecified in the routingstrategy or because an erroroccurred when the call was
Cisco Webex Contact Center Management Portal User Guide206
Webex Contact Center Report ParametersCall Report Parameters

ReportDescriptionParameter
sent to an agent.
Real-timeCall Interval &HistoricalCall reports for Entry Points
The number of calls that weretransferred to another entry point.
To Entry Point
Real-timeCall Interval &HistoricalCall reports for Entry Points
The number of calls that were sentto a queue.
To Queue
Monitored Calls reportThe total number of calls monitoredduring the report time interval.
Total Monitored Calls
CDRThe number of times an erroroccurred during the transferprocess.
Transfer Errors
Real-time Call Interval reports forQueues, Skills by Queue, Sites, &Teams; Historical Call reports forQueues, Sites, & Teams
The sum of all calls transferredfrom this queue to an agent,external DN, or another CJP queue:
Transferred Out + Requeued
Transferred
Real-timeCall Interval &HistoricalCall reports for Entry Points
The number of calls that weretransferred to this entry point by anagent.
Transferred In
Real-time Call Interval reports forQueues & Skills by Queue;Historical Call reports for Queues
The number of calls that enteredthis queue after having beentransferred into the queue by anagent who clicked the Queuebutton, selected a queue from thedrop-down list, and clickedTransfer.
CDRThe phone number to which theagent transferred the call in anagent-to-DN transfer. Thisparameter appears in the CJPwindow that opens when you clickan entry in the S No. (sequencenumber) column of either an entrypoint or queue call detail record(CDR).
Transferred Number
Cisco Webex Contact Center Management Portal User Guide207
Webex Contact Center Report ParametersCall Report Parameters

ReportDescriptionParameter
Real-time Call Interval reports forQueues, Skills by Queue, Sites, &Teams; Historical Call reports forQueues, Sites, & Teams
The number of calls that left thisqueue after having been transferredby an agent to an external DN or toanother agent. Transferred out callsresult when an agent clicks theAgent button, selects an agent fromthe drop-down list, and clicksTransfer, or when the agent clicksthe DN button, enters a phonenumber, and clicks Transfer.Transferred out calls may begin asa consultation or conference, butwill be counted as transferred outonly when the first agent completesthe transfer to the second party.
Transferred Out
CDRThe wrap-up code that the agentgave for the call. Note that if theagent wraps up the call after theCDR is generated, thecorrespondingCDRwill be updatedafter the agent selects the wrap-upcode for that call.
Wrap Up
CDRThe amount of time an agent spentin the Wrap-up state after handlingthe call.
Wrap Up Time
Real-time Call Interval reports forQueues, Skills by Queue, Sites, &Teams; Historical Call reports forQueues, Sites, & Teams
The cumulative amount of timeagents spent in the Wrap-up stateafter handling the calls.
Agent Report ParametersThe parameters available in CJP real-time and historical agent reports are described in the following table. Inthe table, ADR is an abbreviation for Agent Detail Report.
Cisco Webex Contact Center Management Portal User Guide208
Webex Contact Center Report ParametersAgent Report Parameters

ReportDescriptionParameter
Snapshot/Team & Skill viewsIcons you can click to perform anaction:
• Click the Logout icon to logout the agent.
• Click theMonitor icon to openthe Call Monitoring modulewhere you can monitor theagent's call by entering yourcallback number and clickingthe Midcall Monitor button.
This icon is displayed only inthe Team view and only if theagent is in the Connected stateand your user profileauthorizesmidcall monitoring.For more information, seeMonitor Calls, on page 167.
Action
Snapshot/Agent view; Real-timeAgent Interval/Agent-level
The name of an agent in the report.
If your enterprise uses theMultimedia feature and the reportincludes more than one mediachannel, you can click the acollapse arrow or expand arrow tothe left of an agent name to collapseor expand the data grouped bychannel type.
Agent
Historical Agent Summary &Interval reports; ADR;Snapshot/Agent view; Agent Tracereport
The number of times an agentrequeued an inbound call.
Agent Requeue
Historical Agent Summary &Interval reports; ADR; Agent Tracereport
The number of times an agenttransferred an inbound call toanother agent.
Agent Transfer
Cisco Webex Contact Center Management Portal User Guide209
Webex Contact Center Report ParametersAgent Report Parameters

ReportDescriptionParameter
Historical Agent Summary &Interval reports; ADR &Snapshot/Agent view; Agent Tracereport
Count. The number of times anagent went into the Available state.
Total Time. The total amount oftime an agent spent in the Availablestate.
Average Time. (Not in ADR orSnapshot/Agent view or AgentTrace report) The average lengthof time agents were in theAvailable state (Total AvailableTime divided by Available Count).
% Time. (Only in ADR) Thepercentage of time the agent was inthe Available state.
Available
Snapshot/Site, Skill, & Skills byTeam views
The number of agents currently inthe Available state or, in the Skillview, the number of agents in theAvailable state who possess theskill.
Real-time Agent Interval reportsThe amount of time agents were inthe Available state during the timeinterval.
Available Time
Real-time Skills Interval by TeamThe connected time divided by thenumber of calls that were connectedduring the time interval.
Average Connected Time
Real-time Skills Interval by TeamThe average length of time spenthandling a call (connected time pluswrap-up time, divided by numberof calls).
Average Handle Time
Historical Agent Summary &Interval reports; ADR;Snapshot/Agent view; Agent Tracereport
The number of times an agenttransferred an inbound call withoutconsulting first.
Blind Transfer
Cisco Webex Contact Center Management Portal User Guide210
Webex Contact Center Report ParametersAgent Report Parameters

ReportDescriptionParameter
Snapshot/Team view & Skill viewThe number of calls the agenthandled (or, for the Skill view, thenumber of calls the agent handledfor that skill) since logging in. Restthe cursor over a number in thiscolumn to display a pop-upshowing the wrap-up codes theagent entered and how many timeseach code was entered.
Calls Handled
Historical Agent Summary &Interval reports
The total number of inbound andoutdial calls handled.
ADR; Agent Trace reportThe media channel associated withthe activity. (Appears only if yourenterprise uses the Multimediafeature.)
Channel
Historical Agent Summary &Interval reports; ADR;Snapshot/Agent view; Agent Tracereport
The number of times the agentinitiated a conference call.
Conference
Snapshot/Site, Skill, & Skills byTeam views
The number of agents currentlyconnected to an inbound call, or inthe Skill view, the number of agentsconnected to a call who possess theskill.
Connected
Real-time Skills Interval by TeamThe amount of time inbound callswere connected to an agent duringthe time interval (talk time plushold time).
Connected Time
Historical Agent Summary &Interval reports; ADR; Agent Tracereport
Count. The number of times anagent answered a consult requestplus the number of times an agentconsulted other agents.
Total Time. Total Consult AnswerTime plus Total Consult RequestTime.
Average Time. (Not in ADR orAgent Trace report) The averagelength of consulting time (TotalConsult Time divided by ConsultCount).
Consult
Cisco Webex Contact Center Management Portal User Guide211
Webex Contact Center Report ParametersAgent Report Parameters

ReportDescriptionParameter
Historical Agent Summary &Interval reports; ADR; Agent Tracereport
Count. The number of times anagent answered a consult requestfrom another agent.
Total Time. The total amount oftime an agent spent answeringconsult requests from agents.
Average Time. (Not in ADR orAgent Trace report) The averagelength of time agents spentanswering consult requests (TotalConsult Answer Time divided byConsult Answer Count).
% Time. (Only in ADR and AgentTrace report) The percentage oftime the agent spent answeringconsult requests.
Consult Answer
Historical Agent Summary &Interval reports; ADR; Agent Tracereport
Count. The number of times anagent sent a consult request toanother agent.
Total Time. The total amount oftime an agent spent consulting otheragents.
Average Time. (Not in ADR orAgent Trace report) The averagelength of time agents spentconsulting other agents (TotalConsult Request Time divided byConsult Request Count).
% Time. (Only in ADR and AgentTrace report) The percentage oftime the agent spent consultingother agents while on an inboundcall.
Consult Request
Snapshot/Site & Skills by Teamviews
The number of agents currentlyconsulting with another agent.
Consulting
Snapshot/Site viewThe number of agents currentlyconsulting with another agent afterinitiating or answering aconsult-to-queue request.
CTQ
Cisco Webex Contact Center Management Portal User Guide212
Webex Contact Center Report ParametersAgent Report Parameters

ReportDescriptionParameter
Snapshot/Team, Skill, & Agentviews
The agent's current state.
In Team and Skill views, If thecurrent state is Idle, the idle codethe agent selected is shown inparentheses (no code is shown ifthe agent has just logged in and hasnot selected an idle code).
Current State
HistoricalAgent Summary&AgentInterval reports; ADR; Agent Tracereport
The number of calls that wereconnected to an agent, but that werethen immediately disconnectedwithin the Sudden Dsconnectthreshold provisioned for theenterprise.
Disconnected Count
Snapshot/Agent viewThe number of times an inboundcall was disconnected while thecaller was on hold.
Disconnected Hold Count
Snapshot/Team, Agent, & Skillviews; ADR; Agent Trace report
The dial number the agent used tolog in to the Agent Desktop.
DN
Agent Trace ReportThe amount of time the agent wasin the state.
Duration
Historical Agent Summary/Agentlevel
The date and time the agent loggedout. This column appears only inagent-level summary reports.
Final Logout Time
Snapshot/Site view & Skills byTeam view
The number of agents in theConnected state who have placedthe caller on hold.
Hold
Real-time Skills Interval by TeamThe amount of time callers were onhold during the time interval.
Hold Time
Cisco Webex Contact Center Management Portal User Guide213
Webex Contact Center Report ParametersAgent Report Parameters
ReportDescriptionParameter
Snapshot/Team & Skill viewsThe number of times the agent wentinto the Idle state from a differentstate. Rest the cursor over a numberin this column to display a pop-upshowing the idle codes the agententered and how many times eachcode was entered.
Because an agent canchange the idle codewhile in the Idle state,the number of idle codesdisplayed in the pop-upcan exceed the numberof times the agent wentinto the Idle state. Forexample, an agent mightmove from Idle-Breakto Idle-Email.
Note
Idle
Snapshot/Site & Skills by Teamviews
The number of agents currently inthe Idle state.
Historical Agent Summary &Interval reports; ADR; Agent Tracereport
Count. The number of times anagent went into the Idle state.
Total Time. The total amount oftime agents spent in the Idle state.
Average Time. (Not available inADR or Agent Trace report) Theaverage length of time agents werein the Idle state (Total Idle Timedivided by Idle Count).
% Time. (Not available in AgentSummary and Interval reports) Thepercentage of time the agent was inthe Idle state.
Snapshot/Agent view
Cisco Webex Contact Center Management Portal User Guide214
Webex Contact Center Report ParametersAgent Report Parameters

ReportDescriptionParameter
Count. The number of times theagent went into the Idle state froma different state. Rest the cursorover the number in this field to seethe idle codes the agent entered andhow many times each code wasused.
Because an agent canchange the idle codewhile in the Idle state,the number of idle codescan exceed the numberof times the agent wentinto the Idle state. Forexample, an agent mightmove from Idle-Breakto Idle-Email.
Total Time. The totalamount of time theagent spent in the Idlestate.
Note
Real-time Agent Interval reportsThe amount of time agents were inthe Idle state during the timeinterval.
Idle Time
Snapshot/Site view & Skills byTeam view
The number of agents who areconnected to or are wrapping up anoutdial call.
In Outdial
Snapshot/Team viewThe number of times the agent wasconnected to or was wrapping upan outdial call.
Agent Trace reportThe time the agent entered the state.In Time
Cisco Webex Contact Center Management Portal User Guide215
Webex Contact Center Report ParametersAgent Report Parameters
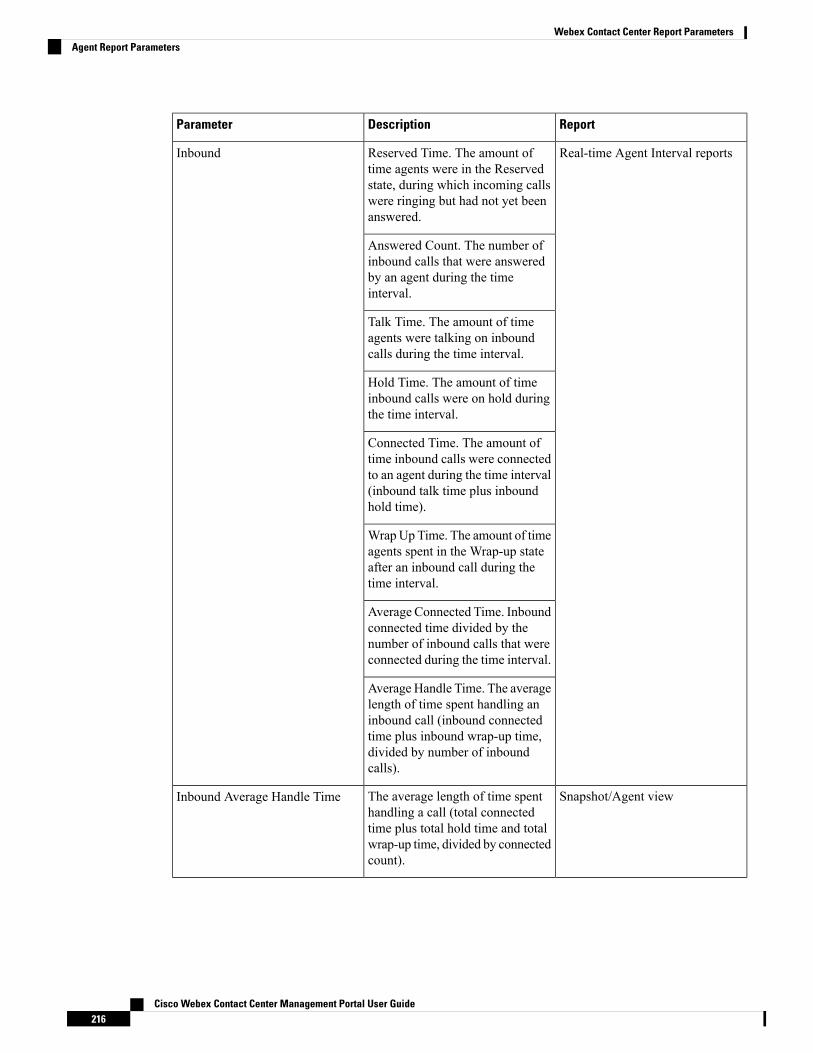
ReportDescriptionParameter
Real-time Agent Interval reportsReserved Time. The amount oftime agents were in the Reservedstate, during which incoming callswere ringing but had not yet beenanswered.
Inbound
Answered Count. The number ofinbound calls that were answeredby an agent during the timeinterval.
Talk Time. The amount of timeagents were talking on inboundcalls during the time interval.
Hold Time. The amount of timeinbound calls were on hold duringthe time interval.
Connected Time. The amount oftime inbound calls were connectedto an agent during the time interval(inbound talk time plus inboundhold time).
WrapUp Time. The amount of timeagents spent in the Wrap-up stateafter an inbound call during thetime interval.
Average Connected Time. Inboundconnected time divided by thenumber of inbound calls that wereconnected during the time interval.
Average Handle Time. The averagelength of time spent handling aninbound call (inbound connectedtime plus inbound wrap-up time,divided by number of inboundcalls).
Snapshot/Agent viewThe average length of time spenthandling a call (total connectedtime plus total hold time and totalwrap-up time, divided by connectedcount).
Inbound Average Handle Time
Cisco Webex Contact Center Management Portal User Guide216
Webex Contact Center Report ParametersAgent Report Parameters

ReportDescriptionParameter
Historical Agent Summary &Interval reports; ADR; Agent Tracereport
The average length of time spenthandling an inbound call (TotalInbound Connected Time plusTotal Wrap Up Time, divided byInbound Connected Count).
Inbound Avg Handle Time
Historical Agent Summary &Interval reports; ADR;Snapshot/Agent view; Agent Tracereport
Hold Count. The number of timesan agent put an inbound caller onhold.
Connected Count. The number ofinbound calls that were connectedto an agent.
Total Talk Time. The total amountof time an agent was talking witha caller.
Total Hold Time. The total amountof time inbound calls were on hold.
Total Time. The total amount oftime agents were connected toinbound calls.
Average Hold Time. (Not in ADRor Snapshot/Agent view or AgentTrace report) The average hold timefor inbound calls (Total Hold Timedivided by Hold Count).
Average Time. (Not in ADR orSnapshot/Agent view) The averageinbound connected time (TotalTime divided byConnected Count).
% Talk Time. (Only in ADR andAgent Trace report) The percentageof inbound connected time theagent was talking with the caller.
% Hold Time. (Only in ADR) Thepercentage of inbound connectedtime the caller was on hold.
% Time. (Only in ADR) Thepercentage of time the agent wasconnected to an inbound call.
Inbound Connected
Cisco Webex Contact Center Management Portal User Guide217
Webex Contact Center Report ParametersAgent Report Parameters

ReportDescriptionParameter
Snapshot/Agent viewCount. The number of times anagent answered a consult requestplus the number of times an agentconsulted other agents.
Total Time. Total Consult AnswerTime plus Total Consult RequestTime.
Inbound Consult
Snapshot/Agent viewCount. The number of times anagent answered a consult requestfrom another agent handling aninbound call.
Total Time. The total amount oftime an agent spent answeringconsult requests from agentshandling inbound calls.
Inbound Consult Answer
Snapshot/Agent viewCount. The number of times anagent sent a consult request toanother agent during an inboundcall.
Total Time. The total amount oftime an agent spent consulting otheragents during inbound calls.
Inbound Consult Request
Snapshot/Agent viewCount. Inbound CTQ AnswerCount plus Inbound CTQ RequestCount.
Total Time. Total Inbound CTQAnswer Time plus Total InboundCTQ Request Time.
Inbound CTQ
Snapshot/Agent view; HistoricalAgent Summary& Interval reports;ADR
Count. The number of times anagent answered a consult-to-queuerequest from an agent who washandling an inbound call.
Total Time. The total amount oftime an agent spent answeringconsult-to-queue requests fromagents handling inbound calls.
Inbound CTQ Answer
Cisco Webex Contact Center Management Portal User Guide218
Webex Contact Center Report ParametersAgent Report Parameters

ReportDescriptionParameter
Snapshot/Agent view; HistoricalAgent Summary& Interval reports;ADR
Count. The number of times anagent initiated a consult to queuewhile handling an inbound call.
Total Time. The total amount oftime between when an agentinitiated consult-to-queue requestswhile handling inbound calls andwhen the consultations ended.
Inbound CTQ Request
Snapshot/Agent viewCount.(Not in ADR or Agent Tracereport) The number of times anagent went into the InboundReserved state, during which a callis coming in to an agent’s stationbut has not yet been answered.
Total Time. The total amount oftime an agent spent in the Reservedstate.
Average Time. The average lengthof time agents were in the InboundReserved state (Total AvailableTime divided by Available Count).
% Time. (Only in ADR and AgentTrace report) The percentage oftime the agent was in the InboundReserved state.
Inbound Reserved
Snapshot/Agent viewThe number of inbound calls theagent transferred to another agent,queue, or number.
Inbound Transfers
Cisco Webex Contact Center Management Portal User Guide219
Webex Contact Center Report ParametersAgent Report Parameters

ReportDescriptionParameter
Historical Agent Summary &Interval reports; ADR; Agent Tracereport; Snapshot/Agent view
Count. The number of times anwent into the Wrap-up state afteran inbound call.
In the Snapshot/Agent view, youcan rest the cursor over a numberin this column to see the wrap-upcodes the agent entered and howmany times each code was used.
Total Time. The total amount oftime an agent spent in the Wrap-upstate after an inbound call.
Average Time. (Not in ADR, AgentTrace report, or Snapshot/Agentview) The average length of timeagents were in the Wrap-up stateafter an inbound call (Total WrapUp Time divided by Wrap UpCount).
% Time. (Only in ADR and AgentTrace report) The percentage oftime the agent was in the Wrap-upstate after an inbound call.
Inbound Wrap Up
Historical Agent Summary/Agentlevel
The date and time the agent loggedin.
Initial Login Time
Historical Agent Summary/Agentlevel
Total number of times an agentlogged in on that day. Appears onlyif Agents is selected in the DisplayResults By drop-down list.
Login Count
Snapshot/Team, Agent, & Skillviews; ADR; Agent Trace report
The date and time the agent loggedin to the Agent Desktop.
Login Time
ADR; Agent Trace reportThe date and time the agent loggedout of the Agent Desktop.
Logout Time
Cisco Webex Contact Center Management Portal User Guide220
Webex Contact Center Report ParametersAgent Report Parameters

ReportDescriptionParameter
Snapshot/Site & Skills by Teamviews
The number of agents currently inthe Not Responding state.
Not Responding
Historical Agent Summary &Interval reports; ADR; Agent Tracereport; Snapshot/Agent view
Count. The number of times anagent was in the Not Respondingstate.
Total Time. The total amount oftime an agent spent in the NotResponding state.
Average Time. (Not in ADR orSnapshot/Agent view or AgentTrace report) The average lengthof time agents were in the NotResponding state (Total NotResponding Time divided by NotResponding Count).
% Time. (Only in ADR and AgentTrace report) The percentage oftime the agent was in the NotResponding state.
Real-time Agent Interval reportsThe amount of time agents spent inthe Not Responding state duringthe time interval.
Not Responding Time
Real-time Skills Interval by TeamThe number of inbound calls thatwere connected to the site or teamduring the time interval.
Number of Calls
Snapshot/Agent view; Real-timeAgent Interval reports; HistoricalAgent Summary, Agent Interval,ADR, & Agent Trace report
The measure of time the agentspent on calls compared toavailable and idle time, calculatedby dividing total connected time(inbound connected time plusoutdial connected time) plus totalwrap up time (inbound wrap uptime plus outdial wrap up time) bystaff hours.
Occupancy
Real-time Skills Interval by TeamThe measure of time the agentspent on calls compared toavailable and idle time, calculatedby dividing inbound connected timeplus inbound wrap up time by staffhours.
Agent Trace reportThe time the agent left the state.Out Time
Cisco Webex Contact Center Management Portal User Guide221
Webex Contact Center Report ParametersAgent Report Parameters

ReportDescriptionParameter
Real-time Agent Interval reportsAttempted. The number of callsthat agents initiated during the timeinterval.
Outdial
Connected. The number of outdialcalls that were connected to anagent during the time interval.
Reserved Time. The amount oftime agents were in the OutdialReserved state, a state indicatingthat the agent has initiated anoutdial call, but the call is notconnected yet.
Talk Time. The amount of timeagents were talking on outdial callsduring the time interval.
Hold Time. The amount of timeoutdial calls were on hold duringthe time interval.
Connected Time. The amount oftime outdial calls were connectedto an agent during the time interval(outdial talk time plus outdial holdtime).
Average Connected Time. Outdialconnected time divided by thenumber of outdial calls that wereconnected during the time interval.
WrapUp Time. The amount of timeagents spent in the Wrap-up stateafter an outdial call during the timeinterval.
Average Handle Time. The averagelength of time spent handling anoutdial call (outdial connected timeplus outdial wrap up time, dividedby number of outdial calls).
Historical Agent Summary, AgentInterval, ADR, & Agent Tracereport
The average length of time spenthandling an outdial call (TotalOutdial Connected Time plus TotalOutdial Wrap Up Time, divided byOutdial Connected Count).
Outdial Avg Handle Time
Cisco Webex Contact Center Management Portal User Guide222
Webex Contact Center Report ParametersAgent Report Parameters
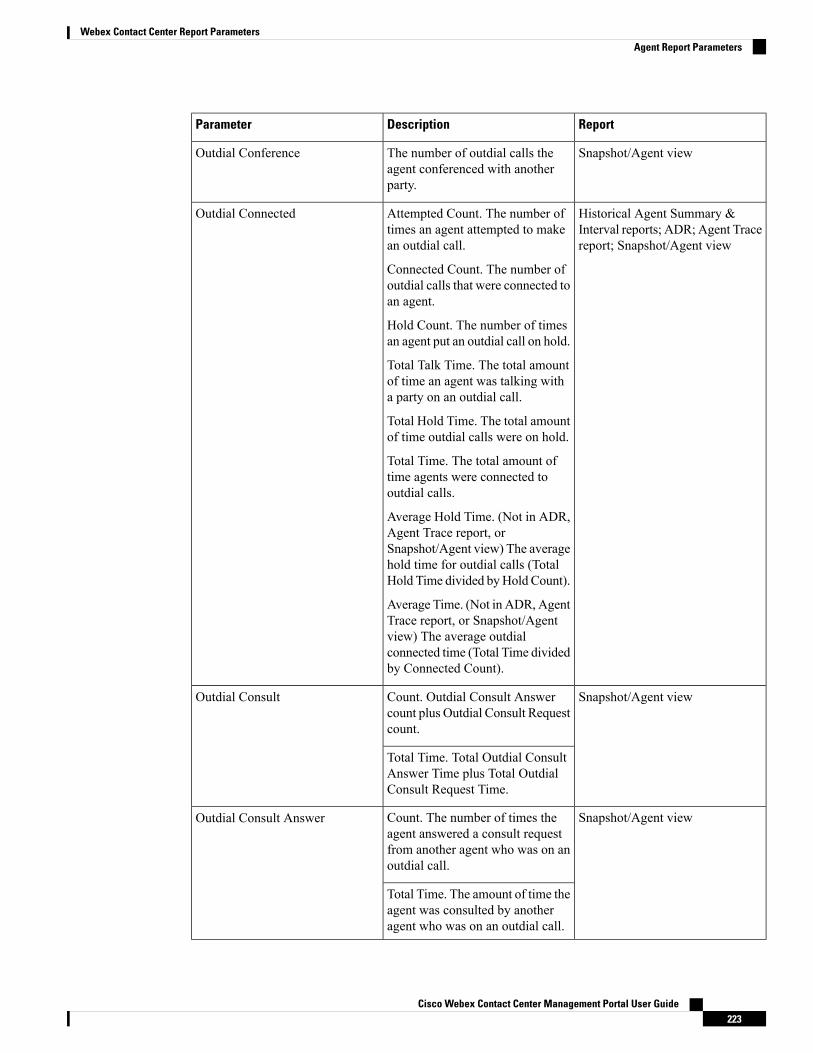
ReportDescriptionParameter
Snapshot/Agent viewThe number of outdial calls theagent conferenced with anotherparty.
Outdial Conference
Historical Agent Summary &Interval reports; ADR; Agent Tracereport; Snapshot/Agent view
Attempted Count. The number oftimes an agent attempted to makean outdial call.
Connected Count. The number ofoutdial calls that were connected toan agent.
Hold Count. The number of timesan agent put an outdial call on hold.
Total Talk Time. The total amountof time an agent was talking witha party on an outdial call.
Total Hold Time. The total amountof time outdial calls were on hold.
Total Time. The total amount oftime agents were connected tooutdial calls.
Average Hold Time. (Not in ADR,Agent Trace report, orSnapshot/Agent view) The averagehold time for outdial calls (TotalHold Time divided byHold Count).
Average Time. (Not in ADR, AgentTrace report, or Snapshot/Agentview) The average outdialconnected time (Total Time dividedby Connected Count).
Outdial Connected
Snapshot/Agent viewCount. Outdial Consult Answercount plus Outdial Consult Requestcount.
Outdial Consult
Total Time. Total Outdial ConsultAnswer Time plus Total OutdialConsult Request Time.
Snapshot/Agent viewCount. The number of times theagent answered a consult requestfrom another agent who was on anoutdial call.
Outdial Consult Answer
Total Time. The amount of time theagent was consulted by anotheragent who was on an outdial call.
Cisco Webex Contact Center Management Portal User Guide223
Webex Contact Center Report ParametersAgent Report Parameters
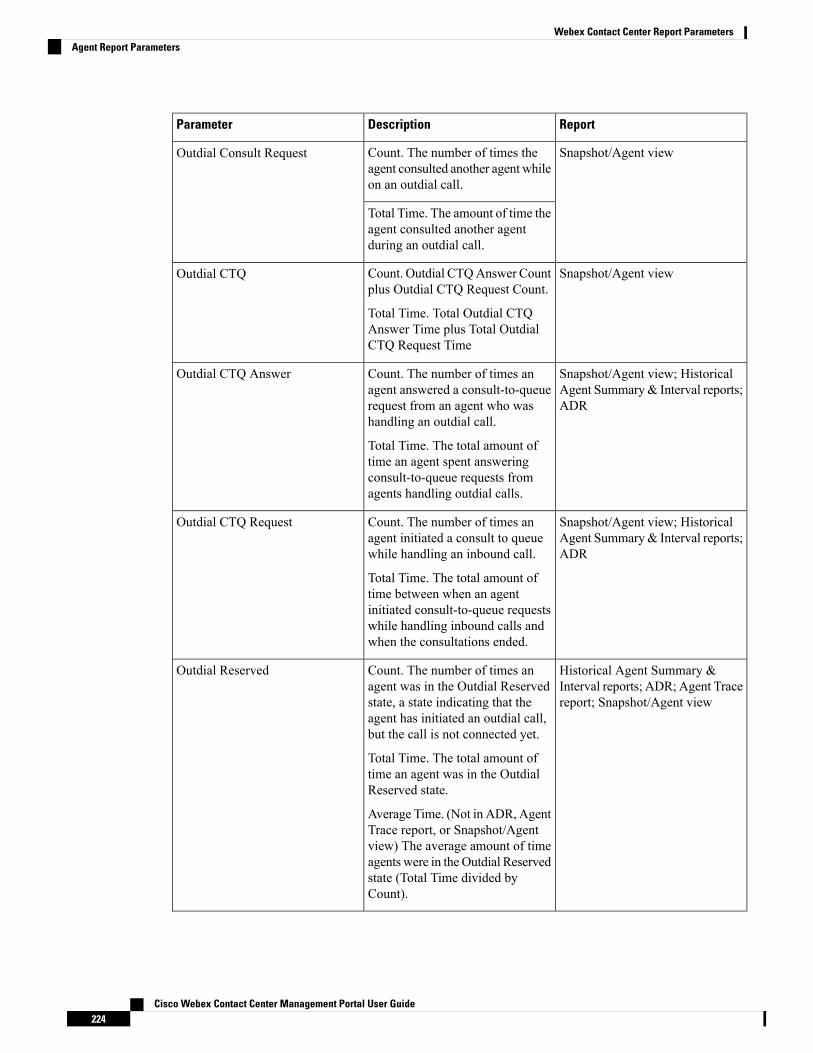
ReportDescriptionParameter
Snapshot/Agent viewCount. The number of times theagent consulted another agent whileon an outdial call.
Outdial Consult Request
Total Time. The amount of time theagent consulted another agentduring an outdial call.
Snapshot/Agent viewCount. Outdial CTQAnswer Countplus Outdial CTQ Request Count.
Total Time. Total Outdial CTQAnswer Time plus Total OutdialCTQ Request Time
Outdial CTQ
Snapshot/Agent view; HistoricalAgent Summary& Interval reports;ADR
Count. The number of times anagent answered a consult-to-queuerequest from an agent who washandling an outdial call.
Total Time. The total amount oftime an agent spent answeringconsult-to-queue requests fromagents handling outdial calls.
Outdial CTQ Answer
Snapshot/Agent view; HistoricalAgent Summary& Interval reports;ADR
Count. The number of times anagent initiated a consult to queuewhile handling an inbound call.
Total Time. The total amount oftime between when an agentinitiated consult-to-queue requestswhile handling inbound calls andwhen the consultations ended.
Outdial CTQ Request
Historical Agent Summary &Interval reports; ADR; Agent Tracereport; Snapshot/Agent view
Count. The number of times anagent was in the Outdial Reservedstate, a state indicating that theagent has initiated an outdial call,but the call is not connected yet.
Total Time. The total amount oftime an agent was in the OutdialReserved state.
Average Time. (Not in ADR, AgentTrace report, or Snapshot/Agentview) The average amount of timeagents were in theOutdial Reservedstate (Total Time divided byCount).
Outdial Reserved
Cisco Webex Contact Center Management Portal User Guide224
Webex Contact Center Report ParametersAgent Report Parameters

ReportDescriptionParameter
Snapshot/Agent viewThe number of outdial calls theagent transferred to another agent,queue, or number.
Outdial Transfers
Historical Agent Summary &Interval reports; ADR; Agent Tracereport; Snapshot/Agent view
Count. The number of times anagent went into the Wrap-up stateafter an outdial call.
Total Time. The total amount oftime an agent spent in the Wrap-upstate after an outdial call.
Average Time. (Not in ADR, AgentTrace report, or Snapshot/Agentview) The average length of timeagents were in the Wrap-up stateafter an outdial call (Total OutdialWrap Up Time divided by OutdialWrap Up Count).
Outdial Wrap Up
Snapshot/Team, Agent, & Skillviews
If the agent is currently handling acall, the name of the queue that thecall came in on.
Queue
Cisco Webex Contact Center Management Portal User Guide225
Webex Contact Center Report ParametersAgent Report Parameters

ReportDescriptionParameter
ADR; Agent Trace reportThe reason the agent logged out.For example:
• Desktop browser closed.Thebrowser window in which theAgent Desktop applicationwas running was closed whilethe agent was logged in.
• LoggingInAnotherInstance.The system logged the agentout because the agent loggedin to another instance of theAgent Desktop.
• Lost network connection.The agent was logged outbecause of a networkinterruption that exceeded twominutes (unless a differenttimeout is specified for yoursystem).
• Normal logout. The agentclicked the Log Out button inthe Agent Desktop window.
• Operational logout. Thesystem logged the agent outin response to a commandinitiated by Cisco CJPOperations or TechnicalSupport.
• Supervisory logout. Thesupervisor logged the agentout.
Other reasons can occasionallyoccur.
Reason
Snapshot/Site view & Skills byTeam view
The number of agents currently inthe Reserved state, during which acall is coming in but has not yetbeen answered.
Reserved
Snapshot/Skill viewThe number of agents in theReserved state who possess theskill.
Cisco Webex Contact Center Management Portal User Guide226
Webex Contact Center Report ParametersAgent Report Parameters

ReportDescriptionParameter
Snapshot/Site view; Real-timeAgent Interval reports (exceptAgent-level)
The name of a site.
If your enterprise uses theMultimedia feature and the reportincludes more than one mediachannel, you can click the acollapse arrow or expand arrow tothe left of a team name to collapseor expand the data grouped bychannel type.
In the Site view of a currentsnapshot agent report, you can dothe following:>
• Click a collapse arrow orexpand arrow next to a sitename to collapse or expandthe list of logged-in teams atthe site.
• Click the name of a team todrill-down to the Team viewfor that team.
Site
ADR; Agent Trace reportThe site where the team the agentwas handling calls for is located.
Snapshot/Skill view; Real-timeSkills Interval by Team
The name of the skill.
In the Skill view of the currentsnapshot agent report you can dothe following:
• Click a collapse arrow orexpand arrow next to a skillname to collapse or expandthe list of logged-in agentswho possess the skill.
• Click the name of an agent todrill-down to the Agent viewfor that agent.
• If your enterprise uses theMultimedia feature and thereport includes more than onemedia channel, you can clickthe collapse or expand arrowto the left of an agent name tocollapse or expand the datagrouped by channel type.
Skill
Cisco Webex Contact Center Management Portal User Guide227
Webex Contact Center Report ParametersAgent Report Parameters

ReportDescriptionParameter
Snapshot/Team, Agent, & Skillviews
The amount of time the agent hasbeen logged in.
Staff Hours
Real-timeAgent Interval reports &Skills Interval by Team
The amount of time the agent waslogged in during the time interval.
Historical Agent Summary &Interval reports
The total amount of time agentswere logged in.
ADR; Agent Trace reportThe amount of time the agent waslogged in during each login session.
Agent Trace reportThe time the agent logged in andlogged out and each state the agentwas in during the login session:
• Available. The agent wasavailable and waiting for calls.
• Conference. The agentconferenced a call withanother party.
• Consult-Answer. The agentanswered a consult requestfrom another agent.
• Consult-Request. The agentinitiated a consultation withanother agent.
• Idle. The phone rang but wasnot answered within aspecified period of time.
• Not Responding.The agent’sphone rang but the agent didnot answer within a specifiedperiod of time.
• Hold. The agent placed aconnected call on hold.
• Talk. The agent was talkingon an inbound call.
Wrap Up. The call ended but theagent was not ready for the nextcall.
State
Snapshot/Site & Skills by Teamviews
The number of agents in theConnected state who are currentlytalking with a caller.
Talk
Cisco Webex Contact Center Management Portal User Guide228
Webex Contact Center Report ParametersAgent Report Parameters

ReportDescriptionParameter
Real-time Skills Interval by TeamThe amount of time agents weretalking with callers during the timeinterval.
Talk Time
Snapshot/Team view & Skills byTeam view; Real-time AgentInterval report/Team & Skills byTeam level
The name of a team in the report.
In the Team view and Skills byTeam view of a current snapshotagent report you can do thefollowing:
• Click a collapse arrow orexpand arrow next to a teamname to collapse or expandthe list of logged-in agents onthe team.
• If your enterprise uses theMultimedia feature and thereport includes more than onemedia channel, you can clickthe a collapse or expand arrowto the left of an agent name tocollapse or expand the datagrouped by channel type.
In the Team view, you can click thename of an agent to drill-down tothe Agent view for that agent.
Team
ADR; Agent Trace reportThe team the agent was handlingcalls for.
Snapshot/Team, Agent, & Skillviews
The amount of time the agent hasbeen in the current state.
Time in Current State
Real-time Agent Interval reportsInbound Answered calls plusOutdial Attempted calls.
Total Calls
Snapshot/Site, Team, Skill, & Skillsby Team views
The number of agents currentlylogged in or, in the Skill view, thenumber of agents currently loggedin who possess the skill
Total Logged In
Snapshot/Site, Team, Skill, & Skillsby Team views
The number of media channels towhich agents are currently loggedin. Appears only if your enterpriseuses the Multimedia feature.
Channels Logged In
Snapshot/Site & Skills by Teamview
The number of agents currently inthe Wrap-up state.
Wrap Up
Cisco Webex Contact Center Management Portal User Guide229
Webex Contact Center Report ParametersAgent Report Parameters
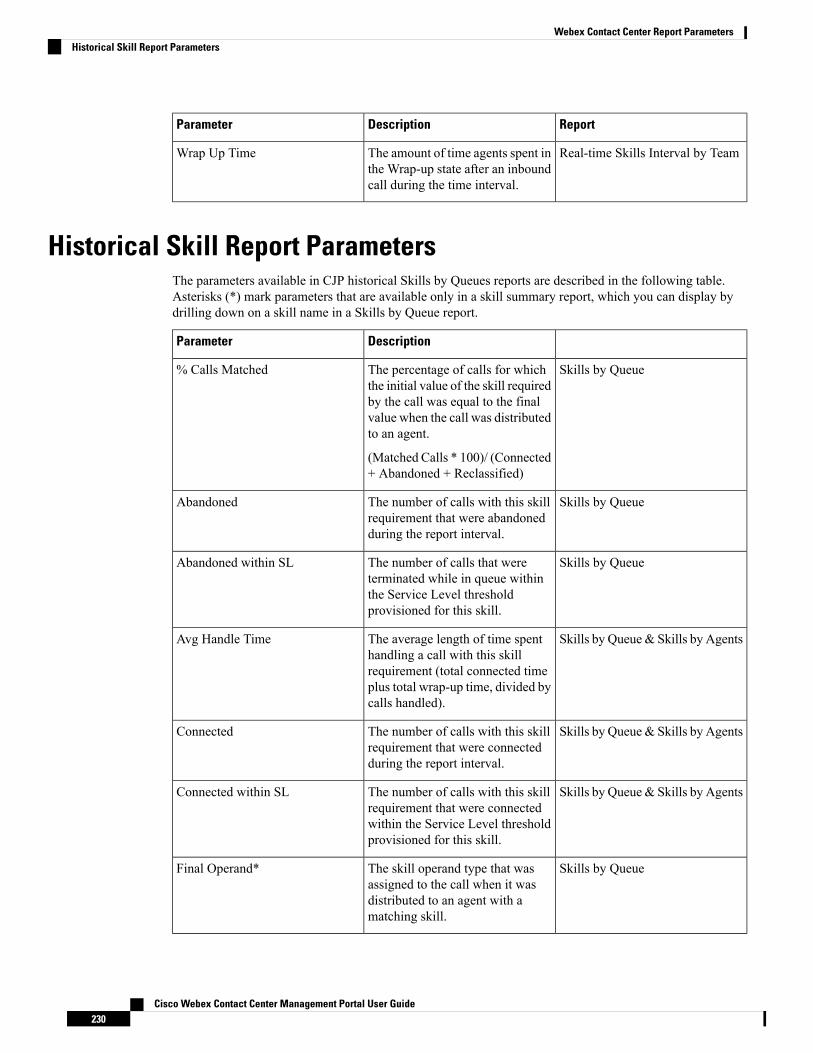
ReportDescriptionParameter
Real-time Skills Interval by TeamThe amount of time agents spent inthe Wrap-up state after an inboundcall during the time interval.
Wrap Up Time
Historical Skill Report ParametersThe parameters available in CJP historical Skills by Queues reports are described in the following table.Asterisks (*) mark parameters that are available only in a skill summary report, which you can display bydrilling down on a skill name in a Skills by Queue report.
DescriptionParameter
Skills by QueueThe percentage of calls for whichthe initial value of the skill requiredby the call was equal to the finalvalue when the call was distributedto an agent.
(Matched Calls * 100)/ (Connected+ Abandoned + Reclassified)
% Calls Matched
Skills by QueueThe number of calls with this skillrequirement that were abandonedduring the report interval.
Abandoned
Skills by QueueThe number of calls that wereterminated while in queue withinthe Service Level thresholdprovisioned for this skill.
Abandoned within SL
Skills by Queue& Skills by AgentsThe average length of time spenthandling a call with this skillrequirement (total connected timeplus total wrap-up time, divided bycalls handled).
Avg Handle Time
Skills by Queue& Skills by AgentsThe number of calls with this skillrequirement that were connectedduring the report interval.
Connected
Skills by Queue& Skills by AgentsThe number of calls with this skillrequirement that were connectedwithin the Service Level thresholdprovisioned for this skill.
Connected within SL
Skills by QueueThe skill operand type that wasassigned to the call when it wasdistributed to an agent with amatching skill.
Final Operand*
Cisco Webex Contact Center Management Portal User Guide230
Webex Contact Center Report ParametersHistorical Skill Report Parameters

DescriptionParameter
Skills by QueueThe value of the skill requirementassigned to the call when the callwas distributed to an agent.
Final Value*
Skills by QueueThe skill operand type that wasassigned to the call when it wasdistributed to the queue. Possiblevalues:
• eq (equal to)
• neq (not equal to)
• gte (greater than or equal to)
• lte (less than or equal to)
Initial Operand*
Skills by QueueThe value of the skill requirementassigned to the call when it arrivedin the queue.
Initial Value*
Skills by AgentsThe skill operand type that wasassigned to the call when it wasdistributed to the agent. Possiblevalues:
• eq (equal to)
• neq (not equal to)
• gte (greater than or equal to)
• lte (less than or equal to)
Operand
Skills by QueueThe number of calls with this skillrequirement that were transferredfrom the queue by the system.
Reclassified
Skills by QueueThe number of calls with this skillrequirement that were transferredfrom the queue by the systemwithin the Service Level thresholdprovisioned for the skill.
Reclassified within SL
Skills by Queue Skills by AgentsThe name of a skill.
In a Skills by Queue report, you canclick an entry in this column to drilldown to view daily activity for themonth (from a monthly summary)or to view half-hourly data for aday (from a daily summary).
Skill
Cisco Webex Contact Center Management Portal User Guide231
Webex Contact Center Report ParametersHistorical Skill Report Parameters

DescriptionParameter
Skills by QueueThe total number of calls.Total
Skills by AgentsThe value of the skill requirementassigned to the call when the callwas distributed to the agent.
Value
Historical Threshold Alerts Report ParametersIf your enterprise uses the threshold alerts feature and your user profile authorizes you to view alerts, you canuse the controls on the Threshold Alerts page of the Historical Reports module to display details about thresholdalerts that were triggered between midnight of the current day and three months ago. Available parametersare described in the following table.
DescriptionParameter
Whether or not a supervisor acknowledged the alert.Acknowledged
The time the alert was acknowledged.Acknowledged Time
The actual value that triggered the alert.Actual Value
Whether or not a supervisor archived the alert.Archived
Optional comments, if any, entered by the supervisorwho acknowledged the alert.
Comments
The metric that the threshold is associated with.Metric
> (greater than)
>= (greater than or equal to)
< (less than)
<= (less than or equal to)
= (equal to)
Operand
The name of the supervisor who acknowledged thealert.
Supervisor
The date and time that the threshold alert wastriggered
Time
The number of seconds specified in the threshold ruleas the interval during which the system shouldgenerate only one alert for the threshold rule check.
Trigger Interval
The value that the threshold rule defined as the trigger.Trigger Value
Cisco Webex Contact Center Management Portal User Guide232
Webex Contact Center Report ParametersHistorical Threshold Alerts Report Parameters
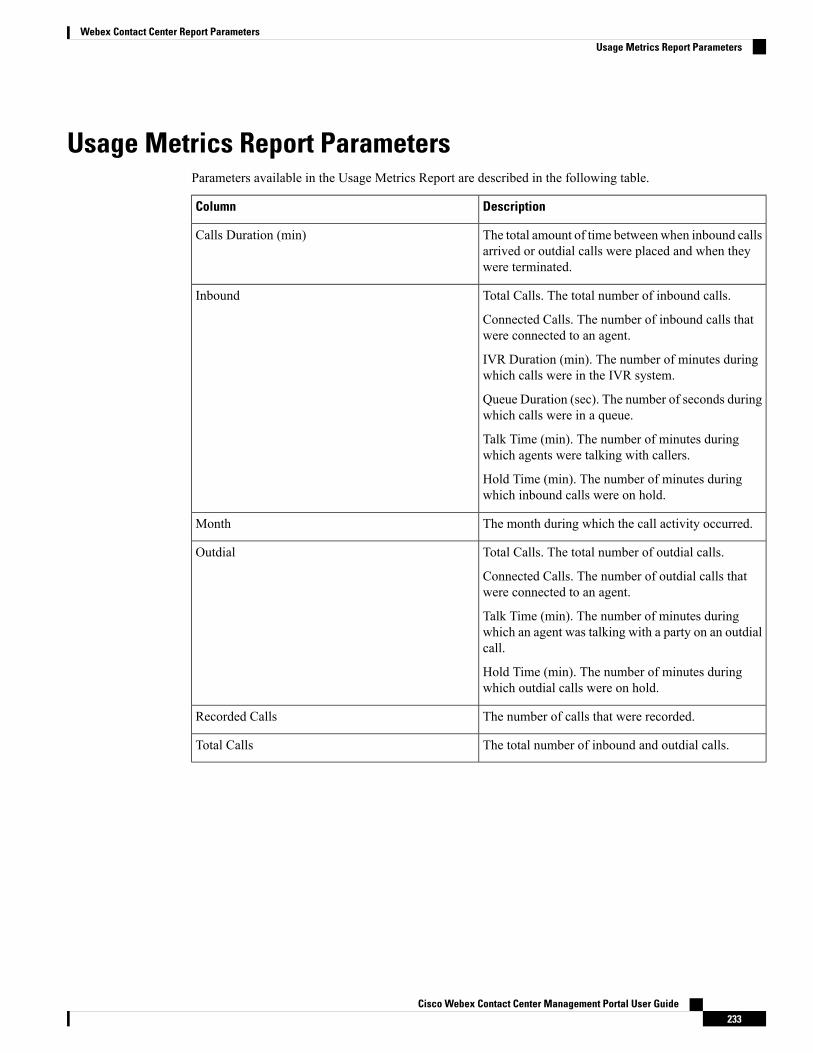
Usage Metrics Report ParametersParameters available in the Usage Metrics Report are described in the following table.
DescriptionColumn
The total amount of time betweenwhen inbound callsarrived or outdial calls were placed and when theywere terminated.
Calls Duration (min)
Total Calls. The total number of inbound calls.
Connected Calls. The number of inbound calls thatwere connected to an agent.
IVR Duration (min). The number of minutes duringwhich calls were in the IVR system.
Queue Duration (sec). The number of seconds duringwhich calls were in a queue.
Talk Time (min). The number of minutes duringwhich agents were talking with callers.
Hold Time (min). The number of minutes duringwhich inbound calls were on hold.
Inbound
The month during which the call activity occurred.Month
Total Calls. The total number of outdial calls.
Connected Calls. The number of outdial calls thatwere connected to an agent.
Talk Time (min). The number of minutes duringwhich an agent was talking with a party on an outdialcall.
Hold Time (min). The number of minutes duringwhich outdial calls were on hold.
Outdial
The number of calls that were recorded.Recorded Calls
The total number of inbound and outdial calls.Total Calls
Cisco Webex Contact Center Management Portal User Guide233
Webex Contact Center Report ParametersUsage Metrics Report Parameters

Cisco Webex Contact Center Management Portal User Guide234
Webex Contact Center Report ParametersUsage Metrics Report Parameters