cisco ip phone 8800 series user guide · features 8811 8841 8845 8851 8851nr 8861 8865 8865nr...
TRANSCRIPT

Cisco IP Phone 8800 Series User GuideFirst Published: 2015-11-25
Last Modified: 2018-06-27
Americas HeadquartersCisco Systems, Inc.170 West Tasman DriveSan Jose, CA 95134-1706USAhttp://www.cisco.comTel: 408 526-4000
800 553-NETS (6387)Fax: 408 527-0883
THE SPECIFICATIONS AND INFORMATION REGARDING THE PRODUCTS IN THIS MANUAL ARE SUBJECT TO CHANGE WITHOUT NOTICE. ALL STATEMENTS,INFORMATION, AND RECOMMENDATIONS IN THIS MANUAL ARE BELIEVED TO BE ACCURATE BUT ARE PRESENTED WITHOUT WARRANTY OF ANY KIND,EXPRESS OR IMPLIED. USERS MUST TAKE FULL RESPONSIBILITY FOR THEIR APPLICATION OF ANY PRODUCTS.
THE SOFTWARE LICENSE AND LIMITED WARRANTY FOR THE ACCOMPANYING PRODUCT ARE SET FORTH IN THE INFORMATION PACKET THAT SHIPPED WITHTHE PRODUCT AND ARE INCORPORATED HEREIN BY THIS REFERENCE. IF YOU ARE UNABLE TO LOCATE THE SOFTWARE LICENSE OR LIMITED WARRANTY,CONTACT YOUR CISCO REPRESENTATIVE FOR A COPY.
The following information is for FCC compliance of Class A devices: This equipment has been tested and found to comply with the limits for a Class A digital device, pursuant to part 15of the FCC rules. These limits are designed to provide reasonable protection against harmful interference when the equipment is operated in a commercial environment. This equipmentgenerates, uses, and can radiate radio-frequency energy and, if not installed and used in accordance with the instruction manual, may cause harmful interference to radio communications.Operation of this equipment in a residential area is likely to cause harmful interference, in which case users will be required to correct the interference at their own expense.
The following information is for FCC compliance of Class B devices: This equipment has been tested and found to comply with the limits for a Class B digital device, pursuant to part 15 ofthe FCC rules. These limits are designed to provide reasonable protection against harmful interference in a residential installation. This equipment generates, uses and can radiate radiofrequency energy and, if not installed and used in accordance with the instructions, may cause harmful interference to radio communications. However, there is no guarantee that interferencewill not occur in a particular installation. If the equipment causes interference to radio or television reception, which can be determined by turning the equipment off and on, users areencouraged to try to correct the interference by using one or more of the following measures:
• Reorient or relocate the receiving antenna.
• Increase the separation between the equipment and receiver.
• Connect the equipment into an outlet on a circuit different from that to which the receiver is connected.
• Consult the dealer or an experienced radio/TV technician for help.
Modifications to this product not authorized by Cisco could void the FCC approval and negate your authority to operate the product
The Cisco implementation of TCP header compression is an adaptation of a program developed by the University of California, Berkeley (UCB) as part of UCB’s public domain version ofthe UNIX operating system. All rights reserved. Copyright © 1981, Regents of the University of California.
NOTWITHSTANDING ANY OTHERWARRANTY HEREIN, ALL DOCUMENT FILES AND SOFTWARE OF THESE SUPPLIERS ARE PROVIDED "AS IS" WITH ALL FAULTS.CISCO AND THE ABOVE-NAMED SUPPLIERS DISCLAIM ALL WARRANTIES, EXPRESSED OR IMPLIED, INCLUDING, WITHOUT LIMITATION, THOSE OFMERCHANTABILITY, FITNESS FOR A PARTICULAR PURPOSE AND NONINFRINGEMENT OR ARISING FROM A COURSE OF DEALING, USAGE, OR TRADE PRACTICE.
IN NO EVENT SHALL CISCO OR ITS SUPPLIERS BE LIABLE FOR ANY INDIRECT, SPECIAL, CONSEQUENTIAL, OR INCIDENTAL DAMAGES, INCLUDING, WITHOUTLIMITATION, LOST PROFITS OR LOSS OR DAMAGE TO DATA ARISING OUT OF THE USE OR INABILITY TO USE THIS MANUAL, EVEN IF CISCO OR ITS SUPPLIERSHAVE BEEN ADVISED OF THE POSSIBILITY OF SUCH DAMAGES.
Any Internet Protocol (IP) addresses and phone numbers used in this document are not intended to be actual addresses and phone numbers. Any examples, command display output, networktopology diagrams, and other figures included in the document are shown for illustrative purposes only. Any use of actual IP addresses or phone numbers in illustrative content is unintentionaland coincidental.
Cisco and the Cisco logo are trademarks or registered trademarks of Cisco and/or its affiliates in the U.S. and other countries. To view a list of Cisco trademarks, go to this URL:https://www.cisco.com/go/trademarks. Third-party trademarks mentioned are the property of their respective owners. The use of the word partner does not imply a partnership relationshipbetween Cisco and any other company. (1721R)
© 2018 Cisco Systems, Inc. All rights reserved.
C O N T E N T S
Your Phone 1C H A P T E R 1
The Cisco IP Phone 8800 Series 1
New and Changed Information 2
New Information for Firmware Release 12.1(1)SR1 2
New Information for Firmware Release 12.1(1) 2
New Information for Firmware Release 12.0(1) 3
New Information for Firmware Release 11.7(1) 3
New Information for Firmware Release 11.5(1)SR1 4
New Information for Firmware Release 11.5(1) 4
New Information for Firmware Release 11.0 5
Phone Setup 5
Adjust the Handset Rest 5
Change the Viewing Angle of Your Phone 6
Connect to the Network 6
Set Up Wi-Fi Client 6
Connect to a Preconfigured Wi-Fi Network 7
Connect to a VPN 7
Set up a Phone for Use with VPN 8
Connect to Expressway 8
Secure the Phone with a Cable Lock 9
Activate and Sign In to Your Phone 10
Sign In to Your Phone 10
Sign In to Your Extension from Another Phone 10
Sign Out of Your Extension from Another Phone 10
Self Care Portal 11
Speed-Dial Numbers 12
Cisco IP Phone 8800 Series User Guideiii

Buttons and Hardware 13
Navigation 14
Softkey, Line, and Feature Buttons 15
Phone Screen Features 15
Clean the Phone Screen 16
Badged Icons 16
Differences Between Phone Calls and Lines 16
USB Ports 17
Mobile Device Charging 17
Bluetooth and Your Phone 18
Accessibility Features for the Cisco IP Phone 8800 Series 18
Hearing-Impaired Accessibility Features 19
Vision-Impaired and Blind Accessibility Features 20
Voice Feedback 24
Mobility-Impaired Accessibility Features 25
Cisco IP Phone 8800 Series Wall Mount Kit Accessibility 26
Phone Firmware and Upgrades 27
Postpone a Phone Upgrade 27
View the Progress of a Phone Firmware Upgrade 28
Energy Savings 28
Turn On Your Phone 28
Phone Line Modes 29
Normal Line Mode 29
Enhanced Line Mode 29
Additional Help and Information 30
Accessibility Features 30
Troubleshooting 30
Find Information About Your Phone 30
Report Call Quality Issues 31
Report All Phone Issues 31
Lost Phone Connectivity 31
Cisco One-Year Limited Hardware Warranty Terms 32
Calls 33C H A P T E R 2
Cisco IP Phone 8800 Series User Guideiv
Contents

Make Calls 33
Make a Call 33
Make a Call with the Speakerphone 33
Make a Call with a Headset 34
Make a Call with a Phone or Video Address 34
Redial a Number 34
Speed Dial 35
Make a Call with a Speed-Dial Button 35
Add a Speed Dial Button from Your Phone 36
Modify a Speed Dial Button from Your Phone 36
Delete a Speed Dial Button from Your Phone 36
Make a Call With a Speed-Dial Code 37
Make a Call With a Fast-Dial Button 37
Dial an International Number 37
Get Notified When a Contact is Available 38
Calls That Require a Billing Code or Authorization Code 38
Secure Calls 38
Answer Calls 39
Answer a Call 39
Answer Call Waiting 39
Decline a Call 39
Ignore a Call 39
Turn On Do Not Disturb 40
Answer a Coworker's Phone (Call Pickup) 40
Answer a Call Within Your Group (Pickup) 40
Answer a Call from Another Group (Group Pickup) 41
Answer a Call From an Associated Group (Other Pickup) 41
Answer a Call Within Your Hunt Group 41
Sign In and Out of a Hunt Group 42
View the Call Queue in a Hunt Group 42
Answer Calls Automatically 42
Trace a Suspicious Call 43
Video Calls 43
Make a Video Call 43
Cisco IP Phone 8800 Series User Guidev
Contents

Stop Your Video 44
Toggle Between Phone and Video Display 44
Adjust the Picture-In-Picture Position 44
Video Calls and Security 45
Mute Your Call 45
Hold Calls 45
Put a Call on Hold 45
Answer a Call Left on Hold for Too Long 45
Swap Between Active and Held Calls 46
Call Park 46
Place a Call on Hold with Call Park 46
Retrieve a Call on Hold with Call Park 47
Place a Call on Hold with Assisted Directed Call Park 47
Retrieve a Call on Hold with Assisted Directed Call Park 47
Place a Call on Hold with Manual Directed Call Park 47
Retrieve a Call on Hold with Manual Directed Call Park 48
Forward Calls 48
Transfer a Call to Another Person 49
Conference Calls and Meetings 49
Add Another Person to a Call 49
Swap Between Calls Before You Complete a Conference 50
View and Remove Conference Participants 50
Scheduled Conference Calls (Meet Me) 50
Host a Meet-Me Conference 50
Join a Meet-Me Conference 51
Sign-in to a WebEx Meeting 51
Intercom Calls 51
Make an Intercom Call 51
Answer an Intercom Call 52
Supervise and Record Calls 52
Set Up a Supervised Call 52
Record a Call 53
Prioritized Calls 53
Make a Priority Call 54
Cisco IP Phone 8800 Series User Guidevi
Contents
Answer a Priority Call 54
Answer a Priority Call While on Another Call 54
Multiple Lines 55
Answer the Oldest Call First 55
View All Calls on Your Phone 55
View Important Calls 55
Display Call Notifications on Select Lines with Line Filters 56
Create a Line Filter 56
Use a Line Filter 56
Change a Line Filter 56
Shared Lines 57
Add Yourself to a Call on a Shared Line 57
Get Notified Before You Join a Call on a Shared Line 57
Enable Privacy on a Shared Line 58
Mobile Devices and Your Desk Phone 58
Phone Calls with Intelligent Proximity 58
Pair a Mobile Device with Your Desk Phone 58
Switch Connected Mobile Devices 59
Delete a Mobile Device 59
View Your Paired Bluetooth Devices 60
Intelligent Proximity for Mobile Phones 60
Intelligent Proximity for Tablets 63
Phone Calls with Mobile Connect 63
Enable Mobile Connect 64
Move a Call from Your Desk Phone to Your Mobile Phone 64
Move a Call from Your Mobile Phone to Your Desk Phone 64
Transfer a Call from Your Mobile Phone to Your Desk Phone 65
Contacts 67C H A P T E R 3
Corporate Directory 67
Dial a Contact in the Corporate Directory 67
Personal Directory 67
Sign In and Out of a Personal Directory 68
Add a New Contact to Your Personal Directory 68
Cisco IP Phone 8800 Series User Guidevii
Contents

Search for a Contact in Your Personal Directory 68
Call a Contact in Your Personal Directory 69
Assign a Fast-Dial Code to a Contact 69
Call a Contact with a Fast-Dial Code 69
Edit a Contact in Your Personal Directory 70
Remove a Contact from Your Personal Directory 70
Delete a Fast-Dial Code 70
Cisco Web Dialer 71
Recent Calls 73C H A P T E R 4
Recent Calls List 73
View Your Recent Calls 73
Return a Recent Call 74
Clear the Recent Calls List 74
Delete a Call Record 74
Voicemail 77C H A P T E R 5
Your Voicemail Account 77
Check for New Voice Messages 77
Access Voicemail 78
Visual Voicemail 78
Access Audio Voicemail 78
Applications 79C H A P T E R 6
Available Applications 79
View Active Applications 79
Switch to Active Applications 79
Close Active Applications 80
Settings 81C H A P T E R 7
Change the Wallpaper 81
Change the Ringtone 82
Adjust the Screen Brightness 82
Adjust the Contrast 82
Cisco IP Phone 8800 Series User Guideviii
Contents
Change the Font Size 83
Change the Phone Name 83
Adjust the Headset Feedback 83
Video Settings 84
Adjust the Video Brightness 84
Adjust the Video Bandwidth 84
View Video Calls on Your Computer 85
Adjust the Volume During a Call 85
Adjust the Phone Ringer Volume 86
Enable Voice Feedback from Accessibility 86
Adjust Voice Speed 86
Phone Display Language 87
Accessories 89C H A P T E R 8
Supported Accessories 89
View the Accessories Associated with Your Phone 91
Headsets 91
Important Headset Safety Information 91
Cisco Headset 500 Series 91
Cisco Headset USB Adapter 92
Adjust Your Bass and Treble 93
Adjust Your Speaker Feedback 93
Adjust Your Microphone Volume 94
Test Your Microphone 94
Third Party Headsets 94
Audio Quality 95
Wired Headsets 95
Bluetooth Wireless Headsets 95
Wireless Headsets 97
Standard Headsets 97
Connect a Standard Headset 97
Set Up a Wideband Standard Headset 98
USB Headsets 98
Connect a USB Headset 98
Cisco IP Phone 8800 Series User Guideix
Contents
Bluetooth Headsets 99
Turn Bluetooth On or Off 99
Add a Bluetooth Headset 100
Disconnect a Bluetooth Headset 100
Remove a Bluetooth Headset 100
Wireless Headsets 101
Enable an E-Hookswitch Headset 101
Swap Headsets While on a Call 101
Cisco IP Phone 8800 Key Expansion Module 102
Key Expansion Module Buttons and Hardware 104
Place a Call on the Key Expansion Module 106
Adjust the Key Expansion Module Screen Brightness 106
Product Safety and Security 107C H A P T E R 9
Safety and Performance Information 107
Power Outage 107
Regulatory Domains 107
Health-Care Environments 107
External Devices 107
Bluetooth Wireless Headset Performance 108
Ways to Provide Power to Your Phone 108
Phone Behavior During Times of Network Congestion 108
UL Warning 109
Compliance Statements 109
Compliance Statements for the European Union 109
CE Marking 109
RF Exposure Statement for the European Union 109
Compliance Statements for Canada 109
Canadian RF Exposure Statement 109
Compliance Statement for Argentina 110
Compliance Information for Brazil 110
Compliance Information for China 110
Compliance Information for Mexico 111
Compliance Information for Russia 111
Cisco IP Phone 8800 Series User Guidex
Contents

FCC Compliance Statements 111
FCC Part 15.19 Statement 111
FCC Part 15.21 Statement 111
FCC RF Radiation Exposure Statement 111
FCC Receivers and Class B Digital Statement 111
Cisco Product Security Overview 112
Important Online Information 112
Cisco IP Phone 8800 Series User Guidexi
Contents

Cisco IP Phone 8800 Series User Guidexii
Contents
C H A P T E R 1Your Phone
• The Cisco IP Phone 8800 Series, on page 1• New and Changed Information, on page 2• Phone Setup, on page 5• Activate and Sign In to Your Phone, on page 10• Self Care Portal, on page 11• Buttons and Hardware, on page 13• Accessibility Features for the Cisco IP Phone 8800 Series, on page 18• Phone Firmware and Upgrades, on page 27• Energy Savings, on page 28• Phone Line Modes, on page 29• Additional Help and Information , on page 30
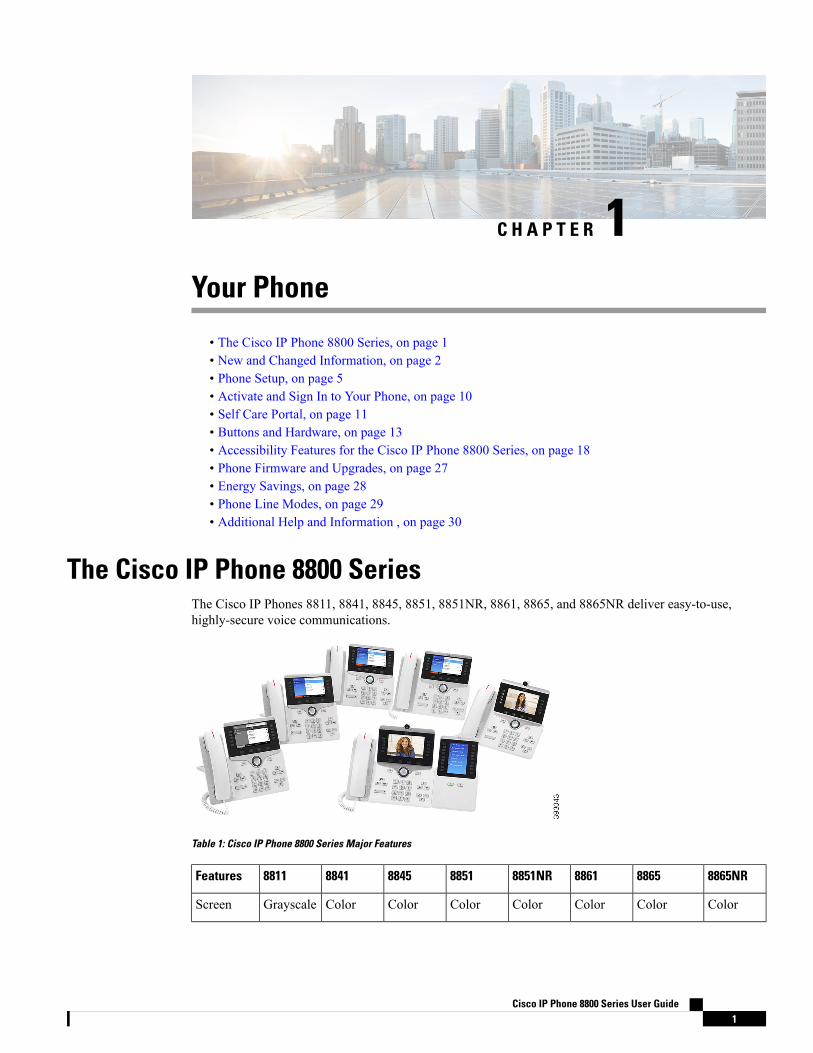
The Cisco IP Phone 8800 SeriesThe Cisco IP Phones 8811, 8841, 8845, 8851, 8851NR, 8861, 8865, and 8865NR deliver easy-to-use,highly-secure voice communications.
Table 1: Cisco IP Phone 8800 Series Major Features
8865NR886588618851NR8851884588418811Features
ColorColorColorColorColorColorColorGrayscaleScreen
Cisco IP Phone 8800 Series User Guide1
8865NR886588618851NR8851884588418811Features
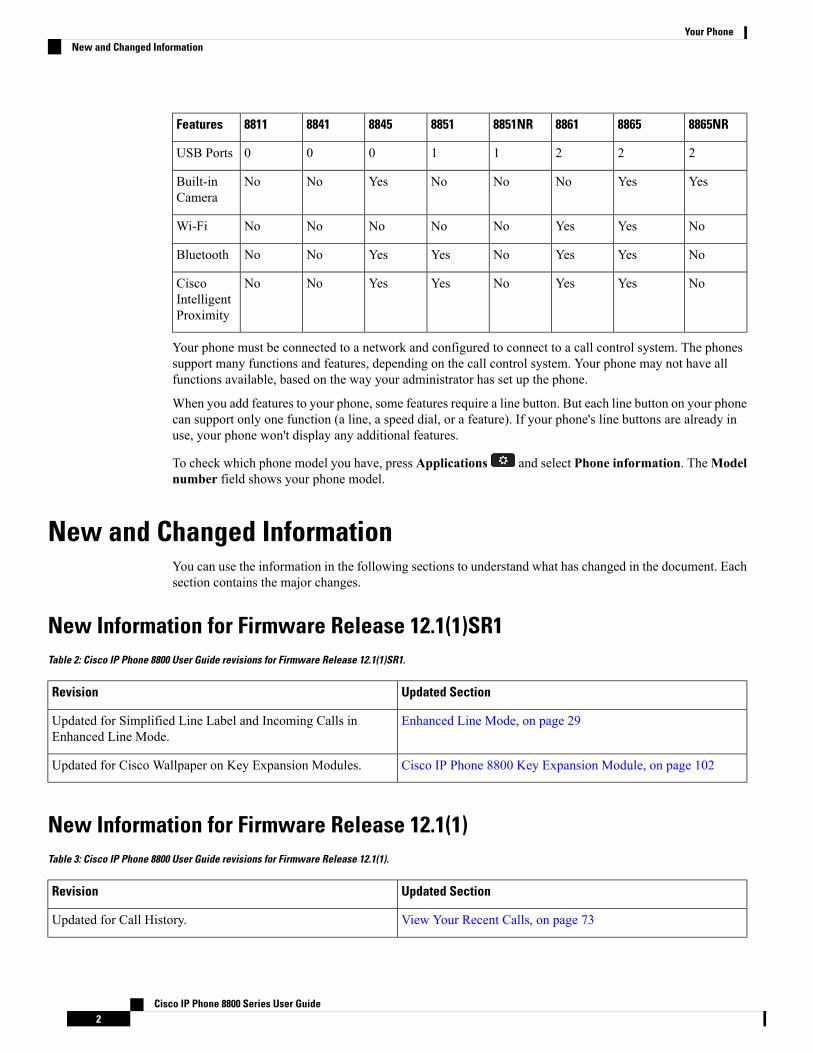
22211000USB Ports
YesYesNoNoNoYesNoNoBuilt-inCamera
NoYesYesNoNoNoNoNoWi-Fi
NoYesYesNoYesYesNoNoBluetooth
NoYesYesNoYesYesNoNoCiscoIntelligentProximity
Your phone must be connected to a network and configured to connect to a call control system. The phonessupport many functions and features, depending on the call control system. Your phone may not have allfunctions available, based on the way your administrator has set up the phone.
When you add features to your phone, some features require a line button. But each line button on your phonecan support only one function (a line, a speed dial, or a feature). If your phone's line buttons are already inuse, your phone won't display any additional features.
To check which phone model you have, press Applications and select Phone information. TheModelnumber field shows your phone model.
New and Changed InformationYou can use the information in the following sections to understand what has changed in the document. Eachsection contains the major changes.
New Information for Firmware Release 12.1(1)SR1Table 2: Cisco IP Phone 8800 User Guide revisions for Firmware Release 12.1(1)SR1.
Updated SectionRevision
Enhanced Line Mode, on page 29Updated for Simplified Line Label and Incoming Calls inEnhanced Line Mode.
Cisco IP Phone 8800 Key Expansion Module, on page 102Updated for Cisco Wallpaper on Key Expansion Modules.
New Information for Firmware Release 12.1(1)Table 3: Cisco IP Phone 8800 User Guide revisions for Firmware Release 12.1(1).
Updated SectionRevision
View Your Recent Calls, on page 73Updated for Call History.
Cisco IP Phone 8800 Series User Guide2
Your PhoneNew and Changed Information

Updated SectionRevision
Accessibility Features for the Cisco IP Phone 8800 Series, onpage 18 and the included sections such as Voice Feedback, onpage 24
Added for Accessibility enhancements
Enable Voice Feedback from Accessibility, on page 86
Adjust Voice Speed, on page 86
Enhanced Line Mode, on page 29Updated for Incoming Call Notifications and Call Alert.
Cisco Headset 500 Series, on page 91Updated for Cisco Headset 531 and Cisco Headset 532.
Test Your Microphone , on page 94
Adjust Your Speaker Feedback, on page 93
Adjust Your Bass and Treble, on page 93
Adjust Your Microphone Volume, on page 94
Make a Call with a Speed-Dial Button, on page 35Updated for Speed Dial navigation.
Add a Speed Dial Button from Your Phone, on page 36Updated for Speed Dial Button.
Modify a Speed Dial Button from Your Phone, on page 36
Delete a Speed Dial Button from Your Phone, on page 36
New Information for Firmware Release 12.0(1)Table 4: Cisco IP Phone 8800 User Guide revisions for Firmware Release 12.0(1).
Updated SectionRevision
Cisco IP Phone 8800 Key Expansion Module, on page 102Updated for new key expansion module
New Information for Firmware Release 11.7(1)Table 5: Cisco IP Phone 8800 User Guide revisions for Firmware Release 11.7(1).
Updated SectionRevision
Video Calls, on page 43Updated for video call enhancements
Badged Icons, on page 16Updated for new user experience
Phone Screen Features, on page 15
Enhanced Line Mode, on page 29
Cisco IP Phone 8800 Series User Guide3
Your PhoneNew Information for Firmware Release 12.0(1)

New Information for Firmware Release 11.5(1)SR1Table 6: Cisco IP Phone 8800 User Guide revisions for Firmware Release 11.5(1)SR1.
Updated SectionRevision
The Cisco IP Phone 8800 Series, on page 1Updated for Cisco IP Phone 8865NR support
Set Up Wi-Fi Client, on page 6
Buttons and Hardware, on page 13
Supported Accessories, on page 89
Stop Your Video, on page 44Updated for Video with Closed Shutter
Turn On Do Not Disturb, on page 40Updated for MLPP and Do not disturb support
Prioritized Calls, on page 53
Answer a Priority Call, on page 54
Set Up Wi-Fi Client, on page 6Updated for Wi-Fi sign support
Connect to a Preconfigured Wi-Fi Network, on page7
New Information for Firmware Release 11.5(1)Table 7: Cisco IP Phone 8800 User Guide revisions for Firmware Release 11.5(1).
Updated SectionRevision
• Differences Between Phone Calls and Lines, onpage 16.
• Ignore a Call, on page 39.
• Decline a Call, on page 39.
• Phone Line Modes, on page 29.
• Normal Line Mode, on page 29.
• Enhanced Line Mode, on page 29.
Updated the following sections for Enhance LineMode.
Phone Firmware and Upgrades, on page 27Added the following section for Postpone a PhoneUpgrade
Turn On Do Not Disturb, on page 40Revised the following section for Do Not Disturb
Connect to a Preconfigured Wi-Fi Network, on page7
Added Connect to a Pre-Configured Wi-Fi Network
Cisco IP Phone 8800 Series User Guide4
Your PhoneNew Information for Firmware Release 11.5(1)SR1
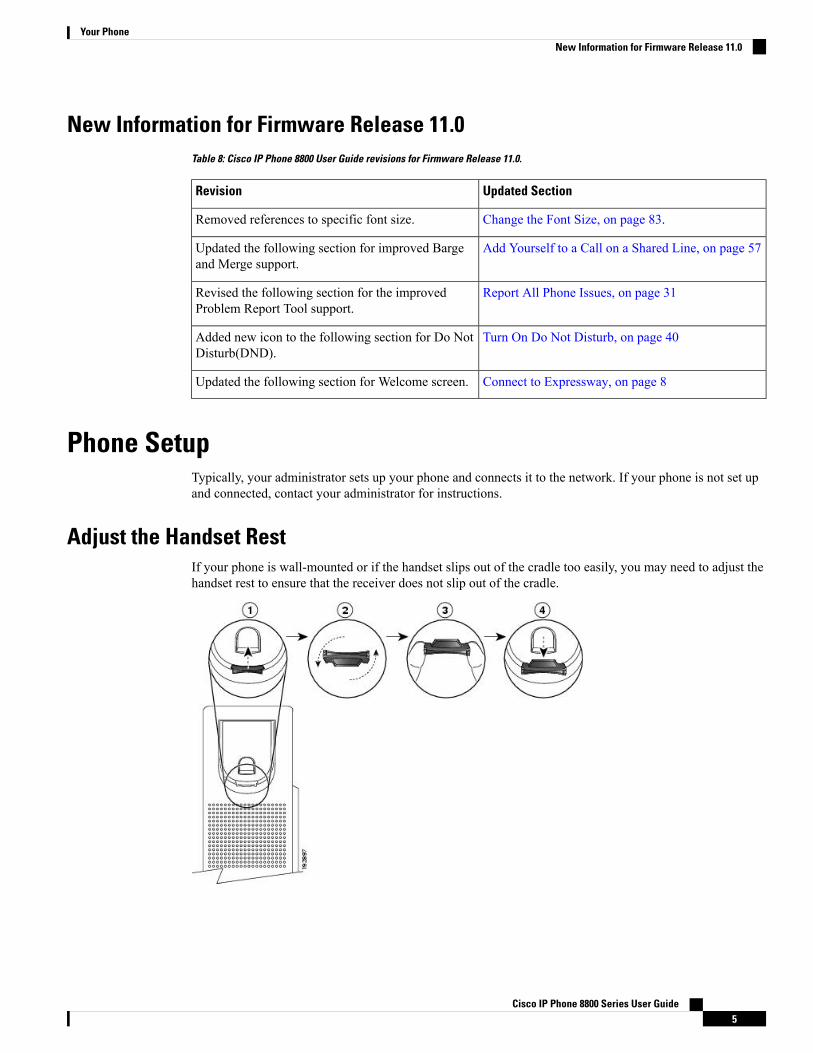
New Information for Firmware Release 11.0Table 8: Cisco IP Phone 8800 User Guide revisions for Firmware Release 11.0.
Updated SectionRevision
Change the Font Size, on page 83.Removed references to specific font size.
Add Yourself to a Call on a Shared Line, on page 57Updated the following section for improved Bargeand Merge support.
Report All Phone Issues, on page 31Revised the following section for the improvedProblem Report Tool support.
Turn On Do Not Disturb, on page 40Added new icon to the following section for Do NotDisturb(DND).
Connect to Expressway, on page 8Updated the following section for Welcome screen.
Phone SetupTypically, your administrator sets up your phone and connects it to the network. If your phone is not set upand connected, contact your administrator for instructions.
Adjust the Handset RestIf your phone is wall-mounted or if the handset slips out of the cradle too easily, you may need to adjust thehandset rest to ensure that the receiver does not slip out of the cradle.
Cisco IP Phone 8800 Series User Guide5
Your PhoneNew Information for Firmware Release 11.0
Procedure
Step 1 Remove the handset from the cradle and pull the plastic tab from the handset rest.Step 2 Rotate the tab 180 degrees.Step 3 Hold the tab between two fingers, with the corner notches facing you.Step 4 Line up the tab with the slot in the cradle and press the tab evenly into the slot. An extension protrudes from
the top of the rotated tab.Step 5 Return the handset to the handset rest.
Change the Viewing Angle of Your PhoneYou can change the angle of the phone to eliminate glare on the screen. If your phone has a video camera ,you can change the angle to improve the camera view.
Procedure
Step 1 Hold the receiver in the cradle with one hand.Step 2 Move the footstand with the other hand to change the angle.Step 3 (Optional) Adjust the footstand on the key expansion module and ensure that the phone and key expansion
module are stable.Step 4 (Optional) Press Self-view to check the camera angle.
Connect to the NetworkYou need to connect the phone to the network.
• Wired network connection—The phone is plugged into the network with an Ethernet cable.
• Wireless connection—The Cisco IP Phone 8861 and 8865 can connect to a Wireless Access Point usingWi-Fi.
• Virtual Private Network (VPN)—After the phone is connected to the network, it is set up to automaticallyconnect into a protected network.
Mobile and Remote Access Through Expressway—If your administrator sets up Mobile and Remote AccessThrough Expressway and you connect your phone to the network, it connects to the Expressway serverautomatically.
Set Up Wi-Fi ClientThe Cisco IP Phone 8861 and 8865 can access a Wi-Fi network. You need a power adapter to power thephone. The Cisco IP Phone 8865NR cannot be used with a Wi-Fi network.
Cisco IP Phone 8800 Series User Guide6
Your PhoneChange the Viewing Angle of Your Phone

The phone PC port is disabled when Wi-Fi is enabled on your phone.Note
Before you begin
Your administrator needs to configure settings on the call control system to enable Wi-Fi access.
Procedure
Step 1 If the phone is plugged into the Ethernet, unplug the Ethernet cable.
Step 2 Press Applications .Step 3 Navigate to Admin settings > Network setup >Wi-Fi client setup >Wi-Fi sign in access.Step 4 Navigate toWireless and press On.Step 5 Navigate toWi-Fi sign in access and press On.Step 6 Press Apply to save the changes, or press Revert to cancel the changes.
Connect to a Preconfigured Wi-Fi NetworkYou can connect to aWi-Fi network with your Cisco IP Phone 8861 and 8865. But the Cisco IP Phone 8865NRdoes not support Wi-Fi.
Depending upon how your phone is configured, you could be required to sign in when you join a Wi-Finetwork or when your phone powers up.
You cannot dismiss the Wi-Fi sign-in window without entering the correct username and password.
Procedure
Step 1 Enter your Wi-Fi credentials when prompted.Step 2 Select Sign-in.
Connect to a VPNYou connect to your VPN in one of two ways:
• By entering credentials (username and password, or just a password)
• With a certificate
If you have a certificate installed on your phone, you do not need to do anything. Your phone automaticallyconnects to the VPN.
Cisco IP Phone 8800 Series User Guide7
Your PhoneConnect to a Preconfigured Wi-Fi Network
Procedure
Step 1 When prompted, enter your VPN credentials.Step 2 Select Sign-in.
Set up a Phone for Use with VPN
Before you begin
To complete this procedure, you must have a valid TFTP server address. If you do not have this information,contact your administrator.
You cannot use the Wi-Fi client with the Cisco IP Phone 8865NR.
Procedure
Step 1 Press Applications .Step 2 Select Admin settings.Step 3 Select one of the following menu items:
• All phones connected to the Ethernet: Ethernet setup• Cisco IP Phone 8861 and 8865 users that use Wi-Fi: Network setup >Wi-Fi client setup
Step 4 Select IPv4 Setup.Step 5 Navigate to Alternate TFTP and choose On.Step 6 Select TFTP server 1.Step 7 Enter your TFTP server address in the TFTP server 1 field.Step 8 Press Apply.Step 9 Press Continue.Step 10 Press Exit.
Connect to ExpresswayYou can use Mobile and Remote Access Through Expressway to connect into your corporate network whenyou are working away from your office. Because your phone does not have a TFTP address configured, thephone displays a Welcome screen to begin the sign-in process.
Before you begin
If you have been using your phone at the office or with a VPN, reset your service mode before you connectto Expressway.
If you need to connect to Mobile and Remote Access Through Expressway on-premise, restart your phoneand press Select when prompted.
Cisco IP Phone 8800 Series User Guide8
Your PhoneSet up a Phone for Use with VPN

Procedure
Step 1 Enter your activation code or service domain on theWelcome screen and press Continue.Step 2 Enter your username and password.Step 3 Press Submit.
Activate Your Phone Automatically with a QR Code
If your phone has a camera, you can scan a QR code to activate the phone. If you inadvertently press Entermanually, press Back to return to the QR code screen.
Before you begin
You need the QR code from your welcome message.
If the code from your welcome message has expired, generate an activation code for your device with the SelfCare portal or request an activation code from your administrator.
Procedure
Step 1 Make the QR code ready with one of these methods:
• Print the email with the QR code and hold the paper in front of the phone camera.• Display the QR code on your mobile device and hold the device in front of the phone camera.• Display the QR code on your computer and hold the phone in front of the computer screen.
Step 2 Turn the ring around the camera clockwise to open the shutter.Step 3 Scan the QR code.
When the scan succeeds, your phone registers with the server, and you're ready to make your first call.
Secure the Phone with a Cable LockYou can secure your Cisco IP Phone 8800 Series with a laptop cable lock up to 20 mm wide.
Procedure
Step 1 Take the looped end of the cable lock and wrap it around the object to which you want to secure your phone.Step 2 Pass the lock through the looped end of the cable.Step 3 Unlock the cable lock.Step 4 Press and hold the locking button to align the locking teeth.Step 5 Insert the cable lock into the lock slot of your phone and release the locking button.Step 6 Lock the cable lock.
Cisco IP Phone 8800 Series User Guide9
Your PhoneActivate Your Phone Automatically with a QR Code

Activate and Sign In to Your PhoneYou may need to activate or sign in to your phone. Activation happens once for your phone, and connects thephone to the call control system. Your administrator gives you your sign-in and activation credentials.
Sign In to Your Phone
Before you begin
Get your user ID and PIN or password from your administrator.
Procedure
Step 1 Enter your user ID in the User ID field.Step 2 Enter your PIN or password in the PIN or Password field, then press Submit.
Sign In to Your Extension from Another PhoneYou can use Cisco Extension Mobility to sign in to a different phone in your network and have it act the sameas your phone. After you sign in, the phone adopts your user profile, including your phone lines, features,established services, and web-based settings. Your administrator sets you up for the Cisco ExtensionMobilityservice.
Before you begin
Get your user ID and PIN from your administrator.
Procedure
Step 1 Press Applications .Step 2 Select Extension Mobility (name can vary).Step 3 Enter your user ID and PIN.Step 4 If prompted, select a device profile.
Sign Out of Your Extension from Another Phone
Procedure
Step 1 Press Applications .
Cisco IP Phone 8800 Series User Guide10
Your PhoneActivate and Sign In to Your Phone
Step 2 Select Extension Mobility.Step 3 Press Yes to sign out.
Self Care PortalYou can customize some phone settings with the Self Care portal web site, which you access from yourcomputer. The Self Care portal is part of your organization's Cisco Unified Communications Manager.
Your administrator gives you the URL to access the Self Care portal, and provides your user ID and password.
In the Self Care portal, you can control features, line settings, and phone services for your phone.
• Phone features include speed dial, do not disturb, and your personal address book.
• Line settings affect a specific phone line (directory number) on your phone. Line settings can includecall forwarding, visual and audio message indicators, ring patterns, and other line-specific settings.
• Phone services can include special phone features, network data, and web-based information (such asstock quotes and movie listings). Use the Self Care Portal to subscribe to a phone service before youaccess it on your phone.
If you have a Cisco IP Phone 8800 Key Expansion Module connected to your phone, you can also configurethe expansion module buttons for speed dial and other phone services.
The following table describes some specific features that you configure with the Self Care portal. For moreinformation, see the Self Care portal documentation for your call control system.
DescriptionFeatures
Use the number that will receive calls when call forward is enabled on the phone. Usethe Self Care portal to set up more complicated call forward functions, for example,when your line is busy.
Call forward
Specify additional phones (your mobile and other phones) that you want to use to makeand receive calls with the same directory numbers as your desk phone. You can alsodefine blocked and preferred contacts to restrict or allow calls from certain numbersto be sent to your mobile phone. When you set up additional phones, you can also setup these features:
• Single number reach—Specify whether the additional phone should ring whensomeone calls your desk phone.
• Mobile calls—If the additional phone is a mobile phone, you can set it up to allowyou to transfer mobile calls to your desk phone or desk phone calls to your mobilephone.
Additional phones
Assign phone numbers to speed-dial numbers so that you can quickly call that person.Speed dial
Related TopicsPhone Calls with Mobile Connect, on page 63Speed Dial, on page 35Forward Calls, on page 48
Cisco IP Phone 8800 Series User Guide11
Your PhoneSelf Care Portal
Speed-Dial NumbersWhen you dial a number on your phone, you enter a series of digits. When you set up a speed-dial number,the speed-dial number must contain all the digits you need to make the call. For example, if you need to dial9 to get an outside line, you enter the number 9 and then the number you want to dial.
You can also add other dialed digits to the number. Examples of additional digits include a meeting accesscode, an extension, a voicemail password, an authorization code, and a billing code.
The dial string can contain the following characters:
• 0 to 9
• Pound (#)
• Asterisk (*)
• Comma (,)—This is the pause character, and gives a 2- second delay in the dialing. You can have severalcommas in a row. For example, two commas (,,) represent a pause of 4 seconds.
The rules for dial strings are:
• Use the comma to separate the parts of the dial string.
• An authorization code must always precede a billing code in the speed-dial string.
• A single comma is required between the authorization code and the billing code in the string.
• A speed-dial label is required for speed dials with authorization codes and additional digits.
Before you configure the speed dial, try to dial the digits manually at least once to ensure that the digit sequenceis correct.
Your phone does not save the authorization code, billing code, or extra digits from the speed dial in the callhistory. If you press Redial after you connect to a speed-dial destination, the phone prompts you to enter anyrequired authorization code, billing code, or additional digits manually.
Note
Example
To set up a speed-dial number to call a person at a specific extension, and if you need an authorization codeand billing code, consider the following requirements:
• You need to dial 9 for an outside line.
• You want to call 5556543.
• You need to input the authorization code 1234.
• You need to input the billing code 9876.
• You must wait for 4 seconds.
• After the call connects, you must dial the extension 56789#.
In this scenario, the speed-dial number is 95556543,1234,9876,,56789#.
Cisco IP Phone 8800 Series User Guide12
Your PhoneSpeed-Dial Numbers
Related TopicsCalls That Require a Billing Code or Authorization Code, on page 38
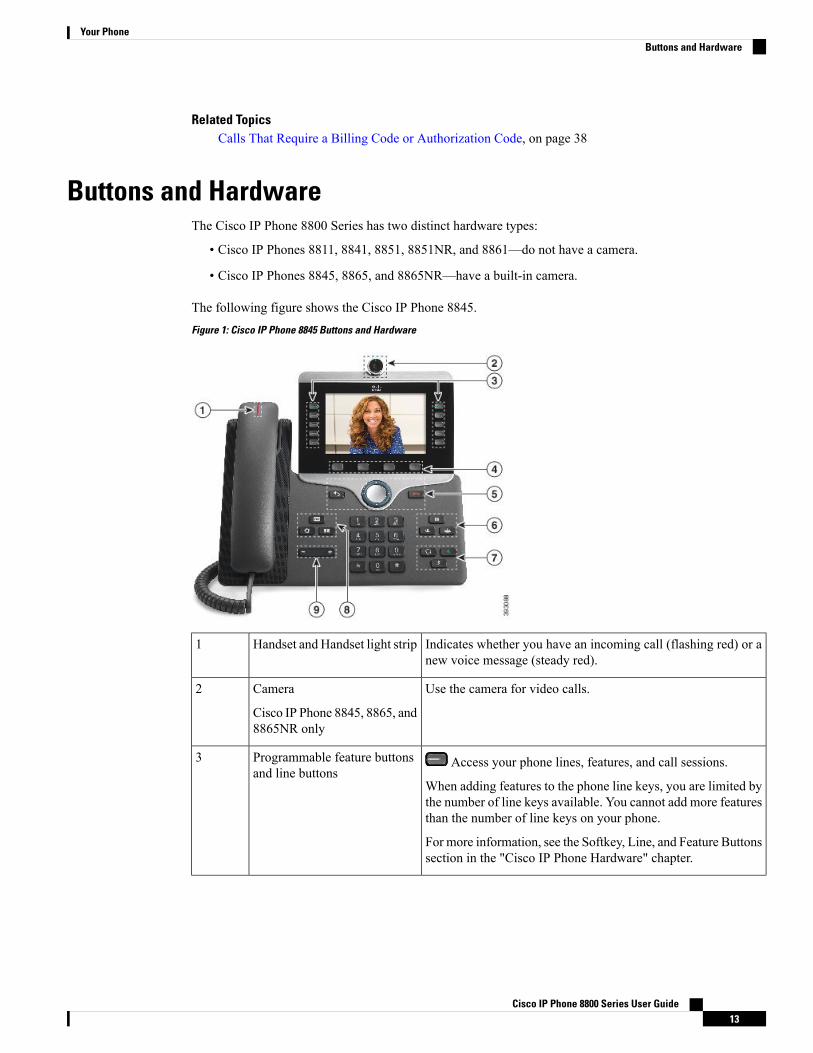
Buttons and HardwareThe Cisco IP Phone 8800 Series has two distinct hardware types:
• Cisco IP Phones 8811, 8841, 8851, 8851NR, and 8861—do not have a camera.
• Cisco IP Phones 8845, 8865, and 8865NR—have a built-in camera.
The following figure shows the Cisco IP Phone 8845.Figure 1: Cisco IP Phone 8845 Buttons and Hardware
Indicates whether you have an incoming call (flashing red) or anew voice message (steady red).
Handset and Handset light strip1
Use the camera for video calls.Camera
Cisco IP Phone 8845, 8865, and8865NR only
2
Access your phone lines, features, and call sessions.
When adding features to the phone line keys, you are limited bythe number of line keys available. You cannot add more featuresthan the number of line keys on your phone.
For more information, see the Softkey, Line, and Feature Buttonssection in the "Cisco IP Phone Hardware" chapter.
Programmable feature buttonsand line buttons
3
Cisco IP Phone 8800 Series User Guide13
Your PhoneButtons and Hardware

Access to functions and services.
For more information, see the Softkey, Line, and Feature Buttonssection in the "Cisco IP Phone Hardware" chapter.
Softkey buttons4
Back Return to the previous screen or menu.
Navigation cluster Navigation ring and Select button—Scrollthrough menus, highlight items and select the highlighted item.
Release End a connected call or session.
Back, Navigation cluster, andRelease
5
Hold/Resume Place an active call on hold and resume theheld call.
Conference Create a conference call.
Transfer Transfer a call.
Hold/Resume, Conference,and Transfer
6
Speakerphone Toggle the speakerphone on or off. Whenthe speakerphone is on, the button is lit.
Mute Toggle the microphone on or off. When themicrophone is muted, the button is lit.
Headset Toggle the headset on or off. When the headset ison, the button is lit.
Speakerphone,Mute, andHeadset
7
Contacts Access personal and corporate directories.
Applications Access recent calls, user preferences, phonesettings, and phone model information.
Messages Autodial your voice messaging system.
Contacts, Applications, andMessages
8
Adjust the handset, headset, and speakerphone volume(off hook) and the ringer volume (on hook).
Volume button9
NavigationUse the outer ring of the Navigation cluster to scroll through menus and to move between fields. Use the innerSelect button of the Navigation cluster to select menu items.
If a menu item has an index number, you can enter the index number with the keypad to select the item.
Cisco IP Phone 8800 Series User Guide14
Your PhoneNavigation

Softkey, Line, and Feature ButtonsYou can interact with the features on your phone in several ways:
• Softkeys, located below the screen, give you access to the function displayed on the screen above thesoftkey. The softkeys change depending on what you are doing at the time. TheMore ... softkey showsyou that more functions are available.
• Feature and line buttons, located on either side of the screen, give you access to phone features and phonelines.
• Feature buttons—Used for features such as Speed dial or Call pickup, and to view your status onanother line.
• Line buttons—Used to answer a call or resume a held call. When not used for an active call, usedto initiate phone functions, such as the missed calls display.
Feature and line buttons illuminate to indicate status:
• Green, steady—Active call or two-way intercom call
• Green, flashing—Held call
• Amber, steady—Privacy in use, one-way intercom call, Do Not Disturb (DND) active, or loggedinto a Hunt Group
• Amber, flashing—Incoming call or reverting call
• Red, steady—Remote line in use (shared line or Line Status)
• Red, flashing—Remote line on hold
Your administrator can set up some functions as softkeys or as feature buttons. You can also access somefunctions with softkeys or the associated hard button.
Phone Screen FeaturesThe phone screen shows information about your phone such as directory number, active call and line status,softkeys, speed dials, placed calls, and phone menu listings. The screen is made up of three sections: theheader row, the middle section, and the footer row.
Cisco IP Phone 8800 Series User Guide15
Your PhoneSoftkey, Line, and Feature Buttons
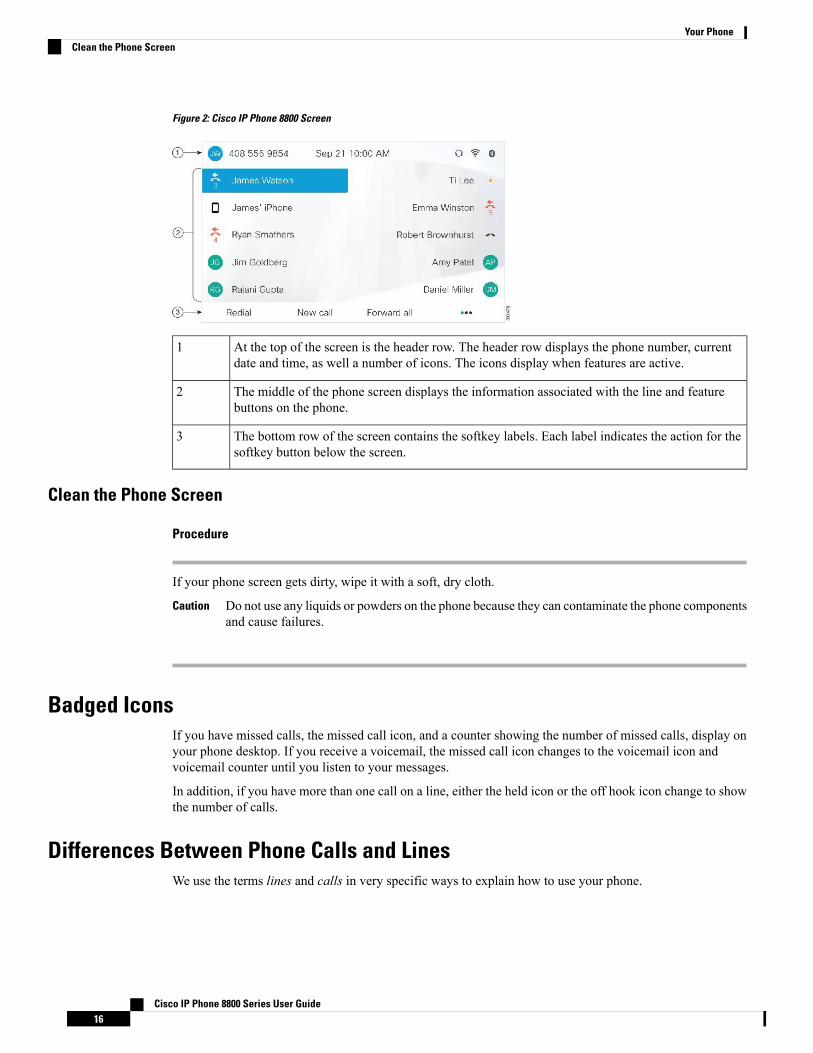
Figure 2: Cisco IP Phone 8800 Screen
At the top of the screen is the header row. The header row displays the phone number, currentdate and time, as well a number of icons. The icons display when features are active.
1
The middle of the phone screen displays the information associated with the line and featurebuttons on the phone.
2
The bottom row of the screen contains the softkey labels. Each label indicates the action for thesoftkey button below the screen.
3
Clean the Phone Screen
Procedure
If your phone screen gets dirty, wipe it with a soft, dry cloth.
Do not use any liquids or powders on the phone because they can contaminate the phone componentsand cause failures.
Caution
Badged IconsIf you have missed calls, the missed call icon, and a counter showing the number of missed calls, display onyour phone desktop. If you receive a voicemail, the missed call icon changes to the voicemail icon andvoicemail counter until you listen to your messages.
In addition, if you have more than one call on a line, either the held icon or the off hook icon change to showthe number of calls.
Differences Between Phone Calls and LinesWe use the terms lines and calls in very specific ways to explain how to use your phone.
Cisco IP Phone 8800 Series User Guide16
Your PhoneClean the Phone Screen

• Lines—Each line corresponds to a directory number or intercom number that others can use to call you.You have as many lines as you have directory numbers and phone line icons. Depending upon how yourphone is configured, you could have up to 16 lines.
• Calls—Each line can support multiple calls. By default, your phone supports four connected calls perline, but your administrator can adjust this number according to your needs.
Only one call can be active at any time; other calls are automatically placed on hold.
Here is an example: If you have two lines and each line supports four calls, then you could have up toeight connected calls at one time. Only one of those calls is active and the other seven are held calls.
USB PortsYour phone may have one or more USB ports. Each USB port supports a maximum of five USB devices.Each device connected to the port is included in the maximum device count, including any Key ExpansionModules.
For example, your phone can support five USB devices on the side port and five additional standard USBdevices on the back port. Many third-party USB products contain more than one USB device, and thus countas more than one device.
If you use a USB hub and remove the USB cable from the phone during an active call, your phone mightrestart.
Note
Related TopicsThe Cisco IP Phone 8800 Series, on page 1
Mobile Device ChargingYou can use the USB ports on your phone to charge your mobile device if the device has a USB connection.The following ports support USB charging:
• Side port—Provides standard device charging.
• Back port (Cisco IP Phone 8861, 8865, and 8865NR only)—Provides standard device charging as wellas fast-charging.
Your phone continues to charge the mobile device while it is in power-saving mode but stops charging inPower Save Plus mode.
When you use your phone to charge your mobile device, the following conditions apply:
• A short delay may occur before charging begins.
• In some situations, your device will not display the charging icon. For example, the icon may not displaywhen the device is fully charged.
• When more than one Cisco IP Phone 8800 Key Expansion Module is attached to your phone, the backUSB port cannot fast-charge the device.
If you unplug your tablet and immediately plug in a USB headset to the phone, a 3-second delay occurs beforethe phone recognizes the USB headset.
Cisco IP Phone 8800 Series User Guide17
Your PhoneUSB Ports
Related TopicsEnergy Savings, on page 28
Bluetooth and Your PhoneIf your phone supports Bluetooth, use a Bluetooth headset and connect your mobile phone or tablet to thephone.
Bluetooth connections work best when you're within 3 to 6 feet (1 to 2 meters) from your phone, but youmight be able to be as far away as 66 feet (20 meters). The Bluetooth connection can degrade if you have abarrier (wall, door, window), large metal object, or other electronic devices between your phone and theconnected device.
To connect a mobile device or headset to your phone with Bluetooth, start by pairing the device with yourphone. You can pair up to 50 mobile devices and Bluetooth headsets with the phone.
After the headset or mobile device is paired, the phone connects to the headset or mobile device when theheadset or mobile device is turned on.
When you use a Bluetooth headset and mobile devices with your phone, keep these things in mind:
• The last Bluetooth headset or mobile device connected with the phone is the default device that the phoneuses.
• You can connect one mobile device (phone or tablet) and one Bluetooth headset at the same time.
• The phone can connect to only one paired mobile device at a time. If your mobile phone is connectedand you turn on your tablet, the tablet connects to the phone and the mobile phone disconnects.
• When your Bluetooth headset and your mobile device are connected to the phone, you cannot use theBluetooth headset to answer desk phone calls from the mobile device.
Related TopicsBluetooth Headsets, on page 99Pair a Mobile Device with Your Desk Phone, on page 58The Cisco IP Phone 8800 Series, on page 1
Accessibility Features for the Cisco IP Phone 8800 SeriesThe Cisco IP Phones 8811, 8841, 8845, 8851, 8851NR, 8861, and 8865 provide accessibility features for theblind, and the visually, hearing, and mobility impaired. Because many of these features are standard, they canbe used by users with disabilities without requiring any special configuration.
In this document, the term phone support pages refers to the web pages that users can access to set up certainfeatures. For Cisco Unified Communications Manager (Release 10.0 and later), these pages are the Self CarePortal. For Cisco Unified CommunicationsManager (Release 9.1 and earlier), these pages are the User Optionsweb pages.
For additional information, see the phone User Guide, located here: http://www.cisco.com/c/en/us/support/collaboration-endpoints/unified-ip-phone-8800-series/products-user-guide-list.html
Cisco is committed to designing and delivering accessible products and technologies to meet the needs ofyour organization. You can find more information about Cisco and its commitment to accessibility at thisURL: http://www.cisco.com/go/accessibility
Cisco IP Phone 8800 Series User Guide18
Your PhoneBluetooth and Your Phone
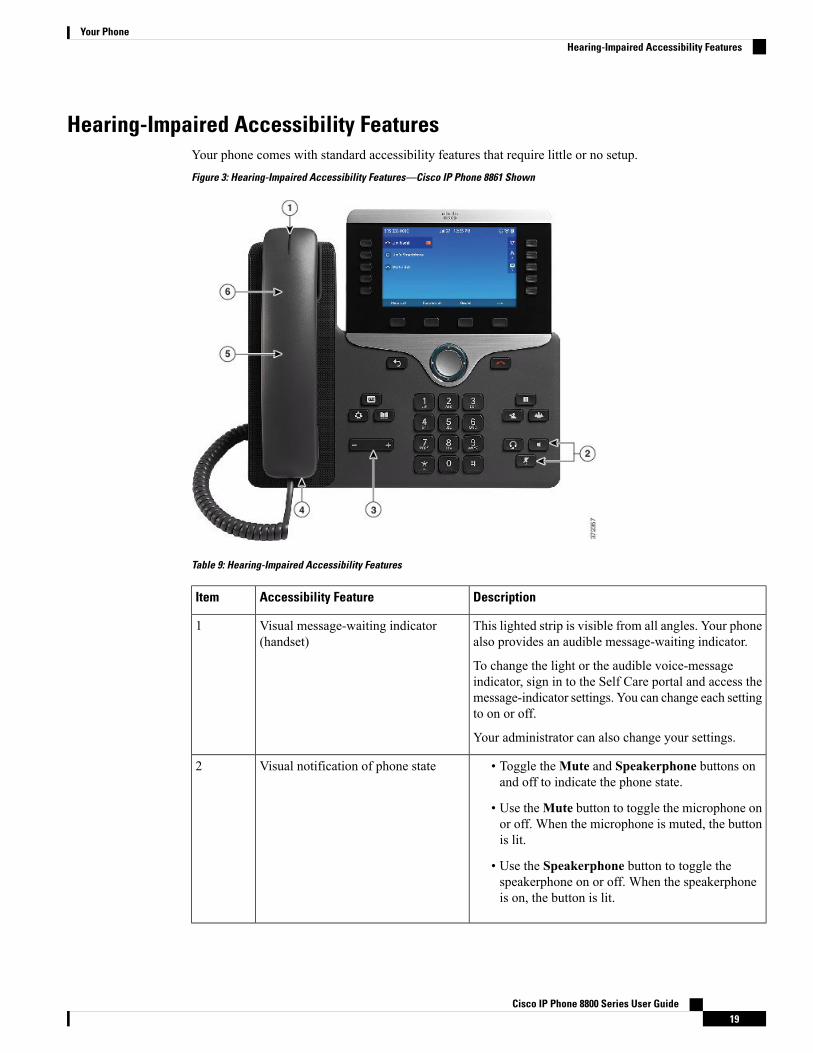
Hearing-Impaired Accessibility FeaturesYour phone comes with standard accessibility features that require little or no setup.Figure 3: Hearing-Impaired Accessibility Features—Cisco IP Phone 8861 Shown
Table 9: Hearing-Impaired Accessibility Features
DescriptionAccessibility FeatureItem
This lighted strip is visible from all angles. Your phonealso provides an audible message-waiting indicator.
To change the light or the audible voice-messageindicator, sign in to the Self Care portal and access themessage-indicator settings. You can change each settingto on or off.
Your administrator can also change your settings.
Visual message-waiting indicator(handset)
1
• Toggle theMute and Speakerphone buttons onand off to indicate the phone state.
• Use theMute button to toggle the microphone onor off. When the microphone is muted, the buttonis lit.
• Use the Speakerphone button to toggle thespeakerphone on or off. When the speakerphoneis on, the button is lit.
Visual notification of phone state2
Cisco IP Phone 8800 Series User Guide19
Your PhoneHearing-Impaired Accessibility Features
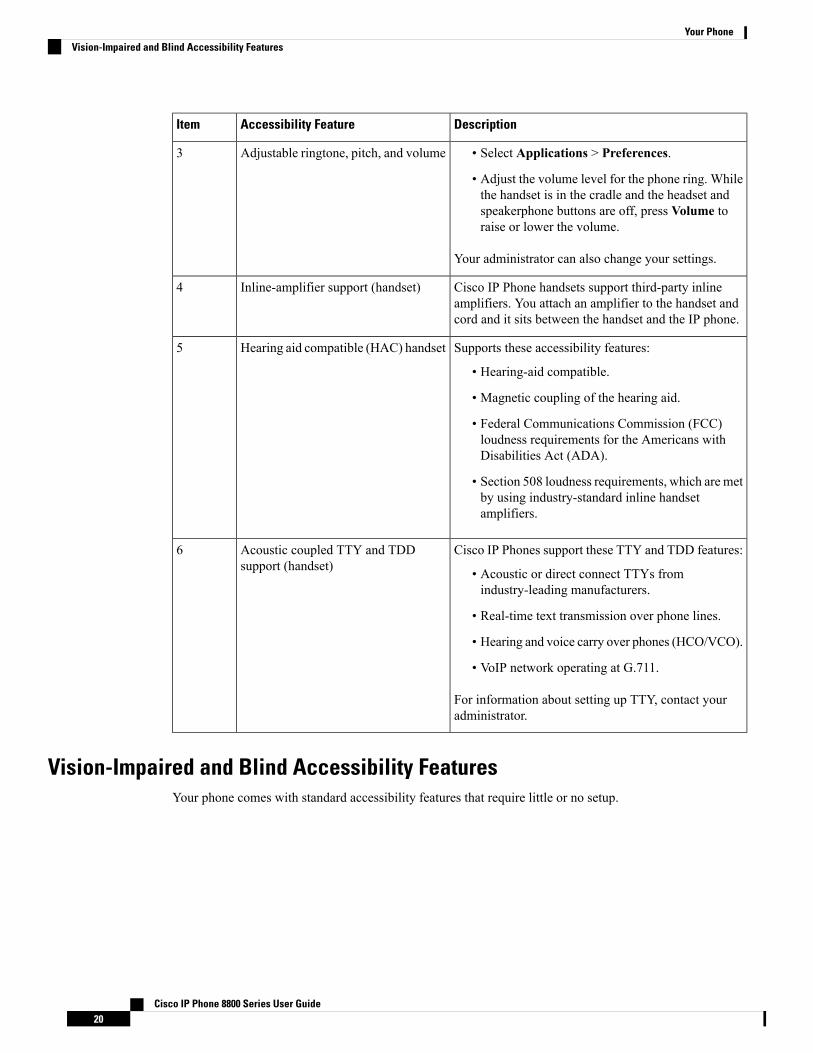
DescriptionAccessibility FeatureItem
• Select Applications > Preferences.
• Adjust the volume level for the phone ring. Whilethe handset is in the cradle and the headset andspeakerphone buttons are off, press Volume toraise or lower the volume.
Your administrator can also change your settings.
Adjustable ringtone, pitch, and volume3
Cisco IP Phone handsets support third-party inlineamplifiers. You attach an amplifier to the handset andcord and it sits between the handset and the IP phone.
Inline-amplifier support (handset)4
Supports these accessibility features:
• Hearing-aid compatible.
• Magnetic coupling of the hearing aid.
• Federal Communications Commission (FCC)loudness requirements for the Americans withDisabilities Act (ADA).
• Section 508 loudness requirements, which are metby using industry-standard inline handsetamplifiers.
Hearing aid compatible (HAC) handset5
Cisco IP Phones support these TTY and TDD features:
• Acoustic or direct connect TTYs fromindustry-leading manufacturers.
• Real-time text transmission over phone lines.
• Hearing and voice carry over phones (HCO/VCO).
• VoIP network operating at G.711.
For information about setting up TTY, contact youradministrator.
Acoustic coupled TTY and TDDsupport (handset)
6
Vision-Impaired and Blind Accessibility FeaturesYour phone comes with standard accessibility features that require little or no setup.
Cisco IP Phone 8800 Series User Guide20
Your PhoneVision-Impaired and Blind Accessibility Features

Figure 4: Vision-Impaired and Blind Accessibility Features—Cisco IP Phone 8861 Shown
Table 10: Vision-Impaired and Blind Accessibility Features
DescriptionAccessibility FeatureItem
Alerts you to an incoming call. The handset light stripflashes during incoming calls and stays lit when avoicemail message is received.
High-contrast visual and audiblealert of an incoming call
1
Cisco IP Phone 8800 Series User Guide21
Your PhoneVision-Impaired and Blind Accessibility Features

DescriptionAccessibility FeatureItem
Use line buttons to start, answer, or switch to a call on aparticular line.
Features, such as speed dial, line status, privacy, do notdisturb (DND), and service URLs, can be assigned tofeature buttons.
Your administrator sets up programmable feature buttonson your phone.
Use session buttons to perform tasks, such as answeringa call or resuming a held call.
Colors indicate your phone's status:
• Green, steady—Active call or two-way intercomcall.
• Green, flashing—Held call.
• Amber, steady—Privacy in use, one-way intercomcall, DND active, or signed in to a hunt group.
• Amber, flashing—Incoming call or reverting call.
• Red, steady—Remote line in use (shared line or linestatus).
• Red, flashing—Remote line on hold.
Line, feature, and session buttonson the Cisco IP Phone
• Line and feature buttons areto the left of the LCD.Session buttons are to theright of the LCD.
• For locales that read right toleft, such as Arabic, sessionbuttons are on the left and theline and feature buttons areon the right.
2
Allows you to adjust your phone screen's brightness.Back-lit color LCD screen on theCisco IP Phone
• The Cisco IP Phone 8811 hasa grayscale LCD withadjustable contrast.
3
Provide access to special functions. The functions aredisplayed on the LCD.
Softkeys
• These are large buttons justbelow the LCD.
4
Use the Navigation ring to move up, down, left, and rightin the phone LCD. The Select button is in the center ofthe Navigation cluster.
Use the Back button to return to the previous screen ormenu.
Use theRelease (EndCall) button to end a call or session.
Navigation Cluster (includes theNavigation ring and the Selectbutton)
• The Navigation cluster islocated just above the keypad.
• Back button to the left of theNavigation cluster
• Release button to the right ofthe Navigation cluster
5
Cisco IP Phone 8800 Series User Guide22
Your PhoneVision-Impaired and Blind Accessibility Features

DescriptionAccessibility FeatureItem
Allow you to easily access your messages, applications,and contacts.
Messages button, Applicationsbutton, and Contacts button
• These three large buttons arelocated to the left of thekeypad.
• In this group of buttons, theMessages button is the singlebutton in the top row. BelowtheMessages button, theApplications button is on theleft, and the Contacts buttonis on the right.
6
Allow you to use these functions on your phone.Hold button,Transfer button, andConference button
• These three large buttons arelocated to the right of thekeypad.
• In this group, theHold buttonis the single button in the toprow. Below the Hold button,the Transfer button is on theleft, and the Conferencebutton is on the right.
7
Allows you to increase or decrease the ring volume or thesound through the handset, headset, or speakerphone.
Press the right side of the rocker key to increase thevolume; press the left side of the rocker key to decreasethe volume.
Volume key
• This key is located at thebottom left of the phone.
8
Allows you to use existing or familiar key positions. Key5 has a nib.
Standard 12-key layout9
Cisco IP Phone 8800 Series User Guide23
Your PhoneVision-Impaired and Blind Accessibility Features

DescriptionAccessibility FeatureItem
Provide audible notification of the phone state:
• Toggle the Headset,Mute, and Speakerphonebuttons on and off to indicate the phone state.
• Use the Headset button to toggle the headset on oroff. When the headset is on, the button is lit.
• Use theMute button to toggle the microphone on oroff. When the microphone is muted, the button is lit.When you turn on Mute, your phone beeps once;when you turn off Mute, your phone beeps twice.
• Use the Speakerphone button to toggle thespeakerphone on or off. When the speakerphone ison, the button is lit.
Headset, Speakerphone, andMute buttons
• These buttons are located onthe bottom right of the phone.
• In this group, theMutebutton is the single button inthe bottom row. Above theMute button, the Headsetbutton is on the left, and theSpeakerphone button is onthe right.
10
Adjustable Footstand
You can adjust the footstand to provide optimum phone display viewing and easy access to all buttons andkeys.
Voice FeedbackVoice Feedback helps people who have trouble seeing use their Cisco IP phone.When enabled, a voice prompthelps you navigate your phone buttons, and to use and configure phone features. The voice also reads outincoming Caller IDs, displayed screens and settings, and button functions.
A few important items to keep in mind as you use this feature.
• Voice Feedback is enabled and disabled with the Select button that is located in the center of the Navigationcluster. When the phone is idle, quickly tap Select three times to turn this feature on or off. A voiceprompt alerts you to the feature status.
• Push a softkey once, and Voice Feedback reads out the feature that is associated with the key. Quicklypush the softkey twice to execute the feature.
• Hardkeys such as the Contacts, Applications, andMessages buttons are treated differently. Push a hardkeyonce, and a voice reads out the screen name followed by the application or setting this is displayed onthe phone.
Volume is adjusted with the Volume button. To adjust your handset volume, lift the receiver from the cradle,and press Volume. If you use a headset, select the Headset button, and then Volume. If you use thespeakerphone, select Speakerphone and Volume.
You may not hear Voice Feedback if you select the Headset button, but don't have a connected headset. SelectSpeakerphone and you hear Voice Feedback again.
When on a call, only you hear Voice Feedback so your privacy is assured. Voice Feedback is only availablefor English language users. If this feature is not available to you, then it is disabled on your phone.
Related TopicsEnable Voice Feedback from Accessibility, on page 86
Cisco IP Phone 8800 Series User Guide24
Your PhoneVoice Feedback
Adjust Voice Speed, on page 86
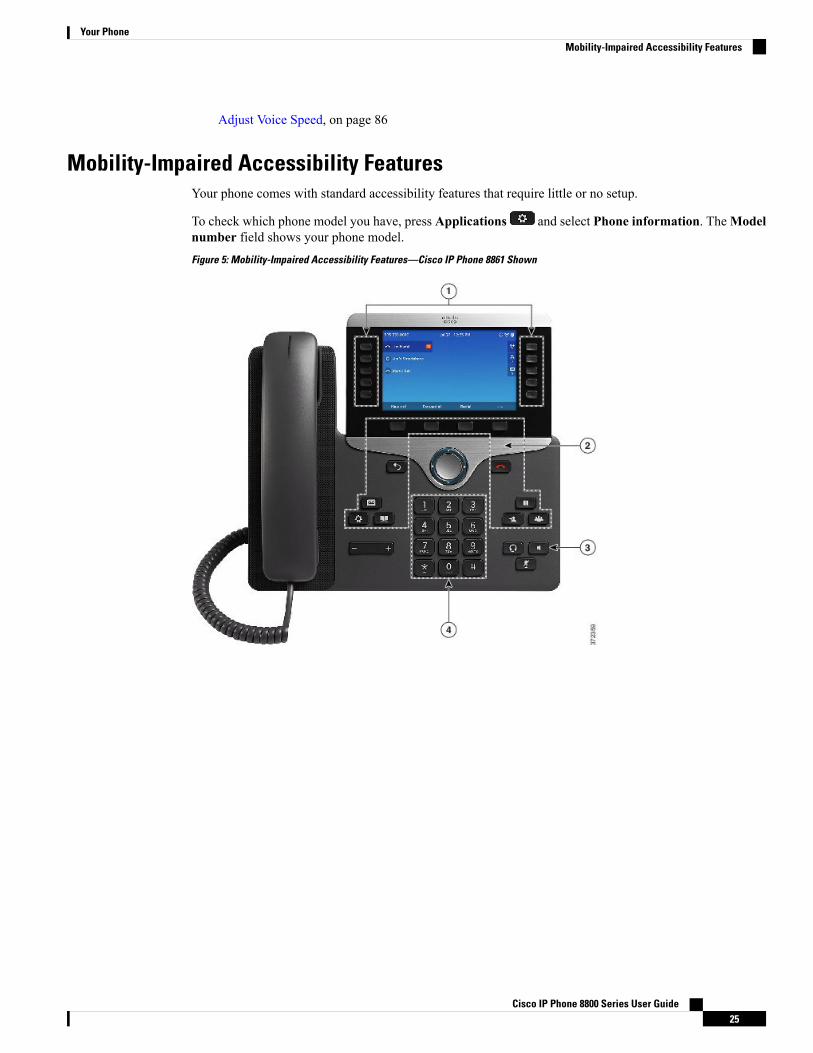
Mobility-Impaired Accessibility FeaturesYour phone comes with standard accessibility features that require little or no setup.
To check which phone model you have, press Applications and select Phone information. TheModelnumber field shows your phone model.Figure 5: Mobility-Impaired Accessibility Features—Cisco IP Phone 8861 Shown
Cisco IP Phone 8800 Series User Guide25
Your PhoneMobility-Impaired Accessibility Features

Table 11: Mobility-Impaired Accessibility Features
DescriptionAccessibility FeatureItem
Allow you to access the following features:
• Phone lines and intercom lines (line buttons)
• Speed-dial numbers (speed-dial buttons,including the speed-dial line status feature)
• Web-based services, such as a personal addressbook
• Phone features, such as privacy
Indicate your phone's status:
• Green, steady—Active call or two-wayintercom call
• Green, flashing—Held call
• Amber, steady—Privacy in use, one-wayintercom call, DND active, or signed in to huntgroup
• Amber, flashing—Incoming call or revertingcall
• Red, steady—Remote line in use (shared lineor Line Status)
Lighted buttons1
Allow you to easily access your phone applications,voice messages, corporate and personal directories,and calling features.
Large buttons to access Applications,Messages, Contacts, Hold, Transfer,and Conference
2
Indicates whether the speakerphone is on or off.When the speakerphone is on, the button is lit.
Built-in speakerphone3
Allow you to easily locate your phone's keys. Forexample, Key 5 has a nib, which you can use tolocate other key positions.
Tactile-discernible buttons andfunctions, including a nib on Key 5
4
Cisco IP Phone 8800 Series Wall Mount Kit AccessibilityThe Cisco IP Phone 8800 Series phones can be mounted on a wall using one of the following wall mount kits:
• Wallmount Kit for Cisco IP Phone 8800 Series—used to mount a single phone on the wall.
• Wallmount Kit for Cisco IP Phone 8800 Series with single KEM—used to mount a single phone withone attached key expansion module on a wall.
• Wallmount Kit for Cisco IP Phone 8800 Video Series—used to mount a single video phone on the wall.
Cisco IP Phone 8800 Series User Guide26
Your PhoneCisco IP Phone 8800 Series Wall Mount Kit Accessibility
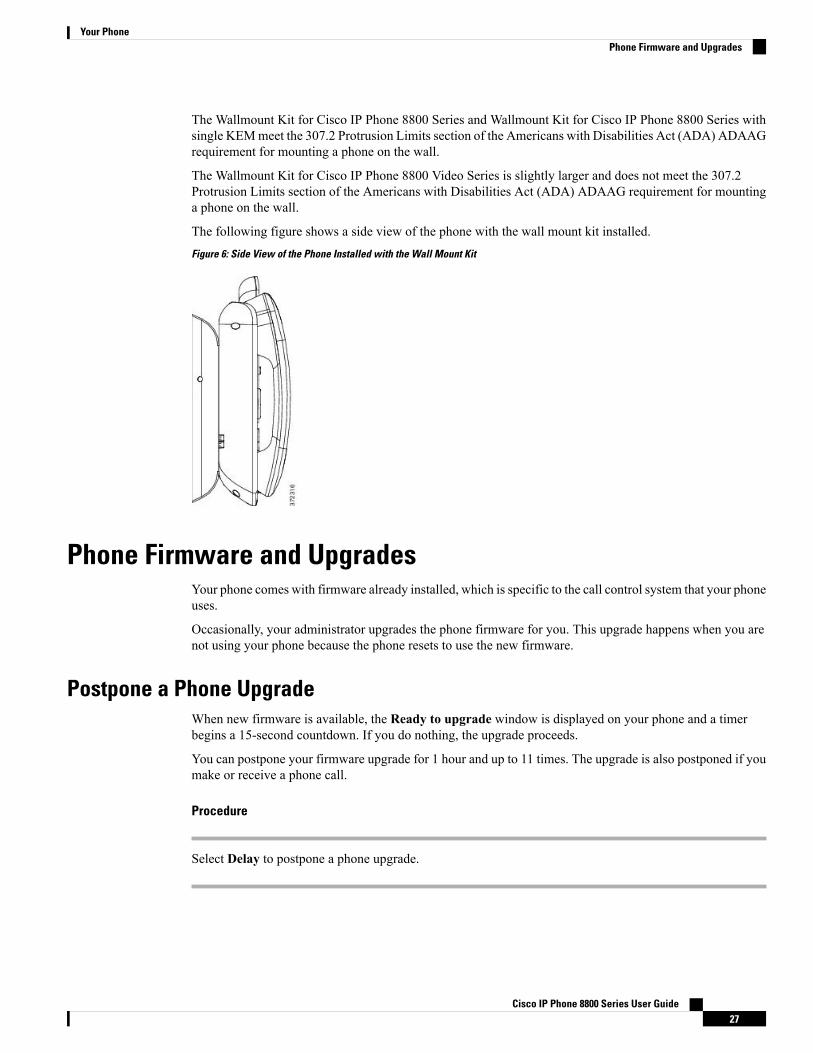
The Wallmount Kit for Cisco IP Phone 8800 Series and Wallmount Kit for Cisco IP Phone 8800 Series withsingle KEMmeet the 307.2 Protrusion Limits section of the Americans with Disabilities Act (ADA) ADAAGrequirement for mounting a phone on the wall.
The Wallmount Kit for Cisco IP Phone 8800 Video Series is slightly larger and does not meet the 307.2Protrusion Limits section of the Americans with Disabilities Act (ADA) ADAAG requirement for mountinga phone on the wall.
The following figure shows a side view of the phone with the wall mount kit installed.Figure 6: Side View of the Phone Installed with the Wall Mount Kit
Phone Firmware and UpgradesYour phone comes with firmware already installed, which is specific to the call control system that your phoneuses.
Occasionally, your administrator upgrades the phone firmware for you. This upgrade happens when you arenot using your phone because the phone resets to use the new firmware.
Postpone a Phone UpgradeWhen new firmware is available, the Ready to upgrade window is displayed on your phone and a timerbegins a 15-second countdown. If you do nothing, the upgrade proceeds.
You can postpone your firmware upgrade for 1 hour and up to 11 times. The upgrade is also postponed if youmake or receive a phone call.
Procedure
Select Delay to postpone a phone upgrade.
Cisco IP Phone 8800 Series User Guide27
Your PhonePhone Firmware and Upgrades
View the Progress of a Phone Firmware UpgradeDuring a phone firmware upgrade, you can view the upgrade progress.
Procedure
Step 1 Press Applications .Step 2 Select Phone information > Show detail.Step 3 Press Exit.
Energy SavingsYour administrator can reduce the amount of power your phone screen uses when you're not using your phone.
Your administrator can set up these energy-saving levels on your phone:
• Power Save—The backlight or screen turns off when the phone is inactive for a set interval.
• Power Save Plus—Your phone screen turns on and off at times that are based on your work schedule. Ifyour work hours or work days change, you can contact your administrator to reconfigure your phone.
For example, your administrator can set your phone to alert you 10 minutes before it turns off. You see theSelect button light up and you get a message that your phone is turning off soon. You get notifications at theseintervals:
• Four rings at 10 minutes before power off
• Four rings at 7 minutes before power off
• Four rings at 4 minutes before power off
• 15 rings at 30 seconds before power off
If your phone is active, it waits until it has been inactive for a set interval before it notifies you of the pendingpower shutdown.
Turn On Your PhoneWhen your phone turns off to save energy, the phone screen is blank and the Select button lights up.
Procedure
Press Select to turn your phone back on.
Cisco IP Phone 8800 Series User Guide28
Your PhoneView the Progress of a Phone Firmware Upgrade

Phone Line ModesYour phone can be set up in one of these modes:
• Normal line mode—In this mode, the buttons to the left and right of the screen have different functions.Usually, the left buttons are the line buttons and the right buttons are the feature buttons. The line andfeature buttons are reversed for locales that read from right to left. This mode is also known as sessionline mode.
• Enhanced line mode—In this mode, the buttons on the left and right of the screen can be set up as linebuttons. This mode increases the number of phone lines that you can see and use. You see an alert foran incoming call.
Normal Line ModeWhen your phone is set up for normal (Session) line mode, you interact with the phone in these ways:
• Use the New call window to place a call.
• Select Answer to answer a call, unless your phone is set up for an Incoming Call alert. If your phone isset up for an Incoming Call alert, select Answer, Decline, or Ignore.
• Five line keys are available. If your phone is connected to your mobile device or tablet with Bluetooth,only four line keys are available.
Enhanced Line ModeWhen your phone is set up for Enhanced Line mode, you interact with the phone in these ways:
• Select a phone line and enter the phone number to make calls. The Recents list displays phone numberssimilar to the number being dialed.
• Select Answer, Decline, or Ignore to answer calls.
• Ten line keys are available.
You can see your missed calls by selecting a line key to view the missed calls for that line in the callwindow. The missed call counter clears when you return to the idle screen.
If you use Enhanced line mode and have Actionable Incoming Call Alert disabled, you will see the line labeldisplay the following information for incoming calls:
• To—The line receiving the call.
• From—The line that is used to make the call.
Forwarded calls are also identified.
This action occurs on the Cisco IP Phone 8800 Series phone, as well as the Cisco IP Phone 8851/8861 KeyExpansion Module and the Cisco IP Phone 8865 Key Expansion Module.
Cisco IP Phone 8800 Series User Guide29
Your PhonePhone Line Modes
Additional Help and InformationIf you have questions about the functions available on your phone, contact your administrator.
The Cisco website (https://www.cisco.com) contains more information about the phones and call controlsystems.
• For quick start guides and end-user guides in English, follow this link:
https://www.cisco.com/c/en/us/support/collaboration-endpoints/unified-ip-phone-8800-series/products-user-guide-list.html
• For guides in languages other than English, follow this link:
https://www.cisco.com/c/en/us/support/collaboration-endpoints/unified-ip-phone-8800-series/tsd-products-support-translated-end-user-guides-list.html
• For licensing information, follow this link:
https://www.cisco.com/c/en/us/support/collaboration-endpoints/unified-ip-phone-8800-series/products-licensing-information-listing.html
Accessibility FeaturesCisco IP Phones provide accessibility features for the vision impaired, the blind, and the hearing and mobilityimpaired.
For detailed information about the accessibility features on these phones, see http://www.cisco.com/c/en/us/support/collaboration-endpoints/unified-ip-phone-8800-series/products-technical-reference-list.html.
You can also find more information about accessibility at this Cisco website:
http://www.cisco.com/web/about/responsibility/accessibility/index.html
TroubleshootingYou may experience issues related to the following scenarios:
• Your phone cannot communicate with the call control system.
• The call control system has communication or internal problems.
• Your phone has internal problems.
If you experience problems, your administrator can help troubleshoot the root cause of the problem.
Find Information About Your PhoneYour administrator may ask for information about your phone. This information uniquely identifies the phonefor troubleshooting purposes.
Cisco IP Phone 8800 Series User Guide30
Your PhoneAdditional Help and Information

Procedure
Step 1 Press Applications .Step 2 Select Phone information.Step 3 (Optional) Press Show detail to view the active load information.Step 4 Press Exit.
Report Call Quality IssuesYour administrator may temporarily configure your phone with the Quality Reporting Tool (QRT) totroubleshoot performance problems. Depending on the configuration, use the QRT to:
• Immediately report an audio problem on a current call.
• Select a general problem from a list of categories and choose reason codes.
Procedure
Step 1 Press Report quality.Step 2 Scroll and select the item that closely matches your problem.Step 3 Press the Select softkey to send the information to your system administrator.
Report All Phone IssuesYou can use the Cisco Collaboration Problem Report Tool (PRT) to collect and send phone logs, and to reportproblems to your administrator. If you see a message that the PRT upload has failed, the problem report issaved on the phone and you should alert your administrator.
Procedure
Step 1 Press Applications .Step 2 Select Phone information > Report problem.Step 3 Enter the date and time that you experienced the problem in the Date of problem and Time of problem fields.Step 4 Select Problem description.Step 5 Select a description from the displayed list, then press Submit.
Lost Phone ConnectivitySometimes your phone can lose its connection to the call control system. When this connection is lost, yourphone displays a message.
Cisco IP Phone 8800 Series User Guide31
Your PhoneReport Call Quality Issues

If you are on an active call when the connection is lost, the call continues. However, you do not have accessto all normal phone functions because some functions require information from the call control system. Yoursoftkeys might not work as you expect.
When the phone reconnects to the call control system, you'll be able to use your phone normally again.
Cisco One-Year Limited Hardware Warranty TermsSpecial terms apply to your hardware warranty and services that you can use during the warranty period.
Your formalWarranty Statement, including the warranties and license agreements applicable to Cisco software,is available on Cisco.com at this URL: https://www.cisco.com/go/hwwarranty.
Cisco IP Phone 8800 Series User Guide32
Your PhoneCisco One-Year Limited Hardware Warranty Terms
C H A P T E R 2Calls
• Make Calls, on page 33• Answer Calls, on page 39• Video Calls, on page 43• Mute Your Call, on page 45• Hold Calls, on page 45• Forward Calls, on page 48• Transfer a Call to Another Person, on page 49• Conference Calls and Meetings, on page 49• Sign-in to a WebEx Meeting, on page 51• Intercom Calls, on page 51• Supervise and Record Calls, on page 52• Prioritized Calls, on page 53• Multiple Lines, on page 55• Mobile Devices and Your Desk Phone, on page 58
Make CallsYour phone works just like a regular phone. But we make it easier for you to make calls.
Make a CallUse your phone just like any other phone to make a call.
Procedure
Enter a number and pick up the handset.
Make a Call with the SpeakerphoneUse your speakerphone for hands-free calling. Keep in mind that your coworkers might be able to hear yourcall too.
Cisco IP Phone 8800 Series User Guide33

Procedure
Step 1 Enter a number using the keypad.
Step 2 Press Speakerphone .
Related TopicsHeadsets, on page 91
Make a Call with a HeadsetUse your headset for hands-free calling that won't disturb your coworker and gives you some privacy.
Procedure
Step 1 Plug in a headset.Step 2 Enter a number using the keypad.
Step 3 Press Headset .
Make a Call with a Phone or Video AddressSometimes, instead of just having someone’s phone number, you might also have a phone or video addressthat you can use to place the call instead.
This address might look like an email address, such as [email protected], or it might containnumbers like [email protected].
If you and the person you're calling have video phones, you'll be able to see each other.
Procedure
Step 1 Press New call.Step 2 Press ABC and you’ll be able to enter text using the keypad.Step 3 Press a number on the keypad to see the available options, and then press the number again to move through
the choices.
For example, press the number 1 three times to enter the @ symbol.
Step 4 Press Call.
Redial a NumberYou can call the most recently dialed phone number.
Cisco IP Phone 8800 Series User Guide34
CallsMake a Call with a Headset
Procedure
Step 1 (Optional) Select a line.Step 2 Press Redial.
Speed DialYou can assign buttons or codes to quickly dial the numbers of people you call often. Before you can usespeed-dial features on your phone, set up speed dial in the Self Care portal.
Depending on your setup, your phone can support these features:
• Speed-dial buttons—Dial a phone number from one or more line buttons set up for speed dialing.
• Speed-dial codes—Dial a phone number from a code (sometimes referred to as abbreviated dialing).
Related TopicsSelf Care Portal, on page 11Speed-Dial Numbers, on page 12
Make a Call with a Speed-Dial Button
To check which phone model you have, press Applications and select Phone information. TheModelnumber field shows your phone model.
You can see only as many speed-dial numbers as you have speed-dial buttons. For example, you add 15speed-dial numbers in the Self Care portal but your phone has five speed-dial buttons. You can see only thefirst five speed-dial numbers from the list of speed-dial numbers in your Self Care portal.
When you add features to your phone, some features require a line button. But each line button on your phonecan support only one function (a line, a speed dial, or a feature). If your phone's line buttons are already inuse, your phone won't display any additional features.
You can see all the speed-dial numbers that you add in the Self Care portal. Use the up and down buttons inthe navigation cluster to scroll through your speed-dial numbers, then select a speed-dial number.
You can see all the speed-dial numbers that you add in the Self Care portal. Use the down button in thenavigation cluster to scroll through your speed-dial numbers, then select a speed-dial number.
Before you begin
Set up speed-dial codes in the Self Care portal.
Procedure
Press a speed-dial button .
Related TopicsSelf Care Portal, on page 11
Cisco IP Phone 8800 Series User Guide35
CallsSpeed Dial
Add a Speed Dial Button from Your PhoneYou can use your phone to configure a line key as a speed-dial button, if you cannot access the Self CarePortal. This method is quick way to add a favorite phone number as a speed-dial to your phone.
In addition to being supported on the Cisco IP Phones 8800 Series, this method of adding speed-dial buttonsis supported on the following key expansion modules:
• Cisco IP Phone 8800 Key Expansion Module
• Cisco IP Phone 8851/8861 Key Expansion Module
• Cisco IP Phone 8865 Key Expansion Module
A Reset All clears any speed-dial buttons created from your phone.
Procedure
Step 1 Press and hold a line key for 2 seconds.The Define favorites screen displays.
Step 2 In the Name field, enter the name of the speed-dial number.Step 3 In the Number field, enter the phone number. Include all the digits required to complete the call.Step 4 Select Apply to save your speed-dial number.
Modify a Speed Dial Button from Your PhoneYou can use your phone to modify or edit a speed-dial button, if you cannot access the Self Care Portal. Butit does not apply to speed-dial buttons created from the Self Care Portal, or from the Cisco UnifiedCommunications Manager by your administrator.
Procedure
Step 1 Press and hold a line key for 2 seconds.The Define favorites screen displays.
Step 2 In the Name field, enter the new name of the speed-dial number, if required.Step 3 In the Number field, enter the new phone number, if required. Include all the digits required to complete the
call.Step 4 Select Apply to save your speed-dial number.
Delete a Speed Dial Button from Your PhoneYou can use your phone to delete a speed-dial button. This method only works if you added the speed-dialbuttons from the phone. It does not apply to speed-dial buttons added from the Self Care Portal, or from theCisco Unified Communications Manager by your administrator.
Cisco IP Phone 8800 Series User Guide36
CallsAdd a Speed Dial Button from Your Phone
Procedure
Step 1 Press and hold a line key for 2 seconds.The Define favorites screen displays.
Step 2 Select Delete.Step 3 Select Yes to confirm your choice.
Make a Call With a Speed-Dial Code
Before you begin
Set up speed-dial codes in the Self Care portal.
Procedure
Enter the speed-dial code and press Speed Dial.
Related TopicsSelf Care Portal, on page 11
Make a Call With a Fast-Dial Button
Before you begin
You need to set up the fast-dial codes in your personal directory.
Procedure
Step 1 Press Fast Dial.Step 2 Sign in to Personal Directory.Step 3 Select Personal Fast Dials.Step 4 Select a fast-dial code and then press the Dial softkey.
Related TopicsAssign a Fast-Dial Code to a Contact, on page 69
Dial an International NumberYou can dial international calls when you prefix the phone number with a plus (+) sign.
Cisco IP Phone 8800 Series User Guide37
CallsMake a Call With a Speed-Dial Code
Procedure
Step 1 Press and hold star (*) for at least 1 second.
The plus (+) sign is displayed as the first digit in the phone number.
Step 2 Enter the phone number.Step 3 Press Call or wait 10 seconds after the last key press to automatically place the call.
Get Notified When a Contact is AvailableIf you call someone and their line is busy or they do not answer, you can be notified with a special ringtoneand a message when they are available.
Procedure
Step 1 Press Callback while you are listening to the busy tone or ring sound.Step 2 Press Exit to exit the confirmation screen.Step 3 When you hear the ringtone that the person is available and see the message, pressDial to place the call again.
Calls That Require a Billing Code or Authorization CodeYour administrator may require that you enter a billing code or authorization code (or both codes) after youdial a phone number. The billing code, called a Client Matter Code, is used for accounting or billing purposes.The authorization code, called a Forced Authorization Code, controls access to certain phone numbers.
When a billing code is required, the phone displays Enter Client Matter Code, the dialed numberchanges to “********”, and you hear a special tone.
When an authorization code is required, the phone displays Enter Authorization Code, the dialednumber changes to “********”, and you hear a special tone. For security reasons, the phone displays a “*”instead of the number entered.
When both a billing code and an authorization code are required, you are prompted for the authorization codefirst. Then you are prompted for the billing code.
Related TopicsSpeed-Dial Numbers, on page 12
Secure CallsYour administrator can take steps to protect your calls from tampering by people outside your company.Whena lock icon is displayed on your phone during a call, your phone call is secure. Depending upon how yourphone is configured, you may have to sign on before you make a call or before a security tone plays over yourhandset.
Cisco IP Phone 8800 Series User Guide38
CallsGet Notified When a Contact is Available
Answer CallsYour Cisco IP Phone works just like a regular phone. But we make it easier for you to answer calls.
Answer a Call
Procedure
When your phone rings, press the flashing line button to answer the call.
Answer Call WaitingWhen you are on an active call, you know that a call is waiting when you hear a single beep and see the linebutton flash.
Procedure
Step 1 Press the line button.Step 2 (Optional) If you have more than one call waiting, select an incoming call.
Decline a CallYou can send a ringing call to your voicemail system or to a preset phone number.
Procedure
Decline a call by performing one of the following actions:
• Press Decline.• If you have multiple incoming calls, highlight the incoming call and press Decline.
Ignore a CallIf you do not want to be disturbed, you can ignore an incoming call. The call goes to voicemail.
Cisco IP Phone 8800 Series User Guide39
CallsAnswer Calls

Procedure
Ignore a call by performing one of the following actions:
• Select Ignore.• PressVolume down once to silence the incoming (ringing) call, and then let the incoming call go to yourvoicemail or to a preset phone number.
Turn On Do Not DisturbUse do not disturb (DND) to silence your phone and ignore incoming call notifications when you need toavoid distractions.
When you turn on DND, your incoming calls are forwarded to another number, such as your voicemail, if itis set up.
When DND is turned on, the header section of the phone screen changes color and Do not disturb isdisplayed on the phone screen.
When you turn on DND, it affects all lines on your phone. However, you will always receive intercom andemergency calls, even when DND is turned on.
If multilevel precedence and preemption (MLPP) is set up for your phone, priority calls will ring your phonewith a special ringtone, even when DND is turned on.
Procedure
Step 1 Press Do not disturb to turn on DND.Step 2 Press Do not disturb again to turn off DND.
Answer a Coworker's Phone (Call Pickup)If you share call handling tasks with your coworkers, you can answer a call that is ringing on a coworker’sphone. First, your administrator has to assign you to at least one call pickup group.
Answer a Call Within Your Group (Pickup)You can answer a call that rings on another phone within your call pickup group. If multiple calls are availablefor pickup, you'll answer the call that has been ringing for the longest time.
Procedure
Step 1 (Optional) Press the line button.Step 2 Press PickUp to transfer an incoming call within your pickup group to your phone.
Cisco IP Phone 8800 Series User Guide40
CallsTurn On Do Not Disturb
Step 3 Press Answer to connect to the call when the call rings.
Answer a Call from Another Group (Group Pickup)Group pickup allows you to answer a call on a phone that is outside your call pickup group. You can use thegroup pickup number to pick up the call, or you can use the number of the phone line that is ringing.
Procedure
Step 1 (Optional) Press the line button.Step 2 Press Group PickUp.Step 3 Do one of the following actions:
• Enter the number of the phone line with the call that you want to pick up.
For example, if the call is ringing on line 12345, enter 12345.
• Enter the group pickup number.
Step 4 Press Answer to connect to the call when the call rings.
Answer a Call From an Associated Group (Other Pickup)
Procedure
Step 1 (Optional) Press the line button.Step 2 Press PickUp to answer a call in your pickup group or in a group that is associated with your phone.Step 3 If the call rings, press Answer to connect to the call when the call rings.
Answer a Call Within Your Hunt GroupHunt groups, also known as line groups, allow organizations that receive many incoming calls to share thecall load. Your administrator sets up a hunt group with a series of directory numbers. Phones ring based onthe hunt sequence that your administrator specifies for a hunt group. If you are a member of a hunt group,you sign in to a hunt group when you want to receive calls. You sign out of the group when you want toprevent calls from ringing on your phone.
Before you begin
You must be signed into the hunt group to receive hunt group calls.
Cisco IP Phone 8800 Series User Guide41
CallsAnswer a Call from Another Group (Group Pickup)

Procedure
When a hunt group call rings on your phone, answer the call.
Sign In and Out of a Hunt GroupSign out of your hunt group to stop receiving calls from it. You continue receiving calls placed directly toyou.
Procedure
Step 1 Press Hunt Group to sign in.Step 2 Press Hunt Group again to sign out.
View the Call Queue in a Hunt GroupYou can use the queue statistics to check the status of the hunt group queue. The queue status display providesthe following information:
• The phone number used by the hunt group
• Number of queued callers on each hunt group queue
• Longest waiting time
Procedure
Step 1 Press Queue Status.Step 2 Press Update to refresh the statistics.Step 3 Press Exit.
Answer Calls AutomaticallyIf your phone is set up to answer calls automatically, you don't do anything when your phone rings. After onering, you're automatically connected to the call using the speakerphone.
If you prefer to use your headset to answer the call, set up your headset first.
If you automatically answer calls on your speakerphone and you change the call to the headset, your nextincoming call automatically answers on the headset. If you automatically answer calls on your headset andyou change the call to the speakerphone, your next incoming call automatically rings on the speakerphone.Automatic answer ensures that the call is answered; it does not change the location you used for the previouscall.
Cisco IP Phone 8800 Series User Guide42
CallsSign In and Out of a Hunt Group

Procedure
Step 1 Connect your headset to your phone.
Step 2 Make sure that the Headset button lights up.Step 3 When your phone automatically answers the incoming call, talk to the caller using your headset.
If you don't want to use your headset anymore, press the Headset button to turn it off, and use the handset orspeakerphone instead.
Related TopicsHeadsets, on page 91
Trace a Suspicious CallIf you receive unwanted or harassing calls, use malicious call identification (MCID) to alert your administrator.Your phone sends a silent notification message to your administrator with information about the call.
Procedure
Press Report caller.
Video CallsCisco IP Phones 8845, 8865, and 8865NR support video calls with a built-in video camera.
You can make an audio call into a video call by opening your camera shutter.
Related TopicsVideo Settings, on page 84
Make a Video CallCisco IP Phones 8845, 8865, and 8865NR support video calls as long as the person you're calling also has avideo phone. The ring on the outside of the camera controls the shutter.
Procedure
Step 1 Turn the ring around the camera clockwise to open the shutter.Step 2 (Optional) Press Self-view and move the camera up and down to improve the perspective.Step 3 Make your call.
Cisco IP Phone 8800 Series User Guide43
CallsTrace a Suspicious Call

Stop Your VideoWhen you are on a video call, you can stop the camera from sending video. The ring on the outside of thecamera controls the shutter. When you close the shutter, the person you're talking to won't see you anymore,but they'll still be able to hear you.
If you close the shutter, you will continue receiving video from the other party on the call.
If both people on a call close their camera shutters, the call becomes an audio call.
Procedure
Step 1 Turn the shutter ring counterclockwise to close the camera shutter and stop sharing your video.Step 2 Turn the shutter ring clockwise to open the video camera shutter and share your video again.
Toggle Between Phone and Video DisplayIf you need to see your phone's desktop while you're on a video call, you can easily switch between the videoand the desktop. When you hide the video, it blurs and moves to the background.
Procedure
Step 1 Press Hide video to hide the video.Step 2 Press Show video to show the video.
Adjust the Picture-In-Picture PositionWhen you are on a video call, you can view your incoming and your outgoing video at the same time, whichis known as Picture-in-Picture (PiP). Typically, the incoming video displays on the full screen and a smallinset screen shows the video from your camera.
When PiP is on, you can move the inset picture to a different quadrant of the screen. You can also change theview so that your camera video displays on the full screen and the inset displays the incoming video.
Procedure
Step 1 Press PiP to turn on PiP.Step 2 Press PiP again to move the PiP window counter-clockwise around your phone screen.
When the window returns to the default lower right position, PiP automatically turns off.
Step 3 (Optional) Press Swap to toggle between the full-screen view and the PiP view.
Cisco IP Phone 8800 Series User Guide44
CallsStop Your Video
Video Calls and SecurityYour administrator can take steps to protect your video calls from tampering by people outside your company.If you see the Secure icon displayed during a video call, your administrator has taken steps to ensure yourprivacy.
Related TopicsSecure Calls, on page 38
Mute Your CallWhile you are on a call, you can mute the audio, so that you can hear the other person, but they cannot hearyou.
If you have a video phone, when you mute your audio, your camera continues to transmit video.
Procedure
Step 1 PressMute .Step 2 PressMute again to turn mute off.
Hold Calls
Put a Call on HoldYou can put an active call on hold and then resume the call when you're ready. When you place a video callon hold, video transmission is blocked until you resume the call.
Procedure
Step 1 Press Hold .Step 2 To resume a call from hold, press Hold again.
Answer a Call Left on Hold for Too LongWhen you've left a call on hold too long, you'll be notified with these cues:
• Single ring, repeating at intervals
• Flashing amber line button
• Flashing message indicator on the handset
Cisco IP Phone 8800 Series User Guide45
CallsVideo Calls and Security
• Visual notification on the phone screen
Procedure
Press the flashing amber line button or Answer to resume the held call.
Swap Between Active and Held CallsYou can easily switch between active and held calls.
Procedure
Press Swap to switch to the held call.
Call ParkYou can use your phone to park a call. You can then retrieve the call either from your phone or another phone,such as a phone at a coworker’s desk or in a conference room.
There are two ways you can park a call: call park and directed call park. You'll only have one type of callpark available on your phone.
A parked call is monitored by your network so you won't forget about it. If the call remains parked for toolong, you hear an alert. You can then answer, decline to answer, or ignore the call on your original phone.You can also continue retrieving it from another phone.
If you don't answer the call within a certain length of time, it's routed to voicemail or another destination, asset by your administrator.
A parked call occupies one line.
Place a Call on Hold with Call ParkYou can park an active call that you answered on your phone and then use another phone in the call controlsystem to retrieve the call.
You can park only one call at the call park number.
Before you begin
Your call must be active.
Procedure
Step 1 Press Park, and then hang up.
Cisco IP Phone 8800 Series User Guide46
CallsSwap Between Active and Held Calls

Your phone displays the number where the system parked the call. The parked call is put on hold, and youcan press Resume to resume the call on your phone.
Step 2 (Optional) Communicate the parked number to the person who needs to answer the call.
Retrieve a Call on Hold with Call ParkYou can pick up a parked call from anywhere in your network.
Before you begin
You need the number that was used to park the call.
Procedure
Enter the number where the call is parked to retrieve the call.
Place a Call on Hold with Assisted Directed Call ParkYou can park and retrieve an active call using a dedicated call park number. Using assisted directed call park,you use a button to park an active call. Your administrator sets up the button as a speed-dial line. With thistype of directed call, you can use line status indicators to monitor the status of the line (in-use or idle).
Procedure
Press BLF Directed Call Park on a line that displays an idle line status indicator for an assisted directed callpark.
Retrieve a Call on Hold with Assisted Directed Call Park
Procedure
Press BLF Directed Call Park.
Place a Call on Hold with Manual Directed Call ParkYou can park and retrieve an active call using a dedicated call park number. Using manual directed call park,you transfer an active call to a directed call park number, which your administrator sets up.
Cisco IP Phone 8800 Series User Guide47
CallsRetrieve a Call on Hold with Call Park

Procedure
Step 1 Press Transfer .Step 2 Required: Enter the directed call park number.Step 3 Required: Press Transfer again to park the call.
Retrieve a Call on Hold with Manual Directed Call ParkYou can pick up a call that was parked to a dedicated call park number.
Before you begin
You need the directed call park number and the park retrieval prefix.
Procedure
Step 1 Dial the park retrieval prefix.Step 2 Dial the directed call park number.
Forward CallsYou can forward calls from any line on your phone to another number. Call forward is phone-line specific.If a call reaches you on a line where call forwarding is not enabled, the call rings as usual.
There are two ways of forwarding your calls:
• Forward all calls
• Forward calls in special situations, such as when the phone is busy or there is no answer.
When a line is forwarded, you see the Forward all icon with the line.
Procedure
Step 1 When the line to be forwarded is inactive, press Fwd All.Step 2 Enter the call forward target number exactly as you would dial it from your phone, or select an entry from
your list of recent calls.
Related TopicsSelf Care Portal, on page 11
Cisco IP Phone 8800 Series User Guide48
CallsRetrieve a Call on Hold with Manual Directed Call Park
Transfer a Call to Another PersonWhen you transfer a call, you can stay on the original call until the other person answers. This way, you cantalk privately with the other person before you remove yourself from the call. If you don't want to talk, transferthe call before the other person answers.
You can also swap between both callers to consult with them individually before you remove yourself fromthe call.
Procedure
Step 1 From a call that is not on hold, press Transfer .Step 2 Enter the other person's phone number.Step 3 (Optional) Wait until you hear the line ring or until the other person answers the call.Step 4 Press Transfer again.
Conference Calls and MeetingsYou can talk with several people in a single call. You can dial another person and add them to the call. If youhave multiple phone lines, you can join two calls across two lines.
When you add more than one person to a conference call, wait a few seconds between adding participants.
As the conference host, you can remove individual participants from the conference. The conference endswhen all participants hang up.
Add Another Person to a CallWhen you add more than one person to a call, wait a few seconds between adding participants.
Procedure
Step 1 From an active call, press Conference .Step 2 Add the other person to the call by doing one of the following:
• Press Active calls and select a held call.• Enter the phone number and press Call.
Step 3 Press Conference.
Cisco IP Phone 8800 Series User Guide49
CallsTransfer a Call to Another Person
Swap Between Calls Before You Complete a ConferenceYou can talk to a person before you add them to a conference. You can also swap between the conferencecall and the call with the other person.
Procedure
Step 1 Call a new conference participant, but do not add the participant to the conference.
Wait until the call is connected.
Step 2 Press Swap to toggle between the participant and the conference.
View and Remove Conference ParticipantsIf you create a conference, you can view the details of the last 16 participants who join the conference. Youcan also remove participants.
Procedure
Step 1 While you are in a conference, press Show Details to view a list of participants.Step 2 (Optional) Highlight a participant and press Remove to drop the participant from the conference.
Scheduled Conference Calls (Meet Me)You can host or join a conference call at a scheduled time.
The conference call does not start until the host dials in, and it ends when all participants hang up. Theconference does not automatically end when the host hangs up.
Host a Meet-Me Conference
Before you begin
Get a meet-me phone number from your administrator, and distribute the number to the conference participants.
Procedure
Step 1 Lift the handset to get a dial tone and pressMeet Me.Step 2 Dial the meet-me phone number.
Cisco IP Phone 8800 Series User Guide50
CallsSwap Between Calls Before You Complete a Conference
Join a Meet-Me ConferenceYou cannot join a meet-me conference until the conference hosts dials in. If you hear a busy tone, the hosthas not dialed into the conference. Hang up and try your call again.
Procedure
Dial the meet-me phone number that the conference host provides.
Sign-in to a WebEx MeetingIf you are using WebEx for your online meetings, you can use your phone to join an online meeting insteadof your PC. This option can save you time and effort, and is useful if your PC is not available.
Before you begin
Know your meeting number before you attempt to sign in to your meeting. Depending upon how your hosthas configured your meeting, you could need a password also.
Procedure
Step 1 SelectWebEx.Step 2 Enter your sign-in informationStep 3 Select Join.
Intercom CallsYou can use an intercom line to place and receive one-way calls.
When you place an intercom call, the recipient’s phone answers the call automatically with mute activated(whisper mode).Your message is broadcast through the recipient’s speakerphone, headset, or handset, if oneof these devices is active.
After receiving the intercom call, the recipient can start two-way audio (connected mode) to allow for furtherconversation.
Make an Intercom CallWhen you place an intercom call, your phone enters whisper mode until the recipient accepts the intercomcall. In whisper mode, the other person can hear you, but you can't hear them. If you are on an active call, thatcall is placed on hold.
Cisco IP Phone 8800 Series User Guide51
CallsJoin a Meet-Me Conference
Procedure
Step 1 Press Intercom.Step 2 (Optional) Enter the intercom code.Step 3 Listen for the intercom alert tone, and then begin speaking.Step 4 Press Intercom to end the call.
Answer an Intercom CallYou can answer an intercom call to talk to the other person.
Before you begin
You receive a message on your phone screen, and an audible alert. Your phone answers the intercom call inwhisper mode.
Procedure
Step 1 Press Intercom to switch to connected mode. In connected mode, you can speak to the intercom caller.Step 2 Press Intercom to end the call.
Supervise and Record CallsYou can supervise and record a call. But you must have a minimum of three people on a line: the personcalling, the chaperone, and the person called.
The chaperone answers a call, creates a conference call, and monitors and records the conversation.
The chaperone performs the following tasks:
• Records the call.
• Conferences in the first participant only. Other participants add people as needed.
• Ends the call.
The conference ends when the chaperone hangs up the call.
Set Up a Supervised Call
Procedure
Step 1 Answer an incoming call.
Cisco IP Phone 8800 Series User Guide52
CallsAnswer an Intercom Call
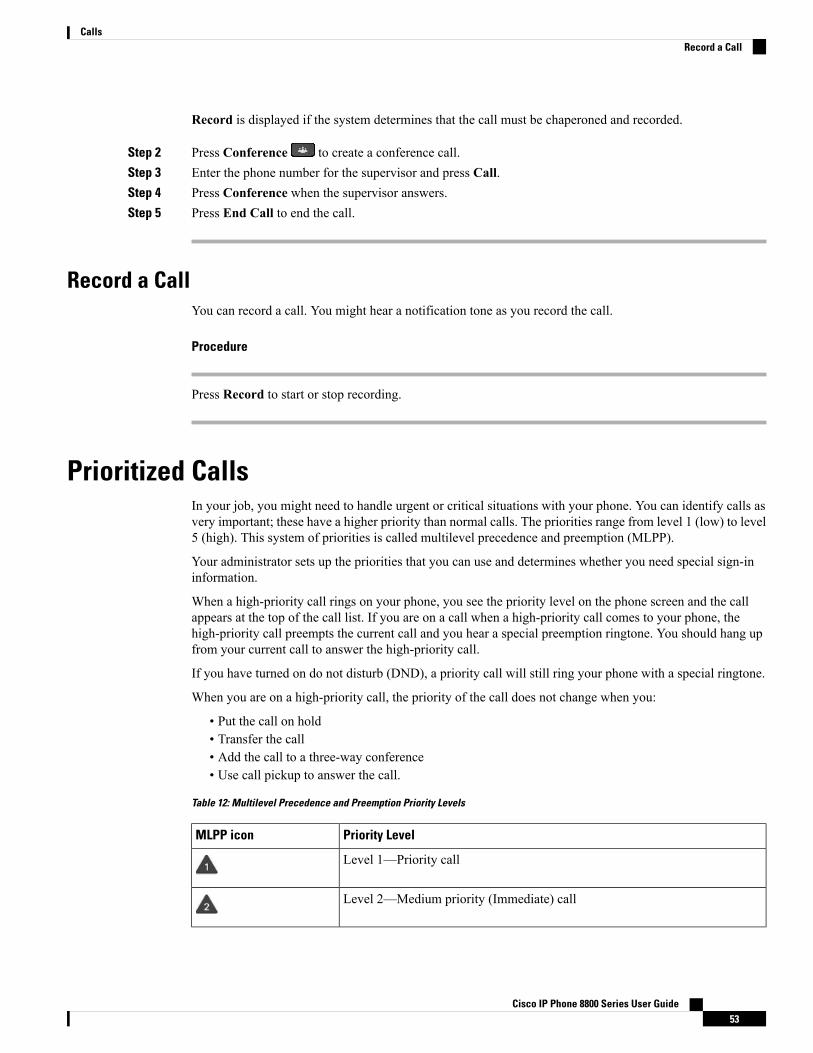
Record is displayed if the system determines that the call must be chaperoned and recorded.
Step 2 Press Conference to create a conference call.Step 3 Enter the phone number for the supervisor and press Call.Step 4 Press Conference when the supervisor answers.Step 5 Press End Call to end the call.
Record a CallYou can record a call. You might hear a notification tone as you record the call.
Procedure
Press Record to start or stop recording.
Prioritized CallsIn your job, you might need to handle urgent or critical situations with your phone. You can identify calls asvery important; these have a higher priority than normal calls. The priorities range from level 1 (low) to level5 (high). This system of priorities is called multilevel precedence and preemption (MLPP).
Your administrator sets up the priorities that you can use and determines whether you need special sign-ininformation.
When a high-priority call rings on your phone, you see the priority level on the phone screen and the callappears at the top of the call list. If you are on a call when a high-priority call comes to your phone, thehigh-priority call preempts the current call and you hear a special preemption ringtone. You should hang upfrom your current call to answer the high-priority call.
If you have turned on do not disturb (DND), a priority call will still ring your phone with a special ringtone.
When you are on a high-priority call, the priority of the call does not change when you:
• Put the call on hold• Transfer the call• Add the call to a three-way conference• Use call pickup to answer the call.
Table 12: Multilevel Precedence and Preemption Priority Levels
Priority LevelMLPP icon
Level 1—Priority call
Level 2—Medium priority (Immediate) call
Cisco IP Phone 8800 Series User Guide53
CallsRecord a Call

Priority LevelMLPP icon
Level 3—High priority (Flash) call
Level 4—Flash Override
Level 5—Executive Override
Make a Priority CallTo make a priority call, you might need to sign in with your special credentials. You have three chances toenter these credentials, and you're notified if you've entered them incorrectly.
Procedure
Step 1 Pick up the handset.Step 2 Press PrecLevel.Step 3 Select a priority level for the call.Step 4 (Optional) Enter your credentials on the authorization screen.Step 5 Enter the destination number.
You see the precedence level icon on the phone screen and you hear the precedence ringback tone.
Answer a Priority CallIf you hear a special ring that's faster than usual, you are receiving a priority call.
Procedure
Press the flashing amber session button when you hear the special ringtone for a precedence call.
Answer a Priority Call While on Another CallIf you hear a continuous tone that interrupts your call, you or your coworker are receiving a priority call. Hangup immediately and let the higher priority call go to the intended person.
Procedure
Press Release or hang up the handset.
Cisco IP Phone 8800 Series User Guide54
CallsMake a Priority Call
Your call ends, and the higher priority call rings on the appropriate phone.
Multiple LinesIf you share phone numbers with other people, you could have multiple lines on your phone. When you havemultiple lines, you have more calling features available to you.
Answer the Oldest Call FirstYou can answer the oldest call available on all your phone lines, including Hold Reversion and Park Reversioncalls that are in an alerting state. Incoming calls always have priority over Held or Park Reversion calls.
When working with multiple lines, you typically press the line button for the incoming call you want to answer.If you just want to answer the oldest call regardless of line, press Answer.
View All Calls on Your PhoneYou can view a list of all your active calls—from all your phone lines—sorted in chronological order, oldestto newest.
The list of all calls is useful if you have multiple lines or if you share lines with other users. The list displaysall your calls together.
You can also display your active calls on your primary line, which is useful if you want all your calls displayedon a single screen.
Procedure
Press All Calls or the session button for your primary line.
View Important CallsYou can view a list of all Alert Calls in chronological order (oldest to most recent). An Alert Call is a phonenumber that you consider important. You want to be alerted when you receive a call from or make a call tothis number.
Procedure
Press Alert call.
Cisco IP Phone 8800 Series User Guide55
CallsMultiple Lines

Display Call Notifications on Select Lines with Line FiltersYou can configure your phone so you are alerted when somebody calls a high priority phone number or line.For example, a senior executive's phone line or a customer help line. This tool is useful if you work withmultiple phone lines and a high number of calls.
Depending upon how your administrator has configured your phone, youmay be able to use a line filter duringspecific times of the day also.
Create a Line Filter
Procedure
Step 1 Press Applications .Step 2 Select Settings > Call notifications > Add new filter.
The maximum number of custom filters is 20. If you have already created the maximum number of customfilters, delete a filter before continuing with this procedure.
Step 3 Press Select to make the text editable.Step 4 Accept the default name for the new filter, or enter a new one.Step 5 Select the lines to add to the new filter.
All available lines are displayed in the list. If you require a line that is not in the list, contact your administrator.
Step 6 Click Apply.Step 7 To view the filter, press Back.
Use a Line Filter
Procedure
Step 1 Press Applications .Step 2 Select Settings > Call notifications.Step 3 Highlight the filter to apply and press Select.
Change a Line FilterYou can change the line filters that you control. Your administrator controls the All Calls filter and the Dailyschedule filter.
Cisco IP Phone 8800 Series User Guide56
CallsDisplay Call Notifications on Select Lines with Line Filters

Procedure
Step 1 Press Applications .Step 2 Select Settings > Call notification.Step 3 Highlight a filter and Press Edit to change an existing filter.
Shared LinesYou can share a single phone number with one or more of your coworkers. For example, as an administrativeassistant, you may be responsible for screening calls for the person you support.
When you share a phone number, you can use that phone line just like any other line. Be aware of these specialcharacteristics about shared lines:
• The shared phone number appears on all phones that share the number.
• If your coworker answers the call, the shared line button and the session button are solid red on yourphone.
• If you put a call on hold, your line button is solid green and the session button pulses green. But yourcoworker's line button is solid red and the session button pulses red.
Add Yourself to a Call on a Shared LineYou or your coworker can join a call on the shared line. Your administrator needs to enable the feature onyour phone.
If you try to add yourself to a call on a shared line and see a message that you cannot be added, try again.
If a user with whom you share a line has privacy turned on, you can't see their line settings and you can't addyourself to their call.
Procedure
Step 1 Press the line button for the shared line or select the line and press Barge.
You need to press Calls to add yourself to a call on a shared line.Note
Step 2 (Optional) If you see a confirmation message, press Yes to add yourself to the call.
Get Notified Before You Join a Call on a Shared LineYou can set up your phone to alert you when you barge in to a call. By default, the alert prompt is turned Off.
Cisco IP Phone 8800 Series User Guide57
CallsShared Lines

Procedure
Step 1 Press Applications .Step 2 Select Settings > Barge Alert.Step 3 Click On to enable the alert.
Enable Privacy on a Shared LinePrivacy prevents others who share your line from seeing information about your calls.
Privacy applies to all shared lines on your phone. If you have multiple shared lines and privacy is enabled,others cannot view any of your shared lines.
If the phone that shares your line has privacy enabled, you can make and receive calls using the shared lineas usual.
Visual confirmation is displayed on your phone screen for as long as the feature is enabled.
Procedure
Step 1 Press Privacy to enable the feature.Step 2 Press Privacy again to turn off the feature.
Mobile Devices and Your Desk PhoneIf you have a mobile device (phone or a tablet), you can connect the mobile device to your desk phone. Thisconnection allows you to make and answer phone calls on either the mobile device or the desk phone.
Cisco IP Phone 8851 and 8861 support this feature.
Do not pair two or more Cisco IP Phone 8800 Series desk phones.
Phone Calls with Intelligent ProximityWhen you use Bluetooth, you can pair your mobile device (phone or tablet) to your desk phone. After youpair and connect the mobile device, your phone displays an additional phone line, which is your mobile line(your mobile phone number). You can place and receive calls on this mobile line from your desk phone. Thisability to use the mobile line on your desk phone is called Intelligent Proximity.
Pair a Mobile Device with Your Desk PhoneAfter you pair your mobile device to your desk phone, the phone connects to the mobile device when thedevice is in range. It disconnects from the mobile device when the device is out of range.
If you have both a Bluetooth headset and a mobile device connected, you cannot use the Bluetooth headsetto answer the audio from the mobile device.
Cisco IP Phone 8800 Series User Guide58
CallsEnable Privacy on a Shared Line
After the mobile device and phone are connected, you can save your mobile contacts and call history on yourdesk phone.
Before you begin
Make sure that your mobile device has Bluetooth turned on and that it is discoverable. Check the documentationincluded with your mobile device if you need help.
Procedure
Step 1 On your desk phone, press Applications .Step 2 Select Bluetooth > Add Bluetooth device.Step 3 Select the mobile device from the available devices list to pair.Step 4 Verify the passkey on the mobile device.Step 5 Verify the passkey on the desk phone.Step 6 (Optional) Choose to make your mobile device contacts and call history available on your desk phone.
Related TopicsBluetooth and Your Phone, on page 18The Cisco IP Phone 8800 Series, on page 1
Switch Connected Mobile DevicesIf you have more than one paired mobile device in range of your Cisco IP Phone, you can choose whichmobile device to connect.
Procedure
Step 1 Press Applications .Step 2 Select Bluetooth.Step 3 Select a mobile device from the available devices list.
Delete a Mobile DeviceYou can delete a mobile device, so that it does not automatically connect using Bluetooth.
Procedure
Step 1 Press Applications .Step 2 Select Bluetooth.Step 3 Select the mobile device in the available devices list.
Cisco IP Phone 8800 Series User Guide59
CallsSwitch Connected Mobile Devices

Step 4 Select Delete.
View Your Paired Bluetooth DevicesA paired mobile device displays in the list of paired devices. You'll see this device listed until you unpair itfrom the desk phone.
Procedure
Step 1 Press Applications .Step 2 Select Bluetooth.
Intelligent Proximity for Mobile PhonesYou can share your mobile contacts and call history with the desk phone, and move calls between your mobilephone and desk phone. You can also view signal strength and battery level of the mobile device on the deskphone.
Handle an Incoming Mobile Call
Before you begin
Your mobile phone is paired to your desk phone.
Procedure
When a call rings on your mobile phone, do one of these actions on your desk phone:
• Press Answer to answer the call.• Press Decline to decline the call and send it to your voicemail.• Press Ignore to silence the ringer and decline the call.
Make a Mobile Call
Before you begin
Your mobile phone is paired to your desk phone.
Procedure
Step 1 Select a mobile line on your desk phone.Step 2 Enter a phone number.
Cisco IP Phone 8800 Series User Guide60
CallsView Your Paired Bluetooth Devices

Step 3 Press Call.
Move a Call Between the Desk Phone and a Mobile Device
You can use your desk phone to move an active call to or from your mobile device.
Before you begin
Your mobile phone is paired to your desk phone.
Procedure
PressMove audio to move a call from your desk phone to your mobile device or in the opposite direction.
Adjust the Mobile Device Volume
Volume controls on your phone and mobile device are synchronized. Synchronization only occurs when thereis an active call.
Before you begin
Your mobile phone is paired to your desk phone.
Procedure
Perform one of these options:
• Press Volume on your desk phone. Press the + to increase the volume or - to decrease thevolume.
• Press the Volume button on your mobile device.
View Your Mobile Contacts on Your Desk Phone
Use your desk phone to view the contacts list on your mobile phone. This is a convenient way to view a contactwithout accessing your mobile phone.
Before you begin
Before you can use your mobile device with your desk phone, use Bluetooth to pair the two phones. Selectthe option to share the mobile contacts.
Procedure
Step 1 On the desk phone, press Contacts .
Cisco IP Phone 8800 Series User Guide61
CallsMove a Call Between the Desk Phone and a Mobile Device

Step 2 Select your mobile phone from the list.
Save Contacts from Your Mobile Device on Your Desk Phone
You can save the contact list from your mobile device to your desk phone. This mobile contact list remainson your desk phone, even if you disconnect or unpair your mobile device.
Before you begin
Your mobile phone is paired to your desk phone.
Procedure
Step 1 Press Contacts .Step 2 Select your mobile phone.
Delete Contacts in Your Mobile Device Contact List
You can remove your mobile contacts list from your desk phone. The contacts list on your mobile phoneremains intact.
Before you begin
Your mobile phone is paired to your desk phone.
Procedure
Step 1 Press Contacts .Step 2 Select your mobile phone.Step 3 Check Delete.
View Your Mobile Call History on Your Desk Phone
You can view on your desk phone the recent calls placed or received from your mobile phone.
Before you begin
Before you can see the mobile call history on your desk phone, use Bluetooth to pair the mobile phone withyour desk phone. Select the option to share your mobile call history with your desk phone.
Cisco IP Phone 8800 Series User Guide62
CallsSave Contacts from Your Mobile Device on Your Desk Phone
Procedure
On the desk phone, press New Call.
Intelligent Proximity for TabletsIf you have a tablet, you can use Bluetooth to pair the tablet to your desk phone. After pairing, audio from aphone app on the tablet can be played on the desk phone. You can't use as many calling features on your tabletas you can with a mobile phone.
The desk phone supports connections from Android and iOS tablets.
Move the Audio from Your Tablet to Your Desk Phone
Before you begin
Your tablet is paired to your desk phone and you receive a call on the tablet.
Procedure
Step 1 On the tablet, set the audio path to use Bluetooth.Step 2 Use the headset, handset, or speakerphone to listen to the audio on the phone.
Move the Audio from Your Desk Phone to Your Tablet
Before you begin
Your tablet is paired to your desk phone and you are on a call on the tablet with the audio on the desk phone.
Procedure
Do one of the following actions:
• Hang up the handset.• Press Release.• Answer another call on the desk phone.
Phone Calls with Mobile ConnectYou can use your mobile phone to handle calls that are associated with your desk phone number. This serviceis called Mobile Connect.
You associate your mobile phone with your desk phone in the Self Care portal, as an additional phone. Youcan control which calls are sent to your mobile phone.
Cisco IP Phone 8800 Series User Guide63
CallsIntelligent Proximity for Tablets

When you enable additional phones:
• Your desk phone and your additional phones receive calls simultaneously.
• When you answer the call on your desk phone, the additional phones stop ringing, disconnect, and displaya missed call message.
• When you answer the call on one additional phone, the other additional phones and desk phone stopringing and disconnect. A missed call message shows on the other additional phones.
• You can answer the call on an additional phone and switch the call to a desk phone that shares the line.If you do so, the desk phones that share the same line display a Remote In Use message.
Related TopicsSelf Care Portal, on page 11
Enable Mobile Connect
Procedure
Step 1 PressMobility to display the current remote destination status (Enabled or Disabled).Step 2 Press Select to change the status.
Move a Call from Your Desk Phone to Your Mobile PhoneYou can move a call from your desk phone to your mobile phone. The call is still connected to the line onyour desk phone, so you cannot use that line for other calls. The line remains in use until the call ends.
Before you begin
You need to enable Mobile Connect on your desk phone.
Procedure
Step 1 PressMobility.Step 2 Press Select to send a call to your mobile phone.Step 3 Answer the active call on your mobile phone.
Move a Call from Your Mobile Phone to Your Desk PhoneYou can move a call from your mobile phone to your desk phone. The call is still connected to your mobilephone.
Before you begin
You need to enable Mobile Connect on your desk phone.
Cisco IP Phone 8800 Series User Guide64
CallsEnable Mobile Connect

Procedure
Step 1 Hang up the call on your mobile phone to disconnect the mobile phone, but not the call.Step 2 Press the line on your desk phone within 5 to 10 seconds to resume the call on your desk phone.
Transfer a Call from Your Mobile Phone to Your Desk PhoneYou can transfer a call from your mobile phone to your desk phone.
Before you begin
You need to enable Mobile Connect on your desk phone.
Get the access code from your administrator.
Procedure
Step 1 On the mobile phone, enter the access code for the hand-off feature.Step 2 Hang up the call on your mobile phone to disconnect the mobile phone, but not the call.Step 3 Press Answer on your desk phone within 10 seconds and start talking on the desk phone.
Cisco IP Phone 8800 Series User Guide65
CallsTransfer a Call from Your Mobile Phone to Your Desk Phone

Cisco IP Phone 8800 Series User Guide66
CallsTransfer a Call from Your Mobile Phone to Your Desk Phone
C H A P T E R 3Contacts
• Corporate Directory, on page 67• Personal Directory, on page 67• Cisco Web Dialer, on page 71
Corporate DirectoryYou can look up a coworker's number from your phone, which makes it easier to give them a call. Youradministrator sets up and maintains the directory.
Dial a Contact in the Corporate Directory
Procedure
Step 1 Press Contacts .Step 2 Select Corporate Directory.Step 3 Select a search criteria.Step 4 Enter your search criteria and press Submit.Step 5 Select the contact and press Dial.
Personal DirectoryUse the personal directory to store the contact information for friends, family, or coworkers. You can addyour own contacts to the personal directory. You can add special speed-dial codes for people who you oftencall.
You can set up your personal directory from your phone or from the Self Care portal. Use your phone to assignspeed-dial codes to the directory entries.
Related TopicsSelf Care Portal, on page 11
Cisco IP Phone 8800 Series User Guide67

Sign In and Out of a Personal Directory
Before you begin
Before you can sign in to your personal directory, you need your user ID and PIN. Contact your administratorif you don't know this information.
Procedure
Step 1 Press Contacts .Step 2 Select Personal directory.Step 3 Enter your user ID and PIN, and press Submit.Step 4 To sign out, select Log out, press Select, and then press OK.
Add a New Contact to Your Personal Directory
Procedure
Step 1 Press Contacts .Step 2 Sign in to your personal directory.Step 3 Select Personal Address Book and press Submit.Step 4 Press New.Step 5 Enter first name, last name, and optionally a nickname.Step 6 Press Phones, enter the phone number along with any required access codes, and then press Submit.
Search for a Contact in Your Personal Directory
Procedure
Step 1 Press Contacts .Step 2 Sign in to your personal directory.Step 3 Select Personal Address Book.Step 4 Select a search criteria.Step 5 Enter your search criteria and press Submit.
Cisco IP Phone 8800 Series User Guide68
ContactsSign In and Out of a Personal Directory
Call a Contact in Your Personal Directory
Procedure
Step 1 Press Contacts .Step 2 Sign in to your personal directory.Step 3 Select your Personal directory and search for an entry.Step 4 Select the personal address book entry that you want to dial.Step 5 Select the required fast-dial code and press Call.
Assign a Fast-Dial Code to a ContactA fast-dial code makes it easier to call a contact.
Procedure
Step 1 Press Contacts .Step 2 Sign in to your personal directory.Step 3 Select Personal Address Book.Step 4 Select a search criteria.Step 5 Enter the search criteria information and press Submit.Step 6 Select the contact.Step 7 Press FastDial.Step 8 Select a number and press Select.Step 9 Scroll to an unassigned fast-dial index and press Submit.
Related TopicsMake a Call With a Fast-Dial Button, on page 37
Call a Contact with a Fast-Dial Code
Procedure
Step 1 Press Contacts .Step 2 Sign in to your personal directory.Step 3 Select Personal Fast Dials and scroll to a fast-dial code.
Cisco IP Phone 8800 Series User Guide69
ContactsCall a Contact in Your Personal Directory

Step 4 Select the required fast-dial code and press Call.
Edit a Contact in Your Personal Directory
Procedure
Step 1 Press Contacts .Step 2 Sign in to your Personal directory.Step 3 Select Personal address book and search for an entry.Step 4 Press Select, then Edit.Step 5 Modify the entry information.Step 6 Press Phones to modify a phone number.Step 7 Press Update.
Remove a Contact from Your Personal Directory
Procedure
Step 1 Press Contacts .Step 2 Sign in to your personal directory.Step 3 Select Personal Address Book and search for an entry.Step 4 Press Select, then Edit, then Delete.Step 5 Press OK to confirm the deletion.
Delete a Fast-Dial Code
Procedure
Step 1 Press Contacts .Step 2 Sign in to your personal directory.Step 3 Select Personal Fast Dials and search for a fast-dial code.Step 4 Select the required code and press Remove.Step 5 Select the index and press Remove.
Cisco IP Phone 8800 Series User Guide70
ContactsEdit a Contact in Your Personal Directory
Cisco Web DialerYou can use Cisco Web Dialer, a web browser, and your Cisco IP phone to make calls from web and desktopapplications. Use your web browser and go to a website or your company directory, and then click a hyperlinkedphone number to begin your call.
You need a user ID and password to make a call. Your administrator can give you this information. First-timeusers have to configure their preferences before a call.
For more information, see the “Cisco Web Dialer” document in https://www.cisco.com/c/en/us/support/unified-communications/unified-communications-manager-callmanager/products-installation-and-configuration-guides-list.html
Cisco IP Phone 8800 Series User Guide71
ContactsCisco Web Dialer

Cisco IP Phone 8800 Series User Guide72
ContactsCisco Web Dialer

C H A P T E R 4Recent Calls
• Recent Calls List, on page 73• View Your Recent Calls, on page 73• Return a Recent Call, on page 74• Clear the Recent Calls List, on page 74• Delete a Call Record , on page 74
Recent Calls ListUse the Recents list to see the 150 most recent individual calls and call groups.
If your Recents list reaches the maximum size, the next new entry overwrites the oldest entry in the list.
Calls in the Recents list are grouped if they are to and from the same number and are consecutive. Missedcalls from the same number also get grouped.
View Your Recent CallsCheck to see who's called you recently.
Procedure
Step 1 Press Applications .Step 2 Select Recents.
When the phone is in the idle state, you can also view the Recent calls list by pressing the Navigation clusterup.
Step 3 If you have more than one line, select a line to view.
If two lines on your phone are configured for the same number, only the line that receives the call shows thecall details in the call history.
Cisco IP Phone 8800 Series User Guide73

Return a Recent CallYou can easily call someone who has called you.
Procedure
Step 1 Press Applications .Step 2 Select Recents.Step 3 (Optional) Select All lines or the required line.Step 4 Select the number that you want to dial.Step 5 (Optional) Press EditDial to edit the number.Step 6 Press Call.
Clear the Recent Calls ListYou can clear the Recents list on your phone.
Procedure
Step 1 Press Applications .Step 2 Select Recents.Step 3 (Optional) Select All Lines or the required line.Step 4 Press Clear.Step 5 Press Delete.
Delete a Call RecordYou can edit Recents to remove a single call from your history. This helps preserve important contactinformation because Recents holds only 150 calls.
Procedure
Step 1 Press Applications .Step 2 Select Recents.Step 3 (Optional) Select All Lines or the required line.Step 4 Highlight the individual record or call group that you want to delete.
Cisco IP Phone 8800 Series User Guide74
Recent CallsReturn a Recent Call

Step 5 Press Delete.Step 6 Press Delete again to confirm.
Cisco IP Phone 8800 Series User Guide75
Recent CallsDelete a Call Record

Cisco IP Phone 8800 Series User Guide76
Recent CallsDelete a Call Record

C H A P T E R 5Voicemail
• Your Voicemail Account, on page 77• Check for New Voice Messages, on page 77• Access Voicemail, on page 78• Visual Voicemail, on page 78
Your Voicemail AccountYou can access your voice messages directly from your phone. But your administrator must set up yourvoicemail account and set up your phone to access the voicemail system.
TheMessages button on your phone acts as a speed dial into the voicemail system.
The voicemail system is not part of the phone. The voicemail system is a separate system that the phone andthe call server communicate with to give you voicemail capability.
When you aren’t at your desk, you can call your voicemail system to access your voicemail. Typically, yourvoicemail system has a phone number that you can dial directly and then follow the prompts to log into yourvoice mailbox. Your administrator can give you the voicemail system phone number.
Because each voicemail system is different, we can't tell you how to use your voicemail system. For informationand help with your voicemail commands, see the voicemail system user documentation or contact youradministrator or IT department.
Check for New Voice MessagesTo find out if you have new voicemail messages, look for one of these signs:
• The light strip on your handset is solid red.
• The number of missed calls and voicemail messages is displayed on your screen. If you have more than99 new messages, a plus (+) sign is displayed.
You will also hear a stutter tone played from your handset, headset, or speakerphone when you use a phoneline. This stutter tone is line-specific. You only hear it when you use a line that has voice messages.
Related TopicsSelf Care Portal, on page 11
Cisco IP Phone 8800 Series User Guide77
Access VoicemailProcedure
Step 1 If you have more than line, press the appropriate line key.
Step 2 PressMessages .Step 3 Follow the voice prompts.
Visual VoicemailVisual Voicemail is an alternative to audio voicemail that might be available to you, depending on yourvoicemail system. You use the screen on your phone to work with your messages, rather than respond to audioprompts. You can view a list of your messages and play your messages. You can also compose, reply to,forward, and delete messages.
Depending upon your voicemail system, you may be able to access your audio voicemail by selecting Audioinbox. Use this feature if you occasionally work with audio prompts, but you have the visual prompts set upas your default.
For more information, see Quick Start Guide for Visual Voicemail for Unity Connection athttp://www.cisco.com/c/en/us/support/unified-communications/unity-connection/products-user-guide-list.html.
Access Audio VoicemailDepending upon how your administrator has set up your phone, you can retrieve your voicemail withoutviewing a list of messages. This option is useful if you prefer a list of voicemail messages, but you occasionallyaccess your messages without the visual prompts.
Procedure
Step 1 In the screen, press the Audio softkey.Step 2 When prompted, enter your voicemail credentials.
Cisco IP Phone 8800 Series User Guide78
VoicemailAccess Voicemail

C H A P T E R 6Applications
• Available Applications, on page 79• View Active Applications, on page 79• Switch to Active Applications, on page 79• Close Active Applications, on page 80
Available ApplicationsCisco phones don't include these applications by default. But your company might have added applicationssuch as the weather, stock information, company news, to-do lists, or similar information and services.
View Active ApplicationsYou can easily see what applications you already have open.
Procedure
Step 1 Press Applications .Step 2 Select Running applications.Step 3 Press Exit.
Switch to Active ApplicationsProcedure
Step 1 Press Applications .Step 2 Select Running applications.Step 3 Select a running application and press Switch to to open and use the selected application.
Cisco IP Phone 8800 Series User Guide79
Step 4 Press Exit.
Close Active ApplicationsProcedure
Step 1 Press Applications .Step 2 Select Running applications.Step 3 Select a running application and press Close app to close the application.Step 4 Press Close, then press Exit.
Cisco IP Phone 8800 Series User Guide80
ApplicationsClose Active Applications
C H A P T E R 7Settings
• Change the Wallpaper, on page 81• Change the Ringtone, on page 82• Adjust the Screen Brightness, on page 82• Adjust the Contrast, on page 82• Change the Font Size, on page 83• Change the Phone Name, on page 83• Adjust the Headset Feedback, on page 83• Video Settings, on page 84• Adjust the Volume During a Call, on page 85• Adjust the Phone Ringer Volume, on page 86• Enable Voice Feedback from Accessibility, on page 86• Adjust Voice Speed, on page 86• Phone Display Language, on page 87
Change the WallpaperYour administrator may allow you to change the wallpaper on your phone.
Procedure
Step 1 Press Applications .Step 2 Select Settings >Wallpaper.Step 3 Select a wallpaper option and perform any of the steps:
• Press Preview to see the wallpaper on your phone screen.• Press Set to apply the wallpaper to the phone.
Step 4 Press Exit.
Cisco IP Phone 8800 Series User Guide81

Change the RingtoneYou can change the sound that your phone uses for incoming calls.
Procedure
Step 1 Press Applications .Step 2 Select Settings > Ringtone.Step 3 Select a line.Step 4 Scroll through the list of ringtones and press Play to hear a sample.Step 5 Press Set to use the ringtone.
Adjust the Screen BrightnessYou can change the brightness of the phone screen to make it easier to read.
Procedure
Step 1 Press Applications .Step 2 Select Settings > Brightness.Step 3 Press the Navigation cluster left to decrease, or right to increase, the brightness.Step 4 Press Save.
Adjust the ContrastYou can change the contrast of your Cisco IP Phone 8811 to make the screen easier to read.
To check which phone model you have, press Applications and select Phone information. TheModelnumber field shows your phone model.
Procedure
Step 1 Press Applications .Step 2 Select Settings > Contrast.Step 3 Select Contrast.Step 4 Press the Navigation cluster left to decrease, or right to increase the contrast.
Cisco IP Phone 8800 Series User Guide82
SettingsChange the Ringtone
Step 5 Press Save to set the contrast.
Change the Font SizeYou can change the font size on your phone to make the screen easier to read. However, if you increase thefont size, some messages might be truncated.
The font size affects the following labels:
• call screen (caller name and feature key labels)
• caller name in Recents
• line labels on the phone screen
Procedure
Step 1 Press Applications .Step 2 Select Settings > Font Size.Step 3 Select a font size and press Set.Step 4 Press Exit to return to the Applications window.
Change the Phone NameYou can change the name of the phone from the default name. Your mobile device displays this name whenyou pair your mobile device with your desk phone.
Procedure
Step 1 Press Applications .Step 2 Select Settings > Phone name.Step 3 Use the keypad to enter a name.Step 4 Press Apply.Step 5 Press Exit.
Adjust the Headset FeedbackWhen you use a headset, you can hear your own voice in the earpiece, which is called headset sidetone orheadset feedback. You can control the amount of headset sidetone on your phone.
Cisco IP Phone 8800 Series User Guide83
SettingsChange the Font Size

Headsets connect to your phone with either the USB or the auxiliary port. Depending upon your model ofheadset, you have to adjust your phone's audio settings for the best audio experience, including the headsetsidetone setting.
Procedure
Step 1 Press Applications .Step 2 Select Settings > Headset sidetone.Step 3 Select a setting.Step 4 Wait one minute and then reboot the phone.
Video SettingsIf you have a video phone, you have settings to control the video.
Adjust the Video BrightnessIf the lighting in your office makes it hard to see the video, you can adjust the brightness.
Procedure
Step 1 Turn the ring around the camera clockwise to open the shutter.
Step 2 Press Applications .Step 3 Select Settings > Video > Exposure.Step 4 Press the Navigation cluster left to decrease, or right to increase, the brightness.Step 5 Press Save.
Adjust the Video BandwidthDuring a video call, your video can suddenly stop or lag behind the audio. The lag is often caused by a busynetwork.
By default, your phone automatically selects a bandwidth setting that balances the audio and video networkrequirements. If you frequently see a video lag, you can select a fixed bandwidth. We suggest that you startat the lowest setting, and only increase the setting if the video lag continues.
Procedure
Step 1 Press Applications .Step 2 Select Settings > Video > Bandwidth.
Cisco IP Phone 8800 Series User Guide84
SettingsVideo Settings

Step 3 Select a bandwidth setting.Step 4 Press Save to set the bandwidth.
View Video Calls on Your ComputerYou can view the video part of a call on your computer instead of the phone screen. The audio part of the callremains on your phone.
Before you begin
Connect the computer to the PC port of your phone with an Ethernet cable, and login to Cisco Jabber forWindows or Cisco Jabber for Mac. The phone must be connected to the first network interface card (NIC1)in the computer.
The phone PC port is disabled when Wi-Fi is enabled on your phone.Note
You need the latest version of Cisco Media Services Interface (MSI) and one of the following products:
• Cisco Jabber for Windows 9.7(5) or later
• Cisco Jabber for Mac 10.8.1 or later
Contact your administrator if you do not have the latest version of Cisco Jabber or MSI. For a list of hardwareand software requirements, see:
• Cisco Jabber forWindows release notes at http://www.cisco.com/c/en/us/support/unified-communications/jabber-windows/products-release-notes-list.html.
• Cisco Jabber for Mac release notes at http://www.cisco.com/c/en/us/support/unified-communications/jabber-mac/products-release-notes-list.html
Procedure
Step 1 Press Applications .Step 2 Select Settings > Video.Step 3 Select Video through computer.Step 4 Select On to enable the video.
Adjust the Volume During a CallIf the sound in your handset, headset, or speakerphone is too loud or too soft, you can change the volumewhile you are listening to the other person.When you change the volume during a call, the change only affects
Cisco IP Phone 8800 Series User Guide85
SettingsView Video Calls on Your Computer
the speaker you're using at the time. For example, if you adjust the volume while you're using a headset, thehandset volume doesn't change.
Procedure
Press Volume right or left to adjust the volume while you are on a call.
Adjust the Phone Ringer VolumeIf your phone ringer is too loud or too soft when you get an incoming call, you can change the ringer volume.Changes to the ringer volume do not affect the call volume you hear when you are on a call.
Procedure
Press Volume right or left to adjust the ringer volume when the phone rings.
Enable Voice Feedback from AccessibilityYou can enable or disable the Voice Feedback feature by pushing the Select button on the Navigation ringthree times. But you can also access this feature from the Accessibility setting on your phone.
With Voice Feedback enabled, you press your Softkey buttons twice to use or configure a feature.
Procedure
Step 1 Press Applications .Step 2 Select Accessibility > Voice Feedback.Step 3 Select On to enable the feature.Step 4 Select Exit twice to save your settings and return to Applications.
Related TopicsVoice Feedback, on page 24
Adjust Voice SpeedYou can customize the speed of Voice Feedback if it reads too quickly or too slowly. Voice Feedback mustbe enabled before you can select a Voice Speed.
Cisco IP Phone 8800 Series User Guide86
SettingsAdjust the Phone Ringer Volume
Procedure
Step 1 Press Applications .Step 2 Select Accessibility > Voice Speed.Step 3 Press the Navigation cluster up and down to navigate. Press Select to choose a speed.Step 4 Select Save twice to save your settings and return to Accessibility.Step 5 Select Exit twice to return to Applications.
Related TopicsVoice Feedback, on page 24
Phone Display LanguageYour phone can display text in many languages. Your administrator sets the language the phone uses. If youwant the language changed, contact your administrator.
Cisco IP Phone 8800 Series User Guide87
SettingsPhone Display Language

Cisco IP Phone 8800 Series User Guide88
SettingsPhone Display Language
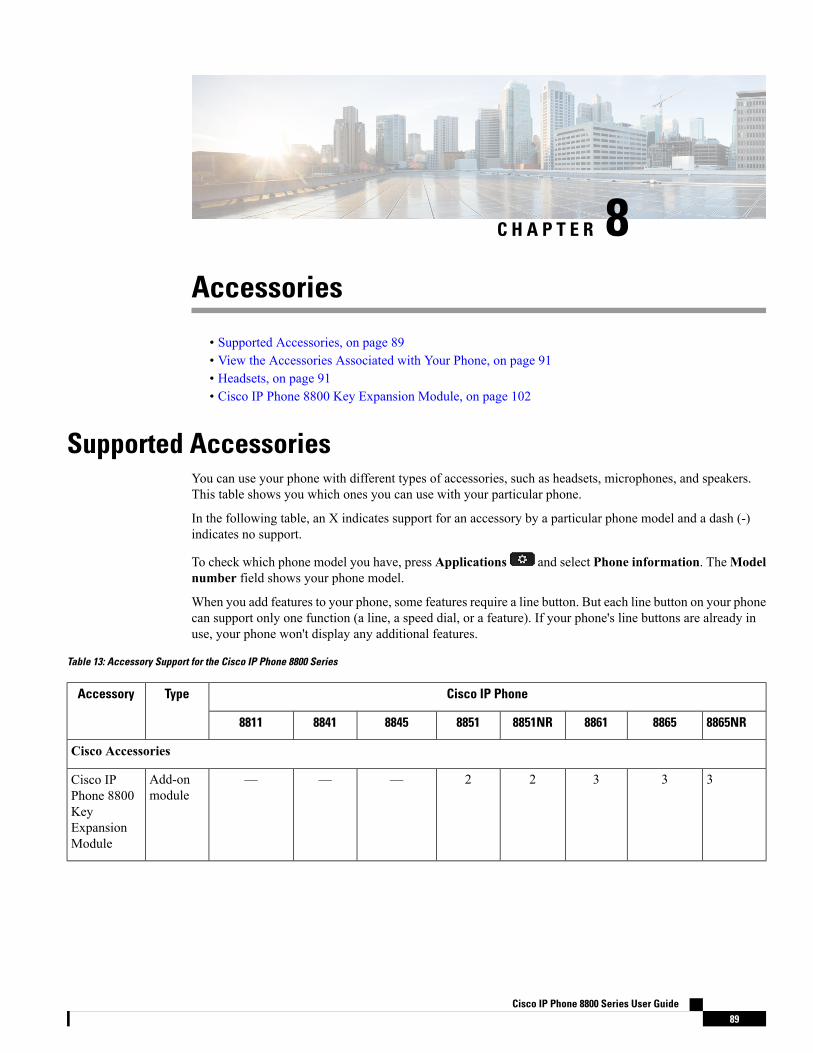
C H A P T E R 8Accessories
• Supported Accessories, on page 89• View the Accessories Associated with Your Phone, on page 91• Headsets, on page 91• Cisco IP Phone 8800 Key Expansion Module, on page 102
Supported AccessoriesYou can use your phone with different types of accessories, such as headsets, microphones, and speakers.This table shows you which ones you can use with your particular phone.
In the following table, an X indicates support for an accessory by a particular phone model and a dash (-)indicates no support.
To check which phone model you have, press Applications and select Phone information. TheModelnumber field shows your phone model.
When you add features to your phone, some features require a line button. But each line button on your phonecan support only one function (a line, a speed dial, or a feature). If your phone's line buttons are already inuse, your phone won't display any additional features.
Table 13: Accessory Support for the Cisco IP Phone 8800 Series
Cisco IP PhoneTypeAccessory
8865NR886588618851NR8851884588418811
Cisco Accessories
33322———Add-onmodule
Cisco IPPhone 8800KeyExpansionModule
Cisco IP Phone 8800 Series User Guide89
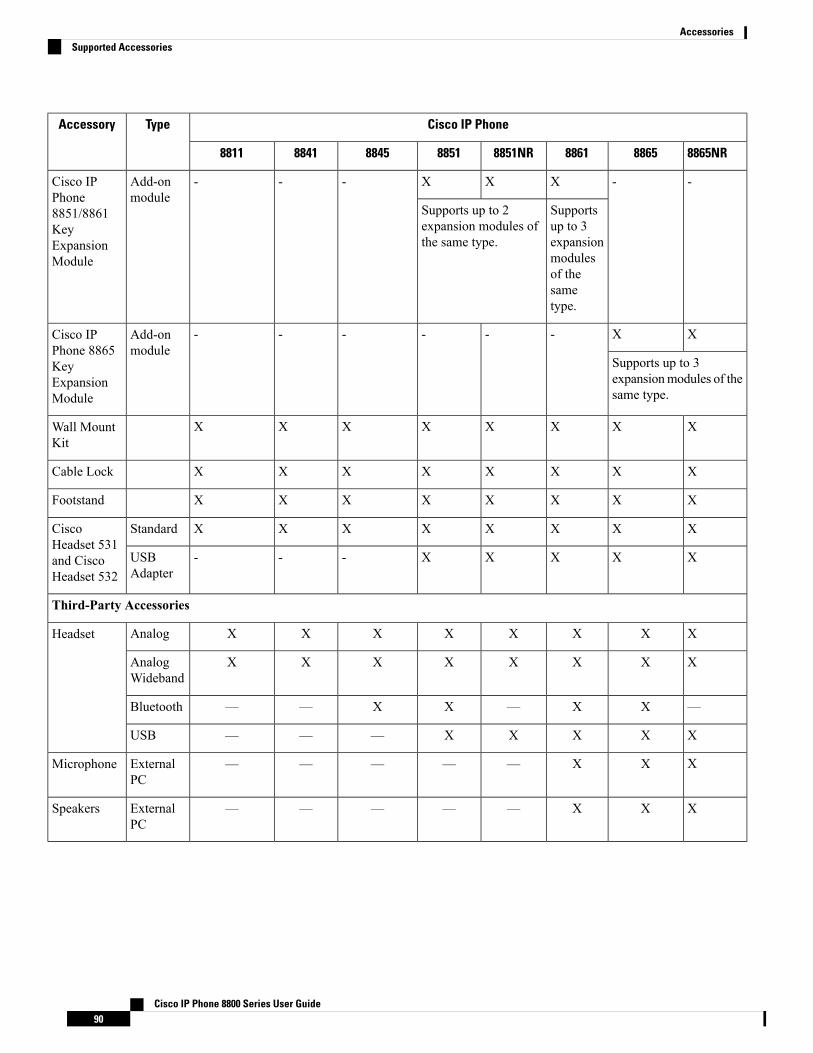
Cisco IP PhoneTypeAccessory
8865NR886588618851NR8851884588418811
--XXX---Add-onmodule
Cisco IPPhone8851/8861KeyExpansionModule
Supportsup to 3expansionmodulesof thesametype.
Supports up to 2expansion modules ofthe same type.
XX------Add-onmodule
Cisco IPPhone 8865KeyExpansionModule
Supports up to 3expansionmodules of thesame type.
XXXXXXXXWall MountKit
XXXXXXXXCable Lock
XXXXXXXXFootstand
XXXXXXXXStandardCiscoHeadset 531and CiscoHeadset 532
XXXXX---USBAdapter
Third-Party Accessories
XXXXXXXXAnalogHeadset
XXXXXXXXAnalogWideband
—XX—XX——Bluetooth
XXXXX———USB
XXX—————ExternalPC
Microphone
XXX—————ExternalPC
Speakers
Cisco IP Phone 8800 Series User Guide90
AccessoriesSupported Accessories

View the Accessories Associated with Your PhoneYou can use headset jack, Bluetooth, or USB port to connect external hardware to your phone. The accessorylist, by default, contains an analog headset that can be set up to enable wideband
Procedure
Step 1 Press Applications .Step 2 Select one of the following options:
• Accessories• Bluetooth
Step 3 (Optional) Select an accessory and press Show detail.Step 4 Press Exit.
HeadsetsCheck with the headset manufacturer to confirm whether you can use it with your Cisco phone.
If you plug a headset into the phone during an active call, the audio path automatically changes to the headset.
Important Headset Safety InformationHigh Sound Pressure—Avoid listening to high volume levels for long periods to preventpossible hearing damage.
When you plug in your headset, lower the volume of the headset speaker before you put the headset on. Ifyou remember to lower the volume before you take the headset off, the volume will start lower when youplug in your headset again.
Be aware of your surroundings. When you use your headset, it may block out important external sounds,particularly in emergencies or in noisy environments. Don’t use the headset while driving. Don’t leave yourheadset or headset cables in an area where people or pets can trip over them. Always supervise children whoare near your headset or headset cables.
Cisco Headset 500 SeriesThe Cisco Headset 531 and Cisco Headset 532 are two headsets developed for Cisco IP Phones and devices.The 531 headset features a single earpiece, and offers lightweight comfort. The 532 headset features twoearpieces for use in a noisy environment or busy office.
The Cisco Headset 531 and 532 can be used as standard headsets on the phones. You plug the headset intothe headset port using the RJ connector.
Cisco IP Phone 8800 Series User Guide91
AccessoriesView the Accessories Associated with Your Phone
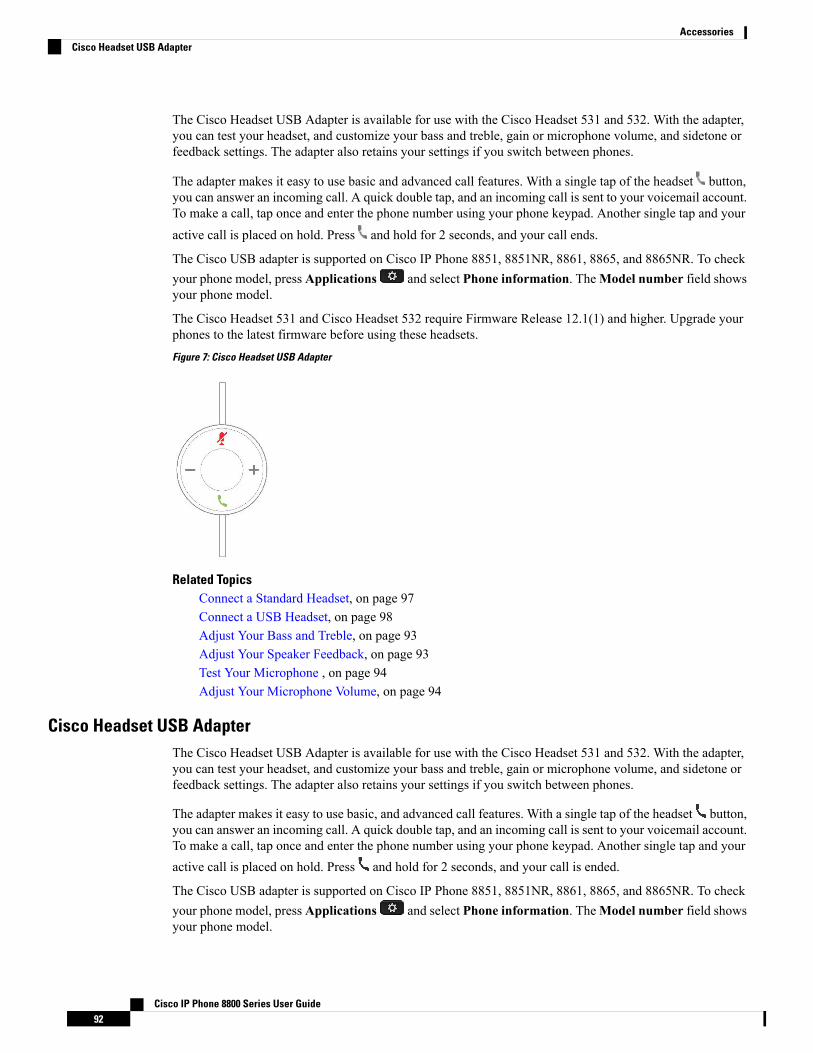
The Cisco Headset USB Adapter is available for use with the Cisco Headset 531 and 532. With the adapter,you can test your headset, and customize your bass and treble, gain or microphone volume, and sidetone orfeedback settings. The adapter also retains your settings if you switch between phones.
The adapter makes it easy to use basic and advanced call features. With a single tap of the headset button,you can answer an incoming call. A quick double tap, and an incoming call is sent to your voicemail account.To make a call, tap once and enter the phone number using your phone keypad. Another single tap and youractive call is placed on hold. Press and hold for 2 seconds, and your call ends.
The Cisco USB adapter is supported on Cisco IP Phone 8851, 8851NR, 8861, 8865, and 8865NR. To checkyour phone model, press Applications and select Phone information. TheModel number field showsyour phone model.
The Cisco Headset 531 and Cisco Headset 532 require Firmware Release 12.1(1) and higher. Upgrade yourphones to the latest firmware before using these headsets.Figure 7: Cisco Headset USB Adapter
Related TopicsConnect a Standard Headset, on page 97Connect a USB Headset, on page 98Adjust Your Bass and Treble, on page 93Adjust Your Speaker Feedback, on page 93Test Your Microphone , on page 94Adjust Your Microphone Volume, on page 94
Cisco Headset USB AdapterThe Cisco Headset USB Adapter is available for use with the Cisco Headset 531 and 532. With the adapter,you can test your headset, and customize your bass and treble, gain or microphone volume, and sidetone orfeedback settings. The adapter also retains your settings if you switch between phones.
The adapter makes it easy to use basic, and advanced call features. With a single tap of the headset button,you can answer an incoming call. A quick double tap, and an incoming call is sent to your voicemail account.To make a call, tap once and enter the phone number using your phone keypad. Another single tap and youractive call is placed on hold. Press and hold for 2 seconds, and your call is ended.
The Cisco USB adapter is supported on Cisco IP Phone 8851, 8851NR, 8861, 8865, and 8865NR. To checkyour phone model, press Applications and select Phone information. TheModel number field showsyour phone model.
Cisco IP Phone 8800 Series User Guide92
AccessoriesCisco Headset USB Adapter
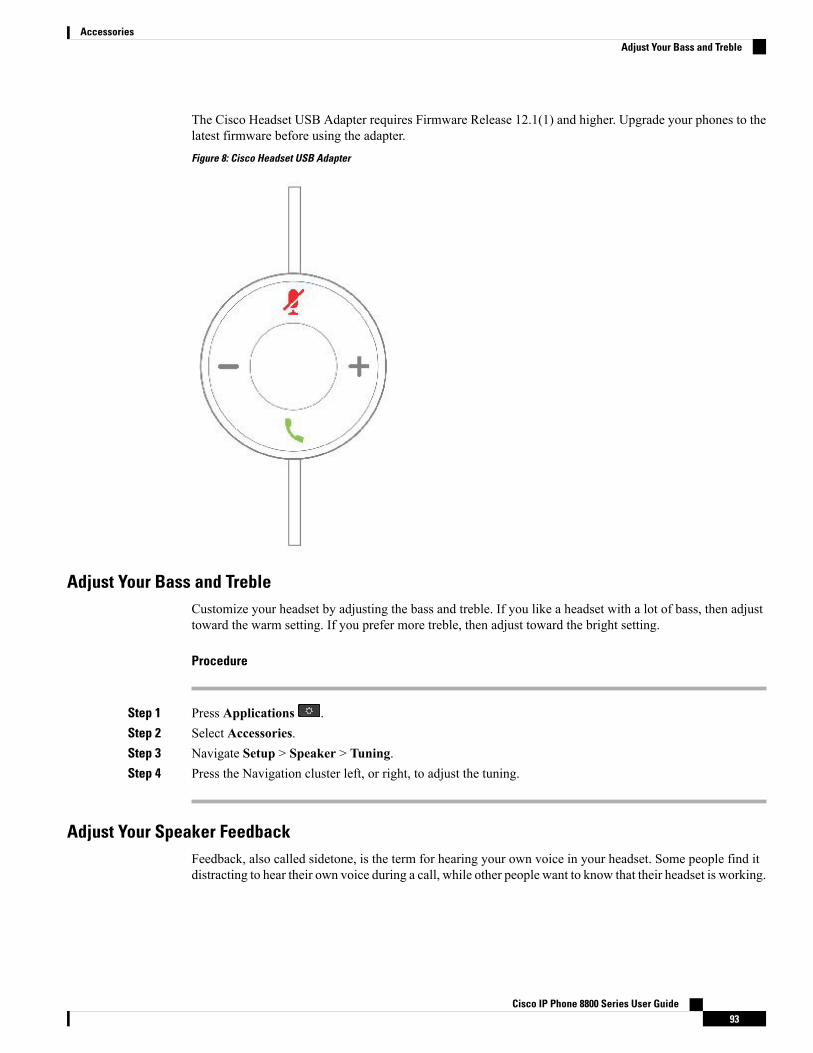
The Cisco Headset USB Adapter requires Firmware Release 12.1(1) and higher. Upgrade your phones to thelatest firmware before using the adapter.Figure 8: Cisco Headset USB Adapter
Adjust Your Bass and TrebleCustomize your headset by adjusting the bass and treble. If you like a headset with a lot of bass, then adjusttoward the warm setting. If you prefer more treble, then adjust toward the bright setting.
Procedure
Step 1 Press Applications .Step 2 Select Accessories.Step 3 Navigate Setup > Speaker > Tuning.Step 4 Press the Navigation cluster left, or right, to adjust the tuning.
Adjust Your Speaker FeedbackFeedback, also called sidetone, is the term for hearing your own voice in your headset. Some people find itdistracting to hear their own voice during a call, while other people want to know that their headset is working.
Cisco IP Phone 8800 Series User Guide93
AccessoriesAdjust Your Bass and Treble

Procedure
Step 1 Press Applications .Step 2 Select Accessories.Step 3 Navigate Setup > Speaker > Sidetone.Step 4 Press the Navigation cluster left or right to adjust the sidetone.Step 5 Select Set to apply your settings.
Adjust Your Microphone VolumeMicrophone volume is also known as gain, and this setting is used when you are on a call with a variety ofloud and soft voices. This setting equalizes the voices heard in your earpiece by making loud voices softer,and quiet voices louder.
Procedure
Step 1 Press Applications .Step 2 Select Accessories.Step 3 Navigate Setup >Microphone > Gain.Step 4 Press the Navigation cluster, left or right, to adjust the gain.
Test Your MicrophoneCheck your microphone when you first install it, and before you begin a call.
Procedure
Step 1 Press Applications .Step 2 Select Accessories.Step 3 Navigate to Setup >Microphone > Test.Step 4 Press Record and speak into the microphone.Step 5 Press Stop rec when you finish speaking.Step 6 Press Play to review your test recording.
Third Party HeadsetsCisco Systems performs internal testing of third-party headsets for use with Cisco IP Phones. But Cisco doesnot certify or support products from headset or handset vendors.
Cisco IP Phone 8800 Series User Guide94
AccessoriesAdjust Your Microphone Volume

Headsets connect to your phone using either the USB or the auxiliary port. Depending upon your headsetmodel, you have to adjust your phone's audio settings for the best audio experience, including the headsetsidetone setting.
If you have a third party headset, and you apply a new sidetone setting, then wait one minute and reboot thephone so the setting is stored in flash.
The phone reduces some background noise that a headset microphone detects. You can use a noise cancelingheadset to further reduce the background noise and improve the overall audio quality.
If you are considering a third part headset, we recommend the use of good quality external devices; for example,headsets that are screened against unwanted radio frequency (RF) and audio frequency (AF) signals. Dependingon the quality of headsets and their proximity to other devices, such as mobile phones and two-way radios,some audio noise or echo may still occur. Either the remote party or both the remote party and the Cisco IPPhone user may hear an audible hum or buzz. A range of outside sources can cause humming or buzzingsounds; for example, electric lights, electric motors, or large PC monitors.
Sometimes, use of a local power cube or power injector may reduce or eliminate hum.Note
Environmental and hardware inconsistencies in the locations where Cisco IP Phones are deployed mean thatno single headset solution is optimal for all environments.
We recommend that customers test headsets in the intended environment to determine performance beforemaking a purchasing decision to deploy on a large scale.
You can use only one headset at a time. The most-recently connected headset is the active headset.
Audio QualityBeyond physical, mechanical, and technical performance, the audio portion of a headset must sound good tothe user and to the party on the far end. Sound quality is subjective, and we cannot guarantee the performanceof any headsets. However, various headsets from leading headset manufacturers are reported to perform wellwith Cisco IP Phones.
For additional information, see https://www.cisco.com/c/en/us/products/unified-communications/uc_endpoints_accessories.html
Wired HeadsetsA wired headset works with all Cisco IP Phone features, including the Volume and Mute buttons. Thesebuttons adjust the earpiece volume and mute the audio from the headset microphone.
When you install a wired headset, make sure you press the cable into the channel in the phone.
Failure to press the cable into the channel in the phone can lead to cable damage.Caution
Bluetooth Wireless HeadsetsCisco IP Phone 8845, 8851, 8861 and 8865 support Bluetooth. For a list of supported third party headsets,see http://www.cisco.com/c/en/us/products/unified-communications/uc_endpoints_accessories.html.
Cisco IP Phone 8800 Series User Guide95
AccessoriesAudio Quality

Bluetooth enables low-bandwidth wireless connections within a range of 66 feet (20 meters). The bestperformance is in the 3- to 6-foot (1- to 2-meter) range. Bluetooth wireless technology operates in the 2.4GHz band, which is the same as the 802.11b/g band. Interference issues can occur. We recommend that you:
• Use 802.11a, 802.11n, or 802.11ac that operates in the 5 GHz band.
• Reduce the proximity of other 802.11b/g devices, Bluetooth devices, microwave ovens, and large metalobjects.
The Cisco IP Phone uses a shared key authentication and encryption method to connect with headsets. TheCisco IP Phone can connect with up to 50 headsets, one at a time. The last connected headset is used as thedefault. Pairing is typically performed once for each headset.
After a device is paired, the Bluetooth connection is maintained as long as both devices (phone and headset)are enabled and within range of each other. The connection typically reestablishes itself automatically if eitherof the devices powers down then powers up. However, some headsets require user action to reestablish theconnection.
The Bluetooth icon indicates that Bluetooth is on, whether a device is connected or not.
Potential interference issues can occur. We recommend that you reduce the proximity of other 802.11b/gdevices, Bluetooth devices, microwave ovens, and large metal objects. If possible, configure other 802.11devices to use the 802.11a channels.
For a Bluetooth wireless headset to work, it does not need to be within direct line-of-sight of the phone. Butsome barriers such as walls or doors can affect the connection. Interference from other electronic devices canalso affect performance.
When headsets are more than 30 feet (10meters) away from the Cisco IP Phone, Bluetooth drops the connectionafter a 15- to 20-second timeout. The paired headset reconnects when it is comes back into range of the CiscoIP Phone. For certain phone types that operate in power-save modes, you can wake up the headset by tappingon the operational button.
Enable the headset before you add it as a phone accessory.
The phone supports various Handsfree Profile features that allow you to use devices such as Bluetooth wirelessheadsets for certain tasks. For example, instead of pressing Redial on the phone, you can redial a number fromthe Bluetooth wireless headset by following instructions from the headset manufacturer.
Cisco IP Phone 8811, 8841, 8851NR, and 8865NR do not support Bluetoothwireless headsets. These hands-freefeatures apply to Bluetooth wireless headsets that are used with the Cisco IP Phone 8845, 8851, 8861 and8865:
• Answer a call
• End a call
• Change the headset volume for a call
• Redial
• Caller ID
• Divert
• Hold and Accept
• Release and Accept
Cisco IP Phone 8800 Series User Guide96
AccessoriesBluetooth Wireless Headsets

Hands-free devices have different feature activation methods. Device manufacturers may also use differentterms when referring to the same feature.
Only one headset type works at any given time. If you use both a Bluetooth headset and an analog headsetthat are attached to the phone, enabling the Bluetooth headset disables the analog headset. To enable the analogheadset, disable the Bluetooth headset. Plugging a USB headset into a phone that has Bluetooth headsetenabled disables both the Bluetooth and analog headset. If you unplug the USB headset, you can either enablethe Bluetooth headset or disable the Bluetooth headset to use the analog headset.
Important
For information about how to use your Bluetooth wireless headset, see:
• Cisco IP Phone 8811, 8841, 8851, 8851NR, and 8861 User Guide for Cisco Unified CommunicationsManager
• User Guides provided with your headset
Wireless HeadsetsYou can use most wireless headsets with your phone. For a list of supported wireless headsets, seehttp://www.cisco.com/c/en/us/products/unified-communications/uc_endpoints_accessories.html
Refer to your wireless headset documentation for information about connecting the headset and using thefeatures.
Standard HeadsetsYou can use a standard headset with your desk phone. Standard headsets plug into the back of the phone withan RJ-type connecter.
Connect a Standard HeadsetStandard headsets plug into the back of the phone.
Procedure
Plug the headset into the jack on the back of the phone and press the cable into the cable channel.
Cisco IP Phone 8800 Series User Guide97
AccessoriesWireless Headsets
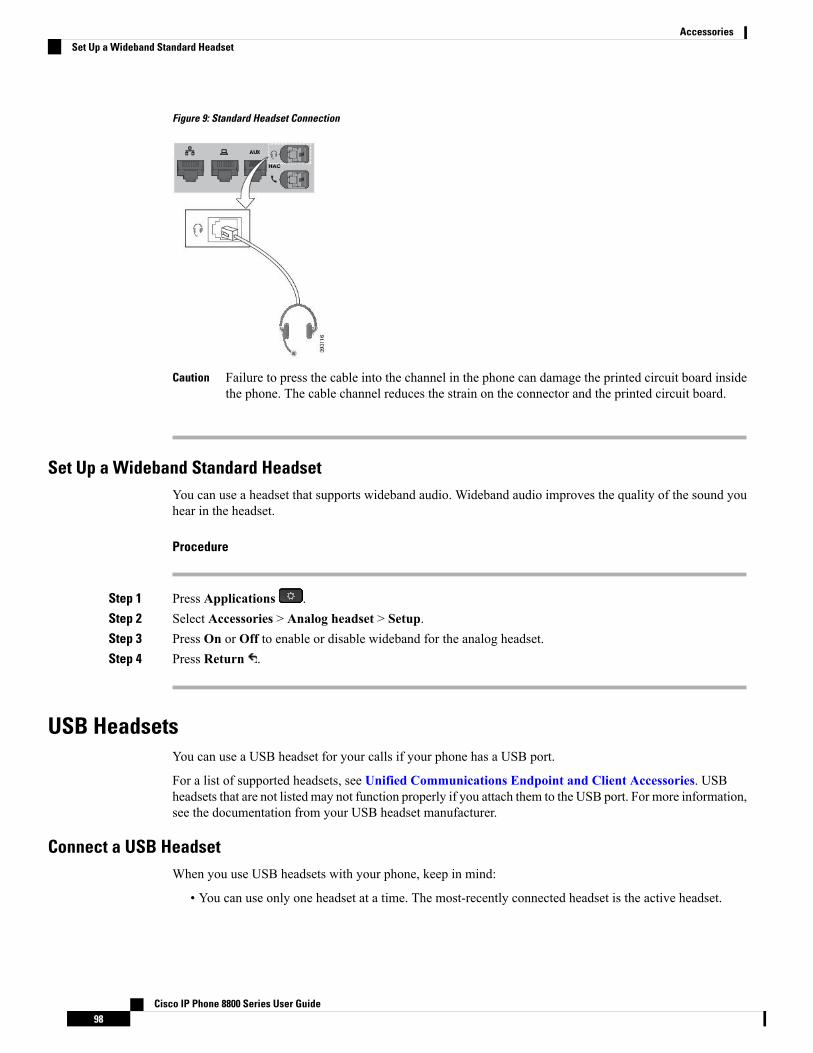
Figure 9: Standard Headset Connection
Failure to press the cable into the channel in the phone can damage the printed circuit board insidethe phone. The cable channel reduces the strain on the connector and the printed circuit board.
Caution
Set Up a Wideband Standard HeadsetYou can use a headset that supports wideband audio. Wideband audio improves the quality of the sound youhear in the headset.
Procedure
Step 1 Press Applications .Step 2 Select Accessories > Analog headset > Setup.Step 3 Press On or Off to enable or disable wideband for the analog headset.Step 4 Press Return .
USB HeadsetsYou can use a USB headset for your calls if your phone has a USB port.
For a list of supported headsets, see Unified Communications Endpoint and Client Accessories. USBheadsets that are not listed may not function properly if you attach them to the USB port. For more information,see the documentation from your USB headset manufacturer.
Connect a USB HeadsetWhen you use USB headsets with your phone, keep in mind:
• You can use only one headset at a time. The most-recently connected headset is the active headset.
Cisco IP Phone 8800 Series User Guide98
AccessoriesSet Up a Wideband Standard Headset

• If you are on an active call and unplug a USB headset, the audio path does not change automatically.You need to press the Speakerphone button or pick up the handset.
Procedure
Required: Plug the USB headset plug into the USB port on the phone.
Bluetooth HeadsetsYou can use a Bluetooth headset for your calls if your phone supports Bluetooth.
When you use Bluetooth headsets with your phone, keep in mind:
• If you have both a Bluetooth headset and a standard headset attached to the phone, only one type ofheadset works at any time. When you enable one headset, the other is automatically disabled.
• If you use a USB headset, both the Bluetooth and analog headset are disabled. If you unplug the USBheadset, you need to enable the Bluetooth or standard headset.
• For optimum headset coverage, use your Bluetooth headset within 10 feet (3 meters) of the phone.
• Your phone supports the Bluetooth Handsfree Profile. If your Bluetooth headset supports these features,you can use your headset to:
• Answer a call
• End a call
• Change the headset volume for a call
• Redial a number
• View Caller ID
• Reject a call
• Divert a call
• Place a call on hold by answering an incoming call
• End a call by answering an incoming call
For more information, see the documentation from your Bluetooth headset manufacturer.
Related TopicsBluetooth and Your Phone, on page 18The Cisco IP Phone 8800 Series, on page 1View Your Paired Bluetooth Devices, on page 60
Turn Bluetooth On or Off
When Bluetooth is active, the Bluetooth icon appears in the phone screen header.
Cisco IP Phone 8800 Series User Guide99
AccessoriesBluetooth Headsets
Procedure
Step 1 Press Applications .Step 2 Select Bluetooth.Step 3 Press On or Off.
Add a Bluetooth Headset
Procedure
Step 1 Make your Bluetooth headset discoverable.
Step 2 Press Applications .Step 3 Select Bluetooth > Add Bluetooth device.
Your phone searches for discoverable accessories.Step 4 Select your headset and press Connect.Step 5 (Optional) If prompted, enter the PIN for your headset.
Disconnect a Bluetooth HeadsetYou should disconnect your Bluetooth headset before you use it with another device.
Procedure
Step 1 Press Applications .Step 2 Select Bluetooth.Step 3 Select a Bluetooth headset.Step 4 Press Disconnect.
Remove a Bluetooth HeadsetRemove your Bluetooth headset if you aren't going to use it with your phone again.
Procedure
Step 1 Press Applications .Step 2 Select Bluetooth.Step 3 Select a Bluetooth headset and press Delete.
Cisco IP Phone 8800 Series User Guide100
AccessoriesAdd a Bluetooth Headset
Wireless HeadsetsYou can use most wireless headsets with your phone. For a list of supported headsets, seehttp://www.cisco.com/c/en/us/products/unified-communications/uc_endpoints_accessories.html.
Refer to your wireless headset documentation for information about connecting the headset and using itsfeatures.
Enable an E-Hookswitch HeadsetElectronic Hookswitch headsets use a base station and a wireless headset. The base station plugs into yourphone headset jack. After installing the headset, you enable it on the Cisco Unified CommunicationsManager.
Procedure
Step 1 Press Applications .Step 2 Navigate to Settings > E-Hookswitch connected.Step 3 Select Yes.
Swap Headsets While on a CallYou can connect an analog headset, a Bluetooth headset, and a USB headset simultaneously to your phone.However,you can use only one headset at a time.
When you connect multiple headsets to the phone, you can switch among the headsets during a call by pressingtheHeadset key on the phone. Though the phone is connected to multiple devices, you see a specific headsetis selected as the preferred audio device in the following priority order:
• When you connect a USB headset, a Bluetooth, and an analog headset to the phone, you can make yourUSB headset the preferred audio device.
• When you connect a Bluetooth and an analog headset to the phone, you can make your Bluetooth devicethe preferred audio device. The Bluetooth headset takes priority over wired headset, so audio is sent orreceived from Bluetooth headset and there will be no audio on wired headset.
• When you connect only an analog headset to the phone, you make your analog headset the preferredaudio device.
Procedure
Step 1 Before you make or answer a call, press Headset.Step 2 (Optional) If you place a call, dial the number.
Cisco IP Phone 8800 Series User Guide101
AccessoriesWireless Headsets
Cisco IP Phone 8800 Key Expansion ModuleA key expansion module allows you to add extra line appearances or programmable buttons to your phone.The programmable buttons can be set up as phone line buttons, speed-dial buttons, or phone feature buttons.
Simplified dialing is not supported on the expansion modules.
.
There are 3 expansion modules available:
• Cisco IP Phone 8800 Key Expansion Module—Single LCD screen module, 18 line keys, 2 pages,configure with one or two column displays.
• Cisco IP Phone 8851/8861 Key ExpansionModule—Dual LCD screen module for audio phones, 14 linekeys, 2 pages, configure with one-column display only. If you are in Enhanced line mode, and you receivea call on a key expansion line, then a Call Alert displays on the phone, and the Caller ID displays on theexpansion module line.
• Cisco IP Phone 8865 Key ExpansionModule—Dual LCD screen module for video phones, 14 line keys,2 pages, configure with one-column display only. If you are in Enhanced line mode, and you receive acall on a key expansion line, then a Call Alert displays on the phone, and the Caller ID displays on theexpansion module line.
Cisco IP Phone 8851/8861 Key ExpansionModule require firmware release 12.0(1) or later, and Cisco UnifiedCommunications Manager 10.5(2) or later to function. Enhanced line mode (ELM) is supported only on theCisco IP Phone 8851/8861 Key Expansion Module and the Cisco IP Phone 8865 Key Expansion Module.ELM is not supported on the single LCD expansion modules.
If you are using more than one expansion module, all the modules must be the same type. You cannot combinedifferent expansion modules on your phone.
When you configure your wallpaper on your Cisco IP Phone 8800 Series device, it also displays on your dualLCD key expansion modules. It is not supported on the single LCD expansion modules. Custom backgroundimages may not be supported.
Table 14: Key Expansion Module Support
Supported Dual LCD Key ExpansionModules
Supported Single LCD KeyExpansion Modules
Cisco IP Phone Model
2; providing 56 lines or buttons2; providing 72 lines or buttonsCisco IP Phone 8851 and 8851NR
3; providing 84 lines or buttons3; providing 108 lines or buttonsCisco IP Phone 8861
3; providing 84 lines or buttons3; providing 108 lines or buttonsCisco IP Phone 8865 and 8865NR
When multiple key expansion modules are attached to the phone, they are numbered according to the orderin which they are connected to the phone. For example:
• Key expansion module 1 is the closest unit to the phone.
• Key expansion module 2 is the unit in the middle.
• Key expansion module 3 is the farthest unit from the phone.
Cisco IP Phone 8800 Series User Guide102
AccessoriesCisco IP Phone 8800 Key Expansion Module
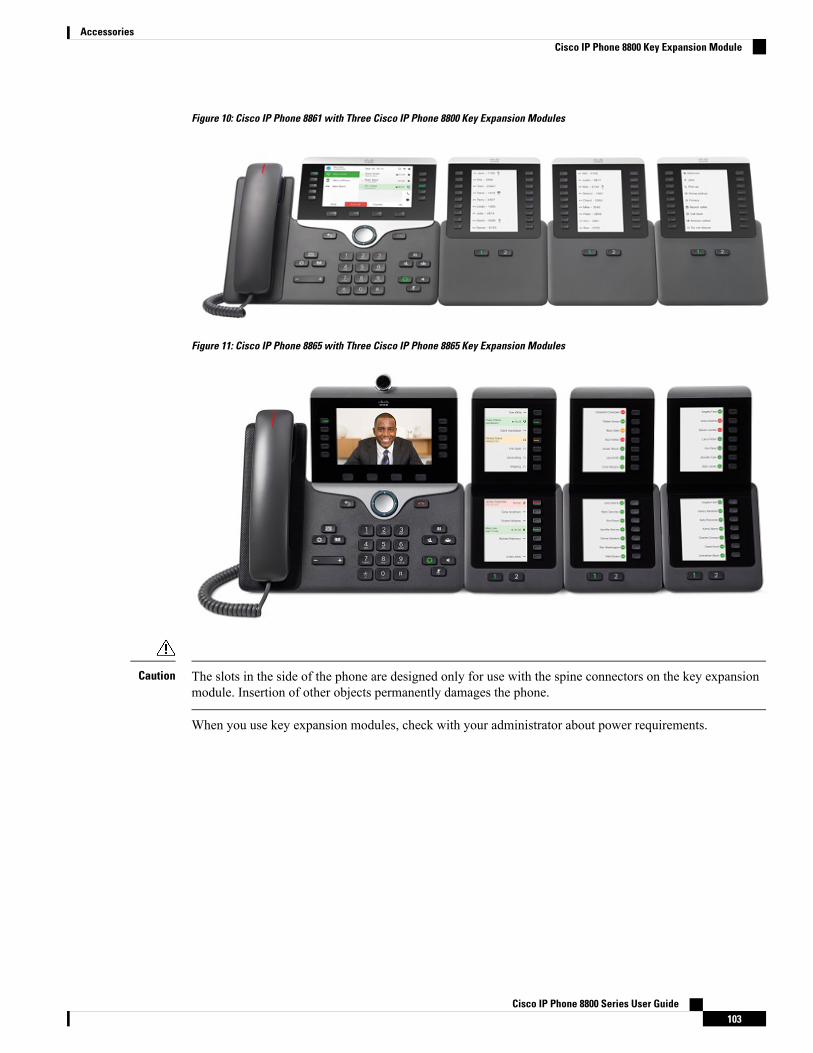
Figure 10: Cisco IP Phone 8861 with Three Cisco IP Phone 8800 Key Expansion Modules
Figure 11: Cisco IP Phone 8865 with Three Cisco IP Phone 8865 Key Expansion Modules
The slots in the side of the phone are designed only for use with the spine connectors on the key expansionmodule. Insertion of other objects permanently damages the phone.
Caution
When you use key expansion modules, check with your administrator about power requirements.
Cisco IP Phone 8800 Series User Guide103
AccessoriesCisco IP Phone 8800 Key Expansion Module

Key Expansion Module Buttons and Hardware
The following table describes the features of the key expansion module.
LCD screen—Displays the phone number, speed-dial number (or name or other text label), phoneservice, or phone feature assigned to each button.
Icons that indicate line status resemble (in both appearance and function) the icons on the phoneto which the key expansion module is attached.
Lighted buttons—18 line buttons. Depending on the mode, each button or pair of buttonscorresponds to one line (same as on the phone). For mode information, see the descriptions of1-column and 2-column mode that follow this table. The lights beneath each button indicate thestate of the corresponding line as follows:
• light off—Line available or a call is ringing on an inactive page.
• green steady—Line in use by you, you have a call on hold, or a call being transferred.
• red steady—Line in use by someone else or someone else has a call on hold on a sharedline.
• amber steady—Line ringing.
1
Shift buttons—2 buttons. The button for page 1 is labeled as 1 and the button for page 2 is labeledas 2. The lights in each button indicate the state of the page as follows:
• green steady—Page is in view.
• light off—Page is not in view.
• amber steady—Page is not in view with one or more alerting calls on the page.
2
Your administrator sets up the key expansion module to display in one-column or two-column mode.
Cisco IP Phone 8800 Series User Guide104
AccessoriesKey Expansion Module Buttons and Hardware
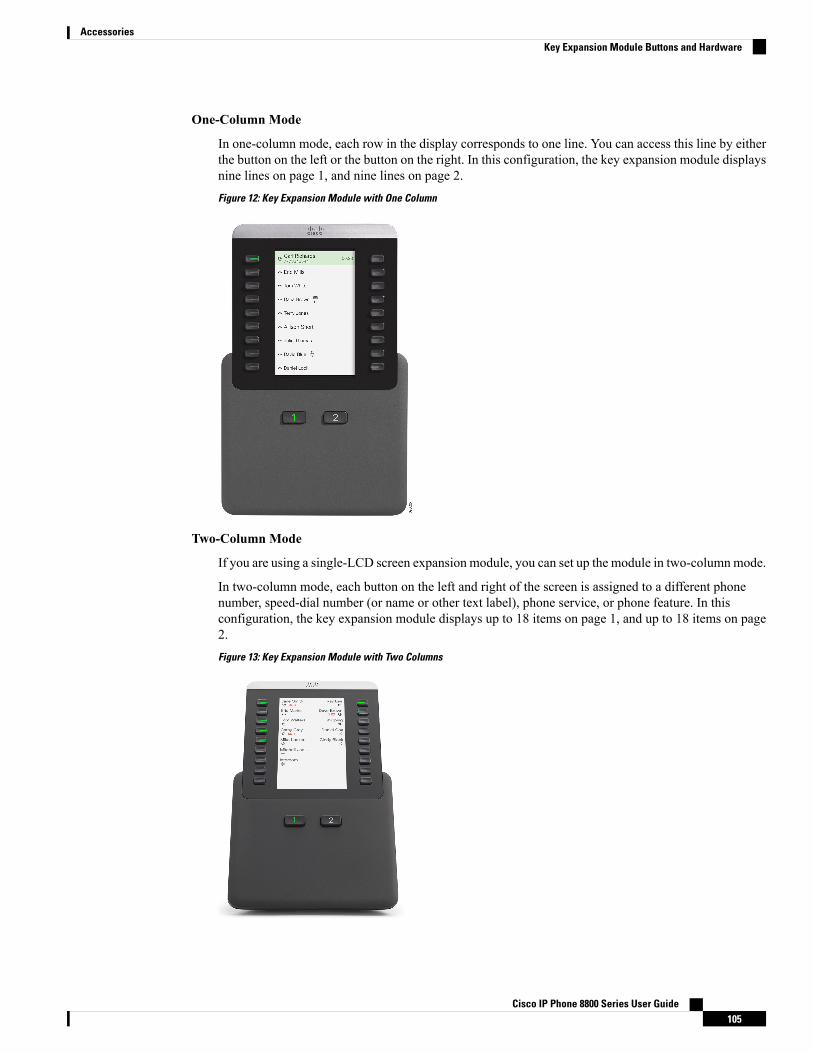
One-Column Mode
In one-column mode, each row in the display corresponds to one line. You can access this line by eitherthe button on the left or the button on the right. In this configuration, the key expansion module displaysnine lines on page 1, and nine lines on page 2.Figure 12: Key Expansion Module with One Column
Two-Column Mode
If you are using a single-LCD screen expansion module, you can set up the module in two-columnmode.
In two-column mode, each button on the left and right of the screen is assigned to a different phonenumber, speed-dial number (or name or other text label), phone service, or phone feature. In thisconfiguration, the key expansion module displays up to 18 items on page 1, and up to 18 items on page2.Figure 13: Key Expansion Module with Two Columns
Cisco IP Phone 8800 Series User Guide105
AccessoriesKey Expansion Module Buttons and Hardware
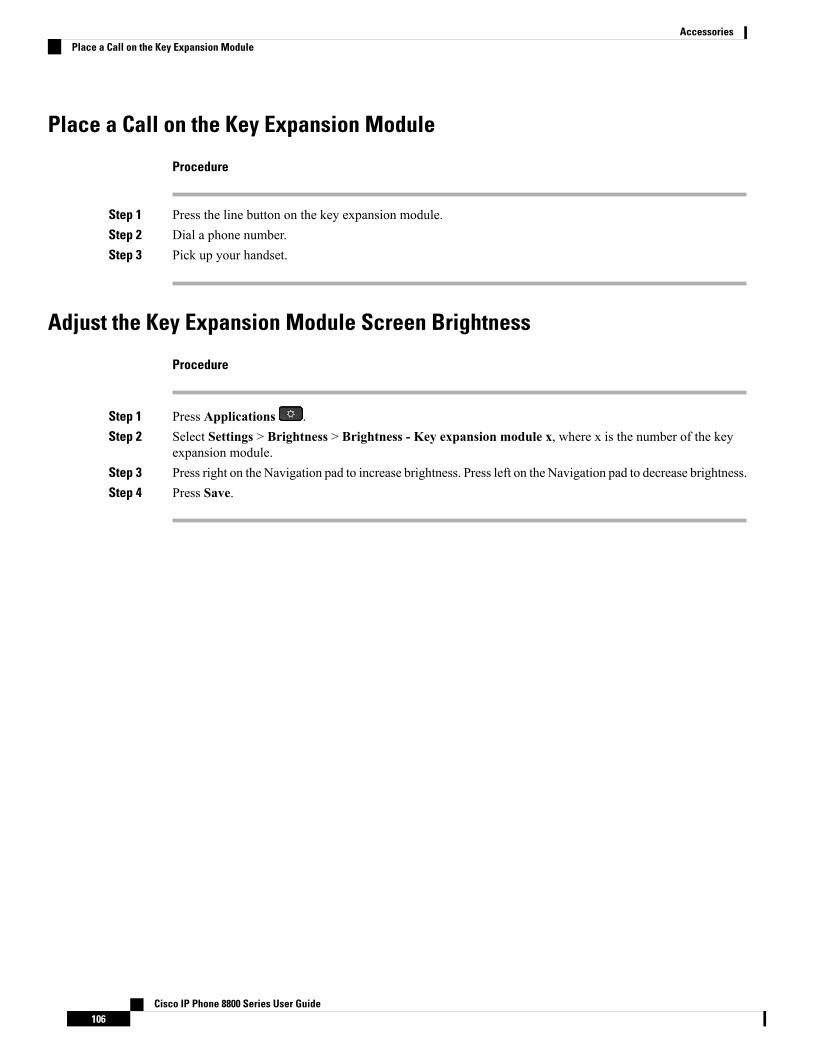
Place a Call on the Key Expansion Module
Procedure
Step 1 Press the line button on the key expansion module.Step 2 Dial a phone number.Step 3 Pick up your handset.
Adjust the Key Expansion Module Screen Brightness
Procedure
Step 1 Press Applications .Step 2 Select Settings > Brightness > Brightness - Key expansion module x, where x is the number of the key
expansion module.Step 3 Press right on the Navigation pad to increase brightness. Press left on the Navigation pad to decrease brightness.Step 4 Press Save.
Cisco IP Phone 8800 Series User Guide106
AccessoriesPlace a Call on the Key Expansion Module
C H A P T E R 9Product Safety and Security
• Safety and Performance Information, on page 107• Compliance Statements, on page 109• Cisco Product Security Overview, on page 112• Important Online Information, on page 112
Safety and Performance Information
Power OutageYour access to emergency service through the phone requires that the phone receive power. If a powerinterruption occurs, service or emergency calling service dialing does not function until power is restored. Ifa power failure or disruption occurs, you may need to reset or reconfigure the equipment before you can useservice or emergency calling service dialing.
Regulatory DomainsThe radio frequency (RF) for this phone is configured for a specific regulatory domain. If you use this phoneoutside of the specific regulatory domain, the phone will not function properly, and you might violate localregulations.
Health-Care EnvironmentsThis product is not a medical device and uses an unlicensed frequency band that is susceptible to interferencefrom other devices or equipment.
External DevicesWe recommend that you use good-quality external devices that are shielded against unwanted radio frequency(RF) and audio frequency (AF) signals. External devices include headsets, cables, and connectors.
Depending on the quality of these devices and their proximity to other devices, such as mobile phones ortwo-way radios, some audio noise may still occur. In these cases, we recommend that you take one or moreof these actions:
Cisco IP Phone 8800 Series User Guide107
• Move the external device away from the source of the RF or AF signals.
• Route the external device cables away from the source of the RF or AF signals.
• Use shielded cables for the external device, or use cables with a better shield and connector.
• Shorten the length of the external device cable.
• Apply ferrites or other such devices on the cables for the external device.
Cisco cannot guarantee the performance of external devices, cables, and connectors.
In European Union countries, use only external speakers, microphones, and headsets that are fully compliantwith the EMC Directive [89/336/EC].
Caution
Bluetooth Wireless Headset PerformanceCisco IP phones support Bluetooth Class 2 technology when the headsets support Bluetooth. Bluetooth enableslow-bandwidth wireless connections within a range of 30 feet (10 meters). The best performance is in the 3-to 6-foot (1- to 2-meter) range. You can connect up to five headsets, but only the last one connected is usedas the default.
Because of potential interference issues, we recommend that you move 802.11b/g devices, Bluetooth devices,microwave ovens, and large metal objects away from the wireless headset.
The Bluetooth wireless headset does not need to be within direct line-of-sight of the phone. However, somebarriers, such as walls or doors, and interference from other electronic devices, can affect the connection.
Ways to Provide Power to Your PhoneYou can provide power to your phone in one of two ways:
• Use the power adapter that comes with your phone.
• If your network supports Power over Ethernet (PoE), you can plug your phone into the network. Plugan Ethernet cable into the Ethernet phone port and into the network.
If you are not sure whether your network supports PoE, check with your administrator.
Phone Behavior During Times of Network CongestionAnything that degrades network performance can affect phone voice and video quality, and in some cases,can cause a call to drop. Sources of network degradation can include, but are not limited to, the followingactivities:
• Administrative tasks, such as an internal port scan or security scan
• Attacks that occur on your network, such as a Denial of Service attack
Cisco IP Phone 8800 Series User Guide108
Product Safety and SecurityBluetooth Wireless Headset Performance

UL WarningThe LAN/Ethernet cable or other cables attached to the device should not be extended outside of the building.
Compliance Statements
Compliance Statements for the European Union
CE MarkingThe following CE mark is affixed to the equipment and packaging.
RF Exposure Statement for the European UnionThis device has been evaluated and found compliant in accordance with EU EMF Directive 2014/53/EU.
Compliance Statements for CanadaThis device complies with Industry Canada license-exempt RSS standard(s). Operation is subject to thefollowing two conditions: (1) this device may not cause interference, and (2) this device must accept anyinterference, including interference that may cause undesired operation of the device.
Avis de Conformité Canadien
Ce dispositif est conforme aux normes CNR exemptes de licence d’Industrie Canada. Le fonctionnement dece dispositif est autorisé sous réserve des deux conditions suivantes : (1) il ne doit pas produire de brouillageet (2) l’utilisateur du dispositif doit être prêt à accepter tout brouillage radioélectrique reçumême si ce brouillageest susceptible de compromettre le fonctionnement du dispositif.
Canadian RF Exposure StatementTHIS DEVICE MEETS THE LIMITS AS REFERENCED BY ISED RSS-102 R5 FOR EXPOSURE TORADIO WAVES
Your device includes a radio transmitter and receiver. It is designed not to exceed the General populace(uncontrolled) limits for exposure to radio waves (radio frequency electromagnetic fields) as referenced inRSS-102 which references Health Canada Safety Code 6 and include a substantial safety margin designed toassure the safety of all persons, regardless of age and health.
As such the systems are designed to be operated as to avoid contact with the antennas by the end user. It isrecommended to set the system in a location where the antennas can remain at least a minimum distance asspecified from the user in accordance to the regulatory guidelines which are designed to reduce the overallexposure of the user or operator.
Cisco IP Phone 8800 Series User Guide109
Product Safety and SecurityUL Warning
The device has been tested and found compliant with the applicable regulations as part of the radio certificationprocess.
Déclaration d'Exposition aux RF Canadienne
CEPÉRIPHÉRIQUERESPECTELESLIMITESDÉCRITESPARLANORMERSS-102R5D'EXPOSITIONÀ DES ONDES RADIO
Votre appareil comprend un émetteur et un récepteur radio. Il est conçu pour ne pas dépasser les limitesapplicables à la population générale (ne faisant pas l'objet de contrôles périodiques) d'exposition à des ondesradio (champs électromagnétiques de fréquences radio) comme indiqué dans la norme RSS-102 qui sert deréférence au règlement de sécurité n°6 sur l'état de santé du Canada et inclut une marge de sécurité importantesconçue pour garantir la sécurité de toutes les personnes, quels que soient leur âge et état de santé.
En tant que tels, les systèmes sont conçus pour être utilisés en évitant le contact avec les antennes par l'utilisateurfinal. Il est recommandé de positionner le système à un endroit où les antennes peuvent demeurer à au moinsune distance minimum préconisée de l'utilisateur, conformément aux instructions des réglementations quisont conçues pour réduire l'exposition globale de l'utilisateur ou de l'opérateur.
Le périphérique a été testé et déclaré conforme aux réglementations applicables dans le cadre du processusde certification radio.
Compliance Statement for Argentina
Advertencia
No utilizar una fuente de alimentación con caracteristícas distintas a las expresadas ya que podría ser peligroso.
Compliance Information for Brazil
Art. 6º - 506
This equipment is a secondary type device, that is, it is not protected against harmful interference, even if theinterference is caused by a device of the same type, and it also cannot cause any interference to primary typedevices.
For more information, go to this URL: http://www.anatel.gov.br
Este equipamento opera em caráter secundário, isto é, não tem direito a proteção contra interferência prejudicial,mesmo de estações do mesmo tipo, e não pode causar interferência a sistemas operando em caráter primário.
Site Anatel: http://www.anatel.gov.br
Compliance Information for China
Class A Warning Statement
This statement applies to the Cisco IP Conference Phone 8832NR.
Cisco IP Phone 8800 Series User Guide110
Product Safety and SecurityCompliance Statement for Argentina
Compliance Information for MexicoIFETEL: RCPCICP18-0445
Approval: NYCE/CT/0125/18/TS
CP-8832-K9 and CP-8832-W-K9
Compliance Information for RussiaEurasia Customs Union Mark (Russia, Belarus, Kazakhstan)
FCC Compliance StatementsThe Federal Communications Commission requires compliance statements for the following:
FCC Part 15.19 StatementThis device complies with part 15 of the FCC Rules. Operation is subject to the following two conditions: (1)This device may not cause harmful interference, and (2) this device must accept any interference received,including interference that may cause undesired operation.
FCC Part 15.21 StatementChanges or modifications not expressly approved by the party responsible for compliance could void theuser’s authority to operate the equipment.
FCC RF Radiation Exposure StatementThis equipment complies with FCC radiation exposure limits set forth for an uncontrolled environment. Endusers must follow the specific operating instructions for satisfying RF exposure compliance. This transmittermust be at least 20 cm from the user and must not be collocated or operating in conjunction with any otherantenna or transmitter.
FCC Receivers and Class B Digital StatementThis product has been tested and complies with the specifications for a Class B digital device, pursuant toPart 15 of the FCC Rules. These limits are designed to provide reasonable protection against harmfulinterference in a residential installation. This equipment generates, uses, and can radiate radio frequencyenergy and, if not installed and used according to the instructions, may cause harmful interference to radiocommunications. However, there is no guarantee that interference will not occur in a particular installation.
Cisco IP Phone 8800 Series User Guide111
Product Safety and SecurityCompliance Information for Mexico
If this equipment does cause harmful interference to radio or television reception, which is found by turningthe equipment off and on, the user is encouraged to try to correct the interference by one or more of thefollowing measures:
• Reorient or relocate the receiving antenna
• Increase the separation between the equipment or devices
• Connect the equipment to an outlet other than the receiver's
• Consult a dealer or an experienced radio/TV technician for assistance
Cisco Product Security OverviewThis product contains cryptographic features and is subject to U.S. and local country laws that govern import,export, transfer, and use. Delivery of Cisco cryptographic products does not imply third-party authority toimport, export, distribute, or use encryption. Importers, exporters, distributors, and users are responsible forcompliance with U.S. and local country laws. By using this product, you agree to comply with applicablelaws and regulations. If you are unable to comply with U.S. and local laws, return this product immediately.
Further information regarding U.S. export regulations can be found at https://www.bis.doc.gov/policiesandregulations/ear/index.htm.
Important Online InformationEnd User License Agreement
The End User License Agreement (EULA) is located here: https://www.cisco.com/go/eula
Regulatory Compliance and Safety Information
Regulatory Compliance and Safety Information (RCSI) is located here:
https://www.cisco.com/c/dam/en/us/td/docs/voice_ip_comm/cuipph/8800-series/regulatory_compliance/RCSI-0313-book.pdf
Cisco IP Phone 8800 Series User Guide112
Product Safety and SecurityCisco Product Security Overview