cisco ip phone 7821, 7841, and 7861 user guide for cisco...
TRANSCRIPT
Cisco IP Phone 7821, 7841, and 7861 User Guide for Cisco UnifiedCommunications Manager 10.0 (SIP)First Published: October 25, 2013
Last Modified: April 16, 2014
Americas HeadquartersCisco Systems, Inc.170 West Tasman DriveSan Jose, CA 95134-1706USAhttp://www.cisco.comTel: 408 526-4000 800 553-NETS (6387)Fax: 408 527-0883
THE SPECIFICATIONS AND INFORMATION REGARDING THE PRODUCTS IN THIS MANUAL ARE SUBJECT TO CHANGE WITHOUT NOTICE. ALL STATEMENTS,INFORMATION, AND RECOMMENDATIONS IN THIS MANUAL ARE BELIEVED TO BE ACCURATE BUT ARE PRESENTED WITHOUT WARRANTY OF ANY KIND,EXPRESS OR IMPLIED. USERS MUST TAKE FULL RESPONSIBILITY FOR THEIR APPLICATION OF ANY PRODUCTS.
THE SOFTWARE LICENSE AND LIMITEDWARRANTY FOR THE ACCOMPANYING PRODUCT ARE SET FORTH IN THE INFORMATION PACKET THAT SHIPPED WITHTHE PRODUCT AND ARE INCORPORATED HEREIN BY THIS REFERENCE. IF YOU ARE UNABLE TO LOCATE THE SOFTWARE LICENSE OR LIMITED WARRANTY,CONTACT YOUR CISCO REPRESENTATIVE FOR A COPY.
The following information is for FCC compliance of Class A devices: This equipment has been tested and found to comply with the limits for a Class A digital device, pursuant to part 15of the FCC rules. These limits are designed to provide reasonable protection against harmful interference when the equipment is operated in a commercial environment. This equipmentgenerates, uses, and can radiate radio-frequency energy and, if not installed and used in accordance with the instruction manual, may cause harmful interference to radio communications.Operation of this equipment in a residential area is likely to cause harmful interference, in which case users will be required to correct the interference at their own expense.
The following information is for FCC compliance of Class B devices: This equipment has been tested and found to comply with the limits for a Class B digital device, pursuant to part 15of the FCC rules. These limits are designed to provide reasonable protection against harmful interference in a residential installation. This equipment generates, uses and can radiate radiofrequency energy and, if not installed and used in accordance with the instructions, may cause harmful interference to radio communications. However, there is no guarantee that interferencewill not occur in a particular installation. If the equipment causes interference to radio or television reception, which can be determined by turning the equipment off and on, users areencouraged to try to correct the interference by using one or more of the following measures:
• Reorient or relocate the receiving antenna.
• Increase the separation between the equipment and receiver.
• Connect the equipment into an outlet on a circuit different from that to which the receiver is connected.
• Consult the dealer or an experienced radio/TV technician for help.
Modifications to this product not authorized by Cisco could void the FCC approval and negate your authority to operate the product
The Cisco implementation of TCP header compression is an adaptation of a program developed by the University of California, Berkeley (UCB) as part of UCB’s public domain versionof the UNIX operating system. All rights reserved. Copyright © 1981, Regents of the University of California.
NOTWITHSTANDINGANYOTHERWARRANTYHEREIN, ALL DOCUMENT FILES AND SOFTWAREOF THESE SUPPLIERS ARE PROVIDED "AS IS"WITHALL FAULTS.CISCO AND THE ABOVE-NAMED SUPPLIERS DISCLAIM ALL WARRANTIES, EXPRESSED OR IMPLIED, INCLUDING, WITHOUT LIMITATION, THOSE OFMERCHANTABILITY, FITNESS FORA PARTICULAR PURPOSEANDNONINFRINGEMENTORARISING FROMACOURSEOFDEALING, USAGE, OR TRADE PRACTICE.
IN NO EVENT SHALL CISCO OR ITS SUPPLIERS BE LIABLE FOR ANY INDIRECT, SPECIAL, CONSEQUENTIAL, OR INCIDENTAL DAMAGES, INCLUDING, WITHOUTLIMITATION, LOST PROFITS OR LOSS OR DAMAGE TO DATA ARISING OUT OF THE USE OR INABILITY TO USE THIS MANUAL, EVEN IF CISCO OR ITS SUPPLIERSHAVE BEEN ADVISED OF THE POSSIBILITY OF SUCH DAMAGES.
Any Internet Protocol (IP) addresses and phone numbers used in this document are not intended to be actual addresses and phone numbers. Any examples, command display output, networktopology diagrams, and other figures included in the document are shown for illustrative purposes only. Any use of actual IP addresses or phone numbers in illustrative content is unintentionaland coincidental.
Cisco and the Cisco logo are trademarks or registered trademarks of Cisco and/or its affiliates in the U.S. and other countries. To view a list of Cisco trademarks, go to this URL: http://www.cisco.com/go/trademarks. Third-party trademarks mentioned are the property of their respective owners. The use of the word partner does not imply a partnershiprelationship between Cisco and any other company. (1110R)
© 2014 Cisco Systems, Inc. All rights reserved.

C O N T E N T S
C H A P T E R 1 Getting Started 1
Accessibility Features 1
Cisco IP Phone 7821 1
Phone Connections 1
Buttons and Hardware 3
Phone Screen 5
Cisco IP Phone 7841 6
Phone Connections 6
Buttons and Hardware 7
Phone Screen 9
Cisco IP Phone 7861 10
Phone Connections 10
Buttons and Hardware 12
Phone Screen 14
Power Requirements 15
Power Save and Power Save Plus 15
Power Save 15
Power Save Plus 15
Additional Information 16
C H A P T E R 2 Phone Setup 17
Connect Footstand 17
Adjust Handset Rest 17
C H A P T E R 3 Basic Operations 19
Clean Phone Display 19
Make Calls 20
Predial Number 20
Cisco IP Phone 7821, 7841, and 7861 User Guide for Cisco Unified Communications Manager 10.0 (SIP) iii

Place Call Using Speakerphone 20
Place Call Using Headset 21
Release Call and Start Another Call 21
Dial International Number 21
Redial Number 22
Answer Calls 22
Answer Oldest Call First 22
Answer Call Using PickUp 22
Answer Call Using Group PickUp and Group PickUp Number 23
Answer Call Using Group PickUp and Phone Number 23
Answer Call Using Other PickUp 23
Automatically Answer Calls 24
Respond to Call Waiting Notification 25
Manage Calls 25
Divert Call 25
Forward All Calls 26
Transfer Call to Another Number 26
Swap Between Calls 26
Mute Phone 27
Monitor and Record Calls 27
Hold Calls 27
Swap Between Active and Held Calls 27
Put Call on Hold by Answering New Call 28
Respond to Hold Reversion Notification 28
Determine If Shared Line Is On Hold 28
Remote Hold 29
Setup Call Back Notification 29
Call Park 29
Park Call Using Assisted Directed Call Park 29
Park Call Using Manual Directed Call Park 30
Manage Intercom Calls 30
Place Dedicated Intercom Call 31
Place Dialable Intercom Call 31
Receive Intercom Call 32
View Phone Information 32
Cisco IP Phone 7821, 7841, and 7861 User Guide for Cisco Unified Communications Manager 10.0 (SIP)iv
Contents

Sign In to Cisco Unified Communications Self Care Portal 32
C H A P T E R 4 Contacts 35
Corporate Directory 35
Dial Contact from Search 35
Search and Dial While on Call 36
Personal Directory 36
Add Personal Directory Entry 37
Edit Personal Directory Entry 37
Delete Personal Directory Entry 37
Sign In and Out of Personal Directory 38
Dial Number from Personal Directory 38
Search for Entry in Personal Directory 38
Edit Personal Directory Entry 39
Delete Personal Directory Entry 39
Fast-Dial Codes with Personal Directory 39
Assign Fast-Dial Code to Personal Directory Entry 40
Place Call Using Fast-Dial Code 40
Delete Fast-Dial Code 40
Cisco WebDialer 41
Use Cisco WebDialer with Another Online Corporate Directory 41
Change Cisco WebDialer Preferences 41
Sign Out of Cisco WebDialer 42
C H A P T E R 5 Call History 43
Call History Overview 43
View Call History 44
View Call Record Details 44
Filter Call History 44
Dial From Call History 45
Edit Phone Number 45
Clear Call History 46
Delete Call Record 46
C H A P T E R 6 Voicemail 47
Cisco IP Phone 7821, 7841, and 7861 User Guide for Cisco Unified Communications Manager 10.0 (SIP) v
Contents
Voicemail Overview 47
Check for Voice Messages 47
Access Voicemail 48
Listen to Voice Messages 48
C H A P T E R 7 Calling Features 49
Conference 49
Add Third Party to Conference 50
Combine Calls to Create Conference 50
Swap Between Calls Before Completing Conference 50
View Conference Participants 51
Remove Conference Participant 51
Meet Me Conference 51
Host Meet Me Conference 51
Join Meet Me Conference 52
Speed Dial 52
Place Call Using Speed-Dial Codes 52
Do Not Disturb 52
Turn DND On and Off 53
Line Status 53
Malicious Call Identification 54
Trace Suspicious Call 54
Cisco Extension Mobility 54
Enable Extension Mobility 55
Mobile Connect 55
Enable Mobile Connect 56
Turn Mobile Connect On or Off for All Remote Destinations from Desk Phone 56
Switch Desk Phone Call to Mobile Phone 56
Switch Mobile Call to Desk Phone 57
Hand Off Call from Mobile Phone to Desk Phone 57
Hunt Groups 57
Sign In and Out of Hunt Group 57
Display Queue Statistics 58
cBarge 58
Join Conference on Shared Line 58
Cisco IP Phone 7821, 7841, and 7861 User Guide for Cisco Unified Communications Manager 10.0 (SIP)vi
Contents
C H A P T E R 8 Advanced Operations 59
Call Functions 59
Agent Greeting 59
Answer 59
Client Matter Code 60
Forced Authorization Code 60
Secure and Nonsecure Indication Tones 60
Shared Lines 61
Feature Buttons and Softkeys 61
Survivable Remote Site Telephony Overview 63
C H A P T E R 9 Preferences 67
Adjust Brightness 67
Adjust Headset Sidetone 67
Change Ringtone 68
Line Settings 68
Phone Services 69
C H A P T E R 1 0 Frequently Asked Questions 71
Frequently Asked Questions 71
C H A P T E R 1 1 Troubleshooting 73
Conference Button and Softkey Unresponsive 73
Meet Me Conference Busy Tone 73
Cannot Sign In to Personal Directory 74
No Caller ID on Remote Hold 74
Cannot Access Self Care Portal 74
Security Error Message 75
C H A P T E R 1 2 Product Safety and Security 77
Safety and Performance Information 77
Power Outage 77
External Devices 77
Bluetooth Wireless Headset Performance 78
Cisco IP Phone 7821, 7841, and 7861 User Guide for Cisco Unified Communications Manager 10.0 (SIP) vii
Contents
Power Information 78
FCC Compliance Statements 78
FCC Part 15.21 Statement 78
FCC RF Radiation Exposure Statement 78
FCC Receivers and Class B Digital Statement 79
Cisco Product Security Overview 79
C H A P T E R 1 3 Warranty 81
Cisco One-Year Limited Hardware Warranty Terms 81
Cisco IP Phone 7821, 7841, and 7861 User Guide for Cisco Unified Communications Manager 10.0 (SIP)viii
Contents
C H A P T E R 1Getting Started
• Accessibility Features, page 1
• Cisco IP Phone 7821, page 1
• Cisco IP Phone 7841, page 6
• Cisco IP Phone 7861, page 10
• Power Requirements, page 15
• Power Save and Power Save Plus, page 15
• Additional Information, page 16
Accessibility FeaturesThe Cisco IP Phones 7821, 7841, and 7861 provide accessibility features for the vision impaired, the blind,and the hearing and mobility impaired.
For detailed information about the accessibility features on these phones, see: http://www.cisco.com/en/US/products/ps13220/products_feature_guides_list.html
You can also find more information about accessibility at this Cisco website:
http://www.cisco.com/web/about/responsibility/accessibility/index.html
Cisco IP Phone 7821
Phone ConnectionsFor your phone to work, it must be connected to the corporate IP telephony network.
Cisco IP Phone 7821, 7841, and 7861 User Guide for Cisco Unified Communications Manager 10.0 (SIP) 1
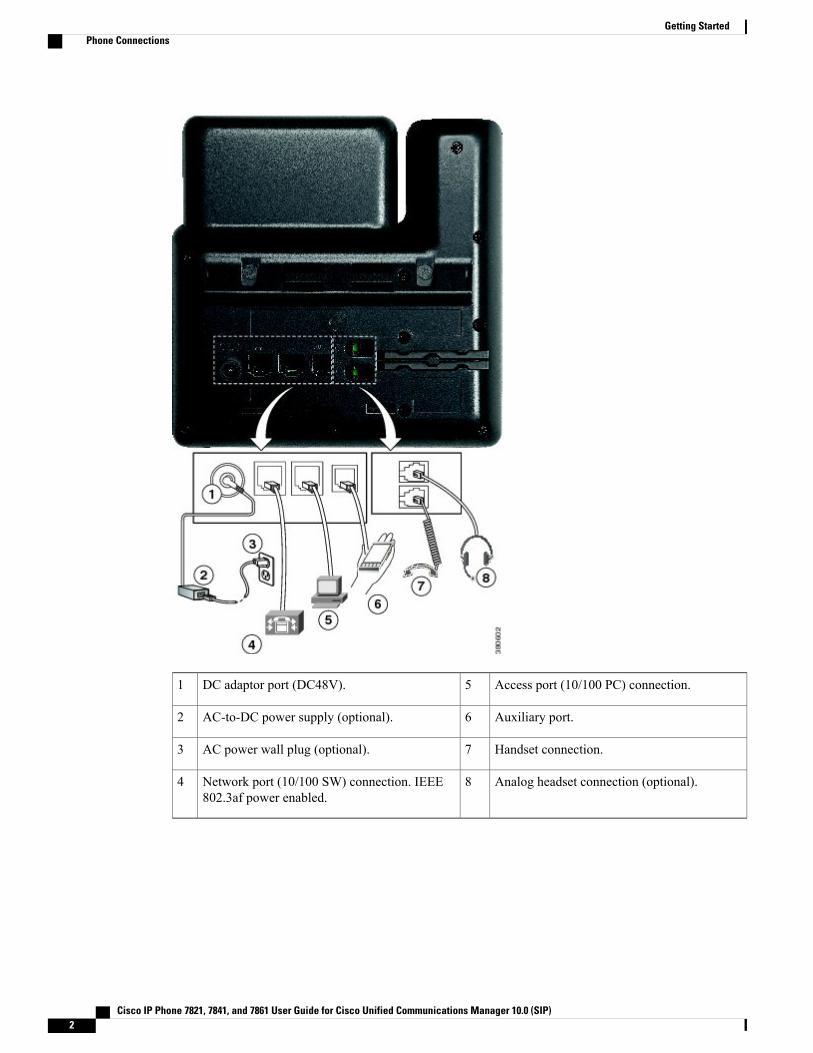
Access port (10/100 PC) connection.5DC adaptor port (DC48V).1
Auxiliary port.6AC-to-DC power supply (optional).2
Handset connection.7AC power wall plug (optional).3
Analog headset connection (optional).8Network port (10/100 SW) connection. IEEE802.3af power enabled.
4
Cisco IP Phone 7821, 7841, and 7861 User Guide for Cisco Unified Communications Manager 10.0 (SIP)2
Getting StartedPhone Connections
Buttons and Hardware
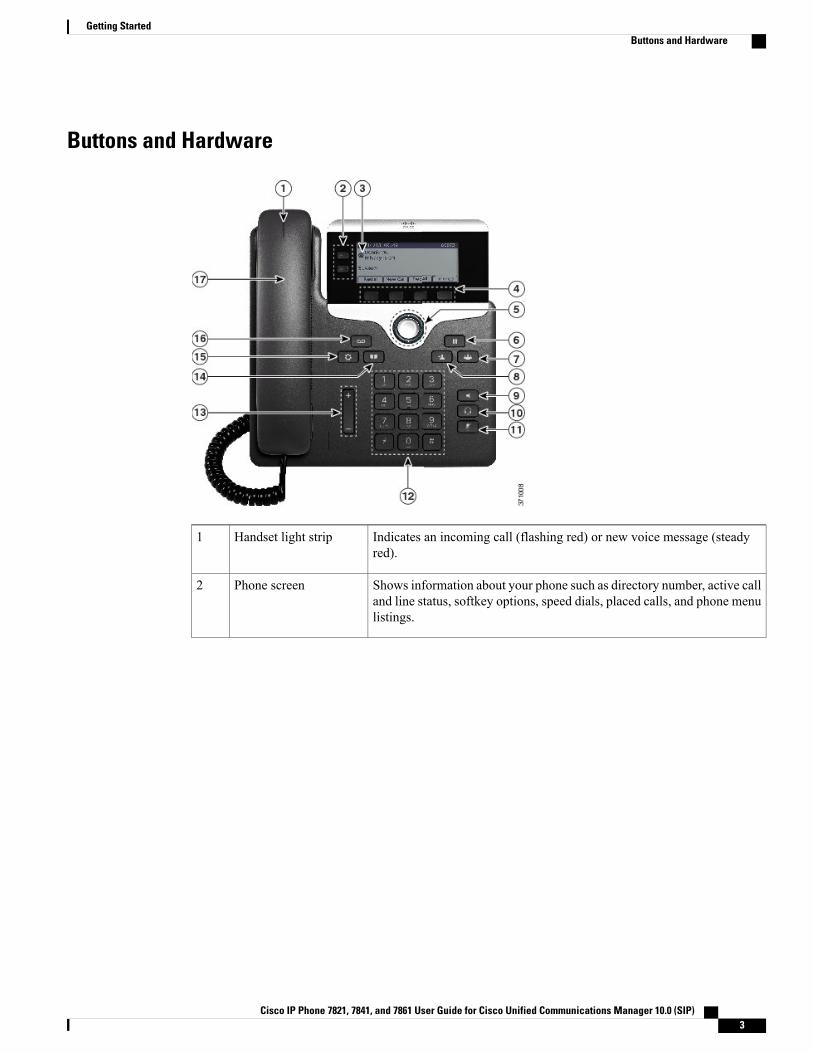
Indicates an incoming call (flashing red) or new voice message (steadyred).
Handset light strip1
Shows information about your phone such as directory number, active calland line status, softkey options, speed dials, placed calls, and phone menulistings.
Phone screen2
Cisco IP Phone 7821, 7841, and 7861 User Guide for Cisco Unified Communications Manager 10.0 (SIP) 3
Getting StartedButtons and Hardware

Depending on how your system administrator sets up the phone,programmable feature buttons (on each side of the phone screen) provideaccess to:
• Phone lines and intercom lines
• Speed-dial numbers (speed-dial buttons, including the Line Statusspeed-dial features)
• Web-based services (for example, a Personal Address Book button)
• Call features (for example, a Privacy button)
Buttons illuminate to indicate status:
• Green, steady: Active call or two-way intercom call
• Green, flashing: Held call
• Amber, steady: Privacy in use, one-way intercom call, DND active,or logged into Hunt Group
• Amber, flashing: Incoming call or reverting call
• Red, steady: Remote line in use (shared line or Line Status)
• Red, flashing: Remote line on hold
Programmable featurebuttons
3
Depending on how your system administrator sets up the phone, enablesoftkey options displayed on your phone screen.
Softkey buttons4
The Navigation and Select button allows you to scroll through menus,highlight items and select the highlighted item.
Navigation and Select
button
5
Places an active call on hold and resumes the held call.Hold/Resumebutton6
Creates a conference call.Conference button7
Transfers a call.Transfer button8
Toggles the speakerphone on or off. When the speakerphone is on, thebutton is lit.
Speakerphone button9
Cisco IP Phone 7821, 7841, and 7861 User Guide for Cisco Unified Communications Manager 10.0 (SIP)4
Getting StartedButtons and Hardware

Toggles the headset on or off. When the headset is on, the button is lit.Headset button10
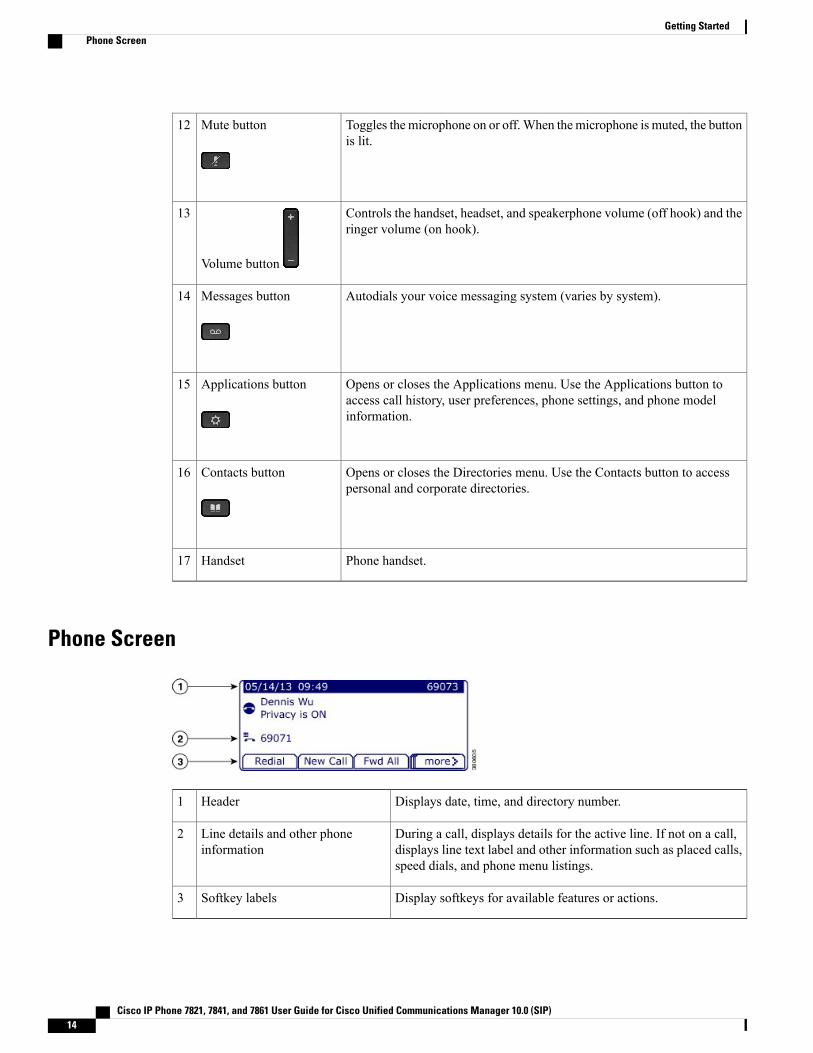
Toggles the microphone on or off. When the microphone is muted, thebutton is lit.
Mute button11
Allows you to dial phone numbers, enter letters, and select menu items(by entering the item number).
Keypad12
Controls the handset, headset, and speakerphone volume (off hook) andthe ringer volume (on hook).
Volume button
13
Opens or closes the Directories menu. Use the Contacts button to accesspersonal and corporate directories.
Contacts button14
Opens or closes the Applications menu. Use the Applications button toaccess call history, user preferences, phone settings, and phone modelinformation.
Applications button15
Autodials your voice messaging system (varies by system).Messages button16
Phone handset.Handset17
Phone Screen
Cisco IP Phone 7821, 7841, and 7861 User Guide for Cisco Unified Communications Manager 10.0 (SIP) 5
Getting StartedPhone Screen
Displays date, time, and directory number.Header1
Display softkeys for available features or actions.Softkey labels2
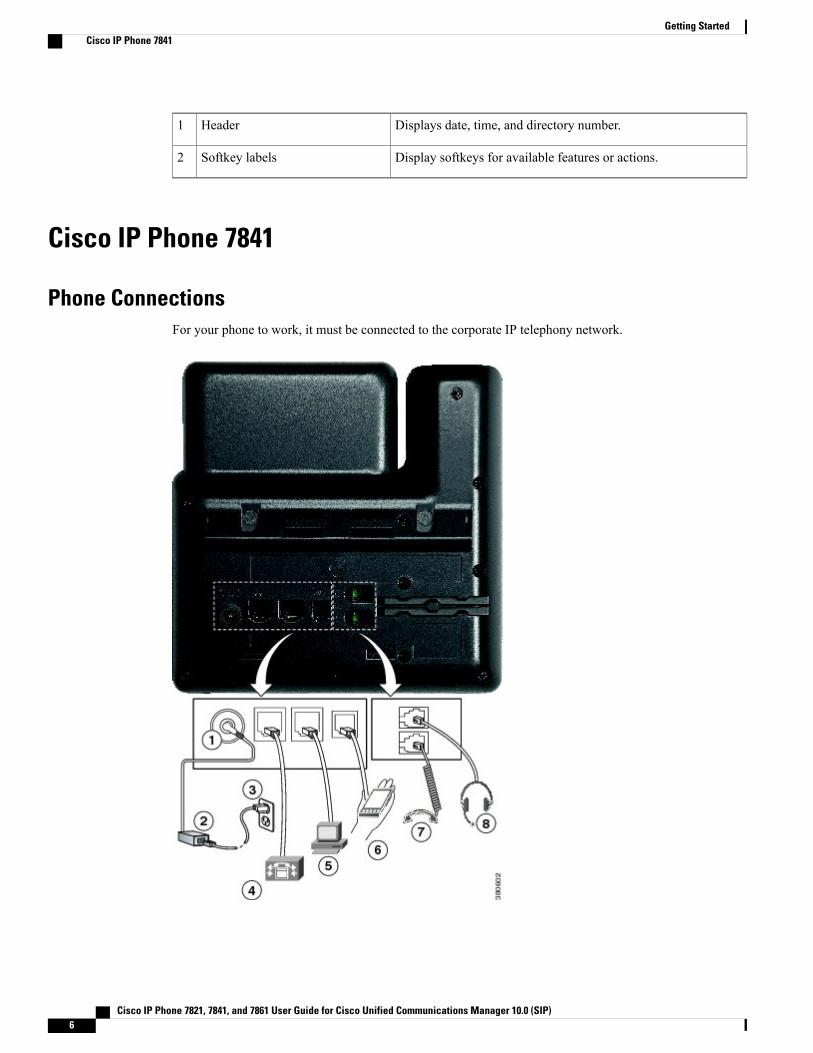
Cisco IP Phone 7841
Phone ConnectionsFor your phone to work, it must be connected to the corporate IP telephony network.
Cisco IP Phone 7821, 7841, and 7861 User Guide for Cisco Unified Communications Manager 10.0 (SIP)6
Getting StartedCisco IP Phone 7841
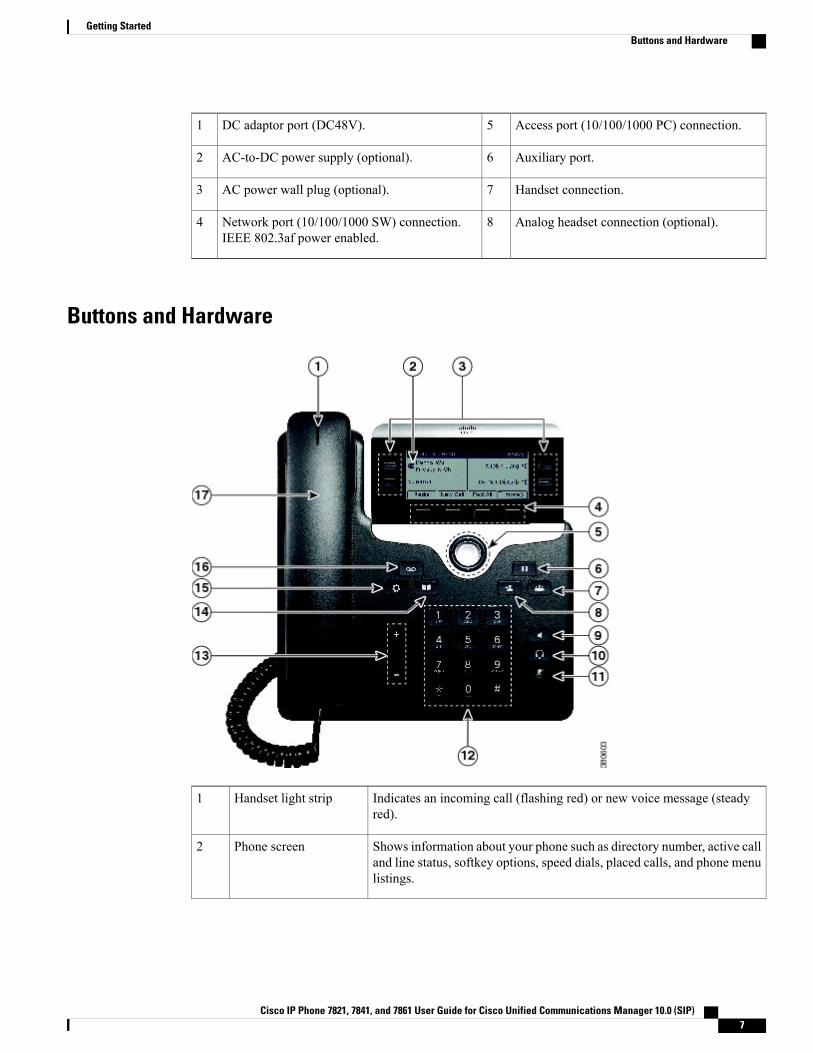
Access port (10/100/1000 PC) connection.5DC adaptor port (DC48V).1
Auxiliary port.6AC-to-DC power supply (optional).2
Handset connection.7AC power wall plug (optional).3
Analog headset connection (optional).8Network port (10/100/1000 SW) connection.IEEE 802.3af power enabled.
4
Buttons and Hardware
Indicates an incoming call (flashing red) or new voice message (steadyred).
Handset light strip1
Shows information about your phone such as directory number, active calland line status, softkey options, speed dials, placed calls, and phone menulistings.
Phone screen2
Cisco IP Phone 7821, 7841, and 7861 User Guide for Cisco Unified Communications Manager 10.0 (SIP) 7
Getting StartedButtons and Hardware
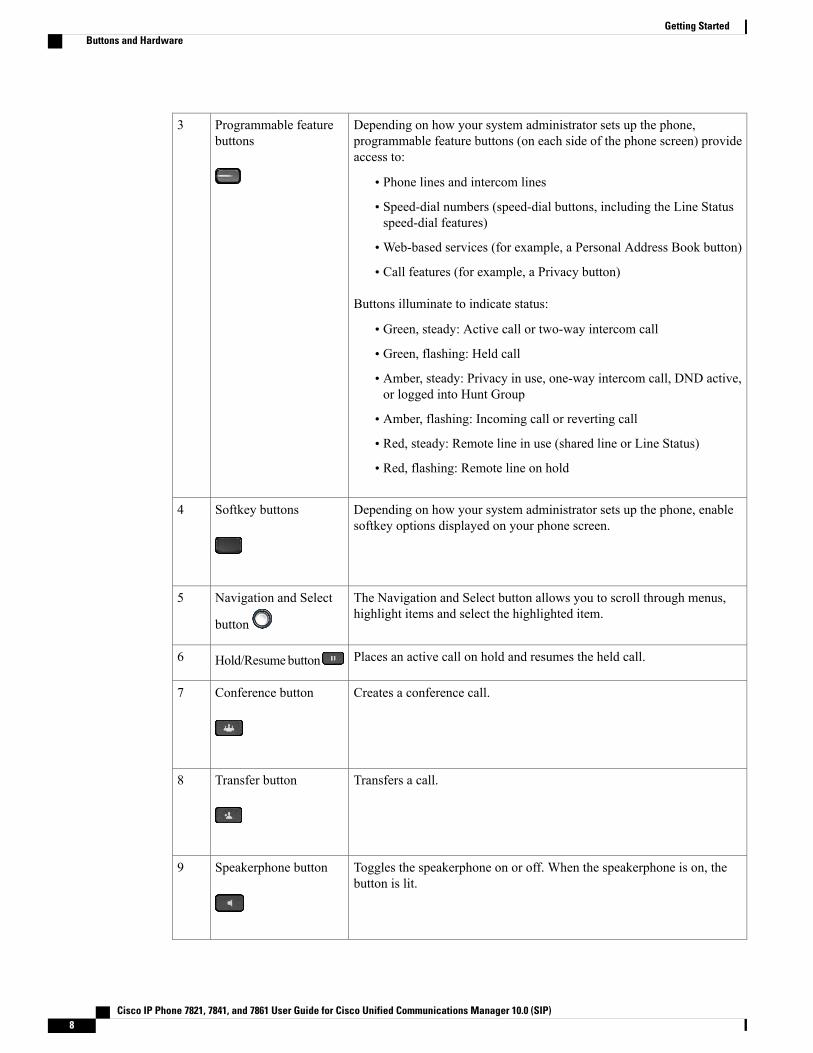
Depending on how your system administrator sets up the phone,programmable feature buttons (on each side of the phone screen) provideaccess to:
• Phone lines and intercom lines
• Speed-dial numbers (speed-dial buttons, including the Line Statusspeed-dial features)
• Web-based services (for example, a Personal Address Book button)
• Call features (for example, a Privacy button)
Buttons illuminate to indicate status:
• Green, steady: Active call or two-way intercom call
• Green, flashing: Held call
• Amber, steady: Privacy in use, one-way intercom call, DND active,or logged into Hunt Group
• Amber, flashing: Incoming call or reverting call
• Red, steady: Remote line in use (shared line or Line Status)
• Red, flashing: Remote line on hold
Programmable featurebuttons
3
Depending on how your system administrator sets up the phone, enablesoftkey options displayed on your phone screen.
Softkey buttons4
The Navigation and Select button allows you to scroll through menus,highlight items and select the highlighted item.
Navigation and Select
button
5
Places an active call on hold and resumes the held call.Hold/Resumebutton6
Creates a conference call.Conference button7
Transfers a call.Transfer button8
Toggles the speakerphone on or off. When the speakerphone is on, thebutton is lit.
Speakerphone button9
Cisco IP Phone 7821, 7841, and 7861 User Guide for Cisco Unified Communications Manager 10.0 (SIP)8
Getting StartedButtons and Hardware
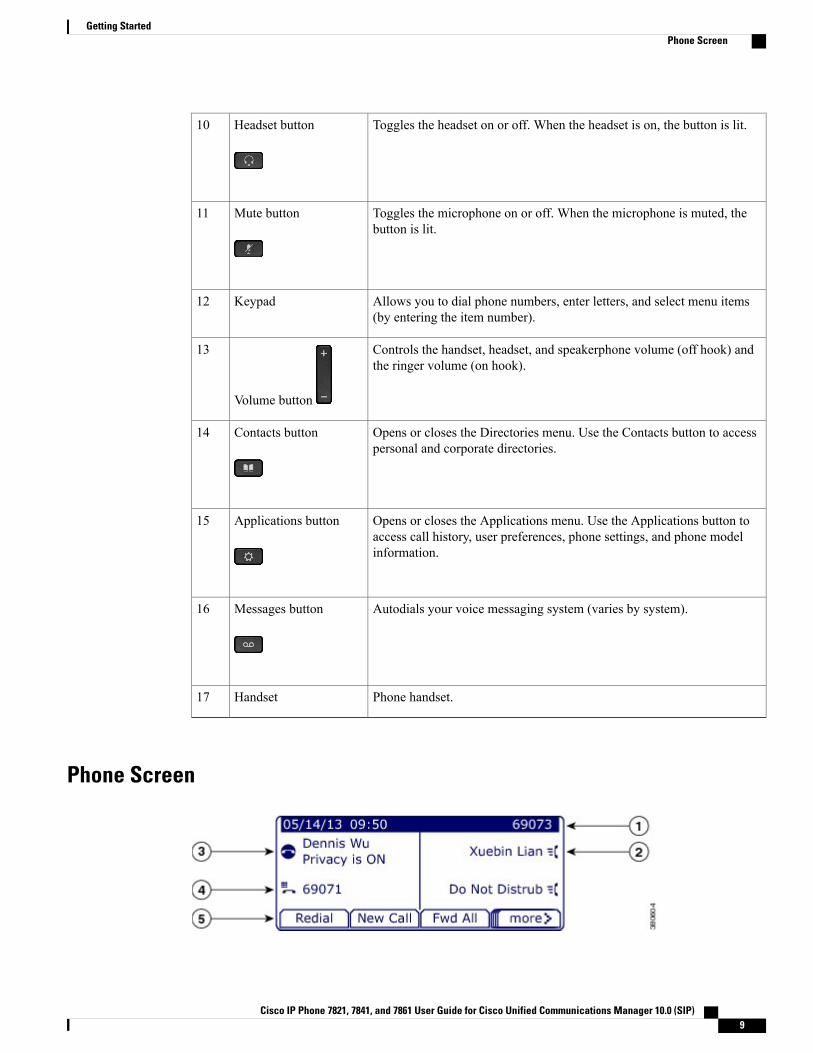
Toggles the headset on or off. When the headset is on, the button is lit.Headset button10
Toggles the microphone on or off. When the microphone is muted, thebutton is lit.
Mute button11
Allows you to dial phone numbers, enter letters, and select menu items(by entering the item number).
Keypad12
Controls the handset, headset, and speakerphone volume (off hook) andthe ringer volume (on hook).
Volume button
13
Opens or closes the Directories menu. Use the Contacts button to accesspersonal and corporate directories.
Contacts button14
Opens or closes the Applications menu. Use the Applications button toaccess call history, user preferences, phone settings, and phone modelinformation.
Applications button15
Autodials your voice messaging system (varies by system).Messages button16
Phone handset.Handset17
Phone Screen
Cisco IP Phone 7821, 7841, and 7861 User Guide for Cisco Unified Communications Manager 10.0 (SIP) 9
Getting StartedPhone Screen
Displays date, time, and directory number.Header1
Displays text label and icon for phone or intercomline, speed-dial numbers, or services, dependingon your configuration.
Line text label with icon2
Displays line label and call details for the primaryline, and other phone information such as placedcalls, speed dials, and phone menu listings.
Primary line details and other phone information3
Displays line label and call details for the secondaryline, and other phone information such as placedcalls, speed dials, and phone menu listings.
Secondary line details and other phoneinformation
4
Display softkeys for available features or actions.Softkey labels5
Cisco IP Phone 7861
Phone ConnectionsFor your phone to work, it must be connected to the corporate IP telephony network.
Cisco IP Phone 7821, 7841, and 7861 User Guide for Cisco Unified Communications Manager 10.0 (SIP)10
Getting StartedCisco IP Phone 7861
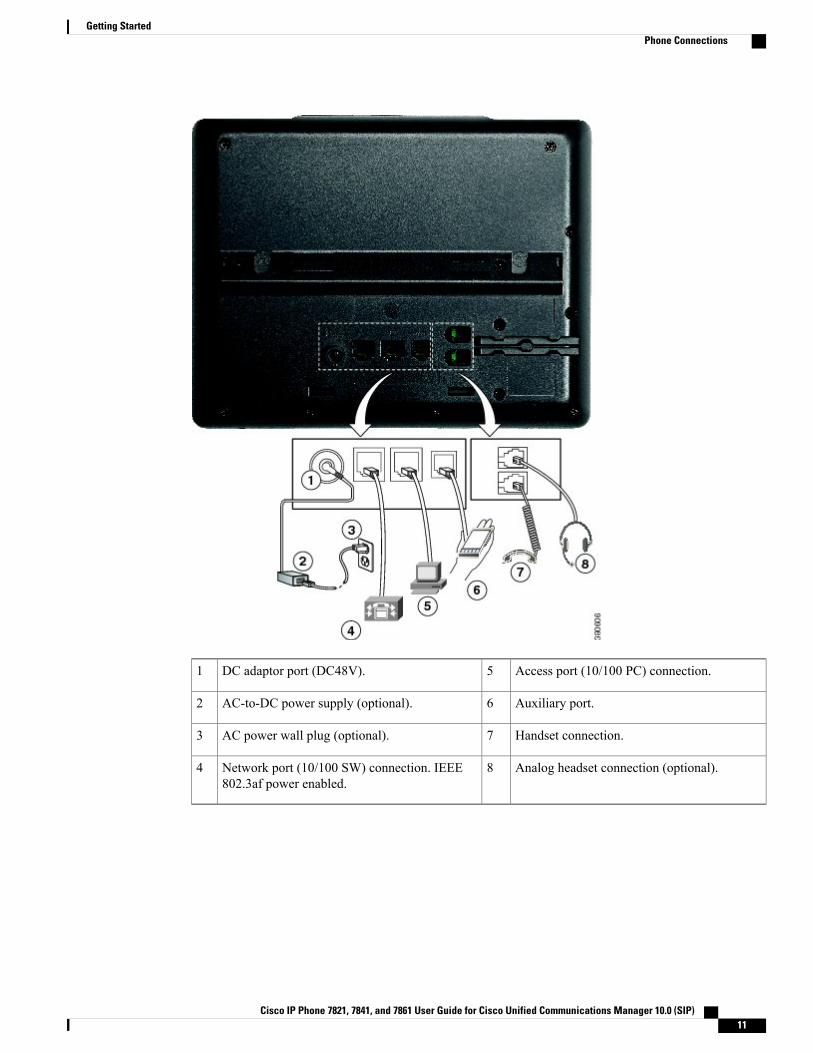
Access port (10/100 PC) connection.5DC adaptor port (DC48V).1
Auxiliary port.6AC-to-DC power supply (optional).2
Handset connection.7AC power wall plug (optional).3
Analog headset connection (optional).8Network port (10/100 SW) connection. IEEE802.3af power enabled.
4
Cisco IP Phone 7821, 7841, and 7861 User Guide for Cisco Unified Communications Manager 10.0 (SIP) 11
Getting StartedPhone Connections
Buttons and Hardware
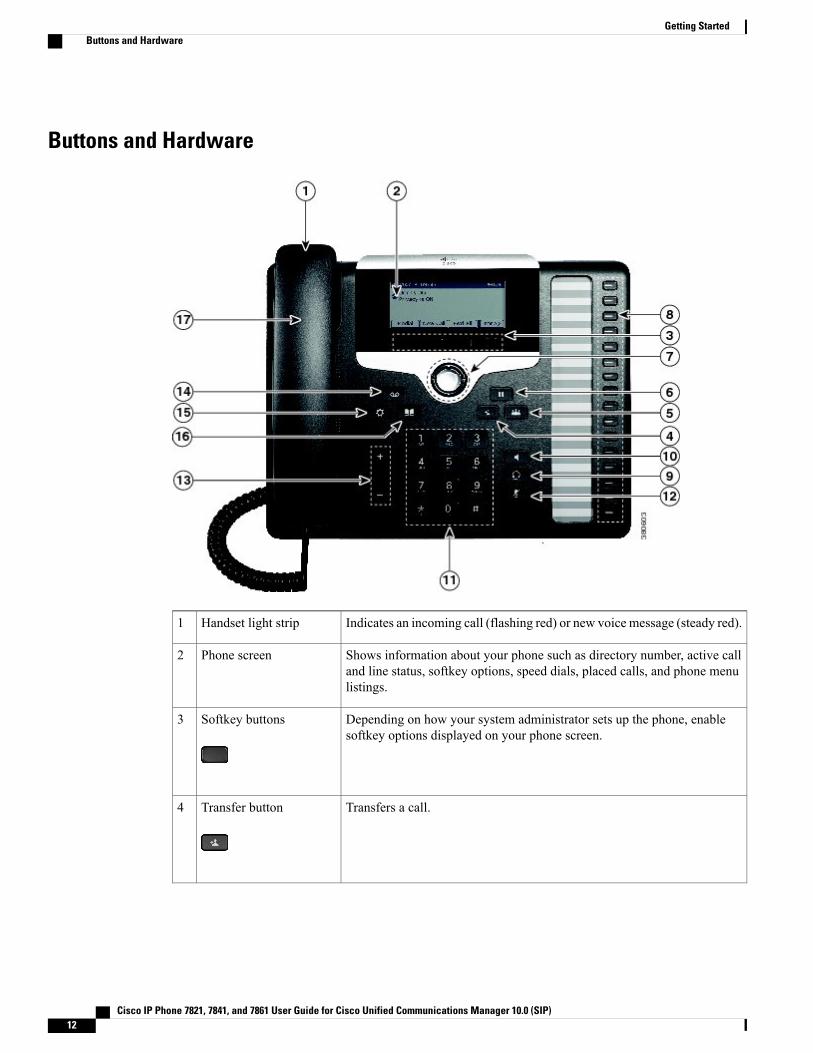
Indicates an incoming call (flashing red) or new voice message (steady red).Handset light strip1
Shows information about your phone such as directory number, active calland line status, softkey options, speed dials, placed calls, and phone menulistings.
Phone screen2
Depending on how your system administrator sets up the phone, enablesoftkey options displayed on your phone screen.
Softkey buttons3
Transfers a call.Transfer button4
Cisco IP Phone 7821, 7841, and 7861 User Guide for Cisco Unified Communications Manager 10.0 (SIP)12
Getting StartedButtons and Hardware
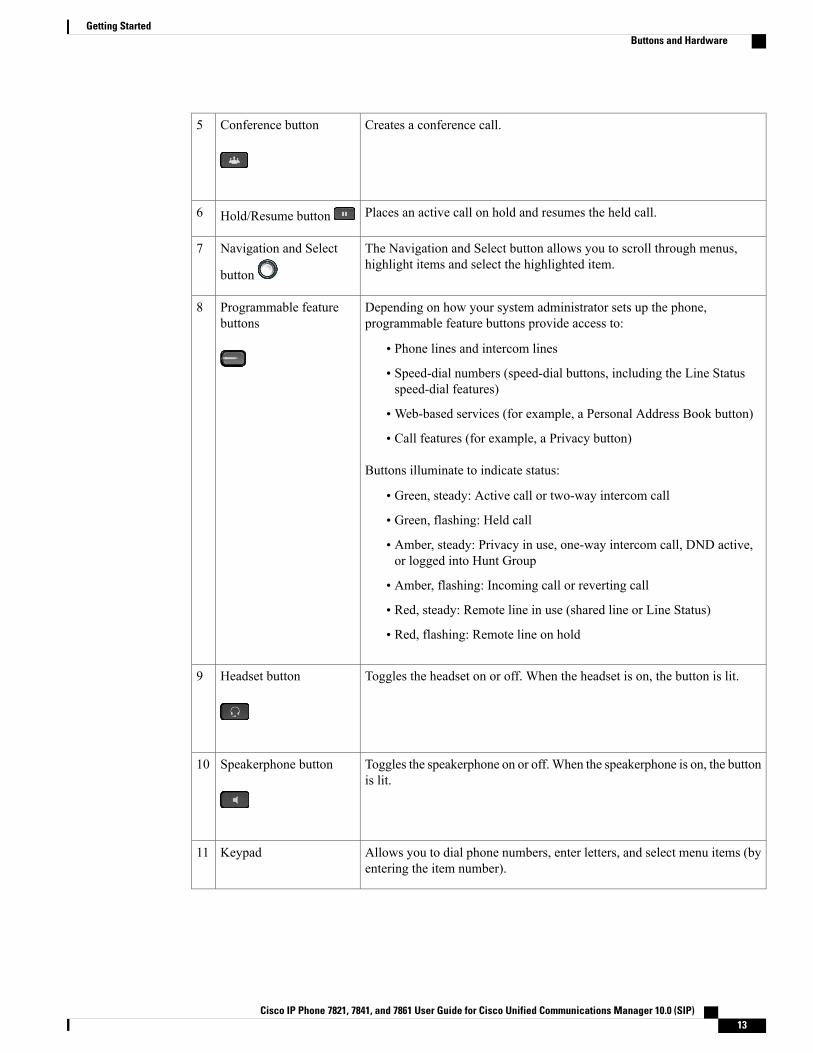
Creates a conference call.Conference button5
Places an active call on hold and resumes the held call.Hold/Resume button6
The Navigation and Select button allows you to scroll through menus,highlight items and select the highlighted item.
Navigation and Select
button
7
Depending on how your system administrator sets up the phone,programmable feature buttons provide access to:
• Phone lines and intercom lines
• Speed-dial numbers (speed-dial buttons, including the Line Statusspeed-dial features)
• Web-based services (for example, a Personal Address Book button)
• Call features (for example, a Privacy button)
Buttons illuminate to indicate status:
• Green, steady: Active call or two-way intercom call
• Green, flashing: Held call
• Amber, steady: Privacy in use, one-way intercom call, DND active,or logged into Hunt Group
• Amber, flashing: Incoming call or reverting call
• Red, steady: Remote line in use (shared line or Line Status)
• Red, flashing: Remote line on hold
Programmable featurebuttons
8
Toggles the headset on or off. When the headset is on, the button is lit.Headset button9
Toggles the speakerphone on or off.When the speakerphone is on, the buttonis lit.
Speakerphone button10
Allows you to dial phone numbers, enter letters, and select menu items (byentering the item number).
Keypad11
Cisco IP Phone 7821, 7841, and 7861 User Guide for Cisco Unified Communications Manager 10.0 (SIP) 13
Getting StartedButtons and Hardware
Toggles the microphone on or off.When themicrophone is muted, the buttonis lit.
Mute button12
Controls the handset, headset, and speakerphone volume (off hook) and theringer volume (on hook).
Volume button
13
Autodials your voice messaging system (varies by system).Messages button14
Opens or closes the Applications menu. Use the Applications button toaccess call history, user preferences, phone settings, and phone modelinformation.
Applications button15
Opens or closes the Directories menu. Use the Contacts button to accesspersonal and corporate directories.
Contacts button16
Phone handset.Handset17
Phone Screen
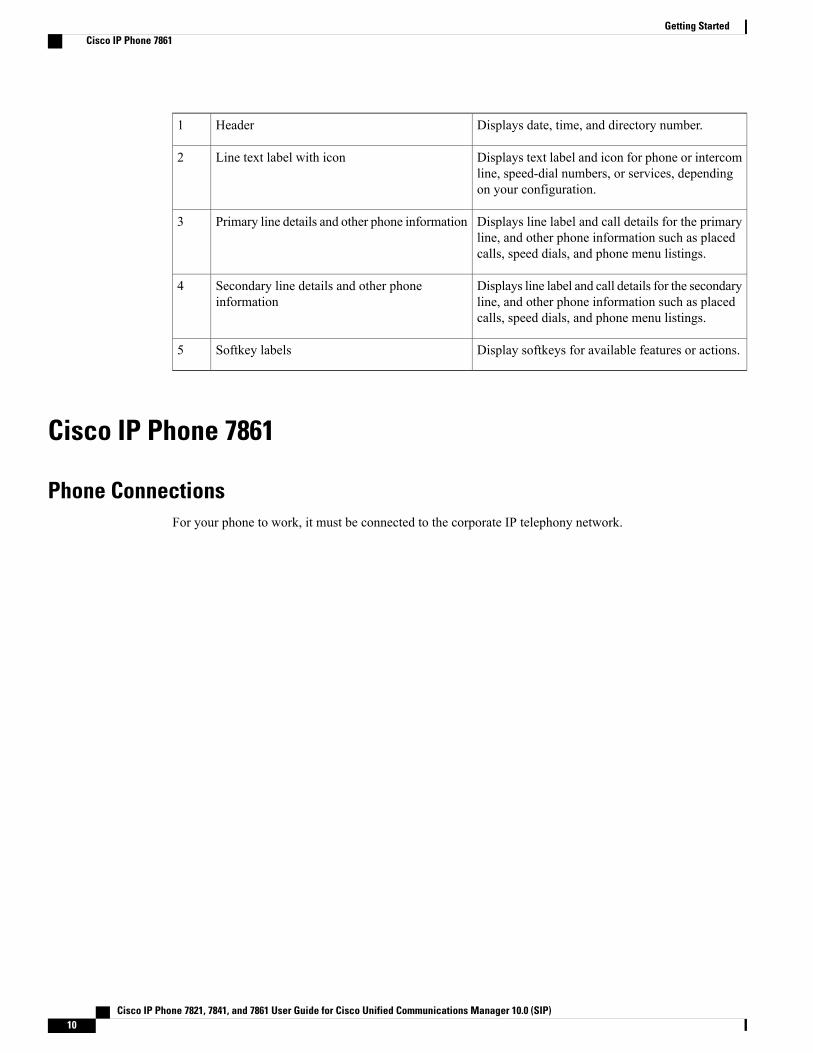
Displays date, time, and directory number.Header1
During a call, displays details for the active line. If not on a call,displays line text label and other information such as placed calls,speed dials, and phone menu listings.
Line details and other phoneinformation
2
Display softkeys for available features or actions.Softkey labels3
Cisco IP Phone 7821, 7841, and 7861 User Guide for Cisco Unified Communications Manager 10.0 (SIP)14
Getting StartedPhone Screen
Power RequirementsThe following Cisco-approved power adaptors must be used with the Cisco IP Phones 7821, 7841, and 7861:
• Phihong Adaptor (PSC18U-480); Rating: 48 VDC 0.38A
• Delta Adaptor (EADP-18VB B); Rating: 48 VDC 0.375A
Power Save and Power Save PlusThere are two levels of energy-saving modes that your system administrator can set up:
• Power Save—The phone display goes blank when not in use for a period of time, reducing the powerrequirements.
• Power Save Plus—The phone display goes blank, turning the phone off and on at predetermined times.The power to the phone is significantly reduced.
Power SaveDepending on how your system administrator set up your phone, the phone display may go into a power-savemode (the phone screen appears blank).
To turn on the phone display, press any button, touch the blank phone screen, or pick up the handset.
Power Save PlusYour Cisco IP Phone supports the Cisco EnergyWise (EW) program, also known as Power Save Plus. Yoursystem administrator sets up sleep (power down) and wake (power up) times for your phone to save energy.If your phone goes into the Power Save Plus mode, the Select button is lit white.
Ten minutes before the scheduled sleep time, the Select button lights up and you receive a message that yourphone will power off at a specific time. If enabled by your system administrator, you also hear your ringtoneplay. The ringtone plays according to the following schedule:
• At 10 minutes before power off, the ringtone plays four times
• At 7 minutes before power off, the ringtone plays four times
• At 4 minutes before power off, the ringtone plays four times
• At 30 seconds before power off, the ring tone plays 15 times or until the phone powers off
If your phone is inactive (idle) at the sleep time, you see a message to remind you that your phone is aboutto power down. To keep the phone active, you need to press OK in the message or any key on the phone. Ifyou do not press the button or any key, your phone powers down.
If your phone is active (for example, on a call), your phone waits until it has been inactive for a period of timebefore telling you of the pending power shutdown. Before the shutdown happens, you see a message to remindyou that your phone is about to power off.
Cisco IP Phone 7821, 7841, and 7861 User Guide for Cisco Unified Communications Manager 10.0 (SIP) 15
Getting StartedPower Requirements
After your phone goes to sleep, press Select to wake up your phone. After the phone is inactive for a periodof time, a message displays to alert you that the phone is about to power down. At the configured wake time,your phone powers up.
Wake and sleep times are also linked to the configured days that you normally work. If your requirementschange (for example, your work hours or work days change), contact your system administrator to have yourphone reconfigured.
For more information about EnergyWise and your phone, contact your system administrator.
Additional Information• You can access the Cisco website at this URL:http://www.cisco.com/
• Cisco IP Phone 7821, 7841, and 7861 user documentation:
http://www.cisco.com/en/US/products/ps13220/tsd_products_support_series_home.html
• Licensing information:
http://www.cisco.com/en/US/products/ps13220/products_licensing_information_listing.html
• Cisco international web sites:Allows access to international Cisco web sites fromwww.cisco.com by clicking theWorldwide [change]link at the top of the web page.
• Connect your Cisco IP phone to your LAN using an Ethernet cable to enable full functionality of yourCisco IP phone. If your Ethernet port is equipped with Power over Ethernet (PoE), your Cisco IP phonecan be powered through the LAN port. Do not extend the LAN Ethernet cable outside the building.
Cisco IP Phone 7821, 7841, and 7861 User Guide for Cisco Unified Communications Manager 10.0 (SIP)16
Getting StartedAdditional Information
C H A P T E R 2Phone Setup
• Connect Footstand, page 17
• Adjust Handset Rest, page 17
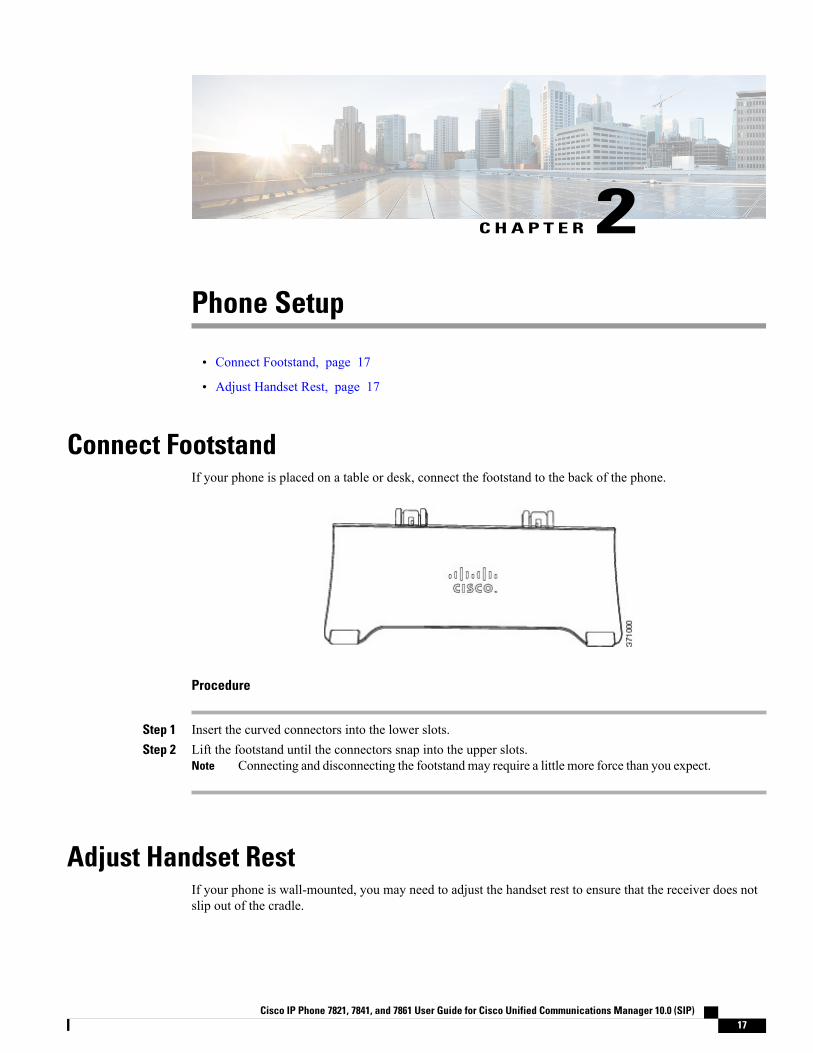
Connect FootstandIf your phone is placed on a table or desk, connect the footstand to the back of the phone.
Procedure
Step 1 Insert the curved connectors into the lower slots.Step 2 Lift the footstand until the connectors snap into the upper slots.
Connecting and disconnecting the footstandmay require a little more force than you expect.Note
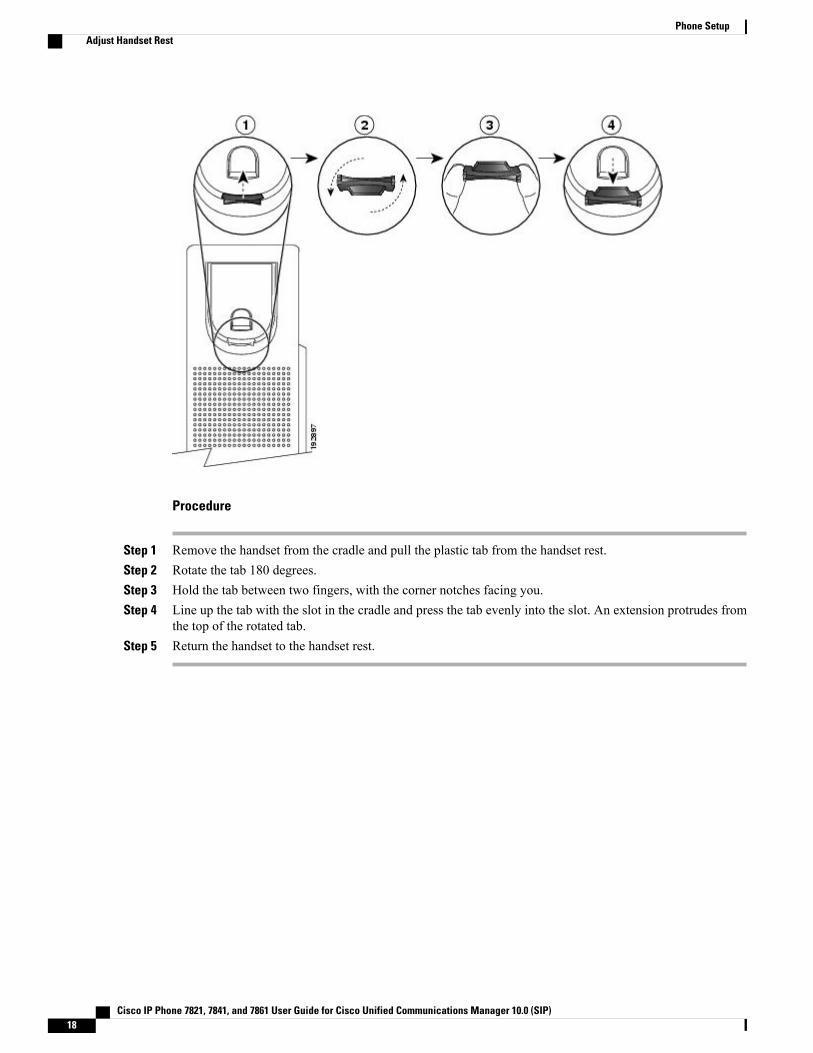
Adjust Handset RestIf your phone is wall-mounted, you may need to adjust the handset rest to ensure that the receiver does notslip out of the cradle.
Cisco IP Phone 7821, 7841, and 7861 User Guide for Cisco Unified Communications Manager 10.0 (SIP) 17
Procedure
Step 1 Remove the handset from the cradle and pull the plastic tab from the handset rest.Step 2 Rotate the tab 180 degrees.Step 3 Hold the tab between two fingers, with the corner notches facing you.Step 4 Line up the tab with the slot in the cradle and press the tab evenly into the slot. An extension protrudes from
the top of the rotated tab.Step 5 Return the handset to the handset rest.
Cisco IP Phone 7821, 7841, and 7861 User Guide for Cisco Unified Communications Manager 10.0 (SIP)18
Phone SetupAdjust Handset Rest
C H A P T E R 3Basic Operations
• Clean Phone Display, page 19
• Make Calls, page 20
• Answer Calls, page 22
• Automatically Answer Calls, page 24
• Respond to Call Waiting Notification, page 25
• Manage Calls, page 25
• Mute Phone, page 27
• Monitor and Record Calls , page 27
• Hold Calls, page 27
• Setup Call Back Notification, page 29
• Call Park, page 29
• Manage Intercom Calls, page 30
• View Phone Information, page 32
• Sign In to Cisco Unified Communications Self Care Portal, page 32
Clean Phone DisplayWhen the phone is in sleep mode, it can be in the Power Save mode or the Power Save Plus mode. If thephone is in the Power Save mode, the Select button is not lit but if the phone is in Power Save Plus mode, theSelect button is lit. You can clean the screen when the phone is in this condition, as long as you know thatthe phone will remain asleep until after you finish cleaning. If the phone is likely to wake up during cleaning,wake it up or wait until it is awake before following the instructions.
Use only a soft, dry cloth to wipe the phone display. Do not use any liquids or powders on the phonebecause they can contaminate phone components and cause failures.
Caution
Cisco IP Phone 7821, 7841, and 7861 User Guide for Cisco Unified Communications Manager 10.0 (SIP) 19
Procedure
Step 1 Press Select.Step 2 Wipe the screen with a soft, dry cloth.Step 3 After cleaning, press Select again.
Make Calls
Predial NumberYou can dial a number while your phone is on-hook (without hearing dial tone); this dialing action is calledpredial.
Procedure
Step 1 Enter a number using the keypad.Step 2 Go off-hook using one of the following actions:
• Lift the handset.
• Press Dial.
• Press Handset .
• Press Speakerphone .
Place Call Using Speakerphone
Procedure
Step 1 Press Speakerphone .Step 2 Enter a number.
Cisco IP Phone 7821, 7841, and 7861 User Guide for Cisco Unified Communications Manager 10.0 (SIP)20
Basic OperationsMake Calls
Place Call Using Headset
Procedure
Step 1 Press New Call.Step 2 Ensure the headset button is lit. If the headset button is not lit, press Headset .Step 3 Enter a number.
Release Call and Start Another CallWhen you are on an active call or dialing, and want to release the call, the following actions occur:
• The active call ends
• The phone provides dial tone
• The New Call displays
Procedure
Step 1 When you are on an active call or while dialing, press Cancel.Step 2 Enter the required number and press Dial.
Dial International NumberPlus Dialing allows you to press and hold the star (*) key for at least 1 second to insert a plus (+) sign as thefirst digit in a phone number for international dialing. The plus sign applies only for on-hook or off-hookcalling.
When you see phone numbers with the + sign in them, you can select and dial the entry without having to adddigits for international calls.
Procedure
Step 1 Press and hold star (*) for at least 1 second.The plus (+) sign displays as the first digit in the phone number. The corresponding tone stops to indicate thatthe * has changed to a + sign.
Step 2 Dial the number.
Cisco IP Phone 7821, 7841, and 7861 User Guide for Cisco Unified Communications Manager 10.0 (SIP) 21
Basic OperationsPlace Call Using Headset

Redial NumberRedial allows you to call the most recently dialed phone number.
Procedure
Step 1 To place a call from any phone line, press Redial.Step 2 To place the call on a specific phone line, select the line to obtain dial tone and press Redial.
Answer CallsAnswer allows you to answer the oldest call that is available on all line appearances on your phone, includingHold Reversion and Park Reversion calls that are in an alerting state. Incoming calls always have priorityover Held or Park Reversion calls.
When you get a call, you see a notification window on the phone screen, called a call toast. The call toastremains visible for a preset amount of time. If an incoming call has been call forwarded from another phone,you may see additional information in the call toast to identify that the call has been forwarded.
For more information, contact your system administrator.
Answer Oldest Call FirstTo answer the oldest incoming call first, press Answer.
If there are multiple incoming calls, press Answer and then choose the required call.
Answer Call Using PickUp
Procedure
Step 1 Perform one of the following actions:
• Press PickUp to transfer a ringing call within your pickup group to your phone.
• If you have multiple lines and want to pick up the call on a nonprimary line, first press the desired linebutton, then press PickUp.
Step 2 If the call rings, press Answer to connect to the call.
Cisco IP Phone 7821, 7841, and 7861 User Guide for Cisco Unified Communications Manager 10.0 (SIP)22
Basic OperationsRedial Number
Answer Call Using Group PickUp and Group PickUp Number
Procedure
Step 1 Perform one of the following actions:
• Press Group PickUp to answer a call on a phone outside your pickup group.
• If you have multiple lines and want to pick up the call on another line, first press the desired line button,then press Group PickUp.
Step 2 Enter the group pickup number.Step 3 If the call rings, press Answer to connect to the call.
Answer Call Using Group PickUp and Phone Number
Procedure
Step 1 Perform one of the following actions:
• Press Group PickUp to answer a call on a phone outside your pickup group.
• If you have multiple lines and want to pick up the call on another line, first press the desired line button,then press Group PickUp.
Step 2 Enter the number of the phone line with the required call.Step 3 If the call rings, press Answer to connect to the call.
Answer Call Using Other PickUp
Procedure
Step 1 Press OPickUp to answer a call in your pickup group or in an associated group to your phone.If your phone supports autopickup, you are now connected to the call.
Step 2 If the call rings, press Answer to connect to the call.
Cisco IP Phone 7821, 7841, and 7861 User Guide for Cisco Unified Communications Manager 10.0 (SIP) 23
Basic OperationsAnswer Call Using Group PickUp and Group PickUp Number
Automatically Answer CallsIncoming calls can be answered automatically by your phone after one ring. Your administrator sets up theAuto Answer feature to work with either your speakerphone or headset. For more information, contact youradministrator.
Incoming calls are autoanswered with the headset when the following conditions apply:
• Auto Answer with Headset is enabled by your system administrator.
• The Headset button is illuminated.
• The headset is connected to the phone.
Otherwise, calls ring normally and you manually answer them.
To keep the Headset button illuminated, use buttons and softkeys (instead of the Headset button) to placeand end calls. Your administrator sets the headset as the default audio path for Auto Answer.
To have incoming calls autoanswered with the speakerphone, keep the handset in the cradle and the Headset
button unlit. Otherwise, calls ring normally and you must manually answer them.
Procedure
Step 1 When your phone is set up to autoanswer calls using your headset,a) To answer calls automatically with a headset, prepare your phone in the following way:
• Ensure that your headset is connected to the phone.
• Ensure that the headset icon is present in the left hand side of the screen.When you get a call, the call answers automatically and you interact with the caller using the headset.
b) To end or make calls, use the Headset buttonc) If you do not want calls to automatically answer on your headset, press the speakerphone button twice
to turn off the headset and use the speakerphone to make and answer calls.
Step 2 When your phone is set up to autoanswer calls using the speakerphone,a) To answer calls automatically on the speakerphone, prepare your phone in the following way:
• Ensure that there is no headset icon present in the left hand side of the screen.
• Leave the handset in the cradle.When you get a call, the call answers automatically and you interact with the caller using thespeakerphone.
b) If you do not want calls to answer automatically on your speakerphone, contact your system administrator.
Cisco IP Phone 7821, 7841, and 7861 User Guide for Cisco Unified Communications Manager 10.0 (SIP)24
Basic OperationsAutomatically Answer Calls

Respond to Call Waiting NotificationThis feature is applicable only if your phone supports multiple lines. For more information, contact yoursystem administrator.
Procedure
Step 1 Perform one of the following actions to answer a waiting call:
• Press the line button to answer an incoming call (in case of one incoming call) or to list all incomingcalls (in case of more than one incoming call).
• Scroll to display the sessions if the call is on the same line but not visible.
• Press the feature button (if available).
Step 2 Press the flashing amber line button.Your phone puts the original call on hold automatically and connects the ringing call.
Manage Calls
Divert CallDivert allows you to send an active or ringing call to your voicemail system or to a predetermined phonenumber. For more information, contact your system administrator.
You can silence the incoming (ringing) call. Press Volume down once, then let the incoming call go to thetarget number (voicemail or predetermined number set up the system administrator).
Procedure
Step 1 To redirect an incoming (ringing) call while on another call, use the Navigation pad to highlight the incomingcall, then press Divert. Otherwise, press Divert to redirect the current, active call.
Step 2 To redirect an incoming call while not on a call, press Divert.Step 3 To redirect a held call, first resume the call and then press Divert.
Cisco IP Phone 7821, 7841, and 7861 User Guide for Cisco Unified Communications Manager 10.0 (SIP) 25
Basic OperationsRespond to Call Waiting Notification
Forward All Calls
Procedure
Step 1 Press Forward All on a primary line from which you want to forward your calls.Step 2 Enter a phone number or select an entry from the Call History list.Step 3 PressMessages to forward all calls to voicemail.
If call forward is active, a Forward All icon is displayed in the line label or the forwarding informationis present in the header.
Note
Step 4 Press Forward Off to cancel call forwarding.You can set up conditional call forwarding in the Self CarePortal.
Note
Related Topics
Sign In to Cisco Unified Communications Self Care Portal, on page 32
Transfer Call to Another NumberTransfer allows you to redirect a connected call from your phone to another number.
• You can redirect a single call to another number that you specify.
• You can connect two calls to each other (without remaining on the line yourself).
Procedure
Step 1 Verify that you are on an active call (not on hold).Step 2 Press Transfer .Step 3 Enter the transfer recipient’s phone number or press a speed-dial button.Step 4 Wait for the recipient to answer or skip to Step 5 while the call is ringing.Step 5 Press Transfer again.
Swap Between CallsTransfer allows you to redirect a connected call from your phone to another number:
• You can redirect a single call to another number that you specify.
• You can also connect two calls on one line or two different lines to each other (without remaining onthe line yourself).
Cisco IP Phone 7821, 7841, and 7861 User Guide for Cisco Unified Communications Manager 10.0 (SIP)26
Basic OperationsForward All Calls
Before completing a transfer procedure, you can press Cancel to cancel the transfer or you can press Swapto toggle between calls, which allows you to speak privately with each party.
Procedure
Step 1 While on a call, connect to the transfer recipient.Step 2 To return to the original call, press Swap.
You can consult privately with each person before you complete the transfer.
Mute PhoneMute allows you to block audio input for your handset, headset, and speakerphone, so that you can hear otherparties on the call but they cannot hear you.
Procedure
Step 1 PressMute to turn Mute on.Step 2 PressMute again to turn Mute off.
Monitor and Record CallsTo configure your phone to monitor and record calls, contact your system administrator.
Hold CallsHold allows you to put an active call into a held state. Your phone allows one active call at a time; other callsare put on hold. Hold works with your phone handset as well as with USB headsets.
Procedure
You can put a call on hold by pressing Hold.
Swap Between Active and Held CallsUse the line buttons to swap between holding and connected calls.
Cisco IP Phone 7821, 7841, and 7861 User Guide for Cisco Unified Communications Manager 10.0 (SIP) 27
Basic OperationsMute Phone
Procedure
If you have a held call and an active call, press the line button for the held call to resume that call and placethe other call on hold automatically.
Put Call on Hold by Answering New CallIf you are already on a call and receive a new call, answering the new call puts the first call on holdautomatically.
Procedure
Step 1 Press the flashing amber Line button.Step 2 Navigate to the new call using the Navigation pad and either press Answer or Select.
Respond to Hold Reversion NotificationHold Reversion notifies you when a call is left on hold.
A Hold Reversion notification is similar to a new call notification and includes these cues:
• Single ring, repeating at intervals
• Flashing amber line button
• Flashing message indicator on the handset
• Visual notification on the phone screen
Procedure
Press the flashing amber line button or Answer to resume the held call.
Determine If Shared Line Is On HoldIf a call on a shared line has been put on hold remotely by another user, a pulsing red line button and the Hold
icon are displayed.
Cisco IP Phone 7821, 7841, and 7861 User Guide for Cisco Unified Communications Manager 10.0 (SIP)28
Basic OperationsPut Call on Hold by Answering New Call
Remote HoldWhen you place a call on hold while using a shared line, the line button pulses green and the phone displays
the Hold icon.When another phone places a call on hold, the line button pulses red and the phone displaysthe Remote Hold icon.
Setup Call Back NotificationProcedure
Step 1 Press Callback while listening to the busy tone or ring sound.Step 2 Press Cancel to deactivate the call back.Step 3 Press Exit to activate the call back.
Call ParkCall Park allows you to use your phone to park (temporarily store) a call, which you can then retrieve fromanother phone (such as a phone at a coworker’s desk or in a conference room).
There are two ways you can park a call:
• Park: Allows you to park an active call that you answered on your phone, and retrieve it from anotherphone in the Cisco Unified Communications Manager system.
• Directed Call Park: Allows you to park and retrieve an active call in two different ways:
• Assisted Directed Call Park: Allows you to park an active call using a feature button.
• Manual Directed Call Park: Allows you to park an active call by transferring it to a Directed Callnumber.
For more information, contact your system administrator.
Park Call Using Assisted Directed Call ParkIf you fail to retrieve or resume the call within a specified amount of time, the call is directed to anotherdestination (set up by your system administrator), such as voicemail. If the call gets redirected, it can no longerbe retrieved by using Call Park.
Cisco IP Phone 7821, 7841, and 7861 User Guide for Cisco Unified Communications Manager 10.0 (SIP) 29
Basic OperationsRemote Hold

Procedure
Step 1 During a call, press Directed Call Park on a line that displays an idle Line Status indicator.Step 2 Retrieve the call from any other Cisco IP Phone in your network as follows:
a) Enter the park retrieval prefix.b) Dial the Directed Call number.
Step 3 If you do not retrieve the call within the time that your system administrator has set, you receive an alert tone.At that time, you can:
• Press Resume to resume the call on your phone.
• Retrieve the call from another phone.
Park Call Using Manual Directed Call Park
Procedure
Step 1 During a call, press Transfer .Step 2 Enter the Directed Call number where you will park the call.Step 3 Press Transfer again to finish parking the call and then hang up.Step 4 Retrieve the call from any other Cisco IP Phone in your network as follows:
a) Enter the park retrieval prefix.b) Dial the Directed Call number.
Step 5 If you do not retrieve the call within the time that your system administrator has set, you receive an alert tone.At that time, you can:
• Press Resume to resume the call on your phone.
• Retrieve the call from another phone.
Manage Intercom CallsIntercom allows you to place and receive one-way calls using a dedicated or dialable intercom line.
When you place an intercom call, the recipient’s phone autoanswers with mute activated (whisper mode) andbroadcasts your message through the recipient’s speakerphone or headset if one of these devices is active.After receiving the intercom call, the recipient can initiate two-way audio (connected mode), by pressing theline button, to allow for further conversation.
Cisco IP Phone 7821, 7841, and 7861 User Guide for Cisco Unified Communications Manager 10.0 (SIP)30
Basic OperationsPark Call Using Manual Directed Call Park
Place Dedicated Intercom CallIntercom allows you to place and receive one-way calls using a dedicated or dialable intercom line.
When you place an intercom call, the recipient phone autoanswers with mute activated (whisper mode) andbroadcasts your message through the recipient’s speakerphone, headset, or handset, if one of these devices isactive.
After receiving the intercom call, the recipient can initiate two-way audio (connected mode) to allow forfurther conversation.
Procedure
Step 1 Press Intercom.Your phone enters whisper mode until the recipient accepts the intercom call. If you are on an activecall, that call is placed on hold.
Note
Step 2 Listen for the intercom alert tone, then begin speaking.Step 3 Press Intercom to end the call.
Place Dialable Intercom CallIntercom allows you to place and receive one-way calls using a dedicated or dialable intercom line.
When you place an intercom call, the recipient’s phone autoanswers with mute activated (whisper mode) andbroadcasts your message through the recipient’s speakerphone, headset, or handset, if one of these devices isactive.
After receiving the intercom call, the recipient can initiate two-way audio (connected mode) to allow forfurther conversation.
Procedure
Step 1 Press Intercom.Step 2 Enter the intercom code.
Your phone enters whisper mode until the recipient accepts the intercom call. If you are on an activecall, that call is placed on hold.
Note
Step 3 Listen for the intercom alert tone, then begin speaking.Step 4 Press Intercom to end the call.
Cisco IP Phone 7821, 7841, and 7861 User Guide for Cisco Unified Communications Manager 10.0 (SIP) 31
Basic OperationsPlace Dedicated Intercom Call
Receive Intercom CallWhen you receive an intercom call, you hear an intercom-alert tone and your phone autoanswers the call. Anycurrent call activity that you are engaged in continues simultaneously, but the intercom caller cannot hearyou.
To speak to the intercom caller, press the active Intercom button.
View Phone InformationPhone Information allows you to view the following model information for your phone:
• Model Number
• MAC Address
• Active Load ID
• IP Address
• Active Server
• Stand-by-Server
Procedure
Step 1 Press Applications .Step 2 Select Phone Information.Step 3 Press Exit to return to the Applications screen.
Sign In to Cisco Unified Communications Self Care PortalYour phone is a network device that can share information with other network devices in your company,including your personal computer. You can use your computer to sign in to the Cisco Unified CommunicationsSelf Care Portal, where you can control features, settings, and services for your phone. For example, you canmanage your phone display language, set up services, add entries to your personal address book, and set upspeed-dial codes.
Before you can access any of your options, such as Speed Dial or Personal Address Book, you must sign in.When you are finished using portal, you must sign out.
In some cases, you can access the Cisco Unified Communications Self Care Portal without having to sign in.For more information, contact your system administrator.
For assistance in using the portal, see theCisco Unified Communications Self Care Portal User Guide, locatedat http://www.cisco.com/en/US/products/sw/voicesw/ps556/products_user_guide_list.html.
Cisco IP Phone 7821, 7841, and 7861 User Guide for Cisco Unified Communications Manager 10.0 (SIP)32
Basic OperationsReceive Intercom Call
Procedure
Step 1 Obtain the portal URL, user ID, and default password from your system administrator.Typically, the portal URL is http://<ip_address or hostname>/ucmuser.
Step 2 Open a web browser on your computer and enter the URL.Step 3 If prompted to accept security settings, select Yes or Install Certificate.Step 4 Enter your user ID in the Username field.Step 5 Enter your password in the Password field.Step 6 Select Login.Step 7 To sign out, select Logout.
Cisco IP Phone 7821, 7841, and 7861 User Guide for Cisco Unified Communications Manager 10.0 (SIP) 33
Basic OperationsSign In to Cisco Unified Communications Self Care Portal

Cisco IP Phone 7821, 7841, and 7861 User Guide for Cisco Unified Communications Manager 10.0 (SIP)34
Basic OperationsSign In to Cisco Unified Communications Self Care Portal
C H A P T E R 4Contacts
• Corporate Directory, page 35
• Personal Directory, page 36
• Fast-Dial Codes with Personal Directory, page 39
• Cisco WebDialer, page 41
Corporate DirectoryThe Corporate Directory menu contains corporate contacts that you can access on your phone. Your systemadministrator sets up and maintains the directory.
Dial Contact from Search
Procedure
Step 1 Press Contacts .Step 2 Select Corporate Directory.Step 3 Select one of the following options:
• First Name
• Last Name
• Number
Step 4 Enter the search criteria information, press Submit, and select a contact.Step 5 Perform one of the following actions:
• Press Dial.
• Press Details to check the user details.
Cisco IP Phone 7821, 7841, and 7861 User Guide for Cisco Unified Communications Manager 10.0 (SIP) 35
• Press the contact label number.
• Press a line button.
• Press Speakerphone .
• Press Headset .
• Pick up the handset.
Search and Dial While on Call
Procedure
Step 1 Press Contacts .Step 2 Select Corporate Directory.Step 3 Select one of the following options:
• First Name
• Last Name
Step 4 Enter the search criteria information, press Submit, and select a contact.Step 5 Perform one of the following actions:
• Press Dial.
• Press Details to check the user details.
• Press the number that is displayed in the upper right corner of the contact label.
• Press Speakerphone .
• Press Headset .
• Pick up the handset.
Personal DirectoryThe personal directory contains a list of your personal contacts. You can assign fast-dial codes to your personaldirectory entries for fast-dialing.
You can set up your personal directory from your phone or from the Cisco Unified Communications SelfCare Portal. Use your phone to assign fast-dial codes to the directory entries. For more information, see the
Cisco IP Phone 7821, 7841, and 7861 User Guide for Cisco Unified Communications Manager 10.0 (SIP)36
ContactsSearch and Dial While on Call
Cisco Unified Communications Self Care Portal User Guide, located at http://www.cisco.com/en/US/products/sw/voicesw/ps556/products_user_guide_list.html.
Add Personal Directory Entry
Procedure
Step 1 Press Contacts .Step 2 Sign in to Personal Directory.Step 3 Select Personal Address Book.Step 4 Press Submit.Step 5 Press New and enter a name or nick name.Step 6 Press Phones and enter the phone number along with require access codes.Step 7 Press Submit.
Edit Personal Directory Entry
Procedure
Step 1 Sign in to Personal Directory and search for an entry.Step 2 Select the entry.Step 3 Press Edit to modify the name or email address.Step 4 Modify the name or email address.Step 5 Press Phones to modify a phone number.Step 6 Press Update.
Delete Personal Directory Entry
Procedure
Step 1 Sign in to Personal Directory and search for an entry.Step 2 Select the entry.Step 3 Press Edit.Step 4 Press Delete.
Cisco IP Phone 7821, 7841, and 7861 User Guide for Cisco Unified Communications Manager 10.0 (SIP) 37
ContactsAdd Personal Directory Entry
You may need to selectMore first.Step 5 Press OK to confirm the deletion.
Sign In and Out of Personal Directory
Procedure
Step 1 Press Contacts .Step 2 Select Personal Directory.Step 3 Enter the user ID and PIN, and press Submit.Step 4 Select Log Out, press Select, and then press OK.
Dial Number from Personal Directory
Procedure
Step 1 Press Contacts .Step 2 Sign in to Personal Directory.Step 3 Select Personal Directory and search for an entry.Step 4 Select the personal address book entry that you want to dial.Step 5 Press Dial.
Search for Entry in Personal Directory
Procedure
Step 1 Press Contacts .Step 2 Sign in to Personal Directory.Step 3 Select Personal Address Book.Step 4 Select one or all of the following:
• Last Name
• First Name
Cisco IP Phone 7821, 7841, and 7861 User Guide for Cisco Unified Communications Manager 10.0 (SIP)38
ContactsSign In and Out of Personal Directory
• Nickname
Step 5 Enter the search criteria information and press Submit.
Edit Personal Directory Entry
Procedure
Step 1 Press Contacts .Step 2 Sign in to Personal Directory.Step 3 Select Personal Address Book and search for an entry.Step 4 Press Select and then press Edit.Step 5 Modify the entry information.Step 6 Press Phones and then press Update.
Delete Personal Directory Entry
Procedure
Step 1 Press Contacts .Step 2 Sign in to Personal Directory and search for the required entry.Step 3 Select the entry and press Edit.Step 4 Press Delete.Step 5 Press OK to confirm the deletion.
Fast-Dial Codes with Personal DirectoryYou manage the fast-dial codes with Personal Directory using the Contacts menu on your phone.
Cisco IP Phone 7821, 7841, and 7861 User Guide for Cisco Unified Communications Manager 10.0 (SIP) 39
ContactsEdit Personal Directory Entry
Assign Fast-Dial Code to Personal Directory Entry
Procedure
Step 1 Press Contacts .Step 2 Select Personal Directory.Step 3 Select Personal Address Book.Step 4 Enter the name and press Submit.Step 5 Press Select and then press FastDial.Step 6 Select a number and press Select.Step 7 Scroll to an unassigned fast-dial index and press Submit.
Place Call Using Fast-Dial Code
Procedure
Step 1 Press Contacts .Step 2 Sign in to Personal Directory.Step 3 Select Personal Fast Dials and scroll to a fast-dial code.
To get more fast-dial codes, pressNext.
Note
Step 4 Select the required fast-dial code and press Dial.
Delete Fast-Dial Code
Procedure
Step 1 Press Contacts .Step 2 Sign in to the Personal Directory.Step 3 Select Personal Fast Dials and search for a fast-dial code.Step 4 Select the required code and press Remove.Step 5 Select the index and press Remove.
Cisco IP Phone 7821, 7841, and 7861 User Guide for Cisco Unified Communications Manager 10.0 (SIP)40
ContactsAssign Fast-Dial Code to Personal Directory Entry
Cisco WebDialerCisco WebDialer allows you to make calls on your Cisco IP Phone to directory contacts by selecting itemsin a web browser.
For more information, contact your system administrator.
Use Cisco WebDialer with Another Online Corporate Directory
Procedure
Step 1 Sign in to a Cisco WebDialer-enabled corporate directory.Step 2 Search for the required name and select the required number.Step 3 When prompted, enter your user ID and password.
If you are using CiscoWebDialer for the first time, review preferences on theMake Call window.Note
Step 4 Select Dial.Step 5 Select Hang up or hang up the handset after your call completes.
Change Cisco WebDialer Preferences
Procedure
Step 1 Initiate a call using Cisco WebDialer to access the Make Call window.Step 2 Select one of the following options from the Make Call window:
• Preferred language
• Preferred device
Step 3 Choose a line or a phone.If you have one phone with a single line, the appropriate phone and line are automatically selected.
If you have more than one phone of the same type, the list identifies the phone by device type andMAC address. To display theMAC address on your phone, selectApplications >Phone Information.
Note
Step 4 If you have an Extension Mobility profile, select Extension Mobility from the Calling Device drop-downmenu.
Step 5 Ensure that you do not select Do not display call information nor Disable Auto Close.If you select Do not display call information, the Make Call Window is not displayed when younext use the phone. If you select Disable auto close, the call window does not automatically closeafter 15 seconds.
Note
Cisco IP Phone 7821, 7841, and 7861 User Guide for Cisco Unified Communications Manager 10.0 (SIP) 41
ContactsCisco WebDialer
Sign Out of Cisco WebDialer
Procedure
Step 1 Access the Make Call or Hang Up window.Step 2 Select Sign Out.
Cisco IP Phone 7821, 7841, and 7861 User Guide for Cisco Unified Communications Manager 10.0 (SIP)42
ContactsSign Out of Cisco WebDialer
C H A P T E R 5Call History
• Call History Overview, page 43
• View Call History, page 44
• View Call Record Details, page 44
• Filter Call History , page 44
• Dial From Call History, page 45
• Edit Phone Number, page 45
• Clear Call History , page 46
• Delete Call Record , page 46
Call History OverviewCall History allows you to view information about the last 50 calls on your phone, listed under the followingcategories:
• Missed: lists the last 50 missed calls
• Received: lists the last 50 received calls
• Placed: lists the last 50 placed calls
• All: lists the last 150 calls, including Missed, Received, and Placed
A call icon displays to indicate the type of call. The caller ID displays with the call icon. If the caller ID isunavailable, then the phone number displays. If the phone number is unavailable, then “Unknown” displays.All Call History items display in order by time (latest to oldest).
You can also dial a number directly from the Call History list.
Cisco IP Phone 7821, 7841, and 7861 User Guide for Cisco Unified Communications Manager 10.0 (SIP) 43
View Call HistoryProcedure
Step 1 Press Applications.Step 2 Select Call History.Step 3 Scroll and select a call record or call group.Step 4 Press Exit to return to the Applications screen.
View Call Record DetailsProcedure
Step 1 If you are on a connected call, press Show Details to show the Call Details screen. This screen displays singlecall information and call duration and updates each second.
Step 2 If you are not on a connected call, follow the steps below.a) Press Applications and select Call History.b) Select a call record or group and press Details.
When you are on a call record, you can keep the Navigation pad highlighted to display the calldetails.
Note
c) Press Return to return to the Call History screen.d) Press Exit to return to the Applications screen.
Filter Call HistoryProcedure
Step 1 Press Applications and select Call History.Step 2 Select the required phone line and view the individual calls or call groups for that line and pressMissed Calls.Step 3 Press Exit to return to the Applications screen.
Cisco IP Phone 7821, 7841, and 7861 User Guide for Cisco Unified Communications Manager 10.0 (SIP)44
Call HistoryView Call History
Dial From Call HistoryIf the phone is in idle state, press the down arrow on the Navigation pad to display the On-Hook Dialingscreen.
If the phone is not in idle state, perform the following steps.
Procedure
Step 1 Press Applications and select Call History.Step 2 Select the call record that you want to dial and perform one of the following:
• Press Call.
• Pick up the handset.
• Press Details.
• Press Speakerphone or Headset .
Step 3 When phone is in idle, you can press the down arrow on the Navigation pad to display the On-Hook Dialingscreen.
Edit Phone NumberProcedure
Step 1 Press Applications and select Call History.Step 2 Press All Lines or the required line.Step 3 Select the call you want to edit and press EditDial.
Press >> to move the cursor to the right and press << to move the cursor to theleft.
Note
Step 4 Press Edit to edit the number.Step 5 Press Return to return to the Call History list.
Cisco IP Phone 7821, 7841, and 7861 User Guide for Cisco Unified Communications Manager 10.0 (SIP) 45
Call HistoryDial From Call History
Clear Call HistoryProcedure
Step 1 Press Applications and select Call History.Step 2 Select All Lines or the required line.Step 3 Press Clear and then press Delete to delete the call history list.Step 4 Press Cancel to go back to the Call History screen.
Delete Call RecordProcedure
Step 1 Press Applications and select Call History.Step 2 Highlight the individual call record or call group that you want to delete.Step 3 Press Delete to delete an individual call record or all calls in a group.
If you delete all calls in a group, a Delete Record alert message appears for verification.Note
Step 4 Press Delete to delete the record.Step 5 Press Exit to return to the Applications screen.
Cisco IP Phone 7821, 7841, and 7861 User Guide for Cisco Unified Communications Manager 10.0 (SIP)46
Call HistoryClear Call History
C H A P T E R 6Voicemail
• Voicemail Overview, page 47
• Check for Voice Messages, page 47
• Access Voicemail, page 48
• Listen to Voice Messages, page 48
Voicemail OverviewVoice messages are stored on your voicemail system. Your company determines the voicemail system yourphone uses.
For information about the commands that your voicemail service supports, see the voicemail service userdocumentation.
Check for Voice MessagesProcedure
Step 1 Look for the following visual indications:
• A solid red light on your handset. Set up the visual message waiting lamp using the Self Care Portal.
• Message icon on a line. If you have more than 99 new voice messages, a 99+ sign replaces themessage count.
Step 2 Listen for the stutter tone (if available) from your handset, headset, or speakerphone when you place a call.The stutter tone is line-specific and you hear it only when using the line that has new voice messages. Youcan set up audible message waiting tones using the Self Care Portal.
Cisco IP Phone 7821, 7841, and 7861 User Guide for Cisco Unified Communications Manager 10.0 (SIP) 47
Related Topics
Sign In to Cisco Unified Communications Self Care Portal, on page 32
Access VoicemailProcedure
Step 1 PressMessages .Step 2 Follow the voice prompts.
Listen to Voice MessagesProcedure
Step 1 To listen to voice messages, do one of the following:
• PressMessages .
• Select a line with a Message icon.
•Press the line button and then, Voicemail .
Step 2 Follow the prompts to listen to your voice message.
Cisco IP Phone 7821, 7841, and 7861 User Guide for Cisco Unified Communications Manager 10.0 (SIP)48
VoicemailAccess Voicemail

C H A P T E R 7Calling Features
• Conference, page 49
• Meet Me Conference, page 51
• Speed Dial, page 52
• Do Not Disturb, page 52
• Line Status, page 53
• Malicious Call Identification, page 54
• Cisco Extension Mobility , page 54
• Mobile Connect, page 55
• Hunt Groups, page 57
• cBarge, page 58
ConferenceConference allows you to talk simultaneously with multiple parties.
When you are on a call, you can use Conference to dial another party and add the party to the call. Alternately,if you have multiple phone lines, you can use Conference to combine calls across two lines.
Before you complete a conference procedure, you can press the Cancel softkey to cancel the procedure. Youcan also press the Swap softkey to toggle between calls and allowing you to speak privately with each party.
As the conference host, you can remove individual participants from the conference.
Cisco IP Phone 7821, 7841, and 7861 User Guide for Cisco Unified Communications Manager 10.0 (SIP) 49
Add Third Party to Conference
Procedure
Step 1 Verify that you are on an active call (not on hold).Step 2 Press Conference.Step 3 Enter the phone number for the party that you want to add or press a speed dial button.Step 4 Wait for the party to answer, or skip to step 5 while the call is ringing.Step 5 Press Conference again.
The conference begins.
Step 6 (Optional) Repeat these steps to add more parties, if desired.
Combine Calls to Create Conference
Before You Begin
You require multiple phone lines to perform this task.
Procedure
Step 1 Verify that you have two connected calls and that one of the calls is active (not on hold).Step 2 Press Conference.Step 3 Press the line button for the other (held) call.
The conference begins. The conference is established on the line with the active call.
Swap Between Calls Before Completing ConferenceYou can consult privately with the conference and another person, before adding the person into the conference.
Procedure
Step 1 Call a new conference participant, but do not add the participant to the conference.Step 2 Press Swap to toggle between the participant and the conference.
Cisco IP Phone 7821, 7841, and 7861 User Guide for Cisco Unified Communications Manager 10.0 (SIP)50
Calling FeaturesAdd Third Party to Conference
View Conference ParticipantsYou can view the details of the last 16 participants who joined the conference.
Procedure
While in a conference, press Show Details to view a list of participants.When you place a call to another party and the person that you called creates a conference with athird phone, the Show Details softkey displays only for the person who created the conference.
Note
Remove Conference Participant
Procedure
Step 1 While you are in a conference, press Details to view a list of participants.Step 2 Highlight the participant that you want to remove, then press Remove.
Meet Me ConferenceMeet Me allows you to call a predetermined number at a scheduled time to host or join a Meet Me conference.
The Meet Me conference begins when the host connects. Participants who call the conference before the hosthas joined hear a busy tone and must dial again.
The conference ends when all participants hang up; the conference does not automatically end when the hostdisconnects.
Host Meet Me Conference
Procedure
Step 1 Obtain a Meet Me phone number from your system administrator.Step 2 Distribute the Meet Me phone number to participants.Step 3 When you are ready to start the meeting, lift the handset to get a dial tone and then pressMeet Me.Step 4 Dial the Meet Me phone number.
Cisco IP Phone 7821, 7841, and 7861 User Guide for Cisco Unified Communications Manager 10.0 (SIP) 51
Calling FeaturesView Conference Participants
Join Meet Me Conference
Procedure
Step 1 Dial the Meet Me phone number that the conference host provided.Step 2 If you hear a busy tone, the host has not yet joined the conference. In this case, hang up and try your call
again.
Speed DialSpeed Dial allows you to press a button and enter a preset code to place a call. Before you can use Speed Dialfeatures on your phone, you must set up speed-dial on your Self Care Portal.
Depending on setup, your phone can support these Speed Dial features:
• Speed-dial buttons: Allow you to quickly dial a phone number from one or more line buttons that areset up for speed dialing.
• If your system administrator has set up the Line Status feature, you can monitor the status of a speed-dialline by using the line status indicators.
Related Topics
Sign In to Cisco Unified Communications Self Care Portal, on page 32
Place Call Using Speed-Dial CodesBefore you can use speed-dial codes on your phone, you must set up the codes on the Self Care Portal.
Procedure
Step 1 To place a call using speed-dial code while on-hook, enter the speed-dial code and press Speed Dial.Step 2 To place a call using speed-dial while off-hook, perform these steps:
a) Lift the handset and press Speed Dial.b) Enter the speed-dial code and press Speed Dial again to complete the call.
Do Not DisturbDo Not Disturb (DND) allows you to turn off one of the following incoming call indicators:
• The ringer on your phone
Cisco IP Phone 7821, 7841, and 7861 User Guide for Cisco Unified Communications Manager 10.0 (SIP)52
Calling FeaturesJoin Meet Me Conference
• The ringer and any visual notification that you have an incoming call
When DND is enabled, your incoming calls forward to another number, such as your voicemail, if it is set upand the call is not saved or listed in your Call History.
The DND feature affects all lines on a phone. The feature does not affect intercom or 911 calls.
You can change your DND options from the Self Care Portal. For information on customizing your Do NotDisturb options, see the Cisco Unified Communications Self Care Portal User Guide, located at http://www.cisco.com/en/US/products/sw/voicesw/ps556/products_user_guide_list.html.
Turn DND On and Off
Procedure
Step 1 Press DND to turn on DND.Visual confirmation displays briefly.
Step 2 Press DND again to turn off DND.Visual confirmation displays briefly.
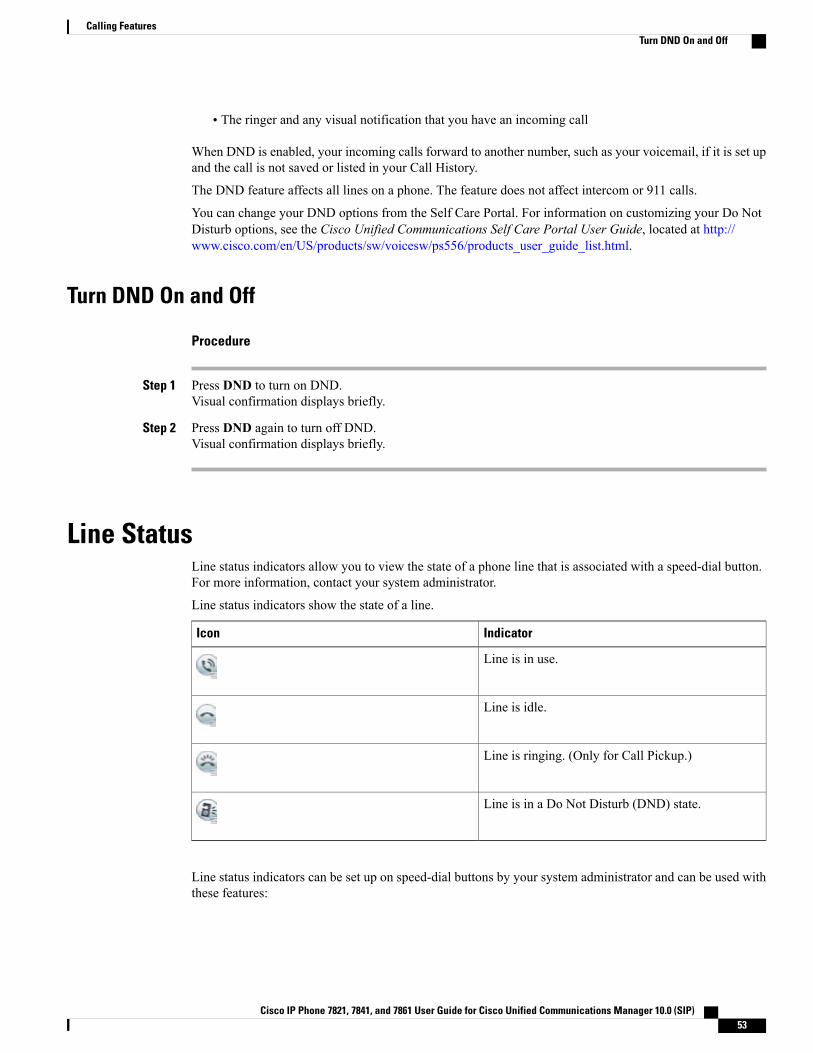
Line StatusLine status indicators allow you to view the state of a phone line that is associated with a speed-dial button.For more information, contact your system administrator.
Line status indicators show the state of a line.
IndicatorIcon
Line is in use.
Line is idle.
Line is ringing. (Only for Call Pickup.)
Line is in a Do Not Disturb (DND) state.
Line status indicators can be set up on speed-dial buttons by your system administrator and can be used withthese features:
Cisco IP Phone 7821, 7841, and 7861 User Guide for Cisco Unified Communications Manager 10.0 (SIP) 53
Calling FeaturesTurn DND On and Off

Speed Dial
Allows you to monitor the status of (and dial) a specific number on a speed-dial button. If the monitoredline is unavailable, the Line Status button changes to a normal speed-dial button.
Directed Call Park
Allows you to monitor the line status of and dial a Directed Call Park number on a speed-dial button.
Call Pickup
Allows you to monitor the line status of (and pick up a ringing call on) a ringing call on aspeed-dial button.
Your phone can play an audible alert when a call rings on the monitored line. For more information, contactyour system administrator.
Malicious Call IdentificationMalicious Call Identification (MCID) allows you to identify an active call as suspicious, which initiates aseries of automated tracking and notification messages.
Trace Suspicious Call
Procedure
PressMCID to send a silent notification message to your system administrator.When the silent notification message is sent, your phone provides both a visual and audible confirmation.
Cisco Extension MobilityCisco Extension Mobility allows you to temporarily configure a Cisco IP Phone as your own. After you signin to Cisco ExtensionMobility, the phone displays the message Resetting and then Registering. Thereset enables the phone to adopt your user profile, including your phone lines, features, established services,and web-based settings. For more information, contact your system administrator.
Cisco IP Phone 7821, 7841, and 7861 User Guide for Cisco Unified Communications Manager 10.0 (SIP)54
Calling FeaturesMalicious Call Identification

Enable Extension Mobility
Procedure
Step 1 Press Applications.Step 2 Select Extension Mobility (name can vary, including EM Service).Step 3 Enter your user ID and PIN (provided by your system administrator).Step 4 Select a device profile if prompted.Step 5 Press Applications to sign out.Step 6 Select Services.Step 7 Select Extension Mobility.Step 8 Press Yes when prompted to sign out.
Mobile ConnectMobile Connect allows you to use your mobile phone to handle calls that are associated with your desk phonenumber.
When using Cisco Mobile Connect, you must add your mobile and other phones that you want to use to makeand receive calls using the same directory numbers as your desk phone. These phones are called remotedestinations. You can also define access lists to restrict or allow calls from certain numbers to be sent to yourmobile phone.
When you enable Mobile Connect:
• Your desk phone and remote destinations (your mobile phones) receive calls simultaneously.
• When you answer the call on your desk phone, the remote destinations stop ringing, are disconnected,and display a missed call message.
• When you answer the call on one remote destination, the other remote destinations and desk phone stopringing and are disconnected, and a missed call message is shown on the other remote destinations.
• When you answer the call on one remote destination and then switch the call to a Cisco Unified devicethat shares lines, the Cisco Unified devices that share the same line display a Remote In Usemessage.
Cisco IP Phone 7821, 7841, and 7861 User Guide for Cisco Unified Communications Manager 10.0 (SIP) 55
Calling FeaturesEnable Extension Mobility
Enable Mobile Connect
Procedure
Step 1 PressMobility to display the current remote destination status (Enabled or Disabled).Step 2 Press Select to change the status.Step 3 Press Exit.
Turn Mobile Connect On or Off for All Remote Destinations from Desk Phone
Procedure
Step 1 PressMobility or To Mobile to display the current remote destination status (Enabled or Disabled).Step 2 Press Select to change the status.Step 3 Press Exit.
Switch Desk Phone Call to Mobile Phone
Procedure
Step 1 PressMobility.Step 2 Select To mobile.Step 3 Answer the in-progress call on your mobile phone.
You cannot use the same phone line for any other calls, but if your desk phone supports multiplelines, you can use another line to make or receive calls.
Note
Cisco IP Phone 7821, 7841, and 7861 User Guide for Cisco Unified Communications Manager 10.0 (SIP)56
Calling FeaturesEnable Mobile Connect

Switch Mobile Call to Desk Phone
Procedure
Step 1 Select a line on your desk phone.Step 2 Hang up the call on your mobile phone to disconnect the mobile phone, but not the call.Step 3 Press Resume on your desk phone within five to 10 seconds and start talking on the desk phone.
Hand Off Call from Mobile Phone to Desk Phone
Procedure
Step 1 While on your mobile phone, enter the access code for the hand off feature.For more information, contact your system administrator.
Step 2 Hang up the call on your mobile phone to disconnect the mobile phone, but not the call.Step 3 Press the Answer softkey on your desk phone within 10 seconds and start talking on the desk phone.
For more information, contact your system administrator. The Cisco Unified devices that share the same linedisplay a Remote In Use message.
Hunt GroupsHunt Groups are used to share the call load in organizations that receive a large number of incoming calls.
Your system administrator sets up a hunt group with a series of directory numbers. When the first directorynumber in the hunt group is busy, the system hunts for the next available directory number in the group anddirects the call to that phone.
If you are a member of a hunt group, you sign in to a hunt group when you want to receive calls, and you signout of the hunt group when you want to prevent calls from ringing on your phone.
Sign In and Out of Hunt GroupSigning out of a hunt group does not prevent direct calls from ringing your phone.
Procedure
Step 1 Press Hunt Group to sign in.Visual confirmation displays briefly.
Cisco IP Phone 7821, 7841, and 7861 User Guide for Cisco Unified Communications Manager 10.0 (SIP) 57
Calling FeaturesSwitch Mobile Call to Desk Phone
Step 2 Press Hunt Group again to sign out.
Display Queue StatisticsUse the queue statistics to check the status of the hunt group queue.
Procedure
Step 1 Press QueueStatus.The Queue status window appears.
Step 2 To refresh the statistics, press Refresh.Step 3 To exit, press Exit.
cBargeThe cBarge feature allows you to create a standard (ad hoc) conference by adding yourself to a call on a sharedline.
Join Conference on Shared Line
Procedure
Press the line button of the shared line that is in use. If Privacy is enabled, you cannot add yourself to theshared line.
Cisco IP Phone 7821, 7841, and 7861 User Guide for Cisco Unified Communications Manager 10.0 (SIP)58
Calling FeaturesDisplay Queue Statistics
C H A P T E R 8Advanced Operations
• Call Functions, page 59
• Feature Buttons and Softkeys, page 61
• Survivable Remote Site Telephony Overview, page 63
Call FunctionsThis section provides information about some of the advanced call functions that are available on Cisco IPPhones.
Agent GreetingAgent Greeting allows you to create and update a prerecorded greeting that plays at the beginning of a call,such as a customer call, before you begin the conversation with the caller. You can prerecord a single greetingor multiple greetings as needed.
When a customer calls, both parties hear the prerecorded greeting. You can remain on mute until the greetingends or answer the call over the greeting.
For more information, contact your system administrator.
AnswerPressing Answer allows you to answer the call if there is only one incoming call. But if there are severalincoming calls, pressingAnswerwill give you a list of the callers, and you can determine which one to answer.Incoming calls are given priority over Held or Park Reversion calls. The Answer button setup depends onyour call-handling needs and work environment .This feature is set up for users who have multiple lines. Formore information, contact your system administrator.
When you get a call, you see a notification window on the phone screen, called a call toast. The call toastremains visible for a preset amount of time. For more information, contact your system administrator.
Cisco IP Phone 7821, 7841, and 7861 User Guide for Cisco Unified Communications Manager 10.0 (SIP) 59
If an incoming call has been call forwarded from another phone, you may see additional information to identifythat the call has been forwarded. Additional information can identify the caller details. For more information,contact your system administrator.
When you receive a call, the phone number that displays on the screen contains the string of digits that youcan dial to contact the caller. The digit string can contain the following digits, if required:
• Code to obtain an outside line (for example, if you have to dial 9)
• Long-distance code
• Area code
• City code
• Telephone number
The phone saves the complete digit string in the call history, and you can save the number in your PersonalAddress Book.
Client Matter CodeYour administrator may require that you enter a Client Matter Code (CMC) after you dial a phone number.The CMC can be used for accounting or billing codes. For more information, contact your system administrator.
When you need to enter a CMC, the phone displays Enter Client Matter Code, the dialed numberchanges to “********”, and you hear a special tone. Enter the CMC for the call using the keypad.
Related Topics
Forced Authorization Code, on page 60
Forced Authorization CodeYour administrator may require that you enter a Forced Authorization (FACC) after you dial a phone number.The FAC controls access to phone numbers. For more information, contact your system administrator.
When you need to enter an FAC, the phone displays Enter Authorization Code, the dialed numberchanges to “********”, and you hear a special tone. Enter the FAC for the call using the keypad. For securityreasons, the phone displays a “*” instead of the number entered.
Related Topics
Client Matter Code, on page 60
Secure and Nonsecure Indication TonesWhen a phone is configured as secure (encrypted and trusted), it can be given a “protected” status. After aphone is protected, it can be configured to play an indication tone at the beginning of a call.
You will hear these secure or nonsecure indication tones only on protected phones. If the overall call statuschanges during the call, the protected phone plays the appropriate tone.
Cisco IP Phone 7821, 7841, and 7861 User Guide for Cisco Unified Communications Manager 10.0 (SIP)60
Advanced OperationsClient Matter Code
When the Play Secure Indication Tone option is enabled (True), the following circumstances determine thetype of tone the protected phone plays:
• If end-to-end secure media is established and the call status is secure, the phone plays the secure indicationtone (three long beeps with pauses)
• If end-to-end nonsecuremedia is established and the call status is not secure, the phone plays the nonsecureindication tone (six short beeps with brief pauses)
• When the Play Secure Indication Tone option is disabled, no tone plays.
For more information, contact your system administrator.
Shared LinesShared lines allow you to use one phone number for multiple phones.
You might have a shared line if you have multiple phones and want one phone number, if you sharecall-handling tasks with coworkers, or if you handle calls on behalf of a manager.
For example, if you share a line with a coworker:
• When a call comes in on the shared line:
• Your phone rings and the line button flashes amber.
• Your coworker’s phone rings and the line button flashes amber.
• If you answer the call:
◦Your line button turns green.
◦Your coworker’s line button turns red.When the line button is red, that line cannot be used to barge in on the call or used to make anothercall.
• If you put the call on hold:
◦Your line button flashes green.
◦Your coworker’s line button flashes red.When the line button flashes red, your coworker can pick up the call.
Your call history shows the status for all calls for shared lines. For example, if a call rings on a shared lineand you answer the call, your coworkers who share the line will see that the call was answered remotely. Yourcall history identifies calls that were Placed, Received, Remote Placed, Remote Received, or Missed.
Feature Buttons and SoftkeysThis table provides information about some of the features that are available on dedicated feature buttons,and some of the features that your system administrator sets up either on programmable feature buttons orsoftkeys.
Cisco IP Phone 7821, 7841, and 7861 User Guide for Cisco Unified Communications Manager 10.0 (SIP) 61
Advanced OperationsShared Lines
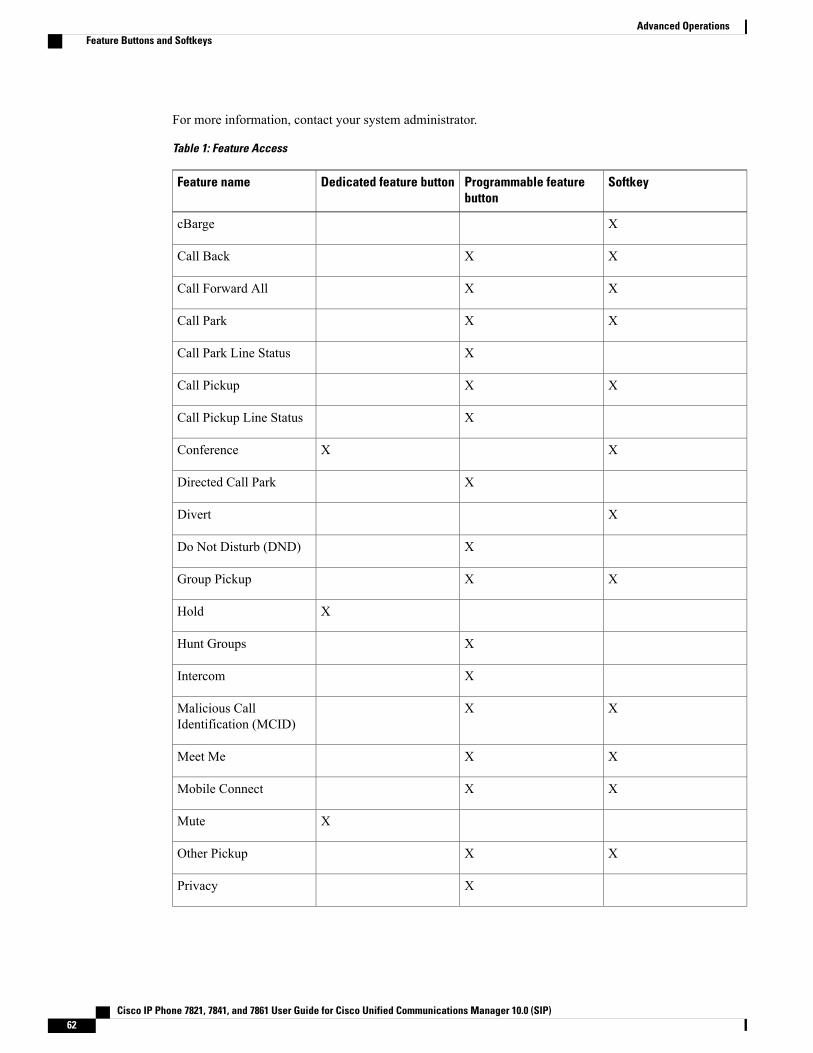
For more information, contact your system administrator.
Table 1: Feature Access
SoftkeyProgrammable featurebutton
Dedicated feature buttonFeature name
XcBarge
XXCall Back
XXCall Forward All
XXCall Park
XCall Park Line Status
XXCall Pickup
XCall Pickup Line Status
XXConference
XDirected Call Park
XDivert
XDo Not Disturb (DND)
XXGroup Pickup
XHold
XHunt Groups
XIntercom
XXMalicious CallIdentification (MCID)
XXMeet Me
XXMobile Connect
XMute
XXOther Pickup
XPrivacy
Cisco IP Phone 7821, 7841, and 7861 User Guide for Cisco Unified Communications Manager 10.0 (SIP)62
Advanced OperationsFeature Buttons and Softkeys
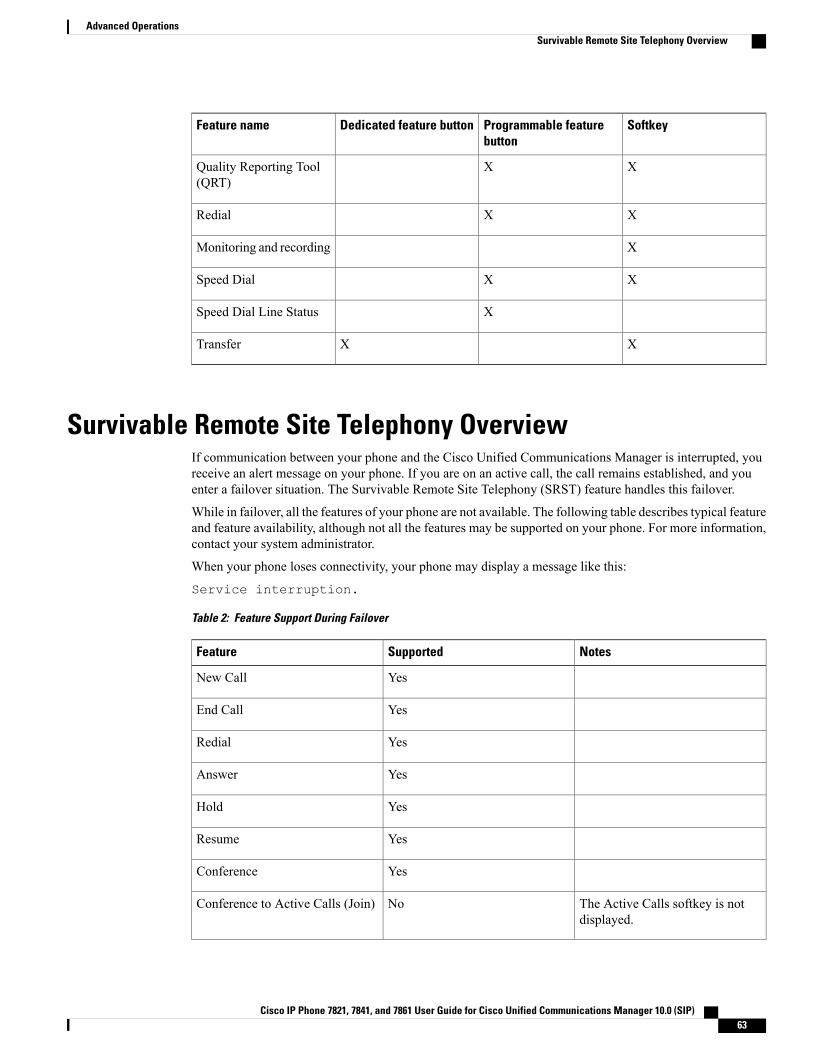
SoftkeyProgrammable featurebutton
Dedicated feature buttonFeature name
XXQuality Reporting Tool(QRT)
XXRedial
XMonitoring and recording
XXSpeed Dial
XSpeed Dial Line Status
XXTransfer
Survivable Remote Site Telephony OverviewIf communication between your phone and the Cisco Unified Communications Manager is interrupted, youreceive an alert message on your phone. If you are on an active call, the call remains established, and youenter a failover situation. The Survivable Remote Site Telephony (SRST) feature handles this failover.
While in failover, all the features of your phone are not available. The following table describes typical featureand feature availability, although not all the features may be supported on your phone. For more information,contact your system administrator.
When your phone loses connectivity, your phone may display a message like this:
Service interruption.
Table 2: Feature Support During Failover
NotesSupportedFeature
YesNew Call
YesEnd Call
YesRedial
YesAnswer
YesHold
YesResume
YesConference
The Active Calls softkey is notdisplayed.
NoConference to Active Calls (Join)
Cisco IP Phone 7821, 7841, and 7861 User Guide for Cisco Unified Communications Manager 10.0 (SIP) 63
Advanced OperationsSurvivable Remote Site Telephony Overview
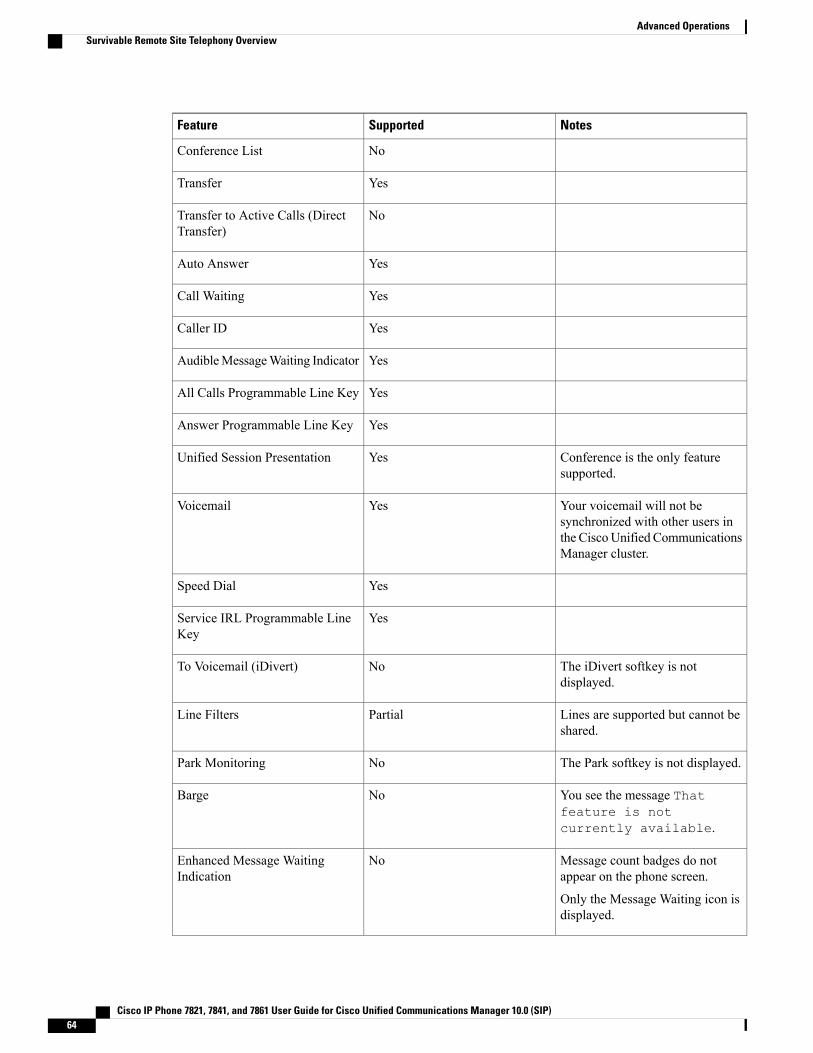
NotesSupportedFeature
NoConference List
YesTransfer
NoTransfer to Active Calls (DirectTransfer)
YesAuto Answer
YesCall Waiting
YesCaller ID
YesAudibleMessageWaiting Indicator
YesAll Calls Programmable Line Key
YesAnswer Programmable Line Key
Conference is the only featuresupported.
YesUnified Session Presentation
Your voicemail will not besynchronized with other users inthe CiscoUnified CommunicationsManager cluster.
YesVoicemail
YesSpeed Dial
YesService IRL Programmable LineKey
The iDivert softkey is notdisplayed.
NoTo Voicemail (iDivert)
Lines are supported but cannot beshared.
PartialLine Filters
The Park softkey is not displayed.NoPark Monitoring
You see the message Thatfeature is notcurrently available.
NoBarge
Message count badges do notappear on the phone screen.
Only the Message Waiting icon isdisplayed.
NoEnhanced Message WaitingIndication
Cisco IP Phone 7821, 7841, and 7861 User Guide for Cisco Unified Communications Manager 10.0 (SIP)64
Advanced OperationsSurvivable Remote Site Telephony Overview
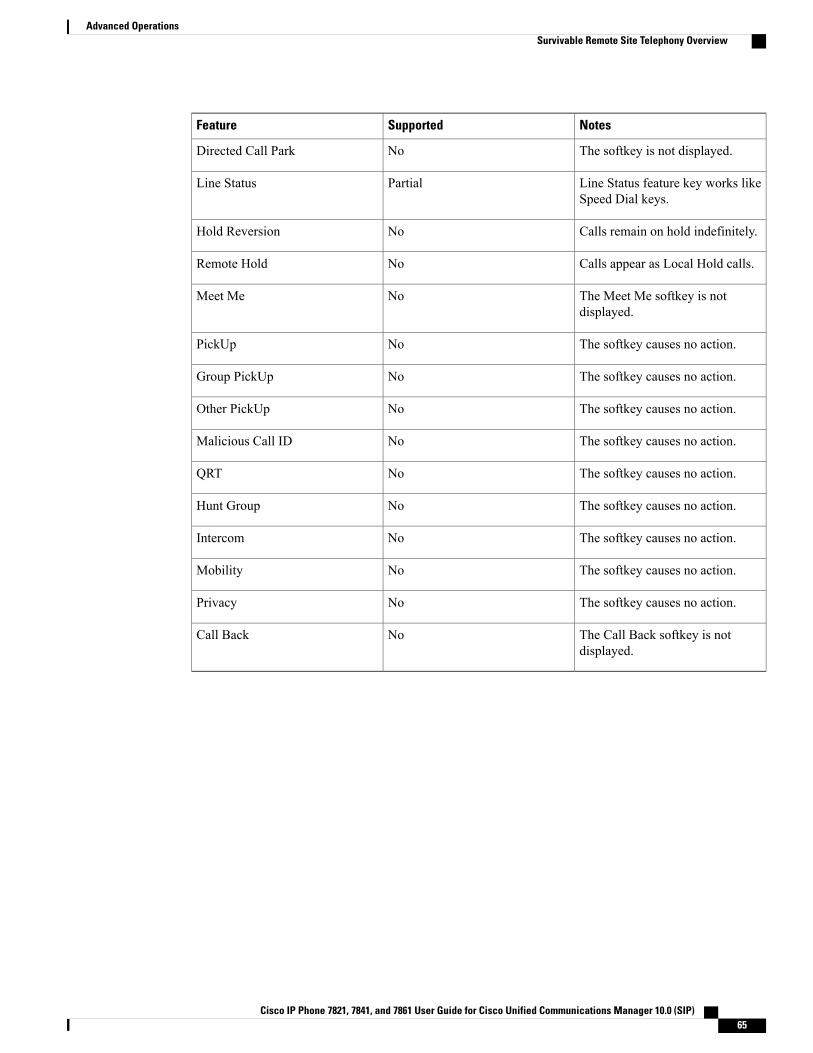
NotesSupportedFeature
The softkey is not displayed.NoDirected Call Park
Line Status feature key works likeSpeed Dial keys.
PartialLine Status
Calls remain on hold indefinitely.NoHold Reversion
Calls appear as Local Hold calls.NoRemote Hold
The Meet Me softkey is notdisplayed.
NoMeet Me
The softkey causes no action.NoPickUp
The softkey causes no action.NoGroup PickUp
The softkey causes no action.NoOther PickUp
The softkey causes no action.NoMalicious Call ID
The softkey causes no action.NoQRT
The softkey causes no action.NoHunt Group
The softkey causes no action.NoIntercom
The softkey causes no action.NoMobility
The softkey causes no action.NoPrivacy
The Call Back softkey is notdisplayed.
NoCall Back
Cisco IP Phone 7821, 7841, and 7861 User Guide for Cisco Unified Communications Manager 10.0 (SIP) 65
Advanced OperationsSurvivable Remote Site Telephony Overview

Cisco IP Phone 7821, 7841, and 7861 User Guide for Cisco Unified Communications Manager 10.0 (SIP)66
Advanced OperationsSurvivable Remote Site Telephony Overview
C H A P T E R 9Preferences
• Adjust Brightness, page 67
• Adjust Headset Sidetone, page 67
• Change Ringtone, page 68
• Line Settings, page 68
• Phone Services , page 69
Adjust BrightnessProcedure
Step 1 Press Applications .Step 2 Select Preferences.Step 3 Select Brightness.Step 4 Use the left and right arrows on the Navigation pad to adjust the brightness.Step 5 Press Save to set the brightness, or press Cancel to exit.
Adjust Headset SidetoneIf your system administrator has set the Headset Sidetone Controls feature for your phone, you can specifythe volume of your headset from your phone.
Cisco IP Phone 7821, 7841, and 7861 User Guide for Cisco Unified Communications Manager 10.0 (SIP) 67
Procedure
Step 1 Press Applications .Step 2 Select Preferences.Step 3 Select Headset Sidetone.Step 4 Select one of the following sidetone levels:
• High
• Normal
• Low
• Off
Step 5 Press Return to return to the Preferences screen.
Change RingtoneYou can customize how your phone indicates an incoming call. You can also adjust the ringer volume foryour phone.
Procedure
Step 1 Press Applications .Step 2 Select Preferences.Step 3 Select Ringtone.Step 4 Select the required ringtone.Step 5 Press Play to play the ringtone.Step 6 Press Set to select the ringtone.Step 7 Press Apply to confirm your selection, or press Cancel to go back to the Ringtone screen.Step 8 Press Return to the Preferences screen.
Line SettingsLine settings affect a specific phone line (directory number) on your phone. Line settings can include callforwarding, visual and audio message-waiting indicators, voice-message indicators, ring patterns, and otherline-specific settings.
Cisco IP Phone 7821, 7841, and 7861 User Guide for Cisco Unified Communications Manager 10.0 (SIP)68
PreferencesChange Ringtone
You can change your line settings using the Cisco Unified Communications Self Care Portal. For information,see the Cisco Unified Communications Self Care Portal User Guide, located at http://www.cisco.com/en/US/products/sw/voicesw/ps556/products_user_guide_list.html.
Phone ServicesPhone services can include special phone features, network data, and web-based information (such as stockquotes and movie listings). You must subscribe to a phone service using the Self Care Portal before you accessit on your phone.
For more information, contact your system administrator.
If only one service is set up, the service opens by default. If more than one service is set up, select an optionfrom the menu.
Select a service by using one of these feature buttons:
• (Feature button that your system administrator sets up)
• Messages
• Applications
• Contacts
For information on Cisco Unified Communications Self Care Portal, see the Cisco Unified CommunicationsSelf Care Portal User Guide, located at http://www.cisco.com/en/US/products/sw/voicesw/ps556/products_user_guide_list.html.
Cisco IP Phone 7821, 7841, and 7861 User Guide for Cisco Unified Communications Manager 10.0 (SIP) 69
PreferencesPhone Services

Cisco IP Phone 7821, 7841, and 7861 User Guide for Cisco Unified Communications Manager 10.0 (SIP)70
PreferencesPhone Services
C H A P T E R 10Frequently Asked Questions
• Frequently Asked Questions, page 71
Frequently Asked QuestionsThe following section describes the FAQs.
Why don’t I see the icons shown in the documentation on my phone screen?Many of the phone screen icons are applicable only to the Cisco IP Phone 7841.
Can I use the second line on my Cisco IP Phone 7821 as a feature button?
Yes. If you do not require two phone lines, your system administrator can set up a feature on your secondline.
How do I resume a call that is on hold?
To resume a call, press the Hold button or Resume softkey.
Why does my phone not wake up?
If your system administrator has set up your phone for EnergyWise, the phone may be sleeping (powereddown). Your system administrator sets your phone to sleep at a certain time and wake (power up) at a certaintime. Your phone will wake up at the time set by your system administrator. You can press the Select buttonto wake your phone up. See your system administrator to have the sleep and wake up times changed.
What do four rings in succession mean?
The phone is notifying you that your phone will power down (sleep) soon to conserve energy (the EnergyWisefeature). Your system administrator sets your phone to sleep at a certain time and wake (power up) at a certaintime. Your phone will wake up at the time set by your system administrator. See your system administratorto have the sleep and wake up times changed.
What do I do if my phone displays the message Security Error?
Your phone firmware has identified an internal error. Try unplugging the phone from the power source, waitone minute, and then plug the phone back in. If the message persists, contact your system administrator.
Cisco IP Phone 7821, 7841, and 7861 User Guide for Cisco Unified Communications Manager 10.0 (SIP) 71

Cisco IP Phone 7821, 7841, and 7861 User Guide for Cisco Unified Communications Manager 10.0 (SIP)72
Frequently Asked QuestionsFrequently Asked Questions

C H A P T E R 11Troubleshooting
• Conference Button and Softkey Unresponsive, page 73
• Meet Me Conference Busy Tone, page 73
• Cannot Sign In to Personal Directory, page 74
• No Caller ID on Remote Hold, page 74
• Cannot Access Self Care Portal, page 74
• Security Error Message, page 75
Conference Button and Softkey UnresponsiveProblem
You have set up a conference call, but the Conf softkey is not available and the Conference button isunresponsive.
Possible Cause
You have reached the maximum number of conference participants.
Solution
Ask one of the participants to drop, or drop a conference participant.
Meet Me Conference Busy ToneProblem
You hear a busy tone after you dial into a Meet Me conference.
Possible Cause
The conference host has not yet joined the conference.
Cisco IP Phone 7821, 7841, and 7861 User Guide for Cisco Unified Communications Manager 10.0 (SIP) 73
Solution
Try calling back again.
Cannot Sign In to Personal DirectoryProblem
You are unable to sign in to your personal directory.
Possible Cause
• You are using your password to sign in, not your personal identification number (PIN).
• Your PIN needs to be reset.
Solution
• Use your PIN, not your password.
• Contact your system administrator.
No Caller ID on Remote HoldProblem
You have a shared line on your Cisco IP Phone 7821 and cannot see the caller ID when the remote line is onhold.
This is applicable to the Cisco IP Phone 7821 only.Note
Possible Cause
This works as designed.
Solution
None.
Cannot Access Self Care PortalProblem
You are unable to access your Self Care Portal.
Cisco IP Phone 7821, 7841, and 7861 User Guide for Cisco Unified Communications Manager 10.0 (SIP)74
TroubleshootingCannot Sign In to Personal Directory
Possible Cause
Your password needs to be reset or your administrator may have changed your access to the pages.
Solution
Contact your system administrator.
Security Error MessageProblem
Your phone displays Security Error.
Cause
Your phone firmware has identified an internal error.
Solution
If the message persists, contact your system administrator.
Cisco IP Phone 7821, 7841, and 7861 User Guide for Cisco Unified Communications Manager 10.0 (SIP) 75
TroubleshootingSecurity Error Message

Cisco IP Phone 7821, 7841, and 7861 User Guide for Cisco Unified Communications Manager 10.0 (SIP)76
TroubleshootingSecurity Error Message
C H A P T E R 12Product Safety and Security
• Safety and Performance Information, page 77
• FCC Compliance Statements, page 78
• Cisco Product Security Overview, page 79
Safety and Performance Information
Power OutagePower outages and other devices can affect your Cisco IP Phone.
Your access to emergency service through the phone requires that the phone receive power. If a powerinterruption occurs, Service and Emergency Calling Service dialing will not function until power is restored.In case of a power failure or disruption, you may need to reset or reconfigure the equipment before you canuse the Service or Emergency Calling Service dialing.
External DevicesWe recommend using good-quality external devices, such as headsets, cables, and connectors, that are shieldedagainst unwanted radio frequency (RF) and audio frequency (AF) signals.
Not all Cisco IP Telephony products support external devices, cords or cables. For more information,consult the documentation for your phone.
Note
Depending on the quality of these devices and their proximity to other devices, such as mobile phones ortwo-way radios, some audio noise may still occur. In these cases, Cisco recommends that you take one ormore of these actions:
• Move the external device away from the source of the RF or AF signals.
• Route the external device cables away from the source of the RF or AF signals.
Cisco IP Phone 7821, 7841, and 7861 User Guide for Cisco Unified Communications Manager 10.0 (SIP) 77
• Use shielded cables for the external device, or use cables with a better shield and connector.
• Shorten the length of the external device cable.
• Apply ferrites or other such devices on the cables for the external device.
Cisco cannot guarantee the performance of external devices, cables, and connectors.
In EuropeanUnion countries, use only external speakers, microphones, and headsets that are fully compliantwith the EMC Directive [89/336/EC].
Caution
Bluetooth Wireless Headset PerformanceThe Cisco IP Phones support Bluetooth Class 2 technology when the headsets support Bluetooth. Bluetoothenables low-bandwidth wireless connections within a range of 30 feet (10 meters). The best performance isin the 3- to 6-foot (1- to 2-meter) range. You can connect up to five headsets, but only the last one connectedis used as the default.
Because there can be potential interference issues, Cisco recommends that you move 802.11b/g devices,Bluetooth devices, microwave ovens, and large metal objects away from the wireless headset.
For a Bluetooth wireless headset to work, it does not need to be within direct line-of-sight of the phone, butsome barriers, such as walls or doors, and interference from other electronic devices, can affect the connection.
Power InformationConnect your Cisco IP phone to your LAN using a CAT 5e Ethernet cable to enable full functionality of yourCisco IP phone. If your Ethernet port is equipped with Power over Ethernet (PoE), your Cisco IP phone canbe powered through the LAN port. Do not extend the LAN Ethernet cable outside the building.
FCC Compliance StatementsThe Federal Communications Commission requires compliance statements for the following:
FCC Part 15.21 StatementChanges or modifications not expressly approved by the party responsible for compliance could void theuser’s authority to operate the equipment.
FCC RF Radiation Exposure StatementThis equipment complies with FCC radiation exposure limits set forth for an uncontrolled environment. Endusers must follow the specific operating instructions for satisfying RF exposure compliance. This transmittermust be at least 20 cm from the user and must not be collocated or operating in conjunction with any otherantenna or transmitter.
Cisco IP Phone 7821, 7841, and 7861 User Guide for Cisco Unified Communications Manager 10.0 (SIP)78
Product Safety and SecurityBluetooth Wireless Headset Performance
FCC Receivers and Class B Digital StatementThis product has been tested and complies with the specifications for a Class B digital device, pursuant toPart 15 of the FCC Rules. These limits are designed to provide reasonable protection against harmfulinterference in a residential installation. This equipment generates, uses, and can radiate radio frequencyenergy and, if not installed and used according to the instructions, may cause harmful interference to radiocommunications. However, there is no guarantee that interference will not occur in a particular installation.
If this equipment does cause harmful interference to radio or television reception, which is found by turningthe equipment off and on, the user is encouraged to try to correct the interference by one or more of thefollowing measures:
• Reorient or relocate the receiving antenna
• Increase the separation between the equipment or devices
• Connect the equipment to an outlet other than the receiver's
• Consult a dealer or an experienced radio/TV technician for assistance
Cisco Product Security OverviewThis product contains cryptographic features and is subject to United States and local country laws governingimport, export, transfer, and use. Delivery of Cisco cryptographic products does not imply third-party authorityto import, export, distribute, or use encryption. Importers, exporters, distributors, and users are responsiblefor compliance with U.S. and local country laws. By using this product you agree to comply with applicablelaws and regulations. If you are unable to comply with U.S. and local laws, return this product immediately.
Further information regarding U.S. export regulations may be found at http://www.bis.doc.gov/index.php/regulations/export-administration-regulations-ear.
Cisco IP Phone 7821, 7841, and 7861 User Guide for Cisco Unified Communications Manager 10.0 (SIP) 79
Product Safety and SecurityFCC Receivers and Class B Digital Statement

Cisco IP Phone 7821, 7841, and 7861 User Guide for Cisco Unified Communications Manager 10.0 (SIP)80
Product Safety and SecurityCisco Product Security Overview

C H A P T E R 13Warranty
• Cisco One-Year Limited Hardware Warranty Terms, page 81
Cisco One-Year Limited Hardware Warranty TermsSpecial terms apply to your hardware warranty and services that you can use during the warranty period.
Your formalWarranty Statement, including the warranties and license agreements applicable to Cisco software,is available on Cisco.com at the following URL: http://www.cisco.com/go/hwwarranty.
Cisco IP Phone 7821, 7841, and 7861 User Guide for Cisco Unified Communications Manager 10.0 (SIP) 81

Cisco IP Phone 7821, 7841, and 7861 User Guide for Cisco Unified Communications Manager 10.0 (SIP)82
WarrantyCisco One-Year Limited Hardware Warranty Terms