cisco data center assurance program (dcap) cisco data center assurance program (dcap) cisco data...
TRANSCRIPT

Cisco Data Center Assurance Program (DCAP)Data Mobility Manager (DMM) Design Guide (External)THE SPECIFICATIONS AND INFORMATION REGARDING THE PRODUCTS IN THIS MANUAL ARE SUBJECT TO CHANGE WITHOUT NOTICE. ALL STATEMENTS, INFORMATION, AND RECOMMENDATIONS IN THIS MANUAL ARE BELIEVED TO BE ACCURATE BUT ARE PRESENTED WITHOUT WARRANTY OF ANY KIND, EXPRESS OR IMPLIED. USERS MUST TAKE FULL RESPONSIBILITY FOR THEIR APPLICATION OF ANY PRODUCTS.
Americas HeadquartersCisco Systems, Inc.170 West Tasman DriveSan Jose, CA 95134-1706 USAhttp://www.cisco.comTel: 408 526-4000
800 553-NETS (6387)Fax: 408 527-0883

THE SOFTWARE LICENSE AND LIMITED WARRANTY FOR THE ACCOMPANYING PRODUCT ARE SET FORTH IN THE INFORMATION PACKET THAT SHIPPED WITH THE PRODUCT AND ARE INCORPORATED HEREIN BY THIS REFERENCE. IF YOU ARE UNABLE TO LOCATE THE SOFTWARE LICENSE OR LIMITED WARRANTY, CONTACT YOUR CISCO REPRESENTATIVE FOR A COPY.
The Cisco implementation of TCP header compression is an adaptation of a program developed by the University of California, Berkeley (UCB) as part of UCB’s public domain version of the UNIX operating system. All rights reserved. Copyright © 1981, Regents of the University of California.
NOTWITHSTANDING ANY OTHER WARRANTY HEREIN, ALL DOCUMENT FILES AND SOFTWARE OF THESE SUPPLIERS ARE PROVIDED “AS IS” WITH ALL FAULTS. CISCO AND THE ABOVE-NAMED SUPPLIERS DISCLAIM ALL WARRANTIES, EXPRESSED OR IMPLIED, INCLUDING, WITHOUT LIMITATION, THOSE OF MERCHANTABILITY, FITNESS FOR A PARTICULAR PURPOSE AND NONINFRINGEMENT OR ARISING FROM A COURSE OF DEALING, USAGE, OR TRADE PRACTICE.
IN NO EVENT SHALL CISCO OR ITS SUPPLIERS BE LIABLE FOR ANY INDIRECT, SPECIAL, CONSEQUENTIAL, OR INCIDENTAL DAMAGES, INCLUDING, WITHOUT LIMITATION, LOST PROFITS OR LOSS OR DAMAGE TO DATA ARISING OUT OF THE USE OR INABILITY TO USE THIS MANUAL, EVEN IF CISCO OR ITS SUPPLIERS HAVE BEEN ADVISED OF THE POSSIBILITY OF SUCH DAMAGES.
ALL DESIGNS, SPECIFICATIONS, STATEMENTS, INFORMATION, AND RECOMMENDATIONS (COLLECTIVELY, "DESIGNS") IN THIS MANUAL ARE PRESENTED "AS IS," WITH ALL FAULTS. CISCO AND ITS SUPPLIERS DISCLAIM ALL WARRANTIES, INCLUDING, WITHOUT LIMITATION, THE WARRANTY OF MERCHANTABILITY, FITNESS FOR A PARTICULAR PURPOSE AND NONINFRINGEMENT OR ARISING FROM A COURSE OF DEALING, USAGE, OR TRADE PRACTICE. IN NO EVENT SHALL CISCO OR ITS SUPPLIERS BE LIABLE FOR ANY INDIRECT, SPECIAL, CONSEQUENTIAL, OR INCIDENTAL DAMAGES, INCLUDING, WITHOUT LIMITATION, LOST PROFITS OR LOSS OR DAMAGE TO DATA ARISING OUT OF THE USE OR INABILITY TO USE THE DESIGNS, EVEN IF CISCO OR ITS SUPPLIERS HAVE BEEN ADVISED OF THE POSSIBILITY OF SUCH DAMAGES.
THE DESIGNS ARE SUBJECT TO CHANGE WITHOUT NOTICE. USERS ARE SOLELY RESPONSIBLE FOR THEIR APPLICATION OF THE DESIGNS. THE DESIGNS DO NOT CONSTITUTE THE TECHNICAL OR OTHER PROFESSIONAL ADVICE OF CISCO, ITS SUPPLIERS OR PARTNERS. USERS SHOULD CONSULT THEIR OWN TECHNICAL ADVISORS BEFORE IMPLEMENTING THE DESIGNS. RESULTS MAY VARY DEPENDING ON FACTORS NOT TESTED BY CISCO..
CCDE, CCVP, Cisco Eos, Cisco StadiumVision, the Cisco logo, DCE, and Welcome to the Human Network are trademarks; Changing the Way We Work, Live, Play, and Learn is a service mark; and Access Registrar, Aironet, AsyncOS, Bringing the Meeting To You, Catalyst, CCDA, CCDP, CCIE, CCIP, CCNA, CCNP, CCSP, Cisco, the Cisco Certified Internetwork Expert logo, Cisco IOS, Cisco Press, Cisco Systems, Cisco Systems Capital, the Cisco Systems logo, Cisco Unity, Collaboration Without Limitation, Enterprise/Solver, EtherChannel, EtherFast, EtherSwitch, Event Center, Fast Step, Follow Me Browsing, FormShare, GigaDrive, HomeLink, Internet Quotient, IOS, iPhone, IP/TV, iQ Expertise, the iQ logo, iQ Net Readiness Scorecard, iQuick Study, IronPort, the IronPort logo, LightStream, Linksys, MediaTone, MeetingPlace, MGX, Networkers, Networking Academy, Network Registrar, PCNow, PIX, PowerPanels, ProConnect, ScriptShare, SenderBase, SMARTnet, Spectrum Expert, StackWise, The Fastest Way to Increase Your Internet Quotient, TransPath, WebEx, and the WebEx logo are registered trademarks of Cisco Systems, Inc. and/or its affiliates in the United States and certain other countries.
All other trademarks mentioned in this document or Website are the property of their respective owners. The use of the word partner does not imply a partnership relationship between Cisco and any other company. (0801R)
Cisco Data Center Assurance Program (DCAP) © 2008 Cisco Systems, Inc. All rights reserved.

Cisco Data Mobility Manager (DMM)
C O N T E N T S
Preface v
Key Technologies v
Related Documentation v
CHAPTER 1 DMM Overview 1-1
Introduction 1-1
The Customer Problem 1-2
Typical Customer Requirements and Cisco’s DMM Solution 1-3
Cisco MDS and DMM Background 1-4
Available Migration Types 1-4
Server-Based Migrations 1-5
Storage-Based Migrations 1-5
Appliance-Based Migrations 1-6
Fabric-Based Migrations (DMM) 1-7
Cisco MDS Topologies 1-8
Core Edge Design (storage at the core and servers at the edge) 1-8
Core Edge Design (core reserved for transit) 1-9
Core Edge Design (dedicated layers) 1-10
CHAPTER 2 DMM Architecture Overview 2-1
DMM License Options 2-2
Hardware and Software Requirements 2-3
Hardware Requirements 2-3
Software Requirements 2-3
Migrations Schemes 2-4
DMM OSM / ATP Support 2-4
CHAPTER 3 Detailed System Design 3-1
DMM Test Hardware 3-1
Cisco MDS Test Switches 3-1
Test Storage Arrays 3-3
Test Hosts 3-3
End To End Storage Configuration 3-3
Initial Cisco MDS DMM Connectivity 3-5
iCisco Data Center Assurance Program (DCAP)

Contents
CHAPTER 4 Designing A DMM Deployment 4-1
Designing The DMM Hardware Environment 4-1
Designed IP Connectivity 4-3
IP Addressing 4-3
Initial DMM Zoning 4-4
Testing Connectivity & Summary 4-4
Migration Options 4-5
DMM Migration Modes 4-5
Migration Rates & Job Verification 4-6
Default Migration Options 4-6
Designing a Single Host Migration 4-7
Pre-Migration 4-8
Live-Migration 4-13
Post Migration (Cutover) 4-14
Designing a Full Storage Array DMM Migration 4-14
DMM Performance and Scalability 4-21
SSM Performance 4-21
DMM Job Restrictions 4-21
APPENDIX A DMM Troubleshooting A-1
Show FC-Redirect A-1
Show DMM Commands A-2
Collecting Fabric Manager DMM Logging Events A-3
The DMM CLI Debug A-5
Common Configuration Mistakes A-5
APPENDIX B Terms and Acronyms B-1
APPENDIX C DMM Design Forms C-1
APPENDIX D Cisco MDS Configurations D-1
iiCisco Data Center Assurance Program (DCAP)
Cisco Data Mobility Manager (DMM)

Preface
This guide is aimed at providing assistance to experienced Cisco MDS administrators and Data Center Sales Engineers (SEs) who are responsible for planning and designing the Cisco MDS 9000 Family Data Mobility Manager (DMM) installation and application. An understanding of Cisco MDS technologies including VSANs, Zoning and Cisco MDS management is required. This document will provide design guidance on DMM, IPFC and hardware design. For detailed implementation guidance refer to the Cisco MDS 9000 Family Data Mobility Manager Configuration Guide.
Key TechnologiesThe following is a list of key technologies used within this document:
• Cisco MDS platform and SAN switching
• SAN storage
• SAN storage migrations
• Multipathing and SAN host agents
Related DocumentationThe documentation set for the Cisco MDS 9000 Family includes the following documents. To find a document online, use the Cisco MDS SAN-OS Documentation Locator.
http://www.cisco.com/en/US/docs/storage/san_switches/mds9000/roadmaps/doclocater.htm
Release Notes
• Cisco MDS 9000 Family Release Notes for Cisco MDS SAN-OS Releases
• Cisco MDS 9000 Family Release Notes for Storage Services Interface Images
Installation Guides
• Cisco MDS 9000 Family Data Mobility Manager Configuration Guide
• Cisco MDS 9000 Family Fabric Manager Configuration Guide
• Cisco MDS 9000 Family CLI Configuration Guide
Compatibility Information
• Cisco MDS Storage Services Module Interoperability Support Matrix
vCisco Data Center Assurance Program (DCAP)
Preface

Preface
• Cisco MDS 9000 SAN-OS Hardware and Software Compatibility Information
• Cisco MDS 9000 Family Interoperability Support Matrix
• Cisco MDS SAN-OS Release Compatibility Matrix for Storage Service Interface Images
Hardware Installation
• Cisco MDS 9124 Multilayer Fabric Switch Quick Start Guide
• Cisco MDS 9500 Series Hardware Installation Guide
• Cisco MDS 9200 Series Hardware Installation Guide
• Cisco MDS 9100 Series Hardware Installation Guide
viCisco Data Center Assurance Program (DCAP)
Preface

Overview
C H A P T E R 1
DMM OverviewThe purpose of this design guide is to describe the design practices that should be involved when planning to implement Cisco’s Data Mobility Manager (DMM). This document attempts to provide detailed and comprehensive design consideration steps which are required for successful DMM implementation. At present this initial release is aimed at providing DMM guidance for Active/Passive storage arrays only. Active/Active storage arrays such as EMC’s DMX may be covered in later revisions.
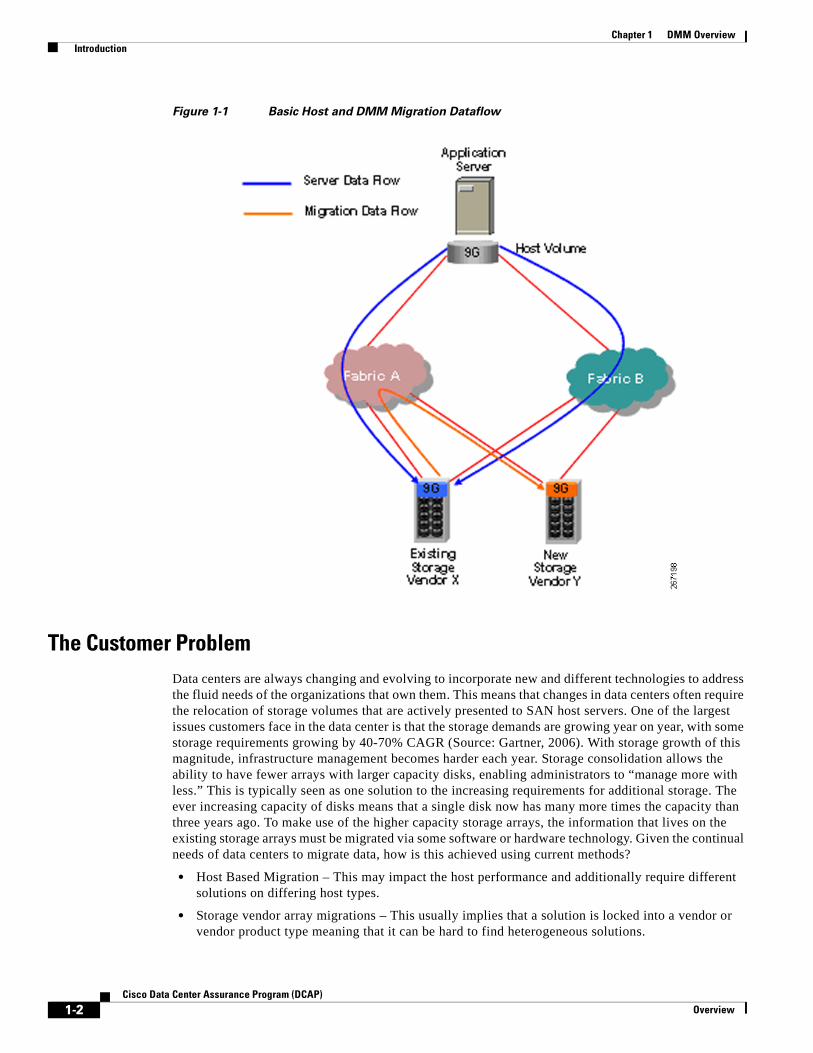
IntroductionData Mobility Manager is a new addition to the Cisco MDS family suite of products and applications. Its purpose is to allow the nondisruptive addition of a migration tool into the SAN fabric and give the ability to perform both offline and online SAN volume migrations. As storage demands are ever increasing, the ability to move host data from one array platform to another without disruption is ever paramount. DMM addresses migration needs using the current Storage Services Module (SSM) and Cisco’s FC-Redirect feature to migrate data. Typical uses of this technology include migrating host SAN volumes from an existing SAN storage (ES) array to a new SAN storage (NS) array. This may be required as the existing storage array is to be decommissioned or a requirement exists simply to migrate to a different classification of storage on cost or performance grounds. DMM provides two types of migration, one based on host-to-storage traffic flow or the other based on storage array-to-storage array traffic flow. DMM supports migrations via a single fabric connection or via the most commonly deployed dual fabric configuration.
Figure 1-1 shows a graphical depiction of the basic flow of data for a host and DMM.
1-1Cisco Data Center Assurance Program (DCAP)
Chapter 1 DMM Overview Introduction
Figure 1-1 Basic Host and DMM Migration Dataflow
The Customer Problem Data centers are always changing and evolving to incorporate new and different technologies to address the fluid needs of the organizations that own them. This means that changes in data centers often require the relocation of storage volumes that are actively presented to SAN host servers. One of the largest issues customers face in the data center is that the storage demands are growing year on year, with some storage requirements growing by 40-70% CAGR (Source: Gartner, 2006). With storage growth of this magnitude, infrastructure management becomes harder each year. Storage consolidation allows the ability to have fewer arrays with larger capacity disks, enabling administrators to “manage more with less.” This is typically seen as one solution to the increasing requirements for additional storage. The ever increasing capacity of disks means that a single disk now has many more times the capacity than three years ago. To make use of the higher capacity storage arrays, the information that lives on the existing storage arrays must be migrated via some software or hardware technology. Given the continual needs of data centers to migrate data, how is this achieved using current methods?
• Host Based Migration – This may impact the host performance and additionally require different solutions on differing host types.
• Storage vendor array migrations – This usually implies that a solution is locked into a vendor or vendor product type meaning that it can be hard to find heterogeneous solutions.
1-2Cisco Data Center Assurance Program (DCAP)
Overview

Chapter 1 DMM Overview Introduction
• Virtualization – Typical solutions are good for migrations but are usually very expensive, take up expensive SAN ports and can be disruptive at the point of installation.
Traditional migration methods are often very complex, disruptive to the existing customer environment and can require extensive SAN infrastructure changes. These changes typically involve many different customer IT groups and external suppliers (e.g. storage vendors) and may well mandate an extended server downtime window. Given the need to migrate, a customer has to decide how they can (a) undertake migrations as nondisruptively as possible, (b) keep costs relatively low and (c) be storage vendor neutral should the need to migrate from one vendor array type to another arise.
Typical Customer Requirements and Cisco’s DMM SolutionGiven the ever changing nature of a customer’s data center and the increasing demand for storage, data migrations are commonplace. The current methods of migrating data can be disruptive, requiring large amounts of downtime, and be very expensive and complex. A solution to address these factors is required and this is where DMM (Data Mobility Manager), a Cisco developed tool, comes into play. Cisco, with its MDS line of SAN switches/directors is in a unique position to offer fabric-based storage migrations. This means that no additional applications are required on either the hosts or the storage array in order for migrations to take place. DMM is the Cisco developed tool that runs on a special module, the Storage Services Module (SSM), inside the Cisco MDS platform and is already integrated into Cisco’s SAN management tool, Fabric Manager. Customers using DMM will be able to nondisruptively migrate data and solve the migration challenges.
The following is a list of common migration tool requirements that a customer might have:
• The solution must not negatively impact existing data paths or host IO during installation (for example, there should be no impact during physical hardware module insertion or feature enablement).
• Migrations (active or created) must have the ability to limit the impact on production SAN host volumes.
• A migration solution should have the ability to migrate host data either with the original host in production use or offline. For online migrations there should be no host outage required during the migration and the migrated data must be consistent with any live changes made during the migration window (applies to online live data migrations).
• The solution should provide the granular ability to migrate data on a per-storage port basis (for example, migrate all volumes presented via a single storage port) rather than on a per-server level.
• The solution must provide a mechanism to confirm that the migrated data is valid and that no corruption has occurred.
• The solution must provide the ability to migrate concurrently multiple host volumes. As well as migrating multiple volumes from a single host concurrently, this solution should be able to handle the migration of multiple volumes from multiple hosts. The solution should be able to scale for a large environment.
• The solution must provide a migration tool which is flexible enough that it can be added to a “full” MDS environment.
• It is a requirement that the solution does not involve the installation of any additional host drivers or software.
• The solution should include the ability to specify when to migrate data, i.e. start and continue to migrate data at a different time to the migration job creation. The migration should be able to start without administrator assistance.
• The solution must have the ability to detect and cope with failed migrations or hardware failures.
1-3Cisco Data Center Assurance Program (DCAP)
Overview

Chapter 1 DMM Overview Cisco MDS and DMM Background
• Migration issues and errors should be reported via the normal Cisco MDS error reporting channels.
• The solution must be able to migrate data both from and to different vendor arrays as well as migrate data between different classes of storage. The solution should also be able to migrate data between the same types of storage array.
• The migration solution should be able to determine if the storage arrays to be used are of a “supported” type (there are many storage arrays and vendors in existence).
Cisco MDS and DMM BackgroundThe Cisco MDS DMM tool is an intuitive migration tool that consists of some basic terminology that will assist in the understanding of both DMM and this design document. DMM is based upon a “job” and “session(s)” concept. The following terminology will be used throughout this guide.
• Active/Active Storage Array: This is a type of storage array that can present a storage LUN (Logical Unit Number) to a host via one or more paths, using multiple controllers whilst still allowing every path to service IO requests.
• Active/Passive Storage Array: This is a type of storage array that can present a storage LUN to a host via one or more paths typically via an active controller. To provide resiliency, a passive or standby controller is provided which can take over serving host IO. The two controllers cannot actively service IO to the same LUN at the same time; otherwise it would be considered an active/active array.
• Existing Storage: This refers to either the storage volumes that are currently used by the application SAN server or the source SAN storage array that is currently in use. The data contained in the existing storage will be migrated to the new storage array.
• New Storage: The storage (volume or array) to which the data will be migrated.
• DMM Job: A data migration job is a container that defines a set of LUNs to be migrated together. It is at the DMM job granularity that job migrations are started or stopped. A data migration session is created for each LUN that is to be migrated and is the main unit of configuration and management.
• DMM Session: A DMM session migrates data from one LUN in the existing storage array to a LUN in the new storage array.
• Server: An application server with SAN storage volumes presented.
• Server-based Migration: In a server-based migration, the focus is migrating data from the storage used by a particular server (or server HBA port). All LUNs accessed by the selected server are available for migration to new storage.
• Storage-based Migration: In a storage-based migration, the focus is data migration for storage exposed by a particular storage array (or storage array port). All LUNs on the specified storage port are available for migration to new storage.
Please refer to the Appendix A for a full list of DMM acronyms.
Available Migration TypesWith the exception of DMM and its fabric-based migration solution, there are three common types of migration methods that exist today. These migration methods will be covered in this section together with an introduction to the new fabric based method (DMM).
1-4Cisco Data Center Assurance Program (DCAP)
Overview

Chapter 1 DMM Overview Cisco MDS and DMM Background
Server-Based Migrations
Using a server-based migration, the server is responsible for migrating the data to the new array. This allows the application to be online while the data is being copied to the new array. This implementation does, however, affect CPU cycles on the application server while this migration is taking place. This can therefore affect the overall performance of the application and could be time consuming for applications with large amounts of data to migrate. Figure 1-2 demonstrates this data flow.
Figure 1-2 Server-Based Migrations
Storage-Based Migrations
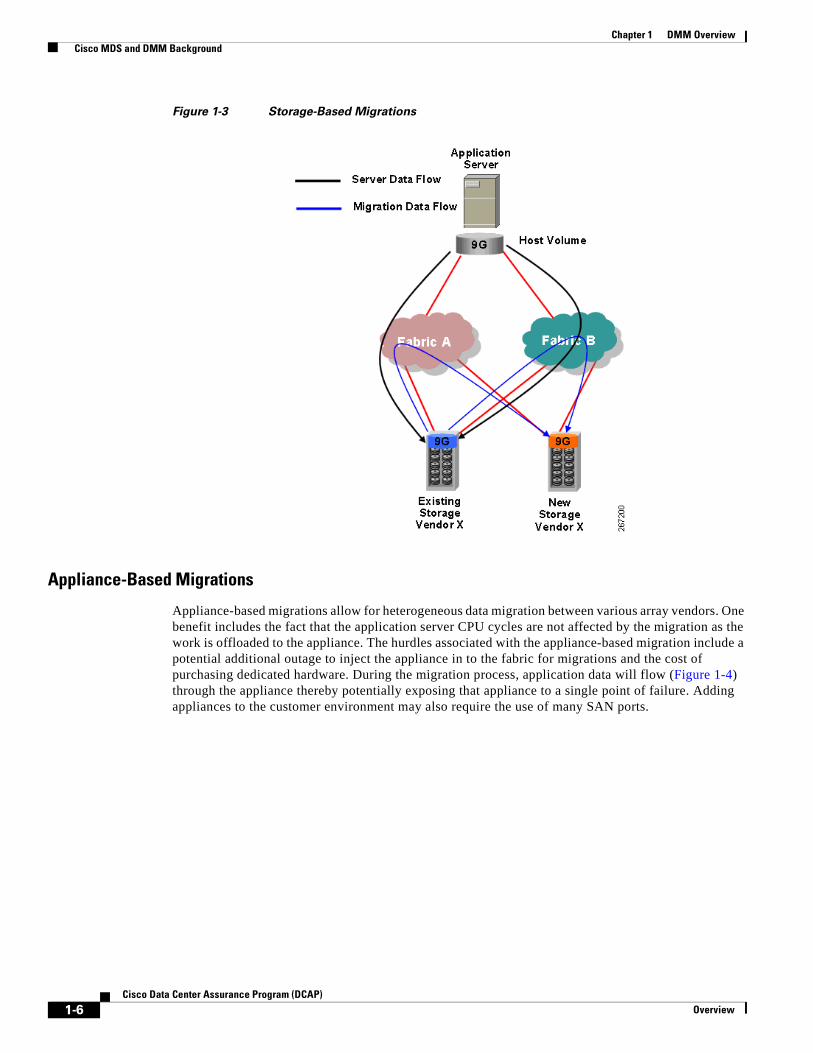
Storage-based migrations can provide faster data migrations because the storage array is migrating the data within hardware and is not limited to the processing power of the server CPU. Additionally the host servers application can remain online during the migration process although a brief outage will be required to “cutover” to the new storage array. This implementation typically only provides homogeneous data migration within the storage vendor’s line of storage arrays and sometimes only within the same tier of storage types. Storage-based data migration typically utilizes the array vendor’s replication software feature to migrate the data which can be costly, especially if data migration is the only functionality required. Storage-based migrations typically dedicate ports for migration which can be hard to come by in a customer environment. Figure 1-3 shows this storage data migration flow via the use of the blue line.
1-5Cisco Data Center Assurance Program (DCAP)
Overview
Chapter 1 DMM Overview Cisco MDS and DMM Background
Figure 1-3 Storage-Based Migrations
Appliance-Based Migrations
Appliance-based migrations allow for heterogeneous data migration between various array vendors. One benefit includes the fact that the application server CPU cycles are not affected by the migration as the work is offloaded to the appliance. The hurdles associated with the appliance-based migration include a potential additional outage to inject the appliance in to the fabric for migrations and the cost of purchasing dedicated hardware. During the migration process, application data will flow (Figure 1-4) through the appliance thereby potentially exposing that appliance to a single point of failure. Adding appliances to the customer environment may also require the use of many SAN ports.
1-6Cisco Data Center Assurance Program (DCAP)
Overview

Chapter 1 DMM Overview Cisco MDS and DMM Background
Figure 1-4 Appliance-Based Migrations
Fabric-Based Migrations (DMM)
This “fabric–based” migration method utilizes fabric resources and offers benefits similar to the appliance-based approach along with some additional advantages. Firstly, the fabric migration method does not require an outage to inject the migration tool into the customer environment. It does, however, require a single outage at the time of a customer’s choosing for the hosts to “cutover” to the new array (as with most migration methods). DMM currently operates on a special blade which incorporates 32 fibre channel SAN ports. Looking forward it may be possible for the fabric-based migration functionality to be run on other blade types which customers may already have running in their environments. Unlike some other methods there are no ports utilized connecting the tool into the fabric. This is the migration method that will be tested as part of this design guide (Figure 1-5).
1-7Cisco Data Center Assurance Program (DCAP)
Overview

Chapter 1 DMM Overview Cisco MDS and DMM Background
Figure 1-5 Fabric-Based Migrations (DMM)
Cisco MDS TopologiesThere are many different ways the Cisco MDS platform has been installed in customer environments and as such there are a number of design solutions that could apply. The best practice for DMM for all topologies is to place the SSMs as close as possible to the storage arrays. This section covers three main types of common topologies:
• Core/Edge (most common): Servers are connected to the edge switches while storage arrays are connected at the core.
• Core/Edge (Dedicated Core): Both servers and storage arrays are connected to the edge whilst the core is dedicated to Port-Channel or Inter-switch Link (ISL) traffic. It is also common for the core switches to connect to cross-site infrastructure.
• Edge/Core/Edge: Servers are connected to a dedicated edge layer whilst storage arrays are connected to a different dedicated edge layer, leaving the core layer to connect the dedicated edge layers together.
Core Edge Design (storage at the core and servers at the edge)
The “Core/Edge” design with storage arrays located at the core and host servers located at the edge is the most common topology found in customer SAN deployments. Figure 1-6 describes the same topology used in this design guide although the documented environment is actually larger in the figure to demonstrate the core/edge design in a clearer manner. The major advantages of this topology over other types (ring, mesh, etc.) is that it is scaleable, it is manageable, it reduces unusable port waste (due to ISLs) and hop count is predictable.
1-8Cisco Data Center Assurance Program (DCAP)
Overview

Chapter 1 DMM Overview Cisco MDS and DMM Background
Figure 1-6 Core Edge Topology (Core for Storage Connectivity) Example
Core Edge Design (core reserved for transit)
In the topology, as indicated by Figure 1-7, both the hosts and storage arrays are added to the same edge switches, leaving the core layer to connect to other cross-site fabrics.
Figure 1-7 Core Edge Topology (Core for Transit only) Example
1-9Cisco Data Center Assurance Program (DCAP)
Overview

Chapter 1 DMM Overview Cisco MDS and DMM Background
Core Edge Design (dedicated layers)
Figure 1-8 depicts an environment with dedicated edge layers for SAN storage connectivity and SAN hosts. This leaves a core layer which glues the edge layers together and allows for a very scaleable design.
Figure 1-8 Core Edge Topology (dedicated layers) Example
1-10Cisco Data Center Assurance Program (DCAP)
Overview
Architecture
C H A P T E R 2
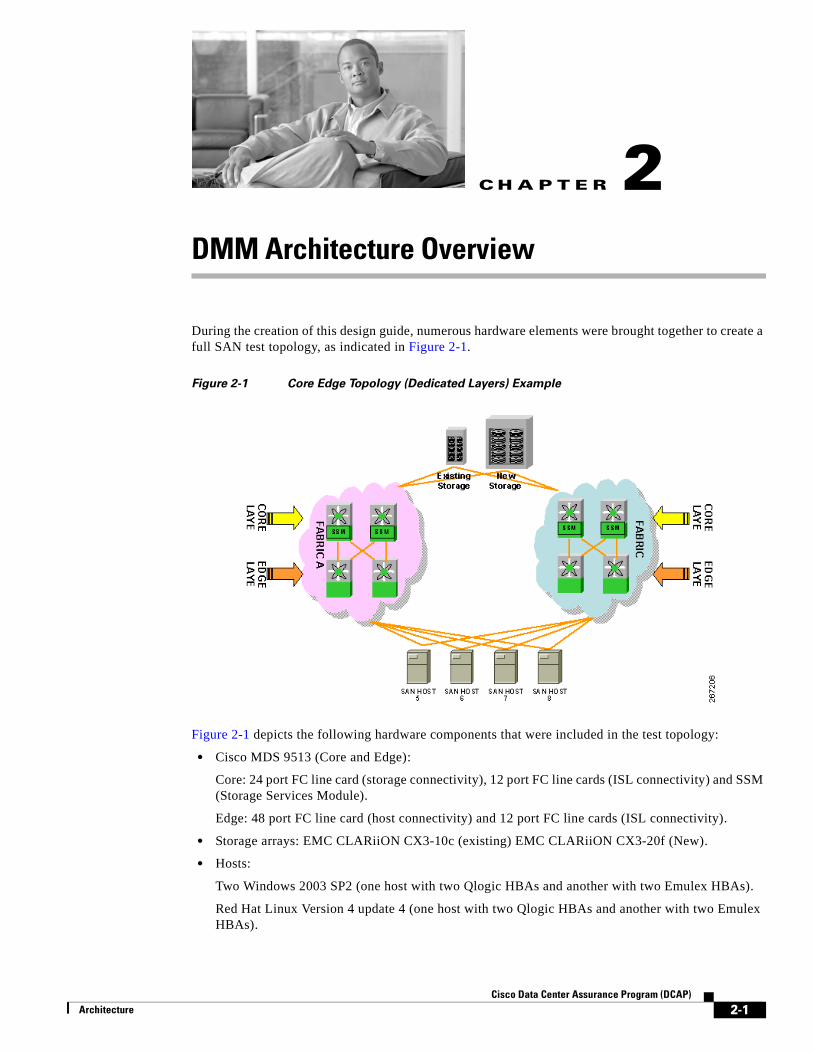
DMM Architecture OverviewDuring the creation of this design guide, numerous hardware elements were brought together to create a full SAN test topology, as indicated in Figure 2-1.
Figure 2-1 Core Edge Topology (Dedicated Layers) Example
Figure 2-1 depicts the following hardware components that were included in the test topology:
• Cisco MDS 9513 (Core and Edge):
Core: 24 port FC line card (storage connectivity), 12 port FC line cards (ISL connectivity) and SSM (Storage Services Module).
Edge: 48 port FC line card (host connectivity) and 12 port FC line cards (ISL connectivity).
• Storage arrays: EMC CLARiiON CX3-10c (existing) EMC CLARiiON CX3-20f (New).
• Hosts:
Two Windows 2003 SP2 (one host with two Qlogic HBAs and another with two Emulex HBAs).
Red Hat Linux Version 4 update 4 (one host with two Qlogic HBAs and another with two Emulex HBAs).
2-1Cisco Data Center Assurance Program (DCAP)

Chapter 2 DMM Architecture Overview DMM License Options
DMM License OptionsThere are a number of licensing options to consider when using DMM. Licensing will need to be thought out early since without a valid DMM license you will only be able to use DMM features and functionality for 120 days (as with all Cisco MDS licenses, there is a 120-day evaluation period). After 120 days, the trial license will expire and DMM functionality will automatically become disabled.
To decide which licensing option best suits your needs, you will be required to know your platform type (9200 or 9500) and choose whether you need a time-based license (available for 180 days) or a perpetual license (permanent). A license will need to be purchased for each SSM that you plan to utilize DMM upon. Please refer to Table 2-1 for Cisco licensing part numbers.
Note Most customer environments utilize dual fabrics which will require the purchase of individual DMM licenses for at least one SSM in each fabric.
A DMM license may be purchased for an SSM in a fabric that does not have a Fabric Manager Server license. In this configuration, you will have the ability to open multiple fabrics in Fabric Manager and use the DMM functionality. Full Fabric Manager Server functionality however will not be available. For example, performance manager, desktop client, remote login, and web client fabric reporting are not available without a Fabric Manager license. Table 2-2 demonstrates the required licenses for Fabric Manager features.
Note For more information about installing or upgrading software licenses, refer to the Cisco MDS 9000 Family Fabric Manager Configuration Guide.
Table 2-1 Cisco MDS Licensing Options
Switch FamilyPerpetual License(permanent)
Time-based License(180 Days)
9500 M95DMMS1K9 M95DMMTS1K9
9200 M92DMMS1K9 M92DMMTS1K9
Table 2-2 Cisco MDS Fabric License Capabilities
Fabric Manager Feature FMS License Required DMM License Required
Performance Manager Yes No
Fabric Manager
Desktop Client
Remote Login Yes No
Multiple Logins Yes Yes
Multiple Fabric Views Yes Yes
Fabric Manager
Web Client
Fabric Reporting Yes No
Fabric Navigation Yes No
Continuous Fabric Monitoring No License Required
2-2Cisco Data Center Assurance Program (DCAP)
Architecture

Chapter 2 DMM Architecture Overview Hardware and Software Requirements
Note If you replace an existing SSM (which includes a DMM license) with another SSM, such as in the event of a module failure, the existing license will support the new module.
Hardware and Software Requirements There are a number of hardware and software prerequisites which have to be met in order for the DMM functionality to be utilized. These prerequisites are detailed below.
Hardware Requirements
SSM-Capable Switches
The following switches support the SSM:
• All MDS 9200 family switches
• All MDS 9500 family switches
Storage Ports
The storage ports must connect to Cisco MDS switches that support FC-Redirect. All Cisco MDS switches support FC-Redirect, with the following exceptions:
• MDS 9124
• MDS 9134
• MDS 9020
• MDS 9040
Server HBA Ports
The server HBA ports can be connected to any switch (Cisco or third-party vendor).
SAN Fabric
Cisco MDS DMM supports single-fabric and dual-fabric topologies. The DMM feature requires at least one SSM in each fabric.
The Cisco MDS DMM feature is supported in homogeneous and heterogeneous SAN fabrics. SSMs can be located on any SSM-capable MDS switch in the fabric. However, the SSM and the storage ports must either be located on the same switch or connected through a Cisco SAN.
Software RequirementsMDS switches hosting the storage or the SSM must be running SAN-OS release 3.2(1) or later for Method 1 (see box below). SAN-OS Release 3.3(1a) or later is required for Method 2 (typically used in remote data center migrations).
The Fabric Manager server must be running software release 3.2(1) or later.
For supported SAN-OS and SSI image revisions, please refer to the “Cisco MDS SAN-OS Release Compatibility Matrix for Storage Service Interface Images” guide or your OSM.
2-3Cisco Data Center Assurance Program (DCAP)
Architecture

Chapter 2 DMM Architecture Overview DMM OSM / ATP Support
Migrations Schemes“Method 1” and “Method 2” refers to either the synchronous or asynchronous migrations schemes, as defined in the “Cisco MDS 9000 Family Data Mobility Manager Configuration Guide.” From the Configuration Guide:
Method 1
For the section of existing storage LUN whose data is already migrated to a new storage LUN, any new SCSI Write I/Os from the server is written to both the existing and new storage LUN before sending a response back to the server. Method 1 is typically used in local data migration.
Method 2
SCSI Write I/Os from the server to any section of existing storage LUN are written only to the existing storage LUN. The Write I/O changes to the existing storage LUN are marked in the Modified Region Log (MRL) before sending a response back to the server. These changes are then migrated to the new storage LUN on subsequent iterations. Method 2 is used in remote data centre migration.
(For more information, see: http://www.cisco.com/en/US/docs/switches/datacenter/mds9000/sw/4_1/dmm/configuration/guide/dmmgd.html)
DMM OSM / ATP SupportIn order to be able to obtain DMM licenses and receive appropriate support it is worth noting which vendors do and do not support DMM. Table 2-3 contains a list of Original Storage Manufacturers (OSMs) and information about which OSMs resell DMM and associated licenses.
Note This information is correct at the time of writing this document and is subject to change (please contact your Cisco representative or your OSM for the latest update if you are planning on purchasing DMM).
If your OSM does not currently support DMM there is still an easy way to obtain and get DMM support. DMM as a product in its own right can be purchased through an ATP (Advanced Technology Partner) which will come with “standard Cisco support” (please contact your ATP for exact details). If a customer requires extended support, this can simply be achieved via a Cisco SMARTnet contract. For OSMs with no DMM support a customer with a support query and appropriate contract simply calls Cisco TAC and bypasses their normal OSM technical support line.
Table 2-3 DMM OSM Support Status
OSM / ATP Purchase / Support Note
EMC No / No EMC does not resell
HDS Planned / Via RPQ Will support and resell and support under RPQ request from customer.
HP No / No To be reviewed at a latter date.
IBM No / No
NetApp Yes / Yes Support via SMARTnet contract.
Sun Yes / Yes
2-4Cisco Data Center Assurance Program (DCAP)
Architecture

Design
C H A P T E R 3
Detailed System DesignThe following section describes, in detail, the specific Cisco MDS and DMM environment that was created and used for DMM testing. The testing was then subsequently used to prove the resiliency of the design.
DMM Test HardwareThere are three hardware elements that make up the test environment: servers, fibre channel storage arrays and fibre channel Cisco MDS switches. Each of these is discussed in turn.
Cisco MDS Test SwitchesThe are eight Cisco MDS 9513 switches in the test configuration, four configured as core switches and four configured as edge switches. Figure 3-1 depicts the hardware modules included in each module type.
Figure 3-1 Cisco MDS Physical Modules
Each Cisco MDS switch is configured with SANOS version 3.4(1) and has dual power supplies, dual crossbars and two generation 2 supervisors. There are four SSMs, one per core and each SSM is running SSM firmware version 3.4(1). In each fabric (there are two in total) each edge switch is connected to the
3-1Cisco Data Center Assurance Program (DCAP)

Chapter 3 Detailed System Design DMM Test Hardware
two corresponding core switches via a port-channel. Each port-channel contains six physical ISLs (each ISL is operating at 4Gbps) giving a total bandwidth of 24Gbps per port-channel. The orange links that are shown in Figure 3-2 demonstrate the way the port-channels are physically connected.
Figure 3-2 Cisco MDS ISLs
Table 3-1 displays the licenses installed on each Cisco MDS switch. The important license for the purposes of this design guide is the “DMM_FOR_SSM_PKG” license and the “FM_SERVER_PKG” license.
Refer to Cisco MDS Configurations, page D-1 for switch configurations.
Table 3-1 Cisco MDS Licenses Installed
Core Switch Edge Switch
License License Type License License Type
FM_SERVER_PKG permanent FM_SERVER_PKG permanent
MAINFRAME_PKG permanent MAINFRAME_PKG permanent
ENTERPRISE_PKG permanent ENTERPRISE_PKG permanent
DMM_FOR_SSM_PKG permanent counted DMM_FOR_SSM_PKG unlicensed
SAN_EXTN_OVER_IP permanent counted SAN_EXTN_OVER_IP permanent counted
PORT_ACTIVATION_PKG unlicensed PORT_ACTIVATION_PKG unlicensed
SME_FOR_IPS_184_PKG unlicensed SME_FOR_IPS_184_PKG unlicensed
STORAGE_SERVICES_184 unlicensed STORAGE_SERVICES_184 unlicensed
SAN_EXTN_OVER_IP_18_4 unlicensed SAN_EXTN_OVER_IP_18_4 unlicensed
SAN_EXTN_OVER_IP_IPS2 permanent counted SAN_EXTN_OVER_IP_IPS2 permanent counted
SAN_EXTN_OVER_IP_IPS4 permanent counted SAN_EXTN_OVER_IP_IPS4 permanent counted
STORAGE_SERVICES_SSN16 unlicensed STORAGE_SERVICES_SSN16 unlicensed
10G_PORT_ACTIVATION_PKG unlicensed 10G_PORT_ACTIVATION_PKG unlicensed
STORAGE_SERVICES_ENABLER_PKG
permanent counted STORAGE_SERVICES_ENABLER_PKG permanent counted
3-2Cisco Data Center Assurance Program (DCAP)
Design

Chapter 3 Detailed System Design End To End Storage Configuration
Test Storage ArraysIn order for DMM to undertake migrations, a minimum of two storage arrays is required, one source array to migrate data from (referred to as “existing storage array” from this point on) and one target array to migrate data to (referred to as “new storage array”). In this test environment we have used two EMC CLARiiON storage arrays, a CX3-10c and a CX-20f (Table 3-2).
Test HostsThere are four Intel hosts used in the DMM testing, all of which were supplied by Datanet. Table 3-3 shows that each host has a number of roles over and above being a normal SAN host.
End To End Storage ConfigurationThe complex matter of detailing how the storage is presented to the SAN hosts is explained in this section. Figure 3-3 displays one of the four SAN connected hosts and will be used as an example. The host (SAN Host 5 / Windows 2003 Server) has two HBAs, each one connected to a separate Cisco MDS fabric (Fabric A and Fabric B). The storage arrays are both physically connected to each Fabric and then Single Initiator Single Target Zoning is used to provide access to the existing storage array only (CX3-10c). The rationale for initially only including Zoning to the existing storage is to mimic a live environment whereby only the existing storage array is operational and in live production use. Each DMM test (covered later in this document) will detail the method of providing host access to the new storage array.
Table 3-2 EMC CLARiiON Information
Storage Array FLARE Version Number Of Disks in Array Number Of FC Ports Used
CX3-10c FLARE 24 patch 11 6 4
CX3-20f FLARE 24 patch 16 5 8
Table 3-3 SAN Host Server Roles
Server Hostname Operating System Server Role HBA Revisions
dcap-san-hst-05 Windows 2003 SP1 32 bit Powerpath (SAN host), Navisphere Agent, Active Directory Server, FM Client, ACS server
Qlogic - QLE2460-CK
Driver: 9.1.4.15 / Firmware: 4.00.26
dcap-san-hst-07 Windows 2003 SP1 32 bit Powerpath (SAN host), Navisphere Agent, FM Server, ACS server
Emulex - LPe11000-M4
Driver: 2.01a4 / Firmware: 2.72a2
dcap-san-hst-06 Cisco Lin RHEL 4.4 64bit Powerpath (SAN host), Navisphere Agent
Qlogic - QLE2460-CK
Driver: 8.02.08-1 / Firmware: 4.00.26
dcap-san-hst-08 Cisco Lin RHEL 4.4 64bit Powerpath (SAN host), Navisphere Agent
Emulex - LPe11000-M4
Driver: 8.0.16.32 / Firmware: 2.72a2
3-3Cisco Data Center Assurance Program (DCAP)
Design
Chapter 3 Detailed System Design End To End Storage Configuration
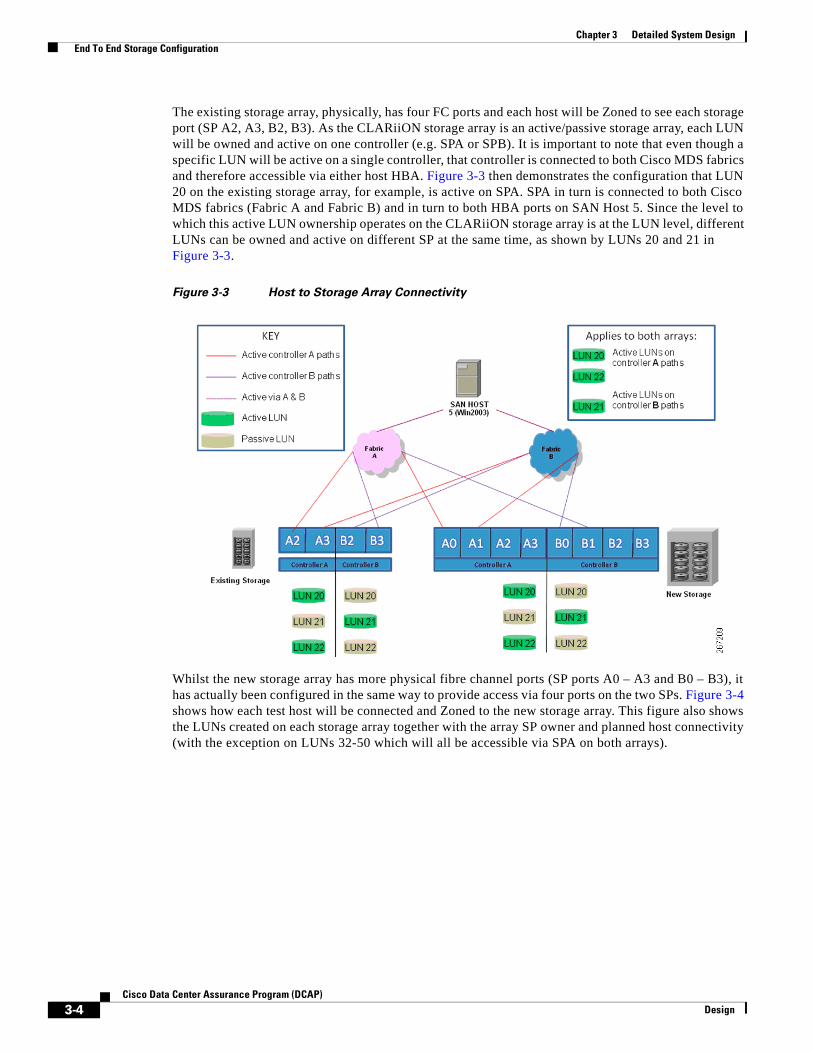
The existing storage array, physically, has four FC ports and each host will be Zoned to see each storage port (SP A2, A3, B2, B3). As the CLARiiON storage array is an active/passive storage array, each LUN will be owned and active on one controller (e.g. SPA or SPB). It is important to note that even though a specific LUN will be active on a single controller, that controller is connected to both Cisco MDS fabrics and therefore accessible via either host HBA. Figure 3-3 then demonstrates the configuration that LUN 20 on the existing storage array, for example, is active on SPA. SPA in turn is connected to both Cisco MDS fabrics (Fabric A and Fabric B) and in turn to both HBA ports on SAN Host 5. Since the level to which this active LUN ownership operates on the CLARiiON storage array is at the LUN level, different LUNs can be owned and active on different SP at the same time, as shown by LUNs 20 and 21 in Figure 3-3.
Figure 3-3 Host to Storage Array Connectivity
Whilst the new storage array has more physical fibre channel ports (SP ports A0 – A3 and B0 – B3), it has actually been configured in the same way to provide access via four ports on the two SPs. Figure 3-4 shows how each test host will be connected and Zoned to the new storage array. This figure also shows the LUNs created on each storage array together with the array SP owner and planned host connectivity (with the exception on LUNs 32-50 which will all be accessible via SPA on both arrays).
3-4Cisco Data Center Assurance Program (DCAP)
Design

Chapter 3 Detailed System Design Initial Cisco MDS DMM Connectivity
Figure 3-4 Host LUN Configuration And Connectivity
Initial Cisco MDS DMM ConnectivityOne of the first things configured in order for DMM to function correctly is the IP connectivity element. Table 3-4 and Figure 3-5 both show the IP information and configuration of the management, VSAN and DMM engine (CPP) interfaces together with related gateway information. The purpose of the configuration is to allow a DMM migration job to be run on any two SSM modules, as any two SSMs can communicate with each other. In addition to the IP configuration, each fabric has a “VSAN 1” Zone and Zoneset that contains the PWWN (Port World Wide Number) member of each switch VSAN 1 interface and SSM engine (CPP) interface.
Table 3-4 Initial Connectivity Details
Switch Management IP Address VSAN 1 IP CPP IP Gateway IP / Interface
Route Destination / Next Hop (destination mgmt address)
CoreA1 192.168.1.194 101.1.1.1 101.1.1.3 101.1.1.1 CPP12/1/1 101.1.2.0 / 192.168.1.198
CoreA2 192.168.1.196 101.1.1.2 101.1.1.4 101.1.1.2 CPP12/1/1 101.1.2.0 / 192.168.1.200
CoreB1 192.168.1.198 101.1.2.1 101.1.2.3 101.1.2.1 CPP12/1/1 101.1.1.0 / 192.168.1.194
CoreB2 192.168.1.200 101.1.2.2 101.1.2.4 101.1.2.2 CPP12/1/1 101.1.1.0 / 192.168.1.196
EdgeA1 192.168.1.193 NA NA NA NA
EdgeA2 192.168.1.195 NA NA NA NA
EdgeB1 192.168.1.197 NA NA NA NA
EdgeB2 192.168.1.199 NA NA NA NA
3-5Cisco Data Center Assurance Program (DCAP)
Design

Chapter 3 Detailed System Design Initial Cisco MDS DMM Connectivity
Figure 3-5 Initial Connectivity Details
The following has then been configured, tested and verified.
• On each Fabric, a single IPFC VSAN 1 Zone in each DMM was created containing all VSAN 1 and CPP PWWNs.
• Fabric Manger enclosures have been specified, as per the scheme shown in Table 3-5.
• IP routing was enabled on all core switches.
• The DMM feature was enabled on all core switches (those with a valid DMM license installed).
• A SSH key configured (RSA and DSA) and tested on core switches.
• Test DMM Array Specific Libraries (ASLs) to confirm suitability of existing and new storage arrays.
Table 3-5 Fabric Manager Enclosure Names
VSAN Enclosure Name Alias Port WWN
101 cx3--10--0312 dca--cx0312--spa2--tgt Clariion 50:06:01:60:41:e0:55:18
201 cx3--10--0312 dca--cx0312--spa3--tgt Clariion 50:06:01:61:41:e0:55:18
201 cx3--10--0312 dca--cx0312--spb2--tgt Clariion 50:06:01:68:41:e0:55:18
101 cx3--10--0312 dca--cx0312--spb3--tgt Clariion 50:06:01:69:41:e0:55:18
101 cx3--20--0627 dca--cx0627--spa0--tgt Clariion 50:06:01:60:41:e0:92:f5
201 cx3--20--0627 dca--cx0627--spa1--tgt Clariion 50:06:01:61:41:e0:92:f5
101 cx3--20--0627 dca--cx0627--spa2--tgt Clariion 50:06:01:62:41:e0:92:f5
201 cx3--20--0627 dca--cx0627--spa3--tgt Clariion 50:06:01:63:41:e0:92:f5
201 cx3--20--0627 dca--cx0627--spb0--tgt Clariion 50:06:01:68:41:e0:92:f5
101 cx3--20--0627 dca--cx0627--spb1--tgt Clariion 50:06:01:69:41:e0:92:f5
201 cx3--20--0627 dca--cx0627--spb2--tgt Clariion 50:06:01:6a:41:e0:92:f5
3-6Cisco Data Center Assurance Program (DCAP)
Design

Chapter 3 Detailed System Design Initial Cisco MDS DMM Connectivity
Figure 3-6 below depicts the full model used in the design guide DMM testing. There are 30 LUNs created on both the existing and new storage arrays which are then split up between the four SAN hosts. Figure 3-6 also displays the created array LUN numbers (ALU) as well as the corresponding host LUN numbers (HLU). Table 3-6 summarizes the storage LUN information as well as specifies the sizes of the LUNs. The only difference in the size of the LUNs is that every third LUN on the new storage array is 50GB whereas the corresponding existing LUN size is 20GB.
101 cx3--20--0627 dca--cx0627--spb3--tgt Clariion 50:06:01:6b:41:e0:92:f5
201 DCA--DCAP-SAN-HST-05 dca--dcap-san-hst-05--port0--init 21:00:00:1b:32:1f:7f:17
101 DCA--DCAP-SAN-HST-05 dca--dcap-san-hst-05--port1--init 21:00:00:1b:32:1f:4b:b2
201 DCA--DCAP-SAN-HST-06 dca--dcap-san-hst-06--host4--init 21:00:00:1b:32:1f:fe:14
101 DCA--DCAP-SAN-HST-06 dca--dcap-san-hst-06--host5--init 21:00:00:1b:32:1f:9f:b1
101 DCA--DCAP-SAN-HST-07 dca--dcap-san-hst-07--port0--init Emulex 10:00:00:00:c9:64:5e:a5
201 DCA--DCAP-SAN-HST-07 dca--dcap-san-hst-07--port1--init Emulex 10:00:00:00:c9:65:14:80
101 DCA--DCAP-SAN-HST-08 dca--dcap-san-hst-08--host4--init Emulex 10:00:00:00:c9:65:15:b6
201 DCA--DCAP-SAN-HST-08 dca--dcap-san-hst-08--host5--init Emulex 10:00:00:00:c9:65:15:fc
Table 3-5 Fabric Manager Enclosure Names
VSAN Enclosure Name Alias Port WWN
Table 3-6 Array LUNs Configured for Migration
Array LUN(s) CX3-10c CX3-20f Host LUN Presented To
20 20GB - SPA 20GB - SPA DCAP-SAN-HST-05
21 20GB - SPB 20GB - SPB DCAP-SAN-HST-05
22 20GB - SPA 50GB - SPA DCAP-SAN-HST-05
23 20GB - SPA 20GB - SPA DCAP-SAN-HST-07
24 20GB - SPB 20GB - SPB DCAP-SAN-HST-07
25 20GB - SPA 50GB - SPA DCAP-SAN-HST-07
26 20GB - SPA 20GB - SPA DCAP-SAN-HST-06
27 20GB - SPB 20GB - SPB DCAP-SAN-HST-06
28 20GB - SPA 50GB - SPA DCAP-SAN-HST-06
29 20GB - SPA 20GB - SPA DCAP-SAN-HST-08
30 20GB - SPB 20GB - SPB DCAP-SAN-HST-08
31 20GB - SPA 50GB - SPA DCAP-SAN-HST-08
35-42 1 GB - SPA 1 GB - SPA DCAP-SAN-HST-05
43-50 1 GB - SPA 1 GB - SPA DCAP-SAN-HST-07
3-7Cisco Data Center Assurance Program (DCAP)
Design

Chapter 3 Detailed System Design Initial Cisco MDS DMM Connectivity
Figure 3-6 Full DMM Environment
There are a number of rules followed when adding the new storage array. These included:
• Adding the new storage array to the same VSAN as the existing storage array.
• New LUNs on the new storage array (to migrate to) were created physically, but not mapped or masked as this would be undertaken in the design guide testing.
• Zoning of the new storage array ports was not required until the cutover phase and therefore was not implemented in the initial configuration.
Refer to Cisco MDS Configurations, page D-1 for switch configurations.
3-8Cisco Data Center Assurance Program (DCAP)
Design

Migration
C H A P T E R 4
Designing A DMM DeploymentThere are many factors to consider when designing a DMM deployment. The most important factors are discussed in this section. It is important to note that this design guide only covers migrations between arrays that have “active/passive” controllers. The major components to consider are:
• The physical hardware required and its placement.
• The DMM licenses.
• The design of the IPFC connectivity and DMM Zoning.
• Designing a DMM job and migration schedule.
• SSM performance and scalability.
Designing The DMM Hardware EnvironmentThe first step in designing the DMM environment is deciding how many SSMs are required and the placement within the Cisco MDS fabrics. The quantity of SSMs required will be dependant on a number of factors including:
• The number of concurrent DMM migrations required.
• The number of Cisco MDS SAN fabrics or the locations of the SAN connected storage arrays.
• The acceptable amount of impact on production traffic, per migration. This will affect the length of migrations.
• The customer’s budgetary constraints for both the SSM and appropriate licenses.
The availability of host outages (for cutover step only) as the migrations can only be completed once the cutover step has been fulfilled.
• (optional) The number of SSMs already purchased.
Please see the section in this document titled “DMM Performance and Scalability” for performance and scalability information. This information can then be used to work out the number of SSMs required based on DMMs scalability rules. It is advisable to purchase the required DMM license per SSM at this point (DMM License Options, page 2-2).
The physical placement of the SSM as well as the connectivity of the new storage array is important as there can be an impact on ISL traffic utilization. For the typical SAN topologies covered in Section 2, it is recommended that you place the SSMs in the Cisco MDS chassis that are as close to the storage arrays (those you wish to migrate data from and to) as possible. In addition, it is recommended that you connect the new storage array to the same Cisco MDS as the existing storage array. As an example, Figure 4-1 highlights the optimal placement of the SSMs for the Cisco DMM environment under test. It is, however,
4-1Cisco Data Center Assurance Program (DCAP)

Chapter 4 Designing A DMM Deployment Designing The DMM Hardware Environment
possible to place the SSM in a different Cisco MDS chassis to the storage arrays, as proved in DMM tests “Test 10. DMM Server Remote SSM, page 5-17” and “Test 15. DMM Storage Remote SSM, page 5-26”. This may be the only option if, for example, all slots are utilized within the Cisco MDS connected to the storage arrays. The impact of placing the SSM away from the storage arrays is that storage traffic is routed via the ISLs to the SSM, thereby increasing the utilization of the ISLs.
Once the quantity and placement of SSMs has been decided, the next step is add the SSM into the chassis and enable the DMM feature. The “Test 2. DMM SSM OIR and DMM Feature Enable, page 5-4” has been created to prove that the SSM can be added without disruption to the fabric.
Figure 4-1 SSM Placement
Early on in the DMM design, it would be prudent to confirm that the storage arrays are ASL (Array Specific Library) compatible using the SLD (Server LUN Discovery) tool. This includes running the SLD commands in the SANOS CLI or running the Fabric Manager SLD tool from planned migrating hosts to both the existing storage array and the new storage array. If the SLD tool does not report the “ASL = Yes” contact Cisco support for the next actions.
Table 4-1 Hardware Design Summary
Task Task Completed
Descide the quantity and location of the SSMs 1
Decide and purchase the relevant DMM hardware and DMM / Fabric Manager licenses
1
Install SSM hardware and approperiate license 1
Enable the DMM feature on each required SSM. 1
4-2Cisco Data Center Assurance Program (DCAP)
Migration

Chapter 4 Designing A DMM Deployment Designed IP Connectivity
Designed IP ConnectivityThe initial reason for configuring connectivity within the DMM environment is to ensure each SSM can communicate with its local Cisco MDS supervisors. This is achieved using IPFC in VSAN 1 and PWWN Zoning. Since DMM has the ability to understand both storage and host paths from dual fabrics, inter-fabric communication is required. Since the diverse host- or storage-connected fabrics are typically never connected together (best practice), the only mechanism for inter-fabric connectivity is via the management network. This IPFC management traffic will therefore need to be transferred over the Cisco MDS management network. As this IP traffic will not be advertised outside of the internal network, a private network can be used.
Note It is not the actual host data that is communicated over the IPFC network, only DMM management traffic. It is also worth understanding at this point that any single running migration job will only ever be active on one path, even though many active paths may exist (and even on multiple fabrics).
IP AddressingIf there are two or more SSMs per fabric in an DMM environment, an IP design scheme is recommended. There are a number of rules that exist to enable any DMM job to be run upon any combination of SSMs. These rules are explained here:
• For each switch that has an SSM to be used with DMM, assign an IP address to VSAN 1. When allocating IP addresses to SSMs in the same fabric, ensure they are on the same sub-network. Remember that the chosen addresses can be from a “private network” and can be separate from the management network.
• For each switch that has an SSM to be used with DMM, assign an IP address to the CPP (also known as the DMM engine) interface. This IP address should be on the same sub-network as the IP address on VSAN 1.
• When creating the IP addressing scheme for the second fabric, use a second sub-network. In the design guide test environment, for example (Figure 3-5), Fabric A uses IP address scheme “101.1.x.x/27” while fabric B uses “101.2.x.x/27”.
• For each CPP that is used with DMM, set an IP gateway to the VSAN 1 IP address, via the CPP interface. The CPP interface consists of slot number (in MDS chassis) / Processor (normally 1 for CPP) / VSAN number (1).
It is both assumed and a prerequisite that the Cisco MDS switches are all on management networks that can communicate with each other. At this point, IP connectivity will still not work as there are no Gateways or routes. This guide also assumes that a management default gateway has been set (optional).
Figure 3-4 and Figure 3-5 both show the gateways and routes set in the design guide DMM test environment. It is the requirement to add a default gateway between the VSAN1 assigned interface and the SSM CPP interface (e.g. IP default-gateway 101.1.1.1 interface cpp12/1/1). This allows the IP information to communicate with VSAN 1 but in order for the intra-fabric communication to work, a route is needed from a switch in Fabric A to a switch SSM in Fabric B. Referring to Figure 14 for a Fabric A switch we have specified a management route to any Fabric B switch (101.1.2.0) to go via a fabric B Cisco MDS management interface. The reverse is then set for the Fabric B switches to Fabric A switches so that a return communication can occur.
4-3Cisco Data Center Assurance Program (DCAP)
Migration

Chapter 4 Designing A DMM Deployment Designed IP Connectivity
Initial DMM ZoningAnother initial requirement that needs to be considered is the VSAN 1 Zoning. Per fabric, a VSAN 1 Zone will need to be created that contains the VSAN 1 PWWN and CPP PWWN. This Zone will need to be added to a relevant Zoneset and activated. As is the case of this design guide test environment, it is possible to add multiple SSMs to the same fabric, thereby having multiple VSAN1 members and CPP interfaces. In such scenarios where we would like any combination of SSMs to communicate, it is possible to add all of VSAN 1’s PWWNs and CPP interfaces to the same Zone.
An example of two DMM Zones and Zonesets is displayed here:
Fabric A
zoneset name ZS_IPFC_DMM_A vsan 1
zone name core_DMM_mgmt vsan 1
– fcid 0x830002 [pwwn 10:00:00:0d:ec:3b:17:87] [corea1_vsan_1]
– fcid 0x830003 [pwwn 10:00:00:0d:ec:3b:17:8c] [corea1_cpp_12_1_1]
– fcid 0x850002 [pwwn 10:00:00:0d:ec:3b:17:47] [corea2_vsan_1]
– fcid 0x850003 [pwwn 10:00:00:0d:ec:3b:17:4c] [corea2_cpp_12_1_1]
Fabric B
zoneset name ZS_IPFC_DMM_B vsan 1
zone name core_DMM_MGMT_B vsan 1
– fcid 0x870007 [pwwn 10:00:00:0d:ec:3b:0f:c7] [coreb1_cpp_12_1_1]
– fcid 0x870006 [pwwn 10:00:00:0d:ec:3b:0f:cc] [coreb1_vsan_1]
– fcid 0x890002 [pwwn 10:00:00:0d:ec:3b:18:87] [coreb2_vsan_1]
– fcid 0x890003 [pwwn 10:00:00:0d:ec:3b:18:8c] [coreb2_cpp_12_1_1]
Testing Connectivity & SummaryWhilst it is possible to assume that everything has been configured, it is prudent to test the configuration and build in enough time to run appropriate tests. The test below contains some useful checks which are well worth undertaking in any DMM solution to avoid issues later on in the implementation. This test includes the following checklist and tasks (Table 4-2):
• Check firmware versions (so they can be cross checked with the support matrix).
• Check SSH connectivity to each Cisco MDS switch.
• Check DMM licensing.
• Confirm IPFC connectivity, especially concerning the intra-fabric element.
• Check Fabric Manger enclosure names.
Table 4-2 Connectivity Design Summary
Task Task Completed
For each Cisco MDS chassis with an SSM, assign an IP address to VSAN 1
For each Cisco MDS chassis with an SSM, assign an IP address to CPP 1
4-4Cisco Data Center Assurance Program (DCAP)
Migration

Chapter 4 Designing A DMM Deployment Migration Options
Migration OptionsThe following sections discuss the most important options used when designing and implementing DMM migrations. These are a limited subset of the full options available which can be found by referencing the Cisco MDS DMM Configuration Guide.
DMM Migration ModesWith the introduction of this fabric-based data migration tool, DDM will provide the following migration modes.
• Server-Based Migration – Online or Offline
• Storage (Target Port)-Based Migration – Online or Offline
The tests in Section 6 successfully prove that both migrations methods work with active/passive storage arrays, based on differing configuration options and environmental possibilities.
Server-Based Migration
As the term indicates, “Server-Based” migration mode for DMM migrates data on a per-server basis. The DMM GUI will retrieve all the LUN(s) the server has access to on the “Existing” storage array and will list all the available LUN(s) that can be migrated to on the “New” storage array. The user has the option to migrate all the available LUNs or a selection of the LUNs available for migration. This can be achieved regardless of whether the server is offline or online. For online migrations, there will be a one-time disruption (at the time of the customers choosing) of the applications on the server whilst cutting over from the “Existing” storage array to the “New” storage array.
DMM utilizes the identity of the server to access the “New” storage array, there is therefore no need to Zone the “New” storage array port to the server in order for the migration to take place. Access to the “New” storage is only visible to the DMM feature and cannot be physically accessed by the server if there is no Zoning in place. The only access control that needs to be undertaken is on the storage management tool on the “New” storage array. If LUN masking is enabled, then the server Port World Wide Name (PWWN) needs to be able to access the LUNs on the “New” storage array.
Storage-Based Migration
Storage-based migration allows DMM to migrate all LUNs visible on a particular storage port on the “Existing” storage array to any specified storage port on the “New” storage array. In this mode, there could be multiple servers accessing a specific storage port and all of these servers could be migrated all at once via a single storage migration. As with server-based migration, storage-based migration will allow the user to pick and choose the pairing of LUNs between the two arrays and can be done offline or online. For storage-based migrations, additional Zoning is needed in the fabric for DMM access.
Enable IP Routing On DMM related switches
Add IP Gateways / Management routes
Add DMM Zoning
Test Connectivity
Table 4-2 Connectivity Design Summary
Task Task Completed
4-5Cisco Data Center Assurance Program (DCAP)
Migration

Chapter 4 Designing A DMM Deployment Migration Options
When a DMM job for storage based migration is created, there will be a single “Virtual Initiator” (VI) PWWN also generated (per fabric). It is this VI PWWN that will need to be zoned in with the DMM job’s Existing storage array ports and New storage array ports. When using the DMM wizard for storage-based migrations, it is the GUI that will create the necessary Zone for the access to the New and Existing storage. If LUN masking is enabled in the storage arrays (Existing and New), then the LUN masking tool will need to add this “Virtual Initiator” to this access control on both storage arrays. Then, once the job is started, those “Virtual Initiator” will access the LUNs that need to be migrated and can be manually load-balanced across SSMs in separate physical fabrics.
Note When using certain types of storage arrays, it is advisable to use server-based migrations only due to WWN protection built into the storage array management software. A single DMM VI WWN needs to be added to multiple hosts array containers (e.g. Storage Groups) and it was not possible on the storage arrays used in the production of this design guide. Tests were then adapted according to prove functionality but server-based migration method is preferable.
Migration Rates & Job VerificationThere are four different configurable migration rates and three that can be set between the range of between 1 and 200 MB/s. These rates and default values are:
• Best Effort
• Fast (60MB/s)
• Medium (25MB/s)
• Slow (10MB/s)
Note Whilst migration rates are configured on a per job basis, it is the lowest configured rate set that will be applied upon a single storage port.
An additional data integrity check can be undertaken by running a “verify” operation once a DMM migration job has successfully completed its migration. This additional “offline” check compares data on the existing storage array to the migrated copy on the new storage array.
Note Verify migration must be undertaken offline and will consume bandwidth resources on the SSM.
Default Migration OptionsThere are a number of default options that DMM will suggest, that include:
• Host (if a server based migration method chosen): The first host enclosure in the list is highlighted.
• Existing Storage & Selected Ports: By default, a storage array will automatically be highlighted and associated storage ports selected (Figure 4-2).
• New Storage & Selected Ports: By default, a storage array will automatically be highlighted and associated storage ports selected (Figure 4-2).
• Migration Type: Online.
• Rate: Best Effort.
4-6Cisco Data Center Assurance Program (DCAP)
Migration

Chapter 4 Designing A DMM Deployment Designing a Single Host Migration
• Schedule: Manual.
• Method: Method 1.
• Selecting SSMs: The least utilized SSMs will be highlighted.
• Migration Rate: Fast (60 MB/s), Medium (25MB/s) and Slow (10MB/s).
Warning Even though a storage array is selected, the correct storage ports for the migration may not be highlighted. By default all storage ports are selected but only active ports should have been chosen (as we are using active/passive storage arrays). If all ports were left highlighted (default) and the DMM job creation continued, the DMM job creation for the hosts would fail as the storage LUNs are not accessible down all paths.
Figure 4-2 DMM Default Settings
Designing a Single Host MigrationThis section covers the steps involved in designing a single DMM migration job and assumes that the hardware design element has been designed and implemented. It is prudent to work on a single test host so that the steps can be fully understood before ramping up to a full scale environment migration.
4-7Cisco Data Center Assurance Program (DCAP)
Migration

Chapter 4 Designing A DMM Deployment Designing a Single Host Migration
There are three migration stages, each critical to the success of a DMM migration. The stages are:
• Pre-Migration. This stage includes the DMM design and job creations.
• Live-Migration. This stage contains the actual copying of production data from the existing storage array to the new storage array.
• Post-Migration or “Cut Over”. This is the final stage whereby the storage visibility is switched from the existing storage array to the new.
Note The Post-Migration phase will require a planned application outage whilst host access to the existing storage is removed and access to the new storage array is provided.
In addition to the planning and design efforts it is important to consider the many customer teams that may be involved in a successful DMM migration. These include the customer’s application teams, host administrators (for example Windows or Unix), storage administrators and all the associated management, datacenter and vendor involvements. Whilst DMM minimizes the involvement and impact of the migrations on these teams, their input may still be required.
Pre-MigrationThe key to understanding how to design a DMM job involving active/passive storage arrays lies within the understanding of the active paths to the storage and the connectivity of the environment. Following is a step-by-step approach in designing a DMM job, ready for the design and implementation of the second phase (Live-MigrationMigration). This stage covers the design element (Steps 1 – 8) and DMM job creation (Steps 9 - 11). Although the jobs are created they will not start migrating data until the jobs are actually started (next phase).
Step 1 The first step is to identify a host that you would like to use DMM to migrate data upon. This host should already be using an active/passive storage array with a view to migrate data to another active/passive storage array, which should also have been identified. (this is due to the initial phase of this design guide which has only tested active/passive storage array migrations). As already stated, it is assumed that the new storage array is connected to the same Cisco MDS fabrics as is the existing storage array. The new storage array has also been placed in the same VSANs as the existing storage array. Additionally it is assumed all involved storage array ports (both existing and new) and host ports have had encloses set in Fabric Manager.
Step 2 Decide upon the preferred configuration medium from the choice of either the DMM Command Line Interface (CLI) or the DMM Graphical User Interface (GUI). As with most choices of this nature, the GUI wizard is easy for any user to use whilst the CLI should be used by advanced users or those wishing to script DMM migrations.
The DMM CLI is integrated into the SANOS CLI with some commands run natively under SANOS and some other commands run directly on the SSM itself. The DMM GUI tool is conveniently integrated into Cisco Fabric Manager application and can be found under the “Tools” menu or under the “End Devices” folder in the Physical Attributes pane.
Step 3 Decide upon the preferred migration method: “Server” or “Storage”. The section titled “DMM Migration Modes” details the information on the two migration methods. As discussed in the testing section, if you are using EMC CLARiiON storage arrays it would only be feasible to undertake server-based migrations if only one host migration is required. This is due to the increased array access (EMC CLARiiON Storage Group) requirements and associated overheads.
4-8Cisco Data Center Assurance Program (DCAP)
Migration

Chapter 4 Designing A DMM Deployment Designing a Single Host Migration
Step 4 Obtain host information (HBA WWNs, LUNs and active controllers) and discover active storage ports to the existing storage array. This can be achieved from a variety of host based tools or management systems and is dependant on the host and storage arrays in the environment. Figure 4-3 shows an example of the EMC Powerpath powermt display dev=all command output, showing the existing storage array (312), array type (CLARiiON) and storage ports LUN 20 is actively available upon (A2, A3 – Active and B2, B3 - Passive). Using Fabric Manager, it is then possible to determine which fabrics the active storage ports reside upon (A2 – Fabric A and A3 Fabric B).
Figure 4-3 Host Based Multipathing Tool
At this point, it is useful to start recording the information. Table 4-5 (server migration) and Table 4-6 (storage migration) provide a useful template for recording such information. Blank versions of these tables can be found in the Appendix.
Figure 12 is a depiction of a real SAN host with multiple LUNs used in design guide testing. The host contains a number of LUNs which are active on and load balanced across different controllers of the same existing storage array. The information for SAN host 5 (dcap-san-hst-05) is then recorded in Tables 11 and 12.
Note It is critical to only record all of the active storage ports as DMM will need to migrate data on the storage array and keep track of write data in-flight from the host. As we are using an active/passive storage array we do not need to record the storage ports to the standby controller (per job) as host data will not be via these storage ports. Should a LUN trespass event occur, the DMM job will fail.
Step 5 The next step is to plan the new storage element. Once again record the information in a useful form, such as in a version of Tables 11 or 12.
• For each existing storage LUN, specify a corresponding new storage LUN.
• The new storage LUN has to be at least the same size or bigger than the existing LUN. If a larger LUN is created on the new storage array and intended to be used, the volume created on the disk will still be the same size as the existing LUN volume. Extending the volume size is a feature of the operating system (volume extension is not supported or possible on all operating systems) and is outside the scope of this document.
• The new storage LUN number does not need to be the same as the existing array LUN number (ALU). To simplify the understanding, it is preferable to use the same LUN numbers but is not always possible. The same is also true for the associated host LUN numbers (this is the LUN number set on the storage array that the host will see).
• For each new storage array LUN specify a storage controller owner. Keep the existing LUN controller owners consistent on the new storage array. An example of controller consistency is LUNs 3 and 5 owned by controller A on the existing storage array, whilst LUNs 3 and 5 (grouped
4-9Cisco Data Center Assurance Program (DCAP)
Migration

Chapter 4 Designing A DMM Deployment Designing a Single Host Migration
together) on the new storage array are also owned by SPA. The LUN controller ownerships do not have to be the same on each storage array (e.g. LUNs 20 and 22 on SPA migrating to SPB on the new storage array) it simplifies the design and understanding to do so.
Note It is not possible to create two jobs with the same host enclosures and storage ports.
Step 6 Calculate the number of DMM jobs that are required to complete the migration of the single host’s LUNs. Even though this section is concerned with migrating a single hosts data, it is possible that multiple DMM jobs are required if there are multiple LUNs to migrate (only if there are differing LUN controller ownerships).
Server-Based Method
Create a DMM job for each host that uses the same storage ports (both existing and new) and the same storage controller owners. As an example a single host with two LUNs, each owned by a different storage array controller (SPA and SPB) will require two DMM jobs to migrate the volumes. If the LUNs were owned by the same controller (SPA) then only a single DMM job is required.
Figure 12 shows a real world example where LUNs 20 and 22 are owned by the same controller, belonging to the same host and are accessed via the same storage ports. LUN 21 on the same host is owned by a different controller and is “active” upon different storage ports and therefore requires a second DMM job.
Storage-Based Method
Storage-based migrations allow DMM to migrate the LUNs that are visible upon an existing storage array storage port and migrate to another storage port on the new array. A DMM job should therefore be created for ports active LUNs are available upon. Using Figure 12 as an example, a single DMM job should be created for LUNs 20 and 22 as they are accessible via the same storage ports. LUN 21 however is owned by a different controller and therefore actively visible via different storage ports and requires a second DMM job. As with server-based migrations, when choosing existing storage ports ensure that all active ports that a LUN is available upon is selected.
The following two points are recommended to help design the DMM CLI migrations. The DMM Wizard alternative will display the required information during the time of installation.
• Host LUN Mapping/Masking can be undertaken in advance of the DMM job creation. For the GUI implementation method it is recommended to undertake this step during the job creation but for CLI users the virtual initiator (VI) PWWN can be determined in advance using the get-vi command (dmm module 12 job 1001 get-vi). This can then be recorded in an appropriate table and VI access mapped and masked on the storage array, ready for the DMM job to be created.
• DMM Storage Zones (CLI) should be catered for including the VI PWWN, existing array storage port(s) and new array storage port(s). This is a new Zone and will be required to be activated in order for a successful storage migration to be undertaken.
Note It is not possible to create two jobs with the same storage ports and the same VI (existing and new). To solve this problem, multiple DMM sessions should be used.
Step 7 Decide job options and record the decisions.
• Migrations (Offline or Online).
• Migration Rate (Best Effort, Fast - default 60MB/s, Medium - default 25 MB/s or Slow - default 10MB/s)
4-10Cisco Data Center Assurance Program (DCAP)
Migration

Chapter 4 Designing A DMM Deployment Designing a Single Host Migration
• Verify required (Yes or No). This refers to whether an offline “verify” is required after a DMM migration has successfully been synchronized.
• Migration Method: This refers to migration methods 1 or 2 (method 2 is not covered in the design guide and therefore all options are method 1 – local data migration).
Step 8 (Optional). This optional step activity is to undertake an SLD discovery to ensure that the specified storage ports are “active.”
Step 9 Start the DMM job creations using the DMM wizard or the DMM CLI. The information that has already been recorded (such as host HBAs and active paths) should be used to help configure the jobs. Figure 4-4 displays the type information that can now be selected. The following options will need be selected:
• SAN Host (as per enclosure) and associated host HBAs (in server-based migrations only).
• Existing storage array and its active ports that should partake in the migration.
• New storage array and active new storage array ports that should partake in the migration.
• Migration type (offline or online), Rate (Best effort, fast, medium or slow), Schedule (DMM jobs can started manually or a date/time of when to start the migration can be specified) and method (for the purposes for this design guide, only method 1 has been tested).
Figure 4-4 DMM Job Creation Example (Server Based – Left, Storage Based - Right)
In addition, you should configure the options at the bottom of the menu which should already have been decided.
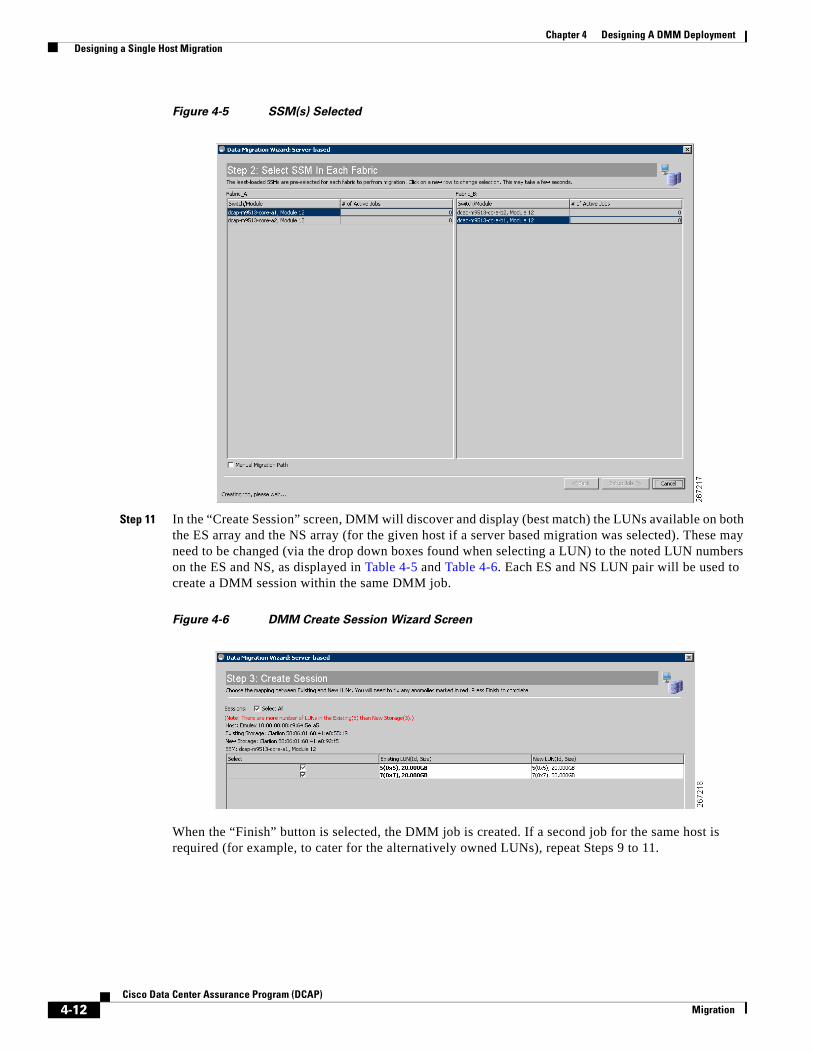
Step 10 Select SSM(s) as demonstrated in Figure 4-5. In a standard dual-fabric migration, the wizard will list all SSMs in both fabrics (not just those that have the DMM feature enabled). By default, DMM will select the least utilized SSMs in each fabric. If a single fabric migration is required, only the SSMs in that fabric will be displayed.
4-11Cisco Data Center Assurance Program (DCAP)
Migration
Chapter 4 Designing A DMM Deployment Designing a Single Host Migration
Figure 4-5 SSM(s) Selected
Step 11 In the “Create Session” screen, DMM will discover and display (best match) the LUNs available on both the ES array and the NS array (for the given host if a server based migration was selected). These may need to be changed (via the drop down boxes found when selecting a LUN) to the noted LUN numbers on the ES and NS, as displayed in Table 4-5 and Table 4-6. Each ES and NS LUN pair will be used to create a DMM session within the same DMM job.
Figure 4-6 DMM Create Session Wizard Screen
When the “Finish” button is selected, the DMM job is created. If a second job for the same host is required (for example, to cater for the alternatively owned LUNs), repeat Steps 9 to 11.
4-12Cisco Data Center Assurance Program (DCAP)
Migration

Chapter 4 Designing A DMM Deployment Designing a Single Host Migration
Live-MigrationThis phase covers the actual live migration of data from the existing storage array to the new storage array. This occurs when the DMM job is started, either manually or scheduled. DMM has the ability to allow online migrations so that the host and its applications can continue to operate even though data is being migrated. There are 3 steps to this migration flow (to be migrated, being migrated and already migrated), all of which are handled seamlessly by DMM, as indicated in Figure 4-7.
Figure 4-7 DMM Migration Data Flow
This phase has a single step, start DMM jobs and wait until they are in the “completed” state.
Once the DMM job is started, blocks of data are read from the “Existing” storage array by the SSM and then written to the “New” storage array. During the migration process, the SAN host (application) read I/Os will be permitted only from the existing storage array. If a SAN host attempts to write data in regions that have already been migrated, the I/O will be written to both the “Existing” and “New” storage. For blocks of data that are actually in-flight, being migrated at that specific time, write I/Os from the SAN host will be held until those blocks are migrated to the “New” storage array. For regions that have not been migrated, write I/Os will only write to the “Existing” storage array.
A full list of the DMM job state values and meanings can be found in the Cisco MDS DMM Configuration Guide. In this guide, we assume that each DMM job will go from a “created” or “schedule” state to a “completed” state, ready for the next migration phase. If any other configuration state is found, please see the section titled “DMM Troubleshooting & DDTS, page A-1”.
Note State (for example if a LUN trespasses) will cause the DMM job to fail. There is currently no mechanism to restart a migration from the last block of data migrated and therefore the migration job will need to be started from the first block again.
4-13Cisco Data Center Assurance Program (DCAP)
Migration

Chapter 4 Designing A DMM Deployment Designing a Full Storage Array DMM Migration
Post Migration (Cutover)This is the final migration stage and the most important as it contains a requirement that will affect each host being migrated. Optionally, once the DMM job reaches the “completed” state an offline verification can be undertaken to confirm that each block of data on the” existing” storage array LUN matches the corresponding block of data on the “New” storage array LUN. The “offline” phrase is a requirement that the SAN host access to the LUNs on both the “Existing” and “New” storage arrays should be removed (the SAN host will not be able to write data to these LUNs during the Verify).
At a time of your choosing, prepare for an application outage (or a server outage if you prefer) to enable the storage array visibility to be swapped. The two host operating systems that were tested in this design guide did not require a host reboot or server outage, only an application outage. For the application outage, at an appropriate time undertake the following steps on the selected SAN host:
• Gracefully bring down all applications that access the existing storage array (even those not part of the migration).
• Unmount or remove the drive letters to all volumes that access the existing storage array to ensure there is no host traffic to these volumes. If there are any volume managers used (none were used in the design guide testing), then appropriate action should be undertaken to ensure there are no host read or writes possible.
• Delete the DMM job.
• Remove access to the existing storage array LUNs that have been migrated and confirm LUN loss.
• Zone in the new storage array (both active and passive storage ports) and active the Zoneset to apply the changes.
• (Optional) Remove DMM Zoning for storage based migration methods.
• On the host, scan for the new storage array disks (the method will be host operating system and HBA type dependant). Confirm the new LUNs have been found, that they are on the new storage array and that they have the correct visibility of the storage ports.
Mount the newly discovered LUNs as well as any original existing storage array LUNs unmounted but not migrated. Alternatively add appropriate drive letters to host volumes. It may be a requirement to undertake volume management work in this step (again not covered in this design guide).
• Gracefully start the application and check consistency.
The points above refer to the steps involved in migrating SAN host LUNs based on the Windows and Linux operating systems. It has not been possible to test the “cutover” steps above on every host type or permutation possible. If you have a differing host type to the ones used in this design guide, it is recommended that you test the process on a non-production host before attempting live migrations.
Designing a Full Storage Array DMM MigrationTo design a full storage array migration the design considerations are more critical than just creating lots of DMM jobs. The design and physical steps involved creating a single migration can however be replicated to help design and create multiple migrations. The same three stages that apply to a single migration (pre-migration, live-migration and post-migration/cutover) are also applicable to every migration that is to be undertaken.
4-14Cisco Data Center Assurance Program (DCAP)
Migration

Chapter 4 Designing A DMM Deployment Designing a Full Storage Array DMM Migration
When designing a full environment migration (assuming one storage array migration to another) it is the performance impact as well as multi-job creation restrictions that are of concern. Please see the section titled “DMM Performance and Scalability” for known performance and scale rules or limits. Performance bottlenecks can occur in many places but when adding the additional load of DMM migrations you should closely monitor:
• The overall SSM module and backplane throughput.
• The SSM migration engine (CPP) throughput via SSM DMM job performance aggregation.
• The storage array ports (specifically the existing storage array ports) should be monitored due to potential host production traffic as well as the addition of migration traffic.
• Storage array performance (if a storage array is able to cope with the new increased traffic load).
It is assumed that production traffic should be prioritized over migration traffic.
The following stages are used to design, create and complete an environment migration. It cannot be emphasized enough that good documentation and planning activities will help assist in a full array migration as well as potentially reduce impacting performance issues.
Step 1 Understand your migration needs and record the information in a table, such as in Tables 11 or 12. Use Steps 1 – 8 of the Pre-Migration phase (single DMM job creation) to assist in entering the information. The information in these tables includes all the hosts and associated storage that you wish to migrate. As both the existing storage array and new storage array are “active/passive” storage arrays, only active storage ports should be included in the table.
Step 2 Since it is likely that there are many storage LUNs to be migrated (and many servers), to reduce the impact on production traffic consider the use of DMM job migration rate limits. The first step is to analyze the current throughput on the storage ports before DMM traffic is added (to get a baseline). Performance rates can then be worked out that is acceptable to the storage array, storage array ports and SSM engine. A working example scenario is detailed here:
Scenario
There are three low priority hosts using the same set of existing storage array ports (active on A2 and B3). A fourth critical host also exists that has active IO on storage ports A3, B2. The storage array has RAID sets and cache that support maximum storage port throughputs (2Gb/s or 200MB/s). After port analysis (from a tool such as Cisco’s Performance Analyzer/Traffic Analyzer) the following could be determined.
• A2 - 100MB/s (sustained peak rate – shared between hosts 1 - 3)
• A3 - 95MB/s (sustained peak rate – dedicated to high priority host 4 only)
• B2 - 100MB/s (sustained peak rate – dedicated to high priority host 4 only)
• B3 - 110MB/s (sustained peak rate – shared between hosts 1 - 3)
The peak sustained IO rate observed for hosts 1-3 is 110MB/s, leaving 90MB/s of available bandwidth on SPB3 and 100MB/s on SPA2. A migration rate limit of “90MB/s” will be used by setting the “Fast” rate to 90MB/s and applying that to the DMM jobs using existing storage ports A2 and A3. It is understood from the customer that should host SAN IO requests exceed the 110MB/s, there may be contention for the remaining bandwidth (90MB/s) with any “in-progress” migrations.
The high priority host has a maximum migration rate of 100MB/s although the customer has made it clear that not impacting this host is a strong requirement. It has been decided an extra margin of 70 MB/s should be given in case IO patterns change, leaving 30 MB/s for migration. A “slow rate” of 30MB/s has been configured and the DMM job when created should have a “slow” rate applied.
4-15Cisco Data Center Assurance Program (DCAP)
Migration

Chapter 4 Designing A DMM Deployment Designing a Full Storage Array DMM Migration
When a configured DMM job starts, it will only be active upon one path, even if multiple paths to the storage exist. Should multiple active DMM migration use the same storage port and both “Fast” and “slow” rate jobs applied to the storage port, it is only the “slow” rate that will be applied.
Step 3 Now that you have a clear view of what you want to migrate and a plan to limit the impact of the migrations the next step is to create a migration scheduling plan. To maximize its usefulness, the scheduling plan should include the date and time that DMM jobs should be started, the expected completion time and the agreed (with the application teams) planned cutover times. Table 10 is an example of useful DMM schedule information that could be recorded. Every data center environment is different and could, therefore, have different requirements that need to be catered to in a table of information.
DMM requires an “application” outage (see Step 6) in order for the old storage to be removed from the operating system and the new storage LUN to be added. As an outage is required (and some potential host work to remove/rescan the new disks, it is advisable to contact the host and application teams to arrange this in advance of undertaking the migration. It is recommended that the cutover be planned within a reasonably close time to the DMM job completion for two main reasons. Firstly, there is a limit to the number of DMM jobs each SSM can keep in synchronization (ES and NS). Secondly, there is the feature that if a host path is lost, the whole migration needs to be restarted. Reducing the time window of a DMM job that is either migrating data or keeping LUNs in sync will reduce the chances of being affected by an issue.
Table 4-3 DMM Migration Schedule
Existing Storage Array: CLARiiON CX3-10: CK200072700312 New Storage Array: CLARiiON CX3-20: CK200074500627
Host / Operating System DMM Job #
JobType
SSMs inFabric A/B
LUN / LUN size (ES)
Migration Rate Expected 1
1. This firstly refers to the configured migration rate and secondly to the average expected data rate of the migration. The valuein MB/s is not the value of the configured rate (e.g. medium) but the average value of the host migration rate that the DMMjob will migrate at. As an example, a “Medium” configured rate of 20 MB/s has been applied to DMM jobs on two SAN hosts(dcap-san-hst-05 and dcap-san-hst-07), both using the same storage ports. As there are two SAN hosts migrating data at the same time they equally share the migration bandwidth of 20 MB/s (which is applied per storage port), giving each host 10MB/s.
Planned Start Time
Est. time to complete (mins) 2
2. The “Est. time to complete” column refers to the calculated time a DMM migration will take from the moment the DMM jobis started to the completion of the last block I/O migration. The value is calculated in Footnote 2 Expanded below.
Est. Time / Date Of Completion
Planned Cutover Time/Date 3
3. This Column refers to the planned application window from which the applications on the affected hosts will be quiesced andall volumes to the existing storage unmounted.
dcap-san-hst-05Windows
1223460601 Svr CA1/CB1 5 20GB7 20GB
Med 10MB/s Man – 23:30 20/09/08
75 00:4521/09/08
04:0021/09/08
dcap-san-hst-05Windows
1223460602 Svr CA1/CB1 6 20GB Med 10MB/s Man – 23:30 20/09/08
40 00:1021/09/08
04:0021/09/08
dcap-san-hst-07Windows
1223460603 Svr CA1/CB1 5 20GB7 20GB
Med 10MB/s Man – 23:30 20/09/08
75 00:4521/09/08
04:3021/09/08
dcap-san-hst-07Windows
1223460604 Svr CA1/CB1 6 20GB Med 10MB/s Man – 23:30 20/09/08
40 00:1021/09/08
04:3021/09/08
dcap-san-hst-06Linux
1223460605 Svr CA2/CB2 5 20GB7 20GB
Slow 5MB/s Man – 23:30 20/09/08
142 01:5221/09/08
04:0021/09/08
dcap-san-hst-06Linux
1223460606 Svr CA2/CB2 6 20GB Slow 5MB/s Man – 23:30 20/09/08
74 00:4421/09/08
04:0021/09/08
dcap-san-hst-08Linux
1223460607 Svr CA2/CB2 5 20GB7 20GB
Slow 5MB/s Man – 23:30 20/09/08
142 01:5221/09/08
04:3021/09/08
dcap-san-hst-08Linux
1223460608 Svr CA2/CB2 6 20GB Slow 5MB/s Man – 23:30 20/09/08
74 00:4421/09/08
04:3021/09/08
4-16Cisco Data Center Assurance Program (DCAP)
Migration

Chapter 4 Designing A DMM Deployment Designing a Full Storage Array DMM Migration
Footnote 2 Expanded
1. Add together the values of the LUN sizes in the corresponding “LUN / LUN size (ES)” row. We will call this total the “total DMM job size”.
2. Multiply the “total DMM job size” by 1024 to obtain the amount in MB to migrate for a given DMM job.
3. Divide the “total DMM job size” in MB by the expected migration rate (also in MB).
4. Add a user-defined value for a margin of safety, based on the customers own environment knowledge and safety margin requirements.
5. (Optional) covert the time in minutes back to hours and minutes.
A worked example of the estimated time to complete for DMM job “1223460601” (Table 10) is shown here:
1. 2 X 20GB LUNs to migrate = 40GB “total DMM job size”.
2. 40 GB (total DMM job size) X 1024 = 40960 MB to migrate.
3. 40960 MB / 10 MB/s = 4096 seconds or (/ 60 to get into minutes – 70 rounded up)
As a margin of safety, an additional time amount has been added (5 minutes in this case) in case the rate is not always at the expected rate. This is a total expected migration window of 75 minutes.
A blank copy of this table can be found in the DMM Design Forms, page C-1.
Step 4 As stated earlier, multiple migrations still follow the same three migrations stages as discussed in the Designing a Single Host Migration section (pre-migration, live migration and post-migration / cutover). This step refers to “Pre-Migration” stage whereby the DMM jobs themselves should be created. DMM jobs should therefore be created for each host to be migrated, using the information already recorded.
Step 5 This follows the second stage of the migration, referred to as “live-migration”. All DMM jobs should have either been scheduled to start at the correct time or planned to be manually started. Since there is now the potential for multiple migrations as well as a full environment of host production traffic, it is crucial to monitor the impact of starting and maintaining the migrations. Whilst the impact of migrations should be closely monitored, DMM is capable of starting the jobs (based on a schedule) and continuing without disruption to completion (where LUN volumes are in a synchronized state).
Step 6 This is the final stage of each DMM job and is known as “Post-Migration” or “Cutover”. It is assumed that during the planning stage, the appropriate customer teams where notified that they had to prepare for an application outage of the appropriate applications at the agreed time (based on the volumes being migrated). The team controlling the DMM element can then coordinate the elements involved in cutover by simply repeating the steps involved in the section titled “Post Migration (Cutover)-Migration (Cutover)”.
Table 4-4 Full Storage Array DMM Migration Design Checklist
Task Task Completed
Understand your migration environment and create a migration plan
Consider use of rate limitation and where it is appropriate
Create a migration schedule and coordinate with host / application teams to prepare for an application outage and cutover stage.
Complete the pre-migration stage by create DMM jobs
Complete the “go-live” migration stage for each DMM job at appropriate times.
Complete “cutover” migration stage when appropriate.
4-17Cisco Data Center Assurance Program (DCAP)
Migration

Chapter 4 Designing A DMM Deployment Designing a Full Storage Array DMM Migration
# 5
8 N N N N
Tab
le 4
-5D
MM
Se
rve
r M
igra
tio
n P
lan So
urce
Arr
ayCL
ARi
iON
CX3
-10:
CK
2000
7270
0312
Targ
et A
rray
CLA
RiiO
N C
X3-2
0:
CK20
0074
5006
27H
ostn
ame
/ En
clos
ure
HB
A P
WW
NFa
bric
Sour
ce A
rray
LU
N(s
) to
Mig
rate
ALU
,Dri
ve,s
ize,
HLU
Act
ive
Con
trolle
r 1
Act
ive
Con
trolle
r Pa
th a
nd V
SAN
sTa
rget
(New
) LU
N
ALU
,Siz
e,H
LU
Targ
et
Act
ive
Con
trolle
r 2
Act
ive
Targ
et
Con
trolle
r Pat
hsV
SAN
&
LU
N
Size
ch
eck
3
Logi
cal
Job
# 4
Mig
Typ
e
Verif
y #
6
Rat
e 7
Met
hod=
1
FAB
AFA
B B
FAB
AFA
B B
dcap
-san
-hst
-05
21:0
0:00
:1b:
32:1
f:4b:
b2
Fabr
ic_A
20 (M
:) (2
0GB
) 5
21 (N
:) (2
0GB
) 6
22 (O
:) (2
0GB
) 7
SPA
SPB
SPA
A2(
101)
A
3(20
1)
B3(
101)
B
2(20
1)
A2(
101)
A
3(20
1)
20 (2
0GB
) 5
21 (2
0GB
) 6
22 (5
0GB
) 7
SPA
SPB
SPA
A0(
101)
A
1(20
1)
B1(
101)
B
0(20
1)
A0(
101)
A
1(20
1)
Yes
Yes
Yes
1 2 1
M-S
VR
-O
Verif
y-N
o
R-B
E/M
-121
:00:
00:1
b:32
:1f:7
f:1
7Fa
bric
_B
dcap
-san
-hst
-06
21:0
0:00
:1b:
32:1
f:9f:b
1Fa
bric
_A26
(/M
) (20
GB
) 5
27 (/
N) (
20G
B) 6
28 (/
O) (
20G
B) 7
SPA
SPB
SPA
A2(
101)
A
3(20
1)
B3(
101)
B
2(20
1)
A2(
101)
A
3(20
1)
26 (2
0GB
) 5
27 (2
0GB
) 6
28 (5
0GB
) 7
SPA
SPB
SPA
A2(
101)
A
3(20
1)
B3(
101)
B
2(20
1)
A2(
101)
A
3(20
1)
Yes
Yes
Yes
3 4 3
M-S
VR
-O
Verif
y-N
o
R-B
E/M
-121
:00:
00:1
b:32
:1f:f
e:14
Fabr
ic_B
dcap
-san
-hst
-07
10:0
0:00
:00:
c9:6
4:5e
:a5
Fabr
ic_A
23 (M
:) (2
0GB
) 5
24 (N
:) (2
0GB
) 6
25 (O
:) (2
0GB
) 7
SPA
SPB
SPA
A2(
101)
A
3(20
1)
B3(
101)
B
2(20
1)
A2(
101)
A
3(20
1)
23 (2
0GB
) 5
24 (2
0GB
) 6
25 (5
0GB
) 7
SPA
SPB
SPA
A0(
101)
A
1(20
1)
B1(
101)
B
0(20
1)
A0(
101)
A
1(20
1
Yes
Yes
Yes
5 6 5
M-S
VR
-O
Verif
y-N
o
R-B
E/M
-110
:00:
00:0
0:c9
:65:
14:8
0Fa
bric
_B
dcap
-san
-hst
-08
10:0
0:00
:00:
c9:6
5:15
:b6
Fabr
ic_A
29 (/
M) (
20G
B) 5
30 (/
N) (
20G
B) 6
31 (/
O) (
20G
B) 7
SPA
SPB
SPA
A2(
101)
A
3(20
1)
B3(
101)
B
2(20
1)
A2(
101)
A
3(20
1)
29 (2
0GB
) 5
30 (2
0GB
) 6
31 (5
0GB
) 7
SPA
SPB
SPA
A2(
101)
A
3(20
1)
B3(
101)
B
2(20
1)
A2(
101)
A
3(20
1)
Yes
Yes
Yes
7 8 7
M-S
VR
-O
Verif
y-N
o
R-B
E/M
-110
:00:
00:0
0:c9
:65:
15:f
cFa
bric
_B
4-18Cisco Data Center Assurance Program (DCAP)
Migration

Chapter 4 Designing A DMM Deployment Designing a Full Storage Array DMM Migration
Tab
le 4
-6D
MM
Sto
rag
e M
igra
tio
n P
lan
Sour
ce A
rray
CLA
RiiO
N C
X3-1
0:
CK20
0072
7003
12Ta
rget
Arr
ayCL
ARi
iON
CX3
-20:
CK
2000
7450
0627
Hos
ts T
o M
igra
teFa
bric
/ D
MM
Jo
b(s)
Virt
ual I
nitia
tor
(N =
NW
WN
)
(P =
PW
WN
)
Sour
ce A
rray
LU
N(s
) to
Mig
rate
ALU
,Dri
ve,s
ize,
HL
U
Act
ive
Ctrl
’r 1
Act
ive
Con
trolle
r Pa
th a
nd V
SAN
sTa
rget
(New
) LU
N
ALU
,Siz
e,H
LU
Targ
et
Act
ive
Con
trolle
r 2
Act
ive
Targ
et
Con
trolle
r Pat
hsV
SAN
&
LUN
chk
3
Map
, Mas
k &
Zon
e 10
Logi
cal
DM
M
Job
# 4,
9
Mig
Typ
e #
5
Verif
y #
6
Rat
e 7
Met
hod=
1 8
FAB
AFA
B B
FAB
AFA
B B
dcap
-san
-hst
-05
dcap
-san
-hst
-07
Fabr
ic_A
N 2
1:33
:00:
0d:e
c:3b
:17:
82
P 21
:34:
00:0
d:ec
:3b:
17:8
2
20 (M
:) (2
0GB
) 5
21 (N
:) (2
0GB
) 6
22 (O
:) (2
0GB
) 7
23 (M
:) (2
0GB
) 5
24 (N
:) (2
0GB
) 6
25 (O
:) (2
0GB
) 7
SPA
SPB
SPA
SPA
SPB
SPA
A2(
101)
A
3(20
1)
B3(
101)
B
2(20
1)
A2(
101)
A
3(20
1)
A2(
101)
A
3(20
1)
B3(
101)
B
2(20
1)
A2(
101)
A
3(20
1)
20 (2
0GB
) 5
21 (2
0GB
) 6
22 (5
0GB
) 7
23 (2
0GB
) 5
24 (2
0GB
) 6
25 (5
0GB
) 7
SPA
SPB
SPA
SPA
SPB
SPA
A0(
101)
A
1(20
1)
B1(
101)
B
0(20
1)
A0(
101)
A
1(20
1)
A0(
101)
A
1(20
1)
B1(
101)
B
0(20
1)
A0(
101)
A
1(20
1)
Yes
Yes
Yes
Yes
Yes
Yes
1 2 1 3 4 3
M-S
TG-O
N
Verif
y-N
o
Rat
e-B
E
Met
hod-
1
Fabr
ic_B
N 2
1:33
:00:
0d:e
c:3b
:17:
82
P 21
:34:
00:0
d:ec
:3b:
17:8
2
dcap
-san
-hst
-06
dcap
-san
-hst
-08
Fabr
ic_A
N 2
1:35
:00:
0d:e
c:3b
:17:
82
P 21
:36:
00:0
d:ec
:3b:
17:8
2
26 (/
M) (
20G
B) 5
27 (/
N) (
20G
B) 6
28 (/
O) (
20G
B) 7
29 (/
M) (
20G
B) 5
31 (/
N) (
20G
B) 6
32 (/
O) (
20G
B) 7
SPA
SPB
SPA
SPA
SPB
SPA
A2(
101)
A
3(20
1)
B3(
101)
B
2(20
1)
A2(
101)
A
3(20
1)
A2(
101)
A
3(20
1)
B3(
101)
B
2(20
1)
A2(
101)
A
3(20
1)
26 (2
0GB
) 5
27 (2
0GB
) 6
28 (5
0GB
) 7
29 (2
0GB
) 5
30 (2
0GB
) 6
31 (5
0GB
) 7
SPA
SPB
SPA
SPA
SPB
SPA
A2(
101)
A
3(20
1)
B3(
101)
B
2(20
1)
A2(
101)
A
3(20
1)
A2(
101)
A
3(20
1)
B3(
101)
B
2(20
1)
A2(
101)
A
3(20
1)
Yes
Yes
Yes
Yes
Yes
Yes
5 6 5 7 8 7
M-S
TG-O
N
Verif
y-N
o
Rat
e-B
E
Met
hod-
1Fa
bric
_BN
21:
35:0
0:0d
:ec:
3b:1
7:82
P 21
:36:
00:0
d:ec
:3b:
17:8
2
4-19Cisco Data Center Assurance Program (DCAP)
Migration

Chapter 4 Designing A DMM Deployment Designing a Full Storage Array DMM Migration
1 This column refers to the active controller that owns the LUN on the existing storage array. This information can usually be found using a storage array utility or via multipathing software such as EMC’s Powerpath.2 This column refers to the active controller that owns the LUN on the new storage array. This information can usually be found using a storage array utility or via multipathing software such as EMC’s Powerpath.3 The purpose of this column is for the storage administrator to confirm that the existing storage array and new storage array each have active storage ports to the LUNs which are in the same fabric / VSAN (this assumes uniquely assigned VSANs throughout the fabrics). Additionally confirmed is that the LUN sizes on the ES and NS are of equal size or larger on the NS. An example is LUN 20, which has been confirmed to be active via storage port A2 in VSAN 101 (Fabric A) and checked against an active path (A0) also in VSAN 101 / Fabric A on the new storage array. The Fabric B active paths and storage ports have also been checked to comply (existing storage array active port A3 / New storage array active port A1 - both in VSAN 201). To confirm the LUN size, the target LUN size must be equal to or greater than the source LUN. 4 The logical job number is a manually assigned number that will give the administrator the ability to see how many DMM jobs to create as well as how many LUN migrations per job to assign (referred to as sessions in DMM). The rules to allocate this are as follows:
• Only LUNs from the same source to the same target can exist in the same job (and for server migrations from the same host).
• Only LUNs with owners on the same fabric can exist in the same job.
• During testing it has been discovered (see DMM Testing and Results, page 5-1) that for storage migrations each host should be migrated separately and only one configured migration on the same storage port pairs. This rule may be limited to the CLARiiON storage array only.
5 This table confirms the migration type and uses one of the following options:
• SVR-OFF: Offline server based migration (LUN(s) will not be accessible / mounted by the host during migration)
• SVR-ON: Online server based migration (LUN(s) will remain accessible to the host during migration)
• STG-OFF: Offline storage based migration (LUN(s) will not be accessible / mounted by the host during migration)
• STG-ON: Online storage based migration (LUN(s) will remain accessible to the host during migration)
6 This refers to whether an offline “verify” is required after a DMM migration has successfully been synchronized (Yes or No). 7 The “Rate” reference refers to one of the following:
• BE: Best Effort, the globally configured maximum migration rate.
• FA: Fast, the globally configured maximum migration bandwidth allowed (default rate 60MB/s).
• ME: Medium, the globally configured maximum migration bandwidth allowed (default rate 25MB/s).
• SL: Slow, the globally configured maximum migration bandwidth allowed (default rate 10MB/s).
The configured rate is applied per existing storage port with the value of bandwidth shared (best effort, fast, medium or slow) amongst all DMM jobs using that chosen port. If there are multiple configured rates applied via DMM jobs to a single storage port then the lower configured rate is applied. As an example, if DMM job 1 is running on existing storage port A1 with a rate of Medium configured whilst
4-20Cisco Data Center Assurance Program (DCAP)
Migration

Chapter 4 Designing A DMM Deployment DMM Performance and Scalability
DMM job 2 is running also on storage port A1 but with a configured rate of slow then the slow rate will be applied. This slow rates associated bandwidth (10MB/s) is then shared amongst the two migration rates (giving them a maximum rate of 5 MB/s each if the default rates were used). 8 This refers to migration methods 1 or 2 (method 2 is not covered in the design guide and therefore all options are method 1 – local data migration). 9 Due to the limitations of adding the same PWWN in to multiple storage groups on the CLARiiON storage array, each host using the same storage ports should have a separate migration job and be migrated at a separate time. The testing later in this document does however prove that this is possible. 10 During a storage migration, additional work is required to be carried out which is confirmed in this column. This additional work includes:
• Creation and activation of a DMM Zone containing the DMM VI, existing storage port and new storage port involved in the migration.
• Storage mapping and masking of the VI on the storage array to allow the DMM VI to access the LUNs.
DMM Performance and ScalabilityWhen designing and configuring DMM there are a number of performance and scalability factors to be considered. The most important aid when considering scalability and performance factors is understanding your environment and deciding the number of storage LUNs / hosts to concurrently migrate. Recording information (such as in Table 11) and planning migrations (such as in Table 10) is critical to a successful full environment migration. The following information and guidelines should be understood and adhered to when implementing DMM.
SSM PerformanceThe SSM is based on a Cisco MDS generation one line card and as such the line card has maximum throughput of 80 Gb/s if placed in a 9500 director. It is important to remember there is a possible 32 X 2G SAN devices connected to the SSM as well as active DMM migrations, all competing for the available bandwidth. It is already Cisco MDS best practice to place high utilization ports on modules with less over subscription. It is the customer’s responsibility to monitor both host and storage port performance activity to ensure no bottlenecks occur.
Cisco has tested the maximum throughput of an SSM engine (known as a data path processor) to 180MB/s. This is with no host IO on the SSM line card. Additionally a single SSM has had all SSM engines fully loaded to test a maximum line card migration rate of 4.1 TB/hour. A single DMM job cannot therefore exceed 180MB/s. Due to the limitations of the storage arrays used in this design guide, we have been unable to verify these numbers.
DMM Job RestrictionsThere are a number of restrictions that apply when creating DMM jobs, these include:
• Per DMM job, the maximum number of active (in progress) concurrent sessions is 10. If a job with more than 10 sessions is started the first 10 will start migrating and the others will only start when one of the original 10 completes. This feature was verified in design guide tests Test 11. DMM Server Scale 11 LUN CLARiiON, page 5-19 and Test 16. DMM Storage Scale 11 LUN CLARiiON, page 5-28.
4-21Cisco Data Center Assurance Program (DCAP)
Migration

Chapter 4 Designing A DMM Deployment DMM Performance and Scalability
• A dual fabric DMM job actually only migrates data via one path.
• Per SSM, the maximum number of active (in progress) DMM jobs is 16 (each with a maximum of 10 active sessions = 160 LUNs which can be migrated at a single point in time).
• Each SSM can keep 255 LUNs in sync before a cutover or DMM job stop / delete is required.
The last two points were not able to be verified in this design guide.
If there are multiple SSMs in the same fabric, DMM jobs can be manually load balanced by choosing the SSMs at the DMM job creation stage. As already stated, if a DMM migration job is disrupted (host, switch, SP reboot or associated migration paths) either during migration or once it is in the “completed” state, it will need to be restarted causing a migration of the whole LUN again.
4-22Cisco Data Center Assurance Program (DCAP)
Migration

CAppendix—Troubleshooting and DDTS
A
P P E N D I X A DMM TroubleshootingThere is already a comprehensive DMM troubleshooting guide which can be found in the Cisco MDS 9000 Family Data Mobility Manager Configuration Guide. It is advisable to refer first to this section if you are wishing to troubleshoot an issue. Over and above the troubleshooting information contained within the existing DMM guide there are a limited number of troubleshooting commands and features that have been heavily relied upon when troubleshooting issues found during DMM test development for this design guide.
Show FC-RedirectThe show FC-Redirect internal wwn-database all command can be run on any switch in the fabric so long as there is an SSM in the fabric and will return all fabric wide results. The command returns useful information as to the current WWNs involved in the FC-Redirect from relevant initiators, hosts and targets. This is useful as the WWNs can be matched to confirm configuration. When all DMM jobs on all SSMs in a given fabric are deleted, the FC-Redirect command output should return no values and therefore if results persist they can be analyzed further. Figure A-1 shows an output the FC-Redirect command.
Figure A-1 Show FC-Redirect internal wwn-database all Command
A-1isco Data Center Assurance Program (DCAP)

Appendix A DMM Troubleshooting Show DMM Commands
Show DMM CommandsThere are 3 main show commands that have been particularly useful when either troubleshooting a potential issue or to determine the state or success of a DMM job. Example outputs are included in Figure A-2 with the following commands:
show dmm job—This command displays critical information in a summarized form including DMM job IDs and their status. The DMM job ID could then be noted (or copied) and the ID could be referenced quickly to see if a status alert (e.g. failed) had occurred. Additionally as a DMM job can involve multiple fabrics but only be actively migrating on one path, it was this command that was used to determine if a job was created and active (DMM job status is either “in-progress” or “completed”), created (status is “created”) or a problem had occurred (“failed” or “stopped”).
show dmm job job-id X session session_id Y (X = DMM job ID; Y = session ID)—This command shows both the average throughputs, job status and the WWNs included in the DMM job. This was particularly useful when running host IO tests together with a DMM migration as the impact on DMM migration performance could be observed.
show dmm job job-id X detail (X = DMM job ID)—This command provides full information about a DMM job including the SSMs IP addresses the job is running upon, the rate limitation set, WWNs and most useful the error history of the DMM job. This output was most useful when trying to determine why a DMM job was failing.
A-2Cisco Data Center Assurance Program (DCAP)
Appendix—Troubleshooting and DDTS
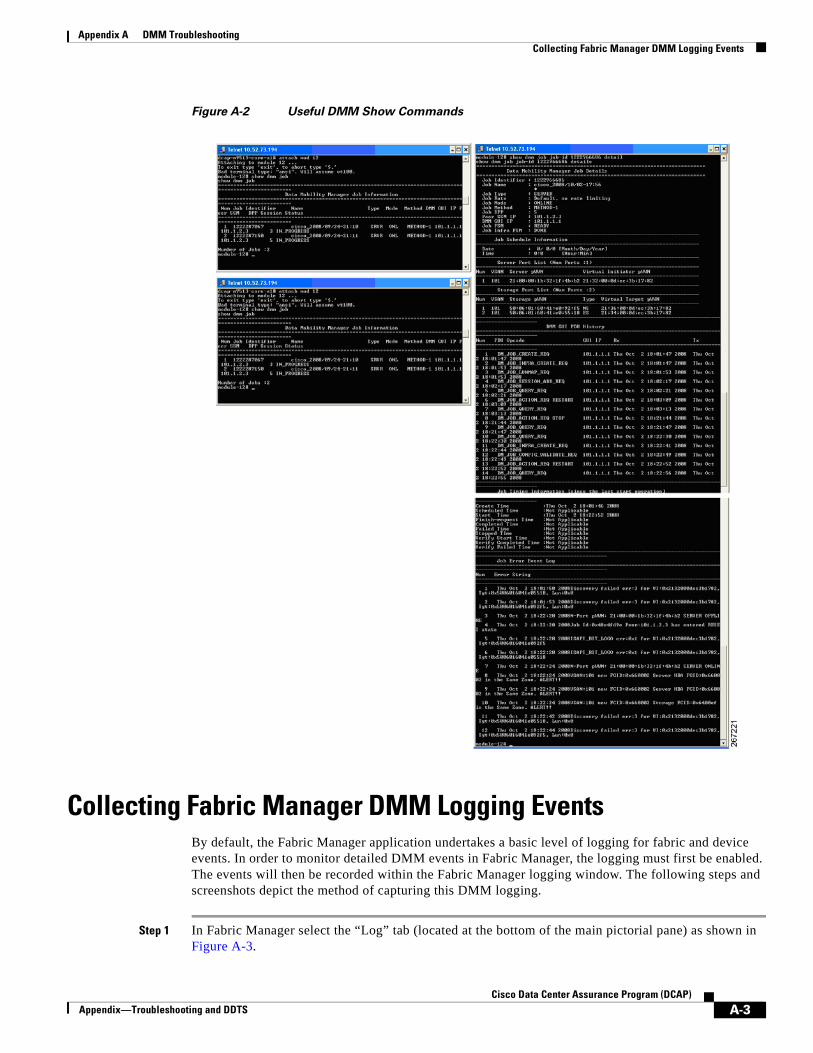
Appendix A DMM Troubleshooting Collecting Fabric Manager DMM Logging Events
Figure A-2 Useful DMM Show Commands
Collecting Fabric Manager DMM Logging EventsBy default, the Fabric Manager application undertakes a basic level of logging for fabric and device events. In order to monitor detailed DMM events in Fabric Manager, the logging must first be enabled. The events will then be recorded within the Fabric Manager logging window. The following steps and screenshots depict the method of capturing this DMM logging.
Step 1 In Fabric Manager select the “Log” tab (located at the bottom of the main pictorial pane) as shown in Figure A-3.
A-3Cisco Data Center Assurance Program (DCAP)
Appendix—Troubleshooting and DDTS

Appendix A DMM Troubleshooting Collecting Fabric Manager DMM Logging Events
Figure A-3 Fabric Managers “Log” Tab
Step 2 Right click in the empty window space in the main pictorial pane and select “Log level…”. This is demonstrated in Figure A-4.
Figure A-4 FLog Level Menu
Step 3 Select the “FM Backend” tab and change the DMM component to an appropriate level (for example Debug or Trace). Figure A-5 shows the DMM tab and option.
Figure A-5 DMM Trace Logging
The DMM events are then written into the Fabric Manager logfile. The default location of the logfile (fmserver.log) on a windows host is “C:\Program Files\Cisco Systems\MDS 9000\logs\” or on a Linux host (FMServer.log) “/usr/local/cisco_mds9000”.
Warning The logging levels can have an adverse impact on the Fabric Manager performance and potentially the SSM, depending on the logging levels set and the number of alerts generated. The impact should be monitored and guidance sought from Cisco support, your OSM or your ATP as to the long term level that should be set if the logging is to be left enabled.
A-4Cisco Data Center Assurance Program (DCAP)
Appendix—Troubleshooting and DDTS

Appendix A DMM Troubleshooting The DMM CLI Debug
The DMM CLI DebugIn the unlikely event that you have a DMM issue and Cisco or OSM support ask you to capture a DMM specific debug file, run the following commands on the SSM that the DMM job. attach module X (X = SSM module number)debug dmm allno debug dmm fsmno debug dmm init
The resultant logfile can then be taken off the switch and sent to support.
Warning The logging commands can have an impact on performance and should be used with caution, preferably with guidance from Cisco or the OSM support.
Common Configuration MistakesAs with most complex applications, it is possible to make mistakes during configuration or operational use. The following is a list of common mistakes which were made during test development:
• Symptom: The host LUN I wish to migrate does not appear in the “Create Session” drop down list.
Cause: The most likely cause is that the LUN in question is either not owned by the correct storage array controller or that the LUN is not accessible upon the storage ports provided in the “Create Job” screen.
• Symptom: I keep getting a “No luns found on existing storage” error message.
Cause: There can be many causes of this error but the most common one was due to the simple mistake that all host storage ports were specified in the “Create Job” screen. As we were using active/passive storage arrays, only the ports relating to the active controller for the LUN(s) should have been specified (e.g. active ports A2, A3 for LUN 20, not A2, A3 and passive ports B2, B3).
• Symptom: A DMM job has failed.
Cause: This was most likely due to a configuration change with caused a momentary loss of one element of the DMM path hardware (this includes a cause of a host reboot). Simply restarting the DMM job again may allow this job to complete.
• Symptom: There is no progress reported on all the DMM jobs in the Fabric Manager DMM screen.
Cause: This is not actually a problem, a manual refresh of the DMM screen is required to give an up to date snapshot of the DMM job and session progression.
A-5Cisco Data Center Assurance Program (DCAP)
Appendix—Troubleshooting and DDTS

Appendix A DMM Troubleshooting Common Configuration Mistakes
A-6Cisco Data Center Assurance Program (DCAP)
Appendix—Troubleshooting and DDTS

CAppendix—Terms and Acronyms
A
P P E N D I X B Terms and AcronymsThe following table lists some of the common terms and acronyms used with Data Mobility Manager (DMM). Some common acronyms are not expanded in the text, but are included here for reference. These are marked with an asterisk.
Table B-1 Terms and Acronyms Definitions
Term or Acronym Definition
Active/Active Storage Array This is a type of storage array that can present a storage LUN (Logical Unit Number) to a host via one or more paths, using multiple controllers whilst still allowing every path to service IO requests.
Active/Passive Storage Array This is a type of storage array that can present a storage LUN (Logical Unit Number) to a host via one or more paths typically via an active controller. To provide resiliency a passive or standby controller is provided which can take over IO serving host IO. The two controllers cannot actively service IO to the same LUN at the same time, otherwise it would be considered an active/active array.
ALU Array LUN number (see below for LUN). This is the LUN number assigned by the storage array.
ATP Advanced Technology Partner. An advanced Cisco partner with the skills and authority to resell Cisco products.
ASL Array Specific Library. An ASL is a DMM feature which contains a database of information (LUN maps) about specific supported storage array products.
CPP Control Path Processor (DMM engine)
DMM Data Mobility Manager, the name for the Cisco MDS developed migration tool.
DMM Job A data migration job defines a set of LUNs to be migrated together. A data migration session is created for each LUN that is to be migrated. The data migration job is the main unit of configuration and management. For example, the migration rate and other attributes are configured for the data migration job. The data migration job (and not individual sessions) can be started or stopped.
DMM Session A data migration session migrates the data from one LUN in the existing storage to a LUN in the new storage.
B-1isco Data Center Assurance Program (DCAP)

Appendix B Terms and Acronyms
ES Existing Storage (existing storage array). This refers to the “source” storage array from which DMM uses to migrate data from.
Existing Storage The DMM term for storage that is currently used by the application server. The data contained in the existing storage will be migrated to the new storage and should be considered the “source volume”.
FC1 Fibre Channel.
HBA Host Bus Adapter, the hardware module that is the interface between a host bus and the fibre channel SAN (conceptually like a network card to connect to the SAN)
HLU Host LUN Number, this is the value typically set on the storage array that specifies the LUN number the host will be presented with.
IPFC Internet Protocol over Fibre Channel.
ISL Interswitch Link – a link between two SAN switches.
LUN Logical Unit Number, a value given to a logical or virtual volume, typically created on a storage array and presented to one or more hosts.
New Storage The DMM term for storage to which the data will be migrated (new storage should be considered as the “target volume”.
NS New Storage (new storage array). This refers to the “target” storage array from which DMM uses to migrate data to.
NWWN2 Node World Wide Name. See WWN.
OSM Original Storage Manufacturer
PWWN3 Port World Wide Name. See WWN.
SAN Storage Area Network. A SAN is a network of devices including both hosts and targets (storage arrays or tape devices) typically based on a fibre channel transport.
SE4 System Engineer.
Server The application server with SAN storage to be migrated.
Server-based Migration In server-based migration, the focus is data migration for the storage used by a particular server (or server HBA port). All LUNs accessed by the selected server are available for migration to new storage.
SLD5 Server Lunmap Discovery.
SPA / SPB Service Processor (A or B) refers to the controllers inside the SAN storage array.
SSM Storage Services Module, the Cisco MDS specific hardware module that supports fabric applications such as DMM.
Storage-based Migration In storage-based migration, the focus is data migration for storage exposed by a particular storage array (or storage array port). All LUNs in the specified storage array are available for migration to new storage.
Table B-1 Terms and Acronyms Definitions
Term or Acronym Definition
B-2Cisco Data Center Assurance Program (DCAP)
Appendix—Terms and Acronyms

Appendix B Terms and Acronyms
VSAN Virtual SAN. VSANs provide a method for allocating ports within a physical fabric to create virtual fabrics.
WWN World Wide Name. A WWN is a unique 64bit / 16 character number for ports and nodes in a fabric.
1. Denotes an acronym without a description.2. Denotes an acronym without a description.3. Denotes an acronym without a description.4. Denotes an acronym without a description.5. Denotes an acronym without a description.
Table B-1 Terms and Acronyms Definitions
Term or Acronym Definition
B-3Cisco Data Center Assurance Program (DCAP)
Appendix—Terms and Acronyms

Appendix B Terms and Acronyms
B-4Cisco Data Center Assurance Program (DCAP)
Appendix—Terms and Acronyms

CAppendix—Design Forms
A
P P E N D I X C DMM Design FormsThere are three main forms used in this design guide guide, all of which were created for use with multiserver migrations. A blank version of these forms is given here in case they prove useful in your DMM migration.
Table C-1 is a blank version of Table 4-3 on page 4-16 (DMM Migration Schedule).
Table C-2 is a blank version of Table 4-5 on page 4-18 (DMM Server Migration Plan).
Table C-3 is a blank version of Table 4-6 on page 4-19 (DMM Storage Migration Plan).
C-1isco Data Center Assurance Program (DCAP)

Appendix C DMM Design Forms
Table C-1 Blank Version of the DMM Migration Schedule
Existing Storage Array New Storage Array
Host / Operating System DMM Job #
JobType
SSMs inFabric A/B
LUN / LUN size (ES)
Migration Rate Expected *A
Planned Start Time
Est. time to complete (mins) *B
Est. Time / Date Of Completion
Planned Cutover Time/Date *C
C-2Cisco Data Center Assurance Program (DCAP)
Appendix—Design Forms

Appendix C DMM Design Forms
# 5
8
Tab
le C
-2B
lan
k V
ers
ion
of
the
DM
M S
erv
er
Mig
rati
on
Pla
n
Sour
ce A
rray
CLA
RiiO
N C
X3-1
0:
CK20
0072
7003
12Ta
rget
Arr
ayCL
ARi
iON
CX3
-20:
CK
2000
7450
0627
Hos
tnam
e /
Encl
osur
eH
BA
PW
WN
Fabr
icSo
urce
Arr
ay L
UN
(s)
to M
igra
te
ALU
,Dri
ve,s
ize,
HLU
Act
ive
Con
trolle
r 1
Act
ive
Con
trolle
r Pa
th a
nd V
SAN
sTa
rget
(New
) LU
N
ALU
,Siz
e,H
LU
Targ
et
Act
ive
Con
trolle
r 2
Act
ive
Targ
et
Con
trolle
r Pat
hsV
SAN
&
LU
N
Size
ch
eck
3
Logi
cal
Job
# 4
Mig
Typ
e
Verif
y #
6
Rat
e 7
Met
hod=
1
FAB
AFA
B B
FAB
AFA
B B
C-3Cisco Data Center Assurance Program (DCAP)
Appendix—Design Forms

Appendix C DMM Design Forms
Tab
le C
-3B
lan
k V
ers
ion
of
the
DM
M S
tora
ge
Mig
rati
on
Pla
n
Sour
ce A
rray
CLA
RiiO
N C
X3-1
0:
CK20
0072
7003
12Ta
rget
Arr
ayCL
ARi
iON
CX3
-20:
CK
2000
7450
0627
Hos
ts T
o M
igra
teFa
bric
/ D
MM
Jo
b(s)
Virt
ual I
nitia
tor
(N =
NW
WN
)
(P =
PW
WN
)
Sour
ce A
rray
LU
N(s
) to
Mig
rate
ALU
,Dri
ve,s
ize,
HL
U
Act
ive
Ctrl
’r 1
Act
ive
Con
trolle
r Pa
th a
nd V
SAN
sTa
rget
(New
) LU
N
ALU
,Siz
e,H
LU
Targ
et
Act
ive
Con
trolle
r 2
Act
ive
Targ
et
Con
trolle
r Pat
hsV
SAN
&
LUN
chk
3
Map
, Mas
k &
Zon
e 10
Logi
cal
DM
M
Job
# 4,
9
Mig
Typ
e #
5
Verif
y #
6
Rat
e 7
Met
hod=
1 8
FAB
AFA
B B
FAB
AFA
B B
C-4Cisco Data Center Assurance Program (DCAP)
Appendix—Design Forms

CAppendix—Configurations
A
P P E N D I X D Cisco MDS ConfigurationsThe tests and configurations used on the Cisco MDS switches in this design guide are detailed in the document entitled “Data Mobility Manager (DMM) Design Guide (Internal)”. Although the configurations are very similar, they have all been included in order for a reader to be able to see the complete setup. The configurations (which have been used as a starting point in all DMM tests) were taken at a point in time where no actual DMM jobs or sessions existed.
Note Contact your account team for the “Data Mobility Manager (DMM) Design Guide (Internal)” document. Ask for EDCS-725641.
Edge Switches
• M9513 Edge A1
• M9513 Edge A2
• M9513 Edge B1
• M9513 Edge B2
Core Switches
• M9513 Core A1
• M9513 Core A2
• M9513 Core B1
• M9513 Core B2
D-1isco Data Center Assurance Program (DCAP)

Appendix D Cisco MDS Configurations
D-2Cisco Data Center Assurance Program (DCAP)
Appendix—Configurations