cisco agent desktop user guide · may 14, 2003 1 cisco agent desktop user guide introduction cisco...
TRANSCRIPT

Cisco Agent Desktop User GuideCisco Desktop Product Suite 4.5 (ICD)
Corporate HeadquartersCisco Systems, Inc.170 West Tasman DriveSan Jose, CA 95134-1706 USAhttp://www.cisco.comTel: 408 526-4000
800 553-NETS (6387)Fax: 408 526-4100
Customer Order Number: Text Part Number: OL-4201-01

THE SPECIFICATIONS AND INFORMATION REGARDING THE PRODUCTS IN THIS MANUAL ARE SUBJECT TO CHANGE WITHOUT NOTICE. ALL STATEMENTS, INFORMATION, AND RECOMMENDATIONS IN THIS MANUAL ARE BELIEVED TO BE ACCURATE BUT ARE PRESENTED WITHOUT WARRANTY OF ANY KIND, EXPRESS OR IMPLIED. USERS MUST TAKE FULL RESPONSIBILITY FOR THEIR APPLICATION OF ANY PRODUCTS.
THE SOFTWARE LICENSE AND LIMITED WARRANTY FOR THE ACCOMPANYING PRODUCT ARE SET FORTH IN THE INFORMATION PACKET THAT SHIPPED WITH THE PRODUCT AND ARE INCORPORATED HEREIN BY THIS REFERENCE. IF YOU ARE UNABLE TO LOCATE THE SOFTWARE LICENSE OR LIMITED WARRANTY, CONTACT YOUR CISCO REPRESENTATIVE FOR A COPY.
The Cisco implementation of TCP header compression is an adaptation of a program developed by the University of California, Berkeley (UCB) as part of UCB’s public domain version of the UNIX operating system. All rights reserved. Copyright © 1981, Regents of the University of California.
NOTWITHSTANDING ANY OTHER WARRANTY HEREIN, ALL DOCUMENT FILES AND SOFTWARE OF THESE SUPPLIERS ARE PROVIDED “AS IS” WITH ALL FAULTS. CISCO AND THE ABOVE-NAMED SUPPLIERS DISCLAIM ALL WARRANTIES, EXPRESSED OR IMPLIED, INCLUDING, WITHOUT LIMITATION, THOSE OF MERCHANTABILITY, FITNESS FOR A PARTICULAR PURPOSE AND NONINFRINGEMENT OR ARISING FROM A COURSE OF DEALING, USAGE, OR TRADE PRACTICE.
IN NO EVENT SHALL CISCO OR ITS SUPPLIERS BE LIABLE FOR ANY INDIRECT, SPECIAL, CONSEQUENTIAL, OR INCIDENTAL DAMAGES, INCLUDING, WITHOUT LIMITATION, LOST PROFITS OR LOSS OR DAMAGE TO DATA ARISING OUT OF THE USE OR INABILITY TO USE THIS MANUAL, EVEN IF CISCO OR ITS SUPPLIERS HAVE BEEN ADVISED OF THE POSSIBILITY OF SUCH DAMAGES.
CCIP, the Cisco Powered Network mark, the Cisco Systems Verified logo, Cisco Unity, Follow Me Browsing, FormShare, Internet Quotient, iQ Breakthrough, iQ Expertise, iQ FastTrack, the iQ Logo, iQ Net Readiness Scorecard, Networking Academy, ScriptShare, SMARTnet, TransPath, and Voice LAN are trademarks of Cisco Systems, Inc.; Changing the Way We Work, Live, Play, and Learn, Discover All That’s Possible, The Fastest Way to Increase Your Internet Quotient, and iQuick Study are service marks of Cisco Systems, Inc.; and Aironet, ASIST, BPX, Catalyst, CCDA, CCDP, CCIE, CCNA, CCNP, Cisco, the Cisco Certified Internetwork Expert logo, Cisco IOS, the Cisco IOS logo, Cisco Press, Cisco Systems, Cisco Systems Capital, the Cisco Systems logo, Empowering the Internet Generation, Enterprise/Solver, EtherChannel, EtherSwitch, Fast Step, GigaStack, IOS, IP/TV, LightStream, MGX, MICA, the Networkers logo, Network Registrar, Packet, PIX, Post-Routing, Pre-Routing, RateMUX, Registrar, SlideCast, StrataView Plus, Stratm, SwitchProbe, TeleRouter, and VCO are registered trademarks of Cisco Systems, Inc. and/or its affiliates in the U.S. and certain other countries.
All other trademarks mentioned in this document or Web site are the property of their respective owners. The use of the word partner does not imply a partnership relationship between Cisco and any other company. (0203R)
Cisco Agent Desktop User GuideCopyright © 2002, Cisco Systems, Inc.All rights reserved.
Contents
Cisco Agent Desktop User Guide
■ Introduction . . . . . . . . . . . . . . . . . . . . . . . . . . . . . . . . . . . . . . . . .1
Features . . . . . . . . . . . . . . . . . . . . . . . . . . . . . . . . . . . . . . . . .1
Agent Desktop Versions. . . . . . . . . . . . . . . . . . . . . . . . . . . .2
Media Termination. . . . . . . . . . . . . . . . . . . . . . . . . . . . . . . . .2
■ About This Document . . . . . . . . . . . . . . . . . . . . . . . . . . . . . . . .3
Intended Audience . . . . . . . . . . . . . . . . . . . . . . . . . . . . . . . .3
Conventions. . . . . . . . . . . . . . . . . . . . . . . . . . . . . . . . . . . . . .3
■ Starting Agent Desktop . . . . . . . . . . . . . . . . . . . . . . . . . . . . . . .5
Hot Seating . . . . . . . . . . . . . . . . . . . . . . . . . . . . . . . . . . . . . .5
Access Through a Virtual Private Network . . . . . . . . . . . . .5
Access Through Virtual Network Computing . . . . . . . . . . .6
■ Agent Desktop Windows. . . . . . . . . . . . . . . . . . . . . . . . . . . . . .7
The Main Window . . . . . . . . . . . . . . . . . . . . . . . . . . . . . . . . .7
The Menu Bar. . . . . . . . . . . . . . . . . . . . . . . . . . . . . . . . . .8
Call Control Buttons . . . . . . . . . . . . . . . . . . . . . . . . . . . .9
Agent State Buttons . . . . . . . . . . . . . . . . . . . . . . . . . . 10
Task Buttons . . . . . . . . . . . . . . . . . . . . . . . . . . . . . . . . 11
Call Information Pane . . . . . . . . . . . . . . . . . . . . . . . . . 11
Status Bar. . . . . . . . . . . . . . . . . . . . . . . . . . . . . . . . . . . 12
Resetting Your Local Extension . . . . . . . . . . . . . . . . . 12
The Dial Pad Window. . . . . . . . . . . . . . . . . . . . . . . . . . . . 13
Recent Call List . . . . . . . . . . . . . . . . . . . . . . . . . . . . . . 13
Phone Books . . . . . . . . . . . . . . . . . . . . . . . . . . . . . . . . 14
Name: Number Field . . . . . . . . . . . . . . . . . . . . . . . . . . 15
Dial Number as Entered Check Box . . . . . . . . . . . . . 15
■ Agent States . . . . . . . . . . . . . . . . . . . . . . . . . . . . . . . . . . . . . . 16
■ Reason Codes . . . . . . . . . . . . . . . . . . . . . . . . . . . . . . . . . . . . 17
■ Handling Calls. . . . . . . . . . . . . . . . . . . . . . . . . . . . . . . . . . . . . 18
Answering a Call . . . . . . . . . . . . . . . . . . . . . . . . . . . . . . . . 18
Making a Call . . . . . . . . . . . . . . . . . . . . . . . . . . . . . . . . . . . 18
Entering Touch Tones During a Call . . . . . . . . . . . . . 19
Transferring a Call . . . . . . . . . . . . . . . . . . . . . . . . . . . . . . . 19
May 14, 2003 i
Contents
Making a Conference Call. . . . . . . . . . . . . . . . . . . . . . . . . 20
■ Call/Chat . . . . . . . . . . . . . . . . . . . . . . . . . . . . . . . . . . . . . . . . . 22
The Call/Chat Window . . . . . . . . . . . . . . . . . . . . . . . . . . . 22
Window Behavior . . . . . . . . . . . . . . . . . . . . . . . . . . . . . 23
Conference Callers. . . . . . . . . . . . . . . . . . . . . . . . . . . . 24
Chat Log . . . . . . . . . . . . . . . . . . . . . . . . . . . . . . . . . . . . 24
Text Pane. . . . . . . . . . . . . . . . . . . . . . . . . . . . . . . . . . . . 24
Scrolling Marquee Message Pane . . . . . . . . . . . . . . . 24
Using Call/Chat . . . . . . . . . . . . . . . . . . . . . . . . . . . . . . . . . 25
■ Viewing Logs and Statistics . . . . . . . . . . . . . . . . . . . . . . . . . . 26
Call Log Viewer . . . . . . . . . . . . . . . . . . . . . . . . . . . . . . . . . 26
Sorting Log Entries. . . . . . . . . . . . . . . . . . . . . . . . . . . . 27
Setting Log Viewing Options. . . . . . . . . . . . . . . . . . . . 27
Setting Log Filters . . . . . . . . . . . . . . . . . . . . . . . . . . . . 28
Copying Log Entries . . . . . . . . . . . . . . . . . . . . . . . . . . . 29
Agent State Logs . . . . . . . . . . . . . . . . . . . . . . . . . . . . . . . . 29
Copying Log Entries . . . . . . . . . . . . . . . . . . . . . . . . . . . 30
Statistics . . . . . . . . . . . . . . . . . . . . . . . . . . . . . . . . . . . . . . . 30
Agent Statistics. . . . . . . . . . . . . . . . . . . . . . . . . . . . . . . 31
Skills Statistics . . . . . . . . . . . . . . . . . . . . . . . . . . . . . . . 31
■ Enterprise Data . . . . . . . . . . . . . . . . . . . . . . . . . . . . . . . . . . . . 32
The Enterprise Data Window . . . . . . . . . . . . . . . . . . . . . . 32
Enterprise Data View . . . . . . . . . . . . . . . . . . . . . . . . . . 33
Call Activity View . . . . . . . . . . . . . . . . . . . . . . . . . . . . . 33
Window Behavior . . . . . . . . . . . . . . . . . . . . . . . . . . . . . 33
■ Server Autorecovery . . . . . . . . . . . . . . . . . . . . . . . . . . . . . . . . 35
Features Affected by Server Failure . . . . . . . . . . . . . . 36
ii May 14, 2003
May 14, 2003
e
Cisco Agent Desktop User GuidIntroduction
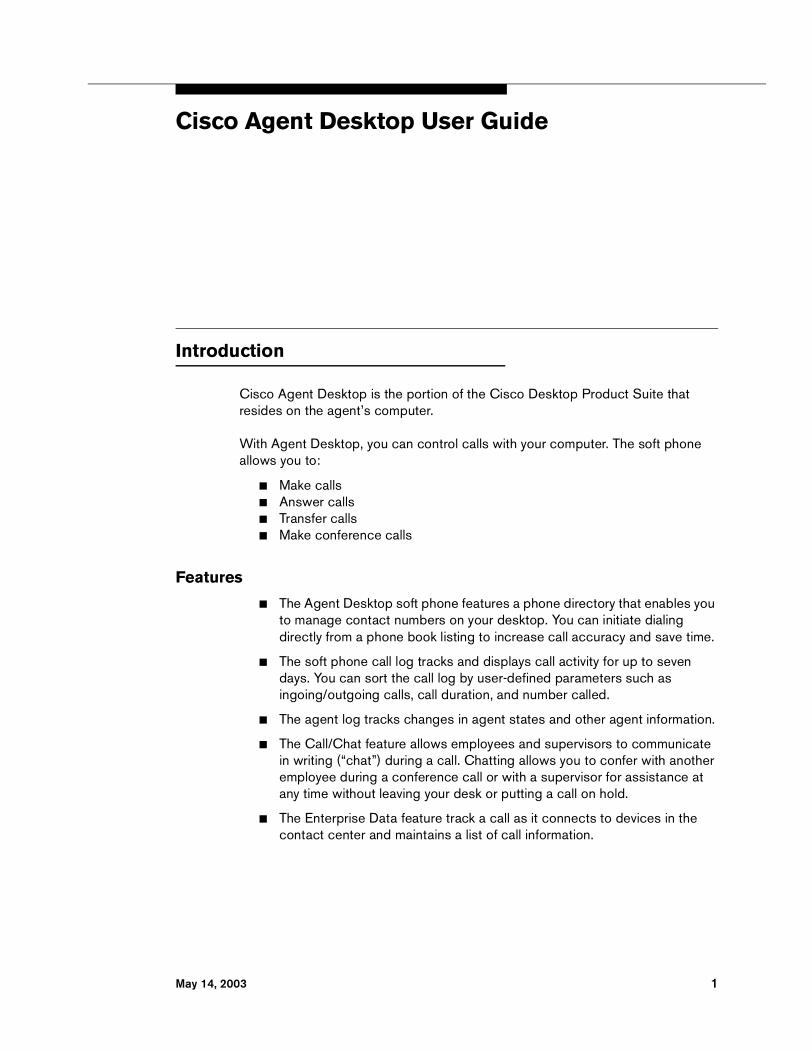
Cisco Agent Desktop is the portion of the Cisco Desktop Product Suite that resides on the agent’s computer.
With Agent Desktop, you can control calls with your computer. The soft phone allows you to:
■ Make calls■ Answer calls■ Transfer calls■ Make conference calls
Features
■ The Agent Desktop soft phone features a phone directory that enables you to manage contact numbers on your desktop. You can initiate dialing directly from a phone book listing to increase call accuracy and save time.
■ The soft phone call log tracks and displays call activity for up to seven days. You can sort the call log by user-defined parameters such as ingoing/outgoing calls, call duration, and number called.
■ The agent log tracks changes in agent states and other agent information.
■ The Call/Chat feature allows employees and supervisors to communicate in writing (“chat”) during a call. Chatting allows you to confer with another employee during a conference call or with a supervisor for assistance at any time without leaving your desk or putting a call on hold.
■ The Enterprise Data feature track a call as it connects to devices in the contact center and maintains a list of call information.
1
Cisco Agent Desktop 4.5 User Guide
Agent Desktop VersionsAgent Desktop is available in two versions, Standard and Enhanced.
■ Enhanced Agent Desktop includes task buttons on the tool bar. These buttons can be configured by the administrator to perform tasks such as starting and stopping recording or popping a third-party application. Enhanced Agent Desktop also includes the “Work” agent state, which is used when agents are performing wrapup work after a call.
■ Standard Agent Desktop does not include the task buttons or the “Work” agent state.
Either version can include Media Termination.
Media TerminationIf your version of Agent Desktop includes Media Termination, you can use the Agent Desktop soft phone to perform call functions. If your version does not include Media Termination, you must use a hard IP phone to perform call functions.
NOTE: To ensure that Media Termination functions correctly, make sure that your sound card is selected in the Windows Sounds and Media Properties dialog box.
Choose Start > Settings > Control Panel, and then double-click the Sounds and Media icon (Windows 2000) or Multimedia icon (Windows 98) to display the Sounds and Media Properties dialog box. Select the Audio tab. Under Sound Playback, choose your sound card from the dropdown list, and then click OK.
2 May 14, 2003
About This Document
About This Document
Intended AudienceThis document is written for contact center agents who use Agent Desktop on their computers.
ConventionsIn this document, terminology and typographic conventions are as follows.
Terminology
■ The word enter means to press the sequence of keys specified. For example, an instruction to enter the letter “y” is shown as
Enter y to continue.
■ The word click means to use your mouse to execute the action represented by a button. For example, an instruction to click the Next button is shown as
Click Next.
■ The words check and uncheck mean to activate or deactivate a check box. For example, an instruction to deactivate the Dial Number as Entered check box is shown as
Uncheck the Dial Number as Entered check box.
■ The word choose means to pick an option from a menu or submenu. For example, an instruction to choose the Desktop option from a series of submenus is shown as
Choose Start > Programs > Cisco > Desktop.
■ The word select means to mark text or other elements to be copied or cut. For example, an instruction to select text is shown as
Select an entry from the list to edit.
■ Simultaneous keystrokes (as when you hold down the first key, then press the second and third keys) are represented as a series of bolded key names joined by dashes. For example, an instruction to press and hold the Alt key while pressing the letter “d” is shown as
Press Alt–d
■ Function keys are represented by the letter F followed by the function key number. For example, an instruction to press function key 3 is shown as
Press F3.
May 14, 2003 3
Cisco Agent Desktop 4.5 User Guide
Typography
■ Commands and text you type, the names of windows, buttons, menus, and menu options appear in bold type:
From the Options menu, choose Local Admin.
■ Variables you must enter appear in italics:
http://servername/appadmin
■ Terms that are being defined appear in italics:
Actions are commands that perform a task.
■ Menu paths appear in bold type with menu options separated by right angle brackets:
Choose Options > Status Bar.
4 May 14, 2003
Starting Agent Desktop
Starting Agent Desktop
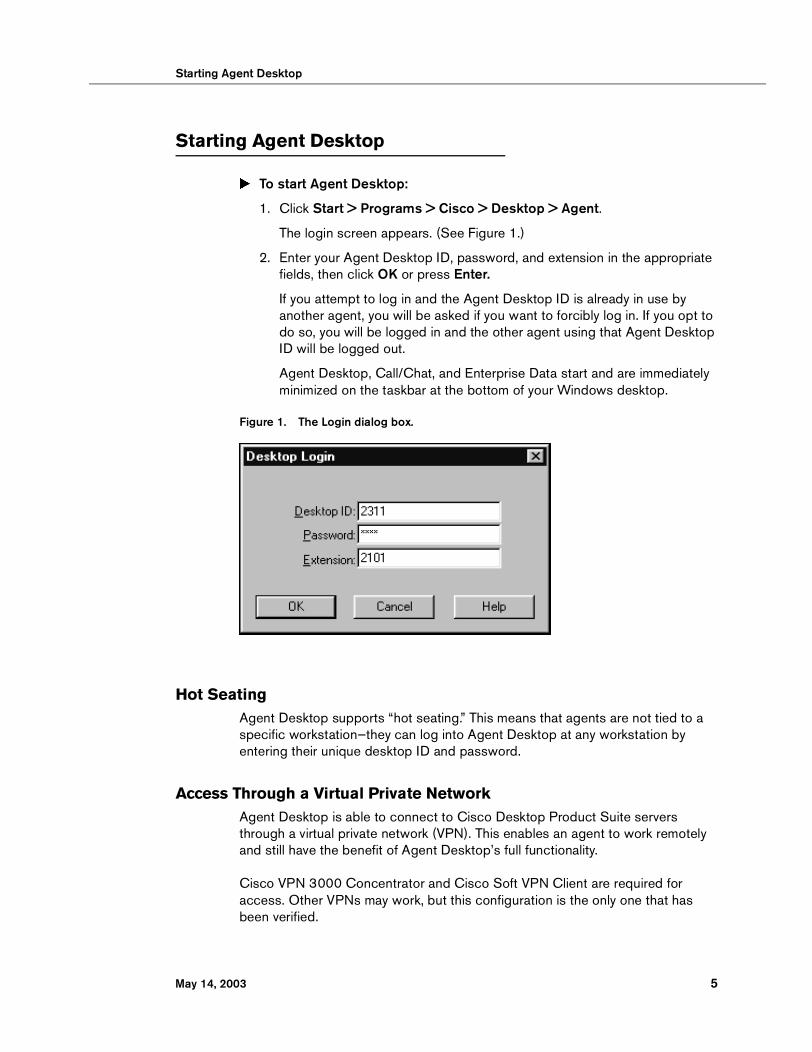
� To start Agent Desktop:
1. Click Start > Programs > Cisco > Desktop > Agent.
The login screen appears. (See Figure 1.)
2. Enter your Agent Desktop ID, password, and extension in the appropriate fields, then click OK or press Enter.
If you attempt to log in and the Agent Desktop ID is already in use by another agent, you will be asked if you want to forcibly log in. If you opt to do so, you will be logged in and the other agent using that Agent Desktop ID will be logged out.
Agent Desktop, Call/Chat, and Enterprise Data start and are immediately minimized on the taskbar at the bottom of your Windows desktop.
Figure 1. The Login dialog box.
Hot SeatingAgent Desktop supports “hot seating.” This means that agents are not tied to a specific workstation—they can log into Agent Desktop at any workstation by entering their unique desktop ID and password.
Access Through a Virtual Private NetworkAgent Desktop is able to connect to Cisco Desktop Product Suite servers through a virtual private network (VPN). This enables an agent to work remotely and still have the benefit of Agent Desktop’s full functionality.
Cisco VPN 3000 Concentrator and Cisco Soft VPN Client are required for access. Other VPNs may work, but this configuration is the only one that has been verified.
May 14, 2003 5
Cisco Agent Desktop 4.5 User Guide
NOTE: Agent Desktop with Media Termination is not supported behind a VPN if a proxy server is configured. In that case, there is one-way audio and Agent Desktop does not work.
Access Through Virtual Network ComputingAccessing Agent Desktop remotely using AT&T Laboratories Virtual Network Computing (VNC) is not supported.
6 May 14, 2003
Agent Desktop Windows
Agent Desktop Windows
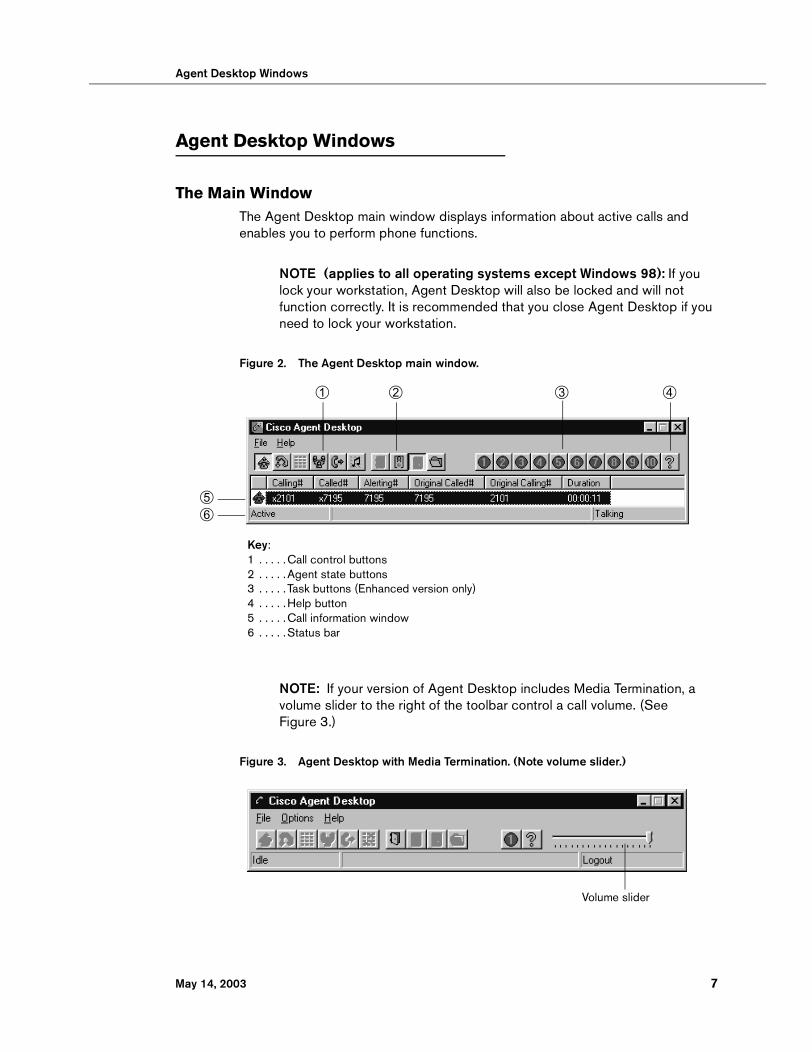
The Main WindowThe Agent Desktop main window displays information about active calls and enables you to perform phone functions.
NOTE (applies to all operating systems except Windows 98): If you lock your workstation, Agent Desktop will also be locked and will not function correctly. It is recommended that you close Agent Desktop if you need to lock your workstation.
Figure 2. The Agent Desktop main window.
NOTE: If your version of Agent Desktop includes Media Termination, a volume slider to the right of the toolbar control a call volume. (See Figure 3.)
Figure 3. Agent Desktop with Media Termination. (Note volume slider.)
Key:1 . . . . .Call control buttons2 . . . . .Agent state buttons3 . . . . . Task buttons (Enhanced version only)4 . . . . .Help button5 . . . . .Call information window6 . . . . .Status bar
� � � �
��
Volume slider
May 14, 2003 7

Cisco Agent Desktop 4.5 User Guide
The Menu Bar
The Agent Desktop menu bar (see Figure 2) includes the following options:
File
Logout/Login Logs you out and in to Agent Desktop.
View Accesses the Call Logs, Agent State Logs, and ACD Statistics. (See “Viewing Logs and Statistics” on page 26.)
Exit Quits Agent Desktop.
Options (available only when your Administrator has enabled local administration)
Window Behavior Allows you to change the behavior of the Agent Desktop window for the current session:
■ Normal (default): The window appears when calls are present and minimizes when Agent Desktop is idle.
■ Keep Open: The window remains open when Agent Desktop is idle.
■ Always on Top: The window remains open when Agent Desktop is idle and stays on top of all other open applications.
■ Stealth: The window appears as an icon in the system tray (on lower right corner of your desktop, next to the system clock) and doesn’t appear unless double-clicked.
Local Admin Enables you to set your local extension and view the the work flow group and team to which you are currently assigned by the system administrator. It also shows the path to the work flow group configuration file.
Status Bar Displays or hides the status bar.
Help
Contents Accesses the contents of the online help file.
About Cisco Agent Desktop
Displays version and copyright information.
8 May 14, 2003
Agent Desktop Windows
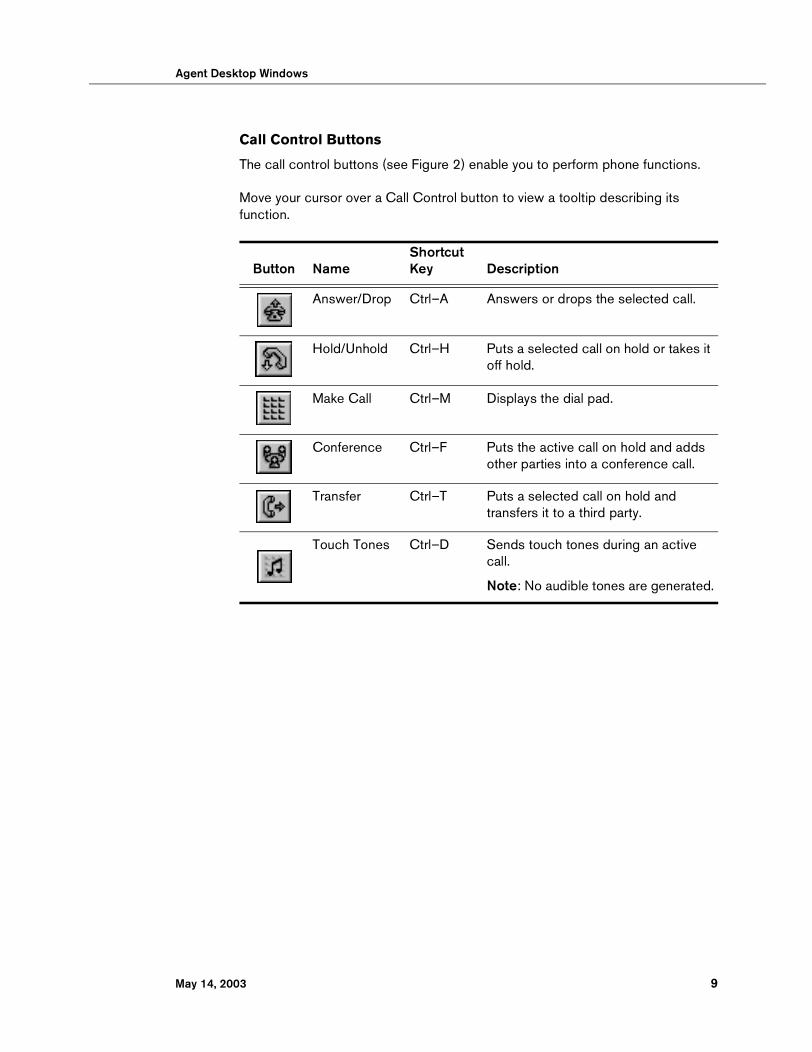
Call Control Buttons
The call control buttons (see Figure 2) enable you to perform phone functions.
Move your cursor over a Call Control button to view a tooltip describing its function.
Button NameShortcut Key Description
Answer/Drop Ctrl–A Answers or drops the selected call.
Hold/Unhold Ctrl–H Puts a selected call on hold or takes it off hold.
Make Call Ctrl–M Displays the dial pad.
Conference Ctrl–F Puts the active call on hold and adds other parties into a conference call.
Transfer Ctrl–T Puts a selected call on hold and transfers it to a third party.
Touch Tones Ctrl–D Sends touch tones during an active call.
Note: No audible tones are generated.
May 14, 2003 9
Cisco Agent Desktop 4.5 User Guide
Agent State Buttons
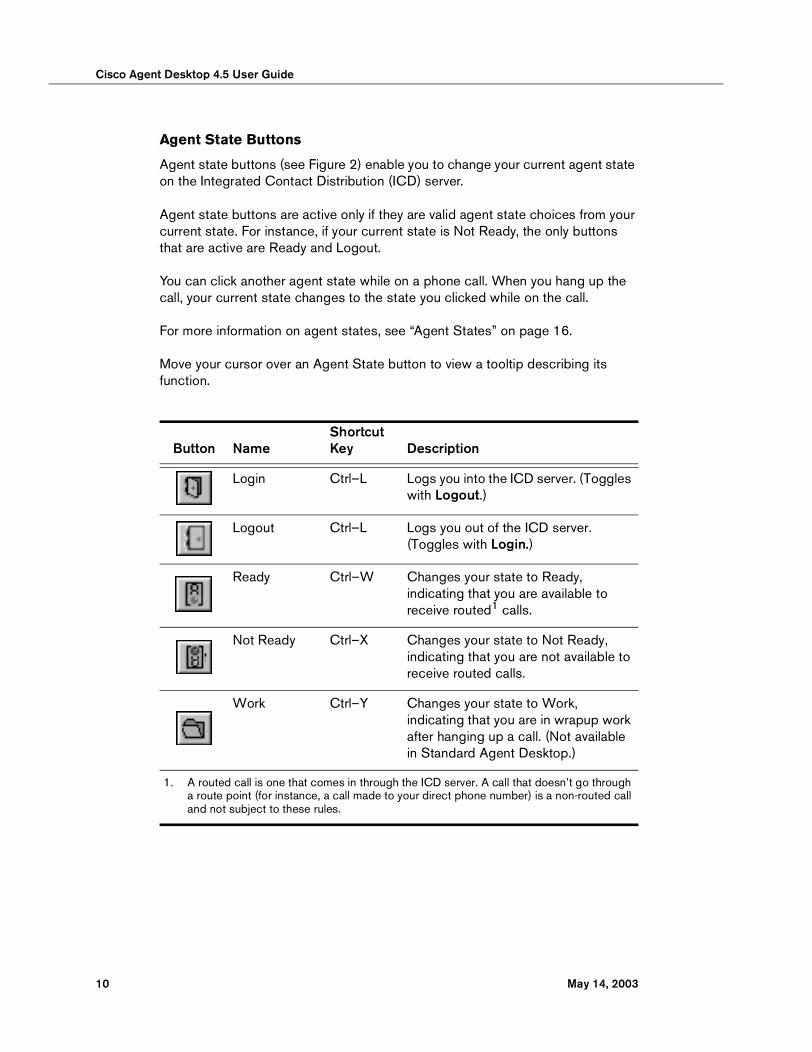
Agent state buttons (see Figure 2) enable you to change your current agent state on the Integrated Contact Distribution (ICD) server.
Agent state buttons are active only if they are valid agent state choices from your current state. For instance, if your current state is Not Ready, the only buttons that are active are Ready and Logout.
You can click another agent state while on a phone call. When you hang up the call, your current state changes to the state you clicked while on the call.
For more information on agent states, see “Agent States” on page 16.
Move your cursor over an Agent State button to view a tooltip describing its function.
Button NameShortcut Key Description
Login Ctrl–L Logs you into the ICD server. (Toggles with Logout.)
Logout Ctrl–L Logs you out of the ICD server. (Toggles with Login.)
Ready Ctrl–W Changes your state to Ready, indicating that you are available to receive routed1 calls.
Not Ready Ctrl–X Changes your state to Not Ready, indicating that you are not available to receive routed calls.
Work Ctrl–Y Changes your state to Work, indicating that you are in wrapup work after hanging up a call. (Not available in Standard Agent Desktop.)
1. A routed call is one that comes in through the ICD server. A call that doesn’t go through a route point (for instance, a call made to your direct phone number) is a non-routed call and not subject to these rules.
10 May 14, 2003
Agent Desktop Windows
Task Buttons
Task buttons (see Figure 2) perform various functions (for example, running a macro, controlling a call, or launching an application). Up to ten task buttons (numbered 1 to 10) can appear on the toolbar, and each
button may be assigned more than one action. Task buttons and the actions assigned to them are configured by the system administrator.
When you click a task button, Agent Desktop performs the actions assigned to that button. If more than one action is assigned, Agent Desktop performs them in sequence. (You can also use the shortcut key A–button number to actuate a button.)
NOTE: Task buttons are not available in Standard Agent Desktop.
Move your cursor over a Task button to view a tooltip describing its function.
High-Priority Chat Message Task Button. You may have a task button configured to send a high-priority chat message to your supervisor(s). This chat message is a popup window containing a predefined message set up by your system administrator (for instance, “Please monitor my call”) that appears on your supervisor’s desktop. You must be on a call to be able to send a high-priority chat message. Use Call/Chat for all other types of chat messages (see “Using Call/Chat” on page 25).
Call Information Pane
The call information pane (see Figure 2) shows details of active calls. Up to six fields may be visible, depending on how the pane is configured by the system administrator. Available fields are:
Notes on the Data Displayed in the Call Information Pane
■ Some fields may display <unavailable> if the call information is unknown.
Field Description
Alerting# The number of the ringing device
Called# The number of the destination device
Calling# The number of the originating device
Duration The length of the phone call
Original Called# The original number called
Original Calling# The initial originating number
May 14, 2003 11
Cisco Agent Desktop 4.5 User Guide
■ When you retrieve a parked call, Agent Desktop displays it as a conference call. (See your Cisco IP phone documentation for information on parked calls.)
■ Whenever the IP IVR is involved in a call, Agent Desktop displays the same information about the call in the call information pane as the IP phone displays on its screen. Enterprise Data may display different data because it tracks the entire life of the call.
Status Bar
The status bar (see Figures 2 and 3) is divided into three sections:
■ The left panel displays the status of a selected call.
■ The middle panel displays messages generated by the software or hardware.
■ The right panel displays the current agent state.
If a message is too long to fit in a panel, double-click the panel to display a popup window showing the complete text.
If your system administrator has configured Agent Desktop so that local administration is enabled, you can use the Option menu to show or hide the status bar.
� To show/hide the status bar:
■ Choose Options > Status Bar.
Resetting Your Local Extension
If your system administrator has enabled local administration, you can reset the phone extension that Agent Desktop monitors.
� To reset your local extension:
1. Choose Options > Local Admin.
The Local Setup window appears.
2. Click the Local Extensions tab.
3. Enter the new phone number in the Call Appearance field, and then click OK.
4. Exit Agent Desktop.
5. Restart Agent Desktop.
Agent Desktop now monitors the new local extension.
12 May 14, 2003
Agent Desktop Windows
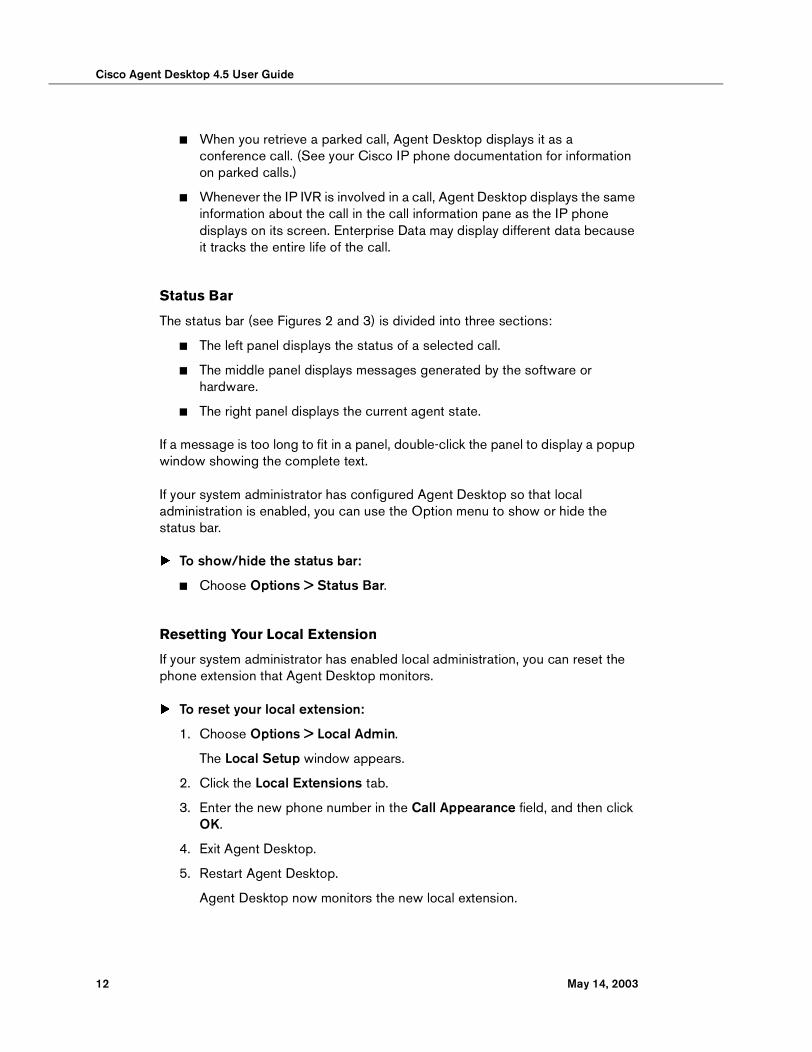
The Dial Pad WindowThe Dial Pad window (Figure 4) allows you to make calls either by entering a phone number or selecting an existing phone number from the recent call list or from a stored phone book.
NOTE: The Dial Pad window is the general name for this window. Depending on what you are doing, the window title may be Make a Call, Transferring Call, or Conferencing.
Figure 4. The Dial Pad window.
Recent Call List
When you dial a phone number, it is automatically entered into the recent call list (see Figure 4). This list stores up to 100 entries, from most recent to least recent. As the number of entries exceeds 100, the oldest entries drop off the list.
Agent Desktop checks to prevent duplicate phone numbers from appearing in this list. However, if the same phone number is entered twice using different
�
�
Key:1 . . . . . Select a name and number from a phone book or the recent call list.2 . . . . . The selected name and number appears in the Name:Number field
ready to be dialed.
May 14, 2003 13
Cisco Agent Desktop 4.5 User Guide
formats, for instance, 555-1212 and 5551212, both numbers will appear on the list.
Phone Books
Phone books are phone number lists set up by you (your personal phone book) and the system administrator (public phone books). Click the drop-down arrow to choose the phone book you want to use.
NOTE: The system administrator can configure Agent Desktop so that one or both types of phone books are not available.
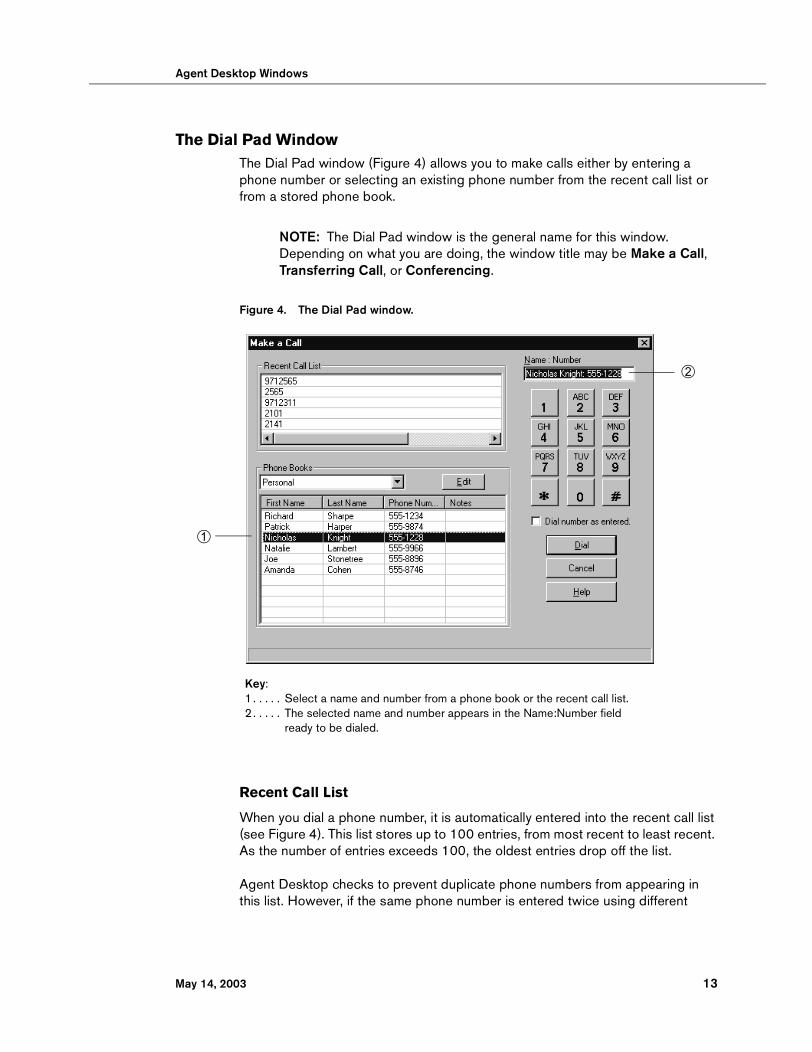
Personal Phone BookYour personal phone book is the only one you can edit. All others are controlled by the system administrator.
� To edit your personal phone book:
1. In the Dial Pad window, choose Personal from the Phone Books drop-down list, and then click Edit.
The Personal Phone Book Edit window appears.
Figure 5. The Personal Phone Book Edit window.
14 May 14, 2003
Agent Desktop Windows
2. Make one of the following edits:
■ To add a new entry to the list, complete the First Name, Last Name, and Phone Number fields and click Add. (The Notes field is optional.)
■ To edit an existing entry, select it to display it in the edit fields, click Edit, and then make your changes.
■ To delete an entry from the list, select it, and then click Delete.
3. When all your edits are completed, click OK.
Name: Number Field
Use this field to enter the phone number you want to dial (see Figure 4). Entering a name is optional, but if one is entered, it must be followed by a colon and a space to separate it from the phone number:
John Doe: 555-1212
You may enter phone numbers with or without spaces, parentheses, and dashes. Agent Desktop ignores any non-numeric characters.
You may also select a phone number from the Recent Call List or a phone book, which is then displayed in the Name: Number field.
Depending on how the system administrator has configured the dial plan, Agent Desktop may automatically add the local access and long distance access codes to numbers you enter. Contact your system administrator for details.
Dial Number as Entered Check Box
Check the Dial Number as Entered check box (see Figure 4) to circumvent any automatic formatting (local access and long distance access codes) and dial the number exactly as you enter it in the Name: Number field.
May 14, 2003 15
Cisco Agent Desktop 4.5 User Guide
Agent States
Agent Desktop allows you to change your agent state in the ICD server through the use of the agent state buttons. (See “Agent State Buttons” on page 10.) Only the agent states that are valid choices from your current agent state will be available at any given time.
You can change your agent state while on a call (in the Talking state). Your state will change to the state you clicked after you hang up the call.
NOTE: The agent state buttons indicate the state you clicked, not your current state. For instance, if you click the Work state button while on a call, the Work button appears to be pressed.
Available agent states are:
State Description
Logout You are logged out of the ICD server.
Not Ready You are not available to receive routed calls. If you receive a non-routed call you are automatically put into the Not Ready state and then returned to the previous state when the call ends.
Ready You are available to receive routed calls.
Reserved You are temporarily “set aside” to receive a specific call. Your state changes to the Talking state when you answer the call. If you fail to answer the call within a time limit specified by the system administrator, the ICD server places you in a Not Ready state. The Reserved state is automatically set for you by the ICD server and does not have a corresponding button. You can be in this state without the phone ringing. (You are waiting for it to ring.)
Talking You are on the phone with a customer or another agent. This state is automatically set for you by the ICD server and does not have a corresponding button.
Work You are completing work from a previous call, and are unavailable to receive routed calls. (Not available in Standard Agent Desktop.)
16 May 14, 2003
Reason Codes
Reason Codes
Agent Desktop can be configured by the system administrator so that you are required to enter reason codes.
Reason codes describe why your state changes to the Not Ready agent state or have logged out. These codes are set up by your system administrator and are customized for your contact center.
NOTE: If reason codes are not configured, the reason code window will not appear.
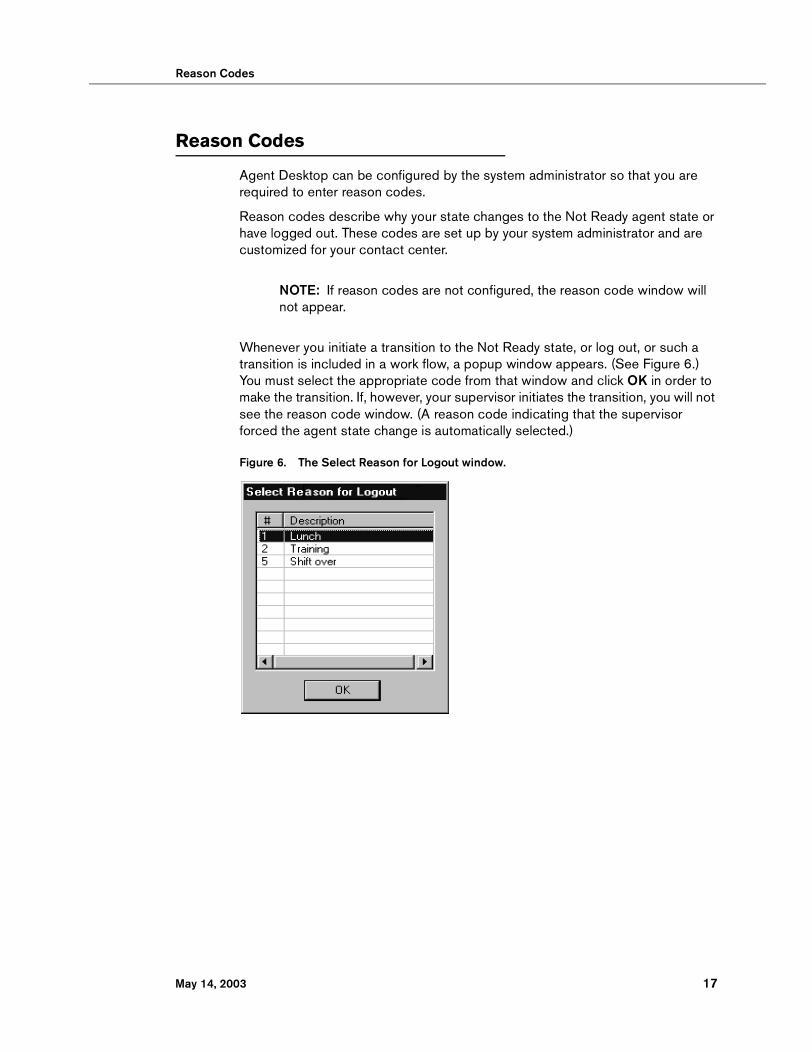
Whenever you initiate a transition to the Not Ready state, or log out, or such a transition is included in a work flow, a popup window appears. (See Figure 6.) You must select the appropriate code from that window and click OK in order to make the transition. If, however, your supervisor initiates the transition, you will not see the reason code window. (A reason code indicating that the supervisor forced the agent state change is automatically selected.)
Figure 6. The Select Reason for Logout window.
May 14, 2003 17
Cisco Agent Desktop 4.5 User Guide
Handling Calls
You can use the soft phone built into Agent Desktop, a third-party soft phone, or a hard IP phone to handle calls. (If you have Agent Desktop with Media Termination, you must use the built-in soft phone.) Either type of call shows up in the Agent Desktop interface. The following sections assume you use the Agent Desktop interface (see Figure 2) to handle calls.
Answering a CallYou can receive both routed and non-routed calls through Agent Desktop. You must be logged in, and you must be in the Ready agent state, to receive a routed call; you can be in any state to receive a non-routed call.
If you do receive a non-routed call, you are automatically put in the Not Ready agent state and then returned to the previous state after the call ends.
� To answer a call:
■ Click Answer.
� To terminate a call:
■ Click Drop.
NOTE: If you are using the soft phone as the agent device to handle calls, and you log out while one or more calls are active on that device, you should not log back in until all the active calls are disconnected.
Making a CallYou can make a call from any agent state except Logoff, as long as you are not on a call. User the Make Call button to make a call.
� To make a call:
1. Click Make Call.
The Make a Call window appears.
2. Enter a number in the Name: Number field. You can enter a number by:
■ Using your PC keyboard
■ Dialing the number with the dial pad
■ Selecting an existing number from the Recent Call List or a phone book.
3. Click Dial.
18 May 14, 2003

Handling Calls
You can enter a number only, or you can enter a name and number. Use the format name: number. You must include the colon and a space to separate the name from the number.
When you enter the number, it doesn’t matter whether you include dashes, parentheses, or spaces; only the numbers are read. Depending on how Agent Desktop is configured, you may not have to include the local access or long-distance access codes. Consult your system administrator for information.
Entering Touch Tones During a Call
If you need to send touch tones during a call (for instance, if you are prompted to enter an account number) you can do so using the Touch Tones button. This button activates a number pad on which you enter the required numbers.
� To enter touch tones:
1. When prompted to enter numbers during a call, click Touch Tone.
The number pad appears.
2. Enter the required numbers and/or symbols. When finished, click Done.
NOTE: You will not hear any tones when you enter the numbers.
The number pad closes and you are returned to the Agent Desktop interface.
Transferring a CallThere are two types of transfer calls:
■ Supervised transfers. In a supervised transfer, you speak to the third party to whom the call is being transferred before connecting the active call, in order to confirm that the transfer can be made successfully.
■ Blind transfers. In a blind transfer, you transfer the active call to the third party without speaking. You hang up before the third party answers the phone and therefore can’t confirm that the transfer was successful.
Arbitrary transfers are not supported. An arbitrary transfer occurs when you receive a call, place that call on hold, and then initiate another call to another agent or user. You then merge the two calls into a conference by making a new call and pressing the Transfer button twice. This action will cause some information in certain historical reports to be inaccurate.
Transferring a conference call is not supported. This action will cause some information in certain historical reports to be inaccurate.
May 14, 2003 19
Cisco Agent Desktop 4.5 User Guide
� To transfer a call:
1. With a call active, click Transfer.
The Transferring Call window appears and the active call is put on hold.
2. Enter the phone number to which you are transferring the call in the Name: Number field. You can enter a number by:
■ Using your PC keyboard
■ Dialing the number with the dial pad
■ Selecting an existing number from the Recent Call List or a phone book.
3. Click Dial.
When the phone rings, the Dial button changes to the Transfer button.
4. Take one of the following actions:
■ For a supervised transfer, wait for the third person to answer the phone, announce the transfer, then click Transfer.
■ For a blind transfer, click Transfer without waiting for the third person to pick up the phone.
Making a Conference CallYou can add other parties to an active call to make a conference call.
� To make a conference call:
1. With a call active, click Conference.
The Conferencing window appears and the active call is put on hold.
2. Enter the phone number of the person you want to add to the call in the Name: Number field. You can enter a number by:
■ Using your PC keyboard
■ Dialing the number with the dial pad
■ Selecting an existing number from the Recent Call List or a phone book.
3. Click Dial.
When the phone rings, the Dial button changes to the Add to Conf. button.
4. Take one of the following actions:
■ For a supervised conference, wait for the third person to answer the phone, announce the conference, then click Add to Conf.
■ For a blind conference, click Add to Conf. without waiting for the third person to pick up the phone.
20 May 14, 2003
Handling Calls
The Add to Conf. button changes back to the Dial button.
5. To add one or more people to the conference call, repeat Steps 2 to 4 for each person.
6. Click Done to close the Conferencing window.
Arbitrary conferences are not supported. An arbitrary conference occurs when you receive a call, place that call on hold, and then initiate another call to another agent or user. You then merge the two calls into a conference by making a new call and pressing the Conference button twice. This action will cause some information in certain historical reports to be inaccurate.
May 14, 2003 21
Cisco Agent Desktop 4.5 User Guide
Call/Chat
Call/Chat is an application that allows you to:
■ Use a chat window to exchange messages with your supervisor and conference call participants
■ Receive messages from your supervisor, including attention-getting scrolling marquee messages
Call/Chat is active when Agent Desktop is active. It cannot be started independently.
The Call/Chat Window
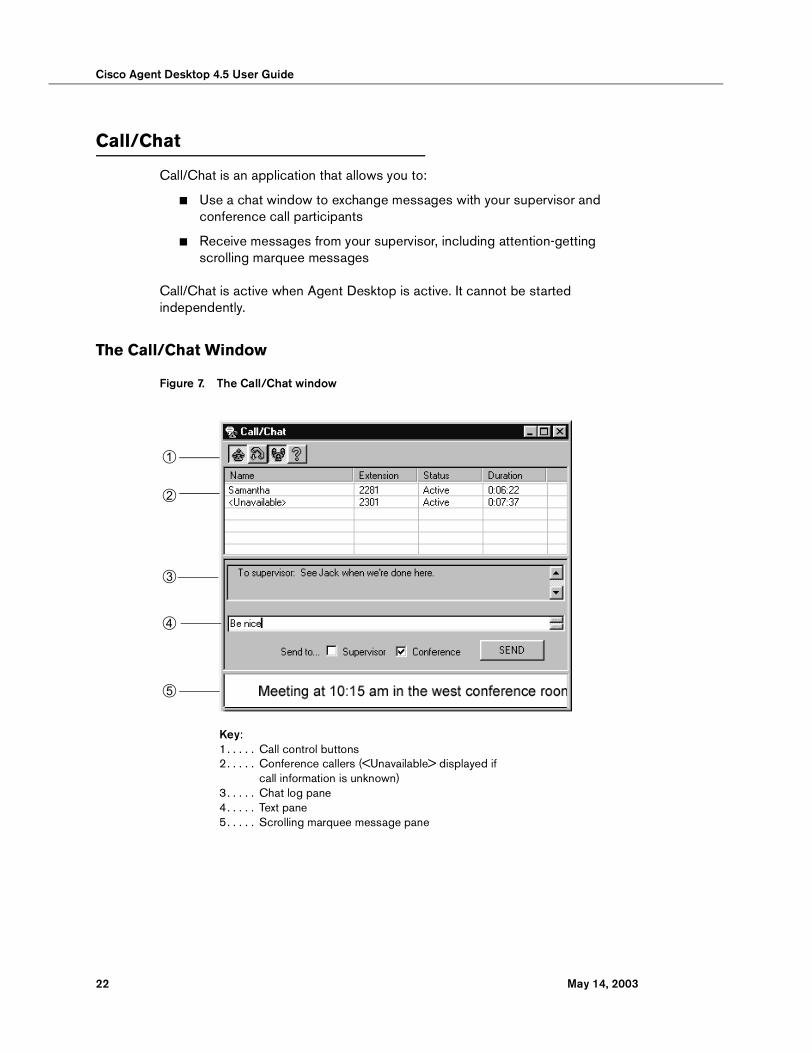
Figure 7. The Call/Chat window
�
�
�
�
�
Key:1. . . . . Call control buttons2. . . . . Conference callers (<Unavailable> displayed if
call information is unknown)3. . . . . Chat log pane4. . . . . Text pane5. . . . . Scrolling marquee message pane
22 May 14, 2003
Call/Chat
Window Behavior
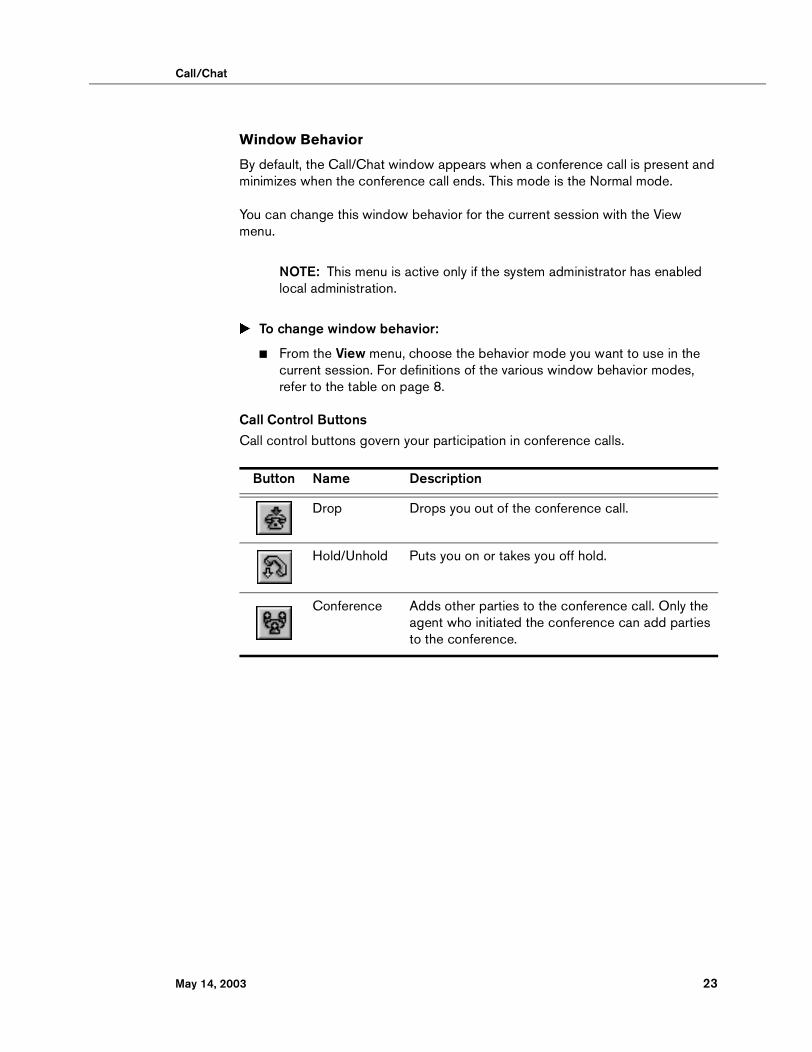
By default, the Call/Chat window appears when a conference call is present and minimizes when the conference call ends. This mode is the Normal mode.
You can change this window behavior for the current session with the View menu.
NOTE: This menu is active only if the system administrator has enabled local administration.
� To change window behavior:
■ From the View menu, choose the behavior mode you want to use in the current session. For definitions of the various window behavior modes, refer to the table on page 8.
Call Control ButtonsCall control buttons govern your participation in conference calls.
Button Name Description
Drop Drops you out of the conference call.
Hold/Unhold Puts you on or takes you off hold.
Conference Adds other parties to the conference call. Only the agent who initiated the conference can add parties to the conference.
May 14, 2003 23
Cisco Agent Desktop 4.5 User Guide
Conference Callers
This pane of the Call/Chat window lists information about the participants in the conference call.
NOTE: If you are in a conference call with an IP phone agent, it will not be displayed in the Call/Chat window. If call information is unknown, the field displays <Unavailable>.
Chat Log
The chat log is a record of any chatting done between conference call participants. It can hold up to 50 lines of chat. Once that limit is reached the earliest line is dropped off as the most recent is added. The chat log is viewable only during the current session and is not saved.
Text Pane
Type messages to your supervisor or other conference call participants in the text pane. There is no limit to the amount you can type; the window scrolls down when you exceed the width of the field.
Scrolling Marquee Message Pane
Your supervisor can send important announcements to all Agent Desktop users on his or her team using the scrolling marquee message function. These messages appear for a preset length of time.
If you have set Call/Chat in Normal or Stealth mode, receiving a marquee message will cause the window to maximize so you can see the message.
Field Description
Name Name of the conference participant, if available.
Extension The conference participant’s phone extension, if available.
Status Participant’s call status (active or on hold).
Duration The length of time the participant has spent on the call.
24 May 14, 2003
Call/Chat
Using Call/ChatYou can send a message to your supervisor at any time and to other agents when they are conference call participants.
NOTE: Chat messages can be sent only to agents within your Logical Contact Center. If you are on a conference call with agents outside your Logical Contact Center, the Conference “Send to:” check box is not displayed in the Call/Chat window.
If you are on a conference call with agents both within and outside your Logical Contact Center, the Conference “Send to:” check box is displayed, but only the agents within your Logical Contact Center will receive any chat message you send.
� To send a message:
1. Type your message in the text pane.
2. Check the message recipient— Supervisor, Conference, or both.
3. Click Send.
The text you typed appears in the Chat log pane.
May 14, 2003 25
Cisco Agent Desktop 4.5 User Guide
Viewing Logs and Statistics
Call logs and agent logs are viewed in their respective viewers. You can access logs from the main window by choosing File > View Logs > Call Logs or File > View Logs > Agent State Logs.
You can view statistics pertaining to the agent and to the skill group by choosing File > View Logs > ACD Statistics.
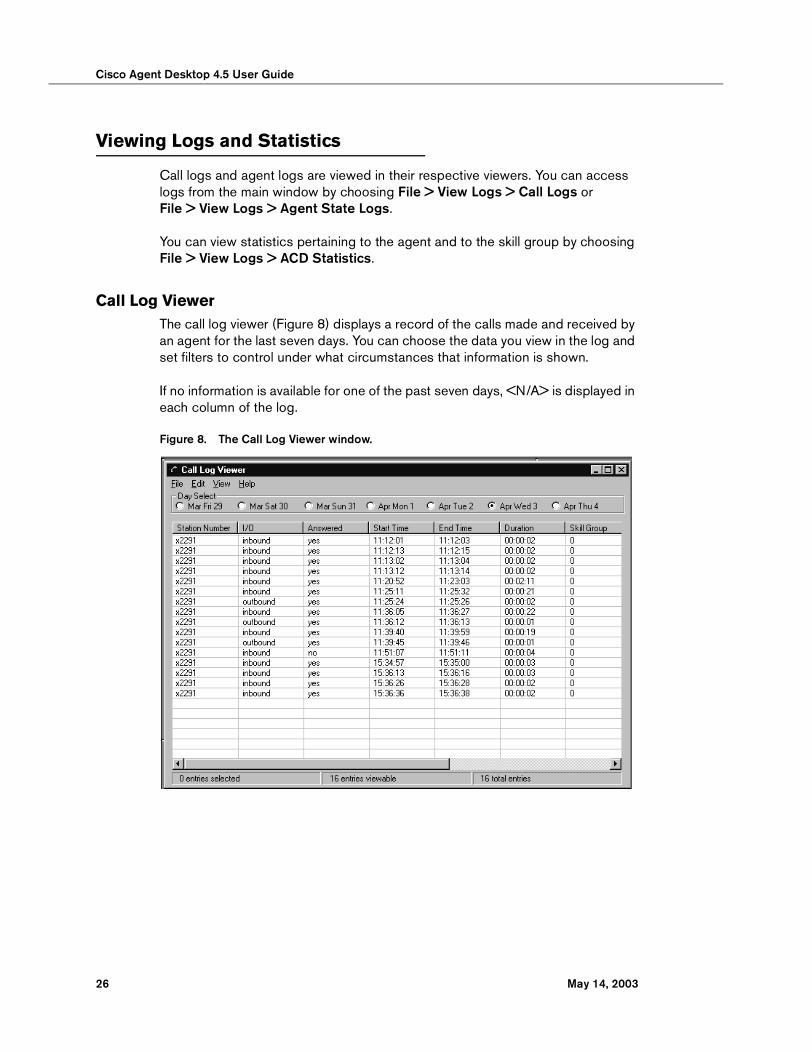
Call Log ViewerThe call log viewer (Figure 8) displays a record of the calls made and received by an agent for the last seven days. You can choose the data you view in the log and set filters to control under what circumstances that information is shown.
If no information is available for one of the past seven days, <N/A> is displayed in each column of the log.
Figure 8. The Call Log Viewer window.
26 May 14, 2003
Viewing Logs and Statistics
The information displayed for each call is:
Sorting Log Entries
You can sort log entries by any of the columns in the log in ascending/descending order by clicking on the column header.
Setting Log Viewing Options
The Log Viewing Options window (Figure 9) enables you to control how your log viewer window appears.
� To hide/view columns:
■ Click Hide All to prevent any columns from displaying.
■ Click Show All to display all available columns.
■ Check or uncheck the individual columns to selectively display data.
Field Description
Station Number The agent’s phone extension
I/O Inbound or outbound call
Answered (Yes/No) Answered or unanswered call
Start Time Start time of the call
End Time End time of the call
Duration Length of the call
Skill Group Call’s skill group
Calling Number Originating phone number
Called Number Recipient phone number
Calling Info Not active
Called Info Not active
May 14, 2003 27
Cisco Agent Desktop 4.5 User Guide
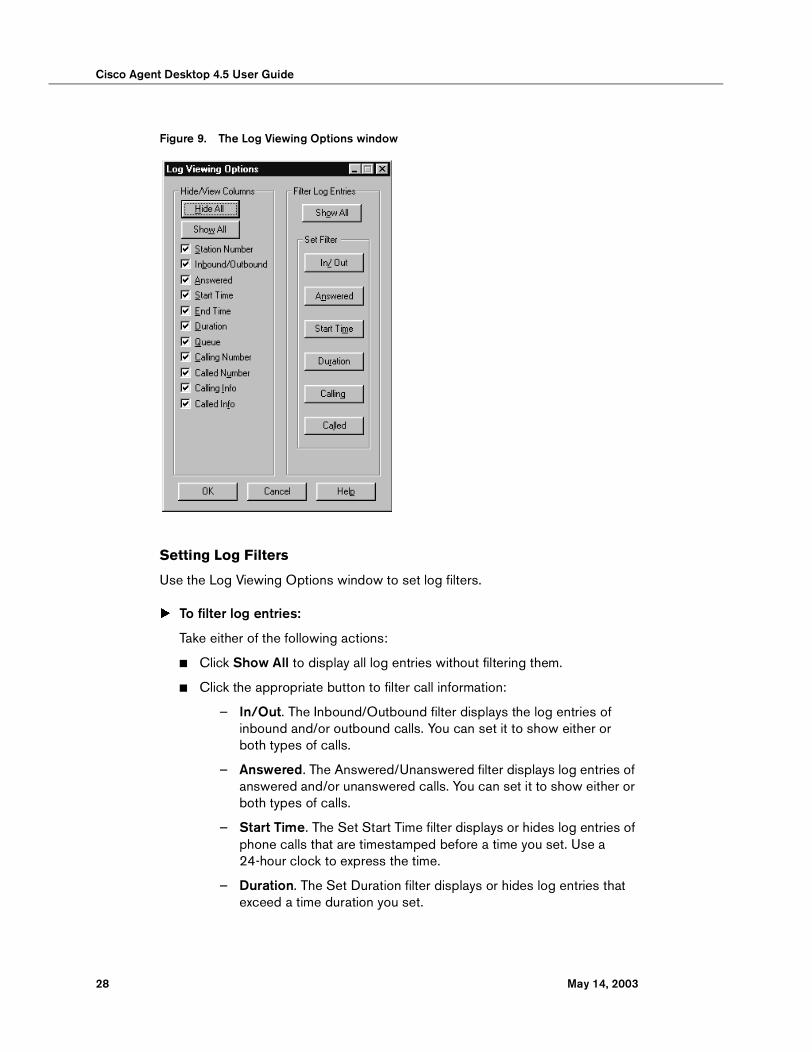
Figure 9. The Log Viewing Options window
Setting Log Filters
Use the Log Viewing Options window to set log filters.
� To filter log entries:
Take either of the following actions:
■ Click Show All to display all log entries without filtering them.
■ Click the appropriate button to filter call information:
— In/Out. The Inbound/Outbound filter displays the log entries of inbound and/or outbound calls. You can set it to show either or both types of calls.
— Answered. The Answered/Unanswered filter displays log entries of answered and/or unanswered calls. You can set it to show either or both types of calls.
— Start Time. The Set Start Time filter displays or hides log entries of phone calls that are timestamped before a time you set. Use a 24-hour clock to express the time.
— Duration. The Set Duration filter displays or hides log entries that exceed a time duration you set.
28 May 14, 2003
Viewing Logs and Statistics
— Calling. The Set Calling Number filter displays or hides log entries of calls made from phones containing a string of numbers you enter in the field. The number string can appear anywhere within the phone number.
— Called. The Set Called Number filter displays or hides log entries of calls made to phones containing a string of numbers you enter in the field. The number string can appear anywhere within the phone number.
Copying Log Entries
You can copy log entries and paste them into other applications as comma-delimited text.
� To copy log entries:
1. Select a log entry. To copy all entries in the log, choose Edit > Select All.
2. Choose Edit > Copy.
3. Open another application (for instance, a word processor or a spreadsheet) and paste the information into it.
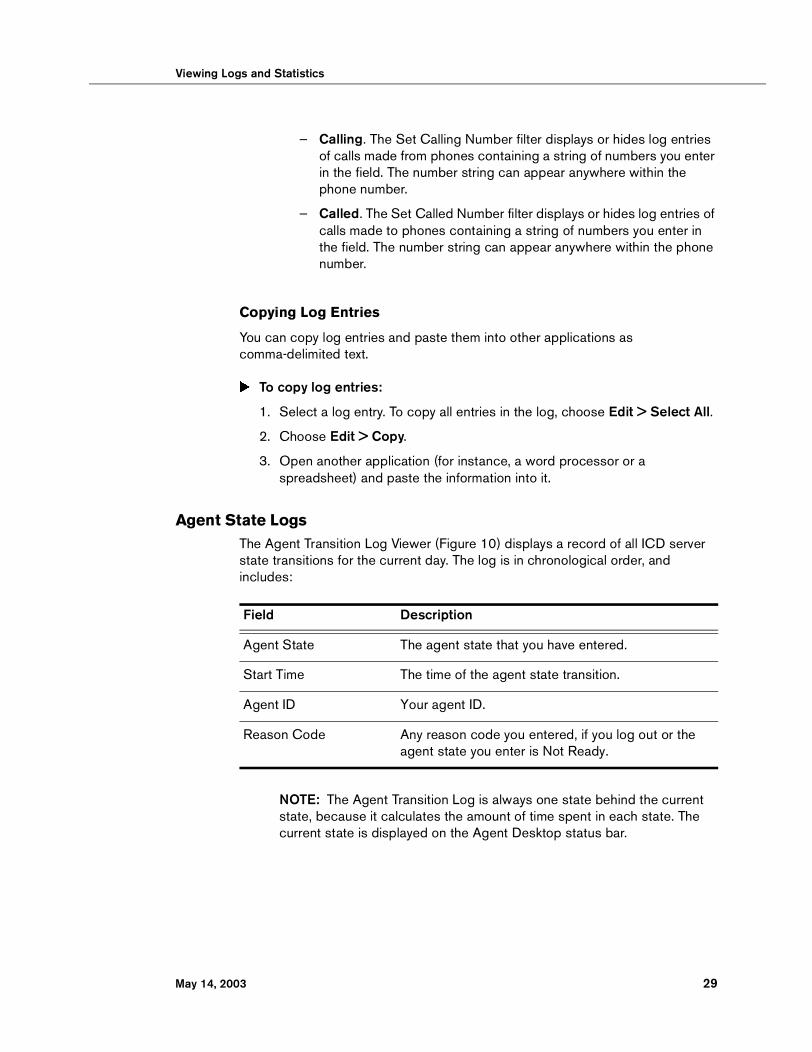
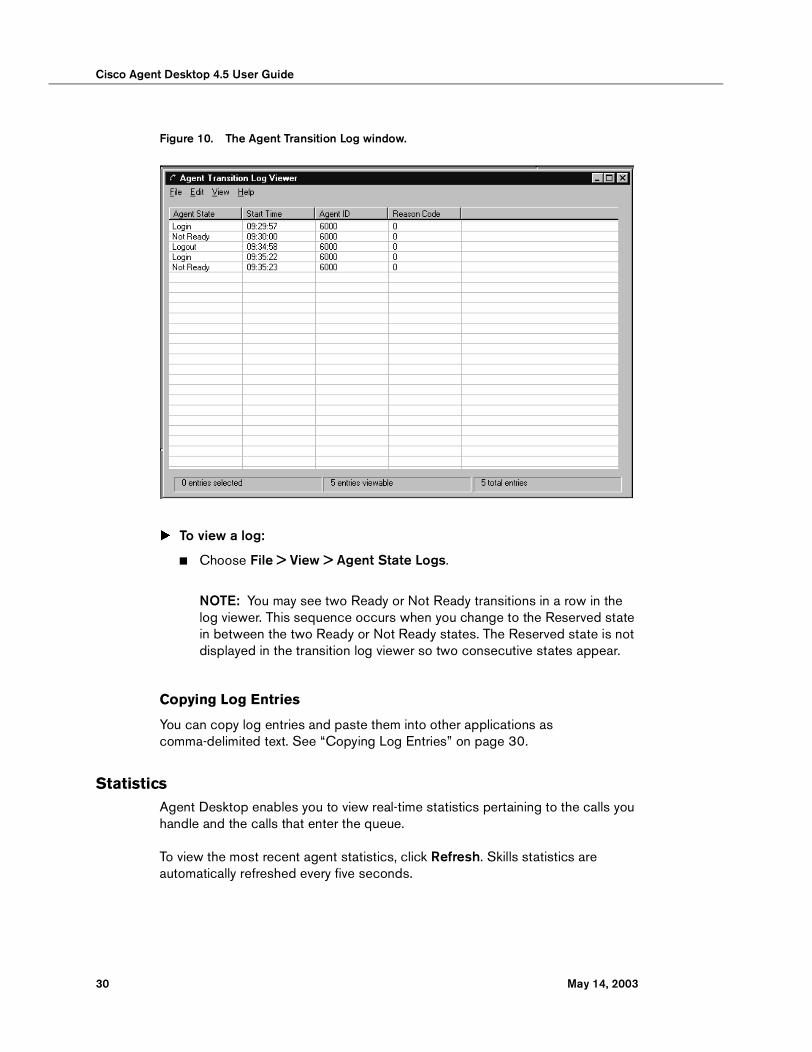
Agent State LogsThe Agent Transition Log Viewer (Figure 10) displays a record of all ICD server state transitions for the current day. The log is in chronological order, and includes:
NOTE: The Agent Transition Log is always one state behind the current state, because it calculates the amount of time spent in each state. The current state is displayed on the Agent Desktop status bar.
Field Description
Agent State The agent state that you have entered.
Start Time The time of the agent state transition.
Agent ID Your agent ID.
Reason Code Any reason code you entered, if you log out or the agent state you enter is Not Ready.
May 14, 2003 29
Cisco Agent Desktop 4.5 User Guide
Figure 10. The Agent Transition Log window.
� To view a log:
■ Choose File > View > Agent State Logs.
NOTE: You may see two Ready or Not Ready transitions in a row in the log viewer. This sequence occurs when you change to the Reserved state in between the two Ready or Not Ready states. The Reserved state is not displayed in the transition log viewer so two consecutive states appear.
Copying Log Entries
You can copy log entries and paste them into other applications as comma-delimited text. See “Copying Log Entries” on page 30.
StatisticsAgent Desktop enables you to view real-time statistics pertaining to the calls you handle and the calls that enter the queue.
To view the most recent agent statistics, click Refresh. Skills statistics are automatically refreshed every five seconds.
30 May 14, 2003
Viewing Logs and Statistics
Agent Statistics
The Agent tab displays the following statistics. All statistics are for the current day starting at midnight.
Skills Statistics
The Skills tab displays the following statistics. All statistics are for the current day, stating at midnight.
Statistic Description
Calls presented The number of inbound calls (routed and non-routed) received on the monitored extension of the phone device.
Calls completed The number of calls (inbound, outbound, routed, and non-routed) answered or made by the agent on the monitored extension of the phone device.
Avg talking The average talk time, in seconds, of all contacts handled.
Max talking The longest talk time, in seconds, of all contacts handled.
Avg ready The average time, in seconds, spent in the Ready state.
Max ready The single longest time, in seconds, spent in the Ready state.
Avg not ready The average time, in seconds, spent in the Not Ready state.
Max not ready The single longest time, in seconds, spent in the Not Ready state.
Statistic Description
Calls queued The total number of calls waiting in the customer service queues from which the agent receives calls.
Oldest in queue The duration of the oldest call waiting in the customer service queue.
May 14, 2003 31
Cisco Agent Desktop 4.5 User Guide
Enterprise Data
The Enterprise server tracks a call as it connects to devices and maintains a list of call information. If your installation includes the Enterprise server, and the Enterprise Data function is installed on your PC, then this data displays as part of the call information.
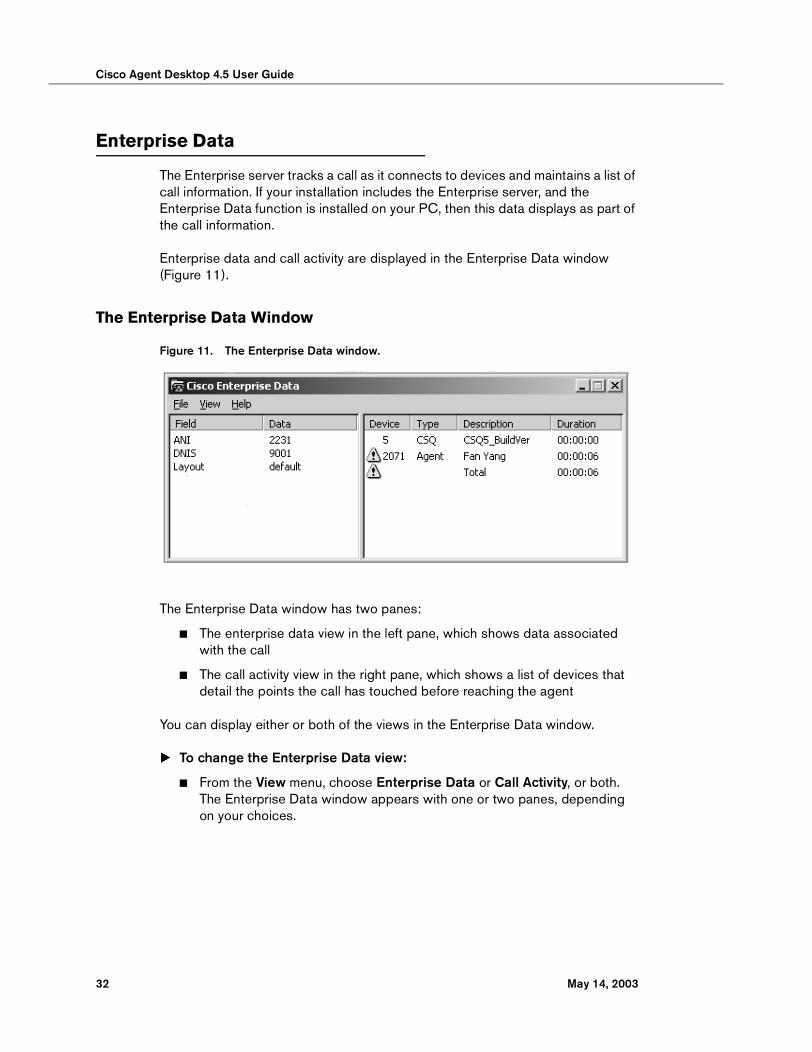
Enterprise data and call activity are displayed in the Enterprise Data window (Figure 11).
The Enterprise Data Window
Figure 11. The Enterprise Data window.
The Enterprise Data window has two panes:
■ The enterprise data view in the left pane, which shows data associated with the call
■ The call activity view in the right pane, which shows a list of devices that detail the points the call has touched before reaching the agent
You can display either or both of the views in the Enterprise Data window.
� To change the Enterprise Data view:
■ From the View menu, choose Enterprise Data or Call Activity, or both. The Enterprise Data window appears with one or two panes, depending on your choices.
32 May 14, 2003
Enterprise Data
Enterprise Data View
This pane displays enterprise data associated with the selected call.
If you are set up by the administrator to be able to edit data fields, you may modify any of the data fields.
� To modify a data field:
1. Double-click the field to view the Edit Enterprise Data window.
2. Modify the data.
3. Click OK.
Call Activity View
The call activity view displays the call activity for the selected call:
■ The Device column displays the list of devices a call passes through.
■ The Duration column displays the amount of time the call spent on that device. If the call is still on the device, the duration increments in real time.
■ The Total is the sum of all the durations listed in the window.
NOTE: In some cases, a call may be on multiple devices simultaneously—for example, if a call is placed in multiple queues or is conferenced to multiple extensions. The call activity window displays the duration of the call on each individual device. No attempt is made to indicate overlapping times. In this case the total duration is the sum of the time spent on these overlapping devices, and is greater than the actual amount of time the call spends in the contact center.
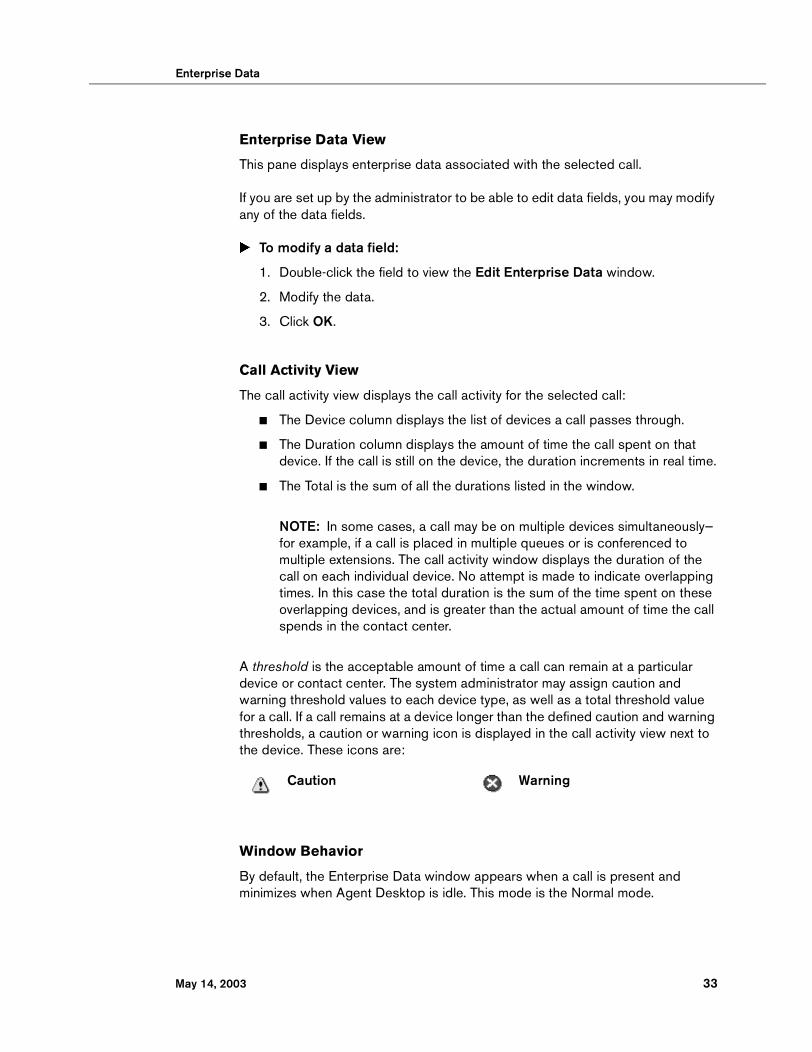
A threshold is the acceptable amount of time a call can remain at a particular device or contact center. The system administrator may assign caution and warning threshold values to each device type, as well as a total threshold value for a call. If a call remains at a device longer than the defined caution and warning thresholds, a caution or warning icon is displayed in the call activity view next to the device. These icons are:
Window Behavior
By default, the Enterprise Data window appears when a call is present and minimizes when Agent Desktop is idle. This mode is the Normal mode.
Caution Warning
May 14, 2003 33
Cisco Agent Desktop 4.5 User Guide
You can change this window behavior for the current session with the View menu.
NOTE: This menu is active only if the system administrator has enabled local administration.
� To change window behavior:
■ From the View menu, choose the behavior mode you want to use in the current session. For definitions of the various window behavior modes, refer to the table on page 8.
34 May 14, 2003
Server Autorecovery
Server Autorecovery
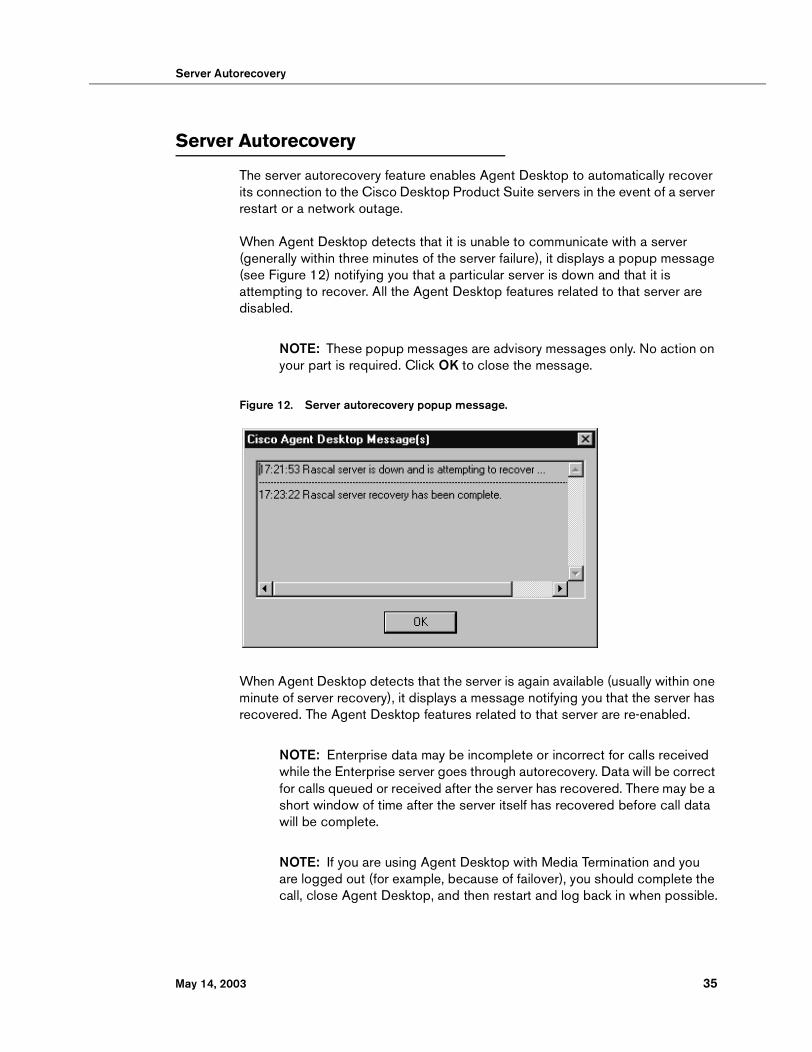
The server autorecovery feature enables Agent Desktop to automatically recover its connection to the Cisco Desktop Product Suite servers in the event of a server restart or a network outage.
When Agent Desktop detects that it is unable to communicate with a server (generally within three minutes of the server failure), it displays a popup message (see Figure 12) notifying you that a particular server is down and that it is attempting to recover. All the Agent Desktop features related to that server are disabled.
NOTE: These popup messages are advisory messages only. No action on your part is required. Click OK to close the message.
Figure 12. Server autorecovery popup message.
When Agent Desktop detects that the server is again available (usually within one minute of server recovery), it displays a message notifying you that the server has recovered. The Agent Desktop features related to that server are re-enabled.
NOTE: Enterprise data may be incomplete or incorrect for calls received while the Enterprise server goes through autorecovery. Data will be correct for calls queued or received after the server has recovered. There may be a short window of time after the server itself has recovered before call data will be complete.
NOTE: If you are using Agent Desktop with Media Termination and you are logged out (for example, because of failover), you should complete the call, close Agent Desktop, and then restart and log back in when possible.
May 14, 2003 35
Cisco Agent Desktop 4.5 User Guide
Features Affected by Server Failure
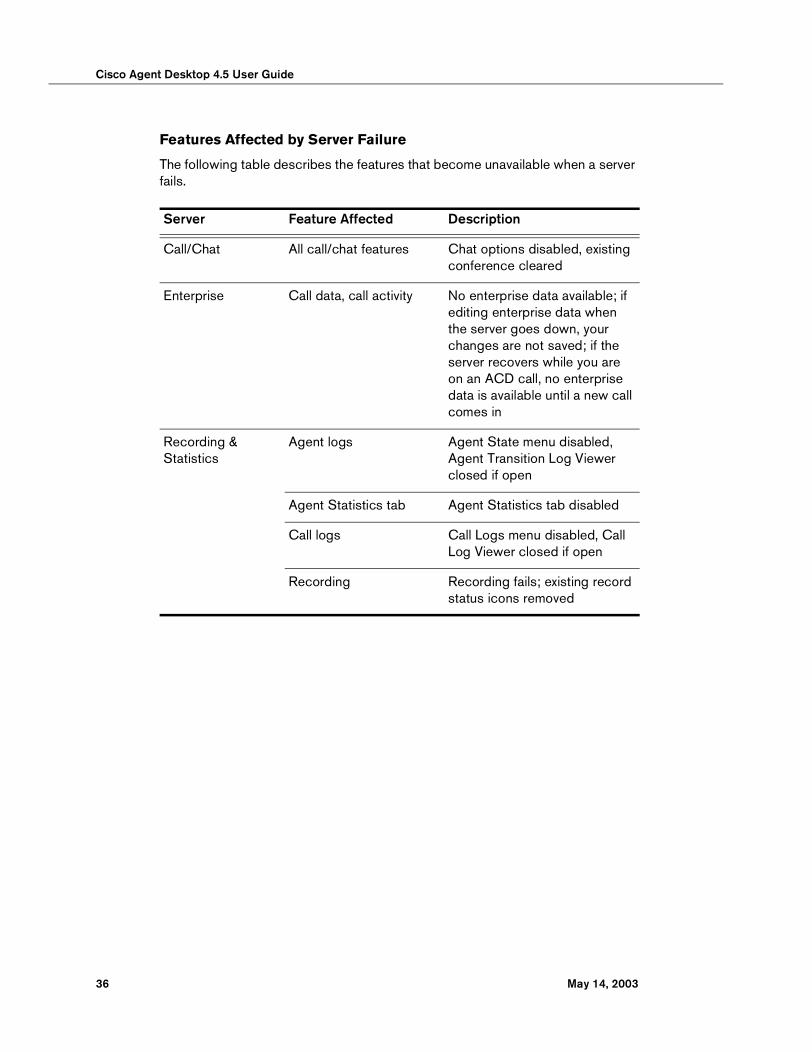
The following table describes the features that become unavailable when a server fails.
Server Feature Affected Description
Call/Chat All call/chat features Chat options disabled, existing conference cleared
Enterprise Call data, call activity No enterprise data available; if editing enterprise data when the server goes down, your changes are not saved; if the server recovers while you are on an ACD call, no enterprise data is available until a new call comes in
Recording & Statistics
Agent logs Agent State menu disabled, Agent Transition Log Viewer closed if open
Agent Statistics tab Agent Statistics tab disabled
Call logs Call Logs menu disabled, Call Log Viewer closed if open
Recording Recording fails; existing record status icons removed
36 May 14, 2003