cis administrator guide - oracle · integrated study workflows ... cis administration application...
TRANSCRIPT

CIS Administrator Guide
Clintrial Integration Solution Release 4.6 SP0
Part Number DC-CIS46-001-000

Copyright © 2002 - 2015, Oracle and/or its affiliates. All rights reserved.
This software and related documentation are provided under a license agreement containing restrictions on use and disclosure and are protected by intellectual property laws. Except as expressly permitted in your license agreement or allowed by law, you may not use, copy, reproduce, translate, broadcast, modify, license, transmit, distribute, exhibit, perform, publish, or display any part, in any form, or by any means. Reverse engineering, disassembly, or decompilation of this software, unless required by law for interoperability, is prohibited.
The information contained herein is subject to change without notice and is not warranted to be error-free. If you find any errors, please report them to us in writing.
If this is software or related documentation that is delivered to the U.S. Government or anyone licensing it on behalf of the U.S. Government, the following notice is applicable:
U.S. GOVERNMENT END USERS: Oracle programs, including any operating system, integrated software, any programs installed on the hardware, and/or documentation, delivered to U.S. Government end users are "commercial computer software" pursuant to the applicable Federal Acquisition Regulation and agency-specific supplemental regulations. As such, use, duplication, disclosure, modification, and adaptation of the programs, including any operating system, integrated software, any programs installed on the hardware, and/or documentation, shall be subject to license terms and license restrictions applicable to the programs. No other rights are granted to the U.S. Government.
This software or hardware is developed for general use in a variety of information management applications. It is not developed or intended for use in any inherently dangerous applications, including applications that may create a risk of personal injury. If you use this software or hardware in dangerous applications, then you shall be responsible to take all appropriate fail-safe, backup, redundancy, and other measures to ensure its safe use. Oracle Corporation and its affiliates disclaim any liability for any damages caused by use of this software or hardware in dangerous applications.
Oracle and Java are registered trademarks of Oracle and/or its affiliates. Other names may be trademarks of their respective owners.
Intel and Intel Xeon are trademarks or registered trademarks of Intel Corporation. All SPARC trademarks are used under license and are trademarks or registered trademarks of SPARC International, Inc. AMD, Opteron, the AMD logo, and the AMD Opteron logo are trademarks or registered trademarks of Advanced Micro Devices. UNIX is a registered trademark of The Open Group.
This software or hardware and documentation may provide access to or information about content, products, and services from third parties. Oracle Corporation and its affiliates are not responsible for and expressly disclaim all warranties of any kind with respect to third-party content, products, and services unless otherwise set forth in an applicable agreement between you and Oracle. Oracle Corporation and its affiliates will not be responsible for any loss, costs, or damages incurred due to your access to or use of third-party content, products, or services, except as set forth in an applicable agreement between you and Oracle.
This documentation may include references to materials, offerings, or products that were previously offered by Phase Forward Inc. Certain materials, offerings, services, or products may no longer be offered or provided. Oracle and its affiliates cannot be held responsible for any such references should they appear in the text provided.

Clintrial Integration Solution 4.6 SP0 iii
Contents
About this guide ix
Overview of this guide .....................................................................................................................................................x Audience ...............................................................................................................................................................x
Related information.........................................................................................................................................................xi Documentation ...................................................................................................................................................xi Training ................................................................................................................................................................xi
If you need assistance....................................................................................................................................................xiii
Chapter 1 CIS Overview 1
Integrating InForm and Clintrial software ....................................................................................................................2 About the InForm software ...............................................................................................................................2 Benefits of integration.........................................................................................................................................2 About the Clintrial software ...............................................................................................................................4
About integrated studies ..................................................................................................................................................5 About integrated EDC-only studies..................................................................................................................5 About hybrid studies ...........................................................................................................................................5
Integration architecture....................................................................................................................................................6 Overview of CIS architecture.............................................................................................................................6 Design environment ............................................................................................................................................8 Production environment...................................................................................................................................10
Load balancing ................................................................................................................................................................12 Integrated study workflows ...........................................................................................................................................13
Design environment workflow ........................................................................................................................13 Production environment workflow.................................................................................................................13
CIS Administration application.....................................................................................................................................15
Chapter 2 CIS Administration 17
Overview of CIS Administration..................................................................................................................................18 Logging on to the CIS Administration application .......................................................................................18 Common features of CIS Administration pages............................................................................................20 CIS Administration pages .................................................................................................................................21 Menus ..................................................................................................................................................................21 Database users and System users in the CIS environment...........................................................................23 User accounts provided with the CIS software .............................................................................................23
Customizing the CIS Administration application.......................................................................................................25 Overview of customizing the CIS Administration........................................................................................25 Viewing and adding folders for favorite pages ..............................................................................................26 Changing the name of a favorite folder ..........................................................................................................26 Removing a favorites folder .............................................................................................................................27 Adding a favorite page ......................................................................................................................................27 Viewing favorites ...............................................................................................................................................27 Removing a favorite...........................................................................................................................................27 Renaming a favorite...........................................................................................................................................28 Changing the folder of a favorite.....................................................................................................................28 Viewing your user profile..................................................................................................................................28 Managing My CIS user settings........................................................................................................................29 Managing your user profile...............................................................................................................................30
Registering InForm Adapters........................................................................................................................................32 Overview of registering an InForm Adapter .................................................................................................32 Registering an InForm Adapter .......................................................................................................................32

Contents
iv Clintrial Integration Solution 4.6 SP0
Managing adapters ..........................................................................................................................................................34 Overview of managing adapters ......................................................................................................................34 Filtering and sorting adapters in the adapter list............................................................................................34 Enabling and disabling Auto-refresh...............................................................................................................35 Viewing a list of InForm Adapters ..................................................................................................................35 Viewing a list of Clintrial Adapters..................................................................................................................35 Adapter List page—Fields ................................................................................................................................36
Managing InForm Adapters and end points ...............................................................................................................37 Overview of managing InForm Adapters and end points ...........................................................................37 Enabling or disabling auto-refresh for an InForm Adapter.........................................................................37 Viewing and changing the URL for an InForm Adapter .............................................................................38 Changing the enabled state of an InForm Adapter.......................................................................................38 Adapter tab of the Admin Adapter page—Fields .........................................................................................38
Managing Clintrial Adapters..........................................................................................................................................40 Overview of managing a Clintrial Adapter.....................................................................................................40 Enabling or disabling auto-refresh for a Clintrial Admin Adapter .............................................................40 Viewing and changing the URL of a Clintrial Adapter.................................................................................41 Changing the enabled state of a Clintrial Adapter.........................................................................................41 Adapter tab of the Admin Adapter page—Fields .........................................................................................41
Managing plugin installation information....................................................................................................................43 Overview of plugins ..........................................................................................................................................43 Viewing plugin installation information by server.........................................................................................43 Viewing plugin installation information by adapter ......................................................................................44 Resetting the error status of a page .................................................................................................................44 Plugin List page by Server—Fields..................................................................................................................44 Plugin List page by Adapter—Fields...............................................................................................................45
Managing configuration settings ...................................................................................................................................46 Overview of configuration settings .................................................................................................................46 Viewing and changing general configuration settings ...................................................................................46 Viewing and changing security settings...........................................................................................................47 Checking for adapter updates...........................................................................................................................47 Viewing and setting the adapter checking frequency ....................................................................................47 General tab of the Configuration page—Fields ............................................................................................48 Security tab of the Configuration page—Fields ............................................................................................48
Managing Security...........................................................................................................................................................49 Overview of managing security........................................................................................................................49 Managing CIS users ...........................................................................................................................................54 Managing roles ...................................................................................................................................................57 Managing domains.............................................................................................................................................60
Chapter 3 Administering synchronization connections 63
Definition of synchronization.......................................................................................................................................64 Overview of synchronization connection administration tasks................................................................................65 Viewing synchronization connections .........................................................................................................................67
Overview of viewing synchronization connections ......................................................................................67 Viewing a list of synchronization connections ..............................................................................................67 Enabling and disabling auto-refresh of a CIS Synchronization Adapter....................................................67 Filtering the synchronization connection list by status.................................................................................68 Sorting the synchronization connection list ...................................................................................................68 Sync Connections tab of the CIS Synchronization Adapter page—Fields ................................................69 Adapter tab of the Admin Adapter page—Fields .........................................................................................70
Creating a synchronization connection........................................................................................................................72 Overview of setting up a connection ..............................................................................................................72 Clintrial study book autocreation.....................................................................................................................73 Clintrial panel and item autocreation ..............................................................................................................75 Creating a synchronization connection using the connection wizard.........................................................76
CIS Administrator Guide
Clintrial Integration Solution 4.6 SP0 v
Monitoring and editing synchronization connections ...............................................................................................83 Overview of monitoring and editing synchronization connections............................................................83 Viewing a summary of all CIS synchronization transactions .......................................................................84 Viewing synchronization error details for the last job ..................................................................................84 Viewing all jobs for a specific synchronization connection .........................................................................85 Viewing error details for a job in the job history table .................................................................................85 Viewing and editing transactions .....................................................................................................................86 Managing new mappings...................................................................................................................................87 Viewing general information about a synchronization connection.............................................................87 Viewing and changing settings for a synchronization connection ..............................................................88 Status tab of CIS Synchronization Connection page—Fields .....................................................................88 New Mapping Options view of CIS Synchronizations Status tab—Fields................................................90 General tab of CIS Synchronization Connection page—Fields..................................................................91 Settings tab of CIS Synchronization Connection page—Fields ..................................................................92
Viewing and changing global synchronization connection settings.........................................................................94 Overview of changing global synchronization connection settings............................................................94 Viewing and changing global synchronization connection settings............................................................95 Settings tab of the CIS Synchronization Adapter page—Fields..................................................................95
Removing a synchronization connection.....................................................................................................................97 Overview of removing a synchronization connection..................................................................................97 Removing a synchronization connection........................................................................................................97
Resetting a protocol and replaying synchronization transactions ............................................................................99 Overview of resetting a protocol .....................................................................................................................99 Resetting a protocol........................................................................................................................................ 100
Managing email notifications...................................................................................................................................... 102 Overview of managing email notifications.................................................................................................. 102 Viewing email notification addresses ........................................................................................................... 102 Adding a new email address .......................................................................................................................... 103 Editing an email address ................................................................................................................................ 104 Disabling all email notifications .................................................................................................................... 104 Removing an email address ........................................................................................................................... 105 Sending a test email notification ................................................................................................................... 105
Managing named synchronization schedules ........................................................................................................... 107 Overview of managing named synchronization schedules ....................................................................... 107 Viewing a list of named schedules ................................................................................................................ 107 Adding a named schedule .............................................................................................................................. 108 Editing a named schedule .............................................................................................................................. 108 Removing a named schedule ......................................................................................................................... 109 Schedule view, Named Schedules tab, CIS Synchronization Adapter page—Fields............................. 109
Managing Clintrial database instances for synchronizations.................................................................................. 110 Overview of managing Clintrial database instances ................................................................................... 110 Viewing Clintrial database instances............................................................................................................. 110 Adding a new Clintrial database instance .................................................................................................... 111 Editing a Clintrial database instance............................................................................................................. 111 Removing a reference to a Clintrial database instance............................................................................... 112 CIS Synchronization Adapter Add Clintrial Database Instance page—Fields....................................... 113
Starting a synchronization manually.......................................................................................................................... 114 Overview of starting a synchronization manually ...................................................................................... 114 Starting a synchronization manually............................................................................................................. 114
Data recovery ............................................................................................................................................................... 115 Overview of data recovery............................................................................................................................. 115 Recovering data............................................................................................................................................... 117
Chapter 4 Monitoring and managing load balancing 121
Overview of monitoring load balancing ................................................................................................................... 122 How the CIS software selects a processing machine ................................................................................. 122

Contents
vi Clintrial Integration Solution 4.6 SP0
Configuring CIS load balancing .................................................................................................................... 122 If problems occur during load balancing..................................................................................................... 123
Performing load balancing activities.......................................................................................................................... 124 Viewing load-balancing machine status ....................................................................................................... 124 Taking a load-balancing machine off line .................................................................................................... 125 Setting a load-balancing machine online...................................................................................................... 125
Appendix A INF_Tables 127
Overview of INF_ tables............................................................................................................................................ 128 INF_CODECONTROL............................................................................................................................................ 129
Rows ................................................................................................................................................................. 129 Columns ........................................................................................................................................................... 129
INF_CODELIST ........................................................................................................................................................ 130 Rows ................................................................................................................................................................. 130 Columns ........................................................................................................................................................... 130
INF_ERRORITEM.................................................................................................................................................... 131 Rows ................................................................................................................................................................. 131 Columns ........................................................................................................................................................... 131
INF_ERRORITEM_AUDIT.................................................................................................................................... 133 Rows ................................................................................................................................................................. 133 Columns ........................................................................................................................................................... 133
INF_ERRORLOG...................................................................................................................................................... 134 Rows ................................................................................................................................................................. 134 Columns ........................................................................................................................................................... 134
INF_ERRORSTATUS............................................................................................................................................... 135 Rows ................................................................................................................................................................. 135 Columns ........................................................................................................................................................... 135
INF_ERRORSTATUS_AUDIT............................................................................................................................... 140 Rows ................................................................................................................................................................. 140 Columns ........................................................................................................................................................... 140
INF_FORMSTATUS ................................................................................................................................................. 141 Rows ................................................................................................................................................................. 141 Columns ........................................................................................................................................................... 141
INF_ITEMINSTANCE............................................................................................................................................. 142 Rows ................................................................................................................................................................. 142 Columns ........................................................................................................................................................... 142
FORMSTATE values.................................................................................................................................................. 143 INF_ITEMSTATUS................................................................................................................................................... 144
Rows ................................................................................................................................................................. 144 Columns ........................................................................................................................................................... 144
INF_MSGEDIT_HISTORY .................................................................................................................................... 145 Rows ................................................................................................................................................................. 145 Columns ........................................................................................................................................................... 145
INF_OBJECTS............................................................................................................................................................ 146 Rows ................................................................................................................................................................. 146 Columns ........................................................................................................................................................... 146
INF_OUTGOINGTRANSACTIONS ................................................................................................................... 147 Rows ................................................................................................................................................................. 147 Columns ........................................................................................................................................................... 147
INF_PANELINSTANCE ......................................................................................................................................... 148 Rows ................................................................................................................................................................. 148 Columns ........................................................................................................................................................... 148
INF_PATHMAP......................................................................................................................................................... 149 Rows ................................................................................................................................................................. 149 Columns ........................................................................................................................................................... 149
INF_PENDINGVALIDATIONS........................................................................................................................... 151 Rows ................................................................................................................................................................. 151

CIS Administrator Guide
Clintrial Integration Solution 4.6 SP0 vii
Columns ........................................................................................................................................................... 151 INF_PFELEMENT.................................................................................................................................................... 152
Rows ................................................................................................................................................................. 152 Columns ........................................................................................................................................................... 152
INF_RULE................................................................................................................................................................... 153 Rows ................................................................................................................................................................. 153 Columns ........................................................................................................................................................... 153
INF_SIMPLECONTROL......................................................................................................................................... 154 Rows ................................................................................................................................................................. 154 Columns ........................................................................................................................................................... 154
INF_SITE_AUDIT, INF_SITE_DATA, INF_SITE_UPDATE....................................................................... 155 Rows ................................................................................................................................................................. 155 Columns ........................................................................................................................................................... 155
INF_SUBJECT............................................................................................................................................................ 157 Rows ................................................................................................................................................................. 157 Columns ........................................................................................................................................................... 157
INF_STUDYVERSION............................................................................................................................................ 158 INF_STUDYVERSION rows ..................................................................................................................... 158 INF_STUDYVERSION columns ............................................................................................................... 158
INF_SUBJECT_AUDIT............................................................................................................................................ 159 Rows ................................................................................................................................................................. 159 Columns ........................................................................................................................................................... 159
INF_TRANSACTION............................................................................................................................................... 160 Rows ................................................................................................................................................................. 160 Columns ........................................................................................................................................................... 160
INF_TRANSACTIONDATA .................................................................................................................................. 161 Rows ................................................................................................................................................................. 161 Columns ........................................................................................................................................................... 161
INF_USER_AUDIT, INF_USER_DATA, INF_USER_UPDATE.................................................................. 162 Rows ................................................................................................................................................................. 162 Columns ........................................................................................................................................................... 162
Appendix B CIS_Tables 165
Overview of CIS_Tables............................................................................................................................................. 166 CIS_LB_MACHINES ................................................................................................................................................ 167
CIS_LB_MACHINES rows.......................................................................................................................... 167 CIS_LB_MACHINES columns ................................................................................................................... 167
CIS_SYNCH_JOBS_QUEUE.................................................................................................................................. 169 CIS_SYNCH_JOB_QUEUE rows.............................................................................................................. 169 CIS_SYNCH_JOBS_QUEUE columns ..................................................................................................... 169
CIS_DEFAULT_PROPERTIES.............................................................................................................................. 171 CIS_DEFAULT_PROPERTIES rows ....................................................................................................... 171 CIS_DEFAULT_PROPERTIES columns................................................................................................. 171
Appendix C Data transfer and storage 173
Overview of data transfer and storage ...................................................................................................................... 174 Databases in the CIS system ...................................................................................................................................... 175
Clintrial database ............................................................................................................................................. 175 InForm databases............................................................................................................................................ 178 CIS databases................................................................................................................................................... 178
Data transfer summary................................................................................................................................................ 179 Deletion and undeletion processing .......................................................................................................................... 181 Audit processing .......................................................................................................................................................... 183
General audit trail information...................................................................................................................... 183 Transaction edits ............................................................................................................................................. 184
Contents
viii Clintrial Integration Solution 4.6 SP0
Appendix D Troubleshooting 187
Suggested troubleshooting procedure....................................................................................................................... 188 Environment configuration........................................................................................................................................ 189 Synchronization connection definition ..................................................................................................................... 190 Database statistics ........................................................................................................................................................ 191 InForm and Clintrial data incompatibility ................................................................................................................ 192
Column size ..................................................................................................................................................... 192 Data type .......................................................................................................................................................... 192
Appendix E CIS error messages 195
CIS Error messages ..................................................................................................................................................... 196
Index 201

Clintrial Integration Solution 4.6 SP0 ix
In this preface Overview of this guide ...........................................................................................................................x
Related information...............................................................................................................................xi
If you need assistance..........................................................................................................................xiii
About this guide

About this guide
x Clintrial Integration Solution 4.6 SP0
Overview of this guide The CIS Administrator Guide describes:
How to use the CIS Administration application to manage adapters, load balanced machines, and synchronization connections.
How to troubleshoot synchronization problems and how to recover in case of a system failure.
Data transfer and storage in an integrated study.
Key database tables.
Audience This guide is for:
CIS administrators
Database administrators
System engineers
CIS Administrator Guide
Clintrial Integration Solution 4.6 SP0 xi
Related information
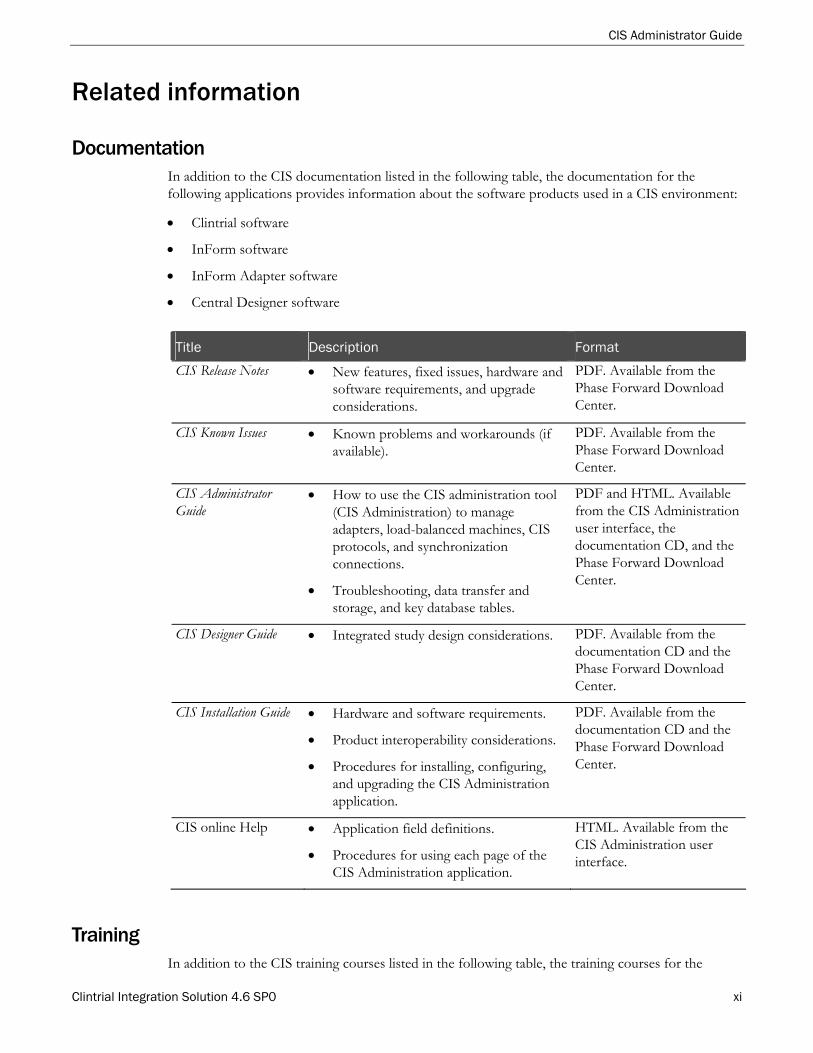
Documentation In addition to the CIS documentation listed in the following table, the documentation for the following applications provides information about the software products used in a CIS environment:
Clintrial software
InForm software
InForm Adapter software
Central Designer software
Title Description Format
CIS Release Notes New features, fixed issues, hardware and software requirements, and upgrade considerations.
PDF. Available from the Phase Forward Download Center.
CIS Known Issues Known problems and workarounds (if available).
PDF. Available from the Phase Forward Download Center.
CIS Administrator Guide
How to use the CIS administration tool (CIS Administration) to manage adapters, load-balanced machines, CIS protocols, and synchronization connections.
Troubleshooting, data transfer and storage, and key database tables.
PDF and HTML. Available from the CIS Administration user interface, the documentation CD, and the Phase Forward Download Center.
CIS Designer Guide Integrated study design considerations. PDF. Available from the documentation CD and the Phase Forward Download Center.
CIS Installation Guide Hardware and software requirements.
Product interoperability considerations.
Procedures for installing, configuring, and upgrading the CIS Administration application.
PDF. Available from the documentation CD and the Phase Forward Download Center.
CIS online Help Application field definitions.
Procedures for using each page of the CIS Administration application.
HTML. Available from the CIS Administration user interface.
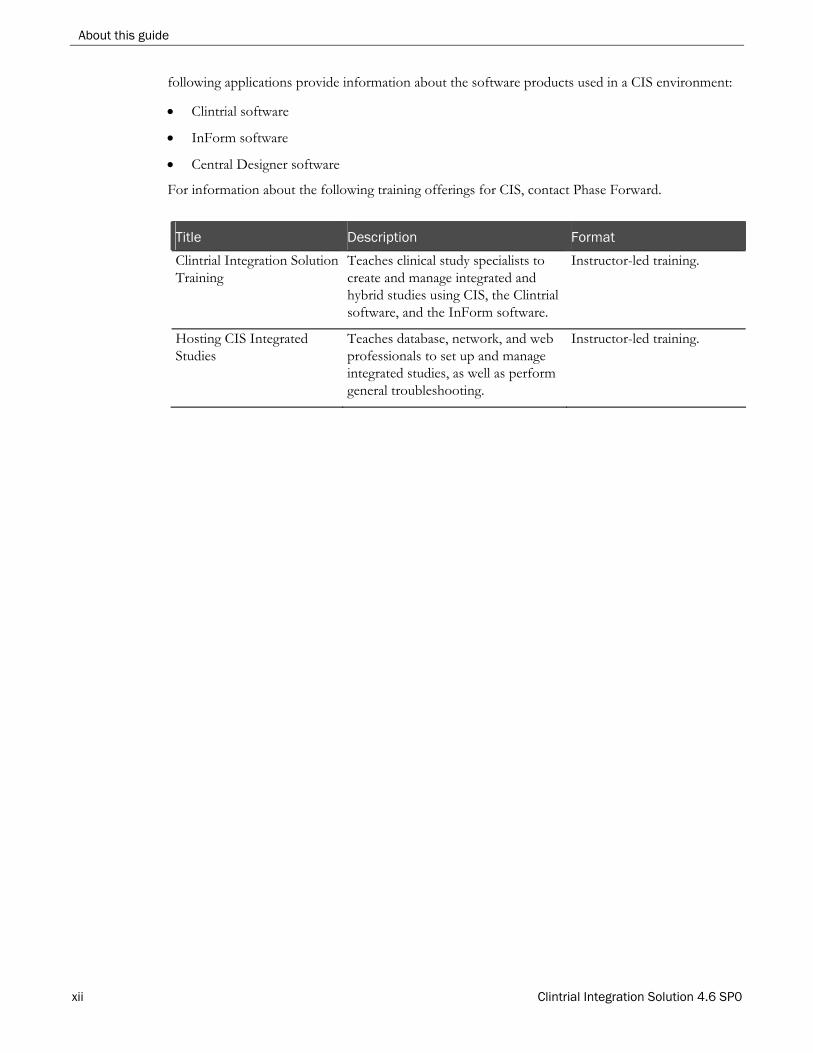
Training In addition to the CIS training courses listed in the following table, the training courses for the
About this guide
xii Clintrial Integration Solution 4.6 SP0
following applications provide information about the software products used in a CIS environment:
Clintrial software
InForm software
Central Designer software
For information about the following training offerings for CIS, contact Phase Forward.
Title Description Format
Clintrial Integration Solution Training
Teaches clinical study specialists to create and manage integrated and hybrid studies using CIS, the Clintrial software, and the InForm software.
Instructor-led training.
Hosting CIS Integrated Studies
Teaches database, network, and web professionals to set up and manage integrated studies, as well as perform general troubleshooting.
Instructor-led training.

CIS Administrator Guide
Clintrial Integration Solution 4.6 SP0 xiii
If you need assistance If you are a Phase Forward customer with a maintenance agreement, you can contact the Global Support Center for assistance with product issues.
Your maintenance agreement indicates the type of support you are eligible to receive and describes how to contact Phase Forward. Additionally, the Phase Forward website lists the toll-free support number for your product, location, and support level:
http://www.phaseforward.com/support In the event that our toll-free telephone service is interrupted, please use either of the following methods to contact the Global Support Center:
Telephone
In the US: 781-902-4900
Outside of the US: +44 (0) 1628 640794
Phase Forward also provides assistance with User Management, Site Assessment, and Provisioning. Please refer to your Master Services Agreement and individual Statement of Work to determine if you are eligible to use these services.

About this guide
xiv Clintrial Integration Solution 4.6 SP0
Clintrial Integration Solution 4.6 SP0 1
In this chapter Integrating InForm and Clintrial software..........................................................................................2
About integrated studies ........................................................................................................................5
Integration architecture..........................................................................................................................6
Load balancing ......................................................................................................................................12
Integrated study workflows.................................................................................................................13
CIS Administration application ..........................................................................................................15
C H A P T E R 1
CIS Overview

Chapter 1 CIS Overview
2 Clintrial Integration Solution 4.6 SP0
Integrating InForm and Clintrial software The Clintrial Integration Solution (CIS) software is an application that allows users to integrate the features of the InForm software and the Clintrial software in a complete environment for study development and execution.
About the InForm software The InForm™ software is an integrated study management system that comprises:
The InForm software, a web-based electronic data capture (EDC) tool for entering, monitoring, and cleaning data in an ongoing clinical study.
InForm Reporting and Analysis, a reporting application, developed by Cognos Corporation, which has been customized and integrated into InForm software by Phase Forward.
With the InForm software, you can:
Enter data remotely into study databases over the Internet.
Clean and monitor study data.
Review management and clinical data reports to track the progress of your studies and obtain previews of clinical data trends.
Produce standard and ad hoc reports on clinical and study management data.
Benefits of integration The CIS software enables the integration between the InForm and Clintrial systems. Using the CIS software, you can combine the benefits of both products into a single system for data entry, data management, and study archiving.
Study design and deployment
In a CIS environment, you can design a study using the Central Designer software.
As a result, you can:
Reuse components in existing studies that were created using the Central Designer software, that are currently deployed with the InForm software.
Deploy a completed study definition as:
A paper-based protocol in the Clintrial software.
An EDC study in the InForm software.
A study with both paper-based and EDC sites.
CIS Administrator Guide
Clintrial Integration Solution 4.6 SP0 3
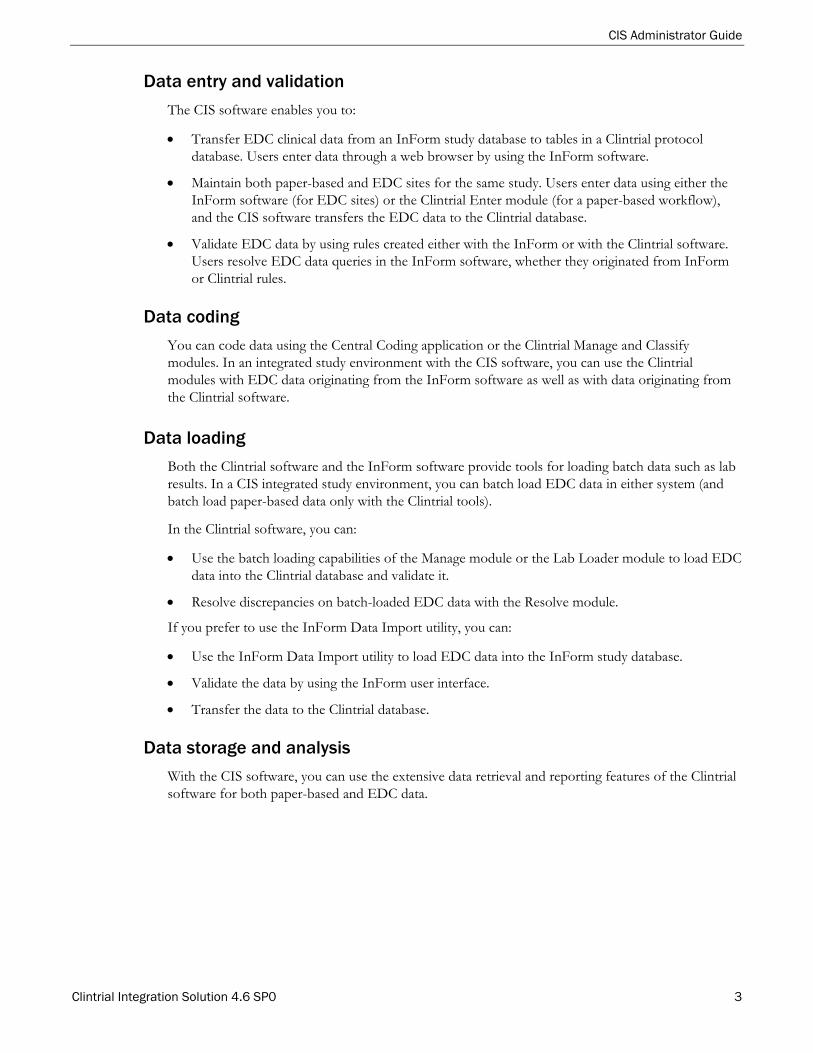
Data entry and validation
The CIS software enables you to:
Transfer EDC clinical data from an InForm study database to tables in a Clintrial protocol database. Users enter data through a web browser by using the InForm software.
Maintain both paper-based and EDC sites for the same study. Users enter data using either the InForm software (for EDC sites) or the Clintrial Enter module (for a paper-based workflow), and the CIS software transfers the EDC data to the Clintrial database.
Validate EDC data by using rules created either with the InForm or with the Clintrial software. Users resolve EDC data queries in the InForm software, whether they originated from InForm or Clintrial rules.
Data coding
You can code data using the Central Coding application or the Clintrial Manage and Classify modules. In an integrated study environment with the CIS software, you can use the Clintrial modules with EDC data originating from the InForm software as well as with data originating from the Clintrial software.
Data loading
Both the Clintrial software and the InForm software provide tools for loading batch data such as lab results. In a CIS integrated study environment, you can batch load EDC data in either system (and batch load paper-based data only with the Clintrial tools).
In the Clintrial software, you can:
Use the batch loading capabilities of the Manage module or the Lab Loader module to load EDC data into the Clintrial database and validate it.
Resolve discrepancies on batch-loaded EDC data with the Resolve module.
If you prefer to use the InForm Data Import utility, you can:
Use the InForm Data Import utility to load EDC data into the InForm study database.
Validate the data by using the InForm user interface.
Transfer the data to the Clintrial database.
Data storage and analysis
With the CIS software, you can use the extensive data retrieval and reporting features of the Clintrial software for both paper-based and EDC data.
Chapter 1 CIS Overview
4 Clintrial Integration Solution 4.6 SP0
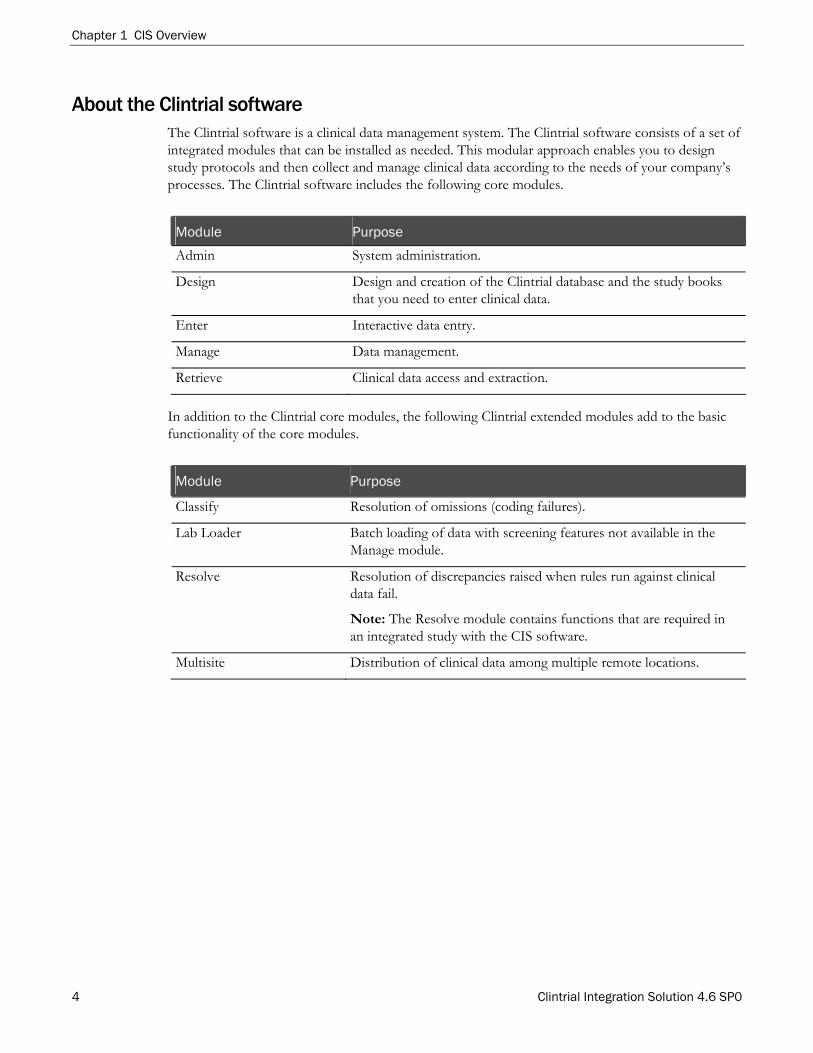
About the Clintrial software The Clintrial software is a clinical data management system. The Clintrial software consists of a set of integrated modules that can be installed as needed. This modular approach enables you to design study protocols and then collect and manage clinical data according to the needs of your company’s processes. The Clintrial software includes the following core modules.
Module Purpose
Admin System administration.
Design Design and creation of the Clintrial database and the study books that you need to enter clinical data.
Enter Interactive data entry.
Manage Data management.
Retrieve Clinical data access and extraction.
In addition to the Clintrial core modules, the following Clintrial extended modules add to the basic functionality of the core modules.
Module Purpose
Classify Resolution of omissions (coding failures).
Lab Loader Batch loading of data with screening features not available in the Manage module.
Resolve Resolution of discrepancies raised when rules run against clinical data fail.
Note: The Resolve module contains functions that are required in an integrated study with the CIS software.
Multisite Distribution of clinical data among multiple remote locations.
CIS Administrator Guide
Clintrial Integration Solution 4.6 SP0 5
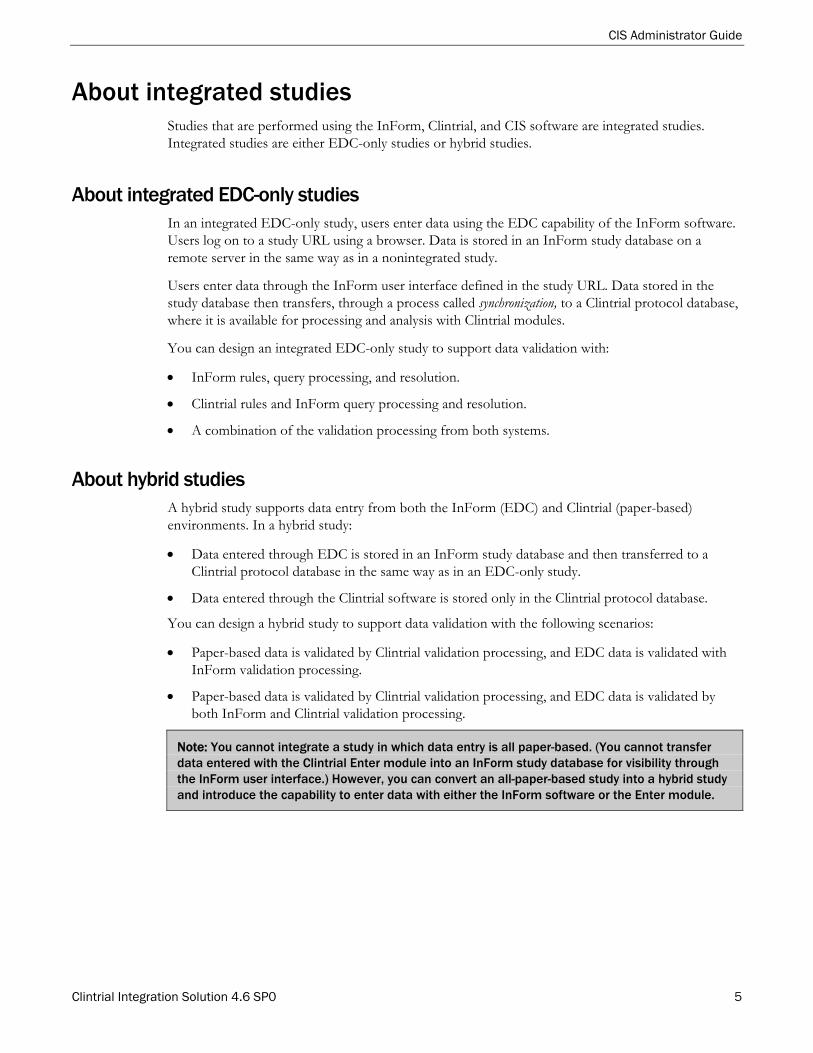
About integrated studies Studies that are performed using the InForm, Clintrial, and CIS software are integrated studies. Integrated studies are either EDC-only studies or hybrid studies.
About integrated EDC-only studies In an integrated EDC-only study, users enter data using the EDC capability of the InForm software. Users log on to a study URL using a browser. Data is stored in an InForm study database on a remote server in the same way as in a nonintegrated study.
Users enter data through the InForm user interface defined in the study URL. Data stored in the study database then transfers, through a process called synchronization, to a Clintrial protocol database, where it is available for processing and analysis with Clintrial modules.
You can design an integrated EDC-only study to support data validation with:
InForm rules, query processing, and resolution.
Clintrial rules and InForm query processing and resolution.
A combination of the validation processing from both systems.
About hybrid studies A hybrid study supports data entry from both the InForm (EDC) and Clintrial (paper-based) environments. In a hybrid study:
Data entered through EDC is stored in an InForm study database and then transferred to a Clintrial protocol database in the same way as in an EDC-only study.
Data entered through the Clintrial software is stored only in the Clintrial protocol database.
You can design a hybrid study to support data validation with the following scenarios:
Paper-based data is validated by Clintrial validation processing, and EDC data is validated with InForm validation processing.
Paper-based data is validated by Clintrial validation processing, and EDC data is validated by both InForm and Clintrial validation processing.
Note: You cannot integrate a study in which data entry is all paper-based. (You cannot transfer data entered with the Clintrial Enter module into an InForm study database for visibility through the InForm user interface.) However, you can convert an all-paper-based study into a hybrid study and introduce the capability to enter data with either the InForm software or the Enter module.
Chapter 1 CIS Overview
6 Clintrial Integration Solution 4.6 SP0
Integration architecture This section describes the system components of a CIS integrated environment. In a CIS integrated environment, you deploy integrated clinical studies on production servers that gather clinical data through the InForm EDC interface and store the data in a Clintrial protocol database. The CIS software performs the following integration tasks between the Clintrial and InForm software:
Transfers study metadata and translates metadata definitions between Clintrial and InForm.
Transfers clinical data.
Transfers data validation information.
For clarity, the Clintrial, CIS, and InForm components are described as residing on separate computers in the discussions that follow. Actual configurations can vary, depending on study size and organizational priorities. For example, in a design environment, it is possible to install all components on the same physical computer. In a production environment, it is possible to install each product component on multiple computers to maximize processing efficiency and take advantage of the load balancing capability of the CIS software.
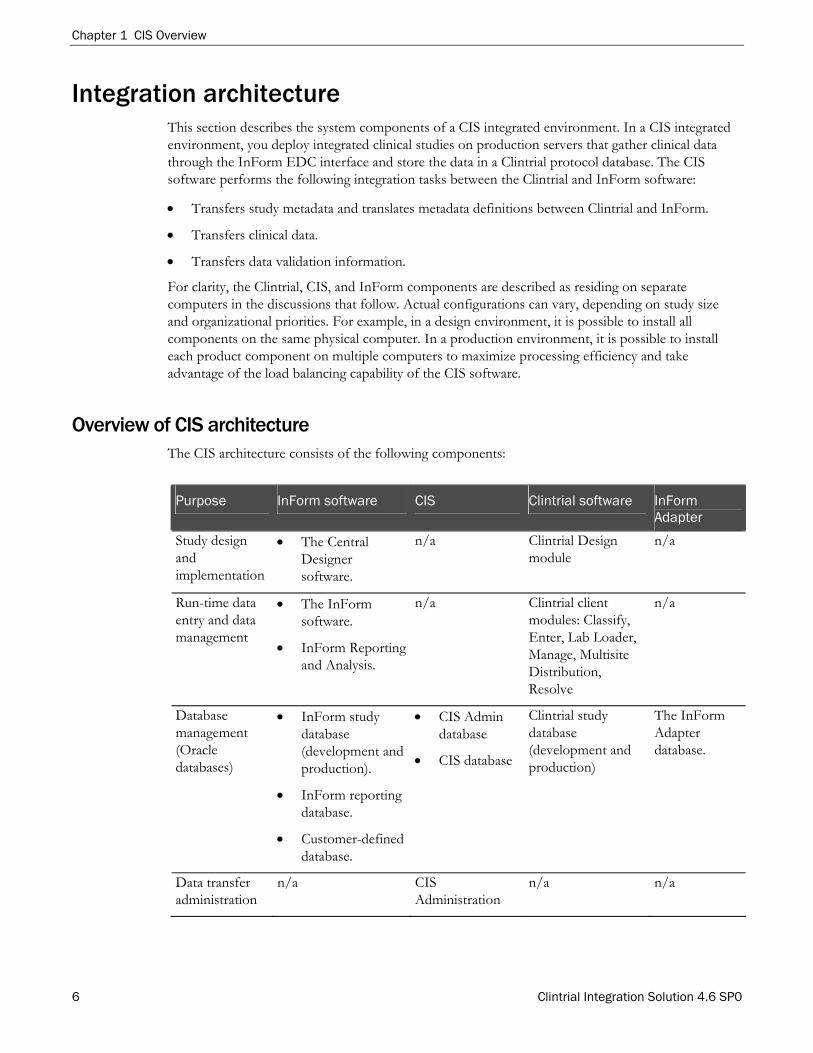
Overview of CIS architecture The CIS architecture consists of the following components:
Purpose InForm software CIS Clintrial software InForm Adapter
Study design and implementation
The Central Designer software.
n/a Clintrial Design module
n/a
Run-time data entry and data management
The InForm software.
InForm Reporting and Analysis.
n/a Clintrial client modules: Classify, Enter, Lab Loader, Manage, Multisite Distribution, Resolve
n/a
Database management (Oracle databases)
InForm study database (development and production).
InForm reporting database.
Customer-defined database.
CIS Admin database
CIS database
Clintrial study database (development and production)
The InForm Adapter database.
Data transfer administration
n/a CIS Administration
n/a n/a
CIS Administrator Guide
Clintrial Integration Solution 4.6 SP0 7
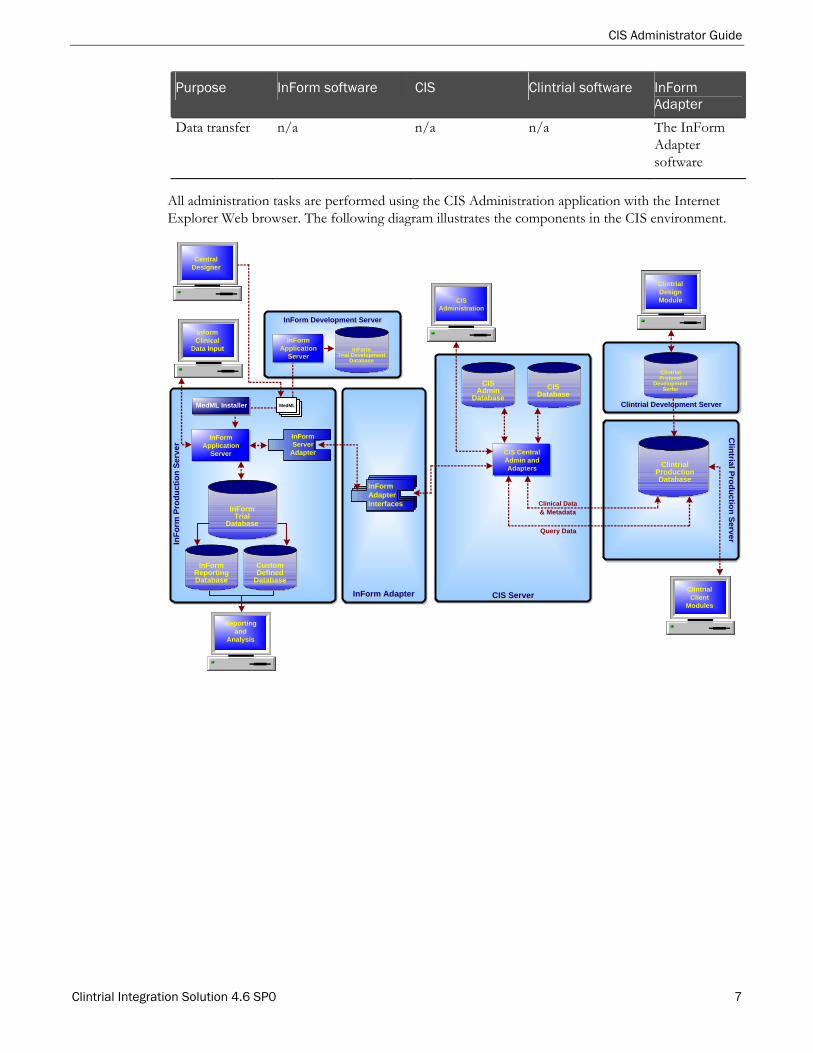
Purpose InForm software CIS Clintrial software InForm Adapter
Data transfer n/a n/a n/a The InForm Adapter software
All administration tasks are performed using the CIS Administration application with the Internet Explorer Web browser. The following diagram illustrates the components in the CIS environment.
CIS ServerCIS Server
InF
orm
Pro
du
cti
on
Se
rve
rIn
Fo
rm P
rod
uct
ion
Ser
ve
r
Clin
trial P
rod
uc
tion
Se
rver
Clin
trial P
rod
uc
tion
Se
rver
Inform Clinical
Data Input
Reportingand
Analysis
CISAdministration
InFormReportingDatabase
CustomDefined
Database
ClintrialProductionDatabase
InFormServer
Adapter
Query Data
InFormTrial Development
Database
InForm Development ServerInForm Development Server
MedML Installer MedML
ClintrialClient
Modules
Clintrial Development ServerClintrial Development Server
ClintrialProtocol
DevelopmentSerfer
CISAdmin
Database
CISDatabase
InFormTrial
Database
InForm AdapterInForm Adapter
InFormAdapterInterfaces
InFormApplication
Server
InFormApplication
Server
ClintrialDesignModule
Central Designer
CIS Central Admin and Adapters
Clinical Data& Metadata
Chapter 1 CIS Overview
8 Clintrial Integration Solution 4.6 SP0
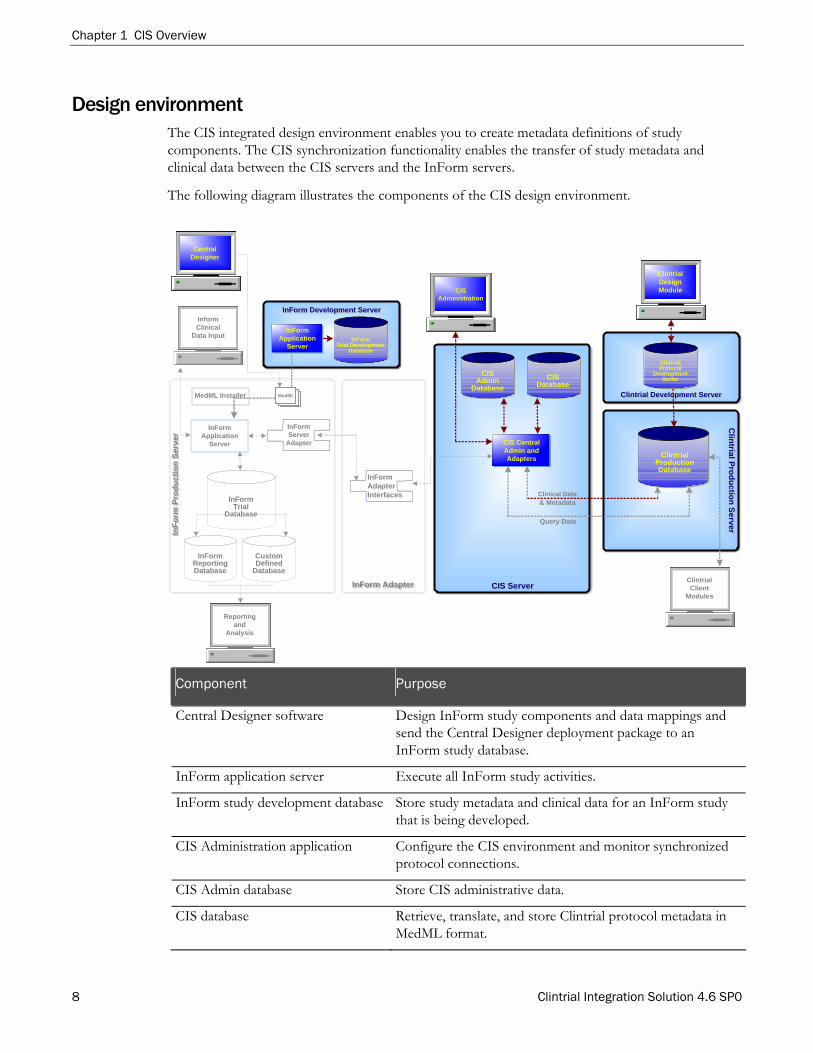
Design environment The CIS integrated design environment enables you to create metadata definitions of study components. The CIS synchronization functionality enables the transfer of study metadata and clinical data between the CIS servers and the InForm servers.
The following diagram illustrates the components of the CIS design environment.
CIS ServerCIS Server
InF
orm
Pro
du
ctio
n S
erve
rIn
Fo
rm P
rod
uct
ion
Ser
ve
r
Clin
trial Pro
du
ction
Server
Clin
trial P
rod
uc
tion
Se
rve
r
Inform Clinical
Data Input
Reportingand
Analysis
CISAdministration
InFormReportingDatabase
CustomDefined
Database
ClintrialProductionDatabase
Query Data
InFormTrial Development
Database
InForm Development ServerInForm Development Server
MedML Installer MedML
ClintrialClient
Modules
Clintrial Development ServerClintrial Development Server
ClintrialProtocol
DevelopmentSerfer
CISAdmin
Database
CISDatabase
InFormTrial
Database
InForm AdapterInForm Adapter
InFormApplication
Server
InFormApplication
Server
ClintrialDesignModule
Central Designer
CIS Central Admin and Adapters
Clinical Data& Metadata
CIS ServerCIS Server
Clin
trial Pro
du
ction
Server
Clin
trial P
rod
uc
tion
Se
rve
r
CISAdministration
ClintrialProductionDatabase
Query Data
InFormTrial Development
Database
InForm Development ServerInForm Development Server
MedML Clintrial Development ServerClintrial Development Server
ClintrialProtocol
DevelopmentSerfer
CISAdmin
Database
CISDatabase
InFormApplication
Server
ClintrialDesignModule
Central Designer
CIS Central Admin and Adapters
Clinical Data& Metadata
InFormServer
Adapter
InFormAdapterInterfaces
Component Purpose
Central Designer software Design InForm study components and data mappings and send the Central Designer deployment package to an InForm study database.
InForm application server Execute all InForm study activities.
InForm study development database Store study metadata and clinical data for an InForm study that is being developed.
CIS Administration application Configure the CIS environment and monitor synchronized protocol connections.
CIS Admin database Store CIS administrative data.
CIS database Retrieve, translate, and store Clintrial protocol metadata in MedML format.

CIS Administrator Guide
Clintrial Integration Solution 4.6 SP0 9
Component Purpose
CIS Central Admin and adapters Perform CIS administrative activities and process transactions between the Clintrial software and the InForm software.
Clintrial Design module Design a Clintrial protocol.
Clintrial protocol development database
Store and test new Clintrial protocol components.
Clintrial production database Store protocol components, EDC study data, and paper-based study data for studies that are integrated with the InForm software.

Chapter 1 CIS Overview
10 Clintrial Integration Solution 4.6 SP0
Production environment When study design and development are complete, use the CIS integrated production environment to:
Test the flow of metadata and clinical data between the product components.
Run a live integrated study.
In an integrated production environment, the CIS synchronization functionality enables the transfer of study metadata and clinical data between the CIS server and the InForm server. Study metadata and clinical data transfer between the CIS server and the Clintrial software server over an OLEDB connection.
The following diagram illustrates the components of the CIS production environment.
CIS ServerCIS Server
InF
orm
Pro
du
ctio
n S
erve
rIn
Fo
rm P
rod
uct
ion
Ser
ve
r
Clin
trial P
rod
uc
tion
Se
rve
rC
lintria
l Pro
du
ctio
n S
erve
r
Inform Clinical
Data Input
Reportingand
Analysis
CISAdministration
InFormReportingDatabase
CustomDefined
Database
ClintrialProductionDatabase
InFormServer
Adapter
Query Data
InFormTrial Development
Database
InForm Development ServerInForm Development Server
MedML Installer MedML
ClintrialClient
Modules
Clintrial Development ServerClintrial Development Server
ClintrialProtocol
DevelopmentSerfer
CISAdmin
Database
CISDatabase
InFormTrial
Database
InForm AdapterInForm Adapter
InFormAdapterInterfaces
InFormApplication
Server
InFormApplication
Server
ClintrialDesignModule
Central Designer
CIS Central Admin and Adapters
Clinical Data& Metadata
CIS ServerCIS Server
InF
orm
Pro
du
ctio
n S
erv
er
InF
orm
Pro
du
cti
on
Se
rver
Clin
trial P
rod
uc
tion
Serv
er
Clin
trial Pro
du
ction
Server
Inform Clinical
Data Input
Reportingand
Analysis
CISAdministration
InFormReportingDatabase
CustomDefined
Database
ClintrialProductionDatabase
InFormServer
Adapter
Query Data
MedML Installer MedML
ClintrialClient
Modules
CISAdmin
Database
CISDatabase
InFormTrial
Database
InForm AdapterInForm Adapter
InFormAdapterInterfaces
InFormApplication
Server CIS Central Admin and Adapters
Clinical Data& Metadata
Component Purpose
InForm clinical data input Enter, update, and monitor clinical study data in the InForm software.
Central Designer software Create a study deployment package and deploy it to the InForm database.
InForm application server Execute all InForm study activities.
CIS Administrator Guide
Clintrial Integration Solution 4.6 SP0 11
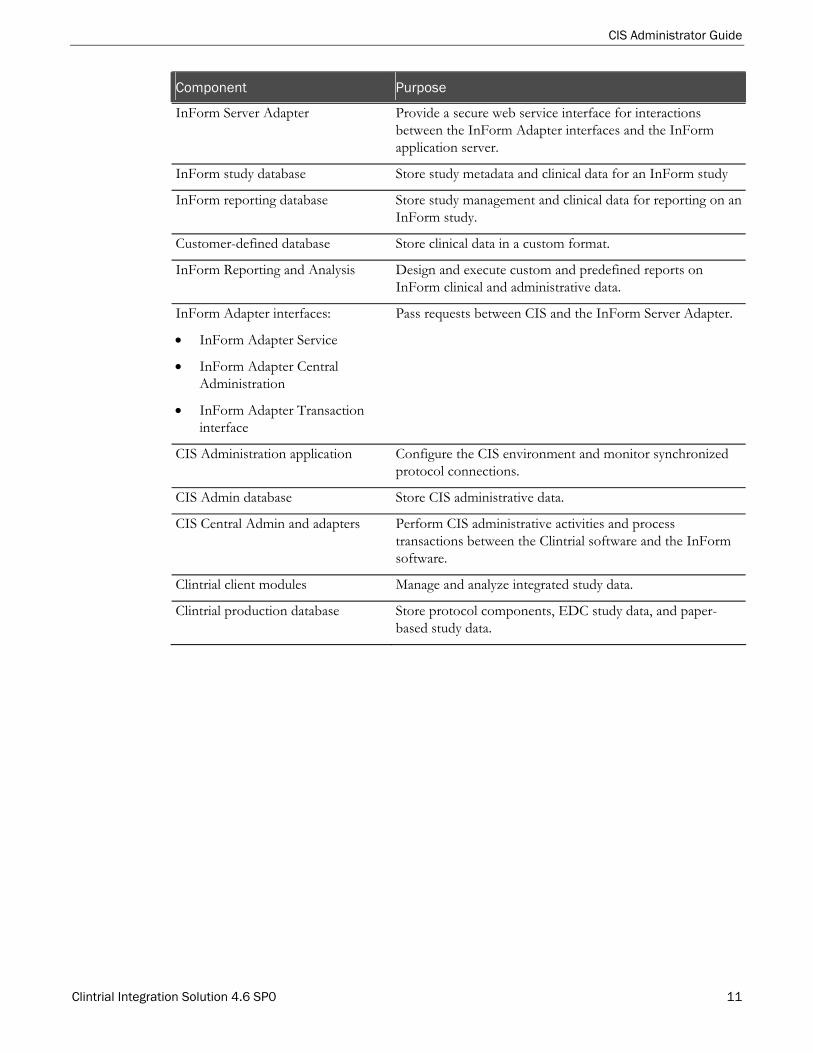
Component Purpose
InForm Server Adapter Provide a secure web service interface for interactions between the InForm Adapter interfaces and the InForm application server.
InForm study database Store study metadata and clinical data for an InForm study
InForm reporting database Store study management and clinical data for reporting on an InForm study.
Customer-defined database Store clinical data in a custom format.
InForm Reporting and Analysis Design and execute custom and predefined reports on InForm clinical and administrative data.
InForm Adapter interfaces:
InForm Adapter Service
InForm Adapter Central Administration
InForm Adapter Transaction interface
Pass requests between CIS and the InForm Server Adapter.
CIS Administration application Configure the CIS environment and monitor synchronized protocol connections.
CIS Admin database Store CIS administrative data.
CIS Central Admin and adapters Perform CIS administrative activities and process transactions between the Clintrial software and the InForm software.
Clintrial client modules Manage and analyze integrated study data.
Clintrial production database Store protocol components, EDC study data, and paper-based study data.
Chapter 1 CIS Overview
12 Clintrial Integration Solution 4.6 SP0
Load balancing Load balancing allows multiple machines to share the work load of a CIS synchronization and achieves the following:
Improves performance when multiple synchronizations are defined.
Provides redundancy by moving the synchronization process to another machine if the initial processing machine fails.
When the CIS software processes a scheduled or manually run synchronization, it selects a load-balance machine to process the synchronization. If a machine is processing a synchronization and stops responding, the machine is automatically taken offline and the synchronization process is assigned to another machine.
Note: Each synchronization is processed by only one machine. Therefore, load balancing cannot improve the performance of a single synchronization but only the performance of multiple synchronizations.
A load-balancing environment is set up by installing the CIS software on multiple machines and having them all store information as the same CIS database user.
For more information, see the CIS Installation Guide and Monitoring and managing load balancing (on page 121) in this guide.
CIS Administrator Guide
Clintrial Integration Solution 4.6 SP0 13
Integrated study workflows
Design environment workflow The CIS integrated design environment enables you to create study component metadata definitions by using the Central Designer software.
Designing with the Central Designer software
The following steps illustrate a typical integrated design scenario in which the Central Designer software is the primary design tool.
1 Using the Central Designer software, develop a study.
2 Using the Central Designer software, create a deployment package for the study.
3 Deploy the package to the InForm study database.
The deployment process installs the MedML metadata definitions and the CIS mapping definitions in the InForm study database.
4 Using CIS Administration, create a synchronization connection between the InForm study database and the Clintrial clinical database, and transfer the protocol component definitions to the Clintrial database through the synchronization process.
5 Using the Clintrial Design module, refine the protocol component definitions as needed to accommodate paper-based data entry.
For more information, see:
Working with data mappings in the CIS Designer Guide.
Central Designer documentation.
Production environment workflow When study design and development are complete, use the CIS integrated production environment to:
Test the flow of metadata and clinical data between the product components.
Run a live integrated study.
The following steps illustrate a typical integrated production environment workflow:
1 Deploy the package to an InForm study database.
2 Create a synchronization connection between the InForm study database and the Clintrial clinical database, and transfer the protocol component definitions to the Clintrial database through the synchronization process.
3 Enter clinical data through the InForm software (storing EDC data in the InForm database) and through the Clintrial Enter module (storing the paper-based data in the Clintrial database).
4 Through a synchronization connection, and using data mapping definitions, transfer the study metadata and the EDC clinical data from the InForm study database to the Clintrial database.
5 Validate entered data by running Clintrial or InForm rules:
Chapter 1 CIS Overview
14 Clintrial Integration Solution 4.6 SP0
Resolve EDC data queries in the InForm software, whether they originate from rules within the InForm database or the Clintrial database.
Resolve paper-based data discrepancies by using the Clintrial data validation modules.
6 Archive and manage study data in the Clintrial clinical data management system.
CIS Administrator Guide
Clintrial Integration Solution 4.6 SP0 15
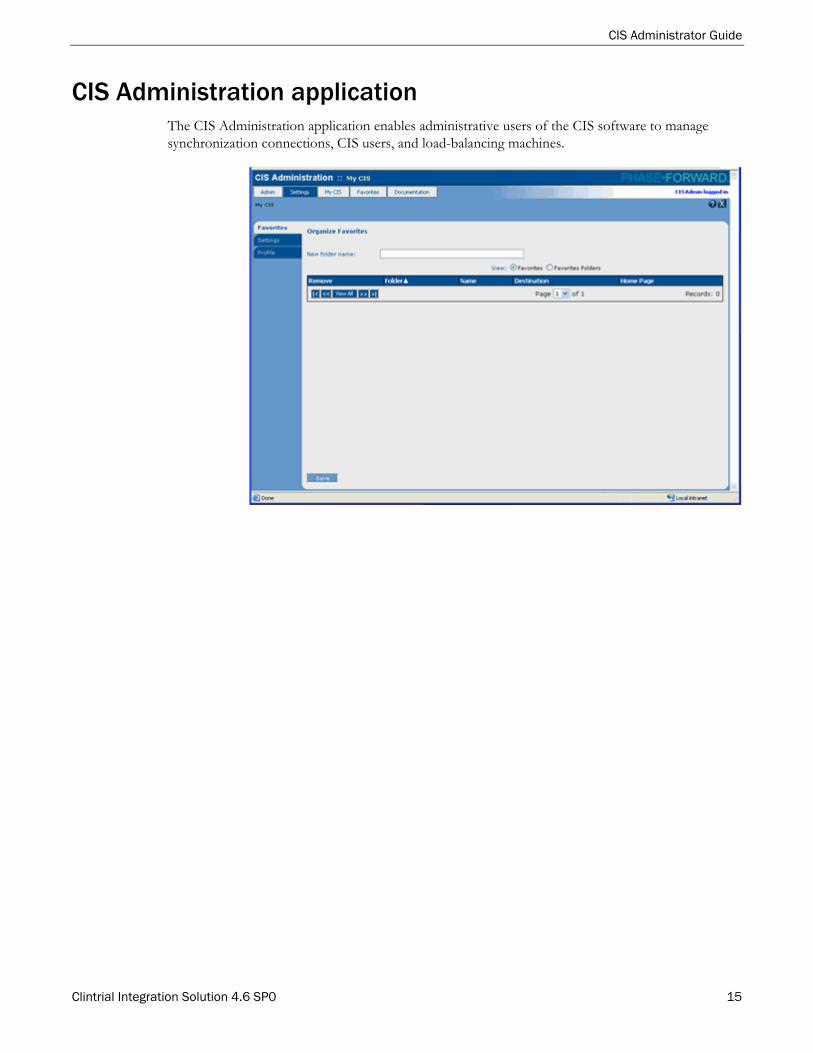
CIS Administration application The CIS Administration application enables administrative users of the CIS software to manage synchronization connections, CIS users, and load-balancing machines.

Chapter 1 CIS Overview
16 Clintrial Integration Solution 4.6 SP0
Clintrial Integration Solution 4.6 SP0 17
In this chapter Overview of CIS Administration .......................................................................................................18
Customizing the CIS Administration application............................................................................25
Registering InForm Adapters .............................................................................................................32
Managing adapters ................................................................................................................................34
Managing InForm Adapters and end points ....................................................................................37
Managing Clintrial Adapters................................................................................................................40
Managing plugin installation information .........................................................................................43
Managing configuration settings.........................................................................................................46
Managing Security .................................................................................................................................49
C H A P T E R 2
CIS Administration

Chapter 2 CIS Administration
18 Clintrial Integration Solution 4.6 SP0
Overview of CIS Administration The CIS Administration application enables you to administer your CIS environment from a central application. Use CIS Administration to:
Manage synchronization connections. A synchronization connection defines a communication path between an InForm study database and a Clintrial database. By using the CIS synchronization features of CIS Administration, you can:
Define synchronization connections and standard synchronization schedules.
Initiate synchronization and monitor synchronization status and history.
Create study books for a protocol.
Enable notifications in the case of a synchronization error.
Edit failed transactions from InForm software to the Clintrial software to enable processing to continue.
Manage CIS user rights and roles.
Define and update the CIS environment, including:
Database instances for the CIS synchronization.
Adapter components of CIS.
Load-balanced computers.
Environment configuration settings.
Favorites (frequently visited folders and pages).
Recover data after a database restoration
Reset a protocol.
Logging on to the CIS Administration application To start the CIS Administration application, you use the Clintrial Integration Solution logon page. Before you can log on, obtain the URL for the logon page.
1 Type the URL for the CIS Administration application into your browser.
2 Type your user name and password.
The CIS Administration home page appears.
Note: The CIS product provides an initial logon with CISAdmin as the user name and password. Use these logon credentials for the initial logon. You should change your password after you initially log on.

CIS Administrator Guide
Clintrial Integration Solution 4.6 SP0 19
CIS system administrators can change a user password and can set an interval after which a user password expires. If your password has been changed by an administrator or has expired, you must change the password the next time you log on to the CIS Administration application.
For more information, see Changing your user password (on page 30).

Chapter 2 CIS Administration
20 Clintrial Integration Solution 4.6 SP0
Common features of CIS Administration pages The pages of CIS Administration include common information and navigation features.
1—Title bar indicates the area of CIS Administration in which you are currently working.
2—Click a menu button and select a command to move to other areas of CIS Administration.
3—Navigation path displays the last pages you have visited. Click a page name to return to that page.
4—Select a tab to work with the features that are available in the area of CIS Administration that the title bar identifies.
5—Click to navigate through the pages of a multiple-page display.
6—Click a link in a row of a grid to display information about a specific object in the grid.
7—Select a page number to move to a specific page.
8,12—Click a command button to initiate an action.
9—Click the button with a question mark to display help on the current page of CIS Administration.
10—Click the button with an X to log off from CIS Administration.
11—Indicates the user ID of the user currently logged on to CIS Administration.
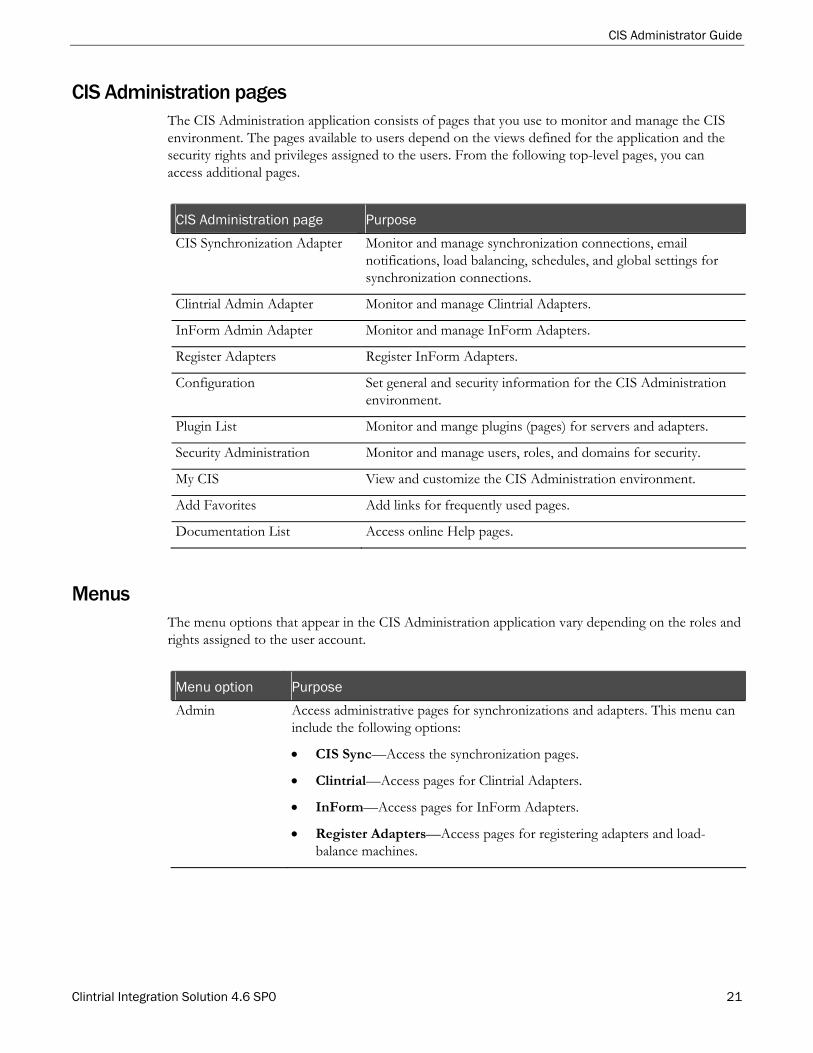
CIS Administrator Guide
Clintrial Integration Solution 4.6 SP0 21
CIS Administration pages The CIS Administration application consists of pages that you use to monitor and manage the CIS environment. The pages available to users depend on the views defined for the application and the security rights and privileges assigned to the users. From the following top-level pages, you can access additional pages.
CIS Administration page Purpose
CIS Synchronization Adapter Monitor and manage synchronization connections, email notifications, load balancing, schedules, and global settings for synchronization connections.
Clintrial Admin Adapter Monitor and manage Clintrial Adapters.
InForm Admin Adapter Monitor and manage InForm Adapters.
Register Adapters Register InForm Adapters.
Configuration Set general and security information for the CIS Administration environment.
Plugin List Monitor and mange plugins (pages) for servers and adapters.
Security Administration Monitor and manage users, roles, and domains for security.
My CIS View and customize the CIS Administration environment.
Add Favorites Add links for frequently used pages.
Documentation List Access online Help pages.
Menus The menu options that appear in the CIS Administration application vary depending on the roles and rights assigned to the user account.
Menu option Purpose
Admin Access administrative pages for synchronizations and adapters. This menu can include the following options:
CIS Sync—Access the synchronization pages.
Clintrial—Access pages for Clintrial Adapters.
InForm—Access pages for InForm Adapters.
Register Adapters—Access pages for registering adapters and load-balance machines.
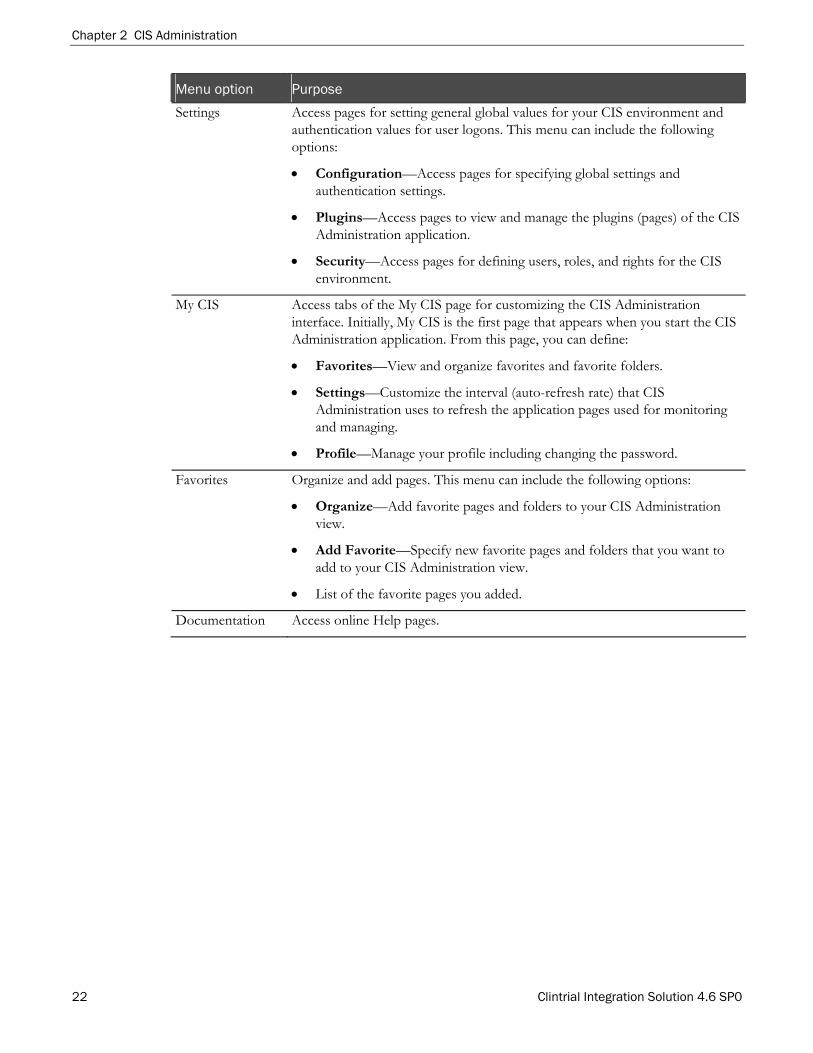
Chapter 2 CIS Administration
22 Clintrial Integration Solution 4.6 SP0
Menu option Purpose
Settings Access pages for setting general global values for your CIS environment and authentication values for user logons. This menu can include the following options:
Configuration—Access pages for specifying global settings and authentication settings.
Plugins—Access pages to view and manage the plugins (pages) of the CIS Administration application.
Security—Access pages for defining users, roles, and rights for the CIS environment.
My CIS Access tabs of the My CIS page for customizing the CIS Administration interface. Initially, My CIS is the first page that appears when you start the CIS Administration application. From this page, you can define:
Favorites—View and organize favorites and favorite folders.
Settings—Customize the interval (auto-refresh rate) that CIS Administration uses to refresh the application pages used for monitoring and managing.
Profile—Manage your profile including changing the password.
Favorites Organize and add pages. This menu can include the following options:
Organize—Add favorite pages and folders to your CIS Administration view.
Add Favorite—Specify new favorite pages and folders that you want to add to your CIS Administration view.
List of the favorite pages you added.
Documentation Access online Help pages.

CIS Administrator Guide
Clintrial Integration Solution 4.6 SP0 23
Database users and System users in the CIS environment The CIS environment has users that support different kinds of activities and tasks.
Type of User Description
Oracle Users that provides access to Oracle databases. Three Oracle users are created when you install the CIS software:
CIS Administration Database—Owns all of the CIS administration database objects.
CIS Database User—Owns all the CIS database objects. For more information, see the CIS Installation Guide.
CISUser—Used to connect to the Clintrial database. The CISUser is a default user that cannot be changed. You can change the password for this user.
CISUser is one of the five default user accounts that you can manage through the CIS interface.
Windows Windows Run as user that has access to domains. This user is required in a design environment.
CIS Sync—System user used to connect to the adapters (web services) within CIS Administration. The initial name and password for this user is Service. For more information, see Viewing and changing global synchronization connection settings (on page 94).
User accounts provided with the CIS software In the CIS environment, security is managed by assigning rights to roles, and associating one or more roles to each user account.
The CIS software provides five default user accounts. Each account is assigned default roles.
User Name Display Name Assigned roles
CAAdmin CA Administrator Administrator (role)
System User Role
Adapter user Role
Security Admin Role
Configuration Admin Role
CISAdmin CISAdmin Administrator (role)
System User Role
Security Admin Role
Configuration Admin Role

Chapter 2 CIS Administration
24 Clintrial Integration Solution 4.6 SP0
User Name Display Name Assigned roles
CISPower CISPower Power User (role)
System User Role
Adapter User Role
CISUser CISUser User (role)
System User Role
Adapter User Role
Service CA Service User Adapter User Role
System User Role
Configuration Admin Role
For information about the rights assigned to the Administrator role, Power User role, and User role, see CIS synchronization page rights and assignments to default roles (on page 50).
For information about the Configuration Admin Role, the Security Admin role, and the Adapter User Role, see CIS central administration page rights and assignments to default roles (on page 52).
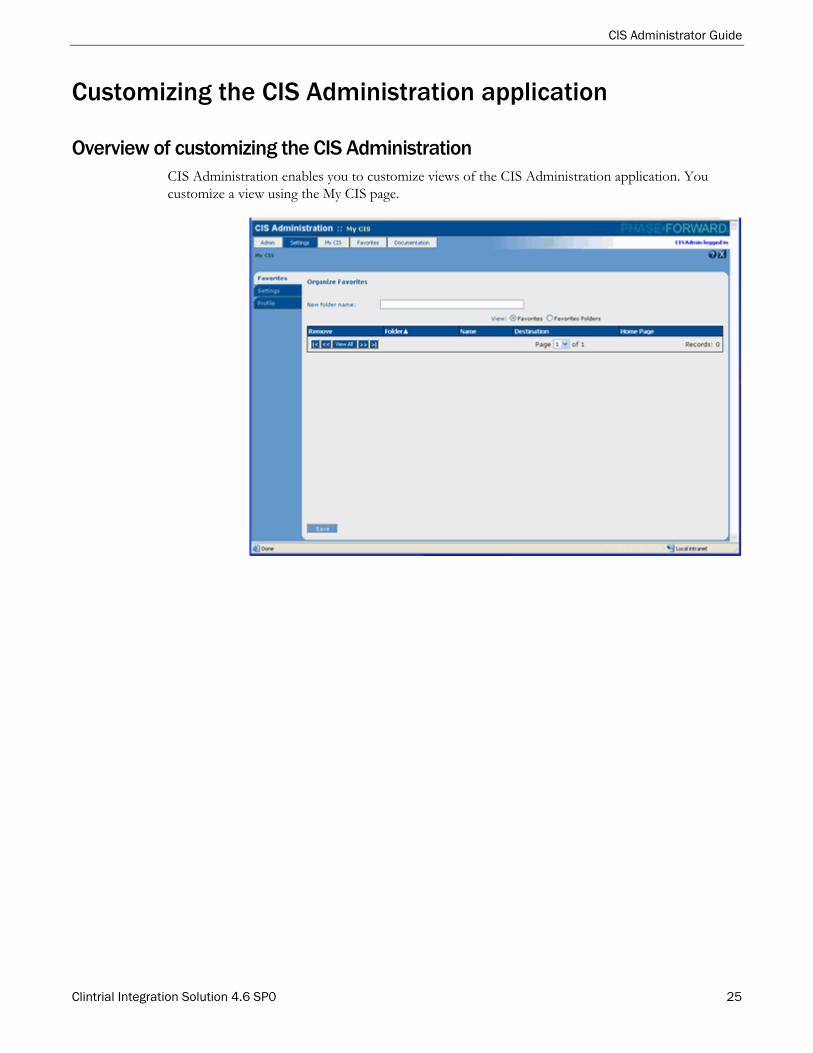
CIS Administrator Guide
Clintrial Integration Solution 4.6 SP0 25
Customizing the CIS Administration application
Overview of customizing the CIS Administration CIS Administration enables you to customize views of the CIS Administration application. You customize a view using the My CIS page.

Chapter 2 CIS Administration
26 Clintrial Integration Solution 4.6 SP0
The My CIS page has the following tabs:
Favorites—View and organize favorite pages and folders.
Settings—Specify the initial logon page for your home page and customize the interval (auto-refresh rate) that CIS Administration uses to refresh the application pages used for monitoring and management.
Profile—Manage your profile including changing passwords.
In addition to using these tabs to customize views, you can use the Favorites option on the main menu to add and organize bookmarks (on page 27) for favorite pages.
From the My CIS page, you can:
View and add folders (on page 26).
Rename a folder (on page 26).
Remove a folder (on page 27).
View favorites (on page 27).
Remove favorites (on page 27).
Rename a favorite (on page 28).
Change the folder of a favorite (on page 28).
Manage My CIS user settings (on page 29).
Change user profiles (on page 30).
Viewing and adding folders for favorite pages You can view existing folders and add new folders to help organize pages for easy navigation.
1 Select My CIS.
The Favorites tab of the My CIS page appears and displays a list of favorites.
2 Click Favorite Folders.
A list of current folders appears.
3 In the New folder name field, type the name of a folder in which to store favorites.
4 Click Save.
Changing the name of a favorite folder Usually, folder names identify the type of pages stored in them. If the type of pages stored in a folder changes, you can change the name of the folder.
1 Select My CIS.
The Favorites tab of the My CIS page appears and displays a list of favorites.
2 Click Favorite Folders.
CIS Administrator Guide
Clintrial Integration Solution 4.6 SP0 27
A list of current folders appears.
3 In the Name column, type a new name for the folder you want to rename.
4 Click Save.
Removing a favorites folder When you no longer use a folder, you can remove it.
1 Select My CIS.
The Favorites tab of the My CIS page appears and displays a list of favorites.
2 Click Favorite Folders.
A list of folders appears.
3 In the Remove column for each folder you want to remove, select the checkbox.
4 Click Save.
Adding a favorite page You can add pages that you use frequently to a folder for convenient access. Use the Add Favorite window to add a favorite.
1 Navigate to the page you want to add to your favorites.
2 Select Favorites > Add Favorite.
The Add Favorite window appears.
3 Click Save.
Viewing favorites You can view a list of favorites from the Favorites tab of the My CIS page.
1 Select My CIS.
The Favorites tab of the My CIS page appears and displays a list of favorites.
2 If there are multiple pages, use the View All and other navigation buttons to move through the pages.
Removing a favorite When you no longer use a favorite page, you can remove the page.
1 Select My CIS.
The Favorites tab of the My CIS page appears and displays a list of favorites.
2 In the Remove column for each favorite you want to remove, select the checkbox.
3 Click Save.
Chapter 2 CIS Administration
28 Clintrial Integration Solution 4.6 SP0
Renaming a favorite You can rename a favorite page from the Favorites tab of the My CIS page.
1 Select My CIS.
The Favorites tab of the My CIS page appears and displays a list of favorites.
2 In the Name column, type the new name of the favorite you want to rename.
3 Click Save.
Changing the folder of a favorite You can change the folder where a favorite is stored from the Favorites tab of the My CIS page.
1 Select My CIS.
The Favorites tab of the My CIS page appears and displays a list of favorites.
2 In the Folder column for the favorite you want to move, select the new folder from the drop-down list.
3 Click Save.
Viewing your user profile 1 Select My CIS.
The Favorites tab of the My CIS page appears and displays a list of favorites.
2 Select Profile.
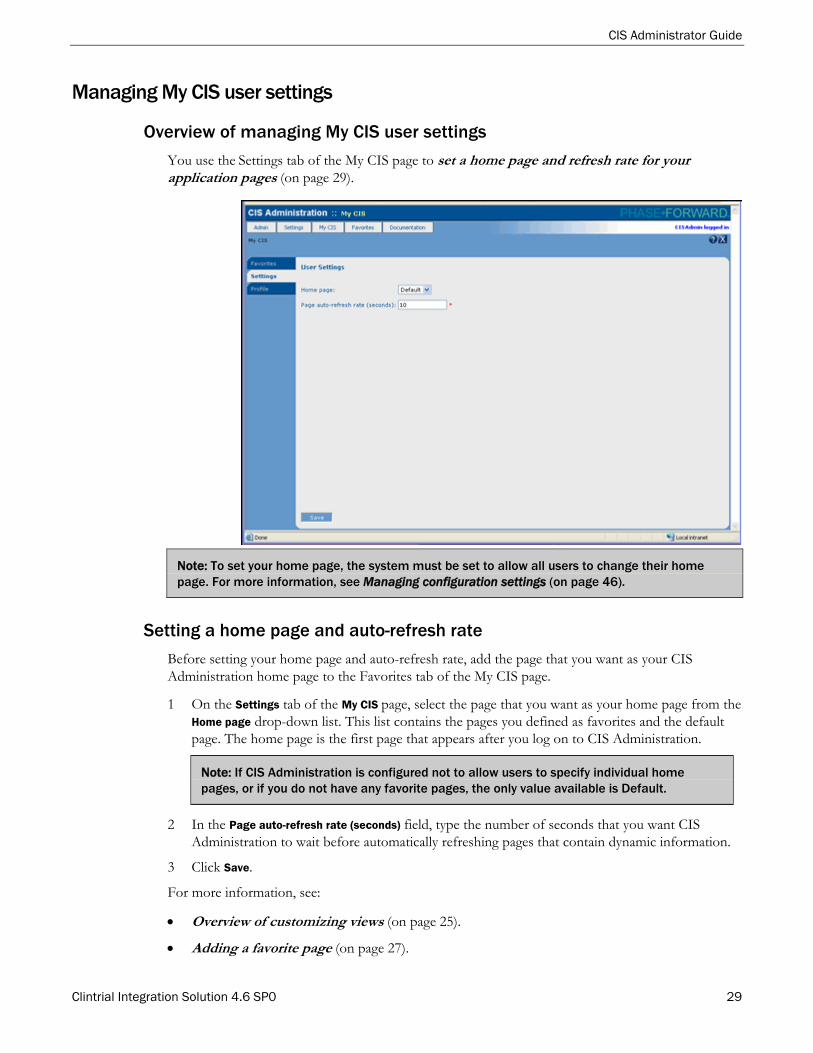
CIS Administrator Guide
Clintrial Integration Solution 4.6 SP0 29
Managing My CIS user settings
Overview of managing My CIS user settings
You use the Settings tab of the My CIS page to set a home page and refresh rate for your application pages (on page 29).
Note: To set your home page, the system must be set to allow all users to change their home page. For more information, see Managing configuration settings (on page 46).
Setting a home page and auto-refresh rate
Before setting your home page and auto-refresh rate, add the page that you want as your CIS Administration home page to the Favorites tab of the My CIS page.
1 On the Settings tab of the My CIS page, select the page that you want as your home page from the Home page drop-down list. This list contains the pages you defined as favorites and the default page. The home page is the first page that appears after you log on to CIS Administration.
Note: If CIS Administration is configured not to allow users to specify individual home pages, or if you do not have any favorite pages, the only value available is Default.
2 In the Page auto-refresh rate (seconds) field, type the number of seconds that you want CIS Administration to wait before automatically refreshing pages that contain dynamic information.
3 Click Save.
For more information, see:
Overview of customizing views (on page 25).
Adding a favorite page (on page 27).
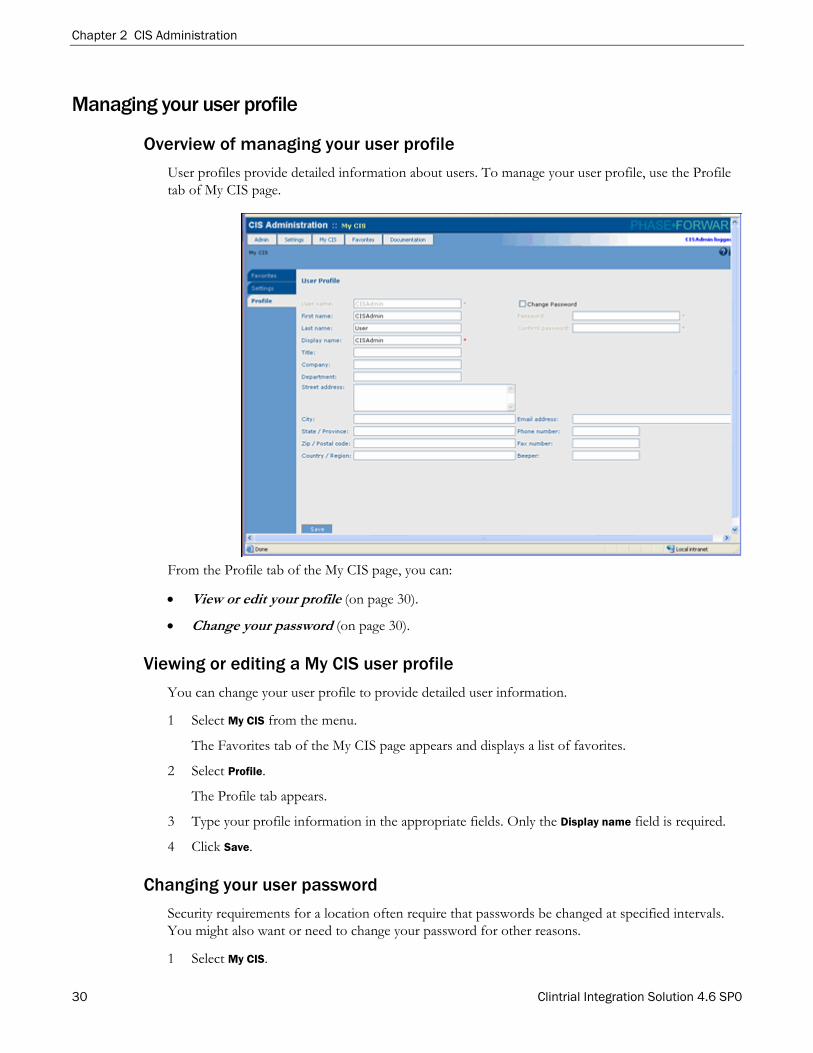
Chapter 2 CIS Administration
30 Clintrial Integration Solution 4.6 SP0
Managing your user profile
Overview of managing your user profile
User profiles provide detailed information about users. To manage your user profile, use the Profile tab of My CIS page.
From the Profile tab of the My CIS page, you can:
View or edit your profile (on page 30).
Change your password (on page 30).
Viewing or editing a My CIS user profile
You can change your user profile to provide detailed user information.
1 Select My CIS from the menu.
The Favorites tab of the My CIS page appears and displays a list of favorites.
2 Select Profile.
The Profile tab appears.
3 Type your profile information in the appropriate fields. Only the Display name field is required.
4 Click Save.
Changing your user password
Security requirements for a location often require that passwords be changed at specified intervals. You might also want or need to change your password for other reasons.
1 Select My CIS.

CIS Administrator Guide
Clintrial Integration Solution 4.6 SP0 31
The Favorites tab of the My CIS page appears and displays a list of favorites.
2 Select Profile.
The Profile tab appears.
3 Select the Change Password checkbox.
4 In the Password field, type the new password. Passwords must meet the requirements and the rules for your specific location.
Allowed characters in passwords are upper and lowercase letters, digits, underscore (_), pound sign (#), and dollar sign ($).
5 In the Confirm password field, retype the password.
6 Click Save.
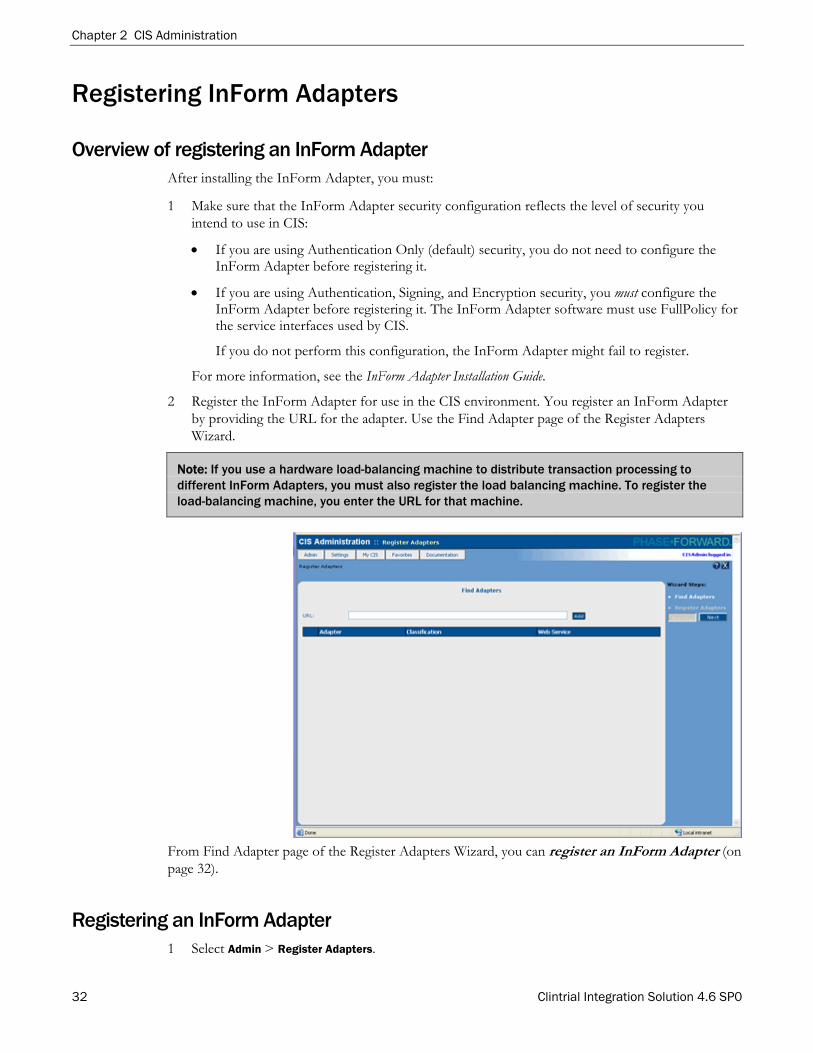
Chapter 2 CIS Administration
32 Clintrial Integration Solution 4.6 SP0
Registering InForm Adapters
Overview of registering an InForm Adapter After installing the InForm Adapter, you must:
1 Make sure that the InForm Adapter security configuration reflects the level of security you intend to use in CIS:
If you are using Authentication Only (default) security, you do not need to configure the InForm Adapter before registering it.
If you are using Authentication, Signing, and Encryption security, you must configure the InForm Adapter before registering it. The InForm Adapter software must use FullPolicy for the service interfaces used by CIS.
If you do not perform this configuration, the InForm Adapter might fail to register.
For more information, see the InForm Adapter Installation Guide.
2 Register the InForm Adapter for use in the CIS environment. You register an InForm Adapter by providing the URL for the adapter. Use the Find Adapter page of the Register Adapters Wizard.
Note: If you use a hardware load-balancing machine to distribute transaction processing to different InForm Adapters, you must also register the load balancing machine. To register the load-balancing machine, you enter the URL for that machine.
From Find Adapter page of the Register Adapters Wizard, you can register an InForm Adapter (on page 32).
Registering an InForm Adapter 1 Select Admin > Register Adapters.

CIS Administrator Guide
Clintrial Integration Solution 4.6 SP0 33
The Find Adapter view of the CIS Administration Register Adapters page appears.
2 Type the URL that identifies the location of the adapter. Specify the URL using the following string:
http://MACHINE/informadapter/centraladmin/informcai.asmx
where MACHINE is the name of the computer on which the adapter is installed.
3 Click Add.
The adapter appears in the table. Repeat these steps for each adapter that you want to register. If you do not want to register an adapter, use the Remove button to remove the adapter.
4 After adding all the adapters you want to register, click Next.
The Register Adapters view of the CIS Administration Register Adapters page appears. This page displays details about the adapters you want to register.
5 Review the list of adapters to verify that the information is correct for each adapter. You can use the Previous button to return to the Find Adapter page to make corrections.
6 Click Finish.
The adapters are registered, and details about each adapter appear in the Register Adapters view of the CIS Administration Register Adapters page.
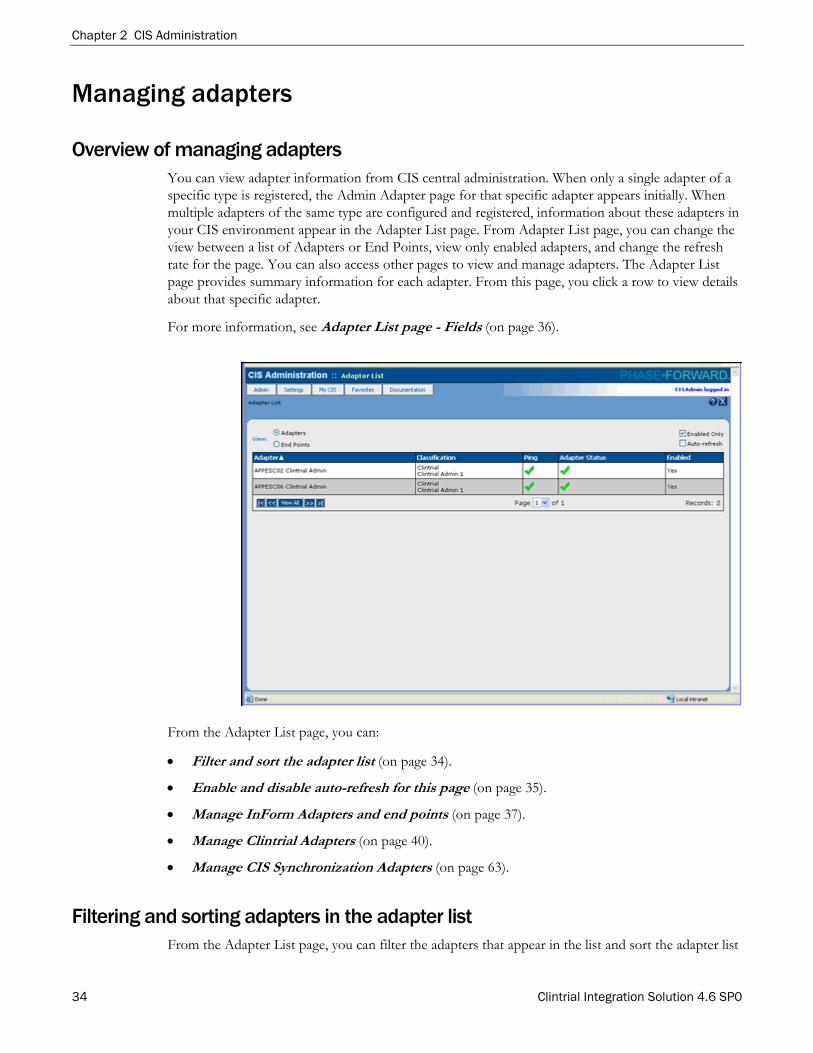
Chapter 2 CIS Administration
34 Clintrial Integration Solution 4.6 SP0
Managing adapters
Overview of managing adapters You can view adapter information from CIS central administration. When only a single adapter of a specific type is registered, the Admin Adapter page for that specific adapter appears initially. When multiple adapters of the same type are configured and registered, information about these adapters in your CIS environment appear in the Adapter List page. From Adapter List page, you can change the view between a list of Adapters or End Points, view only enabled adapters, and change the refresh rate for the page. You can also access other pages to view and manage adapters. The Adapter List page provides summary information for each adapter. From this page, you click a row to view details about that specific adapter.
For more information, see Adapter List page - Fields (on page 36).
From the Adapter List page, you can:
Filter and sort the adapter list (on page 34).
Enable and disable auto-refresh for this page (on page 35).
Manage InForm Adapters and end points (on page 37).
Manage Clintrial Adapters (on page 40).
Manage CIS Synchronization Adapters (on page 63).
Filtering and sorting adapters in the adapter list From the Adapter List page, you can filter the adapters that appear in the list and sort the adapter list

CIS Administrator Guide
Clintrial Integration Solution 4.6 SP0 35
by column.
To view just enabled adapters, select Enabled Only.
Only enabled adapters appear in the list.
To view all registered adapters, deselect Enabled Only.
All adapters registered appear in the list.
To sort the columns in a table, click on the specific column.
Enabling and disabling Auto-refresh You can control whether the information in the Adapter List page refreshes automatically or manually.
1 To automatically refresh the page at the configured rate, select Auto-refresh. For more information, see Setting a home page and auto-refresh rate (on page 29).
2 To specify that the page refreshes only manually, deselect Auto-refresh (the default).
Viewing a list of InForm Adapters You view a list of InForm Adapters from the Adapter List page.
1 Select Admin > InForm.
If more than one InForm Adapter is installed, the Adapter List page appears and displays a list of InForm Adapters. If only one InForm Adapter is installed, the InForm Admin Adapter page appears.
2 To view a list of end points, click End Points.
The view changes to a list of end points for enabled adapters and displays the following information:
Adapter—Name of the InForm Adapter for the InForm end point (trial).
URL—Location where the adapter is installed.
End Point—InForm trial for the adapter.
Status—Displays a green check mark if the end point status is OK or a red X if the end point status is Error.
Viewing a list of Clintrial Adapters You view a list of Clintrial Adapters from the Adapter List page.
Select Admin > Clintrial.
If more than one Clintrial Adapter is installed, the Adapter List page appears and displays a list of Clintrial Adapters. If only one Clintrial Adapter is installed, the Clintrial Admin Adapter page appears.
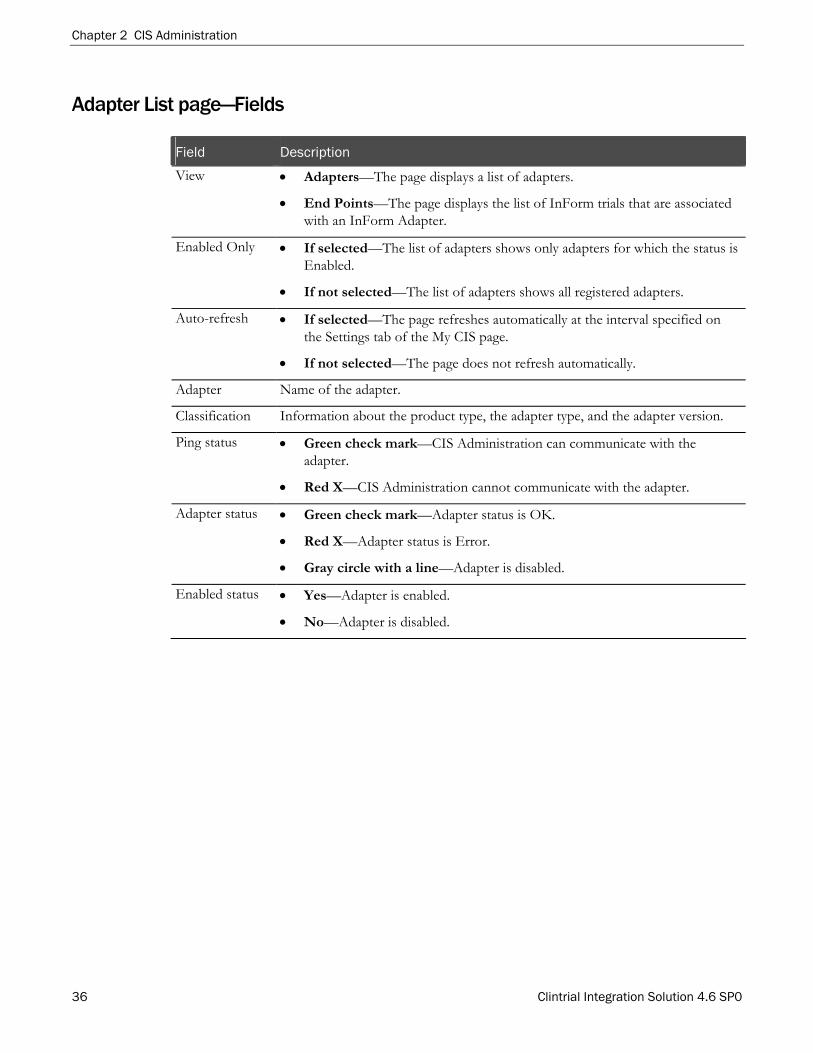
Chapter 2 CIS Administration
36 Clintrial Integration Solution 4.6 SP0
Adapter List page—Fields
Field Description
View Adapters—The page displays a list of adapters.
End Points—The page displays the list of InForm trials that are associated with an InForm Adapter.
Enabled Only If selected—The list of adapters shows only adapters for which the status is Enabled.
If not selected—The list of adapters shows all registered adapters.
Auto-refresh If selected—The page refreshes automatically at the interval specified on the Settings tab of the My CIS page.
If not selected—The page does not refresh automatically.
Adapter Name of the adapter.
Classification Information about the product type, the adapter type, and the adapter version.
Ping status Green check mark—CIS Administration can communicate with the adapter.
Red X—CIS Administration cannot communicate with the adapter.
Adapter status Green check mark—Adapter status is OK.
Red X—Adapter status is Error.
Gray circle with a line—Adapter is disabled.
Enabled status Yes—Adapter is enabled.
No—Adapter is disabled.
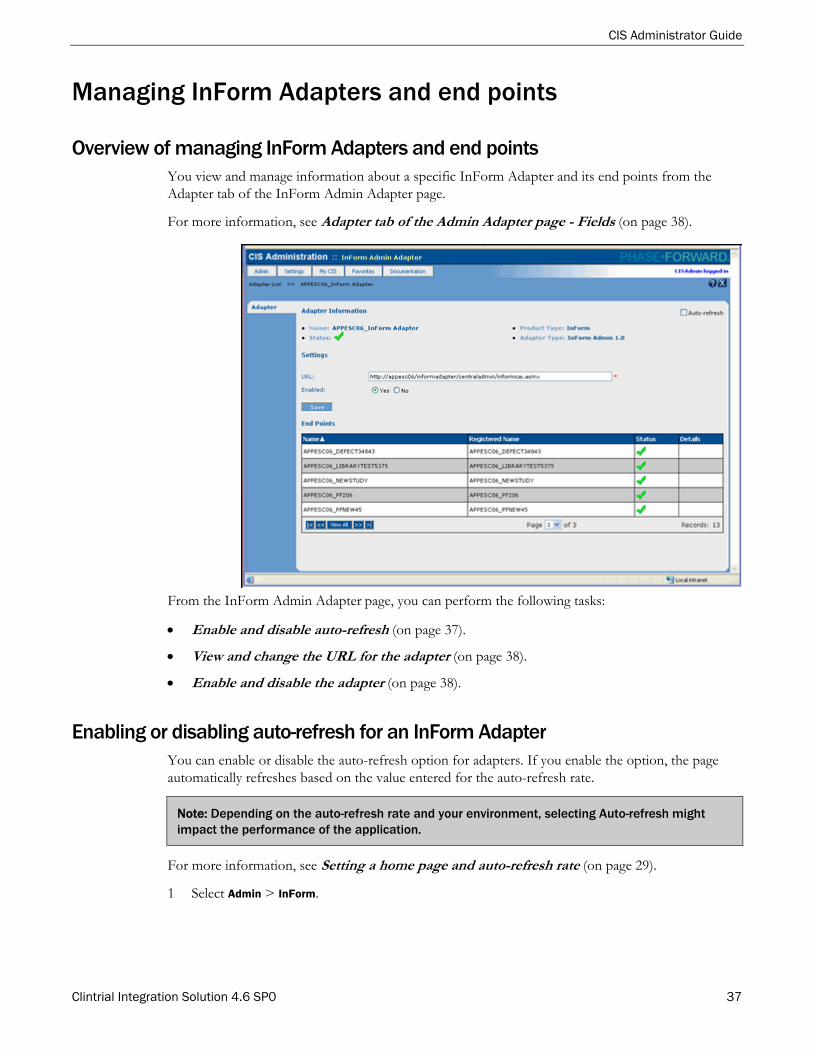
CIS Administrator Guide
Clintrial Integration Solution 4.6 SP0 37
Managing InForm Adapters and end points
Overview of managing InForm Adapters and end points You view and manage information about a specific InForm Adapter and its end points from the Adapter tab of the InForm Admin Adapter page.
For more information, see Adapter tab of the Admin Adapter page - Fields (on page 38).
From the InForm Admin Adapter page, you can perform the following tasks:
Enable and disable auto-refresh (on page 37).
View and change the URL for the adapter (on page 38).
Enable and disable the adapter (on page 38).
Enabling or disabling auto-refresh for an InForm Adapter You can enable or disable the auto-refresh option for adapters. If you enable the option, the page automatically refreshes based on the value entered for the auto-refresh rate.
Note: Depending on the auto-refresh rate and your environment, selecting Auto-refresh might impact the performance of the application.
For more information, see Setting a home page and auto-refresh rate (on page 29).
1 Select Admin > InForm.
Chapter 2 CIS Administration
38 Clintrial Integration Solution 4.6 SP0
If multiple adapters are installed, the Adapter List page appears. Click the row of the adapter you want to view and manage. The Adapter tab of the InForm Admin Adapter page appears.
or
If only one adapter is installed, the Adapter tab of the InForm Admin Adapter page appears.
2 To enable or disable auto refresh, select one of the following:
To automatically refresh the page at the configured rate, select Auto-refresh.
To specify that the page refreshes manually, deselect Auto-refresh (the default).
3 Click Save.
Viewing and changing the URL for an InForm Adapter If an adapter is moved to a different machine, you can change the URL to point to the new location.
1 Select Admin > InForm.
If multiple adapters are installed, the Adapter List page appears. Click the row of the adapter you want to view and manage. The Adapter tab of the InForm Admin Adapter page appears.
or
If only one adapter is installed, the Adapter tab of the InForm Admin Adapter page appears.
2 In the URL field, type the full path of the location where the adapter is installed.
3 Click Save.
Changing the enabled state of an InForm Adapter When adapters are removed from your environment or when the computer where an adapter resides is offline, you can change the enabled state of an adapter.
1 Select Admin > InForm.
If multiple adapters are installed, the Adapter List page appears. Click the row of the adapter you want to view and manage. The Adapter tab of the InForm Admin Adapter page appears.
or
If only one adapter is installed, the Adapter tab of the InForm Admin Adapter page appears.
2 In the Enabled group, select Enabled or Disabled.
3 Click Save.
Adapter tab of the Admin Adapter page—Fields
Field Description
The top section of the page displays information about the adapter.
Auto-refresh If selected—The page refreshes automatically at the interval specified on the Settings tab of the My CIS page.
If not selected—The page does not refresh automatically.

CIS Administrator Guide
Clintrial Integration Solution 4.6 SP0 39
Field Description
Name Name of the adapter.
Status Green check mark—Adapter status is OK.
Red X—Adapter status is Error.
Product Type Product with which the adapter is associated:
CIS—For CIS Synchronization Adapters.
Clintrial—For Clintrial Adapters.
InForm—For InForm Adapters.
Adapter Type Type of adapter:
CIS Synchronization—For CIS Synchronization Adapters.
Clintrial Admin—For Clintrial Adapters.
InForm Admin—For InForm Adapters.
URL URL for the adapter.
Enabled Yes—Adapter is enabled.
No—Adapter is disabled.
If the adapter is an InForm Adapter, the lower section of the page displays information about the end points (trials) for the adapter.
Name Name of the InForm trial.
Registered Name Registered name of the InForm trial.
Status Green check mark—End point status is OK.
Red X—End point status is Error.
Details Link to additional information about an end point with an Error status.
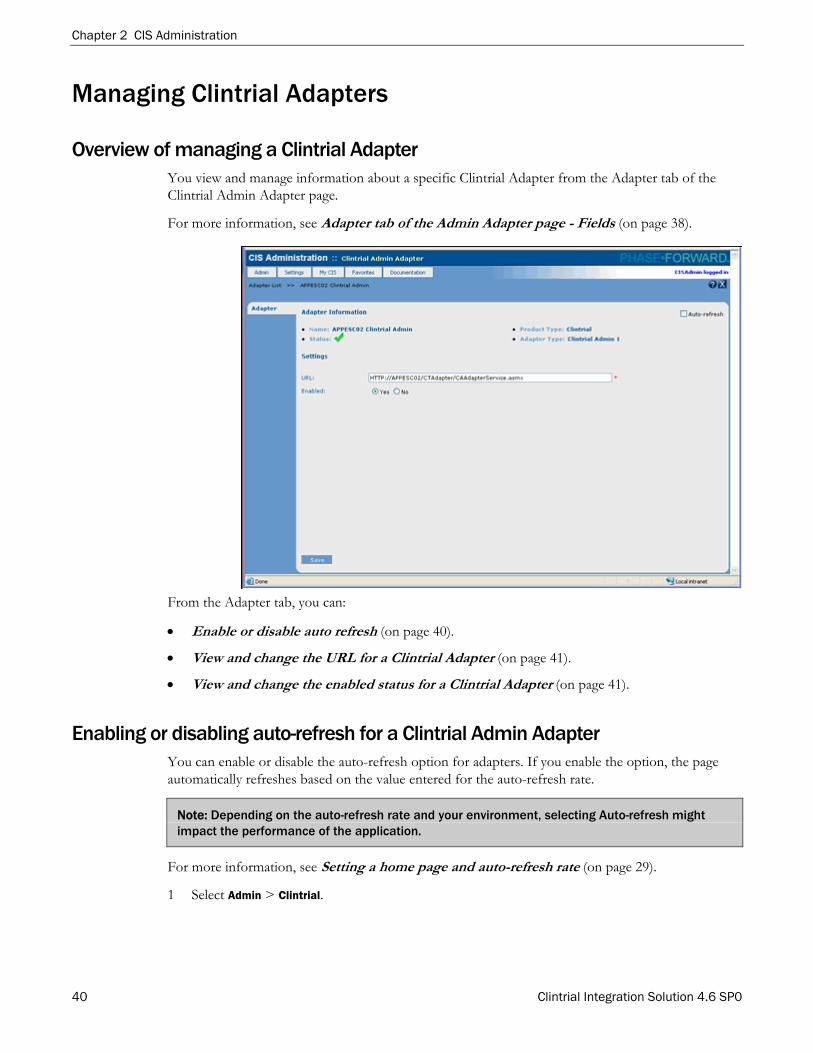
Chapter 2 CIS Administration
40 Clintrial Integration Solution 4.6 SP0
Managing Clintrial Adapters
Overview of managing a Clintrial Adapter You view and manage information about a specific Clintrial Adapter from the Adapter tab of the Clintrial Admin Adapter page.
For more information, see Adapter tab of the Admin Adapter page - Fields (on page 38).
From the Adapter tab, you can:
Enable or disable auto refresh (on page 40).
View and change the URL for a Clintrial Adapter (on page 41).
View and change the enabled status for a Clintrial Adapter (on page 41).
Enabling or disabling auto-refresh for a Clintrial Admin Adapter You can enable or disable the auto-refresh option for adapters. If you enable the option, the page automatically refreshes based on the value entered for the auto-refresh rate.
Note: Depending on the auto-refresh rate and your environment, selecting Auto-refresh might impact the performance of the application.
For more information, see Setting a home page and auto-refresh rate (on page 29).
1 Select Admin > Clintrial.
CIS Administrator Guide
Clintrial Integration Solution 4.6 SP0 41
If multiple adapters are installed, the Adapter List page appears. Click the row of the adapter you want to view and manage. The Adapter tab of the Clintrial Admin Adapter page appears.
or
If only one adapter is installed, the Adapter tab of the Clintrial Admin Adapter page appears.
2 To enable or disable auto refresh, select one of the following:
To automatically refresh the page at the configured rate, select Auto-refresh.
To specify that the page refreshes manually, deselect Auto-refresh (By default, Auto-refresh is deselected).
3 Click Save.
Viewing and changing the URL of a Clintrial Adapter If an adapter is moved to a different machine, you can change the URL to point to the new location.
1 Select Admin > Clintrial.
If multiple adapters are installed, the Adapter List page appears. Click the row of the adapter you want to view and manage. The Adapter tab of the Clintrial Admin Adapter page appears.
or
If only one adapter is installed, the Adapter tab of the Clintrial Admin Adapter page appears.
2 In the URL field, type the full path of the location where the adapter is installed.
3 Click Save.
Changing the enabled state of a Clintrial Adapter When adapters are removed from your environment or when the machine the adapter resides on is offline, you can change the enabled state of an adapter.
1 Select Admin > Clintrial.
If multiple adapters are installed, the Adapter List page appears. Click the row of the adapter you want to view and manage. The Adapter tab of the Clintrial Admin Adapter page appears.
or
If only one adapter is installed, the Adapter tab of the Clintrial Admin Adapter page appears.
2 In the Enabled group, select Enabled or Disabled.
3 Click Save.
Adapter tab of the Admin Adapter page—Fields
Field Description
The top section of the page displays information about the adapter.

Chapter 2 CIS Administration
42 Clintrial Integration Solution 4.6 SP0
Field Description
Auto-refresh If selected—The page refreshes automatically at the interval specified on the Settings tab of the My CIS page.
If not selected—The page does not refresh automatically.
Name Name of the adapter.
Status Green check mark—Adapter status is OK.
Red X—Adapter status is Error.
Product Type Product with which the adapter is associated:
CIS—For CIS Synchronization Adapters.
Clintrial—For Clintrial Adapters.
InForm—For InForm Adapters.
Adapter Type Type of adapter:
CIS Synchronization—For CIS Synchronization Adapters.
Clintrial Admin—For Clintrial Adapters.
InForm Admin—For InForm Adapters.
URL URL for the adapter.
Enabled Yes—Adapter is enabled.
No—Adapter is disabled.
If the adapter is an InForm Adapter, the lower section of the page displays information about the end points (trials) for the adapter.
Name Name of the InForm trial.
Registered Name Registered name of the InForm trial.
Status Green check mark—End point status is OK.
Red X—End point status is Error.
Details Link to additional information about an end point with an Error status.
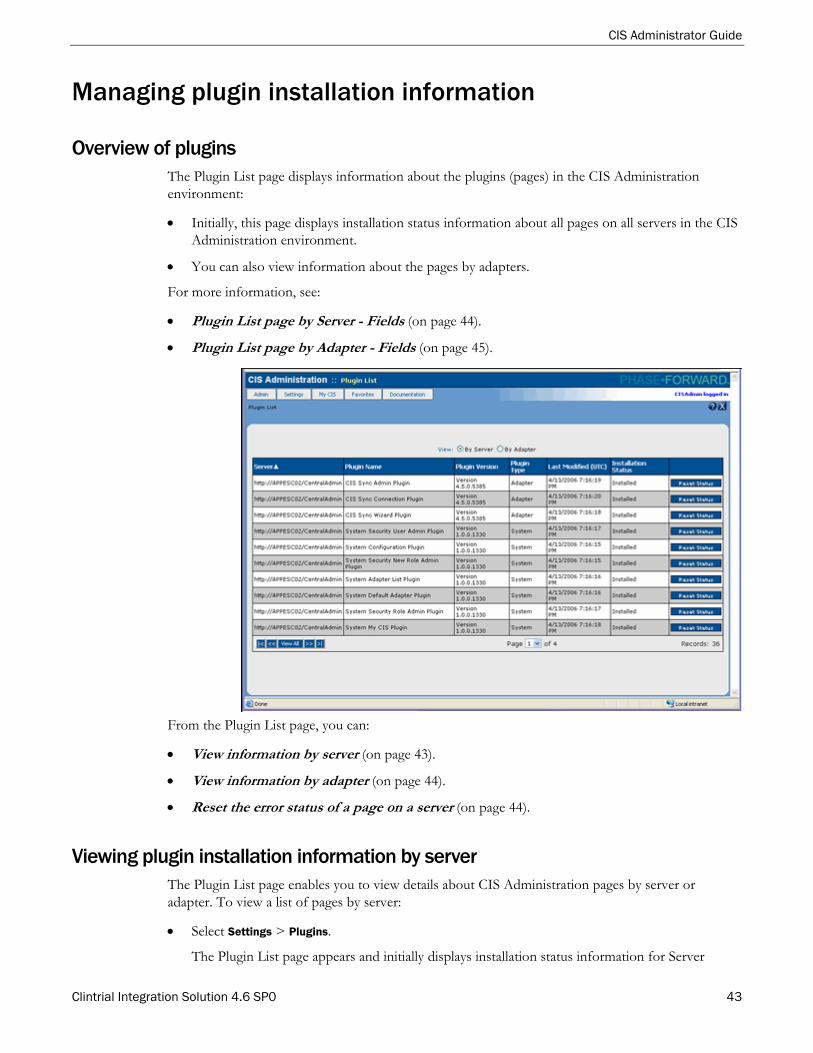
CIS Administrator Guide
Clintrial Integration Solution 4.6 SP0 43
Managing plugin installation information
Overview of plugins The Plugin List page displays information about the plugins (pages) in the CIS Administration environment:
Initially, this page displays installation status information about all pages on all servers in the CIS Administration environment.
You can also view information about the pages by adapters.
For more information, see:
Plugin List page by Server - Fields (on page 44).
Plugin List page by Adapter - Fields (on page 45).
From the Plugin List page, you can:
View information by server (on page 43).
View information by adapter (on page 44).
Reset the error status of a page on a server (on page 44).
Viewing plugin installation information by server The Plugin List page enables you to view details about CIS Administration pages by server or adapter. To view a list of pages by server:
Select Settings > Plugins.
The Plugin List page appears and initially displays installation status information for Server
Chapter 2 CIS Administration
44 Clintrial Integration Solution 4.6 SP0
pages.
For more information, see Plugin List page by Server - Fields (on page 44).
Viewing plugin installation information by adapter The Plugin List page enables you to view details about CIS Administration pages by server or adapter. To view a list of pages by adapter:
1 Select Settings > Plugins.
The Plugin List page appears and initially displays installation status information about CIS Administration pages by server.
2 Select By Adapter.
For more information, see Plugin List page by Adapter - Fields (on page 45).
Resetting the error status of a page If the installation of a page fails, the Reset Status button for the page is enabled in the by server view of the Plugin List page.
1 Select Settings > Plugins.
The Plugin List page appears and displays installation status information for CIS Administration pages by server.
2 Click Reset Status.
CIS Administration sets the installation status of the application page to Awaiting Install. The background service on the specified server attempts to reinstall the application page the next time it runs.
Plugin List page by Server—Fields
Field Description
Server URL of the CIS Administration web service for the specific CIS Admin server.
Plugin Name Name of the plugin page.
Plugin Version Version of the plugin page.
Plugin Type Plugin page type.
Last Modified (UTC)
Last time (in Coordinated Universal time) the plugin page was updated.
Installation Status Installation status of the plugin page:
Installed
Error
Awaiting Install

CIS Administrator Guide
Clintrial Integration Solution 4.6 SP0 45
Plugin List page by Adapter—Fields
Field Description
Adapter URL of the CIS Administration web service for the specific CIS Admin server.
Plugin Name Name of the plugin page.
Plugin Version Version of the plugin page.
Plugin Type Plugin page type.
Default Yes—If the plugin page is the initial page that appears for its associated adapter.
No—If the plugin page is not the initial page that appears for its associated adapter.
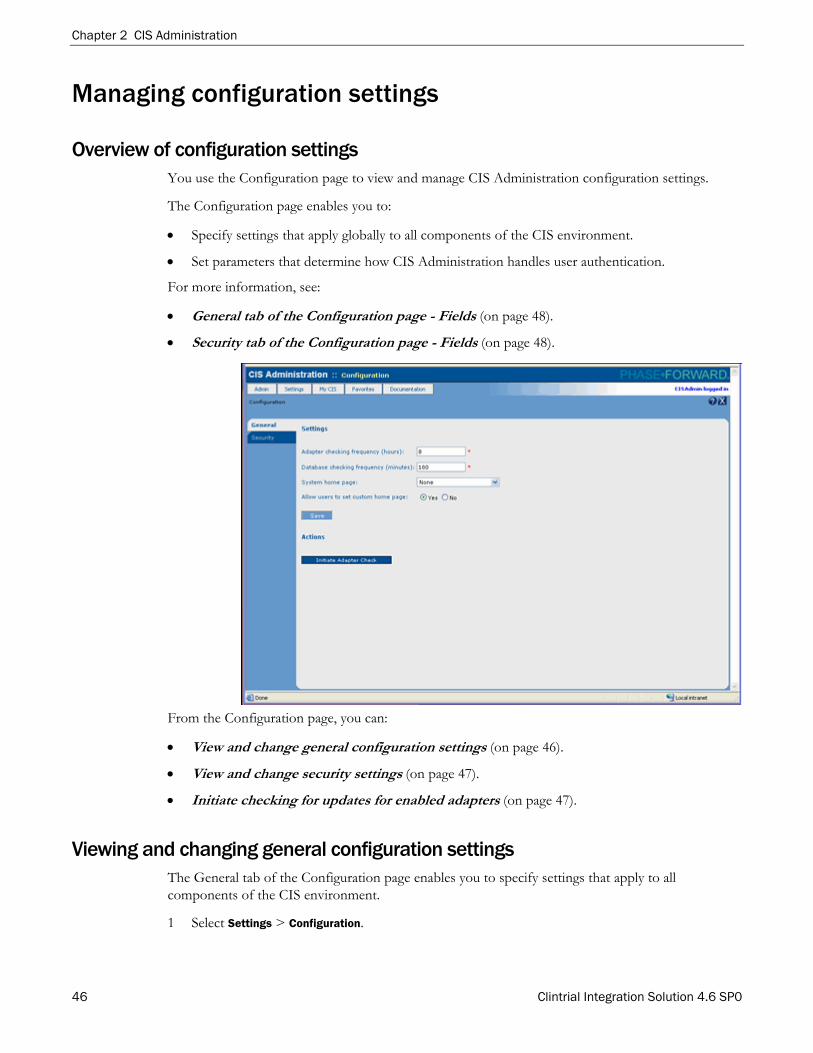
Chapter 2 CIS Administration
46 Clintrial Integration Solution 4.6 SP0
Managing configuration settings
Overview of configuration settings You use the Configuration page to view and manage CIS Administration configuration settings.
The Configuration page enables you to:
Specify settings that apply globally to all components of the CIS environment.
Set parameters that determine how CIS Administration handles user authentication.
For more information, see:
General tab of the Configuration page - Fields (on page 48).
Security tab of the Configuration page - Fields (on page 48).
From the Configuration page, you can:
View and change general configuration settings (on page 46).
View and change security settings (on page 47).
Initiate checking for updates for enabled adapters (on page 47).
Viewing and changing general configuration settings The General tab of the Configuration page enables you to specify settings that apply to all components of the CIS environment.
1 Select Settings > Configuration.
CIS Administrator Guide
Clintrial Integration Solution 4.6 SP0 47
The Configuration page appears with the General tab selected.
2 Fill in the fields as needed, and click Save.
For more information, see General tab of the Configuration page - Fields (on page 48).
Viewing and changing security settings The Security tab of the Configuration page enables you to view and change settings that determine how CIS Administration handles user authentication.
1 Select Settings > Configuration.
The Configuration page appears.
2 Select Security.
The Security tab of the Configuration page appears.
3 Fill in the fields as needed, and click Save.
For more information, see Security tab of the Configuration page - Fields (on page 48).
Checking for adapter updates CIS Administration checks the status of all adapters at the interval specified in the Adapter checking frequency (hours) field. You can immediately initiate checks for updates for an enabled adapter from the General tab of the Configuration page.
1 Select Settings > Configuration.
The General tab of the Configuration page appears.
2 Click Initiate Adapter Check.
CIS Administration checks for updates for all enabled adapters in the CIS environment.
Viewing and setting the adapter checking frequency You view and change how often CIS Administration checks for updates for an adapter from the General tab on the Configuration page.
1 Select Settings > Configuration.
The General tab of the Configuration page appears.
2 In Adapter checking frequency (hours), type a value from 1 to 48 hours to determine how often CIS Administration checks for updates for enabled adapters.
3 Click Save.

Chapter 2 CIS Administration
48 Clintrial Integration Solution 4.6 SP0
General tab of the Configuration page—Fields
Field Description
Adapter checking frequency (hours)
Frequency in hours for CIS Administration to check all adapters in the CIS environment to determine whether any of the adapters have changed.
Database checking frequency (minutes)
Frequency in minutes for CIS Administration to check the database for the presence of any new components that need to be placed on the local web server.
System home page (Page name)—Name of the initial CIS Administration page that appears when a user logs on. A specific page here overrides any custom home page set by a user if Allow users to set custom page is No.
None—The system default page (My CIS) appears.
Allow users to set custom page Yes—Users can specify the page that appears when they log on.
No—The home page specified in the System home page field appears when a user logs on.
Security tab of the Configuration page—Fields
Field Description
Inactivity timeout (minutes) Number of minutes a CIS Administration session can be inactive before it times out and CIS Administration logs a user off.
Authentication expiration (hours)
Number of hours after which a user authentication is no longer valid and the user must log on again.
Password expiration (days) Number of days before a user password expires and the user must change the password when logging on.
Minimum password length Minimum number of characters a user password must contain.
Note: Allowed characters in passwords are upper and lowercase letters, digits, underscore (_), pound sign (#), and dollar sign ($).
Failed logon limit Number of failed logon attempts a user can make before CIS Administration deactivates a user.
Audit verbosity level Any—Save all logon errors.
Failures only—Save errors only when a logon fails.
Inactive failures only—Save errors when the inactive period exceeds the value in the Security tab of the Configuration page.
CIS Administrator Guide
Clintrial Integration Solution 4.6 SP0 49
Managing Security
Overview of managing security CIS Administration enables you to define security for application users and product adapters. Defining security for a user includes the ability to define:
Secure logons.
Time-out periods to require authentication again.
Users.
Roles and rights.
Domains that allow different roles for each adapter domain.
Active and inactive states.
Defining security for domains includes the ability to:
Indicate security to CIS Administration during adapter registration.
Specify security rights for plugin pages.
Assign security rights to users using security roles.
Assign security domains to an adapter.
Rights and roles in the CIS environment
In a CIS environment, roles, rights, and domains are used to control the tasks that users can perform. User access to the pages (plugins) of the CIS Administration application and the tasks that a user can perform depend on the roles assigned to a user and the rights assigned to the role.
The process for providing users with specific roles and rights to perform tasks in the CIS environment includes:
Creating and modifying roles.
Granting rights for a specific role.
Associating users with roles for one or more domains.
Using domains to group roles for specific adapters.
CIS includes the following default roles for the Synchronization pages:
Administrator—Allowed to perform all operations in the CIS environment.
Power user—Allowed to perform most daily operations including monitoring and operations that can impact the entire system. For example, this user can add and remove a reference to a Clintrial database instance, change protocols, or set up a database connection for an adapter.
User—Allowed to view the system state but cannot make changes.
CIS central administration includes the following default roles for the administration pages:
Security Admin—View and modify security pages.
Config Admin—View and modify adapters, pages (plugins), security configuration, and general

Chapter 2 CIS Administration
50 Clintrial Integration Solution 4.6 SP0
configuration.
Adapter User—View a list of adapters and use adapters.
CIS includes the System User Role, a default role that gives the rights to perform any platform-based tasks. The System User Role does not provide any CIS-specific rights.
CIS synchronization page rights and assignments to default roles
CIS synchronization page rights provide access to the different pages of the CIS Administration applications and are used to control the tasks a user can perform. The rights available for a CIS user must be associated to at least one role and can be associated with many roles. If a user logon has been assigned to a specific role and rights have been granted to the role, a user can perform the task associated with a specific role. The following table defines each right and indicates the default roles with which it is associated.
Role association Right Action allowed
Admin-istrator
Power user
User
View Sync Connections View the Synchronization Connections tab.
View Notifications View the Notifications tab.
View load Balancing View the Load Balancing tab.
View Database Settings View the Database Settings tab for a synchronization connection.
View Named Schedules View the Named Schedules tab.
View Settings View the Settings tab for global synchronization information.
View Sync Info View the General tab for a synchronization connection.
View Sync Settings View the Synchronization Settings tab for a synchronization connection.
View Sync Actions View the Synchronization Actions tab for a synchronization connection.
View Sync Status View the Synchronization Status tab for a synchronization connection.
View Sync Errors View the errors of a synchronization job.

CIS Administrator Guide
Clintrial Integration Solution 4.6 SP0 51
Role association Right Action allowed
Admin-istrator
Power user
User
Create Sync Connections Create a new synchronization connection.
Create Notifications Create a new notification.
Create Clintrial Connections Create a new Clintrial connection.
Create named Schedules Create a new named synchronization schedule.
Edit Sync Connections Edit an existing synchronization connection.
Edit load Balance Machines Set a load-balanced machine online or offline.
Edit Notifications Edit an email notification.
Edit a Named Schedule Edit a named synchronization schedule.
Edit CIS Connection Edit CIS database connection information.
Edit Clintrial Connections Edit a Clintrial connection.
Edit Global Settings Edit the global synchronization settings.
Edit Transactions Edit a failed transaction.
Sync Now Start a synchronization.
Remove Sync Delete a synchronization.
Reset Protocol Reset a protocol.
Create Study Book Auto-create a study book.
Send Test Email Send a test email from the Notifications tab.
Data Recovery Perform a data recovery.
Delete Notification Delete an email notification.
Remove Clintrial Connections Delete a Clintrial connection.
Delete a Named Schedule Delete a named schedule.

Chapter 2 CIS Administration
52 Clintrial Integration Solution 4.6 SP0
CIS central administration page rights and assignments to default roles
CIS administration rights are associated with specific administrative roles and control the central administration tasks a user can perform. The following table defines each right and indicates the default roles with which it is associated.
Role association* Right Action allowed
CA SA AU
Register A New Adapter With Central Administration
Register a new adapter with CIS Administration.
Modify An Adapter's General Settings
Modify the general settings for an adapter.
Use And View An Adapter Use and view an adapter.
Modify Central Administration General Configuration Setting
Modify the general configuration settings for CIS central administration.
Modify Central Administration Security Configuration Setting
Modify the security configuration settings for CIS central administration.
View And Administer Central Admin Adapter UI Plugins
View and manage interface pages (plugins) for the CIS central administration adapter.
View The Registered Adapter List View the list of registered adapters.
Administer Security For Users, Roles and Adapter Domains
Manage security for users, roles, and adapter domains.
Create A New User Create a new user.
Edit A User's Standard Security Profile
Modify the standard security profile for a user.
Modify A User's State Modify the state of a user.
Modify A User's Granted Roles Modify the roles granted to a user.
Create A New Role Create a new role.
Edit A Role's Standard Security Profile
Modify the standard security profile for a role.
Modify A Role's Granted Rights Modify the rights granted to a role.
View and Modify An Adapter's Security Domain
View and modify the security domain of an adapter.
* Roles: CA=Config Admin. SA=Security Admin. AU=Adapter User.

CIS Administrator Guide
Clintrial Integration Solution 4.6 SP0 53
Security Administration page
You view and manage security from the Security Administration page.
The Security Administration page has the following tabs:
Users—Displays information about all of the current users defined for the CIS environment, including their account status.
Roles—Displays information about all the security roles defined for the CIS environment.
Domains—Displays information about the domains assigned to adapters.
From the Security Administration page, you can view and manage:
Users (on page 54).
Roles (on page 57).
Domains (on page 60).
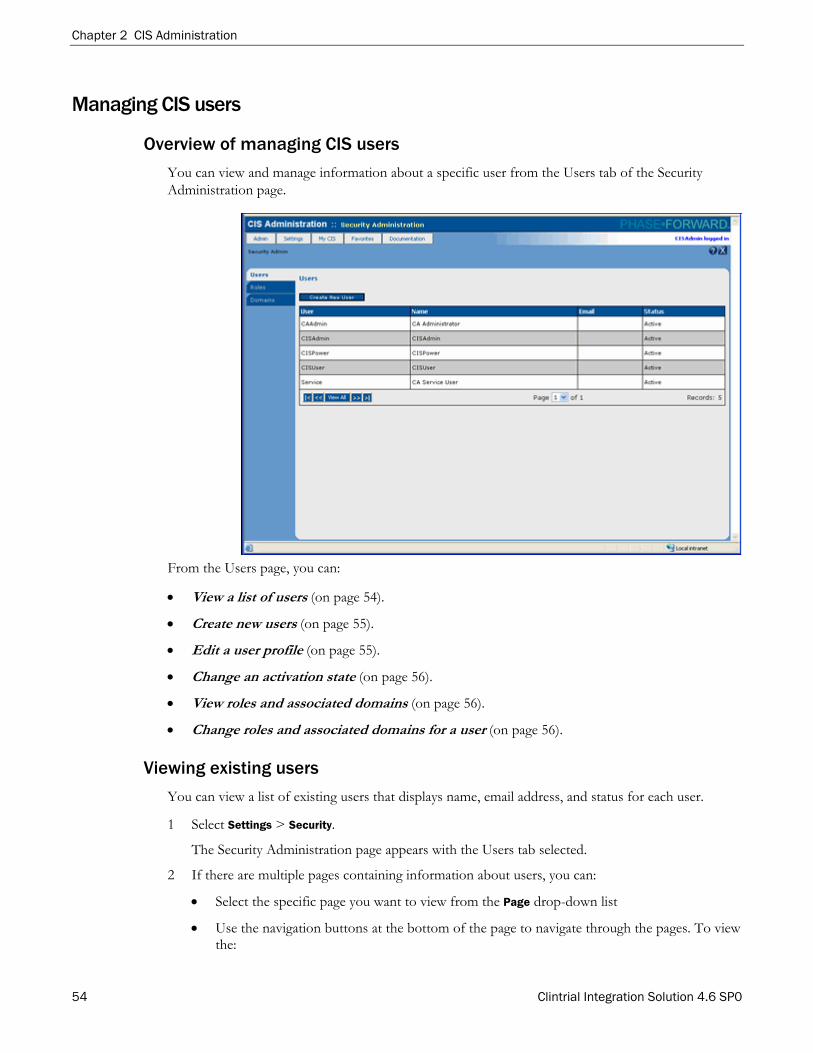
Chapter 2 CIS Administration
54 Clintrial Integration Solution 4.6 SP0
Managing CIS users
Overview of managing CIS users
You can view and manage information about a specific user from the Users tab of the Security Administration page.
From the Users page, you can:
View a list of users (on page 54).
Create new users (on page 55).
Edit a user profile (on page 55).
Change an activation state (on page 56).
View roles and associated domains (on page 56).
Change roles and associated domains for a user (on page 56).
Viewing existing users
You can view a list of existing users that displays name, email address, and status for each user.
1 Select Settings > Security.
The Security Administration page appears with the Users tab selected.
2 If there are multiple pages containing information about users, you can:
Select the specific page you want to view from the Page drop-down list
Use the navigation buttons at the bottom of the page to navigate through the pages. To view the:
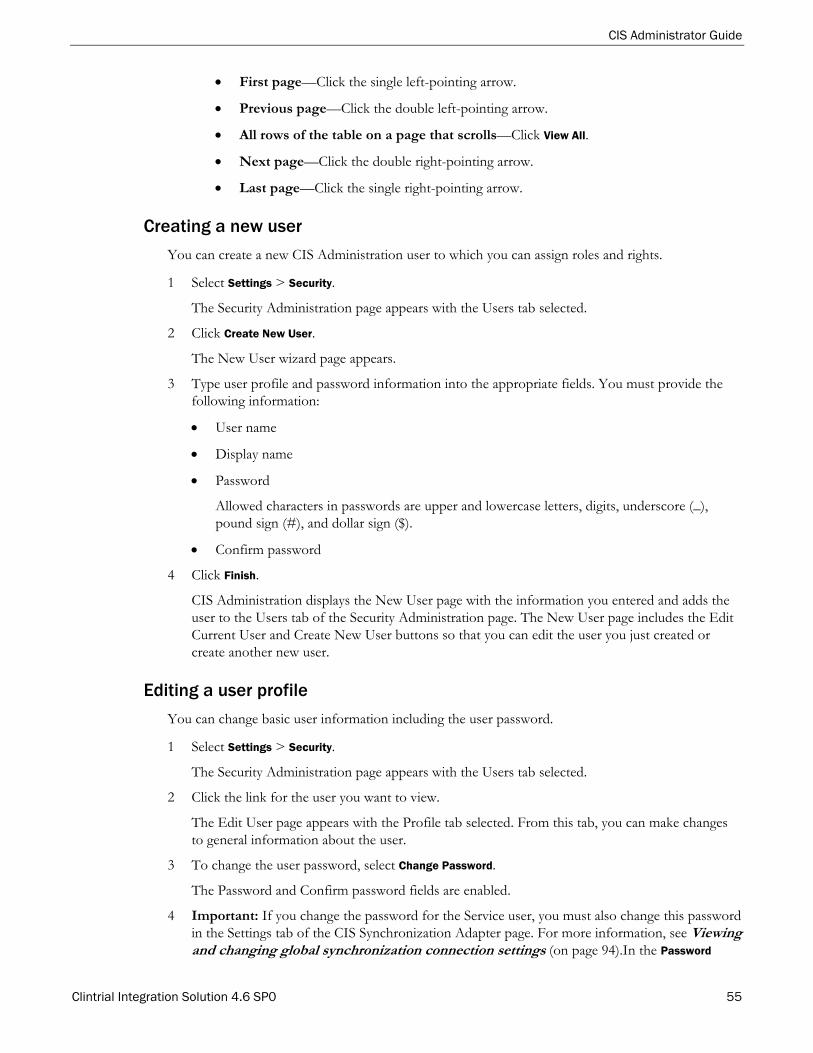
CIS Administrator Guide
Clintrial Integration Solution 4.6 SP0 55
First page—Click the single left-pointing arrow.
Previous page—Click the double left-pointing arrow.
All rows of the table on a page that scrolls—Click View All.
Next page—Click the double right-pointing arrow.
Last page—Click the single right-pointing arrow.
Creating a new user
You can create a new CIS Administration user to which you can assign roles and rights.
1 Select Settings > Security.
The Security Administration page appears with the Users tab selected.
2 Click Create New User.
The New User wizard page appears.
3 Type user profile and password information into the appropriate fields. You must provide the following information:
User name
Display name
Password
Allowed characters in passwords are upper and lowercase letters, digits, underscore (_), pound sign (#), and dollar sign ($).
Confirm password
4 Click Finish.
CIS Administration displays the New User page with the information you entered and adds the user to the Users tab of the Security Administration page. The New User page includes the Edit Current User and Create New User buttons so that you can edit the user you just created or create another new user.
Editing a user profile
You can change basic user information including the user password.
1 Select Settings > Security.
The Security Administration page appears with the Users tab selected.
2 Click the link for the user you want to view.
The Edit User page appears with the Profile tab selected. From this tab, you can make changes to general information about the user.
3 To change the user password, select Change Password.
The Password and Confirm password fields are enabled.
4 Important: If you change the password for the Service user, you must also change this password in the Settings tab of the CIS Synchronization Adapter page. For more information, see Viewing and changing global synchronization connection settings (on page 94).In the Password

Chapter 2 CIS Administration
56 Clintrial Integration Solution 4.6 SP0
field, type a new password.
Note: When you create a password, you must follow the rules and requirements defined in the Configuration Settings page. For more information, see Viewing and changing security settings (on page 47).
5 In the Confirm Password field, retype the password.
6 Click Save.
Changing the activation state of a user
You can change the activation state of a user when the administrative role of the user changes.
1 Select Settings > Security.
The Security Administration page appears with the Users tab selected.
2 Click the row of the user you want to change.
The Edit User page appears with the Profile tab selected.
3 Select State.
The State tab appears.
4 In the User state field, click the appropriate user state: Active, Inactive, or Terminated.
Note: For a newly created user, CIS Administration sets the User state to Inactive.
5 Click Save.
Viewing roles and associated domains for a user
1 Select Settings > Security.
The Security Administration page appears with the Users tab selected.
2 Click the row of the user you want to view.
The Edit User page appears with the Profile tab selected.
3 Select Roles.
The Roles tab appears with the Modify Roles view selected.
4 Select View Current Roles.
The Roles tab displays the domains and roles that are currently assigned to the user.
5 If you want to change the view based on domains, select a domain from the Filter Domains drop-down list.
Changing roles associated with a user
You can change the roles granted to a user and the domain associated with the role. The roles are used to create an association with a user, a role, and a domain.
1 Select Settings > Security.
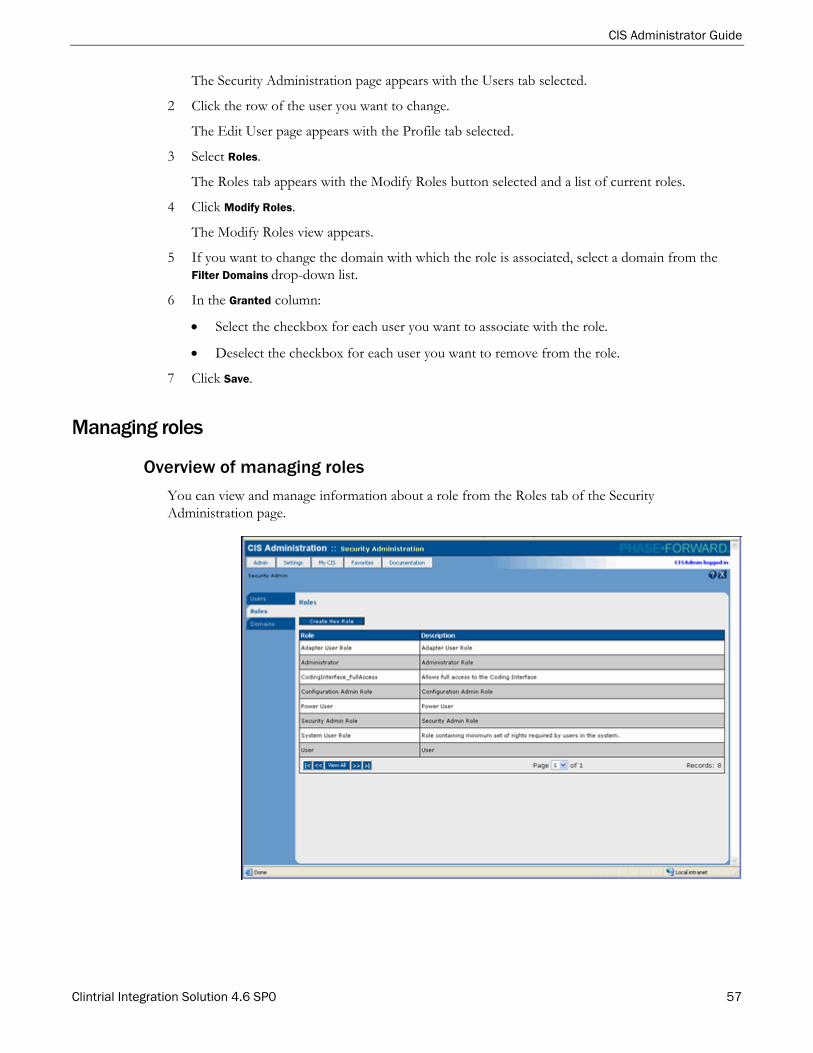
CIS Administrator Guide
Clintrial Integration Solution 4.6 SP0 57
The Security Administration page appears with the Users tab selected.
2 Click the row of the user you want to change.
The Edit User page appears with the Profile tab selected.
3 Select Roles.
The Roles tab appears with the Modify Roles button selected and a list of current roles.
4 Click Modify Roles.
The Modify Roles view appears.
5 If you want to change the domain with which the role is associated, select a domain from the Filter Domains drop-down list.
6 In the Granted column:
Select the checkbox for each user you want to associate with the role.
Deselect the checkbox for each user you want to remove from the role.
7 Click Save.
Managing roles
Overview of managing roles
You can view and manage information about a role from the Roles tab of the Security Administration page.
Chapter 2 CIS Administration
58 Clintrial Integration Solution 4.6 SP0
From the Roles tab on the Security Administration page, you can:
View a list of security roles (on page 58).
Create a new security role (on page 58).
Change a security role (on page 59).
Viewing a list of security roles
From the Roles tab on the Security Administration page, you can view a list of security roles already defined.
1 Select Settings > Security.
The Security Administration page appears with the Users tab selected.
2 Select Roles.
The Roles tab appears and displays a list of currently defined roles.
3 If there are multiple pages containing information about roles, you can:
Select the specific page you want to view from the Page drop-down list
Use the navigation buttons at the bottom of the page to navigate through the pages. To view the:
First page—Click the single left-pointing arrow.
Previous page—Click the double left-pointing arrow.
All rows of the table on a page that scrolls—Click View All.
Next page—Click the double right-pointing arrow.
Last page—Click the single right-pointing arrow.
Creating a new security role
You can create a new security role that you can associate with users, rights, and an associated domain.
1 Select Settings > Security.
The Security Administration page appears with the Users tab selected.
2 Select Roles.
The Roles tab appears and displays a list of currently defined roles.
3 Click Create New Role.
The New Role wizard page appears.
4 In the Role name field, type the name of the role.
5 In the Role description field, type a description of the role.
6 Click Finish.
CIS Administration displays the New Role page with the name and description you entered and adds the role to the Roles tab of the Security Administration page. The New Role page includes the Edit Current Role and Create New Role buttons so that you can edit the role you just created
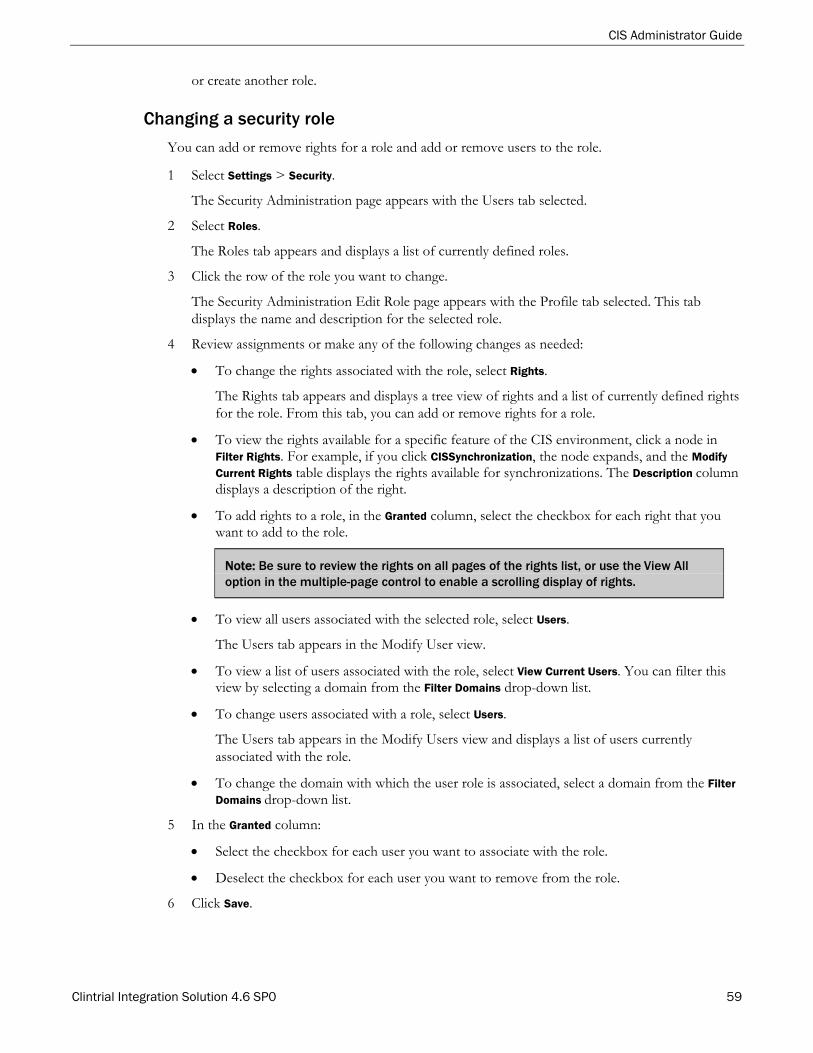
CIS Administrator Guide
Clintrial Integration Solution 4.6 SP0 59
or create another role.
Changing a security role
You can add or remove rights for a role and add or remove users to the role.
1 Select Settings > Security.
The Security Administration page appears with the Users tab selected.
2 Select Roles.
The Roles tab appears and displays a list of currently defined roles.
3 Click the row of the role you want to change.
The Security Administration Edit Role page appears with the Profile tab selected. This tab displays the name and description for the selected role.
4 Review assignments or make any of the following changes as needed:
To change the rights associated with the role, select Rights.
The Rights tab appears and displays a tree view of rights and a list of currently defined rights for the role. From this tab, you can add or remove rights for a role.
To view the rights available for a specific feature of the CIS environment, click a node in Filter Rights. For example, if you click CISSynchronization, the node expands, and the Modify Current Rights table displays the rights available for synchronizations. The Description column displays a description of the right.
To add rights to a role, in the Granted column, select the checkbox for each right that you want to add to the role.
Note: Be sure to review the rights on all pages of the rights list, or use the View All option in the multiple-page control to enable a scrolling display of rights.
To view all users associated with the selected role, select Users.
The Users tab appears in the Modify User view.
To view a list of users associated with the role, select View Current Users. You can filter this view by selecting a domain from the Filter Domains drop-down list.
To change users associated with a role, select Users.
The Users tab appears in the Modify Users view and displays a list of users currently associated with the role.
To change the domain with which the user role is associated, select a domain from the Filter Domains drop-down list.
5 In the Granted column:
Select the checkbox for each user you want to associate with the role.
Deselect the checkbox for each user you want to remove from the role.
6 Click Save.

Chapter 2 CIS Administration
60 Clintrial Integration Solution 4.6 SP0
Managing domains
Overview of managing domains
You can view and manage information about adapter domains from the Domains tab of the Security Administration page.
Domains are used to group multiple adapters so that you can assign different roles to each adapter domain.
An adapter then uses its assigned domain when it grants a user access to the CIS administrative features for the adapter. The tasks a user can perform are determined by the roles that have been granted to a user for a specific domain.
Note: The Service user is used by CIS to contact adapters during adapter administration. Therefore, the Service user must have roles assigned to the domains for the adapters.
From the Domains tab of the Security Administration page, you can perform the following tasks:
View a list of adapters and assigned domains (on page 60).
Assign an adapter to a domain (on page 61).
Create a new domain (on page 61).
Viewing a list of adapters and associated domain
1 Select Settings > Security.
The Security Administration page appears with the Users tab selected.
2 Select Domains.
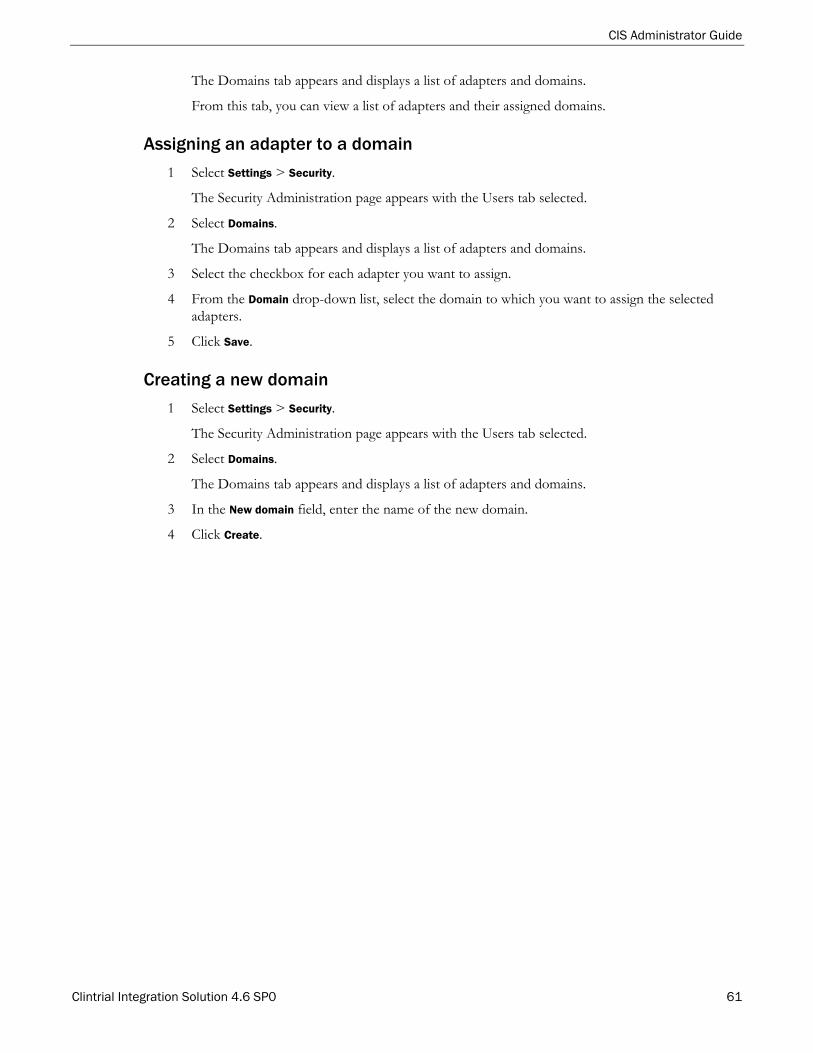
CIS Administrator Guide
Clintrial Integration Solution 4.6 SP0 61
The Domains tab appears and displays a list of adapters and domains.
From this tab, you can view a list of adapters and their assigned domains.
Assigning an adapter to a domain
1 Select Settings > Security.
The Security Administration page appears with the Users tab selected.
2 Select Domains.
The Domains tab appears and displays a list of adapters and domains.
3 Select the checkbox for each adapter you want to assign.
4 From the Domain drop-down list, select the domain to which you want to assign the selected adapters.
5 Click Save.
Creating a new domain
1 Select Settings > Security.
The Security Administration page appears with the Users tab selected.
2 Select Domains.
The Domains tab appears and displays a list of adapters and domains.
3 In the New domain field, enter the name of the new domain.
4 Click Create.

Chapter 2 CIS Administration
62 Clintrial Integration Solution 4.6 SP0

Clintrial Integration Solution 4.6 SP0 63
In this chapter Definition of synchronization.............................................................................................................64
Overview of synchronization connection administration tasks ....................................................65
Viewing synchronization connections...............................................................................................67
Creating a synchronization connection .............................................................................................72
Monitoring and editing synchronization connections ....................................................................83
Viewing and changing global synchronization connection settings .............................................94
Removing a synchronization connection..........................................................................................97
Resetting a protocol and replaying synchronization transactions .................................................99
Managing email notifications ............................................................................................................102
Managing named synchronization schedules .................................................................................107
Managing Clintrial database instances for synchronizations........................................................110
Starting a synchronization manually ................................................................................................114
Data recovery.......................................................................................................................................115
C H A P T E R 3
Administering synchronization connections
Chapter 3 Administering synchronization connections
64 Clintrial Integration Solution 4.6 SP0
Definition of synchronization Synchronization is the process of transferring metadata and clinical data between the InForm software and the Clintrial software. To enable synchronization, you define a synchronization connection from an InForm study to a study protocol within a target Clintrial database instance that is addressable by the CIS machine.
During synchronization, CIS transfers InForm transactions to the CIS Adapter. From the CIS Adapter, the Clintrial Adapter transfers transactions to the Clintrial database. Return transactions carry query data from the Clintrial software to CIS and from there to the InForm software.
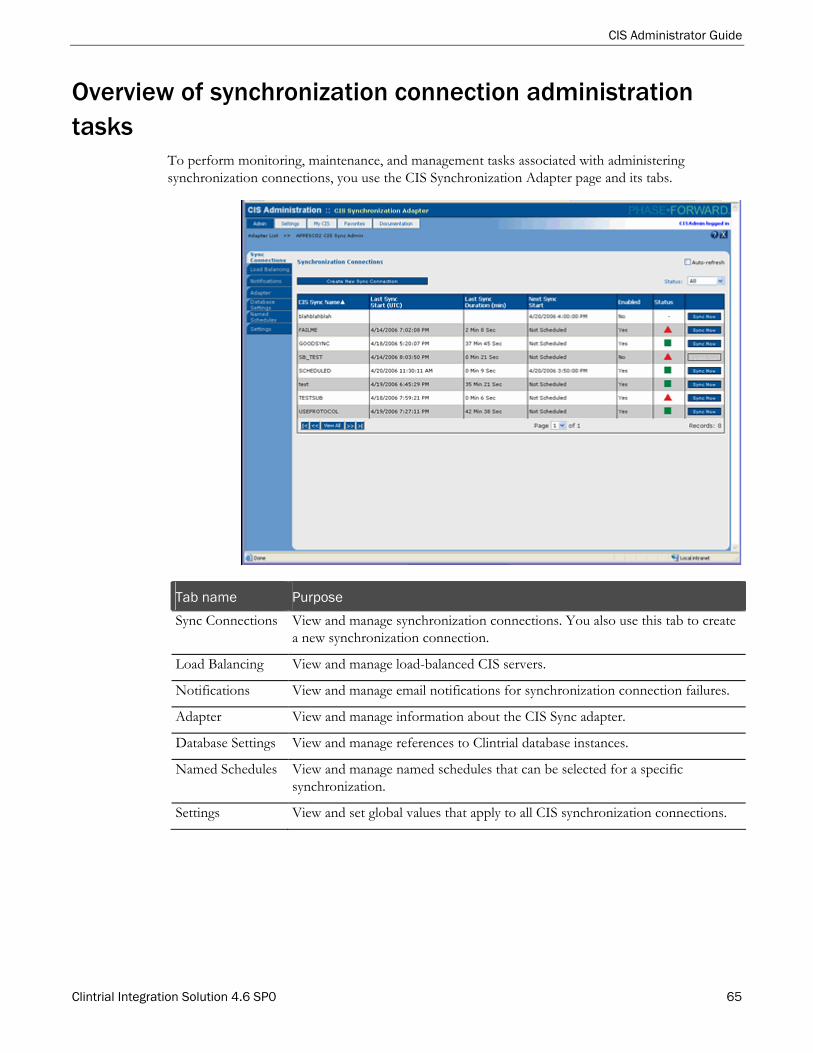
CIS Administrator Guide
Clintrial Integration Solution 4.6 SP0 65
Overview of synchronization connection administration tasks
To perform monitoring, maintenance, and management tasks associated with administering synchronization connections, you use the CIS Synchronization Adapter page and its tabs.
Tab name Purpose
Sync Connections View and manage synchronization connections. You also use this tab to create a new synchronization connection.
Load Balancing View and manage load-balanced CIS servers.
Notifications View and manage email notifications for synchronization connection failures.
Adapter View and manage information about the CIS Sync adapter.
Database Settings View and manage references to Clintrial database instances.
Named Schedules View and manage named schedules that can be selected for a specific synchronization.
Settings View and set global values that apply to all CIS synchronization connections.
Chapter 3 Administering synchronization connections
66 Clintrial Integration Solution 4.6 SP0
From these pages, you can perform setup, administrative, and monitoring tasks for synchronization connections in a CIS environment. These tasks include:
Viewing information about synchronization connections (on page 67).
Creating a synchronization connection (on page 72).
Monitoring and editing synchronization connections (on page 83).
Viewing and changing global values for synchronization connections (on page 94).
Removing a synchronization connection (on page 97).
Resetting a protocol and replaying synchronization transactions (on page 99).
Autocreating a Clintrial software study book (on page 73).
Monitoring load balancing (on page 122).
Managing email notifications (on page 102).
Managing synchronization schedules (on page 107).
Managing Clintrial database instances (on page 110).
Starting synchronization manually (on page 114).
Recovering data (on page 115).

CIS Administrator Guide
Clintrial Integration Solution 4.6 SP0 67
Viewing synchronization connections
Overview of viewing synchronization connections The Sync Connections tab on the CIS Synchronization Adapter page displays a list of current synchronization connections and provides details about each synchronization connection.
For more information, see:
Sync Connections tab of the CIS Synchronization Adapter page - Fields (on page 69).
Adapter tab of the Admin Adapter page - Fields. (on page 38)
You use the Sync Connections tab of the CIS Synchronization Adapter page to view and manage synchronization connections. From the Sync Connections tab, you can:
View a list of synchronization connections (on page 67).
Enable and disable auto-refresh (on page 67).
Filter the list based on status (on page 68).
Sort the list of synchronization connections (on page 68).
Viewing a list of synchronization connections 1 Select Admin > CIS Sync.
If only one adapter is configured and registered in the CIS environment, the CIS Synchronization Adapter page appears with the Sync Connections tab selected.
or
If multiple adapters are configured and registered in the CIS environment, the Adapter List page appears and displays a list of adapters.
2 If the Adapter List page appears, click the row of the CIS synchronization adapter whose synchronization connections you want to view.
The CIS Synchronization Adapter page appears with the Sync Connections tab selected.
Enabling and disabling auto-refresh of a CIS Synchronization Adapter You can enable or disable the auto-refresh option for adapters. If you enable the option, the page automatically refreshes based on the value entered for the auto-refresh rate.
For more information, see Setting a home page and auto-refresh rate (on page 29).
Note: Depending on the auto-refresh rate and your environment, selecting Auto-refresh might impact the performance of the application.
1 Select Admin > CIS Sync.

Chapter 3 Administering synchronization connections
68 Clintrial Integration Solution 4.6 SP0
If only one adapter is configured and registered in the CIS environment, the CIS Synchronization Adapter page appears with the Sync Connections tab selected.
or
If multiple adapters are configured and registered in the CIS environment, the Adapter List page appears and displays a list of adapters.
2 If the Adapter List page appears, click the row of the CIS synchronization adapter whose synchronization connections you want to view.
The CIS Synchronization Adapter page appears with the Sync Connections tab selected.
3 To enable or disable auto refresh, select one of the following:
To automatically refresh the page at the configured rate, select Auto-refresh.
To specify that the page refreshes manually, deselect Auto-refresh (the default).
4 Click Save.
Filtering the synchronization connection list by status You can change which synchronization connections appear in the table by selecting a different view Status.
1 Select Admin > CIS Sync.
If only one adapter is configured and registered in the CIS environment, the CIS Synchronization Adapter page appears with the Sync Connections tab selected.
or
If multiple adapters are configured and registered in the CIS environment, the Adapter List page appears and displays a list of adapters.
2 If the Adapter List page appears, click the row of the CIS synchronization adapter whose synchronization connections you want to view.
The CIS Synchronization Adapter page appears with the Sync Connections tab selected.
3 From the Status drop-down list box, select the status you want to view.
The table changes to display synchronization connections that match the status you selected.
Sorting the synchronization connection list You can change how the synchronization connections appear in the table by clicking each column heading to sort the column. For example, if you click the column heading CIS Sync name, the sort order switches between ascending or descending alphabetical order.
1 Select Admin > CIS Sync.
If only one adapter is configured and registered in the CIS environment, the CIS Synchronization Adapter page appears with the Sync Connections tab selected.
or
If multiple adapters are configured and registered in the CIS environment, the Adapter List page appears and displays a list of adapters.
2 If the Adapter List page appears, click the row of the CIS synchronization adapter whose
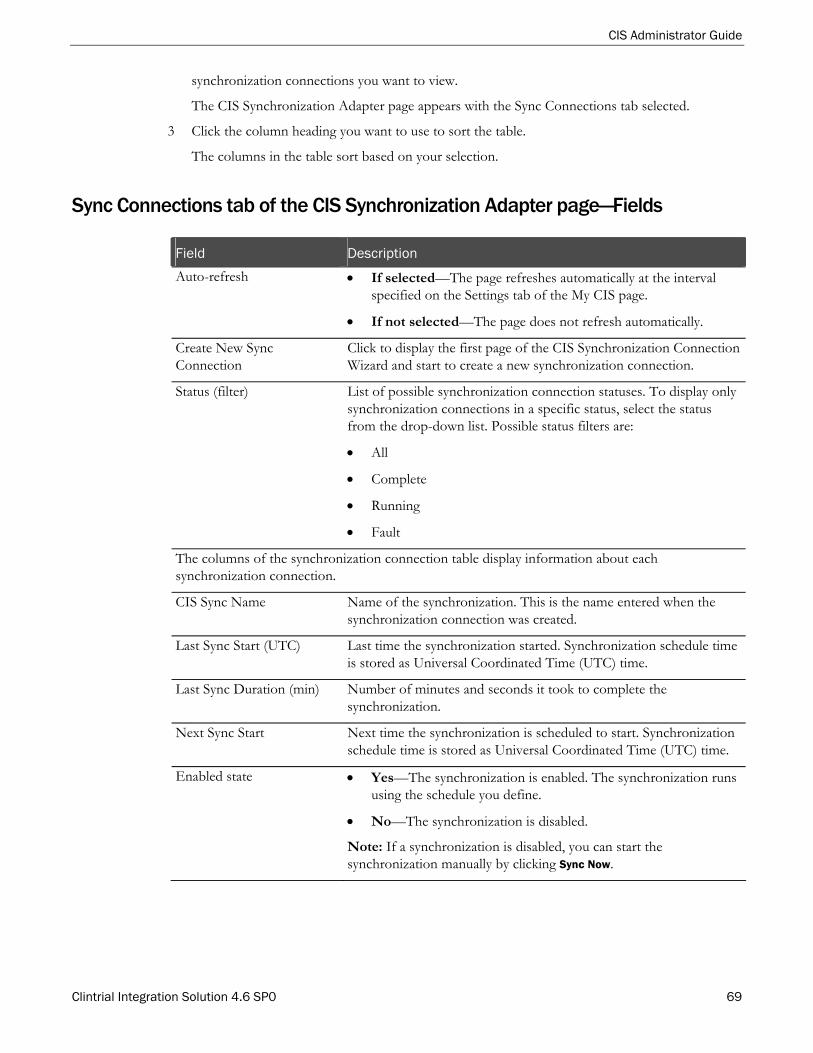
CIS Administrator Guide
Clintrial Integration Solution 4.6 SP0 69
synchronization connections you want to view.
The CIS Synchronization Adapter page appears with the Sync Connections tab selected.
3 Click the column heading you want to use to sort the table.
The columns in the table sort based on your selection.
Sync Connections tab of the CIS Synchronization Adapter page—Fields
Field Description
Auto-refresh If selected—The page refreshes automatically at the interval specified on the Settings tab of the My CIS page.
If not selected—The page does not refresh automatically.
Create New Sync Connection
Click to display the first page of the CIS Synchronization Connection Wizard and start to create a new synchronization connection.
Status (filter) List of possible synchronization connection statuses. To display only synchronization connections in a specific status, select the status from the drop-down list. Possible status filters are:
All
Complete
Running
Fault
The columns of the synchronization connection table display information about each synchronization connection.
CIS Sync Name Name of the synchronization. This is the name entered when the synchronization connection was created.
Last Sync Start (UTC) Last time the synchronization started. Synchronization schedule time is stored as Universal Coordinated Time (UTC) time.
Last Sync Duration (min) Number of minutes and seconds it took to complete the synchronization.
Next Sync Start Next time the synchronization is scheduled to start. Synchronization schedule time is stored as Universal Coordinated Time (UTC) time.
Enabled state Yes—The synchronization is enabled. The synchronization runs using the schedule you define.
No—The synchronization is disabled.
Note: If a synchronization is disabled, you can start the synchronization manually by clicking Sync Now.

Chapter 3 Administering synchronization connections
70 Clintrial Integration Solution 4.6 SP0
Field Description
Status (synchronization connection)
Run status of the synchronization. A synchronization can have the following status:
Green Square—Indicates that the last synchronization was successful and all transactions for that synchronization were sent to both the InForm software and the Clintrial software. However, this column only displays the status for the last synchronization and does not indicate that all transactions have been synchronized. If additional transactions were generated by the InForm software or the Clintrial software, these transactions do not appear until the next synchronization completes.
Orange Diamond—Indicates the synchronization is still running.
Red Triangle—Indicates an error has occurred.
Adapter tab of the Admin Adapter page—Fields
Field Description
The top section of the page displays information about the adapter.
Auto-refresh If selected—The page refreshes automatically at the interval specified on the Settings tab of the My CIS page.
If not selected—The page does not refresh automatically.
Name Name of the adapter.
Status Green check mark—Adapter status is OK.
Red X—Adapter status is Error.
Product Type Product with which the adapter is associated:
CIS—For CIS Synchronization Adapters.
Clintrial—For Clintrial Adapters.
InForm—For InForm Adapters.
Adapter Type Type of adapter:
CIS Synchronization—For CIS Synchronization Adapters.
Clintrial Admin—For Clintrial Adapters.
InForm Admin—For InForm Adapters.
URL URL for the adapter.
Enabled Yes—Adapter is enabled.
No—Adapter is disabled.
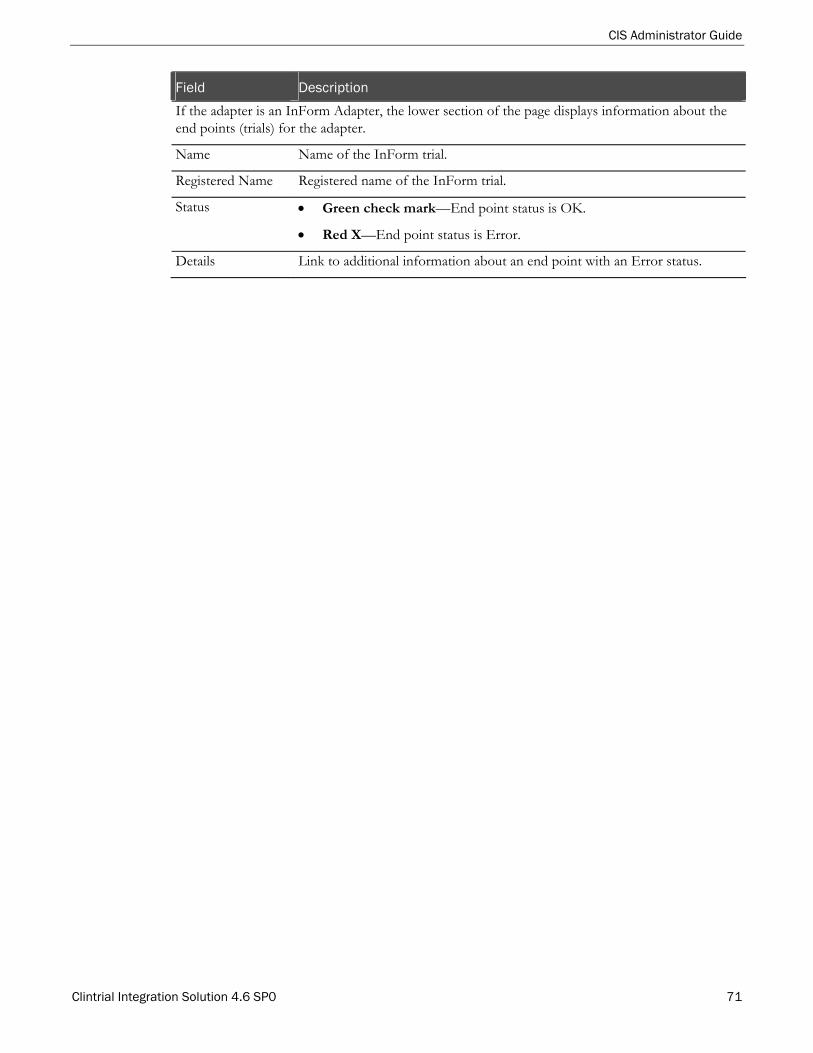
CIS Administrator Guide
Clintrial Integration Solution 4.6 SP0 71
Field Description
If the adapter is an InForm Adapter, the lower section of the page displays information about the end points (trials) for the adapter.
Name Name of the InForm trial.
Registered Name Registered name of the InForm trial.
Status Green check mark—End point status is OK.
Red X—End point status is Error.
Details Link to additional information about an end point with an Error status.

Chapter 3 Administering synchronization connections
72 Clintrial Integration Solution 4.6 SP0
Creating a synchronization connection
Overview of setting up a connection The CIS software uses synchronization to update clinical data or metadata between the InForm database and the Clintrial database.
To enable synchronization, you define a synchronization connection from an InForm study to a study protocol within a target Clintrial database instance addressable by the CIS machine.
If the target protocol does not exists in the Clintrial library, the CIS software creates it. Otherwise, the CIS software updates the existing protocol with metadata or clinical data synchronized from the InForm study.
Connections and time settings
Synchronization depends on the coordination of system clocks on the machines between which the synchronization occurs. Phase Forward strongly recommends installing a time synchronization tool on each machine involved in a CIS synchronization and making sure all clocks are set accurately before setting up a synchronization connection.
Additionally, you should be aware of how times and synchronization schedules are stored in each software component.
System date times
The CIS software components store system dates and timestamps as follows:
Software component Storage of system dates and timestamps
InForm software Stored as Universal Time (also called Greenwich Mean Time) (UTC or GMT) and displayed according to the time zone of the user site.
CIS software Stored as UTC/GMT.
Clintrial software Stored as local time on the Oracle machine.
In Clintrial audit tables, the ENTRY_DATETIME column reflects the time the record was updated in InForm software (in UTC/GMT), and the MERGE_DATETIME column reflects the time the value was updated in the Clintrial software (in the local time of the Clintrial machine).
Because the InForm and CIS machines store the same system dates and timestamps, there is no need for the machines to be set to the same time zone as long as their system clocks are synchronized. You should set the Clintrial machine to the time zone you want to use for analyzing data; UTC/GMT is suggested to minimize confusion.
CIS Administrator Guide
Clintrial Integration Solution 4.6 SP0 73
Synchronization schedule time
Synchronization schedule time is stored in UTC, and run times shown at the locations of the source and destination computers are the same.
Dates and times in patient data
When a form calls for the entry of date and time information, the InForm software database stores it as entered. Such dates and times are synchronized, without any time zone conversion, to the columns to which they are mapped in the Clintrial software.
Clintrial study book autocreation
Overview of autocreating Clintrial study books
When the CIS software performs a synchronization for the first time, it creates, optionally:
A Clintrial protocol, panels, and panel items if they do not already exist.
The study books, page templates, and page sections, either during the initial synchronization or afterwards.
When study book autocreation is enabled, during synchronization, the CIS software:
Creates new enrollment, non-patient data, and patient data study books in the target protocol if they do not already exist.
Regenerates study books if they do exist in the target protocol, overwriting the existing study books.
Note: If a non-CIS user, such as a user of the Clintrial Design module, has updated a pre-existing element, the CIS software ignores the element and does not regenerate it during regular synchronization processing. However, if you request immediate study book generation by using the Actions tab of the CIS Synchronizations page, you can specify that the CIS software regenerates elements updated by a non-CIS user and overwrites those elements.
The CIS software can detect most changes that a user makes to a protocol with the Clintrial Design module. However, some changes are not detectable by the CIS software. If a user of the Design module makes any of the following changes, the CIS software does not detect them and overwrites those changes:
Deleting the last page template from a block.
Deleting the last block from a study book.
Changing the order of page sections in a page template.
Chapter 3 Administering synchronization connections
74 Clintrial Integration Solution 4.6 SP0
You can enable study book autocreation by:
Creating a synchronization connection with study book autocreation enabled (on page 76).
Changing a synchronization connection definition to enable study book autocreation (on page 88).
Requesting immediate study book autocreation (on page 74).
Timing of study book autocreation
After generating a complete set of XML definitions for the study books of a protocol, the CIS software creates the study books and their components.
Study book autocreation can occur:
When a user requests study book autocreation by clicking the Create Study Books button on the Actions tab of the CIS Synchronizations page in the CIS Administration application.
When the CIS software detects that autocreation is necessary. The CIS software determines that autocreation is needed if it processes any of the following types of transactions from the InForm software:
STUDYVERSION XML definitions.
Data mappings.
Any InForm metadata that causes an autogenerated codelist to be attached to a Clintrial item. Examples are metadata definitions for radio controls and dropdown lists.
The CIS software does not autocreate study books if any of the following are true:
The protocol is closed for revision or is locked.
The synchronization connection is not defined to autocreate study books.
Requesting immediate autocreation of a study book
If a synchronization connection exists, you can have the CIS software autocreate or update the study books for the Clintrial protocol immediately.
1 Select Admin > CIS Sync.
If only one adapter is configured and registered in the CIS environment, the CIS Synchronization Adapter page appears with the Sync Connections tab selected.
or
If multiple adapters are configured and registered in the CIS environment, the Adapter List page appears and displays a list of adapters.
2 If the Adapter List page appears, click the row of the CIS synchronization adapter whose synchronization connections you want to view.
The CIS Synchronization Adapter page appears with the Sync Connections tab selected.
3 Click the row of the synchronization connection that you want to update.

CIS Administrator Guide
Clintrial Integration Solution 4.6 SP0 75
The CIS Synchronizations page appears.
4 Select Actions.
The Actions tab appears.
5 Click Create Study Books.
A confirmation page appears.
6 If you want the study book autocreation process to overwrite changes made by non-CIS users (for example, users of Clintrial Design), select Overwrite non-CIS changes.
7 Click Create Study Books.
Clintrial panel and item autocreation
Overview of autocreating Clintrial panels and items
By default, the CIS software creates a Clintrial protocol, panels, and panel items during synchronization if they do not already exist. If a protocol, panels, and panel items exist, and new metadata is received in mapping definitions, the CIS software updates the protocol, panels, and panel items to match the mapping definitions.
This behavior is optional. When you define or update a synchronization connection, you can specify whether you want the CIS software to create or update the protocol, panels, and panel items.
For more information, see:
Creating a synchronization connection using the connection wizard (Specifying a Clintrial protocol) (on page 77).
Viewing and changing settings for a synchronization connection (on page 88).
The following table summarizes the impact of choosing for the CIS software not to create or update Clintrial protocol, panels, and panel items.
Software area Effect on synchronization if Create panels and items = No
Study book creation None.
Codelist creation None.

Chapter 3 Administering synchronization connections
76 Clintrial Integration Solution 4.6 SP0
Software area Effect on synchronization if Create panels and items = No
Mappings The CIS software does not create the panels and items defined by mapping definitions. However, the following validation occurs to determine whether the Clintrial panels or items match the incoming mappings:
When the CONTEXTPANEL tag is received, the CIS software verifies that a CONTEXT panel exists for the protocol. If a CONTEXT panel does not exist, validation fails.
For CTITEM tags inside the CONTEXTPANEL tag, no additional validation is performed.
When a CTPANEL tag is received, the CIS software verifies that the panel exists and is installed. If the panel does not exist or is not installed, validation fails.
For a CTITEM tag inside the CTPANEL tag, the CIS software verifies that the item exists in the panel. The item type is not checked. If the item does not exist in the panel, validation fails
The CIS software ignores all other properties of the panel from the mappings, including the master-detail information.
If validation fails, synchronization stops processing. To continue, make corrections in the Clintrial software or in the mapping definitions and the CIS software:
Alter the protocol in Clintrial Design so it passes the CIS validation.
Remove the synchronization connection in the CIS software, alter the mapping definitions so they will pass validation, and re-create the synchronization connection to the same protocol.
Rules The CIS software does not create or update Clintrial rules and derivations. No validation checks are performed to verify that rules or derivations exist in the Clintrial protocol.
Protocols The CIS software does not create a Clintrial protocol. If the protocol specified in the synchronization connection definition does not exist, synchronization fails.
Creating a synchronization connection using the connection wizard
Overview of creating a synchronization connection using the connection wizard
To help you create a synchronization connection, CIS Administration provides a synchronization connection wizard. Using the pages of the synchronization connection wizard, you:
1 Specify how the synchronization connection communicates.
2 Specify the Clintrial software database instance with which the synchronization connection communicates.
3 Specify the Clintrial software protocol with which the synchronization connection
CIS Administrator Guide
Clintrial Integration Solution 4.6 SP0 77
communicates (on page 77).
4 Select the InForm Adapter, trial, and mapping definition used by the synchronization connection (on page 77).
5 Select or define a synchronization schedule, or specify that the synchronization connection does not use a schedule (on page 78).
6 Review and save the definition of the synchronization connection (on page 78).
Specifying how the synchronization connection communicates
You begin creating a new synchronization connection from the main CIS Administration page. If you are not logged on to CIS Administration, see Logging on to the CIS Administration application (on page 18).
To provide general information about the synchronization connection:
1 Select Admin > CIS Sync.
The CIS Synchronization Adapter page appears.
2 Click Create New Sync Connection.
The CIS Synchronization Connection Wizard - Connection Settings page appears.
3 Complete the fields on the page, and click Next.
The CIS Synchronization Connection Wizard - Clintrial Instance page appears.
For more information, see CIS Synchronization Connection Wizard - Connection Settings page - Fields (on page 79).
Identifying the Clintrial database instance
1 If the Clintrial Machine field has a drop-down list, select the computer where the Clintrial instance for the synchronization connection is installed.
2 If the Clintrial Machine field has a drop-down list, in the Clintrial Instance group, click Register new.
3 Complete the fields on the page, and click Next.
The CIS Synchronization Connection Wizard - Clintrial Protocol page appears.
For more information, see CIS Synchronization Connection Wizard - Clintrial Instance page - Fields (on page 80).
Specifying a Clintrial protocol
Complete the fields on the page, and click Next.
The CIS Synchronization Connection Wizard - InForm Trial page appears.
For more information, see CIS Synchronization Connection Wizard Clintrial Protocol page - Fields (on page 80).
Selecting an InForm trial
1 From the InForm machine drop-down list, select the computer where the InForm Adapter is

Chapter 3 Administering synchronization connections
78 Clintrial Integration Solution 4.6 SP0
registered.
The CIS software populates the InForm trial drop-down list when you select a machine.
Note: If only one Adapter is registered, this drop-down list does not appear.
2 From the InForm trial drop-down list, select the InForm software trial for the synchronization connection.
The CIS software populates the Mapping drop-down list with the names of the mapping definitions that exist for the selected trial.
3 From the Mapping drop-down list, select the mapping definition to use when synchronizing data for the trial.
4 Click Next.
The CIS Synchronization Connection Wizard - Schedule page appears.
Specifying a schedule
For the synchronization connection, you can select an existing named schedule, create a custom schedule, or not schedule the synchronization. If you do not define a schedule for the synchronization connection, you must manually run the synchronization. For more information, see Starting synchronization manually (on page 114).
To select a schedule or define a new schedule for a synchronization connection:
1 Select the type of schedule that you want for the synchronization connection.
2 Complete the fields on the page, and click Next.
The CIS Synchronization Connection Wizard - Summary wizard page appears.
For more information, see CIS Synchronization Connection Wizard - Schedule page - Fields (on page 81).
Reviewing and saving a new connection
After you provide information for the synchronization connection, use the Summary page to review the information about the synchronization connection. If you want to make changes, you can navigate to previous pages to make changes, or you can save the synchronization connection.
1 If the synchronization connection is not correct, click Previous to return to a page to make corrections and then use Next to return to the summary page.
2 When the synchronization connection is correct, click Finish to save it.
The Synchronization connection created successfully summary page appears. From this summary page, you can:
View all synchronization connections for this server (on page 67).
View the synchronization connection you just defined (on page 83).
Create another synchronization connection (on page 76).

CIS Administrator Guide
Clintrial Integration Solution 4.6 SP0 79
CIS Synchronization Connection Wizard—Connection Settings page—Fields
Field Description
Sync name Name of the synchronization connection.
Sync description Description of the synchronization connection.
Enabled Yes—Connection is enabled when created. When you enable a synchronization, the synchronization begins immediately when it is created. After that, the synchronization runs using the schedule you define.
No—Connection is not enabled when created.
Note: If a synchronization is disabled, you can start the synchronization manually by clicking Sync Now on the Sync Connections tab of the CIS Synchronization Adapter page.
CIS Metadata Locale Specifies the language to use when synchronizing the trial.
InForm Metadata only Yes—Connection transfers only metadata.
No—Connection transfers both metadata and patient data.
Auto-generate codelist Indicates whether CIS automatically generates Clintrial codelists when synchronizing metadata that includes radio and pulldown controls from InForm software:
Yes—CIS automatically generates codelists.
No—CIS does not automatically generate codelists.
Number of transactions per message Number of transactions in a message.
The number of transactions per message is the number of transactions per operation, including the sending and receiving of transactions between InForm Adapters and Clintrial Adapters. In general, the more transactions per message, the faster the synchronization completes because fewer requests are made to the adapters. However, when typing a value for this option, you should consider that all transactions in each operation are in memory. Therefore, if you have a number of synchronizations running, a high number of transactions per operation could result in a greater demand on memory.
Phase Forward recommends that you accept the default value of 500 for this option. A lower value might slow down a synchronization.

Chapter 3 Administering synchronization connections
80 Clintrial Integration Solution 4.6 SP0
CIS Synchronization Connection Wizard—Clintrial Instance page—Fields
Field Description
Instance Name of the Clintrial database instance.
CISUSER password Password for the CISUSER user in the database instance.
Get State Options Click to populate the State to map queries as open list box.
State to map queries as open Clintrial discrepancy status that corresponds to the InForm Open query status. There is no default; you must specify a value. This information is used for transfer of query (discrepancy) information from the Clintrial database back to the InForm database.
If the value you specify for "State to map queries as open" matches the value in the Clintrial software for "Discrepancy initial status" for the Clintrial rule, the Clintrial discrepancy maps as an Open query in the InForm software. If the values do not match, the Clintrial discrepancy maps as a Candidate query in the InForm software.
Note: If in the Clintrial software the value for "Discrepancy initial status" of a Clintrial rule is not specified, the CIS software assumes the default value "Ready to Send".
CIS Synchronization Connection Wizard—Clintrial Protocol page—Fields
Field Description
Clintrial protocol Clintrial protocol that is the target of the synchronization connection:
Existing protocol—Indicates that the synchronization connection connects to the Clintrial protocol selected in the drop-down list.
New protocol—Indicates that the synchronization creates and updates the Clintrial protocol specified in the text field.
Note: The value specified in this field becomes the name of an Oracle user. Therefore, the new protocol name must meet Oracle requirements for user names.
Note: The protocol name you specify must adhere to the following rules for naming Clintrial software objects:
Name cannot exceed 20 characters.
First character must be alphabetic.
Alphabetic and numeric characters are allowed.
Do not use any special characters, except the underscore (_).
Do not use Clintrial software reserved words. For more information, see the Clintrial Reference Guide.
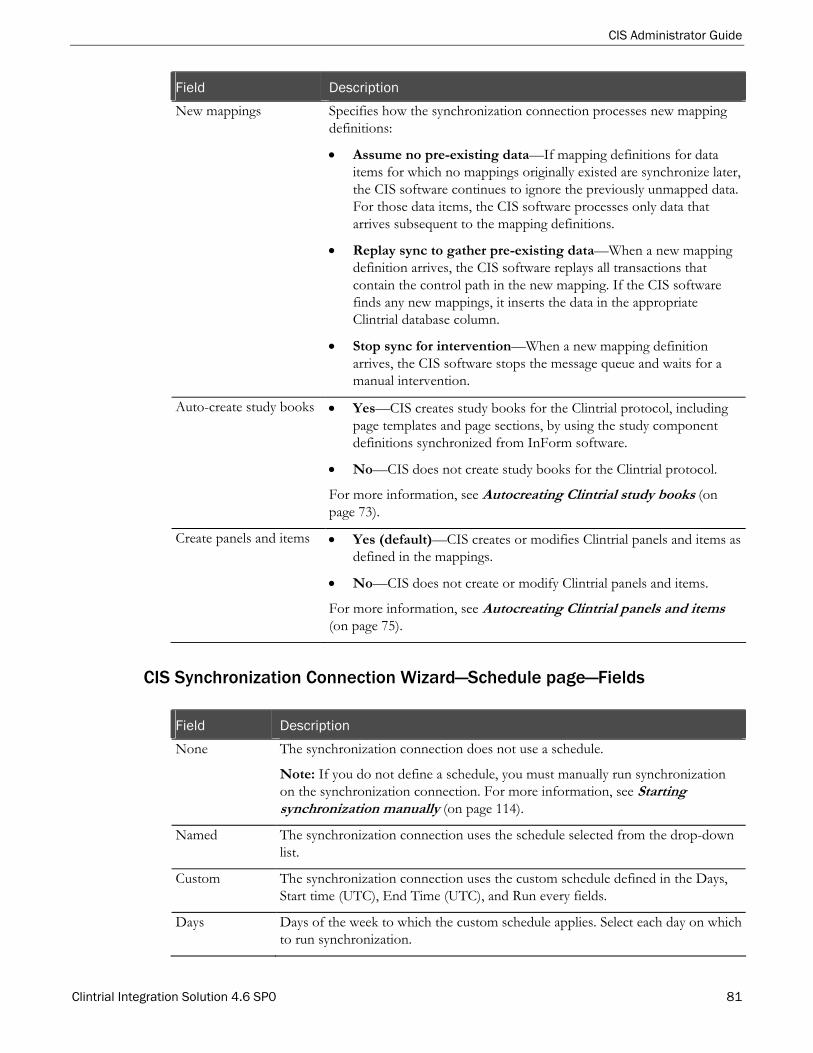
CIS Administrator Guide
Clintrial Integration Solution 4.6 SP0 81
Field Description
New mappings Specifies how the synchronization connection processes new mapping definitions:
Assume no pre-existing data—If mapping definitions for data items for which no mappings originally existed are synchronize later, the CIS software continues to ignore the previously unmapped data. For those data items, the CIS software processes only data that arrives subsequent to the mapping definitions.
Replay sync to gather pre-existing data—When a new mapping definition arrives, the CIS software replays all transactions that contain the control path in the new mapping. If the CIS software finds any new mappings, it inserts the data in the appropriate Clintrial database column.
Stop sync for intervention—When a new mapping definition arrives, the CIS software stops the message queue and waits for a manual intervention.
Auto-create study books Yes—CIS creates study books for the Clintrial protocol, including page templates and page sections, by using the study component definitions synchronized from InForm software.
No—CIS does not create study books for the Clintrial protocol.
For more information, see Autocreating Clintrial study books (on page 73).
Create panels and items Yes (default)—CIS creates or modifies Clintrial panels and items as defined in the mappings.
No—CIS does not create or modify Clintrial panels and items.
For more information, see Autocreating Clintrial panels and items (on page 75).
CIS Synchronization Connection Wizard—Schedule page—Fields
Field Description
None The synchronization connection does not use a schedule.
Note: If you do not define a schedule, you must manually run synchronization on the synchronization connection. For more information, see Starting synchronization manually (on page 114).
Named The synchronization connection uses the schedule selected from the drop-down list.
Custom The synchronization connection uses the custom schedule defined in the Days, Start time (UTC), End Time (UTC), and Run every fields.
Days Days of the week to which the custom schedule applies. Select each day on which to run synchronization.
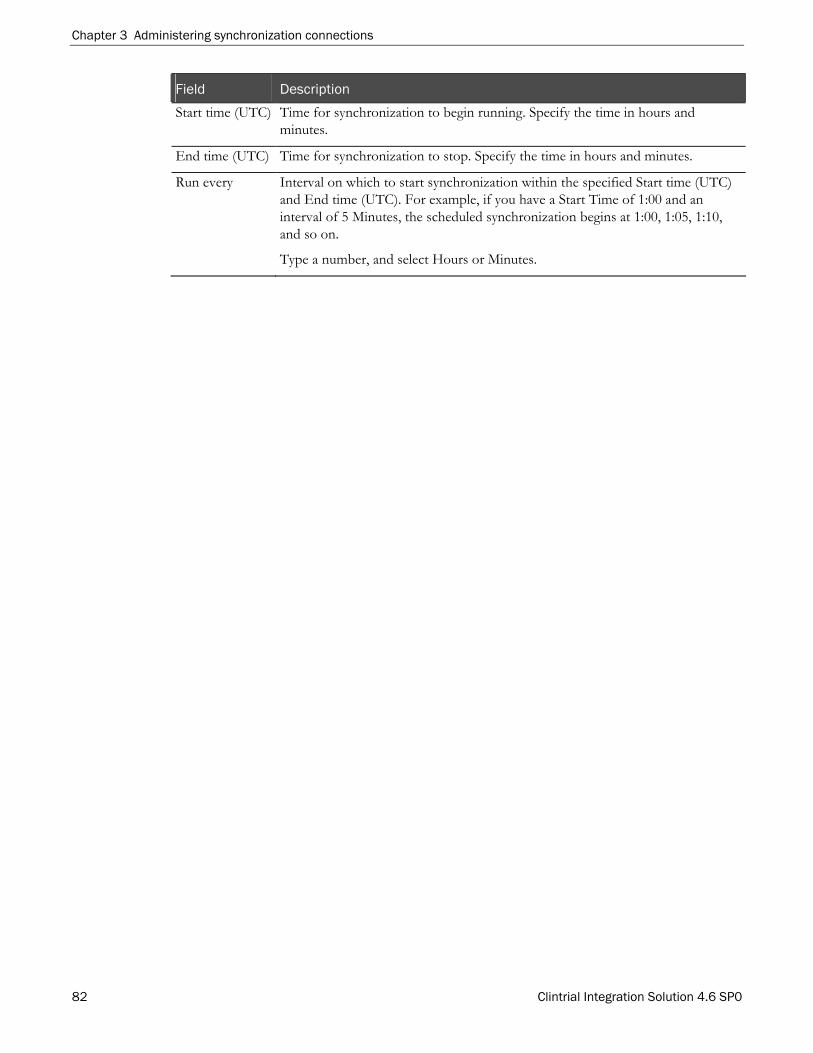
Chapter 3 Administering synchronization connections
82 Clintrial Integration Solution 4.6 SP0
Field Description
Start time (UTC) Time for synchronization to begin running. Specify the time in hours and minutes.
End time (UTC) Time for synchronization to stop. Specify the time in hours and minutes.
Run every Interval on which to start synchronization within the specified Start time (UTC) and End time (UTC). For example, if you have a Start Time of 1:00 and an interval of 5 Minutes, the scheduled synchronization begins at 1:00, 1:05, 1:10, and so on.
Type a number, and select Hours or Minutes.
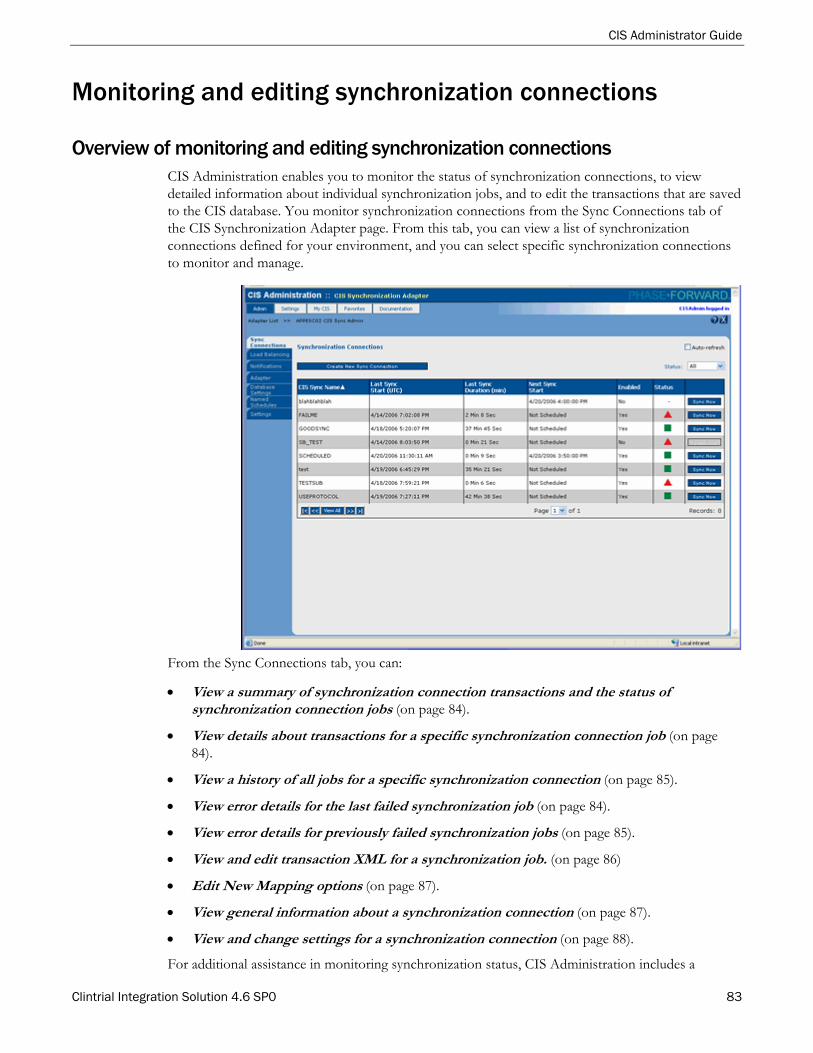
CIS Administrator Guide
Clintrial Integration Solution 4.6 SP0 83
Monitoring and editing synchronization connections
Overview of monitoring and editing synchronization connections CIS Administration enables you to monitor the status of synchronization connections, to view detailed information about individual synchronization jobs, and to edit the transactions that are saved to the CIS database. You monitor synchronization connections from the Sync Connections tab of the CIS Synchronization Adapter page. From this tab, you can view a list of synchronization connections defined for your environment, and you can select specific synchronization connections to monitor and manage.
From the Sync Connections tab, you can:
View a summary of synchronization connection transactions and the status of synchronization connection jobs (on page 84).
View details about transactions for a specific synchronization connection job (on page 84).
View a history of all jobs for a specific synchronization connection (on page 85).
View error details for the last failed synchronization job (on page 84).
View error details for previously failed synchronization jobs (on page 85).
View and edit transaction XML for a synchronization job. (on page 86)
Edit New Mapping options (on page 87).
View general information about a synchronization connection (on page 87).
View and change settings for a synchronization connection (on page 88).
For additional assistance in monitoring synchronization status, CIS Administration includes a

Chapter 3 Administering synchronization connections
84 Clintrial Integration Solution 4.6 SP0
notification feature. When you set up email notifications, you can specify the addressees who should receive email notification when a synchronization fails or a synchronization processor goes offline. For more information, see Managing email notifications (on page 102).
Viewing a summary of all CIS synchronization transactions 1 Select Admin > CIS Sync.
If only one adapter is configured and registered in the CIS environment, the CIS Synchronization Adapter page appears with the Sync Connections tab selected.
or
If multiple adapters are configured and registered in the CIS environment, the Adapter List page appears and displays a list of adapters.
2 If the Adapter List page appears, click the row of the CIS synchronization adapter whose synchronization connections you want to view.
The CIS Synchronization Adapter page appears with the Sync Connections tab selected.
3 Click the row of the synchronization connection you want to monitor or change.
The Status tab of the CIS Synchronization Connection page appears.
For more information, see Status tab of the CIS Synchronization Connection page - Fields (on page 88).
Viewing synchronization error details for the last job You can view error details for the last synchronization connection job from the Status tab of the CIS Synchronizations page.
1 Select Admin > CIS Sync.
If only one adapter is configured and registered in the CIS environment, the CIS Synchronization Adapter page appears with the Sync Connections tab selected.
or
If multiple adapters are configured and registered in the CIS environment, the Adapter List page appears and displays a list of adapters.
2 If the Adapter List page appears, click the row of the CIS synchronization adapter whose synchronization connections you want to view.
The CIS Synchronization Adapter page appears with the Sync Connections tab selected.
3 Click the row of the synchronization connection you want to view.
The Status tab of the CIS Synchronization Connection page appears.
4 Click View Error next to the job in the table.

CIS Administrator Guide
Clintrial Integration Solution 4.6 SP0 85
The Synchronization Connection Error Details page appears. This page provides information about when the errors occurred, the source of the error, and details about the error.
Depending on the type of error, buttons at the bottom of the page are enabled, and you can either edit transactions or specify new mapping if the synchronization connection is defined to allow intervention for stopped synchronizations. For more information, see:
Viewing and editing transactions (on page 86)
Managing new mappings (on page 87).
Viewing all jobs for a specific synchronization connection The Job History tab of the CIS Synchronization Adapter page displays information about all jobs for a specific synchronization.
1 Select Admin > CIS Sync.
If only one adapter is configured and registered in the CIS environment, the CIS Synchronization Adapter page appears with the Sync Connections tab selected.
or
If multiple adapters are configured and registered in the CIS environment, the Adapter List page appears and displays a list of adapters.
2 If the Adapter List page appears, click the row of the CIS synchronization adapter whose synchronization connections you want to view.
The CIS Synchronization Adapter page appears with the Sync Connections tab selected.
3 Click the row of the synchronization connection that you want to view.
The Status tab of the CIS Synchronization Connection page appears.
4 Click View Jobs History.
The Synchronization Connection Job History view of the CIS Synchronizations Status tab appears. This page displays a list of all jobs for the synchronization connection. From this page, you can view details about transaction errors for the job or return to the Status page.
Viewing error details for a job in the job history table 1 Select Admin > CIS Sync.
If only one adapter is configured and registered in the CIS environment, the CIS Synchronization Adapter page appears with the Sync Connections tab selected.
or
If multiple adapters are configured and registered in the CIS environment, the Adapter List page appears and displays a list of adapters.
2 If the Adapter List page appears, click the row of the CIS synchronization adapter whose synchronization connections you want to view.
The CIS Synchronization Adapter page appears with the Sync Connections tab selected.
3 Click the row of the synchronization connection you want to view.

Chapter 3 Administering synchronization connections
86 Clintrial Integration Solution 4.6 SP0
The Status tab of the CIS Synchronization Connection page appears.
4 Click View Jobs History.
The Synchronization Connection Job History view of the CIS Synchronizations Status tab appears.
5 Click View Error next to the job for which you want to view errors.
The Synchronization Connection Error Detail view of the CIS Synchronizations page Status tab appears. This page displays error details for the selected synchronization connection. This page provides information about when the errors occurred, the source of the error, and details about the error.
Viewing and editing transactions You can edit the transaction that caused the last synchronization to fail from the Status tab of the CIS Synchronization page.
Caution: Phase Forward recommends that you edit transactions only when no other option is available. You should also have a well-documented process that meets good clinical practice guidelines when you edit a transaction. Editing a transaction will make the Clintrial data different from the InForm data.
1 Select Admin > CIS Sync.
If only one adapter is configured and registered in the CIS environment, the CIS Synchronization Adapter page appears with the Sync Connections tab selected.
or
If multiple adapters are configured and registered in the CIS environment, the Adapter List page appears and displays a list of adapters.
2 If the Adapter List page appears, click the row of the CIS synchronization adapter whose synchronization connections you want to view.
The CIS Synchronization Adapter page appears with the Sync Connections tab selected.
3 Click the row of the synchronization connection you want to view.
The Status tab of the CIS Synchronization Connection page appears.
4 Click View Error.
The Error Detail view appears.
5 Click Edit Transaction.
The Synchronization Connection Transaction Edit screen of the CIS Synchronizations Status tab appears.
6 In the text box, locate the GUID of the transaction that caused the error in the last synchronization and correct the transaction.
7 In the Reason for edit field, type the reason for correcting the transaction and the corrections made.
8 Click Validate to validate the transaction.
9 Click Save.

CIS Administrator Guide
Clintrial Integration Solution 4.6 SP0 87
Managing new mappings If a synchronization connection has Stop sync for intervention selected, the New Mapping Options button is enabled when a synchronization fails because the CIS software has encountered new mappings. Use this button to specify how the new mappings should be processed.
To manage mapping options for the synchronization job:
1 Select Admin > CIS Sync.
If only one adapter is configured and registered in the CIS environment, the CIS Synchronization Adapter page appears with the Sync Connections tab selected.
or
If multiple adapters are configured and registered in the CIS environment, the Adapter List page appears and displays a list of adapters.
2 If the Adapter List page appears, click the row of the CIS synchronization adapter whose synchronization connections you want to view.
The CIS Synchronization Adapter page appears with the Sync Connections tab selected.
3 Click the row of the synchronization connection you want to view.
The Status tab of the CIS Synchronization Connection page appears.
4 Click View Error.
The Synchronization Connection Error Detail view of the CIS Synchronizations page Status tab appears.
5 Click New Mapping Options.
The Synchronization Connection New Mapping Options view of the CIS Synchronizations Status tab appears.
6 Complete the fields on the page, and click Save.
For more information, see Synchronization Connection New Mapping Options, CIS Synchronizations Status tab - Fields (on page 90).
Viewing general information about a synchronization connection You can view general information about the Clintrial and InForm computers for the selected synchronization. The General tab is only for viewing information. You cannot change information in this tab after the synchronization is created.
1 Select Admin > CIS Sync.
If only one adapter is configured and registered in the CIS environment, the CIS Synchronization Adapter page appears with the Sync Connections tab selected.
or
If multiple adapters are configured and registered in the CIS environment, the Adapter List page appears and displays a list of adapters.
2 If the Adapter List page appears, click the row of the CIS synchronization adapter whose synchronization connections you want to view.

Chapter 3 Administering synchronization connections
88 Clintrial Integration Solution 4.6 SP0
The CIS Synchronization Adapter page appears with the Sync Connections tab selected.
3 Click the row of the synchronization connection you want to view.
The Status tab of the CIS Synchronization Connection page appears.
4 Select General.
The General tab of the CIS Synchronizations Connection page appears.
For more information, see General tab of the CIS Synchronizations Connection page - Field (on page 91)s.
Viewing and changing settings for a synchronization connection You can view and change synchronization connection information for a specific synchronization connection.
1 Select Admin > CIS Sync.
If only one adapter is configured and registered in the CIS environment, the CIS Synchronization Adapter page appears with the Sync Connections tab selected.
or
If multiple adapters are configured and registered in the CIS environment, the Adapter List page appears and displays a list of adapters.
2 If the Adapter List page appears, click the row of the CIS synchronization adapter whose synchronization connections you want to view.
The CIS Synchronization Adapter page appears with the Sync Connections tab selected.
3 Click the row of the synchronization connection you want to view.
The Status tab of the CIS Synchronization Connection page appears.
4 Click Settings.
The Settings tab of the CIS Synchronization Connection page appears.
5 Complete the fields on the page, and click Save.
For more information, see Settings tab of the CIS Synchronization Connection page - Fields (on page 92).
Status tab of CIS Synchronization Connection page—Fields From the Status tab of the CIS Synchronization Connection page, you can view:
Transaction summary information.
Summary information and error details about the last synchronization connection that ran.
Information about the job history for the synchronization connection.
Note: In very large studies, the Status tab of the CIS Synchronization Connection page could fail to appear if a query that determines the transaction count times out. If this happens, you cannot view the Status page until the synchronization completes or fails. To prevent this situation, make sure that database statistics are kept up-to-date.
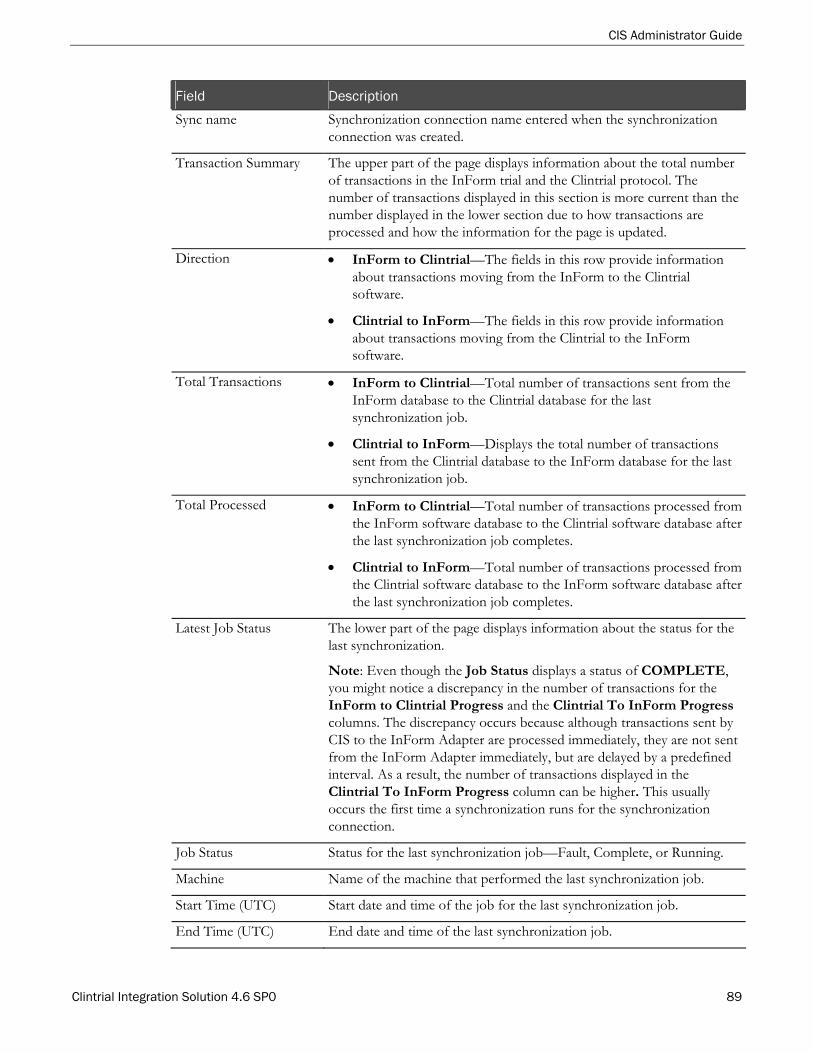
CIS Administrator Guide
Clintrial Integration Solution 4.6 SP0 89
Field Description
Sync name Synchronization connection name entered when the synchronization connection was created.
Transaction Summary The upper part of the page displays information about the total number of transactions in the InForm trial and the Clintrial protocol. The number of transactions displayed in this section is more current than the number displayed in the lower section due to how transactions are processed and how the information for the page is updated.
Direction InForm to Clintrial—The fields in this row provide information about transactions moving from the InForm to the Clintrial software.
Clintrial to InForm—The fields in this row provide information about transactions moving from the Clintrial to the InForm software.
Total Transactions InForm to Clintrial—Total number of transactions sent from the InForm database to the Clintrial database for the last synchronization job.
Clintrial to InForm—Displays the total number of transactions sent from the Clintrial database to the InForm database for the last synchronization job.
Total Processed InForm to Clintrial—Total number of transactions processed from the InForm software database to the Clintrial software database after the last synchronization job completes.
Clintrial to InForm—Total number of transactions processed from the Clintrial software database to the InForm software database after the last synchronization job completes.
Latest Job Status The lower part of the page displays information about the status for the last synchronization.
Note: Even though the Job Status displays a status of COMPLETE, you might notice a discrepancy in the number of transactions for the InForm to Clintrial Progress and the Clintrial To InForm Progress columns. The discrepancy occurs because although transactions sent by CIS to the InForm Adapter are processed immediately, they are not sent from the InForm Adapter immediately, but are delayed by a predefined interval. As a result, the number of transactions displayed in the Clintrial To InForm Progress column can be higher. This usually occurs the first time a synchronization runs for the synchronization connection.
Job Status Status for the last synchronization job—Fault, Complete, or Running.
Machine Name of the machine that performed the last synchronization job.
Start Time (UTC) Start date and time of the job for the last synchronization job.
End Time (UTC) End date and time of the last synchronization job.

Chapter 3 Administering synchronization connections
90 Clintrial Integration Solution 4.6 SP0
Field Description
Last Action Details about the progress of the last synchronization job. Possible values are:
JOB_CREATED
MACHINE_ASSIGNED
JOB_INITIALIZED
CREATING_PROTOCOL
PROCESSING_MAPPINGS
INFORM_TO_CLINTRIAL
CLINTRIAL_TO_INFORM
InForm to Clintrial Progress
Total number of transactions sent from the InForm database to the Clintrial database for the last synchronization job.
Clintrial to InForm Progress
Total number of transactions sent from the Clintrial database to the InForm database for the last synchronization job.
View Error Click to view errors that occurred during the last synchronization job when it has a status of Fault.
View Jobs History Click to view the history of all jobs for the selected synchronization connection.
New Mapping Options view of CIS Synchronizations Status tab—Fields
Field Description
Sync name Synchronization connection name entered when the synchronization connection was created.
Choose new mapping option
Assume no data—If mapping definitions for data items for which no mappings originally existed are synchronize later, the CIS software continues to ignore the previously unmapped data. For those data items, the CIS software processes only data that arrives subsequent to the mapping definitions.
Replay transactions—When a new mapping definition arrives, the CIS software replays all transactions that contain the control path in the new mapping. If the CIS software finds any new mappings, it inserts the data in the appropriate Clintrial database column.
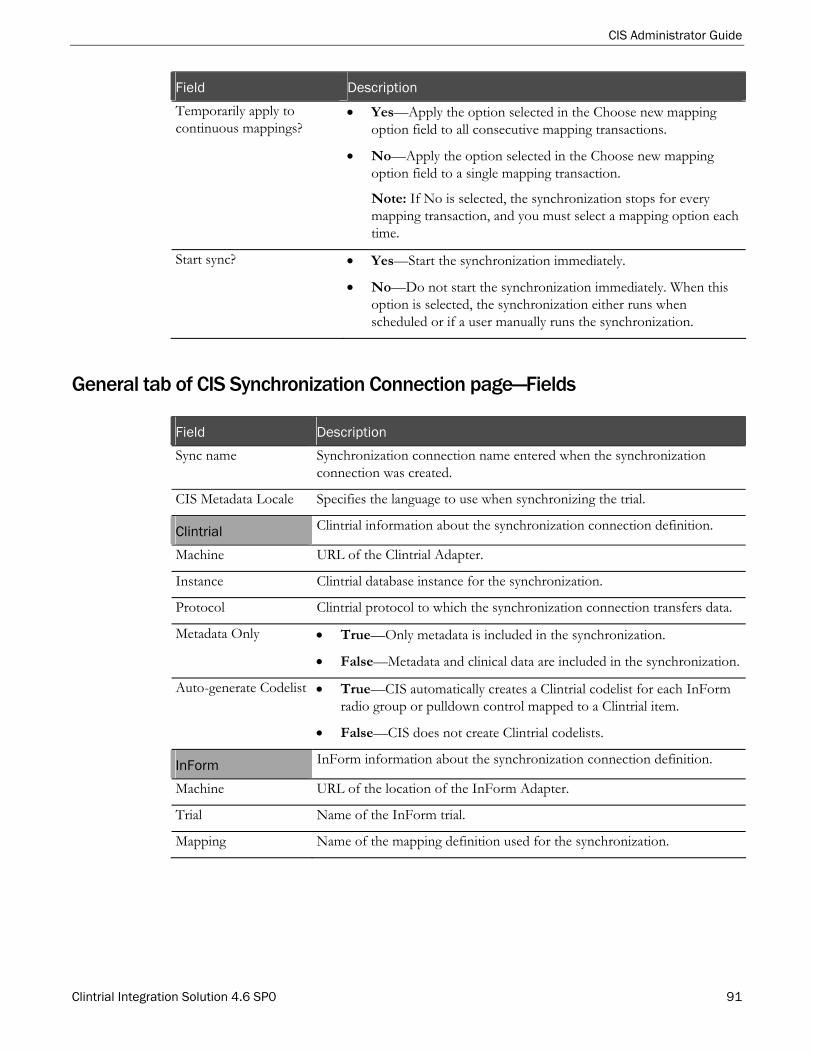
CIS Administrator Guide
Clintrial Integration Solution 4.6 SP0 91
Field Description
Temporarily apply to continuous mappings?
Yes—Apply the option selected in the Choose new mapping option field to all consecutive mapping transactions.
No—Apply the option selected in the Choose new mapping option field to a single mapping transaction.
Note: If No is selected, the synchronization stops for every mapping transaction, and you must select a mapping option each time.
Start sync? Yes—Start the synchronization immediately.
No—Do not start the synchronization immediately. When this option is selected, the synchronization either runs when scheduled or if a user manually runs the synchronization.
General tab of CIS Synchronization Connection page—Fields
Field Description
Sync name Synchronization connection name entered when the synchronization connection was created.
CIS Metadata Locale Specifies the language to use when synchronizing the trial.
Clintrial Clintrial information about the synchronization connection definition.
Machine URL of the Clintrial Adapter.
Instance Clintrial database instance for the synchronization.
Protocol Clintrial protocol to which the synchronization connection transfers data.
Metadata Only True—Only metadata is included in the synchronization.
False—Metadata and clinical data are included in the synchronization.
Auto-generate Codelist True—CIS automatically creates a Clintrial codelist for each InForm radio group or pulldown control mapped to a Clintrial item.
False—CIS does not create Clintrial codelists.
InForm InForm information about the synchronization connection definition.
Machine URL of the location of the InForm Adapter.
Trial Name of the InForm trial.
Mapping Name of the mapping definition used for the synchronization.

Chapter 3 Administering synchronization connections
92 Clintrial Integration Solution 4.6 SP0
Settings tab of CIS Synchronization Connection page—Fields
Field Description
Sync name Name of the synchronization connection.
Sync description Description of the synchronization connection.
Enabled Yes—Connection is enabled when created. When you enable a synchronization, the synchronization begins immediately when it is created. After that, the synchronization runs using the schedule you define.
No—Connection is not enabled when created.
Note: If a synchronization is disabled, you can start the synchronization manually by clicking Sync Now on the Sync Connections tab of the CIS Synchronization Adapter page.
Number of transactions per message
Number of transactions in a message.
The number of transactions per message is the number of transactions per operation, including the sending and receiving of transactions between InForm Adapters and Clintrial Adapters. In general, the more transactions per message, the faster the synchronization completes because fewer requests are made to the adapters. However, when typing a value for this option, you should consider that all transactions in each operation are in memory. Therefore, if you have a number of synchronizations running, a high number of transactions per operation could result in a greater demand on memory.
Phase Forward recommends that you accept the default value of 500 for this option. A lower value might slow down a synchronization.
New mappings Specifies how the synchronization connection processes new mapping definitions:
Assume no pre-existing data—If mapping definitions for data items for which no mappings originally existed are synchronize later, the CIS software continues to ignore the previously unmapped data. For those data items, the CIS software processes only data that arrives subsequent to the mapping definitions.
Replay sync to gather pre-existing data—When a new mapping definition arrives, the CIS software replays all transactions that contain the control path in the new mapping. If the CIS software finds any new mappings, it inserts the data in the appropriate Clintrial database column.
Stop sync for intervention—When a new mapping definition arrives, the CIS software stops the message queue and waits for a manual intervention.

CIS Administrator Guide
Clintrial Integration Solution 4.6 SP0 93
Field Description
Auto-create study books Yes—CIS creates study books for the Clintrial protocol, including page templates and page sections, by using the study component definitions synchronized from InForm software.
No—CIS does not create study books for the Clintrial protocol.
For more information, see Autocreating Clintrial study books (on page 73).
Create panels and items Yes (default)—CIS creates or modifies Clintrial panels and items as defined in the mappings.
No—CIS does not create or modify Clintrial panels and items.
For more information, see Autocreating Clintrial panels and items (on page 75).
Schedule type Type and definition of the schedule on which synchronization runs for this synchronization connection:
None—The synchronization connection does not use a schedule.
Note: If you do not define a schedule, you must manually run synchronization on the synchronization connection. For more information, see Starting synchronization manually (on page 114).
Named—The synchronization connection uses the schedule selected from the drop-down list.
Custom—The synchronization connection uses the custom schedule defined in the Days, Start time (UTC), End Time (UTC), and Run every fields.
Days Days of the week to which the custom schedule applies. Select each day on which to run synchronization.
Start time (UTC) Time for synchronization to begin running. Specify the time in hours and minutes.
End time (UTC) Time for synchronization to stop. Specify the time in hours and minutes.
Run every Interval on which to start synchronization within the specified Start time (UTC) and End time (UTC). For example, if you have a Start Time of 1:00 and an interval of 5 Minutes, the scheduled synchronization begins at 1:00, 1:05, 1:10, and so on.
Type a number, and select Hours or Minutes.
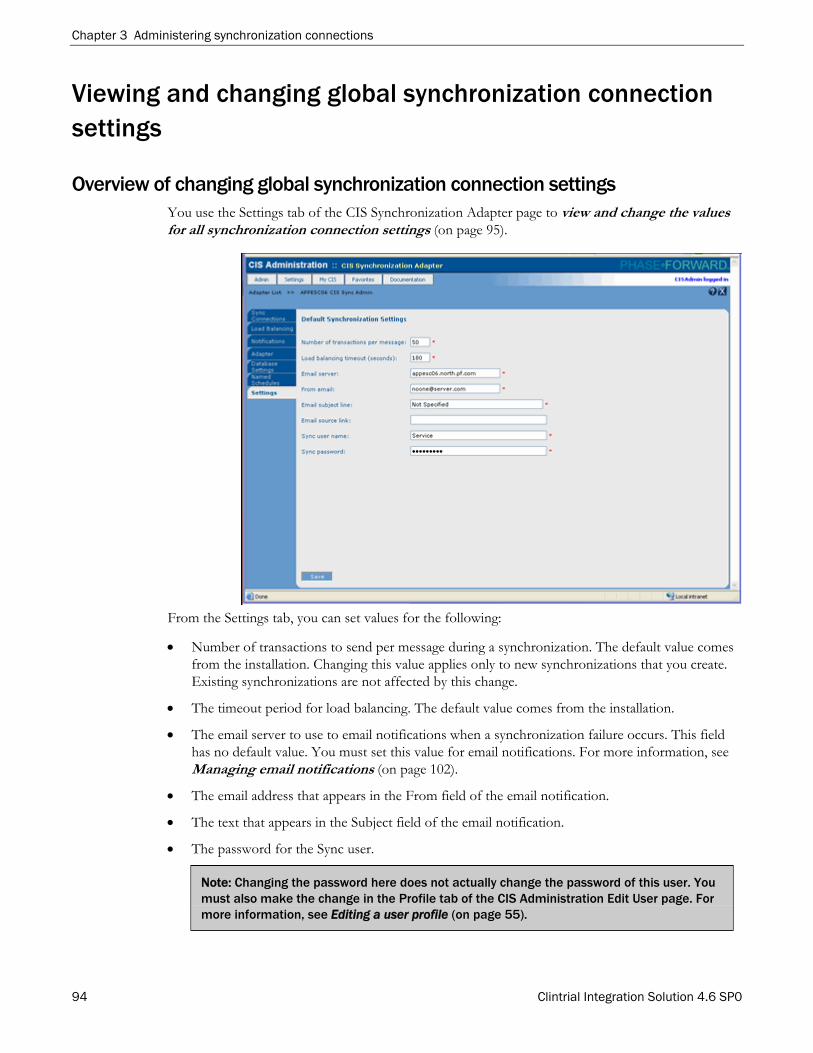
Chapter 3 Administering synchronization connections
94 Clintrial Integration Solution 4.6 SP0
Viewing and changing global synchronization connection settings
Overview of changing global synchronization connection settings You use the Settings tab of the CIS Synchronization Adapter page to view and change the values for all synchronization connection settings (on page 95).
From the Settings tab, you can set values for the following:
Number of transactions to send per message during a synchronization. The default value comes from the installation. Changing this value applies only to new synchronizations that you create. Existing synchronizations are not affected by this change.
The timeout period for load balancing. The default value comes from the installation.
The email server to use to email notifications when a synchronization failure occurs. This field has no default value. You must set this value for email notifications. For more information, see Managing email notifications (on page 102).
The email address that appears in the From field of the email notification.
The text that appears in the Subject field of the email notification.
The password for the Sync user.
Note: Changing the password here does not actually change the password of this user. You must also make the change in the Profile tab of the CIS Administration Edit User page. For more information, see Editing a user profile (on page 55).

CIS Administrator Guide
Clintrial Integration Solution 4.6 SP0 95
Viewing and changing global synchronization connection settings 1 Select Admin > CIS Sync.
If only one adapter is configured and registered in the CIS environment, the CIS Synchronization Adapter page appears with the Sync Connections tab selected.
or
If multiple adapters are configured and registered in the CIS environment, the Adapter List page appears and displays a list of adapters.
2 If the Adapter List page appears, click the row of the CIS synchronization adapter whose synchronization connections you want to view.
The CIS Synchronization Adapter page appears with the Sync Connections tab selected.
3 Select Settings.
The Settings tab of the CIS Synchronization Adapter page appears.
4 Complete the fields on the page, and click Save.
For more information, see Settings tab of the CIS Synchronization Adapter page - Fields (on page 95).
Settings tab of the CIS Synchronization Adapter page—Fields
Field Description
Number of transactions per message
Number of transactions in a message.
The number of transactions per message is the number of transactions per operation, including the sending and receiving of transactions between InForm Adapters and Clintrial Adapters. In general, the more transactions per message, the faster the synchronization completes because fewer requests are made to the adapters. However, when typing a value for this option, you should consider that all transactions in each operation are in memory. Therefore, if you have a number of synchronizations running, a high number of transactions per operation could result in a greater demand on memory.
Phase Forward recommends that you accept the default value of 500 for this option. A lower value might slow down a synchronization.
Load balancing timeout (seconds)
Number of seconds for CIS to wait before setting a load-balancing machine on which synchronization has stopped to offline.
Email server Fully-qualified domain name of the email server being used to send notifications, for example, smtp.company.com.

Chapter 3 Administering synchronization connections
96 Clintrial Integration Solution 4.6 SP0
Field Description
From email Email address that will be used as the From address in email notifications.
Note: The address you specify must be a valid email address that has been defined in your email system. The CIS Administration does not prevent you from entering and saving an email address that contains spaces and might not be treated as a single entity. To specify an email address that contains spaces, enclose the email address in double quotes.
Email source link Web link to the CIS administration login page in the body of the email message.
Sync user name User name for the CIS Administration user.
Note: The Sync user name is the Service user.
Sync user password Password for the CIS Administration user
Important: Although you can change the Sync user password in this page, you must first change the password for the Service user in the Profile tab of the Security Administration Edit User page. For more information, see Editing a user profile (on page 55). Then you can make changes in this page.
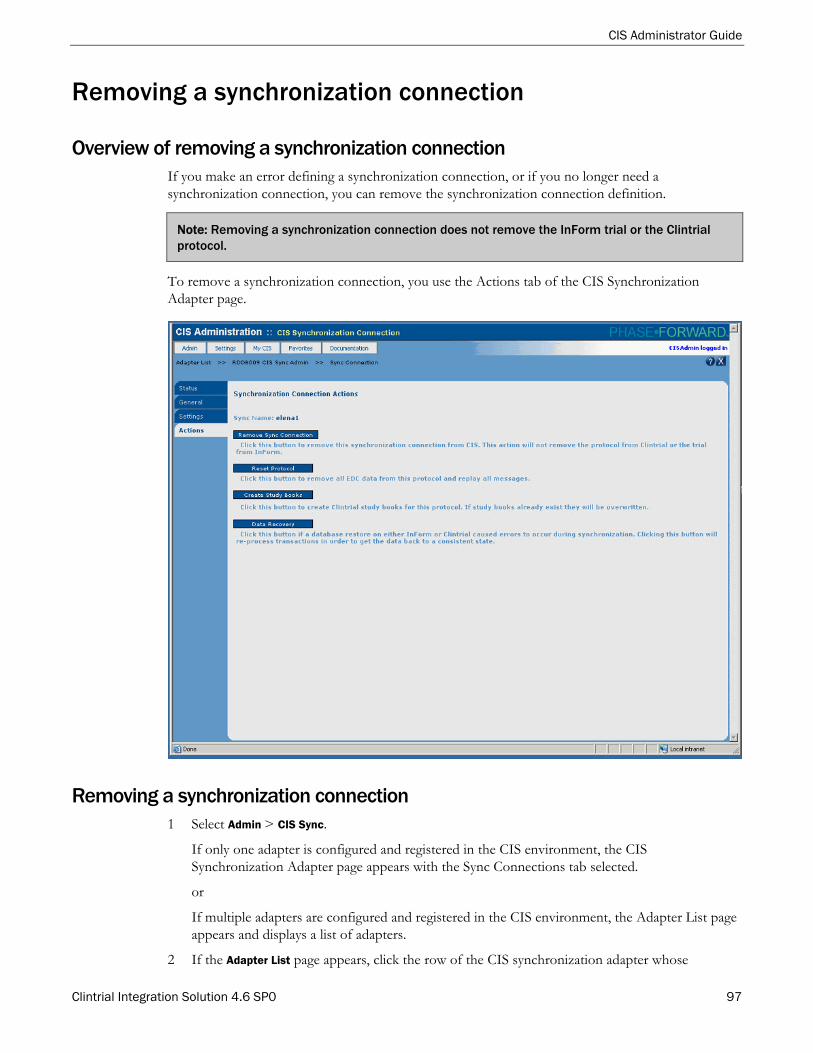
CIS Administrator Guide
Clintrial Integration Solution 4.6 SP0 97
Removing a synchronization connection
Overview of removing a synchronization connection If you make an error defining a synchronization connection, or if you no longer need a synchronization connection, you can remove the synchronization connection definition.
Note: Removing a synchronization connection does not remove the InForm trial or the Clintrial protocol.
To remove a synchronization connection, you use the Actions tab of the CIS Synchronization Adapter page.
Removing a synchronization connection 1 Select Admin > CIS Sync.
If only one adapter is configured and registered in the CIS environment, the CIS Synchronization Adapter page appears with the Sync Connections tab selected.
or
If multiple adapters are configured and registered in the CIS environment, the Adapter List page appears and displays a list of adapters.
2 If the Adapter List page appears, click the row of the CIS synchronization adapter whose

Chapter 3 Administering synchronization connections
98 Clintrial Integration Solution 4.6 SP0
synchronization connections you want to view.
The CIS Synchronization Adapter page appears with the Sync Connections tab selected.
3 Click the synchronization connection you want to remove.
The CIS Synchronizations page appears.
4 Select Actions.
5 The Actions tab appears.
6 Click Remove Sync Connection.
A confirmation page appears.
7 Click Remove Sync.
CIS Administrator Guide
Clintrial Integration Solution 4.6 SP0 99
Resetting a protocol and replaying synchronization transactions
Overview of resetting a protocol If you experience a synchronization failure and need to correct your metadata or mapping definitions by backing out previously synchronized data and metadata, use the Reset Protocol option to restart a synchronization for a specific synchronization connection after making the trial definition corrections.
When you reset a protocol, the CIS software:
Removes all data for EDC subjects including lab loaded data.
Restarts the synchronization from the beginning and replays all the transactions in the database.
Because all messages are replayed, if your study uses Clintrial rules on EDC data, transactions that are replayed regenerate queries and post them to the InForm software, even if they had previously been resolved.
Caution: This option is intended as a debugging tool when you are developing an integrated trial. Reset Protocol deletes existing Clintrial protocol data before running the synchronization again. Therefore, if you do use this option in a production environment, you should only use it with assistance from Phase Forward Customer Support.

Chapter 3 Administering synchronization connections
100 Clintrial Integration Solution 4.6 SP0
To reset a protocol, you use the Actions tab of the CIS Synchronization page.
Resetting a protocol 1 Select Admin > CIS Sync.
If only one adapter is configured and registered in the CIS environment, the CIS Synchronization Adapter page appears with the Sync Connections tab selected.
or
If multiple adapters are configured and registered in the CIS environment, the Adapter List page appears and displays a list of adapters.
2 If the Adapter List page appears, click the row of the CIS synchronization adapter whose synchronization connections you want to view.
The CIS Synchronization Adapter page appears with the Sync Connections tab selected.
3 Click the row of the synchronization connection.
The Status tab of the CIS Synchronization Connection page appears.
4 Select Actions.
The Actions tab appears.
5 Click Reset Protocol.

CIS Administrator Guide
Clintrial Integration Solution 4.6 SP0 101
A confirmation page appears.
6 Click Reset Sync.
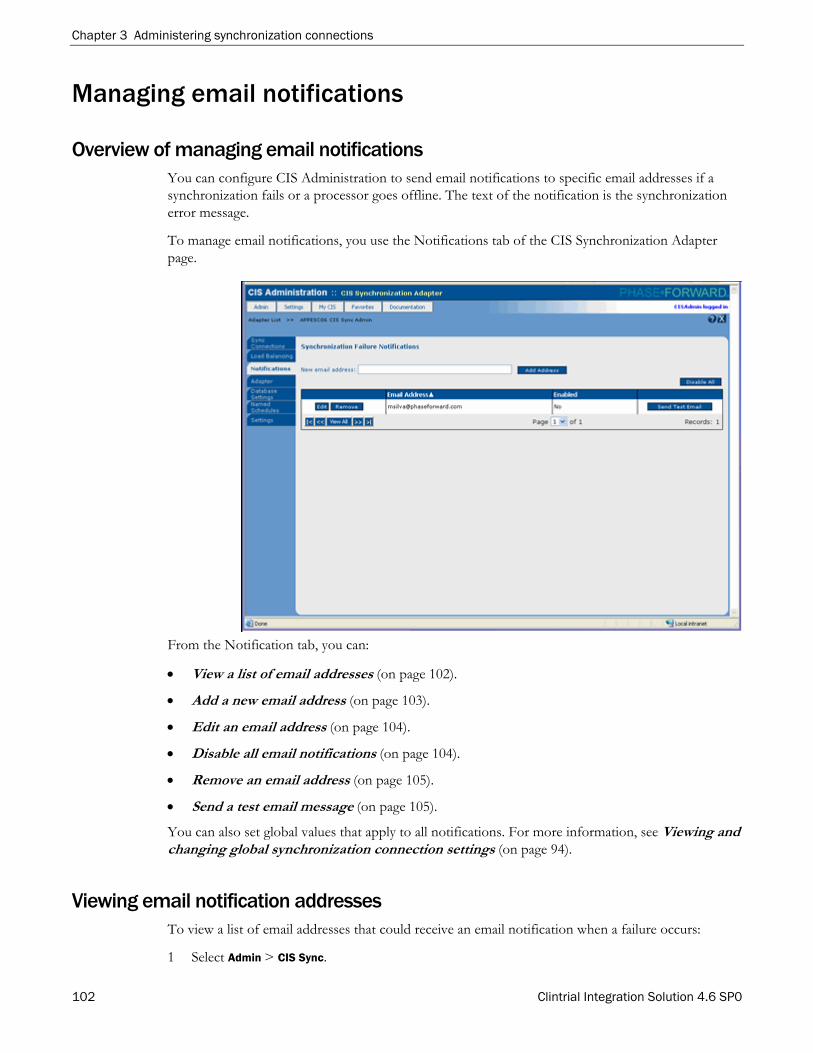
Chapter 3 Administering synchronization connections
102 Clintrial Integration Solution 4.6 SP0
Managing email notifications
Overview of managing email notifications You can configure CIS Administration to send email notifications to specific email addresses if a synchronization fails or a processor goes offline. The text of the notification is the synchronization error message.
To manage email notifications, you use the Notifications tab of the CIS Synchronization Adapter page.
From the Notification tab, you can:
View a list of email addresses (on page 102).
Add a new email address (on page 103).
Edit an email address (on page 104).
Disable all email notifications (on page 104).
Remove an email address (on page 105).
Send a test email message (on page 105).
You can also set global values that apply to all notifications. For more information, see Viewing and changing global synchronization connection settings (on page 94).
Viewing email notification addresses To view a list of email addresses that could receive an email notification when a failure occurs:
1 Select Admin > CIS Sync.
CIS Administrator Guide
Clintrial Integration Solution 4.6 SP0 103
If only one adapter is configured and registered in the CIS environment, the CIS Synchronization Adapter page appears with the Sync Connections tab selected.
or
If multiple adapters are configured and registered in the CIS environment, the Adapter List page appears and displays a list of adapters.
2 If the Adapter List page appears, click the row of the CIS synchronization adapter whose synchronization connections you want to view.
The CIS Synchronization Adapter page appears with the Sync Connections tab selected.
3 Select Notifications.
The Notifications tab of the CIS Synchronization Adapter page appears.
This page displays a list of email addresses.
Yes displays in the Enabled column if that email address is enabled to receive messages.
No appears in the column if the address is not enabled to receive messages.
For more information, see Editing an email address (on page 104).
Adding a new email address 1 Select Admin > CIS Sync.
If only one adapter is configured and registered in the CIS environment, the CIS Synchronization Adapter page appears with the Sync Connections tab selected.
or
If multiple adapters are configured and registered in the CIS environment, the Adapter List page appears and displays a list of adapters.
2 If the Adapter List page appears, click the row of the CIS synchronization adapter whose synchronization connections you want to view.
The CIS Synchronization Adapter page appears with the Sync Connections tab selected.
3 Select Notifications.
The Notifications tab of the CIS Synchronization Adapter page appears.
4 In the New email address field, type the email address.
Note: The address you specify must be a valid email address that has been defined in your email system. The CIS Administration does not prevent you from entering and saving an email address that contains spaces and might not be treated as a single entity. To specify an email address that contains spaces, enclose the email address in double quotes.
5 Click Add Address.
The new address appears in the list of email addresses.
Note: By default, a new email address is enabled to receive messages. To change the enabled setting, see Editing an email address (on page 104).

Chapter 3 Administering synchronization connections
104 Clintrial Integration Solution 4.6 SP0
Editing an email address 1 Select Admin > CIS Sync.
If only one adapter is configured and registered in the CIS environment, the CIS Synchronization Adapter page appears with the Sync Connections tab selected.
or
If multiple adapters are configured and registered in the CIS environment, the Adapter List page appears and displays a list of adapters.
2 If the Adapter List page appears, click the row of the CIS synchronization adapter whose synchronization connections you want to view.
The CIS Synchronization Adapter page appears with the Sync Connections tab selected.
3 Select Notifications.
The Notifications tab of the CIS Synchronization Adapter page appears.
4 In the Synchronization Failure Notifications table, click Edit next to the email address you want to change.
The page becomes enabled.
5 In the Email Address field, type the new address.
Note: The address you specify must be a valid email address that has been defined in your email system. The CIS Administration does not prevent you from entering and saving an email address that contains spaces and might not be treated as a single entity. To specify an email address that contains spaces, enclose the email address in double quotes.
6 In the Enabled column, select Yes or No from the drop-down list to enable or disable the address.
7 Click Update.
Disabling all email notifications 1 Select Admin > CIS Sync.
If only one adapter is configured and registered in the CIS environment, the CIS Synchronization Adapter page appears with the Sync Connections tab selected.
or
If multiple adapters are configured and registered in the CIS environment, the Adapter List page appears and displays a list of adapters.
2 If the Adapter List page appears, click the row of the CIS synchronization adapter whose synchronization connections you want to view.
The CIS Synchronization Adapter page appears with the Sync Connections tab selected.
3 Select Notifications.
The Notifications tab of the CIS Synchronization Adapter page appears.
4 Click Disable All.

CIS Administrator Guide
Clintrial Integration Solution 4.6 SP0 105
A confirmation page appears.
5 Click Disable All.
Note: When you use Disable All to disable email notifications, you must enable each email notification individually. For more information, see Editing an email address (on page 104).
Removing an email address 1 Select Admin > CIS Sync.
If only one adapter is configured and registered in the CIS environment, the CIS Synchronization Adapter page appears with the Sync Connections tab selected.
or
If multiple adapters are configured and registered in the CIS environment, the Adapter List page appears and displays a list of adapters.
2 If the Adapter List page appears, click the row of the CIS synchronization adapter whose synchronization connections you want to view.
The CIS Synchronization Adapter page appears with the Sync Connections tab selected.
3 Select Notifications.
The Notifications tab of the CIS Synchronization Adapter page appears.
4 In the Synchronization Failure Notifications table, click Remove next to the email address you want to remove.
A confirmation page appears.
5 Click Proceed with Deletion.
Sending a test email notification 1 Select Admin > CIS Sync.
If only one adapter is configured and registered in the CIS environment, the CIS Synchronization Adapter page appears with the Sync Connections tab selected.
or
If multiple adapters are configured and registered in the CIS environment, the Adapter List page appears and displays a list of adapters.
2 If the Adapter List page appears, click the row of the CIS synchronization adapter whose synchronization connections you want to view.
The CIS Synchronization Adapter page appears with the Sync Connections tab selected.
3 Select Notifications.
The Notifications tab of the CIS Synchronization Adapter page appears.
4 In the row for the addressee to whom you want to send a test email message, click Send Test Email.

Chapter 3 Administering synchronization connections
106 Clintrial Integration Solution 4.6 SP0
CIS Administration sends a test email to the specified email address.
Note: Email notifications will not necessarily be received immediately. Your specific environment and SMTP configuration can impact how quickly a message is received.
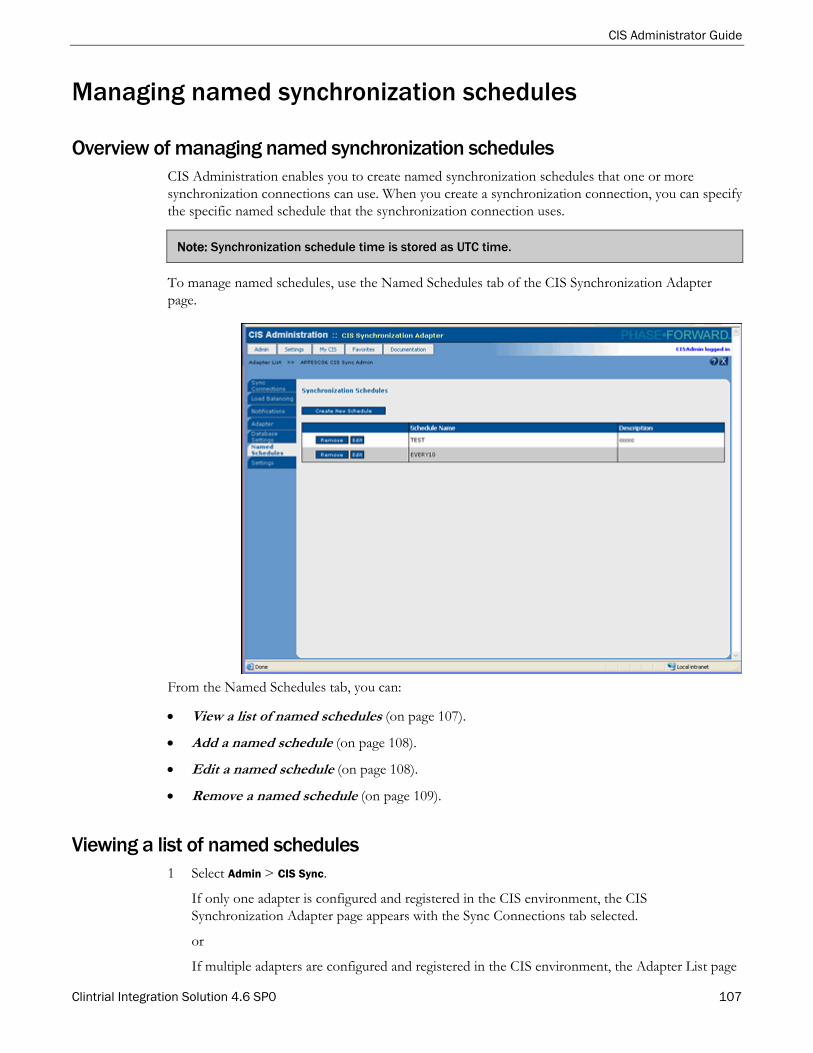
CIS Administrator Guide
Clintrial Integration Solution 4.6 SP0 107
Managing named synchronization schedules
Overview of managing named synchronization schedules CIS Administration enables you to create named synchronization schedules that one or more synchronization connections can use. When you create a synchronization connection, you can specify the specific named schedule that the synchronization connection uses.
Note: Synchronization schedule time is stored as UTC time.
To manage named schedules, use the Named Schedules tab of the CIS Synchronization Adapter page.
From the Named Schedules tab, you can:
View a list of named schedules (on page 107).
Add a named schedule (on page 108).
Edit a named schedule (on page 108).
Remove a named schedule (on page 109).
Viewing a list of named schedules 1 Select Admin > CIS Sync.
If only one adapter is configured and registered in the CIS environment, the CIS Synchronization Adapter page appears with the Sync Connections tab selected.
or
If multiple adapters are configured and registered in the CIS environment, the Adapter List page
Chapter 3 Administering synchronization connections
108 Clintrial Integration Solution 4.6 SP0
appears and displays a list of adapters.
2 If the Adapter List page appears, click the row of the CIS synchronization adapter whose synchronization connections you want to view.
The CIS Synchronization Adapter page appears with the Sync Connections tab selected.
3 Select Named Schedules.
The Named Schedules tab of the CIS Synchronization Adapter page appears.
Adding a named schedule 1 Select Admin > CIS Sync.
If only one adapter is configured and registered in the CIS environment, the CIS Synchronization Adapter page appears with the Sync Connections tab selected.
or
If multiple adapters are configured and registered in the CIS environment, the Adapter List page appears and displays a list of adapters.
2 If the Adapter List page appears, click the row of the CIS synchronization adapter whose synchronization connections you want to view.
The CIS Synchronization Adapter page appears with the Sync Connections tab selected.
3 Select Named Schedules.
The Named Schedules tab of the CIS Synchronization Adapter page appears.
4 Click Create New Schedule.
The Synchronization Schedule view appears.
5 Complete the fields on the page, and click Save.
For more information, see Synchronization Schedule view of the Named Schedules tab of the CIS Synchronization Adapter page - Fields (on page 109).
Editing a named schedule 1 Select Admin > CIS Sync.
If only one adapter is configured and registered in the CIS environment, the CIS Synchronization Adapter page appears with the Sync Connections tab selected.
or
If multiple adapters are configured and registered in the CIS environment, the Adapter List page appears and displays a list of adapters.
2 If the Adapter List page appears, click the row of the CIS synchronization adapter whose synchronization connections you want to view.
The CIS Synchronization Adapter page appears with the Sync Connections tab selected.
3 Select Named Schedules.
The Named Schedules tab of the CIS Synchronization Adapter page appears.
4 In the Synchronization Schedules table, click Edit next to the schedule you want to change.
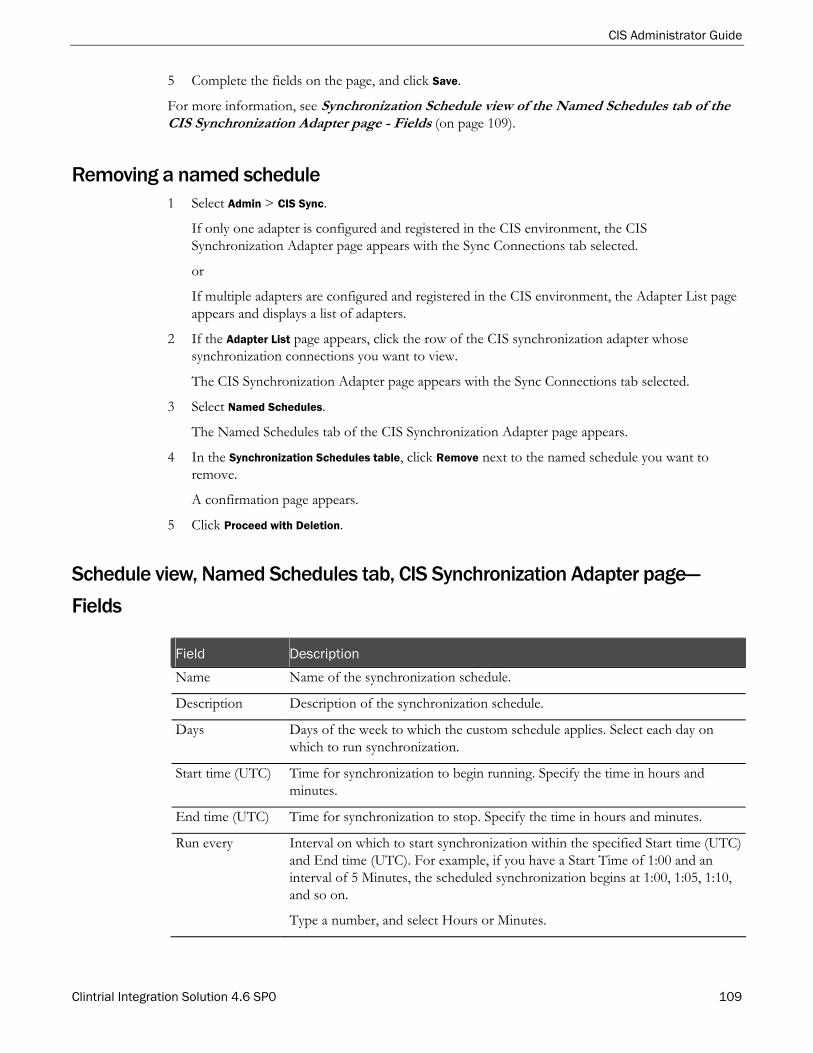
CIS Administrator Guide
Clintrial Integration Solution 4.6 SP0 109
5 Complete the fields on the page, and click Save.
For more information, see Synchronization Schedule view of the Named Schedules tab of the CIS Synchronization Adapter page - Fields (on page 109).
Removing a named schedule 1 Select Admin > CIS Sync.
If only one adapter is configured and registered in the CIS environment, the CIS Synchronization Adapter page appears with the Sync Connections tab selected.
or
If multiple adapters are configured and registered in the CIS environment, the Adapter List page appears and displays a list of adapters.
2 If the Adapter List page appears, click the row of the CIS synchronization adapter whose synchronization connections you want to view.
The CIS Synchronization Adapter page appears with the Sync Connections tab selected.
3 Select Named Schedules.
The Named Schedules tab of the CIS Synchronization Adapter page appears.
4 In the Synchronization Schedules table, click Remove next to the named schedule you want to remove.
A confirmation page appears.
5 Click Proceed with Deletion.
Schedule view, Named Schedules tab, CIS Synchronization Adapter page—
Fields
Field Description
Name Name of the synchronization schedule.
Description Description of the synchronization schedule.
Days Days of the week to which the custom schedule applies. Select each day on which to run synchronization.
Start time (UTC) Time for synchronization to begin running. Specify the time in hours and minutes.
End time (UTC) Time for synchronization to stop. Specify the time in hours and minutes.
Run every Interval on which to start synchronization within the specified Start time (UTC) and End time (UTC). For example, if you have a Start Time of 1:00 and an interval of 5 Minutes, the scheduled synchronization begins at 1:00, 1:05, 1:10, and so on.
Type a number, and select Hours or Minutes.

Chapter 3 Administering synchronization connections
110 Clintrial Integration Solution 4.6 SP0
Managing Clintrial database instances for synchronizations
Overview of managing Clintrial database instances When you install the CIS software, you specify the tnsname of the database instance and the Oracle user name and password for the CIS synchronization database.
CIS Administration enables you to review and update connection information for the Clintrial database instance.
You manage Clintrial database instances from the Database Settings tab of the CIS Synchronization Adapter page.
From the Database Settings tab, you can:
View Clintrial database instances (on page 110).
Add a new Clintrial database instance.
Edit a Clintrial database instance (on page 111).
Remove a Clintrial database instance (on page 112).
Viewing Clintrial database instances 1 Select Admin > CIS Sync.
If only one adapter is configured and registered in the CIS environment, the CIS Synchronization Adapter page appears with the Sync Connections tab selected.
or
If multiple adapters are configured and registered in the CIS environment, the Adapter List page

CIS Administrator Guide
Clintrial Integration Solution 4.6 SP0 111
appears and displays a list of adapters.
2 If the Adapter List page appears, click the row of the CIS synchronization adapter whose synchronization connections you want to view.
The CIS Synchronization Adapter page appears with the Sync Connections tab selected.
3 Select Database Settings.
The Database Settings tab of the CIS Synchronization Adapter page appears.
4 Select a Clintrial machine.
The page displays a list of Clintrial database instances.
Note: The drop-down list is populated only when there is more than one Clintrial machine. If there is only one machine, that machine name is displayed.
Adding a new Clintrial database instance 1 Select Admin > CIS Sync.
If only one adapter is configured and registered in the CIS environment, the CIS Synchronization Adapter page appears with the Sync Connections tab selected.
or
If multiple adapters are configured and registered in the CIS environment, the Adapter List page appears and displays a list of adapters.
2 If the Adapter List page appears, click the row of the CIS synchronization adapter whose synchronization connections you want to view.
The CIS Synchronization Adapter page appears with the Sync Connections tab selected.
3 Select Database Settings.
The Database Settings tab of the CIS Synchronization Adapter page appears.
4 Click Add Instance.
The CIS Synchronization Adapter Add Clintrial Database Instance page appears.
5 If the Clintrial Machine field has a drop-down list, select the computer where the Clintrial instance for the synchronization connection is installed.
6 Complete the fields on the page, and click Save.
For more information, see CIS Synchronization Adapter Add Clintrial Database Instance page - Fields (on page 113).
Editing a Clintrial database instance 1 Select Admin > CIS Sync.
If only one adapter is configured and registered in the CIS environment, the CIS Synchronization Adapter page appears with the Sync Connections tab selected.
or
If multiple adapters are configured and registered in the CIS environment, the Adapter List page

Chapter 3 Administering synchronization connections
112 Clintrial Integration Solution 4.6 SP0
appears and displays a list of adapters.
2 If the Adapter List page appears, click the row of the CIS synchronization adapter whose synchronization connections you want to view.
The CIS Synchronization Adapter page appears with the Sync Connections tab selected.
3 Select Database Settings.
The Database Settings tab of the CIS Synchronization Adapter page appears.
4 In the Clintrial Database Instance table, click Edit next to the database instance you want to change.
The Instance, CISUSER Password, and Open Query State fields are enabled.
5 In the Instance field, type a new tnsname for the instance.
6 In the CISUSER Password field, type a new password.
Important: If you want to change this password, you must first change the Clintrial instance password for Oracle. What you specify for the CISUSER password must be the same as the Oracle password for the Clintrial instance.
7 From the Open Query State drop-down list, select the Clintrial discrepancy status that corresponds to the InForm open Query status.
8 Click Update.
Removing a reference to a Clintrial database instance 1 Select Admin > CIS Sync.
If only one adapter is configured and registered in the CIS environment, the CIS Synchronization Adapter page appears with the Sync Connections tab selected.
or
If multiple adapters are configured and registered in the CIS environment, the Adapter List page appears and displays a list of adapters.
2 If the Adapter List page appears, click the row of the CIS synchronization adapter whose synchronization connections you want to view.
The CIS Synchronization Adapter page appears with the Sync Connections tab selected.
3 Select Database Settings.
The Database Settings tab of the CIS Synchronization Adapter page appears.
4 In the Clintrial Database Instances table, click Remove next to the instance for which you want to remove the reference.
A confirmation page appears.
5 Click Proceed with Deletion.
Note: This action removes the reference to the instance. It does not remove the actual instance.

CIS Administrator Guide
Clintrial Integration Solution 4.6 SP0 113
CIS Synchronization Adapter Add Clintrial Database Instance page—Fields
Field Description
Instance Name of the Clintrial database instance.
CISUSER password Password for the CISUSER user in the database instance.
Get State Options Click to populate the State to map queries as open list box.
State to map queries as open Clintrial discrepancy status that corresponds to the InForm Open query status. There is no default; you must specify a value. This information is used for transfer of query (discrepancy) information from the Clintrial database back to the InForm database.
If the value you specify for "State to map queries as open" matches the value in the Clintrial software for "Discrepancy initial status" for the Clintrial rule, the Clintrial discrepancy maps as an Open query in the InForm software. If the values do not match, the Clintrial discrepancy maps as a Candidate query in the InForm software.
Note: If in the Clintrial software the value for "Discrepancy initial status" of a Clintrial rule is not specified, the CIS software assumes the default value "Ready to Send".

Chapter 3 Administering synchronization connections
114 Clintrial Integration Solution 4.6 SP0
Starting a synchronization manually
Overview of starting a synchronization manually Sync Now allows you to start a synchronization manually. This option is usually used when there is no schedule defined for the synchronization connection. For more information, see:
Managing named synchronization schedules (on page 107).
Monitoring and editing synchronization connections (on page 83).
You start a synchronization manually from the Sync Connections tab of the CIS Synchronization Adapter page.
Starting a synchronization manually 1 Select Admin > CIS Sync.
If only one adapter is configured and registered in the CIS environment, the CIS Synchronization Adapter page appears with the Sync Connections tab selected.
or
If multiple adapters are configured and registered in the CIS environment, the Adapter List page appears and displays a list of adapters.
2 If the Adapter List page appears, click the row of the CIS synchronization adapter whose synchronization connections you want to view.
The CIS Synchronization Adapter page appears with the Sync Connections tab selected.
Note: You cannot use Sync Now if the synchronization is already running.
3 In the row for the synchronization you want to start, click Sync Now.
The synchronization begins.

CIS Administrator Guide
Clintrial Integration Solution 4.6 SP0 115
Data recovery
Overview of data recovery As with all systems that process critical data, you should back up the servers in your CIS environment regularly at a frequency that meets your organization’s disaster recovery requirements. Typical schemes include both frequent incremental backups and full backups at a less frequent interval.
Any time you restore from a backup, you must also recover data that was entered between the backup time and the time that the system failed. CIS Administration provides a way to recover lost transactions without re-creating synchronization connections or reentering data manually, by:
Detecting discrepancies between transactions sent and received on each synchronization connection in the CIS system.
Stopping the synchronization until a user intervenes. After discrepancies are detected and the user completes the necessary tasks to begin the synchronization, the CIS software then goes through all transactions until both the InForm software and the Clintrial software have all the transactions.
To recover data, you use the Actions tab of the CIS Synchronization Connection page.
Data recovery scenario
Three databases are involved in synchronizing clinical data and metadata between the InForm

Chapter 3 Administering synchronization connections
116 Clintrial Integration Solution 4.6 SP0
software and the Clintrial software:
InForm trial database
CIS database
Clintrial instance
These databases can be backed-up independently of one another.
Note: It would be possible for CIS Sync Adapter to automatically recover after a database is restored rather than going into a Data Recovery mode. However, database recoveries are judged to be rare enough and serious enough that user intervention will be required.
Consider the following example.
A CIS configuration consists of one server running the InForm software and one running the CIS and the Clintrial software. A trial on the InForm server A is synchronized through CIS to an InForm protocol on server B. All databases are backed up every 24 hours, and all systems synchronize automatically every 30 minutes.
Disk failure on CIS and Clintrial server B
System B is restored from a nightly backup. All data entered during the last 13 hours on server B is lost. EDC data that has been synchronized from server B exists on server A. The synchronization connection between servers A and B is in a discrepancy state.
Note: Only EDC data can be recovered; data entered directly into the Clintrial software server must be re-created manually.

CIS Administrator Guide
Clintrial Integration Solution 4.6 SP0 117
The recovery process is initiated by the user from the Actions tab of the CIS Synchronizations page. During recovery, all EDC data that was synchronized from server B to server A is synchronized back. For more information, see Recovering data (on page 117).
After recovery, EDC data on Server B is restored up to the later of:
The most recent backup.
The last successful synchronization before failure.
Note: Non-EDC Data on Server B is restored only up to the point of the backup.
Disk failure on InForm software server A
Server A is restored from a nightly backup. All data entered during the last 13 hours on server A is lost. Data that has been synchronized from server A exists on server B. There is a discrepancy between the number of transactions sent and received on the synchronization connection between servers A and B. Therefore, the synchronization connection is in a discrepancy state.
The recovery process is initiated by the user from the Actions tab of the CIS Synchronizations page. During recovery, all data that was synchronized to server B before the failure synchronizes back from server B to server A. For more information, see Recovering data (on page 117).
After recovery, data on Server A is restored up to the later of:
The most recent backup.
The last successful synchronization before failure.
Unrecovered data
In each of these scenarios, the CIS Administration application can detect and restore missing transactions only if:
The synchronization connection exists, and the messages that created the connection are part of the backup from which you restore the database.
The transactions have been involved in a synchronization process and are stored in the transaction history of a server that has not failed.
To insure that you recapture all transactions, after recovering you must manually re-enter any data that is not captured in one of the following:
A database backup.
A synchronization process.
Additionally, you must manually re-enter data that was entered with the Enter module of the Clintrial software if the Clintrial server fails and is restored.
Recovering data 1 Select Admin > CIS Sync.
Chapter 3 Administering synchronization connections
118 Clintrial Integration Solution 4.6 SP0
If only one adapter is configured and registered in the CIS environment, the CIS Synchronization Adapter page appears with the Sync Connections tab selected.
or
If multiple adapters are configured and registered in the CIS environment, the Adapter List page appears and displays a list of adapters.
2 If the Adapter List page appears, click the row of the CIS synchronization adapter whose synchronization connections you want to view.
The CIS Synchronization Adapter page appears with the Sync Connections tab selected.
3 Click the row of the synchronization connection for which you want to recover data.
4 Select Actions.
The Actions tab appears.
5 Click Data Recovery.
A confirmation page appears.
6 Click Recover Data.

CIS Administrator Guide
Clintrial Integration Solution 4.6 SP0 119


Clintrial Integration Solution 4.6 SP0 121
In this chapter Overview of monitoring load balancing..........................................................................................122
Performing load balancing activities ................................................................................................124
C H A P T E R 4
Monitoring and managing load balancing

Chapter 4 Monitoring and managing load balancing
122 Clintrial Integration Solution 4.6 SP0
Overview of monitoring load balancing Load balancing is a process that:
Distributes the processing load among multiple machines so that more data can be processed in a shorter period of time.
Provides fail-over capability by assigning the synchronization processing to another machine when one machine fails.
As implemented in the CIS software, load balancing is a set of software components within the CIS system that distribute synchronization jobs among a pool of machines, called processors. If the CIS software is installed on a single server, it performs all of the load balancing actions described in this section but distributes data only to the single server in the pool.
Load balancing takes place in the following steps:
A synchronization connection starts to run, either according to a schedule or when requested by a user clicking the Sync Now button in CIS Administration.
The CIS scheduling software starts a synchronization job.
CIS Administration enables you to check the status of the load-balanced machines in your configuration and to place machines online or offline.
For additional assistance in monitoring synchronization status, CIS Administration includes a notification feature. When you set up email notifications, you can specify the addressees who should receive email notification when a synchronization fails or a synchronization processor goes offline.
How the CIS software selects a processing machine The load balancer performs selection by:
Selecting the machine with the highest amount of available processing power (processing threshold minus the current processing load).
Randomly selecting a machine from all machines with the same power if more than one machine has the same power.
Note: To implement load balancing all CIS servers must use the same Oracle credentials.
Configuring CIS load balancing When you install the CIS software in an environment where the processing load will be distributed over multiple CIS machines, verify that all CIS servers being used for load balancing use the same Oracle credentials and tnsnames for the CIS and Clintrial databases.
In addition, if you use a hardware load-balancing machine to distribute transaction processing to different InForm Adapters, you must register the load balancing machine with CIS administration. For more information, see Registering an InForm Adapter (on page 32).
CIS Administrator Guide
Clintrial Integration Solution 4.6 SP0 123
If problems occur during load balancing Load balancing problems could occur when a machine fails.
Machine failure
A background thread that runs in the load balancer periodically checks that each processor continues to update its status more frequently than the processing time-out. If the load balancer determines that one of the processors has not responded in time, it automatically marks that processor offline and assigns the synchronization connection to the next available machine.
Recovering from a machine failure
After the load-balancing error has been corrected, you can use the CIS Administration application to set a load-balance machine back online.
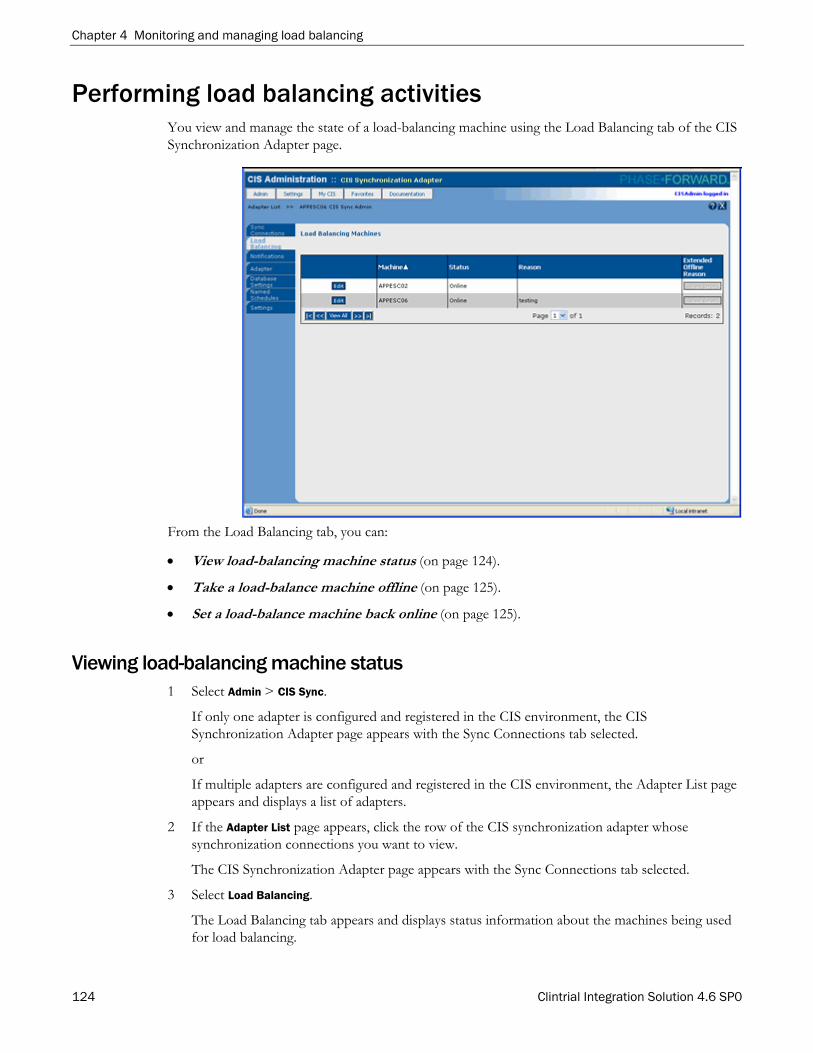
Chapter 4 Monitoring and managing load balancing
124 Clintrial Integration Solution 4.6 SP0
Performing load balancing activities You view and manage the state of a load-balancing machine using the Load Balancing tab of the CIS Synchronization Adapter page.
From the Load Balancing tab, you can:
View load-balancing machine status (on page 124).
Take a load-balance machine offline (on page 125).
Set a load-balance machine back online (on page 125).
Viewing load-balancing machine status 1 Select Admin > CIS Sync.
If only one adapter is configured and registered in the CIS environment, the CIS Synchronization Adapter page appears with the Sync Connections tab selected.
or
If multiple adapters are configured and registered in the CIS environment, the Adapter List page appears and displays a list of adapters.
2 If the Adapter List page appears, click the row of the CIS synchronization adapter whose synchronization connections you want to view.
The CIS Synchronization Adapter page appears with the Sync Connections tab selected.
3 Select Load Balancing.
The Load Balancing tab appears and displays status information about the machines being used for load balancing.

CIS Administrator Guide
Clintrial Integration Solution 4.6 SP0 125
Taking a load-balancing machine off line 1 Select Admin > CIS Sync.
If only one adapter is configured and registered in the CIS environment, the CIS Synchronization Adapter page appears with the Sync Connections tab selected.
or
If multiple adapters are configured and registered in the CIS environment, the Adapter List page appears and displays a list of adapters.
2 If the Adapter List page appears, click the row of the CIS synchronization adapter whose synchronization connections you want to view.
The CIS Synchronization Adapter page appears with the Sync Connections tab selected.
3 Select Load Balancing.
The Load Balancing tab appears and displays status information about the machines being used for load balancing.
4 In the Load Balancing Machines table, click Edit next to the load-balance machine whose status you want to change.
The Status and Offline Reason fields are enabled.
5 In the Status column for the machine you want to change, select Offline from the drop-down list.
6 Optionally, in the Offline Reason column, type a reason for taking the machine off line.
7 Click Update.
CIS places the load-balanced machine off line. Synchronization transactions bypass the offline machine and are processed on the next available load-balanced machine.
Setting a load-balancing machine online 1 Select Admin > CIS Sync.
If only one adapter is configured and registered in the CIS environment, the CIS Synchronization Adapter page appears with the Sync Connections tab selected.
or
If multiple adapters are configured and registered in the CIS environment, the Adapter List page appears and displays a list of adapters.
2 If the Adapter List page appears, click the row of the CIS synchronization adapter whose synchronization connections you want to view.
The CIS Synchronization Adapter page appears with the Sync Connections tab selected.
3 Select Load Balancing.
The Load Balancing tab appears and displays status information about the machines being used for load balancing.
4 In the Load Balancing table, click Edit next to the load-balancing machine whose status you want to change.

Chapter 4 Monitoring and managing load balancing
126 Clintrial Integration Solution 4.6 SP0
The Status and Offline Reason fields are enabled.
5 In the Status column for the machine you want to change, select Online from the drop-down list.
6 Click Update.
CIS places the machine online.
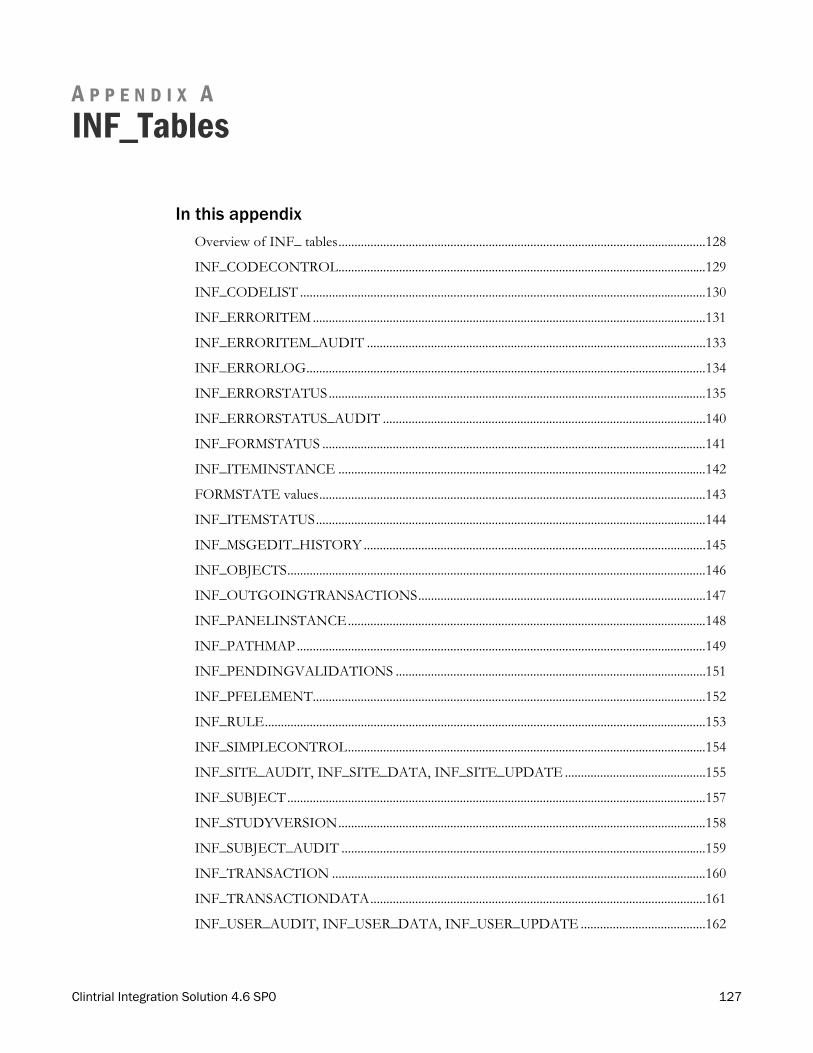
Clintrial Integration Solution 4.6 SP0 127
In this appendix Overview of INF_ tables...................................................................................................................128
INF_CODECONTROL...................................................................................................................129
INF_CODELIST ...............................................................................................................................130
INF_ERRORITEM...........................................................................................................................131
INF_ERRORITEM_AUDIT ..........................................................................................................133
INF_ERRORLOG.............................................................................................................................134
INF_ERRORSTATUS......................................................................................................................135
INF_ERRORSTATUS_AUDIT .....................................................................................................140
INF_FORMSTATUS ........................................................................................................................141
INF_ITEMINSTANCE ...................................................................................................................142
FORMSTATE values.........................................................................................................................143
INF_ITEMSTATUS..........................................................................................................................144
INF_MSGEDIT_HISTORY ...........................................................................................................145
INF_OBJECTS...................................................................................................................................146
INF_OUTGOINGTRANSACTIONS..........................................................................................147
INF_PANELINSTANCE................................................................................................................148
INF_PATHMAP................................................................................................................................149
INF_PENDINGVALIDATIONS .................................................................................................151
INF_PFELEMENT...........................................................................................................................152
INF_RULE..........................................................................................................................................153
INF_SIMPLECONTROL................................................................................................................154
INF_SITE_AUDIT, INF_SITE_DATA, INF_SITE_UPDATE ............................................155
INF_SUBJECT...................................................................................................................................157
INF_STUDYVERSION...................................................................................................................158
INF_SUBJECT_AUDIT ..................................................................................................................159
INF_TRANSACTION .....................................................................................................................160
INF_TRANSACTIONDATA.........................................................................................................161
INF_USER_AUDIT, INF_USER_DATA, INF_USER_UPDATE .......................................162
A P P E N D I X A
INF_Tables
Appendix A INF_Tables
128 Clintrial Integration Solution 4.6 SP0
Overview of INF_ tables The CIS software creates the INF_ tables in the Clintrial database by CIS when the CIS software synchronizes a study from the InForm software to the Clintrial software.
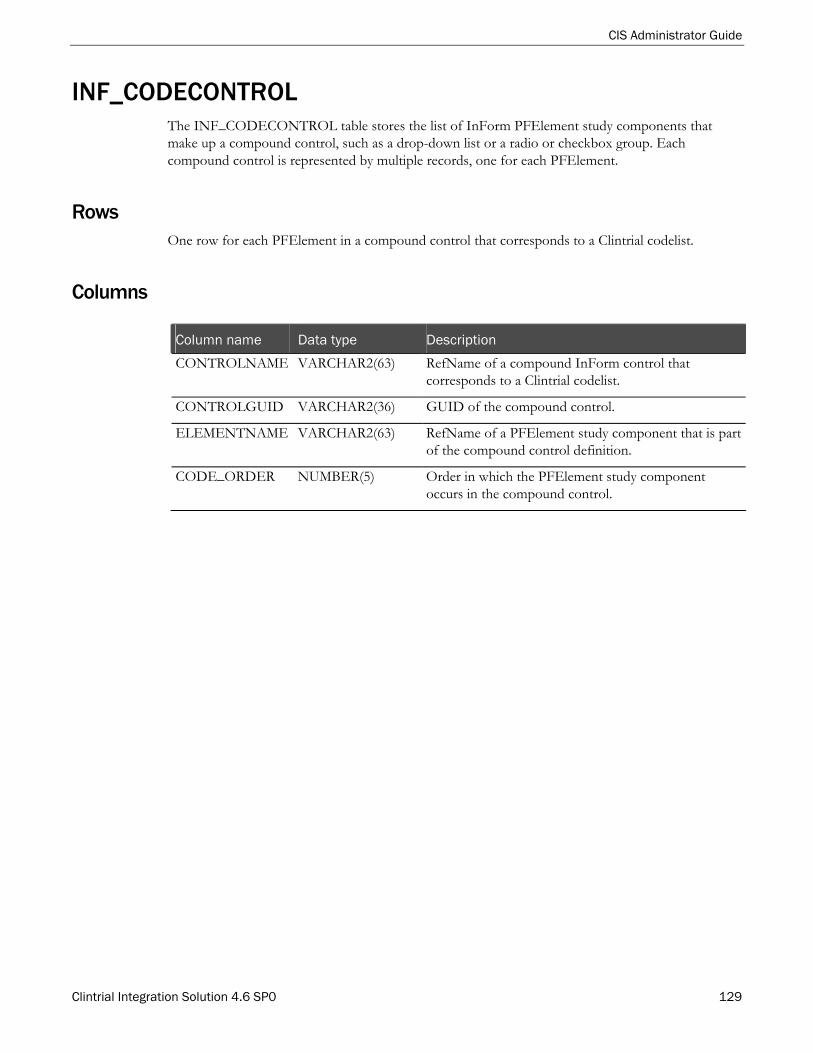
CIS Administrator Guide
Clintrial Integration Solution 4.6 SP0 129
INF_CODECONTROL The INF_CODECONTROL table stores the list of InForm PFElement study components that make up a compound control, such as a drop-down list or a radio or checkbox group. Each compound control is represented by multiple records, one for each PFElement.
Rows One row for each PFElement in a compound control that corresponds to a Clintrial codelist.
Columns
Column name Data type Description
CONTROLNAME VARCHAR2(63) RefName of a compound InForm control that corresponds to a Clintrial codelist.
CONTROLGUID VARCHAR2(36) GUID of the compound control.
ELEMENTNAME VARCHAR2(63) RefName of a PFElement study component that is part of the compound control definition.
CODE_ORDER NUMBER(5) Order in which the PFElement study component occurs in the compound control.
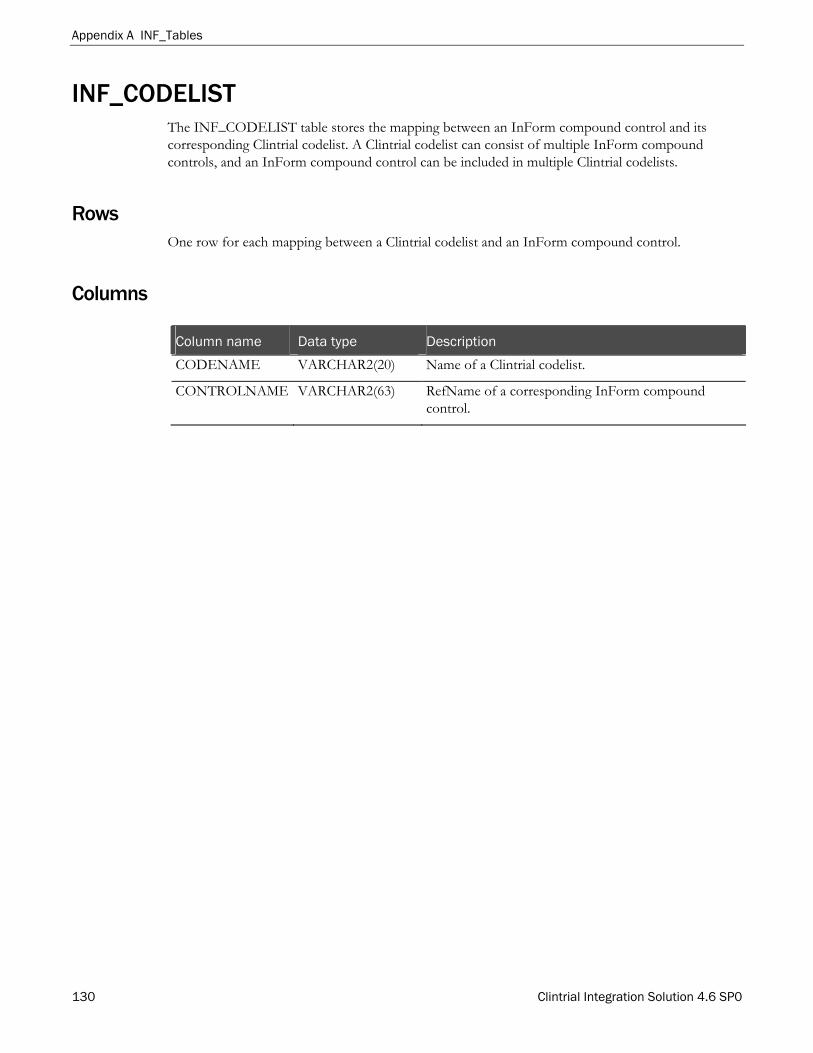
Appendix A INF_Tables
130 Clintrial Integration Solution 4.6 SP0
INF_CODELIST The INF_CODELIST table stores the mapping between an InForm compound control and its corresponding Clintrial codelist. A Clintrial codelist can consist of multiple InForm compound controls, and an InForm compound control can be included in multiple Clintrial codelists.
Rows One row for each mapping between a Clintrial codelist and an InForm compound control.
Columns
Column name Data type Description
CODENAME VARCHAR2(20) Name of a Clintrial codelist.
CONTROLNAME VARCHAR2(63) RefName of a corresponding InForm compound control.
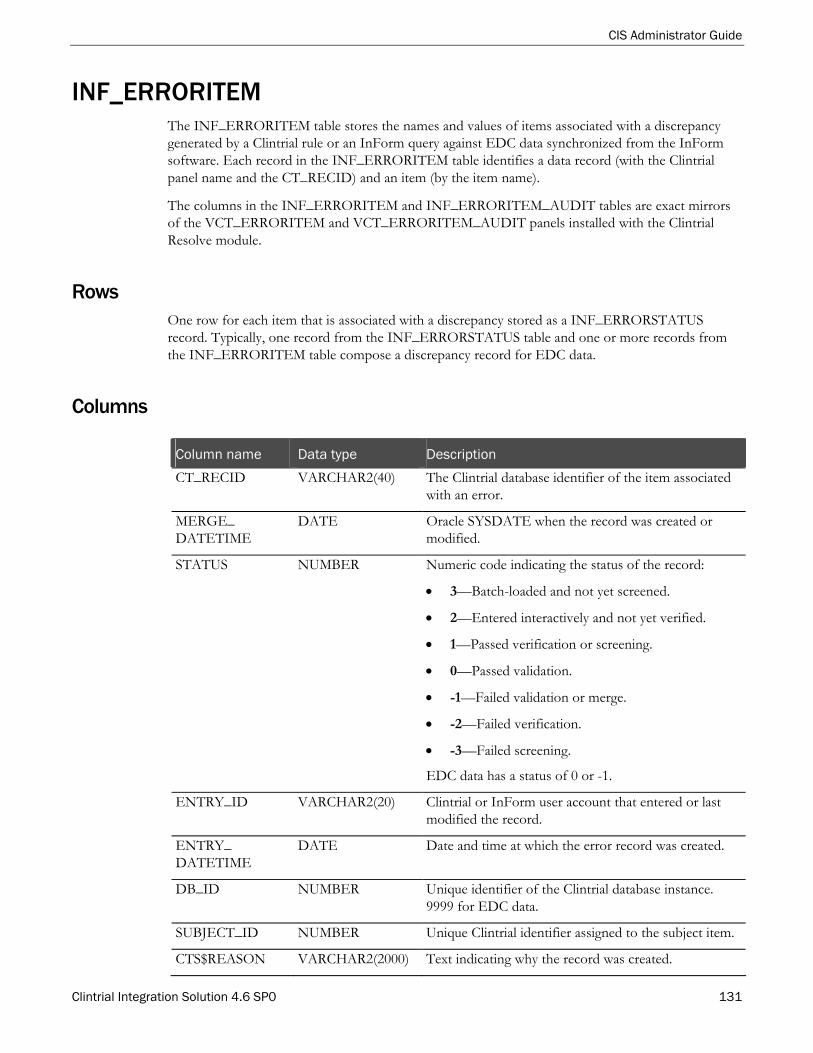
CIS Administrator Guide
Clintrial Integration Solution 4.6 SP0 131
INF_ERRORITEM The INF_ERRORITEM table stores the names and values of items associated with a discrepancy generated by a Clintrial rule or an InForm query against EDC data synchronized from the InForm software. Each record in the INF_ERRORITEM table identifies a data record (with the Clintrial panel name and the CT_RECID) and an item (by the item name).
The columns in the INF_ERRORITEM and INF_ERRORITEM_AUDIT tables are exact mirrors of the VCT_ERRORITEM and VCT_ERRORITEM_AUDIT panels installed with the Clintrial Resolve module.
Rows One row for each item that is associated with a discrepancy stored as a INF_ERRORSTATUS record. Typically, one record from the INF_ERRORSTATUS table and one or more records from the INF_ERRORITEM table compose a discrepancy record for EDC data.
Columns
Column name Data type Description
CT_RECID VARCHAR2(40) The Clintrial database identifier of the item associated with an error.
MERGE_ DATETIME
DATE Oracle SYSDATE when the record was created or modified.
STATUS NUMBER Numeric code indicating the status of the record:
3—Batch-loaded and not yet screened.
2—Entered interactively and not yet verified.
1—Passed verification or screening.
0—Passed validation.
-1—Failed validation or merge.
-2—Failed verification.
-3—Failed screening.
EDC data has a status of 0 or -1.
ENTRY_ID VARCHAR2(20) Clintrial or InForm user account that entered or last modified the record.
ENTRY_ DATETIME
DATE Date and time at which the error record was created.
DB_ID NUMBER Unique identifier of the Clintrial database instance. 9999 for EDC data.
SUBJECT_ID NUMBER Unique Clintrial identifier assigned to the subject item.
CTS$REASON VARCHAR2(2000) Text indicating why the record was created.
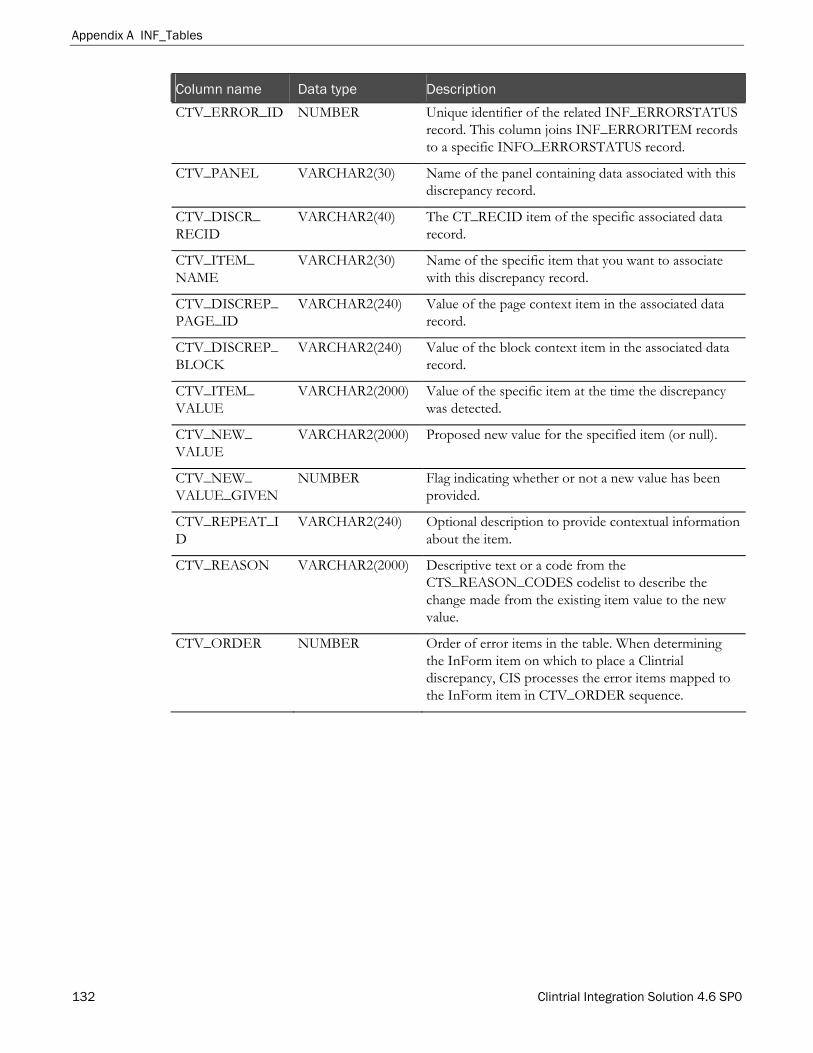
Appendix A INF_Tables
132 Clintrial Integration Solution 4.6 SP0
Column name Data type Description
CTV_ERROR_ID NUMBER Unique identifier of the related INF_ERRORSTATUS record. This column joins INF_ERRORITEM records to a specific INFO_ERRORSTATUS record.
CTV_PANEL VARCHAR2(30) Name of the panel containing data associated with this discrepancy record.
CTV_DISCR_ RECID
VARCHAR2(40) The CT_RECID item of the specific associated data record.
CTV_ITEM_ NAME
VARCHAR2(30) Name of the specific item that you want to associate with this discrepancy record.
CTV_DISCREP_ PAGE_ID
VARCHAR2(240) Value of the page context item in the associated data record.
CTV_DISCREP_ BLOCK
VARCHAR2(240) Value of the block context item in the associated data record.
CTV_ITEM_ VALUE
VARCHAR2(2000) Value of the specific item at the time the discrepancy was detected.
CTV_NEW_ VALUE
VARCHAR2(2000) Proposed new value for the specified item (or null).
CTV_NEW_ VALUE_GIVEN
NUMBER Flag indicating whether or not a new value has been provided.
CTV_REPEAT_ID
VARCHAR2(240) Optional description to provide contextual information about the item.
CTV_REASON VARCHAR2(2000) Descriptive text or a code from the CTS_REASON_CODES codelist to describe the change made from the existing item value to the new value.
CTV_ORDER NUMBER Order of error items in the table. When determining the InForm item on which to place a Clintrial discrepancy, CIS processes the error items mapped to the InForm item in CTV_ORDER sequence.
CIS Administrator Guide
Clintrial Integration Solution 4.6 SP0 133
INF_ERRORITEM_AUDIT The INF_ERRORITEM_AUDIT table stores records of changes made to data items associated with discrepancy records through query updates and resolutions performed in the InForm software and synchronized back to the Clintrial software for validation. For EDC data, validation occurs automatically, and the start point of auditing is ENTRY.
Rows One row for each changed data item.
Columns The columns in the INF_ERRORITEM_AUDIT table are identical to those in the INF_ERRORITEM table.
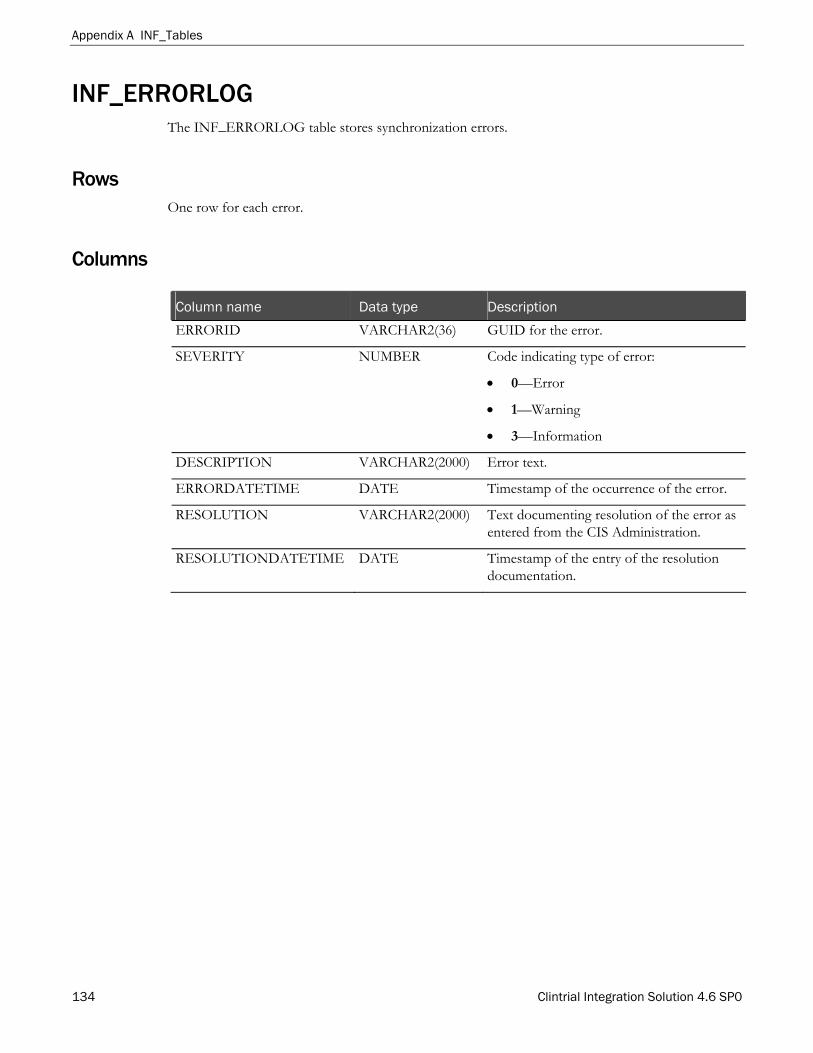
Appendix A INF_Tables
134 Clintrial Integration Solution 4.6 SP0
INF_ERRORLOG The INF_ERRORLOG table stores synchronization errors.
Rows One row for each error.
Columns
Column name Data type Description
ERRORID VARCHAR2(36) GUID for the error.
SEVERITY NUMBER Code indicating type of error:
0—Error
1—Warning
3—Information
DESCRIPTION VARCHAR2(2000) Error text.
ERRORDATETIME DATE Timestamp of the occurrence of the error.
RESOLUTION VARCHAR2(2000) Text documenting resolution of the error as entered from the CIS Administration.
RESOLUTIONDATETIME DATE Timestamp of the entry of the resolution documentation.
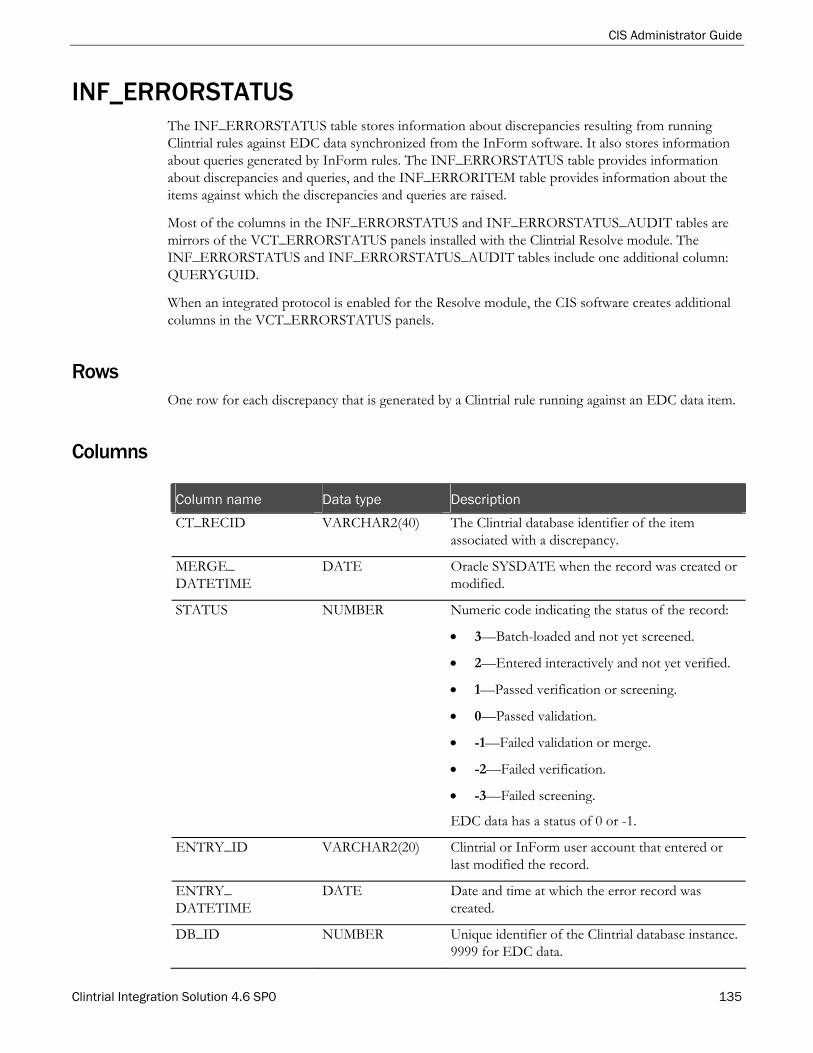
CIS Administrator Guide
Clintrial Integration Solution 4.6 SP0 135
INF_ERRORSTATUS The INF_ERRORSTATUS table stores information about discrepancies resulting from running Clintrial rules against EDC data synchronized from the InForm software. It also stores information about queries generated by InForm rules. The INF_ERRORSTATUS table provides information about discrepancies and queries, and the INF_ERRORITEM table provides information about the items against which the discrepancies and queries are raised.
Most of the columns in the INF_ERRORSTATUS and INF_ERRORSTATUS_AUDIT tables are mirrors of the VCT_ERRORSTATUS panels installed with the Clintrial Resolve module. The INF_ERRORSTATUS and INF_ERRORSTATUS_AUDIT tables include one additional column: QUERYGUID.
When an integrated protocol is enabled for the Resolve module, the CIS software creates additional columns in the VCT_ERRORSTATUS panels.
Rows One row for each discrepancy that is generated by a Clintrial rule running against an EDC data item.
Columns
Column name Data type Description
CT_RECID VARCHAR2(40) The Clintrial database identifier of the item associated with a discrepancy.
MERGE_ DATETIME
DATE Oracle SYSDATE when the record was created or modified.
STATUS NUMBER Numeric code indicating the status of the record:
3—Batch-loaded and not yet screened.
2—Entered interactively and not yet verified.
1—Passed verification or screening.
0—Passed validation.
-1—Failed validation or merge.
-2—Failed verification.
-3—Failed screening.
EDC data has a status of 0 or -1.
ENTRY_ID VARCHAR2(20) Clintrial or InForm user account that entered or last modified the record.
ENTRY_ DATETIME
DATE Date and time at which the error record was created.
DB_ID NUMBER Unique identifier of the Clintrial database instance. 9999 for EDC data.
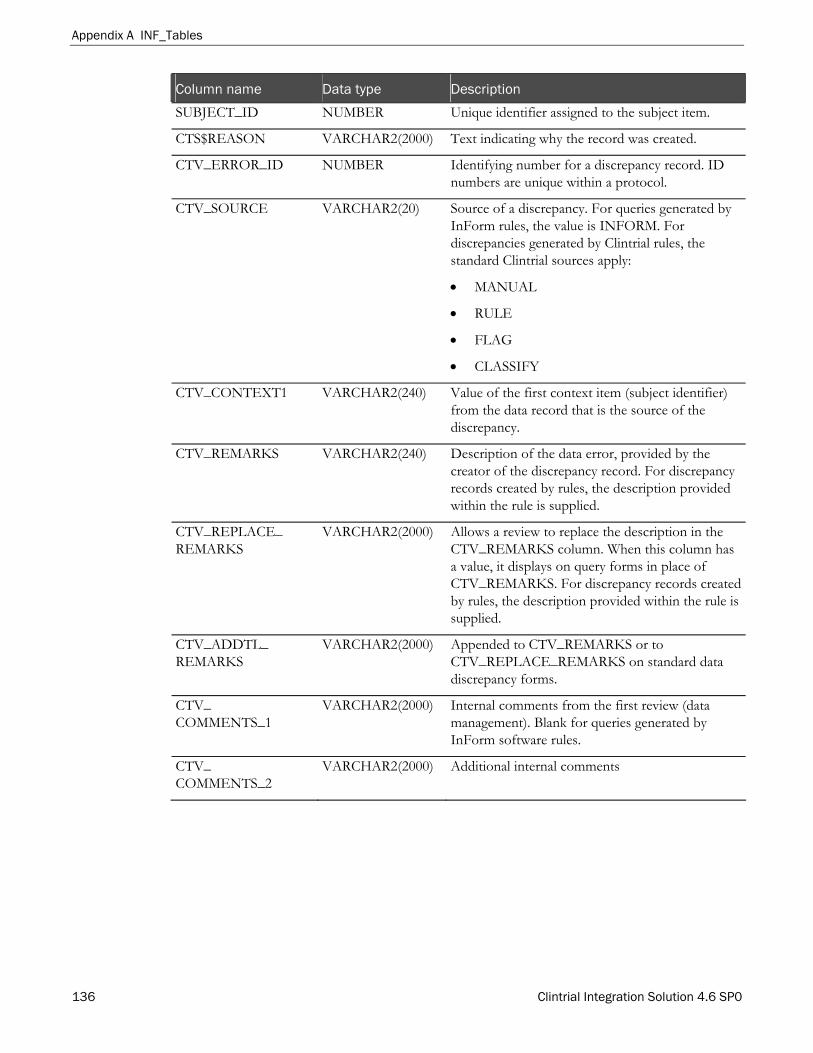
Appendix A INF_Tables
136 Clintrial Integration Solution 4.6 SP0
Column name Data type Description
SUBJECT_ID NUMBER Unique identifier assigned to the subject item.
CTS$REASON VARCHAR2(2000) Text indicating why the record was created.
CTV_ERROR_ID NUMBER Identifying number for a discrepancy record. ID numbers are unique within a protocol.
CTV_SOURCE VARCHAR2(20) Source of a discrepancy. For queries generated by InForm rules, the value is INFORM. For discrepancies generated by Clintrial rules, the standard Clintrial sources apply:
MANUAL
RULE
FLAG
CLASSIFY
CTV_CONTEXT1 VARCHAR2(240) Value of the first context item (subject identifier) from the data record that is the source of the discrepancy.
CTV_REMARKS VARCHAR2(240) Description of the data error, provided by the creator of the discrepancy record. For discrepancy records created by rules, the description provided within the rule is supplied.
CTV_REPLACE_ REMARKS
VARCHAR2(2000) Allows a review to replace the description in the CTV_REMARKS column. When this column has a value, it displays on query forms in place of CTV_REMARKS. For discrepancy records created by rules, the description provided within the rule is supplied.
CTV_ADDTL_ REMARKS
VARCHAR2(2000) Appended to CTV_REMARKS or to CTV_REPLACE_REMARKS on standard data discrepancy forms.
CTV_ COMMENTS_1
VARCHAR2(2000) Internal comments from the first review (data management). Blank for queries generated by InForm software rules.
CTV_ COMMENTS_2
VARCHAR2(2000) Additional internal comments
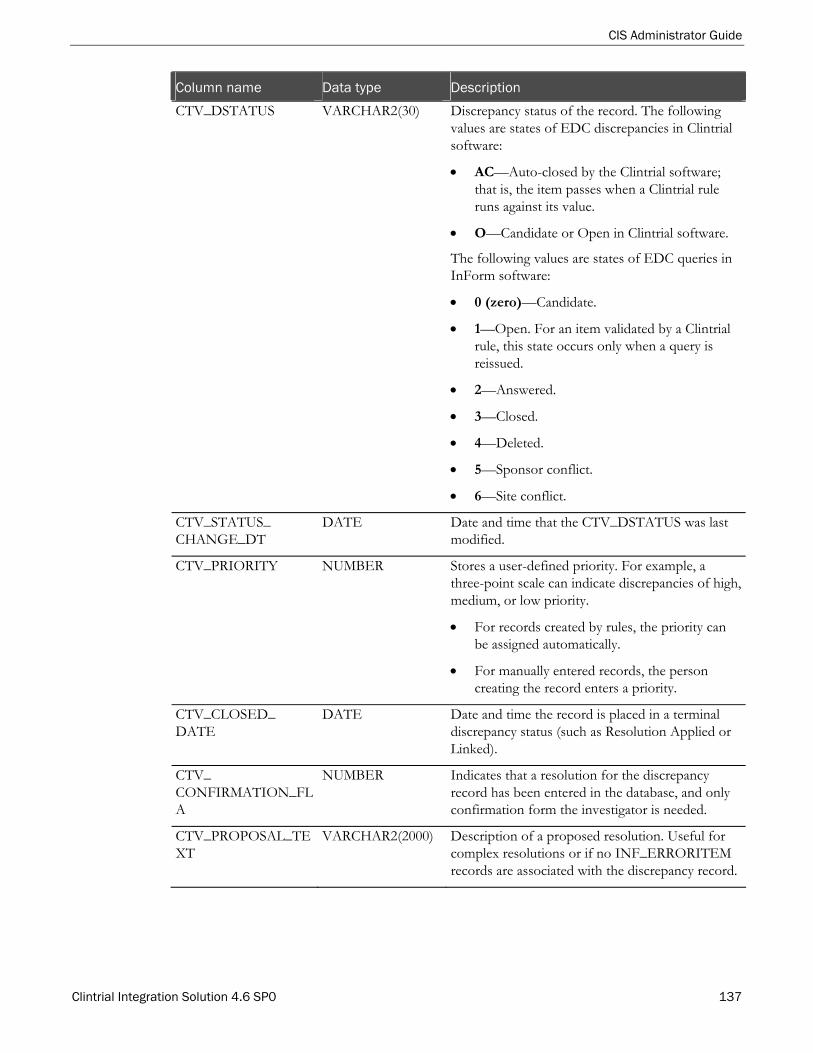
CIS Administrator Guide
Clintrial Integration Solution 4.6 SP0 137
Column name Data type Description
CTV_DSTATUS VARCHAR2(30) Discrepancy status of the record. The following values are states of EDC discrepancies in Clintrial software:
AC—Auto-closed by the Clintrial software; that is, the item passes when a Clintrial rule runs against its value.
O—Candidate or Open in Clintrial software.
The following values are states of EDC queries in InForm software:
0 (zero)—Candidate.
1—Open. For an item validated by a Clintrial rule, this state occurs only when a query is reissued.
2—Answered.
3—Closed.
4—Deleted.
5—Sponsor conflict.
6—Site conflict.
CTV_STATUS_ CHANGE_DT
DATE Date and time that the CTV_DSTATUS was last modified.
CTV_PRIORITY NUMBER Stores a user-defined priority. For example, a three-point scale can indicate discrepancies of high, medium, or low priority.
For records created by rules, the priority can be assigned automatically.
For manually entered records, the person creating the record enters a priority.
CTV_CLOSED_ DATE
DATE Date and time the record is placed in a terminal discrepancy status (such as Resolution Applied or Linked).
CTV_ CONFIRMATION_FLA
NUMBER Indicates that a resolution for the discrepancy record has been entered in the database, and only confirmation form the investigator is needed.
CTV_PROPOSAL_TEXT
VARCHAR2(2000) Description of a proposed resolution. Useful for complex resolutions or if no INF_ERRORITEM records are associated with the discrepancy record.
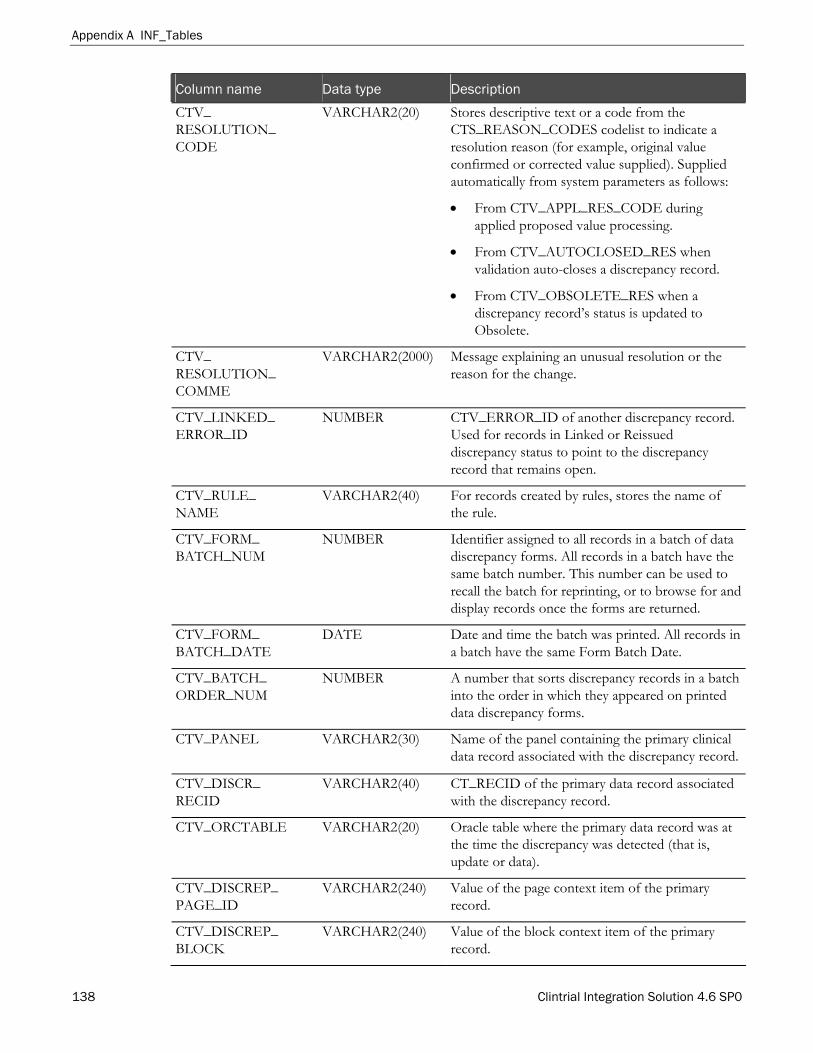
Appendix A INF_Tables
138 Clintrial Integration Solution 4.6 SP0
Column name Data type Description
CTV_ RESOLUTION_ CODE
VARCHAR2(20) Stores descriptive text or a code from the CTS_REASON_CODES codelist to indicate a resolution reason (for example, original value confirmed or corrected value supplied). Supplied automatically from system parameters as follows:
From CTV_APPL_RES_CODE during applied proposed value processing.
From CTV_AUTOCLOSED_RES when validation auto-closes a discrepancy record.
From CTV_OBSOLETE_RES when a discrepancy record’s status is updated to Obsolete.
CTV_ RESOLUTION_ COMME
VARCHAR2(2000) Message explaining an unusual resolution or the reason for the change.
CTV_LINKED_ ERROR_ID
NUMBER CTV_ERROR_ID of another discrepancy record. Used for records in Linked or Reissued discrepancy status to point to the discrepancy record that remains open.
CTV_RULE_ NAME
VARCHAR2(40) For records created by rules, stores the name of the rule.
CTV_FORM_ BATCH_NUM
NUMBER Identifier assigned to all records in a batch of data discrepancy forms. All records in a batch have the same batch number. This number can be used to recall the batch for reprinting, or to browse for and display records once the forms are returned.
CTV_FORM_ BATCH_DATE
DATE Date and time the batch was printed. All records in a batch have the same Form Batch Date.
CTV_BATCH_ ORDER_NUM
NUMBER A number that sorts discrepancy records in a batch into the order in which they appeared on printed data discrepancy forms.
CTV_PANEL VARCHAR2(30) Name of the panel containing the primary clinical data record associated with the discrepancy record.
CTV_DISCR_ RECID
VARCHAR2(40) CT_RECID of the primary data record associated with the discrepancy record.
CTV_ORCTABLE VARCHAR2(20) Oracle table where the primary data record was at the time the discrepancy was detected (that is, update or data).
CTV_DISCREP_ PAGE_ID
VARCHAR2(240) Value of the page context item of the primary record.
CTV_DISCREP_ BLOCK
VARCHAR2(240) Value of the block context item of the primary record.

CIS Administrator Guide
Clintrial Integration Solution 4.6 SP0 139
Column name Data type Description
CTV_REC_ MODDATE
DATE Date of last modification of the primary record at the time the discrepancy was detected.
CTV_ERRDT DATE Date and time the record was first inserted into the INF_ERRORSTATUS table.
CTV_ERRTYPE VARCHAR2(10) Process that created the discrepancy record:
VALIDATE—For discrepancies generated by Clintrial rules during CIS auto-validation.
INFORM—For queries generated by InForm rules.
CTV_ERRACT VARCHAR2(20) For records created by rules, error action (Report or Reject) taken by the rule.
QUERYGUID VARCHAR2(36) Unique ID assigned to the query returned to the InForm software on synchronization.
Appendix A INF_Tables
140 Clintrial Integration Solution 4.6 SP0
INF_ERRORSTATUS_AUDIT The INF_ERRORSTSATUS_AUDIT table stores records of changes made to discrepancy records through query updates and resolutions performed in the InForm software and synchronized back to the Clintrial software for validation. For EDC data, validation occurs automatically, and the start point of auditing is ENTRY.
Rows One row for each changed discrepancy record.
Columns The columns in the INF_ERRORSTATUS_AUDIT table are identical to those in the INF_ERRORSTATUS table.
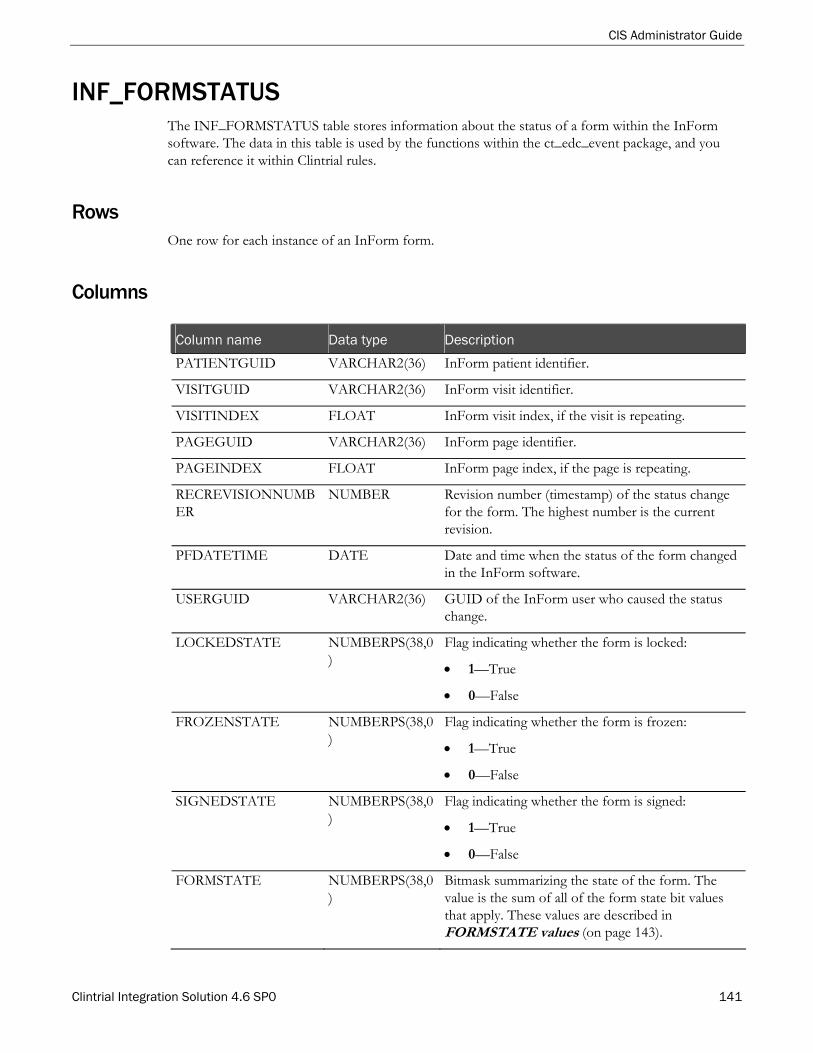
CIS Administrator Guide
Clintrial Integration Solution 4.6 SP0 141
INF_FORMSTATUS The INF_FORMSTATUS table stores information about the status of a form within the InForm software. The data in this table is used by the functions within the ct_edc_event package, and you can reference it within Clintrial rules.
Rows One row for each instance of an InForm form.
Columns
Column name Data type Description
PATIENTGUID VARCHAR2(36) InForm patient identifier.
VISITGUID VARCHAR2(36) InForm visit identifier.
VISITINDEX FLOAT InForm visit index, if the visit is repeating.
PAGEGUID VARCHAR2(36) InForm page identifier.
PAGEINDEX FLOAT InForm page index, if the page is repeating.
RECREVISIONNUMBER
NUMBER Revision number (timestamp) of the status change for the form. The highest number is the current revision.
PFDATETIME DATE Date and time when the status of the form changed in the InForm software.
USERGUID VARCHAR2(36) GUID of the InForm user who caused the status change.
LOCKEDSTATE NUMBERPS(38,0)
Flag indicating whether the form is locked:
1—True
0—False
FROZENSTATE NUMBERPS(38,0)
Flag indicating whether the form is frozen:
1—True
0—False
SIGNEDSTATE NUMBERPS(38,0)
Flag indicating whether the form is signed:
1—True
0—False
FORMSTATE NUMBERPS(38,0)
Bitmask summarizing the state of the form. The value is the sum of all of the form state bit values that apply. These values are described in FORMSTATE values (on page 143).
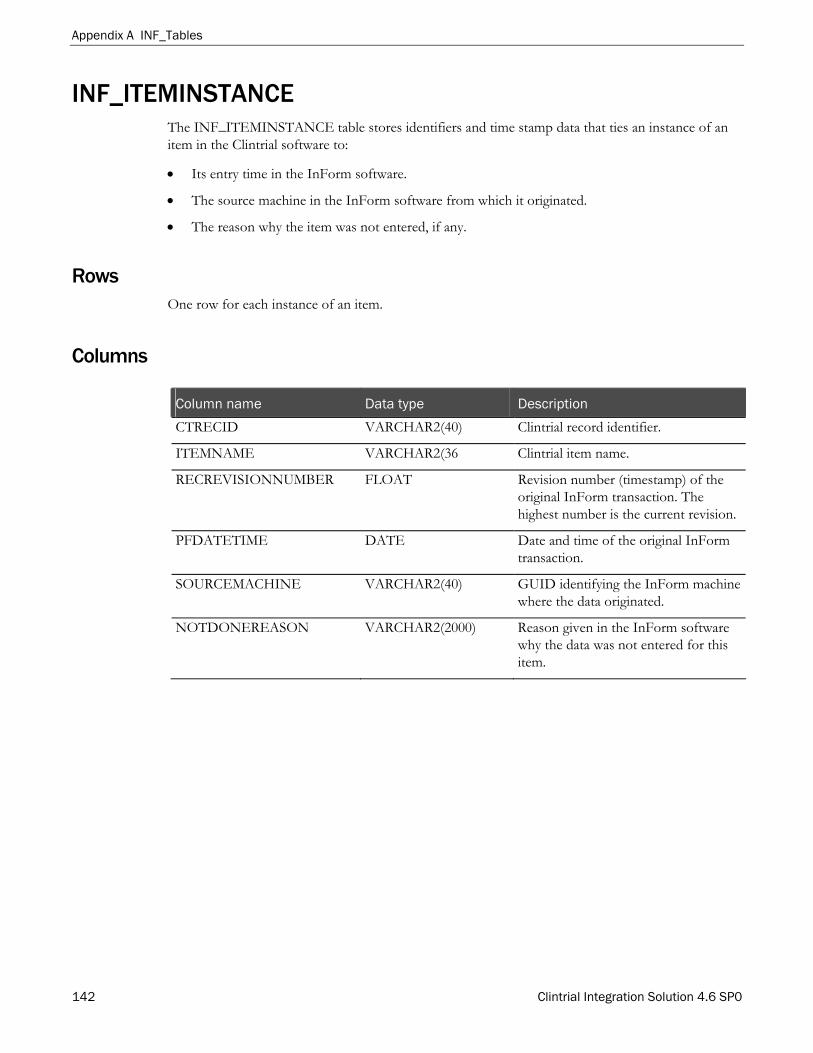
Appendix A INF_Tables
142 Clintrial Integration Solution 4.6 SP0
INF_ITEMINSTANCE The INF_ITEMINSTANCE table stores identifiers and time stamp data that ties an instance of an item in the Clintrial software to:
Its entry time in the InForm software.
The source machine in the InForm software from which it originated.
The reason why the item was not entered, if any.
Rows One row for each instance of an item.
Columns
Column name Data type Description
CTRECID VARCHAR2(40) Clintrial record identifier.
ITEMNAME VARCHAR2(36 Clintrial item name.
RECREVISIONNUMBER FLOAT Revision number (timestamp) of the original InForm transaction. The highest number is the current revision.
PFDATETIME DATE Date and time of the original InForm transaction.
SOURCEMACHINE VARCHAR2(40) GUID identifying the InForm machine where the data originated.
NOTDONEREASON VARCHAR2(2000) Reason given in the InForm software why the data was not entered for this item.

CIS Administrator Guide
Clintrial Integration Solution 4.6 SP0 143
FORMSTATE values The following table describes the bit values that make up the summary of the state of an InForm form, as stored in the FORMSTATE column of the INF_FORMSTATUS table.
Bit value component Description Hex Value
PFP_STARTED Form was started with data, comments, or queries. 1
PFP_QUERIES Form has queries. 2
PFP_MISSINGITEMS Form has missing data. 4
PFP_SDVREADY Form has been marked ready for source verification. 8
PFP_FROZEN Form is frozen. 10
PFP_LOCKED Form is locked. 20
PFP_SIGNED Form is signed. 40
PFP_SDVCOMPLETE Form has been marked completely source verified. 80
PFP_SDVPARTIAL Form has been marked partially source verified. 100
PFP_MARKEDASNOTDONE
Form has been marked not completed with a form-level comment.
200
PFP_HASCOMMENT Form has a form-level comment. 400
PFP_FORMHASDATA Form has data. 800
PFP_DYNADELETE Form was generated by a dynamic form rule and was subsequently deleted.
1000
PFP_DELETEDFORM Instance of a repeating form has been deleted. 2000

Appendix A INF_Tables
144 Clintrial Integration Solution 4.6 SP0
INF_ITEMSTATUS The INF_ITEMSTATUS table stores information about the status of an item within the InForm software. The data in this table is used by the functions within the ct_edc_event package, and you can reference it within Clintrial rules.
Rows One row for each instance of an InForm item that has been source verified.
Columns
Column name Data type Description
PATIENTGUID VARCHAR2(36) InForm patient identifier.
VISITGUID VARCHAR2(36) InForm visit identifier.
VISITINDEX FLOAT InForm visit index, if the visit is repeating.
PAGEGUID VARCHAR2(36) InForm page identifier.
PAGEINDEX FLOAT InForm page index, if the page is repeating.
SECTIONGUID VARCHAR2(36) InForm section identifier.
ITEMSETGUID VARCHAR2(36) InForm itemset identifier, if the item occurs within an itemset.
ITEMSETINDEX FLOAT InForm itemset index, if the instance is an itemset. The corresponding Clintrial repeat identifier is stored as a suffix to the CTRECID.
ITEMGUID VARCHAR2(36) InForm item identifier.
RECREVISIONNUMBER
NUMBER Revision number (timestamp) of the status change for the item. The highest number is the current revision.
PFDATETIME DATE Date and time when the status of the item changed in the InForm software.
USERGUID VARCHAR2(36) GUID of the InForm user who caused the status change.
SDVSTATE NUMBERPS(38,0) Flag indicating whether the item has been source verified:
1—True.
0—False. An item has a 0 value only if it has been source verified and then marked not source verified. Items that have never been source verified do not appear in the table.

CIS Administrator Guide
Clintrial Integration Solution 4.6 SP0 145
INF_MSGEDIT_HISTORY The INF_MSGEDIT_HISTORY table stores an audit record of each synchronized transaction that was changed by using the transaction edit feature of CIS Administration.
Rows One row for each transaction that was edited.
Columns
Column name Data type Description
TRANSACTIONID VARCHAR2(36) GUID of the transaction for the edit operation (the audit trail for the edit).
EDITEDTRANSACTIONID
VARCHAR2(255) GUID of the transaction that was edited.
EDITORMACHINE VARCHAR2(255) Simple machine name of the CIS application server that processed the transaction edit.
EDITUSER VARCHAR2(255) User name of the user who edited the transaction.
EDITUSERHOST VARCHAR2(255) Simple machine name of the CIS client computer that was running the web browser where a user edited the transaction. The format consists of two values that are separated by a comma:
Host name of the client computer.
IP address of the client computer.
If the Host name is not available, the EDITUSERHOST value consists of two identical IP addresses that are separated by a comma.
EDITDATETIME DATE UTC time at which the transaction edit occurred.
REASON VARCHAR2(2000)
Reason for editing the message.
TRANSACTIONCONTENT
LONG VARCHAR
Before and after image of the transaction XML.
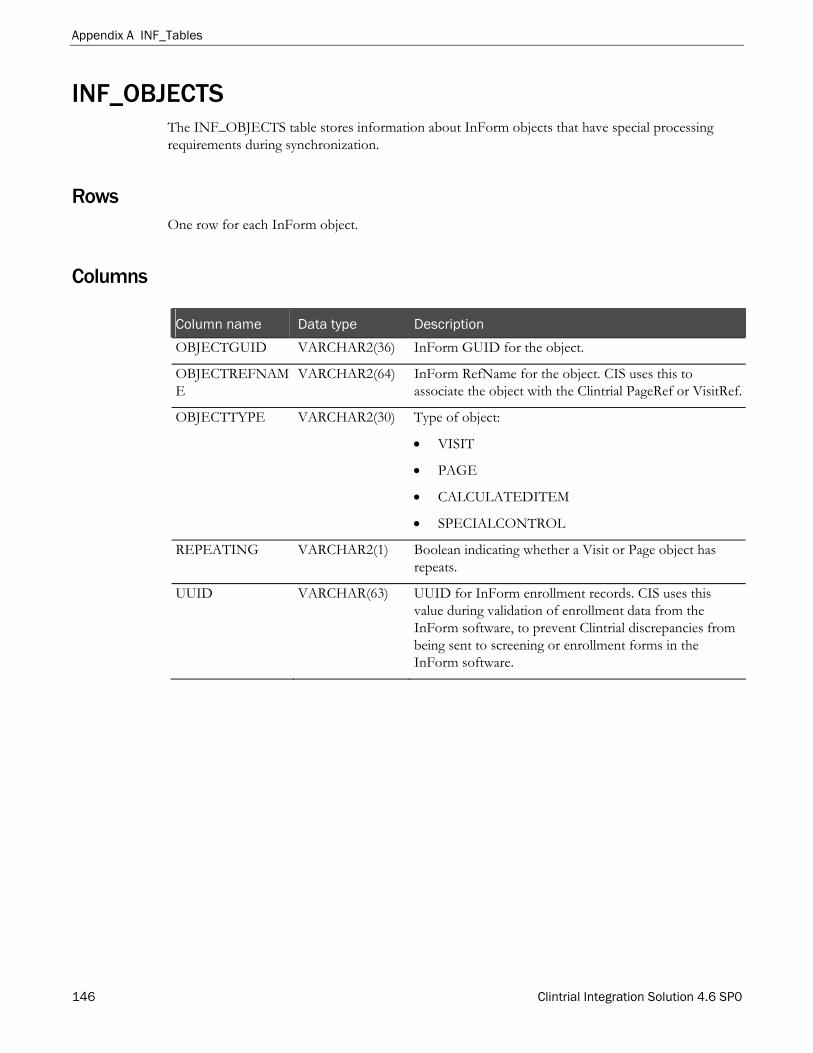
Appendix A INF_Tables
146 Clintrial Integration Solution 4.6 SP0
INF_OBJECTS The INF_OBJECTS table stores information about InForm objects that have special processing requirements during synchronization.
Rows One row for each InForm object.
Columns
Column name Data type Description
OBJECTGUID VARCHAR2(36) InForm GUID for the object.
OBJECTREFNAME
VARCHAR2(64) InForm RefName for the object. CIS uses this to associate the object with the Clintrial PageRef or VisitRef.
OBJECTTYPE VARCHAR2(30) Type of object:
VISIT
PAGE
CALCULATEDITEM
SPECIALCONTROL
REPEATING VARCHAR2(1) Boolean indicating whether a Visit or Page object has repeats.
UUID VARCHAR(63) UUID for InForm enrollment records. CIS uses this value during validation of enrollment data from the InForm software, to prevent Clintrial discrepancies from being sent to screening or enrollment forms in the InForm software.
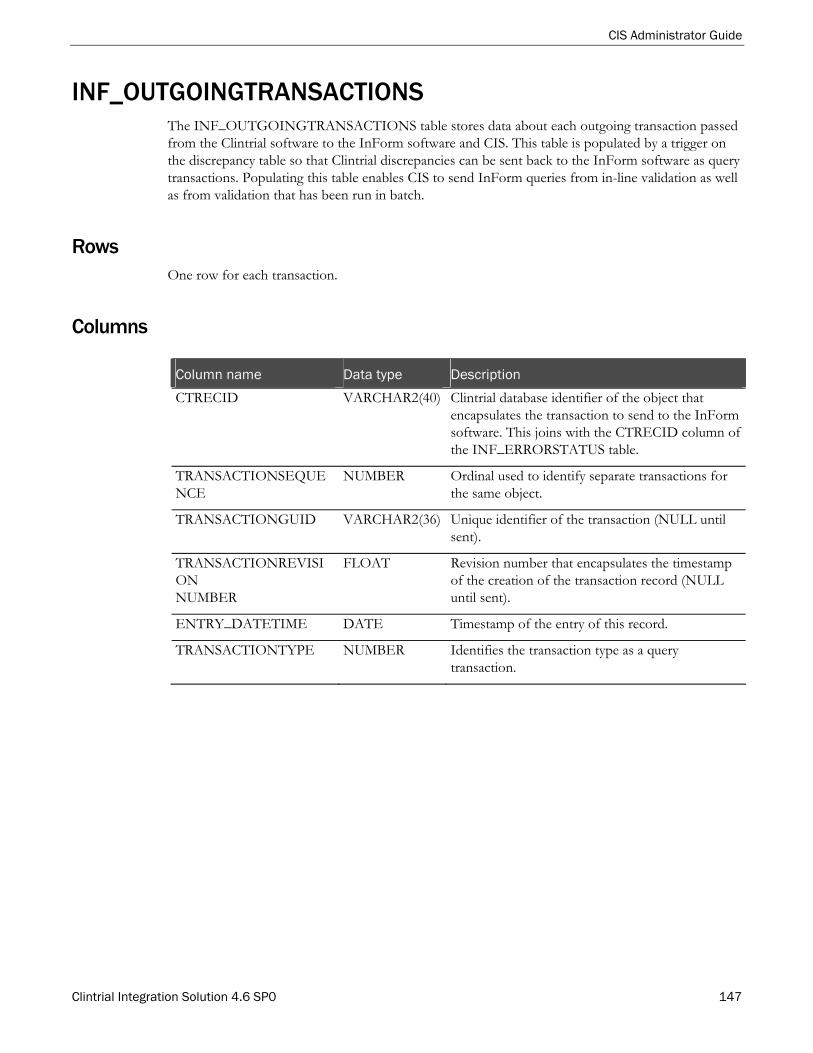
CIS Administrator Guide
Clintrial Integration Solution 4.6 SP0 147
INF_OUTGOINGTRANSACTIONS The INF_OUTGOINGTRANSACTIONS table stores data about each outgoing transaction passed from the Clintrial software to the InForm software and CIS. This table is populated by a trigger on the discrepancy table so that Clintrial discrepancies can be sent back to the InForm software as query transactions. Populating this table enables CIS to send InForm queries from in-line validation as well as from validation that has been run in batch.
Rows One row for each transaction.
Columns
Column name Data type Description
CTRECID VARCHAR2(40) Clintrial database identifier of the object that encapsulates the transaction to send to the InForm software. This joins with the CTRECID column of the INF_ERRORSTATUS table.
TRANSACTIONSEQUENCE
NUMBER Ordinal used to identify separate transactions for the same object.
TRANSACTIONGUID VARCHAR2(36) Unique identifier of the transaction (NULL until sent).
TRANSACTIONREVISION NUMBER
FLOAT Revision number that encapsulates the timestamp of the creation of the transaction record (NULL until sent).
ENTRY_DATETIME DATE Timestamp of the entry of this record.
TRANSACTIONTYPE NUMBER Identifies the transaction type as a query transaction.
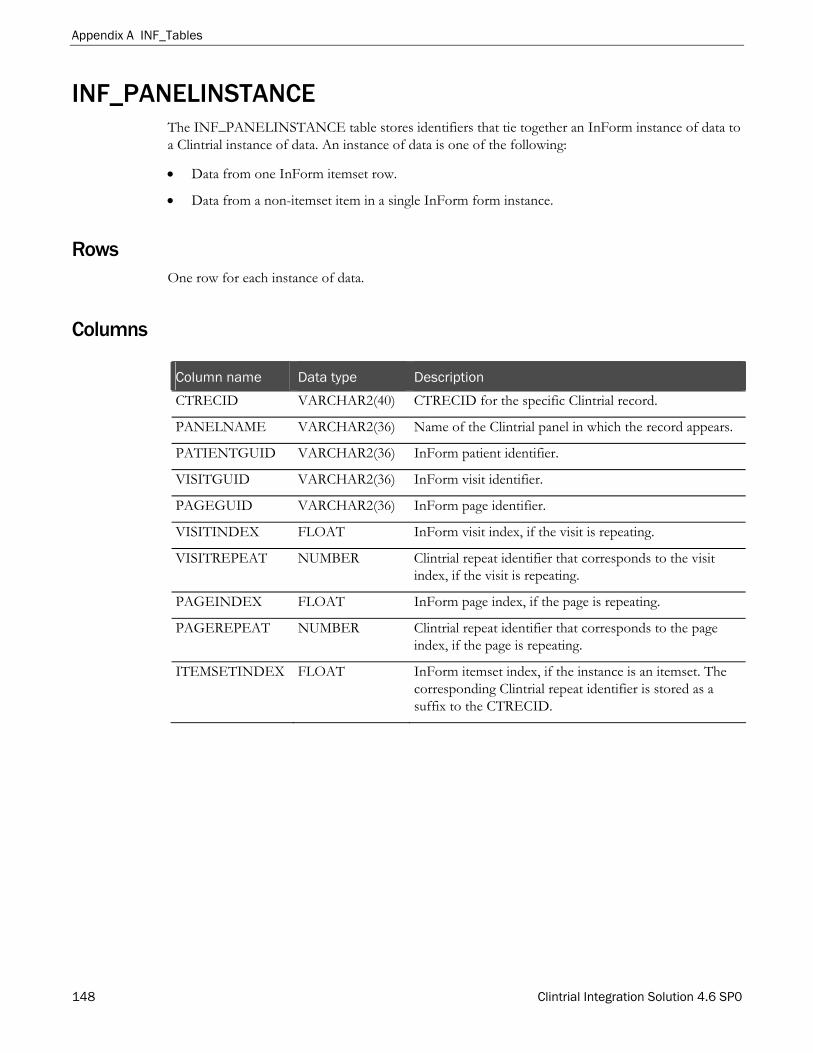
Appendix A INF_Tables
148 Clintrial Integration Solution 4.6 SP0
INF_PANELINSTANCE The INF_PANELINSTANCE table stores identifiers that tie together an InForm instance of data to a Clintrial instance of data. An instance of data is one of the following:
Data from one InForm itemset row.
Data from a non-itemset item in a single InForm form instance.
Rows One row for each instance of data.
Columns
Column name Data type Description
CTRECID VARCHAR2(40) CTRECID for the specific Clintrial record.
PANELNAME VARCHAR2(36) Name of the Clintrial panel in which the record appears.
PATIENTGUID VARCHAR2(36) InForm patient identifier.
VISITGUID VARCHAR2(36) InForm visit identifier.
PAGEGUID VARCHAR2(36) InForm page identifier.
VISITINDEX FLOAT InForm visit index, if the visit is repeating.
VISITREPEAT NUMBER Clintrial repeat identifier that corresponds to the visit index, if the visit is repeating.
PAGEINDEX FLOAT InForm page index, if the page is repeating.
PAGEREPEAT NUMBER Clintrial repeat identifier that corresponds to the page index, if the page is repeating.
ITEMSETINDEX FLOAT InForm itemset index, if the instance is an itemset. The corresponding Clintrial repeat identifier is stored as a suffix to the CTRECID.

CIS Administrator Guide
Clintrial Integration Solution 4.6 SP0 149
INF_PATHMAP The INF_PATHMAP table stores InForm GUIDs that identify a unique InForm path, along with other data that specifies a Clintrial mapping definition. CIS uses this information to identify the columns in which to store each piece of data entered or updated on an InForm form.
Rows One row for each unique InForm path.
Columns
Column name Data type Description
VISITGUID VARCHAR2(36) GUID of an InForm visit.
PAGEGUID VARCHAR2(36) GUID of an InForm form.
SECTIONGUID VARCHAR2(36) GUID of an InForm section.
ITEMSETGUID VARCHAR2(36) GUID of an InForm itemset.
ITEMGUID VARCHAR2(36) GUID of an InForm item.
CONTROL1GUID VARCHAR2(36) GUID of an InForm control.
CONTROL2GUID, CONTROL3GUID, CONTROL4GUID, CONTROL5GUID
VARCHAR2(36) GUID of an InForm control nested within another control. Each additional column denotes another level of nesting, up to the five levels supported by the InForm software.
BLOCKKEY VARCHAR2(100) Page key value specified for the mapping.
PAGEKEY VARCHAR2(100) Block key value specified for the mapping.
PANELNAME VARCHAR2(36) Name of the Clintrial panel targeted by the InForm path that the GUIDs define.
ITEMNAME VARCHAR2(36) Name of the Clintrial item targeted by the Clintrial path that the GUIDs define.
SUBSETVALUE VARCHAR2(2000) Subset Value to store with the InForm path that the GUIDs define.
SUBSETITEM VARCHAR2(36) Name of the Clintrial item in which to store the Subset Value.

Appendix A INF_Tables
150 Clintrial Integration Solution 4.6 SP0
Column name Data type Description
DATEPART NUMBER Date time control component to be stored in the Clintrial item, if the components are being stored separately:
1—Month
2—Day
3—Year
4—Hour
5—Minute
6—Second
INFSITEUSERMAP NUMBER Not used.
INFSITEUSERPROPERTY VARCHAR2(64) Not used.
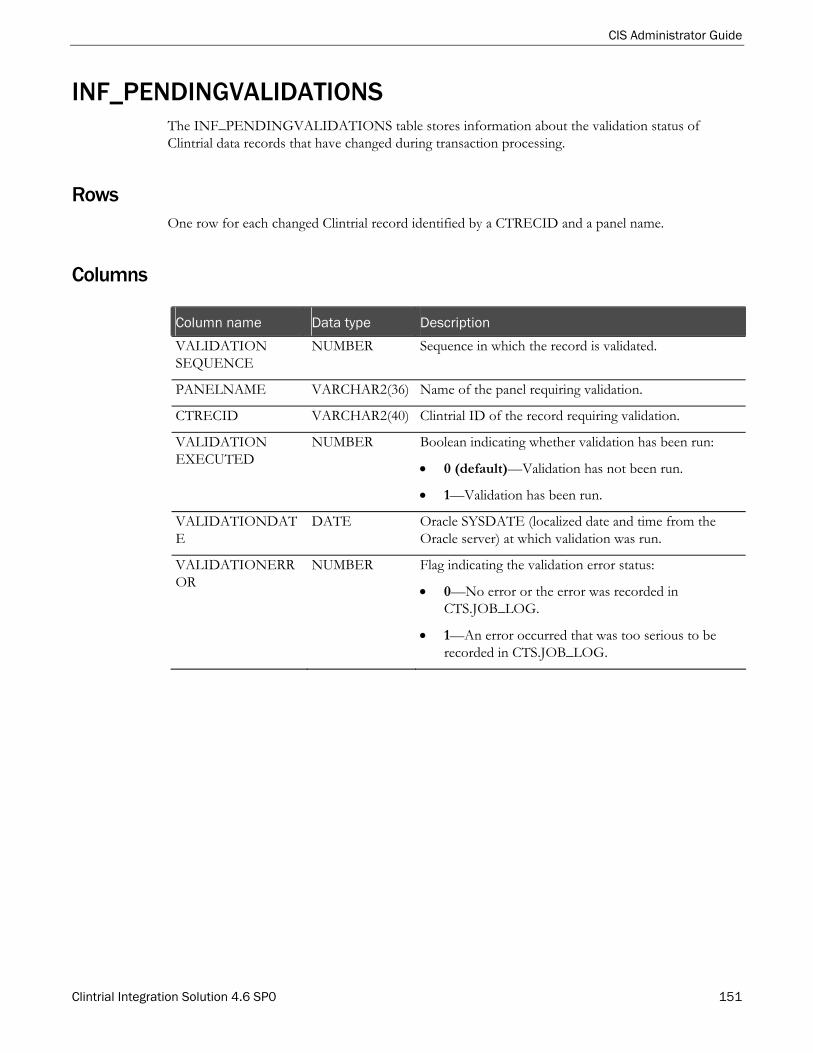
CIS Administrator Guide
Clintrial Integration Solution 4.6 SP0 151
INF_PENDINGVALIDATIONS The INF_PENDINGVALIDATIONS table stores information about the validation status of Clintrial data records that have changed during transaction processing.
Rows One row for each changed Clintrial record identified by a CTRECID and a panel name.
Columns
Column name Data type Description
VALIDATION SEQUENCE
NUMBER Sequence in which the record is validated.
PANELNAME VARCHAR2(36) Name of the panel requiring validation.
CTRECID VARCHAR2(40) Clintrial ID of the record requiring validation.
VALIDATION EXECUTED
NUMBER Boolean indicating whether validation has been run:
0 (default)—Validation has not been run.
1—Validation has been run.
VALIDATIONDATE
DATE Oracle SYSDATE (localized date and time from the Oracle server) at which validation was run.
VALIDATIONERROR
NUMBER Flag indicating the validation error status:
0—No error or the error was recorded in CTS.JOB_LOG.
1—An error occurred that was too serious to be recorded in CTS.JOB_LOG.

Appendix A INF_Tables
152 Clintrial Integration Solution 4.6 SP0
INF_PFELEMENT The INF_PFELEMENT table stores information about transactions that pass PFElement data from an InForm compound control, such as a pulldown, radio, or checkbox control, to a Clintrial codelist. A PFELEMENT transaction describes a single entry in a codelist, including the code and value of the codelist entry.
Rows One row for each InForm PFELEMENT transaction.
Columns
Column name Data type Description
ELEMENTNAME VARCHAR2(63) RefName of the PFElement study component.
LABEL VARCHAR2(80) Label of the PFElement study component.
VALUE VARCHAR2(80) Data value of the PFElement study component.
ELEMENTTYPE VARCHAR2(10) Data type of the PFElement study component:
TEXT (InForm String>).
FIXED (InForm Integer or Float).

CIS Administrator Guide
Clintrial Integration Solution 4.6 SP0 153
INF_RULE The INF_RULE table stores information about Clintrial rules or derivations that are synchronized to a Clintrial protocol from the InForm software.
Rows One row for each rule or derivation.
Columns
Column name Data type Description
NAME VARCHAR2(255)
InForm RefName of the rule or derivation. The name is converted to upper-case.
TYPE NUMBER(1) 0 for a rule; 1 for a derivation.
XMLDATA LONG MedML RULE definition.
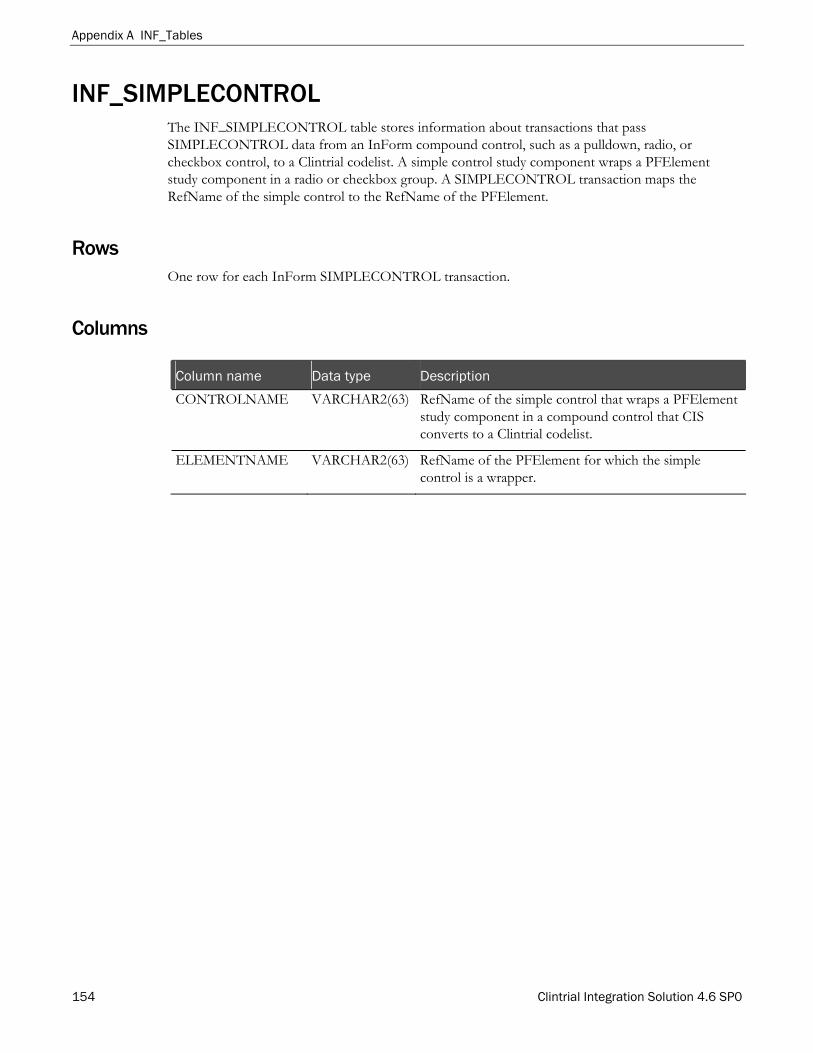
Appendix A INF_Tables
154 Clintrial Integration Solution 4.6 SP0
INF_SIMPLECONTROL The INF_SIMPLECONTROL table stores information about transactions that pass SIMPLECONTROL data from an InForm compound control, such as a pulldown, radio, or checkbox control, to a Clintrial codelist. A simple control study component wraps a PFElement study component in a radio or checkbox group. A SIMPLECONTROL transaction maps the RefName of the simple control to the RefName of the PFElement.
Rows One row for each InForm SIMPLECONTROL transaction.
Columns
Column name Data type Description
CONTROLNAME VARCHAR2(63) RefName of the simple control that wraps a PFElement study component in a compound control that CIS converts to a Clintrial codelist.
ELEMENTNAME VARCHAR2(63) RefName of the PFElement for which the simple control is a wrapper.

CIS Administrator Guide
Clintrial Integration Solution 4.6 SP0 155
INF_SITE_AUDIT, INF_SITE_DATA, INF_SITE_UPDATE The INF_SITE_AUDIT, INF_SITE_DATA, and INF_SITE_UPDATE panels store are a set of type 0 panels that hold InForm site information in a Clintrial protocol. This information is not associated with any specific subject, block, and page context.
The _AUDIT, _DATA, and _UPDATE tables associated with these panels have identical formats.
Rows One row for each site in an InForm trial.
Columns
Column name Data type Description
MERGE_DATETIME DATE Date and time of the latest modification to the site record.
STATUS NUMBER Numeric code indicating the status of the record. This is set to 1 and not changed by CIS processing.
ENTRY_ID VARCHAR2(20) User account of the user who entered or last modified the record. For InForm SITE tables, the account is INFORM.
ENTRY_DATETIME DATE Date and time at which the site record was entered in the InForm software.
CT_RECID VARCHAR2(40) Unique record ID assigned to the record in the Clintrial software.
DB_ID NUMBER Unique identifier of the Clintrial database instance. The DB_ID for EDC data is 9999.
SUBJECT_ID NUMBER Unique identifier automatically assigned to the subject item. For SITE tables, the value is 1.
CTS$REASON VARCHAR2(2000)
Reason that the record was modified or deleted.
SITEFAXNUMBER VARCHAR2(255) Fax number of the site.
SITEDAYPHONE NUMBER
VARCHAR2(32) Daytime phone number of the site.
SITECOUNTRY VARCHAR2(127) Country in which the site is located.
SITEPOSTALCODE VARCHAR2(64) Zip or postal code of the site’s location.
SITECITY VARCHAR2(127) City in which the site is located.
DISABLED NUMBER Not used currently.

Appendix A INF_Tables
156 Clintrial Integration Solution 4.6 SP0
Column name Data type Description
SITESERVER VARCHAR2(255) Name of the server designated as the site server. In an InForm configuration where synchronization is used, the site server is dedicated for specific activities such as randomization, screening and enrollment, and generating patient numbers.
SITETIMEZONE VARCHAR2(64) Time zone in which the site is located, used to convert from internal universal system time to local time.
SITEALTPHONE NUMBER
VARCHAR2(32) Alternate phone number for the site.
GROUPDESCRIPTION VARCHAR2(255) Not used currently.
SITESTUDYTERMINATION
DATE Date that the site came off line; for example, date that the last patient was signed off and locked.
SITESTATEPROVINCE VARCHAR2(64) State or province in which the site is located.
SITEBEEPER VARCHAR2(255) Beeper number of the site.
SITEDATEFORMAT VARCHAR2(32) The format of the date as displayed for the site, if a format is not specified at the user level.
0—Month/Day/Year
1—Day/Month/Year
2—Year/Month/Day
SITESTUDYINITIATIOND
DATE Date that the site came on line. Users cannot add data for a site before the specified date.
GROUPNAME VARCHAR2(255) Name of the site group to which the site belongs. If no site group is specified, site name is used.
GROUPCONFLICT NUMBER Not used currently.
SITEMNEMONIC VARCHAR2(32) Abbreviated name with which to refer to the site.
SITEEMAILADDRESS VARCHAR2(255) Email address of the site.
SITECONTACTUSER VARCHAR2(64) Not used currently.
SITEADDRESS1 VARCHAR2(255) First line of the mailing address of the site.
SITEADDRESS2 VARCHAR2(255) Second line of the mailing address of the site.
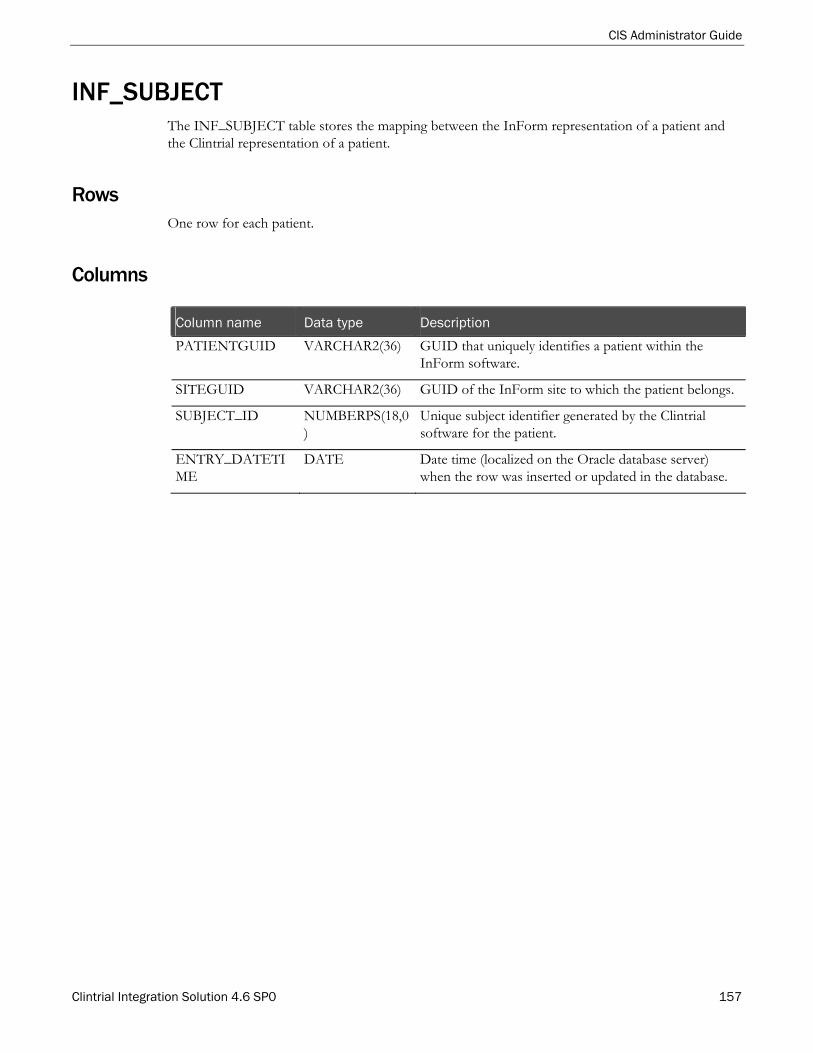
CIS Administrator Guide
Clintrial Integration Solution 4.6 SP0 157
INF_SUBJECT The INF_SUBJECT table stores the mapping between the InForm representation of a patient and the Clintrial representation of a patient.
Rows One row for each patient.
Columns
Column name Data type Description
PATIENTGUID VARCHAR2(36) GUID that uniquely identifies a patient within the InForm software.
SITEGUID VARCHAR2(36) GUID of the InForm site to which the patient belongs.
SUBJECT_ID NUMBERPS(18,0)
Unique subject identifier generated by the Clintrial software for the patient.
ENTRY_DATETIME
DATE Date time (localized on the Oracle database server) when the row was inserted or updated in the database.

Appendix A INF_Tables
158 Clintrial Integration Solution 4.6 SP0
INF_STUDYVERSION INF_STUDYVERSION table that is created for each protocol.
INF_STUDYVERSION rows One row for each InForm STUDYVERSION transaction.
INF_STUDYVERSION columns
Column name Data type Description
TRANSACTIONID Number A value from INF_TRANSACTION.TRANSACTIONID.
When a study book is to be generated, the row of INF_STUDYVERSION with the highest TRANSACTIONID is used to find the current InForm study version.
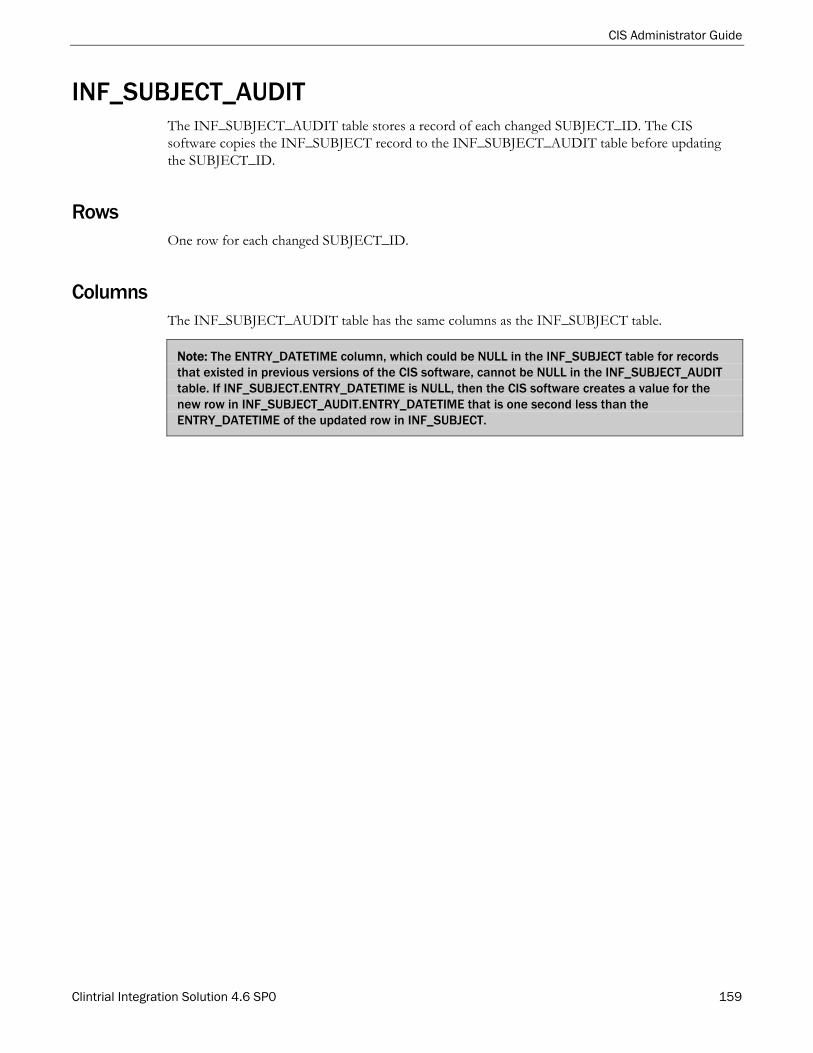
CIS Administrator Guide
Clintrial Integration Solution 4.6 SP0 159
INF_SUBJECT_AUDIT The INF_SUBJECT_AUDIT table stores a record of each changed SUBJECT_ID. The CIS software copies the INF_SUBJECT record to the INF_SUBJECT_AUDIT table before updating the SUBJECT_ID.
Rows One row for each changed SUBJECT_ID.
Columns The INF_SUBJECT_AUDIT table has the same columns as the INF_SUBJECT table.
Note: The ENTRY_DATETIME column, which could be NULL in the INF_SUBJECT table for records that existed in previous versions of the CIS software, cannot be NULL in the INF_SUBJECT_AUDIT table. If INF_SUBJECT.ENTRY_DATETIME is NULL, then the CIS software creates a value for the new row in INF_SUBJECT_AUDIT.ENTRY_DATETIME that is one second less than the ENTRY_DATETIME of the updated row in INF_SUBJECT.

Appendix A INF_Tables
160 Clintrial Integration Solution 4.6 SP0
INF_TRANSACTION The INF_TRANSACTION table stores information identifying and specifying the status of EDC transactions passed between the InForm software and the Clintrial software through the CIS software.
Rows One row for each transaction.
Columns
Column name Data type Description
TRANSACTIONGUID VARCHAR2(64) GUID of the transaction.
TRANSACTIONID NUMBER Oracle sequence number incremented automatically for each transaction added.
TRANSACTIONSTATUS NUMBER Boolean indicating whether the transaction has been processed. This is set to 1 when the transaction is added to the INF_TRANSACTION table.

CIS Administrator Guide
Clintrial Integration Solution 4.6 SP0 161
INF_TRANSACTIONDATA The INF_TRANSACTIONDATA table stores the XML text of EDC transactions passed between the InForm software and the Clintrial software through the CIS software.
Rows One row for each transaction.
Columns
Column name Data type Description
TRANSACTIONID NUMBER Local ID of the transaction. This joins with the TRANSACTIONID column of the INF_TRANSACTION table.
TRANSACTIONDATA
CLOB Full XML text of the transaction.

Appendix A INF_Tables
162 Clintrial Integration Solution 4.6 SP0
INF_USER_AUDIT, INF_USER_DATA, INF_USER_UPDATE The INF_USER_AUDIT, INF_USER_DATA, and INF_USER_UPDATE panels store are a set of type 0 panels that hold InForm user information in a Clintrial protocol. This data is not associated with any specific subject, block, and page context.
The _AUDIT, _DATA, and _UPDATE tables associated with these panels have identical formats.
Rows One row for each InForm user.
Columns
Column name Data type Description
MERGE_DATETIME DATE Date and time of the latest modification to the user record.
STATUS NUMBER Numeric code indicating the status of the record. This is set to 1 and is not changed by CIS processing.
ENTRY_ID VARCHAR2(20) User account of the user who entered or last modified the record. For InForm USER tables, the account is INFORM.
ENTRY_DATETIME DATE Date and time at which the user record was entered in the InForm software.
CT_RECID VARCHAR2(40) Unique record ID assigned to the record in the Clintrial software.
DB_ID NUMBER Unique identifier of the Clintrial database instance. The DB_ID for EDC data is 9999.
SUBJECT_ID NUMBER Unique identifier automatically assigned to the subject item. For USER tables, the value is 1.
CTS$REASON VARCHAR2(2000) Reason that the record was modified or deleted.
USERDISPLAYNAME VARCHAR2(64) User name as displayed on the navigation pane in the InForm trial.
USERDELETESTATE NUMBER Flag that indicates whether the user has been terminated:
1—True
2—False
USERFIRSTNAME VARCHAR2(127) First name of the user.
USERDAYPHONE NUMBER
VARCHAR2(255) Daytime phone number for the user.

CIS Administrator Guide
Clintrial Integration Solution 4.6 SP0 163
Column name Data type Description
USERAUTHTYPE VARCHAR2(32) Not used currently.
USEREMAILADDRESS VARCHAR2(255) Email address of the user.
USERSUBJECTGUID VARCHAR2(255) GUID of the user; not used currently.
USERNAME VARCHAR2(255) Name the user enters to log on to InForm software.
USERSTATEPROVINCE VARCHAR2(64) State or province in which the address of the user is located.
USERPOSTALCODE VARCHAR2(64) Zip or postal code of the address of the user.
USERIMAGEID VARCHAR2(36) GUID of the resource storing the image of the user; not used currently.
USERHOMESCREENURL VARCHAR2(255) Local or external URL identifying the initial screen that appears when a user logs in to the InForm software. The address must include the http:// prefix and identify the server on which the file is located by name or IP address.
USERADDRESS1 VARCHAR2(255) First line of the address of the user.
USERADDRESS2 VARCHAR2(255) Second line of the address of the user.
USERRESETPASSWORD NUMBER Flag indicating whether the user must reset the password when logging in to the InForm software for the first time:
1—False
0—True
USERCONFLICT NUMBER Not used currently.
USERFAXNUMBER VARCHAR2(255) Fax number of the user.
USERCITY VARCHAR2(127) City where the user is located.
USERTITLE VARCHAR2(255) Title of the user.
USERLASTNAME VARCHAR2(127) Last name of the user.
USERDESCRIPTION VARCHAR2(255) Description of the user; for example, role of the user in the trial.
USERALTPHONE NUMBER
VARCHAR2(32) Alternate phone number for the user.
USERLANGID VARCHAR2(64) Preferred language of the user. English Language is the default.

Appendix A INF_Tables
164 Clintrial Integration Solution 4.6 SP0
Column name Data type Description
USERDATEFORMAT VARCHAR2(32) Desired date format of the user for viewable InForm pages:
0—Month/Day/Year
1—Day/Month/Year
2—Year/Month/Day
USERBEEPER VARCHAR2(255) Beeper number of the user.
USERACTIVESTATE NUMBER Flag indicating whether the user is active:
1—Active
0—Inactive
USERCOUNTRY VARCHAR2(127) Country where the user is located.
USERTYPE NUMBER Type of user:
0—System
1—Site
2—Sponsor
Clintrial Integration Solution 4.6 SP0 165
In this appendix Overview of CIS_Tables ...................................................................................................................166
CIS_LB_MACHINES .......................................................................................................................167
CIS_SYNCH_JOBS_QUEUE.........................................................................................................169
CIS_DEFAULT_PROPERTIES ....................................................................................................171
A P P E N D I X B
CIS_Tables
Appendix B CIS_Tables
166 Clintrial Integration Solution 4.6 SP0
Overview of CIS_Tables The CIS_LB_MACHINES, CIS_SYNCH_JOBS, and CIS_DEFAULT_PROPERTIES tables are used to support load balancing.
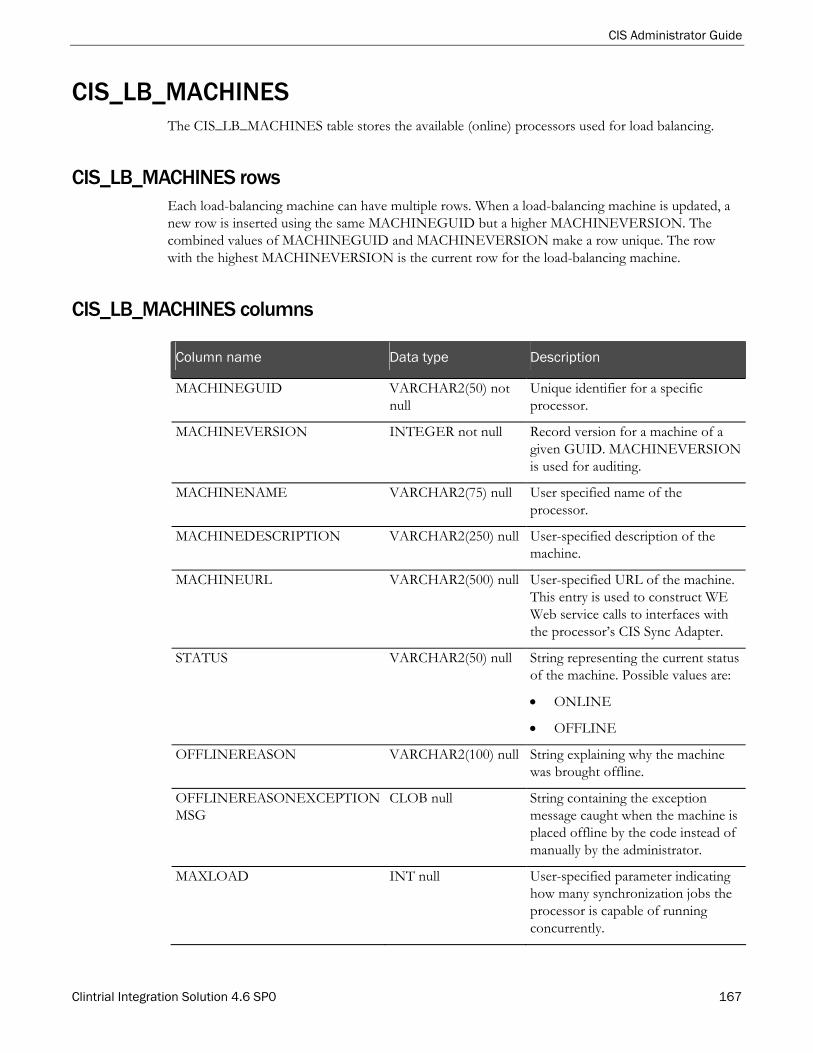
CIS Administrator Guide
Clintrial Integration Solution 4.6 SP0 167
CIS_LB_MACHINES The CIS_LB_MACHINES table stores the available (online) processors used for load balancing.
CIS_LB_MACHINES rows Each load-balancing machine can have multiple rows. When a load-balancing machine is updated, a new row is inserted using the same MACHINEGUID but a higher MACHINEVERSION. The combined values of MACHINEGUID and MACHINEVERSION make a row unique. The row with the highest MACHINEVERSION is the current row for the load-balancing machine.
CIS_LB_MACHINES columns
Column name Data type Description
MACHINEGUID VARCHAR2(50) not null
Unique identifier for a specific processor.
MACHINEVERSION INTEGER not null Record version for a machine of a given GUID. MACHINEVERSION is used for auditing.
MACHINENAME VARCHAR2(75) null User specified name of the processor.
MACHINEDESCRIPTION VARCHAR2(250) null User-specified description of the machine.
MACHINEURL VARCHAR2(500) null User-specified URL of the machine. This entry is used to construct WE Web service calls to interfaces with the processor’s CIS Sync Adapter.
STATUS VARCHAR2(50) null String representing the current status of the machine. Possible values are:
ONLINE
OFFLINE
OFFLINEREASON VARCHAR2(100) null String explaining why the machine was brought offline.
OFFLINEREASONEXCEPTIONMSG
CLOB null String containing the exception message caught when the machine is placed offline by the code instead of manually by the administrator.
MAXLOAD INT null User-specified parameter indicating how many synchronization jobs the processor is capable of running concurrently.
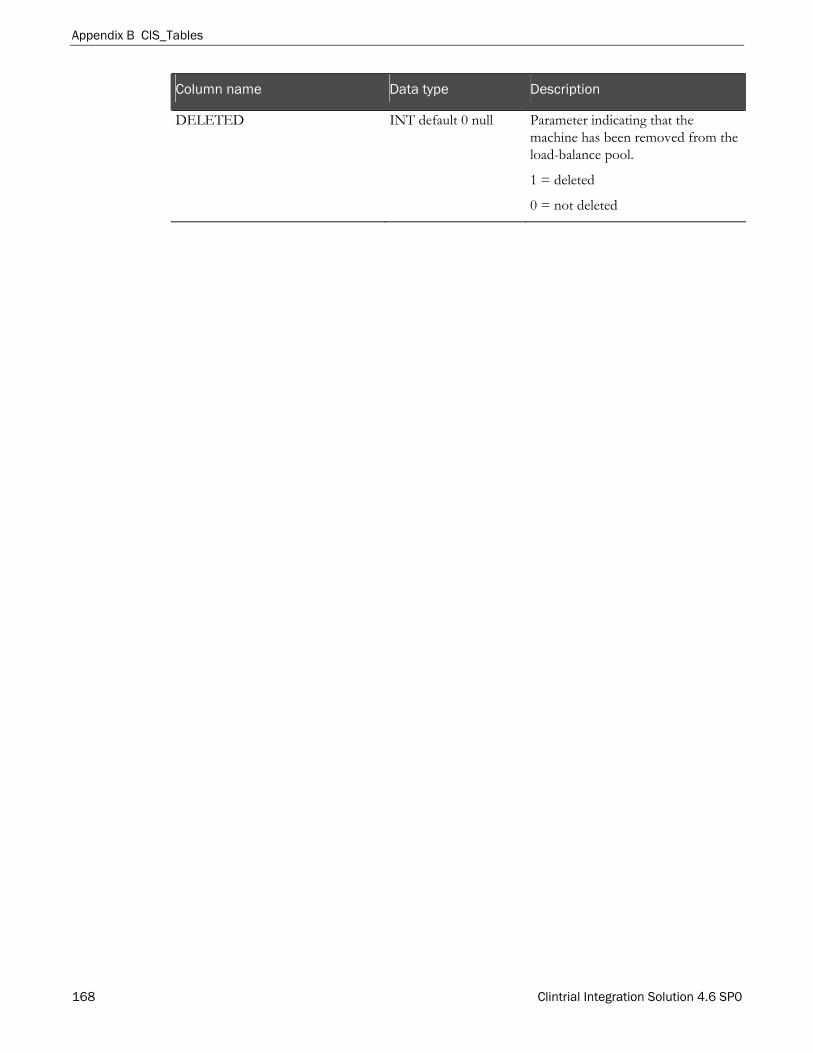
Appendix B CIS_Tables
168 Clintrial Integration Solution 4.6 SP0
Column name Data type Description
DELETED INT default 0 null Parameter indicating that the machine has been removed from the load-balance pool.
1 = deleted
0 = not deleted
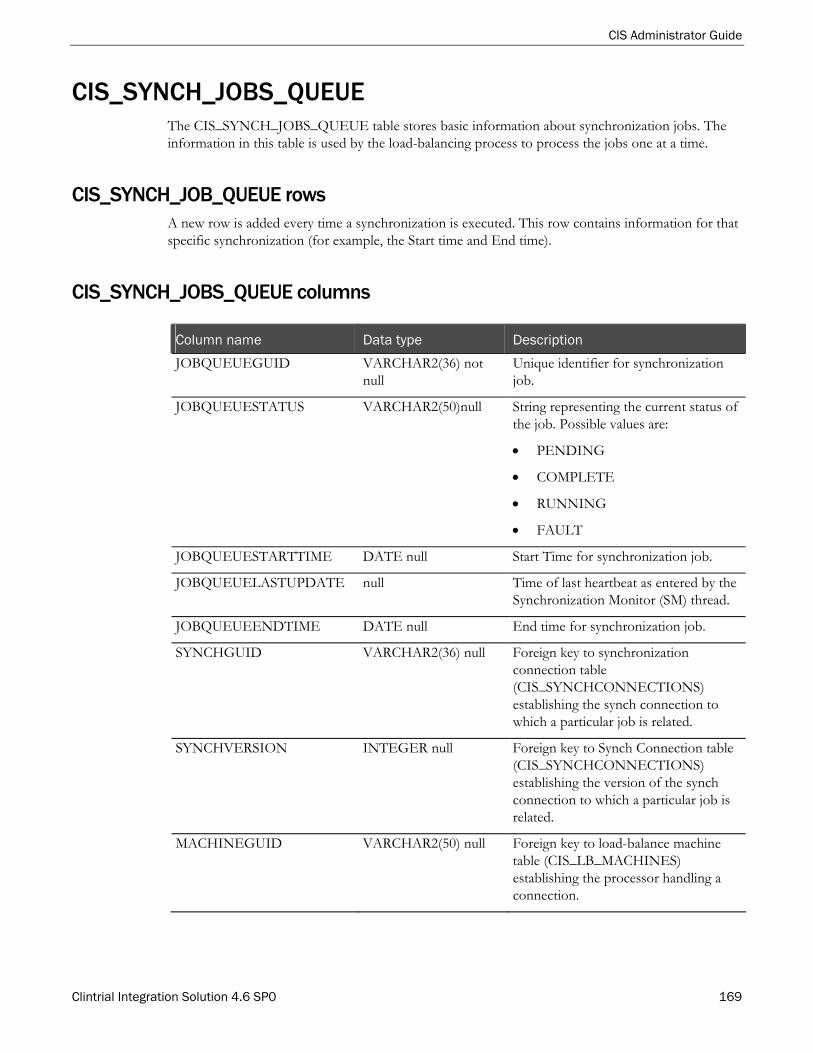
CIS Administrator Guide
Clintrial Integration Solution 4.6 SP0 169
CIS_SYNCH_JOBS_QUEUE The CIS_SYNCH_JOBS_QUEUE table stores basic information about synchronization jobs. The information in this table is used by the load-balancing process to process the jobs one at a time.
CIS_SYNCH_JOB_QUEUE rows A new row is added every time a synchronization is executed. This row contains information for that specific synchronization (for example, the Start time and End time).
CIS_SYNCH_JOBS_QUEUE columns
Column name Data type Description
JOBQUEUEGUID VARCHAR2(36) not null
Unique identifier for synchronization job.
JOBQUEUESTATUS VARCHAR2(50)null String representing the current status of the job. Possible values are:
PENDING
COMPLETE
RUNNING
FAULT
JOBQUEUESTARTTIME DATE null Start Time for synchronization job.
JOBQUEUELASTUPDATE null Time of last heartbeat as entered by the Synchronization Monitor (SM) thread.
JOBQUEUEENDTIME DATE null End time for synchronization job.
SYNCHGUID VARCHAR2(36) null Foreign key to synchronization connection table (CIS_SYNCHCONNECTIONS) establishing the synch connection to which a particular job is related.
SYNCHVERSION INTEGER null Foreign key to Synch Connection table (CIS_SYNCHCONNECTIONS) establishing the version of the synch connection to which a particular job is related.
MACHINEGUID VARCHAR2(50) null Foreign key to load-balance machine table (CIS_LB_MACHINES) establishing the processor handling a connection.
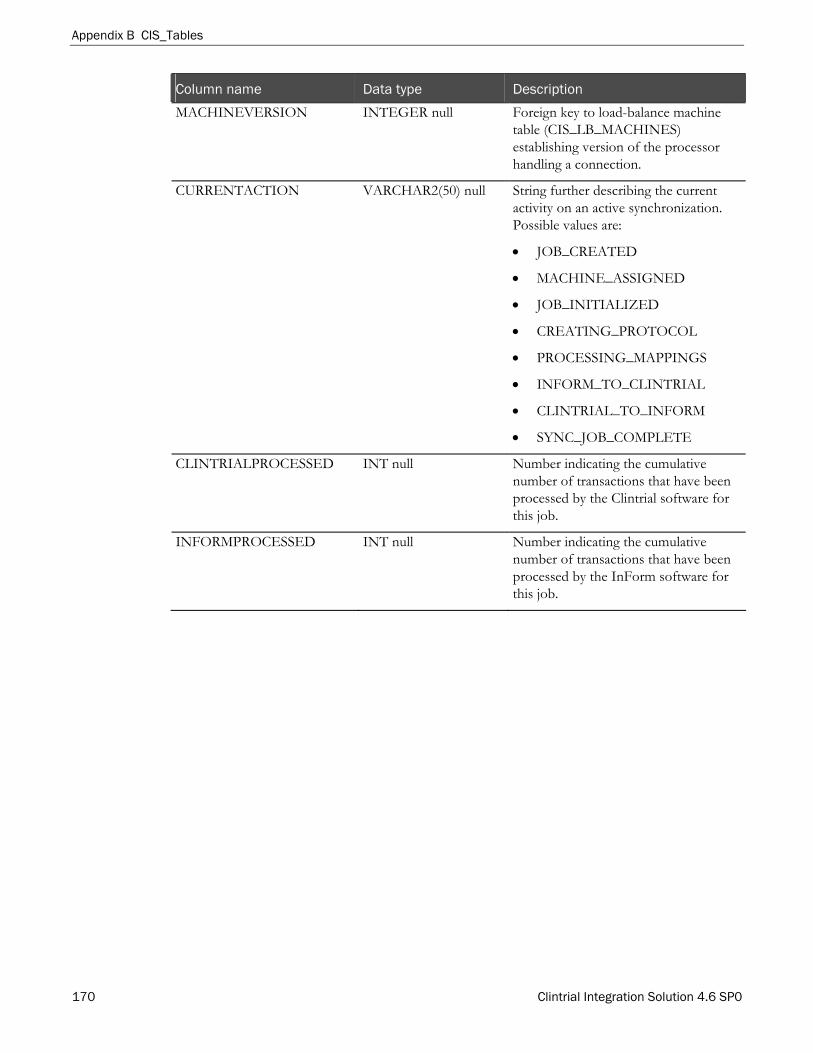
Appendix B CIS_Tables
170 Clintrial Integration Solution 4.6 SP0
Column name Data type Description
MACHINEVERSION INTEGER null Foreign key to load-balance machine table (CIS_LB_MACHINES) establishing version of the processor handling a connection.
CURRENTACTION VARCHAR2(50) null String further describing the current activity on an active synchronization. Possible values are:
JOB_CREATED
MACHINE_ASSIGNED
JOB_INITIALIZED
CREATING_PROTOCOL
PROCESSING_MAPPINGS
INFORM_TO_CLINTRIAL
CLINTRIAL_TO_INFORM
SYNC_JOB_COMPLETE
CLINTRIALPROCESSED INT null Number indicating the cumulative number of transactions that have been processed by the Clintrial software for this job.
INFORMPROCESSED INT null Number indicating the cumulative number of transactions that have been processed by the InForm software for this job.

CIS Administrator Guide
Clintrial Integration Solution 4.6 SP0 171
CIS_DEFAULT_PROPERTIES The CIS_DEFAULT_PROPERTIES table stores information about global settings.
CIS_DEFAULT_PROPERTIES rows Information that is specified in the Settings tab is global to the CIS software (for example, Email settings, Time out settings and so on).
CIS_DEFAULT_PROPERTIES columns
Column name Data type Description
CONFIGVERSION FLOAT not null
Version of the configuration. The only active configuration is the latest one. Previous versions exist for audit purposes.
CONFIGXML CLOB
null, constraint
Property-value pairs contained in an XML format. The following shows these property-value pairs:
<settings>
<EmailServer></EmailServer>
<FromEmail></FromEmail>
<EmailSubject></EmailSubject>
<NumberTransactions></NumberTransactions>
<timeout></timeout>
<PlatformUser></PlatformUser>
<PlatformPassword></PlatformPassword>
<SyncPort></SyncPort>
<LBRetryWait></LBRetryWait>
<HBTimePeriod></HBTimePeriod
</settings>

Appendix B CIS_Tables
172 Clintrial Integration Solution 4.6 SP0

Clintrial Integration Solution 4.6 SP0 173
In this appendix Overview of data transfer and storage ............................................................................................174
Databases in the CIS system .............................................................................................................175
Data transfer summary.......................................................................................................................179
Deletion and undeletion processing ................................................................................................181
Audit processing..................................................................................................................................183
A P P E N D I X C
Data transfer and storage
Appendix C Data transfer and storage
174 Clintrial Integration Solution 4.6 SP0
Overview of data transfer and storage This appendix describes the data stores used in the CIS system and the mechanisms used for transporting data between the CIS software components. This section also describes how data is audited in the CIS system and how the Clintrial software and the InForm software handle data deletions.
CIS Administrator Guide
Clintrial Integration Solution 4.6 SP0 175
Databases in the CIS system The CIS environment, comprising the Clintrial software, InForm software, and CIS software, includes several Oracle databases that manage data storage for the activities performed by the three software products.
Clintrial database The Clintrial server in a CIS environment hosts a database of clinical data. Site personnel, monitors, data managers, and project managers use the Clintrial client modules to:
Enter, update, verify, and validate paper-based clinical data.
Import clinical data in batch mode.
Analyze and archive studies.
Additionally, if an integrated study is set up to use Clintrial rules and derivations to validate EDC data, those rules and derivations usually run automatically against data synchronized from an InForm study. Rules and derivations are not run automatically when:
There are cross-panel dependencies in rules scripts. Rules in the Clintrial are attached to one panel and there is no way of determining (before a rule generates a query) that rules should run when data on a different panel changes.
Rules are changed.
In these situations, you should run manual validation.
Queries generated in the Clintrial software by validation failure synchronize back to the InForm study for resolution.
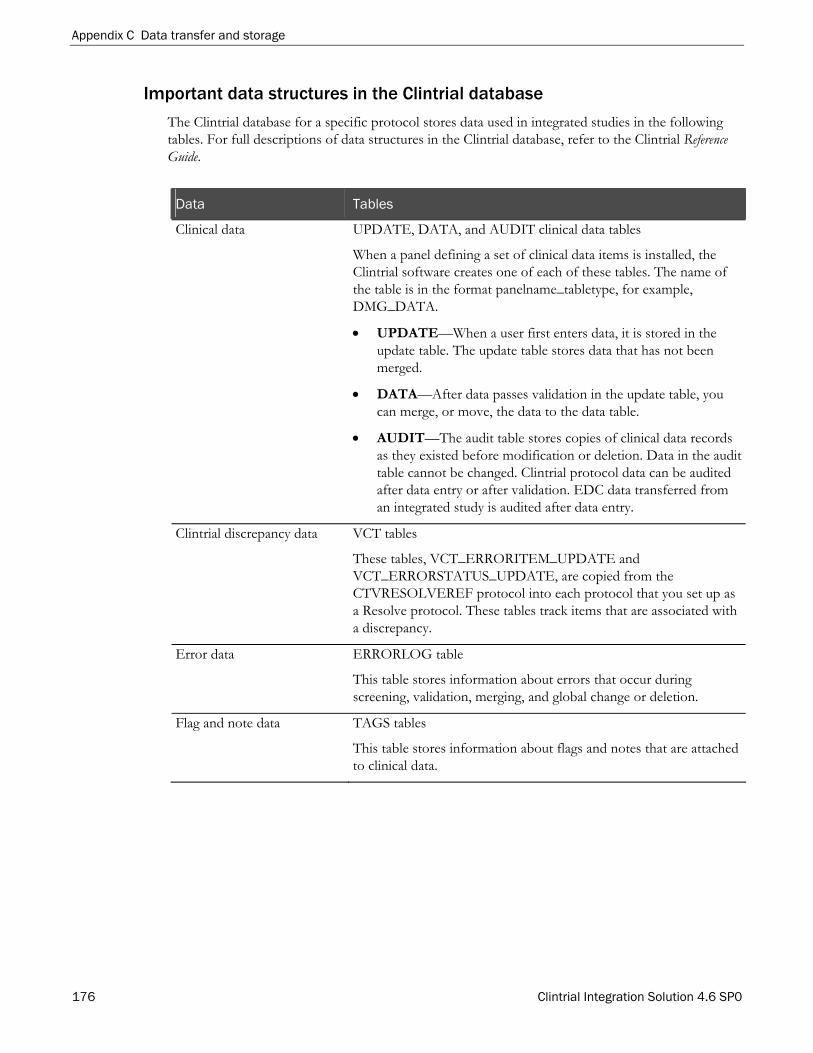
Appendix C Data transfer and storage
176 Clintrial Integration Solution 4.6 SP0
Important data structures in the Clintrial database
The Clintrial database for a specific protocol stores data used in integrated studies in the following tables. For full descriptions of data structures in the Clintrial database, refer to the Clintrial Reference Guide.
Data Tables
Clinical data UPDATE, DATA, and AUDIT clinical data tables
When a panel defining a set of clinical data items is installed, the Clintrial software creates one of each of these tables. The name of the table is in the format panelname_tabletype, for example, DMG_DATA.
UPDATE—When a user first enters data, it is stored in the update table. The update table stores data that has not been merged.
DATA—After data passes validation in the update table, you can merge, or move, the data to the data table.
AUDIT—The audit table stores copies of clinical data records as they existed before modification or deletion. Data in the audit table cannot be changed. Clintrial protocol data can be audited after data entry or after validation. EDC data transferred from an integrated study is audited after data entry.
Clintrial discrepancy data VCT tables
These tables, VCT_ERRORITEM_UPDATE and VCT_ERRORSTATUS_UPDATE, are copied from the CTVRESOLVEREF protocol into each protocol that you set up as a Resolve protocol. These tables track items that are associated with a discrepancy.
Error data ERRORLOG table
This table stores information about errors that occur during screening, validation, merging, and global change or deletion.
Flag and note data TAGS tables
This table stores information about flags and notes that are attached to clinical data.
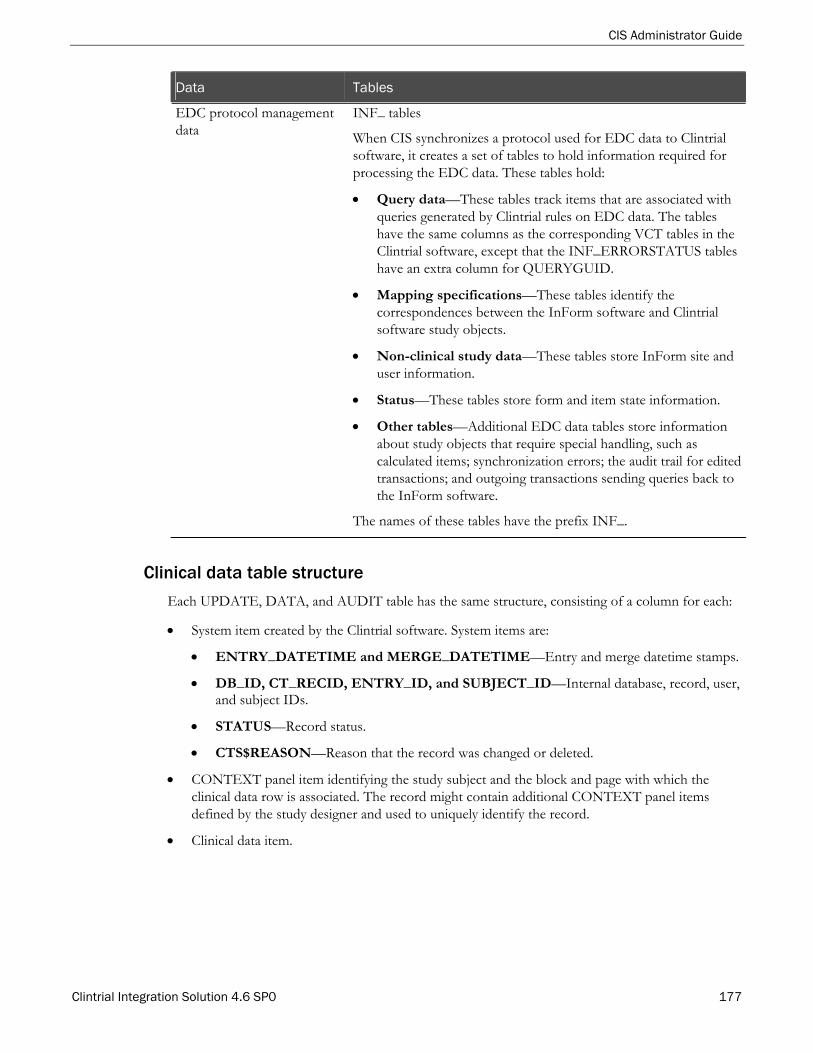
CIS Administrator Guide
Clintrial Integration Solution 4.6 SP0 177
Data Tables
EDC protocol management data
INF_ tables
When CIS synchronizes a protocol used for EDC data to Clintrial software, it creates a set of tables to hold information required for processing the EDC data. These tables hold:
Query data—These tables track items that are associated with queries generated by Clintrial rules on EDC data. The tables have the same columns as the corresponding VCT tables in the Clintrial software, except that the INF_ERRORSTATUS tables have an extra column for QUERYGUID.
Mapping specifications—These tables identify the correspondences between the InForm software and Clintrial software study objects.
Non-clinical study data—These tables store InForm site and user information.
Status—These tables store form and item state information.
Other tables—Additional EDC data tables store information about study objects that require special handling, such as calculated items; synchronization errors; the audit trail for edited transactions; and outgoing transactions sending queries back to the InForm software.
The names of these tables have the prefix INF_.
Clinical data table structure
Each UPDATE, DATA, and AUDIT table has the same structure, consisting of a column for each:
System item created by the Clintrial software. System items are:
ENTRY_DATETIME and MERGE_DATETIME—Entry and merge datetime stamps.
DB_ID, CT_RECID, ENTRY_ID, and SUBJECT_ID—Internal database, record, user, and subject IDs.
STATUS—Record status.
CTS$REASON—Reason that the record was changed or deleted.
CONTEXT panel item identifying the study subject and the block and page with which the clinical data row is associated. The record might contain additional CONTEXT panel items defined by the study designer and used to uniquely identify the record.
Clinical data item.

Appendix C Data transfer and storage
178 Clintrial Integration Solution 4.6 SP0
InForm databases The InForm server in a CIS environment has the following databases by default:
InForm study database, which contains:
Study definition metadata.
Mapping definition metadata.
Production clinical data entered through the InForm EDC interface at a web browser.
INFORMADMIN database, which contains study configuration data.
Important data structures in the InForm databases
For the most part, the study database and INFORMADMIN database schemas are designed to optimize performance but do not organize information in a way that is relevant to study sponsor personnel.
CIS databases The CIS server in a CIS environment has the CIS database that contains synchronization information. This database also stores the encrypted CISUSER password for each Clintrial database instance. The CIS server and Clintrial server must either be the same machine or must be on the same local area network.
Important data structures in the CIS database
The tables in the CIS database hold:
Version and revision information.
User definitions.
Reference to the Clintrial instance with which a protocol is associated.
Data that identifies and defines:
Translated protocol objects.
Mappings between protocol data items and Clintrial data table columns.

CIS Administrator Guide
Clintrial Integration Solution 4.6 SP0 179
Data transfer summary The following diagram and table summarize the metadata and data transfers that occur during the development and production phases of an integrated study.
CIS ServerCIS Server
InF
orm
Pro
du
ctio
n S
erve
rIn
Fo
rm P
rod
uct
ion
Ser
ve
r
Clin
trial Pro
du
ction
Server
Clin
trial P
rod
uc
tion
Se
rver
Inform Clinical
Data Input
Reportingand
Analysis
CISAdministration
InFormReportingDatabase
CustomDefined
Database
ClintrialProductionDatabase
InFormServer
Adapter
Query Data
InFormTrial Development
Database
InForm Development ServerInForm Development Server
MedML Installer MedML
ClintrialClient
Modules
Clintrial Development ServerClintrial Development Server
ClintrialProtocol
DevelopmentSerfer
CISAdmin
Database
CISDatabase
InFormTrial
Database
InForm AdapterInForm Adapter
InFormAdapterInterfaces
InFormApplication
Server
InFormApplication
Server
ClintrialDesignModule
Central Designer
CIS Central Admin and Adapters
Clinical Data& Metadata
Data/Metadata From To Process
Clintrial protocol metadata
Clintrial software
CIS Library When you register a Clintrial protocol in a CIS library, the CIS software translates the protocol to study MedML, generates Clintrial mappings, transfers the MedML, and stores the study metadata and mappings in the library. This occurs over an OLEDB connection.
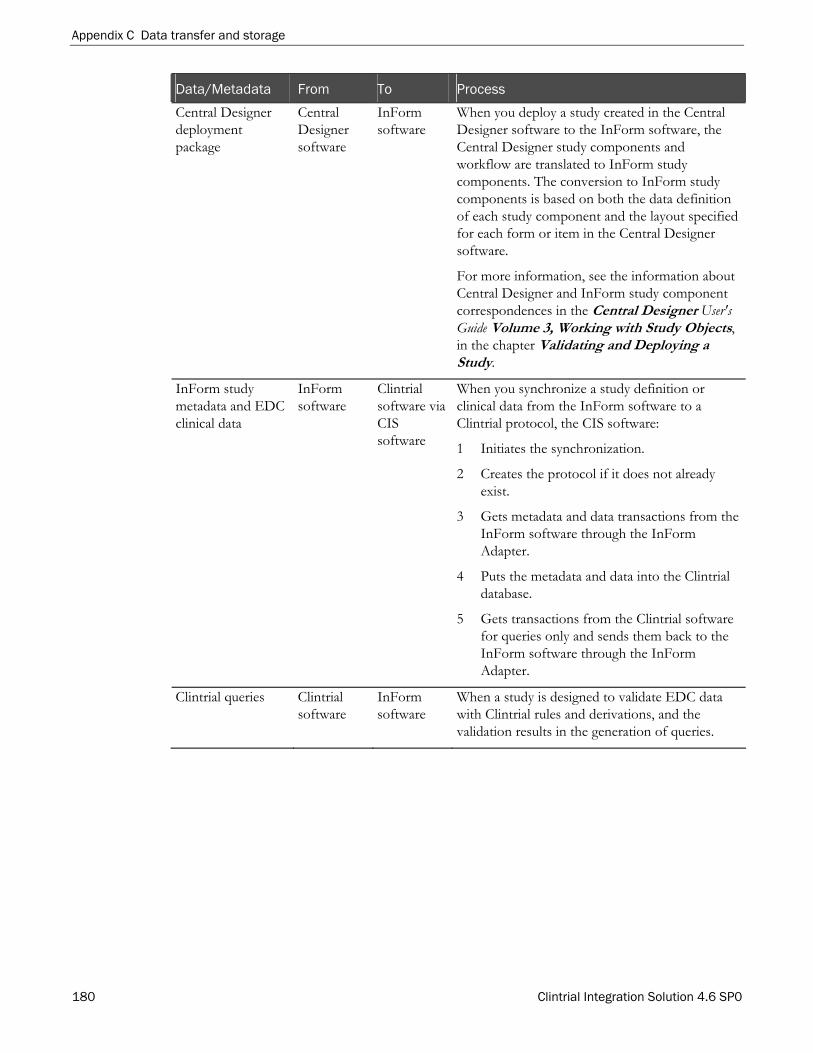
Appendix C Data transfer and storage
180 Clintrial Integration Solution 4.6 SP0
Data/Metadata From To Process
Central Designer deployment package
Central Designer software
InForm software
When you deploy a study created in the Central Designer software to the InForm software, the Central Designer study components and workflow are translated to InForm study components. The conversion to InForm study components is based on both the data definition of each study component and the layout specified for each form or item in the Central Designer software.
For more information, see the information about Central Designer and InForm study component correspondences in the Central Designer User's Guide Volume 3, Working with Study Objects, in the chapter Validating and Deploying a Study.
InForm study metadata and EDC clinical data
InForm software
Clintrial software via CIS software
When you synchronize a study definition or clinical data from the InForm software to a Clintrial protocol, the CIS software:
1 Initiates the synchronization.
2 Creates the protocol if it does not already exist.
3 Gets metadata and data transactions from the InForm software through the InForm Adapter.
4 Puts the metadata and data into the Clintrial database.
5 Gets transactions from the Clintrial software for queries only and sends them back to the InForm software through the InForm Adapter.
Clintrial queries Clintrial software
InForm software
When a study is designed to validate EDC data with Clintrial rules and derivations, and the validation results in the generation of queries.

CIS Administrator Guide
Clintrial Integration Solution 4.6 SP0 181
Deletion and undeletion processing When EDC data is deleted in the InForm software and the action is synchronized to the Clintrial software, the CIS software processes deletions and other related transactions in the Clintrial tables as follows.
InForm action Clintrial table updates
Delete a record. Data—Delete the corresponding UPDATE and DATA table row, and add a record to the AUDIT table, containing a copy of the data before deletion.
Comments—Delete the corresponding row from the TAGS table.
Discrepancies—Auto-close discrepancies on the deleted records, and rerun validation on any panels that have discrepancies with error items that refer to the deleted records.
Add a comment to a deleted record.
Add a record to the TAGS_AUDIT table.
Add a query to an empty form.
Create a record in the UPDATE table for the panel to which the InForm item is mapped, if the InForm item is mapped to the Clintrial software. If the InForm path for the query is mapped to multiple Clintrial panel items, CIS creates a query record for only one of the mappings.
Add a query to a deleted record.
Discard the query.

Appendix C Data transfer and storage
182 Clintrial Integration Solution 4.6 SP0
InForm action Clintrial table updates
Undelete an itemset row or repeating form instance.
Data—Create a row in the UPDATE table, using the CTRECID of the data from before the deletion, obtained from the AUDIT table. Populate the row with data from the AUDIT table.
If a patient number changes in the InForm software, and then a deleted record associated with that patient is undeleted, the AUDIT table used to obtain the rest of the deleted data holds the old patient number. In this case, CIS obtains the new patient number from the enrollment panel.
For protocols started before CIS 4.0 SP4—Until the 4.0 SP4 release, CIS did not delete records in the Clintrial software when processing an InForm delete transaction. Instead, CIS set items in the UPDATE table to NULL. These all-NULL records might still exist in the Clintrial database. CIS processes an undelete on these records as follows:
If the UPDATE table already includes a row for the itemset or repeating form record containing all NULL values, update the row with the itemset or repeating form values, using data from the AUDIT table.
If the DATA table already includes a row for the itemset or repeating form record containing all NULL values, delete the row in the DATA table and insert a row in the UPDATE table, using data from the AUDIT table.
It is possible for CIS to transfer data from the InForm software to a record that contains all NULL values. If such a data transaction is then followed by an undelete, synchronization fails. In the very unlikely event that a failure occurs because of this circumstance, please contact Phase Forward support for assistance.
Comments—Recover any deleted comments from the TAGS_AUDIT table.
Discrepancies—CIS does not recover any deleted discrepancies. To recover a manual query, a user must re-enter the query. Validation must be run again to open discrepancies.
Caution: A delete or undelete action can affect multiple rows in multiple panels.

CIS Administrator Guide
Clintrial Integration Solution 4.6 SP0 183
Audit processing Transactions in an integrated study cause the creation of audit records in the Clintrial and InForm databases. This section describes general audit processing in an integrated study and discusses the following specific audit considerations:
Auditing of manually edited transactions.
Processing of entry and merge date times in the Clintrial software.
General audit trail information Auditing of transactions that occur in an integrated study occurs in both the Clintrial software and the InForm software.
Auditing in the Clintrial software
In the Clintrial software, auditing tracks changes to clinical data and notes associated with clinical data:
For data entered with the Enter module, study designers can configure the point at which auditing begins, and auditing tracks changes or deletions made to records and notes after the audit start point: Entry, Verification, Validation, Validity, or Merge.
For EDC data, when you synchronize metadata for an integrated study designed with the Central Designer software to a Clintrial protocol, CIS creates new panels if they do not already exist in the protocol. When CIS creates Clintrial panels, it automatically sets the audit start point of each panel to Entry.
Note: If you create a panel with the Design module of the Clintrial software to be used for EDC data, you must manually define the panel with an audit start point of Entry. Similarly, do not change the audit start point for panels created by CIS. Creating or changing a panel to an audit start point other than Entry can result in the inability to reinstate data that has been deleted in the InForm software.
Audit data is stored in the AUDIT table for each clinical data panel in a protocol.
The Audit Record Report, available in the Manage module of the Clintrial software, shows changes and deletions made to a selected panel’s records after the audit start point has been reached.
Auditing in the InForm software
In the InForm software, auditing tracks all additions, changes, and deletions made to clinical data from the point of original entry.
Users of the InForm software can track audit data on the Audit screen for each data item of an electronic CRF. For each addition, change, or deletion, the Audit Trail screen shows the server, date and time of change, user, change data, and change reason.
The source machine of each transaction appears in the Server column of the Audit Trail screen. For an EDC transaction, the source machine is the one on which the InForm software is installed. For a query transaction originating in the Clintrial software and synchronized to the InForm software through CIS, the audit trail shows the Oracle TNS name used by the CIS machine to connect to the
Appendix C Data transfer and storage
184 Clintrial Integration Solution 4.6 SP0
database, along with the name of the protocol, in the format TNSName.ProtocolName.
Transaction edits The Transaction Edit Screen page of CIS Administration enables authorized users to edit failed transactions from the synchronization job so that synchronizations can continue.
Changes to synchronization transactions made through CIS Administration do not update the InForm audit trail or Clintrial audit tables as do data changes performed through the InForm software or the Clintrial Enter module data entry screens. Changes appear in the Clintrial Enter module but do not appear in the InForm interface. For more information, see the INF_MSGEDIT_HISTORY (on page 145) table.
Audit trail for manual transaction edits
To ensure that synchronization transaction changes are nevertheless recorded and available for audit, the following occurs when a user edits a transaction:
An audit transaction is created and processed immediately the transaction edit. This XML contains the following information:
Transaction IDs.
User who edited the transaction.
CIS application server computer and client computer where the edit occurred.
Time and date of the change.
Reason for the edit as entered on the Transaction Edit Screen.
Body of the original transaction text.
Body of the updated transaction text.
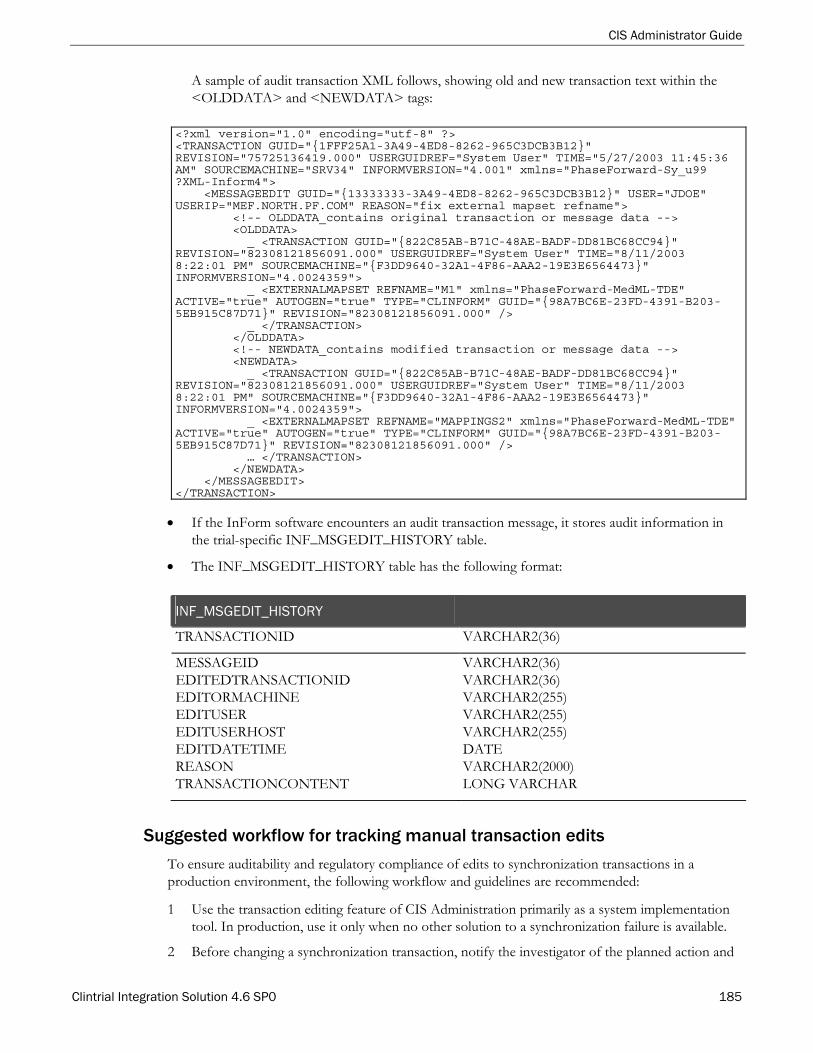
CIS Administrator Guide
Clintrial Integration Solution 4.6 SP0 185
A sample of audit transaction XML follows, showing old and new transaction text within the <OLDDATA> and <NEWDATA> tags:
<?xml version="1.0" encoding="utf-8" ?> <TRANSACTION GUID="{1FFF25A1-3A49-4ED8-8262-965C3DCB3B12}" REVISION="75725136419.000" USERGUIDREF="System User" TIME="5/27/2003 11:45:36 AM" SOURCEMACHINE="SRV34" INFORMVERSION="4.001" xmlns="PhaseForward-Sy_u99 ?XML-Inform4"> <MESSAGEEDIT GUID="{13333333-3A49-4ED8-8262-965C3DCB3B12}" USER="JDOE" USERIP="MEF.NORTH.PF.COM" REASON="fix external mapset refname"> <!-- OLDDATA_contains original transaction or message data --> <OLDDATA> _ <TRANSACTION GUID="{822C85AB-B71C-48AE-BADF-DD81BC68CC94}" REVISION="82308121856091.000" USERGUIDREF="System User" TIME="8/11/2003 8:22:01 PM" SOURCEMACHINE="{F3DD9640-32A1-4F86-AAA2-19E3E6564473}" INFORMVERSION="4.0024359"> _ <EXTERNALMAPSET REFNAME="M1" xmlns="PhaseForward-MedML-TDE" ACTIVE="true" AUTOGEN="true" TYPE="CLINFORM" GUID="{98A7BC6E-23FD-4391-B203-5EB915C87D71}" REVISION="82308121856091.000" /> _ </TRANSACTION> </OLDDATA> <!-- NEWDATA_contains modified transaction or message data --> <NEWDATA> _ <TRANSACTION GUID="{822C85AB-B71C-48AE-BADF-DD81BC68CC94}" REVISION="82308121856091.000" USERGUIDREF="System User" TIME="8/11/2003 8:22:01 PM" SOURCEMACHINE="{F3DD9640-32A1-4F86-AAA2-19E3E6564473}" INFORMVERSION="4.0024359"> _ <EXTERNALMAPSET REFNAME="MAPPINGS2" xmlns="PhaseForward-MedML-TDE" ACTIVE="true" AUTOGEN="true" TYPE="CLINFORM" GUID="{98A7BC6E-23FD-4391-B203-5EB915C87D71}" REVISION="82308121856091.000" /> … </TRANSACTION> </NEWDATA> </MESSAGEEDIT> </TRANSACTION>
If the InForm software encounters an audit transaction message, it stores audit information in the trial-specific INF_MSGEDIT_HISTORY table.
The INF_MSGEDIT_HISTORY table has the following format:
INF_MSGEDIT_HISTORY
TRANSACTIONID VARCHAR2(36)
MESSAGEID EDITEDTRANSACTIONID EDITORMACHINE EDITUSER EDITUSERHOST EDITDATETIME REASON TRANSACTIONCONTENT
VARCHAR2(36) VARCHAR2(36) VARCHAR2(255) VARCHAR2(255) VARCHAR2(255) DATE VARCHAR2(2000) LONG VARCHAR
Suggested workflow for tracking manual transaction edits
To ensure auditability and regulatory compliance of edits to synchronization transactions in a production environment, the following workflow and guidelines are recommended:
1 Use the transaction editing feature of CIS Administration primarily as a system implementation tool. In production, use it only when no other solution to a synchronization failure is available.
2 Before changing a synchronization transaction, notify the investigator of the planned action and
Appendix C Data transfer and storage
186 Clintrial Integration Solution 4.6 SP0
obtain formal signoff indicating that the investigator agrees to the action.
3 At the site, maintain a manual log of the occasions on which you edit synchronization transactions. This log should record:
The user who performed the edit.
The date and time of the action.
The trial or protocol in which synchronization transactions were edited.
4 Update the data in the InForm software if necessary to reflect the change.
5 When an audit of integrated study transactions is required, query the INF_MSGEDIT_HISTORY table for each trial in which synchronization transactions were edited to produce the audit record of those actions. At a minimum, review the INF_MSGEDIT_HISTORY table as part of the database locking process. If any records exist, verify the existence of the required paper documentation at the site.
Note: If you do not follow similar steps to make sure your audit trail is complete, you may be using the CIS software in a way that is not fully compliant with CFR 11.

Clintrial Integration Solution 4.6 SP0 187
In this appendix Suggested troubleshooting procedure .............................................................................................188
Environment configuration...............................................................................................................189
Synchronization connection definition ...........................................................................................190
Database statistics ...............................................................................................................................191
InForm and Clintrial data incompatibility ......................................................................................192
A P P E N D I X D
Troubleshooting

Appendix D Troubleshooting
188 Clintrial Integration Solution 4.6 SP0
Suggested troubleshooting procedure To identify the source of a synchronization problem:
1 Check the status of the synchronization connection using the CIS Administration tool.
2 Examine the content of error messages. For more information, see CIS Error Messages (on page 196).
3 Examine the following log files:
CAConfig.log.
CISAdapterService.log.
CISLibraryAdapterService.log.
CTAdapterService.log.
InFormAdapterService.log.
InFormAdapter.AdapterAdmin.WebService.log.
InFormAdapter.AdapterService.WebService.log.
InFormAdapter.ServerAdapter.WebService.log.
InFormAdapter.TransactionAdapter.WebService.log.
4 Check the Windows Event Viewer on the Clintrial, CIS, and InForm machines. A synchronization error includes the text of any CIS error messages or messages passed through from Oracle or .NET, along with the XML text of the transaction causing the error. For easier legibility, copy and paste the error and transaction text into a text editor such as Notepad.
5 Analyze the problem. For a description of error messages originating from the CIS software, see CIS Error Messages (on page 196). Several common Oracle and .NET error messages are included in the appendix.

CIS Administrator Guide
Clintrial Integration Solution 4.6 SP0 189
Environment configuration A failure to process synchronizations correctly could be caused by incorrect configuration in your CIS environment. Check the following information:
See the Release Notes for your release of the CIS software for:
Oracle version numbers including patch sets.
Operating system version number and service pack.
Version numbers of other required software.
See the Phase Forward Product Compatibility Matrix which identifies CIS compatibility with other Phase Forward products: CIS, Clintrial, InForm Adapter, and InForm version numbers, including service pack levels.
The Phase Forward Product Compatibility Matrix can be downloaded from the Phase Forward Extranet. To sign in to the Extranet, go to www.phaseforward.com and click Customer Login. Enter your email address and password, then navigate to the Bulletins section.
Make sure that you have adjusted your MS DTC log settings and MTS time-out. For more information, see Monitoring MS DTC logs.
Appendix D Troubleshooting
190 Clintrial Integration Solution 4.6 SP0
Synchronization connection definition Review your synchronization connection definitions to ensure that your environment will support synchronization correctly. For more information, see Administering synchronization connections (on page 63).

CIS Administrator Guide
Clintrial Integration Solution 4.6 SP0 191
Database statistics In very large studies, the Status tab of the CIS Synchronization Connection page could fail to appear if a query that determines the transaction count times out. If this happens, you cannot view the Status page until the synchronization completes or fails. To prevent this situation, make sure that database statistics are kept up-to-date.
Appendix D Troubleshooting
192 Clintrial Integration Solution 4.6 SP0
InForm and Clintrial data incompatibility CIS generates mapping definitions for study components. if you generate mappings in the Central Designer software and synchronize the metadata definitions to the Clintrial software, the CIS software optionally creates Clintrial panels, if they do not already exist, and the metadata definitions match between the InForm study and the Clintrial protocol.
However, if you later add to or change the study component or protocol item definitions, you can create data incompatibilities if you do not ensure that the additions or changes are correctly reflected in both systems. This section describes common data incompatibility problems.
Column size The following error messages indicate an incompatibility between an InForm form item and a Clintrial panel item:
ORA-01401: inserted value too large for column. This Oracle error indicates that an InForm data item is too large for the Clintrial panel item to which it is mapped.
Value was either too large or too small for an Int64. This .NET error can happen if the InForm item is a long string of digits too large for numeric storage in a 64-bit integer.
These errors can occur if you increase the size of an InForm form control with the Central Designer software without changing the corresponding Clintrial panel item with the Design module. To recover, do one of the following:
Change the data in the InForm software if appropriate; then, change the size of the control on the InForm form so that it matches the size of the Clintrial panel item. Use the Central Designer software to make the necessary changes in the study, create a deployment package, and deploy it to the InForm server. For more information, see the Central Designer documentation.
Change the size of the Clintrial panel item. In the Design module of the Clintrial software, change the DB Format of the panel item to a length that is compatible with the length of the InForm item. Save the change and implement the revision. For more information, see the Clintrial Admin and Design manual.
Caution: In the Clintrial software, you cannot change the design of a panel in an EDC protocol if data has already been entered in the panel. If the panel contains EDC data, you can override this restriction by selecting the Enable Modifications to EDC Panels option at the protocol level. For details, see the CIS Designer's Guide. Additionally, you can only change the DB Format of a panel item to a length that is larger.
Data type If the mappings between the InForm software and the Clintrial software result in an attempt by the CIS software to insert EDC data into a Clintrial item with an incompatible data type, the synchronization fails if the CIS software cannot successfully convert the data to a compatible data type (for a list of the types of data conversions the CIS software performs during synchronization, see the CIS Designer Guide. In this case you might receive the following message:
Input string not in a correct format
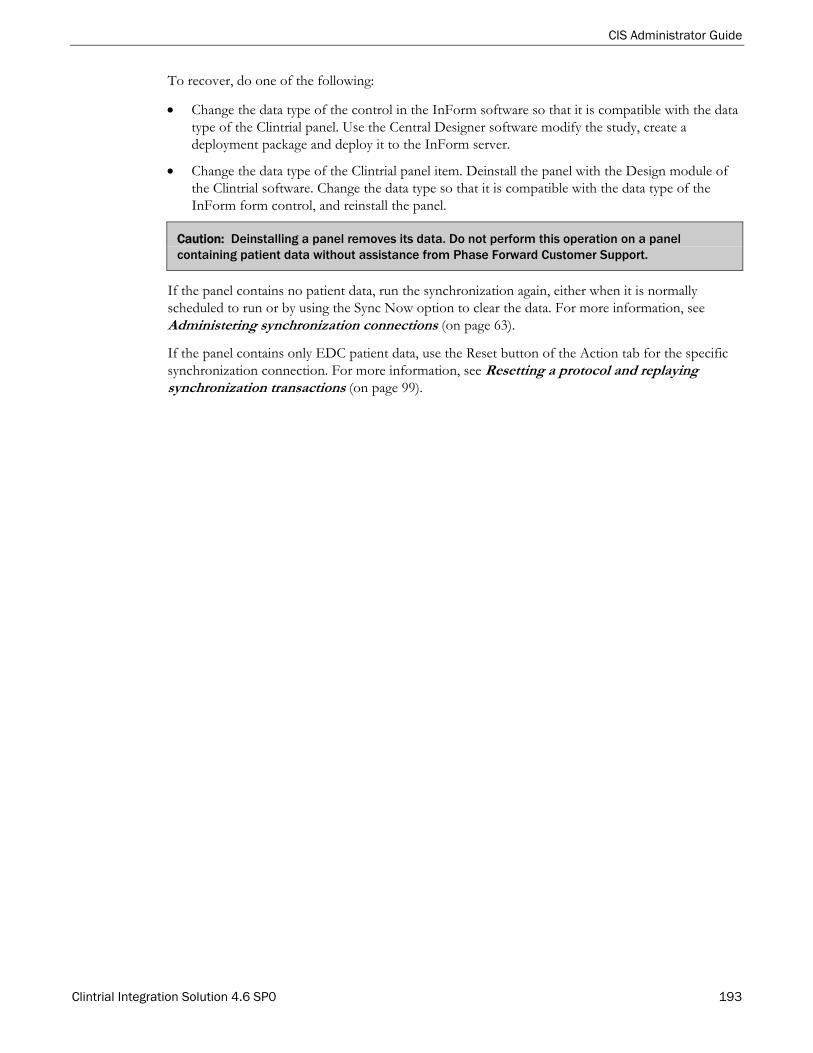
CIS Administrator Guide
Clintrial Integration Solution 4.6 SP0 193
To recover, do one of the following:
Change the data type of the control in the InForm software so that it is compatible with the data type of the Clintrial panel. Use the Central Designer software modify the study, create a deployment package and deploy it to the InForm server.
Change the data type of the Clintrial panel item. Deinstall the panel with the Design module of the Clintrial software. Change the data type so that it is compatible with the data type of the InForm form control, and reinstall the panel.
Caution: Deinstalling a panel removes its data. Do not perform this operation on a panel containing patient data without assistance from Phase Forward Customer Support.
If the panel contains no patient data, run the synchronization again, either when it is normally scheduled to run or by using the Sync Now option to clear the data. For more information, see Administering synchronization connections (on page 63).
If the panel contains only EDC patient data, use the Reset button of the Action tab for the specific synchronization connection. For more information, see Resetting a protocol and replaying synchronization transactions (on page 99).

Appendix D Troubleshooting
194 Clintrial Integration Solution 4.6 SP0
Clintrial Integration Solution 4.6 SP0 195
In this appendix CIS Error messages ............................................................................................................................196
A P P E N D I X E
CIS error messages

Appendix E CIS error messages
196 Clintrial Integration Solution 4.6 SP0
CIS Error messages In a CIS environment, you might encounter errors from the following sources:
Oracle errors at the database level, including:
Database calls from within the CIS software.
Pass-through of errors that occur within Clintrial packages.
CIS errors, which can indicate a problem within the CIS code.
.NET errors, which are generated by the Windows .NET Framework and then handled in the CIS processing code.
This appendix lists the error messages initiated by CIS processing. For more information, see Suggested troubleshooting procedure (on page 188).
Error Description
Cannot receive comment on non-existent Patient Data.
No record exists with which to associate the given comment.
Visit or Page Information not found. Visit or page properties not found in the INF_OBJECTS table.
Invalid parameters passed to the Data Deletion GetAllItems method.
Low level code problem. The method requires either FORM or DATA to be passed. Anything else results in this error.
Invalid parameters passed to the Data Deletion GetCTrecids method.
Similar to above.
Subject not enrolled. Subject was not found in the INF_SUBJECT table.
No Updates allowed to the Patient Enrollment Data.
Once a patient is enrolled, changes to enrollment data cannot be made (feature of the Clintrial software).
Patient screening data has not been loaded. No screening data has been found.
Clintrial Core module not registered. No Clintrial installation at target instance.
Protocol not in correct state to load data. Clintrial protocol must be in "NORMAL" state.
InForm User information not found. InForm user is not found in the INF_USER_UPDATE table.
Cannot insert item SDV status - protocol is not in correct state to load data.
An incorrect SDV record has been received.
Query Information not found in Clintrial ErrorStatus Table.
Outgoing transaction record has CT_RECID for a query that was not found in the INF_ERRORSTATUS table.
Inform Patient Guid not found for CT Subject Id.
Clintrial SUBJECT_ID given did not have matching record in INF_SUBJECT table.

CIS Administrator Guide
Clintrial Integration Solution 4.6 SP0 197
Error Description
Source Record not found for Query in outgoing transactions.
Outgoing transaction record has CT_RECID for a query that was not found in the INF_ERRORSTATUS table.
Invalid Query-State transition. The conflict resolver found an inconsistent query state transition.
Database Execute Exception. General exception (not database exception) occurred during execution of a database command.
Database GetValue Exception
Table: {0}, Column: {1}, RowNum: {2} - There are {3} rows in the DataSet.\n\n{4}.
General exception (not database exception) occurred during retrieval of a database value ({} values indicate where extra information is given).
Unsupported conversion to string from type {0}.
Could not convert from the given type to a string.
Unsupported conversion to BOOL from type {0}.
Could not convert from the given type to a Boolean value.
Database SetValue Exception
Table: {0}, Column: {1}, RowNum: {2} - There are {3} rows in the DataSet.\n\n{4}.
General exception (not database exception) occurred during the setting of a database value.
Database Delete Row Exception
Table: {0}, Column: {1}, RowNum: {2} - There are {3} rows in the DataSet.\n\n{4}.
General exception (not database exception) occurred during deletion of a database row.
Database Add Row Exception AddRow Exception - Table: {0}.
General exception (not database exception) occurred during creation of a database row.
Cannot process System Message of unknown type.
Create CIS Trial processor has been passed XML that is not a CREATECISTRIAL element.
CISMapsetProcessor can process XML tag EXTERNALMAPSET; was passed wrong tag.
Mappings processor has been passed XML that is not a EXTERNALMAPSET element.
NULL Transaction Parameter. Transaction re-player (for new mappings feature) was passed a null transaction.
ProcessMessages() err: Access denied
or
SendNewData() err: Access denied.
Method was called by a user not assigned the CISManager role within the CISManager COM+ package.
startProcessMessageThread() err: concurrent processing.
Another thread (possibly on another machine) is already processing the messages. This might occur when you try to start the processing manually when directly invoking the web service.
Cannot process message. No mapping information provided.
The first message does not contain the definition of the MAPSET (or the MAPSET name has been removed from the CIS database).

Appendix E CIS error messages
198 Clintrial Integration Solution 4.6 SP0
Error Description
No Vector node message found - messages available {0}.
There was no synchronization connection information in the message that was requested to be processed.
Error finding Bookmark
Bookmark {0} - only {1} nodes in message.
Requested bookmark is out of bounds of the number of transactions in message.
Stopped processing due to New Mapping Exception.
Occurs if one has chosen to stop processing upon encountering a new mapping. This is the correct behavior of this new mapping option.
Invalid OnNewMapping Selection. Incorrect new mapping selection given.
GC.Collect() has failed: Call to Garbage Collector failed.
Cannot connect to database
User: [{0}] Password: [{1}] Connection: [{2}].
Unable to connect to database.
Unsupported Clintrial Context Type Clintrial Context items must have type between 0 and 4.
Unsupported Clintrial Item Type. Clintrial item types must be FIXED, FLOAT, TEXT, DATE, or DATETIME.
Not a valid DB format specifier. Oracle database format is not recognized.
The value is not a valid dimension for this DB format.
Oracle database format is recognized but appears to have invalid dimensions.
The database format dimension of an installed item cannot be made smaller.
Column already exists in database with larger dimension (width) than new specification.
The value is not a valid number of decimal places.
Invalid number of decimal places for database column.
The number of decimal places cannot exceed the database format width.
Exceeded number of decimal places for the specified column width.
Number is too large for column
Number {0} is too large for column of width {1} and precision {2}.
The given number (data) is too big to fit into the column. This occurs when a numeric data point is too large for the target Clintrial item.
Floating-Point Rounding - Panel {0}, Item {1}
Floating point numbers submitted to this column have exceeded the number of places specified. For example, the value {1} was rounded to the correct number of decimal places as {2}
This message will not appear again for this Item.
The number has been truncated to fit into the target column. This occurs when a floating point number needs to be truncated to fit into the target Clintrial item.
The CIS software issues this error as a warning. It is commonly seen with values that have been normalized in the InForm software.
Unsupported Clintrial Panel Type. Clintrial panels must have type between 0 and 5.
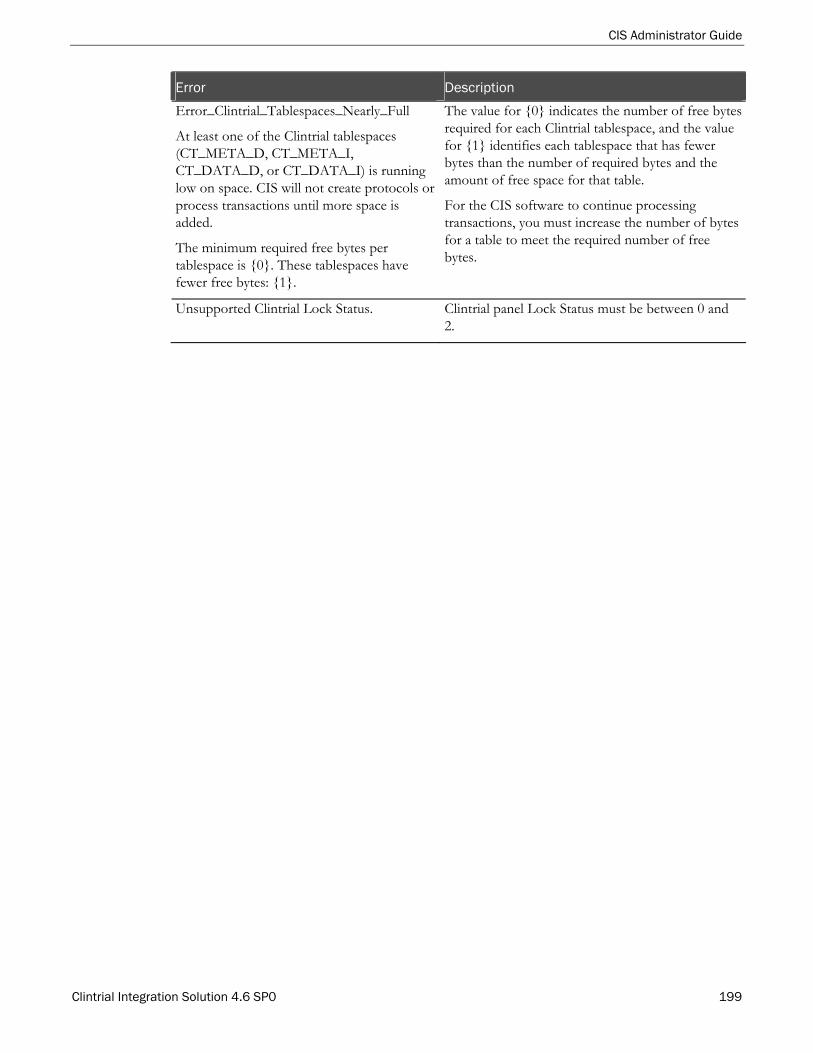
CIS Administrator Guide
Clintrial Integration Solution 4.6 SP0 199
Error Description
Error_Clintrial_Tablespaces_Nearly_Full
At least one of the Clintrial tablespaces (CT_META_D, CT_META_I, CT_DATA_D, or CT_DATA_I) is running low on space. CIS will not create protocols or process transactions until more space is added.
The minimum required free bytes per tablespace is {0}. These tablespaces have fewer free bytes: {1}.
The value for {0} indicates the number of free bytes required for each Clintrial tablespace, and the value for {1} identifies each tablespace that has fewer bytes than the number of required bytes and the amount of free space for that table.
For the CIS software to continue processing transactions, you must increase the number of bytes for a table to meet the required number of free bytes.
Unsupported Clintrial Lock Status. Clintrial panel Lock Status must be between 0 and 2.

Appendix E CIS error messages
200 Clintrial Integration Solution 4.6 SP0

Clintrial Integration Solution 4.6 SP0 201
A
Adapter list page auto refresh • 35 Clintrial Adapters • 35 InForm Adapters • 35
Admin module • 4
C
CIS application pages (plugins) • 43 architecture • 6
CIS Library database CIS_LB_MACHINES table • 167
CIS_SYNCH_JOBS_QUEUE table • 169 creating
synchronization connection • 72
D
data recovery • 115 example • 115
dates and times • 73
F
FORMSTATE • 143
G
Global settings • 46 GMT • 72 Greenwich Mean Time • 72
I
INF_ tables • 128 INF_ERRORITEM table • 131 INF_ERRORITEM_AUDIT table • 133 INF_ERRORLOG table • 134 INF_ERRORSTSATUS_AUDIT table • 140 INF_ITEMINSTANCE table • 142 INF_ITEMSTATUS table • 144 INF_MSGEDIT_HISTORY table • 145 INF_OBJECTS table • 146 INF_OUTGOINGTRANSACTIONS table • 147 INF_PANELINSTANCE table • 148 INF_PATHMAP table • 149 INF_PENDINGVALIDATIONS table • 151 INF_SITE_AUDIT panel • 155 INF_SITE_DATA panel • 155 INF_SITE_UPDATE panel • 155 INF_SUBJECT table • 157 INF_SUBJECT_AUDIT table • 159
INF_TRANSACTION table • 160 INF_TRANSACTIONDATA table • 161 INF_USER_AUDIT panel • 162 INF_USER_DATA panel • 162 INF_USER_UPDATE panel • 162 InForm
form state • 143 synchronization • 72, 73
item autocreation • 75
P
panel autocreation • 75
plugins (pages • 43 error status • 44 plugin view by server • 43 view by adapter • 44
R
recovering data • 115 example • 115
Rights • 49 Roles • 49
S
Schedules named • 107 specifying • 78
Secure Sockets Layer (SSL) • 72 security
security • 47 study book autocreation
overview of • 73 Study books • 73 synchronization connections
defining connection • 72 running manually • 114 scheduling • 107 time settings • 72
system clock • 72 system dates and times • 72
T
time settings • 72
U
Universal Time • 72 unrecovered data • 117 user rights
creating new • 55
Index

Index
202 Clintrial Integration Solution 4.6 SP0
UTC • 72