cineo maverick user guide - b&h photo video · user guide revision 1.1 — november, 2014...
TRANSCRIPT

User GuideRevision 1.1 — November, 2014
Information and specifications in this document are subject to change without notice.
w w w . c i n e o l i g h t i n g . c o m

2
Cineo Lighting has developed the versatile Cineo Maverick Remote Phosphor light source. Maverick operates from many power options, including AC, DC and battery power. The power connection uses an industry-standard XLR4 connector with an input voltage range of 10.8 to 28 VDC. Like all Cineo soft lights, Maverick allows the user to change the Remote Phosphor panels, supporting CCT of 2700K, 3200K, 4300K, 5600K, 6500K, Chroma Blue and Green. Their color quality perfectly matches all other Cineo soft lights, with CRI ratings of 90-98, depending on color temperature. Maverick fixtures feature a versatile mounting system that supports industry-standard hardware for virtually limitless mounting options.
Rather than traditional diffusion to soften the light source, the light actually emits from the Remote Phosphor panels on the front of the fixture, providing a light characteristic that radiates equally in a 160º radius, providing Maverick the ability to “wrap” your subject with soft light with edgeless shadows. The phosphor panels are excited by blue LEDs, which are automatically turned off when the phosphor panels are removed. The color temperature of Maverick is extremely consistent fixture to fixture, and will not change over time like other lighting technologies.
Cineo Maverick fixtures are extremely durable, built to last with anodized alloy construction, flexible polycarbonate panels, and field-serviceable components. Dimming options include both local and DMX control.
Cineo Maverick is perfect for any film or television project, in the studio or on location, or anywhere flicker-free, color-accurate soft light is required.
Welcome to Cineo Maverick

3
General Notes
1. Please read through this manual carefully before operating Cineo Maverick, and keep this manual for future reference.
2. There are numerous safety instructions and warnings that must be adhered to for your own safety.
3. Maverick is not intended for residential use. It is intended for use in a professional studio.
4. Maverick service must be performed by a qualified technician.
5. Although Maverick is weather-resistant, the fixture is intended primarily for indoor use.
6. Cineo products are not certified for use in hazardous locations.
7. Maverick has a typical operating temperature of 120º F (50° C).
Fixture Set Up
1. Read these safety instructions carefully to ensure fixture and accessories are used safely.
2. It is suggested that the fixture is correctly mounted onto the supporting surface before use.
3. Ensure the Maverick and power sources are operated within an ambient temperature range of -4 to 122°F (20 to +50°C)
4
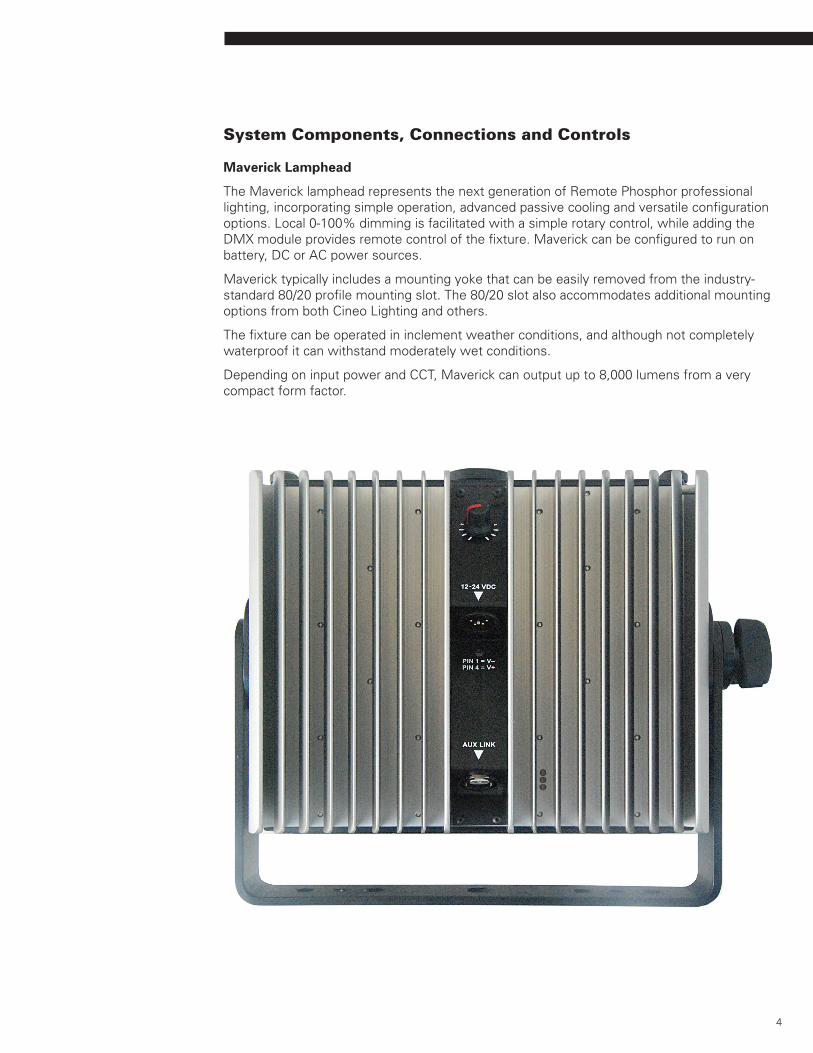
System Components, Connections and Controls
Maverick Lamphead
The Maverick lamphead represents the next generation of Remote Phosphor professional lighting, incorporating simple operation, advanced passive cooling and versatile configuration options. Local 0-100% dimming is facilitated with a simple rotary control, while adding the DMX module provides remote control of the fixture. Maverick can be configured to run on battery, DC or AC power sources.
Maverick typically includes a mounting yoke that can be easily removed from the industry-standard 80/20 profile mounting slot. The 80/20 slot also accommodates additional mounting options from both Cineo Lighting and others.
The fixture can be operated in inclement weather conditions, and although not completely waterproof it can withstand moderately wet conditions.
Depending on input power and CCT, Maverick can output up to 8,000 lumens from a very compact form factor.

5
Maverick Power Sources
The Maverick fixture features SmartPower™ power control, allowing operation with any 12-24VDC power source capable of delivering 75 -150 watts. This provides compatibility with a wide range of battery and AC options. Configuration of SmartPower is covered in detail in the Advanced Power Setting section of this guide.
Cineo offers the following power accessories for mounting on the either the Maverick yoke or BackPak™ accessory bracket. Maverick can be used with virtually any nominal 12-24VDC power source, including camera batteries, car lighter sockets, etc. Adapters and accessory cables are sold for connection to various power sources, including the following:
900.0095 120w portable AC Adapter
900.0195 150w studio power supply
900.0086 V-Lock Battery Plate
900.0094 Gold-Mount Plate
903.0003 Maverick Cigar Lighter Cable
Input power from other sources is also possible, using an XLR4 connector with the following pin configuration:
• Pin1 – GND
• Pin2 – NC
• Pin3 – NC
• Pin4 - +VDC

6
Advanced Power Settings
SmartPower settings are configured on a set of DIP switches located inside the lamphead. By placing these switches inside the fixture, misuse of various power configurations is minimized, as the fixture should be set up with the power sources intended for use in mind.
To access the switches, you must remove the lower panel from the lamphead. Two large screws must be removed, plus two smaller screws, as shown in the following photo:
The two small switches are located as shown and can be depressed or lifted using a small pin.
The simplest way to think about the SmartPower settings is to consider the maximum power capability of your DC source below 18 VDC (Low Voltage setting), and the option of limiting of power draw at a nominal 24VDC (High Voltage setting).
Low Voltage setting (LV)
A standard capacity V-Lock or Gold Mount camera battery will draw 70-95 watts with an output voltage ranging from 10.5 to 16 VDC. A high-capacity camera battery typically has a 120-150 watt output with a similar output voltage range.
If the Maverick is being used with standard capacity batteries, the LV setting should be set to 75 watts; if the fixture will only be used with high-capacity batteries, the LV setting can be set to 120 watts. Note that if the LV setting is 75 watts, virtually any capacity camera battery will work well with Maverick, without damage to the battery.
Note the location of the switch labeled “Option A”, which controls the LV setting. When depressed, the LV mode is set to 75 watts. This is indicated on the back of the fixture by illuminating the Red LED. This is the default setting when the fixture is shipped from the factory. When in the UP position, the LV mode is set to 120 watts and the Red LED on the back of the fixture is OFF.
Use of the 120 watt LV setting should ONLY be used with batteries whose output equals or exceeds 120 watts. A standard capacity battery will exhibit very little run time and risk battery damage if operating a Maverick with the LV setting at 120 watts.

7
High Voltage setting (HV)
The Maverick fi xture is designed for use with a 24VDC AC adapter when used on house power. The HV switch allows the fi xture to be confi gured for use at 120 watts or up to 135 watts, depending on the application.
For portable use, Cineo provides a small, lightweight AC adapter, capable of operating from 90-240 VAC, with a 24VDC output of 120 watts. The mounting bracket for this AC adapter is designed for quick removal of the adapter from the fi xture when minimum weight is a factor.
Note the location of switch closest to the bottom of the fi xture, which controls the HV setting (labeled “Option B”). To set the fi xture for 120 watt operation at 24 VDC, the switch position should be DOWN. The Yellow LED on the back of the fi xture will illuminate, indicating the 120 watt mode is selected. This is the default mode when the fi xture is shipped from the factory. When the position of this switch is
UP, the fi xture is running at 135 watts. In this mode the fi xture MUST be powered with a 150 watt or greater power source or damage to the power source may occur.
Local and Remote Dimming
When correct DC power is applied to the unit, the green LED illuminates on the back, between the cooling fi ns. The output of the Maverick is controlled with the local control knob on the back of the fi xture. The fi xture does not employ an on/off switch; when the knob position is at 0, the fi xture is virtually off, as it draws only 10 ma of power. The dimming curve is logarithmic in nature, providing a very “analog” characteristic to its control.
Remote Dimming via DMX
Cineo offers a DMX interface module for control of the fi xture via standard DMX lighting protocol. The interface module (900.0087) attaches to either the yoke or the BackPak accessory and connects to the Maverick fi xture’s AUX port via an included RJ45 cable. The module includes both DMX IN and DMX THRU via standard 5-pin XLR connections. The DMX pin-out wiring is as follows:
• Pin 1: Signal Common
• Pin 2: Data -
• Pin 3: Data +
• Pin 4: Spare
• Pin 5: Spare
The DMX control line is automatically self-terminating and does not require external DMX termination when no cable is inserted into the DMX THRU connector.
Note that when the DMX control is in use and DMX control signal is lost, the fi xture will hold its last level. When the Maverick loses power, it retains all of its DMX settings when power is resumed.

8
DMX Module Operation
When the DMX module is connected to the Maverick fixture, control of the fixture is automatically switched to the module. The DMX module has a multi-line display screen that indicates the firmware level, control mode (local / remote) and DMX address. The module is programmed by the use of four capacitive-touch buttons below the screen (-, +, Mode, Save).
There are two control modes: one for determining local or DMX control, and one for setting the DMX address (0 – 255). Touching the Mode button toggles the arrow on the right of the screen between these modes.
When the arrow is pointing to the “Control” setting, the “-” and “+” buttons will switch between local and DMX control. When the desired control method is displayed, touch the “Save” button to lock the setting. If the setting is not saved, it will revert to its previous setting in a few seconds.
When the arrow is pointing to the “Address” mode, the “-” and “+” buttons will increase or decrease the DMX address setting to the desired address. When the desired address is displayed, touch the “Save” button to lock the setting. If the setting is not saved, it will revert to its previous setting in a few seconds.
Disconnecting the DMX module from the Maverick fixture will place the fixture back into local control.
Remote Phosphor Panels
Color temperature (CCT) for the Maverick is changed by replacing the Remote Phosphor panel on the front of the fixture. The CCT is clearly labeled on each panel.
To change RP panels:
1. Loosen the two thumbscrews at the top of the fixture, and remove the top plate. The top plate is tethered to the body of the fixture to avoid loss or damage.

9
2. Remove the RP panel by sliding it up and out of the fi xture. If the lamp is on, the output will be cut when the panel is removed.
3. Insert a new panel into the slots and fi rmly seat it into the bottom of the slot. If power is applied, the lamp will turn on.
4. Replace the top plate, tightening the two thumbscrews fi nger-tight.
Although no harmful UV emanates from the fi xture, Maverick should only be used with the remote phosphor panels in place. Although the panels are extremely durable, avoid exposing them to abrasive surfaces. Please reference the Cineo Maverick catalogue for available color temperature options.
Mounting and Accessory Attachment
Maverick has an integrated slot in front of the RP panel for attachment of light control accessories, including the following:
900.0088 90º Louver
900.0089 4-leaf Barndoor set
902.0100 Snapbag™ softbox
902.0101 Chimera™ softbox
To install a light control accessory in the slot:
1. Rotate the accessory lock to the open position
2. Slide the accessory frame into the slot
3. Rotate the accessory lock to the closed position
Maverick also features two industry-standard 80/20 profi le slots running vertically along the sides of the fi xture. Not only do these provide an easy way to attach, detach and vertically position the yoke to the lamphead, it provides a universal mounting solution for other accessories, including handles, frames and Cineo’s BackPak accessory bracket.
Additionally, all Cineo Maverick accessories (battery plates, AC adapters, DMX adapters, etc.) conform to a standard mounting hole pattern that is repeated on the BackPak and several locations on the yoke. This allows your Maverick unit to be confi gured optimally for the application.

10
For example, a studio lighting installation is best configured with the 150 watt power supply and DMX adapter attached to opposite sides of the yoke. For portable applications, the BackPak is an ideal mounting tool for one or two battery plates, or a battery plate and a 120 watt portable AC adapter.
To remove / install the yoke:
1. Position the yoke 90º to the body of the fixture
2. With a #2 Phillips screwdriver, loosen the (4) mounting screws approximately one revolution
3. Slide yoke out of 80/20 slot
4. Installation is in reverse order
To install / remove the BackPak:
1. Align the attached oval-shaped nuts at the top of the BackPak to the top of the 80/20 slot.
2. Slide the top of the BackPak down so the oval nuts on the bottom can be inserted into the bottom of the 80/20 slot.
3. Position the BackPak in the desired location.
4. Tighten the #2 Phillips screws to secure the BackPak bracket

11
Specifications
Lamphead
Input voltage: 10.5-28 VDC
Power consumption: 75 watts / 120 watts / 135 watts (user configurable)
4-pin XLR power input
EtherCon DMX port
Completely silent, flicker-free operation
Fixture dimensions: 9.4” x 7.3” x 3” (240mm x 186mm x 78mm)
Weight: 2.2 kg (4.9 lbs)
Maximum output: 8,000 lumens
Beam Angle: >160º
Max. temperature rise: +45° C above ambient
Environmental temperature range: -20 - +50 C
35,000 hr. L70 rated
2-year parts and labor warranty
ETL and cETL pending, CE Compliant
Zero UV light emitted
Made in USA
Maverick Power Sources
120w AC Adapter
Part # 900.0095
Input Voltage: 100-240VAC
Output Voltage: 24VDC
Max. output current: 5A
Output connector: XLR4
Dimensions: 6.61” x 2.8” x 1.48” (168mm x 71mm x 37.2mm)
Weight: 1.5 lb. (680.3g)
2-year parts and labor warranty
UL, cULus and CE listed

12
150w AC Adapter
Part # 900.0195
Input Voltage: 100-240VAC
Output Voltage: 24VDC
Max. output current: 6.25A
Output connector: XLR4
Dimensions: 6.5” x 3.25” x 1.58 (165.1mm x 82.8mm x 40.1mm)
Weight: 2.25 lb. (1.0 kg)
2-year parts and labor warranty
UL, cULus and CE listed
Input Voltage: 100-240VAC
Output Voltage: 24VDC, 6.25A
900.0086 V-Lock Battery Plate
Max output current: 10A
Output connector: XLR4
Dimensions: 5.6” x 3.2” x 1” (142.1mm x 82.3mm x 26.3mm)
Weight: 13 oz. (368.5 g)
900.0094 Gold-Mount Plate
Max output current: 10A
Output connector: XLR4
Dimensions: 4.7” x 3.9” x 1.7” (119.6mm x 76.5mm x 17.8mm)
Weight: 9.2 oz. (260.8 g)
903.0003 Car Lighter Cable
Length: 10 ft.
Max output current: 10A
Output connector: XLR4
DMX Interface Module
Interface connector: Ethercon F
DMX connectors: XLR5 IN / THRU, self-terminating
Dimensions: 3.0” x 3.9” x 1.7” (77.2mm x 99mm x 43.7mm)
Weight: 7.3 oz. (207 g)

13
Warnings, Disclaimers and Warranty
Burning InjuriesBe aware of high temperatures in excess of 50ºC inside the lamphead during and after fixture use. To avoid burning injuries, do not touch the LEDs.
Flammable MaterialsKeep flammable materials away from the installation. Ensure that the amount of air flow required for safe operation of the equipment is not compromised. Proper ventilation must be provided.
ESD and LED’sLED components used in Maverick are ESD (Electro-Static Discharge) sensitive. To prevent the possibility of destroying LED components do not touch either while the fixture is in operation or while it is switched off.
Blue Light OutputDo not bypass the lamphead safety switches that turn off the blue LEDs when phosphor panels are removed. The light-output intensity may be harmful to human eyes. No UV or IR is emitted at any time from this fixture.
AC Power Supplies and DC CablesUse only a rated AC power supply. The user is responsible for ensuring DC power cables are of adequate condition for each application. If the cables are damaged, replace them with new ones.
Environmental: Disposal of Old Electrical & Electronic EquipmentThis product shall not be treated as household waste.

14
CINEO LIGHTING LIMITED WARRANTY
Products from Cineo Lighting are warranted against defects in materials and workmanship for two years from the date the Product is shipped to Customer. Products are guaranteed to perform substantially in accordance with the accompanying written materials within the warranty period under normal use.
If the Product fails to work as warranted, Cineo Lighting will, in its sole discretion, repair or replace the Product with a new or remanufactured Product that is at least equivalent to the original Product. Customer must obtain a Return Material Authorization number from Cineo Lighting before returning any Products under warranty to Cineo Lighting.
Customer shall pay expenses for shipment of repaired or replacement Products to Cineo Lighting’s repair facility. Any repaired or replaced Products will be warranted for the remainder of the original warranty period or thirty (30) days, whichever is longer. Cineo Lighting will pay shipping of repaired goods back to the customer. After examining and testing a returned product, if Cineo Lighting concludes that a returned product is not defective, Customer will be notified, the product returned at Customer’s expense.
This Limited Warranty is void if failure of the Products has resulted from accident, abuse, misapplication, or use outside of normal operating conditions. Warranty is void if serial number has been defaced or removed.
NO OTHER WARRANTIES. EXCEPT AS EXPRESSLY SET FORTH ABOVE, THE PRODUCTS ARE PROVIDED “AS IS” WITHOUT WARRANTY OF ANY KIND, AND NO OTHER WARRANTIES, EITHER EXPRESSED OR IMPLIED ARE MADE WITH RESPECT TO THE PRODUCTS, INCLUDING BUT NOT LIMITED TO ANY IMPLIED WARRANTIES OF MERCHANTABILITY, FITNESS FOR A PARTICULAR PURPOSE, TITLE OR NON-INFRINGEMENT OR ANY OTHER WARRANTIES THAT MAY ARISE FROM USAGE OF TRADE OR COURSE OF DEALING. ELEMENT DOES NOT WARRANT, GUARANTEE, OR MAKE ANY REPRESENTATIONS REGARDING THE USE OF OR THE RESULTS OF THE USE OF THE PRODUCTS IN TERMS OF CORRECTNESS, ACCURACY, RELIABILITY, OR OTHERWISE AND DOES NOT WARRANT THAT THE OPERATION OF THE PRODUCTS WILL BE UNINTERRUPTED OR ERROR FREE. CINEO LIGHTING EXPRESSLY DISCLAIMS ANY WARRANTIES NOT STATED HEREIN. NO LIABILITY FOR CONSEQUENTIAL DAMAGES. TO THE MAXIMUM EXTENT PERMITTED BY APPLICABLE LAW, IN NO EVENT SHALL ELEMENT AND ITS LICENSORS, DISTRIBUTORS, AND SUPPLIERS (INCLUDING ITS AND THEIR DIRECTORS, OFFICERS, EMPLOYEES, AND AGENTS) BE LIABLE FOR ANY DAMAGES, INCLUDING, BUT NOT LIMITED TO, ANY SPECIAL, DIRECT, INDIRECT, INCIDENTAL, EXEMPLARY, OR CONSEQUENTIAL DAMAGES, EXPENSES, LOST PROFITS, INSTALLATION COSTS, LOST SAVINGS, BUSINESS INTERRUPTION, LOST BUSINESS INFORMATION, OR ANY OTHER DAMAGES ARISING OUT OF THE USE OR INABILITY TO USE THE PRODUCTS, EVEN IF ELEMENT OR ITS LICENSORS, DISTRIBUTORS, AND SUPPLIERS HAS BEEN ADVISED OF THE POSSIBILITY OF SUCH DAMAGES. CINEO LIGHTING’S TOTAL LIABILITY ON ALL CLAIMS, WHETHER IN CONTRACT, WARRANTY, TORT (INCLUDING NEGLIGENCE OR BREACH OF STATUTORY DUTY), STRICT LIABILITY OR OTHERWISE, SHALL NOT EXCEED THE AMOUNTS PAID BY CUSTOMER FOR THE PRODUCTS.
Customer acknowledges that the applicable purchase price or license fee for the Products reflects this allocation of risk. Because some states/jurisdictions do not allow the exclusion or limitation of liability for consequential or incidental damages, the above limitation may not apply. The above limitations shall apply notwithstanding the failure of any limited remedy to fulfill its essential purpose.

w w w . c i n e o l i g h t i n g . c o m
Specifications are subject to change without notice. Cineo Lighting, Cineo Maverick and Maverick are registered trademarks of Cineo Lighting, Inc. ©2014 Cineo Lighting, Inc. v11.06.14
Cineo LightingP.O. Box 808
El Granada, CA 94018
Silicon Valley | Los Angeles | [email protected]
+1 310.425.3425