christon manual 2014 - mendip stoves · christon model 600(d600),700(d700), ... system chimneys...
TRANSCRIPT
9
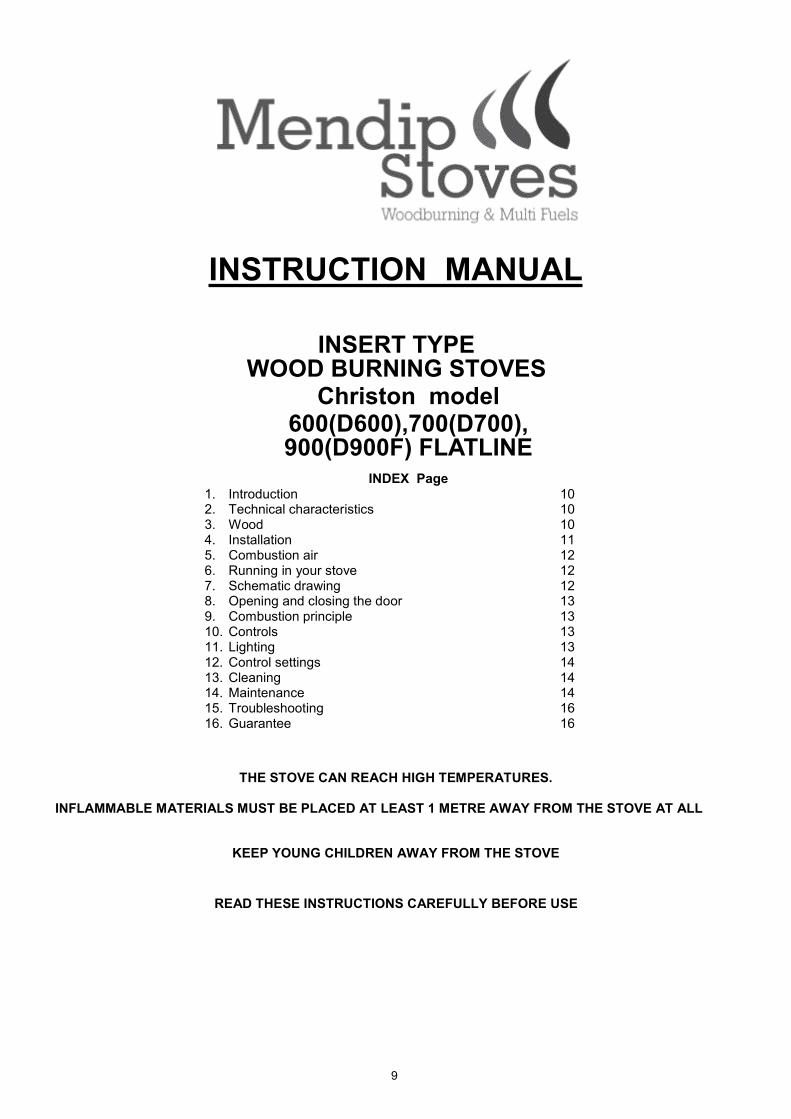
INSTRUCTION MANUAL
INSERT TYPEWOOD BURNING STOVES
Christon model600(D600),700(D700),900(D900F) FLATLINE
INDEX Page1. Introduction 102. Technical characteristics 103. Wood 104. Installation 115. Combustion air 126. Running in your stove 127. Schematic drawing 128. Opening and closing the door 139. Combustion principle 1310. Controls 1311. Lighting 1312. Control settings 1413. Cleaning 1414. Maintenance 1415. Troubleshooting 1616. Guarantee 16
THE STOVE CAN REACH HIGH TEMPERATURES.
INFLAMMABLE MATERIALS MUST BE PLACED AT LEAST 1 METRE AWAY FROM THE STOVE AT ALL
KEEP YOUNG CHILDREN AWAY FROM THE STOVE
READ THESE INSTRUCTIONS CAREFULLY BEFORE USE

HEALTH AND SAFETY PRECAUTIONS—----------------------------------------------------------------------------------------------------INFORMATION FOR THE USER, INSTALLER AND SERVICE ENGINEER
—----------------------------------------------------------------------------------------------------Special care must be taken when installing a stove such that the requirements of the Health & Safety at Work Act are met.
HandlingAdequate facilities must be available for loading, unloading and site handling.
Fire CementSome types of fire cement are caustic and should not be allowed to come into contact with the skin. In case of contactwash immediately with plenty of water.
PREPARATORY WORK AND SAFETY CHECKS
IMPORTANT WARNINGThis stove must not be installed into a chimney that serves any other heating appliance. There must not be an extractorfan fitted in the same room as the stove because this can cause the stove to emit fumes into the room.
AsbestosThis stove contains no asbestos. If there is a possibility of disturbing any asbestos in the coarse of installation then pleaseseek specialist guidance and use appropriate protective equipment.
Metal PartsWhen installing or servicing this stove care should be taken to avoid the possibility of personal injury.
CO Alarms:-Building regulations require that when ever a new or replacement fixed solid fuel or wood/biomass appliance is installedin a dwelling a carbon monoxide alarm must be fitted in the same room as the appliance. Further guidance on theinstallation of the carbon monoxide alarm is available in BS EN 50292:2002 and from the alarm manufacturer’sinstructions. Provision of an alarm must not be considered a substitute for either installing the appliance correctly orensuring regular servicing and maintenance of the appliance and chimney system.
Stove paint AerosolsPaint aerosols are flammable and therefore dangerous to use around a lit stove. Be sure to allow aerosols spray paintsto dry and ventilate the room well before lighting the stove. The use of any aerosol around lit stove is dangerous andcare must be take in handling aerosols.
IMPORTANT:These instructions cover the basic principles to ensure the satisfactory installation of Mendip Stovesproduct :- Christon 600, 700, 900 Flatline models, although detail may need slight modification to suitparticular local site conditions.In all cases the installation must comply with current Building Regulations, Local Authority Byelaws andother specifications or regulations as they affect the installation of the stove.It should be noted that the Building Regulations requirements may be met by adopting the relevantrecommendations given in British Standards BS 8303, BS EN 15287 as an alternative means to achieve anequivalent level of performance to that obtained following the guidance given in Approved Document J.

DECLARATION OF CE-CONFORMITYWe, the manufacturers of the appliance, hereby declare under our sole responsibility that the products describedbelowconform to essential safety requirements. This declaration will be rendered invalid if any changes are made totheappliance without our written consent
Manufacturer Vale Montanha, Lda,Z. Ind. Coca Maravilhas, 268500-483 Portimão, PortugalTel: +351 282470350 Fax: +351 282470359
Classification Solid-fuel appliance: InsertApplied Standards and Directives EN13229 : 2001+ A1:2003 + A2:2003:2005Test Institute Laboratory K.V.B.G. – A.R.G.B
Rodestraat 1251630 Linkebeek, Belgium
David BroadManaging Director
Portimão, the 28th of August 2007
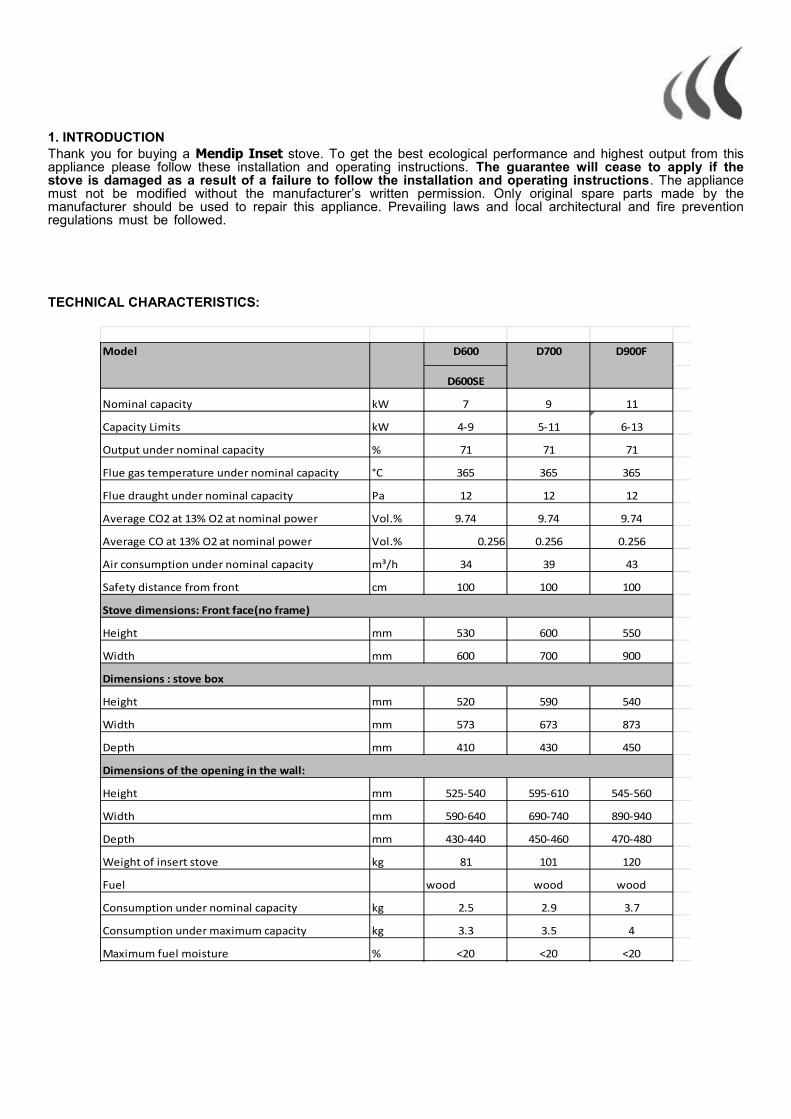
1. INTRODUCTIONThank you for buying a Mendip Inset stove. To get the best ecological performance and highest output from thisappliance please follow these installation and operating instructions. The guarantee will cease to apply if thestove is damaged as a result of a failure to follow the installation and operating instructions. The appliancemust not be modified without the manufacturer’s written permission. Only original spare parts made by themanufacturer should be used to repair this appliance. Prevailing laws and local architectural and fire preventionregulations must be followed.
TECHNICAL CHARACTERISTICS:
D600
D600SE
Nominal capacity kW 7 9 11
Capacity Limits kW 4-9 5-11 6-13
Output under nominal capacity % 71 71 71
Flue gas temperature under nominal capacity °C 365 365 365
Flue draught under nominal capacity Pa 12 12 12
Average CO2 at 13% O2 at nominal power Vol.% 9.74 9.74 9.74
Average CO at 13% O2 at nominal power Vol.% 0.256 0.256 0.256
Air consumption under nominal capacity m³/h 34 39 43
Safety distance from front cm 100 100 100
Height mm 530 600 550
Width mm 600 700 900
Height mm 520 590 540
Width mm 573 673 873
Depth mm 410 430 450
Height mm 525-540 595-610 545-560
Width mm 590-640 690-740 890-940
Depth mm 430-440 450-460 470-480
Weight of insert stove kg 81 101 120
Fuel wood wood wood
Consumption under nominal capacity kg 2.5 2.9 3.7
Consumption under maximum capacity kg 3.3 3.5 4
Maximum fuel moisture % <20 <20 <20
Stove dimensions: Front face(no frame)
Dimensions : stove box
Dimensions of the opening in the wall:
Model D700 D900F
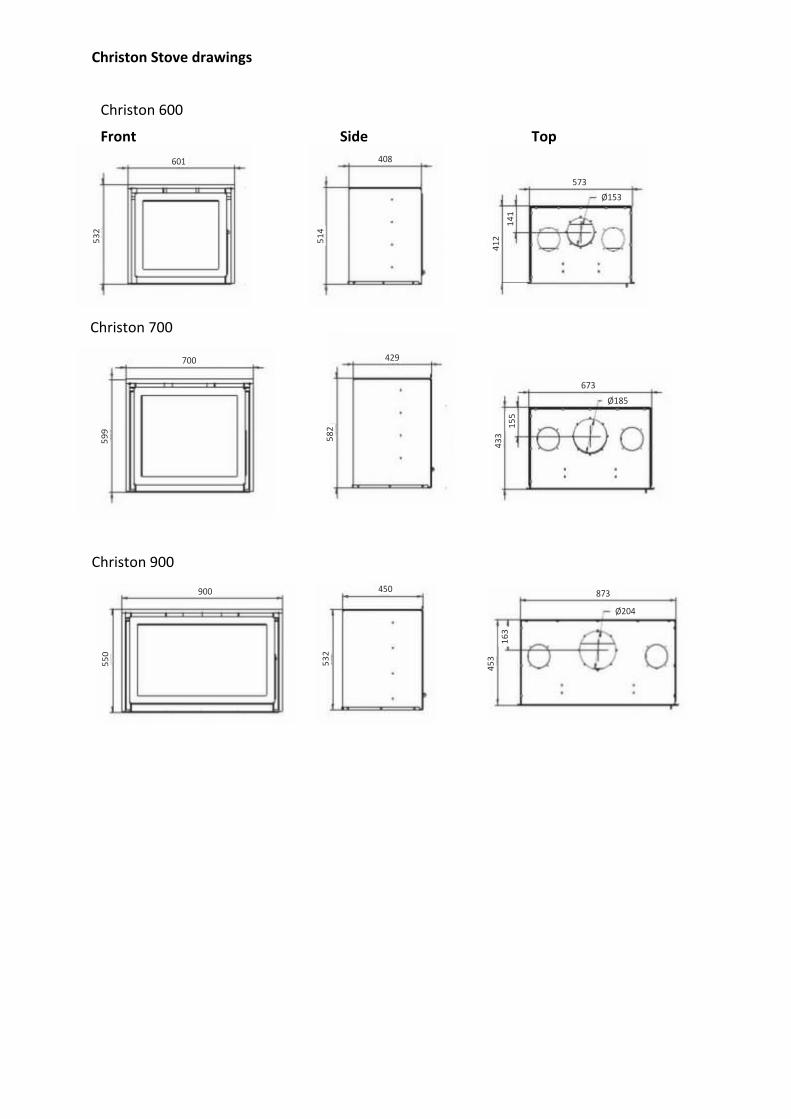
Christon 600
Front Side Top
Christon 900
Christon Stove drawings
Christon 700

11
4. INSTALLATIONYour flue and chimneyFor your stove to work properly the chimney must also work properly. Check out the following points whilst bearing inmind that this is for informational purposes only and is not binding for us in any manner whatsoever. It is an unfortunatefact that there are numerous factors that can play decisive roles in the correct functioning of a chimney.� Thoroughly clean your chimney prior to installation. If it has not been used for a long time, ask a specialist to inspect
it.� The chimney should be of sufficient height to guarantee a minimum draw of 8-20 Pascal. It is only possible to measure
the chimney draught while the appliance is working. If the draw is insufficient raise the chimney and/or insulate it. Ifthe flue draught is too great you will need to install a draught regulator.
� The flue should, ideally, be vertical and not change direction at any more than 45º from vertical.� The flue should not join into another. It should be separate throughout its entire length and have its own, separate
chimney pot.
� The flue should be free of obstructions, of the same size throughout and preferably round. The size should be thatspecified for the stove to function correctly (see catalogue).
� If the top of the chimney is within 60cm of the ridge of the roof, or closer, it should project at least 60cm above theridge. Elsewhere on the roof, not close to the ridge, the chimney should be at least 1 metre above the roof, measuredfrom the upper side.
� The chimney should not be close to tall trees, walls or buildings as these could cause down draughts.� The chimney must be well insulated. The internal face of the flue must be free from cracks and fissures and lined with
fire cement or other, suitable, refractory material. If not, then a suitable liner must be installed throughout its entirelength.

12
Lining Your ChimneyEuropean standards must be followed. Due to the technical nature of these standards they are mostly intended forprofessional installers. The following lists the relevant European standards.
EN 12446: 2003 - Chimneys - Components - Concrete outer wall elementsEN 1443: 2003 - Chimneys - General RequirementsEN1856-1: 2003 - Chimneys - Requirements for metal chimneys - Part 1: Products for system chimneysEN1856-2: 2004 - Chimneys - Requirements for metal chimneys - Part 2: Metal liners and connecting flue pipesEN13384-1: 2003 - Chimneys - Thermal and fluid dynamic calculation methods - Part 1:En 2006 - Chimneys serving one applianceEN1857: 2003 - Chimneys - Components - Flue linersEN1457: 1999 and Clay/ceramic flue liners - Requirements and test methodsEn 2002EN 1806: 2006- Chimneys - Clay/ceramic flue blocks for single wall chimneys - Requirements and test methodsEN13069: 2005 - Chimneys - Clay/ceramic outer walls for system chimneys - Requirements and test methodsEN 13063: 2006 - System chimneys with clay/ceramic flue liners - Part 1: Requirements and test methods for sootresistanceThe liner must be safely and securely connected to the outlet pipe of the stove. And your chimney or liner must be sweptat least once each heating season and in accordance with local regulations.
Your fireplaceIf cement mortar has been used on the inside or outside of the fireplace during construction or installation then a period ofat least 7 days should be allowed before operation to prevent the cement cracking when drying out. The stove will smokeslightly when first lit. These are fumes from the high temperature paint curing and baking hard. The house should be wellventilated during the curing period, which will last approximately twenty minutes. During this period the paintwork of thestove should not be touched. Only an appliance fitted by an accredited installer guarantees compliance with architecturaland fire prevention regulations. These rules must be followed to ensure the correct and safe operation of the stove. Theflue is extremely important when fitting the stove. Be sure to consult authorised specialists about the connection to ensurecompliance with local building regulations. Bear in mind the following:� The appliance door must be closed when in use and also when not in use.� There must be an adequate supply of fresh air when the appliance is in use.Fire safety measures relating to combustible or temperature sensitive floor surfaces:� A fire resistant, non combustible covering must be fitted under and around the stove. This must be at least 15cm thick.� No combustible materials should be stored underneath the appliance (e.g. firewood).� The safety distances from combustible or temperature sensitive objects, given in the table of technical characteristics,
must be adhered to.
5. COMBUSTION AIRContrary to a normal fireplace the stove uses very little combustion air. In most houses entry of fresh air through gaps indoors and windows is sufficient to provide this air. However, in houses that are well insulated this may not be sufficient. Ifso, a ventilation grille should be set into an outside wall near the stove to provide additional combustion air. The combus-tion air consumption of your particular stove can be found in the technical characteristics. Take account of other heatingappliances or air outlet installations in the same area or on the same combustion air connection. If needs be the totalcombustion air consumption for the room(s) should be calculated. If 15 minutes after lighting the fire there is still abackdraught of flue gases due to weather conditions (e.g. fog, storm) stop lighting the fire until the weather improves. Tip:be sure to take account of extractors which might be connected in the vicinity of the stove. These create negative pres-sure, which can lead to disruptions in the supply of combustion air. Any escape of combustion gas is potentially lethal andcan damage the health of the people living in your home.
6. RUNNING IN YOUR STOVERun your stove in slowly. Your first fires should be made with a small amount of wood and a gentle flame, allowing thestresses in the metal to dissipate and the entire installation to dry out. Even after running in your stove, never makeintense, prolonged fires. Little extra heat output is achieved and you risk damaging your stove.
7. SCHEMATIC DRAWING
A. Cold air inlet.B. Hot air outlet.C. Combustion air control.D. Door catch.

13
8. OPENING AND CLOSING THE DOORPlace the handle supplied into the hole provided in the door catch (D). Pull handle towards you to openthe door and push away from you to close the door. The stove surfaces can become very hot. Usetemperature resistant gloves at all times.
9. COMBUSTION PRINCIPLEThe stove is designed so that full of wood, with a slow flame, it will burn at maximum efficiency for several hours.The stove can be made to burn overnight, very slowly, with little or no flame. This is not advisable because thisincomplete combustion creates extra smoke, which, upon condensation, deposits tar on the stove, chimney andglass panel. An accumulation of such tar deposits is not only unsightly but also requires regular chimney cleaningto prevent chimney fires. If you are burning wet or green wood then the Combustion Air Control should be left openenough to ensure the creation of a slow, gentle flame.� Radiant heatThis is given from the hot embers and stainless steel and vermiculite back panels. The radiant heat is transmittedthrough the glass panel into the room and heats the immediate area in front of the stove.� Convection heatCool air enters via the cold air inlet, (A). It then passes along the base of the stove up the back and over the topbefore being expelled from the primary hot air outlet, (B). This convection air reaches the farthest corners of theroom.
10. CONTROLSCombustion air control (C)This controls the amount of combustion air entering the stove thereby controlling the heat output. It is situated onthe top right hand side of the door.� To open - Slide to the right for greater heat output but with greater wood consumption.� To close - Slide to the left for slightly less heat output but much less wood consumption.Being situated at the top of the door the incoming pre-heated combustion air creates a high velocity air wash effectover the entire inner surface of the glass panel. This helps keep the glass cleaner for longer.
11. LIGHTINGThe highest output is achieved by means of "top-down" burning. To achieve this, do not fill the stove in the traditionalway.� Traditional way: what is meant here is laying down paper first, then kindling and finally large logs. With this method
the load is limited when lighting the fire.� "Top-down" burning: this is done by loading the large logs first, then the smaller pieces, and the paper on top.
In this case combustion takes place from the top down and is known as "Top-down" burning.
From cold1. Fully open combustion air control.2. Open door.3. Place the logs in the “traditional way” or “top down” way.4. Light the fire and close the door.5. Leave the combustion air inlet fully open until the wood is burning and the ashes glow.6. Choose a control setting. The best operation setting is around 60% Open
Reloading1. Fully open combustion air control.2. Open door.3. Using poker provided rake hot embers evenly around the vermiculite base.4. Place fresh logs on top of embers.5. Close the door and burn fiercely until flame has caught hold and embers are glowing.6. Choose a Control Setting. The best operation setting is around 60% OpenNote: Do not load wood higher than the vermiculite walls.

BURNING WOOD IN A SMOKE CONTROL AREAYou must purchase a smoke control version of the Mendip stove Christon D600 which is modified slightly to comply withregulations. Any change to this modification will invalidate the stoves compliance for smoke control areas.Order Product M 00643-00-00-00-00 Christon 600 SE with 3 sided frame
M 00644-00-00-00-00 Christon 600 SE with 4 sided frameAny change to this modification will invalidate the stoves compliance for smoke control areas.
The Clean Air Act 1993 and Smoke Control AreasUnder the Clean Air Act local authorities may declare the whole or part of the district of the authority to be a smoke controlarea. It is an offence to emit smoke from a chimney of a building, from a furnace or from any fixed boiler if located in adesignated smoke control area. It is also an offence to acquire an "unauthorised fuel" for use within a smoke control areaunless it is used in an "exempt" appliance ("exempted" from the controls which generally apply in the smoke control area).The Secretary of State for Environment, Food and Rural Affairs has powers under the Act to authorise smokeless fuels orexempt appliances for use in smoke control areas in England. In Scotland and Wales this power rests with Ministers in thedevolved administrations for those countries. Separate legislation, the Clean Air (Northern Ireland) Order 1981, applies inNorthern Ireland. Therefore it is a requirement that fuels burnt or obtained for use in smoke control areas have been
"authorised" in Regulations and that appliances used to burn solid fuel in those areas (other than "authorised" fuels) havebeen exempted by an Order made and signed by the Secretary of State or Minister in the devolved administrations.Further information on the requirements of the Clean Air Act can be found here: http://smokecontrol.defra.gov.uk/ Yourlocal authority is responsible for implementing the Clean Air Act 1993 including designation and supervision of smoke controlareas and you can contact them for details of Clean Air Act requirements
Refuelling on to a low fire bedIf there is insufficient burning material in the firebed to light a new fuel charge, excessive smoke emission can occur. Refuellingmust be carried out onto a sufficient quantity of glowing embers and ash that the new fuel charge will ignite in a reasonableperiod. If thereare too few embers in the fire bed, add suitable kindling to prevent excessive smoke
Fuel overloadingThe maximum amount of fuel specified in this manual should not be exceeded, overloading can cause excess smoke.The following text may be required depending on appliance operation and instructions:
Operation with door left openOperation with the door open can cause excess smoke. The appliance must not be operated with the appliance door leftopen except as directed in the instructions.
Dampers left openOperation with the air controls or appliance dampers open can cause excess smoke. The appliance must not be operatedwith air controls, appliance dampers or door left open except as directed in the instructions

14
13. CLEANINGCleaning is best performed when the stove is cool.
GlassThe specially designed forced hot air wash system and vermiculite insulation helps keep the glass cleaner forlonger. However, if your glass becomes dirty.1. Open the door.2. Apply spray or gel type glass cleaner onto a clean cloth or kitchen paper. Apply to the inside surface of the glass
(Becareful as most glass cleaners are extremely caustic and can damage the painted surface).
3. Leave to soak.4. Wipe off tar deposits using a slightly damp cloth. Polish with a dry cloth or paper.DO NOT USE ABRASIVE CLEANERS
Ash cleaningThe stove has a fixed ashtray. Clean daily with the metal scoop provided. The scoop is hinged. With the handlein a horizontal position, and locked, the scoop acts as a shovel. With the handle unlocked, and hinged upwards,the scoop acts as a bucket.1. Open the door.2. Rake hot embers to one side of the firebox so that they can be used to re-start
the fire.3. Rake spent ash to other side of the firebox and to the rear of the stove.4. With the scoop in the horizontal position, and locked, enter into the stove in a
forwards to backwards direction and shovel up excess ash.5. Unlock and hinge the handle of the scoop upwards and remove from the stove.
Take to the ash deposit.6. Re-rake hot embers evenly over the vermiculite base7. Place fresh wood on embers.Note: Leave 1-2cms of ash on the vermiculite base. The ash insulates the hot embers and protects the vermiculite.Place firelighters on top of the ash and not directly on top of the vermiculite.
PaintWipe off ash deposits on the paint by using a soft haired brush, cotton cloth, or the suction brush attachment of avacuum cleaner. Do not wash the stove.
Cold air inletPeriodically open the air inlet cover plate and wipe away ash deposits that may have accumulated underneath thestove with a dry cloth.
14. MAINTENANCEPaintworkRepaint the stove using only heat resistant paint. Only repaint the stove when it is completely cold. Beforespraying be sure to cover all parts of the stove that do not need to be sprayed (window and fireplace forexample), and to de-grease any parts to be re-sprayed. Follow carefully the instructions written on the spray can.
Chimney cleaningIt is important to have your chimney cleaned once a year. To do this the smoke damper must be removed fromthe appliance. To remove the smoke damper, follow the instructions below with care.1. Open door and remove the smoke deflector (D). To do this, place your hand on the smoke deflector clamp (C)
and rotate the back of the clamp upwards. The clamp will now come free from the deflector and you can moveit towards you and out from the stove. See photos 1 to 5.
Note: The clamp (C) and deflector (D) both have a front and back, (A) and (B). You will need to bear this in mind whenre- assembling the smoke damper.2. You can now remove the smoke deflector (D) by raising the left hand side and lowering the right hand side, so that
the right hand side can be turned to the front and the plate removed. See photos 6 to 9.3. The smoke damper (E) is removed by sliding it backwards and letting it drop down. See photo 10.4. To replace the assembly work in reverse order. Be sure when reassembling that you first mount the smoke damper
operating shaft (F), photo 12, in the guide hole (G), photo 6, before placing the grooves of the smoke damper (E)onto the fixing strips. Now move the smoke damper forwards to prevent it from dropping.

15
Broken glassThe glass panel is heat resistant and very tough. However, it can be broken through lack of care. By applyingthe following tips you will prevent any damage.� Never leave wood sticking out in front of the stove. Otherwise, when closing the door the protruding wood could
pierce the glass.� When filling the stove with wood never do so in a dangerous manner i.e. that the wood can fall forward and break
the glass.� When cleaning the glass do not apply excessive pressure.If your window does break, consult your installer.

16
Replacing broken glassOrder a glass replacement kit for your specific stove model and size from your nearest dealer. The model specificationcan be found on your guarantee card.1. Remove broken glass from door.2. Take the replacement glass and feed the top edge up into the top of the door. The bottom edge of the glass will then
drop into place.3. Push glass downwards to fit against the fibreglass rope in the bottom of the door.
It may be necessary to replace the fibreglass rope seal that surrounds the glass on the bottom and both sides of theframe of the door. The rope is available from your dealer. It prevents air leaking into the stove around the glass. It musttherefore be tightly packed.
15. TROUBLESHOOTINGApparent malfunctions are often caused by incorrect operation. If you think something has gone wrong with your stove,check out the points below. If the trouble is not remedied after checking these points then contact your installer.
Problem Possible causes RemedyStove smokes 1. Damp or green wood.
2. Chimney needs cleaning.
16. GUARANTEEYour Mendip Inset stove has the following guarantees:� 5 years - for the basic structure.� 2 years - for internal removable parts and electrical components.� Glass windows, seals, refractory bricks and vermiculite are not included in this guarantee.The guarantee starts from date of purchase and is only effective where:1. The product has been purchased from an appointed dealer of Mendip Stoves.2. The complaint has first been investigated by the appointed dealer of Mendip Stoves.3. The installation, operation and maintenance of the product is, in the opinion of the appointed dealer and Mendip
Stoves, in accordance with the installation and operating instructions provided.4. Only Mendip Stoves accessories have been used and wood fuels burned in accordance with Mendip Stoves
operating instructions.5. No modifications have been made to the product without prior written permission of Mendip Stoves .The guarantee is strictly limited to the replacement or repair, by Mendip Stoves or their appointed dealer, of partsrecognized by us to be defective and excludes all other indemnities. The affected part must be returned to our factory.The costs of removal and reinstallation are not covered by this guarantee.Note: Due to the wide variations in design and construction of chimney flues we cannot guarantee that your chimneyprovides sufficient draught for your stove to be smoke free. However, if your chimney conforms to the criteria laid down inthese instructions and to European Standards smoke problems should not occur.
1. Use dry wood.2. Clean chimney.
Takes a long time to getthe stove hot.
1. Damp or green wood.2. Chimney needs cleaning.
1. Use dry wood.2. Clean chimney.
Fire does not stay inovernight.
1. Insufficient wood in stove.2. Too soft wood e.g. pine.3. Door seal needs replacing.4. Wrong air inlet regulation.
1. Load more wood.2. Use harder wood.3. Replace door seal.4. Close combustion air control.
Fire goes out. 1. Damp or green wood.
2. Stove not up to temperature.
1. Burn dry wood.2. Get the stove hotter before closing combustionair control.
Glass gets dirty. 1. Lack of flame.
2. Damp or green wood.
1. Leave primary air control slightly open to ensurea slow flame at all times.2. Use dry wood.
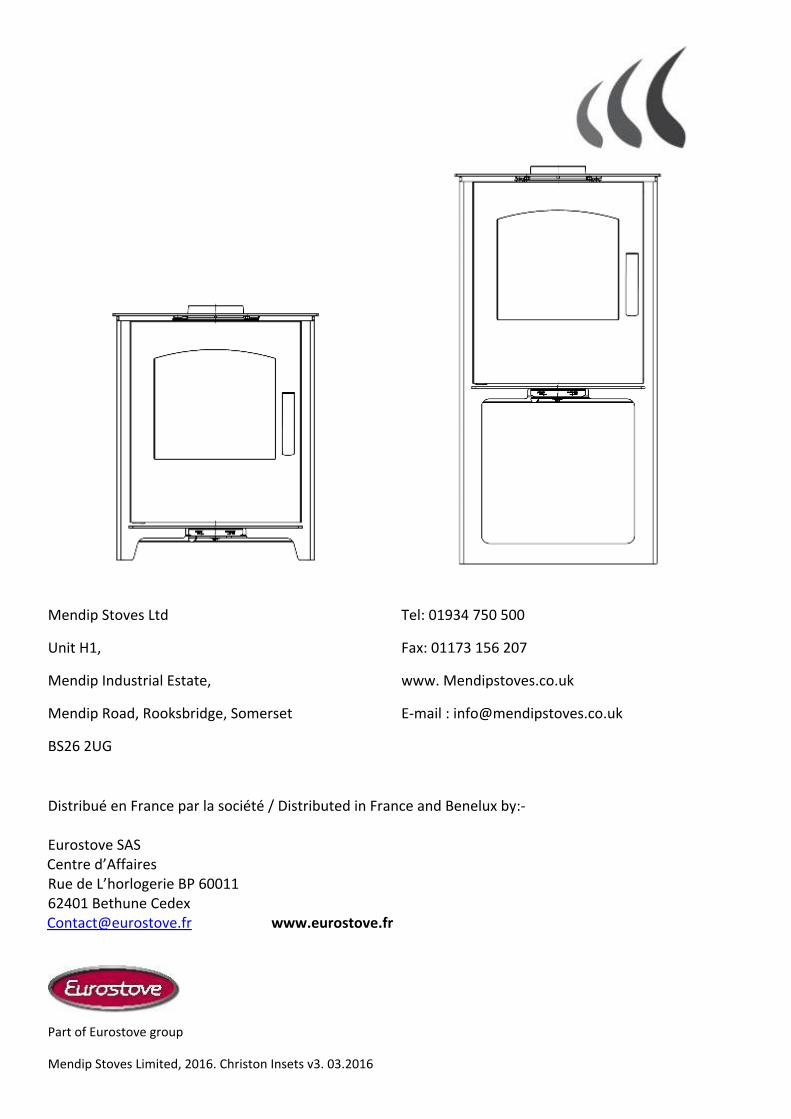
Mendip Stoves Ltd
Unit H1,
Mendip Industrial Estate,
Mendip Road, Rooksbridge, Somerset
BS26 2UG
Tel: 01934 750 500
Fax: 01173 156 207
www. Mendipstoves.co.uk
E-mail : [email protected]
Distribué en France par la société / Distributed in France and Benelux by:-
Eurostove SASCentre d’AffairesRue de L’horlogerie BP 6001162401 Bethune [email protected] www.eurostove.fr
Part of Eurostove group
Mendip Stoves Limited, 2016. Christon Insets v3. 03.2016