checking the version · 2018-08-08 · during tr-rec, these buttons select the instrument that is...
TRANSCRIPT

Copyright © 2018 ROLAND CORPORATION 01
Reference Manual
System Update
This manual applies to program version 1.02 or later.
For details on updating the system, refer to the following URL.
https://www.roland.com/support/
1. On the Support menu, choose “Updates & Drivers.”
2. Choose “TR-8S” as the product name.
3. Choose “TR-8S SYSTEM PROGRAM.”
Checking the version
This manual applies to program version 1.02 or later.
Please check the version of the system working on your TR-8S.
1. Press the [UTILITY] button.The setting screen appears.
2. Use the [VALUE] knob to select “INFORMATION:Version.”
3. Press the [ENTER] button.The display shows the current version.
* Don’t perform the update if the product is already up-to-date.

2
Panel Descriptions . . . . . . . . . . . . . . . . . . . . . . . . . . . . . . . . . . . . . . . 4
Top Panel . . . . . . . . . . . . . . . . . . . . . . . . . . . . . . . . . . . . . . . . . . . . . 4Rear Panel (Connecting Your Equipment) . . . . . . . . . . . . . . . . 6
Introduction . . . . . . . . . . . . . . . . . . . . . . . . . . . . . . . . . . . . . . . . . . . . . 7
Turning the TR-8S On . . . . . . . . . . . . . . . . . . . . . . . . . . . . . . . . . . 7Turning Off the Power . . . . . . . . . . . . . . . . . . . . . . . . . . . . . . . . . 7Formatting an SD Card (SD CARD FORMAT) . . . . . . . . . . . . . 7
Overview of the TR-8S . . . . . . . . . . . . . . . . . . . . . . . . . . . . . . . . . . . 8
What Is a “PATTERN”? . . . . . . . . . . . . . . . . . . . . . . . . . . . . . . . . . . 9What Is a “KIT”? . . . . . . . . . . . . . . . . . . . . . . . . . . . . . . . . . . . . . . . . 9What Is a “MOTION” . . . . . . . . . . . . . . . . . . . . . . . . . . . . . . . . . . . . 9
Main Screens . . . . . . . . . . . . . . . . . . . . . . . . . . . . . . . . . . . . . . . . . . . . 10
Playing Patterns . . . . . . . . . . . . . . . . . . . . . . . . . . . . . . . . . . . . . . . . . 11
Playing Patterns . . . . . . . . . . . . . . . . . . . . . . . . . . . . . . . . . . . . . . . 11Selecting a Pattern . . . . . . . . . . . . . . . . . . . . . . . . . . . . . . . . . . . . 11Changing the Length of the Variation (Setting the Variation’s Last Step) . . . . . . . . . . . . . . . . . . . . . . . 11
Changing the Fill In Length . . . . . . . . . . . . . . . . . . . . . . . 11Changing the Length of a Specific Track (Setting the Track’s Last Step) . . . . . . . . . . . . . . . . . . . . . 11
Generating a Random Pattern . . . . . . . . . . . . . . . . . . . . . . . . . . 12Copying a Pattern . . . . . . . . . . . . . . . . . . . . . . . . . . . . . . . . . . . . . 12Deleting a Pattern . . . . . . . . . . . . . . . . . . . . . . . . . . . . . . . . . . . . . 12
Clearing a Variation . . . . . . . . . . . . . . . . . . . . . . . . . . . . . . 12Clearing a Track . . . . . . . . . . . . . . . . . . . . . . . . . . . . . . . . . . 12
Copying a Variation . . . . . . . . . . . . . . . . . . . . . . . . . . . . . . . . . . . . 12Selecting a Fill-In Variation . . . . . . . . . . . . . . . . . . . . . . . . . . . . . 13
Inserting a Fill-In (Manual Trigger) . . . . . . . . . . . . . . . . . 13Inserting a Fill-In at Regular Intervals (Auto Fill In) . . 13
Muting a Track (MUTE) . . . . . . . . . . . . . . . . . . . . . . . . . . . . . . . . . 13Clearing Muting . . . . . . . . . . . . . . . . . . . . . . . . . . . . . . . . . . 13
Listening to Only the Selected Instrument (SOLO) . . . . . . . 13Adjusting the Reverb or Delay . . . . . . . . . . . . . . . . . . . . . . . . . . 13
Adjusting the Reverb Send Level of Each Instrument 13Adjusting the Delay Send Level of Each Instrument . 13
Master Effects . . . . . . . . . . . . . . . . . . . . . . . . . . . . . . . . . . . . . . . . . 14Assigning a Parameter to the MASTER FX [CTRL] Knob . . . . . . . . . . . . . . . . . . . . . . . . . . . . . . . . . . . . . . . . . . . . 14
Assigning Parameters to the [CTRL] Knobs (CTRL SELECT) 14Assigning a Different Function for Each Instrument to the [CTRL] Knob . . . . . . . . . . . . . . . . . . . . . . . . . . . . . . . . . . . . . . . . . . . 14Adjusting the Tempo . . . . . . . . . . . . . . . . . . . . . . . . . . . . . . . . . . 14
Tap Tempo . . . . . . . . . . . . . . . . . . . . . . . . . . . . . . . . . . . . . . . 14Marking the Tempo . . . . . . . . . . . . . . . . . . . . . . . . . . . . . . 14
Finely Adjusting the Timing of Notes (Nudge Function) . . 15Recording to a Variation That’s Not Playing . . . . . . . . . . . . . . 15Returning to the Beginning of the Pattern . . . . . . . . . . . . . . . 15Checking the Value of a Knob or Fader . . . . . . . . . . . . . . . . . . 15Accessing the Mixer Screens. . . . . . . . . . . . . . . . . . . . . . . . . . . . 15
Recording Knob Movements at Steps (Motion) . . . . . . . . . . 16
Recording/Playing MOTION . . . . . . . . . . . . . . . . . . . . . . . . . . . . 16Clearing Motion Data . . . . . . . . . . . . . . . . . . . . . . . . . . . . . . . . . . 16
Editing the Pattern Settings (Pattern Setting) . . . . . . . . . . . 17
PTN SETTING: KIT . . . . . . . . . . . . . . . . . . . . . . . . . . . . . . . . . . . . . . 17PTN SETTING . . . . . . . . . . . . . . . . . . . . . . . . . . . . . . . . . . . . . . . . . . 17PTN SETTING: NAME . . . . . . . . . . . . . . . . . . . . . . . . . . . . . . . . . . . 17Saving the Pattern, Kit, or System Settings (WRITE) . . . . . . . 17Copying a Pattern or Kit (COPY) . . . . . . . . . . . . . . . . . . . . . . . . . 18Erasing a Pattern (CLEAR) . . . . . . . . . . . . . . . . . . . . . . . . . . . . . . 18
TR-REC (Step Recording) . . . . . . . . . . . . . . . . . . . . . . . . . . . . . . . . . 19
Inputting Sub Steps . . . . . . . . . . . . . . . . . . . . . . . . . . . . . . . . . . . 19Specifying a Flam . . . . . . . . . . . . . . . . . . . . . . . . . . . . . . . . . . . . . . 19Inputting Weak Beats . . . . . . . . . . . . . . . . . . . . . . . . . . . . . . . . . . 19Inputting Alternate Sounds (ALT INST) . . . . . . . . . . . . . . . . . . 19Specifying Accents . . . . . . . . . . . . . . . . . . . . . . . . . . . . . . . . . . . . 19Deleting a Recorded Step from the Track . . . . . . . . . . . . . . . . 19Inputting Steps into the Trigger Out Track . . . . . . . . . . . . . . . 19Changing the Dynamics for Each Step . . . . . . . . . . . . . . . . . . 19
INST REC (Realtime Recording) . . . . . . . . . . . . . . . . . . . . . . . . . . 20
Playing Sub Steps . . . . . . . . . . . . . . . . . . . . . . . . . . . . . . . . . . . . . 20Specifying a Flam . . . . . . . . . . . . . . . . . . . . . . . . . . . . . . . . . . . . . . 20Playing Weak Beats (WEAK BEATS) . . . . . . . . . . . . . . . . . . . . . . 20Playing Alternate Sounds (ALT INST) . . . . . . . . . . . . . . . . . . . . 20Deleting a Recorded Step from the Track . . . . . . . . . . . . . . . . 20Using the Inst Pad . . . . . . . . . . . . . . . . . . . . . . . . . . . . . . . . . . . . . 20
Using the Inst Pad to Play Instruments . . . . . . . . . . . . . 20Recording While You Use the Inst Pad to Play Instruments . . . . . . . . . . . . . . . . . . . . . . . . . . . . . . . . . . . . . 20
INST PLAY (Performing) . . . . . . . . . . . . . . . . . . . . . . . . . . . . . . . . . . 21
Playing Sub Steps . . . . . . . . . . . . . . . . . . . . . . . . . . . . . . . . . . . . . 21Performing a Flam . . . . . . . . . . . . . . . . . . . . . . . . . . . . . . . . . . . . . 21Performing Weak Beats (WEAK BEATS) . . . . . . . . . . . . . . . . . . 21Performing Alternate Sounds (ALT INST) . . . . . . . . . . . . . . . . 21Performing a Roll (ROLL) . . . . . . . . . . . . . . . . . . . . . . . . . . . . . . . 21
Editing a Kit’s Settings (KIT Edit) . . . . . . . . . . . . . . . . . . . . . . . . 22
KIT . . . . . . . . . . . . . . . . . . . . . . . . . . . . . . . . . . . . . . . . . . . . . . . . . . . 22KIT: REVERB . . . . . . . . . . . . . . . . . . . . . . . . . . . . . . . . . . . . . . . . . . . 22KIT: DELAY . . . . . . . . . . . . . . . . . . . . . . . . . . . . . . . . . . . . . . . . . . . . 23KIT: MASTER FX . . . . . . . . . . . . . . . . . . . . . . . . . . . . . . . . . . . . . . . . 23KIT: EXT IN . . . . . . . . . . . . . . . . . . . . . . . . . . . . . . . . . . . . . . . . . . . . 27KIT: LFO . . . . . . . . . . . . . . . . . . . . . . . . . . . . . . . . . . . . . . . . . . . . . . . 27KIT: OUTPUT . . . . . . . . . . . . . . . . . . . . . . . . . . . . . . . . . . . . . . . . . . 27KIT: MUTE . . . . . . . . . . . . . . . . . . . . . . . . . . . . . . . . . . . . . . . . . . . . . 27KIT: CTRL . . . . . . . . . . . . . . . . . . . . . . . . . . . . . . . . . . . . . . . . . . . . . . 28KIT: COLOR . . . . . . . . . . . . . . . . . . . . . . . . . . . . . . . . . . . . . . . . . . . . 28KIT: NAME . . . . . . . . . . . . . . . . . . . . . . . . . . . . . . . . . . . . . . . . . . . . . 28Saving the Pattern, Kit, or System Settings (WRITE) . . . . . . . 29
Editing an Instrument’s Sound (INST Edit) . . . . . . . . . . . . . . . 30
INST . . . . . . . . . . . . . . . . . . . . . . . . . . . . . . . . . . . . . . . . . . . . . . . . . . 30INST FX . . . . . . . . . . . . . . . . . . . . . . . . . . . . . . . . . . . . . . . . . . . . . . . 31
Importing or Exporting a Pattern or Kit . . . . . . . . . . . . . . . . . . 34
Exporting a Pattern or Kit . . . . . . . . . . . . . . . . . . . . . . . . . . . . . . 34Exporting a Pattern . . . . . . . . . . . . . . . . . . . . . . . . . . . . . . . 34Exporting a Kit . . . . . . . . . . . . . . . . . . . . . . . . . . . . . . . . . . . 34
Importing a Pattern or Kit . . . . . . . . . . . . . . . . . . . . . . . . . . . . . . 35Importing a Pattern . . . . . . . . . . . . . . . . . . . . . . . . . . . . . . 35Importing a Kit . . . . . . . . . . . . . . . . . . . . . . . . . . . . . . . . . . . 36
Assigning an Imported User Sample to an Instrument . . . . . . . . 37
Importing a User Sample (SAMPLE Import) . . . . . . . . . . . . . . 37Selecting a Sample (SAMPLE) . . . . . . . . . . . . . . . . . . . . . . . . . . . 38Editing a User Sample Tone’s Settings (SAMPLE Edit) . . . . . 38Deleting a User Sample (SAMPLE Delete) . . . . . . . . . . . . . . . . 39Renaming a User Category (Category Name) . . . . . . . . . . . . 39Optimizing the User Sample Area (OPTIMIZE) . . . . . . . . . . . . 40
Contents

3
Contents
Convenient Functions and Settings (UTILITY) . . . . . . . . . . . 41
GENERAL . . . . . . . . . . . . . . . . . . . . . . . . . . . . . . . . . . . . . . . . . . . . . 41RELOAD . . . . . . . . . . . . . . . . . . . . . . . . . . . . . . . . . . . . . . . . . . . . . . . 41SAMPLE . . . . . . . . . . . . . . . . . . . . . . . . . . . . . . . . . . . . . . . . . . . . . . . 42LED . . . . . . . . . . . . . . . . . . . . . . . . . . . . . . . . . . . . . . . . . . . . . . . . . . . 42SYNC/TEMPO . . . . . . . . . . . . . . . . . . . . . . . . . . . . . . . . . . . . . . . . . 42MIDI . . . . . . . . . . . . . . . . . . . . . . . . . . . . . . . . . . . . . . . . . . . . . . . . . . 42SOUND . . . . . . . . . . . . . . . . . . . . . . . . . . . . . . . . . . . . . . . . . . . . . . . 43MIX OUT . . . . . . . . . . . . . . . . . . . . . . . . . . . . . . . . . . . . . . . . . . . . . . 43ASSIGN OUT 1–6 . . . . . . . . . . . . . . . . . . . . . . . . . . . . . . . . . . . . . . 43EXT IN . . . . . . . . . . . . . . . . . . . . . . . . . . . . . . . . . . . . . . . . . . . . . . . . 43UTILITY . . . . . . . . . . . . . . . . . . . . . . . . . . . . . . . . . . . . . . . . . . . . . . . 43SD CARD . . . . . . . . . . . . . . . . . . . . . . . . . . . . . . . . . . . . . . . . . . . . . . 43INFORMATION . . . . . . . . . . . . . . . . . . . . . . . . . . . . . . . . . . . . . . . . . 43
Initializing, Backing-Up, Restoring . . . . . . . . . . . . . . . . . . . . . . . 44
Returning to the Factory Settings (FACTORY RESET) . . . . . 44Backing Up Data to SD Card (BACKUP) . . . . . . . . . . . . . . . . . . 44Restoring Data That Was Backed Up to SD Card (RESTORE) . . . . . . . . . . . . . . . . . . . . . . . . . . . . . . . . . . . . . . . . . . . . 45
Synchronizing/Recording with Other Devices . . . . . . . . . . . 46
Synchronizing with a DAW (TR-8S as Slave) . . . . . . . . . . . . . . 46Synchronizing with a TB-3 (TR-8S as Master) . . . . . . . . . . . . . 46Using the TR-8S as a MIDI Controller . . . . . . . . . . . . . . . . . . . . 46Using the ASSIGNABLE OUT/TRIGGER OUT jacks as Trigger Out . . . . . . . . . . . . . . . . . . . . . . . . . . . . . . . . . . . . . . . . . . . . . . . . . . . 46Assigning an Instrument to the ASSIGNABLE OUT/TRIGGER OUT jacks . . . . . . . . . . . . . . . . . . . . . . . . . . . . . . . . . . . . 47Inputting an External Audio Source (EXT IN) . . . . . . . . . . . . . 47Connecting a Computer via USB . . . . . . . . . . . . . . . . . . . . . . . . 47Using a Computer to Manage the Connected SD Card (STORAGE MODE) . . . . . . . . . . . . . . . . . . . . . . . . . . . . . . . . . . . . . 48
Error Messages . . . . . . . . . . . . . . . . . . . . . . . . . . . . . . . . . . . . . . . . . . 49
TR-8S Audio Diagram . . . . . . . . . . . . . . . . . . . . . . . . . . . . . . . . . . . . 50

4
Panel Descriptions
1 Common section 1
[VOLUME] knob
Adjusts the MIX OUT jack, PHONES jack’s volume.* This does not affect the volume of the ASSIGNABLE OUT jack (p. 7).
[EXT IN] knob
Adjusts the input volume from the EXT IN jacks.
[SHIFT] button
By holding down this button and operating certain other buttons, you can access a screen for making related settings.
If you edit a parameter value while holding down this button, the value will change more greatly.
[CLEAR] button
Erases the recorded content for an individual instrument, or deletes a pattern.
[PTN SELECT] button
Select a pattern.
[TR-REC] button
Step-records a pattern.
[LAST] button
Specifies the length of the pattern.
[SUB] button
Inputs/plays sub steps.
MOTION [ON] button
If this is ON, knob operation data (MOTION) is played back for each instrument.
MOTION [REC] button
If REC is selected, knob operation data (MOTION) is recorded for each instrument.
[INST PLAY] button
Use the pads [1]–[13] to perform in real time.
You can perform even while a pattern is playing.
[INST REC] button
Realtime-record a pattern.
[A]–[H] buttons
Switch pattern variations (A–H).
[START/STOP] button
Play or stop the pattern.* If a sample is selected as the instrument’s tone, the sound might not
stop automatically depending on the instrument edit settings. While a pattern is stopped, you can silence all currently-sounding samples by holding down the [SHIFT] button and pressing the [START/STOP] button.
2 ACCENT section
Adds an accent to the specified step.
[LEVEL] knob
Adjusts the volume of the accent.
page 11
page 19
page 11
page 19
page 16
page 16
page 20
page 19
Top Panel
1 2
7
8
10
5 6 9 3 4

5
Panel Descriptions
[STEP] button
During TR-REC, you can use pads [1]–[16] to select steps at which an accent is added.
3 REVERB section
[LEVEL] knob
Adjusts the volume of the reverb.
4 DELAY section
[LEVEL] knob
Adjusts the volume of the delay.
[TIME] knob
Adjusts the length of the delay.
[FEEDBACK] knob
Adjusts the amount of delay sound that is returned to the input.
5 MASTER FX section
[ON] button
Turns the master effect on/off.
[CTRL] knob
Controls the content specified by the master effect (p. 14).
6 AUTO FILL IN section
[ON] button
If this is on, a fill-in is inserted at the interval specified by the [AUTO FILL IN] knob.
[AUTO FILL IN] knob
Automatically inserts a fill-in at the specified interval of measures.
[MANUAL TRIG] button
Press this button to insert a fill-in.
7 INST edit section
Here you can adjust the tonal character of the instrument’s tone.
[TUNE] knob
Adjusts the tuning (pitch).
[DECAY] knob
Adjusts the length of the decay.
[CTRL] knob
Controls the content specified by CTRL SELECT (p. 14).* Depending on the tone, there might not be any effect.
Level fader
Adjusts the volume.
8 Instrument select buttons
During TR-REC, these buttons select the instrument that is recorded.
In the INST screen or INST Edit screen, these buttons select the instrument whose settings you want to edit.
In [TR-REC] or [INST REC], you can hold down the [CC] button and press the [RC] button to input a pattern at which a trigger is output to the TRIGGER OUT jack (mini jack).* This is not related to the ASSIGNABLE OUT/TRIGGER OUT jacks
(phone jacks).
9 Common section 2
Display
Shows pattern names and various settings.
[WRITE] button
Saves the pattern/kit/system settings.* Parameters of the pattern or kit that you’re editing
are remembered until you turn off the power. Even if you select a different pattern or kit, and then re-select the one you had been editing, it is recalled in the edited state; however, if you turn the power off and on again, it returns to the unedited state. If you want to keep the edits that you made to a pattern or kit, you must save that pattern or kit.
[ENTER] button
Use this button mainly to confirm a value or execute an operation.
[VALUE] knob
This is used to modify values.
[KIT] button
Selects a kit.
[INST] button
Selects a sound (instrument’s tone) for the instrument.
[SAMPLE] button
Selects a sample as the sound (instrument’s tone) for the instrument.
[CTRL SELECT] button
Specifies the item that is controlled by each instrument’s [CTRL] knob.
[COPY] button
Copies a pattern/kit.
[UTILITY] button
Lets you edit or initialize various settings.
TEMPO display
Shows the tempo.
[TEMPO] knob
Specifies the tempo.
[SHUFFLE] knob
Adjusts the amount of shuffle (bounce).
[MUTE] button
Mutes (silences) the selected instrument.
Inst pad
This pad plays the sound of the corresponding instrument.
You can use this to perform along with a pattern. The volume changes according to how strongly you strike an inst pad (the pad is velocity-sensitive).
page 13
page 13
page 14
page 13
page 17
page 22
page 30
page 37
page 14
page 18
page 41
page 14

6
Panel Descriptions
10 Pad [1]–[16]
Mode Explanation
TR-REC For each step, specify whether the instrument’s tone will sound.
PTN SELECT
Select a pattern.Hold down the [PTN SELECT] button and use pads [1]–[8] to select a bank.Release the [PTN SELECT] button and use pads [1]–[16] to select a number.
Mode Explanation
INST PLAY
5 Pads [1]–[11](INST) play instrument’s tones. 5 If you hold down either the [12] or [13] (ROLL) pad (or both) and press a [1]–[11] pad, the instrument’s tone plays a roll. There are three types of roll (16th note, 32nd note, 64th note).
INST REC During realtime recording, the pads record the corresponding instrument’s tone.
Rear Panel (Connecting Your Equipment)* To prevent malfunction and equipment failure, always turn down the volume, and turn off all the units before making any connections.
A B D E F C G H I J
COMPUTER
SD card
AC adaptor
TRIGGER OUT MIX OUT HEADPHONES
MIDI EXT IN ASSIGNABLE OUT/TRIGGER OUT
Connect an audio device.
Connect a MIDI device.
A DC IN jack
Connect the included AC adaptor here.* To prevent the inadvertent disruption of power to your unit (should
the plug be pulled out accidentally), and to avoid applying undue stress to the jack, anchor the power cord using the cord hook, as shown in the illustration.
B [POWER] switch
This turns the power on/off.& “Introduction” (p. 7)
C USB port
Use a commercially available USB 2.0 cable to connect this port to your computer. It can be used to transfer USB MIDI and USB audio data. You must install the USB driver before connecting the TR-8S to your computer. Download the USB driver from the Roland website. For details, refer to Readme.htm which is included in the download.& https://www.roland.com/support/
D MIDI (OUT, IN) jacks
Use a commercially available MIDI cable to connect MIDI devices here.
E SD card slot
Insert a commercially available SD card here.* Never turn off the power or remove the
memory card while the screen indicates “Executing.”
* The memory card write protect feature (LOCK) The contents of the memory card can be protected by write protecting it. To write protect a card, slide the write protect switch on the side of the memory card to the “LOCK” position. Unlock write protect to edit data on the card.
* All memory cards eventually wear out. We recommend that you consider the memory card not as a permanent storage site, but as a place to store data temporarily. We also recommend that you back up important data onto other media that is supported by your unit.
Write protect switch

7
Introduction
F TRIGGER OUT jack
A trigger pulse is output from this jack at the timing that is specified in the dedicated trigger out track ([CC] + [RC] button).
G EXT IN (L/MONO, R) jacks
These are audio input jacks.
You can apply a side-chain effect at the pattern of the specified track.
H ASSIGNABLE OUT/TRIGGER OUT jacks
For each jack 1–6, you can choose whether it operates as ASSIGNABLE OUT or as TRIGGER OUT.
Instruments that are output to a jack operating as ASSIGNABLE OUT are not output from the MIX OUT jacks.
Instruments that are output to a jack operating as TRIGGER OUT are also output from the MIX OUT jacks.
I MIX OUT (L/MONO, R) jacks
Connect these jacks to your amp or monitor speakers.
J PHONES jack
A set of headphones can be connected to this jack.
Introduction* Before turning the unit on/off, always be sure to turn the volume
down. Even with the volume turned down, you might hear some sound when switching the unit on/off. However, this is normal and does not indicate a malfunction.
Turning the TR-8S On1. Turn on the power in the order of the TR-8S first,
and then the connected system.
2. Switch on power to the connected equipment, and raise the volume to an appropriate level.
Turning Off the Power1. Power-off the connected system first, and then the
TR-8S.
Formatting an SD Card (SD CARD FORMAT)If using an SD card, please format it on the TR-8S.
SD cards are sold separately. Please obtain a SD card separately.
1. Press the [UTILITY] button.The UTILITY screen appears.
2. Use the [VALUE] knob to select “SD CARD:Format.”
3. Press the [ENTER] button.A confirmation message appears.
4. To execute, use the [VALUE] knob to select “OK,” and press the [ENTER] button.If you decide to cancel, use the [VALUE] knob to select “Cancel,” and then press the [ENTER] button.

8
Overview of the TR-8S
PATTERN No. 8-16
PATTERN No. 1-3
PATTERN No. 1-2PATTERN No. 1-1
128 patterns
(16 x 8 banks)PATTERN
KITnumber
TR-8S
Import
Backup/RestoreExport/Import
KIT No. 128
KIT No. 3KIT No. 2
KIT No. 1
INST
INST parameter
INST tone
INST EFFECT
BD
INST parameter
INST tone
INST EFFECT
SD
INST parameter
INST tone
INST EFFECT
RC
MASTER FX
REVERB
DELAY
EFFECT setting
KIT parameter
128 KITsKIT
FILL IN
FILL IN 1
FILL IN 2
ACB tone SAMPLE tone
PRESET PRESET USER SYSTEM setting
INST tone
Audiofiles
SD card
LAST STEP settingMotion data for REVERB/DELAY/MASTER FX
VARIATION A–H
TRACK
BD STEP dataMOTION data
SD STEP dataMOTION data
RC STEP dataMOTION data
TRIGGER OUT STEP data
ACCENT STEP data SAMPLE parameter
BACKUP data
Export data
A B C D
E F G H
VARIATION
Last Step setting for each instrument
Patternsetting
* If you want to make a backup, save the data (patterns, kits, system settings) before you proceed. The backup will not include the pattern or kit that you’re currently editing (shown by an “*” indication) or system settings that you have not saved.
About saving the pattern and kit
Parameters of the pattern or kit that you’re editing are remembered until you turn off the power. Even if you select a different pattern or kit, and then re-select the one you had been editing, it is recalled in the edited state; however, if you turn the power off and on again, it returns to the unedited state. If you want to keep the edits that you made to a pattern or kit, you must save that pattern or kit.
Saving the pattern and kit simultaneously (OVERWRITE)
By holding down the [SHIFT] button and pressing the [WRITE] button, you can overwrite-save the selected pattern and kit.
For details on how to save other settings, refer to “Saving the Pattern, Kit, or System Settings (WRITE)” (p. 17, p. 29).

9
Overview of the TR-8S
What Is a “PATTERN”?The performance data that you record using TR-REC or INST-REC is called a “pattern.”
The TR-8S has 128 patterns (16 patterns x 8 banks); each pattern has eight variations (A–H) and two fill-in patterns.
What Is a “KIT”?The 11 instruments are collectively called a “kit.” The TR-8S has 128 kits.
The pattern plays the instruments of the currently selected kit.
What Is a “MOTION”On the TR-8S, knob or switch movements can be recorded in a pattern as “motions” and played back.
Knobs and switches that can be recorded in a motion
5 REVERB [LEVEL] knob
5 DELAY [LEVEL] knob
5 DELAY [TIME] knob
5 DELAY [FEEDBACK] knob
5 MASTER FX [ON] switch
5 MASTER FX [CTRL] knob
5 [TUNE] knob of each instrument
5 [DECAY] knob of each instrument
5 [CTRL] knob of each instrument
When recording a motion (when the MOTION [REC] button is lit), the screen shows an “M” icon, and the triangle icon is shown as a hollow outline.
When MOTION [REC] button is lit
When MOTION [REC] button is unlit
Variation
Pattern 1-1–8-16
A CB D
E GF H
Fill in 1 Fill in 2
Kit 1–128
Instrument x 11
BASS DRUM
A pattern plays the inst of the kit.
Variation
Pattern 1-1–8-16
A CB D
E GF H
Fill in 1 Fill in 2

10
Main Screens
TR-REC
Create a pattern by specifying the steps at which each track plays a sound.
PTN SELECT
Select the pattern to play.
Bank Number
Variation currently selected for recordingA–H
Name of currently playing pattern
Pattern that plays next
Name of pattern that plays next
Currently playing pattern
Pattern that plays next
SUB
Input or perform sub steps or flams.
INST PLAY
Play pads [1] (BD)–[11] (RC) in real time.
LAST
Specify the length (last step) of a variation or track.
INST REC
Create a pattern by realtime-recording your performance on pads [1] (BD)–[11] (RC).

11
Playing Patterns
Playing Patterns1. Press the [START/STOP] button.
2. Use the controllers of the instrument edit section to modify the sound.
3. Press the [START/STOP] button once again to stop.MEMO
5 During playback, you can hold down the [SHIFT] button and press the [START/STOP] button to return to the beginning of the pattern.
5 To stop samples that are still sounding after the pattern has stopped, hold down the [SHIFT] button and press the [START/STOP] button.
Selecting a Pattern1. Hold down the [PTN SELECT] button and press a
pad [1]–[8].The bank is selected.
2. Release the [PTN SELECT] button.
3. Use pads [1]–[16] to select a pattern.The selected pad blinks. During playback, it is lit.
When you select the next pattern during playback, the pad blinks. The pattern switches when playback returns to the first step.
You can select a region by pressing two pads simultaneously. The selected patterns play in succession.
4. Use the [A]–[H] buttons to select a variation.You can select multiple instruments by holding down a button and pressing other buttons.
The selected variations are lit, and those whose buttons are lit play once each in the order of A 0 H.
Changing the Length of the Variation (Setting the Variation’s Last Step)The overall number of steps used by a variation (the variation’s last step) can be specified individually for each variation.
1. Press the [LAST] button.
2. Use the [A]–[H] buttons to select the variation that you want to change.* You can select multiple variations by holding down a button and
pressing other buttons.
3. Use pads [1]–[16] to select the last step.
Changing the Fill In Length1. Hold down the [SHIFT] button and press the AUTO
FILL IN [ON] button.The FILL IN EDIT screen appears.
2. Use the [VALUE] knob to select “FILL IN 1” or “FILL IN 2.”
3. Press the [LAST] button.
4. Use pads [1]–[16] to select the last step.
Changing the Length of a Specific Track (Setting the Track’s Last Step)The number of steps used by a track (the track’s Last Step) can be specified individually for each track.
1. Press the [LAST] button.
2. Use instrument select buttons [BD]–[RC] to select the track whose setting you want to edit.* You can select multiple instruments by holding down a button and
pressing other buttons.
3. Use pads [1]–[16] to select the last step.
About variations
Each pattern has eight variations, A–H.
Press an [A]–[H] button to select the variation A–H that you want to play back or record.
If you want to play back multiple variations, hold down one of the [A]–[H] buttons and press the other [A]–[H] buttons that you want to additionally play back.
Lit/unlit state of the variation [A]–[H] buttons
Lit green Ready to play
Blinking green Playing
Blinking red During PLAY&REC (TR-REC/INST REC)
Short blinking redSelected for both PLAY and REC(TR-REC only)
Short blinking orange
Not selected for PLAY but selected for REC(TR-REC only)
Selecting the variation during TR-RECWhile [TR-REC] is lit, pressing an [A]–[H] button makes the [A]–[H] button blink red or briefly blink red, allowing you to select a single variation A–H for TR-REC.
During TR-REC, you can hold down the [TR-REC] button and press an [A]–[H] button to select the recording target while maintaining the variation(s) that you selected for playback. (You can also select a variation that’s not being played back.)
About fill-in
Each pattern has two dedicated FILL IN variations. You can also use the Scatter function as a fill-in.
& “Selecting a Fill-In Variation” (p. 13)
What Is Scatter?
“Scatter” adds a digital-feeling groove to the loop playback by exchanging individual steps within the loop playback and also by changing the playback direction or gate length.
1. To adjust Scatter Depth, hold down the AUTO FILL IN [MANUAL TRIG] button and turn the [VALUE] knob.* The scatter effect will not apply to the first cycle of the loop; the
effect will apply to the second and subsequent cycles of the loop.

12
Playing Patterns
Clearing a track’s Last Step setting
1. Press the [LAST] button.The [LAST] button is lit.
2. Press the instrument select button [BD]–[RC] of the track whose setting you want to clear.The instrument select button that you pressed blinks.
The currently-specified last step is shown by pads [1]–[16].
3. Press the [CLEAR] button.The last step of the selected track is cleared, and pads [1]–[16] go dark; the last step is set to the overall number of steps specified for each variation.
MEMO
The track’s Last Step setting is shared by variations A–H. Also, the track’s Last Step takes priority over the variation’s Last Step.
Generating a Random PatternYou can automatically generate a random pattern. This modifies the selected pattern.
1. Hold down the [PTN SELECT] button and press the [SAMPLE] button.A random pattern is provisionally generated for the variation.
The [TR-REC] button blinks.
2. When you press the [TR-REC] button, the provisionally generated random pattern changes to the current pattern.In this state, the pattern is not yet saved. If you want to save it, execute the WRITE operation.& “Saving the Pattern, Kit, or System Settings (WRITE)”
(p. 29)
Copying a Pattern1. Press the [COPY] button.
The COPY screen appears.
2. Use the [VALUE] knob to select “Pattern,” and then press the [ENTER] button.
3. Use the [VALUE] knob to select the copy-source, and press the [ENTER] button.
4. Use the [VALUE] knob to select the copy-destination, and press the [ENTER] button.A confirmation message appears.
5. To copy, use the [VALUE] knob to select “OK,” and press the [ENTER] button.If you decide to cancel, use the [VALUE] knob to select “Cancel,” and then press the [ENTER] button.
Deleting a Pattern1. Press the [PTN SELECT] button.
2. Hold down the [CLEAR] button and use the pads [1]–[16] to specify the pattern that you want to delete.
Clearing a Variation1. Hold down the [CLEAR] button and use the [A]–[H]
buttons to select the variation that you want to clear.All steps of the specified variation are cleared.
Clearing a Track1. Hold down the instrument select button of the
track that you want to clear and press the [CLEAR] button.All steps of the selected track are cleared.
This affects only the selected variation.
Copying a Variation1. Press the [COPY] button.
The COPY screen appears.
2. Use the [VALUE] knob to select “Variation,” and then press the [ENTER] button.
3. Use the [VALUE] knob to select the copy-source pattern, and press the [ENTER] button.You can also use variation buttons [A]–[H] or pads [14]–[15] to make a selection.
Pattern number
Variation
4. Use the [VALUE] knob to select the copy-source variation, and press the [ENTER] button.
5. Use the [VALUE] knob to select the copy-destination pattern, and press the [ENTER] button.You can also use variation buttons [A]–[H] or pads [14]–[15] to make a selection.
6. Use the [VALUE] knob to select the copy-destination variation, and press the [ENTER] button.A confirmation message appears.
7. To copy, use the [VALUE] knob to select “OK,” and press the [ENTER] button.If you decide to cancel, use the [VALUE] knob to select “Cancel,” and then press the [ENTER] button.

13
Playing Patterns
Selecting a Fill-In Variation1. While holding down the AUTO FILL IN [ON] button,
press a pad [14]–[16] or an [A]–[H] button.You can also use a variation A–H as a FILL IN.
Pads [14]–[16] and the [A]–[H] buttons blink. (The selected button is lit.)
MEMO
If FILL IN Type = SCATTER, you can hold down the AUTO FILL IN [MANUAL TRIG] button and use the [VALUE] knob to control SCATTER DEPTH.
Inserting a Fill-In (Manual Trigger)
1. At the moment that you want to insert a fill-in, press the AUTO FILL IN [MANUAL TRIG] button.
Inserting a Fill-In at Regular Intervals (Auto Fill In)Here’s how to automatically insert a fill-in at intervals of the specified number of measures.
1. Turn the AUTO FILL IN [AUTO FILL IN] knob to specify the number of measures at which a fill-in is automatically inserted.Value: 32, 16, 12, 8, 4, 2
2. Press the AUTO FILL IN [ON] button, and a fill-in is automatically inserted at intervals of the specified number of measures.
Muting a Track (MUTE)Here’s how to mute (silence) a selected instrument.
1. Press the [MUTE] button to make it light.
2. Press the instrument select button that you want to mute.The muted instrument select button and level meter go dark.
Press the instrument select button once again to make the button light and clear muting.
3. Press the [MUTE] button once again.You exit the mute settings.
MEMO
You can turn mute on/off by holding down the [MUTE] button and pressing an instrument select button.
Clearing Muting1. Hold down the [MUTE] button and press the
[CLEAR] button.All muting is cleared.
Listening to Only the Selected Instrument (SOLO)Here’s how you can listen to only the selected instrument.
1. Press the [MUTE] button to make it light.
2. Hold down the [SHIFT] button and press an instrument select button.
Adjusting the Reverb or DelayHere’s how to adjust the reverb or delay.
Target Controller
Volume of the reverb sound REVERB [LEVEL] knob
Reverb length [KIT] button + REVERB [LEVEL] knob
Volume of the delay sound DELAY [LEVEL] knob
Delay time DELAY [TIME] knob
Delay feedback DELAY [FEEDBACK] knob
For detailed reverb and delay settings, refer to “Editing a Kit’s Settings (KIT Edit)” (p. 22)
Adjusting the Reverb Send Level of Each InstrumentHere’s how to adjust the reverb send level of the selected instrument.
1. Hold down the instrument select button and turn the REVERB [LEVEL] knob.
Adjusting the Delay Send Level of Each InstrumentHere’s how to adjust the delay send level of the selected instrument.
1. Hold down the instrument select button and turn the DELAY [LEVEL] knob.
14
Playing Patterns
Master Effects1. Press the MASTER FX [ON] button to make it light.
2. Use the MASTER FX [CTRL] knob to adjust the depth of the effect.
Assigning a Parameter to the MASTER FX [CTRL] Knob1. Hold down the [CTRL SELECT] button and turn the
MASTER FX [CTRL] knob.& “KIT: MASTER FX” (p. 23)
Assigning Parameters to the [CTRL] Knobs (CTRL SELECT)You can assign parameters to the [CTRL] knobs of the instrument edit section, and control those parameters while the pattern plays back.
1. Press the [CTRL SELECT] button to make it light.The CTRL SELECT screen appears.
2. Use the [VALUE] knob to select a parameter.The same parameter is selected for all [CTRL] knobs.
3. Press the [CTRL SELECT] button once again.The [CTRL SELECT] button goes dark, and you exit the CTRL SELECT screen.
Assigning a Different Function for Each Instrument to the [CTRL] Knob1. While holding down the [CTRL SELECT] button,
press a [BD]–[RC] button.The parameter that’s assigned to the [CTRL] knob is displayed.
2. Use the [VALUE] knob to select a parameter.
3. Press the [CTRL SELECT] button.The [CTRL SELECT] button goes dark, and you exit the screen.
MEMO
You can also select from the assignable parameters by holding down the [CTRL SELECT] button and directly operating the [CTRL] knob.
5 The assignment that you make is saved in the “User” parameter which you can select in step 2 of “Assigning Parameters to the [CTRL] Knobs (CTRL SELECT)” (p. 14).
Adjusting the Tempo1. Turn the [TEMPO] knob to adjust the tempo.
By holding down the [SHIFT] button and turning the [TEMPO] knob, you can adjust the setting in steps of 0.1 units.
The tempo is shown in the TEMPO display.
Tap TempoHere’s how to tap-input the tempo.
1. While holding down the [SHIFT] button, press the [ENTER] button three or more times.The tempo is specified as the average timing at which you press the button.
Marking the TempoYou can temporarily memorize the current tempo value, and recall it later.
MEMO
The marked tempo is not saved.
Marking the tempo
Here’s how to mark the current tempo value.
1. Hold down the [MUTE] button and press the [UTILITY] button.
Recalling the tempo
Here’s how to switch to the marked tempo value.
1. Hold down the [MUTE] button and press the [COPY] button.

15
Playing Patterns
Finely Adjusting the Timing of Notes (Nudge Function)The “nudge” function lets you adjust the timing of notes forward or backward.
Using the nudge function changes the playback timing of the entire pattern.
Operation Explanation
[SHIFT] + [COPY] button Moves the playback timing forward.
[SHIFT] + [UTILITY] button Moves the playback timing backward.
MEMO
A system setting lets you choose whether the timing of the MIDI clock will be modified.& “MIDI TX: Tx Nudge”
Recording to a Variation That’s Not PlayingHere’s how you can record to a different variation without changing the variation that’s selected to play.
1. Hold down the [TR-REC] button and use the [A]–[H] buttons to select the variation that you want to record.You’ll switch to TR-REC, and can record to the selected variation.
Returning to the Beginning of the PatternHere’s how to forcibly return to the beginning of the pattern while it’s playing.
1. Hold down the [SHIFT] button and press the [START/STOP] button.
Moving to the beginning of a different variation
If more than one variation is selected, here’s how you can move to the beginning of any one of those variations.
1. Hold down the [SHIFT] button and press an [A]–[H] button.
Checking the Value of a Knob or FaderDuring playback or editing, here’s how to check the value of each controller.
1. Hold down the [SHIFT] button and operate the controller whose value you want to check.The screen shows the parameter and its value.
Moving the controller does not change the value.
Accessing the Mixer Screens1. Hold down the [SHIFT] button and press the [CTRL
SELECT] button.The mixer screen appears.
2. Use the [VALUE] knob to switch screens.
Screen Explanation
LevelShows the level of each instrument.* You can also operate a level fader to switch to this
screen.
TuneShows the tune of each instrument.* You can also operate a [TUNE] knob to switch to this
screen.
DecayShows the decay of each instrument.* You can also operate a [DECAY] knob to switch to this
screen.
Pan Shows the pan of each instrument.
RevSend Shows the reverb send level of each instrument.
DlySend Shows the delay send level of each instrument.
LFO Depth Shows the LFO depth of each instrument.
Gain Shows the gain of each instrument.
3. Modify values.3-1. Press the [ENTER] button.
3-2. Use the instrument select buttons to select an instrument, and use the [VALUE] knob to edit its value.
* Note that if you press the instrument select button that’s lit, you’ll exit the screen.
3-3. Press the [ENTER] button.You return to step 2.
MEMO
If a mixer screen is displayed, operating a level fader, [DECAY] knob, or [TUNE] knob will jump to the corresponding screen and edit the value. (If another screen is displayed, this action will edit the value but won’t jump to the corresponding screen as a shortcut.) Also, if the Pan, RevSend, DlySend, LFO Depth, or Gain screen is displayed, you can turn an instrument’s [CTRL] knob to directly edit the parameter that’s shown in the screen.
4. Press the [CTRL SELECT] button once again to exit the mixer screen.You can also exit the mixer screen by pressing the instrument select button that’s lit.

16
Recording Knob Movements at Steps (Motion)
Recording/Playing MOTIONWhile the MOTION [REC] button is lit, movements of the instrument [TUNE] knobs, [DECAY] knobs, and [CTRL] knobs are recorded in the steps.
While the MOTION [ON] button is lit, recorded movements of the instrument [TUNE], [DECAY], and [CTRL] knobs are played back.
* REVERB LEVEL, DELAY LEVEL/TIME/FEEDBACK, MASTER FX CTRL, and MASTER FX ON are also recorded and played back according to the state of the buttons described above.
* If you move a knob while the MOTION [REC] button is lit, an “M” icon appears in the screen, and the triangle icon becomes a hollow outline.
Another operating method
1. While a pattern plays, hold down the MOTION [REC] button and operate a knob.This lets you record a motion only while you’re holding down the button.
Entering a value at a specified step
While the [TR-REC] button is lit, you can specify a step and enter a value for a knob.
1. Operate a knob while holding down a pad [1]–[16].
Clearing Motion Data1. Hold down the [SHIFT] button and press the
MOTION [ON] button.
2. Turn the [VALUE] knob to select the variation from which you want to clear motion data.You can also use the [A]–[H] buttons to select the variation.
If you want to clear motion data from all variations, choose “ALL.”
3. Press the [ENTER] button.Motion data is cleared from the selected variation.
You can also use the following methods to clear motion data.
Clearing motion data from the variation selected for playbackThis clears all motion data from the variation that’s selected for playback.
1. Hold down the MOTION [ON] button and press the [CLEAR] button.
Clearing motion data from a specific track
This clears all motion data from the track that’s specified by the variation selected for playback.
1. Hold down the MOTION [ON] button and press the instrument select button.
Clearing motion data for only a specific knob
This clears all motion data of a knob recorded in the track that’s specified by the variation selected for playback.
1. Hold down the MOTION [ON] button and operate a knob.MEMO
You can also clear motion data by holding down the [CLEAR] button and making the steps go dark.
Clearing motion data for a specific variation
This clears the motion data of the specified variation.
1. Hold down the MOTION [ON] button and press a button [A]–[H].

17
Editing the Pattern Settings (Pattern Setting)
Here’s how to specify the kit and tempo used by a pattern.
1. Hold down the [SHIFT] button and press the [PTN SELECT] button.The PTN SETTING screen appears.
2. Select a parameter.2-1. Use the [VALUE] knob to select a parameter.
2-2. Press the [ENTER] button.
3. Modify values.3-1. Use the [VALUE] knob to edit the parameter value.
3-2. Press the [ENTER] button.You return to parameter selection (step 2).
4. Press the [PTN SELECT] button.You exit the PTN SETTING screen.
MEMO
You can also edit the value by holding down the [ENTER] button and turning the [VALUE] knob in step 2-2.
PTN SETTING: KITParameter Value Explanation
Sw OFF, ON
OFF: When you switch patterns, the kit does not change.
ON: When you switch patterns, the kit also switches to the kit specified by PTN SETTIN: KIT Number.
* This setting is effective when [UTILITY] GENERAL: KitSel = PTN.
Number 001–128
Selects the kit that the pattern uses when PTN SETTING: KIT Sw is ON.* This setting is effective when [UTILITY]
GENERAL: KitSel = PTN.
PTN SETTINGParameter Value Explanation
Tempo 40.0–300.0
Specifies the tempo of the pattern.* When [UTILITY] GENERAL: TempoSrc =
PTN, the tempo specified here is used. The tempo specified here is also shown in the TEMPO display.
* When [UTILITY] GENERAL: TempoSrc = SYSTEM, the tempo specified here is not used. The tempo shown in the TEMPO display (specified by the [TEMPO] knob) is used.
Scale8th (T), 16th (T), 16th, 32nd
Selects the scale.
Shuffle -128–0–+127
Adjusts the amount of shuffle.* When [UTILITY] GENERAL: Shuffle =
PTN, this setting is used.* When [UTILITY] GENERAL: Shuffle =
SYSTEM, this setting is not used. The setting of the [SHUFFLE] knob is used.
Flam Spacing 0–8 Specifies the flam spacing interval.
ScatterType 1–10 Specifies the type of scatter.
ScatterDepth[MANUAL TRIG] + VALUE
1–10 Adjusts the depth of scatter.
PTN SETTING: NAMEParameter Explanation
NAME Specifies the pattern name (maximum 16 characters).
How to enter characters
1. Use the [VALUE] knob to select “NAME.”
2. Press the [ENTER] button to access the character input screen.
3. Use the [COPY] (left) [UTILITY] (right) buttons to move the cursor.
Button Explanation
[UTILITY] button Moves to the right.
[COPY] button Moves to the left.
4. Use the [VALUE] knob to change the character.
Button Explanation
[SHIFT] button+[COPY] button Deletes one character (Erase).
[SHIFT] button+[UTILITY] button Inserts one character (Insert).
[SHIFT] button+[VALUE] knob
Switches between uppercase/lowercase/numerals.
5. When you’ve finished inputting characters, press the [ENTER] button.
Saving the Pattern, Kit, or System Settings (WRITE)Here’s how to save a pattern or kit.
1. Press the [WRITE] button.The WRITE screen appears.
2. Use the [VALUE] knob to select what you want to save, and press the [ENTER] button.The WRITE screens appear in the order of “Pattern” 0 “Kit” 0 “System.”* If “System” is selected, a confirmation screen appears. Proceed to
step 4.
3. Use the [VALUE] knob to select the savedestination, and press the [ENTER] button.
18
Editing the Pattern Settings (Pattern Setting)
A confirmation message appears.
4. To save, use the [VALUE] knob to select “OK,” and press the [ENTER] button.If you decide to cancel, use the [VALUE] knob to select “Cancel,” and then press the [ENTER] button.
Shortcuts for save operations
Operation Operating the Unit
Save a pattern(PATTERN WRITE screen)
Hold down the [WRITE] button and press the [PTN SELECT] button.
Save a kit(KIT WRITE screen)
Hold down the [WRITE] button and press the [KIT] button.
Save the pattern and kit simultaneously(OVERWRITE)
Hold down the [SHIFT] button and press the [WRITE] button.* The selected pattern and kit are
overwrite-saved.
Copying a Pattern or Kit (COPY)Here’s how to copy a pattern or kit.
1. Press the [COPY] button.The COPY screen appears.
2. Use the [VALUE] knob to select what you want to copy, and press the [ENTER] button.The COPY screens appear in the order of “Pattern” 0 “Variation” 0 “Track” 0 “Kit” 0 “Inst.”
3. Use the [VALUE] knob to select the copy-source, and press the [ENTER] button.
4. Use the [VALUE] knob to select the copy-destination, and press the [ENTER] button.A confirmation message appears.
5. To execute the copy, use the [VALUE] knob to select “OK,” and press the [ENTER] button.If you decide to cancel, use the [VALUE] knob to select “Cancel,” and then press the [ENTER] button.
Shortcuts for copy operations
Operation Operating the Unit
Copy a pattern(PATTERN COPY screen)
Hold down the [COPY] button and press the [PTN SELECT] button.
Copy a kit(KIT COPY screen)
Hold down the [COPY] button and press the [KIT] button.
Copy an instrument(INST COPY screen)
Hold down the [COPY] button and press the [INST] button.
Copy a track (selected track)(track copy-destination select screen)
Hold down the [COPY] button and press a [BD]–[RC] button.
Operation Operating the Unit
Copy a variation (selected variation)(variation copy-destination select screen)
While holding down the [COPY] button, press a variation [A]–[H] button.
Erasing a Pattern (CLEAR)Here’s how to erase a pattern.
1. While holding down an instrument select button, press the [CLEAR] button.This lets you erase the pattern of the selected instrument.
Only the selected variation is affected.
If playing back in TR-REC or INST REC
1. During playback, press the [CLEAR] button.The pattern of the instrument that you select by pressing its instrument select button is erased only while you hold down the button.

19
TR-REC (Step Recording)
In this method of recording, you create a pattern by specifying the steps at which each track will sound. You can even play back the pattern while you’re creating it.
* If you want to keep the edits that you made to a pattern or kit, you must save that pattern or kit (p. 29).
1. Press the [TR-REC] button.
2. Use the variation buttons to select A–H.To select a fill-in, hold down the [SHIFT] button and press the AUTO FILL IN [ON] button; then use the [VALUE] knob to select “FILL IN 1” or “FILL IN 2.”
3. Press the [START/STOP] button to start recording.
4. Press one of the instrument select buttons to select the track that you want to record.
5. Press pads [1]–[16] to input the steps at which you want sound to play.
6. Repeat steps 4–5.MEMO
5 If after selecting a fill-in you then want to select a variation A–H, press the [TR-REC] button and then press a variation button A–H.
5 You can change the scale. For details, refer to “Editing the Pattern Settings (Pattern Setting)” (p. 17).
Inputting Sub StepsYou can sub-divide a step and input sub steps within it.
1. Press the [SUB] button.
2. Press the pad [1]–[16] for which you want to specify a sub step.Now you can input sub steps that divide a step by 1/2. By holding down the [SUB] button and turning the [VALUE] knob you can choose 1/2, 1/3, or 1/4 as the number of step divisions.
Sub Step
Pad1
Pad2
Pad3
Pad4
Pad5
Step 1
Step 2
Step 3
Step 4
Step 5
no Sub StepSub Step 1/2Sub Step 1/3Sub Step 1/4
MEMO
You can also input a sub step by holding down the [SUB] button and pressing a pad [1]–[16].
Specifying a Flam1. Hold down the [SHIFT] button and press the [SUB]
button to set SUB STEP to FLAM.SUB STEP and FLAM alternate each time you press the button.
2. Press a pad [1]–[16].
Inputting Weak Beats1. While holding down the [SHIFT] button, press a
pad [1]–[16].
Inputting Alternate Sounds (ALT INST)For sounds whose name includes a “/” character, such as 707Bass1/2, you can input alternate sounds.
1. While holding down an instrument select button [BD]–[RC], press a pad [1]–[16].
Alternate sounds
Although one sound is assigned to each pad, sounds (instrument’s tones) whose name includes a “/” character, such as 707Bass1/2, are also assigned a second sound (alternate sound).
You can switch between normal sounds and alternate sounds for performance.
Specifying Accents1. Press the ACCENT [STEP] button.
2. Press pads [1]–[16] to select the steps at which you want to add an accent.
3. Use the ACCENT [LEVEL] knob to adjust the volume of the accent.
Deleting a Recorded Step from the TrackDeleting only a portion
If you press the [CLEAR] button during playback, steps of the track selected by the instrument select buttons are deleted from the pattern while you continue holding down the button.
Deleting all
While holding down the instrument select button of the track that you want to delete, press the [CLEAR] button.
Inputting Steps into the Trigger Out Track1. Hold down the instrument select button [CC] and
press the instrument select button [RC].The Trigger Out track is selected.
2. Press pads [1]–[16] to input steps at which you want a trigger to be output from the TRIGGER OUT jack.
Changing the Dynamics for Each StepYou can input an accent level (velocity) for each step.
1. Hold down a pad [1]–[16] and turn the ACCENT [LEVEL] knob.

20
INST REC (Realtime Recording)
In this method of recording, you create a pattern by realtime-recording your performance on pads [1] (BD)–[11] (RC). This modifies the selected pattern.
* If you want to keep the edits that you made to a pattern or kit, you must save that pattern or kit (p. 29).
1. Press the [INST REC] button.
2. Press the [START/STOP] button to start recording.
3. Use the variation buttons [A]–[H] to select the variation that you want to record.
4. Perform using pads [1] (BD)–[11] (RC).* Operations in the instrument edit section are not recorded.
Playing Sub StepsHere’s how to play or record sub steps.
1. Press the [SUB] button.
2. Press the pad [1]–[16] that will play sub steps.MEMO
By holding down the [SUB] button and turning the [VALUE] knob you can choose from 1/2, 1/3, or 1/4 as the number of step divisions.
You can also play a sub step by holding down the [SUB] button and pressing a pad [1]–[16].
Specifying a FlamHere’s how to play or record a flam on the instrument’s tone.
1. Hold down the [SHIFT] button and press the [SUB] button to set SUB STEP to FLAM.SUB STEP and FLAM alternate each time you press the button.
2. Press a pad [1] (BD)–[11] (RC).This lets you play or record a flam on the instrument’s tone.
Playing Weak Beats (WEAK BEATS)
1. While holding down the [SHIFT] button, press a pad [1] (BD)–[11] (RC).This lets you play or record weak beats.
Playing Alternate Sounds (ALT INST)For sounds whose name includes a “/” character, such as 707Bass1/2, you can play or record alternate sounds.
1. While holding down an instrument select button [BD]–[RC], press a pad [1] (BD)–[11] (RC).
Deleting a Recorded Step from the TrackDeleting only a portion
If you press the [CLEAR] button during playback, steps of the track selected by the instrument select buttons are deleted from the pattern while you continue holding down the button.
Deleting all
While holding down the instrument select button of the track that you want to delete, press the [CLEAR] button.
Using the Inst PadYou can use the instrument select buttons to play or record the selected instrument.
The volume changes depending on the strength at which you strike the inst pad.
Using the Inst Pad to Play Instruments
During INST PLAY / During PATTERN SELECT
1. Use the instrument select buttons to select the instrument that you want to play from the inst pad.
2. Press the inst pad to play the instrument that you selected in step 1.
Recording While You Use the Inst Pad to Play Instruments
During TR-REC / During INST REC
1. Press the [TR-REC] button or the [INST REC] button.
2. Press the [START/STOP] button, and start recording.
3. Use the instrument select buttons to select the instrument that you want to play from the inst pad.
4. Press the inst pad to record the instrument that you selected in step 3.

21
INST PLAY (Performing)
You can use pads [1] (BD)–[11] (RC) to perform in real time.
Your performance does not modify the pattern.
1. Press the [INST PLAY] button.
2. Perform using pads [1] (BD)–[11] (RC).
Playing Sub StepsHere’s how to play sub steps.
1. Press the [SUB] button.
2. Press the pad [1]–[16] that will play sub steps.MEMO
By holding down the [SUB] button and turning the [VALUE] knob you can choose from 1/2, 1/3, or 1/4 as the number of step divisions.
You can also play a sub step by holding down the [SUB] button and pressing a pad [1]–[16].
Performing a FlamHere’s how to perform a flam on an instrument’s tone.
1. Hold down the [SHIFT] button and press the [SUB] button to set SUB STEP to FLAM.
2. Press a pad [1] (BD)–[11] (RC).This lets you perform a flam on the instrument’s tone.
Performing Weak Beats (WEAK BEATS)
1. While holding down the [SHIFT] button, press a pad [1] (BD)–[11] (RC).This lets you perform weak beats.
Performing Alternate Sounds (ALT INST)For sounds whose name includes a “/” character, such as 707Bass1/2, you can perform alternate sounds.
1. While holding down an instrument select button [BD]–[RC], press a pad [1] (BD)–[11] (RC).
Performing a Roll (ROLL)Here’s how to perform a roll on an instrument’s tone.
1. While holding down a pad [12]–[13], press a pad [1]–[11].This lets you perform a roll on the instrument’s tone.
If you hold down the [INST PLAY] button and press a pad [12]–[13] and a pad [1]–[11], the roll is held and will continue playing even after you release your finger. To cancel the hold, press the selected pad without holding down the [INST PLAY] button.
Alternate method
1. While holding down the [INST PLAY] button, press a pad [12]–[13].Pad [12]–[13] is lit.
2. Press a pad [1]–[11].This lets you perform a roll on the instrument’s tone.
3. To stop playing the roll, press the pad [12]–[13] once again.
Roll speed
Pad Explanation
Pad [12] Sixteenth note
Pad [13] Thirty-second note
Pad [12] + [13] Sixty-fourth note

22
Editing a Kit’s Settings (KIT Edit)
Here’s how to edit the settings of the currently selected kit.
* If you want to keep the edited kit settings, you must save the kit (p. 29).
1. Hold down the [SHIFT] button and press the [KIT] button.The KIT Edit screen appears.
2. Select a parameter.2-1. Use the [VALUE] knob to select a parameter.
2-2. Press the [ENTER] button.Proceed to editing the parameter value (step 3).
3. Modify values.3-1. Use the [VALUE] knob to edit the parameter value.
3-2. Press the [ENTER] button.Return to selecting a parameter (step 2).
4. Press the [KIT] button.Exit the KIT Edit screen.
KITParameter Value Explanation
Level -INF, -53.0dB–0.0dB–+10.0dB Specifies the volume of the kit.
KIT: REVERBParameter Value Explanation
TypeAMBI, ROOM, HALL1, HALL2, PLATE, MOD
Selects the type of reverb.
Time[KIT]+ REVERB [LEVEL]
0–255 Specifies the reverb time.
LevelREVERB [LEVEL]
OFF, 1–255 Specifies the volume of the reverb.
Pre Delay 0ms–100ms Adjusts the time until the reverb sound appears.
Selecting kits (KIT)
Here’s how to select kits.
1. Press the [KIT] button to make it light.The KIT screen appears.
If the kit is being edited, an “*” is shown at the left side of the kit number.
2. Use the [VALUE] knob to select a kit.
3. Press the [KIT] button once again.The [KIT] button goes dark, and you exit the KIT screen.
Copying a kit (KIT COPY)
1. Hold down the [COPY] button and press the [KIT] button.The KIT COPY screen appears.
2. Use the [VALUE] knob to select the copy-source, and press the [ENTER] button.
3. Use the [VALUE] knob to select the copy-destination, and press the [ENTER] button.A confirmation message appears.
4. To copy, use the [VALUE]knob to select “OK,” and press the [ENTER] button.If you decide to cancel, use the [VALUE] knob to select “Cancel,” and then press the [ENTER] button.
Grouping instruments
You can create a group of multiple instruments and play their layered sound with a single note.
You can use grouped master instruments in the following ways. The slave instrument follows the master instrument.
5 Pattern input in “TR-REC” 5 Pad performance in “INST PLAY” 5 Pad recording in “INST REC”
1. Hold down the [SHIFT] button and press the [KIT] button.
2. Long-press the [BD]–[RC] button that you want to specify as the master instrument.The INST GROUP screen appears.
3. While holding down the button that you pressed in step 2, press the [BD]–[RC] button that you want to specify as the slave instrument.The instruments that you selected as the master instrument and the slave instrument are grouped.
MEMO
5 During TR-REC, when you press a grouped [BD]–[RC] button, the [BD]–[RC] button of the master instrument ( ) lights and the [BD]–[RC] button of the slave instrument ( ) blinks.
5 During INST PLAY/INST REC, pressing a pad [1]–[11] of a grouped slave instrument does not produce sound.
5 If you press the [MUTE] button, the same group’s master instrument’s [BD]–[RC] button lights and the slave instrument’s [BD]–[RC] button blinks.

23
Editing a Kit’s Settings (KIT Edit)
Parameter Value Explanation
Low Cut
FLAT, 20Hz, 25Hz, 31.5Hz, 40Hz, 50Hz, 63Hz, 80Hz, 100Hz, 125Hz, 160Hz, 200Hz, 250Hz, 315Hz, 400Hz, 500Hz, 630Hz, 800Hz
Specifies the frequency below which the low-frequency region of the reverb is cut.
HighCut
630Hz, 800Hz, 1kHz, 1.25kHz, 1.6kHz, 2kHz, 2.5kHz, 3.15kHz, 4kHz, 5kHz, 6.3kHz, 8kHz, 10kHz, 12.5kHz, FLAT
Specifies the frequency above which the high-frequency region of the reverb is cut.
Density 0–10 Adjusts the density of the reverb sound.
KIT: DELAYParameter Value Explanation
Type DLY, PAN, TAPE ECHO Selects the type of delay.
TempoSync OFF, ON Choose ON if you want the delay time to synchronize with the tempo.
LevelDELAY [LEVEL]
OFF, 1–255 Specifies the volume of the delay.
TimeDELAY [TIME]
(TempoSync = OFF) 0–255(TempoSync = ON) 1/32, 1/16T, 1/32D, 1/16, 1/8T, 1/16D, 1/8, 1/4T, 1/8D, 1/4, 1/2T, 1/4D, 1/2, 1/1T, 1/2D, 1/1
Specifies the time by which the sound is delayed.
FeedbackDELAY [FEEDBACK]
0–255 Adjusts the amount of feedback (amount of repetition).
DLY, PAN
HighCut
630Hz, 800Hz, 1kHz, 1.25kHz, 1.6kHz, 2kHz, 2.5kHz, 3.15kHz, 4kHz, 5kHz, 6.3kHz, 8kHz, 10kHz, 12.5kHz, FLAT
Specifies the frequency above which the high-frequency region of the delay sound is cut.
H Damp0.0dB–-40.0dB (0.5 dB increments), -INF
Adjusts the amount by which the high-frequency region of the delay sound is cut at each repetition.
H DampF
630Hz, 800Hz, 1kHz, 1.25kHz, 1.6kHz, 2kHz, 2.5kHz, 3.15kHz, 4kHz, 5kHz, 6.3kHz, 8kHz, 10kHz, 12.5kHz
Specifies the frequency above which H Damp cuts the high-frequency region.
L Damp0.0dB–-40.0dB (0.5 dB increments), -INF
Adjusts the amount by which the low-frequency region of the delay sound is cut at each repetition.
Parameter Value Explanation
L DampF
80.0Hz, 100Hz, 125Hz, 160Hz, 200Hz, 250Hz, 315Hz, 400Hz, 500Hz, 630Hz, 800Hz
Specifies the frequency below which L Damp cuts the low-frequency region.
PAN
Tap Time 0% –100%Adjusts the delay (tap) time of the right side, relative to the left side as 100%.
TAP ECHO
ModeS, M, L, S+M, S+L, M+L, S+M+L
Selects the combination of playback heads.S (Short), M (Middle), L (Long)
Bass -15dB–0dB–+15dB
Adjusts the low-frequency region of the echo sound.
Treble -15dB–0dB–+15dB
Adjusts the high-frequency region of the echo sound.
Pan S L127–CENTER–R127
Specifies the panning of the S (Short) playback head.
Pan M L127–CENTER–R127
Specifies the panning of the M (Middle) playback head.
Pan L L127–CENTER–R127
Specifies the panning of the L (Long) playback head.
Tape Dist 0–8 Adjusts the amount of distortion for the echo sound.
W/F Rate 0–255 Adjusts the modulation speed of wow and flutter.
W/F Depth 0–255 Adjusts the depth of wow and flutter.
KIT: MASTER FXParameter Value Explanation
Type
HPF, LPF, LPF/HPF, H BOOST, L BOOST, L/H BOOST, ISOLATOR, TRANSIENT, TRANSIENT2, COMPRESSOR, DRIVE, OVERDRIVE, DISTORTION, FUZZ, CRUSHER, PHASER, FLANGER, SBF, NOISE
Selects the type of MASTER FX.HPF: high pass filter (cuts the low-frequency
region)
LPF: low pass filter (cuts the high-frequency region)
LPF/HPF: low pass filter / high pass filter (cuts the high-frequency or low-frequency region)
H BOOST: high boost (boosts the high-frequency region)
L BOOST: low boost (boosts the low-frequency region)
L/H BOOST: low boost / high boost (boosts the low-frequency or high-frequency region)
ISOLATOR: adjusts the balance of the low, mid, and high-frequency regions.
TRANSIENT: strengthens or weakens the attack and release.
TRANSIENT2: uses the attack and release to operate a filter.
COMPRESSOR: compresses loud input, making the maximum levels more consistent.
DRIVE: uncolored distortion.OVERDRIVE: overdriveDISTORTION: distortionFUZZ: fuzzCRUSHER: produces a lo-fi effect.PHASER: produces a phase effect.FLANGER: produces a flanging effect.SBF: side band filter (a filter that passes only
specific frequency components).NOISE: adds noise.

24
Editing a Kit’s Settings (KIT Edit)
Parameter Value Explanation
SwMASTER FX [ON]
OFF, ON Turns the MASTER FX effect ON/OFF.
Ctrl[CTRL SELECT] + [CTRL]
Selects the parameter that is controlled by the MASTER FX [CTRL] knob.(HPF) Cutoff, Resonance(LPF) Cutoff, Resonance(LPF/HPF) Cutoff, Resonance(H BOOST) Boost, Frequency(L BOOST) Boost, Frequency(L/H BOOST) Boost, Frequency(ISOLATOR) Balance, Low, Mid, High(TRANSIENT) EnvDepth, Attack, Release(TRANSIENT2) EnvDepth, Attack, Release(COMPRESSOR) Balance, Attack, Release(DRIVE) Balance, Drive, Level, HpFreq, PreEqFreq, PreEqL, PreEqH, PostEqFreq, PostEqL, PostEqH(OVERDRIVE) Balance, Drive, Tone, Level(DISTORTION) Balance, Drive, Tone, Level(FUZZ) Balance, Drive, Tone, Level(CRUSHER) Balance, SmplRate, Filter(PHASER) Balance, Rate, Depth, Resonance, Manual(FLANGER) Balance, Rate, Depth, Resonance, Manual(SBF) Balance, BandIntrvl, BandWidth(NOISE) Color, Level
HPF
CutoffMASTER FX [CTRL] *1
0–255Specifies the cutoff frequency.Raising the Cutoff raises the cutoff frequency, deepening the HPF effect.
ResonanceMASTER FX [CTRL] *1
0–255 Specifies the amount of resonance.
Type -24dB, -18dB, -12dB Specifies the filter type.
Gain -40dB–0dB–+40dB Specifies the output gain of the filter.
Clipper OFF, ONTurn this ON if you want to prevent excessive volume from occurring when Resonance is raised.
LPF
CutoffMASTER FX [CTRL] *1
0–255Specifies the cutoff frequency.Raising the Cutoff lowers the cutoff frequency, deepening the LPF effect.
ResonanceMASTER FX [CTRL] *1
0–255 Specifies the amount of resonance.
Type -24dB, -18dB, -12dB Specifies the filter type.
Gain -40dB–0dB–+40dB Specifies the output gain of the filter.
Clipper OFF, ONTurn this ON if you want to prevent excessive volume from occurring when Resonance is raised.
LPF/HPF
CutoffMASTER FX [CTRL] *1
LPF 127–FLAT–HPF 127
Specifies the cutoff frequency.Lowering the Cutoff (toward LPF) produces an LPF effect, lowering the cutoff frequency.Raising the Cutoff (toward HPF) produces an HPF effect, raising the cutoff frequency.
ResonanceMASTER FX [CTRL] *1
0–255 Specifies the amount of resonance.
Type -24dB, -18dB, -12dB Specifies the filter type.
Parameter Value Explanation
Gain -40dB–0dB–+40dB Specifies the output gain of the filter.
Clipper OFF, ONTurn this ON if you want to prevent excessive volume from occurring when Resonance is raised.
H BOOST
BoostMASTER FX [CTRL] *1
0–255 Adjusts the amount of boost.
FrequencyMASTER FX [CTRL] *1
0–255 Boosts the region above the specified frequency.
Gain -40dB–0dB–+40dB Specifies the output gain.
L BOOST
BoostMASTER FX [CTRL] *1
0–255 Adjusts the amount of boost.
FrequencyMASTER FX [CTRL] *1
0–255 Boosts the region below the specified frequency.
Gain -40dB–0dB–+40dB Specifies the output gain.
L/H BOOST
BoostMASTER FX [CTRL] *1
LOW 127–FLAT–HIGH 127
Adjusts the amount of boost.Lowering the Boost (toward LOW) boosts the low-frequency region.Raising the Boost (toward HIGH) boosts the high-frequency region.
FrequencyMASTER FX [CTRL] *1
0–255 The region below or above this frequency is boosted.
Gain -40dB–0dB–+40dB Specifies the output gain.
ISOLATOR
BalanceMASTER FX [CTRL] *1
OFF, 1–255Adjusts the ISOLATOR effect.With a setting of 255, the ISOLATOR effect is at 100%.
LowMASTER FX [CTRL] *1
0dB–-INF Adjusts the level of the low-frequency region.
MidMASTER FX [CTRL] *1
0dB–-INF Adjusts the level of the mid-frequency region.
HighMASTER FX [CTRL] *1
0dB–-INF Adjusts the level of the high-frequency region.
TRANSIENT
EnvDepthMASTER FX [CTRL] *1
0–255 Adjusts the depths of Attack and Release.
AttackMASTER FX [CTRL] *1
-128–0–+127 Emphasizes or weakens the attack.
ReleaseMASTER FX [CTRL] *1
-128–0–+127 Emphasizes or weakens the release.
TRANSIENT2
EnvDepthMASTER FX [CTRL] *1
0–255 Adjusts the depths of Attack and Release.
AttackMASTER FX [CTRL] *1
-128–0–+127 Adjusts the filter movement during the attack.
ReleaseMASTER FX [CTRL] *1
-128–0–+127 Adjusts the filter movement during the release.
Q0.125, 0.25, 0.5, 1.0, 2.0, 4.0, 8.0, 16.0
Adjusts the character of the filter.

25
Editing a Kit’s Settings (KIT Edit)
Parameter Value Explanation
HP Level -INF, -53.0dB–0.0dB–+10.0dB Specifies the HPF level of the filter.
BP Level -INF, -53.0dB–0.0dB–+10.0dB Specifies the BPF level of the filter.
LP Level -INF, -53.0dB–0.0dB–+10.0dB Specifies the LPF level of the filter.
Bypass -INF, -53.0dB–0.0dB–+10.0dB Specifies the bypass level.
COMPRESSOR
BalanceMASTER FX [CTRL] *1
OFF, 1–255Adjusts the compression effect.With a setting of 255, the compression effect is at 100%.
AttackMASTER FX [CTRL] *1
0–255
Specifies the time from the moment that the input exceeds the level specified by Thre until the volume starts being compressed.As the Attack is increased (lengthening the time), the beginning of the note will no longer be compressed.
ReleaseMASTER FX [CTRL] *1
0–255
Specifies the time from the moment that the input falls below the level specified by Thre until compression stops being applied.As the Release is increased (lengthening the time), the sound will have more sustain.
Thre -40dB–0dB
Specifies the level at which compression begins.Set a lower value for Thre if you want to apply compression deeply, or if the input level is low.Because setting a low value for Thre also lowers the output level, raise Gain to make adjustments.
Gain -40dB–0dB–+40dB
Specifies the output level.Set this so that the volume is essentially the same whether the MASTER FX Sw is on or off.
Ratio
1: 1.00, 1: 1.12, 1: 1.25, 1: 1.40, 1: 1.60, 1: 1.80, 1: 2.00, 1: 2.50, 1: 3.20, 1: 4.00, 1: 5.60, 1: 8.00, 1: 16.0, 1: INF
Specifies the compression ratio.The higher the ratio, the more compression is applied to the sound when its level exceeds the Thre setting.If the ratio is set to 1: INF, the sound will not become any louder than the level specified by Thre.
Knee
HARD, SOFT1, SOFT2, SOFT3, SOFT4, SOFT5, SOFT6, SOFT7, SOFT8, SOFT9
Adjusts the character of the compression.HARD compresses the sound suddenly, producing a hard sound.SOFT compresses the sound gently, producing a soft sound.
DRIVE
BalanceMASTER FX [CTRL] *1
OFF, 1–255Adjusts the drive effect.With a setting of 255, the drive effect is at 100%.
DriveMASTER FX [CTRL] *1
0–255
Adjusts the depth of distortion.Because increasing the Drive setting also increases the output level, make adjustments by lowering the Level setting.
LevelMASTER FX [CTRL] *1
0–255
Specifies the output level.Set this so that the volume is essentially the same whether the MASTER FX Sw is on or off.
Parameter Value Explanation
HpFreqMASTER FX [CTRL] *1
0–255
Specifies the frequency below which the low-frequency region of the input is cut.As the HpFreq is raised, the region being cut will extend further into the high-frequency region.
PreEqFreqMASTER FX [CTRL] *1
0–255Specifies the center frequency of the EQ that is applied before distorting the sound.
PreEqLMASTER FX [CTRL] *1
-INF, -53.0dB–0.0dB–+10.0dB
Specifies the low-frequency level of the EQ that is applied before distorting the sound.
PreEqHMASTER FX [CTRL] *1
-INF, -53.0dB–0.0dB–+10.0dB
Specifies the high-frequency level of the EQ that is applied before distorting the sound.By slightly decreasing the high-frequency level, you can reduce the higher-order partials that are generated by distortion.
PostEqFreqMASTER FX [CTRL] *1
0–255Specifies the center frequency of the EQ that is applied after distorting the sound.
PostEqLMASTER FX [CTRL] *1
-INF, -53.0dB–0.0dB–+10.0dB
Specifies the low-frequency level of the EQ that is applied after distorting the sound.
PostEqHMASTER FX [CTRL] *1
-INF, -53.0dB–0.0dB–+10.0dB
Specifies the high-frequency level of the EQ that is applied after distorting the sound.
OVERDRIVE
BalanceMASTER FX [CTRL] *1
OFF, 1–255Adjusts the overdrive effect.With a setting of 255, the overdrive effect is at 100%.
DriveMASTER FX [CTRL] *1
0–255
Adjusts the depth of distortion.Because increasing Drive also increases the output level, make adjustments by lowering Level.
ToneMASTER FX [CTRL] *1
0–255
Adjusts the tone.Raising the Tone emphasizes the high-frequency region.Lowering the Tone emphasizes the low-frequency region.
LevelMASTER FX [CTRL] *1
0–255
Specifies the output level.Set this so that the volume is essentially the same whether the MASTER FX Sw is on or off.
DISTORTION
BalanceMASTER FX [CTRL] *1
OFF, 1–255Adjusts the distortion effect.With a setting of 255, the distortion effect is at 100%.
DriveMASTER FX [CTRL] *1
0–255
Adjusts the depth of distortion.Because increasing Drive also increases the output level, make adjustments by lowering Level.
ToneMASTER FX [CTRL] *1
0–255
Adjusts the tone.Raising the Tone emphasizes the high-frequency region.Lowering the Tone emphasizes the low-frequency region.
LevelMASTER FX [CTRL] *1
0–255
Specifies the output level.Set this so that the volume is essentially the same whether the MASTER FX Sw is on or off.

26
Editing a Kit’s Settings (KIT Edit)
Parameter Value Explanation
FUZZ
BalanceMASTER FX [CTRL] *1
OFF, 1–255Adjusts the fuzz effect.With a setting of 255, the fuzz effect is at 100%.
DriveMASTER FX [CTRL] *1
0–255
Adjusts the depth of distortion.Because increasing Drive also increases the output level, make adjustments by lowering Level.
ToneMASTER FX [CTRL] *1
0–255
Adjusts the tone.Raising the Tone emphasizes the high-frequency region.Lowering the Tone emphasizes the low-frequency region.
LevelMASTER FX [CTRL] *1
0–255
Specifies the output level.Set this so that the volume is essentially the same whether the MASTER FX Sw is on or off.
CRUSHER
BalanceMASTER FX [CTRL] *1
OFF, 1–255Adjusts the lo-fi effect.With a setting of 255, the lo-fi effect is at 100%.
SampleRateMASTER FX [CTRL] *1
0–255
Specifies the sampling frequency at which the crusher effect resamples the sound.Increasing the SampleRate lowers the sampling frequency, producing a more lo-fi sound.
FilterMASTER FX [CTRL] *1
0–255
Specifies the cutoff frequency of the LPF that is applied before Crusher resamples the sound.By lowering the Filter setting you can reduce harsh high-frequency noise.
PHASER
BalanceMASTER FX [CTRL] *1
OFF, 1–255Adjusts the phase effect.With a setting of 255, the phase effect is at 100%.
TempoSync OFF, ON Choose ON if you want the phase effect to synchronize with the tempo.
RateMASTER FX [CTRL] *1
(TempoSync = OFF) 0–255(TempoSync = ON) 64.00–0.25 step(steps of 0.25)
Specifies the rate of the phase effect.
DepthMASTER FX [CTRL] *1
0–255 Specifies the depth of the phase effect.
ResonanceMASTER FX [CTRL] *1
0–255
Adjusts the amount of resonance.Raising the Resonance emphasizes the effect and produces a strongly distinctive sound.
ManualMASTER FX [CTRL] *1
0–255
Specifies the center frequency at which the phase effect is applied.By raising Manual, you can reduce the phase effect in the low-frequency region.(As necessary, lower Depth as well to lighten the phase effect)
Type 4ST, 8ST, 12ST, BI-PHASE
Selects the structure of the phaser.4ST: 4-stage phaser (produces a light phase
effect)
8ST: 8-stage phaser (produces a typical phase effect)
12ST: 12-stage phase (produces a deep phase effect)
BI-PHASE: a phaser that connects two phase shift circuits in series (produces a distinctive phase effect)
Parameter Value Explanation
FLANGER
BalanceMASTER FX [CTRL] *1
OFF, 1–255Adjusts the flanging effect.With a setting of 255, the flanging effect is at 100%.
TempoSync OFF, ON Choose ON if you want the flanging effect to synchronize with the tempo.
RateMASTER FX [CTRL] *1
(TempoSync = OFF) 0–255(TempoSync = ON) 64.00–0.25 step(steps of 0.25)
Specifies the rate of the flanging effect.
DepthMASTER FX [CTRL] *1
0–255 Specifies the depth of the flanging effect.
ResonanceMASTER FX [CTRL] *1
0–255
Adjusts the amount of resonance.Raising the Resonance emphasizes the effect and produces a strongly distinctive sound.
ManualMASTER FX [CTRL] *1
0–255
Specifies the center frequency at which the flanging effect is applied.By raising Manual, you can reduce the flanging effect in the low-frequency region.(As necessary, you can also lower Depth to make the flanging effect shallower.)
LoCutF
FLAT, 20Hz, 25Hz, 31.5Hz, 40Hz, 50Hz, 63Hz, 80Hz, 100Hz, 125Hz, 160Hz, 200Hz, 250Hz, 315Hz, 400Hz, 500Hz, 630Hz, 800Hz
Cuts the frequency region below the specified frequency.
Mode MONO, STEREO
Selects whether the flanging is modulated in the same or the opposite way for left and right.MONO: Left and right are modulated
in the same way.STEREO: Left and right are modulated
in the opposite way.
SBF
BalanceMASTER FX [CTRL] *1
OFF, 1–255Adjusts the side band filter effect.With a setting of 255, the side band filter effect is at 100%.
BandIntrvlMASTER FX [CTRL] *1
0–255
Adjusts the spacing of the bands.As you raise BandIntrvl, the spacing between the bands becomes wider, so that only specific frequency regions are passed.
Band WifthMASTER FX [CTRL] *1
0–255
Adjusts the width of the bands.As you raise Band Width, the width of each band becomes narrower, so that only specific frequency regions are passed.
TypeSBF1, SBF2, SBF3, SBF4, SBF5, SBF6
Switches the range that can be adjusted by BandIntrvl.Switch the Type if you want to narrow (or widen) the bands when adjusting BandIntrvl.
Gain -INF, -53.0dB–0.0dB–+10.0dB Specifies the output gain.

27
Editing a Kit’s Settings (KIT Edit)
Parameter Value Explanation
NOISE
ColorMASTER FX [CTRL] *1
0–255
Moves a filter that is applied to noise.If Color is set to 0, no noise is output.This parameter is intended to be controlled by the MASTER FX [CTRL] knob.
LevelMASTER FX [CTRL] *1
-INF, -53.0dB–0.0dB–+10.0dB Specifies the noise level.
Direction UP, DOWN Switches the direction in which the filter is moved by Color.
*1 This can be controlled by specifying the Ctrl parameter.
KIT: EXT INParameter Value Explanation
SideChnSrc
BD, SD, LT, MT, HT, RS, HC, CH, OH, CC, RC, TRG (TRIGGER OUT)
Selects the instrument that is used as the trigger for the side chain effect.
SideChnType 1–8
Selects the type of side chain effect.1: Type = Ducking, Width = 1step2: Type = Ducking, Width = 2step, (Fast Rise) 3: Type = Ducking, Width = 1step, (Slow Rise) 4: Type = Gate, Width = 1step5: Type = Ducking, Width = Narrow6: Type = Ducking, Width = 2step, (Slow Rise) 7: Type = Gate, Width = Half step 8: Type = Ducking, Width = 1step, (Unique Rise)
SideChnDpt 0–255 Adjusts the depth of the side chain effect.
Gain
-40.0dB–0.0dB–+40.0dB(0.5 dB increments)
Specifies the gain.
Pan L127–CENTER–R127 Specifies the pan.
ReverbSend 0–255 Adjusts the level sent to reverb.
DelaySend 0–255 Adjusts the level sent to delay.
KIT: LFOParameter Value Explanation
Waveform SIN, TRI, SAW, SQR, S&H Selects the LFO waveform.
Tempo Sync OFF, ON Choose ON if you want the LFO to synchronize with the tempo.
Rate
(TempoSync = OFF) 0–255(TempoSync = ON) 64.00–0.25 step(steps of 0.25)
Specifies the LFO rate.
KIT: OUTPUTParameter Value Explanation
BDSDLTMTHTRSHCCHOHCCRCEXT IN*2
MIX, ASSIGN 1, ASSIGN 2, ASSIGN 3, ASSIGN 4, ASSIGN 5, ASSIGN 6, ASSIGN A, ASSIGN B, ASSIGN C
Selects the output destination of each instrument.MIX: Output from the MIX OUT jacks.ASSIGN 1–6: Output as monaural
from an ASSIGNABLE OUT/TRIGGER OUT jack. (When [UTILITY] ASSIGN OUT 1–6 = NORMAL, BOOST) The sound of the instrument is output, and is not output from the MIX OUT jacks. (When [UTILITY] ASSIGN OUT 1–6 = NORMAL, BOOST) The sound of the instrument is output, and is not output from the MIX OUT jacks.
ASSIGN A–C: Output as stereo from an ASSIGNABLE OUT/TRIGGER OUT jack. (When [UTILITY] ASSIGN OUT 1–6 = NORMAL, BOOST) The sound of the instrument is output, and is not output from the MIX OUT jacks. (When [UTILITY] ASSIGN OUT 1–6 = TRIGGER) The trigger signal is output, and the sound of the instrument is also output from the MIX OUT jacks.
KIT: MUTEParameter Value Explanation
BDSDLTMTHTRSHCCHOHCCRC*2
OFF, BD, SD, LT, MT, HT, RS, HC, CH, OH, CC, RC
For the OpenHH sound and sample tones, you can specify that their sound be muted when another instrument is sounded.* By selecting the instrument that plays
CloseHH, you can use CloseHH to close (mute) the sustained sound of OpenHH.

28
Editing a Kit’s Settings (KIT Edit)
KIT: CTRLParameter Value Explanation
Sel[CTRL SELECT]
OFF, Pan, ReverbSend, DelaySend, LFO Depth, InstFX, User
Assigns a parameter to the [CTRL] knobs of the instrument edit section so that it can be controlled.OFF: The [CTRL] knobs do nothing.Pan: Control the pan of each
instrument.ReverbSend: Control the reverb send
level of each instrument.DelaySend: Control the delay send
level of each instrument.LFO Depth: Control the LFO effect
depth of each instrument.InstFX: Control the INST FX effect
that’s selected for each instrument.User: Control the parameter that’s
assigned for each instrument.
BDSDLTMTHTRSHCCHOHCCRC*2
OFF, Pan, ReverbSend, DelaySend, LFO Depth, InstFX,(BD) Attack(SD) Snappy(TOM) Color(SAMPLE) Coarse, Rate, Spread, BitReduce, Attack, HoldMode, HoldTime, HoldStep, FltType, FltCutoff, FltReso, FltEnvAtk, FltEnvDecay, FltEnvDepth, FltVelo
This is shown only if you’ve set CTRL Sel = User. It lets you assign a parameter for each instrument to the [CTRL] knobs of the instrument edit section.
KIT: COLORParameter Value Explanation
BDSDLTMTHTRSHCCHOHCCRC*2
RED, ORANGE, YELLOW, LIME, GREEN, SKYBLUE, LIGHTBLUE, BLUE, PURPLE, MAGENTA, PINK, WHITE
Specifies the color that each level fader BD–RC will be when SLIDER LED Src is set to kit.When the cursor is located at color (value), you can also specify the color by moving the slider.
KIT: NAMEParameter Explanation
NAME Specifies the name of the kit (maximum 16 characters).
How to enter characters
1. Use the [VALUE] knob to select “NAME.”
2. Press the [ENTER] button to access the character input screen.
Controller Explanation
[VALUE] knob Change the character.
[UTILITY] button Moves to the right.
[COPY] button Moves to the left.
[SHIFT] button+[COPY] button Deletes one character (Erase).
[SHIFT] button+[UTILITY] button Inserts one character (Insert).
[SHIFT] button+[VALUE] knob
Switches between uppercase/lowercase/numerals.
3. When you’ve finished inputting characters, press the [ENTER] button.

29
Editing a Kit’s Settings (KIT Edit)
Saving the Pattern, Kit, or System Settings (WRITE)Here’s how to save a pattern or kit.
1. Press the [WRITE] button.The WRITE screen appears.
2. Use the [VALUE] knob to select what you want to save, and press the [ENTER] button.The WRITE screens appear in the order of “Pattern” 0 “Kit” 0 “System.”* If “System” is selected, a confirmation screen appears. Proceed to
step 4.
3. Use the [VALUE] knob to select the save-destination, and press the [ENTER] button.A confirmation message appears.
4. To save, use the [VALUE] knob to select “OK,” and press the [ENTER] button.If you decide to cancel, use the [VALUE] knob to select “Cancel,” and then press the [ENTER] button.
Shortcuts for save operations
Operation Operating the Unit
Save a pattern(PATTERN WRITE screen)
Hold down the [WRITE] button and press the [PTN SELECT] button.
Save a kit(KIT WRITE screen)
Hold down the [WRITE] button and press the [KIT] button.
Save the pattern and kitsimultaneously(OVERWRITE)
Hold down the [SHIFT] button and press the [WRITE] button.* The selected pattern and kit are
overwrite-saved.

30
Editing an Instrument’s Sound (INST Edit)
1. Hold down the [SHIFT] button and press the [INST] button.The INST Edit screen appears
2. Select a parameter.2-1. Use the [VALUE] knob to select a parameter.
2-2. Press the [ENTER] button.
3. Modify values.3-1. Use the [VALUE] knob to edit the parameter value.
3-2. Press the [ENTER] button.Return to the parameter selection (step 2).
4. Press the [INST] button.Exit the INST Edit screen.
INSTParameter Value Explanation
Common to all tones
Tune[TUNE]
-128–0–+127 Adjusts the tuning (pitch)
Decay[DECAY]
0–255 Adjusts the length of the decay.
LevelINST Level Slider
0–255
Specifies the level.* This parameter changes when you
operate each instrument’s level slider.* This adjusts the level of the sound after
it has passed through INST FX.
Gain-40.0dB–0.0dB–+40.0dB(steps of 0.5 dB)
Specifies the gain.* This adjusts the level of the sound after
it has passed through INST FX.
PanINST [CTRL] *3
L127–CENTER–R127 Specifies the pan.
ReverbSendINST [CTRL] *3
0–255 Adjusts the level that is sent to reverb.
DelaySendINST [CTRL] *3
0–255 Adjusts the level that is sent to delay.
LFO
Tune, Decay, Level, Pan, ReverbSend, DelaySend, InstFX,(BD) Attack(SD) Snappy(TOM) Color(SAMPLE) Coarse, Rate, Spread, BitReduce, Attack, HoldMode, HoldTime, HoldStep, FltType, FltCutoff, FltReso, FltEnvAtk, FltEnvDecay, FltEnvDepth, FltVelo
Selects the parameter that is modified by the LFO.
LFO DepthINST [CTRL] *3
-128–0–+127
Specifies the amount that is modified by the LFO.* If the setting of the parameter to be
modified is 128 (the center value), setting LFO Depth to +/-64 will cause the parameter to vary in a range of 0–255.
Only for ACB tones of the BD category
AttackINST [CTRL] *2
0–255 Adjusts the attack strength of the bass drum.
Only for ACB tones of the SD category
SnappyINST [CTRL] *2
0–255 Adjusts the volume of the snare wires (resonating wires) of the snare drum.
Selecting an Instrument’s Tone (INST)
Instrument’s tones of the currently selected kit are selected individually.
1. Press the [INST] button.The [INST] button and the [BD]–[RC] button (that had been selected for [TR-REC]) are lit, and [the INST screen appears.
Category
2. Use the [VALUE] knob to select the instrument’s tone.MEMO
5 To switch categories, hold down the [SHIFT] button and turn the [VALUE] knob.
5 By holding down the [ENTER] button and turning the [Value] knob, you can move through the instrument tones in steps of 10.
5 When you press the [ENTER] button, the category name is enclosed by “[ICON],” and you can switch between instrument tones with the category locked (category lock). When you press the [ENTER] button once again, category lock is cleared. You can specify category lock for each instrument, and that setting is saved in the kit.
3. Press the [INST] button once again.The [INST] button goes dark, and you exit the INST screen.
About the icons shown in the INST screen
Preset: Tones originally in the TR-8S
Sample: Tones that use samples
Loop: Tones that play repeatedly
User: Tones that use imported samples
31
Editing an Instrument’s Sound (INST Edit)
Parameter Value Explanation
Only for ACB tones of the TOM category
ColorINST [CTRL] *2
-128–0–+127
(808Low/Mid/HighTom)
Adjusts the amount of ambience (amount of noise).(808NoiseTomL/M/H)
Adjusts the amount of resonance.(909Low/Mid/HighTom)
Adjusts the amount of ambience (amount of noise).(707Low/Mid/HighTom)
Adjusts the amount by which the pitch will change.(606Low/Mid/HighTom)
Adjusts the amount of ambience (amount of noise).
Sample tone only
Coarse Tune -24–0–+24 Specifies the pitch in semitone steps.
Rate-1.00–0.00–+1.00(steps of 0.01)
Specifies the playback direction and playback speed.
+1.00: Play at the original speed.+0.99–+0.01: Play at a lower speed.0.00: Don’t play.-0.01–-0.99: Play backward at a lower
speed.-1.00: Play backward.
Spread -50–0–+50 Slightly skews the pitch between left and right, producing a stereo effect.
Bit Reduce 0–12 Adds a lo-fi effect.
Attack 0–255 Specifies the time over which the level rises.
Hold Mode Whole, Time, Step
Selects how the sound decays.Whole: The sound is heard to the end
without decaying.Time: Decay begins after a specified
length of time.Step: Decay begins after a specified
number of steps.
Hold Time 0–255
Specifies the time until decay begins when Hold Mode = Time.* The duration of the sound will be
Attack + Hold Time + Decay.
Hold Step0.5–128.0(steps of 0.5)
Specifies the number of steps until decay begins when Hold Mode = Step.* The duration of the sound will be Hold
Step + Decay (Attack changes within Hold Step).
Flt Type LPF, HPF Selects the type of filter.
Flt Cutoff 0–255 Adjusts the cutoff frequency of the filter.
Flt Reso 0–255 Adjusts the amount of filter resonance.
Flt Attack 0–255 Specifies the attack time for the envelope that varies the filter.
Flt Decay 0–255 Specifies the decay time for the envelope that varies the filter.
Flt Env 0–255 Specifies the amount by which the envelope varies the filter.
Flt Velo 0–255 Specifies the amount by which the note’s velocity affects the filter.
*2 By setting the KIT CTRL: BD–RC parameters that appear when you press the [CTRL SELECT]+[BD]–[RC] button, you can control this using the [CTRL] knobs of the instrument edit section.
*3 By setting the KIT: CTRL Sel parameter, you can control this using the [CTRL] knobs of the instrument edit section. (This can also be specified in the screen that appears when you press the [CTRL SELECT] button.)
INST FXParameter Value Explanation
Type
Selects the type of INST FX.
THRU No INST FX effect is applied.
HPF High-pass filter (cuts the low-frequency region)
LPF Low-pass filter (cuts the high-frequency region)
LPF/HPF Low-pass filter / High-pass filter (cuts the high or low-frequency region)
H BOOST High boost (boosts the high-frequency region)
L BOOST Low boost (boosts the low-frequency region)
L/H BOOST Low boost / High boost (boosts the low or high-frequency region)
ISOLATOR Adjusts the balance of the low, mid, and high-frequency regions.
TRANSIENT Emphasizes or softens the attack and release.
COMPRESSOR Compresses loud input, making the maximum levels more consistent.
DRIVE Uncolored distortion.
COMP+DRV Applies COMPRESSOR and then applies DRIVE (monaural).
CRUSHER Produces a lo-fi effect (monaural).
HPF
CutoffINST [CTRL] *4
0–255
Specifies the cutoff frequency.Increasing the Cutoff value raises the cutoff frequency, deepening the HPF effect.
Resonance 0–255 Specifies the amount of resonance.
Type -24dB, -18dB, -12dB Specifies the filter type.
Gain -40dB–0dB–+40dB Specifies the output gain of the filter.
Clipper OFF, ONTurn this ON if you want to prevent excessive volume from occurring when Resonance is raised.
LPF
CutoffINST [CTRL] *4
0–255
Specifies the cutoff frequency.Increasing the Cutoff value lowers the cutoff frequency, deepening the LPF effect.
Resonance 0–255 Specifies the amount of resonance.
Type -24dB, -18dB, -12dB Specifies the filter type.
Gain -40dB–0dB–+40dB Specifies the output gain of the filter.
Clipper OFF, ONTurn this ON if you want to prevent excessive volume from occurring when Resonance is raised.

32
Editing an Instrument’s Sound (INST Edit)
Parameter Value Explanation
LPF/HPF
CutoffINST [CTRL] *4
LPF 127–FLAT–HPF 127
Specifies the cutoff frequency.Lowering the Cutoff value (toward LPF) applies an LPF effect, lowering the cutoff frequency.Raising the Cutoff value (toward HPF) applies an HPF effect, raising the cutoff frequency.
Resonance 0–255 Specifies the amount of resonance.
Type -24dB, -18dB, -12dB Specifies the filter type.
Gain -40dB–0dB–+40dB Specifies the output gain of the filter.
Clipper OFF, ONTurn this ON if you want to prevent excessive volume from occurring when Resonance is raised.
H BOOST
BoostINST [CTRL] *4
0–255 Adjusts the amount of boost.
Frequency 0–255 Specifies the frequency above which the high-frequency region is boosted.
Gain -40dB–0dB–+40dB Specifies the output gain.
L BOOST
BoostINST [CTRL] *4
0–255 Adjusts the amount of boost.
Frequency 0–255 Specifies the frequency below which the low-frequency region is boosted.
Gain -40dB–0dB–+40dB Specifies the output gain.
L/H BOOST
BoostINST FX [CTRL] *4
LOW 127–FLAT–HIGH 127
Adjusts the amount of boost.Lowering the Boost value (toward LOW) boosts the low-frequency region.Raising the Boost value (toward HIGH) boosts the high-frequency region.
Frequency 0–255Specifies the frequency below or above which the low or high-frequency region is boosted.
Gain -40dB–0dB–+40dB Specifies the output gain.
ISOLATOR
BalanceINST [CTRL] *4
OFF, 1–255Adjusts the ISOLATOR effect.With a setting of 255, the ISOLATOR effect is at 100%.
Low 0dB–-INF Adjusts the level of the low-frequency region.
Mid 0dB–-INF Adjusts the level of the mid-frequency region.
High 0dB–-INF Adjusts the level of the high-frequency region.
TRANSIENT
EnvDepthINST [CTRL] *4
0–255 Adjusts the intensity of Attack and Release.
Attack -128–0–+127 Emphasizes or softens the attack.
Release -128–0–+127 Emphasizes or softens the release.
Parameter Value Explanation
COMPRESSOR
BalanceINST [CTRL] *4
OFF, 1–255Adjusts the compression effect.With a setting of 255, the compression effect is at 100%.
Attack 0–255
Specifies the time from when the input exceeds the level specified by Thre until the volume is compressed.As you increase the Attack value (lengthening the time), the sound’s attack is compressed less.
Release 0–255
Specifies the time from when the input falls below the level specified by Thre until compression stops being applied.As you increase the Release value (lengthening the time), the sound has more sustain.
Thre -40dB–0dB
Specifies the level at which compression begins.Set a lower value for Thre if you want to apply the effect deeply, or if the input level is low.Setting a low value for Thre will also decrease the output level, so raise the Gain to make adjustments.
Gain -40dB–0dB–+40dB
Specifies the output level.Set this so that the volume is approximately the same whether MASTER FX Sw is on or off.
Ratio
1: 1.00, 1: 1.12, 1: 1.25, 1: 1.40, 1: 1.60, 1: 1.80, 1: 2.00, 1: 2.50, 1: 3.20, 1: 4.00, 1: 5.60, 1: 8.00, 1: 16.0, 1: INF
Specifies the compression ratio.The higher the ratio, the more compression is applied to levels that exceed the Thre setting.If the ratio is set to 1: INF, the sound will not become any louder than the level specified by Thre.
Knee
HARD, SOFT1, SOFT2, SOFT3, SOFT4, SOFT5, SOFT6, SOFT7, SOFT8, SOFT9
Adjusts how compression is applied.The HARD setting applies compression abruptly, producing a hard sound.The SOFT setting applies compression gently, producing a soft sound.
DRIVE
BalanceINST [CTRL] *4
OFF, 1–255Adjusts the drive effect.With a setting of 255, the drive effect is at 100%.
Drive 0–255
Adjusts the depth of distortion.Because increasing the Drive also increases the output level, make adjustments by lowering the Level.
Level 0–255
Specifies the output level.Set this so that the volume is approximately the same whether MASTER FX Sw is on or off.
HpFreq 0–255
Specifies the frequency below which the low-frequency region of the input is cut.As you raise the HpFreq value, the region being cut extends into the high-frequency region.
PreEqFreq 0–255Specifies the center frequency of the EQ that is applied before distorting the sound.
PreEqL -INF, -53.0dB–0.0dB–+10.0dB
Specifies the low-frequency level of the EQ that is applied before distorting the sound.

33
Editing an Instrument’s Sound (INST Edit)
Parameter Value Explanation
PreEqH -INF, -53.0dB–0.0dB–+10.0dB
Specifies the high-frequency level of the EQ that is applied before distorting the sound.By slightly decreasing the high-frequency level, you can reduce the higher-order partials that are generated when the sound is distorted.
PostEqFreq 0–255Specifies the center frequency of the EQ that is applied after distorting the sound.
PostEqL -INF, -53.0dB–0.0dB–+10.0dB
Specifies the low-frequency level of the EQ that is applied after distorting the sound.
PostEqH -INF, -53.0dB–0.0dB–+10.0dB
Specifies the high-frequency level of the EQ that is applied after distorting the sound.
COMP+DRV
BalanceINST [CTRL] *4
OFF, 1–255Adjusts the overall COMP+DRV effect.With a setting of 255, the effect is at 100%.
CmpBalance OFF, 1–255Adjusts the compression effect.With a setting of 255, the compression effect is at 100%.
DrvBalance OFF, 1–255Adjusts the drive effect.With a setting of 255, the drive effect is at 100%.
CmpAttack 0–255
Specifies the time from when the input exceeds the level specified by Thre until the volume is compressed.As you increase the Attack value (lengthening the time), the sound’s attack is compressed less.
CmpRelease 0–255
Specifies the time from when the input falls below the level specified by Thre until compression stops being applied.As you increase the Release value (lengthening the time), the sound has more sustain.
CmpThre -40dB–0dB
Specifies the level at which compression begins.Set a lower value for Thre if you want to apply the effect deeply, or if the input level is low.Setting a low level for Thre will also decrease the output level, so raise the Gain to make adjustments.
CmpGain -40dB–0dB–+40dB
Specifies the output level.Set this so that the volume is approximately the same whether MASTER FX Sw is on or off.
CmpRatio
1: 1.00, 1: 1.12, 1: 1.25, 1: 1.40, 1: 1.60, 1: 1.80, 1: 2.00, 1: 2.50, 1: 3.20, 1: 4.00, 1: 5.60, 1: 8.00, 1: 16.0, 1: INF
Specifies the compression ratio.The higher the ratio, the more compression is applied to levels that exceed the Thre setting.If the ratio is set to 1: INF, the sound will not become any louder than the level specified by Thre.
CmpKnee
HARD, SOFT1, SOFT2, SOFT3, SOFT4, SOFT5, SOFT6, SOFT7, SOFT8, SOFT9
Adjusts how compression is applied.The HARD setting applies compression abruptly, producing a hard sound.The SOFT setting applies compression gently, producing a soft sound.
DrvDrive 0–255
Adjusts the depth of distortion.Because increasing the Drive also increases the output level, make adjustments by lowering the Level.
Parameter Value Explanation
DrvLevel 0–255
Specifies the output level.Set this so that the volume is approximately the same whether MASTER FX Sw is on or off.
DrvHpF 0–255
Specifies the frequency below which the low-frequency region of the input is cut.As you raise the HpFreq value, the region being cut extends into the high-frequency region.
DrvPreF 0–255Specifies the center frequency of the EQ that is applied before distorting the sound.
DrvPreL -INF, -53.0dB–0.0dB–+10.0dB
Specifies the low-frequency level of the EQ that is applied before distorting the sound.
DrvPreH -INF, -53.0dB–0.0dB–+10.0dB
Specifies the high-frequency level of the EQ that is applied before distorting the sound.By slightly decreasing the high-frequency level, you can reduce the higher-order partials that are generated when the sound is distorted.
DrvPstF 0–255Specifies the center frequency of the EQ that is applied after distorting the sound.
DrvPstL -INF, -53.0dB–0.0dB–+10.0dB
Specifies the low-frequency level of the EQ that is applied after distorting the sound.
DrvPstH -INF, -53.0dB–0.0dB–+10.0dB
Specifies the high-frequency level of the EQ that is applied after distorting the sound.
CRUSHER
BalanceINST [CTRL] *4
OFF, 1–255Adjusts the lo-fi effect.With a setting of 255, the lo-fi effect is at 100%.
SampleRate 0–255
Specifies the sampling frequency at which CRUSHER resamples the sound.Higher settings of SampleRate lower the sampling frequency, producing a more lo-fi sound.
Filter 0–255
Specifies the cutoff frequency of the LFP that is applied before CRUSHER resamples the sound.By lowering the Filter value, you can reduce harsh high-frequency noise.
*4 If you set the KIT: CTRL Sel parameter to InstFX, you can use the [CTRL] knobs of the instrument edit section to control this. (You can also set this in the screen that appears when you press the [CTRL SELECT] button.)

34
Importing or Exporting a Pattern or Kit
Exporting a Pattern or KitHere’s how you can export a kit or pattern to an SD card.
Exporting a PatternInsert the SD card into the TR-8S.
1. Press the [UTILITY] button to make it light.The Utility screen appears.
2. Use the [VALUE] knob to select “UTILITY:Export,” and then press the [ENTER] button.
3. Use the [VALUE] knob to select “Pattern,” and then press the [ENTER] button.
4. Use the [VALUE] knob to select the pattern that you want to export, and then press the [ENTER] button.You may select multiple patterns.
A check mark appears at the left of the pattern number(s) that will be exported.
5. Hold down the [SHIFT] button and press the [ENTER] button, and input a name for the file that will be exported.
Controller Explanation
[VALUE] knob Change the character.
[UTILITY] button Moves to the right.
[COPY] button Moves to the left.
[SHIFT] button+[COPY] button Deletes one character (Erase).
[SHIFT] button+[UTILITY] button Inserts one character (Insert).
[SHIFT] button+[VALUE] knob
Switches between uppercase/lowercase/numerals.
6. Press the [ENTER] button.A confirmation message appears.
7. To execute, use the [VALUE] knob to select “OK,” and press the OK.If you decide to cancel, use the [VALUE] knob to select “Cancel,” and then press the [ENTER] button.
When export is completed, the display indicates “Completed!,” and you exit the UTILITY screen.
Exporting a KitInsert the SDcard into the TR-8S.
1. Press the [UTILITY] button to make it light.The Utility screen appears.
2. Use the [VALUE] knob to select “UTILITY:Export,” and then press the [ENTER] button.
3. Use the [VALUE] knob to select “Kit,” and then press the [ENTER] button.
4. Use the [VALUE] knob to select the kit that you want to export, and then press the [ENTER] button.You may select multiple kits.
A check mark appears at the left of the kit number(s) that will be exported.
5. Hold down the [SHIFT] button and press the [ENTER] button, and input a name for the file that will be exported.
Controller Explanation
[VALUE] knob Change the character.
[UTILITY] button Moves to the right.
[COPY] button Moves to the left.
[SHIFT] button+[COPY] button Deletes one character (Erase).
[SHIFT] button+[UTILITY] button Inserts one character (Insert).
[SHIFT] button+[VALUE] knob
Switches between uppercase/lowercase/numerals.
6. Press the [ENTER] button.A confirmation message appears.
7. To execute, use the [VALUE] knob to select “OK,” and press the OK.If you decide to cancel, use the [VALUE] knob to select “Cancel,” and then press the [ENTER] button.
When export is completed, the display indicates “Completed!,” and you exit the UTILITY screen.

35
Importing or Exporting a Pattern or Kit
Importing a Pattern or KitHere’s how you can import a saved kit or pattern from an SD card.
File formats that can be imported
5 Backup files created by the TR-8S
5 Export files created by the TR-8S
NOTE
Simply executing the import does not save the kit or pattern in internal memory, so it will be lost when you turn off the power. After importing, execute “Saving the Pattern, Kit, or System Settings (WRITE)” (p. 29) to save the kits and patterns if necessary.
Importing a Pattern1. Insert the SD card into the TR-8S.
2. Press the [UTILITY] button to make it light.The Utility screen appears.
3. Use the [VALUE] knob to select “UTILITY:Import,” and then press the [ENTER] button.
4. Use the [VALUE] knob to select “Pattern,” and then press the [ENTER] button.
5. Use the [VALUE] knob to select the data format of the file that contains the pattern you want to import, and then press the [ENTER] button.
Format Explanation
BACKUP w/KitImport from a backup file(including the kit specified by the pattern that you import)
BACKUPImport from a backup file(only the pattern)
EXPORT w/KitImport from an export file(including the kit specified by the pattern that you import)
EXPORTImport from an export file(only the pattern)
6. Use the [VALUE] knob to select the file that you want to import, and then press the [ENTER] button.
7. Use the [VALUE] knob to select the pattern that you want to import, and then press the [ENTER] button.
MEMO
If the data format you’re importing is BACK w/Kit or EXPORT w/Kit, you can press the [KIT] button to see the name of the kit that’s specified by the currently selected pattern.
8. Use the [VALUE] knob to select the import-destination, and then press the [ENTER] button.
9. If the data format you’re importing is BACK w/Kit or EXPORT w/Kit, you can further use the [VALUE] knob to select the import destination for the kit, and then press the [ENTER] button.
A confirmation message appears.
10. To execute, use the [VALUE] knob to select “OK,” and press the OK.If you decide to cancel, use the [VALUE] knob to select “Cancel,” and then press the [ENTER] button.
When the import is completed, the display indicates “Completed!” and you exit the UTILITY screen.

36
Importing or Exporting a Pattern or Kit
Importing a Kit1. Insert the SD card into the TR-8S.
2. Press the [UTILITY] button to make it light.The Utility screen appears.
3. Use the [VALUE] knob to select “UTILITY:Import,” and then press the [ENTER] button.
4. Use the [VALUE] knob to select “Kit,” and then press the [ENTER] button.
5. Use the [VALUE] knob to select the data format of the file that contains the kit you want to import, and then press the [ENTER] button.
Format Explanation
BACKUP Import from a backup file
EXPORT Import from an export file
EXPORT (Ptn) Import from kit data that is included in a pattern export file
6. Use the [VALUE] knob to select the file that you want to import, and then press the [ENTER] button.
7. Use the [VALUE] knob to select the kit that you want to import, and then press the [ENTER] button.
8. Use the [VALUE] knob to select the import-destination, and then press the [ENTER] button.
A confirmation message appears.
9. To execute, use the [VALUE] knob to select “OK,” and press the OK.If you decide to cancel, use the [VALUE] knob to select “Cancel,” and then press the [ENTER] button.
When the import is completed, the display indicates “Completed!” and you exit the UTILITY screen.

37
Assigning an Imported User Sample to an Instrument
Importing a User Sample (SAMPLE Import)Here’s how an audio file saved on an SD card can be imported as a user sample.
* Use the TR-8S to format the SD card.
* The maximum time length of a single audio file is approximately 180 seconds (in the case of 44.1 kHz/mono), and a maximum of 400 files can be imported. Depending on memory usage, the maximum time and maximum number might be less.
1. Using your computer, copy an audio file to the following folder of the SD card.ROLAND\TR-8S\SAMPLE\
If you want to import multiple audio files in a single operation, create another folder inside the above folder, and place the audio files in it.
ROLAND
TR-8S
SAMPLE
Kicks
Snares
2nd_Snares
My_Wave1.wav
My_Kick1.wav
My_Snare1.wav
My_Wave2.wav
My_Kick2.wav
If you want to select and import files individually, place the files in this folder (up to 256 files).
If you create a folder within a folder, it will not be recognized. Do not create folders below the second level of the folder hierarchy.
To import multiple files in a single operation, create a folder and place the files in it (a maximum of 256 folders, with a maximum of 256 files in each folder).
Audio files that can be imported
File formatWAV, AIFF
Sampling frequencyWAV: up to 96 kHzAIFF: 44.1kHz, 48kHz
Bit depth8bit, 16bit, 24bit, 32bit, 32bit float
Channel countMonaural, stereo
2. Insert the SD card into the TR-8S
3. Press the [UTILITY] button to make it light.
4. Use the [VALUE] knob to select “SAMPLE:mport,” and then press the [ENTER] button.
5. Use the [VALUE] knob to select “FILE” or “FOLDER,” and then press the [ENTER] button.
Item Explanation
FILE Select and import audio files individually.
FOLDER Import all the audio files in the specified folder.
6. Use the [VALUE] knob to select the audio file that you want to import, and press the [ENTER] button.A confirmation message appears.
MEMO
If you select a folder, all the audio files in that folder are imported together.
7. To execute, use the [VALUE] knob to select “OK,” and press the OK.If you decide to cancel, use the [VALUE] knob to select “Cancel,” and then press the [ENTER] button.
When the import is completed, the display indicates “Completed!” and you exit the UTILITY screen.
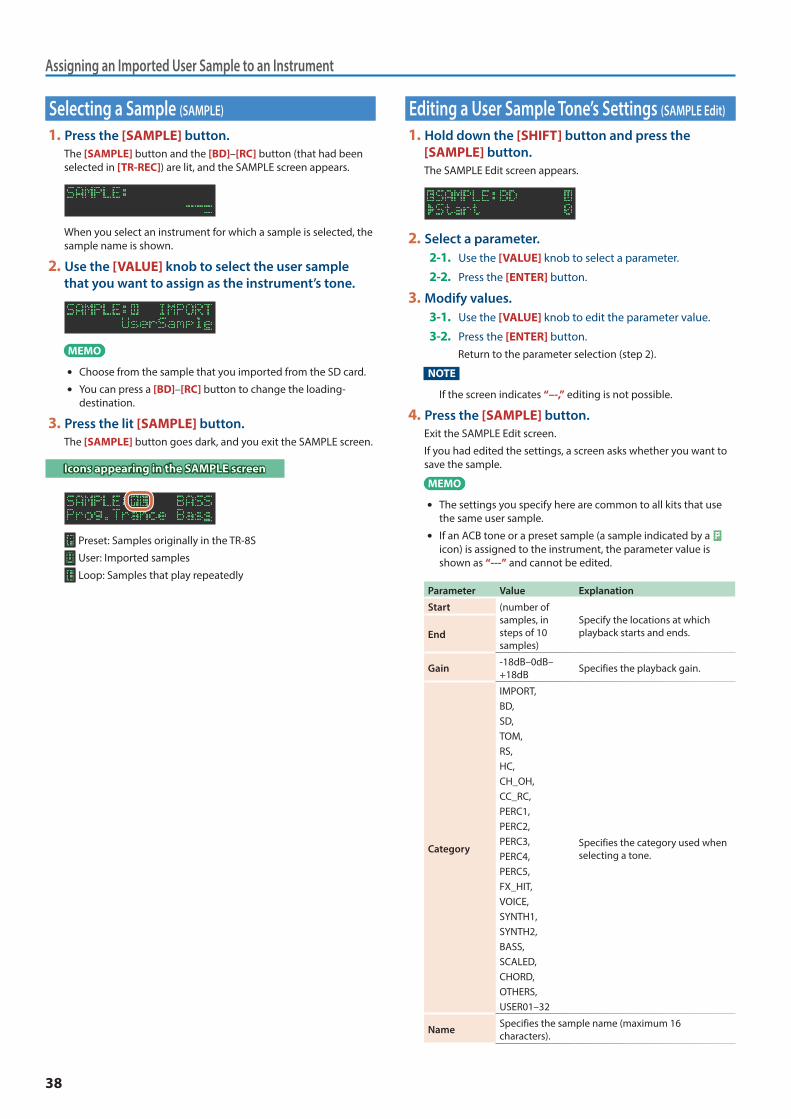
38
Assigning an Imported User Sample to an Instrument
Selecting a Sample (SAMPLE)
1. Press the [SAMPLE] button.The [SAMPLE] button and the [BD]–[RC] button (that had been selected in [TR-REC]) are lit, and the SAMPLE screen appears.
When you select an instrument for which a sample is selected, the sample name is shown.
2. Use the [VALUE] knob to select the user sample that you want to assign as the instrument’s tone.
MEMO
5 Choose from the sample that you imported from the SD card.
5 You can press a [BD]–[RC] button to change the loading-destination.
3. Press the lit [SAMPLE] button.The [SAMPLE] button goes dark, and you exit the SAMPLE screen.
Icons appearing in the SAMPLE screen
Preset: Samples originally in the TR-8S
User: Imported samples
Loop: Samples that play repeatedly
Editing a User Sample Tone’s Settings (SAMPLE Edit)
1. Hold down the [SHIFT] button and press the [SAMPLE] button.The SAMPLE Edit screen appears.
2. Select a parameter.2-1. Use the [VALUE] knob to select a parameter.
2-2. Press the [ENTER] button.
3. Modify values.3-1. Use the [VALUE] knob to edit the parameter value.
3-2. Press the [ENTER] button.Return to the parameter selection (step 2).
NOTE
If the screen indicates “–-,” editing is not possible.
4. Press the [SAMPLE] button.Exit the SAMPLE Edit screen.
If you had edited the settings, a screen asks whether you want to save the sample.
MEMO
5 The settings you specify here are common to all kits that use the same user sample.
5 If an ACB tone or a preset sample (a sample indicated by a icon) is assigned to the instrument, the parameter value is shown as “---” and cannot be edited.
Parameter Value Explanation
Start (number of samples, in steps of 10 samples)
Specify the locations at which playback starts and ends.End
Gain -18dB–0dB–+18dB Specifies the playback gain.
Category
IMPORT,BD,SD,TOM,RS,HC,CH_OH,CC_RC,PERC1,PERC2,PERC3,PERC4,PERC5,FX_HIT,VOICE,SYNTH1,SYNTH2,BASS,SCALED,CHORD,OTHERS,USER01–32
Specifies the category used when selecting a tone.
Name Specifies the sample name (maximum 16 characters).

39
Assigning an Imported User Sample to an Instrument
Deleting a User Sample (SAMPLE Delete)
1. Press the [UTILITY] button to make it light.
2. Use the [VALUE] knob to select “SAMPLE:Delete,” and then press the [ENTER] button.
3. Use the [VALUE] knob to select the user sample that you want to delete, and then press the [ENTER] button to apply a check mark.
4. Use the [VALUE] knob to select “Delete,” and then press the [ENTER] button.A confirmation message appears.
MEMO
5 After applying a check mark in step 3, you can also move to the confirmation message by holding down the [SHIFT] button and pressing the [ENTER] button.
5 Preset samples cannot be deleted.
5. To execute, use the [VALUE] knob to select “OK,” and press the OK.If you decide to cancel, use the [VALUE] knob to select “Cancel,” and then press the [ENTER] button.
When the delete is completed, the display indicates “Completed!” and you exit the UTILITY screen.
Renaming a User Category (Category Name)Here’s how to rename a user category.
1. Press the [UTILITY] button to make it light.
2. Use the [VALUE] knob to select “SAMPLE: Category Name,” and then press the [ENTER] button.The user category select screen appears.
3. Use the [VALUE] knob to select the user category number (01–32) whose name you want to edit, and then press the [ENTER] button to access the character input screen.
4. Edit the name.
Controller Explanation
Knob [VALUE] Change the character.
[UTILITY] button Moves to the right.
[COPY] button Moves to the left.
[SHIFT] button+[COPY] button Deletes one character (Erase).
[SHIFT] button+[UTILITY] button Inserts one character (Insert).
[SHIFT] button+[VALUE] knob
Switches between uppercase/lowercase/numerals.
5. When you finish editing, press the [ENTER] button.

40
Assigning an Imported User Sample to an Instrument
Optimizing the User Sample Area (OPTIMIZE)Here’s how to optimize the user sample area.
If you repeatedly import and delete user samples, the user sample area might become fragmented, reducing the number of samples that can be loaded.
This function optimizes the user sample area so that samples can be loaded.
NOTE
5 Be sure to back up before executing this.
5 This process might take several tens of minutes or longer (depending on the number and size of the user samples).
5 Never turn off the power while this operation is in progress. If you do so, the user samples might be lost.
5 In some cases, optimizing might not produce results.
1. Press the [UTILITY] button to make it light.
2. Use the [VALUE] knob to select “SAMPLE:Optimize,” and then press the [ENTER] button.The amount of free capacity (Free) and the fragmented proportion (Fragment) for the user sample area are shown.
If the Fragment (fragmented proportion) value is not 0%, fragmentation exists.
If you decide to cancel the operation, press the [UTILITY] button to exit the UTILITY screen.
3. Press the [ENTER] button.A confirmation message appears.
4. To execute, use the [VALUE] knob to select “OK,” and press the OK.If you decide to cancel, use the [VALUE] knob to select “Cancel,” and then press the [ENTER] button.
When optimization is complete, the display indicates “Completed!” and you exit the UTILITY screen.

41
Convenient Functions and Settings (UTILITY)
Here’s how to make system settings for the TR-8S itself, or back up and restore data.
1. Press the [UTILITY] button to make it light.The setting screen appears.
2. Select a parameter.2-1. Use the [VALUE] knob to select a parameter.
2-2. Press the [ENTER] button.If a “>” is shown at the right of the parameter name, an additional parameter select screen appears following step 2-2. In this case, repeat steps 2-1. and 2-2. to proceed to step 3.
3. Modify values.3-1. Use the [VALUE] knob to edit the parameter value.
3-2. Press the [ENTER] button.Return to the parameter selection (step 2).
4. Press the lit [UTILITY] button.The [UTILITY] button goes dark, and you exit the UTILITY screen.
GENERALParameter Value Explanation
LCD Contrast 1–10 Adjusts the contrast of the display.
KnobMode DIRECT, CATCH
DIRECT: Control data corresponding to the knob’s position is always output when you move a knob.
CATCH: Control data is output only after the knob passes through the parameter’s current value.
ManualMode OFF, LVL, ALL
OFF: The sound is heard according to the settings of the kit.
LVL: The sound is heard at the volume of the level fader positions. Otherwise, the settings of the kit are used.
ALL: The sound is heard with settings that correspond to the positions of the knobs.
Ptn Lock OFF, ONTurn this ON if you want the saved pattern to be loaded when you reselect the pattern.
Start Ptn LAST, 1-01–8-16
Specifies the pattern that is selected at start-up.If this is set to LAST, the last-selected pattern is selected at start-up.
Start Kit LAST, 001–128
Specifies the pattern that is selected at start-up.If this is set to LAST, the last-selected pattern is selected at start-up.* If KitSel is set to PTN, and a pattern
whose PTN SETTING parameter KIT Sw is ON is specified as the Start Ptn, the Start Kit setting is ignored.
TempoSrc PTN, SYSTEM
PTN: Use the tempo specified by each pattern.
SYSTEM: Always use the tempo specified by the [TEMPO] knob.
Shuffle PTN, SYSTEM
PTN: Use the shuffle setting specified by each pattern.
SYSTEM: Always use the shuffle setting specified by the [SHUFFLE] knob.
Parameter Value Explanation
KitSel KIT, PTN
KIT: Switching patterns does not change the kit.
PTN: When you switch patterns, the kit specified by the PTN SETTING Kit parameter is selected.
InstPad LIGHT, MEDIUM, HEAVY, FIX
Selects the sensitivity of the instrument pads.LIGHT, MEDIUM, HEAVY: Select the
sensitivity (low, medium, high).FIX: Velocity is fixed.
M. Trig MOMENTARY, LATCH
Selects the operation of the AUTO FILL IN [MANUAL TRIG] button.MOMENTARY: The fill-in plays only
while you hold down the [MANUAL TRIG] button.
LATCH: If you press the [MANUAL TRIG] button during the first half of the pattern, the fill-in is inserted immediately. If you press the [MANUAL TRIG] button during the last half of the pattern, the fill-in is inserted after waiting for the beginning of the pattern.
Weak Beat wSHIFT, PAD
Selects how weak beats are entered during TR-REC.wSHIFT: Hold down the [SHIFT]
button and press a pad [1]–[16].PAD: Each time you press a pad [1]–
[16], the setting cycles between strong 0 weak 0 off.
USB Audio ASGN, INDIV
Selects the audio signals that are sent from the TR-8S to the computer via USB IN 1-2–IN 5-6.* The same signals as MIX OUT are
always sent to USB IN MIX.
ASGN: The same signals as are being output from the ASSIGNABLE OUT/TRIGGER OUT jacks are sent to USB IN 1-6.
* USB IN 7–12 are silent.
INDIV: INST x 11 and EXT IN are output in mono to USB IN 1–12.
Auto Save OFF, ON
Specifies how patterns, kits, and system settings are saved.OFF: Saved when you execute the
WRITE operation.ON: Automatically saved when you
turn the [POWER] switch OFF.* If Ptn Lock (Pattern Lock) is ON,
changes to the pattern are discarded; only changes to the kit and the system settings are automatically saved.
RELOADFunction Explanation
Pattern Reloads the saved pattern.
Kit Reloads the saved kit.

42
Convenient Functions and Settings (UTILITY)
SAMPLEFunction Explanation
Import Loads an audio file from the SD card into the TR-8S (import).
Delete Deletes a loaded (imported) user sample.
Category Name
Specifies a name (maximum 16 characters) for each category USER 01–32.
Optimize Shows and reorganizes the available space in the user sample area of the TR-8S.
LEDParameter Value Explanation
Bright 1–10 Specifies the LED brightness for the sliders and buttons.
Glow 1–10 Specifies the brightness of a dimly lit button LED.
Slider KIT, SYSTEM
Specify the color of each level fader.KIT: Lit in the color specified by each
kit.SYSTEM: Lit in the color specified by
LED Slider Color.
Slider Color: BD/SD/LT/MT/HT/RS/HC/CH/OH/CC/RC
RED, ORANGE, YELLOW, LIME, GREEN, SKYBLUE, LIGHTBLUE, BLUE, PURPLE, MAGENTA, PINK, WHITE
Specifies the color of each BD–RC level fader when LED Slider is set to SYSTEM.
Demo OFF, 1min–10min
Specifies the time (minutes) until the LED demo is shown.
SYNC/TEMPOParameter Value Explanation
TempoSync AUTO, MIDI, USB, INT
Specifies the tempo source.AUTO: If MIDI clock is input from
the MIDI IN connector or the USB port, the tempo automatically synchronizes to MIDI clock. If MIDI clock is input simultaneously from the MIDI IN connector and the USB port, the USB port takes priority.
MIDI: The tempo synchronizes to MIDI clock being input from the MIDI IN connector.
USB: The tempo synchronizes to MIDI clock being input from the USB port.
INT: The tempo operates according to the TR-8S’s own setting. Use this setting if you don’t want to synchronize with an external device.
Sync Out OFF, ON
Specifies whether clock, start, and stop messages are transmitted to other devices (ON) or are not transmitted (OFF).
RxStartStop OFF, ON
When synchronizing to external MIDI clock, specifies whether the step sequencer’s start/stop is controlled from an external device (ON) or is not controlled (OFF).
MIDIParameter Value Explanation
Device ID 17–32
When transmitting and receiving system exclusive messages, the device ID numbers of both devices must match.
Omni Mode OFF, ON If this is ON, MIDI messages of all channels are received.
Pattern Ch 1–16 Specifies the pattern sequencer’s MIDI transmit channel.
Kit Ch 1–16 Specifies the kit’s MIDI transmit channel.
Inst Note: BD/SD/LT/MT/HT/RS/HC/CH/OH/CC/RC/ BD Alt/SD Alt/LT Alt/MT Alt/HT Alt/RS Alt/HC Alt/ CH Alt/ OH Alt/ CC Alt/RC Alt/Trig
OFF (---),0 (C -)–127 (G 9)
Specify the MIDI note number for each track’s instrument, instrument alternate sound, and TRIGGER OUT.
USBMidiThru OFF, ON
Specifies whether the MIDI messages received from the USB port or MIDI IN port are retransmitted without change from the MIDI OUT connector and USB port (ON) or are not retransmitted (OFF).If this is ON, MIDI messages received at the USB port are sent to the internal sound engine and to the MIDI OUT connector, and MIDI messages received at the MIDI IN connector are combined with the messages from the internal sound engine and sent to the USB port.
Soft Thru OFF, ON
If this is ON, MIDI messages that are input from the MIDI IN connector are re-transmitted without change from the MIDI OUT connector.
Tx Prog Chg OFF, ONSpecifies whether program change messages are transmitted (ON) or are not transmitted (OFF).
Tx EditData OFF, ON
Specifies whether changes to the kit settings (panel operations) are transmitted as MIDI messages (ON) or are not transmitted (OFF).
Tx Nudge OFF, ON
Specifies whether MIDI Clock messages are transmitted when you perform NUDGE operations (ON) or are not transmitted (OFF).
Rx Prog Chg OFF, ONSpecifies whether program change messages are received (ON) or are not received (OFF).
Rx EditData OFF, ON
Specifies whether MIDI messages that edit the kit settings (panel operations) are received (ON) or are not received (OFF).

43
Convenient Functions and Settings (UTILITY)
SOUNDParameter Value Explanation
LocalSw OFF, ON, SURFACE
Specifies how the controller section (pads [1]–[16], panel knobs, etc.) and the sequencer section (patterns) are connected to the internal sound engine.OFF: The controller section and
sequencer section are internally disconnected from the internal sound engine. Sound is produced only in response to performance data from an external MIDI device.
ON: The controller section and sequencer section are internally connected with the internal sound engine. Normally you will leave this setting selected.
SURFACE: The controller section, sequencer section, and external MIDI device are disconnected from the internal sound engine. Choose this setting if you want operations on the TR-8S to only control an external device.
MIX OUTParameter Value Explanation
Mode NORMAL, BOOST
NORMAL: The output level is not boosted.
BOOST: The output level is boosted.* Before switching this setting, you
should either minimize the volume of the output-destination device or turn off its power.
ASSIGN OUT 1–6Parameter Value Explanation
ModeNORMAL, BOOST, TRIGGER
NORMAL: The output level is not boosted. The instruments that are output to these jacks are not output from MIX OUT.
BOOST: The output level is boosted. The instruments that are output to these jacks are not output from MIX OUT.
TRIGGER: The jacks are used as trigger output jacks. The instruments that are output to these jacks are also output from MIX OUT.
* Before switching this setting, you should either minimize the volume of the output-destination device or turn off its power.
EXT INParameter Value Explanation
Type STEREO, MONO
Selects the function of the EXT IN jacks.STEREO: Function as stereo input
jacks.MONO: Function as two mono input
jacks.
UTILITYFunction Value Explanation
Initialize Pattern, Kit Initializes a pattern or kit.
Exchange Pattern, Kit Changes the order of patterns or kits.
Export Pattern, Kit Exports a pattern or kit.
Import Pattern, Kit Imports a pattern or kit.
Backup --- Backs-up data to an SD card.
Restore --- Restores backup data from an SD card.
Factory Reset ALL, KIT, PTN
Returns the unit to the factory settings.ALL: All settings including kits and
patternsKIT: Only kit settingsPTN: Only pattern settings
SD CARDFunction Explanation
Format Formats the SD card.
INFORMATIONParameter Explanation
Version Displays the system version.

44
Initializing, Backing-Up, Restoring
Returning to the Factory Settings (FACTORY RESET) Here’s how to return the TR-8S to its factory-set state.
NOTE
Be aware that when you execute FACTORY RESET: ALL, the user sample tones and user sample data are also erased.
1. Press the [UTILITY] button to make it light.The UTILITY screen appears.
2. Use the [VALUE] knob to select “UTILITY: Factory Reset.”
3. Press the [ENTER] button.The target selection screen appears.
Target Explanation
ALL Returns all settings including patterns and kits to their factory-set state.
KIT Returns only the kit settings to their factory-set state.
PTN Returns only the patterns to their factory-set state.
MEMO
You can also access the target select screen by holding down the [CLEAR] button while you turn on the power.
4. Use the [VALUE] knob to select the target, and press the [ENTER] button.A confirmation message appears.
5. To execute, use the [VALUE] knob to select “OK,” and press the [ENTER] button.If you decide to cancel, use the [VALUE] knob to select “Cancel,” and then press the [ENTER] button.
6. When the display indicates “Completed. Turn off power.” turn the TR-8S’s power off and on again.
Backing Up Data to SD Card (BACKUP) * If you want to make a backup, save the data (patterns, kits, system
settings) before you proceed. The backup will not include the pattern or kit that you’re currently editing (shown by an “*” indication) or system settings that you have not saved.
1. Insert the SD card into the TR-8S.
2. Press the [UTILITY] button to make it light.The UTILITY screen appears.
3. Use the [VALUE] knob to select “UTILITY: Backup.”
4. Press the [ENTER] button.The BACKUP:NAME screen appears.
MEMO
If a backup file already exists, the BACKUP:SELECT screen appears.
To overwrite-save, select the existing backup file and press the [ENTER] button.
If you select Save As and press the [ENTER] button, the BACKUP:NAME screen appears.
5. Edit the name if necessary.
Controller Explanation
[VALUE] knob Change the character.
[UTILITY] button Moves to the right.
[COPY] button Moves to the left.
[SHIFT] button+[COPY] button Deletes one character (Erase).
[SHIFT] button+[UTILITY] button Inserts one character (Insert).
[SHIFT] button+[VALUE] knob
Switches between uppercase/lowercase/numerals.
6. When you’ve finished inputting characters, press the [ENTER] button.A confirmation message appears.
7. To execute, use the [VALUE] knob to select “OK,” and press the [ENTER] button.If you decide to cancel, use the [VALUE] knob to select “Cancel,” and then press the [ENTER] button.

45
Initializing, Backing-Up, Restoring
Restoring Data That Was Backed Up to SD Card (RESTORE) 1. Insert the SD card into the TR-8S.
2. Press the [UTILITY] button to make it light.The UTILITY screen appears.
3. Use the [VALUE] knob to select “UTILITY: Restore.”
4. Press the [ENTER] button.The RESTORE screen appears.
5. Use the [VALUE] knob to select the file that you want to restore.
6. Press the [ENTER] button.A confirmation message appears.
7. To execute, use the [VALUE] knob to select “OK,” and press the OK.If you decide to cancel, use the [VALUE] knob to select “Cancel,” and then press the [ENTER] button.
8. When the display indicates “Completed. Turn off power.,” turn the power of the TR-8S off and then on again.

46
Synchronizing/Recording with Other DevicesThe TR-8S can receive MIDI Clock (F8) data to synchronize its tempo. It can also receive MIDI Start (FA) and MIDI Stop (FC) to start/stop itself.
Synchronizing with a DAW (TR-8S as Slave)You can synchronize the TR-8S with your DAW by connecting it to your computer via a commercially available USB cable.
TR-8SComputer
USB MIDI IN
USB MIDI OUT
Synchronizing with a TB-3 (TR-8S as Master)You can synchronize the TR-8 with a TB-3 by using a commercially available MIDI cable to make connections.
TR-8S TB-3
MIDI OUT
MIDI IN
Using the TR-8S as a MIDI ControllerYou can use the TR-8S as a controller for your computer software without using the sounds of the TR-8S’s internal sound engine.
1. Press the [UTILITY] button to make it light.The setting screen appears.
2. Use the [VALUE] knob to select “SOUND: Local Sw,” and then press the [ENTER] button.
3. Use the [VALUE] knob to select “SURFACE,” and then press the [ENTER] button.
4. Press the lit [UTILITY] button.The [UTILITY] button goes dark, and you exit the UTILITY screen.* Even if you press pads or if MIDI is received, the TR-8S’s internal
sound engine does not produce sound.
Using the ASSIGNABLE OUT/TRIGGER OUT jacks as Trigger OutBefore you proceed, power-off all devices, and connect the jack that you want to use as TRIGGER out to your device that accepts a trigger input.
1. Press the [UTILITY] button to make it light.The setting screen appears.
2. Use the [VALUE] knob to select the ASSIGN OUT 1–6 “Mode” parameter, and press the [ENTER] button.
3. Use the [VALUE] knob to select “TRIGGER,” and then press the [ENTER] button.
NOTE
Before switching this setting, you should either minimize the volume of the output-destination device or turn off its power.
4. Press the [UTILITY] button.The [UTILITY] button goes dark, and you exit the UTILITY screen.

47
Synchronizing/Recording with Other Devices
Assigning an Instrument to the ASSIGNABLE OUT/TRIGGER OUT jacks1. Hold down the [SHIFT] button and press the [KIT]
button.The setting screen appears.
2. Use the [VALUE] knob to select the KIT:OUTPUT “BD”–”RC” parameter, and press the [ENTER] button.
3. Use the [VALUE] knob to select the jack that you want to assign, and press the [ENTER] button.
Parameter Explanation
MIX
Output stereo audio from the MIX OUT jacks.
Instrument
MIX OUT
ASSIGNSBLE OUT TRIGGER OUT
ASSIGN 1–6ASSIGN A–C
Output mono audio from an ASSIGNABLE OUT/TRIGGER OUT 1–6 jack.Output stereo audio from the ASSIGNABLE OUT/TRIGGER OUT A–C jacks.
Instrument
MIX OUT
ASSIGNSBLE OUT TRIGGER OUT
* If the UTILITY: ASSIGN OUT 1–6 setting is NORMAL or BOOST, audio is output. If the setting is TRIGGER, a trigger is output, and audio is also output from the MIX OUT jacks.
Instrument
MIX OUT
ASSIGNSBLE OUT TRIGGER OUT
4. Press the [KIT] button.Exit the KIT Edit screen.
Inputting an External Audio Source (EXT IN)Connect a microphone, synthesizer, or rhythm machine etc. to the EXT IN jacks.
You can do the following things to the audio source that’s input to the EXT IN jacks.
5 Select the input (stereo input x 1 / mono input x 2)& “Convenient Functions and Settings (UTILITY)” 0 “EXT IN” (p. 43)
5 Apply a side-chain& “Editing a Kit’s Settings (KIT Edit)” 0 “KIT: EXT IN” (p. 27)
5 Specify the gain (Gain).& “Editing a Kit’s Settings (KIT Edit)” 0 “KIT: EXT IN” (p. 27)
5 Specify the stereo position (Pan).& “Editing a Kit’s Settings (KIT Edit)” 0 “KIT: EXT IN” (p. 27)
5 Apply reverb (Reverb Send)& “Editing a Kit’s Settings (KIT Edit)” 0 “KIT: EXT IN” (p. 27)
5 Apply delay (Delay Send)& “Editing a Kit’s Settings (KIT Edit)” 0 “KIT: EXT IN” (p. 27)
5 Select the output destination (MIX OUT / ASSIGNABLE OUT)
5 Apply SCATTER (if FILL IN is set to SCATTER, and using MIX OUT output)
5 Apply MASTER FX (if using MIX OUT output)
Connecting a Computer via USBIf you use a commercially available USB 2.0 cable to connect the TR-8S to your computer, you can synchronize the TR-8S with your DAW via USB MIDI, or record individual instruments of the TR-8S onto tracks of your DAW via USB audio.
In order to use the TR-8S, you’ll need to download the driver from the following URL and install it on your computer.
For details on installation, refer to the following URL.& https://www.roland.com/support/
NOTE
Do not connect the TR-8S to your computer before you have finished installing the driver.
If you have already connected the TR-8S, disconnect it, and then reconnect it after driver installation is completed.

48
Synchronizing/Recording with Other Devices
Using a Computer to Manage the Connected SD Card (STORAGE MODE)By connecting in Storage mode, you can use your computer to manage the contents of an SD card that’s inserted in the TR-8S.
1. With the pattern stopped, connect a commercially available USB cable to the USB port of the TR-8S.At this point, do not connect your computer yet.
2. With the pattern stopped, connect the USB cable to your computer while holding down the [SHIFT] button.The screen of the TR-8S indicates “STORAGE MODE,” and the TR-8S stops responding to operations.
The SD card inserted in the TR-8S is mounted on your computer.
STORAGE MODE
3. To disconnect, perform the appropriate operation on your computer to safely eject, and then disconnect the USB cable.

49
Error MessagesMessage Meaning Action
SDCard NotReady!
The SD card is not inserted, or is inserted incompletely.
Turn off the unit, firmly insert the SD card, and then turn on the unit once again.
The SD card was removed after you selected data that was on the SD card.
The format of the SD card is invalid.
Use the TR-8S to format the SD card (p. 7).
Read Error!Data could not be read from the SD card.
Make sure that the SD card is correctly inserted.
The file is damaged. Do not use this file.
Write Error!
Data could not be written to the SD card.
Make sure that the SD card is correctly inserted.
The format of the SD card is invalid.
Use the TR-8S to format the SD card (p. 7).
SD Card Full! There is insufficient space on the SD card. Delete unneeded data.
Sys Mem Damaged!
The contents of the TR-8S’s save area may be damaged.
Execute the factory reset operation (p. 44).If this does not solve the problem, contact your dealer or customer support.
MIDI Buff Full!
An unusually large amount of MIDI data was received, and could not be processed.
Reduce the amount of MIDI messages that are being transmitted.
MIDI Offline! The MIDI IN connection was broken.
Check that there is no problem with the MIDI cable connected to the TR-8S’s MIDI IN, and that the MIDI cable was not disconnected.
Program Error!
The TR-8S was unable to start up. The program could not be read correctly. Alternatively, the system update program may be invalid.
Use the correct program to perform the update once again. If this does not solve the problem, contact your dealer or customer support.
Now Playing!Since the TR-8S is playing, this operation cannot be executed.
Stop playback before you execute the operation.
NowRecording!
Since the TR-8S is recording, this operation cannot be executed.
Stop recording before you execute the operation.
Not Found! The file was not found on the SD card.
Make sure that the file exists on the SD card.
Not Supported!
The format of the audio file is not supported.
In order to load the file, you’ll need to convert it to a supported format.
Too Long Size!
The audio file exceeds the supported number of samples.
In order to load the audio file, you’ll need to shorten it (decrease the number of samples) or lower its sampling frequency.
No Space! There is no free space in the user sample area.
Delete unneeded user samples to increase the amount of free space.
No Tone!There is no enough free space to save the user sample tone settings.
Delete unneeded user samples to increase the amount of free space.

50
TR-8S Audio DiagramTR-8S Audio Diagram
INST FXTONE
INST : BDLevel
INST: BDGain
INST: BDPan
= ASSIGN 1 - 6, A - C
SCATTER MASTER FX
KITLevel
Soft Clipper
PHONES
MIX OUT
UTILITY: MIX OUTMode
USB IN MIX
USB OUT
INSTReverb Send REVERB
INSTDelay Send DELAY
StepSequencer
KIT:OUTPUT= ASSIGN A - C
= ASSIGN 1 - 6
USB IN 1 - 12
= INDIV
UTILITY: GENERAL : USB Mode = ASGN (7 - 12 : no signal)
USB MULTI A- C
ASSIGNABLE OUT / TRIGGER OUT
1 - 6
UTILITY: ASSIGN OUTMode
VOLUMEKnob
KIT: EXT INGain
KIT: EXT INPan
SIDE CHAIN
EXT INKnob
STEREO / MONO
UTILITY: EXTINType
EXT IN
KITEXT IN
Reverb Send
KITEXT IN
Delay Send
UTILITY : ASSIGN OUT : Mode = NORMAL, BOOST
= TRIGGER
= NORMAL, BOOST
KIT:OUTPUT = MIX
UTILITY : ASSIGN OUT : Mode= TRIGGER
TRIGGER OUT(Miniature phone type)
BD
RC
BD - RC
BD - RC
BD - RC