chase online for business | fraud protection services …€¦ · · 2016-02-18chase online for...
TRANSCRIPT

CHASE ONLINE FOR B US I N ES S | FRAUD PROTECTION SERVICES | ENROLLMENT
First, you'll need to enroll in the service.
Step
1 After you log on to Chase Online for Business, go to the Send Payments tab, under Fraud Protection click "Enroll Now."
Please read and accept the Fraud Protection Services Legal Agreement and then verify a billing account.
Step
2
ENROLL NOW
1

CHASE ONLINE FOR B US I N ES S | FRAUD PROTECTION SERVICES | ENROLLMENT
Step
3Next, select the accounts you want to enroll in Fraud Protection Services, and then select Positive Pay or Reverse Positive Pay for each account. Reverse Positive Pay: Enter the dollar amount for checks to be presented for your review.
Click "Next." You'll be prompted to verify your choices. Carefully read the on screen messaging and click "Enroll."
Carefully read the on screenmessaging. To complete your Positive Pay enrollment, you'll need to upload a file with your check details (see instructions on the next page), or click "Enter Checks" when you complete your enrollment.
Step
4 The Positive Pay service is usually active within three business days, following the submission of at least one issue file either manually or through file upload. Until at least one issue is provided manually or through upload, the status will reflect "Pending Activation."
2
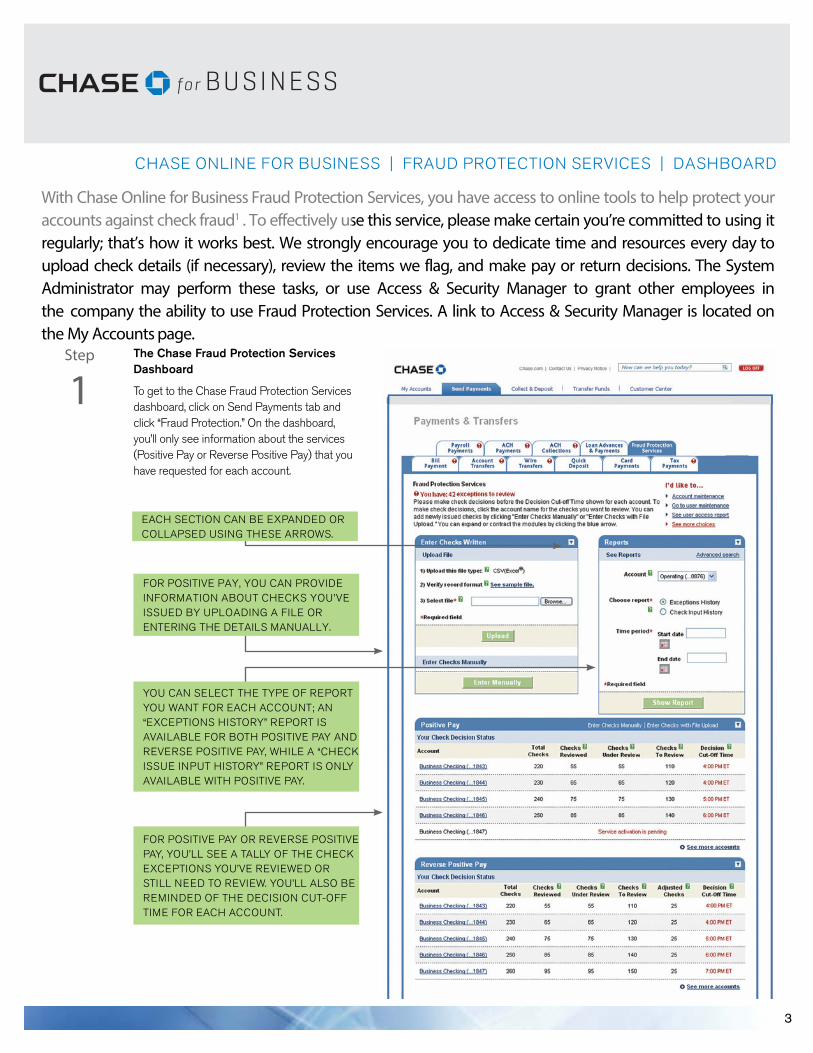
CHASE ONLINE FOR BUSINESS | FRAUD PROTECTION SERVICES | DASHBOARD
With Chase Online for Business Fraud Protection Services, you have access to online tools to help protect your accounts against check fraud1 . To effectively use this service, please make certain you’re committed to using it regularly; that’s how it works best. We strongly encourage you to dedicate time and resources every day to upload check details (if necessary), review the items we flag, and make pay or return decisions. The System Administrator may perform these tasks, or use Access & Security Manager to grant other employees in the company the ability to use Fraud Protection Services. A link to Access & Security Manager is located on the My Accounts page.
Step
1 The Chase Fraud Protection Services Dashboard
To get to the Chase Fraud Protection Services dashboard, click on Send Payments tab and click “Fraud Protection.” On the dashboard, you’ll only see information about the services (Positive Pay or Reverse Positive Pay) that you have requested for each account.
EACH SECTION CAN BE EXPANDED OR COLLAPSED USING THESE ARROWS.
FOR POSITIVE PAY, YOU CAN PROVIDE INFORMATION ABOUT CHECKS YOU’VE ISSUED BY UPLOADING A FILE OR ENTERING THE DETAILS MANUALLY.
YOU CAN SELECT THE TYPE OF REPORT YOU WANT FOR EACH ACCOUNT; AN “EXCEPTIONS HISTORY” REPORT IS AVAILABLE FOR BOTH POSITIVE PAY AND REVERSE POSITIVE PAY, WHILE A “CHECK ISSUE INPUT HISTORY” REPORT IS ONLY AVAILABLE WITH POSITIVE PAY.
FOR POSITIVE PAY OR REVERSE POSITIVE PAY, YOU’LL SEE A TALLY OF THE CHECK EXCEPTIONS YOU’VE REVIEWED OR STILL NEED TO REVIEW. YOU’LL ALSO BE REMINDED OF THE DECISION CUT-OFF TIME FOR EACH ACCOUNT.
3

CHASE ONLINE FOR B US I N ES S | FRAUD PROTECTION SERVICES | POSITIVE PAY
With Positive Pay, you provide details about checks you’ve written and we’ll compare certain information to checks presented for payment. Any check that does not match the account number, check number and dollar amount you’ve provided will be marked as an “exception” and will be available for your review. You can then decide whether to pay or return the check. Note: If you don’t provide check decisions by the decision cutoff time (4 PM local account time), we will return any checks that have not been reviewed and you will be charged a returned check fee where applicable.
To learn how to reduce exceptions caused by readability errors, please see the last page of this guide.
Step
1 Upload Checks
• On the Fraud Protection Servicesdashboard, find the section labeled“Enter Checks Written”
• To select a file containing your checkdetails for upload, click “Browse”
• Transmit the file to Chase by clicking“Upload”
CLICK BROWSE TO UPLOAD FILE
ENTER MANUALLY
Note: Files must be saved as CSV formats, which can be achieved by using the Save As function in Excel and selected CSV. The file name must not contain any spaces. Use the “See sample file” link for an explanation of how your file should be structured.
OR
Enter Checks Manually
• On the Fraud Protection Servicesdashboard, click “Enter Manually” andenter check details in the fields providedand click add to add your item
• If you need to add details for multiplechecks, click “Add” and enter additionalcheck details in the fields that appear
• When you have finished, click “Next”to verify and then submit your checkinformation
Note: Payee Name fields are used for informational purposes only and are not used or reviewed when analyzing checks for Positive Pay purposes. Only Account Number, Check Number and Dollar amount are used in review to provide exceptions to you.
4

CHASE ONLINE FOR B US I N ES S | FRAUD PROTECTION SERVICES | POSITIVE PAY
Step
2 Review Check Exceptions
On the Fraud Protection Services dashboard, click on an account that has exceptions you wish to review.
OR
If you want to review checks in multiple accounts, click “Positive Pay” on the Fraud Protection Services dashboard.
REVIEW EXCEPTIONS
Then select accounts using the checkboxes on the “Review check decisions” page and click “Next.”
REVIEW EXCEPTIONS
Step
3 Make Check Decisions
• Review the check information.
• If you wish to view a copy of the check,click “See check.”
• Make a decision to pay or return theitem, using the drop-down menu foreach check.
• Pay: Pay the Item
• Return: Return the Item (Do Not
Pay the Item)
• After making all decisions, click “Next.”
• You may also choose to pay or return allitems by choosing the “Select all” box.
PAY OR RETURN
CLICK SEE CHECK
5

CHASE ONLINE FOR B US I N ES S | FRAUD PROTECTION SERVICES | POSITIVE PAY
Step
4 Verify & Confirm Decisions
• If you see an item you want to change,click “Change” and make any necessaryrevisions.
• Once you have verified that allinformation is correct, click “SubmitDecisions.”
• You will then receive a confirmation thatyour decisions were submitted.
• All decisions are final after submission.
Note: For Positive Pay, please make all your check decisions by the decision cutoff time. Otherwise, we’ll return checks you haven’t reviewed and charge you a returned check fee, where applicable.
SUBMIT DECISIONS
6

CHASE ONLINE FOR B US I N ES S | FRAUD PROTECTION SERVICES | POSITIVE PAY FILE FORMAT
With Fraud Protection Services through Chase Online for Business, you can use our dashboard to upload information about checks you write so we can compare those details (account number, check number and dollar amount) to checks presented for payment (Positive Pay service only). NOTE: Do not include future dated checks in your check issuance file. Please upload a new file on or after the issuance date.
You can customize the order of the columns in your check issuance file. The step below shows the standard file format, see the next page for instructions on how to customize your file.
Step
1 Creating the CSV file in Microsoft Excel®
Create a file containing the check details you want to upload. Do not include a header row on your file; instead, the first row should contain information about your first check. Information for each additional check should be entered on separate lines.
For each check, enter the following information. No less than six fields are required for submission.
A. Check type: I = issued check, or C = voided or cancelled check (Required)
B. Account number (Required)
C. Check number (Required)
D. Check date: Date should be formatted as mmddyy* (Required)
E. Check amount: This field may contain decimals, but no commas (Required)
F. Payee line 1: This field is limited to 40 characters** (Required)
G. Payee line 2: This field is limited to 40 characters** (Optional)
Finally, save your file in Comma-Separated Value (CSV) format.
Do not include any spaces in the file name.
* In order for your file to be uploaded, the date field must contain a total of 6 characters. In some instances, Microsoft Excel®will delete the first zero of a number, referred to as the leading zero. To force Microsoft Excel® to accept leading zeros:
Right-click the top of the column that contains your date information
Select “Format Cells”
In the “Category:” box, select “Custom”
In the “Type:” box, enter “000000” (six zeros to correspond with the mmddyy format)
** Payee Name fields are used for informational purposes only and are not used or reviewed when analyzing checks for Positive Pay purposes. Only Account Number, Check Number and Dollar amount are used in review to provide exceptions to you.
Excel® is a registered trademark of the Microsoft® Corporation.
7

CHASE ONLINE FOR B US I N ES S | FRAUD PROTECTION SERVICES | CUSTOM POSITIVE PAY FILE
An additional benefit to uploading your Positive Pay check issuance file is that you can customize certain aspects of your upload file. When you upload information about checks you write, we can compare those details to checks presented for payment.
Step
1 From the Fraud Protection Services dashboard click "Manage Custom File Formats."
Note: You may need to click "See more choices" for the option to appear.
MANAGE CUSTOM FILE FORMATS
Step
2 Next, click "Create Custom File Format."
Note: You may need to click "See more choices" for the option to appear.
CREATE CUSTOM FILE FORMATS
8

CHASE ONLINE FOR B US I N ES S | FRAUD PROTECTION SERVICES | CUSTOM POSITIVE PAY
Step
3 Customize Your New File Format
SAVE FORMAT
CUSTOMIZE FILE FORMAT
• Name the file format
• Determine if the new format will be thedefault file format
• Select file type: comma separated orfixed width (for fixed width you will alsoenter a line of sample data)
• Order fields (comma separated) orindicate start to end position for eachfield (fixed width). NOTE: You cannotremove any fields, all fields are required.However, your file must only contain 6fields to be accepted.
• Customize data format, when applicable
• Add help text (optional)
After you click “Save Format” you’ll review your new file format and have the option to make modifications and test the file to make it available for use.
9

CHASE ONLINE FOR B US I N ES S | FRAUD PROTECTION SERVICES | CUSTOM POSITIVE PAY
Step
4Test Your New Custom File Format
• After clicking “Submit” you’ll need totest the new custom file format beforeit is available for use.
• Click, “Test Format” from the CustomFile Format Confirmation Screen
Note: You can edit your custom file formats at any time by clicking “Manage File Formats” on the Fraud Protection Services dashboard.
TEST FORMATS
• Select your file and click “Upload.” Thesystem will provide the result of yourtest file as “Successfully Tested” orprovide you with errors.
• Once you receive the “File SuccessfullyTested” message, your Custom FileFormat is now available for use.
FILE SUCCESSFULLY TESTED
10

CHASE ONLINE FOR B US I N ES S | FRAUD PROTECTION SERVICES | REVERSE POSITIVE PAY
With Reverse Positive Pay, we provide tools for you to monitor checks on your own. We show you checks presented for payment that are equal to or greater than the threshold you specified when you enrolled in Reverse Positive Pay. For example, if you entered $100 as your threshold amount, we’ll only present you with checks that were written for $100 or more and we’ll pay any checks that are less than $100. Please note that any checks below the threshold will not be protected by Fraud Protection Services and may be subject to greater risk of fraud.
Once you have reviewed the checks we’ve shown you, you can decide to pay the check, return the check, or adjust the amount.
Note: If you don’t provide check decisions by the decision cut-off time (4 PM local account time), we’ll pay each check you haven’t reviewed.
Step
1 Review Check Decisions
• On the Fraud Protection Servicesdashboard, click on an account that hasexceptions you wish to review.
OR
• If you want to review checks in multipleaccounts, click “Reverse Positive Pay”on the Fraud Protection Servicesdashboard.
• Then select accounts using thecheckboxes on the “Review checkdecisions” page and click “Next.”
REVIEW CHECK DECISIONS
11

CHASE ONLINE FOR B U S I N E S S | FRAUD PROTECTION SERVICES | REVERSE POSITIVE PAY
Step
2 Make Check Decisions
• Review the check information.
• If you wish to view a copy of the check,click “See check.”
• Make a decision to pay, return, or adjustusing the drop-down menu for eachcheck.
• Pay: Pay the Item
• Return: Return the Item (Do Not Paythe Item)
• Adjust Item: If the dollar amount ofan item presented to you does notmatch the dollar amount on theactual check, you may make anadjustment to match the actualdollar amount on the check. Thiscannot be used to change thepayment amount of the item, only tocorrect an error in how the bankmay have read the amount. If youchoose to adjust an amount, enterthe adjusted amount in the box thatwill appear next to the drop-downmenu.
• After making all decisions, click “Next.”
PAY, RETURN OR ADJUST
12

CHASE ONLINE FOR B U S I N E S S | FRAUD PROTECTION SERVICES | REVERSE POSITIVE PAY
Step
3 Verify & Confirm Decisions
• If you see an item you want to change,click “Change” and make any necessaryrevisions.
• Once you have verified that allinformation is correct, click “SubmitDecisions.”
• You will then receive a confirmation thatyour decisions were submitted.
• All decisions are final after submission.
Note: Please make all your check decisions by the decision cut-off time. Otherwise, we’ll pay the checks you haven’t reviewed.
VERIFY AND SUBMIT DECISIONS
13

CHASE ONLINE FOR B US I N ES S | FRAUD PROTECTION SERVICES | CREATE REPORTS
Generate reports of your exceptions history or check input history.
Step
1 Select a Report to View
• On the Fraud Protection Servicesdashboard, locate the Reports section.
• Use the drop down menu to select the account you want to use to run your report.
• Select either “Exceptions History” or“Check Input History.”
• Enter the date range for the report.
• Click “Show Report” to generate the report.
CLICK SHOW REPORT
Available Reports:
The Exceptions History Report displays information about each exception processed over the selected time period (e.g. - decision, status, reviewed by).
The Check Input History Report (only available with Positive Pay Service) displays information about the issued check details you provided to Chase (e.g. - source of the check issued).
14

CHASE ONLINE FOR B U S I N E S S | FRAUD PROTECTION SERVICES | CREATE REPORTS
Step
2 Print or Download a Report
To print or download the report, use the “Print” or “Download” buttons at the bottom of the report.
PRINT OR DOWNLOAD EXCEPTIONS HISTORY REPORT
PRINT OR DOWNLOAD EXCEPTIONS HISTORY REPORT
15

CHASE ONLINE FOR B US I N ES S | FRAUD PROTECTION SERVICES | TIPS
HOW TO REDUCE EXCEPTIONS CAUSED BY READABILITY ERRORS
Please use the following guidelines to reduce the number of check exceptions presented for review due to readability problems. Remember, with Fraud Protection Services, you will be charged for each check exception presented for review, where applicable.
Text formatting. Checks are most readable when the text is printed in 12-point font or larger, a recommended font style (Courier New, Arial, or Times New Roman), black ink, and all uppercase letters. Please note that text should not be italicized, underlined or written in cursive.
Printing. Checks should be printed on ink jet or laser printers with a resolution of 600 dpi or higher. Dot matrix printed and hand written checks are not recommended.
Printing should also conform to the Federal Reserve Bank Regulation CC Standards, published ANSI layout standards, and be “image friendly.” Please note that any dark background patterns, images or watermarks on the check in the name and address block area can show on the black and white image and may interfere with readability.
STEPS FOR TIMELY POSITIVE PAY ACTIVATION
Positive Pay activation takes 2-3 business days, but the activation process does not take place until you have submitted at least one issue via manual submission or file upload. You will not receive exceptions or have your check activity reviewed until you are activated. Please follow the steps below for a timely Positive Pay activation:
1. Enroll desired accounts in Fraud Protection Services – Positive Pay
2. Immediately submit at least one issued check through the manualsubmission function or through file upload to begin the activationprocess. The account will remain in "Pending Activation" statusuntil at least one issue has been submitted and the 2-3 activationprocess is completed.
3. To prevent unnecessary exceptions, you may want to also provideus check information for any checks outstanding/unpaid checks.Any unpaid/outstanding check presented for payment followingPositive Pay Activation will be an exception if an issue hasn't beenprovided.
4. The Activation Status will be displayed on the Fraud ProtectionServices Dashboard and once activated will display the date theactivation was completed.
FRAUD PROTECTION ALERTS
When you start managing your checks through Chase Fraud Protection Services, you can receive and manage Account Alerts to help you keep track of your account activity.
To enable these alerts for authorized users, the System Administrator should click “Manage Alerts” on the dashboard and then add the user’s email address to their Fraud Protection Services Alerts.
1 Terms, conditions, limitations, and fees apply as described in the Fraud Protection Services Agreement. No representation or warranty of any kind or description is intended or to be inferred from the name
"Fraud Protection Services," given to the Positive Pay Service and the Reverse Positive Pay Service which are available as data matching tools on Chase Online for Business to aid Customer’s in preventing
errors and fraud with respect to Items presented against Customer’s checking accounts.
© 2015 JPMorgan Chase Bank, N.A. Member FDIC. Equal Opportunity Employer. “Chase” is a marketing name for certain businesses of JPMorgan Chase & Co. and its subsidiaries, including, without limitation, JPMorgan Chase Bank, N.A.
16
Need help? If you have questions about Chase Fraud Protection Services, please call the Business Banking Internet Service Center at 1-877-242-7372. Our Service Representatives are available to assist you 24 hours a day/7 days a week. From outside the United States: 713-262-3300, 24 hours a day/7 days a week.
CONTACT US