chapter two implementing, managing, and troubleshooting...
TRANSCRIPT
2C H A P T E R T W O
Implementing, Managing, andTroubleshooting DHCP
ObjectivesMicrosoft lists the following objectives for the DHCP portion of the “Implementing, Managing,and Maintaining IP Addressing” section of Exam 70-291, “Implementing, Managing, andMaintaining a Microsoft Windows Server 2003 Network Infrastructure”:
Manage DHCP.
. Manage DHCP clients and leases.
. Manage DHCP Relay Agent.
. Manage DHCP databases.
. Manage DHCP scope options.
. Manage reservations and reserved clients.
. One of the first few network services you will likely deploy and configure when rolling outa production Windows Server 2003 network is the DHCP service. DHCP is highly integrat-ed with both Active Directory and the dynamic DNS (DDNS) service. To meet this objec-tive, you must have a thorough understanding of the workings of DHCP and also how toconfigure it for use in a network.
Troubleshoot DHCP.
. Diagnose and resolve issues related to DHCP authorization.
. Verify DHCP reservation configuration.
. Examine the system event log and DHCP server audit log files to find relatedevents.
. Diagnose and resolve issues related to configuration of DHCP server andscope options.
. Verify that the DHCP Relay Agent is working correctly.
. Verify database integrity.
. Installing and configuring the DHCP service does not relieve you of monitoring and managing it over time. The ability to monitor, manage, and troubleshoot the DHCP serviceon a network is critical to the ongoing health of the network as a whole. You should beable to use all the tools available to you to ensure that the DHCP service is operating prop-erly, providing service to network clients.

Introduction 72
Understanding DHCP 72
DHCP 73
BOOTP 75
What’s New with Windows Server 2003 DHCP 75
Configuring and Managing DHCP 77
Installing the DHCP Server Service 77
Understanding DHCP Scopes 79
Understanding DHCP Superscopes 80
Understanding Multicasting andMulticast Scopes 80
Creating a DHCP Scope 82
Configuring Scope Properties 88
Authorizing a DHCP Server in ActiveDirectory 93
Configuring DHCP for DNS Integration 95
Configuring and Implementing a DHCPRelay Agent 99
Configuring Security for DHCP 104
DHCP Server Management and Monitoring 107
Examining the DHCP Server Statistics 107
DHCP Server Backup and Restore 108
Reconciling the DHCP Database 110
Stopping the DHCP Server 110
Configuring Options and Classes 111
Changing the Server State 112
DHCP Server Common Commands 112
Troubleshooting DHCP 115
Troubleshooting DHCP Server Authorization Problems 115
Using the DHCP Logs 120
Troubleshooting DHCP Reservations 123
Troubleshooting the DHCP Relay Agent 124
Chapter Summary 125
Key Terms 125
Apply Your Knowledge 126
Exercises 126
Exam Questions 129
Answers to Exam Questions 134
Suggested Readings and Resources 137
Outline
Study Strategies. Be sure you understand what DHCP is, how it works, why it was created, and what
enhancements Microsoft Windows Server 2003 DHCP server service adds to the protocol.DHCP has been used in Transmission Control Protocol/Internet Protocol (TCP/IP)–basednetworks for quite a while. Microsoft has extended the functionality of DHCP as part of itsWindows Server 2003 operating system. DHCP is used to dynamically allocate IPaddresses, and it also plays a critical role in registering hosts with the Domain NameService (DNS).
. Be sure you understand the types of scopes that Windows Server 2003 DHCP serverservice supports, how each works, and when you should use each in a production envi-ronment.
. Get your hands dirty. The Step by Step exercises throughout this book provide plenty ofdirections and exercises, but you should go beyond those examples and create some ofyour own. If you can, experiment with each of the topics we discuss in this chapter to seehow they work and why you would use each one.
72
IntroductionTCP/IP is the de facto standard for computer networking and appears to have no challengersin the networking protocol arena. If you are going to work with Windows Server 2003, youshould expect to work with TCP/IP. One of the keys to successfully working with TCP/IP ishaving an understanding of the concept of TCP/IP addresses. The designers of TCP/IP want-ed an identification scheme that was independent of any one computer or network equipmentdesign, so they established a scheme of IP addresses.
If you’ve ever surfed the Web, you have probably seen IP addresses at one time or another(numbers such as 192.168.144.77). As you administer TCP/IP on a network, a considerablepart of your time will be devoted to IP address assignment because IP addresses don’t just mag-ically get assigned to network hosts—they have to be provided through manual configurationor some other means. When a computer is added to a network, it needs an IP address to com-municate on that network. When the computer moves to a new location, it is likely to need anew IP address. If you are just starting out with managing a large TCP/IP network, you mightfind the notion of managing all those addresses a bit daunting. If you move a DNS server to anew subnet, you may have to reconfigure every client computer. If you move a client comput-er to a new subnet, you may have to update its IP address. This does not endear you to roadwarriors who travel among several offices, especially those who are regional managers. If youmanually manage IP addresses, almost any change to the network will require a visit to one ormore computers to update TCP/IP configurations—not a happy prospect. Fortunately, thepeople who brought us DNS to replace the hosts file also came up with a solution to thisdilemma.
DHCP was the Internet community’s answer to dynamically distributing IP addresses. DHCPis open and standards-based, as defined by the Internet Engineering Task Force (IETF) intheir Requests for Comments (RFCs) 2131 and 2132. (The IETF is the main standards organ-ization for the Internet.) This chapter examines the basics of DHCP as it applies to you, thesystems administrator, and how you can use it to make your life and your network better.
Understanding DHCPPublic IP addresses are registered with the Internet Assigned Numbers Authority (IANA) sothat IANA can keep track of IP addresses that are being used on the Internet. In some cases,a network will not be connected to the Internet and will not need to use registered public IPaddresses. In other cases, the network is connected to the Internet with special hardware andsoftware that can be configured to allow the network to use private addresses in conjunctionwith address translation, commonly referred to as Network Address Translation (NAT). Byusing NAT, you can (in simple terms) place an entire private network behind a single public IP
Chapter 2: Implementing, Managing, and Troubleshooting DHCP
Understanding DHCP73
address. As an example, the organization I work for has over 5,000 hosts on its internal net-work. When I or anyone else visits a Web site on the Internet, we all appear to be coming froma single IP address. That’s NAT in action!
What Are RFCs? RFCs are used to propose changes to existing standards and to help create new stan-dards that specify the way the Internet and IP behave. If an RFC can garner enough interest, it might even-tually become a standard. Topics of RFCs range from File Transfer Protocol (FTP; originally RFC 0114 butupdated by RFC 0141, RFC 0172, and RFC 0171) to the Hitchhiker’s Guide to the Internet (RFC 1118). Thefirst RFC was posted in 1969 by Steve Crocker, and the topic of that document was host software. You canfind listings of all the RFCs at a number of sites throughout the Internet. One place is www.rfc-editor.org.
NOTE
Quite often, systems administrators use private (unregistered) addresses on their internal net-works to ensure that there are enough readily available addresses for all users. This modelworks great on a network that is not tied directly to the Internet. However, with the shortageof Class A and Class B (and even Class C) IP addresses, some environments use small pools ofregistered addresses to service larger numbers of DHCP clients; the idea is that not everyclient computer would need access simultaneously. These environments require aggressiveleasing policies to ensure that everyone can get an address.
In addition to IP addresses, DHCP can also provide gateway addresses, DNS server address-es, and Windows Internet Name Service (WINS) server addresses—in essence, everything theclient computer needs to participate in the network. This means that all available IP address-es can be stored in a central database, along with associated configuration information, such asthe subnet masks, gateways, and addresses of DNS servers.
DHCPDHCP provides the mechanism for dynamically distributing IP addresses on a network—butit doesn’t happen magically. Here’s how a client computer gets an address:
1. After boot up, the client computer broadcasts a DHCPDISCOVER message that is intendedfor the DHCP server(s) on the network. If a router sits between the DHCP server andthe client, it needs to be configured with the IP address of the DHCP server as well asbe configured to forward BOOTP. BOOTP is discussed in the next section,“BOOTP.”
2. Each DHCP server that receives the DHCPDISCOVER message responds with a DHCPoffer message. That message includes an IP address that is appropriate for the subnetwhere the client computer is attached. The DHCP server determines the appropriateaddress by looking at the source subnet for the broadcast DHCPDISCOVER message.

74
3. The client computer considers the offer messages and selects one (usually the first offerit receives). It sends a request (DHCPREQUEST) to use the address to the DHCP serverthat originated the offer. If there are multiple DHCP servers, they need to be carefullyconfigured. It is easy to inadvertently configure servers and end up with them conflict-ing, so it is important if you have multiple DHCP servers on a network that they donot have the capability to offer duplicate IP addresses. Because DHCP servers do notcommunicate with one another, they have no way of telling whether an address hasalready been issued by another DHCP server.
4. The DHCP server acknowledges the request and grants the client computer a lease touse the address.
5. The client computer uses the IP address to bind to the network. If the IP address isassociated with any configuration parameters, the parameters are incorporated into theclient computer’s TCP/IP configuration.
6. For the first renewal of the IP address, when 50 percent of the configured lease timehas elapsed, the client sends another DHCPREQUEST message to the DHCP server thatgranted its lease, asking to renew and extend its current lease. All subsequent leaserenewal will be at 75 percent.
7. If the DHCP server is reachable, it responds with a DHCPACK message to the client,renewing and extending the DHCP lease as requested.
8. If the DHCP server is not reachable, the client continues trying to reach it until 87.5percent of the lease time has elapsed. At this point, the client attempts to renew itslease with any DHCP server that responds. If this is unsuccessful, the client starts theprocess of acquiring a new DHCP lease.
Chapter 2: Implementing, Managing, and Troubleshooting DHCP
EXAM ALERTDHCP Solitude Be sure to remember that DHCP servers do not communicate with one another, there-fore they have no way of telling whether an address has already been issued by another DHCP server.It is for this reason that you will never create identical DHCP scopes on multiple DHCP servers.
The first step of this process indicates that DHCP clients request their addresses by usingbroadcast messages. If you are familiar with routing, particularly TCP/IP routing, you areprobably familiar with the fact that one of the benefits of routing is that the router segregatesbroadcast domains. In other words, broadcasts do not generally cross routers. Does that meanthat DHCP works only on the local segment and you need 50 DHCP servers for 50 subnets?No, that is not the case, not if you configure your routers or other Windows Server 2003 com-puters to act as DHCP relay agents.

What’s New with Windows Server 2003 DHCP75
Configuring a router or server as a DHCP relay agent causes it to begin using BOOTP.BOOTP was the precursor to DHCP, and it was the first protocol used to assign IP addressesdynamically. BOOTP was specially designed to pass across a router, and it continues to be usedto allow DHCP broadcasts to propagate across routers. You’ll learn about the installation andconfiguration of DHCP relay agents later in this chapter, in the section “Configuring andImplementing a DHCP Relay Agent.”
BOOTPBefore we discuss installing and configuring the DHCP service in Windows Server 2003, abrief discussion about BOOTP is necessary. A number of DHCP’s features had their begin-nings in BOOTP. BOOTP was originally designed in 1985 by Bill Croft and John Gilmore toautomate the configuration of network devices. To use BOOTP, the systems administratormust create a table with a list of client computers, their IP addresses, and network configura-tions. When a client computer comes on to the network, it broadcasts a request that theBOOTP server receives. The BOOTP server looks up the client computer in the table andresponds with the configuration information stored in the table, allowing the client computerto communicate on the network.
Because BOOTP worked well, it was used extensively in the early 1990s in conjunction withdiskless workstations. (A BOOTP chip was a common option on a network interface card[NIC], and many networks thrived on BOOTP.) The downside of BOOTP was that it pro-vided only the configuration information entered in the table. The administrator still neededto configure the table. The limitations of BOOTP effectively prevented any automation ofthese tasks, so it was eventually replaced with DHCP. BOOTP and DHCP packets look vir-tually identical, and DHCP even takes advantage of the BOOTP forwarder functionality ofmany routers and switches. DHCP offers the automation features BOOTP was lacking.
Now that we’ve completed the history lesson, you should have a pretty good understanding ofthe theory of DHCP. Before moving on to the workings of DHCP in Windows Server 2003,let’s examine the new DHCP features that Windows Server 2003 provides.
What’s New with Windows Server 2003 DHCPDHCP is not a new service in Windows Server 2003, but it has undergone some changes fromboth Windows 2000 and Windows NT 4.0. The following list summarizes some of the major
76
changes in DHCP in Windows Server 2003, as compared to Windows 2000 Server andWindows NT 4.0:
. DHCP integration in DNS—Windows Server 2003 DHCP servers can triggerdynamic updates in the DNS database for all clients to which it leases IP addresses.Windows 2000 and newer clients can automatically update their DNS records if theyare authorized to do so. Legacy clients can have their records updated by the DHCPserver if it is authorized to do so.
. Rogue DHCP server detection—Unauthorized, or rogue, DHCP servers can cause awide variety of problems, including denial of service (DoS) to clients. To prevent suchproblems, Windows Server 2003 provides for authorizing DHCP servers and detectingand shutting down unauthorized servers. Active Directory is required for the detectionof rogue DHCP servers to occur.
. Superscope and multicast scope support—Superscopes allow you to group severalstandard DHCP scopes into a single administrative group without causing any servicedisruption to network clients. Multicast scopes allow you to lease Class D IP addressesto clients for participation in multicast transmissions, such as streaming video andaudio transmissions. Multicast scopes are discussed in more detail in the section“Understanding Multicasting and Multicast Scopes” later in this chapter.
. Local security groups for DHCP management—Two new local administrative secu-rity groups are created when the DHCP service is installed: DHCP Users and DHCPAdministrators. The DHCP Users group can be used to provide read-only consoleaccess to the server to allow group members to view, but not modify, DHCP data. TheDHCP Administrators group provides full administrative control of the DHCP servicewithout granting its members full administrative control over the entire server.
. Improved monitoring and reporting—DHCP is a critical network service that mustbe kept running. The key to discovering problems early is monitoring, so WindowsServer 2003 provides a full set of performance monitoring counters that can be used tomonitor DHCP server performance.
. Custom DHCP option classes—User- and vendor-specified option classes can beused to distribute specific options to the clients that need them. For example, you canuse option classes to distribute a specific default gateway or parent domain name toone group of computers on a network.
. In-console backup and restore—For the first time ever, Windows Server 2003 pro-vides the administrator with the ability to perform DHCP scope backups and restora-tions from within the DHCP console itself.
Now that we’ve briefly examined the improvements made in the DHCP service in WindowsServer 2003, we can talk about configuring and implementing it on the network.
Chapter 2: Implementing, Managing, and Troubleshooting DHCP

Configuring and Managing DHCP77
Configuring and Managing DHCPThe first question many managers ask when presented with a request to install WindowsServer 2003 DHCP is this: “Can’t we just use our existing DHCP?” The answer to this ques-tion is both yes and no. If you are maintaining a legacy domain and WINS network, WindowsServer 2003 can receive DHCP information from any DHCP server with which Windows NT4.0 or Windows 2000 works. However, if you want to take advantage of the features of ActiveDirectory and migrate away from the legacy WINS architecture, you need the WindowsServer 2003 DHCP service.
The following sections discuss how to install and configure DHCP for a network.
Installing the DHCP Server ServiceWhen you install Windows Server 2003, you have the ability to install DHCP as one of theoptional services. To prepare for Exam 70-291, you need to know how to install DHCP on anexisting server that does not already have DHCP installed.
A DHCP Server Cannot Also Be a DHCP Client If you currently have a server configured as a DHCPclient, the DHCP installation will prompt you to enter a static IP address for the server.
NOTE
Before you install DHCP, you must configure the server with a static IP address, as discussedin Chapter 1, “Configuring and Troubleshooting TCP/IP Addressing.” After the DHCP serv-er’s network adapter is configured with a static IP address, you can go about the process ofinstalling the DHCP service onto the server. To install the DHCP service on your server, per-form the steps described in Step by Step 2.1.
STEP BY STEP2.1 Installing the DHCP Service
1. Select Start, Settings, Control Panel, Add or Remove Programs.
2. On the Add or Remove Programs page, click Add/Remove Windows Components to open the WindowsComponents Wizard.
3. Select Networking Services, as shown in Figure 2.1.

78
4. Click the Details button to open the Networking Services window, shown in Figure 2.2.
5. Select Dynamic Host Configuration Protocol (DHCP) and click OK.
Chapter 2: Implementing, Managing, and Troubleshooting DHCP
FIGURE 2.1 DHCP is located in theNetworking Services group in the WindowsComponent Wizard.
6. Back in the Windows Components Wizard page, click Next to begin the installation.
7. If you are prompted to supply the location of your Windows Server 2003 CD-ROM or installation files,provide the correct location. Windows installs the DHCP service files on your computer.
8. When prompted that installation is complete, click Finish to close the Windows Components Wizard.
FIGURE 2.2 You select the Dynamic HostConfiguration Protocol (DHCP) option to install theDHCP server.
Configuring and Managing DHCP79
After you’ve installed the DHCP service, you next need to begin configuring the DHCP serv-er so that it can service network clients. Before you can begin the configuration process, youfirst need to get an understanding of the types of DHCP scopes in Windows Server 2003.
Understanding DHCP ScopesA scope is a range of IP addresses that are available for dynamic assignment to hosts on a givensubnet. The scope for a particular subnet is determined by the network address of the broad-cast DHCP request. In addition to address information, a scope can include a set of configu-ration parameters to be assigned to client computers when the address is assigned. This list ofconfiguration parameters can include DNS servers, WINS servers, default gateways, the sub-net mask, a NetBIOS scope ID, IP routing information, and WINS proxy information.
You should make the scope as large as you can. Later in the scope-creation process, you havethe ability to exclude addresses, and you can also define reservations for particular addressesthat exist within the scope.
At Least One Scope After you install the DHCP service, you must define at least one scope on the server.Otherwise, the service will not respond to DHCP requests.
NOTE
EXAM ALERTPlanning for Redundancy Although most of the examples in this chapter assume that you have onlyone DHCP server on the network, that is most often not the case. The discussion here is oriented thisway to help you get the important knowledge down without adding any confusion.
In reality, you will want to have two or three or perhaps even more DHCP servers to service clients.Let’s examine, for example, a situation in which you have two DHCP servers servicing network clients.The network has these two DHCP scopes configured with IP addresses: 192.168.50.10–192.168.50.169and 192.168.51.10–192.168.51.169. Your first thought might be to just place one complete IP addressrange on each server. This would not be the best solution, however.
For redundancy and protection in the event that disaster strikes, you should place a portion of each IPaddress range on each DHCP server. You should consider using either the 80/20 or the 70/30 rule (themost common DHCP distribution methods in use today). If you used the 80/20 rule, you would create ascope on the first DHCP server with 80 percent of the first IP address range(192.168.50.10–192.168.50.127) and another scope with 20 percent of the second IP address range(192.168.51.128–192.168.51.169). You would then create a scope on the second DHCP server with 80percent of its IP address range (192.168.51.10–192.168.51.127) and a second scope with 20 percentof the other IP address range (192.168.50.128–192.168.50.169).
This design prevents the failure of one DHCP server from completely preventing network clients fromobtaining DHCP leases and accessing network resources. In addition, you can cluster DHCP servers toprovide another form of redundancy in even larger networks.

80
Understanding DHCP SuperscopesThe superscope type of scope was introduced to the Windows NT product family with ServicePack 2 for Windows NT 4.0. A superscope allows you to support a supernetted or multinet-ted network with a Windows Server 2003 DHCP server.
A supernetted network is a network that has multiple network addresses or subnets running onthe same segment. This configuration is common in a network environment with more than254 hosts on a subnet and in an environment in which certain hosts need to be isolated fromthe rest of the logical network for security or routing reasons. Superscopes support a localmultinet or a multinet that is located across a router and configured to use the BOOTP for-warder service.
When to Use SupernettingVisualize a large company that has been assigned the IP address block 198.142.1.0–198.142.6.254 by itsISP. The company occupies five floors in a building. On each of these floors are approximately 300 users,all on the same physical network. Traditional network design would have a routed backbone runningbetween the floors, and each floor would be its own IP network. But there’s one problem: There are toomany users on these floors to be handled by a single Class C subnet. What are the alternatives?
You could place a router somewhere on each of the floors to further segment the network. This is anexpensive and support-intensive solution and is generally considered to be impractical.
You could purchase a block of Class B addresses, but this could get costly and is generally very wasteful.
The last thing you could do is place multiple IP networks on the single-routed segment. In other words,you could create a supernet. This capability is supported by any of the routers on the market today,including the operating system–based routing services in Windows Server 2003, Novell NetWare, and anyof the Unix flavors. So when you think about a supernet, think about a floor in a building with too manyusers for 254 IP addresses.
Understanding Multicasting and Multicast ScopesMulticasting is the act of transmitting a message to a select group of recipients. This is in con-trast to the concept of a broadcast, in which traffic is sent to every host on the network, or aunicast, in which the connection is a one-to-one relationship and there is only one recipient ofthe data.
Let’s look at an example using an email message. If you send an email message to your man-ager, that email is a unicast message. If you send an email message to every user on the system,you have sent a broadcast. If you send an email message to a mailing list, you have sent a mul-ticast message, which falls between a unicast message and a broadcast message.Teleconferencing and videoconferencing use the concept of multicasting, as does broadcastaudio, in which the connection is from one source computer to a selected group of destination
Chapter 2: Implementing, Managing, and Troubleshooting DHCP

Configuring and Managing DHCP81
computers. At this time, only a few applications take advantage of multicasting, but with thegrowing popularity of multicast applications, we might see more multicast applications in thefuture.
The following are a few terms you need to understand before we discuss the Windows Server2003 multicast capabilities:
. Multicast DHCP (MDHCP)—An extension to the DHCP standard that supportsdynamic assignment and configuration of IP multicast addresses on TCP/IP-based net-works.
. Multicast forwarding table—The table used by an IP router to forward IP multicasttraffic. An entry in the IP multicast forwarding table consists of the multicast groupaddress, the source IP address, a list of interfaces to which the traffic is forwarded (thatis, the next-hop interfaces), and the single interface on which the traffic must be receivedto be forwarded (that is, the previous-hop interface).
. Multicast group—A group of member TCP/IP hosts configured to listen for andreceive datagrams sent to a specified destination IP address. The destination addressfor the group is a shared IP address in the Class D address range (224.0.0.0–2239.255.255.255).
. Multicast scope—A scope of IP multicast addresses in the range239.0.0.0–239.254.255.255. Multicast addresses in this range can be prevented frompropagating in either direction (send or receive) through the use of scope-based multi-cast boundaries.
Windows Server 2003 makes use of the concept of a multicast scope. The DHCP service hasbeen extended to allow the assignment of multicast addresses in addition to unicast (single-computer) addresses. A proposed IETF standard (RFC 2730), Multicast Address DynamicClient Allocation Protocol (MADCAP), defines multicast address allocation. MADCAP (alsoknown as MDHCP in Microsoft lingo) would allow administrators to dynamically allocatemulticast addresses to be assigned in the same fashion as unicast addresses. The WindowsServer 2003 DHCP multicasting capability also supports dynamic membership, which allowsindividual computers to join or leave a multicast group at any time. This is similar to register-ing to receive an Internet broadcast or joining and leaving an email mailing list. Group mem-bership is not limited by size, and computers are not restricted to membership in any singlegroup.
How do client computers join and leave a multicast group? The answer is via MDHCP andthe MDHCP application programming interface (API). Client computers using MDHCPmust be configured to use the MDHCP API. MDHCP assists in simplifying and automatingconfiguration of multicast groups on a network, but it is not required for the operation of mul-ticast groups or for the DHCP service. Multicast scopes provide only address configuration

82
and do not support or use other DHCP-assignable options. MDHCP address configurationfor client computers should be done independently of how the client computers are configuredto receive their primary IP addresses. Computers using either static or dynamic configurationthrough a DHCP server can also be MDHCP clients.
Chapter 2: Implementing, Managing, and Troubleshooting DHCP
EXAM ALERTClass D IP Addresses for the Multicast Scope Remember that along with a primary IP address, acomputer receives a multicast address, and that address is for multicasts only and uses the Class D IPaddresses specified in the multicast scope. Multicast addresses are not used for regular network traf-fic such as Web traffic or other IP-based applications.
Now that you have knowledge of the different types of scopes supported in Windows Server2003, you can move forward to creating scopes on a DHCP server.
Creating a DHCP Scope
Objective:Manage DHCP.
. Manage DHCP clients and leases.
. Manage DHCP scope options.
Now that you are familiar with the different types of scopes, you can create one. To create astandard DHCP scope, you perform the steps described in Step by Step 2.2.
EXAM ALERTPreparing Before Performing Before you actually start to create a DHCP scope, you should ensurethat you have gathered all required information. You typically need the starting and ending IP address-es, the subnet mask, the DNS server IP address, and the gateway IP addresses.
STEP BY STEP2.2 Creating a DHCP Scope
1. Open the DHCP console by selecting Start, Programs, Administrative Tools, DHCP.
2. Right-click the DHCP server and select New Scope from the context menu.
3. Click Next to dismiss the opening page of the New Scope Wizard.
Configuring and Managing DHCP83
4. On the first page of the wizard, the Scope Name page, enter a name and description for the new scope,as shown in Figure 2.3. You should make this name something that will allow you to easily identify thisscope in the event that you have multiple scopes on the DHCP server. When you’re done entering theinformation, click Next to continue.
FIGURE 2.3 You should enter an intuitivename and description for the new scope.
5. On the next page of the wizard, the IP Address Range page, enter the IP address range and subnetmask that you need for the network, as shown in Figure 2.4. You can define the subnet mask by usingthe standard octet method (for example, 255.255.255.0) or by using the more router-centric masklength field (for example, 24 bits). When you’re done entering the information, click Next to continue. Ifyou need a refresher on subnet masks, refer to Chapter 1.
FIGURE 2.4 Configuring the IP addressrange and subnet mask information definesthe scope boundaries.

84
6. On the next page of the wizard, the Add Exclusions page (see Figure 2.5), you can configure a range ofIP addresses that will not be leased to client computers. These are typically addresses assigned toapplication servers, routers, printers, or other infrastructure equipment that requires static addresses.You can have multiple excluded IP addresses or ranges for each scope. When you’re done entering theinformation, click Next to continue.
Chapter 2: Implementing, Managing, and Troubleshooting DHCP
FIGURE 2.5 Configuring IP address exclu-sions allows you to prevent addresses withinthe scope from being leased out.
7. On the next page of the wizard, the Lease Duration page, you can configure the amount of time forwhich a DHCP lease is valid, as shown in Figure 2.6. The default setting is 8 days and can be changedto any value between 1 minute and almost 1,000 days (999 days, 23 hours, 59 seconds, to be exact).For the average network, the default setting of 8 days is sufficient. In a network that has a large numberof computers connecting at various locations, such as portable computers on wireless connections, youmight want to reduce the lease duration. Conversely, in a network with clients that do not change loca-tion, you might consider increasing the lease duration to cut down on DHCP traffic on the network.When you’re done entering the information, click Next to continue.
FIGURE 2.6 You should configure the leaseduration that seems appropriate for the net-work.

Configuring and Managing DHCP85
8. On the next page of the wizard, the Configure DHCP Options page, you are given the choice to configureadditional options for your scope now or later. It is usually best to configure these options at the time ofscope configuration, and thus you should do that now. Table 2.1, later in this chapter, presents theentire list of DHCP scope options that can be configured, although you will only be able to configurethree of them at this time. Select Yes, I want to Configure These Options Now and click Next to continue.
Options Levels You can configure DHCP options at four different levels for each DHCP server:
. Server options—These are DHCP options that are applied, by default, to all scopes on the DHCPserver.
. Scope options—These are DHCP options that are applied only to the specific scope on the DHCPserver. When a scope option conflicts with a server option, the scope option wins and that value ismade a part of the scope. If the conflicting scope option is later removed, the server option onceagain becomes effective in the scope.
. Class options—These are DHCP options that are applied only to clients identified as members ofspecified user or vendor classes.
. Reservation options—These are DHCP options that are applied only to a single specific computer.
NOTE
9. On the next page of the wizard, the Router (Default Gateway) page, enter the default gateway for thenetwork or the subnet that the scope serves, as shown in Figure 2.7. When you’re done entering theinformation, click Next to continue.
FIGURE 2.7 If you configure multiple gate-ways, you need to ensure that you placethem in preferred order from top to bottom.
10. On the next page of the wizard, the Domain Name and DNS Servers page, configure the parent domainof which all DHCP clients should be made part as well as any number of DNS servers you require, as

86
shown in Figure 2.8. It is recommended that you enter at least two DNS servers for your clients to use.If you need to resolve a server name to an IP address, you can enter the server’s name and then clickthe Resolve button. Configuring the DNS service is discussed in Chapter 3, “Implementing andManaging DNS.” When you’re done entering the information, click Next to continue.
Chapter 2: Implementing, Managing, and Troubleshooting DHCP
FIGURE 2.8 If you configure multiple DNSservers, you should ensure that you placethem in preferred order from top to bottom.
11. On the next page of the wizard, the WINS Servers page, enter the IP addresses of the network’s WINSservers, as shown in Figure 2.9. WINS servers are used to convert NetBIOS names to IP addresses forlegacy clients on the network. As in the Domain Name and DNS Servers page, you can use the Resolvebutton to resolve a hostname to an address. If a network is purely Windows 2000 or better, you do notneed to have a WINS server on the network because Windows 2000, Windows XP, and Windows Server2003 use DNS by default for all name resolutions. If you do have the need for WINS servers on a net-work, it is recommended that you enter at least two of them here. When you’re done entering the infor-mation, click Next to complete the scope creation process.
FIGURE 2.9 WINS servers are not requiredfor networks that use only Windows 2000,Windows XP, or Windows Server 2003 computers.
Configuring and Managing DHCP87
12. On the next page of the wizard, the Activate Scope page (see Figure 2.10), you are given the option toactive the configured scope now or later. In most cases you want to activate the scope right away.Select Yes, I Want to Activate This Scope Now and click Next to activate the configured scope.
FIGURE 2.10 You typically want to activatethe scope immediately after configuring it.
13. Click Finish to close the New Scope Wizard. Note that the DHCP won’t issue any IP address from yournew scope unless it has already been authorized in Active Directory, which we discuss a little bit later inthis chapter.
Configuring Scope Ranges The common practice when configuring a new DHCP scope is to configure itand leave out enough addresses to cover all servers and other infrastructure devices that require staticallyassigned IP information without needing all the other options provided in a DHCP scope, such as DNSservers, WINS servers, and default gateways. For example, you might configure a scope of192.168.0.10–192.168.0.200, with the remaining IP addresses available for servers, routers, switches, andother infrastructure equipment on that subnet. This practice prevents the possibility of forgetting a config-ured reservation and ending up with duplicate IP addresses.
NOTE
EXAM ALERTWhen to Use the New Multicast Scope Option Creating a new scope and creating a new multicastscope are two different tasks. If you get a question on the exam regarding the procedure for creating amulticast scope, remember that you need to start the process by selecting New Multicast Scope, notNew Scope.

88
Configuring Scope Properties
Objective:Manage DHCP.
. Manage DHCP clients and leases.
. Manage DHCP scope options.
. Manage reservations and reserved clients.
After you’ve created a scope, you might want to modify its properties. To modify a scope’sproperties, you perform the steps described in Step by Step 2.3.
Chapter 2: Implementing, Managing, and Troubleshooting DHCP
Changing Scope Properties It’s worth it to point out that you cannot change every option a scope has.For example, if you need to change the subnet mask that DHCP clients are receiving as part of their DHCPlease, you’ll need to create a new DHCP scope reflecting this change and then remove the existing DHCPscope. Clients will then get the new information when they renew their lease the next time.
NOTE
STEP BY STEP2.3 Configuring a DHCP Scope’s Properties
1. Right-click the scope and select Properties from the context menu.
2. The Properties dialog box opens, as shown in Figure 2.11.
FIGURE 2.11 You can use the Scope Properties dialogbox to change scope properties after you create a scope.

Configuring and Managing DHCP89
3. On the General tab, change the scope name, IP address range, lease duration, and scope description ifyou want to.
4. If you want to change the options on the DNS tab, do so now. The options on the DNS tab are dis-cussed later in this chapter, in the section “Configuring DHCP for DNS Integration.”
5. On the Advanced tab, select options related to BOOTP clients, as shown in Figure 2.12. If you haveBOOTP clients on your network, select either the BOOTP Only option or the Both option, depending onyour network configuration. The default setting is DHCP Only. Click OK to close the Scope Propertiesdialog box after you make your changes.
FIGURE 2.12 You can configure the scope to serviceBOOTP clients on the Advanced tab of the ScopeProperties dialog box.
6. To view the address pool and configured exclusion ranges, click the Address Pool node of the DHCPconsole, as shown in Figure 2.13.
FIGURE 2.13 You can quickly view all con-figured scope ranges and exclusion rangesfrom the Address Pool node.

90
7. To add a new exclusion range, right-click Address Pool and select New Exclusion Range from the con-text menu. The Add Exclusion window appears (see Figure 2.14). Click Add after you enter your newexclusion range.
Chapter 2: Implementing, Managing, and Troubleshooting DHCP
FIGURE 2.14 You can add a new exclusion range to a config-ured DHCP scope by using the Add Exclusion dialog box.
8. To view the addresses that have been leased, click the Address Leases node, as shown in Figure 2.15.(Of course there won’t be any leases shown here until you authorize the DHCP server, as discussedlater in this chapter, in the section “Authorizing a DHCP Server in Active Directory.”)
FIGURE 2.15 You can view all active scopeleases from the Address Leases node.
9. If you want to manually revoke an active client lease, right-click it in the right pane of the AddressLeases node and select Delete from the context menu.
10. To view the configured reservations, click the Reservations node of the DHCP console.
11. You can configure a new address reservation by right-clicking Reservations and selecting NewReservation from the context menu. You can configure a reservation for any device that you want tohave a DHCP-assigned IP address that never expires. Configure the reservation as shown in Figure 2.16and click Add to add it. Click Close to close the New Reservation input box after you’re done configuringreservations for this scope. After you’ve configured a reservation, you can see it in the Reservationsnode of the DHCP console, as shown in Figure 2.17.
12. You can view existing scope options by clicking the Scope Options node, as shown in Figure 2.18.

Configuring and Managing DHCP91
FIGURE 2.16 You can configure a new DHCP reservation, whichis typically done for printers and other static infrastructuredevices.
FIGURE 2.17 You can view all scope reser-vations from the Reservations node.
FIGURE 2.18 The Scope Options node listsall currently configured scope options.

92
13. To configure a new scope option, right-click the Scope Options node and select Configure Options fromthe context menu. Configure the options in the Scope Options window (see Figure 2.19). Table 2.1 liststhe common DHCP options available for configuration. Table 2.2 explains the Microsoft-specific DHCPoptions that are available for configuration.
Chapter 2: Implementing, Managing, and Troubleshooting DHCP
FIGURE 2.19 You can configure extra scope options from the Scope Options dialog box.
EXAM ALERTConfiguring Server Options You can configure server-wide DHCP options as mentioned in Step byStep 2.3. To configure server DHCP options that apply to all scopes on the DHCP server, right-click theServer Options node in the DHCP console and select Configure Options from the context menu.
Some of the more common DHCP scope options are presented in Table 2.1.
TABLE 2.1 Common DHCP Scope OptionsCode Option Name Option Description
2 Time Offset Specifies the offset of the client’s subnet in seconds from UTC.
3 Router Specifies a list of IP addresses for routers on the client’s subnet.
4 Time Server Specifies a list of RFC 868 time servers available to the client.
5 Name Servers Specifies a list of name servers available to the client.
6 DNS Servers Specifies a list of DNS servers available to the client.

Configuring and Managing DHCP93
TABLE 2.1 ContinuedCode Option Name Option Description
9 LPR Servers Specifies a list of RFC 1179 line printer servers available to the client.
15 DNS Domain Name Specifies the domain name that the client should use when resolving host-names via DNS.
27 All Subnets Are Local Specifies whether the client can assume that all subnets of the IP network towhich the client is connected use the same MTU as the subnet of the net-work to which the client is directly connected.
28 Broadcast Address Specifies the broadcast address in use on the client’s subnet.
44 WINS/NBNS Servers Specifies a list of RFC 1001/1002 NBNS servers, listed in order of prefer-ence.
46 WINS/NBT Node Type Allows NetBT clients, which can be configured as described in RFC1001/1002.
47 NetBIOS Scope ID Specifies the NetBT scope parameter for the client, as specified in RFC1001/1002.
There is a provision in DHCP for manufacturer-specific DHCP options to be configured. Youcan select these options by opening the DHCP management console and selecting the scopefor which to configure options, as described in Step by Step 2.3. Selecting the Advanced taballows you to select Microsoft Options from the drop-down list in the Vendor Class window.Table 2.2 shows the manufacturer options that are defined by Microsoft.
TABLE 2.2 Microsoft-Specific DHCP OptionsCode Option Name Option Description
1 Microsoft Disable NetBIOS This option can be used to selectively enable or dis-able NetBT for DHCP-enabled computers runningWindows.
2 Microsoft Release DHCP Lease on Shutdown This option can be used to control whether DHCP-enabled computers running Windows send arelease for their current DHCP lease to the DHCPserver when shutdown occurs.
3 Microsoft Default Router Metric Base This value is a specified router metric base to beused for all default gateway routes.
Authorizing a DHCP Server in Active DirectoryFor security reasons, a new DHCP server must be authorized in Active Directory before it canassign IP addresses by an administrator with Enterprise Admin credentials. This prevents

94
unauthorized DHCP servers from running on the network. One of the nastiest things a trou-blemaker can do is to put up a rogue DHCP server and have it issue addresses that conflictwith infrastructure devices’ addresses. The nice thing about this feature is that if you are run-ning Windows 2000 or better client computers and they are using Active Directory, the com-puters will not accept DHCP addresses from an unauthorized server. To authorize a DHCPserver in Active Directory, you perform the steps described in Step by Step 2.4.
STEP BY STEP2.4 Authorizing a DHCP Server in Active Directory
1. Open the DHCP console by selecting Start, Programs, Administrative Tools, DHCP.
2. Right-click the DHCP server and select Authorize from the context menu.
3. The authorization process might take some time, depending on network conditions. Refresh the DHCPconsole by pressing F5, and you should see the window shown in Figure 2.20. When authorization iscomplete, the status is shown as Active and the server is ready to issue addresses when it receivesDHCP requests. Note also that the status arrow on the server itself is now pointing up instead of downas before.
Chapter 2: Implementing, Managing, and Troubleshooting DHCP
FIGURE 2.20 When a DHCP server is authorized, DHCP server scope information shows up in the right pane ofthe DHCP console window.
Windows Server 2003 and Windows 2000 Server DHCP servers that are not authorized donot provide DHCP services to network clients. These unauthorized servers also check everyfive minutes to see if their authorization status has changed, thus allowing them to begin serv-icing clients.
You have now installed, configured, and authorized a Windows Server 2003 DHCP server. Wenext examine configuring DHCP for DNS integration.
Configuring and Managing DHCP95
Configuring DHCP for DNS IntegrationOne of the keys to effectively implementing an Active Directory environment is the capabili-ty for Windows 2000 and Windows XP workstations using DHCP to be automatically regis-tered in DNS. You can set the following settings for DNS integration (see Step by Step 2.5):
. Dynamically Update DNS A and PTR Records Only If Requested by the DHCPClients—This is the default behavior of the Windows Server 2003 DHCP server, andit causes the DHCP server to register and update client information with the authori-tative DNS server of the zone in which the DHCP server is located, according to theDHCP client’s request. The DHCP client can request the way in which the DHCPserver performs updates of its host (A) and pointer (PTR) resource records. If possible,the DHCP server will accommodate the client’s request for handling updates to itsname and IP address information in DNS. This selection requires the Enable DynamicDNS Updates According to the Settings Below option to be selected.
. Always Dynamically Update DNS A and PTR Records—When this option isselected, the DHCP server will always update the client’s fully qualified domain name(FQDN), IP address, and both the A and PTR resource records, regardless of whetherthe client has requested to perform its own updates. This selection requires the EnableDynamic DNS Updates According to the Settings Below option to be selected.
. Discard A and PTR Records When Lease Is Deleted—This option, which isselected by default, instructs the DHCP server to cause the DNS server to delete theclient’s A and PTR records when the lease has expired or otherwise has been deleted.This selection requires the Enable Dynamic DNS Updates According to the SettingsBelow option to be selected.
. Dynamically Update DNS A and PTR Records for DHCP Clients That Do NotRequest Automatic Updates—This option allows legacy clients, such as WindowsNT 4.0 and Windows 9x clients, to participate in DNS dynamic updates. This selec-tion requires the Enable Dynamic DNS Updates According to the Settings Belowoption to be selected.
New Group Policy Object Options Although it is beyond the scope of Exam 70-291, you can also config-ure the DNS options discussed here from Group Policy. The options are located in the ComputerConfiguration, Administrative Templates, Network, DNS Client node.
NOTE
Because DNS dynamic updating is controlled by the DHCP server, you will need to performall of the applicable DNS configuration from the DHCP console. The DHCP server auto-matically updates any DNS server configured as part of the server’s TCP/IP network

96
properties. It is important to be sure that the primary DNS server is configured as one of theDNS servers because any updates sent to it will be propagated to the rest of the DNS serversfor that domain. However, the DNS server in question must support DDNS. DNS is discussedin more detail in Chapter 3. The Windows Server 2003 DNS server supports these updates,as do a number of other DNS servers.
To configure a DHCP server for DNS integration, you perform the steps described in Step byStep 2.5.
STEP BY STEP2.5 Configuring DHCP for DNS Integration
1. Open the DHCP console by selecting Start, Programs, Administrative Tools, DHCP.
2. Right-click the DHCP server and select Properties from the context menu. Select the DNS tab of theDHCP Server Properties dialog box, as shown in Figure 2.21.
Chapter 2: Implementing, Managing, and Troubleshooting DHCP
FIGURE 2.21 You can configure DDNS options on theDNS tab.
3. To enable DHCP integration with DNS, ensure that the Enable Dynamic DNS Updates According to theSettings Below check box is selected.
4. Select to have the DHCP server update A and PTR records when requested or to always update A andPTR records.
5. To help keep the DNS database clean and consistent, allow the DHCP server to cause expired leases tolead to A and PTR record deletion.

Configuring and Managing DHCP97
6. If there are legacy clients on the network, ensure that dynamic updating is configured for them.
7. If you are using secure dynamic updates, you should consider configuring a dedicated network useraccount for dynamic updating. You can enter the account credentials by switching to the Advanced tabof the DHCP Server Properties dialog box, as shown in Figure 2.22.
FIGURE 2.22 You need to click the Credentials button toenter the account username and password for DDNS.
8. Click the Credentials button to open the DNS dynamic update credentials window, which is shown inFigure 2.23.
FIGURE 2.23 You need to enter the dynamic updatesaccount credentials on the DNS dynamic update credentialsdialog box.
9. Enter the domain user account name, domain, and password in the DNS dynamic update credentialsdialog box. Click OK to accept the credentials or Cancel to avoid entering credentials at this time.
10. Click OK to close the DHCP Server Properties dialog box.

98
DHCP option code 81 is required in order to make dynamic update work. Let’s look at twoexamples that explain the basic dynamic update process.
The first example looks at a Windows 2000 Professional client computer that has requested aDHCP lease from a Windows Server 2003 DHCP server configured with the default options:
1. During the DHCP lease negotiation process, the Windows 2000 Professional clientsends a DHCPREQUEST message. By default, the client includes DHCP option 81 in thismessage, informing the DHCP server that it is requesting that its PTR record be reg-istered in DNS by the DHCP server. The client will be responsible for registering itsA record on its own.
2. The DHCP server replies with a DHCPACK message, granting the requested DHCPlease. This message includes DHCP option 81. With the default DHCP server set-tings, the DHCP server informs the client that it will register the PTR record and thatthe client will be responsible for registering the A record in DNS.
3. The client registers its A record, and the DHCP server registers the client’s PTRrecord in DNS.
The second example looks at a Windows NT 4.0 Workstation client computer that hasrequested a DHCP lease from a Windows Server 2003 DHCP server configured with thedefault options:
1. During the DHCP lease negotiation process, the Windows NT 4.0 Workstation clientsends a DHCPREQUEST message. DHCP option 81 is not included in this message.
2. The server returns a DHCPACK message to the client, granting its DHCP lease request.
3. The DHCP server updates the DNS server with the client’s A and PTR records.
Chapter 2: Implementing, Managing, and Troubleshooting DHCP
EXAM ALERTDHCP and DNS It is important to remember that Windows 2000 and Windows XP client computersupdate the A records in DNS without any assistance from the DHCP server. The only client computersfor which DHCP updates DNS are older legacy clients.
DDNS Updates and Domain Controllers To perform DDNS updates, you should not configure the DHCPservice on a computer that is also a Domain Controller. If a DHCP server exists on a domain controller, theDHCP server has full control over all DNS objects stored in Active Directory because the account under which itis running (the domain controller computer account) has this privilege. This creates a security risk that shouldbe avoided. You should not install the DHCP server service that is configured to perform DDNS updates on adomain controller; instead, you should install it on a member server if you’re performing DDNS updates.
As an alternative, you can use a new feature in Windows Server 2003 DHCP. This feature allows you to cre-ate a dedicated domain user account that all DHCP servers will use when performing DDNS updates.
CAUTION

Configuring and Managing DHCP99
Configuring and Implementing a DHCP Relay Agent
Objective:Manage DHCP.
. Manage DHCP Relay Agent.
Today, most networks that use DHCP are routed. As discussed previously, DHCP messagesare broadcast messages. By default, nearly all routers do not pass broadcast traffic in the inter-est of reducing overall network traffic levels. Fortunately, you can get around this design lim-itation by configuring a DHCP relay agent to pass BOOTP messages across routers.
There are three basic configurations in which you can set up a DHCP relay agent. The firstinvolves entering the IP address or addresses of the DHCP server(s) into the router itself,instructing it to pass DHCP messages to a specified IP address for action. The second methodinvolves using the Windows Server 2003 Routing and Remote Access Service (RRAS) compo-nent as a router (in the place of a hardware-based router) and configuring the DHCP relayagent within it. The third solution, and the one that we examine in this section, is to use aWindows Server 2003 computer located on a subnet without a DHCP server to act as a DHCPrelay agent. This option requires the use of the RRAS components, but it does not involve thecreation or configuration of a router as the second solution would. What’s important to under-stand is that the server providing the DHCP relay agent service does not have to be dedicat-ed to that purpose; it could be a file server, print server, or any other type of Windows Server2003 (or Windows 2000 Server) server on that subnet. Figure 2.24 shows how this arrange-ment would look on a network.
Router
Clientcomputer
Clientcomputer DHCP Server
Clientcomputer
Subnet A Subnet B
ClientcomputerDHCP Relay
Agent
FIGURE 2.24 The DHCPrelay agent allows clientson the other side of arouter to communicate withthe DHCP server.
EXAM ALERTDHCP Relay Agent Recall that the DHCP relay agent is needed only to help pass DHCP traffic acrossa router that otherwise cannot pass that traffic. As such, the server acting as the relay agent is notgoing to be the same server providing DHCP and will be located on the subnet on the other side of therouter in question. Referring back to Figure 2.24, the DHCP server is located on subnet A whereas theDHCP relay agent is located on subnet B.
100
In Step by Step 2.6, you enable the DHCP relay agent on a Windows Server 2003 computer.This exercise assumes that you have not previously configured and enabled RRAS on the com-puter.
STEP BY STEP2.6 Configuring a DHCP Relay Agent
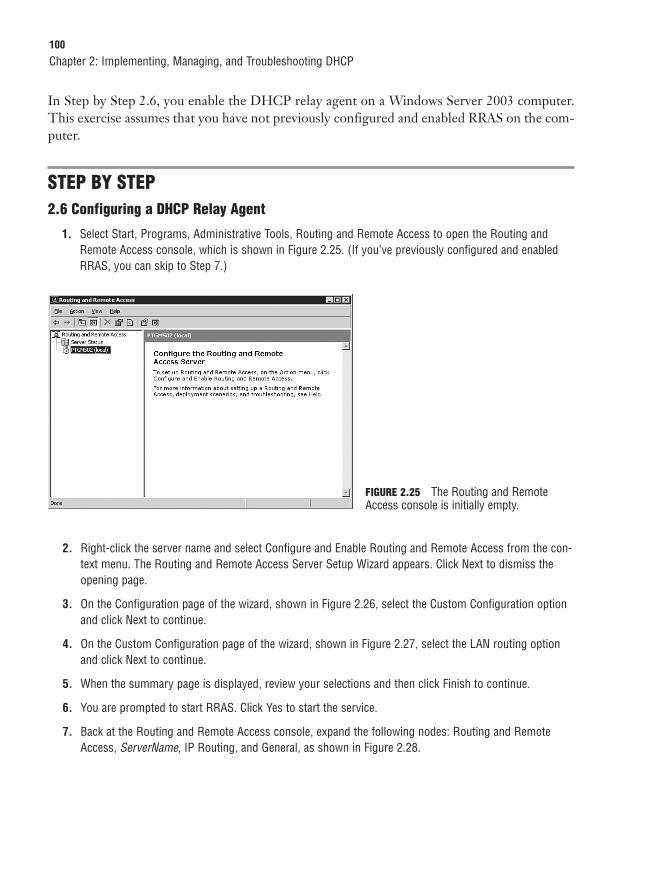
1. Select Start, Programs, Administrative Tools, Routing and Remote Access to open the Routing andRemote Access console, which is shown in Figure 2.25. (If you’ve previously configured and enabledRRAS, you can skip to Step 7.)
Chapter 2: Implementing, Managing, and Troubleshooting DHCP
FIGURE 2.25 The Routing and RemoteAccess console is initially empty.
2. Right-click the server name and select Configure and Enable Routing and Remote Access from the con-text menu. The Routing and Remote Access Server Setup Wizard appears. Click Next to dismiss theopening page.
3. On the Configuration page of the wizard, shown in Figure 2.26, select the Custom Configuration optionand click Next to continue.
4. On the Custom Configuration page of the wizard, shown in Figure 2.27, select the LAN routing optionand click Next to continue.
5. When the summary page is displayed, review your selections and then click Finish to continue.
6. You are prompted to start RRAS. Click Yes to start the service.
7. Back at the Routing and Remote Access console, expand the following nodes: Routing and RemoteAccess, ServerName, IP Routing, and General, as shown in Figure 2.28.

Configuring and Managing DHCP101
FIGURE 2.28 You need to add the DHCP relayagent from the General node.
FIGURE 2.26 You need to specify a customconfiguration in order to perform a basic DHCPrelay agent setup.
FIGURE 2.27 The LAN routing option is thebare minimum you need to support later instal-lation of the DHCP relay agent.

102
8. Right-click the General node and select New Routing Protocol from the context menu. This opens theNew Routing Protocol dialog box.
9. From the New Routing Protocol dialog box, shown in Figure 2.29, select DHCP Relay Agent. Click OK toconfirm your configuration.
Chapter 2: Implementing, Managing, and Troubleshooting DHCP
FIGURE 2.29 You can add the DHCP relay agent in additionto standard IP routing protocols.
10. To select a network interface for the DHCP relay agent to run on, right-click the DHCP Relay Agent nodein the RRAS console and select New Interface from the context menu.
11. On the New Interface for DHCP Relay Agent page, shown in Figure 2.30, select the network interfacethat you want to be available for the DHCP relay agent. Click OK to continue. The DHCP Relay Propertiesdialog box, shown in Figure 2.31, opens.
FIGURE 2.30 You need to select one or more installed net-work adapters for use by the DHCP relay agent.

Configuring and Managing DHCP103
12. In the DHCP Relay Properties dialog box, configure the required values for hop-count threshold andboot threshold. The default value for each of them is 4. Click OK to confirm your settings.
13. The last configuration you need to perform is to assign the DHCP server IP addresses to which theDHCP relay agent forwards DHCP messages. Right-click the DHCP Relay Agent node in the RRAS con-sole and select Properties to open the DHCP Relay Agent Properties dialog box, which is shown inFigure 2.32. Enter one or more remote DHCP servers into the list and click OK to confirm your settings.
FIGURE 2.31 You need to configure the maximum hopcount and length of delay time for the DHCP relay agent.
FIGURE 2.32 You need to provide one or more remote DHCP servers to which the DHCP relay agent can for-ward DHCP messages.
104
Configuring Security for DHCPAlthough there are no administrative tasks that outwardly appear that they will help secureyour DHCP infrastructure, there are some best practices and other actions that you can fol-low that will provide a more secure (and thus, more reliable) DHCP implementation in yourenvironment. We briefly examine them here:
. Use the 80/20 address allocation rule—Use DHCP servers in pairs to provide leasesto each of your network subnets. One server should be configured with 80 percent ofthe available addresses (in a scope) on it, and the other server should have a correspon-ding scope configured with the remaining 20 percent of the available addresses. Thescopes should be balanced between the two servers such that each server has approxi-mately the same number of 80-percent scopes (its own scopes) and 20-percent scopes(scopes that belong to the other server). By using this configuration, you can ensurethat leases will still be made available to clients requesting them in the event a singleserver is under a DoS attack.
. Create and use DHCP server clusters—By enabling a DHCP server cluster, youremove a single server as a single point of failure (SPOF). By having two (or more)servers in a cluster acting a single DHCP entity, a failure of a single server (or multipleservers depending on your configuration) will not result in a failure to provide leases toclients. Clustering can be expanded on by creating two clusters and implementing the80/20 address allocation rule for maximum redundancy.
. Examine the DHCP audit logs regularly—Ensure that audit logging is enabled, asshown in Figure 2.33. The audit logs are stored in the location defined on theAdvanced tab, which was shown in Figure 2.22. The location is %systemroot%\system32\dhcp\ by default.
. Harden servers—You can get detailed information and assistance on hardeningWindows Server 2003 servers from the Windows Server 2003 Security Guide.
Chapter 2: Implementing, Managing, and Troubleshooting DHCP
EXAM ALERTDHCP Relay Agent Options The Hop-Count Threshold option allows you to configure a value for themaximum number of DHCP relay agents that are allowed to handle DHCP-relayed traffic. The maxi-mum value is 16 hops—meaning that you can have only 16 DHCP relay agents (typically on differentconnected subnets) between a client and a DHCP server.
The Boot Threshold option allows you to specify how long the DHCP relay agent waits before forward-ing DHCP messages. By configuring DHCP relay agents with different values, you can establish onethat is to respond first and then one or more DHCP relay agents that are to forward DHCP messages ifrequired.

Configuring and Managing DHCP105
ChallengeYou are the systems administrator for NR Widgets, Inc., a computer manufacturing company. NRWidgets, Inc., is just about to migrate to a purely Windows Server 2003 environment. You have two usernetworks—Sales and Engineering—and a corporate backbone network where all servers and other keyinfrastructure equipment are located.
The Sales network has more than 400 users and is multinetted to provide an adequate number ofaddresses for everyone. The Engineering network has only 75 users, but that network also contains anumber of printers, plotters, and test equipment, so there are only 40 addresses for the users’ comput-ers. The users work three shifts in Engineering, with 25 engineers working each shift.
A major brand router separates the two user networks from each other and also from your corporatebackbone. The multinetted Sales network has been implemented using a major brand switch configuredto create Virtual Local Area Networks (VLANs).
FIGURE 2.33 DHCP audit logging is enabled from theGeneral tab of the DHCP server Properties dialog box.
EXAM ALERTClusters? The topic of configuring and managing server clusters using Windows Server 2003 is onethat is beyond the scope of the 70-291 exam, so don’t worry about it if you’re not all that knowledge-able about them right now. We do examine clustering in detail in the MCSE 70-293 Exam Prep:Planning and Maintaining a Microsoft Windows Server 2003 Network Infrastructure by Will Schmied inpreparation for that exam, so rest at ease.
(continues)

106
Today, all of the hosts use static addresses, which works okay for the Sales network, but it means that toavoid IP address resolution problems, the engineers have to be careful about which computers are leftconnected to the network. Yesterday your manager suggested, “While you’re migrating to WindowsServer 2003, why don’t you fix the IP address problems on the network?”
Your task is to implement a DHCP solution for NR Widgets, Inc., to eliminate the need to manually assignstatic IP addresses to the Sales and Engineering networks.
Try to complete this exercise on your own, listing your conclusions on a sheet of paper. After you havecompleted the exercise, compare your results to those given.
AnswersSome key questions to which you will need to provide answers to successfully complete this task are asfollows:
1. How can you configure enough DHCP addresses for the 400 clients located on the Sales network?
2. Assuming you have the hardware resources available to configure and implement only a singleDHCP server at this time, on what network should you place the new DHCP server?
Given what you know, your best option will be to configure and implement the new DHCP server on thecorporate backbone network where your other servers are located (this is a general best practice). Thislocation, however, assumes that you will be able to create a DHCP scope that contains more than the 40IP addresses that are currently assigned to the Engineering department and that you will be able to con-figure the router to pass DHCP traffic. Following along with this design, you would then create the follow-ing scopes on the DHCP server:
. A single scope for the Engineering network that contains a full Class C subnet worth of IP addresses(254) to eliminate the need to have only a certain number of hosts online at any one time.
. A superscope for the Sales network. The superscope allows you to combine multiple scopes for eas-ier management. The Sales network requires multiple scopes (three of them, in fact) due to the largenumber of hosts on the network. Alternatively, you could opt to create a single larger scope using aClass B subnet.
Before you can call your solution complete, however, you will need to complete at least two more tasks ifyou haven’t already done so:
. After the DHCP service has been installed, you need to authorize the server in Active Directorybefore it will be able to give leases to domain clients.
. You need to be sure that the router has been configured to pass the DHCP traffic back and forthfrom the corporate network to the Sales and Engineering networks. If this is not possible, you willneed to place a DHCP relay agent on each of the client networks to facilitate DHCP traffic transferthrough the router.
Chapter 2: Implementing, Managing, and Troubleshooting DHCP
(continued)

DHCP Server Management and Monitoring107
In the unlikely event that you are not able to procure more IP addresses for use by the Sales network,your design may end a bit differently, especially if network traffic from DHCP is a concern. In this sce-nario, your design will be different in the following ways:
. The DHCP server will likely be placed on the Engineering network as there will be more DHCP trafficoccurring on that network due to the limited number of IP addresses available.
. The lease time for the Sales DHCP scopes should be configured at a longer value, such as 30 days,due to the availability of more than addresses. This will minimize DHCP traffic across the routerfrom the Sales network to the Engineering network.
. The lease time for the Engineering DHCP scope should be configured much shorter than the defaultvalue, perhaps 4 hours, so that addresses are available for the incoming shift as the previous shiftleaves for home. The lease time will likely require some trial and error to tune it to the needs of thespecific implementation.
Regardless of the restrictions and criteria that are imposed on you in this scenario, using WindowsServer 2003 DHCP can produce a solid solution.
DHCP Server Management and MonitoringObjective:Manage DHCP.
. Manage DHCP databases.
We have spent some time now examining the installation and configuration of the WindowsServer 2003 DHCP service. The final piece of the DHCP puzzle is managing and monitoringthe server after it is installed and configured. The Windows Server 2003 DHCP server bun-dles enhanced monitoring and statistical reporting for precisely that purpose.
The DHCP console has several features that can be accessed by selecting the server and click-ing the Action menu or by right-clicking the server. We examine these management and mon-itoring features in more detail in the following sections.
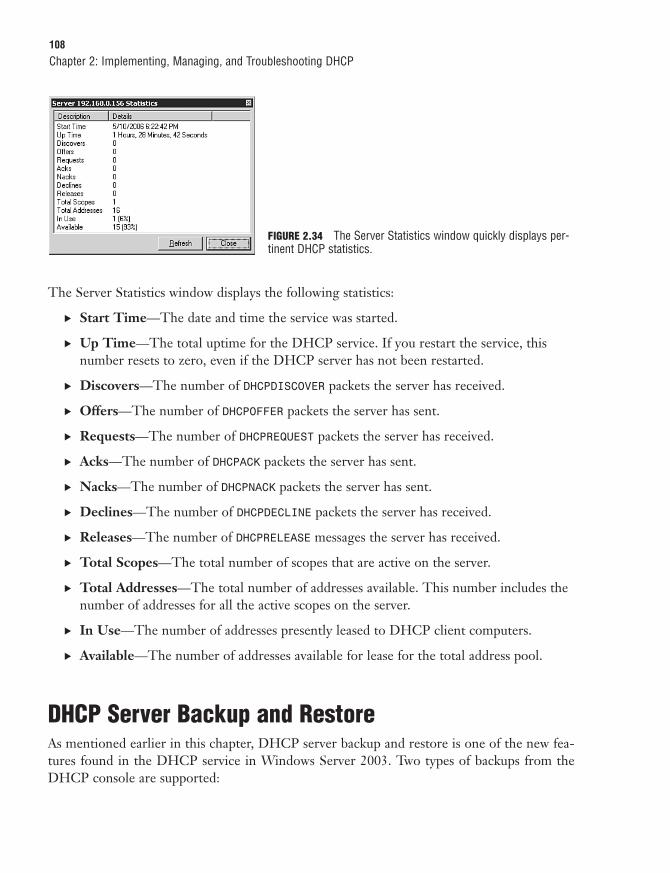
Examining the DHCP Server StatisticsThe Display Statistics command opens the Server Statistics window, which is shown in Figure2.34.
108
The Server Statistics window displays the following statistics:
. Start Time—The date and time the service was started.
. Up Time—The total uptime for the DHCP service. If you restart the service, thisnumber resets to zero, even if the DHCP server has not been restarted.
. Discovers—The number of DHCPDISCOVER packets the server has received.
. Offers—The number of DHCPOFFER packets the server has sent.
. Requests—The number of DHCPREQUEST packets the server has received.
. Acks—The number of DHCPACK packets the server has sent.
. Nacks—The number of DHCPNACK packets the server has sent.
. Declines—The number of DHCPDECLINE packets the server has received.
. Releases—The number of DHCPRELEASE messages the server has received.
. Total Scopes—The total number of scopes that are active on the server.
. Total Addresses—The total number of addresses available. This number includes thenumber of addresses for all the active scopes on the server.
. In Use—The number of addresses presently leased to DHCP client computers.
. Available—The number of addresses available for lease for the total address pool.
DHCP Server Backup and RestoreAs mentioned earlier in this chapter, DHCP server backup and restore is one of the new fea-tures found in the DHCP service in Windows Server 2003. Two types of backups from theDHCP console are supported:
Chapter 2: Implementing, Managing, and Troubleshooting DHCP
FIGURE 2.34 The Server Statistics window quickly displays per-tinent DHCP statistics.

DHCP Server Management and Monitoring109
. Synchronous—A synchronous backup occurs automatically on the configured interval.The default interval is 60 minutes and can be changed from the registry location HKEY_LOCAL_MACHINE\SYSTEM\CurrentControlSet\Services\DHCPServer\Parameters\
BackupInterval.
. Asynchronous—An asynchronous backup is a manual backup that is performed byusing the Backup command from within the DHCP console.
Both types of DHCP backups place their data in the same location, which is %systemroot%\System32\Dhcp\Backup by default. You can then use Windows Backup (NTBACKUP.exe) or anyother backup application to safely back up this data to another location. You can change thedatabase backup folder by selecting a different local folder during a manual backup or bychanging the backup folder location in the DHCP server properties.
Backups of the DHCP data from the DHCP console include the following items:
. All scopes
. All reservations
. All leases
. All options, including server options, scope options, reservation options, and classoptions
. All registry data in the following registry location: HKEY_LOCAL_MACHINE\SYSTEM\CurrentControlSet\Services\DHCPServer\Parameters
Dynamic Update Credentials Regardless of how you back up DHCP data, the DNS dynamic update cre-dentials that the DHCP server uses for registering DHCP client computers in DNS will not be backed up.
NOTE
EXAM ALERTPerforming a Backup You do not need to stop the DHCP service on the server to perform either anasynchronous backup or a synchronous backup unless you will be migrating the database to a differentDHCP server.
You can manually perform a backup by selecting Action, Backup. In addition, you can performthe restoration of the DHCP data by selecting Action, Restore. If you want to change thebackup path, you can do so from the Advanced tab of the DHCP Server Properties dialog box.

110
Reconciling the DHCP Database
Objective:Troubleshoot DHCP.
. Verify database integrity.
When you reconcile scopes on your DHCP server, you are comparing the information con-tained in the DHCP database against the information stored in the registry. Typically, recon-ciliation of scopes is performed when you are observing problems with the DHCP server andwant to verify the configured addresses. The Reconcile All Scopes command allows you to per-form this comparison should you need to. You can click the Verify button in the Reconcile AllScopes dialog box (shown in Figure 2.35) to check the consistency of the database and get areport of any errors.
Chapter 2: Implementing, Managing, and Troubleshooting DHCP
DHCP Database Restoration Caveats You can restore DHCP databases only to the same language ver-sion of Windows from which they were backed up. For example, you cannot restore an English languageversion DHCP database to a DHCP server running the Japanese version of Windows Server 2003.
During the restoration process, the DHCP service is stopped for a short period of time on the server.During this time, clients are not able to contact the DHCP server.
NOTE
FIGURE 2.35 You can reconcile all scopes from the Reconcile AllScopes dialog box.
Stopping the DHCP ServerSometimes you’ll want to prevent a DHCP server from giving out leases so that you can per-form maintenance on the server or make configuration changes to scopes on the server. Youcan cause this happen by either unauthorizing the server or by stopping the DHCP server
DHCP Server Management and Monitoring111
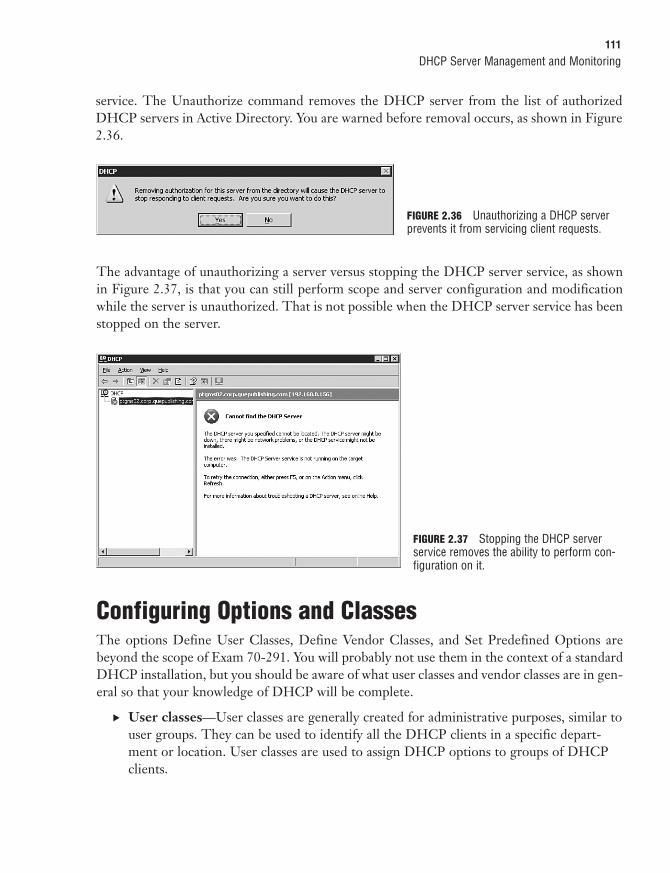
service. The Unauthorize command removes the DHCP server from the list of authorizedDHCP servers in Active Directory. You are warned before removal occurs, as shown in Figure2.36.
FIGURE 2.36 Unauthorizing a DHCP serverprevents it from servicing client requests.
The advantage of unauthorizing a server versus stopping the DHCP server service, as shownin Figure 2.37, is that you can still perform scope and server configuration and modificationwhile the server is unauthorized. That is not possible when the DHCP server service has beenstopped on the server.
FIGURE 2.37 Stopping the DHCP serverservice removes the ability to perform con-figuration on it.
Configuring Options and ClassesThe options Define User Classes, Define Vendor Classes, and Set Predefined Options arebeyond the scope of Exam 70-291. You will probably not use them in the context of a standardDHCP installation, but you should be aware of what user classes and vendor classes are in gen-eral so that your knowledge of DHCP will be complete.
. User classes—User classes are generally created for administrative purposes, similar touser groups. They can be used to identify all the DHCP clients in a specific depart-ment or location. User classes are used to assign DHCP options to groups of DHCPclients.

112
. Vendor classes—Vendor classes are generally used to provide vendor-specific DHCPenhancements. For example, the Windows Server 2003 DHCP service has the capabili-ty to disable NetBT on its DHCP clients.
Changing the Server StateShould you want to change the state of the server, perhaps pause or stop the DHCP serveraltogether, you can do this from the Action menu. Selecting Action, All Tasks opens a submenuthat allows you to control the operational state of the DHCP server. The following options areavailable:
. Start—Starts the DHCP service. This option is available only if the service is stoppedor paused.
. Stop—Stops the DHCP service. This option is available when the service is running orpaused. This option causes the server statistics to be reset.
. Pause—Pauses the DHCP service. This option does not reset the statistics.
. Resume—Resumes the DHCP service after it is paused. This option is available onlywhen the service is paused.
. Restart—Restarts the DHCP service, resetting the server statistics in the process. Thisoption is available only if the service is currently running.
DHCP Server Common CommandsThe three commands Delete, Refresh, and Export List are common ones. The Delete com-mand deletes the DHCP server. The Refresh command causes all the displayed informationto be refreshed with a current status. The Export List command allows you to export the infor-mation displayed in the right pane of the console window to a tab- or comma-delimited textor Unicode text file. You can export a list of various nodes by clicking them before selectingthe Export List command.
The Properties command opens the Properties dialog box for the selected DHCP server. TheProperties dialog box (shown previously in Figure 2.33) opens to the General tab, which allowsyou to configure the following options.
. Automatically Update Statistics Every—This option allows you to set the automaticrefresh of the statistics, as well as the interval at which the statistics are refreshed.
. Enable DHCP Audit Logging—This option allows you to log all the DHCP activityto a text file located in the %systemroot%\System32\dhcp folder, which can be opened
Chapter 2: Implementing, Managing, and Troubleshooting DHCP

DHCP Server Management and Monitoring113
in Notepad or any other text editor. This is an excellent option to select if you aretroubleshooting a DHCP problem and want to see what activity is taking place on theserver.
. Show the BOOTP Table Folder—This option deals with BOOTP backward com-patibility and allows you to view the table that contains the BOOTP configurationentries. After you select this option, the BOOTP Table node appears in the DHCPconsole, as shown in Figure 2.38. From this node you can configure boot images forBOOTP clients. Remember, however, that you still need to provide your own third-party TFTP server.
FIGURE 2.38 When the BOOTP Table folderis enabled, you can perform configuration ofBOOTP boot images.
The DNS tab of the Properties dialog box is discussed in detail earlier in this chapter, in thesection “Configuring DHCP for DNS Integration.” You can use the Advanced tab, shown inFigure 2.39, to perform more advanced and less common configuration tasks.
The Advanced tab has the following configuration options:
. Conflict Detection Attempts—This option causes the DHCP server to check forconflicting IP addresses on the network before issuing an address. Although thissounds like a great way to make sure there are no address conflicts, it can add signifi-cant overhead to the server, and you should use it only while you’re troubleshootingaddress conflict issues. By default, this option is set to 0.
. Audit Log File Path—If audit logging is enabled, the log file is located in the %systemroot%\System32\dhcp directory. You can modify the location to be any loca-tion on the local computer (including mapped drives).
. Database Path—This option allows you to specify the location of the DHCP data-base. By default, it is in the %systemroot%\System32\dhcp directory. You can modifythe location to be any location on the local computer (including mapped drives).
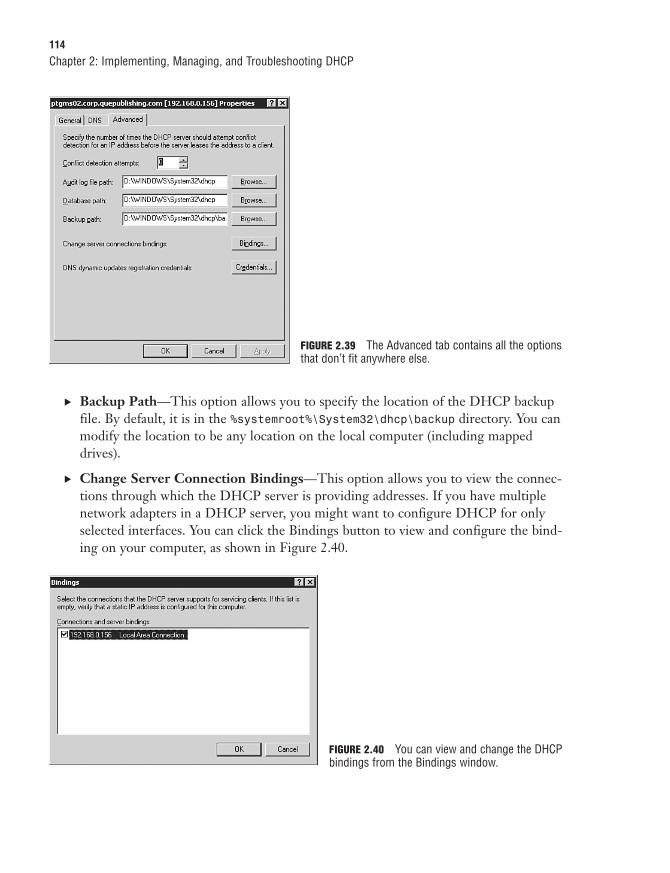
114
. Backup Path—This option allows you to specify the location of the DHCP backupfile. By default, it is in the %systemroot%\System32\dhcp\backup directory. You canmodify the location to be any location on the local computer (including mappeddrives).
. Change Server Connection Bindings—This option allows you to view the connec-tions through which the DHCP server is providing addresses. If you have multiple network adapters in a DHCP server, you might want to configure DHCP for onlyselected interfaces. You can click the Bindings button to view and configure the bind-ing on your computer, as shown in Figure 2.40.
Chapter 2: Implementing, Managing, and Troubleshooting DHCP
FIGURE 2.39 The Advanced tab contains all the optionsthat don’t fit anywhere else.
FIGURE 2.40 You can view and change the DHCPbindings from the Bindings window.

Troubleshooting DHCP115
. DNS Dynamic Updates Registration Credentials—As discussed previously, thisoption allows you to specify a domain user account to be used during DNS dynamicupdates.
EXAM ALERTResolving Conflict Problems When you start seeing a large number of declines per second (as dis-cussed in the next section, “Troubleshooting DHCP”), you might want to enable conflict detection onthe DHCP server. Conflict detection causes the server to look for conflicts before issuing an address,and it should take care of conflict problems until you can find the problem. You should do this onlyuntil the problem is addressed. Forcing the DHCP server to detect conflicts every time it issues anaddress adds a lot of overhead to the server and the DHCP service, and it should be avoided on a long-term basis. After you have resolved a problem, be sure to turn off this feature.
Troubleshooting DHCPAlthough DHCP is typically one of the easiest of the common network services to configureand maintain, from time to time, you might encounter problems. More often than not, theDHCP-related problems that you will have will be due to misconfiguration in a scope, unau-thorized DHCP servers on the network, or network connectivity problems. You might alsohave instances in which information has changed in some way, but the change has not beenreflected in your DHCP configuration, as in the case of DHCP reservations (which are tied toMAC addresses) or the changing of a DHCP server’s IP address. Network connectivity issuesare addressed in Chapter 1, and the following sections examine some troubleshooting tasksyou can do in an effort to quickly determine the cause of DHCP woes and get this vital net-work service back into proper operation.
Troubleshooting DHCP Server Authorization Problems
Objective:Troubleshoot DHCP.
. Diagnose and resolve issues related to DHCP authorization.
. Diagnose and resolve issues related to configuration of DHCP server and scope options.
As discussed previously, one of the first indicators you might see of an unauthorized or rogueDHCP server is an unexpected increase in the number of DHCPNACK messages. You can moni-tor this statistic over time by using the Performance console. The Performance console

116
includes several counter objects that you can use to monitor and troubleshoot your DHCPserver:
. Acks/Sec—This counter monitors the number of DHCPACK messages sent per secondby the DHCP server to client computers. The DHCP server uses the DHCPACK mes-sages to acknowledge requests for an address. An increase in this number indicates thata large number of client computers are probably trying to renew their leases with theDHCP server. This could be because of a short lease time configuration or because anumber of new computers are entering the network.
. Active Queue Length—This counter monitors the current length of the internalmessage queue of the DHCP server. This number represents the number ofunprocessed messages received by the server. A large number here could indicate anunusually large amount of network traffic or a heavy load on the server.
. Conflict Check Queue Length—This counter monitors the current length of theconflict check queue for the DHCP server. Before a Windows Server 2003 DHCPserver issues an address, it checks whether any IP address conflicts exist. The conflictcheck queue holds the messages not responded to while the DHCP server performsaddress conflict detection. A large value here could indicate heavy lease traffic at theserver. You might also want to check the Conflict Detection Attempts parameter,which could be set too high.
. Declines/Sec—This counter monitors the number of DHCPDECLINE messages that theDHCP server receives per second from client computers. This counter indicates thatthe DHCP client computer has declined the IP address issued by the server. You seethis number rise when client computers start having address conflict problems, and itcould indicate a network problem, computers with static addresses also being part of ascope, or having a rogue DHCP server on the network.
. Discovers/Sec—This counter monitors the number of DHCPDISCOVER messagesreceived per second by the server. The DHCPDISCOVER message is the initial request aclient computer sends when it first enters the network and is looking for a DHCPserver to issue an address. A sudden increase in this counter could indicate that a largenumber of client computers are attempting to initialize and obtain an IP address leasefrom the server at the same time. You might see this first thing in the morning, whenusers power on their PCs, or after a power failure, when all the PCs might be poweredon at about the same time.
. Duplicates Dropped/Sec—This counter monitors the number of duplicate packetsper second dropped by the DHCP server. Duplicate packets on a network are never agood sign, and they can indicate that DHCP clients are timing out before the servercan respond. This can be caused by client computers timing out too fast or the servernot responding quickly enough.
Chapter 2: Implementing, Managing, and Troubleshooting DHCP

Troubleshooting DHCP117
. Informs/Sec—This counter monitors the number of DHCPINFORM messages receivedper second by the DHCP server. DHCPINFORM messages are used when the DHCP serv-er queries the directory service for the enterprise root and when dynamic updates arebeing done on behalf of client computers by the DNS server. This is part of theDDNS integration, and an unusual increase in this number could indicate a large num-ber of addresses being issued.
. Milliseconds Per Packet (Avg)—This counter monitors the average time, in millisec-onds, the DHCP server takes to process each packet it receives. This is a very subjec-tive number that depends on the server configuration; therefore, having a baseline forthis number is a good idea. A sudden increase in this counter could indicate a diskproblem or an increased load on the server.
. Nacks/Sec—This counter monitors the number of DHCP negative acknowledgment(DHCPNACK) messages sent per second by the DHCP server to client computers. ADHCPNACK message indicates that the server is unable to fulfill the DHCP request. Avery high value for this counter could indicate a network problem or misconfigurationof client computers or the server. You should keep an eye out for a deactivated scope asa possible culprit.
. Offers/Sec—This counter monitors the number of DHCPOFFER messages that theDHCP server sends per second to client computers. A DHCPOFFER message is the mes-sage the server returns to the client computer after the client computer sends aDHCPDISCOVER message, and it indicates that the server is offering to issue an address tothat client computer. A sudden increase in this value could indicate heavy traffic or aheavy load on the server.
. Packets Expired/Sec—This counter monitors the number of packets per second thatexpire and are dropped by the DHCP server. This situation is caused by a packetremaining in the server’s internal message queue too long. A large number for thiscounter indicates that the server is either taking too long to process some packets orcausing other packets to wait in queue, or that the traffic on the network is too heavyfor the DHCP server to handle. It is important to note that high numbers for thiscounter can indicate pure network traffic problems and not necessarily DHCP-relatedproblems.
. Packets Received/Sec—This counter monitors the number of message packetsreceived per second by the DHCP server. A large number indicates heavy DHCP mes-sage traffic to the server. These message packets might be requests for addresses,renewals, or releases.
. Releases/Sec—This counter monitors the number of DHCPRELEASE messages that theDHCP server receives per second from client computers. A DHCPRELEASE message issent only when the client computer manually releases an address, such as when the

118
ipconfig /release command is used or the Release All button in the winipcfg utili-ty is used at the client computer. Because most users do not manually release theiraddresses, this number should be low in all but the most unusual network environment.
. Requests/Sec—This counter monitors the number of DHCPREQUEST messages that theDHCP server receives per second from client computers. These messages are therequests that the client computer sends to request an IP address after it has found aserver that can issue addresses. An increase in this number indicates that a large num-ber of client computers are probably trying to renew their leases with the DHCP serv-er. This could be caused by a short lease time configuration or because a number ofnew computers are entering the network.
Configuring the Performance console to monitor and collect data about a DCHP server is asimple process, as outlined in Step by Step 2.7.
STEP BY STEP2.7 Monitoring DHCP Performance
1. Select Start, Program, Administrative Tools, Performance to open the Performance console.
2. Click System Monitor, as shown in Figure 2.41.
Chapter 2: Implementing, Managing, and Troubleshooting DHCP
FIGURE 2.41 You can view server perform-ance statistics by using the Performanceconsole.
3. To create an entry in System Monitor, click the + icon. The Add Counters dialog box shown in Figure2.42 opens, allowing you to begin adding counters.

Troubleshooting DHCP119
4. Select the DHCP Server performance object in the Performance object drop-down list box. You then seethe list of counters available for selection that relate to the DHCP service. If you need to know what acounter means, select the counter and click the Explain button.
5. When you have decided what counter you want to monitor, click Add. You can add multiple counterseither by selecting each counter and clicking Add or by holding down the Ctrl key while you select allthe counters you want to monitor and then clicking Add. Click Close when you are finished. Your coun-ters are graphed like those shown in Figure 2.43.
FIGURE 2.42 You can add counters to begin monitoringDHCP server statistics.
FIGURE 2.43 You can monitor DHCP server statistics in real time.

120
If you notice a trend of higher-than-normal numbers of DHCPNACK messages, you need todetermine what the source is. The most common cause is that a rogue DHCP server has beenset up on the network. You can also examine the DHCP lease properties of clients to deter-mine whether any of them have different information than what you have configured in yourDHCP scopes.
It’s important to remember that Windows 2000 and Windows XP clients in an ActiveDirectory environment that are configured to use DHCP do not accept leases from unautho-rized DHCP servers. Older clients accept these leases and can contribute to the number ofDHCPNACK messages when they attempt to renew their DHCP leases.
You can also examine the DHCP server daily audit logs, located in the%systemroot%\sysytem32\dhcp folder, to look for rogue detection events. The DHCP auditlogs are discussed in the next section.
Using the DHCP Logs
Objective:Troubleshoot DHCP.
. Examine the system event log and DHCP server audit log files to find related events.
The DHCP server daily audit logs are often overlooked as a valuable source of information.You have learned how to enable the audit logs; now let’s have a look at what they contain.Unlike the logs produced by the Windows 2000 Server DHCP service, the Windows Server2003 daily audit logs are natively in text format, and you open them simply by double-clickingthem. A sample of what you might expect to find in a log is displayed here:ID,Date,Time,Description,IP Address,Host Name,MAC Address00,04/27/06,20:08:38,Started,,,,55,04/27/06,20:08:39,Authorized(servicing),,lab1.area51partners.com,,24,04/27/06,20:44:10,Database Cleanup Begin,,,,25,04/27/06,20:44:10,0 leases expired and 0 leases deleted,,,,25,04/27/06,20:44:10,0 leases expired and 0 leases deleted,,,,24,04/27/06,21:44:12,Database Cleanup Begin,,,,
Chapter 2: Implementing, Managing, and Troubleshooting DHCP
Creating Server Baselines If you create baselines on servers, you will be able to compare the perform-ance at any given time to a known value. This can be very useful in performing troubleshooting, and it alsohelps in periods when configurations are being modified. To create a baseline, you create a counter logfrom the Counter Logs option of the Performance Logs and Alerts node shown in Figure 2.42. The config-uration and usage of a counter log is nearly identical to the creation and usage of the System Monitor, asdescribed in Step by Step 2.7.
NOTE
Troubleshooting DHCP121
25,04/27/06,21:44:12,0 leases expired and 0 leases deleted,,,,25,04/27/06,21:44:12,0 leases expired and 0 leases deleted,,,,11,04/27/06,19:39:46,Renew,192.168.0.231,
xpclient01.corp.quepublishing.com,00E07DC13E70,31,04/27/06,19:39:46,DNS Update Failed,
192.168.0.231,xpclient01.corp.quepublishing.com,-1,10,04/27/06,19:43:07,Assign,192.168.0.230,
iMac01.corp.quepublishing.com,00306509D772,30,04/27/06,19:44:14,DNS Update Request,192.168.0.231,
xpclient01.corp.quepublishing.com,,31,04/27/06,19:44:14,DNS Update Failed,192.168.0.231,
xpclient01.corp.quepublishing.com,-1,30,04/27/06,19:47:03,DNS Update Request,192.168.0.231,
xpclient01.corp.quepublishing.com,,11,04/27/06,19:47:03,Renew,192.168.0.231,
xpclient01.corp.quepublishing.com,00E07DC13E70,30,04/27/06,19:47:03,DNS Update Request,
192.168.0.231,xpclient01.corp.quepublishing.com,,11,04/27/06,19:47:03,Renew,192.168.0.231,
xpclient01.corp.quepublishing.com,00E07DC13E70,32,04/27/06,19:47:03,DNS Update Successful,192.168.0.231,
xpclient01.corp.quepublishing.com,,32,04/27/06,19:47:03,DNS Update Successful,192.168.0.231,
xpclient01.corp.quepublishing.com,,
As you can see from this example, the DHCP server cleans up the database hourly. You canalso see that two clients requested leases. One of them, an Apple iMac, requested and wasassigned the IP address 192.168.0.230, with no further actions. Another client, a Windows XPProfessional computer, requested and received the IP address 192.168.0.231, with severalfailed DNS updates (evidenced by ID 31). After the DNS dynamic update account was prop-erly configured, the DHCP server was able to make the DNS dynamic updates and generatean ID of 32. Table 2.3 explains the ID codes used in the DHCP daily audit logs.
TABLE 2.3 The DHCP Daily Audit Log ID CodesID Description
00 The log was started.
01 The log was stopped.
02 The log was temporarily paused due to low disk space.
10 A new IP address was leased to a client.
11 A lease was renewed by a client.
12 A lease was released by a client.
13 An IP address was found to be in use on the network.
14 A lease request could not be satisfied because the scope’s address pool was exhausted.
(continues)
122
TABLE 2.3 ContinuedID Description15 A lease was denied.
15 A lease was denied.
16 A lease was deleted.
17 A lease was expired.
20 A BOOTP address was leased to a client.
21 A dynamic BOOTP address was leased to a client.
22 A BOOTP request could not be satisfied because the scope’s address pool for BOOTP was exhausted.
23 A BOOTP IP address was deleted after a check was made to see that it was not in use.
24 The IP address cleanup operation has began.
25 IP address cleanup statistics are provided.
30 A DNS update request to the named DNS server was made.
31 The DNS update failed.
32 The DNS update was successful.
50+ These IDs are used for Rogue Server Detection information.
In addition to the DHCP daily audit logs, events related to the DHCP service are also gener-ated and placed in the system log, as shown in Figure 2.44.
Chapter 2: Implementing, Managing, and Troubleshooting DHCP
FIGURE 2.44 The system log containsevents related to the DHCP service.
As you can see in Figure 2.45, there is a DHCP server on the network that has not beenauthorized in Active Directory. The system log contains many useful log events about allaspects of a server and is an area you should review often.

Troubleshooting DHCP123
Troubleshooting DHCP Reservations
Objective:Troubleshoot DHCP.
. Verify DHCP reservation configuration.
For the most part, the only problem that prevents a DHCP reservation from functioningproperly is a misconfigured MAC address. If you have a misconfigured DHCP reservation,you should see it show up in the Address Leases node of your DHCP server, with the statusReservation (Inactive). Reservations that are configured properly show the status Reservation(Active). If you look back at Figure 2.16, you’ll see the reservation we created had a bad MACaddress and thus was the cause of the problem seen in Figure 2.46.
FIGURE 2.45 An unauthorized DHCP server cannot startthe DHCP service.
FIGURE 2.46 A DHCP reservation that is notactive usually indicates a misconfiguration.
124
To verify that a reservation is configured properly, you can compare the MAC address of thecomponent that is to have a reserved DCHP address (a print server, for example) to the MACaddress entered in the reservation Properties dialog box. The vast majority of the time, thiswill reveal the source of the problem.
Troubleshooting the DHCP Relay Agent
Objective:Troubleshoot DHCP.
. Verify that the DHCP Relay Agent is working correctly.
The DHCP relay agent, like a DHCP reservation, typically doesn’t present a problem.However, there may be cases when relay services are not being provided to network clients.Some of the most common problems that you might encounter with the DHCP relay agentinclude the following:
. The network interface on the DHCP relay agent server that is connected to the subnetwhere the DHCP clients are located has not been selected for use with the DHCPrelay agent. You can verify whether the interface has been added or add it from theDHCP Relay Agent node of the DHCP console. You should also verify that the RelayDHCP Packets check box is selected on all adapters that have been selected for use.
. An incorrectly entered DHCP server IP address on the DHCP Relay Agent Propertiesdialog box (refer back to Figure 2.32) prevents the successful relaying of packets. Youcan verify and correct this problem from the properties dialog box of the DHCP RelayAgent node of the DHCP console.
. Remote DHCP servers may not be reachable due to network or server problems. Inthis case, you need to troubleshoot basic network connectivity, as discussed in Chapter1. You should troubleshoot the server status as discussed in this chapter.
. DHCP traffic may be being filtered. In this case, you need to ensure that no IP filtersexist for UDP ports 67 and 68 at any point between the DHCP servers and the remoteDHCP clients.
Chapter 2: Implementing, Managing, and Troubleshooting DHCP

Chapter Summary125
Chapter SummaryIn this chapter, we’ve examined how to implement, manage, and troubleshoot DHCP inWindows Server 2003. Some points of interest to take away from this chapter include the fol-lowing:
. Windows Server 2003 DHCP supports three types of scopes: standard scopes, super-scopes, and multicast scopes. A superscope is a grouping of one or more standardDHCP scopes, whereas a multicast scope is used for special Class D IP addresses formulticasting to clients.
. DHCP servers must be authorized in Active Directory to service clients. WindowsServer 2003 DHCP servers that have not been authorized cannot offer leases toDHCP clients.
. DHCP can be integrated with DNS to provide dynamic updating of DNS A and PTRrecords for DHCP clients. This serves to keep the DNS database accurate and up-to-date as DHCP assigns leases to client computers.
. You can perform monitoring and troubleshooting on a DHCP server by using theDHCP counters in the Performance console.
Key Terms. BOOTP
. DNS
. DHCP
. DHCP server
. DHCP client
. exclusion
. lease
. multicast scope
. registered IP address
. RFCs
. DHCP reservation
. scope

126
. supernetted network
. superscope
. TCP/IP
. unicast address
Apply Your KnowledgeIn this chapter, you have learned what DHCP is and how it works to make IP address assign-ment easier, quicker, and more accurate. In the following exercises, you will practice some ofthe concepts and methods discussed in this chapter.
Exercises
2.1 Creating a DHCP Scope
This exercise guides you through the process of creating a standard DHCP scope. This exercise requiresyou to have a Windows Server 2003 computer with the DHCP service installed.
Estimated time: 20 minutes
1. Open the DHCP console by selecting Start, Programs, Administrative Tools, DHCP.
2. Right-click the DHCP server and select New Scope from the context menu.
3. Click Next to dismiss the opening page of the New Scope Wizard.
4. On the Scope Name page, enter the name SCOPE1 and an appropriate description for the newscope. Click Next to continue.
5. On the IP Address Range page, enter the IP address range 10.0.0.2–10.0.0.100, and thesubnet mask 255.255.255.0. Click Next to continue.
6. On the Add Exclusions page, enter the IP address ranges 10.0.0.5–10.0.0.10 and10.0.0.15–10.0.0.20 as exclusions. Click Next to continue.
7. On the Lease Duration page, you can leave the default setting of eight days. Click Next to continue.
8. Select to configure advanced options and click Next to continue.
9. On the Router (Default Gateway) page, enter the default gateway IP address 10.0.0.1. Click Nextto continue.
10. On the Domain Name and DNS Servers page, enter the IP addresses 10.0.0.250 and10.0.0.251 for the DNS servers. Specify the parent domain as testlab.local. Click Next tocontinue.
Chapter 2: Implementing, Managing, and Troubleshooting DHCP
Apply Your Knowledge127
11. On the WINS Servers page, enter the IP addresses of the WINS servers if you have legacy clientsthat still need WINS services. Enter the IP addresses 10.0.0.250 and 10.0.0.251 for theWINS servers. Click Next to continue.
12. Opt to activate the scope now and click Finish to complete the wizard.
2.2 Creating a Superscope
This exercise shows you how to manage multiple scopes by creating a superscope. You need to havecompleted Exercise 2.1 in order for this exercise to work.
Estimated time: 20 minutes
1. Open the DHCP console by selecting Start, Programs, Administrative Tools, DHCP.
2. Right-click the DHCP server and select New Scope from the context menu.
3. Create a second scope, using the IP address range 10.0.0.102–10.0.0.200, using the same defaultgateway, DNS servers, and WINS servers as detailed in Exercise 2.1, with no exclusions. Name thescope SCOPE2.
4. Right-click the DHCP server and select New Superscope from the context menu.
5. Click Next to dismiss the opening page of the New Superscope Wizard.
6. On the Superscope Name page, enter SUPERSCOPE1 and click Next to continue.
7. On the Select Scopes page, select SCOPE1 and SCOPE2 by holding down the Ctrl key and clickingboth scopes. Click Next to continue.
8. Verify your configuration on the Completing the New Superscope Wizard page. Click Next to com-plete the superscope creation process.
9. The Completing the New Superscope Wizard dialog box gives you a summary of the selections youmade throughout the wizard. Click Finish to create the superscope.
2.3 Configuring a DHCP Relay Agent
This exercise walks you through the process of creating and configuring a DHCP relay agent for a network.
Estimated time: 15 minutes
1. Open the Routing and Remote Access console.
2. Expand the console nodes so that you can access the IP Routing, General node.
3. Right-click the General node and select New Routing Protocol.
4. Select the DHCP relay agent.
128
5. Right-click the DHCP Relay Agent node and select New Interface from the context menu to selectthe interface to be used for the DHCP relay agent.
6. Configure your required values for hop-count threshold and boot threshold.
7. Right-click the DHCP Relay Agent node and select Properties. Enter one or more remote DHCPservers into the list and click OK to confirm your settings.
2.4 Authorizing a DHCP Server in Active Directory
This exercise walks you through authorizing a DHCP server in Active Directory. This exercise requires thatyou have an Active Directory environment with an installed DHCP server.
Estimated time: 5 minutes
1. Open the DHCP console by selecting Start, Programs, Administrative Tools, DHCP.
2. Right-click the DHCP server and select Authorize from the context menu.
3. The authorization process may take some time, depending on network conditions. Refresh theDHCP console by pressing F5. The DHCP server status is shown as Active when the authorizationis complete. The server is then ready to issue addresses when it receives DHCP requests.
2.5 Configuring DHCP for DNS Integration
This exercise walks you through configuring a DHCP server for DNS integration. This exercise requiresthat you have an Active Directory environment with an installed DHCP server and DNS server. To com-plete this exercise, you need to have completed Exercise 2.4.
Estimated time: 15 minutes
1. Open the DHCP console by selecting Start, Programs, Administrative Tools, DHCP.
2. Right-click the DHCP server and select Properties from the context menu. Switch to the DNS tab ofthe DHCP Server Properties dialog box.
3. To enable DHCP integration with DNS, ensure that the Enable Dynamic DNS Updates According tothe Settings Below check box is selected.
4. Select to either have the DHCP server update A and PTR records when requested or to alwaysupdate A and PTR records.
5. To help keep your DNS database clean and consistent, you should allow the DHCP server to causeexpired leases to lead to A and PTR record deletion.
6. If you have legacy clients on the network, ensure that dynamic updating is configured for them aswell.
7. If you are using secure dynamic updates, you should consider configuring a dedicated networkuser account for the dynamic updating. You can enter the account credentials by switching to theAdvanced tab.
Chapter 2: Implementing, Managing, and Troubleshooting DHCP

Apply Your Knowledge129
8. Click the Credentials button on the Advanced tab to open the DNS Dynamic Update Credentials dia-log box.
9. Enter the domain user account name, domain, and password.
Exam Questions1. You are the systems administrator for Wild Widgets, Inc. You are training a new employee on the
use of the DHCP service in Windows Server 2003. She asks you how the client computer requestsand receives an address from the server. Which of the following answers is correct?
❍ A. The client computer broadcasts a DHCPDISCOVER message. The DHCP server offersan IP address. The client computer accepts the address and uses it to communicate onthe network.
❍ B. The client computer broadcasts a DHCPDISCOVER message. The DHCP server offersan IP address. The client computer accepts the address and sends a request to usethat address back to the DHCP server. The client computer uses the address to com-municate on the network.
❍ C. The client computer broadcasts a DHCPDISCOVER message. The DHCP server offersan IP address. The client computer accepts the address and sends a request to usethat address back to the DHCP server. The DHCP server acknowledges the request andgrants the client computer a lease to use the address. The client computer uses theaddress to connect to the network.
❍ D. The client computer broadcasts a DHCPDISCOVER message. The DHCP server offersan IP address. The client computer accepts the address and sends a request to usethat address back to the DHCP server. The DHCP server acknowledges the request andgrants the client computer a lease to use the address. The client computer respondswith an acknowledgement of the lease and uses the address to connect to the network.
2. You are the system administrator for Phil’s Phill-up Stations, a chain of gas stations. As part of thenetwork, you maintain a Windows Server 2003 DHCP server to dynamically assign addresses. Youhave three superscopes set up, and within each superscope are four scopes. One day, you startexperiencing problems with one of the scopes issuing bad addresses. You check the server andsuspect that there is a database problem. How can you verify that the database is intact?
❍ A. Open the DHCP console. Select the scope in question and select Action, ReconcileScope.
❍ B. Open the DHCP console. Select the superscope that contains the scope in question andthen select Action, Reconcile All Scopes.
❍ C. Open the DHCP console. Select the DHCP server that contains the scope in questionand then select Action, Reconcile All Scopes.
❍ D. Open the DHCP console. Select the DHCP server that contains the scope in questionand then select Action, Reconcile DHCP Database.

130
3. You are the LAN administrator for Get Stuffed Taxidermy, and you are responsible for maintainingthe company’s Windows Server 2003 DHCP server. While doing your daily system checks, younotice that the number of DHCPDISCOVER packets spiked at 9:00 this morning. What could causethe Discovers/Sec counter to spike at 9:00 a.m.?
❍ A. A network problem
❍ B. The DHCP service being restarted
❍ C. A large number of computers entering the network at approximately the same time
❍ D. A rogue DHCP server issuing duplicate addresses
4. You are the systems administrator for Hank’s Harmonicas, Ltd. Your Active Directory–based net-work consists of all Windows Server 2003 server computers and Windows 98, Windows 2000Professional, and Windows XP Professional client computers. This morning one of the users of aWindows 98 computer called you and said that she could no longer connect to network resources.Upon further investigation, you discover that several other Windows 98 clients are experiencingthe same problem. You determine that the cause of the problem is due to an incorrectly configuredDHCP lease. What is the most likely reason that only your Windows 98 clients are exhibiting thisproblem?
❍ A. The DHCP service in Windows 98 is not as stable as that in Windows 2000 orWindows XP, and this sometimes results in corrupted lease information.
❍ B. An unauthorized DHCP server has been set up on the network.
❍ C. A misconfigured DHCP server has been set up on the network.
❍ D. The Windows 98 clients were unable to renew their DHCP lease and have thusassumed APIPA IP addresses instead.
5. You are the lead systems administrator for Little Faith Enterprises, and a customer has asked youto install the DHCP service on her Windows Server 2003 computer, get one scope configured, andissue addresses. What minimum steps do you need to take in order to accomplish this?
❍ A. Install the DHCP service from the Windows Components Wizard. After the service isinstalled, authorize it in Active Directory. Next, create the scope. Finally, configure theDNS integration.
❍ B. Install the DHCP service from the Windows Components Wizard. After the service isinstalled, create the scope and then configure the DNS integration.
❍ C. Install the DHCP service from the Windows Components Wizard. After the service isinstalled, create the scope. Create a superscope and add the scope to it. Authorize theserver in Active Directory.
❍ D. Install the DHCP service from the Windows Components Wizard. After the service isinstalled, create the scope. Authorize the server in Active Directory.
Chapter 2: Implementing, Managing, and Troubleshooting DHCP
Apply Your Knowledge131
6. You are the systems administrator for the Hittem Boxing Glove Corporation. The corporation isrunning a routed network with a centrally located Windows Server 2003 DHCP server. The serveris able to issue addresses to users on the local segment but cannot issue addresses to any of thesites that are across a router. What is the most probable cause of this problem?
❍ A. The DHCP forwarder service is not enabled on the DHCP server.
❍ B. The BOOTP forwarder service is not enabled on the DHCP server.
❍ C. The DHCP forwarder service is not enabled on the routers.
❍ D. The BOOTP forwarder service is not enabled on the routers.
7. You manage the Windows Server 2003 DHCP servers for the Really Big Screwdriver Corporation.You are running in a purely Windows Server 2003 environment with all Windows XP Professionalclients, and you need to make sure that workstations are registered properly in DNS for ActiveDirectory integration. How should you configure DNS integration?
❍ A. Set DNS integration to automatically update DHCP client information in DNS.
❍ B. Set DNS integration to discard A and PTR records when a lease is deleted.
❍ C. Set DNS integration to enable updates for DNS clients that do not support dynamicupdates.
❍ D. Set DNS integration to enable DNS keepalives.
8. You are the systems administrator for UR Write publishing, a bookseller. Your Windows Server2003 DHCP server issues a block of 40 addresses to 120 salespeople on the Sales network. Theseusers are frequently in and out of the office, so no more than 40 users are ever on the network atone time. What do you need to do to ensure that users get addresses when needed?
❍ A. Set the DHCP lease duration to 60 minutes.
❍ B. Set the DHCP lease duration to 5 days.
❍ C. Configure a reservation for each user.
❍ D. Configure an exclusion for each user.

132
9. You are the distributed computing administrator for Talk to Me Telephone. The company hasWindows Server 2003 installed, with the DHCP service running. Mixed in with the DHCP clientcomputers, the company still has some old workstations on the network with BOOTP chips ontheir Ethernet cards. You need to add support for BOOTP for these computers. How do you ensurethat support?
❍ A. Add the BOOTP service to the server.
❍ B. In the Advanced tab of the scope Properties dialog box, configure the server to issueaddresses to BOOTP clients.
❍ C. In the Advanced tab of the server Properties dialog box, configure the server to issueaddresses to both DHCP and BOOTP clients.
❍ D. In the Advanced tab of the scope Properties dialog box, configure the server to issueaddresses to both DHCP and BOOTP clients.
10. You manage the Windows Server 2003 DHCP servers for the Really Big Hammer Corporation. It isa mixed environment, with Windows 2000, Windows XP, and Windows 98 workstations. You needto make sure workstations are registered properly in DNS for Active Directory integration. What doyou need to do?
❍ A. Set DNS integration to automatically update DHCP client information in DNS.
❍ B. Set DNS integration to discard A and PTR records when a lease is deleted.
❍ C. Set DNS integration to enable updates for DNS clients that do not request dynamicupdates.
❍ D. Set DNS integration to enable DNS keepalives.
11. You are the systems administrator for BT Editing Unlimited. You have a 50-host network and arerunning a Windows Server 2003 DHCP server to assign IP addresses. You also have five IP-basedprinters with static IP addresses. Your assistant administrator has been working on the DHCPserver and has made some changes. Now, your users cannot print to one of the printers. What ismost likely the problem?
❍ A. The scope from which the printers were receiving their IP addresses has been deleted.
❍ B. The existing scope has been modified so that it overlaps the addresses reserved for theprinters.
❍ C. The existing scope has been modified so that it overlaps the addresses reserved for theprinters, and a workstation has been assigned the same address as one of the printers.
❍ D. The DHCP service was inadvertently stopped.
Chapter 2: Implementing, Managing, and Troubleshooting DHCP

Apply Your Knowledge133
12. You are the systems administrator for the Little Faith Department Store. You are responsible formaintaining the company’s Windows Server 2003 DHCP server. The company recently added anew router and routed a segment to the network. Now that segment must be added to the DHCPserver. The address of the router port is 10.10.25.1, and the router is subnetted with a Class Csubnet mask. You need to provide 40 addresses, starting at 10.10.25.20. What needs to occur foryou to get DHCP working on that segment?
❍ A. You need to install and configure an additional DHCP server on that segment to pro-vide DHCP services.
❍ B. You need to add to the DHCP server a scope that contains the addresses from10.10.25.20 through 10.10.25.59. The scope needs a subnet mask of 255.255.255.0.You need to configure the BOOTP forwarder for the new segment’s router, using theaddress of the DHCP server. You need to activate the scope.
❍ C. You need to add to the DHCP server a scope that contains the addresses from10.10.25.20 through 10.10.25.60. The scope needs a subnet mask of 255.255.255.0.You need to configure the BOOTP forwarder for the new segment’s router, using theaddress of the DHCP server. You need to activate the scope.
❍ D. You need to add to the DHCP server a scope that contains the addresses from10.10.25.20 through 10.10.25.60. The scope needs a subnet mask of 255.255.255.0.You need to configure the BOOTP forwarder for the new segment’s router, using theaddress of the DHCP server. You do not need to activate the scope because that hap-pens automatically when the scope is created.
13. You are the network manager for IntCo Manufacturing. You are running in a mixed environment,and you are using a Windows Server 2003 DHCP service to support three network segments. Yourclient computers consist of Windows 2000 Professional, Windows NT Workstation, and Windows98 SE workstations. What do you need to do to ensure that all the client computers can receiveDHCP addresses?
❍ A. Configure a scope for each network segment. Configure each client computer toreceive IP addresses dynamically. Configure the DHCP service for backward compati-bility.
❍ B. Configure a scope for each network segment. Configure each client computer toreceive IP addresses dynamically. For the Windows NT Workstation client computers,ensure that the DHCP update from Service Pack 6 has been installed.
❍ C. Configure a scope for each network segment. Configure each client computer toreceive IP addresses dynamically. Configure the DHCP service for mixed mode.
❍ D. Configure a scope for each network segment. Configure each client computer toreceive IP addresses dynamically.

134
14. You are the systems administrator for BT Editing, and you are running a purely Windows Server2003 network using Active Directory and the Windows Server 2003 DHCP service. A user in anoth-er department has installed a DHCP server on a Unix server. How do you prevent your client com-puters from receiving DHCP addresses from that server?
❍ A. Disable the unauthorized server in Active Directory.
❍ B. Make sure all your domain client computers are running Windows 2000 or higher.
❍ C. Reconfigure BOOTP on the router.
❍ D. Go to each client computer and enter the address of the production DHCP server in theInternet Protocol (TCP/IP) Properties dialog box.
15. You are the systems administrator for Area 51 Partners, a consulting firm that is not involved inany way, shape, or form with alien activity in Nevada. You have a customer who would like toensure that only authorized DHCP servers can make dynamic updates to the DNS database. Whatwill you configure for the customer in order to make this happen? (Choose all that apply.)
❍ A. Create a new domain user account called DNSDYNUPD.
❍ B. Enter the credentials for the DNSDYNUPD account in the scope options for your DHCPserver.
❍ C. Enter the credentials for the DNSDYNUPD account in the DNS Dynamic UpdateCredentials dialog box for your DHCP server.
❍ D. Add the DNSDYNUPD account to the Enterprise Administrators group.
Answers to Exam Questions1. C. The client computer cannot use the address until the DHCP server grants the lease. After the
DHCP server acknowledges the DHCP request and grants the lease, the client computer is able touse the address. Before a client computer can actually use an offered address, it must request todo so and receive an acknowledgement from the offering DHCP server; thus Answers A, B, and Dare incorrect. No additional step is required in the process. For more information, see the section“DHCP.”
2. C. You need to reconcile all the scopes on the server. Answer A is almost correct because you canreconcile a single scope, but the correct command is Reconcile, not Reconcile Scope. You cannotreconcile scopes at the Superscope level, as stated in Answer B. The command in Answer D doesnot exist. For more information, see the section “Reconciling the DHCP Database.”
3. C. The DHCPDISCOVER packet is sent when a computer first requests an address. The most likelyreason for the Discovers/Sec counter to spike would be a large number of concurrent requestsoccurring, which could happen when a large number of client workstations request addresses atthe same time. A network problem would have the opposite effect because no DHCPDISCOVERpackets would reach the server; thus Answer A is incorrect. A DHCP service restart or a rogue
Chapter 2: Implementing, Managing, and Troubleshooting DHCP

Apply Your Knowledge135
DHCP server couldn’t affect the number of DHCPDISCOVER packets because the packets are gen-erated by client PCs; thus Answers B and D are incorrect. For more information, see the section“Troubleshooting DHCP Server Authorization Problems.”
4. B. In this scenario, the most likely cause for the problem is that an unauthorized DHCP server hasbeen set up on the network. Windows 2000 and Windows XP clients in an Active Directory domaindo not take DHCP leases from DHCP servers that have not been authorized in Active Directory. TheDHCP service in Windows 98 would not likely cause this sort of problem; thus Answer A is incor-rect. A misconfigured DHCP server that was authorized would give bad DHCP lease information toall clients—not just to Windows 98 clients; thus Answer C is incorrect. In addition, if clients wereunable to reach a DHCP server, the Windows 2000 and Windows XP clients would also assignthemselves APIPA IP addresses; thus Answer D is incorrect. For more information, see the section“Troubleshooting DHCP Server Authorization Problems.”
5. D. If the task is to install the DHCP service and get it issuing addresses, you do not need to config-ure DNS, but you do need to authorize the server in Active Directory; thus Answers A and B areincorrect. Even though you learned how to create a superscope in this chapter, you do not need asuperscope for the server to function; thus Answer C is incorrect. For more information, see thesection “Configuring and Managing DHCP.”
6. D. To issue addresses using DHCP across a router, the router needs to have the BOOTP forwarderservice enabled and configured; thus Answer C is incorrect. DHCP relay is configured on a routeror a Windows Server 2003 computer running Routing and Remote Access; thus Answer A is incor-rect. There is no such thing as the BOOTP forwarder server; thus Answer B is incorrect. For moreinformation, see the section “Configuring and Implementing a DHCP Relay Agent.”
7. A. In a purely Windows 2000, Windows XP, and Windows Server 2003 environment, you need toconfigure DHCP to automatically update DNS to ensure that the client computers appear on thenetwork correctly. Setting the DNS integration to discard lookups after a lease is deleted alsoworks with a purely Windows 2000 network, but it has nothing to do with the computers register-ing properly; thus Answer B is incorrect. Windows 2000, Windows XP and Windows Server 2003all support dynamic updates; thus Answer C is incorrect. Keepalives are associated with HTTP ses-sions, not DNS; thus Answer D is incorrect. For more information, see the section “ConfiguringDHCP for DNS Integration.”
8. A. To ensure that addresses are available, the DHCP lease needs to be set to a short interval; thusAnswer B is incorrect. Reservations won’t help since you have too few leases already; thus AnswerC incorrect. There was no mention of a need for exclusions and thus no need to configure them;therefore Answer D is incorrect. For more information, see the section “Creating a DHCP Scope.”
9. D. You need to configure the scope to issue addresses to both DHCP and BOOTP clients; thusAnswers A, B, and C are incorrect. For more information, see the section “Creating a DHCPScope.”
136
10. C. Because the non-Windows 2000 (or non-Windows XP) machines lack the capability to directlyupdate the DNS server themselves, you need the DHCP server to make the updates to DNS. UsingDNS integration to enable updates for DNS client computers that do not support dynamic updatesenables the DHCP server to perform this service. The options mentioned in Answers A and B donot exist; thus they are incorrect. Keepalives are associated with HTTP sessions, not DNS; thusAnswer D is incorrect. For more information, see the section “Configuring DHCP for DNSIntegration.”
11. C. The address from the printer has probably been issued to another computer. Because the print-ers use static addresses, the only change to the DHCP server that could have affected printingwould be another host having the same address. Deleting the scope would cause problems, butnot likely right away; thus Answer A is incorrect. Answer B is close, but just creating an overlap-ping scope is not a problem until the overlapping addresses are assigned. As with deleting thescope, stopping the DHCP service would cause problems, but not unless a client needed a newaddress; thus Answer D is incorrect. For more information, see the section “Configuring andManaging DHCP.”
12. B. A single DHCP server can serve multiple segments, so you do not need an additional server. Toget 40 addresses, the range must be from 10.10.25.20 to 10.10.25.59, which is an inclusive range.Also, the last step of the New Scope Wizard is to authorize the new scope. The actions listed inAnswer A are not enough to perform the required task; thus Answer A is incorrect. Answers C andD each provide 41 addresses; in addition Answer D has you not activating the scope, which youmust do this in order to use the scope. Therefore Answers C are D are incorrect. For more infor-mation, see the section “Configuring and Managing DHCP.”
13. D. You do not need to make any special configurations to the DHCP service; it can communicatewith non-Windows 2000 or non-Windows XP client computers without problems. Thus Answers Aand C are incorrect. You also do not need to update any of the client computers. Windows NT andWindows 98 are capable of utilizing DHCP without needing updates applied; thus Answer B isincorrect. You just need to configure the appropriate scope and configure the client computers toutilize that scope. For more information, see the section “Configuring and Managing DHCP.”
14. B. Because a Unix server cannot be enabled in Active Directory, Windows 2000 (and Windows XP)client computers do not accept DHCP addresses from the server. Answer A is not correct becauseyou cannot disable a server that isn’t joined to the Active Directory domain. Changing the BOOTPconfiguration on the router might prevent remote users from receiving addresses, but local userswould still be vulnerable; thus Answer C is incorrect. In Answer D, there is nowhere to enter theaddress of the DHCP server. For more information, see the section “Authorizing a DHCP Server inActive Directory.”
15. A, C. Windows Server 2003 allows you to use a preconfigured domain user account to performDNS dynamic updates. This ensures that only authorized DHCP servers are performing dynamicupdates and that all DHCP servers can update and modify DNS entries. In addition, this preventsproblems previously associated with allowing a DHCP server running on a domain controller toperform DNS dynamic updates. The best course of action is to create a dedicated domain user
Chapter 2: Implementing, Managing, and Troubleshooting DHCP

Apply Your Knowledge137
account for this purpose. The account information to be used for dynamic updates is configured atthe server level; thus Answer B is incorrect. The account used for dynamic updates does not needto be a member of the Enterprise Administrators group; thus Answer D is incorrect. For moreinformation, see the section “Configuring DHCP for DNS Integration.”
Suggested Readings and Resources1. Davies, Joseph, and Lee, Thomas. Microsoft Windows Server 2003 TCP/IP Protocols and
Services Technical Reference. Microsoft Press, 2003.
2. Stevens, W. Richard. TCP/IP Illustrated, Volume 1: The Protocols. Addison-Wesley, 1994.
3. “Deploying Network Services,” http://technet2.microsoft.com/WindowsServer/en/Library/119050c9-7c4d-4cbf-8f38-97c45e4d01ef1033.mspx.
4. “Technical Overview of Windows Server 2003 Networking and Communications,”www.microsoft.com/windowsserver2003/techinfo/overview/netcomm.mspx.
5. “Windows Server 2003 Reviewer’s Guide,” www.microsoft.com/windowsserver2003/techinfo/overview/reviewersguide.mspx.
6. Windows Server 2003 Online documentation: “Network Services,” www.microsoft.com/technet/prodtechnol/windowsserver2003/proddocs/entserver/sag_NPStopnode.asp.
7. “Dynamic Host Configuration Protocol (DHCP) Operations Topics,” http://technet2.microsoft.com/windowsserver/en/operations/dhcp.mspx.
8. “Windows Server 2003 Security Guide,” http://www.microsoft.com/technet/security/prodtech/windowsserver2003/W2003HG/SGCH00.mspx.