chapter a1: setting up banklink practice, banklink notes and · pdf file ·...
TRANSCRIPT

627
Chapter A1: Setting up BankLink Practice, BankLink Notes and BankLink Notes Online This chapter is aimed at BankLink Administrators
This chapter covers setting up BankLink Practice and BankLink Notes Online and BankLink Notes. Usually BankLink Practice is installed into a shared directory on your server, but it can also be installed on a stand-alone PC.
The installation adds BankLink Practice to a Start Menu Group on the PC where you carry out the installation.
The default installation also creates your initial database, but you can opt to do this later if required.
From time to time, we release new versions of the BankLink Practice software with new and enhanced features. The most current version of BankLink Practice is always available on our website - see Chapter A3: Updating BankLink Practice.
Our website address is: www.banklink.co.nz.

BankLink Practice Guide for New Zealand
628
System requirements BankLink Practice on a Network
Usually you install BankLink Practice on a network, allowing simultaneous multi user access. The BankLink Practice software and data reside in one directory on a server. All workstations must be running a 32-bit operating system such as Windows 98 or later.
From the user's perspective a single desktop shortcut gives them access to all the functions they require.
Stand-alone BankLink Practice Systems
If you do not have a network, or require multi-user access, BankLink Practice can also run on any stand-alone PC running a 32-bit operating system such as Windows 98 or later.
Internet Access
To download your data via our Internet delivery service, BankLink Secure, there must be access to the Internet from at least one PC on your network that also has access to BankLink Practice. With Internet access, you can not only download your data, but also send us files easily in support of any technical queries, and download software upgrades as they become available.
BankLink Practice does not run in a Mac environment.
Chapter A1: Installing BankLink Practice and BankLink Notes
629
Installing BankLink Practice on a network This topic explains how to install the BankLink Practice software on a network. On a network, you install the BankLink Practice software to a shared directory on the server. It is not important to BankLink Practice what type of server you are using, or which network protocols you use, although for BankLink Secure it assumes you will have TCP/IP networking installed. This installation is normally performed from a workstation. You must be logged in with Network Supervisor rights.
It should take no more than a few minutes to install the software. You need to remove any demonstration copies of the BankLink Practice Software before you install this copy. You can remove the demonstration software by deleting its folder.
If you have any concerns about the installation or the link with your main accounting system, you can call BankLink Support who will take you through the whole process.
1 Place the BankLink CD in your workstation CD drive and wait a few moments while the CD’s autorun program loads the Installation program
If the Installation program does not automatically start, click Start, Run and then select Setup.exe
2 Click
from the root directory of the CD.
The
Install BankLink Practice
Select Country
3 Select your country and click
window displays
OK
The
Welcome
4 Click
window of the BankLink Setup Practice Wizard displays
Next
The BankLink Practice
to continue with the installation
Software End-User Licence Agreement
5 Click
displays
I accept the agreement
6 Click
to accept the terms of the agreement
Next
The
Select Destination Location
7 Specify a drive and directory where BankLink Practice will be installed - the default is
window displays
C:\BK5
8 Click
, change this to a shared directory on your server, for example F:\BK5
Next
The
Select Start Menu folder
9 Click
window displays - by default BankLink appears as the Start Menu Group, change it if required
Next
BankLink Practice is added as a
Start menu option accessible by clicking on Start, Programs, BankLink
The Select Additional Tasks window displays

BankLink Practice Guide for New Zealand
630
10 Ensure that the Create an initial database
11 Click
check box is enabled
Next
The
Ready to Install
12 Click
window appears confirming you are ready to install BankLink Practice
Install
The BankLink Practice software installs, displaying progress
Then the
Create Initial BankLink Database
13 The
window displays
Country
14 Click in the
field should show your country - click in it and alter if incorrect
BankLink Code
15 Click in the
field and enter the code assigned to your practice (this is in your covering letter - if you are unsure contact BankLink Support to confirm)
Practice Name
16 Click
field and enter your full practice name to appear on all applicable reports
OK
BankLink Practice installation is complete
17 Check that the Start BankLink
18 Click
check box is enabled
Finish
The BankLink Practice
to exit setup
login
Set up all users and workstations
window displays with your Practice Name on the title bar
After installing the software, proceed as follows:
If multiple users are to work on BankLink Practice, you must add each of them as a user in BankLink Practice and set up their workstations with a BankLink shortcut - see Setting up BankLink Practice users later in this Chapter.
Set up new client files
You can choose to create client files and associated attributes prior to downloading data or after the download when you attach new bank accounts to client files. See Chapter A5: Creating client files and attaching bank accounts for instructions on creating client files.
Download Data
If you have any BankLink data to download, do this next. When you download the BankLink data, all the new bank accounts are added to your BankLink Practice system. For instructions on downloading data see Chapter A7: Downloading and purging data.

Chapter A1: Installing BankLink Practice and BankLink Notes
631
Set up Security
If you have any bank accounts that contain especially sensitive information, you can protect them by applying a password. See Client files and bank accounts in Chapter A6: Security for more information on attaching passwords to bank accounts.

BankLink Practice Guide for New Zealand
632
Installing BankLink Practice on a stand-alone PC This topic explains how to install BankLink Practice on a stand-alone PC - a stand-alone PC is a computer that is not connected to a network.
It should take no more than a few minutes to install the software. You need to remove any demonstration copies of the BankLink Practice software before you install this copy. You can remove the demonstration software by deleting its folder.
If you have any concerns about the installation or the link with your main accounting system, you can call BankLink Support who will take you through the whole process.
To install the stand-alone version of BankLink Practice:
• Follow the instructions as for installing the network version, but enter a local drive destination at step 5
After installing the software, proceed as follows:
Set up all users
If multiple users are to work on BankLink Practice, you must add each of them as a user - see Setting up BankLink Practice users later in this Chapter.
Set up new client files
You can choose to create client files and associated attributes prior to downloading data or after the download when you attach new bank accounts to client files. See Chapter A5: Creating client files and attaching bank accounts for instructions on creating client files.
Download Data
If you have any BankLink data to download, do this next. When you download the BankLink data, all the new bank accounts are added to your BankLink Practice system. For instructions on downloading data see Chapter A7: Downloading and purging data.
Set up Security
If you have any bank accounts that contain especially sensitive information, you can protect them by applying a password. See Client files and bank accounts in Chapter A6: Security for more information on attaching passwords to bank accounts.

Chapter A1: Installing BankLink Practice and BankLink Notes
633
Creating an initial database Normally, you ensure that the Create an initial database check box is enabled during the installation process to create an initial database - if you did so, you can ignore this topic. If you disabled it, you can use this procedure to create the database later.
To create a BankLink Practice database:
1 Click
BankLink Practice displays the
Start, Programs, BankLink, Create Initial Database
Create Initial BankLink 5 Database
2 The
window
Country
3 Click in the
field should show your country - click in it and alter if incorrect
BankLink Code
4 Click in the
field and enter the code assigned to your practice (this is in your covering letter - if you are unsure phone BankLink Support to confirm)
Practice Name
5 Click OK
field and enter your full practice name to appear on all applicable reports
BankLink Practice displays the BankLink Practice login
Set up all users (and workstations if this is a network installation)
window with your practice name on the title bar
After creating the database, proceed as follows:
If multiple users are to work on BankLink Practice, you must add each of them as a user and set up each workstation (if this is a network installation) with a BankLink shortcut - see Setting up BankLink Practice users later in this Chapter.
Set up new client files
You can choose to create client files and associated attributes prior to downloading data or after the download when you attach new bank accounts to client files. See Chapter A5: Creating client files and attaching bank accounts for instructions on creating client files.
Download Data
If you have any BankLink data to download, do this next. When you download the BankLink data, all the new bank accounts are added to your BankLink Practice system. For instructions on downloading data see Chapter A7: Downloading and purging data.
Set up Security
If you have any bank accounts that contain especially sensitive information, you can protect them by applying a password. See Client files and bank accounts in Chapter A6: Security for more information on attaching passwords to bank accounts.

BankLink Practice Guide for New Zealand
634
Setting up BankLink Practice users This section covers:
• Adding and maintaining users
• Resetting a user
• Finding the workstation where a user is logged in

Chapter A1: Installing BankLink Practice and BankLink Notes
635
Adding and maintaining users
If you install BankLink Practice on a network, or have multiple users using the same PC, you need to ensure that each of your users has the correct access rights - all your users must have full access rights to the BankLink Practice directory. Instructions on how to do this vary with the operating system you are using - check with your systems administrator if you are not sure.
You need to allocate each BankLink Practice user a user name and optional password, which they use to log in. If you are concerned about the security of your data, then you should use passwords to restrict access to the BankLink Practice database.
BankLink Practice user rights can be restricted to prevent access to the System menu. A BankLink Practice user with access to the System menu has BankLink Administrator rights and can perform all the tasks in these Administrator Chapters. All users with BankLink Administrator rights must have a password in BankLink Practice.
User types and access levels
You grant users one of three access levels:
User Type
Password required
Access Levels Master Memorisations
File Access
System Yes Full access to all menu items Yes or No as per the check box
All files
Normal No, but may be used for added security
May access client files but cannot access the System menu, and check in/out BankLink Practice files
Yes or No as per the check box
All files or selected files only
Restricted No, but may be used for added security
As for normal, but also prevented from performing tasks which rely on access to the network’s file system, for example: Save As or Print to File
No Selected files only
Only users with BankLink Administrator rights (System menu access) can delete clients’ files or bank accounts, so restricting System menu access to just those users who actually need it is a sensible precaution against accidental or deliberate loss of data. As you add each user, ensure that you only enable System menu access for those users who really need it.
BankLink Practice Guide for New Zealand
636
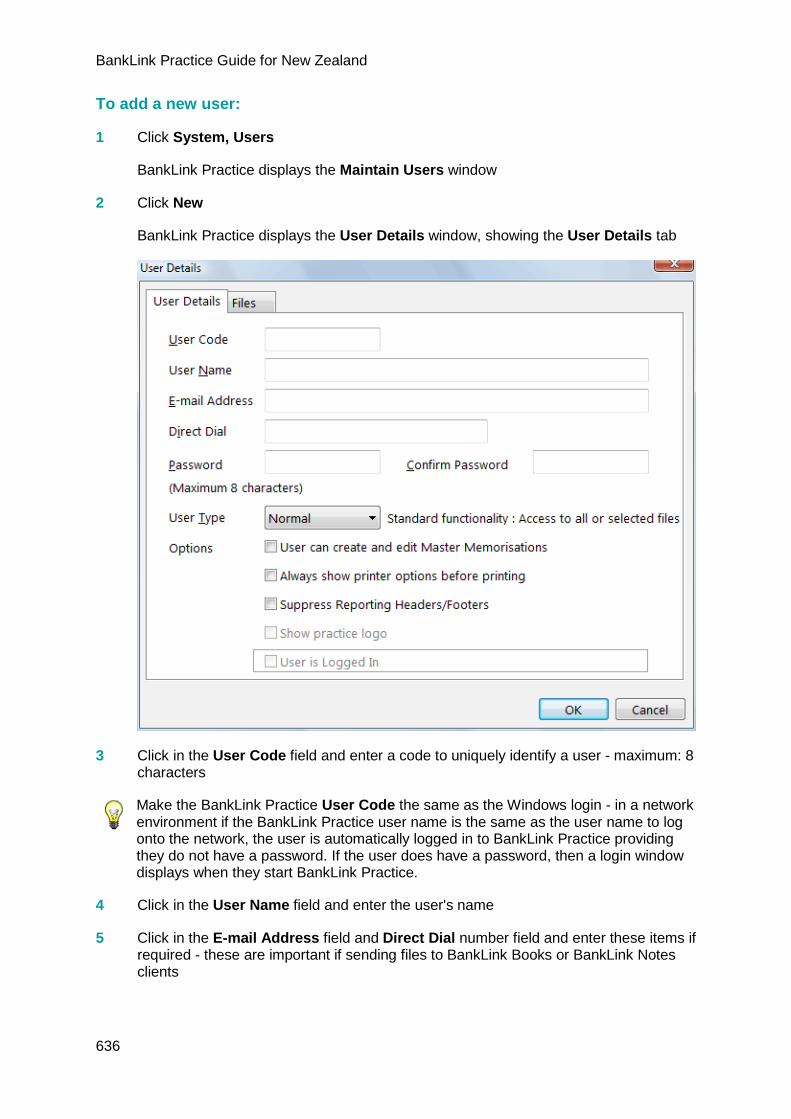
To add a new user:
1 Click System, Users
BankLink Practice displays the
Maintain Users
2 Click
window
BankLink Practice displays the
New
User Details window, showing the User Details tab
3 Click in the User Code field and enter a code to uniquely identify a user - maximum: 8 characters
Make the BankLink Practice User Code
4 Click in the
the same as the Windows login - in a network environment if the BankLink Practice user name is the same as the user name to log onto the network, the user is automatically logged in to BankLink Practice providing they do not have a password. If the user does have a password, then a login window displays when they start BankLink Practice.
User Name
5 Click in the
field and enter the user's name
E-mail Address field and Direct Dial number field and enter these items if required - these are important if sending files to BankLink Books or BankLink Notes clients

Chapter A1: Installing BankLink Practice and BankLink Notes
637
6 Enter a password in the Password and Confirm Password
7 Click in the
fields if required - passwords can consist of alpha and/or numeric characters
User Type
• Restricted
field and select a user type:
• Normal
• System
8 Enable the User can create and edit Master Memorisations
9 Enable the
check box if required - see Master memorisations in Chapter 5 and Viewing and editing master memorisations in Chapter A9 for more information
Always show printer options before printing check box if required - the user will see the Print
10 Enable the
window each time they print a report. For more information about Printer setup see Chapter 13: Producing Reports
Suppress Reporting Headers/Footers
11 If you are creating a Restricted user you can enable the
check box if required - this means that reports produced by this User will not display your practice's default header and footer
Show practice logo
12 Click
checkbox if you want the user to see the practice logo when they open the files they have access to in BankLink Practice - see Practice details in Chapter A9 - The System menu for information about the practice logo
OK
Limiting a User to Selected Client Files
You can set up Normal and Restricted users with file access limited to selected client files, for example: your staff may have their file access limited to only the clients for which they are responsible.
If remote access to your network is available, you may allow your clients to dial in and work on the practice copy of BankLink Practice. If you decide to do this, set up your clients as Restricted users with access limited to their file(s). It is important to set up your clients as Restricted users to prevent them from accessing your network’s file system from within BankLink Practice.
If you have just installed BankLink Practice and are setting up users, there are currently no files to display.
To limit a user to selected client files:
1 Click System, Users
BankLink Practice displays the
Maintain Users
2 Select a
window
Normal or Restricted user type

BankLink Practice Guide for New Zealand
638
3 Click the Files
BankLink Practice displays the
tab
Files
4 Choose the
tab
Selected files only option (Alt+F) - this is the only option for Restricted users)

Chapter A1: Installing BankLink Practice and BankLink Notes
639
5 Click Add
BankLink Practice displays the
Select Files window showing available files
6 Click on the required client file and then click
BankLink Practice returns you to the
Add
Files
7 Click
tab, showing the selected client files
OK
The All files option is not available if the user type is Restricted.
If you select the wrong client file, click on the Client Code and then click Remove (Alt+R). Click Remove All (Alt+V
To edit user details:
) to clear all selected client files.
1 Click
BankLink Practice displays the
System, Users
Maintain Users
2 Click on the User you want to edit and click
window
BankLink Practice displays the
Edit
User Details
3 Edit the appropriate details
window
4 Click OK

BankLink Practice Guide for New Zealand
640
To delete a user:
1 Click
BankLink Practice displays the
System, Users
Maintain Users
2 Click on the user you want to delete and click
window
Delete (press Delete
3 Click
)
Yes
Usually if you add a new BankLink Practice User, you set up their workstation at the same time.
to confirm you want to delete this user

Chapter A1: Installing BankLink Practice and BankLink Notes
641
Resetting a user
If a user experiences a computer failure while working in BankLink Practice, when they restart BankLink Practice displays either an Error window
or the User Already Logged In window (see below)
The client file they were working on is flagged as open, and no one else can access it.
If BankLink Practice displays the Error
To reset a user if you are an Administrator:
window, the user must be reset by an Administrator.
1 Click System, Users
BankLink Practice displays the
Maintain Users
2 Click on the user who is unable to log in and click
window
Edit
BankLink Practice displays the
User Details
3 Disable the
window
User is Logged In check box
Resetting the user also resets any client file the user had open when their system failed.
4 Click Yes
This enables the user to log back into BankLink Practice in the usual manner

BankLink Practice Guide for New Zealand
642
In some circumstances the User Already Logged In window displays.
You can reset yourself even if you are not an Administrator by logging back into the same workstation you were on when you experienced the failure. Click Yes when BankLink Practice displays this window. As stated in the window, any client files that the user has open at the time of the error message are also unlocked.

Chapter A1: Installing BankLink Practice and BankLink Notes
643
Finding the workstation where a user is logged in
All users that are logged in to BankLink Practice are highlighted in the Maintain Users
1 Click
window.
System, Users
BankLink Practice displays the
Maintain Users window - users that are logged in have a smiley face to the left of their User Name and the status
2 Highlight a logged on user and click
Logged ln
BankLink Practice displays the
Edit
User Details window, showing the workstation details at the bottom
3 Click OK

BankLink Practice Guide for New Zealand
644
Setting up workstations When you install the BankLink Practice software onto your network, you need set up the workstations so that they can access BankLink Practice.
To access BankLink Practice from a workstation:
1 Open the My Computer window or Windows Explorer and open the folder on your server where the BankLink Practice software is installed, for example:
2 Right-click on the
F:\BK5
Bk5win.exe
3 Click
program
Send to, Desktop (create shortcut)
4 Double click on the desktop shortcut you just created
5 Log in using the new user code to check that the connection works and that the user has the correct access rights to the BankLink Practice directory
On a network, all your users must have full access rights to the BankLink Practice directory.
If you have trouble running BankLink Practice on a particular workstation, log in as the Network Supervisor.
If you can now access BankLink Practice then your problems are caused by the user not having sufficient access rights to run BankLink Practice.

Chapter A1: Installing BankLink Practice and BankLink Notes
645
Emailing from within BankLink Practice Once you have set up your email attributes for each workstation you can email your clients and BankLink Support directly from the BankLink Practice software.
MAPI Mail
By default, BankLink Practice is set up to use MAPI mail and to use the default profile used to log in to your email. An example of a MAPI compliant mail program is Microsoft Outlook.
To set up your MAPI email using the Default Profile:
1 Click File, Preferences
2 Click the
BankLink Practice displays the
tab
E-mail tab
The Use MAPI Mail option and the Use Default Profile
3 Enable the
check box are selected by default to use a MAPI compliant mail program to send email using the default email profile
Turn on extended MAPI support check box for System users who run Scheduled Reporting

BankLink Practice Guide for New Zealand
646
4 Click OK
In rare situations, more than one user accesses your email program, so you need to specify which Profile Name and Password to use in BankLink Practice.
To set up your MAPI email with a specified Profile Name:
1 Click File, Preferences
2 Click the
3 Click the
tab
Use MAPI Mail
4 Disable the
button if you use a MAPI compliant mail program such as Microsoft Outlook to send email
Use Default Profile
5 Click in the
check box
Profile Name
6 Click in the
field and enter the name you use to log in to your email program
Password
7 Click
field and enter the password you use to log in to your email program
OK
Internet Mail
If your email program is not MAPI-compliant you need to set up the email attributes on each workstation to reflect this. Contact your Internet Service Provider or check their website for the appropriate settings.
To set up your Internet Mail Server email:
1 Click File, Preferences
2 Click the
3 Click the
tab
Use Internet Mail button to use an Internet Mail Server such as SMTP.service provider.com.au to send email from BankLink Practice

Chapter A1: Installing BankLink Practice and BankLink Notes
647
4 Click in the Outgoing Mail Server
5 Click in the
field and enter the address of your Internet Mail SMTP Server (confirm with your ISP if you are not sure)
Timeout (sec.)
6 Click in the
field and enter how many seconds to wait for a response from the server before disconnecting - this field is optional
Return E-Mail Address
7 In the
field and enter the default return address to appear on all emails sent - this field is optional, but if you do not complete it you have to enter a return address each time you send mail
Port No
8 Enable the
field, enter the Port No advised by your Internet Service Provider
My Mail Server requires Authentication
9 Click in the
check box if your mail server requires you to enter a user name to log in to your email Usually one Internet Account Name and password logs you both into the Internet and then into your mail server. Only in rare cases is an additional Account Name needed to log in to the mail server
Account Name
10 Click
field and enter an account name to use when logging in to your email
OK

BankLink Practice Guide for New Zealand
648
Enabling double-click import and check in on users' workstations If you regularly import BankLink Notes files or check client files in and out of the BankLink Practice system, you should have the Check-In extension installed. This enables you to import or check a file in just by double clicking on it and works on both email attachments and saved files. Only users who are able to check files in and out will be able to install the extension on their workstation.
To install the Check-In extension on a workstation
1 Click
BankLink Practice displays the Setup BankLink Check-In Extensions window
Help, Install Check-In extension

Chapter A1: Installing BankLink Practice and BankLink Notes
649
2 Click
The
Next
Select Destination Directory window displays
3 Specify a drive and directory where the BankLink Check-In Extensions will be installed - the default is C:\Program Files\BankLink Client

BankLink Practice Guide for New Zealand
650
4 Click Next
The
Ready to Install window appears confirming you are ready to install the BankLink Check-In Extensions on your workstation

Chapter A1: Installing BankLink Practice and BankLink Notes
651
5 Click Install
The BankLink Check-In Extensions software installs and you are notified when the BankLink Check-In Extensions have been installed on your workstation
6 Click Finish
See
to exit setup
Chapter A2: BankLink Books clients for further information on checking client files in and out of BankLink Practice or Chapter 8: Coding Reports and BankLink Notes for information on importing BankLink Notes files into BankLink Practice.
If you have installed the Check-In Extension, and also have BankLink Notes installed on your PC you will see an extra tab when you select File, Preferences
To set up File Associations:
. You can choose whether to always open BankLink Notes files in BankLink Notes, or to give you the option of opening in BankLink Notes or importing the file to BankLink Practice.
1 Click File, Preferences
BankLink Practice displays the
Preferences
2 Click the
window
File Associations
3 Under
tab
When I click on a BankLink Notes file
•
choose from:
•
Ask me whether to open it in BankLink Practice or BankLink Notes
Open it with BankLink Notes

BankLink Practice Guide for New Zealand
652
4 Click OK to save your changes
If you choose Ask me whether to open it in BankLink Practice or BankLink Notes you will see the Process BankLink Notes file window when you double-click a BankLink Notes file.
1 Click Open with BankLink Notes or Import into BankLink Practice
2 Click
BankLink Practice opens the client file and displays the
OK
Import from BankLink Notes file
window
See Importing a BankLink Notes file into BankLink Practice for further information on importing BankLink Notes files.

Chapter A1: Installing BankLink Practice and BankLink Notes
653
Integration with your accounting system BankLink Practice integrates with most popular client accounting packages. These are the principles of its operation:
• BankLink Practice imports the chart of accounts information from the client's file in your accounting system
• Once you have coded your client’s bank transactions in BankLink Practice, you transfer the coded data from BankLink Practice into your accounting system
The details of setting up the link between your accounting system chart of accounts and BankLink Practice are described in Appendix 1. Use these instructions to set up the link with your accounting system. If your accounting system is not included, please contact BankLink support for more information.

BankLink Practice Guide for New Zealand
654
Backing up your data Our experience supporting BankLink Practice is that many practices don’t realise the importance of backing up until a disaster happens.
To ensure a smooth recovery from disasters it is vital that you take regular backups. Your only protection against equipment failure and accidental or deliberate damage is a reliable backup system.
BankLink Practice does not have automated backup procedures as these can differ for each practice. You need to develop a procedure for the back up of your BankLink Practice folder and all sub folders that is appropriate for your system environment.
Tips for Successful Backups
• Test your backup procedures! We have had clients who thought they were backing up correctly but who were omitting vital files. Restore from your backup system into a fresh directory, and then run BankLink Practice from that directory to see if it works.
• Don’t back up the system if you know it has crashed. Never overwrite a known good copy of BankLink Practice with a dubious one.
• Make sure your staff know that they should contact you, the BankLink Administrator, if they have any problems while they are using BankLink Practice. It’s up to you to determine the best way to fix the problem, which could mean restoring from a backup copy of BankLink Practice.
• Rotation Cycles Don’t be too hasty to recycle your backup tapes. If you use BankLink Practice a lot, then keep your daily backups until the same day the following week. Take a weekly backup and recycle it on the same week the following month.
• Archiving Take a monthly backup and keep this forever. Always take a backup before downloading new BankLink data because this is when the system is most vulnerable to problems.

Chapter A1: Installing BankLink Practice and BankLink Notes
655
Setting up BankLink Notes and BankLink Notes Online Hardware and software requirements
BankLink Notes runs on any stand-alone PC with a 32-bit Windows operating system, for example, Windows 98 or later. The PC must also be able to send and receive emails.
BankLink Notes is not designed for use on a network. If your client requires access to BankLink Notes on more than one PC, install it locally on each one.
If you have BankLink Notes installed on PCs at your practice you should ensure that you have the File Check-In extension - see Enabling double-click import and check in on users' PCs for more information.
To install BankLink Notes:
1 Close all applications currently running on the PC
2 Place the BankLink CD in your CD drive and wait a few moments while the CD’s autorun program loads the Set Up program
If the Set Up program does not automatically start, click Start, Run and then select Setup.exe from the root directory of the CD
When the BankLink 5 Installation window displays, you see these options:
• Install BankLink Practice: to install at your practice.
• Install BankLink Books: to install the BankLink Books software.
• Install BankLink Notes: to install the BankLink Notes software.
• Explore this CD-Rom: to view all files on the CD.
3 Choose
The
Install BankLink Notes
Setup BankLink Notes
4 Read the recommendation and then click the
wizard displays
Next
The wizard displays the
button to continue
License Agreement
5 Click the
window
Yes
The wizard displays the
button to accept the terms of the Agreement
Select Destination Directory
6 By default, the destination directory is
window
C:\BNotes
7 Click the
- change the drive and folder only if required
Next
The wizard displays the
button to continue
Select Start Menu Folder window

BankLink Practice Guide for New Zealand
656
8 By default, BankLink
9 Click the
is selected as the folder in the Start Menu to which the program files are saved - change the name of this folder if required
Next
The set-up program displays the
button to continue
Select Additional Tasks
10 Enable the
window
Create a desktop icon
11 Click the
check box
Next
The set-up program displays the
button to continue
Ready to Install
12 Click the
window
Install
The set-up program displays the
button to complete the installation process
Finish
13 Click the
window
Finish
To access BankLink Notes Online:
button to exit from the installation process
Practice user access
• Click on the BankLink Notes Online link within BankLink Practice
BankLink Notes Online displays the Login page in your browser, for example https://practicesubdomain.banklinkonline.com
Or:
• Click on the link contained within the email received from BankLink Notes Online when your login was created
BankLink Notes Online displays the Login
• Access your practice’s BankLink Notes Online subdomain web address in your browser
page
Or:
BankLink Notes Online displays the Login page
Client user access
• The client will receive an email from the Accountant and click the link contained within that email
BankLink Notes Online displays the Login page
Or:
• The client visits the Accountant’s website and click the link on the website page
BankLink Notes Online displays the Login page
Or:

Chapter A1: Installing BankLink Practice and BankLink Notes
657
• The client accesses the practice’s BankLink Notes Online subdomain web address in their browser
BankLink Notes Online displays the Login page
1 Click in the Login field and enter the clients email address
2 Click in the Password field and enter their password
3 Click the Login
If the Email address or Password is incorrect the You have entered an invalid Email address or Password. Please try again. message is displayed
button
4 Click
BankLink Notes Online displays the Login page for the user to make another attempt
OK
5 Repeat steps 1 – 3
On successful login BankLink Notes Online displays the user’s latest transactions
BankLink Notes Online defaults to the full Date Range of the last upload, or if this is smaller than the transactions for 'month to date', BankLink Notes Online displays the current month.
Full information on how your clients use BankLink Notes is provided to them in the context sensitive BankLink Notes Guide, which they can access by pressing F1 when in the software.
BankLink Support is pleased to answer your questions regarding BankLink Notes. However, BankLink does not provide direct support to your own clients who must contact you directly - ensure you know how to use BankLink Notes yourself in order to support your clients.