chapter 7 transferring survey data 7 transferring survey data table of contents a. connecting to the...
TRANSCRIPT

Chapter 7
Transferring Survey Data
Table of Contents
A. Connecting to the Data Collector ......................................................................... 7-2
B. Trimble Data Transfer ............................................................................................ 7-3
C. Transferring Files to the Data Collector .............................................................. 7-4
1. Project Control File ............................................................................................. 7-6
2. Feature Code List ............................................................................................... 7-7
3. DXF Files ............................................................................................................ 7-8
D. Transferring Files from the Data Collector .......................................................... 7-9
E. Transferring Data with Windows Explorer ......................................................... 7-11
F. Editing Survey Data ............................................................................................. 7-13
1. Editing Tools ..................................................................................................... 7-13
2. Editing Known Errors and Blunders .................................................................. 7-13
G. Reviewing Edited Data ........................................................................................ 7-13
H. Saving Edited Data .............................................................................................. 7-14

Transferring Survey Data
7-2 Revised January, 2016
7. Transferring Survey Data After the survey data has been collected with a data collector, it is then transferred to a desktop
computer or laptop. The survey data is then archived where it will be reviewed and edited (if
necessary) before it is included in the project mapping files.
A. Connecting to the Data Collector Each Trimble data collector is supplied with a USB connection cable. This cable enables the
data collector to connect to a computer or laptop.
Figure 7-1. Data collector and computer connection.
Once the cable is connected to the USB port on the computer, the data collector is turned on.
Data may then be transferred in either direction. Files containing information necessary for data
collection may be sent to the data collector. Survey files on the data collector (i.e. jobs) may be
sent to the computer. This data exchange is accomplished with Trimble Data Transfer. The Data
Transfer software is available to download from the Trimble website.

Chapter 7
Revised January, 2016 7-3
B. Trimble Data Transfer When the USB cable connects the data collector and the computer, the Windows Mobile Device
Center screen will be automatically displayed. If the screen as shown in Figure 7-2 is not
displayed, the Windows Mobile Device Center will need to be downloaded from Microsoft.
Note: If using an operating system older than Windows 7, ActiveSync may be used to transfer
data.
Figure 7-2. Window Mobile Device Center.
To begin transferring data, double-click on the Trimble desktop icon.
Figure 7-3. Data Transfer icon.

Transferring Survey Data
7-4 Revised January, 2016
Use the drop down menu (small red oval) to select Survey Controller on ActiveSync. Click on
the connect button (green check mark indicated by the red arrow). Next, verify that the device is
connected to the survey controller (as indicated by the large red oval).
Note: Even though Windows mobile is being used, the Trimble Data Transfer tool still displays
ActiveSync in its Device menu.
Figure 7-4. Trimble Data Transfer.
C. Transferring Files to the Data Collector The default tab selection in the Data Transfer window is Receive. Click on the Send tab (red
arrow) to transfer data files to the data collector.
Figure 7-5. Data Transfer (Send) window.

Chapter 7
Revised January, 2016 7-5
Next, click on the Add button.
Figure 7-6. Add files to Data Transfer.
In the Open window, path to the file(s) to be sent to the data collector. Highlight each file and
click on the Select button (red arrow).
Figure 7-7. Select file(s) to transfer.

Transferring Survey Data
7-6 Revised January, 2016
After the file has been selected, highlight each one as shown in Figure 7-8 and click on the
Transfer All button (red oval).
Figure 7-8. Transfer files(s).
After the file has been transferred to the data collector, the Transfer Completed window will be
displayed as shown in Figure 7-9. Click on the Close button.
Figure 7-9. Successful transfer.
Many types of files are transferred to the data collector. The most common files for preliminary
survey collections are project control files, feature code lists, and DXF graphic files.
1. Project Control File Project control files typically have a ".dc" file extension (see Figure 7-7). These files are
generated by the Photogrammetry & Surveys Section (P&S). Should any problems occur
while loading these types of files, contact the State Photogrammetry & Surveys Engineer for
assistance.
Chapter 7
Revised January, 2016 7-7
Preliminary survey collection should always use the project control files received from P&S
whenever available. Refer to Chapter 6 in this manual for more information on the project
control file.
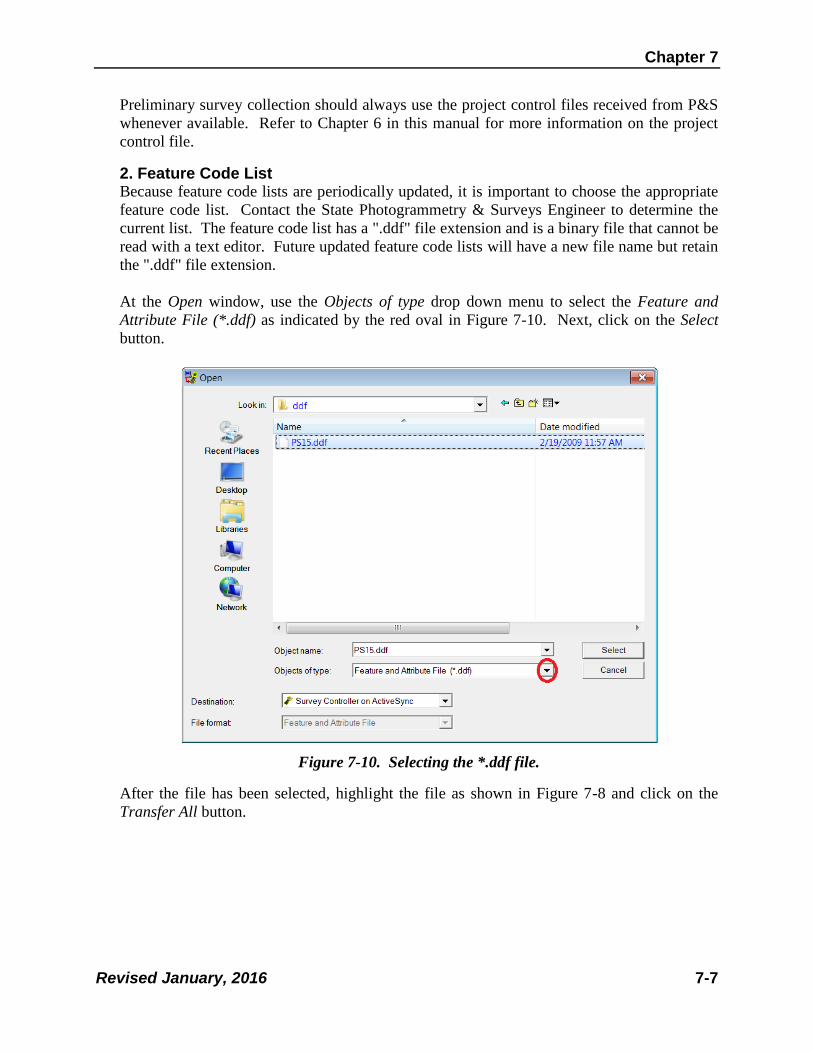
2. Feature Code List Because feature code lists are periodically updated, it is important to choose the appropriate
feature code list. Contact the State Photogrammetry & Surveys Engineer to determine the
current list. The feature code list has a ".ddf" file extension and is a binary file that cannot be
read with a text editor. Future updated feature code lists will have a new file name but retain
the ".ddf" file extension.
At the Open window, use the Objects of type drop down menu to select the Feature and
Attribute File (*.ddf) as indicated by the red oval in Figure 7-10. Next, click on the Select
button.
Figure 7-10. Selecting the *.ddf file.
After the file has been selected, highlight the file as shown in Figure 7-8 and click on the
Transfer All button.
Transferring Survey Data
7-8 Revised January, 2016
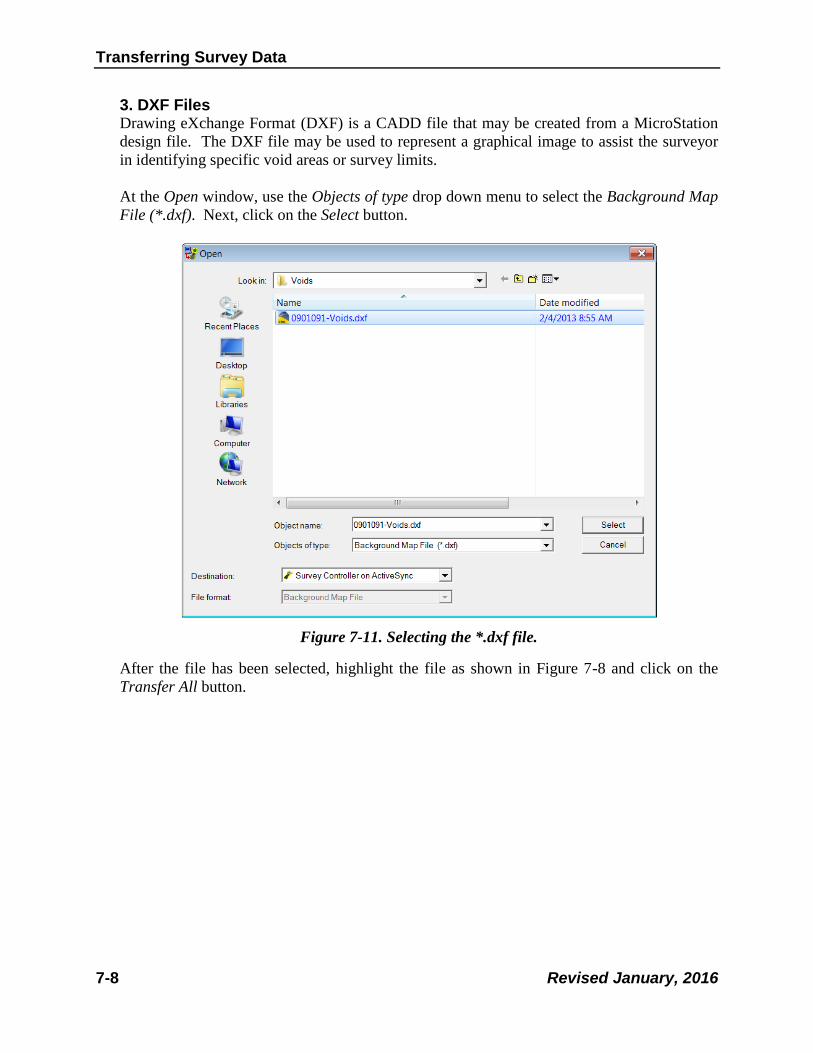
3. DXF Files Drawing eXchange Format (DXF) is a CADD file that may be created from a MicroStation
design file. The DXF file may be used to represent a graphical image to assist the surveyor
in identifying specific void areas or survey limits.
At the Open window, use the Objects of type drop down menu to select the Background Map
File (*.dxf). Next, click on the Select button.
Figure 7-11. Selecting the *.dxf file.
After the file has been selected, highlight the file as shown in Figure 7-8 and click on the
Transfer All button.
Chapter 7
Revised January, 2016 7-9
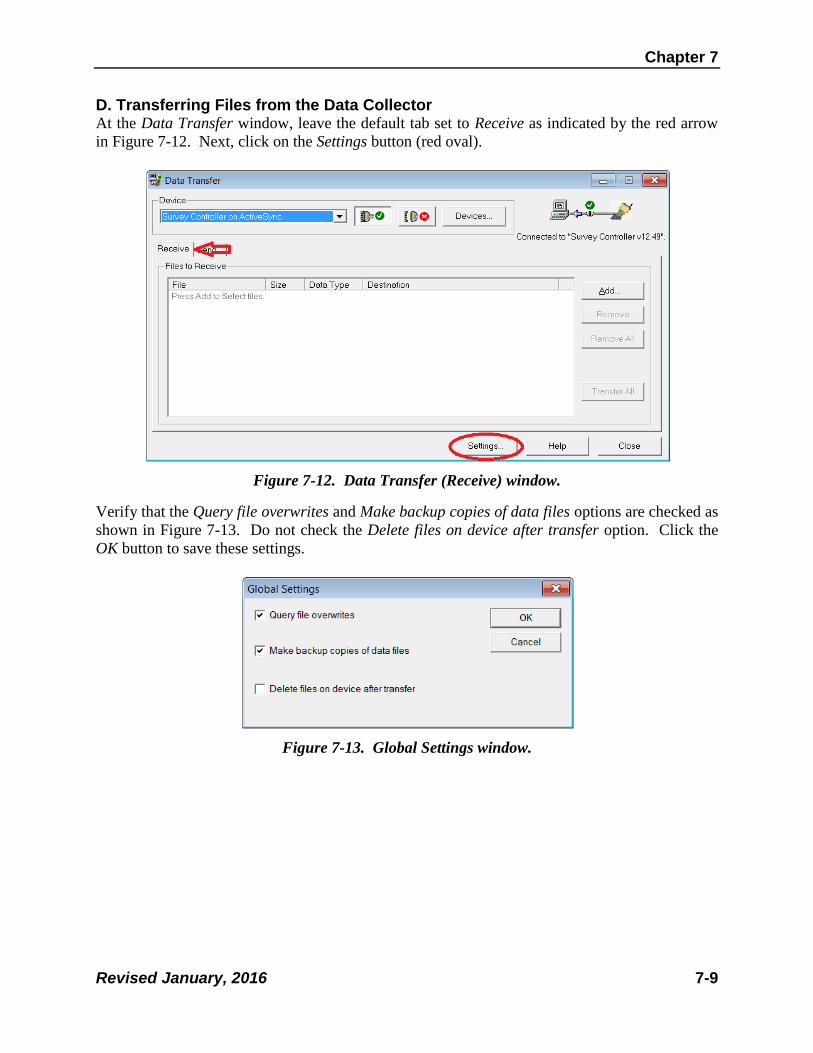
D. Transferring Files from the Data Collector At the Data Transfer window, leave the default tab set to Receive as indicated by the red arrow
in Figure 7-12. Next, click on the Settings button (red oval).
Figure 7-12. Data Transfer (Receive) window.
Verify that the Query file overwrites and Make backup copies of data files options are checked as
shown in Figure 7-13. Do not check the Delete files on device after transfer option. Click the
OK button to save these settings.
Figure 7-13. Global Settings window.

Transferring Survey Data
7-10 Revised January, 2016
At the Data Transfer window, click on the Add button (red oval) to select the file(s) to be
transferred to the data collector.
Figure 7-14. Add files to the Data Transfer.
Highlight the file(s) to be transferred (as indicated by the red 1), then set the File format field to
DC File v10.7 (red 2). Next, click on the Browse button (red 3) to select the location where the
survey file(s) will be transferred to. When complete, click on the Open button (red 4).
Figure 7-15. Survey file selected.

Chapter 7
Revised January, 2016 7-11
After the file has been selected, highlight the file as shown in Figure 7-8 and click on the
Transfer All button. If another file needs to be transferred to a different location, repeat the
above steps.
When transferring a survey file from the data collector to a computer, Data Transfer places two
files in the destination folder. These files will have the same name as the job on the data
collector, but will have file extensions of ".dc" and ".job."
Any other transfer of the same survey job into the same folder will overwrite the *.dc and *.job
files. When the Query file overwrites option is checked in the Global Setting window, a Data
Transfer message will be displayed before any files are overwritten. Clicking the Yes button will
overwrite the files, clicking the No button will cancel the transfer.
Figure 7-16. Overwrite option.
E. Transferring Data with Windows Explorer Survey data jobs may also be transferred between the data collector and a computer using
Windows Explorer. Files transferred in this manner are not converted to another format. The
main purpose for this method is to transfer *.job files from one data collector to another. This
may be necessary if a data collector is being sent in for maintenance or repairs. The *.job files
can then be transferred to another data collector to complete the survey collection. The data
collector is connected to the computer using Window Mobile Device as previously described. It
is not necessary to open Data Transfer. This method of transferring files is only recommended
for transferring the *.job files. It is not possible to use this method to transfer *.dc files.

Transferring Survey Data
7-12 Revised January, 2016
Using Windows Explorer, locate the Portable Devices section (red arrow) in Figure 7-17.
Figure 7-17. Portable Devices.
Next, locate the Trimble Data folder (red oval) on the data collector. Files can be transferred
using either the "drag and drop" or "copy and paste" method. Copy the *.job file(s) as indicated
by the red arrow from the first data collector to the computer in a designated folder. Connect the
second data collector to the collector and copy the *.job file(s) to that data collector using the
same technique.
Figure 7-18. Data collector folder.
Note: The file path as shown in the Figure 7-18 is unique to Window 7, if using another
operating system the path may be slightly different.

Chapter 7
Revised January, 2016 7-13
F. Editing Survey Data Before submitting survey files to P&S, a plot of the survey should be carefully reviewed. This is
accomplished by importing and visualizing the survey into a MicroStation design file using
Geopak Survey. The best error correction occurs when it is reviewed by the survey personnel
shortly after it has been completed. Refer to Chapter 8 in this manual for more information on
reviewing and editing survey data.
1. Editing Tools One of the most important editing tools is an ASCII text editor. An ASCII text editor is not
the same as WordPerfect, Microsoft Word, or any other word processor. A text editor keeps
characters aligned in fixed-width columns without changing the file format. Two
recommended text editors are Programmer’s File Editor (PFE) and Ultra Edit. For more
information about these programs, contact the WYDOT District IT coordinator.
2. Editing Known Errors and Blunders When entering notes in a field book or data collector, make a reference to the specific shot
number(s) to be edited. For example, "change shot 1452 from EUR to EUD" or "delete shot
1655." These notes may become separated from the specific measurement depending on
when the note was entered and when the shot was taken.
When a note is entered in the data collector, it is important that clear and concise editing
instructions are included. Finish each line with the necessary information to describe the
following:
What has been edited.
When was it was edited.
Who did the editing.
This type of editing should be completed before attempting to process the edited survey data
with Geopak Survey.
G. Reviewing Edited Data Any editing of the survey data file must be correct and complete. The editing may be checked
by reviewing the data file itself. Compare the raw file with the edited file to verify that the
proper changes have been made.
The editing can then be further reviewed by importing the file into MicroStation. Each time a
data file is edited, rename the edited file with a unique name. This method can be used to keep
track of which editing changes worked and which did not. Always follow the naming
conventions for edited files sent to P&S. Refer to Chapter 6 in this manual for the file naming
convention.
When an edited measurement file is loaded onto the data collector, it is converted to a coordinate
file. Loading the *.job file via Windows Explorer is the only method to transfer a measurement
file back to the data collector.

Transferring Survey Data
7-14 Revised January, 2016
H. Saving Edited Data Once the survey data file has been edited and saved, send the survey to the State
Photogrammetry & Surveys Engineer. The files submitted to P&S should include copies of the
*.dc, *.job, and *.edt files. Refer to Chapter 10 in this manual for further instructions on
submitting survey data to P&S.