chapter 7 custom saml applications - centrify 7 custom saml applications if you’d like to add...
TRANSCRIPT

Chapter 7
Custom SAML applications
If you’d like to add applications that aren’t in our catalog, you can create custom application profiles using application templates. Custom application profiles provide user access through the user portal to applications that may not be open to the general public or that haven’t yet been added to the Applications Catalog.
With Centrify as your identity service, you can choose single-sign-on (SSO) access to your Custom SAML web application with IdP-initiated SAML SSO (for SSO access through the Centrify user portal) or SP-initiated SAML SSO (for SSO access directly through the Custom SAML web application) or both. Providing both methods gives you and your users maximum flexibility.
If this is the first application you are configuring for SSO through Centrify Identity Services, read these topics before you get started: Introduction to application management
Configuring Single Sign-On (SSO)
These instructions describe the steps for using the Custom SAML application template. They show how to create a custom application profile to a web application that uses SAML (Security Assertion Markup Language) for authentication. Refer to SAML application scripting for more information about writing the scripts in this template.
Note To use the Custom SAML application template, it is highly recommended that you first understand the basics of SAML and JavaScript. You will have to provide required SAML information to the web application’s service provider, and write a script in JavaScript to specify a SAML assertion for each user log-on with the web application. Also see SAML and WS-Federation SSO options for a description of the SAML workflow.
Configuring a Custom SAML template consists of the following steps. Refer to Adding and configuring a Custom SAML application for more detailed instructions.
1 In the Apps page of the Admin Portal, open the App Catalog and add a Custom SAML application.
2 Open the Custom SAML application to edit it. Provide to the web application’s service provider its required general SAML information to cover future SAML transactions. The application’s web site may spell out what information it requires (such as a certificate or different identity provider URLs), or you may have to contact the application publisher to find out what the application requires. The Custom SAML application template you just added provides the general SAML information you’ll need to provide.
3 Find out what SAML log-on data the application’s service provider requires so you can specify the proper SAML assertion in your advanced script (described below in Step 5).
44

Adding and configuring a Custom SAML application
This information is often available in the application’s web site, but it may require contacting the application’s publisher.
4 Use the Custom SAML application template to configure the basics of a new SAML application profile: application name, an icon, a URL to contact for SAML authentication, a way to determine the user name, and so on.
5 On the SAML Response page, write a script in JavaScript that specifies a SAML assertion for each user log-on with the web application. The script addresses the SAML log-on requirements provided by the web application publisher. For details, see the SAML application scripting.
6 Specify roles that have access to the Custom SAML application.
7 Save the new Custom SAML application profile so that it appears with its new name in Admin Portal’s application list.
See Adding and configuring a Custom SAML application to continue.
Adding and configuring a Custom SAML applicationThe following steps are specific to the Custom SAML application and are required to enable SSO for Custom SAML. For information on optional Centrify Admin Portal configuration settings that you may wish to customize for your app, see Optional configuration settings.
To add and configure a Custom SAML application:
1 In Admin Portal, click Apps, then click Add Web Apps.
The Add Web Apps screen appears.
Chapter 7 • 45

Adding and configuring a Custom SAML application
2 Click Custom.
3 On the Custom tab, next to the SAML application, click Add.
4 In the Add Web App screen, click Yes to add the application.
Admin Portal adds the application.
5 Click Close to exit the Application Catalog.
The application that you just added opens to the Settings page.
6 In Admin Portal, click Trust to go to the Trust page.
The Trust page is divided into two parts:
Identity Provider Configuration
Service Provider Configuration
Admin Portal user’s guide 46

Adding and configuring a Custom SAML application
Chapter 7 • 47

Adding and configuring a Custom SAML application
Admin Portal user’s guide 48

Adding and configuring a Custom SAML application
The Trust page contains fields and controls for SAML information that might be required by the web application Service Provider. You must supply this information in the format requested by the Service Provider.
The next steps provide the information about the SAML information available on the Trust page, broken down by section for both Metadata and Manual Configuration.
7 Complete the information for the Identify Provider Configuration section with Metadata selected using the following fields and controls.
Option Description
Identify Provider Configuration
Metadata (selected)
IdP Entity ID / Issuer NOTE: The IdP Entity ID can also be referred to as an Issuer.
A URL unique to this application profile. This value is the entity ID used in the SAML assertion to identify the identity provider attempting to authenticate. The web application doesn’t contact this URL so it need not be functional.
Signing Certificate These settings specify the signing certificate used for secure SSO authentication between the Centrify Directory Service and the web application. Just be sure to use a matching certificate both in the application settings in the Admin Portal and in the application itself. Select an option to change the signing certificate.
• Use the Default Tenant Application Certificate (default)
Select this option to use the Centrify Directory Service standard certificate. This is the default setting.
Click Download to save the certificate so you can use it during the application configuration process.
If you replace the certificate, be sure to update application with the new certificate information.
• -Upload New Signing Certificate-
Select this option to upload your organization’s own certificate. To use your own certificate, you must enter a name and a password (if the file requires a password) and then click Browse to upload an archive file (.p12 or .pfx extension) that contains the certificate along with its private key.
Upload the certificate from your local storage prior to downloading any IdP metadata. If the IdP metadata is available from a URL, be sure to upload the certificate prior to providing the URL to your service provider.
URL The information for the certificate that you have selected is shown in the URL field.
Click Copy URL to easily copy the address of the certificate.
Use this URL to configure your SAML application (this is similar to downloading the metadata and sending it to the service provider but instead you just provide the URL). This method can be used as an alternative to downloading the metadata. The method used depends on service provider requirements.
Chapter 7 • 49

Adding and configuring a Custom SAML application
8 Click Save to preserve your changes.
File Click Download Metadata File to download SAML metadata in an XML file. The metadata contains the security certificate and other SAML information that you can provide to the service provider.
For Business Partner Federation, this is the information that you need to provide to the service provider/host.
XML Click Copy XML to copy the XML content.
This is similar to downloading the metadata and sending it to the service provider but instead you just provide the XML content. This method can be used as an alternative to downloading the metadata. The method used depends on service provider requirements.
Option Description
Admin Portal user’s guide 50

Adding and configuring a Custom SAML application
9 Complete the information for the Identify Provider Configuration section with Manual Configuration selected using the following fields and controls.
Option Description
Identify Provider Configuration
Manual Configuration (selected)
IdP Entity ID / Issuer NOTE: The IdP Entity ID can also be referred to as an Issuer.
A URL unique to this application profile. This value is the entity ID used in the SAML assertion to identify the identity provider attempting to authenticate. The web application doesn’t contact this URL so it need not be functional.
Signing Certificate These settings specify the signing certificate used for secure SSO authentication between the Centrify Directory Service and the web application. Just be sure to use a matching certificate both in the application settings in the Admin Portal and in the application itself. Select an option to change the signing certificate.
• Use the Default Tenant Application Certificate (default)
Select this option to use the Centrify Directory Service standard certificate. This is the default setting.
Click Download to save the certificate so you can use it during the application configuration process.
If you replace the certificate, be sure to update application with the new certificate information.
• -Upload New Signing Certificate-
Select this option to upload your organization’s own certificate. To use your own certificate, you must enter a name and a password (if the file requires a password) and then click Browse to upload an archive file (.p12 or .pfx extension) that contains the certificate along with its private key.
Upload the certificate from your local storage prior to downloading any IdP metadata. If the IdP metadata is available from a URL, be sure to upload the certificate prior to providing the URL to your service provider.
Single Sign On URL The URL that the service provider uses to notify the Centrify Directory Service of SAML Single Sign On.
Single Logout URL The URL the service provider uses to notify the IdP of SAML Single Logout.
Single Sign On Error URL The URL that the service provider uses to notify the Centrify Directory Service if there’s a SAML Single Sign On Error.
Chapter 7 • 51

Adding and configuring a Custom SAML application
10 Click Save to preserve your changes.
11 Complete the information for the Service Provider Configuration section with Metadata selected using the following fields and controls.
Option Description
Service Provider Configuration
Metadata (selected)
URL If your SAML application vendor supplies you with an SP Metadata URL, enter the URL in the input field and then click Load.
File If your SAML application vendor supplies you with an SP Metadata File, click Choose File, select the file.
The file name appears in the Choose File field.
XML If your SAML application vendor supplies you with SP Metadata XML content, copy it and place it in the Paste XML here input field.
Admin Portal user’s guide 52

Adding and configuring a Custom SAML application
12 Click Save to preserve your changes.
13 Complete the information for the Service Provider Configuration section with Manual Configuration selected using the following fields and controls.
Option Description
Service Provider Configuration
Manual Configuration (selected)
SP Entity ID/ Issuer /Audience Enter the Entity ID that your SAML application vendor supplies. This Entity ID is also known as Service Provider Issuer or Audience.
Assertion Consumer Service (ACS) URL
The Assertion Consumer Service (ACS) URL specifies the URL to which the Centrify Directory Service sends the SAML response.
The ACS URL is provided by the application vendor (service provider). Enter the ACS URL provided by the application vendor.
Recipient
Same as ACS URL
Only uncheck the checkbox and enter the Recipient value when the Service Provider instructs you to do so.
Sign Response or Assertion? The Service Provider will specify the Response or Assertion to be signed. Click the applicable button.
<NameID> Format The Service Provider will specify the NameID format to use. If unknown, leave the format as unspecified.
Chapter 7 • 53

Adding and configuring a Custom SAML application
Encrypt SAML Response Assertion
If a Service Provider supports this feature, and you want to use it, check the check box first. Click the Choose File button to select the Public Certificate that the Service Provider sends to you.
The Subject Name and Thumbprint information is shown after the Public Certificate has been selected.
Relay State If the Service Provider specifies a Relay State to use, enter it in the input field.
Authentication Context Class If the Service Provider specifies the Authentication Context Class to use, select the applicable option. If unknown, leave the option as unspecified.
Option Description
Admin Portal user’s guide 54

Adding and configuring a Custom SAML application
14 Click Save to preserve your changes.
15 Click SAML Response to go to the SAML Response page.
Chapter 7 • 55

Custom SAML App Provisioning
16 Click Edit to enter or modify the JavaScript that specifies the SAML assertion that the Centrify Directory Service sends to the service provider when a user requests an application.
This advanced script must be present and configured to match the service provider’s required SAML data. For information on writing an advanced SAML script, see the SAML application scripting.
The default example script shows how to specify various values in the SAML assertion using the Centrify Directory Service set<parameter>() method. The example script does not work as is, and you must modify it to match each application’s SAML requirements.
17 (Optional) Customize the Application Name and Logo fields on the Description tab for your app.
This helps you identify your Custom SAML app in the list of apps by alphabetizing it under the name you give it and providing the visual cue of your custom logo.
18 (Optional) If your SAML application supports SCIM (System for Cross-domain Identity Management) you can continue with Custom SAML App Provisioning to configure the Custom SAML application for automatic provisioning.
Custom SAML App ProvisioningSystem for Cross-domain Identity Management (SCIM) is an open standard for automating the exchange of user identity information between identity domains, or IT systems. It can be used to automatically provision and deprovision accounts for users in external systems such as your custom SAML app. For more information about SCIM, see www.simplecloud.info.
If your Custom SAML application supports SCIM, you can set it up to enable provisioning by entering the Access Token and SCIM URL.
Before configuring the Custom SAML application for provisioning, you must: install, configure, and deploy the app
give Manage Accounts and Manage Groups permissions to the app
get an Access Token for the app
Note The Access Token is only displayed once when you create the app and it never expires. It is important to store the Access Token in a secure location.
Continue with Configuring Custom SAML in the Admin Portal for automatic provisioning.
Admin Portal user’s guide 56
Custom SAML App Provisioning
Configuring Custom SAML in the Admin Portal for automatic provisioning
To configure Custom SAML in Admin Portal for automatic provisioning
1 Click the Provisioning tab.
2 Select Enable provisioning for this application.
3 Select either Preview Mode or Live Mode.
Preview Mode: Use Preview Mode when you’re initially testing the application provisioning or making configuration changes. The identity platform does a test run to show you what changes it would make but the changes aren’t saved.
Live Mode: Use Live mode when you want to use application provisioning in your production system. The identity platform does the provisioning run and saves the changes to both the identity platform and the application’s account information.
Note SCIM doesn't enforce any particular way to authenticate with the Application provider, but you will need to provide a SCIM URL and an access token that the application accepts. The access token and SCIM URL are generally available from the application’s admin console, or by contacting support for the application. Another option is to create an access token using OAuth2.0.
4 Enter the URL you want to use for the SCIM Service URL.
5 Select either OAuth 2.0 or Authorization Header as your Authorization Type. OAuth 2.0 uses a workflow to authorize access and Authorization Header directly provides the credentials.
Your choice of Authorization Type will determine the next few steps you will perform. Where you can find the information you provide will vary depending on the app you are configuring. If you need assistance with locating this information, contact support for the company that makes the app you are configuring.
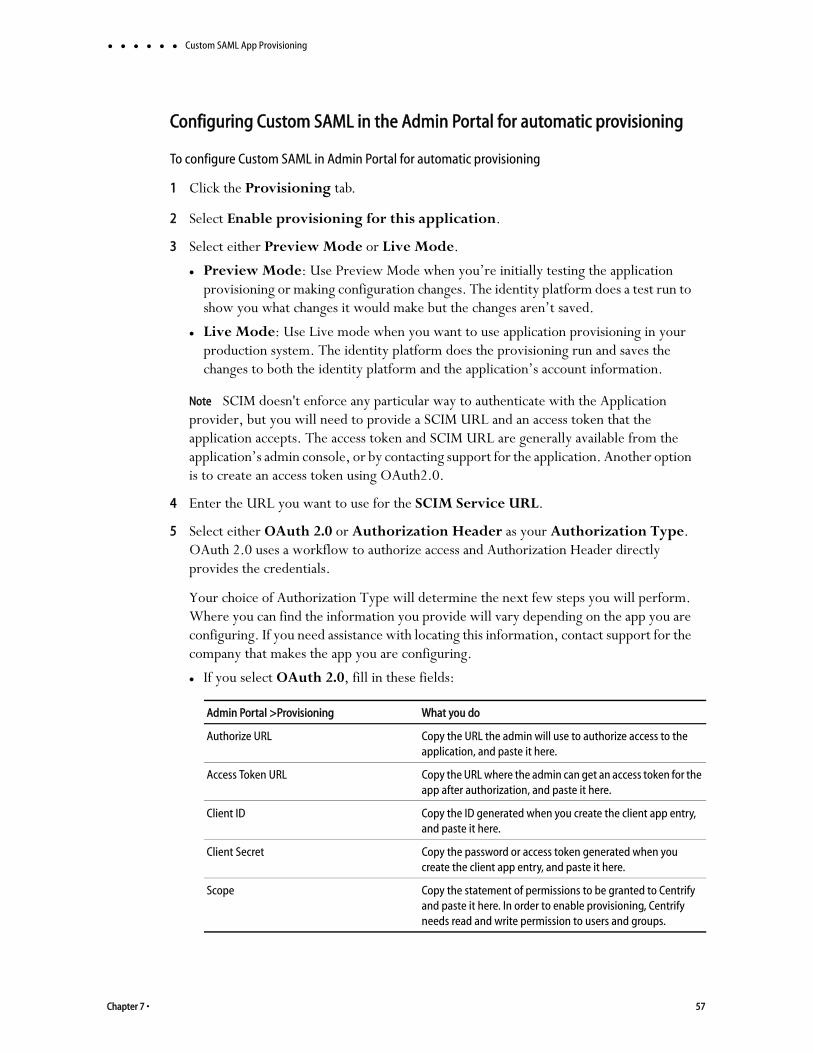
If you select OAuth 2.0, fill in these fields:
Admin Portal >Provisioning What you do
Authorize URL Copy the URL the admin will use to authorize access to the application, and paste it here.
Access Token URL Copy the URL where the admin can get an access token for the app after authorization, and paste it here.
Client ID Copy the ID generated when you create the client app entry, and paste it here.
Client Secret Copy the password or access token generated when you create the client app entry, and paste it here.
Scope Copy the statement of permissions to be granted to Centrify and paste it here. In order to enable provisioning, Centrify needs read and write permission to users and groups.
Chapter 7 • 57

Custom SAML App Provisioning
If you select Authorization Header, you have a choice of Header Type.
Select Bearer Token if your app requires the header in the format: Bearer <your_access_token>.
Select Basic if your app requires authentication in the format: HTTP BASIC.
Select Direct if your app uses some other format.
a If you select Bearer Token, fill in this field:
b If you select Basic, fill in these fields:
c If you select Direct, fill in this field:
6 Click Verify to have the Centrify Directory Service verify the connection and save the provisioning details.
Note If you later want to make changes to any of the fields on the Provisioning page in the Admin Portal, you will have a choice of options when you Verify. You can either choose Verify Credentials, which only checks the fields above the Sync Options section. If you select Verify and re-detect settings then the entire page is refreshed, including overwriting any changes you have made to the Sync options, Deprovisioning options, and Provisioning Script.
7 Continue with Provisioning users for Custom SAML based on roles.
Provisioning users for Custom SAML based on roles
Here you specify both an Admin Portal role and users in that role to be matched to existing or new accounts in Custom SAML with the groups that you specify.
Admin Portal >Provisioning What you do
Bearer Token Copy the access token and paste it here.
Admin Portal >Provisioning What you do
Admin Name Copy the login name for the admin and paste it here.
Admin Password Copy the login password for the admin and paste it here.
Admin Portal >Provisioning What you do
Header Value Copy the exact value of the header and paste it here.
The header value is usually in the form of:
<Token_Type> <Actual Token>
For example:
Example_Token xyztoken122
For more information about other types of headers that can be used, see https://developer.mozilla.org/en-US/docs/Web/HTTP/Headers/Authorization
Admin Portal user’s guide 58

Custom SAML App Provisioning
When you change any role mappings, the Centrify Directory Service synchronizes any user account or role mapping changes immediately.
For Custom SAML, provisioning assigns users access and assignments based on the top-most role mapping. The order in which the roles display in the Role Mappings section matters. The role at the top of the list has priority when provisioning users. For instance, if a user is in multiple roles that you’ve mapped for provisioning, the Centrify Directory Service provisions the user based on the role nearer the top of the list. For more details, see Setting up app-specific provisioning.
To automatically provision users with Custom SAML accounts:
1 Make sure that you’ve entered and verified the provisioning credentials.
2 In the Provisioning page, go to the Role Mappings section.
3 Click Add to open the Role Mapping dialog box.
4 Select a Role.
5 Click Add and select a Destination Group from the drop-down list.
A Destination Group, named after the selected role, automatically populates the list of groups available from the drop-down list. If that Destination Group is selected, a group is created in the application. If the Destination Group already exists in the application, that group is used and the new group is not created. The same user members that are associated with the role, are added as members of the Destination Group. Alternatively, you can type in a new group name to map to the selected role; the newly created Destination Group is also created in the application. If the role is removed from the role mapping, the Destination Group remains in the application without any membership changes. Changing the role or role name does not affect group creation, unless the group name in the role mapping is also changed.
6 (Optional) Add more Destination Groups, if desired, by repeating the previous two steps.
7 Click Done to save the role mapping and return to the Provisioning page.
8 Continue adding role mappings, as desired.
To change a mapping, select the role mapping and click Modify from the Actions list.
To remove a mapping, select the role mapping and click Delete from the Actions list.
Note The provisioning script is intended for advanced users who are familiar with editing server-side JavaScript code.
9 When you’re done, click Save to save the provisioning details.
Chapter 7 • 59

For more information about Custom SAML applications
Anytime that you make changes to the provisioning role mapping, the Centrify Directory Service runs a synchronization automatically. You can also run a preview synchronization or a real synchronization, if desired.
For more information about Custom SAML applications For more information about SCIM, see www.simplecloud.info.
For more information about other types of tokens that can be used (other than Bearer or Basic), see https://developer.mozilla.org/en-US/docs/Web/HTTP/Headers/Authorization
Admin Portal user’s guide 60

For more information about Custom SAML applications
Chapter 7 • 61