chapter 4 development and implementation...
TRANSCRIPT

97
CHAPTER 4
DEVELOPMENT AND IMPLEMENTATION OF AN INSTRUCTIONAL
STRATEGY
4.0 INTRODUCTION
The present chapter deals in detailed description of the development of an
instructional strategy and the implementation of the strategy in the selected school by
the researcher. One method of teaching in its pure form cannot prove effective in all
teaching situations as instructional objectives range from simple objectives to
complex objectives. It has been therefore found that certain modes of transaction
found effective in one situation may not be effective in another situation. Thus there is
a need of several techniques of instruction put together in order to provide the
students with various activities and experiences needed for the realization of the
instructional objectives laid down to be achieved. This requires organizing all the
activities and experiences selected for fulfillment of the desired learning outcomes in
such a manner that the organized activities and experiences become a meaningful
whole and form a system of instruction. When an organization of the sort mentioned
above is done, emphasis is to be on the objectives to be achieved, characteristics of
the students and other practical considerations. An organization of such suitable
components of instruction as stated above, with their functions specified in relation to
the definite objectives to be achieved would lead to the evolvement of the
instructional strategy. An instructional strategy thus composed should be visualized as
an organized system of activities which works for the attainment of the certain
specific objectives. A system of this type is made up of a number of components that
although different in their nature and operation, functions in a coordinated manner
resulting in the achievement of the desired learning outcomes. In an instructional
strategy the components of the system are the learning experiences provided via a
wide range of experience like lecture, discussion, demonstration, power point
presentations, animated educational films, experiments conducted by the students,
audio visual aids, predict observe explain situations, making of toys from trash and
many more. Thus, an instructional strategy involves selection and organization of the
suitable instructional components with their functions specified. This forms the
process aspect of the instructional strategy aiming at the achievement of the objectives
which needs to be seen in terms of the actual learning outcomes of the students which
will form the output of the instructional strategy.
98
4.1 DEVELOPMENT OF AN INSTRUCTIONAL STRATEGY
The present research proposed for development of an instructional strategy to teach
science. The details of the process followed for development of the instructional
strategy is explained in the following section. In order to develop the strategy
researcher first did situational analysis to find out the actual scenario followed for
teaching the subject science and technology at class VII in the schools of Vadodara
city. The development of instructional strategy was based on the results obtained by
situational analysis. The researcher went through the entire textbook of class VII and
tried to analyze the syllabus in terms of scope of incorporating activities with a major
focus on comprehension. The researcher selected six chapters (Appendix B) from the
subject science and technology and carried out content analysis of all the six chapters.
Then, based on the logical sequencing of the content researcher formulated
instructional objectives to be achieved for different concepts covered under each of
the selected six chapters. In order to realize the instructional objectives there were
number of learning experiences designed for each chapter. The learning experiences
designed were in the form of performing number of activities by the students,
demonstrations by researcher, making of toys from trash or low cost material,
showing of animated films, power point presentations, making the students predict
observe explain by providing different situations followed by whole group discussion.
These learning experiences designed were based on reviewing number of books on
science, internet sources, and interaction with the experts. The developed instructional
strategy was send to the subject expert (Appendix F) and the modifications suggested
were incorporated. The then modified instructional strategy was implemented on a
sample other than the sample selected for the present study and thus depending on the
requirement the activities were added, deleted or/and modified. Thus, developed final
strategy was implemented on the selected sample during the academic year 2009-
2010. The brief outline of the learning experiences provided to the students depending
on the concepts is listed in table 4.1 on the succeeding page. Depending on the
concept there were whole group activities organized or small group activities
organized. The detailed description of the components of the implementation of the
instructional strategy is followed in the later part of this chapter.
99
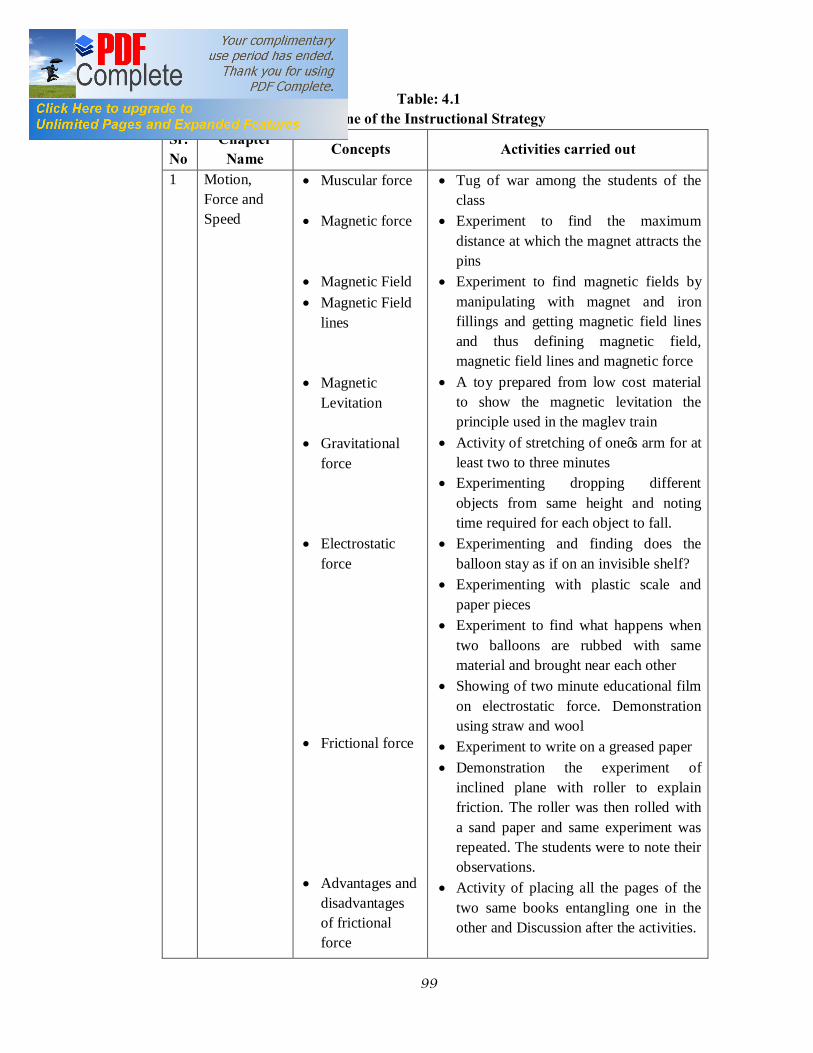
Table: 4.1 Outline of the Instructional Strategy
Sr. No
Chapter Name Concepts Activities carried out
1 Motion, Force and Speed
• Muscular force
• Magnetic force
• Magnetic Field • Magnetic Field
lines • Magnetic
Levitation • Gravitational
force • Electrostatic
force • Frictional force • Advantages and
disadvantages of frictional force
• Tug of war among the students of the class
• Experiment to find the maximum distance at which the magnet attracts the pins
• Experiment to find magnetic fields by manipulating with magnet and iron fillings and getting magnetic field lines and thus defining magnetic field, magnetic field lines and magnetic force
• A toy prepared from low cost material to show the magnetic levitation the principle used in the maglev train
• Activity of stretching of one’s arm for at least two to three minutes
• Experimenting dropping different objects from same height and noting time required for each object to fall.
• Experimenting and finding does the balloon stay as if on an invisible shelf?
• Experimenting with plastic scale and paper pieces
• Experiment to find what happens when two balloons are rubbed with same material and brought near each other
• Showing of two minute educational film on electrostatic force. Demonstration using straw and wool
• Experiment to write on a greased paper • Demonstration the experiment of
inclined plane with roller to explain friction. The roller was then rolled with a sand paper and same experiment was repeated. The students were to note their observations.
• Activity of placing all the pages of the two same books entangling one in the other and Discussion after the activities.

100
• Concept of force
• Various effects
of force • Concept of
motion • Types of motion (Circular motion or rotational motion, periodic motion, rectilinear motion, motion along curved path) • Concept of
speed
• Discussion based on observation of activities done by students and demonstrations done by the researcher
• Activity of rolling a plastic/rubber ball
and obstructing its motion, making motion faster, stopping the motion pressing the ball, hitting a ball with a pad, obstructing a moving ball. Students were to note their observations
• Raising questions based on the activities performed and thus defining motion
• Demonstration and Discussion based on demonstration Showing different real objects like stop watch, pendulum, toy working on winding it
• Students were given list of object/body in motion and they were to identify type of motion
• Organizing running race by dividing the
class into different subgroups and providing stop watch to find out who stood first and thus the concept of speed introduced
2 Levers • Concept of Lever
• Parts of Lever • Types or classes
of lever along with examples of each type
• Principle of Lever
• Preparing a
lever and deriving principle of lever
• Examples of types of lever
• Candle seesaw & Showing of Realia media followed by discussion
• Pictures of different types of levers given in groups and students classify the lever based on the position of fulcrum, load and effort
• Predicting whether spoon with smaller handle will require less effort or spoon with longer handle and conducting the experiment to verify the prediction
• Preparing a lever using pencil, cello tape, two paper cups
• Powerpoint presentation of different types of lever with animations

101
3 Water • Physical properties of water
• Chemical properties of water
• Concept of solvent, solute and solution
• Difference
between hard water and soft water
• Different
methods for removal of hardness of water
• Different
methods of purifying water
• Pollution of water
• Remedies for preventing pollution of water
• Experiment proving Solid form of any substance is heavier than its liquid form except water.
• Experimenting with a glass, candle and matchbox
• Experimenting with water, glass and copper sulphate
• Experimenting with different solutes soluble in water
• Sowing seeds in two pots • Making the students sow seeds at home
and keeping both the pots at same place where they get appropriate sunlight, pouring equal amount of water to both the plants one simple water and another pot with salty water and then drawing a diagram of the sapling in both the pots
• Experiment boiling of water in a test tube and showing the formation of foam in the test tube having boiled water and another test tube having hard water
• Experimenting with tap water, distilled water and determining hardness of water
• Experimenting with contaminated water and trying to purify it
• Showing of a powerpoint presentation prepared by Dr. A. P. J. Abdul Kalam on Water 2070
• Small group discussion on pollution of water followed by whole group discussion on pollution of water
• Making students come out with slogans to prevent pollution of water.
4 Measurement • Least count
• Definition of mass
• Measurement of mass and weight
• Drawing different calibrations on board and asking students to find least possible measurement
• The students made to feel the mass of different object by making them handle different objects of different mass
• Measuring mass of given object (all the students individually provided with box of colgate mega pack, eraser, cassette

102
• Measurement of
volume
• Measurement of volume of a solid having regular geometrical shape
• Measurement of volume of liquid
• Measurement of volume of a solid substance of irregular shape which is insoluble in water and sinks in water
• Density
cover, match box and textbook of science and technology class VII)
• Students made to observe the number of rajama and number of marbles which can be used to fill the jar
• Whole class activity. Researcher takes two transparent vessel (equal) filled with water till its brim. Now the researcher immersed two stones tied to string at the same time in the beaker containing water and the water displaced in both the case is measured.
• Providing different objects and making students measure volume (match box, cassette cover, rubber, colgate paste cover)
• Providing different cylindrical jars and making the students measure the volume of given liquid
• Providing the students with stones of irregular shape and making them calculate the volume of the given stone
• Predict-Observe-Explain 5 Reflection of
Light • Reflection of
light • Laws of
reflection • Regular
reflection
• Making a mirror using transparency. Asking the students to infer which coloured paper will be appropriate for making a transparency look exactly like a mirror
• Taking a transparency or CD and then putting a source of light in front of it to prove the laws of reflection
• Taking a rectangular wooden block and wrapping it with shinny aluminum foil and allowing laser light to fall on it. Measuring incident angle and angle of reflection and finding the relation between the two
• Taking a rectangular wooden block and wrapping it with shinny aluminum foil and allowing two incident rays parallel to each other using laser light to fall on it.

103
• Irregular
reflection • Formation of
image by a plane mirror
• Characteristics of image formed by a plane mirror
• Multiple reflection
• Kaleidoscope
Observing the reflected rays • Taking a rectangular wooden block and
wrapping it with crinkled aluminum foil and allowing two incident rays parallel to each other using laser light to fall on it. Observing the reflected rays
• Predict observe explain (how will Alphabets A to Z appear in the mirror).
• Cardboard made of eight into eight squares just as chess board and putting object in different square and correspondingly finding the distance of image in the mirror
• Placing two mirrors and placing candle in between the two mirrors placed at different angles
• Students making kaleidoscope in the class and observe multiple reflection
6 Curved Mirrors
• Curved mirrors
• Types of curved mirrors
• Difference
between images formed by concave and convex mirror
• Concave mirror as converging mirror
• Convex mirror as diverging mirror
• Concave mirror as converging mirror
• Uses of concave and convex mirrors
• Touching the reflective surfaces of both the curved mirrors and noting down observation followed by discussion
• Observing image of their faces in a transparency by folding the transparency to form curve
• Providing the students two curved mirrors and letting them note the type of images in both the mirrors
• Experiment showing parallel beam of
light after passing through a concave mirror converges
• Experiment showing parallel beam of light after passing through a convex mirror diverges
• Small group activity of burning of paper
• Discussion based on the observation
4.2 IMPLEMENTATION OF AN INSTRUCTIONAL STRATEGY
The developed instructional strategy was implemented on the experimental group
during the academic year 2009-2010. The implementation of the instructional strategy
started from 16th of June 2009 and continued upto 7th of April 2010 which is inclusive
104
of administration of the tests. The detailed description of the implementation of the
instructional strategy developed for six selected chapters is presented chapter wise in
the following paragraphs. The description of the instructional strategy is done day
wise following a uniform pattern of providing concept involved, instructional
objectives to be achieved, materials required and the learning experiences which were
provided.
4.2.1 IMPLEMENTATION OF AN INSTRUCTIONAL STRATEGY TO
TEACH THE CHAPTER MOTION, FORCE AND SPEED
The following section describes in detail the learning experiences provided to the
students to teach the chapter motion, force and speed.
4.2.1.1 Concept of Muscular Force Day 1 Instructional objectives ¨ Students will be able to find the effect of the force applied
¨ Students will be able to comprehend balanced and unbalanced force
¨ Students will be able to infer that in order to change the position of a body
with respect to some stationary body there is force required
¨ Students will be able to infer that one team should apply more force than the
other in order to pull all the members of the opposite team
¨ Students will be able to give number of examples from daily life where
muscular force is applicable
Materials required: Big Rope and some white powder Activity 1 The entire class was taken to the play ground and they were divided into two teams.
There was a big rope procured and the team members were made to play tug of war.
This was followed by discussion. The concept of balanced force, unbalanced force
was elicited from students and then the concept of muscular forced emerged out of
discussion. The students were asked to give examples were similar type of force is
applied.
4.2.1.2 Concept of magnetic field lines, magnetic force Day 2 Instructional Objectives ¨ Students will be able to find the distance at which the attraction takes place
¨ Students will be able to find the maximum distance till which the magnet is
able to attract the pins

105
¨ Students will be able to infer that physical contact is not required for the
attraction
¨ Students will be able to infer that beyond a particular distance the magnet
cannot exert its force
Materials required
Bar Magnet, All Pins, U pins, ruler (of plastic or wood) and pencil
Activity 1
Students were provided with the bar magnet and the all pins, U pins and they were to
find the distance at which the pins are attracted by the magnet. The students were to
explore the distance at which the force acts on the pins and thus to find maximum
distance till which the magnet attract the pins.
Day 3 Instructional objectives ¨ Students will be able to draw the magnetic field lines in the worksheets
¨ Students will be able to infer that the magnetic field lines are concentrated
more at the poles as compared to the middle part.
¨ Students will be able to explain magnetic field lines
¨ Students will be able to explain magnetic field
¨ Students will be able to explain magnetic force
Materials required
Bar magnet, a white sheet paper and iron fillings
Activity 2
The students were provided with a white paper, a bar magnet and iron fillings. They
were instructed to place the bar magnet on the white sheet of paper and sprinkle iron
fillings on the white paper and gently tap the white paper. They were instructed to
observe the pattern formed keenly and then draw the pattern in their notebook or
worksheet provided to each of the students.
The students were made to place two bar magnets such that the north pole of one
magnet is near the south pole of another magnet. Then the students were to sprinkle
the iron filling on the paper and tap and find the pattern formed. They also performed
the experiment placing the like poles of the two bar magnets facing each other and
then sprinkling the iron fillings to find the pattern formed. This was followed with the
discussion and then the magnetic lines of force, magnetic field were defined. The
magnetic field lines in the case when the two magnets were placed such that the like

106
poles of each magnet face each other were also discussed and similarly field lines
when unlike poles are placed facing each other were discussed.
Day 4 Instructional objectives ¨ Students will be able to explain the principle used in working of maglev train
¨ Students will be able to infer that same poles repeal and opposite poles attract
Activity 3
4.2.1.2.1 explaining the principle used in maglev train with the help of toy based on the principle of magnetic levitation The students were shown a toy prepared using low cost material in order to make
them feel of magnetic levitation by observing the toy prepared which is based on the
principle of magnetic levitation.
Materials used were: an old rubber slipper, discarded CD, 6 ring magnets each of 3
mm thickness, 17.5 mm outer diameter, 7.5 mm inner diameter. One pencil, scissors
Steps for preparation of the toy based on the principle of magnetic levitation:
Step 1 Mark out 8 equal parts in the discarded CD. Cut out one sector using a big
scissors.
Step 2 Take that sector of the CD and cut the lower corners of the sector at equal
angles.
Step 3 Take two ring magnets and press fit them in a pencil which is spark at one
edge. They are just right to fit into a pencil. You might have to scrap the pencil a bit.
The polarities of the magnets do not matter.
Step 4 Cut a rectangle of 15 cm length and 7.5 cm breath from an old rubber slipper.
Step 5 From one end mark out 2 cm, 6.5 cm and 12.5 cm. Make 5 cm wide cuts on
these lines horizontally.
Step 6 Now insert the CD piece on the 5 cm wide cut at 2cm mark. Place 2 ring
magnets in the rubber slit next to the CD. These magnets must have poles which
attract the pencil magnet close to the writing end of the pencil. Insert two more ring
magnets in the remaining slits. These magnets must repel the pencil magnet which is
away from the writing end on the pencil.
Step 7 now place the pencil with its tip resting on the CD. Now twirl the rear end of
the pencil and it will keep spinning for a long time.
NOTE: one may have to adjust the positions of the pencil magnets to get the pencil to
levitate.

107
Figure 4.1 view of the toy based on principle of magnetic levitation
Source: Gupta (2008)
4.2.1.3 Concept of gravitational force Day 5 Instructional objectives ¨ Students will be able to observe that any object when left from a shoulder
height or allowed to fall freely is attracted towards the center of the earth
Materials required
Duster, key, plastic ball, pen, scale, chalk, hair pin, stop watch
Activity 1
The students were instructed to drop different objects provided to them one by one
and note what happens. They were to note the time taken for each object to touch the
floor. The same activity was repeated number of times from the same height and the
students were made to verify the time required for the given objects to fall down.
Activity 2
The students were instructed to stretch their arm horizontally and let it remain in the
stretched position for at least two minutes. The students were to note their observation

108
in their notebook. The students were instructed to repeat the activity two more times
and note their observations every time. They were instructed to find out the cause for
the effect.
4.2.1.4 Concept of Electrostatic Force (Charged objects attract uncharged objects) Day 6 Instructional objectives to be achieved at the completion of the activity: ¨ Students will be able to experience that objects on rubbing attracts/pulls
another objects ¨ Students will be able to find the minimum distance at which the attraction
takes place ¨ Students will be able to find that rubbing produces some effect which attracts
the substance ¨ Students will be able to infer that rubbing the two balloons on the same
material causes same effect on both the balloon which makes the balloons repeal each other
¨ Students will be able to infer that the charged object loses the effect of attraction/pulling (gets discharged) after some interval of time
¨ Students will be able to observe that physical contact is not required for the attraction
In order to achieve the above stated instructional objectives the students were made to
perform four activities followed by discussion made by the researcher and students of
each group.
Activity 1
The balloon and its invisible shelf
Materials required
Inflated balloons, wool, tricot, nylon, thread and a stick
Worksheet was provided to the students wherein instructions were written in the
following manner:
Rub a balloon with wool and touch the balloon to the wall. Find out what happens to
the balloon and note your observations in your notebook. Now rub the balloon on
your uniform and repeat the same activity and note down your observations. Try to
stick the balloon without rubbing it on any material. Note down your observations.
Students rubbed the balloon on their school uniform and tried to place it on the wall
and note their observation. Students repeated the same activity thrice. Then the

109
students rubbed the balloon on the wool, tricot, nylon provided to them and tried to
observe the effect in all the situations.
Activity 2
This activity was followed by another activity wherein the students were to hang two
balloons on a stick with a thread. One of the group members was to hold the stick.
The other member of the group was to rub the two balloons on wool and then leave
them. All the members of the group were to note their observations.
Activity 3
Materials required
Plastic scale, pieces of paper
The students were asked to rub their plastic scale on their hair and bring it near the
pieces of paper and observe what happens. Then the researcher instructed the students
to rub the scale on their hair and touch the rubbed part of the scale with their hand and
then bring it near to the paper and observe what happens.
Activity 4
Materials required
Empty refill, eraser, straw with different diameter (one bigger than the other), and
wool
The researcher showed a demonstration where in an empty refill was kept on a
support of eraser. On that refill there was a straw fixed with the help of all pin so that
straw can move freely. The researcher brought a second straw which was rubbed on
wool near the straw held in the refill and the students were to note their observations.
There was discussion held after all the activities and through the discussion the
concept of electrostatic force was build among the students.
4.2.1.5 Concept of frictional force Day 7 Instructional objectives ¨ Students will be able to explain that slippery surface does not allow the ink to
flow through the pen
¨ Students will be able to infer that it is difficult to write on a greased paper
¨ Students will be able to explain that when two equal forces are acting on the
body then it is not possible to change the state of body.
Materials required
Piece of paper either greased by oil or butter or butter paper

110
Activity 1
The students were provided with the greased piece of paper and asked to write on the
paper. The students were to note down the observations in their note books along with
the probable reason.
Activity 2 (whole class activity)
Materials required
Inclined plane, roller, weights, sand paper
Researcher demonstrated inclined plane and a roller along with the minimum weight
required to smoothly move the roller then the roller was covered with a sand paper
and the same activity was done. Students were made to note down their observations.
Activity 3 (whole class activity)
The science textbooks of two students were taken and they were called to do the
activity. The students were asked to put the cover page of one of the book on the back
page of the other book and then all the pages were put one over the other. When all
the pages were arranged in this manner the students were asked to pull from both the
side and then they were asked to make their observations in their notebooks.
This was followed by a discussion session where in students were asked to respond as
to what have they observed in all the activities done. Students were asked to tell what
happened when different activity was done by them. They were asked to tell the
common happening in all the cases and then they were told that in all the cases there
was either push or pull (movement of the object either towards or away). The effect,
which causes the body to move either towards or away from it, is called force. Force
causes change in the state of motion.
4.2.1.6 Various effects of force Day 8 Instructional objectives ¨ Students will be able to observe that the force causes body to come in motion
¨ Students will be able to observe that the force causes body to increase its
speed
¨ Students will be able to observe that the force applied may change the
direction of motion or stop the moving body
¨ Students will be able to observe that the force applied changes the shape of the
body
111
Materials required
Plastic ball, hard board or pad
After doing the activities related to muscular force, magnetic force, electrostatic force,
gravitational force and frictional force the students were asked that in all the case
what was seen by them. To this the students responded that in all the cases the object
was attracted towards the force. This was followed by activity performed by the
researcher wherein researcher took one plastic ball and rolled it, then it was hit by a
pad, then obstructed by pad, then the ball was pressed. After performing the activity
the students were asked what happened in each case. In the first case there was force
used to bring ball in motion followed by hitting the ball to increase its speed. Then
there was a pad to obstruct its motion because of which the ball changed its direction
of motion and then came to rest and finally when the ball was pressed its shape was
changed. Thus the effect of applying force on the object was taught to the students by
performing the activity as stated above.
4.2.1.7 Concept of motion and types of motion Day 9 Instructional objective ¨ Students will be able to define the term motion
¨ Students will be able to identify different types of motion
¨ Students will be able to explain different types of motion
¨ Students will be able to give at least one example of each type of motion
Materials required
Stop clock, pendulum, toy which works on winding by keys, stone tied to string, toy
fan working on battery
There was a discussion held in the class. The researcher raised a question as to what
happened to the balloon when it was rubbed with wool and brought near to the wall.
The students responded that the balloon got stuck to the wall. There were number of
questions asked by the researcher and the students were taken towards the concept of
motion. The students were made to understand that there is some effect required in
order to change the position of the body with respect to a stationary body, and they
were told that when the body changes its position with respect to the stationary body
then the body is said to be in motion. Researcher showed the students the fan which
was working on battery and the students were asked to tell the motion performed by
the blades of the fan. Thus the concept of circular motion was explained. There was

112
also a stone tied to the string and the teacher performed circular motion by moving the
string in a circular manner. Then there was demonstration of motion of hands of the
stop clock and pendulum and discussion was held on the type of motion in both the
cases. Researcher started the stop clock and students were asked to observe the second
hand of the stop clock and find out the type of motion performed and also instructed
the students to note the time taken to complete one round. Thus the concept of
periodic motion and oscillatory motion was developed among the students.
4.2.1.8 Concept of speed Day 10 Instructional objectives ¨ Students will be able to find the time taken by the person to cover the pre-
decided distance first
¨ Students will be able to define speed
¨ Students will be able to calculate speed
Activity
Students were taken to the ground and they were subdivided into groups. There were
two groups formed and within the group also there was subgroup. There was a
running race organized and there were fourteen students who were to run. The
distance was already decided and there was mark put at the starting and ending point.
The students were to run a distance of thirty meter. There were fourteen students
standing at the distance of thirty meter. The students at the destination point had to
start the stop clock when the students on the other side were given the signal to run
and then they were to stop the clock when the student associated with him/her reaches
the destination. Thus the students were to find the time required to cover a specified
distance. Then they were asked to find out who came first by listing the time taken for
each student and calculating speed for each student. The concept of speed was thus
introduced to the students.
4.2.2 IMPLEMENTATION OF AN INSTRUCTIONAL STRATEGY TO
TEACH THE CHAPTER MEASUREMENT
The following section describes in detail the learning experiences provided to the
students to teach the chapter measurement
4.2.2.1 Concept of Least Count Day 1 Instructional objectives ¨ Students will be able to define least count

113
¨ Students will be able to explain least count
¨ Students will be able to determine least count given any calibrated vessel
¨ Students will be able to determine volume contained in the given beaker
Materials required
Beakers of different calibrations, liquid, water, KMnO4
Researcher asked the students what they mean by least count and gave the students
different measuring flasks, beakers with the different calibrations. One of the beakers
had the least count 5 ml and another was having least count 10 ml. The students were
asked to make the reading. Majority of the students made the reading as 50.3 instead
the reading was 65 ml. Actually the liquid filled in the beaker was till the level 65ml
that is after the mark 50 it was three marks above thus making the reading as 65 ml
because each mark was 5 ml and thus 3 marks above 50 making it 65 ml. While in
another beaker the reading was 160 ml and the students came out with the answer
100.6. The students were relating the concept of least count in case of scale to the
beaker and reading it as 150.3 taking the least count as 0.1 as it is in the case of scale.
The students were instructed to take out their scale and were asked to find the value of
smallest mark on their scale. They all came out with the answer as 0.1 cm, then the
researcher explained the least count taking different calibrations and asking students
to find the least count for each calibrations. Researcher made different beaker with
different calibrations on the board. Then randomly the students were asked to tell the
least count in each of the diagrams drawn on the board. Thus the concept of least
count which is least possible measurement using the given calibrated vessel was
introduced to the students. Here when the students were given the beaker and were
asked to make the reading on their own the students actually conceptualized as to
what each mark means and how actually least count can be calculated.
4.2.2.2 Concept of mass and calculating the volume Day 2 and Day 3
The same activity was carried out for two days
Instructional objectives
¨ Students will be able to feel mass of the given objects
¨ Students will be able to estimate the mass of the given objects
¨ Students will be able to find the mass of the given objects using different
calibrated spring balance

114
¨ Students will be able to measure the length, breadth and height of the given
object and then calculate the volume of each object using the formula
Materials required
Objects like cassette cover, colgate toothpaste box, match box, eraser, textbook of
science and textbook of class VII, spring balance
The entire class was given objects like match box, cassette cover, note pad, eraser,
science and technology textbook of standard VII, the box of Colgate toothpaste and
were asked to find the volume of given objects. The students were to measure the
length, breadth and the height of the given object using scale and then they were to
calculate the volume of the given object. After all the students calculated the volume
there was discussion held in the class where any student from the class was called
with any object randomly by the researcher and the student had to explain the entire
process carried out to calculate the volume of the object. Simultaneously the students
were also involved in measuring the mass of the given object using the spring balance
provided to them. Normally it is said that the spring balance is used to measure the
weight of the objects and the physical balance for measuring the mass. But the fact is
spring balances are not calibrated to measure the weight of an object. Therefore if one
wants to determine weight of the object then the mass obtained needs to be multiplied
with 980 if mass is in CGS system and 9.8 if mass measured is in MKS system. Thus
the researcher made use of spring balance to make the students measure the mass as it
is calibrated to measure mass only. The objects given for finding out the mass were
lock, grater, purse, box, onions, bag, and bottle. All the students measured mass of the
given objects individually making use of the spring balance given. The photographs
of the students were taken when they were involved in measuring mass of the given
objects individually. The following part shows the photographs of the students while
measuring mass of the given object. As explained earlier two activities were
simultaneously carried out, one of measuring mass of the given object using spring
balance and another was measuring volume of the given liquid using measuring
cylinder. The photographs of the students while measuring volume of the liquid are
also presented in the subsequent portion.

115
Plate 4.1 Students involved in measuring the volume of the given object. At present measuring the length of the given cassette cover and matchbox
Plate 4.2 Students involved in measuring volume of the given objects.
4.1
4.2

116
Plate 4.3 Group measuring volume of the given liquid
Plate 4.5 Boy measuring the mass of the given lock
Plate 4.7 Boy finding out the least count of the spring balance
Plate 4.4 Girl involved in measuring mass of the onions
Plate 4.6 Boy measuring the mass of the given object box
Plate 4.8 Group involved in measuring volume of the given liquid
4.3 4.4
4.5 4.6
4.7 4.8

117
Plate 4.9 Girls involved in measuring mass of the given object
Plate 4.11 Boys involved in measuring mass of the given objects
Plate 4.10 Girl involved in measuring mass of the given purse
Plate 4.12 Girl involved in measuring mass of the given lock
4.2.2.3 Concept of measurement of volume of irregular shaped object which is insoluble in water and which sinks in water Day:4 Instructional objectives ¨ Students will be able to determine least count of the given measuring cylinder
¨ Students will be able to measure the volume of the given liquid first
¨ Students will be able to measure the volume of the liquid after inserting the
stone in the liquid
¨ Students will be able to measure the volume of the irregular shaped object
stone
Materials required
Irregular object that is insoluble in water and which sinks in water (stone), water,
KMnO4, string, measuring cylinder
4.9
4.11
4.10
4.12

118
Students were given the task of determining volume of the given irregular shaped
objects. The students were divided into eight different groups and each group was
given one stone. Thus the students were given 8 irregular shaped stones and they were
asked to calculate the volume of these stones. They were given a measuring cylinder,
stone, string, KMnO4. Each group noted the volume of the liquid before inserting the
stone and noted it in their book and named it as V1. Then the students tied the stone
with the given string and inserted it in the measuring cylinder so that the stone is fully
submerged in the liquid. Then they again measured the volume of the liquid and
named it as V2. Thus by subtracting the volume V1 from V2 the students found the
volume of the given stone. The photographs of all the groups measuring the volume
of the irregular shaped stone are presented in the subsequent part.
Plate 4.13 Group 1 finding out the volume of the irregular shaped stone
Plate 4.15 Group 4 and 5 involved in finding volume of the given stone
Plate 4.14 Group 2 and 3 involved in finding volume of the given stone
Plate 4.16 Group 6 involved in finding volume of the given stone
4.13
4.14
4.15
4.16

119
Plate 4.17 Group 7 involved in finding volume of the given stone
Plate 4.18 Group 8 involved in finding volume of the given stone
4.2.2.4 Concept of measurement of volume of irregular shaped object which is insoluble in water and which sinks in water using displacement vessel Day:5 Instructional objectives ¨ Students will be able to determine least count of the given measuring cylinder
¨ Students will be able to measure the volume of the given liquid first
¨ Students will be able to measure the volume of the liquid after inserting the
stone in the liquid
¨ Students will be able to measure the volume of the irregular shaped object
stone
Materials required
Irregular object that is insoluble in water and which sinks in water stone, water,
KMnO4, string, measuring beaker and displacement vessel
Students were made to perform an activity of finding out the volume of the given
stones using displacement method. Displacement beaker was given in groups to the
students and they were given water, potassium permanganate, calibrated beaker to
collect displaced liquid, stone of irregular shape of which the volume was to be found.
4.2.2.5 Concept of density Day:6 Instructional objectives ¨ Students will be able to predict which of the given objects will sink, float or
mix in water
¨ Students will be able to give explanation for the prediction they make
¨ Students will be able to observe the effect when each object is one by one
dropped in water
4.17
4.18

120
¨ Students will be able to compare the predictions made by them and the actual
effect when the object is placed/dropped in the beaker filled with water
¨ Students will be able to give reason for the effect when each object is dropped
in water
Students were given an activity to predict observe and explain what will happen when
the objects are placed in a vessel filled with water. Students were supposed to predict
as to what will happen when the given object is dropped in water. Each student was
supposed to write the reason for the predictions made. The objects were then placed
into water one after the other and the students were to note the result followed by
explanation of the result. The list of the objects is given in the table 4.2.
Table: 4.2 Predict observe explain as to which object will sink and which float along with
the reason
Sr. No. objects Prediction Sink Float Dissolve
1 Stone 2 Piece of Wood 3 Pen 4 Eraser 5 Piece of Iron 6 Tomato 7 Potato 8 Banana 9 Plastic Spoon 10 Steel Spoon 11 Chalk piece 12 Sponge 13 Tooth Brush 14 Soap 15 Candle 16 Lemon 17 Ladies Finger 18 Sand 19 Oil 20 Kerosene 21 Petrol The students were then given a chance to observe actually what happens when the
objects are actually put in a vessel filled with water. Finally the students were to
explain why they think the result happened as observed by them. This was followed
by the discussion where in the researcher clarified the concept of density by making
the students understand that any object when sinks in water then it has density more
121
than that of water and if it floats in water that means the density of the object is less
than the density of water.
4.2.3 IMPLEMENTATION OF AN INSTRUCTIONAL STRATEGY TO
TEACH THE CHAPTER LEVER
The following section describes in detail the learning experiences provided to the
students to teach the chapter lever. The description is done following common pattern
of stating the concept to be taught, instructional objectives to be achieved, materials
required and activity to be carried out.
4.2.3.1 Concept of lever Day 1
The students were asked to tell all possible word associated with lever. The students
were told a story clever gardner (Appendix E). This was followed by discussion as to
what the students know about lever.
4.2.3.2 Concept of types of lever Day 2 Instructional objectives ¨ Students will be able to identify the different levers used in daily life
¨ Students will be able to know the three parts of the lever
¨ Students will be able to identify the common parts of each type of levers
¨ Students will be able to identify the difference in the three types of levers in
terms of the position of fulcrum, load and effort
¨ Students will be able to classify the levers based on the position of fulcrum,
load and effort
Materials Required
Pincers, pliers, wire cutter, nail cutter, stapler, a nut cracker, a lemon squasher, tongs
Picture of three types of lever a total of fifteen pictures five of each type of lever
The students were shown number of levers used in day to day life like pincers, pliers,
nail cutter, tongs, stapler, and punch
All the students were divided into eight subgroups and each group was provided with
a kit containing five pictures each of type 1, type 2 and type 3 levers. The students
were asked to classify the type of lever according to the similarities and differences
found. The students were to note down the classified pictures under different columns
in their worksheet. They were instructed to write their answers in the worksheet
provided to them. This was followed by discussion in the class involving majority of
the students to tell their observations.

122
4.2.3.3 concept of gardners’ scissor, scissor used for cutting metal and tailors scissor Day 3 Instructional objectives ¨ Students will be able to identify the difference between the variation in the
length of the load arm and effort arm in the scissors given to them.
Materials Required
Picture of scissor used by tailor, scissor used by gardener and scissors used by metal
cutter
Students were given a kit in which there were pictures of 3 types of scissors, the
gardeners’ scissor, the tailors’ scissor and the metal cutter. The students were asked to
identify the difference if any seen in the three different pictures. This was followed by
discussion in the class involving majority of the students to tell their observations.
4.2.3.4 candle seesaw Day 4 Instructional objectives ¨ Students will be able to identify that as the wax melted the load and effort on
both the sides did not remain same
¨ Students will be able to infer that in order that the seesaw remains in
equilibrium position the four quantities load, effort, load distance and effort
distance needs to be the balanced
Materials Required
Candle with wicks on two sides, a long needle, a match box, two paper cups, two
safety pins
A candle was taken and it was assured that the wick of the candle is on both the sides,
and then the candle was pierced with a big needle exactly at the center. This needle
was then supported on the support from both the sides in the hole of safety pin using
paper cups on which safety pins were attached. The candle was lighted up and the
students were asked to make their observations. The students were made to note down
their observations in their notebooks. The question was raised as to if the candle is to
be made in equilibrium position what needs to be done.
4.2.3.5 concept of principle of lever Day 5 Instructional objectives ¨ Students will be able to identify that if the effort distance is more than the load
distance then the effort required to pull a body will be less.

123
Materials required
Tins of iron and spoon one with large handle another with small handle
Students were given an activity of predict observe explain. They were shown two
spoon one with smaller hand and the other with larger hand and the students were
made to write their observation as to with which spoon will be better to open the lid of
a container a smaller spoon (smaller hand), or a larger one (larger hand). Then they
were given the spoons and a container and they explored the two options to come out
with the reason for the cause.
4.2.3.6 principle of lever Day 6
Instructional objectives
¨ Students will be able to identify that if the effort distance is more than the load
distance then the effort required to pull a body will be less.
Materials required
Scale 30 cm, pencil, tape, two paper cups, some weight, rupee coins of one rupee, two
rupee
Students were given an activity of predict observe and explain. The students were
provided with two paper cups, standard weight of 50 gm, 30 gm, 20 gm, rupee coins,
scale, pencil and cello tape. They were instructed to label one of the paper cups as
load and the other cup as effort. Then the students were instructed to attach the paper
cups to the opposite ends of the scale with the help of a cello tape. Now students were
told to position the pencil underneath and perpendicular to the ruler, so that the pencil
crosses below the 5 cm, 10 cm, 15 cm, 20 cm, 25 cm from the load end line. It may be
helpful to tape the pencil to the desk or floor so it does not roll around. The students
were provided with some weights and coins of one rupee. They were to put the given
weight on load cup and find out number of rupee coins required to lift the load cup.
Day 7
The entire chapter was revised using power point presentation where three types of
lever were shown by animated diagram of load, effort and fulcrum. The three types of
lever were shown according to the position of the fulcrum, load and effort and then
number of examples from day to day life for each type of lever were shown like lever
in our body like our hands, legs, mouth.
124
4.2.4 IMPLEMENTATION OF AN INSTRUCTIONAL STRATEGY TO
TEACH THE CHAPTER WATER
The following section describes in detail the learning experiences provided to the
students to teach the chapter water.
4.2.4.1 Experiment proving solid form of any substance is heavier than their liquid forms except in case of water Day 1 Instructional objectives ¨ Students will be able to infer that the solid form of all liquids are heavier than
their liquid forms except water
¨ Students will be able to observe that the solid form of water is lighter than its
liquid form
Materials required
Wax, pure ghee, test tube, test tube holder, spirit lamp
There was a demonstration done by the researcher to show that solid form of any
substance is heavier than its liquid form. Researcher took pure ghee in a test tube and
heated it on a spirit lamp then the researcher dropped a piece of solid ghee in this
liquid ghee and students were made to observe that solid form of ghee is heavier than
its liquid form. Then the researcher took wax in a test tube and heated it and then
dropped a piece of solid wax and the students were to make observation that the solid
form of wax also sinks in its liquid form. Then there was a transparent beaker taken
and water was poured in it and then ice was dropped in the beaker. The students
observed that the ice was floating in water. Thus one of the important physical
properties of water was taught to the students.
4.2.4.2 Wax is made of carbon and hydrogen and oxygen is required for burning of candle Day 2 Instructional objectives ¨ Students will be able to find that wax is made of carbon and hydrogen
¨ Students will be able to observe that the surface of glass turns black because of
presence of carbon in wax
¨ Students will be able to infer that there is formation of droplet of water when a
glass is partially inverted on a burning candle
¨ Students will be able to infer that presence of oxygen is necessary for the
substance to burn
125
Materials required
Candle, transparent glass, match box
Students were divided into eight groups and were provided with eight transparent
glasses, a candle and a match box. They were instructed to light the candle and invert
the glass on the burning candle partially. They were to make their observation as to
what happens when the glass is partially inverted on the candle and when the glass is
inverted fully.
4.2.4.3 Concept of solvent, solute and solution Day 3 Instructional objectives ¨ Students will be able to infer that water is universal solvent
¨ Students will be able to define solute
¨ Students will be able to define solvent
¨ Students will be able to define solution
¨ Students will be able to classify given substance into solute, solvent and
solution
Materials required
6 transparent plastic glasses filled with water, different solutes
Students were divided into eight different groups and were given different solutes and
where to find which of the solute dissolves first in water. The students were made to
understand that the substance in which the other substance dissolves is called as
solvent, the substance which dissolves is called solute and the mixture of solute and
solvent together is called solution. The students were also shown the granules of
potassium permanganate. The researcher dropped the granules of potassium
permanganate in water and said that potassium permanganate is solute, water is
solvent and the mixture obtained is the solution of potassium permanganate. The
researcher also showed the students copper sulphate and dropped it in water then they
were asked to identify the solute, the solvent and the solution.
4.2.4.4 Concept of hard and soft water Day 4 Instructional objectives ¨ Students will be able to identify hard water
¨ Students will be able to identify soft water
¨ Students will be able to infer that for growth of plant there needs to be least
amount of salt present in water

126
¨ Students will be able to draw the growth of plant when watered with salty
water
¨ Students will be able to draw the growth of plant when watered with soft water
Materials required
Hard water, salty water, soft water, distilled water, seeds, soil, pots
Students were made to understand that hard water is a water consisting impurities of
salt dissolved in it. They were made to identify hard and soft water by conducting the
activity of putting drop of soap solution in a test tube filled with hard and soft water
and were made to observe that hard water does not form enough of foam as compared
to soft water. The students were made to sow equal number of seeds in two pots
having same soil and where made to water the pots everyday with same amount of
water but in one of the pots the water poured was made salty by dissolving common
salt in water. The growth of the plant was monitored on daily basis and after fifteen
days students were made to observe the sapling in both the pots.
4.2.4.5 Methods of removing temporary hardness and methods of purifying water Day 5 Instructional objectives ¨ Students will be able to explain the method to remove the temporary hardness
of water
¨ Students will be able to observe that on boiling the water becomes soft water
¨ Students will be able to observe that the temporary hardness of water can be
removed by boiling it
¨ Students will be able to infer that salts dissolved in water can be removed by
boiling the water
Materials required
Test tube, spirit lamp, test tube holder, soap solution, dropper, and filter paper
Researcher took water containing salts in one test tube. The researcher lighted the
spirit lamp and by holding one of the test tubes containing salt under the spirit lamp
boiled the water, filtered it with the filter paper and left it to cool in the test tube
holder. Meanwhile the researcher prepared the soap solution by dipping soap in a
beaker. Then with the help of a dropper the researcher dropped two drops of soap
solution in both the test tube one containing salt water and other containing water
after boiling. The formation of foam was shown to the students in both the test tubes

127
thus the students were made to understand that boiling the hard water help to make it
soft water by removing the salts.
4.2.4.6 Methods of purifying water Day 6 Instructional objectives ¨ Students will be able to observe the impurities in water
¨ Students will be able to infer that there are two types of impurities one soluble
in water and another insoluble in water
¨ Students will be able to explain that by filtering the water insoluble impurities
can be removed
¨ Students will be able to infer that on adding alum the soluble impurities can be
removed
¨ Students will be able to infer that on adding chlorine tablet the water obtained
is pure than that by adding alum
Materials required
Water, soil to make water impure, cotton cloth to filter the water, transparent glasses,
alum, chlorine tablet
Students were divided into different subgroups and were given water, soil to make
water impure, cotton cloth to filter water, seven transparent glasses, alum, chlorine
tablet. The groups were instructed to dissolve soil to make water impure. The groups
then left the glass of impure water undisturbed for two three minutes so that the
impurities settle down then they filtered the water by placing a cotton cloth on another
glass. Now the students divided this water into three parts and then in one glass added
chlorine tablet, in another glass added alum and left the third as it is after some time
the groups filtered the two glasses one in which alum was added and another in which
chlorine tablet was added into two new glasses. The groups then compared the purity
of water in each of the glasses.
4.2.4.7 Pollution of water and remedies for preventing pollution of water Day 7 Instructional objectives ¨ Students will be able to explain water as life
¨ Students will use water with caution
¨ Students will avoid unnecessary wastage of water
¨ Students will be able to infer that if water is wastage then there will be scarcity
of water

128
¨ Students will become aware of water as one of the important component of life
Materials required
LCD projector, power point presentation
Researcher showed the students the power point presentation (Appendix H) prepared
by our former president and scientist Kalam. This powerpoint made the students
aware about the importance of water in the life of an individual. It also made the
students aware that if water is wasted and polluted then the day is not far when human
civilization will have scarcity of water. This was followed by a discussion where in
students were made to come out with the remedies to prevent water pollution. The
students were also made to write slogans to prevent pollution and wastage of water.
4.2.5 IMPLEMENTATION OF AN INSTRUCTIONAL STRATEGY TO
TEACH THE CHAPTER REFLECTION OF LIGHT
The following section describes in detail the learning experiences provided to the
students to teach the chapter reflection of light
4.2.5.1 Understanding how shadows are formed and Making a mirror Day: 1 concept of reflection of light and shadows Instructional Objectives ¨ Students will be able to infer that shadows are formed by obstruction of light
¨ Students will be able to explain how a mirror is formed
¨ Students will be able to identify which colour reflects the light the most
¨ Students will be able to explain which colour absorbs the light the most
¨ Students will be able to list all the words related to reflection
¨ Students will be able to explain reflection in their own words
¨ Students will be able to prepare mirror using transparency
¨ Students will be able to form shadows by placing their hand between source of
light and screen/white paper.
Materials Required
Light source, transparency and coloured paper (white, green, blue, black, red) and
over head projector
Students were asked to define reflection of light in their own words. They were asked
to list all the words they feel are related with reflection of light. They were also asked
to place their hands in between the light source and screen to form shadows and were
asked why shadows are formed? The students were asked to tell what makes mirror a
mirror? This was followed by an activity of preparing a mirror from transparency

129
sheet. Students were provided with a piece of transparency and they performed an
activity by placing white sheet, green, blue, red and black sheet of paper underneath
the transparency to explore which sheet makes the transparency work as a perfect
mirror.
4.2.5.2 Laws of Reflection Day: 2 concept of laws of reflection Instructional objectives ¨ Students will be able to infer that incident ray, reflected ray and normal all
three lie in the same plane
¨ Students will be able to infer that the measure of angle of incident is equal to
measure of angle of reflection
¨ Students will be able to explain that incident ray and reflected ray lie opposite
side to the normal
Materials Required
Compact Disc, source of light, protractor
Students were given a demonstration as to how are they supposed to place the
compact disc on a stand made of rubber and how to place it on the white paper and
how should the source of light be made incident on the CD and then the students were
given the task to draw the diagram showing the incident ray, the reflected ray and
were asked to find the measure of angle of incidence and measure of angle of
reflection.
4.2.5.3 Concept of regular reflection Day: 3 concept of regular reflection Instructional objectives ¨ Students will be able to infer that two parallel beam of light after reflection
also remains parallel if the surface on which light is incident is smooth and
shinny
¨ Students will be able to infer that the aluminum foil allows the light to reflect
¨ Students will be able to observe their face in the aluminum foil
Materials required
A rectangular wooden block wrapped with shinny aluminum foil, light source, white
sheet of paper
Students were made to perform an activity of placing a small rectangular box in front
of them and wrapping it with silver foil. They were instructed to bring a torch and a
cone made of paper fitting that torch. They were guided to place the rectangular box

130
with shinny paper horizontally on a white sheet of paper and make the light incident
on the paper and then find the path of reflected light and thus perform an experiment
related to laws of reflection of light. The students were to further extend the
experiment where in they were to find the path of the two reflected rays when two
parallel beam of light were made incident on the rectangular block wrapped with the
aluminum foil.
This was followed by the demonstration done by the researcher taking a transparent
box filled with water and adding soap to the water and then placing the plane mirror
in the box and making two parallel beam of light incident on the plane mirror and then
showing the path of both the reflected rays.
Plate 4.19 Regular Reflection- two incident rays which are parallel to each other after reflection also the two reflected rays are parallel 4.2.5.4 Concept of irregular reflection Day:4 Instructional objectives ¨ Students will be able to observe that two parallel beam of light after reflection
does not remain parallel in case of crinkled aluminum foil
¨ Students will be able to infer that the aluminum foil allows the light to reflect
¨ Students will be able to observe their face in the aluminum foil
Materials required
A rectangular wooden block wrapped with crinkled aluminum foil, light source, white
sheet of paper
4.19

131
The students were instructed to remove the silver foil from the rectangular box and
squeeze it. The students were instructed to observe their face in the crinkled paper and
note their observation in their notebooks and then again wrap it to the rectangular box
and then perform the same experiment again and find the relation between incident
rays, and the reflected rays.
4.2.5.5 Characteristic of image in the plane mirror Day:5 Instructional objectives ¨ Students will be able to infer that when alphabets A to Z are seen in mirror
they appear to have lateral inversion that is the left side becomes right and
right side becomes left
¨ Students will be able to write their name in mirror script
¨ Students will be able to write their address in mirror script
¨ Students will be able to observe that the image is of the same size of the object
¨ Students will be able to observe that the distance of the image is same as that
of the object
Materials required
Mirror, plane white paper, pencil
Students were given a task of writing the alphabets A to I as it appears in the plane
mirror. The students were then actually made to observe each alphabet and were
asked to check their answers which they gave before and then they were asked to
keenly observe as to what is the change in the alphabets while observed in the mirror.
Then they were to write their observations in the notebooks. This was followed by the
activity of making the students write their name, name of the school, their address in
the script as will appear in the mirror. Then the students were allowed observe their
written script in the mirror. Thus the characteristic of image in the plane mirror is
discussed.
Forming of a word that remains the same in the mirror
The students were made to predict which alphabet does not change in the mirror. Now
they were to think of a word which does not change in the mirror. One group of
student immediately came out with the word MADAM the students were then
instructed to actually see the word in mirror and find out whether it remains the same
or change.

132
4.2.5.6 Characteristic of image in the plane mirror Day: 6 Instructional objectives ¨ Students will be able to observe that the image in a plane mirror is at the same
distance as that of the object
¨ Students will be able to infer that the size of image is same as the size of the
object
Material required
A card board with 8x8 square just like a chess board, a rupee coin, a mirror
Students were divided into eight groups and each group was given a card board on
which sixty four squares (8x8) were drawn, just as in case of chess board. The
students were instructed to place the card board on a white sheet of paper. They were
to draw one horizontal line on the sheet of paper and place the mirror on this
horizontal line. The groups were instructed to place the coins given to them at fifth
column in the first row of the chess board type card board. They were then instructed
to observe the position of the image. The groups then altered the position of the rupee
coin and found the position of the image of the rupee coin in the mirror and thus
established the relationship that the distance of object from the mirror and distance of
image from the mirror is same. The card board provided to the students is as shown in
the figure below:
Figure 4.2 cardboard for finding the characteristics of image in a plane mirror The actual image when the students placed the object in front of the cardboard with the mirror appeared as shown on the subsequent page:

133
Figure 4.2.1 characteristics of image in a plane mirror
4.2.5.7 Image formed by plane mirror is virtual and is behind the mirror Instructional objectives
¨ Students will be able to explain the image formed by plane mirror
¨ Students will be able to explain that the image is not formed on the screen
Materials required
Candle, rectangular transparent glass, transparent glass filled with water, two lumps of
modeling clay
Students were instructed to place a rectangular glass slab in between the candle and
the glass filled with water. Then the group member were to light the candle and three
members of the group were to stand on one side near the candle and the other three
members were to stand on the side of the transparent glass filled with water. The
three students in front of the mirror were to instruct the other friends on the side of the
glass filled with water to move the glass until the image of the candle appears burning
inside the glass. They were to measure the distance of the candle to the rectangular
glass slab and also the distance of the glass filled with water from the rectangular
glass slab and find the relationship between the two.
4.2.5.8 Multiple Reflections Day:7 Instructional objectives ¨ Students will be able to observe that when two mirrors are placed at different
angles different number of images are seen in the mirror ¨ Students will be able to observe that when two mirrors are placed parallel to
each other then it is difficult to count the number of images seen in the mirror as the number of images is infinite.
Materials required
Two plane mirrors, white sheet of paper, protractor, candle, pen cap, eraser, rupee
coin

134
Students were asked to place cap of their pen, a rupee coin, a small pencil, eraser,
candle one after the other between two mirrors held upright at different angles. They
were made to count the images at different angles starting from 30,45,60,90,120,180
and were then made to plot a graph taking angle on X axis and number of images on
Y axis. Then they were asked to find out the number of images at 5, 10, 15, 20, 25
then try to come down to the formula which gives the number of images for any
angle.
4.2.5.9 Making kaleidoscope Day 8 Instructional objectives ¨ Students will be able to prepare a kaleidoscope
¨ Students will be able to observe different patterns formed in the kaleidoscope
Materials required
3 rectangular piece of mirror, thermocol balls, piece of bangles
Students were instructed to bring three rectangular pieces of mirror of same size. The
students were instructed to arrange the mirrors to form a triangle. The students
wrapped the three mirrors using a paper and gum. Bottom was covered by using
butter paper. The students kept thremocol ball in between the mirrors.
4.2.6 IMPLEMENTATION OF AN INSTRUCTIONAL STRATEGY TO
TEACH THE CHAPTER CURVED MIRRORS
The following section describes in detail the learning experiences provided to the
students to teach the chapter curved mirrors. The uniform pattern is followed of
stating the concept to be taught, instructional objectives to be achieved, materials
required and the learning experiences provided.
4.2.6.1 Concept of curved mirrors Day 1 Instructional objectives ¨ Students will be able to use transparency sheet and observe their face through
it by folding it to form a curve
¨ Students will be able to explore that when they try to see their face into the
curved part they are able to see funny image of their face in the form of fat,
thin
Materials required
Transparency sheet covered with black surface at the back, new shinning steel spoon,
concave and convex mirrors

135
The students were divided into subgroups. There were total eight groups and each
group was provided with the transparency sheet. The group members were to fold the
transparency sheet and try to observe their face in the transparency sheet. They were
to note their observations. The groups were also provided with new steel spoon. The
group was to see their image on both the sides of the spoon and note their
observations in both the cases. The students were also provided with the concave and
convex mirrors and they were asked to observe themselves in both the mirrors.
Plate 4.20 Groups involved in observing the image in the concave and convex mirror 4.2.6.2 Concept of curved mirrors Day 2 Instructional objective ¨ Students will be able to differentiate between the concave and convex mirror
by touching its surface ¨ Students will be able to observe the type of image formed by placing the
concave mirror at different distance from their face ¨ Students will be able to observe the type of image formed by placing the
convex mirror at different distance from their face Materials required
Concave mirrors and convex mirrors
Students were divided into eight subgroups and each group was provided with two
mirrors one concave and another convex. Both the mirrors were of same size.
Students were asked to find out which is the concave mirror and which the convex.
Then they were provided hint to touch the shinning surface of both the mirrors one
after the other and find out the difference they feel when the students touch the
shinning surfaces of both the mirrors. Thus the concept of concave mirror and convex
4.20
136
mirror was developed among the students. The students themselves felt the difference
in the surfaces of both the mirrors.
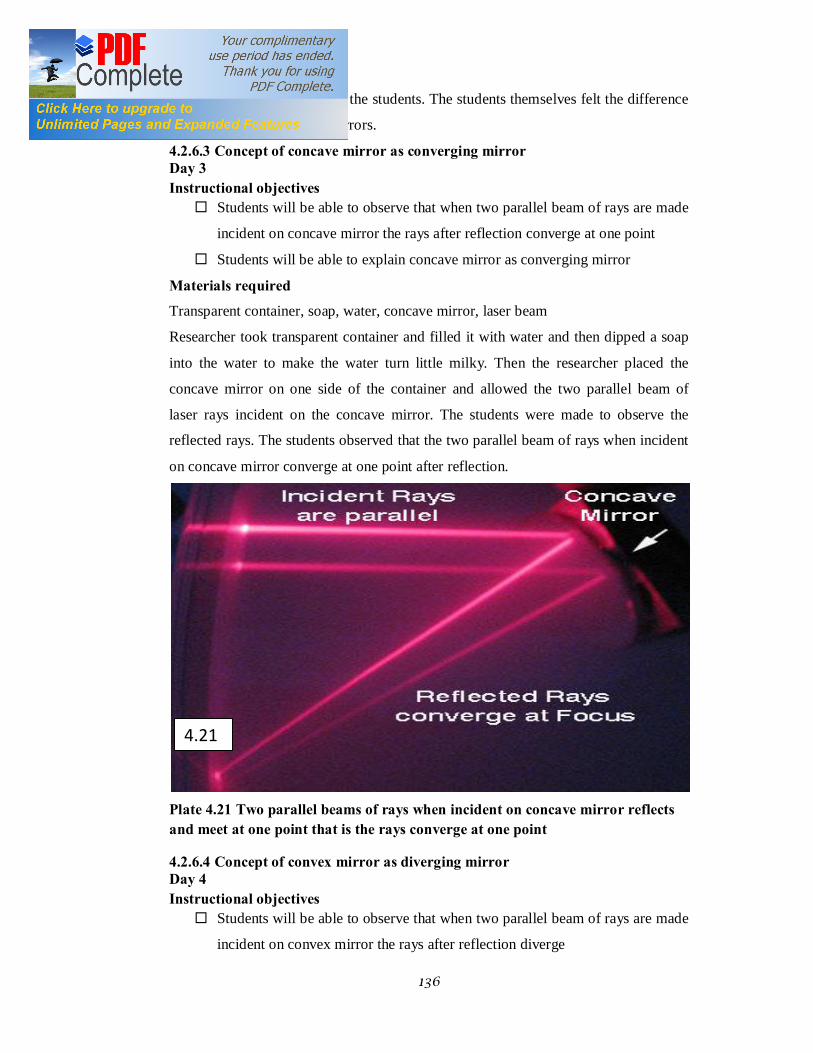
4.2.6.3 Concept of concave mirror as converging mirror Day 3 Instructional objectives ¨ Students will be able to observe that when two parallel beam of rays are made
incident on concave mirror the rays after reflection converge at one point
¨ Students will be able to explain concave mirror as converging mirror
Materials required
Transparent container, soap, water, concave mirror, laser beam
Researcher took transparent container and filled it with water and then dipped a soap
into the water to make the water turn little milky. Then the researcher placed the
concave mirror on one side of the container and allowed the two parallel beam of
laser rays incident on the concave mirror. The students were made to observe the
reflected rays. The students observed that the two parallel beam of rays when incident
on concave mirror converge at one point after reflection.
Plate 4.21 Two parallel beams of rays when incident on concave mirror reflects and meet at one point that is the rays converge at one point
4.2.6.4 Concept of convex mirror as diverging mirror Day 4 Instructional objectives ¨ Students will be able to observe that when two parallel beam of rays are made
incident on convex mirror the rays after reflection diverge
4.21

137
¨ Students will be able to explain convex mirror as diverging mirror
Materials required
Transparent container, soap, water, convex mirror, laser beam
Researcher took transparent container and filled it with water and then dipped a soap
into the water to make the water turn little milky. Then the researcher placed the
convex mirror on one side of the container and allowed the two parallel beam of laser
rays incident on the convex mirror. The students were made to observe the reflected
rays. The students observed that the two parallel beam of rays when incident on
convex mirror diverge after reflection.
Plate 4.22 Two parallel incident rays on the convex mirror after reflection diverge
4.2.6.5 Concept of concave mirror as converging mirror Day 5 Instructional objectives ¨ Students will be able to observe that the parallel rays when made incident on
concave mirror after reflection rays meet at one point
¨ Students will be able to observe that when the paper is white it takes time to
catch fire
¨ Students will be able to observe that when the paper is black it takes less time
as compared to white paper to catch fire
4.22

138
¨ Students will be able to infer that black colour absorbs more heat as compared
to white colour
Materials required
White paper, black paper, black and white paper, concave mirror, sunlight
Students were divided into eight groups and each group was given one concave mirror
and a sheet of black and white paper, black paper and white paper. The groups were
instructed to reflect the rays of sun on the paper such that they are able to see the
image of sun as a small clear spot and then let the mirror remain in the same position
for some time and then observe the effect. The photograph of four groups while
setting up the concave mirror in front of sun such that the rays of sun after reflection
fall on the paper and burn the paper are presented below.
Plate 4.23 Students experimenting with the concave mirror and trying to converge the rays of sun and thus burn paper
4.23

139
Plate 4.24 Group of students experimenting with the concave mirror and trying to converge the rays of sun and thus burn paper
Plate 4.25 Group of students experimenting with the concave mirror and trying to converge the rays of sun and thus burn paper
4.24
4.25

140
Plate 4.26 Group of students experimenting with the concave mirror and trying to converge the rays of sun and thus burn paper 4.2.6.6 Uses of concave and convex mirrors Day 6
Instructional objectives
¨ Students will be able to list uses of concave mirror
¨ Students will be able to list uses of convex mirror
The students had already seen the type of images formed by placing the concave
mirror at different places. In the earlier class the students were provided concave
mirror and they were instructed to observe the image of their face, pen cap by placing
the mirror at different positions from the face. The students in their worksheets have
mentioned that when the mirror is very near to their face they are able to see a big
face in the mirror. Taking this as the base the researcher started the discussion as to if
the image formed by placing a concave mirror is big when it is placed near the face
where should the mirror be used. To this one of the students said it should be used
where the image to be obtained is to be large. Thus the use of concave mirror as
shaving mirror was developed. The students were also told that concave mirrors are
also useful as make- up mirrors. The other uses of the concave and convex mirror
were elicited from the students through discussion.
4.26

141
The present chapter elucidated the development of an instructional strategy along with
the process of the implementation of the developed instructional strategy. In order to
find out how far the implemented strategy proved itself effective it is required that the
data obtained should be anlaysed and interpreted accordingly. The succeeding chapter
presents the data analysis and interpretation.