chapter 3 introducing visual basic.net. 3.1 visual basic.net windows programming -used to create...
TRANSCRIPT

Chapter 3Chapter 3
Introducing Visual Basic.NETIntroducing Visual Basic.NET

3.1 Visual Basic.NET 3.1 Visual Basic.NET Windows ProgrammingWindows Programming
-Used to create Windows, Web, and Console applications-Used to create Windows, Web, and Console applications
-Uses predefined classes to create the interface-Uses predefined classes to create the interface
-We will be creating event driven applications-We will be creating event driven applications
-We are using Visual Basic.NET version 2003-We are using Visual Basic.NET version 2003

3.2 The VB.NET IDE3.2 The VB.NET IDE
-IDE (Integrated Development Environment) -IDE (Integrated Development Environment)
-Start Page is the first thing to be loaded.-Start Page is the first thing to be loaded.
-make sure projects tab is selected.-make sure projects tab is selected.

3.3 Creating a New 3.3 Creating a New ProjectProject
-Select New Project Button-Select New Project Button
-In Dialog Box-In Dialog Box
-Project type: Visual Basic Project-Project type: Visual Basic Project
-Templates: Windows Application-Templates: Windows Application
-Name: Descriptive (ex. Ch 3 Review 2)-Name: Descriptive (ex. Ch 3 Review 2)
-Location: Corresponding folder -Location: Corresponding folder in your files in your files on the share drive on the share drive (ex. G:\Programming\) (ex. G:\Programming\)
-Parts of IDE (Visual Aide p. 14)-Parts of IDE (Visual Aide p. 14)

Ch. 3 – Review 1Ch. 3 – Review 1-New Project-New Project
-Name: Ch3 – Review 1-Name: Ch3 – Review 1
-Location: G:\-Location: G:\
-New Form-New Form
Name: Form1Name: Form1
Text: MessageText: Message

3.4 The Windows Form3.4 The Windows Form
-Use cursor to resize form accordingly-Use cursor to resize form accordingly
-Properties (controls behavior, appearance, position, etc)-Properties (controls behavior, appearance, position, etc)
--NameName: Form1 (must be this for now): Form1 (must be this for now)
--TextText: What is shown in Title Bar: What is shown in Title Bar
-BackColor: Changes color of Form-BackColor: Changes color of Form
-BackgroundImage: Sets an image as the background-BackgroundImage: Sets an image as the background

3.5 The Label Control3.5 The Label Control
-Control Objects: get user data or display information-Control Objects: get user data or display information
-Label Control -Label Control (displays text that can’t be changed by user)(displays text that can’t be changed by user)
-can be added to form by dragging from toolbox or double -can be added to form by dragging from toolbox or double clickingclicking
-can be moved to desired location on form by dragging-can be moved to desired location on form by dragging

Label PropertiesLabel Properties
NameName: lbl + description (ex. lblMessage): lbl + description (ex. lblMessage)
TextText: text to be displayed: text to be displayed
Font: click on … and control size, style, etc.Font: click on … and control size, style, etc.
TextAlign: use button to align text in label areaTextAlign: use button to align text in label area
-notice the name property -notice the name property (lbl stands for label and tells (lbl stands for label and tells other programmers what type of object and other programmers what type of object and information goes there)information goes there)
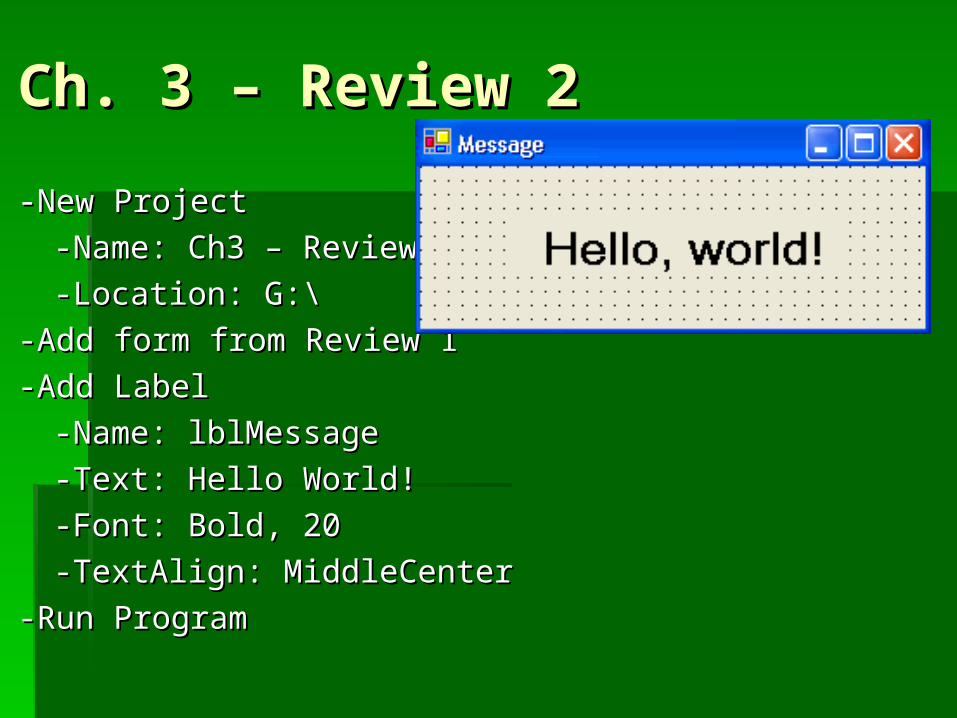
Ch. 3 – Review 2Ch. 3 – Review 2
-New Project-New Project
-Name: Ch3 – Review 2-Name: Ch3 – Review 2
-Location: G:\-Location: G:\
-Add form from Review 1-Add form from Review 1
-Add Label-Add Label
-Name: lblMessage-Name: lblMessage
-Text: Hello World!-Text: Hello World!
-Font: Bold, 20-Font: Bold, 20
-TextAlign: MiddleCenter-TextAlign: MiddleCenter
-Run Program-Run Program

3.6 Saving and Running 3.6 Saving and Running an Applicationan Application
-All projects should be -All projects should be saved frequentlysaved frequently
-To run an application (click on the play button or hit F5)-To run an application (click on the play button or hit F5)
-During the compiling phase the software converts your -During the compiling phase the software converts your program into machine code so the computer can run it.program into machine code so the computer can run it.

3.7 The MainMenu 3.7 The MainMenu ControlControl
-Add menu by dragging or double clicking the icon in the -Add menu by dragging or double clicking the icon in the tool bar.tool bar.
-Adds 2 parts (the visible menu and sub-menus)-Adds 2 parts (the visible menu and sub-menus)
-these are called menuItems-these are called menuItems
-MenuItem Properties-MenuItem Properties
-Name: mnu + description (mnuProgram)-Name: mnu + description (mnuProgram)
-Text: Text to be displayed-Text: Text to be displayed
-Might have to declare the correct menu in the form-Might have to declare the correct menu in the form

3.8 Closing & Opening a 3.8 Closing & Opening a Project in VB.NETProject in VB.NET
-If you are restarting VB.NET it should show the recent -If you are restarting VB.NET it should show the recent projects on the start screen.projects on the start screen.
-If you are starting it for the first time today, you will have -If you are starting it for the first time today, you will have to choose open project from the toolbar. Then select to choose open project from the toolbar. Then select the appropriate folder/file.the appropriate folder/file.

Ch. 3 Review 3Ch. 3 Review 3-New Project-New Project
-Add Form from review 2-Add Form from review 2
-Add a mainmenu from toolbox-Add a mainmenu from toolbox
-Create menu -Create menu
-Name: mnuProgram-Name: mnuProgram
-Text: Program-Text: Program
-Create Sub - menu -Create Sub - menu
-Name: mnuExit-Name: mnuExit
-Text: Exit-Text: Exit
-Run Program-Run Program
-Complete Lesson 3.1 Review Worksheet-Complete Lesson 3.1 Review Worksheet

3.9 Program Code3.9 Program Code
-Statement (each line of computer code)-Statement (each line of computer code)
-All code has to be -All code has to be entered belowentered below the Inherits line but the Inherits line but preferably below the “Windows Form Generated Code” preferably below the “Windows Form Generated Code” boxbox

3.10 The Event Procedure3.10 The Event Procedure
-Procedure is a block of code to perform a specific task-Procedure is a block of code to perform a specific task
-Event Handler is the type of procedure that performs the -Event Handler is the type of procedure that performs the task.task.
-Click Event (executes a task in response to a mouse -Click Event (executes a task in response to a mouse click)click)
-Adding an Event Procedure (In Code Window)\-Adding an Event Procedure (In Code Window)\
-Choose object from left list box-Choose object from left list box
-Choose action from right list box-Choose action from right list box

3.10 Continued3.10 Continued-Will Create code similar to -Will Create code similar to
Private Sub mnuExit_Click (…) handles mnuExit.clickPrivate Sub mnuExit_Click (…) handles mnuExit.click
End SubEnd Sub
-Private Sub indicates that only form1 can access the code -Private Sub indicates that only form1 can access the code and End Sub tells the computer where the procedure stopsand End Sub tells the computer where the procedure stops
-Good Programming Style-Good Programming Style
-All code for procedure needs to be indented one tab-All code for procedure needs to be indented one tabPrivate Sub mnuExit_Click (…) handles mnuExit.clickPrivate Sub mnuExit_Click (…) handles mnuExit.click
me.Close()me.Close()
End SubEnd Sub
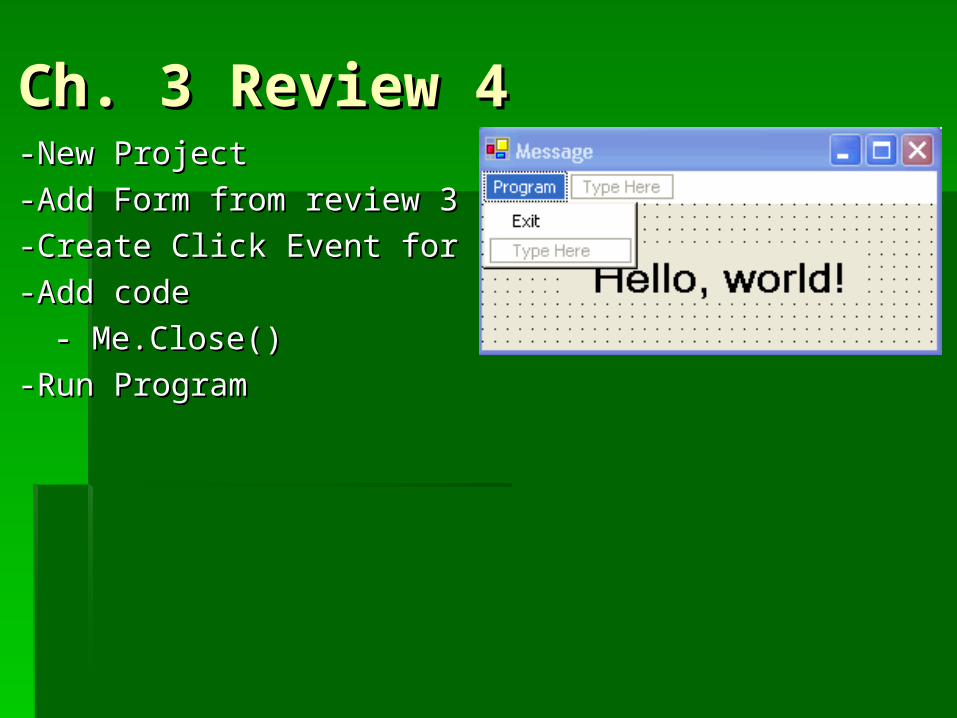
Ch. 3 Review 4Ch. 3 Review 4-New Project-New Project
-Add Form from review 3-Add Form from review 3
-Create Click Event for mnuExit-Create Click Event for mnuExit
-Add code -Add code
- Me.Close() - Me.Close()
-Run Program-Run Program

3.11 Assignment 3.11 Assignment StatementsStatements
-Assignment Statements are used to change an objects property at -Assignment Statements are used to change an objects property at runtimeruntime
-format: -format: form.object.property = valueform.object.property = value
--example:example: me.lblMessage.Text = “Smile!”me.lblMessage.Text = “Smile!”
-When changing text property (all words must be in “ “)-When changing text property (all words must be in “ “)

3.12 Using AutoList3.12 Using AutoList-VB.NET attempts to make coding easier by using an autolist when -VB.NET attempts to make coding easier by using an autolist when
you type in the dot (.) These autolist shows possible properties you type in the dot (.) These autolist shows possible properties you can changeyou can change
--MeMe (is used to refer to the current form) (is used to refer to the current form)
-example: Me.lblMessage.Text = “Hello World!”-example: Me.lblMessage.Text = “Hello World!”
-AutoLists are sometimes listed when you type an (=)-AutoLists are sometimes listed when you type an (=)

Ch 3 Review 6Ch 3 Review 6-New Project-New Project
-Add Form from review 4-Add Form from review 4
-Add Sub Menu Smile (name: mnuSmile)-Add Sub Menu Smile (name: mnuSmile)
-Add Sub Menu Hello World (name: mnuHelloWorld)-Add Sub Menu Hello World (name: mnuHelloWorld)
-Create Click Event for mnuSmile-Create Click Event for mnuSmile
-Add code to click event-Add code to click event
- Me.lblMessage.text = “Smile”- Me.lblMessage.text = “Smile”
-Create Click Event for mnuHelloWorld-Create Click Event for mnuHelloWorld
-Add code to click event-Add code to click event
- Me.lblMessage.text = “Hello World”- Me.lblMessage.text = “Hello World”
-Run Program-Run Program

3.13 RadioButton Control3.13 RadioButton Control-For radio buttons to work correctly they must be grouped in a group -For radio buttons to work correctly they must be grouped in a group
boxbox
-GroupBox Control-GroupBox Control
-Properties-Properties
-Name: grp + Description (ex. grpLanguage)-Name: grp + Description (ex. grpLanguage)
-Text: text to be shown on interface-Text: text to be shown on interface
-RadioButton Control-RadioButton Control
-Properties-Properties
-Name: rad + description (ex. radFrench)-Name: rad + description (ex. radFrench)
-Text: text to be shown on interface-Text: text to be shown on interface
-Checked: True/False -Checked: True/False ((Shows which one to be checked at Shows which one to be checked at startstart))
-When writing code for radio button they must be click events-When writing code for radio button they must be click events

3.14 Commenting Code3.14 Commenting Code
-Used to explain or clarify program code-Used to explain or clarify program code
-Have no effect on how computer runs application-Have no effect on how computer runs application
-To create a comment place a apostrophe (‘) before code-To create a comment place a apostrophe (‘) before code
-Use comments to put Project Name, Your Name, Class -Use comments to put Project Name, Your Name, Class Period, and Date at the top of your program codePeriod, and Date at the top of your program code

Ch. 3 Ch. 3 Review 7Review 7-New Project-New Project-New Form-New Form-Add 1 label (lblGreeting)-Add 1 label (lblGreeting)-Add 1 Groupbox (grpLanguages)-Add 1 Groupbox (grpLanguages)-Add 3 RadioButtons-Add 3 RadioButtons
-(radEnglish, radFrench, radSpanish)-(radEnglish, radFrench, radSpanish)-Add Comments to code (include name, project name, and date)-Add Comments to code (include name, project name, and date)-Add Click Events for all radio buttons-Add Click Events for all radio buttons-Add following code to appropriate Events-Add following code to appropriate Events
-me.lblGreeting.text = “Hello, World” -me.lblGreeting.text = “Hello, World” ‘English‘English-me.lblGreeting.text = “Hola, Mundo”-me.lblGreeting.text = “Hola, Mundo” ‘Spanish‘Spanish-me.lblGreeting.text = “Bonjour le Monde”-me.lblGreeting.text = “Bonjour le Monde” ‘French‘French
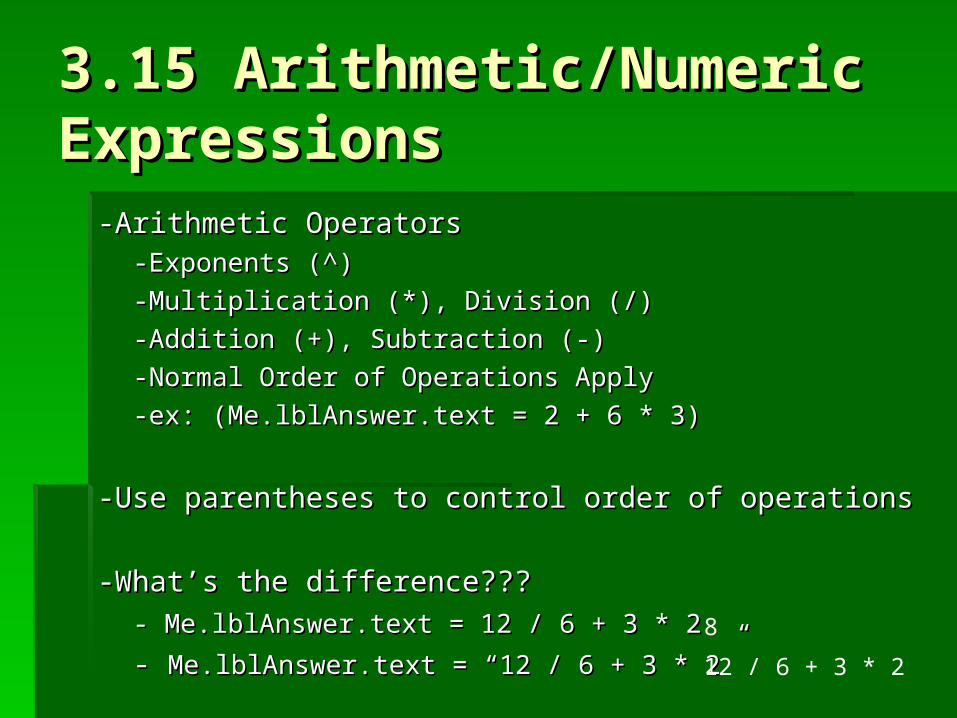
3.15 Arithmetic/Numeric 3.15 Arithmetic/Numeric ExpressionsExpressions
-Arithmetic Operators-Arithmetic Operators-Exponents (^)-Exponents (^)
-Multiplication (*), Division (/)-Multiplication (*), Division (/)
-Addition (+), Subtraction (-)-Addition (+), Subtraction (-)
-Normal Order of Operations Apply-Normal Order of Operations Apply
-ex: (Me.lblAnswer.text = 2 + 6 * 3)-ex: (Me.lblAnswer.text = 2 + 6 * 3)
-Use parentheses to control order of operations-Use parentheses to control order of operations
-What’s the difference???-What’s the difference???
- Me.lblAnswer.text = 12 / 6 + 3 * 2- Me.lblAnswer.text = 12 / 6 + 3 * 2
- - Me.lblAnswer.text = “12 / 6 + 3 * 2”Me.lblAnswer.text = “12 / 6 + 3 * 2”
8
12 / 6 + 3 * 2
3.16 Button Control3.16 Button Control
-Common way to get selections from user-Common way to get selections from user
-When Coding set up as a -When Coding set up as a click eventclick event
-Properties-Properties-Name: btn + description (ex. btnSave)-Name: btn + description (ex. btnSave)
-Text: text to be displayed on button-Text: text to be displayed on button

Ch 3 Review 8Ch 3 Review 8-New Project-New Project
-New Form-New Form
-Add 4 buttons to form-Add 4 buttons to form
-btnProb1, btnProb2, btnProb3, btnProb4-btnProb1, btnProb2, btnProb3, btnProb4
-Add 4 labels to form -Add 4 labels to form
-lblAns1,lblAns2, lblAns3, lblAns4-lblAns1,lblAns2, lblAns3, lblAns4
-Add Click Events for each button-Add Click Events for each button
-Add following code to appropriate events-Add following code to appropriate events
-me.lblAns1.text = 5 + 2 ^ 3-me.lblAns1.text = 5 + 2 ^ 3
-me.lblAns2.text = 4 / 2 + 5-me.lblAns2.text = 4 / 2 + 5
-me.lblAns3.text = 3 + 4 * 2-me.lblAns3.text = 3 + 4 * 2
-me.lblAns4.text = 7 – 3 +2-me.lblAns4.text = 7 – 3 +2