chapter 1 line code encoder - diponegoro universityelektro.undip.ac.id/sukiswo/?download=pt2_1_ line...
TRANSCRIPT

Chapter 1
Line Code Encoder

1-1: Curriculum Objectives
1.To understand the theory and applicat ions of line code encoder.
2.To understand the encode theory and circuit structure of NRZ.
3.To understand the encode theory and circuit structure of RZ.
4.To understand the encode theory and circuit structure of AMI.
5.To understand the encode theory and circuit st ructure of Manchester.
1-2: Curriculum Theory
Line coding is a part of source coding. Before PCM signal send to modulato r,
we use cer t ain s igna l mode in cert ain applicat ion. The considerations of selecting
the digital signal modes to carry the binary data are: 1. types of modulation, 2. types of
demodulation, 3. the limitation of bandwidth, and 4 types of receiver.
Line coding can be divided into two types, which are return-to-zero (RZ) and
nonreturn-to-zero (NRZ). RZ line coding denotes for a single bit time (normally is half of
a single bit time), the waveform will return to 0 V between data pulses.

The data stream is shown in figure 1-1(c). NRZ line coding denotes for a single bit
time, the waveform will not return to 0 V. The data stream is shown in figure 1-1(a). As
a result of the characteristics of signal, line coding also can be divided into two types,
which are unipolar signal and bipolar signal. Unipolar signal denotes that the signal
amplitude varies between a positive voltage level which are +V and 0 V. The only
different between bipolar signal and unipolar signal is the signal amplitude varies
between a positive and a negative voltage level which are +V and -V. Figure 1-1 shows
different types of line code signals and we will discuss the encoding signals in next section.
1 . Unipo lar Nonreturn-to -zero Signa l Encode
The data stream of unipolar nonreturn-to-zero (UNI-NRZ) is shown in fugure 1-1(a).
From figure 1-1(a), when the data bit is “1”, the width and the gap between bits of UNI-NRZ are
equal to each others; when the data bit is “0”, then the pulse is represented as 0V. The circuit
diagram of UNI-NRZ encoder is shown in figure 1-2. As a result of the data signal and the NRZ
encoder signal are similar, therefore, we only need to add a buffer in front of the circuit.


Figure 1-2 Circuit diagram of unipolar nonreturn-to-zero encoder.
2. Bipolar Nonreturn-to-zero Signal Encode
The data stream of bipolar nonreturn-to-zero (BIP-NRZ) is shown in figure 1-1(b).
When the data bit of BIP-NRZ is "1" or "0", the signal amplitude will be a positive or
a negative voltage level. As for bit time, no matter the data bit is "1" or "0", the voltage
level remain same. Figure 1-3 is the circuit diagram of BIP-NRZ encoder. By comparing
the data streams of UNI-NRZ a BIP-NRZ, the only difference is the signal amplitude is
a negative voltage level when the data bit is "0", therefore, we may utilize a comparator
to encode the data bit in the circuit.
3. Unipolar Return-to-zero Signal Encode
The data stream of unipolar return-to-zero (UNI-RZ) is shown in figure 1-1(c). When
the data bit is "1", the signal amplitude at 1/2 bit time is positive voltage level and the rest
of the bit time is represented as 0 V. When the data bit is "0", there is no pulse wave that means
the signal amplitude is 0 V. The bit time of RZ is half of the bit time of NRZ, therefore, the
required bandwidth of RZ is one time more than NRZ. However, RZ has two phase

variations in a bit time, which is easy for receiver synchronization. From figure 1-1,
compare the data signal, clock signal and data after encoding, we know that in order to
obtain the encoding data of RZ, we need to "AND" the data signal and clock signal. The
circuit diagram of unipolar return-to-zero encoder is shown in figure 1-4.
Figure 1-3 Circuit diagram of bipolar nonreturn-to-zero encoder.
Figure 1-4 Circuit diagram of unipolar return-to-zero encoder.

4. Bipolar Return-to-zero Signal Encode
The data stream of bipolar return-to-zero (B1P-RZ) is shown in figure 1-1(d). When
the data bit is "1", the signal amplitude at 1/2 bit time is posit ive voltage level and
the other 1/2 bit time is negative voltage level. When the data bit is "0", the signal
amplitude of the bit time is represented as negative voltage level. Figure 1-5 is the circuit
diagram of BIP-RZ. Bycomparing the data streams of RZ and BIP-RZ in figure 1-1, we only
need a converter to convert the encoding signal from unipolar to bipolar, therefore,
we utilize a comparator to design the converter, which can convert the RZ signal to
BIP-RZ signal.
Figure 1-5 Circuit diagram of bipolar return-to-zero encoder.
5. Alternate Mark Inversion Signal Encode
Alternate mark inversion (AMI) signal is similar to RZ signal except the alternate "1"
inverted. The data stream of AMI signal is shown in figure 1-1(f). When the data bit is
"1", the first signal amplitude at 1/2 bit time is posit ive voltage level and the other 1/2
bit time is 0 V; then the second signal amplitude at 1/2 bit time is negative voltage
level and the other 1/2 bit time 0 V, therefore, the only different between AMI and RZ is
the alternate "1" are inverted. When the data bit is "0", the signal amplitude is 0V.
This type of encode is common used by telephone industry which is pulse coding
modulation (PCM).

Figure 1-6 is the circuit diagram of AMI signal encode. In order to obtain the AMI
encode signal, the data and clock signals need to pass through the buffer stage,
which is comprised by a pair of transistors and NOT gates. After that we need to "AND"
the output of data signal and clock signal, then pass through a divider circuit by
ut ilizing clock as switch exchange. The final signal is the AMI signal. The minimum
bandwidth of AMI is less than UNI-RZ and BIP-RZ. An additional advantage of AMI is
the transmission errors can be detected by detecting the violations of the alternate-one
rule.
Figure 1-6 Circuit diagram of AMI signal encoder.
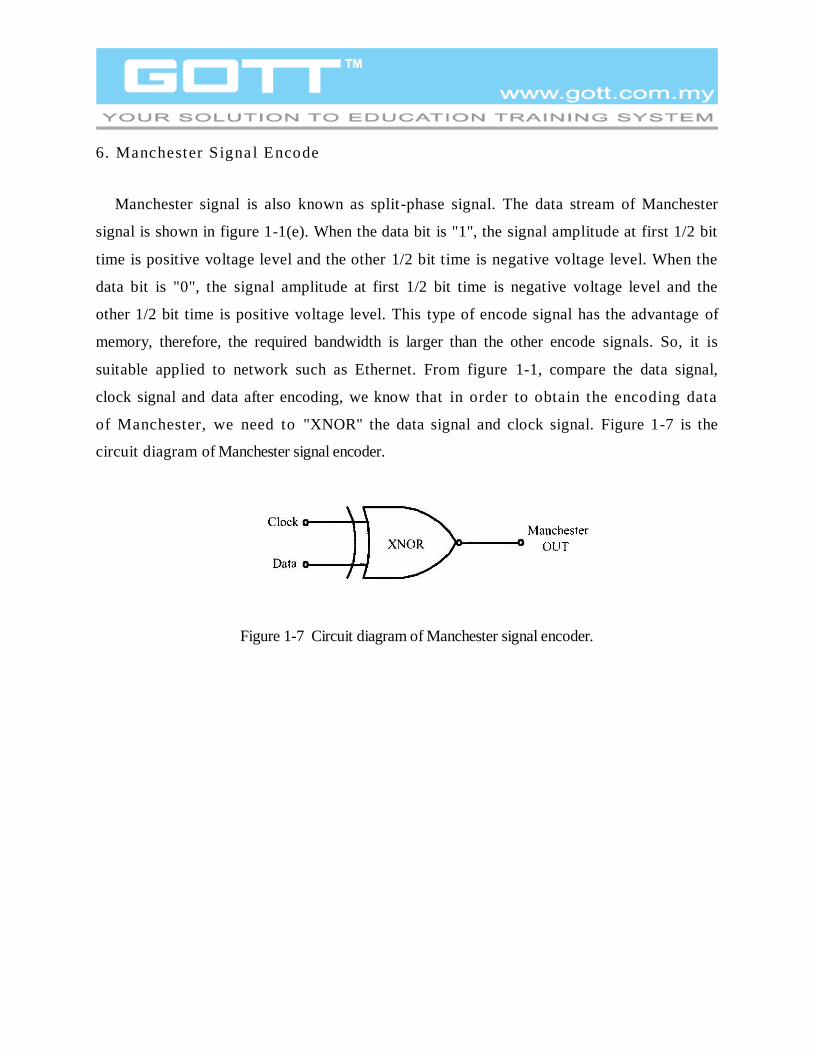
6. Manchester Signa l Encode
Manchester signal is also known as split-phase signal. The data stream of Manchester
signal is shown in figure 1-1(e). When the data bit is "1", the signal amplitude at first 1/2 bit
time is positive voltage level and the other 1/2 bit time is negative voltage level. When the
data bit is "0", the signal amplitude at first 1/2 bit time is negative voltage level and the
other 1/2 bit time is positive voltage level. This type of encode signal has the advantage of
memory, therefore, the required bandwidth is larger than the other encode signals. So, it is
suitable applied to network such as Ethernet. From figure 1-1, compare the data signal,
clock signal and data after encoding, we know that in order to obtain the encoding data
of Manchester, we need to "XNOR" the data signal and clock signal. Figure 1-7 is the
circuit diagram of Manchester signal encoder.
Figure 1-7 Circuit diagram of Manchester signal encoder.

1-3 : Experiment Items
Experiment 1: Unipolar and bipolar NRZ signal encode
Experiment 1-1: Unipolar NRZ signal encode
1. To implement a unipolar NRZ encode circuit as shown in figure 1-2 or refer to figure
DCT1-1 on GOTT DCT-6000-01 module.
2. Setting the frequency of function generator to 1 kHz TTL signal and connect this
signal to the Data I/P. Then observe on the output waveform by using oscilloscope and record
the measured results in table 1-1.
3. According to the input signals in table 1-1, repeat step 2 and record the measured
results in table 1-1.
Experiment 1-2: Bipolar NRZ signal encode
1. To implement a bipolar NRZ signal encode circuit as shown in figure 1-3 or refer to
figure DCT1-1 on GOTT DCT-6000-01 module.
2. Setting the frequency of function generator to 1 kHz TTL signal and connect this
signal to the Data I/P. Then observe on the waveforms of TP1 and BIP-NRZ O/P by
using oscilloscope and record the measured results in table 1-2.
3. According to the input signals in table 1-2, repeat step 2 and record the measured
results in table 1-2.

Experiment 2 : Unipolar and Bipolar RZ signal encode
Experiment 2-1 : Unipolar RZ signal encode
1. To implement a unipolar RZ signal encode circuit as shown in figure 1-4 or refer to
figure DCT 1-2 on GOTT DCT-6000-01 module.
2. Setting the frequency of function generator to 2 kHz TTL signal and connect this
signal to the CLK I/P of figure DCT 1-2 and CLK at the left bottom. After that connect
the Data O/P at the left bottom to the Data I/P in figure DCT 1-2. Then observe on
the waveforms of CLK I/P, Data I/P and UNI-RZ O/P by using oscilloscope, and
record the measured results in table 1-3.
3. According to the input signals in table 1-3, repeat step 2 and record the measured
results in table 1-3.
4. Setting the frequency of function generator to 2 kHz TTL signal and connect
this signal to the CLK I/P in figure DCT 1-2. Then setting another frequency
of funct ion generator to 1 kHz TTL signal and connect this signal to the Data
I/P in figure DCT1-2. Then observe on the waveform o f CLK I/P, Data I/P
and UNI-RZ O/P by using oscilloscope, Hid record the measured results in table 1-4.
5. According to the input signals in table 1-4, repeat step 4 and record the measured results
in table 1-4.

Experiment 2-2 : Bipolar RZ signal encode
1. To implement a bipolar RZ signal encode circuit as shown in figure 5 or refer to figure
DCT1-2 on GOTT DCT-6000-01 module.
2. Setting the frequency of function generator to 2kHz TTL signal and connect this signal to
the CLK I/P in figure DCT1-2 and CLK at the left bottom. After that connect the Data
O/P at the left bottom to the Data I/P in figure DCT1-2. Then observe on the waveforms
of CLK I/P,Data I/P,TP1 and BIP-RZ O/P by using oscilloscope, and record the
measured results in table 1-5.
3. According to the input signals in table 1-5, repeat step 2 and record the measured results
in table 1-5.
4. Setting frequency of function generator to 2kHz TTL signal and connect this signal to the
CLK I/P in figure DCT1-2. Then setting another frequency of function generator to 1
kHz TTL signal and connect this signal to the Data I/P in figure DCT1-2. Then observe
on waveforms of CLK I/P, Data I/P, TP1 and BIP-RZ O/P by using oscilloscope, and
record the measured results in table 1-6.
5. According to the input signals in table 1-6, repeat step 4 and record the measured results
in table 1-6.
Experiment 3 : AMI signal encode
1. To implement an AMI signal encode circuit as shown in figure 1-6 or refer to figure
DCT 1-3 on GOTT DCT-6000-01 module.
2. Setting the frequency of function generator to 2 kHz TTL signal and connect this
signal to the CLK I/P in figure DCT 1-3 and CLK at the left bottom. After that connect the
Data O/P at the left bottom to the Data I/P in figure DCT1-3. Then observe on the
waveforms of CLK I/P, Data I/P, TP1, TP2, TP3, TP4, TP5 and AMI O/P by using
oscilloscope, and record the measured results in table 1-7.
3. According to the input signals in table 1-7, repeat step 2 and record the measured results in
table 1-7.
4. Setting the frequency of function generator to 2 kHz TTL signal and connect
this signal to the CLK I/P in figure DCT1-3. Then sett ing another frequency of
funct ion generator to 1 kHz TTL signal and connect this signal to the Data I/P in
figure DCT1-3. Then observe on the waveforms of CLK I/P,Data I/P, TP1, TP2 , TP3 ,
TP4 , TP5 and AMI O/P by using oscilloscope, and record the measured results in table 1-8.
5. According to the input signals in table 1-8, repeat step 4 and record the measured results in
table 1-8.

Experiment 4: Manchester signal encode
1. To implement a Manchester signal encode circuit as shown in figure 1-7 or refer to
figure DCT1-4 on GOTT DCT-6000-01 module.
2. Setting the frequency of function generator to 2 kHz TTL signal and connect
this signal to the CLK I/P in figure DCT 1-4 and CLK at the left bottom. After that
connect the Data O/P at the left bottom to the Data I/P in figure DCT1-4. Then observe
on the waveforms of CLK I/P, Data I/P and Manchester O/P by using oscilloscope,
and record the measured results in table 1-9.
3. According to the input signals in table 1-9, repeat step 2 and record the measured
results in table 1-9.
4. Setting the frequency of function generator to 2 kHz TTL signal and connect
this signal to the CLK I/P in figure DCT1-4. Then setting, another frequency of
funct ion generator to 1 kHz TTL signal and connect this signal to the Data I/P in
figure DCT 1-4. Then observe on the waveforms of CLK I/P, Data I/P and
Manchester O/P by using oscilloscope, and record the measured results in table 1-10.
5. According to the input signals in table 1-10, repeat step 4 and record the measured results
in table 1-10.

1-4 : Measured Results
Table 1-1: Measured results of UNI-NRZ signal encode.
Input Signal
Frequencies
(Data I/P)
Output Signal Waveforms
UNI-NRZ O/P
1 kHz
2kHz
5kHz
8kHz

Table 1-2 Measured results of BIP-NRZ signal encode.
Input Signal
Frequencies
(Data I/P)
Output Signal Waveforms
TP1 BIP-NRZ O/P
2 kHz
3.5 kHz
5kHz
7.5 kHz

Table 1-3 Measured results of UNI-RZ signal encode.
Input Signal
Frequencies
(Data I/P)
Output Signal Waveforms
CLK I/P Data I/P UNI-RZ O/P
2 kHz
3.5 kHz
5kHz
7.5 kHz

Table 1-4 Measured results of UNI-RZ signal encode.
Input Signal
Frequencies
Output Signal Waveforms
CLK I/P Data I/P CLK I/P Data I/P UNI-RZ O/P
2 kHz
1 kHz
3.5 kHz
1.5 kHz
5kHz
2.5 kHz
7.5 kHz
4 kHz

Table 1-5 Measured results of BIP-NRZ signal encode.
Input Signal
Frequencies (Clock
I/P)
Output Signal Waveforms
2 kHz
CLK I/P Data I/P
TP1 BIP-RZ O/P
5kHz
CLK I/P Data I/P
TP1 BIP-RZ O/P

Table 1-6 Measured results of BIP-NRZ signal encode.
Input Signal
Frequencies Output Signal Waveforms
CLK I/P DATA I/P
2 kHz
1 kHz
CLK I/P Data I/P
TP1 BIP-RZ O/P
5kHz
2.5 kHz
CLK I/P Data I/P
TP1 BIP-RZ O/P

Table 1-7 Measured results of AMI signal encode.
Input Signal
Frequencies (CLK I/P) Output Signal Waveforms
100 Hz
CLK I/P Data I/P
TP1 TP2
TP3 TP4
TP5 AMI O/P

Table 1-7 Measured results of AMI signal encode. (Continue)
Input Signal
Frequencies (CLK I/P) Output Signal Waveforms
500 Hz
CLK I/P Data I/P
TP1 TP2
TP3 TP4
TP5 AMI O/P

Table 1-8 Measured results of AMI signal encode.
Input Signal
Frequencies Output Signal Waveforms
CLK I/P Data I/P
100 Hz 50 Hz
CLK I/P Data I/P
TP1 TP2
TP3 TP4
TP5 AMI O/P

Table 1-8 Measured results of AMI signal encode. (continue)
Input Signal
Frequencies Output Signal Waveforms
CLK I/P Data I/P
500 Hz 250 Hz
CLK I/P Data I/P
TP1 TP2
TP3 TP4
TP5 AMI O/P

Table 1-9 Measured results of Manchester signal encode.
Input Signal
Frequencies (CLK I/P)
Output Signal Waveforms
CLK I/P Data I/P Manchester O/P
2 k
3 k
5 k
8 k

Table 1-10 Measured results of Manchester signal encode.
Input Signal
Frequencies
Output Signal Waveforms
CLK I/P Data I/P CLK I/P Data I/P Manchester O/P
2 kHz
1 kHz
3.5 kHz
1.5 kHz
5kHz
2.5 kHz
8 kHz
4 kHz

1-5 : Problem Discussion
1. Explain what are the common types of line coding ?
2. Explain how the unipolar and bipolar nonreturn-to-zero signals encode ?
3. Explain how the unipolar and bipolar return-to-zero signals encode ?
4. Explain how the AMI signal encodes ?
5. Explain how the Manchester signal encodes ?
6. Explain why do we need line coding ?