chapter 1, lab 1 chapter 1, lab 2 - amazon s3 · – it would be interesting to ask students to...
TRANSCRIPT

© E
RP
I
Rep
rodu
ctio
n pe
rmitt
ed s
olel
y fo
r cla
ssro
om u
se w
ith Observatory.
Observatory/Guide 11071-B XXV NOTES TO TEACHERS
NOTES TO TEACHERS
CHAPTER 1, LAB 1 – You may ask students to write their own protocol. – Use filtered apple juice instead of non-filtered apple juice to avoid pulp particles
in suspension. – Gel toothpastes with a whitening agent are particularly interesting to examine. – Transparent shampoos are usually solutions; opaque shampoos are usually colloids.
CHAPTER 1, LAB 2 – You may ask students to write their own protocol. – It would be interesting to ask students to prepare more than one solution, varying the
concentration each time. – Students may work in groups, then compare the colour of their solutions. – Fruit drink crystals are economical and widely available; they also are coloured. – Control solutions should be prepared the morning of the lab since they tend to
become discoloured. – Remind students that they must never taste a solution or any other substance found
in the lab.
CHAPTER 1, LAB 3 – You may ask students to write their own protocol. – Students may work in groups, then compare the colour of their solutions. – Fruit drink crystals are economical and widely available; they also are coloured. – Remind students that they must never taste a solution or any other substance found
in the lab.
CHAPTER 1, LAB 4 – You may ask students to write their own protocol. – It would be interesting to ask students to prepare more than one solution, varying the
concentration each time. – Concentrations may be predetermined. Students can then verify the validity of their
method by comparing the colour of their solution to that of the control solution. – Fruit drink crystals are economical and widely available; they also are coloured.

© E
RP
I R
epro
duct
ion
and
adap
tatio
n pe
rmitt
ed
sole
ly fo
r use
with
Observatory.
NOTES TO TEACHERS XXVI Observatory/Guide 11071-B
CHAPTER 1, LAB 5 – Fruit drink crystals are economical and widely available; they also are coloured. – Students may work in groups, then compare the colour of their solutions.
CHAPTER 1, LAB 6 – You may ask students to write their own protocol. – It would be opportune to have students calculate the solubility of other solid substances. – Students may work in groups, then compare their results. This way they will not have to
measure the solubility of all solids placed at their disposal.
CHAPTER 1, LAB 7 – Students may work in groups, then compare their results. – It would be interesting to ask students to measure the solubility of other solids in water
according to temperature (table salt, sugar, etc.).
CHAPTER 1, LAB 8 – You may ask students to write their own protocol. – You may replace p-dichlorobenzene by one of the following substances:
Substance Melting point (°C)
Acetamide 81.0
Acetanilide 114.0
Benzoic acid 122.4
Urea 132.7
– If the melting point of the substance selected is greater than 90°C, substituting glycerine for water in the beaker is advised.
– Ask students to record the temperature every minute during the experiment and copy data onto a diagram. They will be able to see the plateau that corresponds to the melting point of their substance.
CHAPTER 1, LAB 9 – You may ask students to write their own protocol. – Instead of water, another liquid such as methanol is a possible option.

© E
RP
I R
epro
duct
ion
and
adap
tatio
n pe
rmitt
ed
sole
ly fo
r use
with
Observatory.
Observatory/Guide 11071-B XXVII NOTES TO TEACHERS
CHAPTER 1, LAB 10 – You may ask students to write their own protocol. – Perforate the syringes before distributing them to students. Heat a nail and insert it into
the plunger so it stays at the 140-mL mark. A hole can also be made with a drill. – Ask students to calculate the density of several gases. – Students may work in groups. They may use different gases and compare their results. – Instead of bringing gas cylinders into the classroom, you may fill properly labelled solute
bags or latex balloons with the gases. Attach rubber tubing to the end of each bag or balloon and seal the tubing with a clamp. Students can collect gas samples by connecting their syringe to the other end of the tubing and opening the clamp.
– Students may be asked to perform some tests to identify the gases they are using (flaming splint test, glowing splint test, etc.).
– It is recommended to weigh the syringe upright so it doesn’t extend beyond the weighing pan.
CHAPTER 1, LAB 11 – You may ask students to write their own protocol. – It would be interesting to ask students to repeat the experiment for each liquid more than
once to verify the validity of results. – It would be interesting to redo the experiment with other liquids to diversify results. – You may suggest that students use a dropper to increase precision of volume
measurements.
CHAPTER 1, LAB 12 – You may ask students to write their own protocol. – It is recommended to insert a rubber stopper into the graduated cylinder before adding
the test solid to absorb its impact and avoid cracking the graduated cylinder. – It is possible to use an overflow can to measure the density of the solid. – It would be interesting to ask students to measure the density of more than one solid. – Students may work in groups. They can select different solids and compare their results.
CHAPTER 1, LAB 13 – The liquid mixture suggested for this lab is a mixture of equal parts methanol and water. – The hot plate can become very hot. Caution students.

© E
RP
I R
epro
duct
ion
and
adap
tatio
n pe
rmitt
ed
sole
ly fo
r use
with
Observatory.
NOTES TO TEACHERS XXVIII Observatory/Guide 11071-B
CHAPTER 1, LAB 14 – You may ask students to write their own protocol. – Products may be given to students in dropper bottles or transfer pipettes. – It would be interesting to test a solution of sugar water (neutral), rubbing alcohol (neutral),
vinegar (acidic) or black coffee (alkaline).
CHAPTER 1, LAB 15 – It is strongly recommended to ask students to write their own protocol. – It is possible to give all students the same unknown substance or to vary the unknown
substances. – The table in Appendix 1 of the textbook (Properties of common substances) can be used
to select test substances and help validate experiment results. – To perforate the plunger of a syringe, heat a nail and insert it into the plunger so it stays at
the 140 mL mark. A hole can also be made with a drill. It is best to perforate the syringes before distributing them to students.
– Remind students how to smell gas safely. If necessary, ask students to read page 4 of the Toolbox.
CHAPTER 2, LAB 16 – The hot plate can become very hot. Caution students.
CHAPTER 2, LAB 17 – You may ask students to prepare the plasticine themselves. Entering “plasticine recipe”
into a search engine will lead to a number of links. – You may ask students to weigh the marbles.
CHAPTER 2, LAB 18 – It is important that the thermometer does not touch the beaker to avoid distorting results. – A pure substance other than distilled water can be used in this experiment: methanol,
glycerine, etc.

© E
RP
I R
epro
duct
ion
and
adap
tatio
n pe
rmitt
ed
sole
ly fo
r use
with
Observatory.
Observatory/Guide 11071-B XXIX NOTES TO TEACHERS
CHAPTER 2, LAB 19 – You may ask students to write their own protocol. – Other soluble substances can be used. The table in Appendix 1 of the textbook
(Properties of common substances) may be used to select substances for students. Also refer to the two tables below.
– A container made of insulating material such as polystyrene should be used to minimize heat loss.
– It is suggested to stir the solution with a thermometer to limit heat exchange. However, it is important to ensure students stir gently to avoid cracking the thermometer.
– Temperature variations may be barely perceptible. Students may then be asked to redo the experiment with a greater amount of solute.
– Here are two tables on the energy associated with dissolution of certain substances.
Substances that absorb energy during dissolution
Substance Molecular formula Possible use Heat absorbed (J/g)
Sodium chloride NaCl Table salt 66.7
Potassium chlorate KClO3 Fireworks 337.8
Potassium iodide KI Starch detection 122.9
Sodium nitrate NaNO3 Fertilizer 241.2
Ammonium chloride NH4Cl Fertilizer 276.7
Substances that release energy during dissolution
Substance Molecular formula Possible use Heat released (J/g)
Copper sulphate CuSO4 Fungicide 424.2
Potassium hydroxide KOH Soaps 1021.3
Lithium bromide LiBr Drying of substances 563.1
Sodium hydroxide NaOH Cleaning products 1040
Calcium chloride CaCl2 Dehydrating agent 746
© E
RP
I R
epro
duct
ion
and
adap
tatio
n pe
rmitt
ed
sole
ly fo
r use
with
Observatory.
NOTES TO TEACHERS XXX Observatory/Guide 11071-B
CHAPTER 2, LAB 20 – It is important to use small quantities of hydrogen because the reaction is explosive. Used
exactly as instructed here, it is safe. – Prefilled test tubes may be given to students.
CHAPTER 2, LAB 21 – It is recommended to provide students with the procedure. However, they may be asked
to create their own list of materials. – It is important to add salt to the water to facilitate the flow of electric current since water
alone is a poor conductor of electricity. – To save time, you may perform this lab as a demonstration.
CHAPTER 2, LAB 22 – Burners produce a very hot flame. Caution students. – It is recommended to carry out this experiment in two sessions. Ask students during the
first session to identify their crucible for use in the second session.
CHAPTER 2, LAB 23 – The six solutions may be prepared with a concentration of 0.1 mol/L.
CHAPTER 2, LAB 24 – Caution students not to look directly at the light emitted by burning magnesium. – The three solutions may be prepared with a concentration of 0.1 mol/L. – In test A, NiCl2 must not be overheated because it may dehydrate completely or turn
yellow, leading students to mistakenly conclude that a chemical reaction has occurred. This product is green at the start because it contains water.
– NiCl2 may be replaced by copper sulphate CuSO4. However, make sure no CuSO4 comes into contact with magnesium powder since they interreact strongly.
CHAPTER 3, LAB 25 – Use glass syringes for this lab. Plastic syringes leak air and do not provide satisfactory
results. Aneroid gauges can be purchased at large hardware stores, pool retailers and plumbing centres.
– Because of the cost of glass syringes, you may wish to perform this lab as a demonstration.

© E
RP
I R
epro
duct
ion
and
adap
tatio
n pe
rmitt
ed
sole
ly fo
r use
with
Observatory.
Observatory/Guide 11071-B XXXI NOTES TO TEACHERS
CHAPTER 3, LAB 26 – You may ask students to write their own protocol. – A U-tube manometer can be made as follows: Secure tubing in the shape of a U onto a vertical surface. Place a sheet of graph paper under the tubing. Insert a piece of rubber tubing into one end of the U-tube. Insert a small funnel into the other end of the rubber tubing. Secure a flexible membrane (e.g. a piece of latex balloon) onto the mouth of the funnel
(see the illustration below).
CHAPTER 3, LAB 27 – You may ask students to write their own protocol. – It is possible to use different types of manometers to perform this experiment; e.g. U-tube
manometer, aneroid gauge, etc. There also is a device called a Boyle’s apparatus that can be placed on an overhead projector; this may be used in a demonstration to save time.
– If a pressure gauge is used, remind students to add atmospheric pressure to the data obtained.
– It is important to conduct this experiment quickly or the gas will evaporate.

© E
RP
I R
epro
duct
ion
and
adap
tatio
n pe
rmitt
ed
sole
ly fo
r use
with
Observatory.
NOTES TO TEACHERS XXXII Observatory/Guide 11071-B
CHAPTER 3, LAB 28 – This lab also may be executed when studying the cardiovascular system. – Electronic sphygmomanometers (blood pressure meters) are available instead of
traditional devices.
CHAPTER 4, LAB 29 – A large transparent plastic container may be used instead of a ripple tank. – To obtain better results in the second part, turn off all lights in the classroom.
CHAPTER 4, LAB 30 – None.
CHAPTER 4, LAB 31 – A spectrometer may replace the ray box and prism.
CHAPTER 4, LAB 32 – Secure the tape measure to the ground with masking tape or align three wooden 1-m
rulers end-to-end. This will facilitate movement of the sound meter. – The greatest challenge in this lab is to eliminate as much background noise as possible
(students, ventilation, circulation outside the classroom, etc.).
CHAPTER 4, LAB 33 – Mirrors are fragile. Instruct students to handle them with care. – Plasticine may substitute for the mirror support. – It would be best to turn off classroom lights to carry out this experiment.
CHAPTER 4, LAB 34 – You may ask students to write their own protocol. – It would be best to turn off classroom lights to carry out this experiment. – You may replace the ray box with a light bulb. – Place the light source as far away as possible from the lens to obtain the most rays
parallel to the main axis. – Lenses are fragile. Instruct students to handle them with care.

© E
RP
I R
epro
duct
ion
and
adap
tatio
n pe
rmitt
ed
sole
ly fo
r use
with
Observatory.
Observatory/Guide 11071-B XXXIII NOTES TO TEACHERS
CHAPTER 4, LAB 35 – Lenses are fragile. Instruct students to handle them with care. – Use a low-intensity light bulb to limit light in the classroom. – A lighted candle may be used instead of the light bulb. – It would be best to turn off classroom lights to carry out this experiment.
CHAPTER 4, LAB 36 – Lenses are fragile. Instruct students to handle them with care. – Use a low-intensity light bulb to limit light in the classroom. – A lighted candle may be used instead of the light bulb. – It would be best to turn off classroom lights to carry out this experiment.
CHAPTER 5, LAB 37 – Commercial preparations of cells coloured with methyl green are available. – Microscope slides and cover slips are fragile. Instruct students to handle them with care.
CHAPTER 5, LAB 38 – Microscope slides and cover slips are fragile. Instruct students to handle them with care. – Onions may be minced ahead of time. – If necessary, hints may be given to students so they can answer question 1 of “Reflecting
on the lab technique.” One hint is that soap dissolves fat and the cell membrane is composed mainly of fat. Students also may refer to Chapters 1 and 2 of the textbook—specifically page 20 on the separation of mixtures and page 52 on how to recognize a precipitate.
– The double-helix structure of DNA cannot be observed with the light microscope.
CHAPTER 5, LAB 39 – Microscope slides and cover slips are fragile. Instruct students to handle them with care. – Commercial preparations of slides showing onion cells in each phase of mitosis
are available. – Set and colour onion roots as follows: 1. Place an onion bulb in a 250-mL beaker filled with water so the roots are submerged.
Allow the roots to develop for a few days.

© E
RP
I R
epro
duct
ion
and
adap
tatio
n pe
rmitt
ed
sole
ly fo
r use
with
Observatory.
NOTES TO TEACHERS XXXIV Observatory/Guide 11071-B
2. Cut off 3 to 4 mm of roots. Set the roots by immersing them in a mixture of acetic alcohol (3 parts 95% ethanol and 1 part glacial acetic acid). The objective is to freeze root cells in their current phase of mitosis. Since the meristems (uppermost part of the roots) are a stage of intense miotic activity, they need to be set properly so the many phases can be observed.
3. To colour the roots, pour 50 mL of aceto-carmine solution into a 125-mL Erlenmeyer flask, then add the set and meristems and boil them for 1 to 2 minutes.
– Prepare aceto-carmine solution as follows: 1. Add a pinch of carmine alum to 50 mL of 50% v/v acetic acid. 2. Boil for 5 minutes to obtain a saturated solution. 3. Let the solution cool, then filter it. – Students may be asked to compare the number of cells in cell division to those
in interphase.
CHAPTER 5, LAB 40 – You may ask students to write their own protocol. – Microscope slides and cover slips are fragile. Instruct students to handle them with care. – To facilitate the observation process, a series of photos may be prepared for students to
refer to as needed.
CHAPTER 6, LAB 41 – Prepare solutions as follows:
Solution Preparation
Glucose solution – Dissolve 5 g of glucose in 250 mL distilled water.
Lactose solution – Dissolve 5 g of lactose in 250 mL of distilled water.
Fehling’s solution A
– A commercial preparation of this product is available. Or it can be prepared as follows: • Dissolve 34.6 g of copper sulphate (CuSO4 • 5H2O) in 500 mL
of distilled water. Filter prior to use.
Fehling’s solution B
– A commercial preparation of this product is available. Or it can be prepared as follows: • Dissolve 125 g of sodium and potassium bitartrate and 173 g of
potassium hydroxide (KOH) in 500 mL of distilled water. – This mixture cannot be preserved.
– Since the quantity of products used is minimal, a spot plate may be used instead of test tubes.
© E
RP
I R
epro
duct
ion
and
adap
tatio
n pe
rmitt
ed
sole
ly fo
r use
with
Observatory.
Observatory/Guide 11071-B XXXV NOTES TO TEACHERS
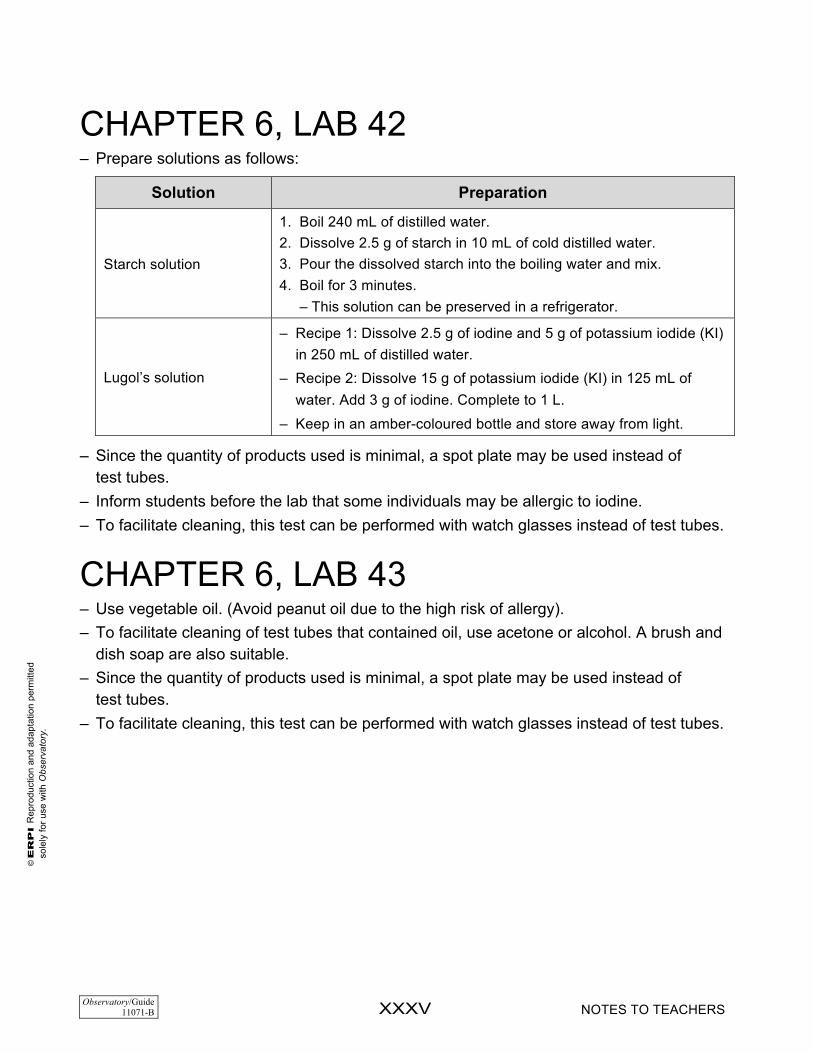
CHAPTER 6, LAB 42 – Prepare solutions as follows:
Solution Preparation
Starch solution
1. Boil 240 mL of distilled water. 2. Dissolve 2.5 g of starch in 10 mL of cold distilled water. 3. Pour the dissolved starch into the boiling water and mix. 4. Boil for 3 minutes.
– This solution can be preserved in a refrigerator.
Lugol’s solution
– Recipe 1: Dissolve 2.5 g of iodine and 5 g of potassium iodide (KI) in 250 mL of distilled water.
– Recipe 2: Dissolve 15 g of potassium iodide (KI) in 125 mL of water. Add 3 g of iodine. Complete to 1 L.
– Keep in an amber-coloured bottle and store away from light.
– Since the quantity of products used is minimal, a spot plate may be used instead of test tubes.
– Inform students before the lab that some individuals may be allergic to iodine. – To facilitate cleaning, this test can be performed with watch glasses instead of test tubes.
CHAPTER 6, LAB 43 – Use vegetable oil. (Avoid peanut oil due to the high risk of allergy). – To facilitate cleaning of test tubes that contained oil, use acetone or alcohol. A brush and
dish soap are also suitable. – Since the quantity of products used is minimal, a spot plate may be used instead of
test tubes. – To facilitate cleaning, this test can be performed with watch glasses instead of test tubes.
© E
RP
I R
epro
duct
ion
and
adap
tatio
n pe
rmitt
ed
sole
ly fo
r use
with
Observatory.
NOTES TO TEACHERS XXXVI Observatory/Guide 11071-B
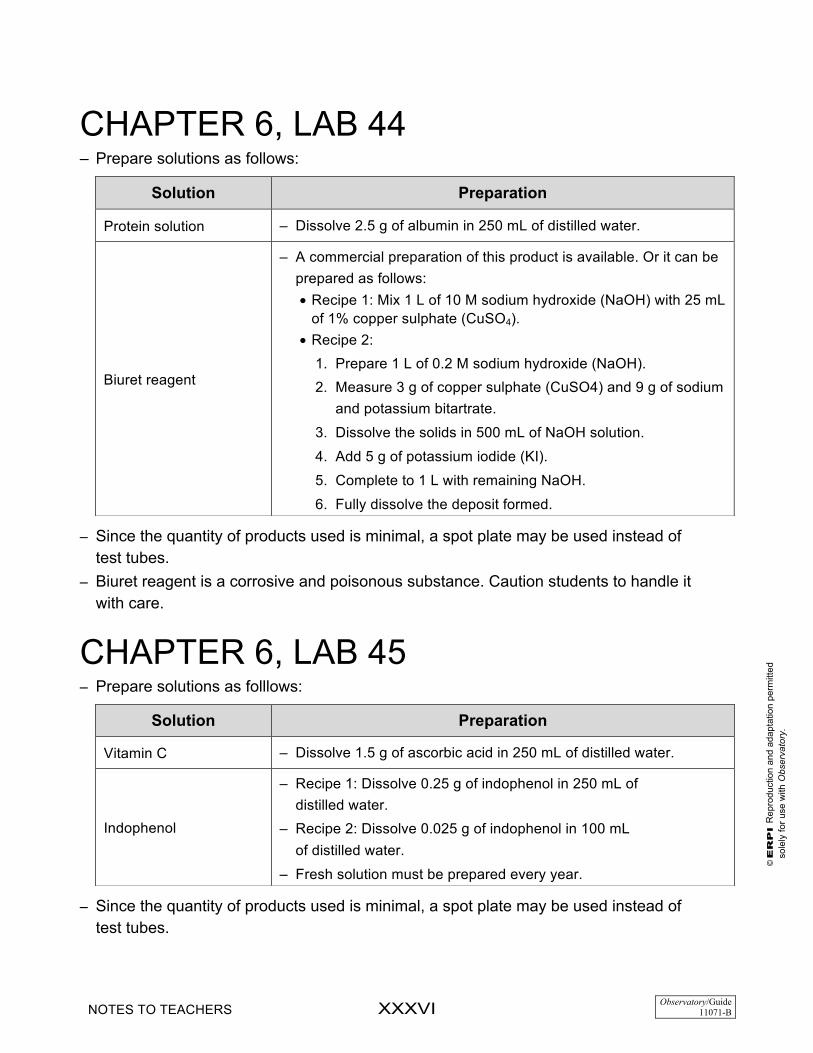
CHAPTER 6, LAB 44 – Prepare solutions as follows:
– Since the quantity of products used is minimal, a spot plate may be used instead of test tubes.
– Biuret reagent is a corrosive and poisonous substance. Caution students to handle it with care.
CHAPTER 6, LAB 45 – Prepare solutions as folllows:
– Since the quantity of products used is minimal, a spot plate may be used instead of test tubes.
Solution Preparation
Protein solution – Dissolve 2.5 g of albumin in 250 mL of distilled water.
Biuret reagent
– A commercial preparation of this product is available. Or it can be prepared as follows: • Recipe 1: Mix 1 L of 10 M sodium hydroxide (NaOH) with 25 mL
of 1% copper sulphate (CuSO4). • Recipe 2:
1. Prepare 1 L of 0.2 M sodium hydroxide (NaOH). 2. Measure 3 g of copper sulphate (CuSO4) and 9 g of sodium
and potassium bitartrate. 3. Dissolve the solids in 500 mL of NaOH solution. 4. Add 5 g of potassium iodide (KI). 5. Complete to 1 L with remaining NaOH. 6. Fully dissolve the deposit formed.
Solution Preparation
Vitamin C – Dissolve 1.5 g of ascorbic acid in 250 mL of distilled water.
Indophenol
– Recipe 1: Dissolve 0.25 g of indophenol in 250 mL of distilled water.
– Recipe 2: Dissolve 0.025 g of indophenol in 100 mL of distilled water.
– Fresh solution must be prepared every year.

© E
RP
I R
epro
duct
ion
and
adap
tatio
n pe
rmitt
ed
sole
ly fo
r use
with
Observatory.
Observatory/Guide 11071-B XXXVII NOTES TO TEACHERS
CHAPTER 6, LAB 46 – Prepare solutions as folllows:
– It is important that the water used is demineralized. – Since the quantity of products used is minimal, a spot plate may be used instead of test
tubes. A coloured spot plate will be needed because results will not be visible with a white spot plate.
CHAPTER 6, LAB 47 – Prepare solutions as follows:
– It is important that the water used is demineralized. – Since the quantity of products used is minimal, a spot plate may be used instead of
test tubes.
CHAPTER 6, LAB 48 – You may have students work at different stations to avoid having to give each team all
the indicators. – Tests may be performed on spot plates instead of test tubes. A glass stirring rod or
toothpicks will be needed to stir the mixture once Sudan IV is added. This way requires less rinsing and reduces the quantity of test substances and reagents used.
– Since Sudan IV and Lugol’s solution are difficult to clean, both tests can be conducted with watch glasses instead of test tubes.
– Biuret reagent is a corrosive and poisonous substance. Caution students to handle it with care.
– To obtain results described in the answer key, use a regular soft drink instead of a diet version—that is, one that has not been sweetened with aspartame or another sugar substitute.
Solution Preparation
Sodium chloride – Dissolve 1.5 g of table salt (NaCl) in 250 mL of distilled water.
Silver nitrate – Dissolve 4 g of AgNO3 in 250 mL of distilled water.
– Keep in an amber-coloured bottle and store away from light.
Solution Preparation
Calcium chloride – Dissolve 1.5 g of CaCl2 in 250 mL of distilled water.
Ammonium oxalate – Dissolve 1.0 g of ammonium oxalate in 250 mL of distilled water.

© E
RP
I R
epro
duct
ion
and
adap
tatio
n pe
rmitt
ed
sole
ly fo
r use
with
Observatory.
NOTES TO TEACHERS XXXVIII Observatory/Guide 11071-B
– To make a rice-derived solution, boil rice in water for 10 minutes. Use only the cooking water.
– Beware of allergy risks when selecting test substances. Ask students before undertaking this lab. For example, avoid use of peanut oil. Some individuals also may be allergic to the iodine in Lugol’s solution.
– Prepare indicators as follows:
Solution Preparation
Fehling's solutions
– A commercial preparation of this product is available. Or it can be prepared as follows: • Solution A: Dissolve 34.6 g of copper sulphate (CuSO4 • 5H2O)
in 500 mL of distilled water. Filter prior to use. • Solution B: Dissolve 125 g of sodium and potassium bitartrate
and 173 g of potassium hydroxide (KOH) in 500 mL of distilled water.
– Do not mix solutions A and B prior to use.
Lugol’s solution
– Recipe 1: Dissolve 2.5 g of iodine and 5 g of potassium iodide (KI) in 250 mL of distilled water.
– Recipe 2: Dissolve 15 g of potassium iodide (KI) in 125 mL of water. Add 3 g of iodine. Complete to 1 L.
– Keep in an amber-coloured bottle and store away from light.
Sudan IV – Sudan IV particles can be purchased at chemical and food product suppliers.
Biuret reagent
– A commercial preparation of this product is available. Or it can be prepared as follows: • Recipe 1: Mix 1 L of 10 M sodium hydroxide (NaOH) with 25 mL
of 1% copper sulphate (CuSO4). • Recipe 2:
1. Prepare 1 L of 0.2 M sodium hydroxide (NaOH). 2. Measure 3 g of copper sulphate (CuSO4) and 9 g of sodium
and potassium bitartrate. 3. Dissolve the solid in 500 mL of NaOH solution. 4. Add 5 g of potassium iodide (KI). 5. Complete to 1 L with remaining NaOH. 6. Fully dissolve the deposit formed.
Indophenol
– Recipe 1: Dissolve 0.25 g of indophenol in 250 mL of distilled water.
– Recipe 2: Dissolve 0.025 g of indophenol in 100 mL of distilled water.
– Fresh solution must be prepared every year.
Silver nitrate – Dissolve 4 g of AgNO3 in 250 mL of distilled water. – Keep in an amber-coloured bottle and store away from light.
Ammonium oxalate – Dissolve 1.0 g of ammonium oxalate in 250 mL of distilled water.
© E
RP
I R
epro
duct
ion
and
adap
tatio
n pe
rmitt
ed
sole
ly fo
r use
with
Observatory.
Observatory/Guide 11071-B XXXIX NOTES TO TEACHERS
CHAPTER 6, LAB 49 – Instead of giving a series of saltshakers to each team of students, you may prepare four or
five series for the entire class. – To facilitate the rating of results, suggest that students first taste maltose since it is in the
medium range. It then can be used as a reference when comparing the tastes of the other carbohydrates.
CHAPTER 6, LAB 50 – To save time, you may cook the macaroni in advance, collect part of the cooking liquid,
and crush the other part. – Artificial saliva: Commercial preparations of amylase can be used as artificial saliva.
Pancreatin also can be purchased and is less expensive than purified amylase. – Prepare Lugol’s solution as follows:
• Recipe 1: Dissolve 2.5 g of iodine and 5 g of potassium iodide (KI) in 250 mL of distilled water.
• Recipe 2: Dissolve 15 g of potassium iodide (KI) in 125 mL of water. Add 3 g of iodine. Complete to 1 L.
– Keep in an amber-coloured bottle and store away from light. – If necessary, show students how to avoid cross-contamination when using spot plates.
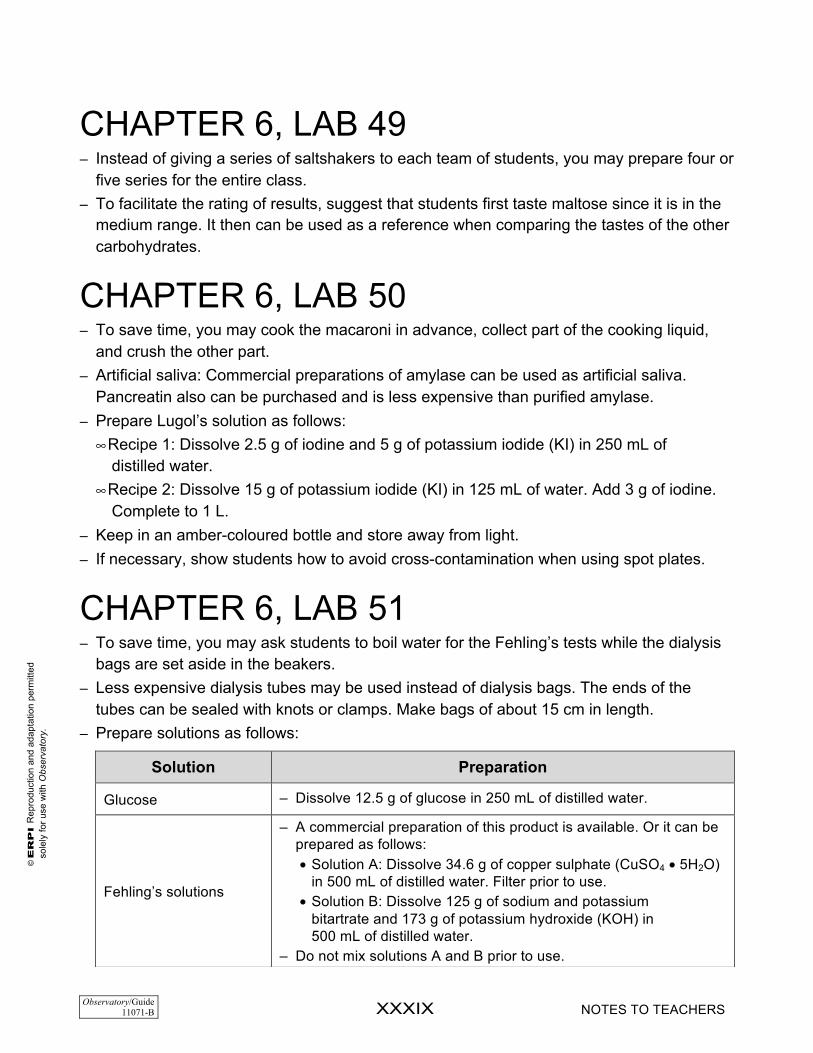
CHAPTER 6, LAB 51 – To save time, you may ask students to boil water for the Fehling’s tests while the dialysis
bags are set aside in the beakers. – Less expensive dialysis tubes may be used instead of dialysis bags. The ends of the
tubes can be sealed with knots or clamps. Make bags of about 15 cm in length. – Prepare solutions as follows:
Solution Preparation
Glucose – Dissolve 12.5 g of glucose in 250 mL of distilled water.
Fehling’s solutions
– A commercial preparation of this product is available. Or it can be prepared as follows: • Solution A: Dissolve 34.6 g of copper sulphate (CuSO4 • 5H2O)
in 500 mL of distilled water. Filter prior to use. • Solution B: Dissolve 125 g of sodium and potassium
bitartrate and 173 g of potassium hydroxide (KOH) in 500 mL of distilled water.
– Do not mix solutions A and B prior to use.

© E
RP
I R
epro
duct
ion
and
adap
tatio
n pe
rmitt
ed
sole
ly fo
r use
with
Observatory.
NOTES TO TEACHERS XL Observatory/Guide 11071-B
CHAPTER 6, LAB 52 – Choose a colourless dishwashing liquid. – Avoid peanut oil due to the high risk of allergy. – To facilitate cleaning, use a brush and dish soap.
CHAPTER 6, LAB 53 – Steel wool is widely available in stores. – Do not use a stainless steel type as it is unoxydizable.
CHAPTER 6, LAB 54 – This lab is redundant if students have completed LES11 or will do so at a later date. – To save time, calibrate plastic bottles in advance. In this case, a 100-mL graduated
cylinder and a marker will not be required. – The lung capacity of a healthy young male averages 4800 mL; that of a healthy young
female averages 3100 mL. – Use two bottles if one of 5 mL or more cannot be found. In this case, the student with the
role of experimenter will have to switch the flexible tubing from one bottle to the other when required.
– To avoid any air leaks, test subjects may be asked to pinch their nose or use a nose plug. – To save time, you may calibrate the bottles at every 250 mL for the first 3 litres, then at
100 mL for the remaining 2 litres.
Starch solution
1. Boil 240 mL of distilled water. 2. Dissolve 2.5 g of starch in 10 mL of cold distilled water. 3. Pour the dissolved starch into the boiling water and mix. 4. Boil for 3 minutes. – This solution can be preserved in a refrigerator.
Lugol’s solution
– Recipe 1: Dissolve 2.5 g of iodine and 5 g of potassium iodide (KI) in 250 mL of distilled water.
– Recipe 2: Dissolve 15 g of potassium iodide (KI) in 125 mL of water. Add 3 g of iodine. Complete to 1 L.
– Keep in an amber-coloured bottle and store away from light.

© E
RP
I R
epro
duct
ion
and
adap
tatio
n pe
rmitt
ed
sole
ly fo
r use
with
Observatory.
Observatory/Guide 11071-B XLI NOTES TO TEACHERS
CHAPTER 6, LAB 55 – Prior to performing this lab, advise students to wear running shoes to class so they can
jog in place. – This experiment may take place outside the classroom; for example, in the gymnasium. – Ask students about any existing health problems that could prevent them from jogging
in place. – The average respiratory rhythm at rest is 12 to 15 inhalations per minute or 6 to 8
inhalations every 30 seconds. – Instead of jogging in place, students may run up and down a staircase. – You may make arrangements with the Physical Education teacher for students to record
their data before, during and after a scheduled activity.
CHAPTER 6, LAB 56 – Refer students not familiar with using a microscope to page 23 of the Toolbox.
CHAPTER 6, LAB 57 – To obtain results as indicated in the answer key, the four samples must belong to the
following blood types: Sample 1: A + Sample 2: O + Sample 3: AB + Sample 4: B –
– Commercial kits of artificial blood samples and anti-A, anti-B and anti-Rh serums are available. Artificial blood samples provided in these kits may be from different blood types than the ones indicated in the lab. In this case, results and answers must be adjusted accordingly.
– To avoid cross-contamination, ask students to break their toothpicks into three or four pieces and use each piece only once.
CHAPTER 6, LAB 58 – It is best to use Petri dishes made of glass and not plastic since microscopes usually
are calibrated according to the refraction of light through a glass medium. – To save time, you may ask a lab technician to catch fish for the students. – It is best to buy goldfish with colourless tails.
© E
RP
I R
epro
duct
ion
and
adap
tatio
n pe
rmitt
ed
sole
ly fo
r use
with
Observatory.
NOTES TO TEACHERS XLII Observatory/Guide 11071-B
– The gauze covering fish must be kept moist during the experiment. Ask students to add water from the beaker with the dropper as needed. Also encourage students to conclude all their observations in less than 5 minutes.
– If necessary, remind students that the image of objects is inverted under a microscope. – Two pieces of gauze may be replaced by one piece measuring 4 cm ¥ 8 cm. Wrap the fish
with the tail extending out. In this way, the fish remains motionless and it is easy to keep its gills moist by wetting them every so often. To save time, a technician may catch the fish and wrap them in gauze.
– You may prepare two different jars, one labelled “Before” and the other “After”. Prior to the experiment, oxygenate the jars with an airstone and a canister of oxygen. Let gas bubble for about 30 seconds in the water. Place fish in the “Before” jar at the start of the lab and in the “After” jar once students are done.
CHAPTER 6, LAB 59 – Some individuals are allergic to latex. For these students, have available gloves made of a
material such as nitrile. – A grooved director may replace the glass stirring rod to reduce the risk of breaks and cuts.
CHAPTER 6, LAB 60 – Some individuals are allergic to latex. For these students, have available gloves made of a
material such as nitrile. – Renal pyramids are also called “Malpighian” pyramids and renal columns are also called
“Bertin” columns. – To limit the odour of urine emitted by the kidneys, place crystallizers filled with vinegar at
various locations of the classroom. – A grooved director may replace the glass stirring rod to reduce the risk of breaks and cuts.
CHAPTER 6, LAB 61 – To avoid plagiarism, you may distribute samples that are not identical so each team
obtains different results. – To limit the odour of urine emitted by the kidneys, place crystallizers filled with vinegar
at various locations of the classroom. – You may have students work at different stations to avoid having to give each team all
the indicators. – Remind students how to smell products safely. If necessary, refer students to page 4 of
the Toolbox. – If available, 13 mm ¥ 100 mm test tubes and No. 00 stoppers are adequate for this lab.

© E
RP
I R
epro
duct
ion
and
adap
tatio
n pe
rmitt
ed
sole
ly fo
r use
with
Observatory.
Observatory/Guide 11071-B XLIII NOTES TO TEACHERS
– To obtain results as described in the answer key, prepare urine samples as follows:
– Preparation of indicators:
CHAPTER 7, LAB 62 – Set up a location for the collection of the sheep brains at the end of the experiment. – Scalpels and knives are very sharp tools. Caution students to handle them with care.
Control solution – Add 3 g of table salt (NaCl), 5 g of urea and several drops of
yellow food colouring to 1 L of distilled water. – Prepare 4 litres of the solution.
Sample A – Add 50 g of glucose to 1 L of control solution.
Sample B – Do not add anything to the control solution.
Sample C – Add 50 g of glucose and 10 g of albumin to 1 L of control solution.
Sample D – Add blood cells provided by a butcher or red food colouring to 1 L of control solution.
Fehling's solutions
– A commercial preparation of this product is available. Or it can be prepared as follows: • Solution A: Dissolve 34.6 g of copper sulphate (CuSO4 • 5H2O)
in 500 mL of distilled water. Filter prior to use. • Solution B: Dissolve 125 g of sodium and potassium
bitartrate and 173 g of potassium hydroxide (KOH) in 500 mL of distilled water.
– Do not mix solutions A and B prior to use.
Sudan IV – Sudan IV particles can be purchased at chemical and food product suppliers.
Biuret reagent
– A commercial preparation of this product is available. Or it can be prepared as follows: • Recipe 1: Mix 1 L of 10 M sodium hydroxide (NaOH) with 25 mL
of 1% copper sulphate (CuSO4). • Recipe 2:
1. Prepare 1 L of 0.2 M sodium hydroxide (NaOH). 2. Measure 3 g of copper sulphate (CuSO4) and 9 g of
sodium and potassium bitartrate. 3. Dissolve the solids in 500 mL of NaOH solution. 4. Add 5 g of potassium iodide (KI). 5. Complete to 1 L with remaining NaOH. 6. Fully dissolve the deposit formed.
Silver nitrate – Dissolve 4 g of AgNO3 in 250 mL of distilled water. – Keep in an amber-coloured bottle and store away from light.

© E
RP
I R
epro
duct
ion
and
adap
tatio
n pe
rmitt
ed
sole
ly fo
r use
with
Observatory.
NOTES TO TEACHERS XLIV Observatory/Guide 11071-B
CHAPTER 7, LAB 63 – None.
CHAPTER 7, LAB 64 – Scalpels and knives are very sharp tools. Caution students to handle them with care. – Clean the specimens by removing some of the attached muscles and fat before
distributing them to students. Students also may proceed with the cleaning themselves. – Frozen eyes are less expensive, but they have certain disadvantages—the greatest
one being retinal detachment. This will appear as a gelatinous mass attached to the optic nerve.
– Set up a location for the collection of the eyes at the end of the experiment.
CHAPTER 7, LAB 65 – This lab should be performed in a dark classroom.
CHAPTER 7, LAB 66 – When verifying hot and cold sensations, make sure the copper wires (or the nails) are
maintained at the right temperature for the duration of the experiment. If necessary, ask students to re-immerse them in the water of the two beakers.
CHAPTER 7, LAB 67 – Ask students if they have any food allergies before undertaking this lab.
CHAPTER 7, LAB 68 – Scalpels and dissecting needles are very sharp tools. Caution students to handle them
with care. – Set up a location for the collection of the calf bones at the end of the experiment. – T-type dissecting pins may be used instead of toothpicks.
CHAPTER 8, LAB 69 – Make sure water used is at room temperature. – Dry baker’s yeast is available in most supermarkets. – To save time, you may prepare a yeast solution in advance. – Refer students not familiar with using a microscope to page 23 of the Toolbox.
© E
RP
I R
epro
duct
ion
and
adap
tatio
n pe
rmitt
ed
sole
ly fo
r use
with
Observatory.
Observatory/Guide 11071-B XLV NOTES TO TEACHERS
CHAPTER 8, LAB 70 – None.
CHAPTER 8, LAB 71 – Yeast used by bakers to make bread rise belongs to the genus Saccharomyces. – If students have not completed Lab 70, instruct them that the gas emitted by yeast is
carbon dioxide. – Glucose, fructose and mannose are carbohydrates that can be transformed by baker’s
yeast. Yeast contains an enzyme that breaks down saccharose into two subunits: glucose and fructose. This is why saccharose can also be used to activate yeast. With bread, amylase naturally contained in flour transforms starch into its subunit, glucose, when mixed with water. Starch is not tested in this lab since it is difficult to dissolve in water.
– Use of a lab apron or coat is strongly recommended when removing balloons from test tubes since they contain pressurized liquid that can spray students.
CHAPTER 8, LAB 72 – Yeast used by bakers to make bread rise belongs to the genus Saccharomyces. – It is preferable that students complete Lab 70 before this experiment. Otherwise, they
should be informed that the gas emitted by yeast is carbon dioxide. – If students overheat their mixture, it may bubble out of the beaker. – As explained in this lab, pasteurization kills nearly all of the yeast. Surviving yeast can
then multiply in the presence of sugar and produce a certain amount of carbon dioxide. Heating for more than 3 minutes would kill all of the yeast present.