ch06-a04750.qxd 8/3/06 11:02 am page 230 6 … · ch06-a04750.qxd 8/3/06 11:02 am page 235 • if a...
TRANSCRIPT

Cardiovascular Interventions
Case Study
6On a warm summer day in mid-June, a 3-year-old boy is found floating face down in the swimming pool
of an apartment complex. The baby-sitter pulled the child from the pool. She states the child was last seen
10 to 15 minutes ago. She does not know how to perform cardiopulmonary resuscitation (CPR). Your first
impression reveals a pale, motionless child with no obvious signs of breathing or circulation. Further
assessment reveals the child is unresponsive, apneic, and pulseless. The child’s chest is pale and his
extremities are blue. CPR is started and a cardiac monitor is applied. The monitor reveals asystole.
What should you do next?
Objectives
1. Identify appropriate parameters for performing infant and child CPR.
2. Describe the differences in proper hand position when performing
external chest compressions in infants and children.
3. State the proper ventilation and compression rates for infants and
children when performing CPR.
4. Describe the indications for vascular access.
5. Discuss age-appropriate vascular access sites for infants and children.
6. State the indications for intraosseous infusion (IOI).
7. Identify the landmarks for IOI.
8. Describe the advantages and disadvantages of peripheral venous,
central venous, and intraosseous vascular access.
9. Define defibrillation and synchronized cardioversion.
10. Describe proper placement of hand-held defibrillator paddles or self-
adhesive monitoring/defibrillation pads.
11. Identify indications for defibrillation and synchronized cardioversion.
12. Describe the procedure for defibrillation and synchronized cardio-
version.
13. For each of the following dysrhythmias, identify the energy levels
currently recommended and indicate if the shock should be delivered
using synchronized cardioversion or defibrillation.
Ch06-A04750.qxd 8/3/06 11:02 AM Page 230

a. Pulseless ventricular tachycardia (VT)/ventricular fibrillation (VF).
b. Supraventricular tachycardia (SVT).
14. Discuss the indications and procedure for transcutaneous pacing
(TCP).
15. List two examples of vagal maneuvers that may be used in the
pediatric patient.
Cardiovascular Interventions 231
Basic Life Support
• Assess/Alert/Attend.
• Assess responsiveness.
• Position the victim.
• Airway.
• Breathing.
• Circulation/Chest Compressions.
Assess• Assess the scene for safety. Is it safe to approach the victim? If the
scene is not safe, alert emergency medical services (EMS) for help and
make sure other bystanders are aware of existing danger.
• Assess the victim for life-threatening conditions and shout for help if
necessary. For example, “I need help here!”
• Assess and make a quick determination regarding the nature of the
emergency and the approximate age of the victim.
Alert and Attend• If you are alone and the patient collapsed suddenly, phone for help,
get an AED, and quickly return to the patient to begin CPR and use
the AED.
• If you are alone and find the patient unresponsive, perform CPR for
about 2 minutes (about 5 cycles). Briefly leave the patient to phone for
help and get an AED. Then return to the patient to resume CPR and use
the AED.
Assess Responsiveness• Quickly assess the child’s level of responsiveness by tapping the child
and speaking loudly, “Are you OK?”
• If head or neck trauma is suspected, do not shake the child to avoid
spinal injury.
• If the child is unresponsive but breathing, call EMS to facilitate
transport of the child as rapidly as possible to an appropriate facility.
• The child with respiratory distress should be permitted to remain in the
position he/she finds most comfortable in order to maintain patency of
the partially obstructed airway.
Basic Life Support (BLS)skill components:
According to the 2005resuscitation guidelines, aninfant is less than 1 year of age.A child is considered 1 to 12 to14 years of age. Some hospitalsmay prefer to consider the ageof a child from 1 to 16 to 18years of age.
Ch06-A04750.qxd 8/3/06 11:02 AM Page 231

232 Pediatric Advanced Life Support Study Guide
Position the Victim• Positioning or moving a victim may be necessary if:
• You find an unresponsive victim lying face down.
• You must momentarily leave a breathing victim unattended.
• The victim is breathing but unresponsive.
• The victim is vomiting or has debris in his or her mouth.
• The victim’s life is in immediate danger in his or her current location.
• The following techniques are suggested for repositioning or moving a
victim:
• If you are alone and the victim is an unresponsive child:
•• Kneel at the victim’s waist.
•• Attempt to roll the victim as a single unit. Grasp the victim’s oppo-
site shoulder and opposite hip and roll the victim toward you.
•• As soon as movement begins, remove your hand from the
victim’s shoulder and support his or her head and neck until the
victim is flat on his or her back on a flat, hard surface, such as a
sturdy table, the floor, or the ground.
• If an assistant is available, one person should stabilize the head and
neck while the other responder rolls the victim’s body. Roll the
victim’s body as a single unit.
• If the victim is an infant and trauma is not suspected, carry the infant
with his or her head in your hand, torso supported by your forearm,
and the infant’s legs straddling your elbow.
• If the child is breathing and trauma to the head or neck is not
suspected, place the child in the recovery position.
• Kneel at the child’s waist.
• Position the child’s arm that is closest to you up and away from the
child’s side.
• Bend the child’s leg that is opposite you upward.
• Grasp the child’s hip and shoulder and roll him or her toward you,
resting the child’s head on his or her extended arm. The child’s bent
leg should help keep him or her from rolling.
• If the child is to be left in this position for an extended period,
alternate the child’s position to the opposite side every 30 minutes.
Continue to monitor airway, breathing, and circulation.
A = AirwayThe tongue is the most common cause of airway obstruction in the
unresponsive pediatric victim. Because the tongue is attached to the lower
jaw, displacing the jaw forward lifts the tongue away from the back of the
throat, opening the airway.
• Kneel beside the victim.
Ch06-A04750.qxd 8/3/06 11:02 AM Page 232

• Place one hand on the child’s forehead. Place the fingers of your other
hand on the bony part of the child’s chin. Tilt the child’s head back and
open the mouth (head tilt–chin lift maneuver).
• If you suspect a neck or spinal injury, lift the child’s jaw without tilting
the head (jaw thrust without head tilt maneuver).
B = Breathing• Determine if the infant or child is breathing (assess for no more than
10 seconds).
• LOOK for rise and fall of the chest and abdomen.
• LISTEN for exhaled air.
• FEEL for exhaled air.
• If the patient is breathing, maintain a patent airway.
• If the patient is not breathing or if breathing is inadequate:
• Remove any obvious airway obstruction.
• Begin rescue breathing while maintaining a patent airway with a
chin lift or jaw thrust without head tilt.
• Deliver two breaths (1 second per breath) with sufficient volume to
cause gentle chest rise. Allow for exhalation between breaths.
C = Circulation• Check for a pulse for up to 10 seconds. In infants, assess the brachial
or femoral pulse. Assess the carotid pulse in children older than
1 year.
• If a pulse is present but the infant or child is not breathing, give rescue
breaths at a rate of one breath every 3 to 5 seconds (a rate of 12 to 20
per minute) until breathing resumes.
• If adequate breathing resumes and head or neck trauma is not
suspected, place the child in the recovery position.
• Begin chest compressions if there is no pulse or if the heart rate is less
than 60 beats per minute with signs of poor perfusion.
Chest Compressions: Infant• Imagine a line between the nipples. Place the flat part of your middle
and ring fingers about one finger’s width below this imaginary line
(Figure 6-1).
• Press down on the sternum and deliver compressions at a rate of
about 100 per minute. Apply firm pressure, depressing the sternum
about 1/3 to 1/2 the depth of the chest (about 1/2 to 1 inch). Do not apply
pressure over the bottom tip of the sternum (xiphoid process) or over
the upper abdomen.
• After 30 compressions, tilt the head, lift the chin, and deliver two
breaths (or, if trauma is suspected, use the jaw thrust without head tilt
maneuver).
Cardiovascular Interventions 233
Ch06-A04750.qxd 8/3/06 11:02 AM Page 233

• Continue compressions and breaths in a ratio of 30:2 until the infant
shows obvious signs of life, advanced life support personnel arrive and
take over, you are too exhausted to continue, or a physician instructs
you to stop.
Chest Compressions: Child• Find the lower half of the sternum (center of the chest between the
nipples) and place the heel of one hand there (Figure 6-2). Using the
heel of one hand, with the second hand on top (adult CPR technique)
is also acceptable.
• Position yourself directly over the child’s chest. With your arms straight
and your elbows locked, press down on the sternum and deliver
compressions at a rate of approximately 100 per minute. Apply firm
pressure, depressing the sternum about 1/3 to 1/2 the depth of the chest
(about 1 to 11/2 inches). Do not apply pressure over the bottom tip of
the sternum or over the upper abdomen.
• After 30 compressions, tilt the head, lift the chin, and deliver two
breaths (or, if trauma is suspected, use the jaw thrust without head tilt
maneuver).
• Continue compressions and breaths in a ratio of 30:2 until the victim
shows obvious signs of life, advanced life support personnel arrive and
take over, you are too exhausted to continue, or a physician instructs
you to stop.
• If an automated external defibrillator (AED) is available, attach the
device and follow the machine’s instructions/prompts.
234 Pediatric Advanced Life Support Study Guide
Figure 6-1 Locating finger position for infant chest compression.
Ch06-A04750.qxd 8/3/06 11:02 AM Page 234

Infant and Child CPR: Two RescuersEMS professionals usually work in teams of at least two and arrive
simultaneously on the scene of an emergency. Typically, one rescuer
establishes unresponsiveness, assesses and opens the airway, and
proceeds with the indicated care. The other rescuer quickly prepares
equipment such as suction, oxygen, and ventilation devices. The second
rescuer (or third rescuer when available) also performs external chest
compressions when indicated. Whenever two rescuers are present and
are not responding EMS professionals, one rescuer should provide CPR
while the second rescuer activates EMS.1
CPR Performed by Two (or More) Rescuers
• Establish unresponsiveness.
• Rescuer no. 1
• Open the airway (head tilt–chin lift or jaw thrust without head tilt
maneuver).
• Look, listen, and feel for breathing.
• Give two breaths (1 second each) if breathing is absent or
inadequate. Be sure the chest rises with each breath and allow for
exhalation between breaths.
• Check for a pulse. Assess the brachial or femoral pulse in infants.
Assess the carotid pulse in a child.
Cardiovascular Interventions 235
Figure 6-2 Locating hand position for child chest compression.
Ch06-A04750.qxd 8/3/06 11:02 AM Page 235

• If a pulse is present but the infant or child is not breathing, give
rescue breaths at a rate of one breath every 3 to 5 seconds (a rate
of approximately 12 to 20 per minute) until breathing resumes.
• Rescuer no. 2
• If no pulse is present or if the heart rate is less than 60 beats per
minute with signs of poor perfusion, perform chest compressions.
•• For an infant, encircle the chest with both hands and compress
the sternum between your opposing thumbs (or use the finger
position previously described for single-rescuer infant CPR) at a
rate of about 100 per minute. Apply firm pressure, depressing the
sternum about 1/3 to 1/2 the depth of the chest. Your thumbs
should be positioned about one finger’s width below the nipple
line (Figure 6-3).
•• For a child, use the same technique used for single-rescuer
child CPR at a rate of about 100 per minute. Apply firm pressure,
depressing the sternum 1/3 to 1/2 the depth of the chest.
•• Deliver 15 chest compressions, pausing for the breaths delivered
by rescuer no. 1. Once an advanced airway is in place, it is not
necessary to pause for a breath.� Do not apply pressure over the bottom tip of the sternum or
over the upper abdomen.
• Rescuer no. 1 should provide oxygen by means of a pediatric bag-valve
mask device or CPR mask.
• Assess the pulse after about 2 minutes of CPR. If there is still no pulse,
continue CPR with cycles of 15 compressions to 2 breaths. Rescuer no.
1 should periodically check the brachial or femoral pulse (Table 6-1).
236 Pediatric Advanced Life Support Study Guide
Figure 6-3 Two-rescuer infant cardiopulmonary resuscitation, twothumb–encircling hands technique.
5 cycles of CPR is about 2minutes.
Once an advanced airway is inplace, do not pause chestcompressions for a breath. Therate of ventilations should thenchange to 8 to 10/minutes.
Ch06-A04750.qxd 8/3/06 11:02 AM Page 236

Cardiovascular Interventions 237
• Maintain hydration.
• Restore fluid and electrolyte balance.
• Provide fluids for resuscitation.
• Administration of medications, volume expanders, blood and blood
components, maintenance solutions.
• Obtain venous blood specimens for laboratory analysis.
• In the management of cardiopulmonary arrest and decompensated
shock, the preferred vascular access site is the largest, most readily
accessible vein.
• If no intravenous (IV) line is in place at the onset of a cardiac arrest,
attempt to establish vascular access using a site that will not
interrupt resuscitation efforts.
• If a central line is in place when an arrest occurs, it should be used
for drug administration during the resuscitation effort.
• The preferred IV solutions in cardiac arrest are normal saline or
lactated Ringer’s solution. Large volumes of dextrose-containing
solutions should not be infused because hyperglycemia may induce
osmotic diuresis, produce or aggravate hyperkalemia, and worsen
ischemic brain injury.
Advantages• Effective route for fluid and medication administration.
• Does not require interruption of resuscitation efforts.
Vascular Access
TABLE 6-1 Summary of Basic Life Support Interventions
Infant Child Adult
Age Younger than 1 y 1 to 12 to 14 y Older than 12 to 14 y
Ventilation rate One breath every 3 to 5 sec One breath every 3 to 5 sec One breath every 5 to sec(12 to 20 breaths/min) (12 to 20 breaths/min) (10 to 12 breaths/min)
Assess pulse Brachial or femoral Carotid Carotid
Compress with Two fingers (one rescuer) or Heel of 1 hand; heels of Heels of two handstwo thumbs encircling two hands (adult chest (two rescuers) technique) acceptable
Compression depth 1/3 to 1/2 depth of chest 1/3 to 1/2 depth of chest 11/2 to 2 inches(1/2 to 1 inch) (1 to 11/2 inches)
Compression rate About 100/min About 100/min About 100/min
Compression to 1 rescuer = 30:2 1 rescuer = 30:2 1 or 2 rescuers = 30:2ventilation ratio 2 rescuers = 15:2 2 rescuers = 15:2
Indications for VascularAccess
General Principles
Peripheral Venous Access
Ch06-A04750.qxd 8/3/06 11:02 AM Page 237

238 Pediatric Advanced Life Support Study Guide
• Easier to learn than central venous access techniques.
• If IV attempt unsuccessful, site easily compressible to reduce bleeding.
• Fewer complications than central venous access.
Disadvantages• In circulatory collapse, peripheral veins may be absent or difficult to
access.
• Small vessel diameter.
• Greater distance from the central circulation.
• Should be used only for administration of isotonic solutions;
hypertonic or irritating solutions may cause pain and phlebitis.
Venipuncture SitesPreferred sites for venous access in infants are shown in Figure 6-4.
• Scalp veins (infants).
• Very small veins found close to the surface and more easily seen
than extremity veins.
Superficialtemporal vein
Posteriorauricularvein
Cephalicvein
Cephalicvein
Mediancubital
vein
Medianvein
Palmarside
Basilicvein
Basilicvein
Greatsaphenous
vein
Medianmarginal
vein
Dorsalvenousnetworkwithtributaries
Dorsalvenous
arch
Frontalvein
Figure 6-4 Preferred sites for venous access in infants.
Medications administered via aperipheral vein during CPRshould be followed with asaline flush of 5 to 10 mL tofacilitate delivery of themedication to the centralcirculation.
Pearl
Ch06-A04750.qxd 8/3/06 11:02 AM Page 238

• Rarely useful during resuscitation efforts.
• May be useful for fluid and medication administration after patient
stabilization.
• Upper extremity veins (Figure 6-5).
• Forearm veins (may be difficult to locate in chubby babies).
•• Cephalic.
•• Median basilic.
•• Median antecubital.
• Dorsal hand veins.
•• Tributaries of the cephalic and basilic veins.
•• Dorsal venous arch.
• Lower extremity veins (Figure 6-6).
• Saphenous.
• Median marginal.
• Dorsal venous arch.
Cardiovascular Interventions 239
Ch06-A04750.qxd 8/3/06 11:02 AM Page 239

240 Pediatric Advanced Life Support Study Guide
Figure 6-5 Veins of the forearm and hand.
A
B
C
Ch06-A04750.qxd 8/3/06 11:02 AM Page 240

Indications• Emergency access to venous circulation when peripheral sites are not
readily accessible.
• Need for long-term IV therapy.
• Administration of large volumes of fluid.
• Administration of blood products, hypertonic solutions, caustic
medications, or parenteral feeding solutions.
• Plasmapheresis, exchange transfusion, or dialysis.
• Placement of transvenous pacemaker electrodes.
• Central venous pressure monitoring or central venous blood sampling.
Advantages• Rapid volume expansion.
• Delivery of medications closer to their sites of action.
• More reliable route of venous access than peripheral venous
cannulation.
• Central venous pressure measurement.
Disadvantages• Special equipment (syringe, catheter, needle) required.
• Excessive time may be required for placement.
• Higher complication rate than with peripheral venipuncture.
• Skill deterioration.
• Inability to initiate procedure while other patient care activities in
progress.
Cardiovascular Interventions 241
Figure 6-6 Lower extremity veins.
Central Venous Access
Ch06-A04750.qxd 8/3/06 11:02 AM Page 241

SitesExternal Jugular Vein
• The external jugular (EJ) vein lies superficially along the lateral portion
of the neck (Figure 6-7). It extends from behind the angle of the jaw
and passes downward across the sternocleidomastoid muscle until it
enters the thorax at a point just above the middle third of the clavicle.
It joins the subclavian vein just behind the clavicle.
• Advantages.
• Usually easy to cannulate because the vein is superficial and easy to
visualize.
• Provides rapid access to the central circulation.
• Disadvantages.
• May not be readily accessible during an arrest situation due to
rescuers working to manage the airway.
• May be easily dislodged.
• May be positional with head movement.
• May be difficult to thread a guidewire or catheter into the central
circulation because of the tortuous angle of entry into the sub-
clavian vein.
• Procedure.
• Use body substance isolation precautions.
• Auscultate and document bilateral breath sounds to establish a
baseline.
• Restrain the child in a supine, head-down position of 30 degrees.
• If no head or neck trauma is suspected, turn the child’s head to the
left (the right side is preferred for venipuncture), away from the
venipuncture site. Cleanse the site. If time permits, use local
anesthesia with 1% lidocaine.
• For peripheral cannulation, insert a short over-the-needle catheter
242 Pediatric Advanced Life Support Study Guide
Sternalnotch
Clavicle
Sternocleidomastoidmuscle
Larynx
Externaljugularvein
Figure 6-7 Anatomy of the external jugular vein.
Ch06-A04750.qxd 8/3/06 11:02 AM Page 242
into the vein. For central venous cannulation, insert a through-the-
needle catheter or catheter-over-guidewire.
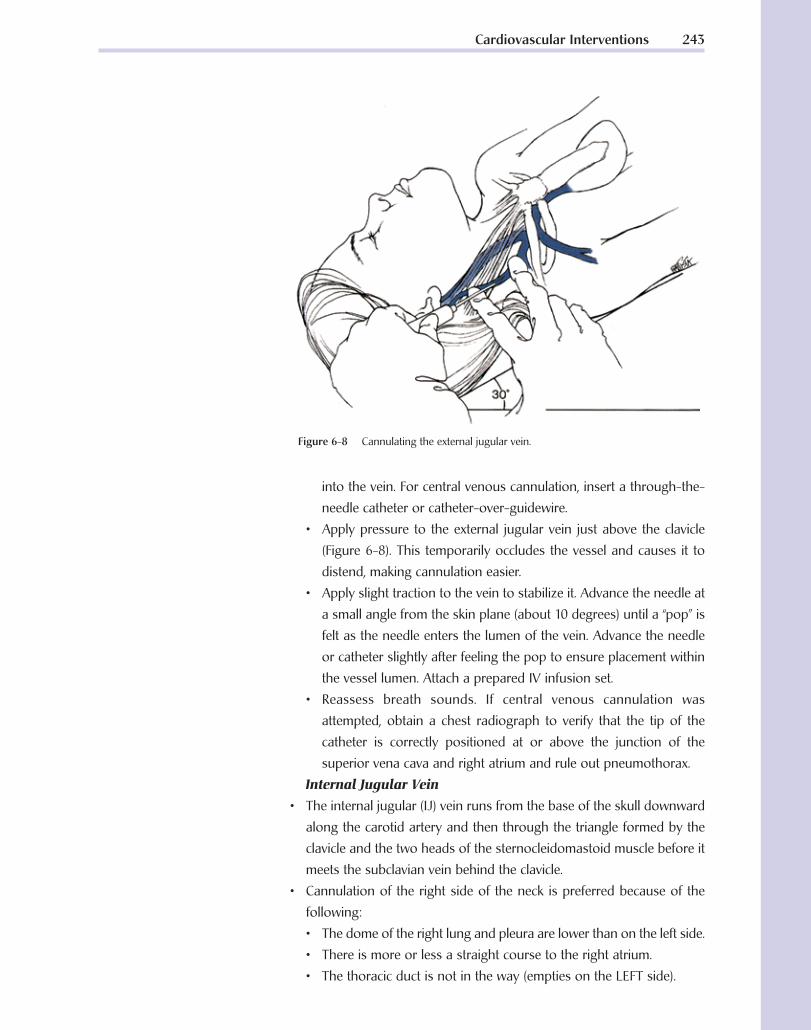
• Apply pressure to the external jugular vein just above the clavicle
(Figure 6-8). This temporarily occludes the vessel and causes it to
distend, making cannulation easier.
• Apply slight traction to the vein to stabilize it. Advance the needle at
a small angle from the skin plane (about 10 degrees) until a “pop” is
felt as the needle enters the lumen of the vein. Advance the needle
or catheter slightly after feeling the pop to ensure placement within
the vessel lumen. Attach a prepared IV infusion set.
• Reassess breath sounds. If central venous cannulation was
attempted, obtain a chest radiograph to verify that the tip of the
catheter is correctly positioned at or above the junction of the
superior vena cava and right atrium and rule out pneumothorax.
Internal Jugular Vein
• The internal jugular (IJ) vein runs from the base of the skull downward
along the carotid artery and then through the triangle formed by the
clavicle and the two heads of the sternocleidomastoid muscle before it
meets the subclavian vein behind the clavicle.
• Cannulation of the right side of the neck is preferred because of the
following:
• The dome of the right lung and pleura are lower than on the left side.
• There is more or less a straight course to the right atrium.
• The thoracic duct is not in the way (empties on the LEFT side).
Cardiovascular Interventions 243
Figure 6-8 Cannulating the external jugular vein.
Ch06-A04750.qxd 8/3/06 11:02 AM Page 243

• Advantages
• Less risk of pneumothorax with this technique versus subclavian.
• Hematomas in the neck are visible and more easily compressible.
• Easier access during CPR than subclavian.
• Usually remains patent even when peripheral veins are collapsed.
• Disadvantages.
• Adjacent structures easily damaged.
• More training required than peripheral venipuncture.
• May interrupt resuscitation efforts.
• Higher complication rate than with peripheral venipuncture.
• Limits patient neck movement.
• Procedure: central (middle) approach.
• Use personal protective equipment.
• Auscultate and document bilateral breath sounds to establish a
baseline.
• Restrain the child in a supine, head-down position of 30 degrees. If
no head or neck trauma is suspected, turn the child’s head to the left
(the right side is preferred for venipuncture), away from the
venipuncture site.
• Attach a 3-mL syringe to a large-gauge catheter, lining up the bevel
of the needle with the numbers on the syringe.
• Identify landmarks by observation and palpation (clavicle and the
triangle formed by the two lower heads of the sternocleidomastoid
muscle) (Figure 6-9). Cleanse the site. If time permits, use local
anesthesia with 1% lidocaine.
• Insert the needle at a 30- to 45-degree angle, bevel up, into the
center of the triangle formed by the two heads of sternomastoid
muscle and the clavicle. With the needle directed toward the feet,
slowly advance the needle aiming toward the ipsilateral nipple, while
applying gentle negative pressure to the syringe (Figure 6-10).
244 Pediatric Advanced Life Support Study Guide
Carotid arteryInternaljugularvein
Sternocleidomastoidmuscle
Subclavianvein
TriangleClavicle
Figure 6-9 Anatomy of the internal jugular vein.Figure 6-10 Cannulation of the internal jugular
vein—central approach.
Ch06-A04750.qxd 8/3/06 11:02 AM Page 244

• When a free flow of blood appears in the syringe, remove the syringe
and occlude the needle hub with a gloved finger to prevent air
embolism. (Newer catheter packaging makes this step unnecessary
because the guidewire is advanced through the syringe or from a Y
port.)
• Advance a guidewire through the needle. Remove the needle and
advance the appropriate central venous catheter over the guidewire
to the junction of the superior vena cava and right atrium during
exhalation. Remove the guidewire and connect the catheter to a
prepared IV infusion set.
• Secure the catheter in place. Reassess breath sounds. Obtain a chest
radiograph to ensure the catheter tip is correctly positioned and rule
out pneumothorax.
Femoral Vein
• The femoral vein lies directly medial to the femoral artery (Figure 6-11).
If a line is drawn between the anterior superior iliac spine and the
symphysis pubis, the femoral artery runs directly across the midpoint.
Medial to that point is the femoral vein.
• If the femoral artery pulse is palpable, the artery can be located with a
finger and the femoral vein will lie immediately medial to the pulsation.
• Advantages.
• Distant from major sites of activity during resuscitation efforts.
• Vein does not collapse like peripheral veins.
• Once cannulated, easy access to the central circulation.
• In case of bleeding, the neck of the femur and pelvis provide hard
surfaces against which direct pressure may be applied.
• Disadvantages.
• If a pulse is absent, the vein may be hard to locate.
Cardiovascular Interventions 245
Figure 6-11 Anatomy of the femoral vein.
If bright red blood forcibly fillsthe syringe, it is probable thatthe carotid artery haspunctured. Remove the needleand apply firm pressure for atleast 10 minutes.
Inadvertent puncture of thecarotid artery can occur whenattempting cannulation of thejugular vein. If a hematomaoccurs on one side of the neck,it is hazardous to attemptvenipuncture on the oppositeside because of the possibilityof bilateral hematomasseverely compromising theairway.
Pearl
An acronym used to recallrelevant anatomy is NAVEL =Nerve, Artery, Vein, Emptyspace, Ligament.
Ch06-A04750.qxd 8/3/06 11:02 AM Page 245

• Injury to the femoral artery, femoral nerve, and hip capsule may
occur; however, injury is unlikely if proper technique is used.
• Procedure.
• Use personal protective equipment.
• Restrain the patient’s lower extremities with slight external rotation.
• Attach a 3-mL syringe to a large-gauge catheter, lining up the bevel
of the needle with the numbers on the syringe.
• Identify the femoral vein medial to the femoral artery. Cleanse the
site thoroughly. If time permits, use local anesthesia with 1% lidocaine.
• Insert the needle 2 to 3 cm below the inguinal ligament and just
medial to the femoral artery (Figure 6-12). Slowly advance the needle
parallel to the femoral artery while gently withdrawing the plunger
of the syringe. When a free flow of blood appears in the syringe,
remove the syringe and occlude the needle hub with a gloved finger
to prevent air embolism.
• Advance a guidewire through the needle. Remove the needle and
advance the appropriate central venous catheter over the guidewire.
Remove the guidewire and connect the catheter to a prepared IV
infusion set.
• Secure the catheter in place. Obtain a radiograph to ensure the
catheter tip is correctly positioned.
Subclavian Vein
• The subclavian vein is a continuation of the axillary vein at the outer
border of the first rib. It joins the IJ vein behind the medial end of the
clavicle to form the brachiocephalic (innominate) vein (Figure 6-13). The
subclavian vein is immobilized by small attachments to the first rib and
clavicle. It lies anterior to the subclavian artery and is separated from it
by the anterior scalene muscle.
246 Pediatric Advanced Life Support Study Guide
Femoral nerve, artery,and vein
Inguinal ligament
Needle enters femoral vein1-2 cm below inguinal ligament
Needle enters skin 2-3 cmbelow inguinal ligament
Figure 6-12 Cannulation of the femoral vein.
During CPR, pulsations may bepalpable in the femoral areathat may originate from eitherthe femoral vein or femoralartery. If CPR is in progressand femoral vein cannulationis attempted, insert the needledirectly over the pulsations.
Pearl
The right femoral vein may beeasier to cannulate than the leftbecause of a straighter path tothe inferior vena cava.
A finger should remain on theartery to assist in landmarkidentification and avoidinsertion of the catheter intothe artery.
Ch06-A04750.qxd 8/3/06 11:02 AM Page 246

• Advantages.
• Usually remains patent even when peripheral veins are collapsed.
• More subsequent patient neck movement with prolonged cannulation.
• Disadvantages.
• Significant risk of pneumothorax, hemothorax, subclavian artery
puncture.
• More training required than peripheral venipuncture.
• May interrupt resuscitation efforts.
• Higher complication rate than with peripheral venipuncture.
• Procedure: infraclavicular approach.
• Use personal protective equipment.
• Auscultate and document bilateral breath sounds to establish a
baseline.
• Restrain the child in a supine, head-down position of 30 degrees. If
no head or neck trauma is suspected, turn the child’s head to the left
(the right side is preferred for venipuncture), away from the veni-
puncture site. Attach a 3-mL syringe to a large-gauge catheter,
lining up the bevel of the needle with the numbers on the syringe.
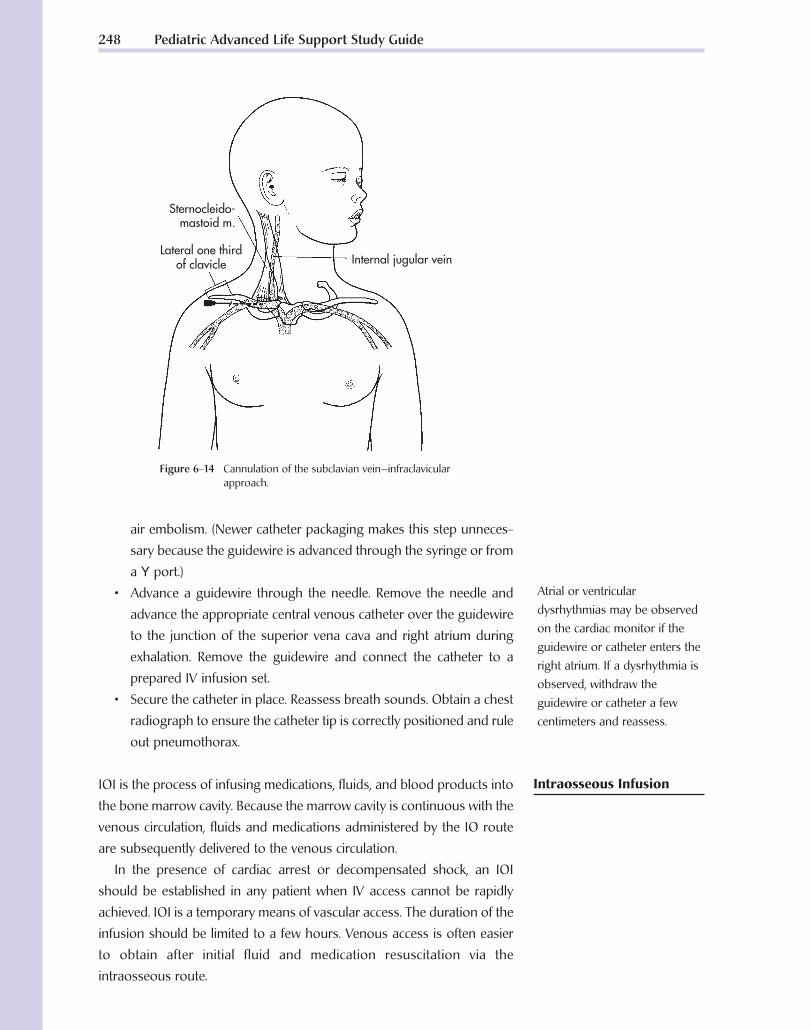
• Identify landmarks: the suprasternal notch and the junction of the
middle and medial thirds of the clavicle. Cleanse the site. If time
permits, use local anesthesia with 1% lidocaine.
• Firmly press a fingertip into the suprasternal notch to establish a
point of reference. Introduce the needle, bevel up, just under the
clavicle at the junction of the middle and medial thirds of the clavicle.
• Holding the syringe and needle parallel to the frontal plane, slowly
advance the needle while applying gentle negative pressure to the
syringe, aiming the needle at the suprasternal notch (Figure 6-14).
When a free flow of blood appears in the syringe, remove the
syringe and occlude the needle hub with a gloved finger to prevent
Cardiovascular Interventions 247
Figure 6-13 Anatomy of the subclavian vein.
Ch06-A04750.qxd 8/3/06 11:02 AM Page 247
air embolism. (Newer catheter packaging makes this step unneces-
sary because the guidewire is advanced through the syringe or from
a Y port.)
• Advance a guidewire through the needle. Remove the needle and
advance the appropriate central venous catheter over the guidewire
to the junction of the superior vena cava and right atrium during
exhalation. Remove the guidewire and connect the catheter to a
prepared IV infusion set.
• Secure the catheter in place. Reassess breath sounds. Obtain a chest
radiograph to ensure the catheter tip is correctly positioned and rule
out pneumothorax.
IOI is the process of infusing medications, fluids, and blood products into
the bone marrow cavity. Because the marrow cavity is continuous with the
venous circulation, fluids and medications administered by the IO route
are subsequently delivered to the venous circulation.
In the presence of cardiac arrest or decompensated shock, an IOI
should be established in any patient when IV access cannot be rapidly
achieved. IOI is a temporary means of vascular access. The duration of the
infusion should be limited to a few hours. Venous access is often easier
to obtain after initial fluid and medication resuscitation via the
intraosseous route.
248 Pediatric Advanced Life Support Study Guide
Internal jugular vein
Sternocleido-mastoid m.
Lateral one thirdof clavicle
Figure 6-14 Cannulation of the subclavian vein—infraclavicularapproach.
Atrial or ventriculardysrhythmias may be observedon the cardiac monitor if theguidewire or catheter enters theright atrium. If a dysrhythmia isobserved, withdraw theguidewire or catheter a fewcentimeters and reassess.
Intraosseous Infusion
Ch06-A04750.qxd 8/3/06 11:02 AM Page 248

Indications• Cardiopulmonary arrest or decompensated shock where vascular
access is essential and venous access is not readily achieved.
• Multi-system trauma with associated shock and/or severe hypovolemia.
• Unresponsive patient in need of immediate medications or fluid resus-
citation (e.g., burns, sepsis, near-drowning, anaphylaxis, status
epilepticus).
• Presence of burns or a traumatic injury preventing access to the
venous system at other sites.
Advantages• Skill is easily mastered, even if done infrequently; healthcare profes-
sionals experienced in the technique can often establish IO access in 60
seconds or less.
• Preferred access sites are distant from major sites of activity during
resuscitation efforts.
• Low incidence of complications.
• Medications and fluids administered IV can be administered IO.
• Absorption of medications administered via the IO route is more rapid
than medications administered via the subcutaneous or rectal routes.
• Blood sampling for laboratory studies is possible.
• Venous access is often easier to obtain after initial fluid resuscitation
via the intraosseous route.
Disadvantages• Short term intervention until venous access can be obtained.
• Causes extreme pain in the responsive patient.
Contraindications• Femoral fracture on the ipsilateral side.
• Osteopetrosis (high fracture potential).
• Osteogenesis imperfecta (high fracture potential).
• Fracture at or above the insertion site.
• Severe burn overlying the insertion site (unless this is the only available
site).
• Infection at insertion site (unless this is the only available site).
• Use of the same bone in which an unsuccessful IO attempt was made.
ProcedureThe preferred site for IOI is the anteromedial surface of the proximal tibia.
This site is preferred because of the broad flat surface of the bone, the thin
layer of skin that covers it, the ease of palpation of this bony landmark,
and use of the proximal tibia does not interfere with airway management
and CPR.
• Use personal protective equipment.
• Place the infant or child in a supine position. Place a towel roll or small
Cardiovascular Interventions 249
• Infusion pumps should beused for all IV infusions ininfants and children to avoidinadvertent circulatoryoverload unless large volumesof fluid are deliberatelyadministered as part of theresuscitation effort.
• Minidrip infusion setsshould be used and closelymonitored if infusion pumpsare not available.
Pearl
Ch06-A04750.qxd 8/3/06 11:02 AM Page 249

sandbag in the popliteal fossa to provide support, optimize position-
ing, and minimize the risk of fractures (Figure 6-15).
• Identify the landmarks for needle insertion. Palpate the tibial tuberosity.
The site for IOI insertion lies 1 to 3 cm (one finger’s width) below this
tuberosity on the medial flat surface of the anterior tibia.
• Cleanse the intended insertion site. If the child is responsive and time
permits, use local anesthesia with 1% lidocaine.
• Stabilize the patient’s leg. With the needle angled away from the joint,
insert the needle using firm pressure.
• Angling away from the joint reduces the likelihood of damage to the
epiphyseal growth plate.
• Firm pressure pushes the needle through the skin and subcuta-
neous tissue.
• Advance the needle using a twisting motion at an angle of 60 to
90 degrees away from the epiphyseal plate (i.e., toward the toes). A
twisting or boring motion is necessary to advance the needle
through the periosteum of the bone. Advance the needle until a sudden
250 Pediatric Advanced Life Support Study Guide
Medial flat surface ofthe anterior tibia
Growthplate
Tibialtuberosity
60 degrees
A
B
Figure 6-15 Anterior tibial approach for intraosseous infusion.
Ch06-A04750.qxd 8/3/06 11:02 AM Page 250

decrease in resistance or a “pop” is felt as the needle enters the marrow
cavity.
• Unscrew the cap, remove the stylet from the needle, attach a 10-mL
saline-filled syringe to the needle, and attempt to aspirate bone
marrow into the syringe.
• If aspiration is successful, slowly inject 10 to 20 mL of saline to clear
the needle of marrow, bone fragments, and/or tissue. Observe for
any swelling at the site.
• If aspiration is unsuccessful, consider other indicators of correct
needle position:
•• The needle stands firmly without support.
•• A sudden loss of resistance occurred on entering the marrow
cavity (this is less obvious in infants than in older children
because infants have soft bones).
•• Fluid flows freely through the needle without signs of significant
swelling of the subcutaneous tissue.
• If signs of infiltration are present, remove the IO needle and attempt
the procedure at another site.
• If no signs of infiltration are present, attach standard IV tubing. A
syringe, pressure infuser, or IV infusion pump may be needed to
infuse fluids.
• Secure the needle and tubing in place with a sterile dressing and tape
(Figure 6-16). Observe the site every 5 to 10 minutes for the duration of
the infusion. Monitor for signs of infiltration and assess distal pulses.
• Attempt to establish venous access as soon as possible and discon-
tinue the IOI. After the IO needle is removed, hold manual pressure for
at least 5 minutes and then apply a sterile dressing to the site.
Cardiovascular Interventions 251
Figure 6-16 Secure the intraosseous needle and tubing in place witha sterile dressing and tape. Observe the site every 5 to10 minutes for the duration of the infusion. Monitor forsigns of infiltration and assess distal pulses.
Ch06-A04750.qxd 8/3/06 11:02 AM Page 251

Alternate Intraosseous Infusion Sites• Distal femur, 2 to 3 cm above the lateral condyle in the midline (Figure
6-17).
• Medial surface of the distal tibia 1 to 2 cm above the medial malleolus
(may be a more effective site in older children) (Figure 6-18).
• Anterior superior iliac spine (may be a more effective site in older
children) (Figure 6-19).
Possible Problems Encountered with Intraosseous Infusion• Incomplete penetration of the bony cortex (Figure 6-20A).
• Penetration of the posterior cortex (Figures 6-20B and 6-20C).
• Fluid or medications escaping around the needle through the puncture
site (Figure 6-20D).
• Fluid leaking through a nearby previous cortical puncture site (Figure
6-20E).
• Fracture of the tibia.
• Local abscess or cellulitis.
252 Pediatric Advanced Life Support Study Guide
75-80 degrees
Femur
Figure 6-17 Distal femur approach. Insert the intraosseous needle 2 to 3 cm proximal to the external condylein the midline and direct it superiorly at a 75- to 80-degree angle.
Saphenous vein
90 degrees
Medial malleolus
Figure 6-18 Distal tibia approach. Insert the intraosseous needle ata 90-degree angle, just proximal to the medialmalleolus and posterior to the saphenous vein.
Ch06-A04750.qxd 8/3/06 11:02 AM Page 252

Cardiovascular Interventions 253
Anterior superioriliac spine
Long axisof body
Iliac crest
Posterior superioriliac spine
90degrees
Figure 6-19 Anterior superior iliac spine approach. Insert the intraosseous needle at a90-degree angle to the long axis of the body.
A B
C
D E
Figure 6-20 Possible problems encountered withintraosseous (IO) infusion. A,Incomplete penetration of the bonycortex. B, Penetration of the posteriorcortex. C, Radiograph of bilaterallymisplaced IO needles with penetrationthrough the posterior tibial cortices. D, Fluid or medications escapingaround the needle through thepuncture site. E, Fluid leaking through anearby previous cortical puncture site.
Ch06-A04750.qxd 8/3/06 11:02 AM Page 253

Definition and PurposeDefibrillation is the therapeutic delivery of an unsynchronized electrical
current (the delivery of energy has no relationship to the cardiac cycle)
through the myocardium over a very brief period to terminate a cardiac
dysrhythmia.
Defibrillation does not “jump start” the heart. The shock attempts to
deliver a uniform electrical current of sufficient intensity to simultaneously
depolarize ventricular cells, including fibrillating cells, causing momentary
asystole. This provides an opportunity for the heart’s natural pacemakers
to resume normal activity. The pacemaker with the highest degree of
automaticity should then assume responsibility for pacing the heart.
A defibrillator is a device used to administer an electrical shock at a
preset voltage to terminate a cardiac dysrhythmia (Figure 6-21). A defibril-
lator consists of a capacitor that stores energy, an adjustable high-
voltage power supply that allows the operator to select an energy level, a
charge switch/button that allows the capacitor to charge, discharge
switches/buttons that allow the capacitor to discharge, and hand-held
paddles (Figure 6-22A) or self-adhesive monitoring/defibrillator pads
(Figure 6-22B) that deliver the energy from the defibrillator to the patient.
254 Pediatric Advanced Life Support Study Guide
Figure 6-21 Medtronic PhysioControl LIFEPAK 20 monitor/defibrillator.
Electrical Therapy
Defibrillation
• Lower extremity compartment syndrome.
• Osteomyelitis.
• Loss of vascular access site may occur due to needle obstruction by
marrow, bone fragments, or tissue.
Ch06-A04750.qxd 8/3/06 11:02 AM Page 254

Self-adhesive pads record and monitor the cardiac rhythm and are
used to deliver the shock. These pads are used during “hands-free” or
“hands-off” defibrillation and consist of a flexible metal “paddle,” a layer of
conductive gel, and an adhesive ring that holds them in place on the
patient’s chest. “Hands-free” defibrillation enhances operator safety by
physically separating the operator from the patient. Instead of leaning
over the patient with hand-held paddles, the operator delivers a shock to
the patient by means of discharge buttons located on a remote cable, an
adapter, or on the defibrillator itself.
Defibrillators deliver energy or current in “waveforms” that flow
between two electrode patches (or paddles). Waveforms are classified by
whether the current flow delivered is in one direction, two directions, or
multiple directions. Monophasic waveforms use energy delivered in one
(mono) direction through the patient’s heart. With biphasic waveforms,
energy is delivered in two (bi) phases—the current moves in one direction
for a specified period, stops, and then passes through the heart a second
time in the opposite direction. When delivered at appropriate energy
levels, biphasic success rates can equal those of conventional devices.2,3
The strength of the electrical shock delivered is expressed in joules (J).
Transthoracic impedance (resistance) refers to the natural resistance of
the chest wall to the flow of current.
Factors Known to Affect Transthoracic ResistancePaddle Size
To a point, transthoracic resistance decreases with increased paddle size.
The largest size paddle that allows good skin contact but maintains
separation between the two paddles is preferred. Infant paddles should be
used for patients up to 1 year of age or 10 kg. However, larger paddles may
be used as long as contact between the paddles is avoided. Adult paddles
should be used for patients older than 1 year or weighing more than 10 kg.
Cardiovascular Interventions 255
Figure 6-22 A, Hand-held paddles. B, Self-adhesive monitoring/defibrillation pads.
A B
If available, use combinationpads instead of hand-heldpaddles for electrical therapy.Combination pads aredisposable and have multiplefunctions. They are applied to apatient’s bare chest for ECGmonitoring and then used fordefibrillation and synchronizedcardioversion (and in somecases, pacing) if necessary. Notall combination pads are alike.Some pads can be used fordefibrillation, synchronizedcardioversion, ECG monitoring,and pacing. Others can be usedfor defibrillation, synchronizedcardioversion, and ECGmonitoring, but not for pacing.Be sure you are familiar withthe capabilities of the pads youare using.
Energy (joules) = Current(amperes) × Voltage (volts) ×Time (seconds)
Ch06-A04750.qxd 8/3/06 11:02 AM Page 255

Use of Conductive Media (Electrode Interface)
Use of a conductive medium aids the passage of current at the interface
between the defibrillator paddles/electrodes and the body surface. Types
of conductive material available include gels, pastes, and prepackaged
defibrillator pads. Failure to use conductive material results in very high
transthoracic impedance, a lack of penetration of current, and burns to
the skin surface. Use of improper pastes, creams, gels, or pads can cause
burns or sparks and pose a risk of fire in an oxygen-enriched environ-
ment.4 Use of excessive gel may result in spreading of the material across
the chest wall during resuscitation, leading to arcing of the current
between paddles and an insufficient delivery of current to the heart. Damp
skin and air pockets beneath hand-held paddles or self-adhesive
defibrillation pads increase transthoracic resistance and may cause an
uneven delivery of current.5
Selected Energy, Number, and Time Interval of Previous Shocks
Defibrillation is the definitive treatment for pulseless VT or VF. When
treating cardiac dysrhythmias using electrical therapy, selecting the
appropriate energy (joules) is important. If the energy and current selected
are too low, the shock delivered will not terminate the dysrhythmia. The
use of excessive energy and current may induce cardiac damage.6
Phase of the Patient’s Respiration
Inspiration increases transthoracic resistance and resistance is lowered
during exhalation. Because air is a poor conductor of electricity, the greater
the volume of air in the lungs when a shock is delivered, the greater the
resistance to the flow of current.7,8 Resistance may be lowest when a
shock is delivered during the expiratory phase of respiration because the
distance between the paddles and the heart is decreased.
Paddle Position
Location of defibrillation paddles (electrodes) affects the magnitude of the
shock necessary to defibrillate the heart. Hand-held paddles or self-
adhesive defibrillator pads may be placed in one of the following
positions for transthoracic defibrillation:
• Sternum-apex (anterolateral) position. Place the sternum paddle to the
right of the upper sternum below the clavicle. Place the other (apex)
paddle to the left of the patient’s left nipple with the center of the
paddle in the left anterior axillary line (Figure 6-23). This paddle
position is most commonly used during resuscitation because the
anterior chest is usually readily accessible.
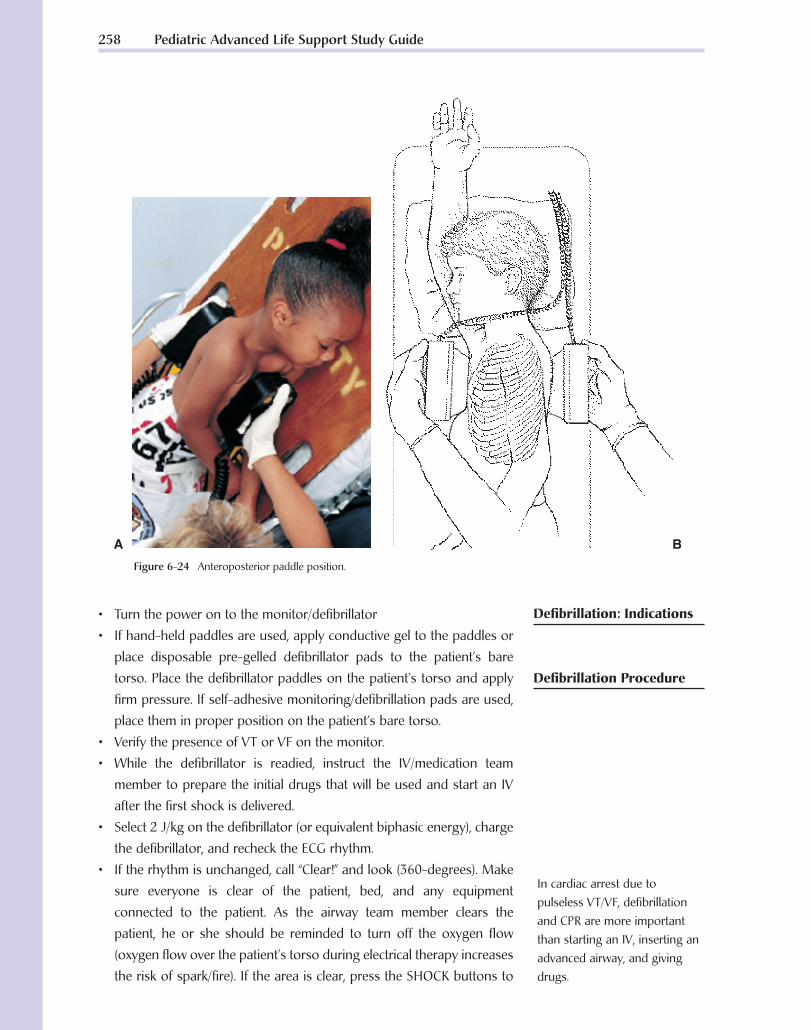
• Anteroposterior position. Place one paddle (or self-adhesive
monitoring/defibrillation pad) immediately to the left of the sternum
and the other on the back behind the heart (Figure 6-24).
256 Pediatric Advanced Life Support Study Guide
If one of the shocks deliveredsuccessfully terminatespulseless VT/VF but thedysrhythmia recurs, begindefibrillation at the last energylevel used that resulted insuccessful defibrillation.
Pearl
Never use ultrasound gel fordefibrillation.
Do not use alcohol-soakedpads for defibrillation—theymay ignite!
Ch06-A04750.qxd 8/3/06 11:02 AM Page 256

Paddle Pressure
When using hand-held paddles for defibrillation, firm paddle-to-chest
contact pressure lowers transthoracic resistance by improving contact
between the skin surface and the paddles and decreasing the amount
of air in the lungs. No pressure is applied when using self-adhesive
monitoring/defibrillation pads. Despite the absence of pressure, these
pads appear to be as effective as hand-held paddles.9
• Pulseless VT
• Ventricular fibrillation
Cardiovascular Interventions 257
Figure 6-23 A, Sternum-apex (anterolateral) paddle position for a child using large(adult) paddles. B, Sternum-apex paddle position using infant paddles.
A
B
When a “flat line” is observedon an ECG:• Ensure the power to the
monitor is on• Check the lead/cable
connections• Ensure the correct lead is
selected• Turn up the gain (ECG size)
on the monitorIf the rhythm appears to beasystole, confirm the rhythm in second lead because it ispossible (although rare) thatVF may be present in someleads.
Pearl
Ch06-A04750.qxd 8/3/06 11:02 AM Page 257
• Turn the power on to the monitor/defibrillator
• If hand-held paddles are used, apply conductive gel to the paddles or
place disposable pre-gelled defibrillator pads to the patient’s bare
torso. Place the defibrillator paddles on the patient’s torso and apply
firm pressure. If self-adhesive monitoring/defibrillation pads are used,
place them in proper position on the patient’s bare torso.
• Verify the presence of VT or VF on the monitor.
• While the defibrillator is readied, instruct the IV/medication team
member to prepare the initial drugs that will be used and start an IV
after the first shock is delivered.
• Select 2 J/kg on the defibrillator (or equivalent biphasic energy), charge
the defibrillator, and recheck the ECG rhythm.
• If the rhythm is unchanged, call “Clear!” and look (360-degrees). Make
sure everyone is clear of the patient, bed, and any equipment
connected to the patient. As the airway team member clears the
patient, he or she should be reminded to turn off the oxygen flow
(oxygen flow over the patient’s torso during electrical therapy increases
the risk of spark/fire). If the area is clear, press the SHOCK buttons to
258 Pediatric Advanced Life Support Study Guide
In cardiac arrest due topulseless VT/VF, defibrillationand CPR are more importantthan starting an IV, inserting anadvanced airway, and givingdrugs.
Figure 6-24 Anteroposterior paddle position.
A B
Defibrillation: Indications
Defibrillation Procedure
Ch06-A04750.qxd 8/3/06 11:02 AM Page 258

discharge energy to the patient. After the shock has been delivered,
release the buttons.
• Instruct the resuscitation team to immediately resume CPR, beginning
with chest compressions. Instruct the IV/medications team member to
start an IV and give a vasopressor (epinephrine). CPR should not be
interrupted to start an IV or give medications. Give epinephrine every 3
to 5 minutes as long as the patient does not have a pulse. After 5 cycles
of CPR (about 2 minutes), recheck the rhythm.
• If a shockable rhythm is present:
• Select 4 J/kg on the defibrillator (or equivalent biphasic energy),
charge the defibrillator and then call “Clear!” Check to be certain
everyone is clear and the oxygen flow is off. Deliver a shock and
then immediately resume CPR, starting with chest compressions.
Consider giving an antiarrhythmic. Give amiodarone (or lidocaine if
amiodarone is not available). Consider magnesium sulfate if the
rhythm is torsades. Consider placement of an advanced airway and
possible causes of the arrest. After 5 cycles of CPR (about 2
minutes), recheck the rhythm.
• If VT/VF persists, check to make sure the oxygen flow is off, clear
everyone from the patient, and then give one shock with 4 J/kg (or
equivalent biphasic energy). Resume CPR, and give epinephrine.
• If a shockable rhythm is not present:
• Check a pulse if an organized rhythm is present on the monitor. If
there is an organized rhythm on the monitor and a pulse is present,
check the patient’s blood pressure and other vital signs and begin
postresuscitation care.
• If there is an organized rhythm on the monitor but there is no pulse
(pulseless electrical activity) or if the rhythm is asystole, resume CPR,
consider possible causes of the arrest, and give medications and
other emergency care as indicated.
An AED is an external defibrillator with a computerized cardiac rhythm
analysis system. The patient’s cardiac rhythm is analyzed by a micropro-
cessor in the defibrillator that uses an algorithm to distinguish rhythms
that should be shocked from those that do not require defibrillation.
Some AEDs require the operator to press an “analyze” control to initiate
rhythm analysis while others automatically begin analyzing the patient’s
cardiac rhythm when the electrode pads are attached to the patient’s chest.
Depending on the type of AED used, the AED will defibrillate or advise the
operator (by means of visual and/or audible signals) to deliver a shock if
a shockable rhythm is present. The shock is delivered by means of two
self-adhesive monitoring/defibrillation pads applied to the patient’s chest.
Cardiovascular Interventions 259
If defibrillation terminatespulseless VT/VF and thenrecurs, begin defibrillation atthe last energy setting thatresulted in an ECG rhythmchange.
If the patient’s rhythm changes,run a rhythm strip forplacement in the patient’smedical record.
Automated ExternalDefibrillation
If the defibrillator’s lowest doseexceeds the calculated dose,use the lowest dose available.When the calculated dose isbetween two available energylevels, choose the higher level.
Ch06-A04750.qxd 8/3/06 11:02 AM Page 259

Standard AEDs should be used for patients that are apneic, pulseless,
and 8 or more years old (approximately more than 25 kg body weight)
(Figure 6-25A). Several AED manufacturers have designed pediatric pad/
cable systems for use with AEDs designed for use in adults to reduce the
energy delivered to patients younger than 8 years of age (Figure 6-25B).
260 Pediatric Advanced Life Support Study Guide
Figure 6-25 A, A standard automated external defibrillator (AED) should be usedfor patients who are apneic, pulseless, and 8 years of age or older(approximately 25 kg body weight or more). B, This defibrillation padand cable system reduces the energy delivered by a standard AED tothat appropriate for a child.
A
B
If an AED with a specialpediatric pad/cable system isnot available, use a standardAED.
Ch06-A04750.qxd 8/3/06 11:02 AM Page 260

Any AED that is to be used on a patient younger than 8 years must be
approved by the Food and Drug Administration (FDA) for that age group.
The FDA has given several AED manufacturers clearance to advertise,
distribute, and sell this new system to physicians (or physicians’ agents).
Children represent less than 10% of all resuscitation attempted outside
the hospital by professional rescuers. Out-of-hospital survival from
cardiac arrest in children ranges from 4% to 9%. However, the death of a
child is an enormous emotional and social loss. Because of their life
expectancy, the number of years of a child’s life lost may rival that for
all adult arrests. Two studies reported VF as the initial rhythm in 19% to
24% of out-of-hospital pediatric cardiac arrests if sudden infant death
syndrome (SIDS) deaths were excluded.10,11 In studies that included SIDS
victims, however, the frequency dropped to 6% to 10%.12,13 The rationale
for exclusion of SIDS patients is that SIDS is not amenable to treatment,
so patients with SIDS should not be included in studies that may influence
potential treatment strategies for cardiac arrest.14 Many children who
survive cardiac arrest have significant neurologic problems, but when VF
is promptly treated, survival rivals that of adults.15,16
Medical science now supports early defibrillation for children with a
pediatric-ready AED. However, there is currently insufficient evidence to
support a recommendation for or against the use of AEDs in children
younger than 1 year.17 Always follow the AED manufacturer’s guidelines
for the application, use, and maintenance of the AED.18
AED Operation• Use personal protective equipment.
• Assess responsiveness.
• Open the airway and check for breathing. If the patient is not breathing,
deliver two slow breaths.
• Assess for the presence of a pulse. If the patient is pulseless, begin
chest compressions and attach the AED.
• Turn the power on to the AED. Depending on the brand of AED, this
is accomplished by either pressing the “on” button or lifting up the
monitor screen or lid. Open the package containing the self-adhesive
monitoring/defibrillation pads. Connect the pads to the AED cables (if
not preconnected), and then apply the pads to the patient’s torso in the
locations specified by the AED manufacturer. Momentarily stop CPR to
allow placement of the pads. Some models require connection of the
AED cable to the AED before use.
• Analyze the ECG rhythm.
• AEDs take multiple “looks” at the patient’s rhythm–each lasting a few
seconds. If several “looks” confirm the presence of a shockable
rhythm, the AED will signal that a shock is indicated.
Cardiovascular Interventions 261
Ch06-A04750.qxd 8/3/06 11:02 AM Page 261

• Artifact due to motion or 60-cycle interference may simulate VF and
interfere with accurate rhythm analysis. While the AED is analyzing
the patient’s cardiac rhythm, all movement (including chest
compressions, artificial ventilations, and the movement associated
with patient transport) must cease.
• Clear the area surrounding the patient. Be sure to look around you.
• Ensure everyone is clear of the patient, bed, and any equipment
connected to the patient.
• Ensure oxygen is not flowing over the patient’s torso (increases risk
of spark/fire).
• If the area is clear, press the shock control to deliver the shock. After
delivering the shock, immediately resume CPR, beginning with chest
compressions.
AED: Advantages• Voice prompts the user.
• Easy to learn; memorizing treatment protocol is easier than recalling
the steps of CPR.
• Less training required to operate and maintain skills than conventional
defibrillators.
• Promotes rescuer safety by permitting remote, “hands-free” defibrillation.
AED: Special Considerations• If the patient is lying in water or on a wet surface, remove the patient
from contact with the water and quickly dry the patient’s torso before
attaching the AED.
• If the patient is lying on a metal surface, remove the patient from
contact with the metal surface before attaching the AED.
Description and PurposeSynchronized cardioversion is the delivery of a shock to the heart to
terminate a rapid dysrhythmia that is timed to avoid the vulnerable period
during the cardiac cycle. On the ECG, this period occurs during the peak
of the T wave to approximately the end of the T wave. When the “sync”
control is pressed, the machine searches for the highest (R wave deflec-
tion) or deepest (QS deflection) part of the QRS complex. When a QRS
complex is detected, the monitor places a “flag” or “sync marker” on that
complex that may appear as an oval, square, line, or highlighted triangle
on the ECG display, depending on the monitor used. When the shock
controls are pressed while the defibrillator is charged in “sync” mode, the
machine will discharge energy only if both discharge buttons are pushed
and the monitor tells the defibrillator that a QRS complex has been detected.
262 Pediatric Advanced Life Support Study Guide
Both monophasic and biphasicAEDs are currently available.Depending on themanufacturer, biphasicwaveform AEDs may delivernonescalating shocks.
Pearl
SynchronizedCardioversion
When discussing synchronizedcardioversion, the QRS complexis often simply referred to asthe “R wave.”
Ch06-A04750.qxd 8/3/06 11:02 AM Page 262

IndicationsSynchronized cardioversion may be used to treat the “sick” (unstable)
patient in SVT, atrial flutter with a rapid ventricular response, or VT with a
pulse. Signs of hemodynamic compromise include poor perfusion, hypo-
tension, or heart failure. This procedure may also be performed electively
in a child with stable SVT or VT at the direction of a pediatric cardiologist.
Procedure• If the patient is awake and time permits, administer sedation unless
contraindicated.
• Turn the monitor/defibrillator on.
• Attach ECG electrodes to monitor the patient’s ECG.
• Some devices allow monitoring and synchronized cardioversion via
disposable self-adhesive monitoring/defibrillation pads. In this case,
additional ECG electrodes are not necessary.
• If self-adhesive monitoring/defibrillation pads are to be used, place
them in proper position on the patient’s bare torso.
• Select a lead with an optimum QRS complex amplitude (positive or
negative) and no artifact, or if monitoring through disposable
defibrillation electrodes, select the “paddles” lead. Run an ECG strip to
document the patient’s rhythm.
• Press the “sync” control on the defibrillator. Verify the machine is
“marking” or “flagging” each QRS complex. If sync markers do not
appear, or appear elsewhere on the ECG display, adjust the gain (ECG
size) until the markers occur within each QRS complex. If adjusting the
gain does not result in sync markers within each QRS complex, select
another lead or reposition the ECG electrodes.
• If hand-held paddles are used, apply conductive gel to the paddles or place
disposable pre-gelled defibrillator pads to the patient’s bare torso. Place
the defibrillator paddles on the patient’s torso and apply firm pressure.
• Ensure the machine is in “sync” mode, select 0.5 to 1 J/kg on the
defibrillator (or equivalent biphasic energy), charge the defibrillator,
and recheck the ECG rhythm. If the rhythm is unchanged, call “clear!”
and look (360 degrees).
• Ensure everyone is clear of the patient, bed, and any equipment
connected to the patient.
• Ensure oxygen is not flowing over the patient’s torso.
• If the area is clear, press and hold both discharge buttons simulta-
neously until the shock is delivered. There may be a slight delay while
the machine detects the next QRS complex. Release the shock controls
after the shock has been delivered.
Cardiovascular Interventions 263
Place ECG electrodes awayfrom defibrillator paddle sites.
Hand-held paddles should notbe used to monitor the ECGduring this procedure becauseartifact caused by paddlemovement on the chest may bemistakenly identified by themonitor as an R wave.
Ch06-A04750.qxd 8/3/06 11:02 AM Page 263

• Reassess the ECG rhythm. If the tachycardia persists, ensure the
machine is in sync mode before delivering another shock. The energy
dose may be increased to 2 J/kg for the second and subsequent
attempts if necessary.
• If VF occurs during the course of synchronization, check the patient’s
pulse and rhythm (verify all electrodes and cable connections are
secure), turn off the sync control, and defibrillate.
Transcutaneous pacing (TCP) is the use of electrical stimulation through
pacing pads positioned on a patient’s torso to stimulate contraction of
the heart. Most transcutaneous pacemakers provide an output current
of 0 to 200 milliamperes (mA) and have a heart rate selection that ranges
from 30 to 180 beats per minute.
TCP requires the use of two pacing electrodes that are attached to the
patient’s chest. Small or medium pediatric electrodes should be used for
a child weighing less than 15 kg. Adult electrodes should be used for a
child weighing more than 15 kg.
TCP may be used for the patient with profound symptomatic bradycardia
refractory to basic and advanced life support therapy.
• Position the pacing pads so that current passes from the negative
pacing pad through the heart to the positive pad.
• Place the negative (anterior) pad on the anterior chest over the heart.
Place the positive (posterior) pad on the patient’s back, behind the
heart (Figure 6-26).
• If the posterior pad cannot be placed on the patient’s back, the
anterolateral position may be used. Place the negative pacing pad
on the left side of the patient’s chest over the fourth intercostal
space in the midaxillary line and the positive pad on the anterior
chest under the right clavicle (Figure 6-27).
• Connect the patient to an ECG monitor and obtain a rhythm strip.
Connect the pacing cable to the pacemaker and to the adhesive
electrodes on the patient.
• Turn the power on to the pacemaker and set the pacing rate to the
desired number of paced pulses per minute (ppm). Set the initial pacing
rate at 100. After the rate has been regulated, start the pacemaker
(Figure 6-28).
• Increase the stimulating current (output or mA) until pacer spikes
are visible before each QRS complex.
• Observe the cardiac monitor for electrical capture (usually evidenced
by a wide QRS and broad T wave). Evaluate mechanical capture by
assessing the patient’s femoral pulse.
264 Pediatric Advanced Life Support Study Guide
Transcutaneous Pacing(TCP)
Indications
Procedure
Do not place the pads overopen cuts, sores, or metalobjects.
Pacer pad positioning varies bymanufacturer. Follow themanufacturer’srecommendations for properpacer pad placement.
Mechanical capture occurswhen pacing produces ameasurable hemodynamicresponse (e.g., palpable pulse,measurable blood pressure).
Sedation or analgesia may beneeded to minimize thediscomfort associated with thisprocedure.
Ch06-A04750.qxd 8/3/06 11:02 AM Page 264

Cardiovascular Interventions 265
Anterior Posterior
Figure 6-26 Anteroposterior positioning of transcutaneous electrodes.
Figure 6-27 Anterolateral positioning of transcutaneouselectrodes.
Figure 6-28 Transcutaneous pacemaker controls.
Ch06-A04750.qxd 8/3/06 11:02 AM Page 265

• Once capture is achieved, continue pacing at an output level slightly
higher (approximately 2 mA) than the threshold of initial electrical
capture.
• Assess the patient’s blood pressure, pulse oximetry, and level of re-
sponsiveness. Monitor the patient closely, including assessment of the
skin for irritation where the pacing pads have been applied. Document
and record the ECG rhythm.
Complications• Skin burns.
• Interference with sensing due to patient agitation or muscle contractions.
• Pain from electrical stimulation of the skin and muscles.
• Tissue damage, including third-degree burns, has been reported in
pediatric patients with improper or prolonged TCP.
Contraindications• Major chest trauma that precludes placement of the pacing pads
(Table 6-2).
266 Pediatric Advanced Life Support Study Guide
TABLE 6-2 Electrical Therapy: Summary
Intervention Dysrhythmia Recommended Energy Levels
Defibrillation Pulseless VT/VF 2 J/kg to 4 J/kg (or equivalent biphasic energy)
Synchronized SVT 0.5 to 1 J/kgcardioversion Atrial flutter with a rapid ventricular (or equivalent biphasic energy)
responseVT with a pulse
Transcutaneous pacing Severe bradycardia (e.g., complete Set initial rate at 100 pulses/minAV block) Increase the output (mA) until pacer
spikes are visible before each QRScomplex. Verify capture.
The final mA setting should be slightly above where capture is obtained tohelp prevent the loss of capture.
AV, atrioventricular; SVT, supraventricular tachycardia; VT, ventricular tachycardia; VF, ventricular fibrillation.
Ch06-A04750.qxd 8/3/06 11:02 AM Page 266

Cardiovascular Interventions 267
Vagal Maneuvers
Vagal maneuvers are methods used to stimulate baroreceptors located
in the internal carotid arteries and the aortic arch. Stimulation of these
receptors results in reflex stimulation of the vagus nerve and release of
acetylcholine. Acetylcholine slows conduction through the AV node,
resulting in slowing of the heart rate.
Vagal maneuvers may be tried in the stable but symptomatic child in SVT
or during preparation for cardioversion or drug therapy for this dysrhyth-
mia. Success rates with vagal maneuvers vary and depend on the patient’s
age, level of cooperation, and the presence of underlying conditions.
Vagal maneuvers that may be used in the pediatric patient include the
following:
• Application of a cold stimulus to the face (e.g., a washcloth soaked in
iced water, cold pack, or crushed ice mixed with water in a plastic bag
or glove) for up to 10 seconds. This technique is often effective in
infants and young children. When using this method, do not obstruct
the patient’s mouth or nose or apply pressure to the eyes.
• Valsalva maneuver. Instruct the child to blow through a straw or take a
deep breath and bear down as if having a bowel movement for 10
seconds. This strains the abdominal muscles and increases intra-
thoracic pressure. In the younger child, abdominal palpation may be
used to create the same effect. Abdominal palpation causes the child to
bear down in an attempt to resist the pressure.
• Gagging. Use a tongue depressor or culturette swab to briefly touch
the posterior oropharynx.
When using vagal maneuvers, keep the following points in mind:
• Ensure oxygen, suction, a defibrillator, and crash cart are available
before attempting the procedure.
• Obtain a 12-lead ECG before and after the vagal maneuver.
• Continuous monitoring of the patient’s ECG is essential. Note the onset
and end of the vagal maneuver on the ECG rhythm strip.
• In general, a vagal maneuver should not be continued for more than
10 seconds.
• Application of external ocular pressure may be dangerous and should
not be used because of the risk of retinal detachment.
• Carotid massage is less effective in children than in adults and is not
recommended.
Indications
Techniques
Special Considerations
Ch06-A04750.qxd 8/3/06 11:02 AM Page 267

268 Pediatric Advanced Life Support Study Guide
Case Study Resolution
Continue CPR. Confirm the rhythm in a second lead. Attempt tracheal intubation. Confirm the position of
the tracheal tube position with primary (assessment) and secondary (mechanical) techniques. Establish
vascular access and give epinephrine. Provide further interventions based on the child’s response to therapy.
References
1. CPR pro for the professional rescuer. National Instructor’s Resource Center, 2003:18.
2. Schneider T, Martens PR, Paschen H, et al. Multicenter, randomized, controlled trial of 150-J biphasic
shocks compared with 200- to 360-J monophasic shocks in the resuscitation of out-of-hospital
cardiac arrest victims. Circulation 2000;102:1780–1787.
3. Gliner BE, Jorgenson DB, Poole JE, et al. Treatment of out-of-hospital cardiac arrest with a low-
energy impedance-compensating biphasic waveform automatic external defibrillator: the LIFE
Investigators. Biomed Instrum Technol 1998;32:631–644.
4. Hummell RS, Ornato JP, Wienberg SM, et al. Spark-generating properties of electrode gels used
during defibrillation: a potential fire hazard. JAMA 1988;260:3021–3024.
5. Crockett PJ, Droppert BM, Higgins SE, et al. Defibrillation: what you should know. Redmond, WA:
Physio-Control Corp., 1996.
6. Kerber RE. Transthoracic cardioversion of atrial fibrillation and flutter: standard techniques and new
advances. Am J Cardiol 1996;17:22–26.
7. Ewy GA, Hellman DA, McClung S, et al. Influence of ventilation phase on transthoracic impedance
and defibrillation effectiveness. Crit Care Med 1980;8:164–166.
8. Sirna SJ, Ferguson DW, Charbonnier F, et al. Factors affecting transthoracic impedance during
electrical cardioversion. Am J Cardiol 1988;15:1048–1052.
9. Stults KR, Brown DD, Cooley F, et al. Self-adhesive monitor/defibrillation pads improve prehospital
defibrillation success. Ann Emerg Med 1987;16:872–877.
10. Mogayzel C, Quan L, Graves JR, et al. Out-of-hospital ventricular fibrillation in children and
adolescents: causes and outcomes. Ann Emerg Med 1995;25:484–491.
11. Hickey RW, Cohen DM, Strausbaugh S, et al. Pediatric patients requiring CPR in the prehospital
setting. Ann Emerg Med 1995;25:495–501.
12. Eisenberg M, Bergner L, Hallstrom A. Epidemiology of cardiac arrest and resuscitation in children. Ann
Emerg Med 1983;12:672–674.
Hemodynamically unstable tachycardia when immediate synchronized
cardioversion is imperative.
• Syncope.
• Bradydysrhythmias (e.g., sinus arrest, AV block, asystole).
• Ventricular dysrhythmias.
Contraindications
Complications
Ch06-A04750.qxd 8/3/06 11:02 AM Page 268

Cardiovascular Interventions 269
13. Sirbaugh PE, Pepe PE, Shook JE, et al. A prospective, population-based study of the demographics,
epidemiology, management, and outcome of out-of-hospital pediatric cardiopulmonary arrest. Ann
Emerg Med 1999;33:174–184.
14. Samson RA, Berg RA, Bingham R; Pediatric Advanced Life Support Task Force, International Liaison
Committee on Resuscitation for the American Heart Association; European Resuscitation Council.
Use of automated external defibrillators for children: an update—an advisory statement from the
Pediatric Advanced Life Support Task Force, International Liaison Committee on Resuscitation.
Pediatrics 2003;112[Pt 1]:163–168.
15. Mogayzel C, Quan L, Graves JR, et al. Out-of-hospital ventricular fibrillation in children and
adolescents: causes and outcomes. Ann Emerg Med 1995;25:484–491.
16. Sirbaugh PE, Pepe PE, Shook JE, et al. A prospective, population-based study of the demographics,
epidemiology, management, and outcome of out-of-hospital pediatric cardiopulmonary arrest. Ann
Emerg Med 1999;33:174–184.
17. Samson RA, Berg RA, Bingham R. Pediatric Advanced Life Support Task Force, International Liaison
Committee on Resuscitation for the American Heart Association, and European Resuscitation Council.
Use of automated external defibrillators for children: an update—an advisory statement from the
Pediatric Advanced Life Support Task Force, International Liaison Committee on Resuscitation.
Pediatrics 2003;112[Pt 1]:163–168.
18. The Use of AEDs for Children. CPR pro for the professional rescuer. National Instructor’s Resource
Center, 2003:20.
Chapter Quiz
Questions 1–12 refer to the following scenario:
A 6-year-old boy is complaining of stomach pain. The child’s father says his son has had frequent vomiting
and diarrhea for the past 72 hours. He is seeking medical care because his son vomited immediately on
awakening this morning and then had diarrhea. Dad put his son in the shower to wash him and his son
“collapsed” for about 10 to 15 seconds. You observe the child sitting in a chair with his hand over his
stomach. He appears uncomfortable and restless, but is aware of your presence. The child has listened
intently to the conversation between you and his father. His face and lips appear pale. Some mottling of the
extremities is present. His breathing is unlabored at a rate that appears normal for his age.
1. Which of the following statements is true of your interactions with a child of this age?
A) Speak to the child in a respectful, friendly manner, as if speaking to an adult.
B) When speaking with the caregiver, include the child.
C) Avoid frightening or misleading terms such as shot, deaden, germs, etc.
D) Establish a contract with the child - tell him that if he does not cooperate with you, you are certain
he will have to have surgery.
Ch06-A04750.qxd 8/3/06 11:02 AM Page 269

2. From the information provided, complete the following documentation regarding the Pediatric
Assessment Triangle.
Appearance:
Breathing:
Circulation:
3. Your initial assessment reveals a patent airway. The child’s respiratory rate is 20/min. Auscultation of the
chest reveals clear breath sounds bilaterally. A radial pulse is easily palpated at a rate of 157 beats/min.
The skin is pale and dry. The child’s capillary refill is 3 seconds, temperature is 99.4 F, and his blood
pressure is 82/56. The normal heart rate range for a 6-year-old child at rest is
beats/min.
A) 60 to 100.
B) 70 to 120.
C) 80 to 140.
D) 90 to 150.
4. You have applied the cardiac monitor and observe the ECG shown below.
This rhythm is:
A) Atrial flutter.
B) Supraventricular tachycardia.
C) Sinus tachycardia.
D) Ventricular tachycardia.
5. Assessment of the child’s skin turgor reveals an elapsed time of 4 1/2 seconds for the skin to return to
normal. You estimate the child’s degree of dehydration to be:
A) < 5% of the child’s body weight.
B) 5 to 8% of the child’s body weight.
C) 9 to 10% of the child’s body weight.
D) > 10% of the child’s body weight.
6. The lower limit of a normal systolic blood pressure for a child of this age is:
A) About 60 mm Hg.
B) About 70 mm Hg.
C) About 80 mm Hg.
D) About 90 mm Hg.
270 Pediatric Advanced Life Support Study Guide
Ch06-A04750.qxd 8/3/06 11:02 AM Page 270

7. This child’s history and presentation are consistent with:
A) Compensated hypovolemic shock.
B) Irreversible cardiogenic shock.
C) Decompensated anaphylactic shock.
D) Preterminal distributive shock.
8. Select the incorrect statement.
A) Hypotension is an early sign of shock in a child.
B) The diastolic blood pressure is usually two-thirds of the systolic pressure.
C) A child may be in shock despite a normal blood pressure.
D) Blood pressure is one of the least sensitive indicators of adequate circulation in children.
9. The presence of compensated shock can be identified by:
A) Assessment of heart rate, ECG rhythm, and skin temperature.
B) Assessment of the presence and strength of peripheral pulses, mental status, and pupil response to light.
C) Assessment of heart rate, presence and strength of peripheral pulses, and the adequacy of end-
organ perfusion.
D) Assessment of end-organ perfusion, ECG rhythm, and pupil response to light.
10. Which of the following methods of vascular access should be attempted first in this child?
A) Establish an intraosseous infusion.
B) Establish an internal jugular intravenous (IV) line.
C) Establish an IV using the saphenous vein.
D) Establish an IV in the antecubital fossa.
11. True or False: As you prepare to establish vascular access, the child becomes uncooperative. A
reasonable approach in this situation would be to ask the child’s father to assist in restraining his son
in order to accomplish the procedure as quickly as possible.
12. Vascular access has been successfully established. You should begin volume resuscitation with a fluid
bolus of:
A) 10 mL/kg.
B) 20 mL/kg.
C) 30 mL/kg.
D) 50 mL/kg.
Questions 13–19 refer to the following scenario:
A 2-year-old near-drowning victim is apneic and pulseless. CPR is in progress.
Cardiovascular Interventions 271
Ch06-A04750.qxd 8/3/06 11:02 AM Page 271

13. The cardiac monitor reveals the rhythm below.
This rhythm is:
A) Ventricular tachycardia.
B) Atrial fibrillation.
C) Ventricular fibrillation.
D) Asystole.
14. CPR is in progress. Your next intervention should be to:
A) Establish vascular access, insert a tracheal tube, and then perform synchronized cardioversion
followed by immediate defibrillation.
B) Insert a tracheal tube, establish vascular access, and then prepare to defibrillate.
C) Perform synchronized cardioversion followed by immediate defibrillation.
D) Prepare to defibrillate.
15. The initial energy dose used for defibrillation should be:
A) 0.5 joules/kg.
B) 1.0 joule/kg.
C) 2.0 joules/kg.
D) 4.0 joules/kg.
16. After delivery of the shock, you should:
A) Attempt a vagal maneuver.
B) Establish vascular access.
C) Attempt transcutaneous pacing.
D) Resume CPR immediately, starting with chest compressions.
17. An endotracheal tube has been inserted. To confirm proper positioning of the tube, you should first
listen:
A) Over the epigastrium.
B) Over the posterior chest.
C) Over the left lateral chest in the axilla.
D) Over the right lateral chest in the axilla.
272 Pediatric Advanced Life Support Study Guide
Ch06-A04750.qxd 8/3/06 11:02 AM Page 272

18. Attempts to establish vascular access have been unsuccessful. Proper positioning of the tracheal tube
has been confirmed. You should now administer via the tracheal tube.
A) 1 mg/kg of lidocaine.
B) 0.02 mg/kg of atropine.
C) 0.1 mg/kg of epinephrine (1:1000 solution).
D) 1.0 mg/kg of epinephrine (1:10,000 solution).
19. A 6-year-old is found unresponsive, not breathing, and pulseless. A standard AED can be used if an
AED with a pediatric pad/cable system is not available.
A) True
B) False
Chapter Quiz Answers
1. B. When the patient is a school-age child (6 to 12 years of age), include the child when speaking with
the caregiver. If the patient is an adolescent, speak to him in a respectful, friendly manner, as if speaking
to an adult. Although it is reasonable to make a contract with a child of this age (“I promise to tell you
everything I am going to do if you will help me by cooperating”), it is inappropriate and unprofessional
to threaten him.
2. Pediatric Assessment Triangle (first impression) findings:
Appearance: Awake and restless; aware of surroundings; listening intently
Breathing: Respirations appear normal for age; normal respiratory effort
Circulation: Pale face and lips. Some mottling of the extremities is present.
3. B. The normal heart rate for a 6 to 12 year old at rest is 70 to 120 beats/min.
4. C. The rhythm shown is sinus tachycardia at 157 beats/min.
5. D. When evaluating skin turgor to estimate dehydration, if it takes < 2 seconds for the skin to return to
normal, suspect the approximate degree of dehydration to be < 5% of the child’s body weight. 2-3
seconds = 5 to 8% of the child’s body weight; 3-4 seconds = 9 to 10% of the child’s body weight; and
> 4 seconds = > 10% of the child’s body weight.
6. C. The lower limit of a normal systolic blood pressure for a child between 1 and 10 years of age can be
estimated using the formula 70 + (2 × age in years). This child’s minimum systolic blood pressure
should be about 82 mm Hg.
7. A. This child’s history and presentation is consistent with compensated hypovolemic shock.
Cardiovascular Interventions 273
Ch06-A04750.qxd 8/3/06 11:02 AM Page 273

8. A. Hypotension is a late sign of shock in a child. Tachycardia and signs of poor perfusion such as pale,
cool, mottled skin occur earlier and are more reliable indicators than hypotension.
9. C. The presence of compensated shock can be identified by evaluation of heart rate, the presence and
volume (strength) of peripheral pulses, and the adequacy of end-organ perfusion (Brain - assess mental
status, skin - assess capillary refill, skin temperature, and kidneys - assess urine output).
10. D. In this situation, you should first attempt to establish a peripheral IV line in the antecubital fossa. If
the child was in decompensated shock or cardiac arrest, intraosseous access could be attempted if IV
access was not rapidly achieved.
11. False. Because a child expects his or her caregiver to protect them, do not ask a caregiver to restrain a
child or participate in any way other than to comfort the child.
12. B. Administer a bolus of 20 mL/kg of isotonic crystalloid solution (NS or LR) over 5 to 20 minutes.
Assess response (i.e., mental status, capillary refill, heart rate, respiratory effort, blood pressure).
13. C. The rhythm shown is ventricular fibrillation.
14. D. Defibrillation is the definitive treatment for pulseless VT/VF. Defibrillation takes priority over
establishing vascular access and placement of a tracheal tube. Synchronized cardioversion is used to
shock hemodynamically compromising tachycardias with a pulse.
15. C. The initial energy dose used to defibrillate pulseless VT/VF is 2 J/kg.
16. D. After delivery of a shock, immediately resume CPR, starting with chest compressions. A vagal
maneuver may be tried in the stable but symptomatic child in supraventricular tachycardia or during
preparation for cardioversion or drug therapy for SVT. Transcutaneous pacing may be used for the
patient with profound symptomatic bradycardia refractory to basic and advanced life support therapy.
17. A. To confirm proper positioning of the tube, listen first over the epigastrium. The presence of bubbling
or gurgling sounds during auscultation of the epigastrium suggests the tube is incorrectly positioned
in the esophagus. To correct this problem, deflate the tracheal tube cuff (if a cuffed tube was used),
remove the tube, and preoxygenate before reattempting intubation. In infants, breath sounds may be
heard over the stomach but should not be louder than midaxillary sounds.
18. C. If vascular access is unavailable, epinephrine may be administered via the tracheal tube. The tracheal
dose is 0.1 mg/kg (1:1000 solution) or 0.1 mL/kg (10 times the IV/IO dose).
19. A. If an AED with a pediatric pad/cable system is not available, a standard AED may be used.
274 Pediatric Advanced Life Support Study Guide
Ch06-A04750.qxd 8/3/06 11:02 AM Page 274