centre user guide 10v1.3 - npted.org of edinburgh... · edofe user guide for dofe centre ... we...
TRANSCRIPT

eDofE guide for participants 10/2010 version 1.3
Page 1
eDofE user guide for DofE centre staff
(Co-ordinators, Leaders and volunteers)
Contact
eDofE helpline T: 0845 4670487

eDofE guide for participants 10/2010 version 1.3
Page 2
Introduction System Requirements: To use eDofE you will need internet access and to allow pop-ups for our website. We currently support IE6 and later, though upgrading from IE6 is recommended. We also support Firefox from v3, Safari from v4, Chrome from v4 and Opera from v10. To use On-line mapping with eDofE you will need to download Silverlight. Our developers are still working on several areas of eDofE (shown in red). These guides will be updated when the new functions are working, and we will publicise the updates via the news section. What is eDofE? eDofE is an interactive online system that helps young people manage their DofE programme and Leaders monitor their progress. Accompanying the system is a Welcome Pack for participants and the facility to create an offline Achievement Pack of their programme that young people can keep. What is your role as DofE centre staff? You will still work with participants by guiding and motivating your participants or help administrate the DofE in your centre. The benefit is that you can now see and check participant’s work wherever you have internet access. You can also continue approving sections and Awards via this system. − Create and manage groups (only centre Co-ordinators can create groups) − Allocate a Leader(s) to each group − Enrol participants (following Operating Authority procedures) − Co-ordinators / Leaders:
- Monitor progress - Message participants and staff (within their group/centre) and Operating Authority (OA) - Post news
− Check and approve/withdraw participants’ evidence − Verify specific sections when completed − When all the sections are completed the Leader notifies the OA for final Award approval. − You can only access and edit specific personal areas of a participant’s online account from
your own account – their name, date of birth and status. The main eDofE process for centre staff

eDofE guide for participants 10/2010 version 1.3
Page 3
Contents Sign in and complete the mandatory fields ................................................................................... 4 Security rules of eDofE access ..................................................................................................... 5 Create groups................................................................................................................................ 5 Create staff .................................................................................................................................... 6 Allocate staff to a group................................................................................................................. 7 Create new participants................................................................................................................. 8 Managing large numbers of participants ..................................................................................... 11 Starting next level ........................................................................................................................ 12
Volunteering section ................................................................................................................ 13 Expedition section.................................................................................................................... 14
Approving participants’ work (ALERT system)............................................................................ 15 Check backdated activity............................................................................................................. 17 Confirming sections..................................................................................................................... 18 Approving Awards ....................................................................................................................... 20 Reports (being designed) ............................................................................................................ 24 How to post news ........................................................................................................................ 25 Resources (being designed) ....................................................................................................... 26 Updating your centre and personal details.................................................................................. 26 Moving participant to a new centre or Operating Authority (being designed) ............................. 26 Amend sectional activity choices................................................................................................. 27 Participants’ progress bar............................................................................................................ 29 Messaging – sending & receiving................................................................................................ 29 Abandon a level........................................................................................................................... 30 Edit passwords, username, name and DOB............................................................................... 31 Edit user status............................................................................................................................ 32 Glossary ...................................................................................................................................... 33

eDofE guide for participants 10/2010 version 1.3
Page 4
Sign in and complete the mandatory fields Before you can start using eDofE you must have received your username and password from your Operating Authority (OA), DofE Manager or your centre Co-ordinator. This will allow you to access your eDofE account. Open up your Internet browser and go to www.eDofE.org/login.aspx. Fill in your username and password and click ‘Sign In’. All users have to complete the listed mandatory fields. A red ‘!’ indicates this has not been completed.
− If the new password given to you isn’t working: You need to get back to the person who
gave it to you and ask for them to check it again
− If you forget your password: if you have your security answer then you can select password reminder and it will prompt you to enter a new password.
Areas which you will find the most useful
− PERSONAL INFORMATION – to update your personal details − PARTICIPANTS – to create and manage participants’ involvement − SYSTEMS ADMINISTRATION, then select DofE DATA: to manage your groups, teams and
centre details − SYSTEMS ADMINISTRATION, select ‘Website DATA’ which allows you to create a bulletin
message which appears on the centre’s participants’ home page. − NEWS – to inform your centres and participants of any events and news − ALERTS – on the bottom right of your homepage. If you are the ‘primary’ Leader then this
will inform you whenever a participant has done some work i.e. selected an activity for a section or uploaded evidence.

eDofE guide for participants 10/2010 version 1.3
Page 5
Security rules of eDofE access 1. Your login to eDofE is timed. Remember to log out if you move away from the computer.
This is for security purposes and there is a timing out rule. If you do not perform any actions in eDofE after 30 minutes then the system will automatically log you out.
2. Security question. If you have forgotten your password and you have previously entered an answer to the security question, you have three attempts to enter the correct password. Failure means you cannot access your account for up to one hour.
3. Password creation. Passwords must be six figures long and it must be alphanumeric. Be careful as it is case sensitive.
Create groups All participants must be part of a group. Participants cannot exist on the system until they are allocated to a group. Note: Only Co-ordinator roles can create groups.
Advice: If your OA are the only ones who are authorised to create participation places (i.e. the centre are not permitted to create places) then when you first create groups, always create a group called New Starters. The OA may not know which group to allocate the participant to and they will choose by default the group called ‘New Starters’. You can then easily move the participants to the relevant group. 1. Click on ‘SYSTEMS ADMINISTRATION’ 2. Click on ‘DofE DATA’ 3. Click on ‘DofE CENTRES’ 4. Click on ‘Manage Groups’ 5. Type in the name of the group 6. Click on ‘Add’ 7. It will indicate that the group has been successfully created

eDofE guide for participants 10/2010 version 1.3
Page 6
Create staff You will need to create the staff and Leaders who will help you run the DofE within your centre. The Operating Authority can also create staff for you.
Safety: You must have been given permission from your OA or Co-ordinator to create new staff within your centre. All the relevant OA safeguarding checks must be completed before an account is created as they will have access to young people’s personal details. The system keeps a record of who has set up each new account. 1. Click on ‘SYSTEMS ADMINISTRATION’ 2. Click on ‘DofE DATA’ 3. Click on ‘DofE CENTRES’ 4. Click on ‘Manage Staff’ and click ‘Select’ 5. Click on ‘Add Staff Member’ 6. You will need to scroll down the page to see a form. Complete the form where the red stars
are located 7. Enter the person’s first name, middle name and surname 8. Tick the Safeguarding (CRB) box if you have completed this. Remember you must be
authorised to tick the Safeguarding (CRB) box. Safeguarding: In line with DofE guidelines, all staff at Operating Authority and centre level must have clicked yes to the safeguarding question. If you click no then that user cannot be registered on eDofE. 9. Allocate them a role. DofE Co-ordinators have full access to all groups within the centre.
Give them a username and password. The password must be alphanumeric and keep it simple as you have to forward the new staff member these details. They can change this when they sign in.
Username creation: Every username is unique. The system will inform you if the username has already been assigned, if this happens then change it or add a number to the end. Advice: You should record the password in a secure place in case you or the staff member loses the password. Passwords are case sensitive, usernames are not. 10. Click on ‘Add’. This will indicate the staff member has been created. You can now give the
username and password to the new staff member so they can access eDofE.
Assistant Managers working with this centre: This lists the OA Assistant Managers who are responsible for managing your centre.

eDofE guide for participants 10/2010 version 1.3
Page 7
Allocate staff to a group Groups must have nominated Leaders to operate. If the OA wishes to directly lead a group then their staff can be selected as a Leader for a group. Only DofE Managers can select their own staff as Leaders for a group.
Advice: Leaders can be involved in multiple groups. They can only see the details of participants from those groups. Groups can have more than one Leader.
The ‘primary’ Leader will be the person who will receive all the alerts from the young people when they update their DofE programme. 1. Click on ‘SYSTEMS ADMINISTRATION’ 2. Click on ‘DofE DATA’ 3. Click on ‘DofE CENTRES’ 4. Click on ‘Maintain Group Members’ 5. Find the correct group and click ‘Select’ 6. Click on ‘Add Leader’ 7. Decide who should be the ‘Primary’ Leader 8. Select from the drop down menu ‘Select Person’ and find the Leader’s name and click
‘Add’. The Leader’s names will only be displayed if you or your OA has input them for the centre. OA staff can see an additional option: ‘Include OA staff’. This will permit them to select their own OA staff as a Leader.
9. This will be displayed indicating the Leader has been added onto this group. You can now create the participants who will form the group.
How to change the ‘primary’ Leader and destination of alerts If you wish to change who gets the alerts, the ‘primary Leader’ tag can be changed to another Leader. For example when a Leader is on leave, ill or has left the centre.
Note: Only a DofE Co-ordinator can change the primary tag for a Leader. 1. Click on ‘SYSTEM ADMINISTRATION’ 2. Click on ‘DofE DATA’ 3. Click on ‘DofE CENTRES 4. Click on ‘Manage Groups’ and click ‘Members’. You can change the primary tag.

eDofE guide for participants 10/2010 version 1.3
Page 8
Create new participants If your OA has decided to create all the participants this section will not be relevant to you. Please contact the OA directly to ask whether your centre or OA will create the Participation Places.
Once you have created the groups, allocated Leaders and been provided Participation Places then you can then create the participants to populate the groups. You do not create a participant account if they already exist in eDofE. Go to page 12 if an eDofE participant wants to start their next DofE level.
Paperwork before creating the account: You should follow your normal processes for participant application forms/parent signatures/collecting fees and sending them to your DofE contact so they can allocate Participation Places to your centre. Before you create new participants on eDofE ensure that: - Enrolment form has been signed with the consent from the parent/ guardian (if under 18) - Enrolment form has the correct details i.e. level, DOB, address and their start date - Young person has paid the participation fee.
1. Click on ‘HOME’ 2. Click on ‘PARTICIPANTS’ 3. Click on ‘CREATE PARTICIPANTS’ 4. Complete all the fields which have a red ‘!’ so they turn into a green tick.
Enrolment date explanation: This date is used to ensure that a young person's DofE work is recognised on eDofE as they wait for their eDofE account to be created by you. If in doubt please use the date on the application form if you are copying in details from one. Their sectional work dates can only be dated at the time of the entry for the expected start date i.e. the expected start date is entered as 23/01/2010. The Skills section start date can only be dated from 23/01/2010 (although the usual backdating rules can be applied).

eDofE guide for participants 10/2010 version 1.3
Page 9
5. Click ‘Create Participant’ – if it’s a Bronze level account being created then it will state it has successfully created that account. See point 6 if this is a Silver or Gold level account.
If you have selected Silver or Gold level then a further option appears which enables you to record any sections of the previous levels the participant has achieved before they received an eDofE account. 6. Tick the boxes and press ‘Create participant’ then it will state it has successfully created
that account. These fields can be edited later via the participant’s summary screen.
Trouble shooting:
Which group? If only the OA can create Participation Places, they may not know which group to allocate the participant to. If it is unclear then they should allocate the participants to the ‘New Starters’ group. This group must first be created. The participants can then be moved to their proper group later on.
Numbers of participants in a group: the ratio of ‘group participant numbers versus Leader numbers’ should be kept at a manageable level. For example having 50+ participants in one group with one Leader can be hard work!
Cannot edit DofE level: You must ensure that the participant’s programme is correct as this cannot be amended once entered and the Participation Place is being used.
School September enrolment: Some schools enrol participants in September, but backdate one section of the DofE to include activities undertaken during the previous summer term. When calculating backdating dates in these circumstances, it would be wise to set the start date on eDofE as the last day of the school’s summer term (usually in July) as the system will not take into account the school summer holiday period, when the participant may not be undertaking the activity.
Username and password: Every username is unique. The system will automatically add a number to the end of the username if the original username has already been assigned. The password is created by using the person’s date of birth: mm/dd/yyyy.
We recommend you keep a record of the username and passwords in a separate place, in case you or the participant loses it. This is because this would be the first time the participant will access their account and they would not have had the chance to complete their security question answer. The security answer allows them to access their account if they forget the password.
7. Congratulations, you have created a participant account on eDofE. If you did not choose to email them their account access details then you need to directly inform them of their username and password.

eDofE guide for participants 10/2010 version 1.3
Page 10
How to edit start dates You have the function to edit a participant’s enrolment date and sectional start dates. 1. If you have inputted an incorrect start date or been asked by your participant to correct a
sectional start date then you can amend it by accessing the participant’s summary screen and clicking ‘Change Enrolment Dates’.
2. You can change any of the dates but the changes must meet the DofE age/date
requirements.
3. The system will automatically check the dates you have entered and show up in green to
confirm if the change is within the DofE requirements. Press ‘Save’.
4. If the proposed change does not meet the requirements it will warn you of the error (in red
text). For example you can’t edit the enrolment date to be after the sectional start dates.

eDofE guide for participants 10/2010 version 1.3
Page 11
Managing large numbers of participants To help Leaders work with large number of participants there is a ‘Manage participant screen’. 1. Click on ‘PARTICIPANTS’ 2. Click on ‘MANAGE PARTICIPANTS’. This will list all your participants based in their groups 3. A summary screen of their work: select their name and a summary page will be shown,
which has the participant’s progress in their sections 4. Select ‘Objectives’ and ‘Evidence’ to see what they have done for each section. The option
‘Approvals’ is used when the participant has informed you that they have finished a section – click ‘Confirming section’ for details.
Advice: If your participants are uploading a lot of evidence and you are finding it hard to keep track of all their work use the ‘Approval’ option. This will list and add up every objective, evidence etc which has been approved, rejected, withdrawn or is awaiting a decision from you.
Moving participants to another group Only a DofE Co-ordinator can move participants from one group to another group within the centre. 1. Click on ‘SYSTEM ADMINISTRATION’ 2. Click on ‘DofE DATA’ 3. Click on ‘DofE CENTRES 4. Click on ‘Manage Groups’ and click ‘Members’. 5. Find the participant and click on ‘Edit’ 6. You can select from a pull down menu a new group and click on ‘Update’ 7. The person will automatically be moved into the other group

eDofE guide for participants 10/2010 version 1.3
Page 12
Starting next level Once a participant has finished the Bronze or Silver Award on eDofE then they can proceed onto the next level. eDofE also permits a participant to start the next level even when they have not finished all the sections of their current programme i.e. they want to do two levels at the same time (subject to age requirements). Note: you do not create a new eDofE account for the participant, you are adding another DofE level onto their existing eDofE account.
Operating Authority permission: you must have OA permission to allow your participants to start their next programme as this will use a Participation Place.
Before you can proceed ensure that: - The starting new DofE level application form has been signed with the consent from the
parent/ guardian (if under 18) and it has the correct details i.e. level and start date - Young person has paid the participation fee. 1. Click on ‘DofE CENTRES’, click on ‘Manage Progress Level’
3. The system will then automatically create a list of participants who meet the conditions of
the selected level. They must have completed at least one section of the previous level. 4. Tick the participant(s) who wish to start the next level, enter the start date and click ‘Set as
start date’.
Note: The start date rule is exactly the same as enrolling a person onto the system. You can only enter a start date three months before today’s date. If you try and enter an earlier date then it will flash up a red warning and you must enter a valid date. The system will also automatically check if the participant meets the minimum age to start that level.
5. Select the new group that the participant will be located in. For example, if he is a Gold
participant in late 09 then he might join a Group called ‘Gold Sept 2009’
6. Check all the details are correct: start date, level, group. Click ‘Create new level’
2. If you have places which your OA has permitted you to use, this will appear. Select the level: Silver or Gold.

eDofE guide for participants 10/2010 version 1.3
Page 13
Volunteering section The Volunteering section has an additional option of creating ‘team’ based work which the Leader can arrange and invite the participants to join. 1. The Volunteering section is slightly different from the Skills and Physical sections as young
people can work on this section as a team or independently 2. Teams must have a Leader allocated to them.
If individual based
If a participant wants to work on the Volunteering section individually then they follow the same process as for the Skills and Physical sections.
If team based
Before you begin you should contact your participants and find out who are interested in working together as a team and which activity they wish to work on. As soon as you are satisfied with the participants team make up and idea for an activity: 1. Click on ‘SYSTEM ADMINISTRATION’ 2. Click on ‘DofE DATA’ 3. Click on ‘DofE CENTRES 4. Click on ‘Manage Teams’ 5. Click ‘Add Activity Team’ 6. Give the activity team a name and complete the fields. Click on ‘Add’ 7. It will indicate that the team has been successfully created. Go to ‘Members’
8. Click ‘Add Leader’ and select from the drop down menu. Go to ‘Add’
9. You can now see the Leader’s name. Go to ‘Invite participants’
10. Select from the drop down menu the correct participants and go to ‘Invite’
11. You can now see the list of Leaders and participants invited listed here and you now have to wait for the participant to accept the invitation. Note: You can only select participants from the same programme as the team. Participants cannot be involved in a team doing a different DofE level.
7. It will ask for your reconfirmation. Click ‘OK’. The system will provide the level to that participant to work on. It will deduct the place from your allocation of places and a message will appear to confirm the success of this work. An automated email will then be sent to the participants account to inform them that they can begin their next level

eDofE guide for participants 10/2010 version 1.3
Page 14
Expedition section This section operates almost exactly like the Skills, Volunteering and Physical sections. Participants have to individually select their own aims/objectives, complete their training matrix and fill in their expedition plans. The participants must request approval for their activity from a Leader.
Note: Work loaded into eDofE is not automatically shared between the team members. Team members must manually share the work outside of eDofE and upload it into their own personal accounts.
Before the participants start this section - agree a ‘primary team member’ When they have formed their teams, now agree with your participants who will write down what the whole team will be entering for their Aims/Objectives and Plans - so you will not receive different types of plans and cause any confusion.
What stages need to be completed before the section is confirmed Centre staff must approve a participant’s four specific areas before the section can be approved: 1. Personal Aims and Objectives 2. All the Training matrix fields 3. At least one practice expedition plan and attachments 4. At least one qualifying expedition plan and attachments 5. Note: Uploading additional evidence is optional.
What this section stores The system will only collect information on the five points above. Any additional requirements of your centre/OA to show route cards, signatures, green forms, blue forms, OA specific paperwork etc should be actioned outside of the system (i.e. offline). The participant can upload these as specific evidence images/documents or as images/documents within an expedition plan.
Approving Expedition plans (practice and qualifying) - You will confirm the participants expedition practice and qualifying plans by checking the details and whether they need to attach work with it, for example: route cards, green forms etc.
Wild Country and the Green form – Any participant arranging their Expedition in Wild Country must complete the Green form. The system allows a participant to create a word based Green form through their planning screen. The participant then completes the form and can decide to upload the completed form into their plan.
You can create the Green form – You have the function to create the green form by accessing the participant’s submitted plan and adding participants – the system will only show names if they are active and their aims and objectives approved. Remember that the approval of this form must be achieved outside of eDofE.
Assessment in Wild Country – If you are planning to use an Accredited Assessor from the network then you must purchase an Expedition Assessment voucher from the DofE shop.
Training Matrix Participants must complete their training matrix and request it for approval. You can approve all or some of their training. The ALERT system permits you to mass approve all evidence such as the training.
eDofE guide for participants 10/2010 version 1.3
Page 15
Route submission tool (being designed) – This function allows the participant to create an electronic route submission and notify an Assessor Network. This will be covered in a separate guide.
Team members – The system will not request the expedition team member names. Any reference to who are in the team must be stored off the system and/or as uploaded evidence (for example within a Green form). Alternatively the participant can write their fellow team members names within their ‘route summary’ box.
Participant has the function to direct alerts to other Leaders – When a participant saves and requests approval for their objectives/evidence and plans, then they will have the function to select which Leader should receive that alert. They can only select Leaders within their group.
How to confirm the work and the section – Approving their work is covered on page 15 and confirming the section is covered on page 18.
Approving participants’ work (ALERT system) When a participant requests approval for their sectional activity/objectives, evidence, expedition training and plans, the system will alert the ‘primary’ Leader (set up when the group was created). If you do not get any alerts it is because you are not the ‘primary’ Leader or it’s because the participants have not yet requested approval.
If you have assistants within your group who help check, you need to ask them to look at specific participant’s accounts, as they will not be alerted if the participant has not selected them to receive the alert.
There are eight specific alerts which you can receive when a participant requests approval: - Sectional activity choice, start date and objectives - Sectional change activity request - Section approval - Expedition training - Expedition plans (practice and qualifying) - Evidence - Abandoning their level - Changing activities
The ‘primary’ Leader has three ways to access, check and approve work (ALERTS and the participants Summary Screen). Other Leaders within the group who cannot utilise the ALERTS system will need to access the participant’s Summary Screen.
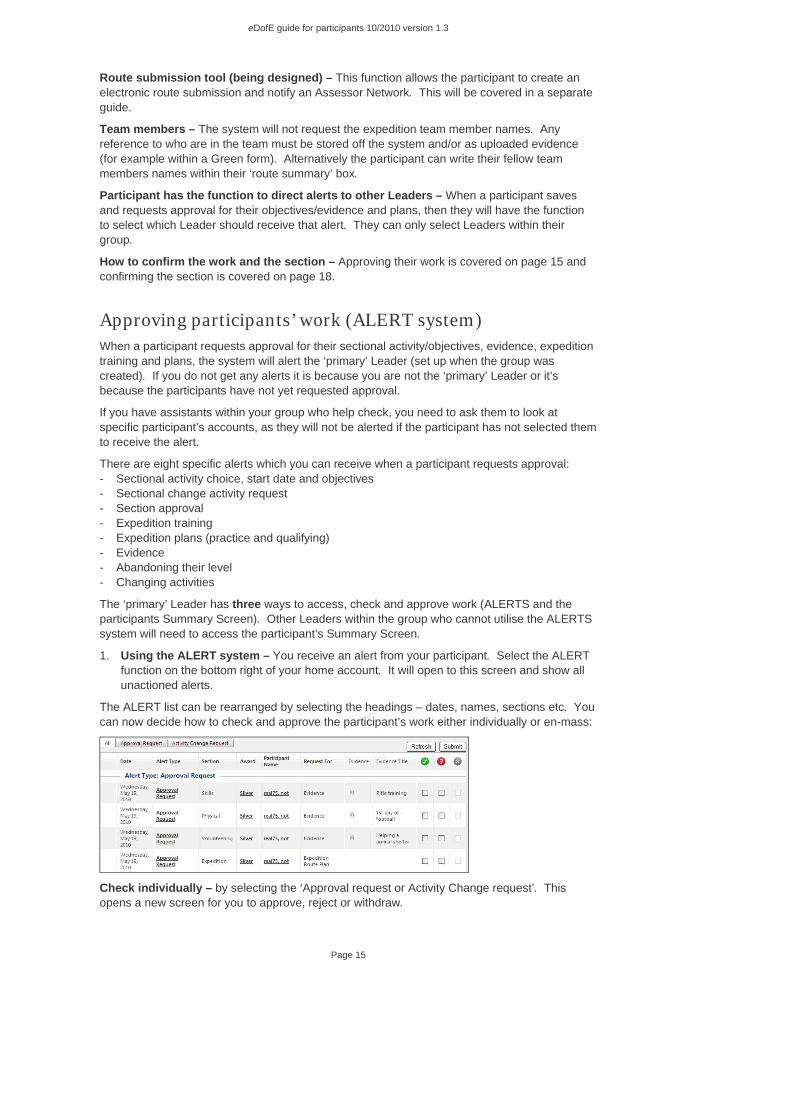
1. Using the ALERT system – You receive an alert from your participant. Select the ALERT function on the bottom right of your home account. It will open to this screen and show all unactioned alerts.
The ALERT list can be rearranged by selecting the headings – dates, names, sections etc. You can now decide how to check and approve the participant’s work either individually or en-mass:
Check individually – by selecting the ‘Approval request or Activity Change request’. This opens a new screen for you to approve, reject or withdraw.

eDofE guide for participants 10/2010 version 1.3
Page 16
‘Reject’ means you have a query with the details and it will alert the participant who can edit the evidence and resubmit it for you to check again. ‘Withdraw’ means you will not approve it or have decided that it is not suitable for use within the DofE. It will still be saved on their account for record keeping purposes.
Using mass approve or reject – if you are sure the participant has met/or has not met the conditions then you can mass approve/reject work by ticking the boxes from the columns green tick sign (approve) or red question mark sign (reject). Selecting ‘ALL’ will tick the entire column.
Now press ‘Submit’ and it will summarise the work in a report. So check the report (if approving work: tick the box to confirm the evidence is suitable) and then press ‘Confirm’. The system will now approve/reject the selected participants work and auto delete the alert from your inbox.
Note: You have the ability to ‘reject’ evidence even after the section has been approved. This means you can ask the participant to edit some work which should not have been approved. The participant must then resubmit the evidence for your approval.
2. Working through the
participant ‘Summary screen’: follow the process for ‘Managing large numbers of participants’. Find and access the participant’s summary screen (see left) and select ‘Evidence’ or ‘Objectives’. This will list the work which the person has uploaded. You can then bulk approve them.
Auto delete: If you approve / reject / withdraw work then it will automatically delete that alert from your inbox. Example of how the participant’s evidence screen looks is to the left.
There is also a function to allow you to edit the participant’s activity choice. If you see an incorrect activity - for example: trying to use football for their Skills section - then this allows you to amend it before you approve it.

eDofE guide for participants 10/2010 version 1.3
Page 17
3. Working through the ‘manage participant screen’: find the young person, click on the
small arrow (left of the persons name). This will expand, click on ‘Evidence’ or ‘Objectives’. This will list the work which the person has done and you can bulk approve them.
- Scroll down the page until you see the relevant section and the details of the young person’s
evidence which will be clearly displayed - Go to the picture/evidence/document and view/read it by clicking on it - If you are satisfied with the details then click ‘Approve’. The next time the participant logs in,
they will see that it has been approved - If you do not believe it should be used then click ‘Reject’ and it will label that evidence as
rejected. If you do not consider it adequate then don’t click approve and just contact the participant to amend it and you can check it again. ‘Withdraw’ means you will not approve it and it will be saved on their account for record keeping purposes.
How approving work affects the participant’s progress bar When you approve a participant’s work, after one day the system will automatically update that participant’s progress bar with a set percentage increase (depending on the timescales they have set for that section).
IPadio (being designed) There will be a new function to permit the participant’s instructor/Supervisor/Assessor/ yourself to call a dedicated telephone number and leave the participant an audio recording. This can be attached to a participant’s evidence. There is a separate guide on how this works.
Check backdated activity The system will allow a participant to backdate one section per level for up to three months.
The system allows a participant to enter a sectional start date before the expected start date of their DofE level. For example a participant starts their Gold DofE at 1 July 2010 (subject to age requirements being met) but has done work for their Skills starting 1 April 2010.
Comment [B1]: Where is it? Add details

eDofE guide for participants 10/2010 version 1.3
Page 18
Confirming sections Participants have a function to send their Leader an alert to confirm their sections. Leaders can only confirm a section when the participant submits a section for approval. The Leader has to confirm all the sections before the Award can be submitted to the OA for approval.
A section will only be completed when two conditions are met: 1. The minimum duration has passed (i.e. a Silver Skills section duration set for six months) 2. The activity choice, objectives/aims, any relevant training and evidence (expeditions must
have at least one practice and one qualifying plan) has been approved or withdrawn.
You can confirm the section by two methods: Confirm section using your ALERT system You will receive an alert from the participant asking to confirm their section. If you approve via the alert system then you will not have the opportunity to check the work and it will automatically give it an end date of the day you action this.
Confirm section by going to the participant’s summary screen If you want to first check all the work then go to the participant’s summary screen -
Once a section has been approved then the line ‘COMPLETED’ will appear on the participants’ sections. As soon as the last section has been approved then this message will appear: if you are permitted to approve a participants level then continue onto ’Approving Awards’.
a) Go to the participant’s ‘Approval’ screen. This screen will add the evidence the participant has submitted. It will also list the evidence not approved with a symbol of ‘*’ or it states ‘draft’.
b) If both conditions are met then the button ‘Section Approval’ can be selected. If you think that the participants have met their sectional aims then press the button and enter an end date. This can be the last evidence date which the participant has entered or the date you approve the section.

eDofE guide for participants 10/2010 version 1.3
Page 19
Confirm sections from the previous level To permit participants who are still working on their previous programme level with the old Record Book to start their current level or section on eDofE. Only a DofE Leader can enter the completion of the previous level or section. Note: It will not show this design if the participant has done/is still doing their previous DofE programme on eDofE – it will show instead the progress bars.
If the conditions are not met then the button ‘Section Approval’ cannot be selected. Either wait until the minimum months have passed and/or approve/decline all of the sectional aims and evidence.
The participant must inform you that they have completed sections on their Record Book. Go to the participant’s summary screen. You can edit the sections or the level to state that they are complete and click on ‘Update’ to save the details. If you complete all the previous sections then it will alert the participant that they are now a non direct entrant for their current DofE programme and can change to the shorter of the timescales.

eDofE guide for participants 10/2010 version 1.3
Page 20
Approving Awards
When all of a participant’s sections have been confirmed by their Leader then their Award can be submitted for approval. Only DofE Co-ordinators and Leaders can submit a level to the OA.
Note: The Award can only be submitted for approval if ALL sections have been confirmed.
Who can approve Awards? All OA DofE Managers and certain Assistant Managers (who have been approved to check levels) can formally approve a participants Award to enable them to receive their certificate and badge. You as centre staff can only submit a participant record to the OA to get their approval.
The main report screen: go to DofE Data and click ‘Approve Level’
On the participant approval screen (go to ‘manage participant’, select the person’s name and then click ‘Approvals’). As soon as the last section has been approved then this message will appear.
If you are permitted to approve a participant’s level (your name will be recorded next to the participant’s account) then continue on this process:
1. Click on ‘Start the Approval Process’ button and this message will appear asking if you
need to check the sectional details again.
2. Scroll down to the bottom of the page and you will see this message. If you want to raise
an issue to the participant then click the ‘Query level’ button.
3. IF you are satisfied the participant has met all the conditions, click the ‘Submit Award for
Approval’ button. This action will update a database which your OA DofE Manager can access.
To be designed in: The system will give you a choice of DofE managers who will be alerted that you have submitted Awards for approval. You can select one person to be alerted or they will not know you have done this.
eDofE guide for participants 10/2010 version 1.3
Page 21
This message will appear confirming that your DofE centre has submitted the participants records for OA checks.
4. Now inform your Operating Authority that you have participant’s who require checking and
approving.
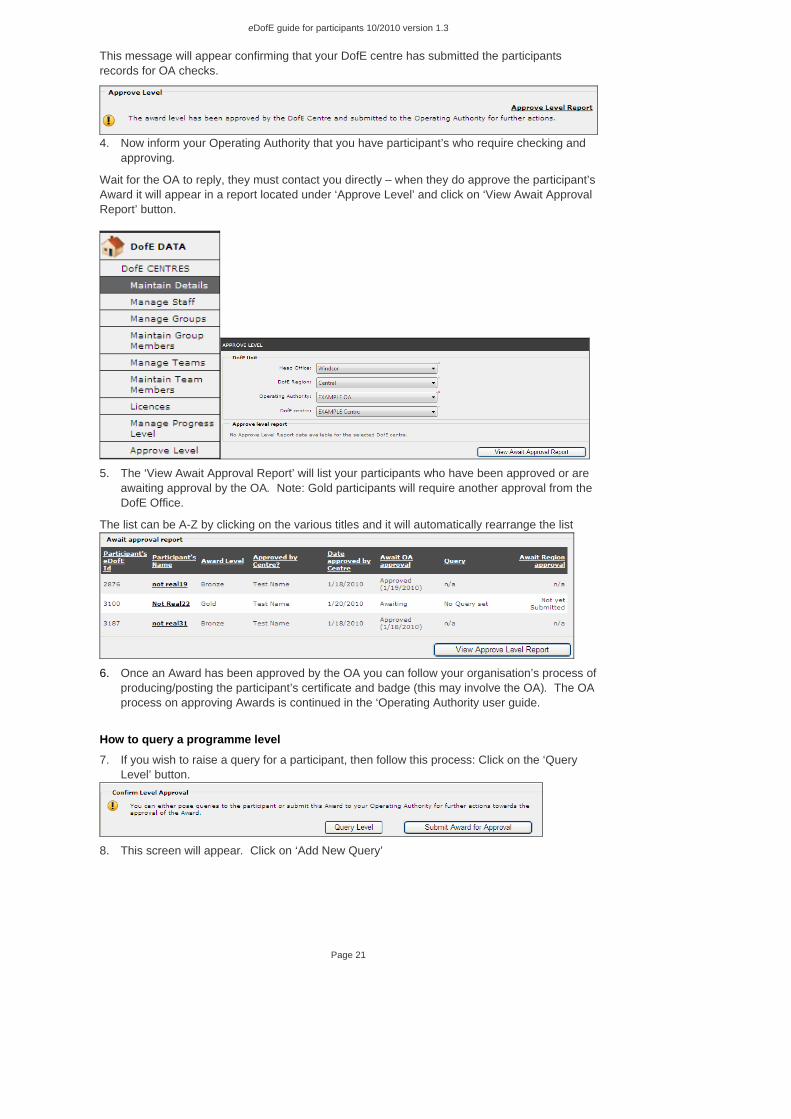
Wait for the OA to reply, they must contact you directly – when they do approve the participant’s Award it will appear in a report located under ‘Approve Level’ and click on ‘View Await Approval Report’ button.
5. The ‘View Await Approval Report’ will list your participants who have been approved or are
awaiting approval by the OA. Note: Gold participants will require another approval from the DofE Office.
The list can be A-Z by clicking on the various titles and it will automatically rearrange the list
6. Once an Award has been approved by the OA you can follow your organisation’s process of
producing/posting the participant’s certificate and badge (this may involve the OA). The OA process on approving Awards is continued in the ‘Operating Authority user guide.
How to query a programme level
7. If you wish to raise a query for a participant, then follow this process: Click on the ‘Query Level’ button.
8. This screen will appear. Click on ‘Add New Query’

eDofE guide for participants 10/2010 version 1.3
Page 22
9. Select the specific section (if there are multiple queries then fill in a separate query for each section) and fill in your query. Click ‘Send’ (which is really Save)
Note: ALL the messages saved here can be read by the centre staff, the participant, the OA and the Regional Office staff, so please ensure you are careful with the content.
10. The query is now saved, if you wish to alert the participant now then click ‘Create Message’
There is another way to send the message, go back to ‘Approve Level’, find the participant and click ‘Query level’. It will list the queries. Click ‘Create message’.

eDofE guide for participants 10/2010 version 1.3
Page 23
To see the list of participant’s levels - select your centre and click on Approve Level. You will see a list of participants who are ‘queried’. It cannot be submitted/approved until ALL queries are resolved/closed.
The participant will receive a unique alert on their level screen – they click ‘Reply Queries’.
The participant should inform you that they have replied to your query. Go back into ‘Approve Level’ and click ‘Query level’. You will see the reply and you can decide to ‘close’ or ‘delete’ the query or even ‘re-open’ an old query.
Note: The participant must reply by this message system or you cannot ‘close’ the query. Closing effectively ends the query and you can now submit/approve the Award.
11. The system will auto fill in a message and you can send this to the participant and cc anyone else into the message (for example other Leaders involved). Click ‘Send Message’ and the participant will receive this message on their eDofE account.

eDofE guide for participants 10/2010 version 1.3
Page 24
12. When ALL queries are closed. This will allow the level to be approved so when you are happy the queries have been resolved, click ‘Submit for Approval’ and await the OA reply. Go back to point 5 to view a report which lists all your participants which are awaiting, queried or have been approved.
Why can’t I submit an Award for approval? This is because you haven’t ‘closed’ ALL the queries. Also note this ‘closed’ option will only appear next to a query if the participant first replies to your message. So chase them if they haven’t replied back, they are only delaying their own DofE progression
Reports (being designed) There will be a new option called reports, there are several automatic reports which will help you see how well your participants and groups are doing and an ability to collate statistics.

eDofE guide for participants 10/2010 version 1.3
Page 25
How to post news You have the ability to post news to your centres and groups for example, group meetings etc 1. Click on ‘SYSTEM ADMINISTRATION’ 2. Click on ‘NEWS ADMIN’ 3. Click on ‘MAINTAIN NEWS STORY’ 4. Click on ‘Add New News Story’ 5. Complete all fields. You can paste your news into the content area and it can be formatted
by the tools provided 6. Click on ‘Save Story’ and it will indicate the news story has been saved 7. To upload pictures: Scroll to the bottom of the page to see these options 8. Click on ‘Upload a Picture’ 9. Click on ‘Browse’, select your image files and click ‘Open’ then click ‘Upload’, 10. Click ‘Save Story’ to save the updates 11. Once you have finished editing the content and saved any pictures you can publish the
news. Scroll back up the screen and click ‘Publish News Story’ 12. Choose a category for the news which closely relates to the subject 13. Choose who you wish to be able to see the news item 14. Set an expiry date which will result in the news being automatically taken off after a period
of time 15. Click ‘Save & Publish’ 16. Scroll back up to the very top and click ‘HOME’ You can see your uploaded news. It will
also be on the pages of all those you have nominated to receive it.
eDofE includes a ‘Welcome Message’ system allowing you to communicate with your participants when they access their account. 1. Click on ‘WEBSITE DATA’ 2. Click on ‘MANAGE WELCOME MESSAGE’ and click ‘Add’

eDofE guide for participants 10/2010 version 1.3
Page 26
Resources (being designed) 1. To access the resources, click on ‘Resources’ 2. This will expand the menu and list all available resources 3. Click on ‘WEB LINKS’ or ‘USEFUL STUFF’ for other resources 4. This will display a list of weblinks to other resources. Clicking them will open them in
another window
Updating your centre and personal details To update/change your centre details 1. Click on ‘SYSTEM ADMINISTRATION’ 2. Click on ‘DofE DATA’ 3. Click on ‘Maintain Details’ 4. Click on ‘Select’ 5. Scroll down the page, complete the form and click on ‘Update’.
To update/change your personal details: 1. Go to ‘HOME’ and click ‘PERSONAL INFORMATION’ 2. Click on ‘Personal Details’ 3. Complete the main personal info fields and click ‘Save Changes’ 4. Saving your picture: upload your picture by clicking ‘Browse’. Locate the image on your
computer, click ‘Open’ and then click ‘Upload’. If successful your picture will appear on the top right of your eDofE account
5. Updating the rest of your profile. You can update all the other areas of information by selecting the tabs on the top bar or selecting the menu on the far left
6. Automatic lookup of address: To save time you can just input your postcode in ‘Address Information’ and press ‘Find’ and it will list addresses with that postcode. You can then select the correct one. All the details of that address will then be input automatically to the form.
Note: You can choose to have a house name or number, you do not need both. 7. Select from the drop down menu the type
of address 8. Click on ‘Add’ and your details are saved.
Continue updating the other options.
Moving participant to a new centre or Operating Authority (being designed) There will be a function to move a participant to another centre within your OA or to another OA.
eDofE guide for participants 10/2010 version 1.3
Page 27
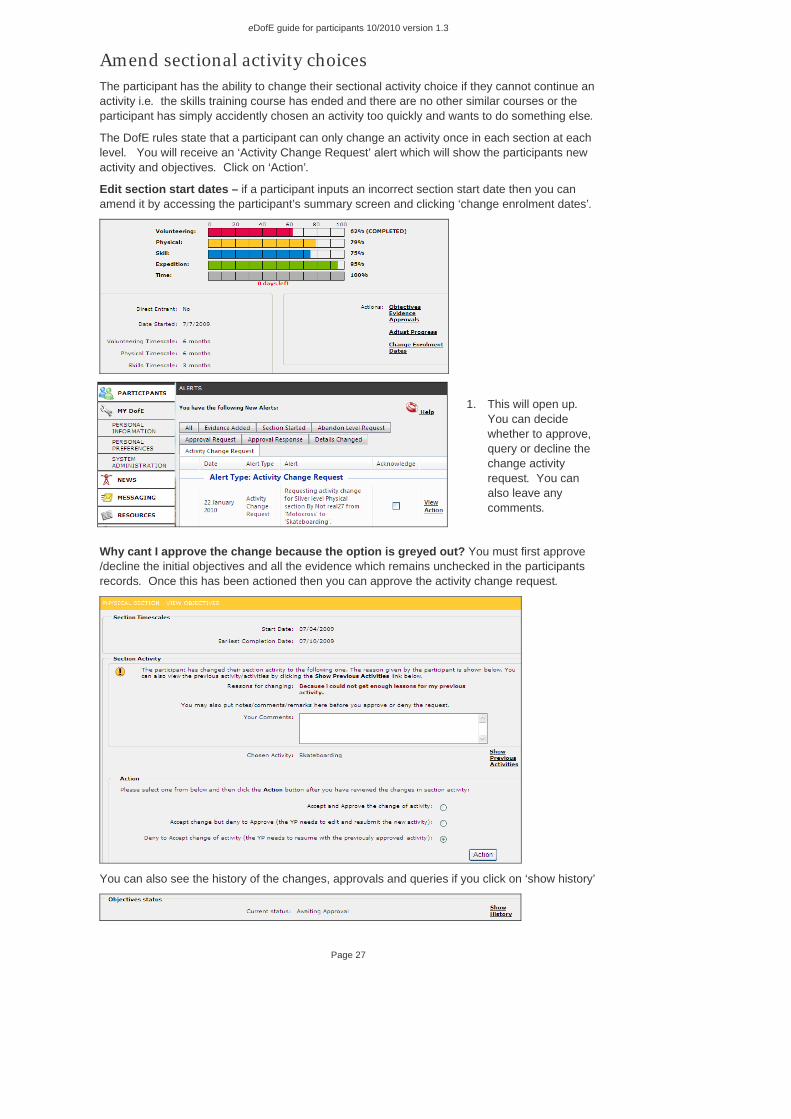
Amend sectional activity choices The participant has the ability to change their sectional activity choice if they cannot continue an activity i.e. the skills training course has ended and there are no other similar courses or the participant has simply accidently chosen an activity too quickly and wants to do something else.
The DofE rules state that a participant can only change an activity once in each section at each level. You will receive an ‘Activity Change Request’ alert which will show the participants new activity and objectives. Click on ‘Action’.
Edit section start dates – if a participant inputs an incorrect section start date then you can amend it by accessing the participant’s summary screen and clicking ‘change enrolment dates’.
1. This will open up.
You can decide whether to approve, query or decline the change activity request. You can also leave any comments.
Why cant I approve the change because the option is greyed out? You must first approve /decline the initial objectives and all the evidence which remains unchecked in the participants records. Once this has been actioned then you can approve the activity change request.
You can also see the history of the changes, approvals and queries if you click on ‘show history’

eDofE guide for participants 10/2010 version 1.3
Page 28
2. If you wish to approve: Click on ‘Accept approval’ and click on ‘Action’. This pop up will appear, click on ‘OK’. This will send an automatic alert to the participant to state their new activity has been approved.
All the objectives of the previous activity will be replaced by the new objectives. You can still view the previous activities objectives.
3. If you wish to query or decline
3.1. To query: Click on ‘accept change but deny approval’ then click ‘OK’. This will send an automatic alert to state their new activity has been conditionally approved. The participant can amend the objectives and ask for approval again.
3.2. To deny: Click on ‘deny to accept change of activity’ then click ‘OK’. This will send an
automatic alert to state their new activity has been denied. The participant must continue their current activity.

eDofE guide for participants 10/2010 version 1.3
Page 29
Participants’ progress bar The participant’s progress bar represents work or evidence being updated or uploaded for each of the sections when have been approved by their Leader. The base measurement used is one piece of evidence per month. This will represent a certain % progress dependent on how many months the person is doing a section. Selecting an activity, deciding on their aims and objectives will also provide a set percentage increase.
Messaging – sending & receiving eDofE includes a messaging system allowing you to communicate with your participants and other staff in your centre and OA.
Sending messages: 1. Click ‘MESSAGING’ 2. Click ‘CREATE MESSAGE’– this will
open up a blank template 3. Enter a subject 4. Choose the person who will receive the
message. You can do this by accessing your address book. Click the book icon next to the ‘to’ field and you will be shown your contacts
5. Select the recipient and click ’ok’ 6. Enter the message text 7. Click ‘Send Message’– the message
will be sent to your recipient
Receiving messages can be accessed in a number of ways: 1. Click under the Communication and News section: ‘New Messages’ or click ‘MESSAGING’
and then click ‘RECEIVED MESSAGES’. This will display a listing of your messages 2. Click on the relevant one and see a preview.
This bar should only be used as an ‘indicator’ of a person’s work to help you see how much work has been done. If the participant bar has a low percentage after a period of months then this could indicate that they have not done any work or they may have not uploaded any evidence. You may wish to discuss this with them.
However a participant could still be doing work outside of eDofE but not uploading any of it. They could upload batches at any time or at the very end of the period. You should speak to your participants and find out when they like to upload work so you understand why their bar is not increasing.
The ‘time left’ measurement is the minimum period of time that must pass before a participant’s programme can be completed. Participants can still continue after the time has passed and the system will not stop work being uploaded until the participants 25th birthday.
Note: The progress bar is not used to indicate whether a section can be approved on eDofE. You can still approve a section even if the bar shows 1% or 100% progress.
eDofE guide for participants 10/2010 version 1.3
Page 30
Abandon a level The participant has the ability to state that they do not want to finish their DofE programme. This can be for various reasons i.e. they want to start the next level but the current level is stopping them starting sections or they no longer want to do their DofE. The participant can locate this button on their sectional screen under ‘Overview’ located at the bottom of the page.
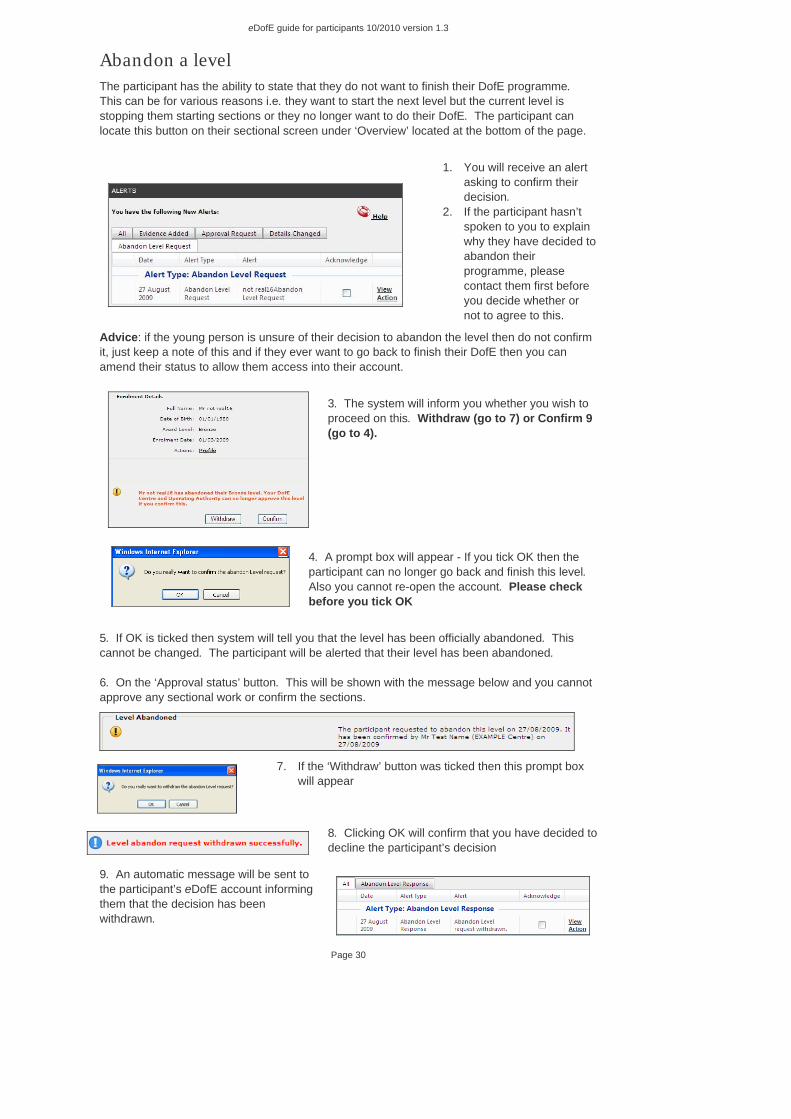
1. You will receive an alert
asking to confirm their decision.
2. If the participant hasn’t spoken to you to explain why they have decided to abandon their programme, please contact them first before you decide whether or not to agree to this.
Advice: if the young person is unsure of their decision to abandon the level then do not confirm it, just keep a note of this and if they ever want to go back to finish their DofE then you can amend their status to allow them access into their account.
3. The system will inform you whether you wish to proceed on this. Withdraw (go to 7) or Confirm 9 (go to 4).
4. A prompt box will appear - If you tick OK then the participant can no longer go back and finish this level. Also you cannot re-open the account. Please check before you tick OK
5. If OK is ticked then system will tell you that the level has been officially abandoned. This cannot be changed. The participant will be alerted that their level has been abandoned. 6. On the ‘Approval status’ button. This will be shown with the message below and you cannot approve any sectional work or confirm the sections.
7. If the ‘Withdraw’ button was ticked then this prompt box
will appear
8. Clicking OK will confirm that you have decided to decline the participant’s decision
9. An automatic message will be sent to the participant’s eDofE account informing them that the decision has been withdrawn.

eDofE guide for participants 10/2010 version 1.3
Page 31
Edit passwords, username, name and DOB For participants Only the participant can edit their own password. No one can access or change the password for a participant account. You can only help facilitate a participant getting a new password.
Also you have the function to change a participants name and date of birth on their eDofE account. The participant cannot change these themselves.
For centre staff Only the DofE Co-ordinator and the DofE Managers can update the password and usernames for DofE Leaders. Co-ordinators who need to change their own details would need to contact their OA to request a change.
I can’t sign in - username is known and security answer has been set:
On the DofE sign in page www.eDofE.org/login.aspx and click on the underlined words password reminder
1. You will then be prompted to put in your username 2. Click ‘Continue’ 3. You are then given your security question and asked for your reply 4. Provided that you give the correct answer then you are able to reset your password and
sign in with the new password.
I can’t sign in - username is known but security answer has not been set or forgotten: 1. Go to the sign in screen 2. Press ‘password reminder’ 3. Enter username 4. If you don’t have the security answer then press ‘Cannot remember’ 5. A message will pop up saying a new password will be sent to your personal email address –
Yes/No 6. Saying yes – the system will send the a new password to the personal email address 7. If the young person hasn’t yet entered an email address (ie they haven’t yet accessed their
account) then the DofE Leader has the ability to access the person’s eDofE account and enter an email address. To do this go to the young person’s summary screen, go to contact details, go to email addresses and enter a new email or correct an error if it has been input incorrectly.
8. The system will send a random password to the users personal email address, and they can then access their account. The content of this random password email will not state the ‘username’ because sometimes the email of that person is incorrect.
View participant’s username: It will permit you to only view the username but not edit. Go to the participant’s summary screen to view their username.

eDofE guide for participants 10/2010 version 1.3
Page 32
Edit user status If a participant or a staff member leaves/decides not to continue, then you can update their status of their eDofE account.
To edit a ‘lapsed’ status – this is a set process if anyone has a lapsed status. Go to DofE centres, select ‘Manage Lapsed accounts’. Find the person name and click ‘View account’, then ‘View/edit’ and change the status.
To edit a participant status (which is not lapsed) – go to their summary screen, select ‘Personal details’, then select ‘Login Info’. Click the ’View/Change Status’ button. You can select a status for the participant and you must enter a reason why it has been changed:
The system will keep a record on who has been updating a participants status.
To edit a centre staff status (which is not lapsed) – go to ‘Manage staff’, find the staff member and press ‘edit’ (if you cannot see edit then its is because you are the same level as they are. You need to contact your manager to edit the other staff members account). Scroll to the very bottom and you will be able to edit the status.
eDofE status definitions ‘Active’ statuses (or what we call a ‘live’ account) - New – a brand new account and the user has not completed all the mandatory fields - Open – the user has completed all the mandatory fields
‘Inactive’ statuses – any user with this status cannot access their account until their Operating Authority or Leader changes their status back to New or Open. - Closed – a user is no longer working on their DofE or left the organisation - Lapsed – the user cannot be contacted and the Leader/manager is unsure if they are still
involved. Also after nine months of inactivity from a user (e.g. not logging in), the system will automatically lapse their account.
- Suspended – The user is under investigation. - Terminated – The user has been removed from their organisation. - Removed – Do not use this status unless you want this account to be deleted from the
system.
To edit a staff member status – Note, a DofE Co-ordinator can edit the Leader’s account. Only a DofE Manager or Assistant can edit the centre Co-ordinator status.

eDofE guide for participants 10/2010 version 1.3
Page 33
Glossary
Participation Place – a young person’s contribution towards the Charity’s costs of running their DofE programme. This includes their Welcome Pack, eDofE account, Award certificate and badge, attendance at a Royal Gold Award Presentation should they wish to accept it at Gold and their Achievement Pack free PDF.
DofE Co-ordinator – The person who sets up and manages the DofE in a centre. They support the Leaders and oversee the groups.
DofE Leader – The adult responsible for a DofE group. They lead, guide and encourage young people, agree their programme choices and sign off the sections/Award. Within eDofE the tag of ‘primary’ Leader will receive all new updates and evidence from their participants.
DofE Manager – The person in an Operating Authority who is responsible for the day to day delivery of the DofE. There will often be other assistants and staff involved. DofE Managers who have been allocated to specific centres (called an Assistant Manager) can only work with those centres and cannot create centres.
Volunteer – An adult who helps a DofE Leader run a group. They may give general support, i.e. administration, help run one section or give specific training. Within eDofE they can only view/access news and resources.
Assessor/Supervisor – These roles only exist within the Expedition section of eDofE.
Centre – A location where the DofE is run for example a school, youth centre, Young Offenders Institution. There may be one or more groups at a centre.
Group – A group of young people who are working together on their DofE programme with one DofE Leader. Centres (like a school) may organise their groups by the DofE level/school term so they know who are in that group. They can duly name it that way.
Teams – Participants working together on a specific volunteering activity. For example: a Bronze volunteering team of three working on a recycling project. eDofE treats participants as individuals within the Expedition section, although they must do their expedition as part of a team.
Alert – eDofE will send an ‘alert’ to a user’s eDofE account whenever another user makes a specific action. This is normally the communication between the Leader and their participants. For example if a participant has uploaded evidence and/or requested approval for their section an alert will be sent to the Leader’s alert inbox.
Status definitions –
‘Open’: you have completed your mandatory fields.
‘New’: a brand new participant account has been created.
‘Closed’, ‘suspended’ and ‘terminated’: indicates you are no longer using your account.
‘Lapsed’: is used if your Leader is unsure where you are. The system will automatically lapse any account not accessed for nine months. A Leader can reactivate lapsed accounts.
A more detailed glossary is available on www.DofE.org