cdx1000 / 13.56mhz / 2mhz dual rf generator · fp5201rx cdx1000 block diagram ... interlock circuit...
TRANSCRIPT

CDX1000, FP5201Rx 06-12-01 Creation date.
CDX1000 / 13.56MHz / 2MHz
DUAL RF GENERATOR
Copyright © 2004 by Comdel, Inc. The information contained in this manual is proprietary to Comdel, Inc. and is protected by copyright and trademark laws.
You may not modify, copy, reproduce, republish, post, transmit, or distribute in any way any material from this manual except as may be expressly permitted in writing by Comdel, Inc .
Comdel, Inc. • 11 Kondelin Road, Gloucester, MA 01930 • Phone: 800-468-3144 • www.comdel.com

1
Table of Contents
I. Safety Information...................................................................2
II. Description / Specifications .....................................................5 A. Electrical Specifications B. Mechanical Specifications C. Environmental Specifications D. Testing Specifications E. Packaging and Shipping Specifications
III. Unpacking and Inspection.....................................................10
IV. Maintenance ..........................................................................10
V. Preparation For Use..............................................................10
A. Line Requirements B. Cooling Requirements C. Installation Requirements
VI. Operating Instructions ..........................................................11
A. Local Operation B. Remote Operation
VII. Theory of Operation..............................................................13
A. AC Interlock System B. DC Power Supplies C. Oscillator Control Board D. Driver E. PA600S Power Amplifier F. LF1250 Power Amplifier G. Directional Coupler Board H. CDX Controller I. CDX Autotune Parameters
VIII. Certification.........................................................................18
IX. Chassis Symbols ....................................................................19
X. Figures
FP5201RX CDX1000 Block Diagram FA0900RX AC Interlock assy schematic FA0500RX Hall Effect Current Monitor assy schematic FA0411RX Oscillator Control assy schematic FA0129RX Directional Coupler assy schematic FA0614RX CDX Interface assy schematic FA0604RX CX Microcontroller assy schematic FA0605RX Softkey Input Interface assy schematic FP5201RX.dwg Facilities Control drawing

2
NOTE: Before installing equipment, carefully read and familiarize yourself with the entire operations manual. Observe and obey all WARNING and CAUTION notes provided.
I. Safety Information
Warning Label and Safety Marking Explanations: The following symbols and terms may be found on an instrument or used in this manual.
The CE mark indicates compliance with all currently applicable directives and standards.
This label indicates a general warning or caution condition.
This symbol indicates the presence of high voltages in or around the unit.
This symbol indicates that the component or circuit is short circuit protected.
This symbol indicates the presence of RF energy in or around the unit.
This symbol indicates a protective earth ground connecting point.
This label indicates a presence of high voltage in or around the equipment, which may cause sever injury or death. All appropriate precautions should be observed when installing, operating or servicing this equipment.
This label indicates the presence of Radio Frequency energy in and around the equipment, which may cause burns or other injuries. All appropriate precautions should be followed when installing, operating or servicing this equipment.

3
The WARNING heading used in this manual explains dangers that might result in personal injury or death. Always read the associated information very carefully before performing the indicated procedure. The CAUTION heading used in this manual explains hazards that could damage the unit. Such damage may invalidate the warranty.
MUST – This word is understood to indicate a mandatory condition. HIGH VOLTAGE – Voltages greater than 50 volts DC or 25volts AC and known to cause death or serious injury if contacted. SERVICE – Any operation of maintenance, repair, calibration or similar activity other than the normal operation of the unit. QUALIFIED SERVICE TECHNICIAN, QUALIFIED ELECTRICIAN, QUALIFIED PERSONELL – These terms indicate persons specifically trained to install, service or other wise handle electronic equipment of the character and hazard potential of this unit.
End User Labeling
The system installer should obtain and apply all appropriate safety and warning labels required by the end user’s local fire department jurisdiction and Occupational Health and Safety Administration over and above those supplied by the generator manufacturer.
Read And Understand This Section Fully Before Installing or Operating This Equipment.
WARNING: This equipment must be installed, operated and serviced only by trained, qualified persons. General Safety Requirements
• WARNING: Hazardous Voltages and RF voltages are present inside this unit, which may cause injury or
death. To prevent electrical shock and or RF burns, never operate this equipment with the covers removed. Never operate without an appropriate cable connected between the RF output connector on the rear panel and the load.
• CAUTION: There are no user or operator serviceable parts inside this equipment. Refer all service to a
qualified service technician.
• This equipment must be bonded to Protective Earth (safety ground) prior to operating the unit. Safety ground connection must be made at the unit’s rear panel designated 1/4”- 20 threaded ground stud. The ground wire should be a #14 awg or equivalent (minimum) green/yellow lead.
• Replace fuses only with identical type and rating parts. Installation and connection of this equipment must
only be performed by a qualified electrician.
• HEAVY OBJECT CAUTION: A heavy object caution exists for equipment weighing more that 51 lbs or 23 kg. Use lifting aids to install unit, such as chain lifts or hooks and straps, attached to the four handles at the sides and front of unit. Guide unit into final location using care to keep hands and body parts clear of unit.

4
CE Mark Specific Safety Requirements
• This equipment meets all applicable safety directives (as specified in prEN50178) required to qualify for the
application of the CE marking. • This equipment must be installed in accordance with the applicable requirements, or prEN50178 and EN60204-1
/ IEC-204-1.
• This equipment is qualified to operate at Pollution Degree II and Insulation Category II.
• The installation of this equipment must assure that the AC power input connector (UL/CSA) is not accessible to the user/operator. Access may be gained only by a qualified service technician. AC Mains connector installation must be in accordance with local requirements.
• This unit provides appropriate separation between all interface, mains and output circuits in accordance with
5.2.18 of prEN50178.
Interlock System
• The low voltage (24 V) safety interlock circuit is designed to disable the unit in the event of an interlock fault condition. At a minimum, interlock protection is located at the removable top cover, bottom cover and RF output connector safety cover.
• End user’s system should provide indication to the operator of the interlock fault condition.
• Low voltage power for the interlock circuit is supplied by a step down transformer located inside the unit.
This transformer is designed to provide safe low voltage operation and provide isolation from the main AC line.
Lockout/Tagout
Prior to performing system maintenance, repair or other service operations the generator must be locked out and tagged out to prevent accidentally energizing the system. The following steps should be performed only by a qualified service technician: • Disconnect AC input power to the generator. • Mount a suitable “Clamshell” type lockout device to the AC input plug such as a Hubbell # HLD2 or
equivalent. Follow all manufacturers’ directions for the lockout device. • Secure the lockout device with an appropriate padlock or safety lock. • Apply a lockout warning tag to the lock out device. The Lockout / Tagout device should not be removed until system service is completed and it has been determined appropriate to reconnect and operate the generator.

5
II. Description / Specification The CDX 1000's high frequency (HF) section provides up to 600W of power, with optional frequencies anywhere from 2 to 60 MHz. The low frequency (LF) section can deliver 600W, with optional fixed or variable frequencies ranging from 20 KHz to 2.2 MHz. The LF section also features an optional phase locked output, which eliminates the need for matching networks in many applications. Sharing a common cooling system and DC power source, the CDX 1000 simplifies facility requirements and reduces spare parts inventory. Each section responds to completely separate remote control commands. The dual control board performs many functions, including: Pulse-width power control; protection circuitry; system status indicators; power metering; remote interface; and protection circuitry. A. Electrical Specifications
1. Electrical input requirements: 208 VAC, 3 phase 50/60 Hz 20 A
2. Manufacturers input specifications:
2.1 AC input voltage: 187-229 VAC, no neutral, 3 Phase with PE ground 2.2 AC line frequency: 47-63 Hz 2.3 AC Input current: 12 Amps max./Phase
3. Input fusing: 20A circuit breaker 4. Output Characteristics: The following specifications, unless otherwise stated, are for both 13.56 MHz
and 2 MHz outputs (for full AC input voltage and frequency range)
4.1 0 to 600 W continuous forward power at the units rear bulkhead RF connector into a 1.25 VSWR load (all phases) as reference to 50 ohms.
4.2 The unit shall be capable of simultaneously supplying 600 W of power at 2 MHz into a
50 ohm power load and 600 W of power at 13.56 MHz into a separate 50 ohm power load. 4.3 The 13.56 MHz output shall deliver 0 to 600 W continuous forward power into a load which
consists of a 50 ohm coaxial cable (any electrical length) feeding a matching network that is connected to a nonlinear plasma source.
4.4 The 2 MHz output shall deliver 0 to 600 W continuous forward power into a L-C parallel
resonant load which is inductively coupled to the above mentioned plasma. The 2 MHz RF feed is tapped into the inductor (of the L-C resonator) so that the input impedance with the plasma present is very close to 50 ohms at the resonance frequency. The 2 MHz output will self tune to the resonance of the L-C resonator by means of a microprocessor controlled frequency tuning algorithm.
4.5 Each output section shall have at least 50 dB of isolation from the other by means of internal
DC power supply isolation and RF shielding. This shall be measured with each output loaded with a 50 ohm power load at full output power.

6
4.6 The actual forward RF output power is to track the command setpoint for any load conditions where the reflected power is less than:
100 W for the 13.56 MHz Output 100 W for the 2 MHz Output
4.7 Accuracy/Regulation: +/- 3.0% of setpoint, from 10% to 100% max output, as measured by
either the actual output power and/or the analog read back signal on Pin 3. 4.8 Linearity: +/- 3.0% deviation from a straight line for successive requested setpoint power
increment changes, from 10% to 100% max output, as measured by either the actual output power and/or the analog read back signal on Pin 3.
4.9 Short Term Stability: +/- 1.0% for any given output power setpoint during one continuous
hour of output. 4.10 Long Term Stability: +/- 5.0% for any given output power setpoint during 3 years of
continuous output. 4.11 Rise Time: less than 100 ms; from leading edge of enable signal to 90% of power level
requested. 4.12 Zero Setpoint: less than 5.0 W actual output power and less than 5.0 W read back power
when setpoint signal is at zero or at a negative voltage.
4.13 High Frequency 13.56 MHz Section Output Frequency and Stability: 13.56 MHz +/- 0.005% 4.14 Low Frequency 2 MHz Section Output Frequency Range and Auto Tuning:
The 2 MHz Section shall have an output frequency range of 1.8 MHz to 2.2 MHz. The unit shall include an auto-tune feature to self adjust frequency for the lowest VSWR over this range. The auto tune feature should operate independent of the length of coaxial cable used to interface the output to the plasma/resonant load. The auto tuning frequency sweep will be of a continuous nature or comprised of discreet frequency steps of step size no larger than 1 KHz. This should be capable of auto tuning to within 1 KHz of the actual resonant frequency. The auto tune circuit shall lock to the lowest VSWR within 2 seconds.
4.15 Output Filtering: (for full power into 50 ohms)
13.56 MHz Output
Harmonic Signals: less than -40 dBc Spurious Signals: less than -50 dBc AM & FM Noise: less than -60 dBc
(@ 50 kHz offset)
2 MHz Output:
Harmonic Signals: less than -40 dBc Spurious Signals: less than -50 dBc AM & FM Noise: less than -50 dBc (@ 20 kHz offset)
7
RF Coupling
Due to RF coupling in the plasma chamber the 2 MHz output section design may require a 13.56 MHz dissipation or filter circuit so that the coupled 13.56 MHz power does not disturb the 2 MHz output section in any way. Similarly, it may be necessary to also ensure that 2 MHz power does not couple into the 13.56 MHz output section and cause any disturbances.
5. Protection Features:
5.1 Mismatch Protection: Continuous operation into any impedance mismatch condition
without damage or malfunction; forward power foldback shall occur within 500us if reflected power exceeds:
100 W for the 13.56 MHz Output Section 100 W for the 2 MHz Output Section
5.2 AC Line Protection: A manually resettable circuit breaker on the rear panel opens upon
overcurrent conditions. 5.3 RF Output Power Connection Interlock: A Hardwired interlock that disables the input AC
power contactor upon removal of either of the RF output cables. 5.4 Safety Interlock: Disables the input AC power contactor via either of the control I/O
connection signals; open between Pins 11 & 12. 5.5 Over Temperature Fault: Output disabled on high internal temperature. 5.6 Control Signal Protection: Unit not to be damaged if a short circuit or up to 30 volts AC or
DC is placed between any input signal, return signal, and ground.
6. Control Signals
6.1 Signal Input Impedance: 10 K ohms, minimum. 6.2 Signal Input Isolation: 1000 VAC minimum to the A/C supply line.
7. Rear Panel Electrical Connections: All electrical connections shall be placed at least 75mm (3") from
the right and 100mm (4") from the left side of the rear panel when viewed from the rear for clearance purposes.
7.1 Input Power Connection: Line cord to be 4 mm2 (12 AWG) conductor (three phase &
ground); line cord jacket material to be type "STO" gray; line cord to be crimped to NEMA L15-20P style plug; line cord length to be 1.37 m +/- .15 m (4.5 ft. +/- 6.0”) as measured from the rear panel exterior to the strain relief end of plug. Reference MARINCO part number 2015P AM3.
MARINCO: One Digital Drive
Novato, CA 94949 (415) 883-3347
7.2 Output Power Connectors: Two Type "N" female coaxial bulkhead connectors.

8
7.3 Control I/O Connector: Two 15 pin sub miniature "D" type (female) receptacles. I/O connector #1 for the 13.56 MHz section and I/O connector #2 for the 2 MHz section.
7.4 Chassis Ground: Stud with two kept nuts and star washers located on the right side of the
rear panel as viewed from the rear of the unit; lower right hand location is preferred. "PE Ground symbol" marking to be located visible next to stud.
8. Control I/O Pinout & Signals for both 13.56 MHz and 2 MHz.
Pin 2: Ref Power Output: 0 to +10 VDC = 0 to 600 W linear Pin 3: Fwd Power Output: 0 to +10 VDC = 0 to 600 W linear Pin 4: Power Enable: Enables the output oscillator with an external contact closure to Pin 9. (24 Volts: 0.5 amps MAX. SWITCHING) Pin 5: Remote Setpoint Input: 0 to +10 VDC = 0 to 600 W linear Pin 6: Remote Common: Common for Pins 2,3,5,7 Pin 7: RF Power On Output: +5 VDC = RF ON; OV = RF OFF Pin 8: Over-temperature output. Pin gets pulled to ground via 1N4001 diode. Pin 9: Power Enable Common: Common for Pin 4 Pin 11: Safety Interlock: Interlock is made with an external contact closure to Pin 12 which enables the AC input power contactor. (24 VDC; 0.5 amps MAX SWITCHING.) Interlock loop must be able to drive an external loop with resistance as high as 8 ohms. Pin 12: Interlock Common: Common for Pin 11. Pins: 1,10,13,14,15: Not assigned: No connection
B. Mechanical Specifications
1. Size: 432 mm x 173 mm x 483 mm (17"W x 6.813"H x 19"D) maximum chassis dimension 2. Weight: 61.4 kg (135 lb.) maximum 3. Mounting: Standard 19" EIA rack mounting adapters with 7" front panel. Front panel to be attached
flush with bottom of power supply chassis. 4. Color and Finish: Front panel to be the only surface to be painted gray with contrasting blue
alpha-numeric reference designators. All other surfaces have a coated finish such as gold zinc chromate, gold alodyne, or equivalent.
5. Water Connections: 1/4" NPT female, one inlet and one outlet for water cooling of amplifier sections.
The water connections shall be placed at least 75 mm (3") from the right and 100 mm (4") from the left side of the rear panel when viewed from the rear for clearance purposed.

9
6. Handles:
6.1 Front Panel: Two handles (left & right) to be mounted on the front panel exterior, evenly
spaced on center. 6.2 Side Panels: One handle to be mounted on the left and right side panel exteriors, evenly
spaced on center, if weight exc eeds 22.73 kg (50 lb.)
7. Front Panel and Indicators and Actuators:
7.1 All front panel indicators will be displayed on a 20 X 2 character alpha-numeric display. 7.2 All settings (in local control mode) will be made from a single rotary encoder or three soft key
actuators.
8. Warning Labels:
8.1 Safety Labels for hazardous voltages, Heavy Object, and Caution for lifting by water fittings are to be provided on operator visible areas of the generator. IEC standard symbols in user visible areas for start, stop, enable and cautionary conditions, PE ground, high temperatures and RF energy present.
8.2 Special marking available at customers specifications
C. Environmental Specifications
1. Operating range: +10 to +40° C (50 to 104° F) ambient, 5-85% R.H. (non-condensing, no formation of
ice), 86-106 kPa. Temperature, humidity and air pressure operating range class 3K3 per prEN50178. 2. Cooling Inlet Air: +5 to +35° C max (41 to 95° F) 3. Inlet Water Cooling Requirements: 6 l/m (1.6 GPM) @ 414 kPa (60 psi) max, +5° to max 25° C
(40° F to 77° F) 4. Coolant type: Water 5. Storage: Temp, pressure & humidity per prEN50178. –25 to +70° C (class 1K4) @ up to 95% R.H. non-
condensing (class 1K3), 70 to 106 kPa (class 1K4). 6. Transportation: Temp, humidity and pressure class 2K3 per prEN50178. –25 to +70° C @ up to 95%
R.H. non-condensing, 70-106 kPa. 7. This equipment has been designed to be compliant with FCC Part 18 emission standards for EMI/RFI
radiation. Radiated emissions shall also not exceed maximum levels permitted by ANSI C95.1-1982 standards on safety levels with respect to human exposure to RF and electromagnetic fields from 300KHz to 100GHz.
D. Testing Specifications
1. Production Acceptance Test: Each unit will be required to "pass" production acceptance testing and
a "Final Test Report" will be generated to document results.
1.1 Production Acceptance Testing process shall include as a minimum: Complete Parametric/Functional Tests covering: line regulation, calibration, linearity, burn-in, over-

10
temp test, open circuit test, MAX power test, harmonic distortion, AC ripple, and remote interface tests. Data sheet for each generator to be shipped with unit.
E. Packaging & Shipping Specifications
1. Accessories Supplied
1.1 Final test results 1.2 Operating manual
2. Shipping
NOTE: If there is a conflict between this document and customer Purchase Order then the latter supersedes. NOTE FOR REPAIRS: Unless repairs have accessories included with them and have them listed on the Return Material Authorization (RMA) Tag, returned materials will not have to fulfill procedural requirements for accessories.
III. Unpacking and Inspection
1. Carefully unpack the unit and inspect for any obvious signs of physical damage that might have occurred during shipment. Notify the shipping agent of any damage immediately.
2. Check the outside of the unit for missing or loose mounting screws or broken parts.
3. If there is shipping damage or the unit fails to operate properly upon receipt, report damage to the
carrier and Comdel immediately. CAUTION: Breaking the seal or removing the warranty decal from this unit will void the warranty. If internal damage is suspected, contact factory for assistance.
IV. Maintenance The CDX1000 is designed to operate unattended for long periods of time. Should periodic maintenance or service be required, it should only be performed by qualified service persons. Contact the factory for maintenance or service recommendations.
V. Preparation For Use
A. Line Requirements
The CDX1000 is designed to operate from a 208 VAC, three phase line. The system will still function within specifications when the line voltage fluctuates between 187 volts and 229 volts. Voltages over the recommended 208 VAC, however, reduce the safe performance margins designed into the system and should be avoided. The system draws a maximum of 12 Amps per phase when used to drive a load of 50 ohms. Under conditions of mismatch, the amplifier could draw slightly more current.

11
B. Cooling Requirements
The ambient air temperature should not exceed 40o C. There should be enough room over the top of the amplifier and along the sides to permit an unobstructed airflow through the unit. Water temperature should not exceed 25 o C, and should not fall below a temperature where excess condensation could develop within the unit. Water volume should be at least 6 l/m (1.6 GPM) and pressure kept below 414 kPa (60 PSI).
C. Installation Requirements 1. This equipment must be installed in accordance with the applicable requirements of prEN50178 and
EN60204-1 / IEC-204-1. 2. This equipment is qualified to operate at pollution degree II and installation category II. 3. This equipment is intended to be powered from a 208 VAC, 3 Phase source, no neutral connection
used. For use at other voltages, a safety isolation transformer must be used to power this equipment in accordance with the requirements of EN60742 / IEC-742.
4. The installation of this equipment must assure that the AC power connector, (UL/CSA) and line cord
is not accessible to the user/operator. Access may be gained only by a qualified service technician. AC Mains connector installation to be in accordance with local requirements.
5. The unit provides appropriate protective separation between all interface, mains and output circuits in
accordance with section 5.2.18 of prEN50178.
6. Connect a 50 ohm load to the RF output of the amplifier.
NOTE: Load and coaxial cable should have a minimu m 600 watt power handling capacity. 7. With circuit breaker "OFF" connect the power line to the unit.
VI. Operating Instructions
The CDX1000 may be operated either locally at the front panel or remotely through the two 15 pin subminiature D connector (P1 and P2) on the rear panel. A. Local Operation
NOTE: AC interlock Pins 11-12 must be connected to power up the unit and RF ENABLE Pins 4-9 must be connected for the unit to be operated. These jumps must be made on both I/O connectors.
1. Check to see that there is clearance around the unit for proper air flow and that a proper RF load is
connected to each RF output connector at rear of unit. 2. Connect unit to 208VAC nominal, three phase and turn on main power breaker at rear of unit.
3. The CDX1000 should power up automatically (autostart enabled) when AC power is applied and the
rear panel circuit breaker is in the ‘ON’ position. If the LED at red pushbutton (AC OFF) marked 'O' is on solid either the AC power was shut off via the AC OFF button or the autostart feature is not enabled. The autostart feature is enabled via a jumper (P8) on the interface assembly (FA0614RX) mounted behind the front panel display. If the AC OFF LED is off, then check AC line power.

12
If LED is flashing then check RF output connector interlock switch, top cover interlock switch, or interlock loop, Pins 11 and 12 of rear panel connectors P1 and P2.
4. Push AC ON green pushbutton marked '|'. The AC ON LED should be illuminated after the mains
contactor closes.
5. The front panel display should show the model/frequency of the unit and the software version number for the first two seconds. The front panel display should show 'RM' for remote control. A double-push (pressing the button twice within one second) of the mode button (>>) on the front panel will switch the generator to local control. To switch back to remote operation double push the mode button (>>) again.
6. In remote mode the display shows the forward and reflected power of the HF side on top and the
forward and reflected power of the LF side on the bottom. The frequency of the LF side is displayed in the lower left corner. In remote mode the LF generator is always in auto tune mode. When the output of one side is enabled the letter H (HF) or L (LF) will blink and the green LED on the RF ON button will illuminate.
7. In local mode the display will show which RF output is currently controlled from the front panel in the
upper left corner. The default is “HF” for the 13.56 MHz output. To switch to the “LF” 2 MHz output press the mode button (>>) once. The forward power, reflected power and setpoint of the output under control are displayed. The setpoint is adjusted by turning the encoder. The output frequency of the LF side is displayed above the setpoint. In the LF mode pressing the select button (>) will switch the generator to manual frequency control. The display will change from AFC (auto) to MFC (manual) and turning the encoder will now adjust the frequency of the LF output. Pressing the select button (>) again will change the LF output back to auto tune.
8. Enable RF by pushing the blue RF button on the left side of the front panel. The RF button LED
should illuminate, the display will flash 'RF', and readings of forward and reflected power should appear. If the display shows 'CHECK RF INTERLOCK', this means that the RF enable Pins 4 and 9 of the appropriate rear panel connector are not connected.
9. RF is disabled by pushing the RF button again, by removing RF interlock by disconnecting Pin 4 and
9 of the appropriate rear panel connector, or by interrupting the AC mains via the AC interlock loop, the stop softkey, or the circuit breaker located on the rear panel.
10. The CDX1000 regulates forward power based upon the setpoint selected by the large data encoder
knob on the front panel.
11. An overtemp condition due to improper clearance around the unit or high ambient temperature will automatically disable both RF outputs on the CDX1000. The front panel display will show 'OVERTEMP'. RF will not be able to be turned on until proper coolant flow/temperature is established.
B. Remote Control Operation
1-4. Refer to section II.A.8 for the electrical interface specification. For remote control operation follow the
first four procedures for local control as listed above.
5. Remote operation is the power-up default mode. If the current mode of operation is local, then double-push the mode button (>>) until the display shows 'RM' in the upper left corner OR restart the unit by turning AC off then back on.
6. Either RF output is enabled by a contact closure between RF ENABLE Pins 4 and 9 of the appropriate
rear panel connector. The RF button should illuminate, the display flash 'H', 'F', or both, and readings of forward and reflected power should appear.

13
7. The voltage on Pin 5(+) and 6(-) of the P1 and P2 connectors will determine the output power level of
each of the generator outputs. A voltage of 0 to 10 volts DC across Pins 5 and 6 (chassis ground) will linearly correspond to an RF output of 0 to 600 watts.
8. Reflected and forward power can be monitored remotely through Pins 2(+), 6(-) and 3(+), 6(-)
respectively on each connector. Both of these balanced analog outputs are 0 to 10 VDC linearly corresponding to 0 to 600 watts of forward or reflected power.
9. An overtemp condition as stated in #11 above in local will also result in the 'closure' of the
OVERTEMP DIGITAL OUTPUT, Pins 8(+) and 9(-) (chassis ground) of both rear panel I/O connectors.
10. When RF is present at either RF output connector, the POWER ON DIGITAL OUTPUT, Pin 7 of the
appropriate rear panel connector will be at approximately 5V.
VII. Theory of Operation
The CDX1000 is a dual frequency power amplifier for use in OEM applications. The power sources consist of an AC Interlock assembly, DC power supply, a 600W 13.56 MHz power amplifier and a 600W 1.8 – 2.2 MHz power amplifier, and associated control systems and monitoring circuits. 13.56 MHz Amplifier
The radio frequency signal is generated locally in the Oscillator Control Module. From this module the signal goes to the driver. The driver further amplifies the signal to approx. 40 Watts to drive the power amplifier. From the PA the signal is fed through a low-pass filter to remove harmonic content. Forward and Reflected control signals are obtained from the output signal as it passes through the power monitor board to the output RF connector. The front panel CDX Controller monitors the user input from either the front panel or rear connector, and monitors the control signals from the RF output power monitor, PA current monitor, and PA overtemp switch. Refer to Figure FP5201RX, CDX1000 BLOCK DIAGRAM, to see how the individual modules are connected together. 2 MHz Amplifier
The radio frequency signal is generated locally on the front panel CDX controller. From this assembly, the signal goes to LF1250 power amplifier (PA). The output of this power amplifier is matched to 50 ohms through a 6 pole low-pass filter. Control signals are obtained from the output signal as it passes through the power monitor board to the RF output connector. The front panel CDX Controller monitors the user input from either the front panel or rear connector, and monitors the control signals from the RF output power monitor, PA voltage sensors, PA current monitor, and PA overtemp switch. Refer to Figure FP5201RX, CDX1000 BLOCK DIAGRAM, to see how the individual modules are connected together. The LF1250 amplifier’s frequency can be manually adjusted between 1.8 – 2.2 MHz from the front panel (local mode only) or the amplifier can Autotune to minimize reflected power. The Autotune algorithm is carried out in the generator’s firmware and is optimized to tune quickly in a plasma load. There are some adjustable parameters that can be set via DIP switches on the CX microcontroller assembly located behind the front panel. Adjustment of these switches should not normally be necessary. A description of the switch settings is located in the Autotune Section VII. I starting on Page 17. A. AC Interlock System
CAUTION: Never attempt to operate this equipment with any of the interlocks bypassed.
14
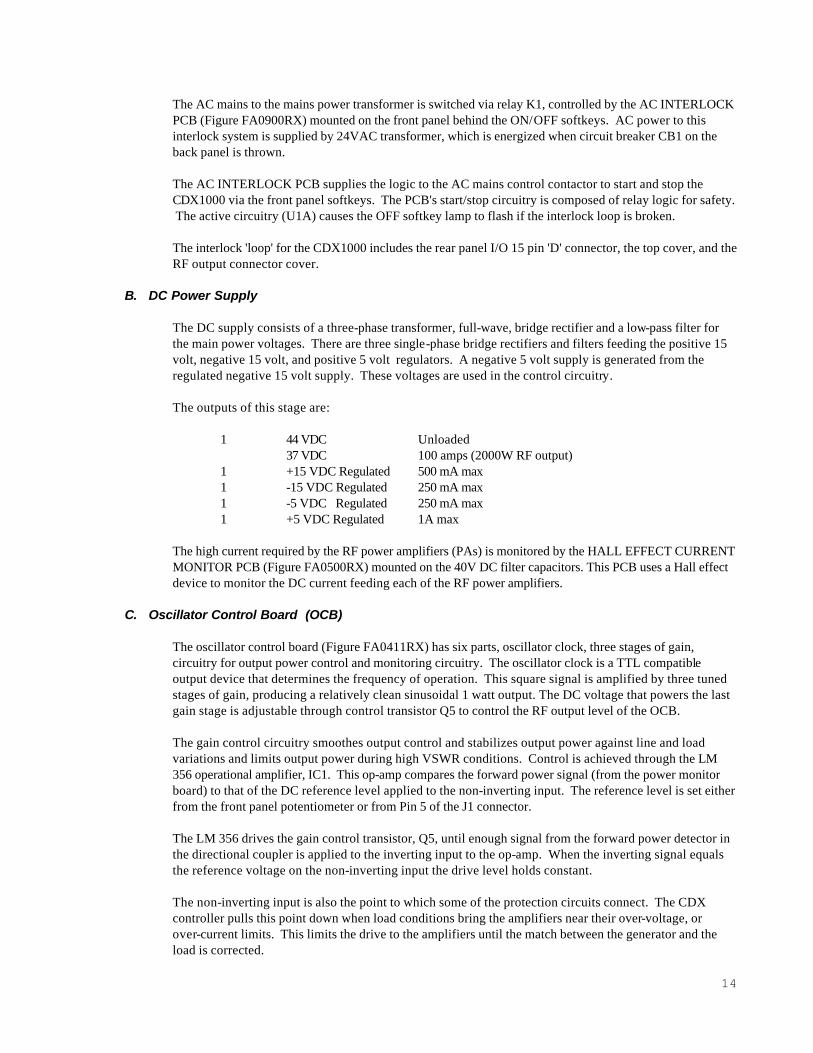
The AC mains to the mains power transformer is switched via relay K1, controlled by the AC INTERLOCK PCB (Figure FA0900RX) mounted on the front panel behind the ON/OFF softkeys. AC power to this interlock system is supplied by 24VAC transformer, which is energized when circuit breaker CB1 on the back panel is thrown. The AC INTERLOCK PCB supplies the logic to the AC mains control contactor to start and stop the CDX1000 via the front panel softkeys. The PCB's start/stop circuitry is composed of relay logic for safety. The active circuitry (U1A) causes the OFF softkey lamp to flash if the interlock loop is broken. The interlock 'loop' for the CDX1000 includes the rear panel I/O 15 pin 'D' connector, the top cover, and the RF output connector cover.
B. DC Power Supply
The DC supply consists of a three-phase transformer, full-wave, bridge rectifier and a low-pass filter for the main power voltages. There are three single-phase bridge rectifiers and filters feeding the positive 15 volt, negative 15 volt, and positive 5 volt regulators. A negative 5 volt supply is generated from the regulated negative 15 volt supply. These voltages are used in the control circuitry. The outputs of this stage are: 1 44 VDC Unloaded 37 VDC 100 amps (2000W RF output) 1 +15 VDC Regulated 500 mA max 1 -15 VDC Regulated 250 mA max
1 -5 VDC Regulated 250 mA max 1 +5 VDC Regulated 1A max
The high current required by the RF power amplifiers (PAs) is monitored by the HALL EFFECT CURRENT MONITOR PCB (Figure FA0500RX) mounted on the 40V DC filter capacitors. This PCB uses a Hall effect device to monitor the DC current feeding each of the RF power amplifiers.
C. Oscillator Control Board (OCB)
The oscillator control board (Figure FA0411RX) has six parts, oscillator clock, three stages of gain, circuitry for output power control and monitoring circuitry. The oscillator clock is a TTL compatible output device that determines the frequency of operation. This square signal is amplified by three tuned stages of gain, producing a relatively clean sinusoidal 1 watt output. The DC voltage that powers the last gain stage is adjustable through control transistor Q5 to control the RF output level of the OCB. The gain control circuitry smoothes output control and stabilizes output power against line and load variations and limits output power during high VSWR conditions. Control is achieved through the LM 356 operational amplifier, IC1. This op-amp compares the forward power signal (from the power monitor board) to that of the DC reference level applied to the non-inverting input. The reference level is set either from the front panel potentiometer or from Pin 5 of the J1 connector. The LM 356 drives the gain control transistor, Q5, until enough signal from the forward power detector in the directional coupler is applied to the inverting input to the op-amp. When the inverting signal equals the reference voltage on the non-inverting input the drive level holds constant. The non-inverting input is also the point to which some of the protection circuits connect. The CDX controller pulls this point down when load conditions bring the amplifiers near their over-voltage, or over-current limits. This limits the drive to the amplifiers until the match between the generator and the load is corrected.
15
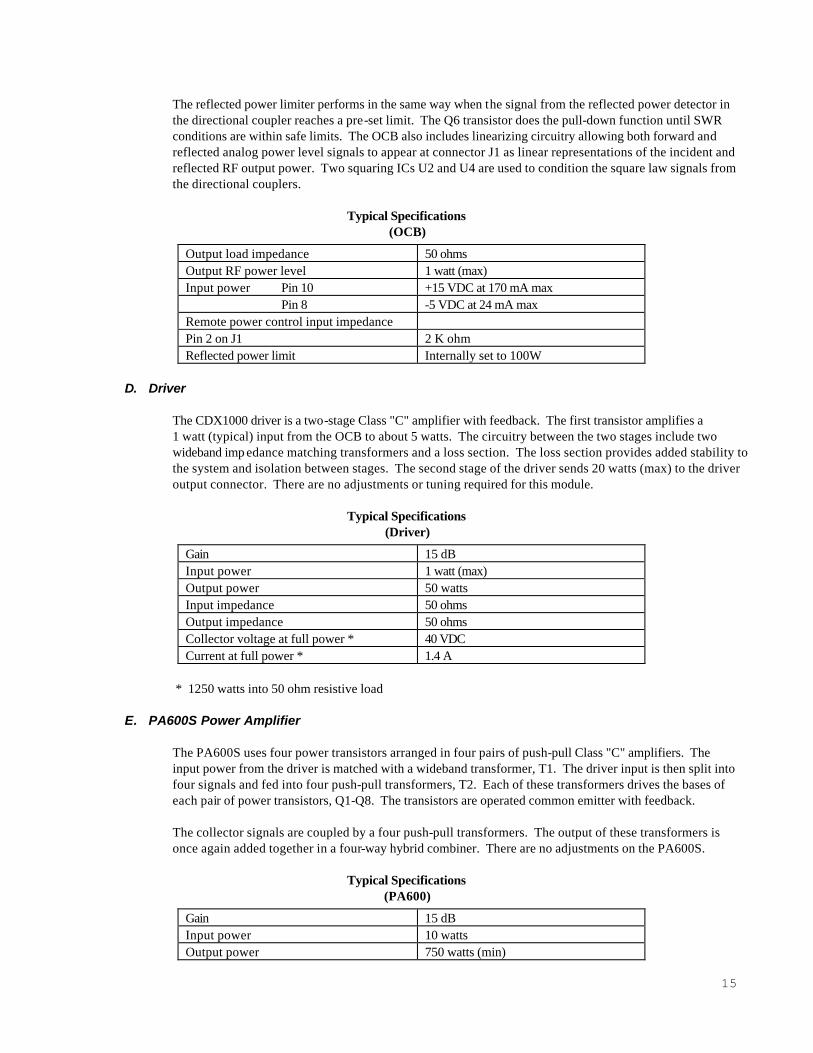
The reflected power limiter performs in the same way when the signal from the reflected power detector in the directional coupler reaches a pre-set limit. The Q6 transistor does the pull-down function until SWR conditions are within safe limits. The OCB also includes linearizing circuitry allowing both forward and reflected analog power level signals to appear at connector J1 as linear representations of the incident and reflected RF output power. Two squaring ICs U2 and U4 are used to condition the square law signals from the directional couplers.
Typical Specifications
(OCB)
Output load impedance 50 ohms Output RF power level 1 watt (max) Input power Pin 10 +15 VDC at 170 mA max Pin 8 -5 VDC at 24 mA max Remote power control input impedance Pin 2 on J1 2 K ohm Reflected power limit Internally set to 100W
D. Driver
The CDX1000 driver is a two-stage Class "C" amplifier with feedback. The first transistor amplifies a 1 watt (typical) input from the OCB to about 5 watts. The circuitry between the two stages include two wideband imp edance matching transformers and a loss section. The loss section provides added stability to the system and isolation between stages. The second stage of the driver sends 20 watts (max) to the driver output connector. There are no adjustments or tuning required for this module.
Typical Specifications (Driver)
Gain 15 dB Input power 1 watt (max) Output power 50 watts Input impedance 50 ohms Output impedance 50 ohms Collector voltage at full power * 40 VDC Current at full power * 1.4 A
* 1250 watts into 50 ohm resistive load
E. PA600S Power Amplifier
The PA600S uses four power transistors arranged in four pairs of push-pull Class "C" amplifiers. The input power from the driver is matched with a wideband transformer, T1. The driver input is then split into four signals and fed into four push-pull transformers, T2. Each of these transformers drives the bases of each pair of power transistors, Q1-Q8. The transistors are operated common emitter with feedback. The collector signals are coupled by a four push-pull transformers. The output of these transformers is once again added together in a four-way hybrid combiner. There are no adjustments on the PA600S.
Typical Specifications
(PA600)
Gain 15 dB Input power 10 watts Output power 750 watts (min)

16
Input impedance 50 ohms Output impedance 50 ohms Collector voltage * 37 VDC Current draw * 25 ADC
* At 1250 watt system output into 50 ohm resistive load
F. LF1250 Power Amplifier
The LF1250 power amplifier in the CDX1000 is an eight device push-pull Class ‘D’ amplifier, with all devices mounted on a water-cooled copper heatsink. Each device (transistor) is rated to produce over 300 Watts of power, giving a total potential output power of 2500 watts per amplifier. This conservative approach gives a large margin of reliability and immunity to large load impedance fluctuations and gives the CDX1000 the ability to deliver large amounts of power into less than ideal load conditions. The output devices are FETs with paralleled gates. The gate drive consists of two FET gate drive ICs U1 & U2. Peak voltage detector diodes D9 & D10 are used by the front panel monitoring circuitry to limit peak voltages seen by the devices. The output impedance of the LF1250 amplifier is about 15 ohms.
G. Directional Coupler Board
The directional coupler board (Figure FA0129RX) is a detector which produces voltages proportional to the square of both forward and reflected power for both the 13.56 MHz and 2 MHz RF outputs. The signals from the detectors are produced from current and voltage taps off the output lines. In the 13.56 MHz amplifier the forward and reflected signals are fed into the OCB where they are linearized. They are then fed to the CDX controller where they are reproduced to the remote interface connector and displayed on the front panel. The reflected power signal is only present when the generator is driving a load that is not purely resistive, or not 50 ohms. This signal is also used to drive the OCB VSWR shutdown circuitry. In the 2 MHz amplifier the forward and reflected signals are linearized and output to the CDX controller where they are displayed on the front panel and buffered for the remote interface connector.
H. CDX Controller
The CDX controller is comprised of four PC boards mounted to the left side of the front panel:
1. CDX INTERFACE PCB
The function of the CDX Interface PCB (Figure FA0614RX) is to condition all of the analog and digital inputs and outputs for the CX Microcontroller. This PCB board also provides the protection control circuitry to limit forward power in cases of high PA current or high PA RF voltage. This protection function is handled by U2. The reflected power protection circuit for the LF PA is located at U1D.
2. CX MICROCONTROLLER PCB
This PCB (Figure FA0604RX), mounted under the CX INTERFACE PCB, contains a 16 bit microprocessor, memory, digital I/O, and analog I/O to control and monitor all activities of the CDX1000. If for any reason the program is terminated or gets lost, the watchdog timer U6 automatically restarts the system. U6 also monitors VCC for low voltage conditions. If VCC drops below 4.5V, the system is shut down via uP reset line, U1-71. If the optional RS-232 serial port is utilized, U7 and associated components supplies the interface.

17
U14 provides the 5V or 10V reference for the A/D (U11) and D/A (U13) converters.
3. SOFTKEY INPUT INTERFACE PCB
This PCB (Figure FA0605RX) is mounted under the CX MICROCONTROLLER PCB and contains the softkey sense pads and buffer circuitry to interface all front panel user interface to the CX Microcontroller.
4. 20 x 2 CHARACTER ALPHA NUMERIC FLORESCENT DISPLAY PCB
This PCB, also mounted under the CX MICROCONTROLLER PCB, provides the display, high voltage power supply, drive circuitry, and microprocessor to interface the 20 x 2 character display to the CX Microcontroller data bus.
I. CDX Autotune Parameters
The parameter settings in the CDX1000 software V3.09 are adjustable via the dip switch settings on the microcontroller board. The settings are only recognized and adjusted during initialization. The settings are displayed for one second during the software initialization routine. The frequency tuning span is 1.8 -2.2 MHz. The minimum step size is 10Hz. The following parameters can be varied, with the factory default values in BOLD type:
1. Gain: The gain is an arbitrary number that is multiplied by an error signal (proportional to rfl/fwd) to
determine the size of the frequency step adjustment. By setting the value of dip switch positions 1&2 the gain number is varied as follows:
0 15 1 20 2 25 3 30
2. Lock: The lock setting determines the percent (of FWD) rise of RFL that the tuning algorithm will tolerate after passing through a null. If the RFL reaches this number the autotune will lock at the null frequency setting. Lock is adjusted by setting dipswitch positions 3&4. The Lock settings vary as follows:
0 1 1 2 2 3 3 5
3. Band: The band setting determines when the autotune algorithm will attempt to retune based on the rise in the RFL by percent of FWD. The band is adjusted by setting dip switch positions 5&6 and varies as follows:
0 .5 1 1 2 2 3 3
4. Scale: The scale setting determines whether the frequency step size is proportional to the SWR or the square root of the SWR. The scale is set by switch 7. Typically the square root setting will tune faster:
0 SQUARE ROOT 1 LINEAR

18
5. Start: The start setting determines whether the frequency starts at MIN frequency and tunes up or
starts at MAX frequency and tunes down. The start is adjusted by switch 8:
0 START LOW 1 START HIGH
VIII. Certification
1. This unit carries the ETL safety compliance mark to UL standard UL-1012. 2. This unit is designed and labeled in compliance with CE mark certification requirements. The
manufacturer will supply a Declaration of Conformity as required.

19
IX. Chassis Symbols
