cd rewritable recorder professional · standard 19-inch rack, as shown below. remove the feet of...
TRANSCRIPT

D01217120B
CD-RW901)"CD Rewritable Recorder
ProfessionalOWNER'S MANUAL

IMPORTANT SAFETY PRECAUTIONS
2 TASCAM CD-RW901MKII
The exclamation point within an equilateral triangle is intended to alert the user to the presence of important operating and maintenance (servicing) instructions in the litera-ture accompanying the appliance.
The lightning flash with arrowhead symbol, within equilateral triangle, is intended to alert the user to the presence of uninsulated “dangerous voltage” within the product’s enclo-sure that may be of sufficient magnitude to constitute a risk of electric shock to persons.
CAUTION: TO REDUCE THE RISK OF ELECTRIC SHOCK, DO NOT REMOVE COVER (OR BACK). NO USER-SERVICEABLE PARTS INSIDE. REFER SERVICING TO QUALIFIED SERVICE PERSONNEL.
This device complies with Part 15 of FCC Rules. Operation is subject to the following two conditions:1) This device may not cause harmful interference, and2) This device must accept any interference received,
including interference that may cause undesired operation.
INFORMATION TO THE USER
This equipment has been tested and found to comply with the limits for a Class A digital device, pursuant to Part 15 of the FCC Rules. These limits are designed to provide reasonable protection against harmful interference when the equipment is operated in a commercial environment. This equipment generates, uses, and can radiate radio frequency energy and, if not installed and used in accor-dance with the instruction manual, may cause harmful interference to radio communications.Operation of this equipment in a residential area is likely to cause harmful interference in which case the user will be required to correct the interference at his own expense.
CAUTIONChanges or modifications to this equipment not expressly approved by TEAC CORPORATION for compliance could void the user's authority to operate this equipment.
For U.S.A.
IN USA/CANADA, USE ONLY ON 120 V SUPPLY.
WARNING: TO PREVENT FIRE OR SHOCK HAZARD, DO NOT EXPOSE THIS
APPLIANCE TO RAIN OR MOISTURE.
CE Marking Informationa) Applicable electromagnetic environment: E4b) The average half-cycle r.m.s. inrush current 1. On initial switch-on: 1.01 Arms 2. After a supply interruption of 5s: 1.61 Arms
For CanadaTHIS CLASS A DIGITAL APPARATUS COMPLIES WITH CANADIAN ICES-003.CET APPAREIL NUMERIQUE DE LA CLASSE A EST CONFORME A LA NORME NMB-003 DU CANADA.
For the customers in EuropeWARNINGThis is a Class A product. In a domestic environment, this product may cause radio interference in which case the user may be required to take adequate measures.
Pour les utilisateurs en EuropeAVERTISSEMENTIl s'agit d'un produit de Classe A. Dans un environnement d o m e s t i q u e , c e t a p p a r e i l p e u t p r o v o q u e r d e s interférences radio, dans ce cas l'utilisateur peut être amené à prendre des mesures appropriées.
Für Kunden in EuropaWarnungDies ist eine Einrichtung, welche die Funk-Entstörung nach Klasse A besitzt. Diese Einrichtung kann im Wohnbereich Funkstörungen versursachen; in diesem Fall kann vom Betrieber verlang werden, angemessene Maßnahmen durchzuführen und dafür aufzukommen.
DECLARATION OF CONFORMITYWe, TEAC EUROPE GmbH. Bahnstrasse 12, 65205 Wiesbaden-Erbenheim, Germany declare in own responsibility, the TEAC product described in this manual is in compliance with the corresponding technical standards.

IMPORTANT SAFETY INSTRUCTIONS
TASCAM CD-RW901MKII 3
• The apparatus draws nominal non-operating power from the AC outlet with its POWER or STANDBY/ON switch not in the ON position.
• The mains plug is used as the disconnect device, the disconnect device shall remain readily operable.
• Caution should be taken when using earphones or headphones with the product because excessive sound pressure (volume) from earphones or headphones can cause hearing loss.
• If you are experiencing problems with this product, contact TEAC for a service referral. Do not use the product until it has been repaired.
CAUTION
• Do not expose this apparatus to drips or splashes.• Do not place any objects filled with liquids, such as
vases, on the apparatus.• Do not install this apparatus in a confined space
such as a book case or similar unit.• The apparatus should be located close enough to
the AC outlet so that you can easily grasp the power cord plug at any time.
• If the product uses batteries (including a battery pack or installed batteries), they should not be exposed to sunshine, fire or excessive heat.
• CAUTION for products that use replaceable lithium batteries: there is danger of explosion if a battery is replaced with an incorrect type of battery. Replace only with the same or equivalent type.
WARNING
• Products with Class ! construction are equipped with a power supply cord that has a grounding plug. The cord of such a product must be plugged into an AC outlet that has a protective grounding connection.
8 RACK-MOUNTING THE UNITUse the supplied rack-mounting kit to mount the unit in a standard 19-inch rack, as shown below.Remove the feet of the unit before mounting.
CAUTION• Leave 1U of space above the unit for ventilation.• Allow at least 10 cm (4 in) at the rear of the unit for
ventilation.
1 Read these instructions.
2 Keep these instructions.
3 Heed all warnings.
4 Follow all instructions.
5 Do not use this apparatus near water.
6 Clean only with dry cloth.
7 Do not block any ventilation openings. Install in accordance with the manufacturer's instructions.
8 Do not install near any heat sources such as radiators, heat registers, stoves, or other apparatus (including amplifiers) that produce heat.
9 Do not defeat the safety purpose of the polarized or grounding-type plug. A polarized plug has two blades with one wider than the other. A ground-ing type plug has two blades and a third grounding prong. The wide blade or the third prong are pro-vided for your safety. If the provided plug does not fit into your outlet, consult an electrician for replace-ment of the obsolete outlet.
10 Protect the power cord from being walked on or pinched particularly at plugs, convenience recep-tacles, and the point where they exit from the appa-ratus.
11 Only use attachments/accessories specified by the manufacturer.
12 Use only with the cart, stand, tripod, bracket, or table specified by the manufacturer, or sold with the appa-ratus. When a cart is used, use caution when moving the cart/apparatus combination to avoid injury from tip-over.
13 Unplug this apparatus during lightning storms or when unused for long periods of time.
14 Refer all servicing to qualified service personnel. Servicing is required when the apparatus has been damaged in any way, such as power-supply cord or plug is damaged, liquid has been spilled or objects have fallen into the apparatus, the apparatus has been exposed to rain or moisture, does not operate normally, or has been dropped.

4 TASCAM CD-RW901MKII
Safety Information
8 For China
“仅适用于海拔2000m以下地区安全使用”
“仅适用于非熱帯气候条件下安全使用”
“環境保護使用年限”
产品有毒有害物质或元素的名称及含量机种 : CD-RW901MKII 有毒有害物质或元素
品名 铅(Pb)
汞(Hg)
镉(Cd)
六价铬(Cr6+)
多溴联苯(PBB)
多溴二苯醚(PBDE)
1 CHASSIS部份 ○ ○ ○ ○ ○ ○2 FRONT PANEL部份 ○ ○ ○ ○ ○ ○3 螺丝部份 ○ ○ ○ ○ ○ ○4 线材部份 ○ ○ ○ ○ ○ ○5 PCB Assy部份 × ○ ○ ○ ○ ○6 DRIVE UNIT部份 × ○ ○ ○ ○ ○7 电源部份 ○ ○ ○ ○ ○ ○8 附属品部份 ○ ○ ○ ○ ○ ○9 LABEL部份 ○ ○ ○ ○ ○ ○
10 包装部份 ○ ○ ○ ○ ○ ○
○: 表示该有毒有害物质在该部件所有均质材料中的含有量均在 SJ/T11363-2006 标准规定的限量要求以下。×: 表示该有毒有害物质至少在该部件的某一均质材料中的含量超出 SJ/T11363-2006 标准规定的限量要求。
(针对现在代替技术困难的电子部品及合金中的铅)
8 CAUTIONS ABOUT LASER RADIATIONThis product has been designed and manufactured according to FDA regulations “title 21, CFR, chapter 1, subchapter J, based on the Radiation Control for Health and Safety Act of 1968,” and is classified as a class 1 laser product. There is no hazardous invisible laser radiation during operation because invisible laser radiation emitted inside of this product is completely confined in the protective housings.The label required in this regulation is shown at 1.
1 For USA
CERTIFICATIONTHIS PRODUCT COMPLIES WITH 21 CFR1040.10 AND 1040.11 EXCEPT FORDEVIATIONS PURSUANT TO LASERNOTICE NO.50, DATED JUNE 24, 2007.
MADE IN CHINA
Cautions:• DO NOT REMOVE THE PROTECTIVE HOUSING
USING A SCREWDRIVER.• USE OF CONTROLS OR ADJUSTMENTS OR
PERFORMANCE OF PROCEDURES OTHER THAN THOSE SPECIFIED HEREIN MAY RESULT IN HAZARDOUS RADIATION EXPOSURE.
• IF THIS PRODUCT DEVELOPS TROUBLE, CONTACT YOUR NEAREST QUALIFIED SERVICE PERSONNEL, AND DO NOT USE THE PRODUCT IN ITS DAMAGED STATE.
Optical pickupType: LO-DWH02Manufacturer: Lite-space Technology Co., Ltd.Laser output: Less than 131.9mW (CD) and
147.8mW (DVD) on the objective lensWavelength: 785nm (CD) typical
661nm (DVD) typicalStandard: IEC60825-1: 2007

TASCAM CD-RW901MKII 5
Contents
1 − Introduction ......................................... 6Supplied accessories ....................................... 6About this manual .......................................... 6Trademarks ...................................................... 6About CD-R and CD-RW discs ........................ 7About finalizing .............................................. 7
Recordable discs ....................................................7Environmental considerations ....................... 8
Handling of compact discs ....................................8Never use a stabilizer or printable discs ..............8Beware of condensation .......................................9
Connections ..................................................... 9Control connections ..............................................9
2 − Features of the CD-RW901MKII .........10Front panel .................................................... 10Rear panel ...................................................... 11Display ........................................................... 12RC-RW901 Remote control unit ................... 13
3 − Menu operation ..................................15Menu configuration ...................................... 15Operation basics ........................................... 16
4 − Playback operations ............................17Discs for playback ......................................... 17Simple playback operations ......................... 17Track selection ............................................... 17
Using the skip function .......................................17Selecting by track number ..................................18
Track search ................................................... 18Normal search ......................................................18Direct search ........................................................18
Basic operation ............................................................18Operation variations ...........................................18
Specifying a track number only ....................18Specifying to the minute ............................... 18
Index search .........................................................19Time skip ..............................................................19
Playback modes ............................................. 19Continuous playback ...........................................19Single-track playback ..........................................20Random playback ................................................20Program playback ................................................20
Time display switching ................................. 20EXT SYNC playback ....................................... 21Timer playback .............................................. 21Repeat playback ............................................ 21A to B repeat playback ................................. 22Pitch control function ................................... 22Key control function ..................................... 22Auto Cue function ......................................... 23Auto Ready function ..................................... 23Incremental playback .................................... 23Call function .................................................. 23End of disc/track message (EOM) ................ 23International Standard Recording Code (ISRC) .............................................................. 23Recorder Identification Data (RID) ............... 24Playing back MP3 files .................................. 24
About MP3 track data .........................................24
Directory playback setting .................................25MP3 action setting ..............................................25
5 − Recording............................................ 26Input selection ............................................... 26
Input monitoring .................................................26Frequency conversion .........................................26
Basic recording .............................................. 27Time display while recording .............................27Full disc .................................................................27
Advanced recording ...................................... 28Fade-in and fade-out recording .........................28Synchronized recording ......................................28Sync recording .....................................................28Sync recording with trim function .....................29
Automatic track division ............................... 29To enable or disable automatic track division: .........29
Automatic track division with trim function.....30Automatically Incrementing index numbers ....30Manually divide track..........................................30Manually incrementing index numbers ............30
Rec mute function ......................................... 30Restricting the number of tracks ................. 31Copy-protection ............................................ 31Continuous recording (CONT REC) ............... 32
6 − After recording....................................33Finalizing ........................................................ 33
Unfinalizing CD-RW discs ...................................33Erasing ........................................................... 34
Erasing tracks .......................................................34Erasing a whole disc ............................................34
Refreshing a disc ........................................... 34
7 − Titling ...................................................35Title input operation ..................................... 35
Disc title input ......................................................35Track title input ....................................................35
Using a keyboard with the CD-RW901MKII 36Keyboard type setting ........................................36Title input by keyboard .......................................36Other keyboard operations ................................36
8 − Data settings .......................................37Data communication setting ........................ 37
9 − Reference and specifications ............. 38Error messages .............................................. 38Messages during operations ........................ 38Troubleshooting ............................................ 39Specifications ................................................40Dimensional drawing.................................... 41

6 TASCAM CD-RW901MKII
Thank you for your purchase of the TASCAM CD-RW901MKII CD rewritable recorder.Before connecting and using the unit, please take time to read this manual thoroughly to ensure you understand how to properly set up and connect the CD-RW901MKII, as well as the operation of its many useful and convenient functions. After you have finished reading this manual, please keep it in a safe place for future reference.
NOTE�This product is designed to help you record and repro-
duce sound works to which you own the copyright, or where you have obtained permission from the copyright holder or the rightful licensor. Unless you own the copyright, or have obtained the appropriate permission from the copyright holder or the rightful licensor, your unauthorized recording, reproduction
or distribution thereof may result in severe criminal penalties under copyright laws and international copyright treaties. If you are uncertain about your rights, contact your legal advisor. Under no circum-stances will TEAC Corporation be responsible for the consequences of any illegal copying performed using the CD-RW901MKII.
About this manual
In this manual, we use the following conventions:• The names of keys and controls are given in the follow-
ing typeface: ERASE.• When the alphanumeric portion of the display shows
a message, this is shown in the following typeface: Complete.
• If a preset indicator in the display (i.e. one which cannot change, but is either on or off) is shown, this is shown as follows: RANDOM.
• Selectable value (i.e. values of dB) or ON and OFF selection (i.e. SRC>XXX) is shown in the following typface: XXX.
Supplied accessories
In addition to this manual, the CD-RW901MKII has been packed with the following:
• RC-RW901 remote control unit (with 5m cable) ............1• AC power cable ...............................................................1• A rack-mounting screw kit (screws and washers) ..........1• Owner’s Manual (this manual) .......................................1
The warranty is included at the end of this manual.
Contact your TASCAM supplier if any of these items are missing.
1 − Introduction
Trademarks
• TASCAM is a trademark of TEAC Corporation, regis-tered in the U.S. and other countries.
• MPEG Layer-3 audio coding technology licensed from Fraunhofer IIS and Thomson.
• Other company names, product names and logos in this document are the trademarks or registered trademarks of their respective owners.

TASCAM CD-RW901MKII 7
1 − Introduction
In this manual, we use the term “recordable” disc to describe a CD-R or CD-RW disc that has not been finalized, i.e. further recording is possible on the disc.
Recordable discs
About CD-R and CD-RW discs
CD-R discs can be recorded once only. Once they have been used for recording, they cannot be erased or re-recorded. However, if space is available on the disc, additional material can be recorded. The pack-aging of CD-R discs will include one of the following logos:
By contrast, a CD-RW disc can be used in much the same way as a CD-R disc, but the last track or tracks recorded can be erased before the disc has been “finalized”, and the space on the disc can be re- used for other recordings. The packaging of CD-RW discs will include the logo one of the following logos:
Hig
h Sp
eed
However, you should note that an audio CD created using a CD-RW disc may not play back satisfactorily on every audio CD player. It will, naturally, be playable on the CD-RW901MKII. This is in no way a limitation of the CD-RW901MKII itself, but of the difference between the different types of media and the methods used to read them.There are precautions that you should take when handling CD-R and CD-RW discs.• Avoid touching the recording (non-label) side of a disc on
which you will be recording. Recording on a disc requires a cleaner surface than playing back, and fingerprints, grease, etc. can cause errors in the recording process.
• CD-R and CD-RW discs are sensitive to the effects of heat and ultraviolet rays. It is important that they are not stored in a location where direct sunlight will fall on them, and which is away from sources of heat such as radiators or heat-generating electrical devices.
• Always store CD-R and CD-RW discs in their cases to avoid dirt and dust accumulating on their surfaces.
• When labeling CD-R and CD-RW discs, always use a soft oil-based felt-tipped pen to write the information. Never use a ball-point or hard-tipped pen, as this may cause damage to the recorded side.
• Always keep the recording sides of the discs away from grime and dust to avoid a reduction in sound quality. To clean a disc, wipe gently with a soft dry cloth from the center towards the outside edge. Do not use thinner, gasoline, benzene or LP cleaning fluid, as these will damage the disc and cause the disc unplayable.
• Do not put labels or protective sheets on the discs and do not use any protective coating spray.
• If you are in any doubt as to the care and handling of a CD-R and CD-RW discs, read the precautions supplied with the disc, or contact the disc manufacturer directly.
About finalizing
Although audio data may be written on a CD-R or CD-RW disc, a standard CD player will not be able to read the data (i.e. play back the audio) until a final *TOC has been written at the start of the disc. *TOC:Table of contents
Information of recorded data, which contains titles, starting and ending addresses, and etc..
The process of writing this table of contents is known as “final-izing”. Once this has been done, no further data can be written to the disc. See “Finalizing” on page 33 for details. In the case of a CD-RW disc which has been finalized, the whole of the
disc may be erased, or the disc may be “refreshed”, and the disc re-used.In addition, a CD-RW disc that has been finalized may be “unfinalized”, i.e. only the TOC is removed. This allows further tracks to be recorded to the disc, provided that there is space on the disc.

8 TASCAM CD-RW901MKII
1 − Introduction
Never use a stabilizer or printable discs
Using commercially available CD stabilizers or printable recordable discs with this player will damage the mechanism and cause it to malfunction.NOTE
�Never use a disc that has had a stabilizer mounted to it. The residual adhesive may cause the disc to stick to the turntable of the CD-RW901MKII. If it sticks to the turntable, you will need a technician to get it out.
The CD-RW901MKII has been designed for the playback of CD-DA (standard audio) format discs and MP3 files recorded on the discs using the ISO9660 format: In addition to ordinary 5-inch and 3-inch CDs, it can also play properly recorded CD-R and CD-RW discs.• Always insert the compact discs into the unit with their
label facing upward.• To remove a disc from its case, press down on the center
of the disc holder, then lift the disc out, holding it care-fully by the edges.
• Avoid getting fingerprints on the signal side (the non-label side). Grime and dust may cause skipping, so keep discs clean and store them in their cases when not being played. To clean the signal side of a disc, wipe gently with a soft dry cloth from the center towards the outside edge.
• Do not use any record spray, anti-static solutions, benzene, paint thinner or other chemical agents to clean CDs as they could damage the delicate playing surface. It may cause CDs to become unplayable.
• Discs should be returned to their cases after use to avoid
serious scratches that could cause the laser pickup to “skip.”• Keep discs away from direct sunlight, and places of
high heat and humidity. If left in such places, warping could result.
• Do not affix any labels or stickers to the label side of the disc. Do not write on the disc with a ballpoint pen.
• Do not insert discs that have adhesive remaining from tape or stickers that have been removed. If they are inserted into the player, they could stick to the internal mechanism, requiring removal by a technician.
• Do not use cracked discs.• Only use circular compact discs. Avoid using non-circu-
lar promotional, etc. discs.
• Music discs with copy control, a copy-protection system, have been released from several record compa-nies in an attempt to protect the copyright. Since some of these discs do not comply with the CD specifications, they may not be playable on the CD-RW901MKII.
Handling of compact discs
Environmental considerations
The CD-RW901MKII may be used in most areas, but to maintain top performance, and prolong operating life, observe the following environmental conditions:• The nominal temperature should be between 5°C and
35°C (41°F and 95°F).• Relative humidity should be 30 to 90 percent.• As the unit may become hot during operation, always
leave sufficient space above the unit for ventilation. Do not install this unit in a confined space such as a book-case, and do not put anything on top of the unit.
• Avoid installing this unit on top of any heat-generating
electrical device such as a power amplifier.• Make sure that the unit is mounted in a level position for
correct operation.NOTE
�The voltage supplied to the unit should match the voltage as printed on the rear panel. If you are in any doubt regarding this matter, consult an electrician.

TASCAM CD-RW901MKII 9
1 − Introduction
Connections
The following should be noted when you connect the unit to other equipment.It is possible to connect the unit’s DIGITAL COAXIAL IN, DIGITAL OPTICAL IN, DIGITAL IN (AES/EBU), and balanced or unbalanced ANALOG INs (L, R) to other equipment at the same time. However, the unit can receive signals from only one digital input at a time. Currently selected input jack is shown on the display.Audio signals output from the unit are output from the balanced or unbalanced ANALOG OUT jacks, as well as from
the DIGITAL COAXIAL OUT, DIGITAL OPTICAL OUT and DIGITAL OUT (AES/EBU) connector simultaneously (but not from the digital outputs in stop mode).
Beware of condensation
If the unit (or a compact disc) is moved from a cold to a warm place, or used after a sudden temperature change, there is a danger of condensation; vapor in the air could condense on the internal mechanism, making correct operation impossible. To
prevent this, or if this occurs, let the player sit for one or two hours at the new room temperature before using.
The pinouts of the CONTROL I/O (parallel) terminal on the rear panel (see “Rear panel” on page 11) are: Pin Function
1 STOP TALLY OUT 2 REC TALLY OUT 3 SKIP (forward) IN 4 SKIP (back) IN 5 EOM TALLY OUT 6 REC IN 7 CALL IN 8 GND 9 PLAY TALLY OUT 10 PAUSE TALLY OUT 11 FADER START/STOP 12 STOP IN 13 PLAY IN 14 PAUSE IN 15 +5V a
a: The maximum current supplied from this terminal is 50 mA.
Tall signals are open collector, with a maximum current of 50 mA. Input signals are active when low (ground) for ≥ 30 ms.A fader start/stop control should be wired according to the following schematic:
START Pin 11 FADER START/STOP
STOP
Pin 8 GND
Control connections

10 TASCAM CD-RW901MKII
Front panel
1POWER switch The power switch is used to switch the unit on and off.
2 Disc tray Discs should be placed label side upwards in the disc tray. When a disc is loaded into the unit, the display shows TOC Reading for a short period while the unit determines the contents of the disc.
3 MENU key Use this key to call up the menu options (see “Operation basics” on page 16).
4 OPEN/CLOSE key Use this key to open and close the disc tray. The display shown Open when the tray is opening and Close when the tray is closing.
5 REPEAT key Use this key to set the repeat playback mode on and off.
6 ESCAPE key When in a menu mode, this key cancels the menu item selected.
7 DISPLAY key Use this key to see the current disc title when the disc is stopped. When the disc is playing or in ready mode, press this key to see the current track title.
8 TIME key Use this key to cycle through the time modes shown on the display (see “Time display switch-ing” on page 20).
9 Display The display is used to show the current status of the unit, as well as the current menu settings.
0 TIMER switch (PLAY, OFF) Using this key switches Timer play on and off. See “Timer playback” on page 21 for details.
q INPUT (L,R) controls Use these concentric controls to adjust the level of the analog audio signals received at the ANALOG IN jacks.
w PHONES jack and the level control Use a standard pair of stereo headphones, equipped with a 1/4-inch plug, with this jack.
Adjust the volume from the jack with the level control (turn clockwise for higher volume).
e PITCH control Push this control to set the Pitch Control on and off. Turning this control adjusts the value within ±16.0%.
r AUTO CUE key Use this key to set Auto Cue on and off.
t AUTO READY key Use this key to set Auto Ready on and off.
y CALL key Pressing this key locates a track to the last point where playback was previously started in playback ready mode, and puts the unit into playback ready mode.
During recording, pressing this key assigns an index number manually.
u MULTI JOG dial Use this dial to select tracks for play-back, to set parameter values.
In addition, pushing the dial acts like an ENTER key, i.e. the currently-displayed value or setting is confirmed.
i FINALIZE/INS key Use this key to finalize recordable discs (see “Finalizing” on page 33).
When in playback or playback ready mode, pressing this key shows the disc’s ISRC code on the display.
It also acts like a space key when entering TEXT data (see “Title input operation” on page 35).
o ERASE/DEL key Use this key (with CD-RW discs only) to erase tracks, or a whole disc, or to refresh a “bad” disc, or to unfinalize a finalized disc (see “Erasing” on page 34 for details).
When in playback or playback ready mode, pressing this key shows the disc’s RID code on the display.
It also acts like a delete key when entering TEXT data (see “Title input operation” on page 35).
2 − Features of the CD-RW901MKII

TASCAM CD-RW901MKII 11
2 − Features of the CD-RW901MKII
p∆/̇ key Use this key to operate review playback (search) while in playback or ready modes.
When Directory search is on, and when stopped, using this key selects the directory.
This key can be used with the SKIP MODE sub-menu option (see “Operation basics” page 16), and operated in the following modes selected in the sub-menu.
Index: When in playback or ready mode, using this key searches indexes backwards within a track.
Time: When in playback or ready mode, pressing this key skips backwards by a minute.
This key also moves the cursor in the left direction when entering TEXT data.
a /̊¥key Use this key to operate cue playback (search) while in playback or ready modes.
When Directory search is on, and when stopped, using this key selects the directory.
This key can be used with the SKIP MODE sub-menu option (see “Operation basics” page 16), and operated in the following modes selected in the sub-menu.
Index: When in playback or ready mode, using this key searches indexes forwards within a track..
Time: When in playback or ready mode, pressing this key skips forwards by a minute.
This key also moves the cursor in the right direction when entering TEXT data.
s STOP key Use this key to stop playback or recording.
d PLAY key Use this key to start or resume playback or recording.
f PAUSE key Use this key to standby for playback or recording.
g RECORD key Use this key to enter record ready mode (see “Basic recording” on page 27 for details) and also to enter manual track divisions (see “Manually divide track” on page 30).
h SYNC REC key Use this key to turn synchronized recording on and off before starting to record (see “Synchronized recording” on page 28 for details).
When EXT SYNC is on, pressing this key turns the 48k Fs adjustment function on and off (see “EXT SYNC playback” on page 21).
j INPUT SEL Use this key to select the different audio inputs and the input combinations (see “Input selection” on page 26 for full details).
k KEYBOARD jack An IBM PC-compatible keyboard with PS/2 interface can be connected to this terminal to enable certain operations of the CD-RW901MKII with the keyboard. Title input operations, in particular, can be performed with greater efficiency.
Rear panel
l ANALOG IN (UNBALANCED) (L, R) These RCA jacks accept analog audio signals from suitably-equipped units (at –10 dBV).
; ANALOG OUT (UNBALANCED) (L, R) These RCA jacks output analog audio signals (at –10 dBV levels) to suitably-equipped units.
z DIGITAL COAXIAL (IN, OUT) These two RCA jacks accept and output digital audio in standard consumer format (SPDIF).
x DIGITAL OPTICAL (IN, OUT) These two TOSLINK optical connectors accept and output digital audio using optical fiber connectors.

12 TASCAM CD-RW901MKII
2 − Features of the CD-RW901MKII
Display
@
DF G H JK
$ & * ( )Q E
Y
UIOPA
W%#
S
^
RT
This display shows various types of operation information, including CD disc information, deck operation modes, and menu status.@TOC The TOC indicator lights up red when a loaded disc
contains TOC (Table of Contents) data.
#Track number display During playback or selection, the track number is displayed.
When Incremental playback is on, and when in play-back or playback ready mode, the TRACK indicator blinks.
$MP3 The MP3 indicator lights when a MP3 disc is in the deck.
%Counter display Depending on the time display mode, TOTAL or REMAIN are lit. The counter display indication are in minutes (three digits) and seconds (two digits).
^KEY The KEY indicator lights when Key Control is on.
&PITCH The PITCH indicator lights when Pitch Control is on.
*A.CUE The A.CUE indicator lights when Auto Cue is on.
(A.READY The A.READY indicator lights when Auto Ready is on.
)A. TRACK The A.TRACK indicator lights when the Auto
Track is on.
QMeter This displays the playback level, as well as the input level of the source device.
WA-B The A-B indicator lights when the A-B repeat func-tion is on.
Also, this flashes until a “B-point” is entered.
EREPEAT The REPEAT indicator lights when the Repeat function is on.
RSYNC The SYNC indicator lights up when SYNC is on.
TREC When the SRC function is on, this lights during recording, or in recording standby mode.
When the SRC function is off, this flashes during recording, or in recording standby mode.
YOPTICAL The OPTICAL indicator lights when the input source is set to optical.
UCOAXIAL The COAXIAL indicator lights when the input source is set to coaxial.
c DIGITAL IN/OUT (AES/EBU) These two XLR connec-tors accept and output digital audio in standard profes-sional format.
v ANALOG INPUT (BALANCED) (L, R) These XLR connectors accept analog audio signals at +4 dBu from suitably-equipped units.
The wirings are: 1=grounding, 2=hot, 3=cold.
bm ATT control right and left Use a small Phillips screwdriver with these attenuators to reduce the output level from either the right or left balanced analog output. The adjustable level is up to -10 dB.
n ANALOG OUT (BALANCED) (L, R) These XLR connectors output analog audio signals at +4 dBu to suitably-equipped units.
The wirings are: 1=grounding, 2=hot, 3=cold.
, CONTROL I/O (RS-232C) terminal RS-232C compati-ble serial control from an external PC can be performed.
. CONTROL I/O (parallel) terminal Use this 15-pin D-sub connector to connect the unit to suitably-equipped units, allowing control of the CD-RW901MKII. The pinouts of this connector are described (see Connections” on page 9).
/ REMOTE IN terminal Connects the supplied RC-RW901 remote control unit.
! AC IN jack Connects the power cable supplied.
TASCAM CD-RW901MKII 13
2 − Features of the CD-RW901MKII
RC-RW901 Remote control unit
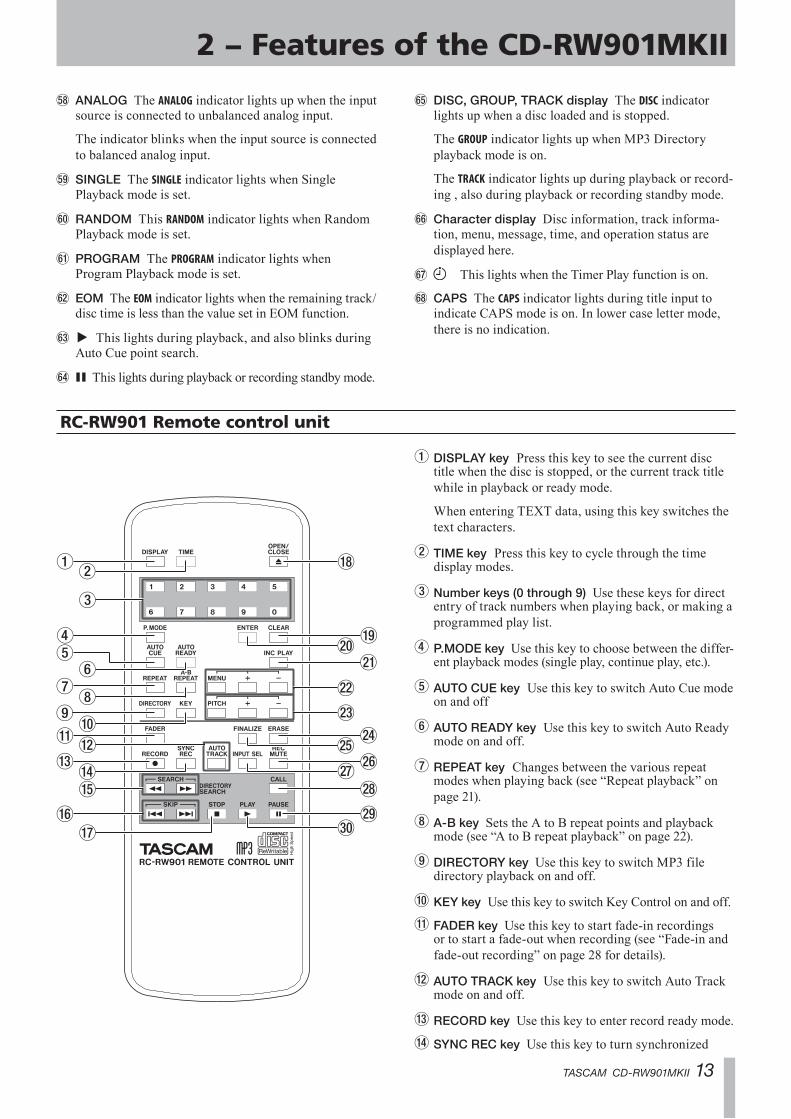
1DISPLAY key Press this key to see the current disc title when the disc is stopped, or the current track title while in playback or ready mode.
When entering TEXT data, using this key switches the text characters.
2TIME key Press this key to cycle through the time display modes.
3Number keys (0 through 9) Use these keys for direct entry of track numbers when playing back, or making a programmed play list.
4P.MODE key Use this key to choose between the differ-ent playback modes (single play, continue play, etc.).
5 AUTO CUE key Use this key to switch Auto Cue mode on and off
6 AUTO READY key Use this key to switch Auto Ready mode on and off.
7REPEAT key Changes between the various repeat modes when playing back (see “Repeat playback” on page 21).
8A-B key Sets the A to B repeat points and playback mode (see “A to B repeat playback” on page 22).
9DIRECTORY key Use this key to switch MP3 file directory playback on and off.
0 KEY key Use this key to switch Key Control on and off.
qFADER key Use this key to start fade-in recordings or to start a fade-out when recording (see “Fade-in and fade-out recording” on page 28 for details).
w AUTO TRACK key Use this key to switch Auto Track mode on and off.
eRECORD key Use this key to enter record ready mode.
rSYNC REC key Use this key to turn synchronized
IANALOG The ANALOG indicator lights up when the input source is connected to unbalanced analog input.
The indicator blinks when the input source is connected to balanced analog input.
OSINGLE The SINGLE indicator lights when Single Playback mode is set.
PRANDOM This RANDOM indicator lights when Random Playback mode is set.
APROGRAM The PROGRAM indicator lights when Program Playback mode is set.
SEOM The EOM indicator lights when the remaining track/disc time is less than the value set in EOM function.
D¥ This lights during playback, and also blinks during Auto Cue point search.
Fπ This lights during playback or recording standby mode.
GDISC, GROUP, TRACK display The DISC indicator lights up when a disc loaded and is stopped.
The GROUP indicator lights up when MP3 Directory playback mode is on.
The TRACK indicator lights up during playback or record-ing , also during playback or recording standby mode.
HCharacter display Disc information, track informa-tion, menu, message, time, and operation status are displayed here.
J This lights when the Timer Play function is on.
KCAPS The CAPS indicator lights during title input to indicate CAPS mode is on. In lower case letter mode, there is no indication.

14 TASCAM CD-RW901MKII
2 − Features of the CD-RW901MKII
recording on and off (see “Synchronized recording” on page 28 for details).
tSEARCH keys (∆/ )̊ Use these keys to move the playback position inside a track.
ySKIP (Â/̄ ) keys Use these keys to move between tracks when playing back (equivalent to rotat-ing the MULTI JOG dial).
uSTOP key Use this key to stop playback or recording.
iOPEN/CLOSE key Opens and close the disc tray.
oCLEAR key Clears a mistaken entry made with the number keys.
In the program mode, pressing this key cancels the program entered at the last.
It also acts like the ESCAPE key in the Menu mode.
pENTER key Pressing this key is equivalent to pressing the MULTI JOG dial to confirm an entry.
a INC PLAY key Use this key to switch Incrementl play-back on or off.
sMENU key and +/– key Pressing the MENU key turns the mode on or off. The +/– key is used to select menu options and make settings during Menu mode.
dPITCH key and +/– key Use this key to switch Pitch Control on and off, and set the pitch value.
fERASE key Erases tracks (CD-RW discs only), or a whole disc, or to refresh a “bad” disc, or to unfinalize a finalized disc (see “Erasing” on page 34 for details).
gFINALIZE key Finalizes recordable discs. See “Finalizing” on page 33 for details.
hREC MUTE key Use this key when recording, to mute the input signal for about four seconds and then to enter record ready mode (see “Rec mute function” on page 30).
j INPUT SEL key Use this key to select the different audio inputs and the input combinations (see “Input selection” on page 26 for full details).
k CALL key Pressing this key locates a track to the last point where playback was previously started in playback ready mode, and puts the unit into playback ready mode.
During recording, pressing this key assigns an index number manually.
lPAUSE key Use this key to standby for playback or recording.
; PLAY key Use this key to start playback, or enter record mode from record ready mode.

TASCAM CD-RW901MKII 15
The various settings and editing operations possible with the CD-RW901MKII are performed through menu options shown on the display. Among the many menu setting options, some may be made directly using the keys on the remote control.
Menu configuration
The menus are configured as shown below. Please see the reference page for more details of each menu.
Menu option Sub-Menu option Function Reference pagePLAY PLAY MODE Playback mode settings P19 (“Playback modes”)
PITCH STEP Pitch control variable pitch setting P22 (“Pitch control function”)KEY Key control mode on/off P22 (“Key control function”)KEY LEVEL Key control level setting P22 (“Key control function”)DIRECTORY MP3 disc directory mode on/off P24 (“Playing back MP3 files”)MP3 ACTION MP3 disc playback error setting P25 (“MP3 action settings“)READ SPEED data reading speed setting P17 (“Simple playback operations“)INC PLAY Incremental playback on/off P23 (“Incremental playback”)EOM_TRK Track EOM setting P23 (“End of disc/track message”)EOM_DISC Disc EOM setting P23 (“End of disc/track message”)SKIP MODE Skip mode setting P18 (“track search“)EXT_SYNC External sync playback on/off P21 (“EXT SYNC playback”)A_CUE LEVEL Auto Cue level setting P23 (“Auto Cue function”)
REC VOLUME Input level setting P26 (“Input selection”)FADE IN Fade-in time setting P28 (“Fade-in and fade-out recording”)FADE OUT Fade-out time setting P28 (“Fade-in and fade-out recording”)SRC Sampling rate converter on/off P26 (“Frequency conversion”)SYNC LEVEL Sync recording operating level P28 (“Sync recording”)A_TRK Auto track on/off P29 (“Automatic track division”)A_TRK LEVEL Auto track operating level P29 (“Automatic track division”)A_TRK TIME Auto track operating time P29 (“Automatic track division”)SYNC TRIM Sync recording operating time P29 (“Synch recording with trim function”)A_TRK TRIM Auto track operating time P30 (“Automatic track division with trim function”)CONT REC Cont rec setting P32 (“Continuos recording“)COPY ID Copy ID setting P31 (“Copy protection”)INDEX INC Index increment on/off P30 (“Automatically incrementing index numbers”)
TEXT TEXT EDIT Text setting P35 (“Title input operation”)SYSTEM KEYBOARD setting for keyboard type P36 (“Keyboard type setting”)
PLAY TIME Display total playing time P17 (“Simple playback operations”)REC TIME Display total recording time P27 (“Basic recording”)F_PRESET Reset to the factory setting P16 (“Operation basics“)BAUD RATE data transmission speed setting P37 (“Data communication setting”)LENGTH data word length setting P37 (“Data communication setting”)PARITY data parity bit setting P37 (“Data communication setting”)STOP BIT data stop bit setting P37 (“Data communication setting”)
3 − Menu operation
16 TASCAM CD-RW901MKII
3 − Menu operation
Operation basics
1. Select the desired menu option.
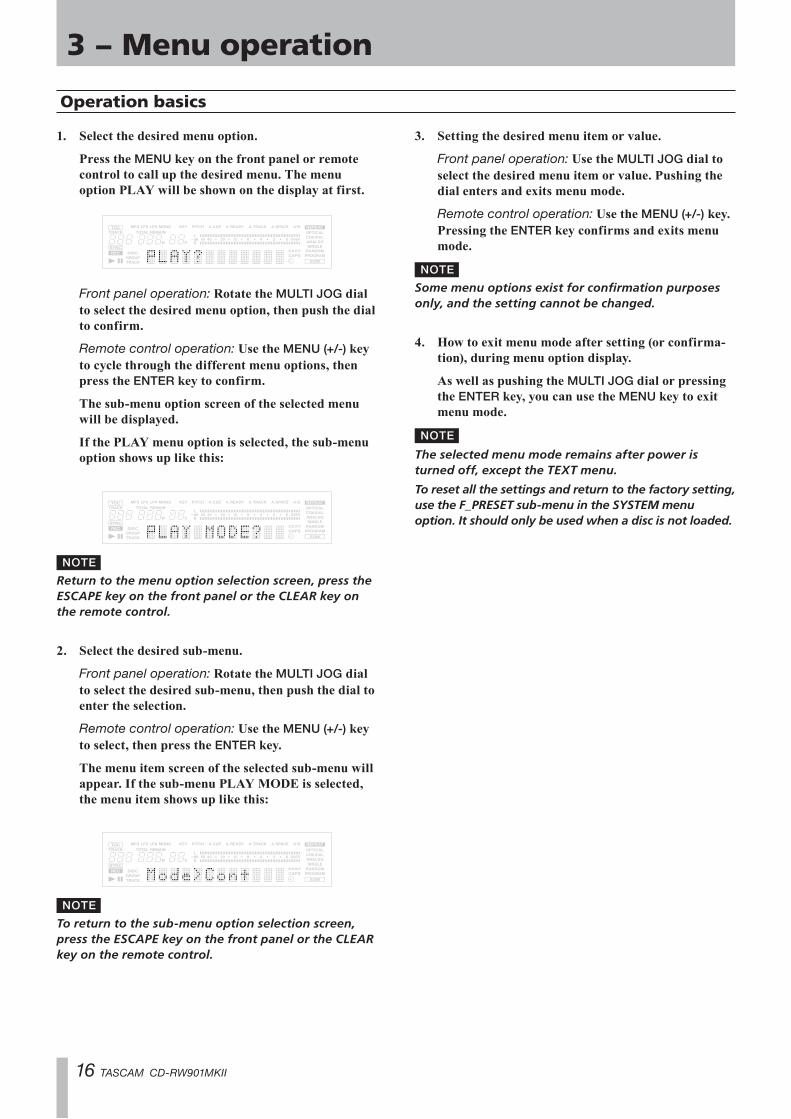
Press the MENU key on the front panel or remote control to call up the desired menu. The menu option PLAY will be shown on the display at first.
Front panel operation: Rotate the MULTI JOG dial to select the desired menu option, then push the dial to confirm.
Remote control operation: Use the MENU (+/-) key to cycle through the different menu options, then press the ENTER key to confirm.
The sub-menu option screen of the selected menu will be displayed.
If the PLAY menu option is selected, the sub-menu option shows up like this:
NOTE�Return to the menu option selection screen, press the
ESCAPE key on the front panel or the CLEAR key on the remote control.
2. Select the desired sub-menu.
Front panel operation: Rotate the MULTI JOG dial to select the desired sub-menu, then push the dial to enter the selection.
Remote control operation: Use the MENU (+/-) key to select, then press the ENTER key.
The menu item screen of the selected sub-menu will appear. If the sub-menu PLAY MODE is selected, the menu item shows up like this:
NOTE�To return to the sub-menu option selection screen,
press the ESCAPE key on the front panel or the CLEAR key on the remote control.
3. Setting the desired menu item or value.
Front panel operation: Use the MULTI JOG dial to select the desired menu item or value. Pushing the dial enters and exits menu mode.
Remote control operation: Use the MENU (+/-) key. Pressing the ENTER key confirms and exits menu mode.
NOTE�Some menu options exist for confirmation purposes
only, and the setting cannot be changed.
4. How to exit menu mode after setting (or confirma-tion), during menu option display.
As well as pushing the MULTI JOG dial or pressing the ENTER key, you can use the MENU key to exit menu mode.
NOTE�The selected menu mode remains after power is
turned off, except the TEXT menu.
To reset all the settings and return to the factory setting, use the F_PRESET sub-menu in the SYSTEM menu option. It should only be used when a disc is not loaded.

TASCAM CD-RW901MKII 17
The CD-RW901MKII can be used to play back CDs (including CD-R and CD-RW discs that have been recorded and finalized on other types of recorder), as well as CD-R discs and CD-RW discs that have been recorded on the unit.
Audio files in MP3 format on CD-ROM, CD-R and CD-RW are also playable on the unit.
Track selection
Skipping track numbers backward or forward.1. Select desired tracks for playback with the MULTI
JOG dial on the front panel. Turning clockwise skips the track number backward and counter-clockwise skips forward.
Or, press the SKIP key on the remote control. Pressing  key skips the track number back-ward and ¯ key skips forward.
2. Press the PLAY key to start playback.
Or, press the PAUSE key to cue the track and enter playback standby mode after moving to the head of the selected track. To start playback, press the PLAY key.
Using the skip function
Simple playback operations
WARNINGIf you are monitoring using headphones, first adjust the level control to low on the unit, then connect to the PHONES jack before playing back. This will prevent any possible damage to your hearing.
NOTE�The explanation in this manual will assume the user is
starting from the normal Continuous mode.
1. Press the POWER switch to turn on the unit.
2. Press the OPEN/CLOSE key to open the disc tray. The display shows Open. Insert a disc in the tray with the label side up.
3. Press the OPEN/CLOSE key to close the tray. The display shows Close when a disc is loaded into the unit, then TOC Reading will appear, with the peri-od flashing.
When the TOC has been read, the display shows the number of tracks and total running time of the disc.
Disc type
Total running timeTotal number of tracks
The CD-RW901MKII also shows one of the follow-ing:
TOC A disc finalized MP3 A disc contains MP3 files4. Press the PLAY key to start playback.
Adjust the connected monitor system, or the level control for the PHONES on the unit to set the listen-ing level you desire.
NOTE�If a disc has scratch or grime, it could cause the laser
pickup to “skip.” In this case, set the READ SPEED sub-menu in the PLAY menu option to “High“ (see “Operation basics” on page 16). This may resolve the problem, however, the unit’s running sound may become louder.
5. To stop playback, press the STOP key.
To temporarily stop playback and enter playback standby mode, press the PAUSE key. To resume playback, press the PLAY key again.
NOTE�To confirm the total playing time, use the PLAY TIME
option in the SYSTEM sub-menu (see “Operation basics” on page 16).
Discs for playback
The CD discs in the CD-RW901MKII can play back the types of discs listed below.• Commercial pre-recorded CDs recorded in CD-DA format.• CD-R and CD-RW discs that have been recorded in
CD-DA format and finalized properly.
• MP3 files recorded in ISO9660 level 1 and level 2 format on CD-R and CD-RW discs, and properly final-ized. MP3 files that are recorded to a disc with Joliet format extensions are also playable.
4 − Playback operations

18 TASCAM CD-RW901MKII
4 − Playback operations
Track search
Press the ∆/˚ search key continuously on the front panel, or the SEARCH ∆/˚ key on the remote control. To stop the search function, simply release the ∆/˚ or the SEARCH key.
NOTE�The search function does not operate with MP3 discs.
Normal search
Using the number keys on the remote control, the number of the desired track can be entered directory. Even numbers with two or three digits can be entered easily. For example:Track 9: press ‘9’ and 009 will be displayed.Track 12: press ‘1’ and ‘2’ and 012 will be displayed.Track 103: press ‘1’ and ‘0’ and ‘3’ and 103 will be displayed.
After input, press the PLAY key to start playback. Or, the PAUSE key to cue the track at its head position and enter playback standby mode.You can also enter the track number and start playback by pushing the MULTI JOG dial or using the ENTER key.NOTE
�This function cannot be used in Program or Random mode.
Selecting by track number
Direct search
By specifying time from the start of a certain track, you can start playback from a specified point of a specified track.
ª Basic operation
During stop, play or playback standby modes, use the number keys on the remote control to input the three-digit track number (such as 002 for track 2), then the desired elapsed time (***min **sec) from the start of that track.Example: To specify 1 min 30 sec from the start of track 2, input “002 001 30.”During input, the counter in the display will flash.
NOTE�Regardless of the time display mode (see “Time
display switching on page 20), the time from the start of the specified track is displayed.
Pressing the CLEAR key cancels the input at any stage during input.During stop or playback modes, when the final digit is entered, the desired position is automatically located and playback will begin from the desired point. During playback standby mode, at the desired point the unit will enter playback standby mode.NOTE
�If a point which does not exist is entered, Direct Search time entry mode will be cancelled.
The direct search function cannot be used in program or random mode.
For MP3 discs, time cannot be specified within a track. However, if you input the three-digit track number, playback will begin from the start of that track.
Operation variations
Even if the final “seconds” time value is not input, playback will begin from the selected “minutes” time after pressing the ENTER or PLAY key. Or, if you press the PAUSE key, the unit will enter the playback standby mode at the selected point.
ª Specifying a track number only
After inputting the track number, press the ENTER or PLAY key to begin playback of that track, or the PAUSE key to cue the track and enter playback standby mode.NOTE
�Instead of inputting the three-digit track number, you can input only the desired track number.Example: To specify track 3, input only “3”.
ª Specifying to the minute
After inputting the three-digit track number and the number of minutes after the start of the track, press the ENTER or PLAY key to begin playback of that track, or the PAUSE key to cue the track and enter playback standby mode.Example: To specify 1 min 00 sec from the start of track 2, input “002 001.”NOTE
�Following the above example, if “0021” is input, the same position will be located.

TASCAM CD-RW901MKII 19
4 − Playback operations
Playback modes
There are four different playback modes. The selected mode will be indicated on the left of the display.• Continuous playback mode (default setting): no indica-
tion lamp• Single playback mode: SINGLE is lit• Program playback mode: PROGRAM red lamp is lit• Random playback mode: RANDOM red lamp is lit
The playback mode can be selected using the P.MODE key on the remote control unit. Pressing the key changes the playback mode on the display in the following order: Continue®Single®Program®RandomYou can also select the playback mode using the PLAY MODE option in the PLAY sub-menu (see “Operation basics” on page 16). Turning the MULTI JOG dial clockwise changes the playback mode shown on the display in the following order: Mode>Cont®Mode>Single®Mode>Program®Mode>Random
Pressing the MENU key or pushing the MULTI JOG dial returns to normal mode from the menu mode.While the mode can be changed from any playback mode, the explanation in this manual will assume the user is starting from the Continuous mode.NOTE
�The selected playback mode remains after power is turned off. However, the program playback mode will be cleared to “Continuous” mode when the power is turned off.
Continuous playback
Programing is cancelled, and playback continues in the normal order.1. When stopped, set the mode to display Continue or
Mode>Cont.
2. Press the PLAY key to begin playback in order of the track number.
Index search
This Index search function allows you to search indexes within a track that were assigned during recording (see “Automati-cally Incrementing index numbers” on page 29).Use the SKIP MODE in the PLAY menu (see “Operation basics” on page 16) and select the item “Index”. The MULTI JOG dial or MENU (+/-) key on the remote control can be used to select.Index XX appears on the display.Select a track you want to assign indexes to, and put the unit in playback or playback ready mode.
Use the /̊¥ or ∆/̇ key to search through the indexes. The unit locates to the index selected, and starts playback at that point, or goes into playback ready mode after moving to that point.NOTE
�The Index search function does not operate with MP3 discs.
Time skip
While in playback or playback ready mode, Time skip function allows you to move the playback position forwards or backwards by a minute.Use the SKIP MODE in the PLAY menu (see “Operation basics” on page 16) and select the item “Time”. The MULTI JOG dial or MENU (+/-) key on the remote control can be used to select.Pressing the /̊¥ or ∆/̇ key moves the playback position one minute forwards or backwards. The unit locates and starts playback at that point.When the key is pressed in playback ready mode, the unit locates and standbys at that point.NOTE
�If the ∆/̇ key is pressed at a time less than one minute from the begging of a track, the unit skips to the head of the track.
If the /̊¥ key is pressed at less than one minute from the end of a track, the unit skips to the begin-
ning of the next track. However, if the current track is the last track on a disc or is the last track in program playback mode, the unit stops and goes into playback ready mode when the last track ends.
If the ∆/̇ key is pressed at less than one second from the begging of a track, the unit skips to one minute before the end of the previous track. Howev-er, if the current track is the first track on a disc or in program playback, and also when in random play-back, the unit skips to the beginning of the current track, and goes into playback ready mode.
The Time skip function does not operate with MP3 discs.

20 TASCAM CD-RW901MKII
4 − Playback operations
Time display switching
When the TIME key on the front panel or the remote control is pressed, the time display will switch through several modes on the display.• Elapsed track time (no display light indication)• Remaining track time (REMAIN is lit in the display)• Elapsed disc time (TOTAL is lit in the display)• Remaining disc time (TOTAL and REMAIN are lit in the display)
When stopped, the total recording time is shown, regardless of the status of the TOTAL and REMAIN indicators.NOTE
�In program mode, pressing the TIME key displays the elapsed and the remaining time of the whole program.
When playing an MP3 disc, elapsed track time is
always displayed, and the TIME key cannot be used.
For details on time display during recording, please refer to “Time display while recording” on page 27.
Even when power is turned off, the time display mode setting is retained.
Random playback
In this mode, the unit will play back all the tracks on the disc in completely random order, regardless of track number.When stopped, set the mode to display Random or Mode>Random. Press the PLAY key and random playback will begin.NOTE
�
Even when the power is turned off, the unit will remain in Random mode.
Program playback
This function enables playback of selected tracks in any desired order. Up to 99 tracks can be selected for program playback.1. When stopped, set the mode to display Program or
Mode>Program.
2. Use the number keys (0~9) on the remote control unit to select each desired track for program play-back, then press the ENTER key.
You can also rotate the MULTI JOG dial to select the track number and push to enter.
The track number will be entered into the program.
Repeat the above step 2 until the desired program is completed. As the program is being created, the program number and total program playing time is revised on the display.NOTE
�If the CLEAR key is pressed, the programmed track will be deleted from the last.
3. When program setting is completed, press the PLAY key to begin playback of the tracks in the programmed order.
NOTE�If the STOP key is pressed without first pressing the
PLAY key, all the program data will be erased.
When stopped, if the playback mode is switched to another, all the program data will be erased.
The programmed play order is not memorized when power is turned off.
In this mode, if there are no tracks programed, the CD-RW901MKII will not start playback.
If an attempt is made to enter more than 100 program steps, the message PGM Full! appears on the display.
If the total program playing time exceeds 999 min 59 sec, --- : -- appears on the display.
Single-track playback
This function enables playback of just a single track.1. When stopped, set the mode to display Single or
Mode>Single.
2. Use the SKIP keys or the number keys (0~9) on the remote control to select the desired track. The MULTI JOG dial can be used to select the track also.
3. Press the PLAY key to begin playback.
After the selected track finishes, playback stops.

TASCAM CD-RW901MKII 21
4 − Playback operations
Timer playback
By using an external timer, you can set the CD-RW901MKII to play the loaded disc automatically when the unit is turned on by the timer.1. First, plug the power cord of the CD-RW901MKII
into the power outlet of the timer.
2. Load a disc into the unit.
3. Switch the TIMER switch on PLAY to enable timer function on for the desired deck.
When Timer playback has been turned on, the timer icon lights up in the display.
NOTE�The indicator flashes when a disc is not loaded into
the unit.
4. Set the timer to the desired time. Consult the timer’s operation manual for details. At the set time, the power to the CD-RW901MKII will be turned on, and playback will automatically begin.
Timer indicator
Repeat playback
1. Press the REPEAT key to turn on the repeat mode.
In this mode, all the tracks on the disc are played continuously. The display shows Repeat ON and the indicator lights up REPEAT.
During playback, if the repeat mode is turned on, playback continues as before, and when the last track finishes, playback resumes from the first track.
If the repeat mode is turned on when the deck is stopped, press the PLAY key to begin operation.
2. Press the REPEAT key again to turn off repeat mode. Repeat OFF appears then the REPEAT indicator turns off.
NOTE�Combining the repeat mode with the program,
Single-track playback and Random playback functions will enable Program repeat, Single-track repeat and Random repeat operations, respectively.
Settings for the repeat playback mode remain after power is turned off, except the specified A-B section (see “A to B repeat playback” on page 22).
EXT SYNC playback
In this mode, the unit will play back in synchronization with the clock selected as digital input source (OPTICAL, COAXIAL, AES/EBU).When stopped, use the EXT SYNC option in the PLAY sub-menu (see “Operation basics” on page 16) to set the external synch playback mode on.Select the input source for sync playback.NOTE
�When the EXT SYNC is on, and when the unit detects a signal other than 44.1kHz, synchronization with the clock of the selected digital input source may fail, and EXT CLK Err! will be displayed. The audio playback may also be affected.
If the selected digital input source is at 48kHz, using the 48k Fs adjustment function allows the audio to be played back at the correct pitch.
When stopped, and when in playback or playback ready mode, press the SYNC REC key to turn the 48k Fs adjustment function on or off. When the function is on, 48k Fs Adj will be displayed.The setting remains until the EXT SYNC function is set to off, and even the power is turned off.NOTE
�When the 48k Fs Adjustment is on, and when the unit detects a signal other than 48kHz, synchronization with the clock of the selected digital input source may fail. The audio playback may also be affected.
When the 48k Fs adjustment is on, the Pitch control and Key control functions cannot be used.
The EXT SYNC playback function does not operate with MP3 discs.

22 TASCAM CD-RW901MKII
4 − Playback operations
Pitch control function
When playing back an audio CD, the pitch (or speed) of the playback can be varied. Pitch can be varied +/- 16%.1. When stopped, push the PITCH control or press the
PITCH key on the remote control to turn the func-tion on.
The current pitch value appears on the display for seconds and the PITCH indicator will light up.
2. Turn the PITCH control or use the PITCH (+/-) key on the remote control to adjust the pitch value from 0.1% to 1.0% in 0.1% increments (default: 0.1%).
3. During playback, the pitch control playback can be disabled temporarily. Press the PITCH key on the remote control or push the PITCH control to turn
the function off.
Pitch>OFF appears on the display and the pitch control playback will be off temporarily, until the function is re-set again.
NOTE�When turning the pitch control on and off during
playback, sound output is cut for a short instant.
Pitch control cannot be used with MP3 discs.
Key control function
The key of the music can be changed during stop, playback or playback standby modes. However, please note that this feature does not work with MP3 discs.1. Press the MENU key to select the KEY option in the
PLAY sub-menu (see “Operation basics” on page 16) to enter the function.
Or, press the KEY key on the remote control to set the function on.
The KEY indicator will light up.
2. Use the KEY LEVEL option in the PLAY sub-menu to adjust the playback key level.
The playback key can be raised or lowered 1/2 octave in half-tone increments. Selection values: 0 (no change), â1 to â6, ã1 to ã6.
3. Rotate the MULTI JOG dial to select the desired key level and push to enter.
NOTE�In this condition, when a CD is played back, the key
of the music is changed while the speed of the music remains the same.
Even when the power is turned off, the key change setting is retained.
When the Key control function is on, even if the Pitch control function is used to change the playback speed, the key of playback will remain fixed at the preset key {even if the key level is 0 (zero)}, the Key control func-tion can be turned on.
When using the key control function, the volume of the playback sound may occasionally sound like it is vibrating. This is a result of the key control algorithm working on the CD playback sound and is normal.
A to B repeat playback
If a specific portion between two points on the disc is specified, that portion can be played back repeatedly.1. During playback, press the A-B key on the remote
control at the beginning of the desired portion on the disc.
The REPEAT indicator lights up in the display and the A- indicator will flash.
2. At the end of the desired portion on the disc, press the A-B key again.
Then, the REPEAT and A-B indicators light up in the display, and the desired A-B section will be played back repeatedly.
NOTE�You can also operate this function during playback standby.
3. To cancel the A-B repeat mode and resume normal playback, press the A-B key once again.
The REPEAT and A-B indicators will turn off.
NOTE�A-B repeat cannot be used when the specified A-B
section spans more than one track, and cannot be used with MP3 discs.
When the STOP key is pressed, the specified A-B section is cancelled.

TASCAM CD-RW901MKII 23
4 − Playback operations
In this function, when the unit is in playback mode, and when the PLAY key is pressed, the unit starts playback from the beginning of the next track.Use the Menu option or the INC PLAY key on the remote control to set this mode on. The TRACK indicator will blink during playback or playback ready mode.
When the STOP key is pressed, the unit will enter playback ready mode at the start of the next track.
Incremental playback
When in playback or playback ready mode, if the FINALIZE key is pressed, the display shows “ISRC” code on the screen. If there is no “ISRC” code on the disc or the code has not been recorded on the disc, Incomplete! will appears on the display.
International Standard Recording Code (ISRC)
Call function allows the unit’s playback position to be returned to the point at which playback last started from ready mode. If there is no “call point”, an error message No Call PT!! will be displayed.NOTE
�This function cannot be used with program, random and MP3 playback mode.
Call function
When nearing the end of a track or disc, the EOM indicator will light up on the display.The number of seconds (1 to 99) before the track/disc end that the indicator is displayed can be set beforehand.
To set the message display time, use the EOM TRK or EOM DISC options on the PLAY sub-menu (see “Operation basics” on page 16).NOTE
�This function cannot be used with MP3 playback mode.
End of disc/track message (EOM)
Using the auto cue function, you can select a cue point where sound begins (not where a track begins) within a track.Turn the auto cue function on and use the A_CUE LEVEL sub-menu option (see “Operation basics” on page 16) to set the sound detection level (-24, -30, -36, -42, -48, -54, -60, -66 and -72 dB).Then, select a track and press the PLAY key. The unit enters playback ready mode.
When the PLAY key is pressed again, playback begins at exactly the cue point.While the auto function is on, the A.CUE indicator lights up on the display.
Auto Cue function
This function allows the playing back a single track, and the automatic cuing of the next track ready for playback.Use the A_READY sub-menu option to turn the function on or off. When on, the A.READY indicator lights up on the display.
Combined with Auto Cue function, the unit enters playback ready mode at the point where the sound detection level is set in A_CUE LEVEL sub-menu option of the next track.
Auto Ready function

24 TASCAM CD-RW901MKII
4 − Playback operations
During playback, titles are displayed in the following order of priority:ID3v2 > ID3v1 > file titleWhen stopped, the file title is displayed.
About MP3 track data
MP3 files recorded onto a CD are handled the same way as files are handled in an ordinary PC, with some MP3 files held within a directory. In addition, several directories can be combined into one directory. This results in multiple layers of directories and files.When the Directory mode is on, only those files within a selected directory are available for playback.When the directory mode is off, the directory configuration is ignored, and all MP3 files recorded on the disc are available for playback. Please note that Program playback and Repeat playback only function within directories.NOTE
�Each MP3 file is handled as a track.
Directories that do not contain MP3 files directly under them cannot be selected for playback. For example, in the diagram below, under directory A are directory B and directory C. If there are MP3 files in both directories B and C, directory A cannot be select-ed for playback, but directory B and C can be selected for playback.
The CD-RW901MKII can play back MP3 files recorded in formats that conform to ISO9660 level 1, level 2, and the Joliet extensions. Discs recorded in multiple sessions may also be played back.CDs containing MP3s to be played by the CD-RW901MKII, have their contents must be within the following maximum limits:
Number of directories: 255Number of hierarchical structures: 8Number of MP3 files: 999Title size of MP3 files and directories: 255
Playing back MP3 files
mp3. 1
mp3. 2
mp3. 3
mp3. 4
mp3. 5
mp3. 6
mp3. 7
mp3. 8
mp3. 9
MP3 files are played in the following order
In this manner, playback proceeds from the top level directories.
MP3 files
Disc
DirectoryA
DirectoryB
DirectoryC
DirectoryD
When in playback or playback ready mode, if the ERASE key is pressed, the display shows “RID” code on the screen. If there is no “RID” code on the disc or the code has not been
recorded on the disc, Incomplete! will appears on the display.
Recorder Identification Data (RID)

TASCAM CD-RW901MKII 25
4 − Playback operations
Directory playback setting
1. Press the DIRECTORY key on the remote control.
Or, use the DIRECTORY option in the PLAY sub-menu to turn this mode on or off (see “Operation basics” on page 16).
Pressing the MENU key or pushing the MULTI JOG dial exits to normal mode.
NOTE�All MP3 files in a disc can be played back when direc-
tory playback mode is off. The indicator MP3 lights up and only the total number of track will be shown.
2. When stopped, use the MULTI JOG dial or SKIP key to select desired directory for playback.
3. Press the PLAY key to start playback in the directory.
Program or Repeat playback can be operated in the selected directory also.
NOTE�MP3 file formatted at 44,1 kHz sampling rate and 128
kbps or higher are required, otherwise, that MP3 file cannot be played back.
Total number of tracks
You can choose whether the unit continues playback or stop when MP3 playback fails.Select “MP3 ACTION?” sub-menu on the PLAY option. Select “Skip” or “Stop.”Skip
When MP3 playback fails, the unit skips the current track and advances to the next track. Playback will stop if the current track is the last track (i.e., if the repeat function is off and the current track is the last track on the disc or in the program). The display shows Decode Err!.Stop
When MP3 playback fails, the unit stops playback. The display shows Decode Err!.
MP3 action setting

26 TASCAM CD-RW901MKII
Before you start recording using the CD-RW901MKII, make sure that you understand the following key points:• Once you have recorded on a CD-R disc, the data cannot
be erased from it.• You can add tracks to an unfinalized recordable disc.
Once finalized, a CD-R disc is “fixed” and behaves in the same way as a pre-recorded disc. Finalized CD-RW discs, however, can be erased, refreshed and re-recorded.
Input monitoring
When the unit is in record ready, or record mode, the input signal is output from the OUT jacks (digital and analog), allowing you to hear the input signal.Press the RECORD key on the front panel or the remote control when a recordable disc is not inserted.
The word Monitor appears on the display to show that the output signal is an echo of the input signal(s).Exit the monitor mode by using the STOP key.
Frequency conversion
The sampling frequency for CDs is 44.1 kHz. The CD-RW901MKII will always record (and play back) CDs at this frequency.However, if recording through a digital connection (coaxial, optical or AES/EBU) and the source has been recorded at a frequency other than 44.1 kHz, or is being played back at a non-standard speed using a varispeed unit (more than 1% away from the standard), the CD-RW901MKII’s internal frequency converter: SRC (Sampling Rate Convertor) will automatically convert the incoming frequency to 44.1 kHz.
To enable the SRC
Press the MENU key and select the SRC? option in the REC sub-menu (see “Operation basics” on page 16). Rotate the MULTI JOG dial to select ON. Press the MENU key or push the MULTI JOG dial to enter.NOTE
�When the SRC function is off, and a digital signal is received, the display shows the REC indicator flashing
while recording or when in recording standby mode.
The digital signals other than 44.1kHz cannot be recorded when SRC is off. The error message Not Fs44.1k! will appear on the display.
Input selection
To select the input to be recorded, press the INPUT SELECT key on the main unit.Repeated presses of the key cycle through the following options:ANALOG Balanced/UnbalancedOPTICAL Optical digital inCOAXIAL Coaxial digital inAES/EBU AES/EBU digital in
In the case of either the coaxial or optical inputs being selected, the indicator COAXIAL or OPTICAL lights up.If the balanced analog signal is selected, the ANALOG indicator blinks. If the unbalanced analog signal is selected, the ANALOG indicator lights up.When the digital input AES/EBU is selected, there is no indicator lights up, instead, the word AES/EBU will appear on the screen for a while.
Analog recording level:
The level of the analog signals received at the ANALOG IN jacks are controlled with the INPUT (L.R) controls. When recording analog signals, set the digital volume to 0 dB.
Digital recording level:The level of the digital signal may be controlled using the digital volume menu, as described below.1. Call up the VOLUME option in the REC sub-menu
(see “Operation basics” on page 16).
Push the MULTI JOG dial to enter the function on.
2. Rotate the MULTI JOG dial to adjust the input volume between -54dB and +18 dB (relative to the original input level).
There is also a -‹ setting which represents a complete signal cut. The display shows Vol> ---dB for the -‹ setting.
3. Press the MENU key or push the MULTI JOG dial to enter the setting and return to normal mode.
5 − Recording

TASCAM CD-RW901MKII 27
5 − Recording
Basic recording
1. Load a recordable disc into the unit. As the disc loaded, the display shows TOC Reading, with the period flashing.
2. Press the INPUT SELECT key to select a recording source (see “Input selection” on page 26).
If a digital source is selected, and the connection or the signal are improper, the error message D-IN UNLOCK! will appear on the display.
3. Press the RECORD key. The unit enters record ready mode, as shown by the REC and READY indica-tors on the display.
NOTE�As the unit enters record ready mode, the display
shows Now OPC (Optimum Power Control) occasion-ally, as the unit prepares to record on the disc.
To adjust the level of the source, following the guidelines in “Input selection” on page 26.
NOTE�The red “OVER” indicators on the meters should never
light. Unlike analog equipment, digital audio units pro-duce extremely unpleasant sounds when distort-ed, and there is no “headroom” after the 0 mark. If recording digitally from a commercially-produced CD, the volume set in the menu should be 0 dB. This will maintain all the dynamic range of the source CD without clipping. Only boost the signal if the source is exceptionally quiet.
An analog signal input at nominal level, with no cut or boost from the volume controls, is equivalent to a reading of −16 dB on the meters.
4. Press the PLAY key to start recording.
Pressing the PAUSE key stands by recording tempo-rarily. To restart recording, press the PAUSE key or PLAY key again.
5. Press the STOP key to stop recording.
When recording stops, the display shows PMA Writing (Program Memory Area) flashing for a few seconds as the unit writes to the disc.
NOTE�When PMA Writing is shown on the display, all keys
are ignored.
To confirm the total recording time, use the REC TIME option in the SYSTEM sub-menu (see “Operation basics” on page 16).
NOTE�Do not vibrate the unit or turn off the power when the
unit writes to the disc, otherwise, recording will fail.
Full disc
If the disc becomes full during recording, the unit will automatically insert a fade-out. For example: When recording a long program, just before the end of the disc is reached, the unit starts a fade-out over four seconds and the display will show Fade Out.When the fade-out has finished, the display shows Disc Full!. Press the STOP key to exit.
If the disc is a CD-RW, the final track can be erased, if required (see “Erasing” on page 34) and the disc then finalized. If the disc is a CD-R, it must be finalized prior to use (see “Finalizing” on page 33).
Time display while recording
When in record or record ready mode, repeated presses of the TIME key cycle through four different time modes:• Elapsed track time (no display light indication)• Remaining track time (REMAIN is lit in the display)• Elapsed disc time (TOTAL is lit in the display)• Remaining disc time (TOTAL and REMAIN are lit in
the display)
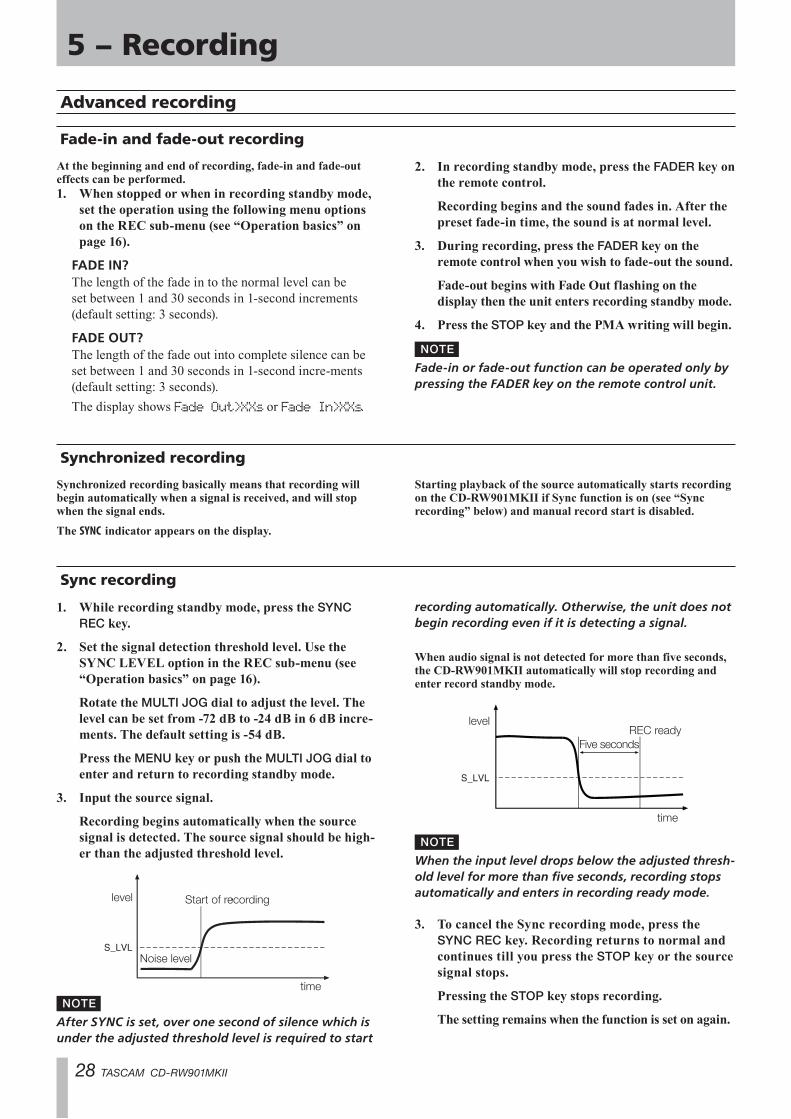
28 TASCAM CD-RW901MKII
5 − Recording
Sync recording
1. While recording standby mode, press the SYNC REC key.
2. Set the signal detection threshold level. Use the SYNC LEVEL option in the REC sub-menu (see “Operation basics” on page 16).
Rotate the MULTI JOG dial to adjust the level. The level can be set from -72 dB to -24 dB in 6 dB incre-ments. The default setting is -54 dB.
Press the MENU key or push the MULTI JOG dial to enter and return to recording standby mode.
3. Input the source signal.
Recording begins automatically when the source signal is detected. The source signal should be high-er than the adjusted threshold level.
S_LVL
Start of recordinglevel
time
Noise level
NOTE�After SYNC is set, over one second of silence which is
under the adjusted threshold level is required to start
recording automatically. Otherwise, the unit does not begin recording even if it is detecting a signal.
When audio signal is not detected for more than five seconds, the CD-RW901MKII automatically will stop recording and enter record standby mode.
S_LVL
REC readylevel
time
Five seconds
NOTE�When the input level drops below the adjusted thresh-
old level for more than five seconds, recording stops automatically and enters in recording ready mode.
3. To cancel the Sync recording mode, press the SYNC REC key. Recording returns to normal and continues till you press the STOP key or the source signal stops.
Pressing the STOP key stops recording.
The setting remains when the function is set on again.
Synchronized recording
Synchronized recording basically means that recording will begin automatically when a signal is received, and will stop when the signal ends.The SYNC indicator appears on the display.
Starting playback of the source automatically starts recording on the CD-RW901MKII if Sync function is on (see “Sync recording” below) and manual record start is disabled.
Advanced recording
Fade-in and fade-out recording
At the beginning and end of recording, fade-in and fade-out effects can be performed.1. When stopped or when in recording standby mode,
set the operation using the following menu options on the REC sub-menu (see “Operation basics” on page 16).
FADE IN? The length of the fade in to the normal level can be
set between 1 and 30 seconds in 1-second increments (default setting: 3 seconds).
FADE OUT? The length of the fade out into complete silence can be
set between 1 and 30 seconds in 1-second incre-ments (default setting: 3 seconds).
The display shows Fade Out>XXs or Fade In>XXs.
2. In recording standby mode, press the FADER key on the remote control.
Recording begins and the sound fades in. After the preset fade-in time, the sound is at normal level.
3. During recording, press the FADER key on the remote control when you wish to fade-out the sound.
Fade-out begins with Fade Out flashing on the display then the unit enters recording standby mode.
4. Press the STOP key and the PMA writing will begin.
NOTE�Fade-in or fade-out function can be operated only by
pressing the FADER key on the remote control unit.

TASCAM CD-RW901MKII 29
5 − Recording
NOTE�If you set the value so that only high-level signals
trigger recording, remember that the start of a piece may not be record as in the diagram.
Recordsing startslevel
time
This part of the track may not be recorded
S_LVL
Also remember that when recording from an analog source, the threshold should be set so that it is higher than the “noise floor”. If the “noise floor” is higher than the threshold, a false start will occur:
S_LVL
level
time
Noise is higher than threshold
Start of track is not registered
Automatic track division
The trigger level can also be used to divide tracks if the A_TRACK (auto track) function is enabled.When this function is enabled, the unit automatically inserts a track division in the recorded material.
ª To enable or disable automatic track division:
1. Use A_TRK option in the REC sub-menu to set the mode on. The A.TRACK indicator at the top right of the display lights.
2. Rotate and push the MULTI JOG dial to select and enter the modes following:
DD (digital direct) When recording digitally from MD, CD or DAT, this
mode detects a track boundary and divides the track. However, when the DD mode is on, and if the analog source or non-DAT/CD/MD digital connections are detected, the track number will be incremented using level detection, as set with the A_TRK LEVEL setting as described here.
When AES/EBU is selected, this mode cannot be used.
Time (Time track increment)
The track will be incremented when the time set prior to recording using the menu item “A_TRK TIME?” has passed (see “Operation basics” on page 16). The time can be set between one minute and ten minutes in one minute increments. The A.TRACK indicator blinks during recording or when in record ready mode.
This function can be turned on by pressing the AUTO TRACK key on the remote control.
Level
When the sound level has dropped below the threshold for more than two seconds, and sound has re-started, the track will be divided.
Use A_TRK LEVEL option in the REC sub-menu. The trigger level is set to -24dB to -72 dB.
A_LVL
At least 2 secondslevel
time
Track increment
Sync recording with trim function
This Sync trim function allows you to override the automatic sync recording where necessary, to chang the start time of the track forwards or backwards.Use the SYNC TRIM option in the REC sub-menu to turn the function on (see “Operation basics” on page 16).The available trim range is from -125 through +125 frames.
Turn the MULTI JOG dial to adjust the trim value.

30 TASCAM CD-RW901MKII
5 − Recording
Manually divide track
While recording is taking place, press the RECORD key. The current track number is incremented by one.For details of automatic track division while recording, see “Automatic track division” on page 29.NOTE
�According to the “Red Book” (the specification for audio CDs), a track cannot be less than four seconds in length, and there can be a maximum of 99 tracks
on an audio CD. Bear these limitations in mind when adding track divisions.
This operation can not be applied while recording track 99.
Manually incrementing index numbers
This function allows you to manually assign index numbers.1. Start recording.
2. Press the CALL key at the point you want to assign an index number. Index XX where XX shows the number, will be displayed.
NOTE�The maximum index number within a track is 99.
When the unit reaches 99, it will increment the track number and start assigning index numbers counting from one.
Automatically Incrementing index numbers
When recording with auto track function, when INDEX INC is set to on (see “Operation basics” on page 16), the unit overrides the setting of the automatic track division, and instead of incrementing track numbers, it increments the index numbers within a track.Use the MULTI JOG dial or MENU (+/-) keys on the remote control to switch INDEX INC on or off.
Index XX where XX is index numbers will appear on the display.NOTE
�The maximum index number within a track is 99. When the unit reaches 99, it will increment the track number and start assigning index numbers counting from one.
Automatic track division with trim function
When Auto Track is set to either Level or DD mode, it is possible to trim the automatic track division point using A_TRK TRIM option in the REC sub-menu (see “Operation basics” on page 16). This function allows you to slip the start time of the track increment forwards or backwards.NOTE
�When Auto Track mode is set to Time, the value set in Auto Track Trim is ignored.
The available trim value is from -125 through +125 frames.
Use the MULTI JOG dial or MENU (+/-) keys on the remote control to adjust the trim value.
Rec mute function
The Rec mute function allows instant cut-off of the input signal, and records four seconds of silence on the disc.While recording is in progress, press the REC MUTE key on the remote control.The display shows the Rec Mute flashing, the meters stop displaying the current level and the monitored sound is cut. After about four seconds, the unit enters record ready mode.NOTE
�This function is only available from the remote control unit.

TASCAM CD-RW901MKII 31
5 − Recording
Copy-protection
The CD-RW901MKII allows copy-protection to be applied to the discs produced. Naturally, the copy-protection applies only to digital-to-digital copies.There are three settings:• Free (may be freely copied), where no copy-protection is
applied to the recorded disc.• 1Gen (single-generation copying), where one digital
copy (“child”) can be made from the recorded disc, but no digital copies (“grandchildren”) can be made from the child.
• Prohi (copy prohibited) which prevents any digital copies being made from the recorded disc.
• Origin (SCMS:Serial Copy Management system) which applies CCI (Copy Control Information) to the recorded disc.
Use the COPY ID option in the REC sub-menu to set the function on (see “Operation basics” on page 16).Turn the MULTI JOG dial to select the desired settings.NOTE
�Copy-protection applies on a “per-track”, not a per-disc basis. This means that you can apply different copy-protection levels to different tracks (but you can’t apply different copy-protection levels to different parts of the same track). If copy-protection is impor-tant to your work, you may want to check this setting every time you make a recording, to ensure that you have the protection level that you want.
Restricting the number of tracks
When making a recording, it is possible to restrict the number of tracks that nay be recorded at one time.At any time within record or record ready mode, turn the MULTI JOG dial to display the track numbers you want to record.The maximum number that can be entered is 99 tracks.

32 TASCAM CD-RW901MKII
5 − Recording
Continuous recording (CONT REC)
Using two CD-RW901MKII units to make continuous recording.
1 Connect two CD-RW901MKII units using the PARALLEL ports.
Unit 1 Unit 2EOM TALLY (pin 5) FADER START/STOP
(pin 11)FADER START/STOP (pin 11)
EOM TALLY (pin 5)
GND (pin 8) GND (pin 8)
2 On both units, select the CONT REC sub-menu in the REC option (see “Operation basics” on page 16).
Cont Rec> XXX appears on the display where XXX shows time setting of 30s, 60s or 90s to trigger the units to start recording when the EOM (End of Message) tally signal is received one after another.
NOTE�OFF is also shown in the time setting, however if
selected, the CONT REC function is canceled.
We recommend selecting the same time setting on both units.
The CD-RW901MKII may take longer for OPC calibra-tion for discs with scratches, grime or dust. To avoid clipping a recording, we recommend not to use such discs, or to select a time setting more than 30s.
3 Connect recording source(s) to both units.
4 Press REC key on the one of the units to start continuous recording, and Cont Rec lights up in the display.
While the one unit is recording, the second unit should be in stop mode.
When the remaining time on a disc being recorded reaches the time setting, the unit sends the EOM tally signal to the second unit.
Simultaneously, Now OPC is displayed on the second unit, and when OPC calibration completes, the unit starts recording.
The two units are now in recording mode during the time setting selected.
When the first unit finishes recording, the recorded disc should be replaced with another recordable disc for the next recording which starts when the unit receives the EOM tally signal from the second unit. This loop recording will be continued until either of the units is stopped.NOTE
�While the first unit is recording, the second unit can be set in recording standby mode. However, it may shorten the unit’s lifetime by running the motor continuously. We recommend to set the second unit in stop mode during stand by.
If the number of tracks is restricted, the EOM tally signal is not output and the continuous recording cannot be operated.
The CONT REC function remains selected even the power is turned off, so that when the power is turned on again on one of the units, and when the following conditions are met, the unit starts recording:
• Both units are connected• The unit has a recordable disc
To avoid recording accidently, remove the recordable disc from the unit before turning off the power, or disconnect the units from each other.
Use two CD-RW901MKII units connected only when CONT REC is operated. In any other operation, two units should be disconnected, or set the CONT REC function off on both units to avoid any unexpected recording.
TASCAM CD-RW901MKII 33
Unfinalizing CD-RW discsIf a CD-RW disc has been finalized, it is possible to erase the Table of Contents in the following way:
1. With the finalized disc loaded and the unit in stop mode, press the ERASE/DEL key on the front panel or the ERASE key on the remote control.
Rotate the MULTI JOG dial or press the MENU (+/-) keys on the remote control to select UNFINALIZE?. Push the MULTI JOG dial or press the ENTER key to confirm.
If you do not want to proceed with the unfinaliz-ing process, press the ERASE/DEL key on the front panel or the ERASE key on the remote control.
2. The display shows Sure?
If you do not want to proceed with the unfinalizing process, press the STOP key.
3. To start the unfinalizing process, press the MULTI JOG dial or the ENTER key again.
When unfinalization has been chosen, the display shows Erase flashing and the remaining time. The unit starts counting down from a time shown on the display.
4. When finalization has been finished successfully, Complete appears on the display, and the TOC indi-cator will go off.
Finalizing
As has been explained earlier (“About Finalizing” on page 7), in order for a disc to become a standard CD, it must have a Table of Contents (TOC) written to it. This process is known as finalizing.An unfinalized disc can always be distinguished on the CD-RW901MKII by the TOC indicator under the disc type on the display being un-lit when the disc is inserted.
To finalize a disc:1. Load the unfinalized disc, and with the unit in stop
mode, press the FINALIZE key.
The display shows FINALIZE?
If you do not want to proceed with the finalizing process, press the FINALIZE/INS key on the front panel or the FINALIZE key on the remote control.
2. To start the finalizing process, push the MULTI JOG dial or press the ENTER key on the remote control.
The display shows Sure?
If you do not want to proceed with the finalizing process, press the STOP key.
3. When finalization has been chosen, the display shows the TOC flashing and the remaining time. The
unit starts counting down from a time shown on the display.
4. When finalization has been finished successfully, Complete appears and the TOC will be lit on the display.
NOTE�During the finalizing process, all key presses are ignored.
This section deals with the actions taken after record-ing: finalizing for CD-R and CD-RW discs, and erase operations for CD-RW discs.Once finalized, CD-R discs are truly final—no more can be recorded on them. By contrast, CD-RW discs can be “unfinalized” using the CD-RW901MKII, i.e. their TOC can be deleted, and if there is space, further material can be recorded on them. Even if the disc is full, tracks can be erased
following the unfinalize process, and new material can be recorded.
6 − After recording

34 TASCAM CD-RW901MKII
6 − After recording
Refreshing a disc
Refreshing the disc makes a disc usable again. This operation destroys all data on the disc.1. Load the disc, and the unit in stop mode, press the
ERASE/DEL key on the front panel or the ERASE key on the remote control. Select the REFRESH? rotating the MULTI JOG dial or pressing the MENU (+/-) keys on the remote control.
To cancel the operation at this point, press the ERASE/DEL or the ERASE key again.
2. Push the MULTI JOG dial or press the ENTER key on the remote control to enter the function. The display shows Sure?
To cancel the operation at this point, press the STOP key.
3. Push the MULTI JOG dial or press the ENTER key again to proceed the operation.
The display shows Erase flashing and the remaining time. The unit starts counting down from a time shown on the display.
4. When the disc has been refreshed, Complete appears then Blank Disc will appear on the display.
Erasing a whole disc
When you want to erase a whole disc (all the tracks on a disc), follow the procedure below:NOTE
�Once the operation is proceeded, the STOP key cannot function. Please confirm before the operation.
1. While stopped, press the ERASE/DEL key on the front panel or the ERASE key on the remote control. Select the ERASE DISC? by rotating the MULTI JOG dial or pressing the MENU (+/-) keys on the remote control.
To cancel the operation at this point, press the ERASE/DEL or the ERASE key again.
2. Push the MULTI JOG dial or press the ENTER key to enter the function. The display shows Sure?
To cancel the operation at this point, press the STOP key.
3. Push the MULTI JOG dial or press the ENTER key again to proceed the operation.
The display shows Erase flashing and the remaining time. The unit starts counting down from a time shown on the display.
4. When the disc has been erased, Complete appears then Blank Disc will appear on the display.
Erasing tracks
Erasing
This operation erases the specified track and all sub-sequent tracks from a recorded CD-RW disc.NOTE
�Once this operation has started, the STOP key cannot be used to cancel it. Please check the track range to be deleted first.
Erasing a track is only possible when the unit is in continuous playback mode.
1. While stopped, press the ERASE/DEL key on the front panel or the ERASE key on the remote control. Select the ERASE TRACK? rotating the MULTI JOG dial or pressing the MENU (+/-) keys on the remote control.
To cancel the operation at this point, press the ERASE/DEL or the ERASE key again.
2. Push the MULTI JOG dial or press the ENTER key to enter the function.
The display shows Erase XX-XX (the number of the first track and last track to be erased).
Rotate the MULTI JOG dial or press the MENU (+/-) key to change the track numbers you desire to erase.
To cancel the operation at this point, press the ERASE/DEL or the ERASE key again.
3. Push the MULTI JOG dial or press the ENTER key to operate the function.
The display shows Sure?
To cancel the operation at this point, press the STOP key.
4. Push the MULTI JOG dial or press the ENTER key again to proceed the operation.
The display shows Erase flashing and the remaining time. The unit starts counting down from a time shown on the display.
5. When the tracks have been erased, Complete will appears on the display.

TASCAM CD-RW901MKII 35
IMPORTANT SAFETY INSTRUCTIONS
Titles can be given to the disc and the tracks on the disc, using the TEXT EDIT option on the TEXT sub-menu.NOTE
�After a new title is selected and entered on the disc, TOC will light up on the display. If the power is turned off, the TOC has not been recorded on the disc and
the titles will not have be added. You must finalize the disc to save the titles.
Follow the guidelines below to input titles on the screen. Operate them when in the text edit mode.It is more efficient to connect a keyboard for title input ( see “Title input by keyboard” on page 36).Select the type of character for input Press the DISPLAY key on the unit or the remote control
to select from two different types of characters. Lower case letters/code: no indication Capital letters/code: CAPSInput procedure Rotate the MULTI JOG dial or the MENU (+/-) keys on
the remote control to get the desired characters on the display.
Push the MULTI JOG dial or press the ENTER key on the remote control to enter.
To move the cursor position Use the ∆/̇ key and the /̊¥ key on the front
panel, or the SEARCH key on the remote control.To delete characters Place the cursor on the character, then press the
ERASE/DEL key on the front panel, or the ERASE key on the remote control.
To insert characters Move the cursor to the location where you wish to insert
a character, and press the FINALIZE/INS key on the front panel or the FINALIZE key on the remote control.
To change a character Place the cursor on the character to be changed, then
input the desired character.
NOTE�As with the TEXT menu, if you attempt to eject the
disc without writing the TOC to the disc, the display will show Sure? Text!. If you want to eject the disc without performing a TOC write, press the OPEN/CLOSE key while “Sure Text!” is shown on the display. The text that have been edited or entered will be abandoned.
The disc or track title on a finalized disc cannot be edited. Unfinalizing (CD-RW only) is needed in this case to use the title input function.
Title input operation
1. While stopped, select the TEXT EDIT option in the TEXT sub-menu (see “Operation basic” on page 16).
2. Rotate the MULTI JOG dial or repeatedly press the MENU (+/-) keys on the remote control to select the track number you wish to title.
3. Push the MULTI JOG dial or press the ENTER key on the remote control.
Now, you can input or edit the track title following the guidelines above.
4. Press the MENU key to enter.
If you want to cancel, press the STOP key.
Track title input
Disc title input
1. While stopped, select the TEXT EDIT option in the TEXT sub-menu (see “Operation basic” on page 16). Text> Disc will appear.
2. Press the MULTI JOG dial or the MENU (+/-) key on the remote control.
Now, you can input or edit the disc title following the guidelines above.
3. Press the MENU key to enter.
If you want to cancel, press the STOP key.
7 − Titling

36 TASCAM CD-RW901MKII
IMPORTANT SAFETY PRECAUTIONS7 − Titling
A computer keyboard can be connected to the IBM PC compatible PS/2 interface on the front panel to operate certain
functions of the CD-RW901MKII. It is particularly efficient for title input.
Using a keyboard with the CD-RW901MKII
Other keyboard operations
The keyboard can be used not only for title input, but also to control the deck transports, perform editing functions and
other operations. The list below shows the keys that perform various operations.
Keyboard key OperationF1 same as pressing the µ keyF2 same as pressing the ≤ keyF3 same as pressing the Key keyF4 same as pressing the STOP keyF5 same as pressing the PLAY keyF6 same as pressing the PAUSE keyF7 same as pressing the AUTO CUE keyF8 same as pressing the RECORD keyF9 same as pressing the AUTO READY keyF10 same as pressing the REPEAT keyF11 same as pressing the P.MODE keyF12 same as pressing the PITCH keySHIFT + F1 direct to “ERASE TRACK?”SHIFT + F2 direct to “ERASE DISC?”SHIFT + F3 direct to “REFRESH?”SHIFT + F4 SHIFT + F5 SHIFT + F6 SHIFT + F7 SHIFT + F8 direct to “TEXT EDIT?”SHIFT + F9 SHIFT + 10
Keyboard key OperationSHIFT + F11 direct to “UNFINALIZE?”SHIFT + F12 direct to “FINALIZE?”CTRL + F1 Direct track search TRACK 1CTRL + F2 Direct track search TRACK 2CTRL + F3 Direct track search TRACK 3CTRL + F4 Direct track search TRACK 4CTRL + F5 Direct track search TRACK 5CTRL + F6 Direct track search TRACK 6CTRL + F7 Direct track search TRACK 7CTRL + F8 Direct track search TRACK 8CTRL + F9 Direct track search TRACK 9CTRL + F10 Direct track search TRACK 10CTRL + F11 Direct track search TRACK 11CTRL + F12 Direct track search TRACK 12CAPS select or cancel upper case letterså/œ to move the cursorDelete same as the DEL or CLEAR keyBack space deletes the character before the cursorInsert same as the FINALIZE/INS keyESC cancel edit or title edit and finis Menu modeEnter same as the ENTER key
Keyboard type setting
The CD-RW901MKII must be set for the type of keyboard being connected.
Set the type using the sub-menu KEYBOARD option on the SYSTEM sub-menu. Select US for an English-language keyboard, or JP for a Japanese-language keyboard.
Title input by keyboard
Titles can be input just like typing on a PC.To enter the Title Edit menu Press SHIFT + F8 to enter the Disc/Track Title Edit Menu.To select the type of characters for input Press CAPS to select or cancel upper case lettersTo input characters Character input is performed directly with the letter and
number keys.To move the cursor Use the cursor arrow keysTo delete characters Delete key: deletes the character in the cursor position
Back space key: deletes the character before the cursor position
To insert a character Use the Insert key.To change a character Put the cursor on its position and input the desired character.

TASCAM CD-RW901MKII 37
Data communication setting
By connecting a PC through its RS-232C terminal to the CD-RW901MKII through its CONTROL I/O (RS-232C) terminal, the two units can be linked for data exchange. Use the following options on the SYSTEM sub-menu to perform their respective setting.• BAUD RATE Sets the communication speed of the keyboard.
4800/9600/19200/38400 bps can be selected (default:19,200).
• LENGTH Commnication word lengrh can be set to either 7 or 8
bits (default:8).
• PARITY Communication partity can be set to NON, EVEN or
ODD (default:NON).
• STOP BIT The data stop bit can be set to either 1 or 2 (default:1).
Use the MULTI JOG dial (or the MENU (+/-) key and ENTER key) to set the value.
8 − Data settings

38 TASCAM CD-RW901MKII
Messages during operations
Message StatementBlank Disc A blank recordable disc has been inserted.Complete An operation such as finalize or erase has been successfully completed.Now OPC* Calibration is being performed to operate recording properly.Disc Repair The disc is being repaired, and this operation will take a long time. Please do not turn off the power of the CD-RW901MKII until it finishes.PMA Writing* The recorded content is being written to the disc.TOC Reading The table of contents data is being read.Incomplete! ISRC or RID codes have not been read by the unit, or there is no code on the disc.48k Fs Adj The 48k Fs adjustment function is on.Cont Rec CONT REC function is on. *OPC=Optimum power Control
*PMA=Program memory Area
Error messages
Message Details / responseCan’t Rec! Cannot record. Either erase the contents of the disc (for a CD-RW), or use a different recordable disc.Disc Error! The disc has malfunctioned. Please replace with a new disc.Disc Full! No recording time remaining, or no recordable track is left on the disc.Text Full! No space to input the letters.Sure? Text! The text data is not written on the disc yet. Open the tray to cancel the text you entered or perform the finalize operation to write the data to the disc.Drive Error! There is a problem in the drive.D-IN UNLOCK! The digital input is not connected. Turn on the power of the equipment connected to DIGITAL IN.Not Audio! There is no audio signal from DIGITAL IN.Erase Error! An error occurred while erasing.Not Fs44.1k! The sampling frequency of the digital input is not 44.1 kHz. Please turn the SRC on.PGM Empty! There is no program.PGM Full! No new programs can be created.Can’t Edit! Editing cannot be performed due to operational restrictions.Can’t Sel! Menu selection cannot be performed due to selection restrictions.Rec Error! There was an error during recording. Please re-record.OPC Error! There was an error during OPC. Please re-record.No DIR! There is no directory that contains a file.Decode Err! The MP3 file cannot be played back.Format Err! The disc is in a format that the CD-RW901MKII cannot read.EXT CLK Err! Can not synchronize with the digital input clock from the selected source. Check the connection with the source unit. No Call PT!! There is no call point. Please set a call point.
9 − Reference and specifications

TASCAM CD-RW901MKII 39
9 − Reference and specifications
Troubleshooting
Symptom Possible cause and remedyThere is no power to the unit. Please check the power cord is properly plugged in.“Disc Error!”, or “OPC Error!” is displayed. The disc may be dirty. Please replace the disc.Playback is not possible. This may be due to condensation. In this case, remove the disc, turn the power on and wait a few hours, then try again.No sound is output. • Confirm the connections with the audio system. • Check the volume level, and proper amplifier operation.Recording is not possible. • Confirm the connections with the audio system. • Adjust the recording level. • The disc may be for playback only. Please replace with a recordable disc.Noise or static can be heard. Please re-position the unit away from strong source of magnetism such as a television.The unit does not retain settings. While settings are retained each time they are made, in some case they will not be retained when the power is turned off too soon. To prevent this from happening, do not turn off the power right after making a setting.
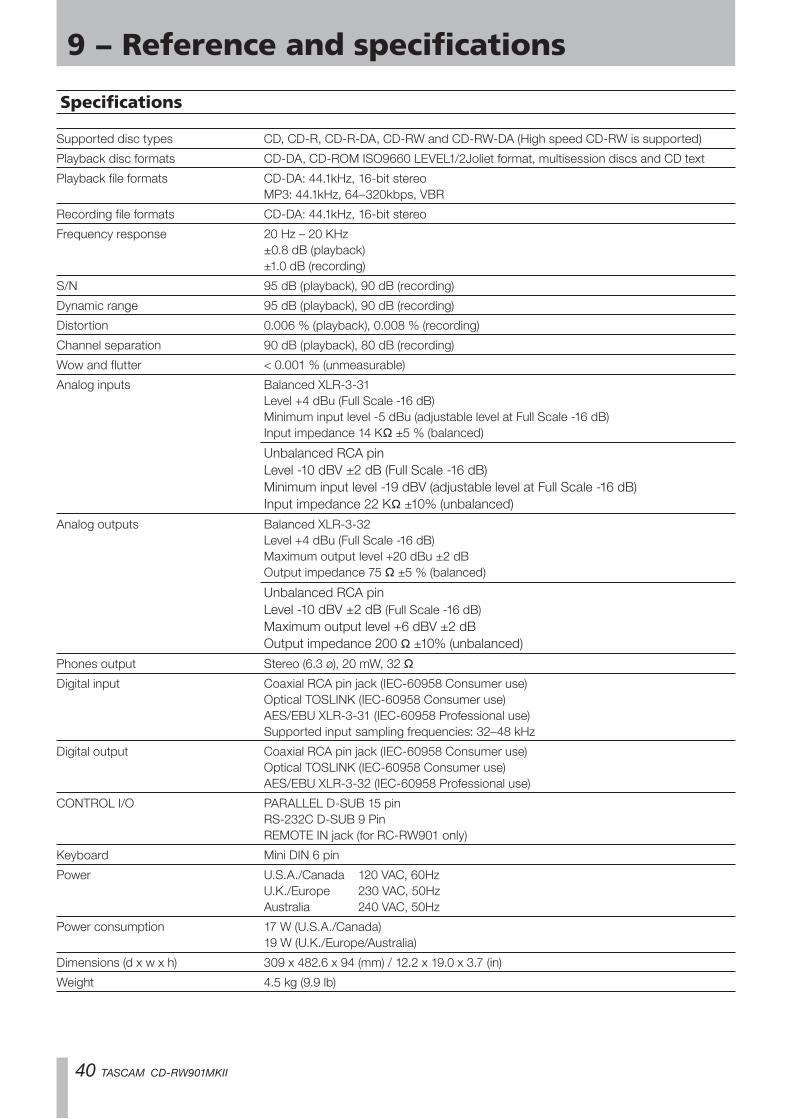
40 TASCAM CD-RW901MKII
9 − Reference and specifications
Specifications
Supported disc types CD, CD-R, CD-R-DA, CD-RW and CD-RW-DA (High speed CD-RW is supported)Playback disc formats CD-DA, CD-ROM ISO9660 LEVEL1/2Joliet format, multisession discs and CD textPlayback file formats CD-DA: 44.1kHz, 16-bit stereo MP3: 44.1kHz, 64–320kbps, VBRRecording file formats CD-DA: 44.1kHz, 16-bit stereoFrequency response 20 Hz – 20 KHz ±0.8 dB (playback) ±1.0 dB (recording)S/N 95 dB (playback), 90 dB (recording)Dynamic range 95 dB (playback), 90 dB (recording)Distortion 0.006 % (playback), 0.008 % (recording)Channel separation 90 dB (playback), 80 dB (recording)Wow and flutter < 0.001 % (unmeasurable)Analog inputs Balanced XLR-3-31 Level +4 dBu (Full Scale -16 dB) Minimum input level -5 dBu (adjustable level at Full Scale -16 dB) Input impedance 14 KØ ±5 % (balanced) Unbalanced RCA pin Level -10 dBV ±2 dB (Full Scale -16 dB) Minimum input level -19 dBV (adjustable level at Full Scale -16 dB) Input impedance 22 KØ ±10% (unbalanced)Analog outputs Balanced XLR-3-32 Level +4 dBu (Full Scale -16 dB) Maximum output level +20 dBu ±2 dB Output impedance 75 Ø ±5 % (balanced) Unbalanced RCA pin Level -10 dBV ±2 dB (Full Scale -16 dB) Maximum output level +6 dBV ±2 dB Output impedance 200 Ø ±10% (unbalanced)Phones output Stereo (6.3 ø), 20 mW, 32 ØDigital input Coaxial RCA pin jack (IEC-60958 Consumer use) Optical TOSLINK (IEC-60958 Consumer use) AES/EBU XLR-3-31 (IEC-60958 Professional use) Supported input sampling frequencies: 32–48 kHzDigital output Coaxial RCA pin jack (IEC-60958 Consumer use) Optical TOSLINK (IEC-60958 Consumer use) AES/EBU XLR-3-32 (IEC-60958 Professional use)CONTROL I/O PARALLEL D-SUB 15 pin RS-232C D-SUB 9 Pin REMOTE IN jack (for RC-RW901 only)Keyboard Mini DIN 6 pinPower U.S.A./Canada 120 VAC, 60Hz U.K./Europe 230 VAC, 50Hz Australia 240 VAC, 50HzPower consumption 17 W (U.S.A./Canada) 19 W (U.K./Europe/Australia)Dimensions (d x w x h) 309 x 482.6 x 94 (mm) / 12.2 x 19.0 x 3.7 (in)Weight 4.5 kg (9.9 lb)

TASCAM CD-RW901MKII 41
9 − Reference and specifications
Dimensional drawing
435mm465.6mm
482.6mm
76.2mm
88mm
94mm
18mm
284.6mm
6.4mm
• Illustrations and other depictions may differ in part from the actual product.• Specifications and external appearance may be changed without notification to improve the product.

42 TASCAM CD-RW901MKII
Notes

Notes
< In the United States >This warranty gives you specific legal rights and you may also have other rights which vary from state to state. This warranty is only valid within the country the unit was originally purchased.
WHAT IS AND IS NOT COVEREDExcept as specified below, this warranty covers all defects in materials and workmanship in this product. The following are not covered by the warranty:1. Damage to or deterioration of the external cabinet.2. Damages resulting from accident, misuse, abuse or neglect.3. Damage resulting from failure to perform basic daily
maintenance and/or calibration or otherwise resulting from failure to follow instructions contained in your owner’s manual.
4. Damage occurring during shipment of the product. (Claims must be presented to the carrier)
5. Damage resulting from repair or attempted repair by anyone other than TEAC or an authorized TASCAM service station.
6. Damage resulting from causes other than product defects, including lack of technical skill, competence, or experience of the user.
7. Damage to any unit which has been altered or on which the serial number has been defaced, modified or is missing.
WHO MAY ENFORCE THE WARRANTYThis warranty may be enforced only by the original purchaser.
LENGTH OF WARRANTYAll parts except heads and disk drives are warranted for one (1) year from the date of original purchase. Heads and disk drives are warranted to ninety (90) days from date of original purchase. Labor is warranted for ninety (90) days from date of original purchase.
WHAT WE WILL PAY FORWe will pay all labor and material expenses for items covered by the warranty. Payment of shipping charges is discussed in the next section of this warranty.
HOW YOU CAN GET WARRANTY SERVICEYour unit must be serviced by an authorized TASCAM service station in the United States. (This warranty is not enforceable outside the U.S.) If you are unable to locate an authorized TASCAM service station in your area, please contact us. We either will refer you to an authorized service station or instruct you to return the unit to the factory. Whenever warranty service is required, you must present a copy of the original dated sales receipt from an Authorized TASCAM Dealer.You must pay any shipping charges if it is necessary to ship the product to service. However, if the necessary repairs are covered by the warranty, we will pay return surface shipping charges to any destination within the United States.
LIMITATION OF IMPLIED WARRANTIESAny implied warranties, INCLUDING WARRANTIES OF MERCHANTABILITY AND FITNESS FOR A PARTICULAR PURPOSE, are limited in duration to the length of this warranty.
EXCLUSION OF DAMAGESTEAC’s liability for any defective product is limited to repair or replacement of the product, at TEAC’s option. TEAC shall not be liable for:1. Damages based upon inconvenience, loss of use of the product,
loss of time interrupted operation or commercial loss; or2. Any other damages, whether incidental, consequential or
otherwise.Some states do not allow limitations on how long an implied warranty lasts and/or do not allow the exclusion or limitation of incidental or consequential damages, so the above limitations and exclusions may not apply to you.
To locate an Authorized Service Center in Your AreaCALL 1-800-447-8322
< Europe >This product is subject to the legal warranty regulations of the country of purchase. In case of a defect or a problem, please contact the dealer where you bought the product.
Ce produit est sujet aux réglementations concernant la garantie légale dans le pays d’achat. En cas de défaut ou de problème, veuillez contacter le revendeur chez qui vous avez acheté le produit.
D i e s e s G e r ä t u n t e r l i e g t d e n g e s e t z l i c h e n Gewährleistungsbestimmungen des Landes, in dem es erworben wurde. Bitte wenden Sie sich im Gewährleistungsfall an den Händler, bei dem sie das Gerät erworben haben.
Questo apparecchio è conforme alle norme sulla garanzia vigenti nel rispettivo Paese in cui esso è stato acquistato. Si prega di rivolgersi al proprio commerciante, presso il quale è stato acquistato l’apparecchio, nel caso in cui si voglia richiedere una prestazione in garanzia.
Las condiciones de garantía de este aparato están sujetas a las disposiciones legales sobre garantía del país en el que ha sido adquirido. En caso de garantía, debe dirigirse al establecimiento donde adquirió el aparato.
< In other countries/areas >This warranty gives you specific legal rights, and you may also have other rights that vary by country, state or province.If you have a warranty claim or request, please contact the dealer where you bought the product.
该保证书赋予了顾客特定的合法权利,并且因国家,州或省等地域的不同,顾客可能拥有其他权利。如需申请或要求保修,请与购买本产品的销售店进行联系。If you require repair services for your TASCAM equipment, please contact the dealer where the product was purchased from or the TASCAM Distributor in your country. A list of TASCAM Distributors can be found on our website at: http://teac-global.com/
WARRANTY
✂

TEAC CORPORATION http://tascam.jp/Phone: +81-42-356-91431-47 Ochiai, Tama-shi, Tokyo 206-8530 Japan TEAC AMERICA, INC. http://tascam.com/Phone: +1-323-726-03037733 Telegraph Road, Montebello, California 90640 USA TEAC MEXICO, S.A. de C.V. http://teacmexico.net/Phone: +52-55-5010-6000Río Churubusco 364, Colonia Del Carmen, Delegación Coyoacán, CP 04100, México DF, México TEAC UK LIMITED http://tascam.eu/Phone: +44-8451-302511Meridien House, Ground Floor,69 - 71, Clarendon Road, Watford, Hertfordshire, WD17 1DS, UK TEAC EUROPE GmbH http://tascam.eu/Phone: +49-611-71580Bahnstrasse 12, 65205 Wiesbaden-Erbenheim, Germany TEAC SALES & TRADING(SHENZHEN) CO., LTDPhone: +86-755-88311561~2Room 817, Block A, Hailrun Complex, 6021 Shennan Blvd., Futian District, Shenzhen 518040, China
Printed in China
Model/Modèle/ModellModello/Modelo/型号
Serial No./No de Série/SeriennummerNumero di serie/Número de serie/序列号
Date of purchase/Date de l’achat/Datum des KaufsData dell’acquisto/Fecha de compra/购买日期
http://teac-global.com/
Owner’s name/Nom du possesseur/Name des EigentümersNome del proprietario/Nombre del propietario/顾客姓名
Address/Adresse/AdresseIndirizzo/Dirección/顾客地址
Dealer’s name/Nom du détaillant/Name des HändlersNome del commerciante/Nombre del establecimiento/销售店名
Dealer’s address/Adresse du détaillant/Adresse des HändlersIndirizzo del commerciante/Dirección del establecimiento/销售店地址
WARRANTY✂
CD-RW901)"