cbmr for windows - tsm user supplement · cbmr for windows - tsm user supplement 1 i ntr oduc i...
TRANSCRIPT

Cristie Bare Machine Recovery
Cristie Softw are Ltd.
New Mill
Chestnut Lane
Stroud GL5 3EH
United Kingdom
Tel:+44(0)1453 847000
Fax:+44(0)1453 847001
Cristie Data Products GmbH
Nordring 53-55
63843 Niedernberg
Germany
Tel: +49 (0) 60 28/97 95-0
Fax: +49 (0) 60 28/97 95 7-99
Cristie Nordic AB
Gamla Värmdövägen 4
SE-131 37 Nacka
Sw eden
Tel:+46(0)8 718 43 30
Fax:+46(0)8 718 53 40
May 2014
TSM User Supplement
For Windows
Version 7.1
CBMR

Copyright © 1998-2014 Cristie Software Ltd.All rights reserved.
The software contains proprietary information of Cristie Software Ltd.; it is provided under a license agreementcontaining restrictions on use and disclosure and is also protected by copyright law. Reverse engineering of thesoftware is prohibited.
Due to continued product development this information may change without notice. The information and intellectualproperty contained herein is confidential between Cristie Software Ltd. and the client and remains the exclusiveproperty of Cristie Software Ltd. If you find any problems in the documentation, please report them to us in writing.Cristie Software Ltd. does not warrant that this document is error-free.
No part of this publication may be reproduced, stored in a retrieval system, or transmitted in any form or by anymeans, electronic, mechanical, photocopying, recording or otherwise without the prior written permission of CristieSoftware Ltd.
IBM Tivoli Storage Manager (TSM), AIX and TIVOLI are trademarks of the IBM Corporation.
NetWorker and Avamar are trademarks of the EMC Corporation.
Simpana is a trademark of CommVault Inc.
vSphere, vCenter and vCloud are trademarks of VMware Inc.
Hyper-V is a trademark of Microsoft Corporation.
Cristie Management Console (CMC), PC-BaX, UBax, Cristie Storage Manager (CSM), SDB, ABMR (Bare MachineRecovery for EMC Avamar), NBMR (Bare Machine Recovery for EMC NetWorker), SBMR (Bare Machine Recovery forCommVault Simpana), TBMR (Bare Machine Recovery for TSM), CBMR (Cristie Bare Machine Recovery), RecoverySimulator (RS), CloneManager and CRISP (Cristie Recovery ISO Producer) are all trademarks of Cristie SoftwareLtd.
Cristie Software LtdNew Mill
Chestnut LaneStroud
GL5 3EHUK
Tel: +44 (0) 1453 847000Email: [email protected]
Website: http://www.cristie.com

3Contents
Copyright © 1998-2014 Cristie Software Ltd.
Contents
1 Introduction 4
................................................................................................................................... 41.1 Document conventions
................................................................................................................................... 41.2 The CBMR Process
................................................................................................................................... 51.3 Prerequisites
2 Windows Client Installation 6
3 Creating a TSM Node 15
................................................................................................................................... 153.1 Creating a Policy Domain with the Management Console
................................................................................................................................... 183.2 Creating a Policy Domain from the Command Line
................................................................................................................................... 193.3 Creating a Node with the Management Console
................................................................................................................................... 253.4 Creating a Node from the Command Line
4 DR Backup to TSM 27
................................................................................................................................... 274.1 Creating the TSM Backup Location/Storage Device
......................................................................................................................................................... 27Windows TSM Backup Location 4.1.1
................................................................................................................................... 294.2 Scheduling DR Backups with TSM
5 Recovery using the DR Backup 32
................................................................................................................................... 325.1 Recovery using WinPE2 or WinPE4
6 Obtaining Information from theTSM Server 37
7 Best Practice 38
................................................................................................................................... 387.1 Storage Pools
................................................................................................................................... 387.2 Nodes and Filespaces
................................................................................................................................... 387.3 Management Class
................................................................................................................................... 397.4 DR Backup
8 Cristie Technical Support 40
4 Cristie Bare Machine Recovery
CBMR for Windows - TSM User Supplement
1 Introduction
Purpose
This document is written for users of Cristie Bare Machine Recovery (CBMR) software who areusing IBM Tivoli Storage Manager (TSM) for the storage of their disaster recovery (DR) backups.It is not self-contained and should be run in conjunction with the CBMR for Windows Quickstart andUser Guides. Much of the detail is common to all the platforms on which CBMR runs. Thisdocument is subject to changes in the official IBM documentation and should therefore only be usedas a guide and not a definition of the the workings of TSM.
If you need guidance in the use or setting up of TSM, then contact your TSM Administrator or IBM.
Versions
The versions used in this document are:
Tivoli Storage Manager 6.2 Server and Client
CBMR for Windows 7.1
Limitations
Windows WinPE2 or WinPE4 recovery requires a minimum of 1024 MB RAM.
Document Structure
This document complements other CBMR documents and deals with:
Installation of the TSM client
Creation of the TSM node
Backup to the node
Recovery from the node
There is also a section on Best Practice.
1.1 Document conventions
The following typographical conventions are used throughout this guide:
/etc/passwd represents command-line commands, options, parameters, directorynames and filenames
Next > used to signify clickable buttons on a GUI dialogue
Note:describes something of importance related to the current topic
1.2 The CBMR Process
Cristie Bare Machine Recovery (CBMR) will recover your Windows machine in the event of adisaster. It can backup to tape drives, virtual tape drives, IBM Tivoli Storage Manager (TSM) andcascaded devices. Extra modules are available to support tape libraries and autochangers, andCristie Storage Manager (CSM) devices.
The processes may be run either from the Command line or a GUI interface. Disaster Recovery(DR) backups can be taken periodically to reflect the changing content of the machine. In order to be

5Introduction
Copyright © 1998-2014 Cristie Software Ltd.
able to recover this data, the machine configuration information must also be saved. This includesdetails of hard disks and network interfaces.
CBMR requires four components for the recovery of any computer. These are:
Bootable CBMR CD - to provide the recovery platform
Configuration data - defining the structure of the machine and its network characteristics
DR Backup data - required to recover the operating system on that structure
Application data - required to recover the applications and user data on top of the basicoperating system
Each of the backup elements will change at a different rate and is therefore best run on separateschedules.
The main steps when performing the DR Backup are:
Create a Backup Location
Perform a DR Backup
Save Configuration Data
The main steps when performing a recovery of the operating system are:
Boot the recovery OS
Establish Network connection
Load Configuration Data
Recreate the disk structures
Restore the OS files from the DR Backup
Reboot to the recovered OS
Thereafter you should recover the Application data.
1.3 Prerequisites
The TSM client software is supplied by IBM. See their specifications for prerequisites.

6 Cristie Bare Machine Recovery
CBMR for Windows - TSM User Supplement
2 Windows Client Installation
In order to connect to a TSM server with CBMR, it is necessary to install both the Backup/Archiveclient and API software for TSM and then install CBMR on the machine that is to be protected.
You should install the TSM Client before installing CBMR because CBMR looks for the client whilstit is installing. If no client is found, then CBMR does not install TSM support.
Check for Installed TSM Client
Check to see if there is a client installed on the CBMR machine. Check the TSM Client version(Refer to the Readme document for a list of the latest supported TSM server versions). This can bedone by looking at the version of the file C:\Program Files\Tivoli\TSM\baclient\dsmagent.exe orC:\Program Files\Tivoli\TSM\api\apienu.dll. If the TSM client is not one of those that aresupported, then you must uninstall the existing client.
Install TSM Backup/Archive client and the TSM API
This step is needed only if you have not already installed a supported version of the TSM client.
The client software will either be on the TSM CD or stored on a network share. Check with youradministrator.
The following description relates to the installation of version 6.2 of the TSM Client. If you areinstalling a different client version, then seek help from your TSM administrator.
Unpackage to the Client Machine
You may need to unpackage the TSM client to the client machine before running the setup program.This process will copy all the files required for the installation from the CD onto the client machine.
Select the location into which the installation files will be unpacked:
Click on Next>. The Wizard will begin extracting the files:

7Windows Client Installation
Copyright © 1998-2014 Cristie Software Ltd.
Select your chosen language:
TSM will now be extracted to your chosen location in preparation for installation.

8 Cristie Bare Machine Recovery
CBMR for Windows - TSM User Supplement
Install
Once it is unpacked, the installation may proceed automatically. If not, locate the unpackagedsoftware and double-click on setup.exe.

9Windows Client Installation
Copyright © 1998-2014 Cristie Software Ltd.
Double click on setup.exe. This will begin extracting the files and the InstallShield Wizard Welcomescreen will be displayed:
Select the folder into which you wish to install the client. It should default to C:\ProgramFiles\Tivoli\TSM.
Click Next>
Typical Install Option

10 Cristie Bare Machine Recovery
CBMR for Windows - TSM User Supplement
The Typical installation of the client includes the Backup Archive (BA) Client and the API.
Select the setup type Typical unless you wish to use the administrator command line utility on yourcomputer (see following). Click on Next>.
Custom Install Option
You may wish to make the Administrative Client Command Line interface available for testingand diagnostic purposes. Provided that you have been given the appropriate privileges to use it,install the software by selecting Custom Setup instead of Typical.
Choose the Custom install and click Next>:

11Windows Client Installation
Copyright © 1998-2014 Cristie Software Ltd.
Then install the Administrative Client Command Line Files from the feature list. Select Administrative Client Command Line Files:
Then click on Next>.
Continue Install
Now that you have completed the Typical or Custom install options, you can proceed with the

12 Cristie Bare Machine Recovery
CBMR for Windows - TSM User Supplement
installation.
Click Install.
The InstallShield Wizard will display the progress of the installation:
When installation is complete you should get the following screen:

13Windows Client Installation
Copyright © 1998-2014 Cristie Software Ltd.
Click on Finish to exit the Wizard.
The following shortcuts will be installed in the Start | Programs menu:
The TSM client is now fully installed on your system. The relevant files are in the folders C:\ProgramFiles\Tivoli\TSM. The API used by CBMR is in the .\api folder and .\baclient and containsnot only the Backup-Archive Client, but also many other utilities including the AdministratorConsole Command Line interface, dsmadmc.exe.

14 Cristie Bare Machine Recovery
CBMR for Windows - TSM User Supplement

15Creating a TSM Node
Copyright © 1998-2014 Cristie Software Ltd.
3 Creating a TSM Node
Several entities must be defined before you can create a node. The node definition relates to:
Policy DomainsCollocation Groups
both of which must be correctly defined before they can be used for a node.
3.1 Creating a Policy Domain with the Management Console
A new Policy Domain may be created via the Management Console at the same time as youcreate a new node.
Select the Client Node Configuration Wizard from the Management Console.
Select the node (or add a new node) for which you wish to define the new Policy Domain:

16 Cristie Bare Machine Recovery
CBMR for Windows - TSM User Supplement
Give the new Policy Domain a name and identify the Storage Pool to which it is attached:
You can also change the retention parameters.

17Creating a TSM Node
Copyright © 1998-2014 Cristie Software Ltd.
Number of backup versions to keep | If client data exists, should be a minimum of 2 and amaximum of 5, depending on the availability of storage.
Number of backup versions to keep | If client data is deleted can be left at 1.
Length of time to retain extra backup version | Number of days will vary depending upon thefrequency of backups.
Length of time to retain only backup version | Number of days will be a policy decision. It willonly matter when you remove or replace servers.
The default values shown above will be acceptable for many installations. Once you have set theparameters to your requirements, click on OK.
Your new Policy Domain has now been assigned to your node. Click on OK.

18 Cristie Bare Machine Recovery
CBMR for Windows - TSM User Supplement
Check that the Policy Domain is set correctly and proceed with Next or Cancel.
3.2 Creating a Policy Domain from the Command Line
You can create a new Policy Domain from the Command line. The results will be the same as usingthe Management Console, but there are more steps and there is more flexibility. The process hassix steps:
1. Define Policy Domain Name2. Define Policy Set3. Create Management Class4. Assign Default Management Class5. Validate Policy Set6. Activate Policy Set
Start the Adminstrator Console dsmadmc.exe and use the following commands with the followingsyntax:
DEFine DOmain <PolicyDomainName> DESCription="<Description>"
DEFine POlicyset <PolicyDomainName> <PolicySetName> DESCription="<Description>"
DEFine MGmtclass <PolicyDomainName> <PolicySetName> <ManagementClassName>
DEFine COpygroup <PolicyDomainName> <PolicySetName> <ManagementClassName> DESTination=<StoragePool> VERExists=<Number> VERDeleted=<Number> RETExtra=<Days> RETOnly=<Days>
DEFine COpygroup <PolicyDomainName> <PolicySetName> <ManagementClassName> Type=Archive DESTination=<StoragePool> RETVER=<Days> RETMin=<Days>
ASsign DEFMGmtclass <PolicyDomainName> <PolicySetName> <ManagementClassName>
VALidate POlicyset <PolicyDomainName> <PolicySetName>
ACTivate POlicyset <PolicyDomainName> <PolicySetName>
So in order to create the same Policy Domain as shown for the Management Console, you wouldissue the following commands:

19Creating a TSM Node
Copyright © 1998-2014 Cristie Software Ltd.
def domain NEWCBMRPD desc="New CBMR Policy Domain"
def policyset NEWCBMRPD NEWCBMRPS desc="New CBMR Policy Set"
def mgmt NEWCBMRPD NEWCBMRPS NEWCBMRMC
def copy NEWCBMRPD NEWCBMRPS NEWCBMRMC dest=BACKUPPOOL verexists=2 verdel=1 retex=30 retonly=60
def copy NEWCBMRPD NEWCBMRPS NEWCBMRMC type=ARCHIVE dest=ARCHIVEPOOL retver=365 retmin=90
assign defmgmt NEWCBMRPD NEWCBMRPS NEWCBMRMC
valid policyset NEWCBMRPD NEWCBMRPS
activate policyset NEWCBMRPD NEWCBMRPS
Now that you have defined the Policy Domain, you can now register new CBMR nodes in thatdomain.
3.3 Creating a Node with the Management Console
You need to create a node for sole use by CBMR that will NEVER be accessed by the BA Client.You cannot share the node that you originally created for backing up files with the BA Client withCBMR.
To create a node with the Management Console, run Wizards:
In the list of Wizards you will find Client Node Configuration. If you click on this you will get thefollowing form:

20 Cristie Bare Machine Recovery
CBMR for Windows - TSM User Supplement
Click Next>.
After you have entered the administrative account name and password, click Next.
Existing nodes will be displayed. First select the appropriate Storage Pool and then click onAdd....

21Creating a TSM Node
Copyright © 1998-2014 Cristie Software Ltd.
Enter the Node Name, the Password and the Verify password (by copying the Password). Do nottick Force password reset as the password must remain constant. Make certain that you selectthe correct Policy domain for the node.
Click Next>.
The new Node ("newcbmr") now appears in the list. The initial information used to create the node is

22 Cristie Bare Machine Recovery
CBMR for Windows - TSM User Supplement
quite sparse and a number of default values have been created. You need to change one of thesebefore the node can be used for CBMR.
The following warning may be displayed if you have not created a node for use with the BA Client.Remember this is a completely separate node from the one used by CBMR. Choose the appropriateresponse.
Click Finish.

23Creating a TSM Node
Copyright © 1998-2014 Cristie Software Ltd.
You have now created the node. One of its characteristics needs to be changed.
Click OK.
You can see all of the parameters associated with the node by using the Command Line from theManagement Console:
24 Cristie Bare Machine Recovery
CBMR for Windows - TSM User Supplement
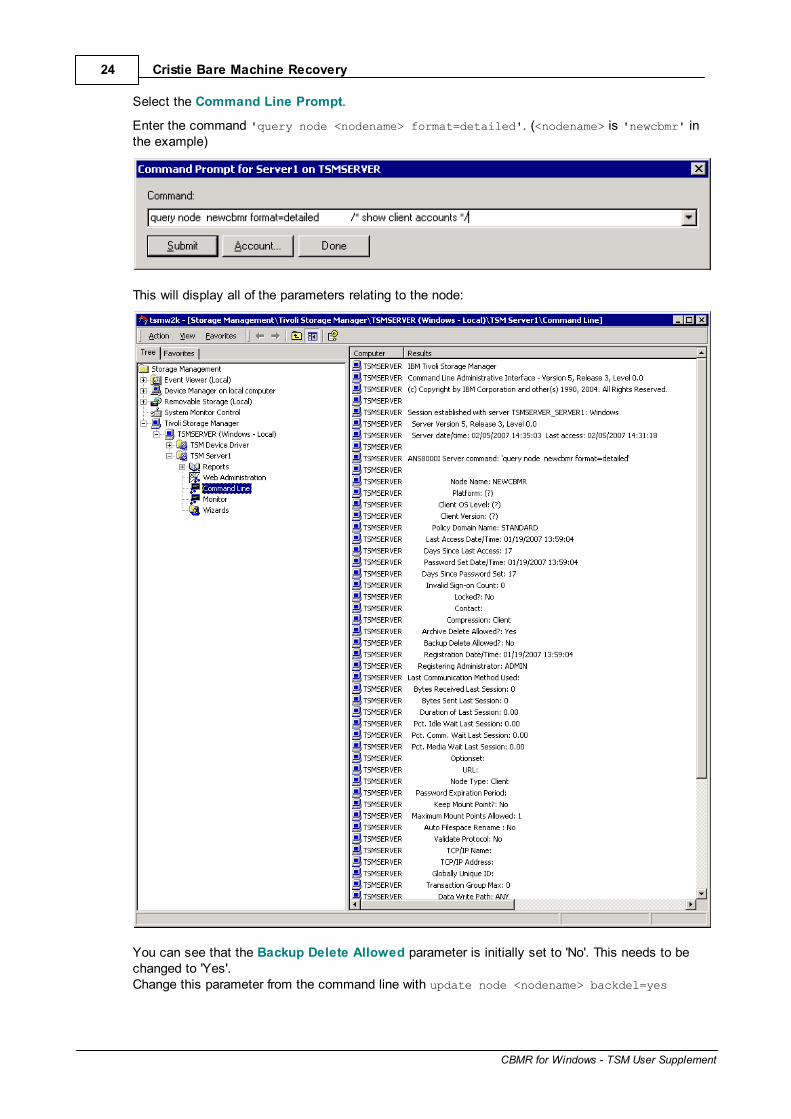
Select the Command Line Prompt.
Enter the command 'query node <nodename> format=detailed'. (<nodename> is 'newcbmr' inthe example)
This will display all of the parameters relating to the node:
You can see that the Backup Delete Allowed parameter is initially set to 'No'. This needs to bechanged to 'Yes'.Change this parameter from the command line with update node <nodename> backdel=yes

25Creating a TSM Node
Copyright © 1998-2014 Cristie Software Ltd.
The update can be confirmed with the 'query node' command as follows:
Now the node may be accessed by CBMR. Remember, do NOT access it from the TSM Backup/Archive client - all of the filespaces within the node would become inaccessible to CBMR, leavingyou unable to perform a disaster recovery.
3.4 Creating a Node from the Command Line
Note: you need to create a node for sole use by CBMR that will NEVER be accessed bythe BA Client. You cannot share the node that you originally created for backing up fileswith the BA Client with CBMR.
In order to create a node from the Command Line, you need to have access to a Command Lineprocessor. You can do this from the server you are protecting by installing the AdministratorConsole Command Line Files (see installation). The command line utility is dsmadmc.exe.
Before creating the node itself, you need to be certain that you have a policy domain correctlydefined.
The syntax for the command to create a node is:
REGister Node <NodeName> <Password> BACKDELete=yes PASSExp=0 DOmain=<policydomain>
Using the command on the local machine gives the following:

26 Cristie Bare Machine Recovery
CBMR for Windows - TSM User Supplement
register node NEWCBMR PASSWORD backdel=YES passexp=0 domain=NEWCBMRPD
ANR2060I Node NEWCBMR registered in policy domain NEWCBMRPD.
ANR2099I Administrative userid NEWCBMR defined for OWNER access to node NEWCBMR.
27DR Backup to TSM
Copyright © 1998-2014 Cristie Software Ltd.
4 DR Backup to TSM
4.1 Creating the TSM Backup Location/Storage Device
CBMR can backup to tape drive, library, virtual tape (file) and a TSM node. It is possible to configureCBMR to work with multiple instances of all or any of these. Each instance is given a definitionwhich is currently termed a Backup Location (was Storage Device). Each Backup Location is givena unique local Name to differentiate it from other Backup Locations.
A TSM node is a port to a network storage system. Currently CBMR treats a node as though itwere a tape. This means that there are some restrictions of the way in which CBMR can beconfigured and used with TSM. The following describes the methos of creating a Backup Location foreach of the CBMR products.
4.1.1 Windows TSM Backup Location
There is one method of creating a TSM Backup Location in CBMR for Windows, but there are twopossible starting points.
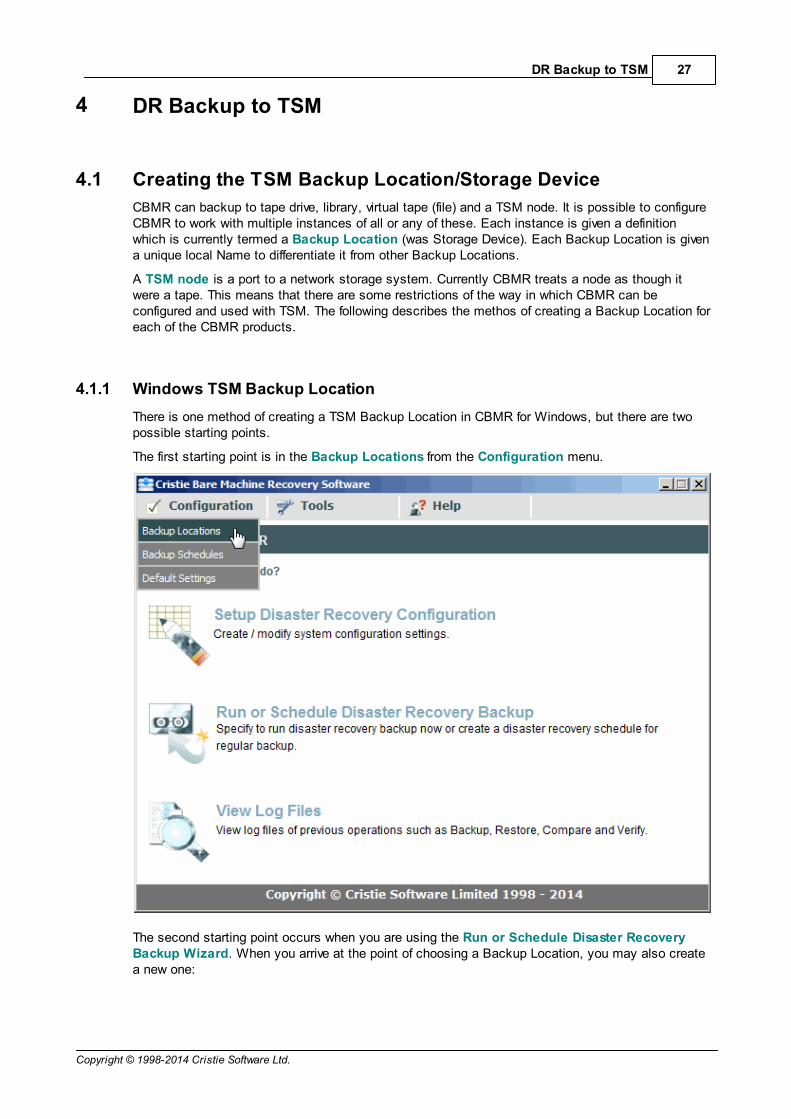
The first starting point is in the Backup Locations from the Configuration menu.
The second starting point occurs when you are using the Run or Schedule Disaster RecoveryBackup Wizard. When you arrive at the point of choosing a Backup Location, you may also createa new one:

28 Cristie Bare Machine Recovery
CBMR for Windows - TSM User Supplement
Create New... will take you to the following window:
Select TSM Location

29DR Backup to TSM
Copyright © 1998-2014 Cristie Software Ltd.
Now define the TSM Location by specifying the parameters on the form. The Name is the localname by which the Backup Location will be known to CBMR. The Communication Method isalways TCPIP. The Server Address is the IP address of your TSM server and the Port is the TCP/IP port number that clients use to access the server (Your TSM Administrator will tell you which touse; 1500 is the default value, but you will not be able to connect to it if the actual value is different).
Specify the Node Name and password and the Filespace Name.
Note: all filespaces start with '/', so if you do not enter it, CBMR will prepend it for you.
Click on Create.
At this point there has been no check to validate the node name or password - this will be done onthe first backup.
4.2 Scheduling DR Backups with TSM
In order to set up a TSM schedule, you need four components.
1. A Schedule on the server

30 Cristie Bare Machine Recovery
CBMR for Windows - TSM User Supplement
2. A Command File on the client to run the job
3. A dsm.opt file on the client to control connection to the TSM server
4. A schedule on the client which will respond to the prompt from the server
Before you set up the schedule, you should ensure that the job you have defined will run outside theschedule.
On the TSM Server
Create a Schedule for a Command File eg. C:\CBMR.CMD
def sch <policy domain> <schedulename> desc=’Cristie BMR Backup’ act=command obj=’”C:\CBMR.CMD”’ startd=today startt=14:00 day=SUN
In response to the command you should get the following message:
ANR2500I Schedule CBMR_SCHED defined in policy domain <policy domain>.
Assign the node to the scheduler
Use the command
Def assoc <policy domain> <schedulename> <CBMR Nodename>
In response to the command you should get the following message:
ANR2510I Node CBMR associated with schedule CBMR_SCHED in policy domain <policy domain>.
On the Windows ClientOn the client machine you will have installed CBMR in the folder C:\Program Files\Cristie\CBMR,defined below as <CBMR path>. You will also have installed the BA Client in C:\ProgramFiles\Tivoli\TSM\baclient (defined here as <TSM Path>\baclient).
Create the CBMR Command file and check that it works
For example
REM CBMR.CMD
@echo off
"C:\Program Files\Cristie\CBMR\pcbax.exe" disrec /b
The parameter disrec is the name of the backup script generated by CBMR (full name is disrec.scp).
Modify DSM.OPT to define the scheduleModify DSM.OPT under C:\Program Files\Cristie\CBMR\ so that it defines Prompted modescheduling. This will mean that the timing of the job is initiated by the server.
Note:all the parameters after Compression Yes (see below) are required by thescheduler. Windows will override relevant values with those that have been defined forthe Backup Location; they should be identical.
Example DSM.OPT File. The note at the top of the file, which is provided with CBMR, refers to theway in which CBMR treats the contents of the file. However the file is also used by the schedulerand will use parameters that CBMR ignores.

31DR Backup to TSM
Copyright © 1998-2014 Cristie Software Ltd.
*=================================================================* Note: This file is provided with PC-BaX/CBMR TSM support module.** IMPORTANT:** The parameters nodename, commmethod, tcpserveraddress and passwordaccess * can not be set using this file! * *=================================================================
COMPRESSION YES NODENAME <CBMR Nodename> TCPCLIENTPORT 1500 QUERYSCHEDPERIOD 1 SCHEDMODE PROMPTEDPASSWORDACCESS GENERATE TCPCLIENTADDRESS <Client IP> TCPSERVERADDRESS <TSM Server IP>
Create the Client Schedule ServiceUsing the dsmcutil utility in the BA Client (<TSM Path>\baclient) folder, type the following at thecommand prompt:
DSMCUTIL INST /NAME:"TSM CBMR Scheduler" /NODE:<CBMR Nodename> /PASSWORD:<password> /CLIENTDIR:"<TSM Path>\baclient" /OPTFILE:"<CBMR path>\DSM.OPT" /AUTOSTART:YES
As a result of the command, you will be able to see the new service TSM CBMR Scheduler underthe Windows services.

32 Cristie Bare Machine Recovery
CBMR for Windows - TSM User Supplement
5 Recovery using the DR Backup
The steps required for a successful disaster recovery are as follows:
Boot into recovery operating system
Connect to the network
Load the configuration data
Recover the DR Backup files (and other optional application data volumes)
Install dissimilar hardware drivers
Reboot
Restore application data (if not restored as part of the DR process itself)
The configuration data includes a definition of the backup location which is used when you start therecovery of the DR Backup files. If the configuration data is stored along with the DR backup data,then the process has to be modified slightly - the backup location has to be defined manuallybefore the configuration data can be loaded.
5.1 Recovery using WinPE2 or WinPE4
This is not a full description of the recovery process, but a description of that part relevant to TSM ie.the connection to the TSM server for recovery of the DR backup.
When you boot the WinPE2 or WinPE4 DR environment, you will see the Recovery Console MainMenu as below:

33Recovery using the DR Backup
Copyright © 1998-2014 Cristie Software Ltd.
Select the Recovery Wizard by clicking the "Start the automatic Recovery" wizard button:
Select TSM and press Next> to proceed to the first step of the sequence. Press Cancel to abort therecovery sequence at this point.
From CBMR version 6.4.1 onwards the configuration data is always stored with the DR backup data.Now define the parameters required to access the TSM server node:

34 Cristie Bare Machine Recovery
CBMR for Windows - TSM User Supplement
The TSM Server Details are sufficient to communicate with the TSM Server:
Server Address should be the IP address of the server. Even when DNS is available on thenetwork, it is always safer to use the IP address rather than the Netbios name
Port defaults to 1500, but you should confirm this with your TSM Administrator
The TSM Client Details define the connection parameters for the TSM server:
Node Name is defined on the server. There must be no spaces in the name
Node Password is as defined
Filespace Name is a division within the node. All filespace names begin with '/'
Click Next> to save the definition. The next dialogue allows the location of the key repository file tobe specified or entered manually.

35Recovery using the DR Backup
Copyright © 1998-2014 Cristie Software Ltd.
This should be provided when the backup is passphrase protected; press Next> when thepassphrase details have been entered. If the backup is not protected with a passphrase press Next>to skip this step. You can click <Back to return to the previous screen and amend the parameters.
CBMR will then attempt to connect to the TSM Server. If you successfully connect to the TSMServer node, you will then be shown a list of the datasets that can be restored.
Select the datasets to be restored (note the boot and system partitions will always be selected).Click Next> to show the Volume Layout dialogue.

36 Cristie Bare Machine Recovery
CBMR for Windows - TSM User Supplement
This will allow you to change the disk and/or partition layout as required. Select Next> to display thefinal Cloen Settings dialogue which allows the hostname and/or the recovering machine to bechanged from the original. This is useful when creating a clone of the original system.
Click Next> to read the configuration data and to begin the recovery.

37Obtaining Information from the TSM Server
Copyright © 1998-2014 Cristie Software Ltd.
6 Obtaining Information from the TSM Server
During the CBMR processes it is often helpful to get information from the TSM Server to help youdiagnose problems or check details. This section contains a list of the commands that have beenfound useful with CBMR.
The commands may be entered via the Management Console on the TSM Server or via theAdministrator Command utility dsmadmc.exe, which you can find in the Tivoli baclient directory ofthe TSM client installation, if you chose to install it.
Note: if you have not used dsmadmc.exe or the Backup/Archive Client on this clientinstallation before, you will need to set up a dsm.opt file in the Tivoli baclient directorywhich links you to the TSM server.
query actlog a summary of the events on the system
query associations a list of schedule names, their node and policy domain
query sched a list of schedules by policy domain
query sched <policydomain>format=detailed
details of the schedule for the policy domain
query node <nodename> format=detailed all of the node parameter values
query occupancy <nodename> the space used by all of the filespaces within the node
query stgpool space utilisation of each storage pool
query session current state of each active session

38 Cristie Bare Machine Recovery
CBMR for Windows - TSM User Supplement
7 Best Practice
Best Practice is a definition of the choices and decisions that need to be addressed when you areusing CBMR with TSM.
There will always be exceptions to the rule and reasons why you might not follow the guidance.Some of the guidance is mandatory and necessary to make CBMR function with TSM; some of it isoptional. Where it is mandatory then this is explicitly indicated.
If you ignore mandatory practice then we are unable to support your implementation.
7.1 Storage Pools
(Recommended)
It is recommended that your Primary Storage Pool is a disk pool. This means that you initiallybackup to disk. The reason for this is that the DR Backup cannot be guaranteed to be completeunless you have a Verify pass after the backup. If your primary Storage Pool is tape, the attempt toverify may timeout while the tape is rewinding (depending upon capacity). This will cause a failure tobe reported by TSM and no guarantee that the last file was completely written to the node.
7.2 Nodes and Filespaces
(Mandatory)Always remember that a node must be reserved for the sole use of CBMR and must not be sharedwith the BA Client. Any use of the BA Client on a CBMR node will render all of the Filespaces in thatnode inaccessible.
When designing your CBMR/TSM interface, you can choose to set up either a single node withseparate filespaces for each CBMR client, or separate nodes for each CBMR client. It isrecommended that you always use a separate node for each CBMR client. The main reasons for thisis safety. By having many nodes you limit the damage that can be caused by inadvertently using theBA Client on the node. Every filespace would become inaccessible. The remedy would be to removethe node and recreate it and then to run all of the DR Backups again.
(Mandatory)When you create a node remember that:
The Policy Domain that you reference must always use the Standard Management Class
Backup Delete Allowed (backdel) must always be set to yes so that CBMR can control thebackup filespaces
Ensure that the node password does not expire (passexp=0). Although CBMR could handlechanges with the DR Backups, there is no secure way to recover a backup in the disasterrecovery situation when the password has changed. It may be possible to reset the password viathe server.
7.3 Management Class
(Mandatory)Only the Standard Management Class may be used in any Policy Domain.

39Best Practice
Copyright © 1998-2014 Cristie Software Ltd.
7.4 DR Backup
Verify after DR Backup(Recommended)Always have a verify pass. This will obviously impact your backup strategy, but a verify pass is theonly way to guarantee that the backup completed. Instances have been noted where backups wereincomplete and yet no error has been reported. The only way to be certain that the last frame of thelast transmission was actually processed and terminated correctly is to begin a verify pass.
Use DR Backup and NOT a Full System Backup (Windows)(Mandatory)The tools within CBMR for Windows allow you to backup every drive and the system state. Althoughyou could use the tools to create an equivalent script for performing DR Backups, if you make amistake you may find that you cannot recover the data. The Wizards available in CBMR for Windowswill do it correctly and will also generate a backup script for the operation.
Keep DR Backup separate from Application Backup(Recommended)Although you can use CBMR for backing up the whole server at once, this is a waste of networkbandwidth. TSM performs a progressive backup of individual files from the server. This is ideal tokeep network bandwidth down to a minimum and for performing a daily backup. The DR Backup isideal for creating a coherent snapshot of operating system files. It deals with all of the files as awhole, not individual files, and therefore requires more runtime and network bandwidth.
Schedule regular DR Backups(Recommended)The operating system ought not to change very often. When you recover a server, you need toensure that it is reasonably up to date and will be a suitable basis for the recovery of yourApplication and Data backup. It is therefore recommended that DR Backups be scheduled regularly,probably weekly.

40 Cristie Bare Machine Recovery
CBMR for Windows - TSM User Supplement
8 Cristie Technical Support
If you have any queries or problems concerning your Cristie Bare Machine Recovery product, pleasecontact Cristie Technical Support. To assist us in helping with your enquiry, make sure you havethe following information available for the person dealing with your enquiry:
CBMR Version Number
Installed OS type and version
Any error message information (if appropriate)
Description of when the error occurs
Log Files
Contact Numbers - Cristie Software (UK) Limited
Technical Support +44 (0) 1453 847 009
Toll-Free US Number 1-866-TEC-CBMR (1-866-832-2267)
Sales Enquiries +44 (0) 1453 847 000
Sales Fax +44 (0) 1453 847 001
Email [email protected]
Web www.cristie.com
Support Hours
05:00 to 17:00 Eastern Standard Time (EST) Monday to Friday
Out-of-Hours support available to customers with a valid Support Agreement - Severity 1 issues* only
UK Bank Holidays** classed as Out-of-Hours - Severity 1 issues only.
*Severity 1 issues are defined as: a production server failure, cannot perform recovery or actual lossof data occurring.
**For details on dates of UK Bank Holidays, please see www.cristie.com/support/
Cristie Software Limited are continually expanding their product range in line with the latesttechnologies. Please contact the Cristie Sales Office for the latest product range. Should you havespecific requirements for data storage and backup devices, then Cristie's product specialists canprovide expert advice for a solution to suit your needs.