catalogue - tradekeyimgusr.tradekey.com/images/uploadedimages/brochures/5/0/...beitai di pipe check...
TRANSCRIPT

BEITAI DI PIPE
CATALOGUE
Applying Instruction ------------------------------- 1-20
Range of Application --------------------------------- 2
Instruction of Usage ------------------------------- 2-20 Assembly for pipes and fittings:
Depth of Cover---------------------------------------------------------2
Lubricating Paste -------------------------------------------------- 3
Assembly---T-type joint ------------------------------------------- 4-6
Pipe laying equipment --------------------------------------------- 7-8
Laying deflection ----------------------------------------------------- 9
Anchor blocks -------------------------------------------------------- 10
Polyethylene sleeving(application)---------------------------- 11-14
Repair for pipes and fittings:
Cutting pipe ------------------------------------------------------- 15-16
Re-rounding ---------------------------------------------------------- 17
Repair-Internal Lining ----------------------------------------- 18-19
Repair-External Coating ------------------------------------------- 20
Matters Needing Attention ---------------- 21-31
1. Lifting ------------------------------------------------------------ 22
2. Placing and Storing------------------------------------------ 23-25
3.Bundling of Pipes ------------------------------------------------ 26
4.Loading and Unloading ------------------------------------- 27-30
5. Safety Precautions ---------------------------------------------- 31

BEITAI DI PIPE
APPLYING
INSTRUCTION

BEITAI DI PIPE
BEITAI brand ductile iron pipes and fittings widely used for water supply and gas supply.
Depth of cover If the line of ductile iron pipe will be covered in ground, the depth of cover
are recommended as following:
A line of D.I. pipe will be coved in
The above illustration shows the maximum and minimum depth of cover with:
-- Traffic loading -- K9 pipes
Instruction of usage:
Range of application:

BEITAI DI PIPE
LUBRICATIN
T-type joints are sealed during assembly by compression of the joint
gasket. This operation requires the use of lubricating paste to reduce
the force needed for the compression.
--First ensure that there is a good chamfer on the pipe spigot. --A thin coat of lubricating paste is then applied by brush. --The paste is applied to the exposed face of the gasket when in its seat and to the spigot.
■Characteristics of the lubricating paste: --reduces jointing force, --is easily applied on site, --is water-resistant, --can be used over a wide temperature range (-20℃ to
+60℃), --Translucent and odourless, it:
· does not affect drinking water quality, · inhibits bacterial growth.

BEITAI DI PIPE
Assembly---T-type joint
The T-type joint is simply assembled by pushing a spigot into a socket. Laying is simple and rapid.
■Cleaning: --Carefully clean the socket chamber
and pipe spigot. Pay particular attention to the gasket seat (eliminate all soil, sand, etc.).
--Clean the spigot of the pipe to be jointed, as well as the gasket.
--Check that the spigot is chamfered and in good condition.
■ Insert the gasket outside the trench
The gasket is insert at the trench side. --Check the condition of the gasket and
introduce it into the socket, looping it into a heart shape, with the lip seal nose directed towards the back of the socket.
--For large diameter pipes (DN800 to 2000) it is preferable to loop the gasket into the shape of a cross for insertion.
--Apply radial pressure to the gasket at the heart shaped loop (or cross loops) to force it into place.

BEITAI DI PIPE
■Check the gasket position
■Marking the socket depth --If the pipe spigot is not already marked, mark
the spigot of the pipe being laid, at a distance from the end equivalent to the socket depth P, 10mm.
P P DN
mm mm
DN
mm mm
80 90 450 113
100 92 500 115
150 98 600 120
200 104 700 145
250 104 800 145
300 105 900 145
350 108 1000 155
400 110 1200 165
--Check that the gasket fits snugly around its circumference

BEITAI DI PIPE
■ Lubrication Apply lubricating paste to: --the exposed surface of the gasket, --the spigot end and chamfer. The lubricating paste is brush applied in reasonable amounts.
■ Assembly --Centre the spigot in the socket and maintain it in this position by resting it on two mounds of tamped soil, or preferably gravel. --Push the spigot into the socket, checking that everything is correctly aligned. --Joint can be deflected, if necessary, within the permissible limits. Pipes marked on site (a) --push in the spigot until the mark is in line with the socket face. Do not penetrate beyond this position. Pipes marked at works (b) --Push in the spigot until the first mark disappears inside the socket. The second mark must still be visible after assembly. ■Control --Check that the gasket is correctly seated by inserting the end of a metal rule through the annular spigot and socket gap until it touches the gasket. The rule must penetrate to the same depth around the whole circumference.

BEITAI DI PIPE
Pipe laying equipment
Some standard field equipment is needed on site to assemble T-type joint pipes and fitting: Crowbar, pulley, or the bucket of hydraulic digger.
--The crowbar levers against the ground. --The pipe socket face must be protected with a piece of hard wood
■ crowbar: DN80 to 150
■ Assembly using digger bucket
Taking a few precautions, it is possible to use the hydraulic force of the arm and bucket of a mechanical digger to joint pipes and straight fitting. In this case: --place a wooden batten between the pipe and digger bucket, --push slowly and steadily to joint the pipes.

BEITAI DI PIPE
■ Assembly using pully
DN 100 to 400: using one 1.5 ton pulley with rope and protected hook. DN 500 to 600: using two 1.5 ton pulleys with rope and protected hooks. DN700 to 1200: using two 3 ton pulleys with rope or chain and protected hooks.

BEITAI DI PIPE
Laying deflection
T-type joints permit angular deflection. In addition to obvius
advantages during laying and to accommodation of ground
movements, the angular deflection allows negotion of large radius
bends without recourse to fitting, as well as a certain amount of route
adjustment.
■ Acceptable deflection on laying ⊿θ
Acceptable deflection On laying ⊿θ DN
(mm) degrees
80 to 150 5
200 to 300 4
350 to 600 3
700 to 1000 2
1200 to 2000 1

BEITAI DI PIPE
Anchor blocks
Use of concrete anchor blocks is the most commonly applied
technique for containing the hydraulic thrust of socket and spigot
mains under pressure.
Various type of concrete anchor blocks can be designed, depending on the configuration of the main, the presence, or absence, of significant amounts of ground water. It is important --to cast the concrete directly against the surrounding soil (check that there is no gap between block and soil). --to use a concrete mix having adequate strength. Leave the pipe joints exposed for
inspection during the hydraulic test.

BEITAI DI PIPE
Polyethylene sleeving (application)
Polyethylene sleeving is made up of overlapping elements:
-- a ‘barrel sleeve’ along the barrel of every pipe,
-- a ‘joint sleeve’ at every joint.
Pipes and fittings must be as clean and dry as possible before sleeving. In particular avoid soil entrapment between the pipe and sleeving. The pipe bed and natural soil, or backfill, must only consist of fine material, to avoid sleeving damage occurring during laying or in service (top loads, weight of full main, wheel loads). The sleeving must fit the pipes as possible (importance of the fold and ties). See sketches opposite. The barral and joint sleeve overlaps must provide total continuity of protection.
The fold must always be made at the top of the pipes, to limit the risk of damage during backfilling. Do not use ripped sleeving and avoid damage during backfilling. Small tears can be repaired with adhesive tape. Larger defects can be covered with extra sleeving of the same type, which must be sufficiently long to cover the damaged area. The same application technique must be used as for the joint sleeves. The polyethylene sleeve must be stored under cover, protected from heat and sunlight.

BEITAI DI PIPE
Cut the barrel and joint sleeves to the dimensions of pipe.
--Before lowering the pipe into the trench, raise it up and slip the pleated sleeving along the barrel
--With the pipe supported on two wooden blocks, spread the sleeving along the whole length of the barrel and fit it snugly to the latter by folding it over at the top of the pipe. The sleeve must not billow.
--Fasten the fold down with tape --Fasten the sleeve ends to the barrel by wrapping adhesive tape around the circumference, overlapping the barrel sleeving junction, to give a watertight over wrap. --Apply intermediate fastenings (plastic coated steel wire) every 1.5m. --Slip on the joint sleeve.

BEITAI DI PIPE
--Lower the pie into the trench. --Joint the pipe with appropriate equipment. The fold must still be at the top of the pipe.
--Bring the joint sleeve over the socket and spigot. A sufficiently large excavation must have been made under the joint to allow satisfactory application of this sleeve (room for tape wrapping and ties).
--Fold the joint sleeve over, fitting it as snugly as possible, overlapping the barrels of the adjoining pipes (the fold must again be at the top). --Secure it with a tie, as near as possible to the gland in the case of the T-joint (Standard joint). wrapping and ties).
--Fasten the ends on to the sleeves of the adjoining pipe barrels with adhesive tape wrapped around the whole circumference to make a watertight over wrap.
--Successive assembly of barrel and joint sleeves must form a continuous protection.

BEITAI DI PIPE
--Use the same polyethylene sleeving to protect fittings. Depending on their shape, two or three pieces of sleeving may be necessary. Application must comply with the same recommendation (particularly fitting the sleeving as snugly as possible).
■ Sleeving of fittings:
Examples:
--Use the same polyethylene sleeving to protect fittings. Depending on their shape, two or three pieces of sleeving may be necessary. Application must comply with the same recommendation (particularly fitting the sleeving as snugly as possible).

BEITAI DI PIPE
Cutting pipe
Adhering to a pipeline route usually involes the use of fittings and requires pipe cutting on site. Ductile iron pipes are easily cut
--The pipe that can be cut has a double line mark. The line indicates the useable cutting length.
Site equipment used Slitting disc type cutters, wheel cutters can be used. An air operated saw can also be used for cutting large diameters (DN800 to 2000). Cutting Before cutting pipes, trace the cutting line perpendicular to the center line using, for example, a tracing tape. --Make the cut with the appropriate equipment. --After cutting, ovality may occur and the coating may be affected. See RE-ROUNDING and Repair-internal lining.
BEITAI DI PIPE
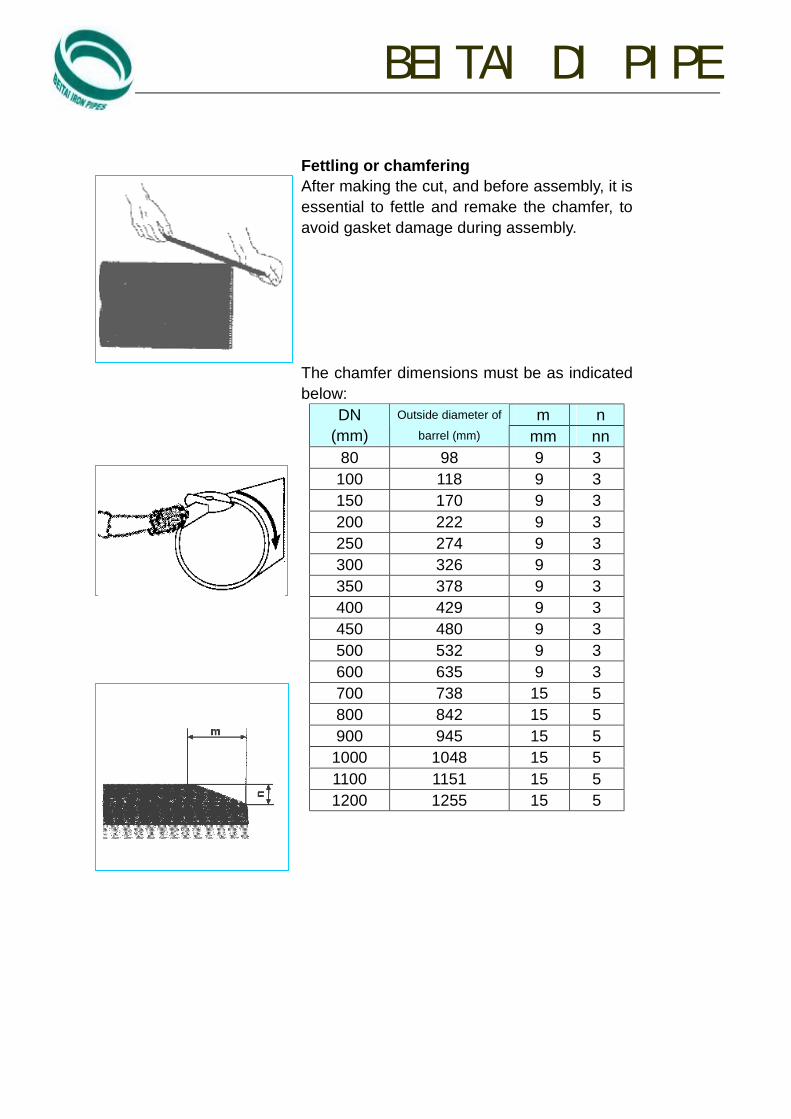
Fettling or chamfering After making the cut, and before assembly, it is essential to fettle and remake the chamfer, to avoid gasket damage during assembly. The chamfer dimensions must be as indicated below:
m n DN (mm)
Outside diameter of
barrel (mm) mm nn 80 98 9 3
100 118 9 3 150 170 9 3 200 222 9 3 250 274 9 3 300 326 9 3 350 378 9 3 400 429 9 3 450 480 9 3 500 532 9 3 600 635 9 3 700 738 15 5 800 842 15 5 900 945 15 5
1000 1048 15 5 1100 1151 15 5 1200 1255 15 5

BEITAI DI PIPE
Re-rounding Transport and handling can cause sufficient pipe ovality to impede correct assembly of the components. The menthods given below cover DN≥400 pipes.
%ovality={(DM-dm)/(DM+dm)}×100 where: DM: maximum measured diameter dm: minimum measured diameter Experience shows that cases of ovality prejudicial to pipe assembly are extremely rare in the small and medium diameters (DN<400) Re-rounding can be carried out by the following methods, taking care that the operation does not damage the cement mortar lining.
For DN ≥400 Equipment --A hydraulic jack (1) --A block (or adjustable support) (2) --Two suitably sized rubber covered base
plates (3) Procedure --Position the parts as shown in the diagram, to cope with the ovality. --Adapt the adjusting support to the diameter. --Operate the jack and make sure that spigot re-rounding does not go beyond circular. --Check that the operation has not damaged the mortar lining. --Assemble the joint with the equipment in position. The equipment must remain in tension throughout jointing to counteract and elastic pipe deformation.

BEITAI DI PIPE
Repair-Internal Lining
The cement mortar lining may be damaged accidentally or by rough handing. A few simple and rapid procedures suffice to restore the lining to its original condition.
Any cement mortar damage caused accidentally or by rough handling can be repaired on site: --area less than 0.10m2, --length less than a quarter of the pipe circumference, --no localized pipe deformation. Otherwise, cut off the damaged section.
Material needed for mortar application --brush, --trowel, --palette knife, or sleeker. Area preparation Lining repair must be carried out sheltered from frost. --Rotate the pipe so that the area to be repaired is as close to the bottom as possible. --Remove the damaged area and 1 or 2 cm of surrounding sound mortar with a hammer and cold chisel. --The edges of the cleared zone must be vertical to the iron surface. --Clean with a wire brush to remove non-adherent material.

BEITAI DI PIPE
--Moisten the repair area. --A few minutes before making the repair, brush-apply the water emulsion mixture, wetting the original mortar over a width of about 20 cm around the edges of the repair zone. Patching material preparation --CHF,CLK or aluminous cement (1), --Fine sand (2), --Emulsion: 50/50 water-PRIMAL or
ICOMENT(3), --Water (4). According to the area to be repaired, mix amount of above materials in the rate of 1:2:1.5:2 in weight. First mix the two dry components, then the two liquids, to give a pasty consistency mortar; adjust the amount of water if necessary. Mortar application --Trowel the mortar on, compacting it adequately to restore the thickness. --Smooth the repaired surface with a palette knife (or sleeker). --Check that there are no gaps between the fresh mortar and the original material. --Apply a protective coat of water + emulsion, not more than 30 minutes after final smoothing, to prevent the patch from drying too quickly and to give it good strength (cover with a damp cloth until set).

BEITAI DI PIPE
Repair-External Coating
The basic external coating may become damaged during transport,
storage, or laying.
It can be repaired on site, or in the storage yard, using a simple
procedure.
Repairable damage Two potential situations: --Slight damage (small scuffs, zinc not detached) No repair is required. --More severe damage Can be repaired with bituminous paint following the procedure described below: Material to use Use the nonpoisonous paint. Application tools Brush, paintbrush or roller. Surface preparation --Brush lightly to remove dirt. --Dry the surface to be treated using the most appropriate method (blowing with oil-free air, gas flare, etc.). Paint application --Apply the paint with brush, paintbrush or roller to paint the damaged area until the film deposited is up to the same level as the undamaged coating, making sure the repair overlaps the existing protection. --In the event of low temperatures, wet condition the pipe should be warmed to about 50℃ (too hot to touch) with a gas burner.

BEITAI DI PIPE
MATTERS
REQUIRING YOUR
ATTENTION

BEITAI DI PIPE
1.Lifting (1) Use of wire rope or nylon sling
Ensure the load of pipe and fittings is correctly balanced so that wire rope or nylon sling does not slip out
Fittings: Use of nylon sling is highly recommended.
Place rubber pieces to avoid rapid abrasion of nylon sling.
(2) Use of hooks: When using hooks, be careful not to damage the pipe or ling. Ⅰ.Cover hooks with rubber pieces. Ⅱ. Make sure the sharp point of hook does not damage the lining
Pipe: Use of wire rope. Place cushion pads to
protect pipe surface. Do not lift pipe with
single rope. For straight pipe, use of hooks with rubber is highly recommended...
The sample of rubber-Covered hook:
Crate and cases: lift from the bottom by Placing wire rope at the sling mark.

BEITAI DI PIPE
2.Placing and store
(a). Preparation Ⅰ) Removing obstacles and level the
Ground. If necessary, use a grader and a roller.(right)
Ⅴ) Arrangement of pipes
Ⅱ ) Place timbers where the pipes are to be stacked:
Ⅲ) Put the pipes slowly onto the timers, and avoid impact between pipes and secure them with chocks (right)
* When stacking more than one tier, make sure that socket ends do not rest on spigot ends or vice versa:
Ⅳ)When stacking more than two tiers of pipes (e.g. pyramid stacking) secure all pipes in the bottom tier with chocks and fix end-chock with cramps.

BEITAI DI PIPE
(b) Type of Stacking:
Pyramid stacking:
Secure all pipes in the
bottom tier with chocks.
Square stacking: Stack pipes in each tier at right angle to those in the
preceding tier:
Stacking of bundles:
Two or three stackings are
remmended (timbers are not
Placing of fittings:
Place fittings on two timbers (right):
Place of crates and cases: Place crates on flat ground, keep them in cool, dry places avoiding the direct sunlight. (Timbers are not necessary for cases and crated because skids attached underneath):

BEITAI DI PIPE
Without timber With timber
Stacking without timber between layers Stacking with timber between layers Norminal Diameter DN (mm)
Layers of stacking (n)
No.of timber bottom
Layers of stacking (n)
No.of timber bottom
80 80 2 50 2
100 70 2 42 2
150 49 2 30 2
200 37 2 24 2
250 30 2 20 2
300 25 2 17 2
350 22 2 15 2
400 19 2 13 2
500 15 2 10 2
600 13 2 9 2
700 11 2 8 2
800 10 3 7 2
900 8 3 6 2
1000 8 4 5 2
1200 6 4 5 2
1400 6 4 5 2
1600 5 4 5 2
1800 5 4 4 2
2000 4 4 4 2

BEITAI DI PIPE
3. Bundling of Pipes
Dimensions(m) Nominal Diameter
Pieces of Pipe/Bundle H W L
Measurement (M3/Bundle)
80 32 0.492 0.827 6.290 2.559
100 18 0.444 0.753 6.300 2.106
150 15 0.630 0.895 6.310 3.558
200 12 0.770 0.940 6.320 4.574
250 6 0.670 0.875 6.350 3.723
300 6 0.780 1.050 6.420 5.258
Fittings: Bare
Approx. mass 0.2 ton or above/piece (metric ton) Fittings: Crate
Approx. mass 3 ton or less/crate (metric ton) Accessories: Crate or Case
Approx. mass 3 ton or less/crate or case (metric ton) Accessories: Steel Box (Used 20 feet container)
Approx. mass 13 ton or less/steel box(metric ton)
Reference standards: 1) ISO 2531 Ductile Cast Iron Pipe, Tubular and Fitting for Pressure Piping.
2)IS06892 Tensile Strength of Metal Materials.
3)IS06506 Metal materials -Ball Hardness Test.
4)ISO 4179 Normal Requirement of Ductile Cast Iron Pipe-Centrifugal Cement Mortar
Lining for Pressure Piping.
5) IS06600 Ductile Cast Iron Pipe-Centrifugal Coating Lining of Cement Mortar-Control
of New Coating Mortar Composition.

BEITAI DI PIPE
6)IS08179 Ductile Cast Iron Pipe-Surface Zinc Coating.
7)GB 223 Chemical Analysis Method of Iron and Steel and Alloy.
4.Loading and Unloading
(1) Loading for pipes on truck and trailer Ⅰ.Place two or more timbers on
the platform of the truck.
Ⅱ.Place pipes on timbers, ensure that the pipes are secured with chocks.
Ⅲ . If loading more than one tier of pipes, reverse the direction of pipes at each tier
Ⅳ. Loading pipes on trailer so that socket of the lowest tier face each other.

BEITAI DI PIPE
Securing
I) Place cushion pads between
wire ropes and pipe surface for protection.
II) Firmly secure all pipes with wire ropes and/or chains
Place fittings stably and secure them with wire ropes
Unloading from Truck and trailer:
I) Confirming that all chocks are
Firmly secured before releasing
Wire ropes, otherwise pipes
may fall off. III) Unloading pipes from the top
II) Loosen wire ropes.
III) Confirm that all wire ropes are firmly secured
Cautions in loading and trailing in truck:

BEITAI DI PIPE
tier, evenly from both sides. * Ensure chocks are firmly secured so that even when truck inclines
pipes will not fall off.
(2) Loading and Unloading for Pipes aboard Vessel:
Unloading from vessel:
Ⅳ) Never drop pipes from the truck or trailer..
The pipes must be laid tidily and be strengthened firmly with steel ropes on vessels. There must be pads and cushions between layers of pipes.
Ⅰ) Use of rubber-covered hooks to lift pipes.
* When stacking more than one tier, make sure that socket ends do not rest on spigot ends or vice versa:

BEITAI DI PIPE
(3) Loading and Unloading for pipes on Train
Ⅱ) When rolling out pipes from the side of the hold, be careful to give impact on pipes. Use some cushion (mattress) on below pipes. Ⅲ) When taking out pipes from the
front or rear of the hold, first slide pipes very slowly and carefully, and them pull them up.
Ⅳ) Do not stand close to the pipe
while operating.
The pipes must be laid tidily and be strengthened firmly with steel wire on railway carriages. There must be pads or cushions between pipes.
Ⅳ) Do not stand close to the pipe while operating.

BEITAI DI PIPE
Unloading from railway carriages:
5. Safty Precautions :
(1).For safety, wear a helmet, gloves and safety shoes.
(2).Periodically inspect and replace wire ropes or slings.
*Observe weight limits of ropes and equipment.
(3) Never stand under a lifted pipe: (4)Be careful not to hit pipe against hard objects while lifting: Pipe may sway by rough operation of crane boom.(avoid sudden starts or stops). Pipe may spin if wire rope is twisted:
Use of rubber-covered hooks to lift pipes. Do not stand close to the pipe while operating.

BEITAI DI PIPE
.
(5) When using of forklift, take the length of pipe into consideration
(6) Always place chokes on timbers to prevent pipes from rolling off.
* Occasionally inspect the condition of timbers.