caring for eagle windows and doorss - andersen … · store flat or on edge. ... rinse the entire...
TRANSCRIPT

Caring for Eagle® Windows and Doors s
Table of Contents
Introduction. . . . . . . . . . . . . . . . . . . . . . . . . . . . . . . . 2
General Warnings and Cautions . . . . . . . . . . . . . . . . . 3
Storage and Installation. . . . . . . . . . . . . . . . . . . . . . . 4Storage of windows and doors. . . . . . . . . . . . . . . . . . . . 4Installation of windows and doors . . . . . . . . . . . . . . . . . 4
Interior Finishing . . . . . . . . . . . . . . . . . . . . . . . . . . . . 5Preparatory steps for finishing. . . . . . . . . . . . . . . . . . . . 5Recommended steps for staining . . . . . . . . . . . . . . . . . 5Recommended steps for painting . . . . . . . . . . . . . . . . . 5Recommended steps for a natural finish . . . . . . . . . . . . 5
Glass Care . . . . . . . . . . . . . . . . . . . . . . . . . . . . . . . 6-8Film removal . . . . . . . . . . . . . . . . . . . . . . . . . . . . . . . . . 6General glass cleaning . . . . . . . . . . . . . . . . . . . . . . . . . 7Glass cleaning specific to window type . . . . . . . . . . . . . 8
Introduction
2 Caring for Eagle® Windows and Doors
Congratulations and thank you for choosing Eagle® window anddoor products.
The information provided here is to assist you in maintaining yourwindows and doors.
“Caring for Eagle® Windows and Doors” includes instructions onfinishing, cleaning and maintaining your windows and doors.Please read thoroughly. The Eagle warranty is available online atEagleWindow.com
Should you have additional questions, please contact your localEagle Window & Door dealer.
Window, Door and Accessory Care . . . . . . . . . . . . 9-12Exterior surfaces. . . . . . . . . . . . . . . . . . . . . . . . . . . . . . 9Weatherstrip . . . . . . . . . . . . . . . . . . . . . . . . . . . . . . . . 10General hardware maintenance . . . . . . . . . . . . . . . . . . 10Maintaining exterior exposed hardware finishes . . . 10-11Blinds and shades . . . . . . . . . . . . . . . . . . . . . . . . . . . 12Insect screens . . . . . . . . . . . . . . . . . . . . . . . . . . . . . . 12
Understanding Condensation . . . . . . . . . . . . . . . . . . 13Condensation and humidity . . . . . . . . . . . . . . . . . . . . . 13

3Caring for Eagle® Windows and Doors
General Warnings and Cautions
Use caution when working at elevated heightsand around unit openings. Follow manufacturer’sinstructions for ladders and/or scaffolding.Failure to do so may result in injury or death.
Do not leave openings unattended when smallchildren are present. Falling from an openingmay result in serious injury or death.
Follow manufacturer’s instructions for hand orpower tools. Always wear safety glasses. Failureto do so may result in injury and/or productdamage.
Avoid placing furniture near or in front ofwindows to keep children from climbing ontowindow. Screens will not stop a child from fallingout a window. They are designed only to keepinsects out, not children in.
If window blinds are utilized, keep cords out ofreach of children to avoid strangulation. Thefollowing devices may assist: clamp or clothespin, cleat, tie-down device, or tying the cord toitself.
Acid solutions used for cleaning masonry orconcrete will damage glass, fasteners, hardware,and metal flashing. Protect unit and follow cleaningproduct instructions carefully. If acid contacts unit,wash all surfaces with water immediately.
Do not apply any type of film to insulating glass.Thermal stress and glass damage can result.Shading devices (insulated coverings, shutters,etc.) may also cause thermal stress andcondensation damage.
Safety should always come first. Following are a listing of warnings and cautions that you need to be mindful ofrelated to window and door products.

4 Caring for Eagle® Windows and Doors
Storage and Installation
Storage of windows and doorsAll windows and doors should be stored upright inclean, dry surroundings prior to installation. Do notstore flat or on edge. Protect unfinished windows and doors from dirt, water and abuse. Do not exposeunfinished windows and doors to excessive moisture,heat, direct sunlight or extreme dry conditions. Alwayshandle with clean hands and follow appropriatehandling warning, as illustrated.
Suction grips will not hold if placed over seam of film to lift or move unit. Unit will fall causingdamage or injury.
SuctionGrip
FilmSeam
Installation of windows and doorsProper installation is important. Failure to properlyinstall any Eagle product will void any warranty, writtenor implied.
Installation instructions for Eagle windows and doorsare available online at EagleWindow.com. Siding, trim,
moldings and other finish materials around the windowopening should be installed in conformity with themanufacturer’s specifications and instructions for suchmaterial.

5Caring for Eagle® Windows and Doors
Interior Finishing
Prior to finishing the interior of windows and doors, please review the following warnings and cautions:
Sanding, staining, painting, varnishing and otherfinishing procedures should always be done inwell-ventilated areas.
Preparatory steps for finishing1. Tape glass edge with painter’s tape prior to staining
or painting. Protective film is not a substitute foredge masking.
2. Fill any visible nail holes in the glazing and sashstops with a quality wood filler.
3. Sand all unfinished interior wood surfaces lightlywith 180 grit sandpaper to remove any handlingmarks. Do not use orbital or belt sanders. Handsanding with a sanding block is sufficient and allowsfor a consistent finish. Always sand in the samedirection as the wood grain. Be careful not toscratch the surface of the glass while sanding.
4. Wipe all surfaces clean of dust with a clean tackcloth or a soft light rag.
Read and follow finishing product instructions andwarnings on finish material.
To prevent magnification of blemishes, avoid using darkstains on light colored wood surfaces and entry doorlite surrounds.
Do not close the window or door until the finish isthoroughly dry as per finish manufacturer’srecommendations.
Recommended steps for staining1. A sanding sealer applied prior to staining may deliver
improved staining consistency.
2. Apply a high-quality stain to all wood surfaces,following the stain manufacturer's instructions.
3. Allow stain to dry. Then apply a high-grade,polyurethane, clear top coat over the stain, againfollowing the manufacturer’s instructions.
4. When dry, lightly sand with 220 grit sandpaper. Wipeclean with a clean tack cloth to remove dust.
5. Apply second coat of clear top coat.
6. If a third coat is desired, repeat steps 3 and 4.
Recommended steps for painting1. Apply one coat of a quality primer to all wood
surfaces, following the primer manufacturer’sinstructions.
2. Allow primer to dry. Then apply two coats of a qualitypaint.
Recommended steps for a natural finish1. Apply a high-grade, polyurethane, clear top coat
following top coat manufacturer’s instructions.
2. When dry, lightly sand with 220 grit sandpaper. Wipeclean with a clean tack cloth to remove dust.
3. Apply second coat of clear top coat.
4. If a third coat is desired, repeat steps 2 and 3.
4Do not apply finishes to surfaces that have asliding contact with another surface, as thiscould cause damage to one or both of thesurfaces.
4Finish wood surfaces immediately afterinstallation. Unfinished wood will deteriorate,discolor, and/or may bow and split. Do notstain or paint weatherstrip, vinyl, glass orhardware. Product damage may occur.

Film removalPrior to film removal from windows and doors, please review the following warnings:
Static created whenremoving film can igniteflammable materials orcause a shock, and canpass through the other sideof the glass. See warninglabel on glass.
- Remove from the area:
- Thinners- Cleaners- Mineral spirits- Foam insulation cans- Solvent-soaked rags
Use caution when working at elevated heightsand around unit openings. Follow manufacturer’sinstructions for ladders and/or scaffolding.Failure to do so may result in injury or death.
6 Caring for Eagle® Windows and Doors
Glass Care
Dispose of film immediately after removing. Filmmay pose suffocation hazard to children.
Most glass on Eagle windows and doors is protectedwith a translucent protective film on both the interiorand exterior sides. Remove protective film from seamor corner using a plastic scraper if needed.
Remove protective film within nine (9) months ofinstallation and when temperature is above 32˚F.Failure to do so may add additional time and effort tothe cleaning process.

General glass cleaningEagle’s high-performance glass has a special low-maintenance exterior coating that helps reduce waterspots. It may still be necessary from time to time toremove larger deposits of dirt and residue. Mostregions may require cleaning only a few times per year.However, some coastal, industrial or agricultural areascontain high amounts of airborne particles and mayrequire more frequent cleaning. Interior cleaning is alsorecommended as needed.
As general practice, never clean glass in directsunlight, as the surface temperature may be toohot for optimum cleaning.
Always start cleaning from the uppermost window andwork downward to reduce the risk of leaving cleaningresidue on glass at lower levels.
1. Rinse the entire exterior glass surface with clean
7Caring for Eagle® Windows and Doors
Glass Care
Prior to cleaning the glass on windows and doors, please review the following cautions:
4Metal razor blades candamage glass surface andexterior coating.
4Abrasive cleaners willdamage glass surface.
4Sealants will damage exteriorcoating on glass.
4Do not apply any type of filmto insulating glass. Thermal stress and glassdamage can result. Shading devices (insulatedcoverings, shutters, etc.) may also causethermal stress and condensation damage.
All names are owned by their respective companies.
water to help loosen dirt and debris.
2. Clean the glass with a mild soap and water solutionusing a sponge or soft brush. Other commercialproducts like Windex® or Fantastik® glass cleanersare sufficient.
3. Rinse clean with water using a sponge if needed.Do not allow to air dry.
4. Dry immediately with a lint-free cloth or softsqueegee (with no exposed metal edges that couldcause scratching).
5. Wipe cleaning solutions dry from the window framesand weatherstrip.
To remove stubborn stains such as sealants, greaseand oil on the glass, use denatured alcohol or mineralspirits sparingly. Follow up by cleaning with a mild soapand water solution. If cleaning solution has come incontact with painted surfaces, weatherstrip orhardware, clean immediately with a damp cloth.
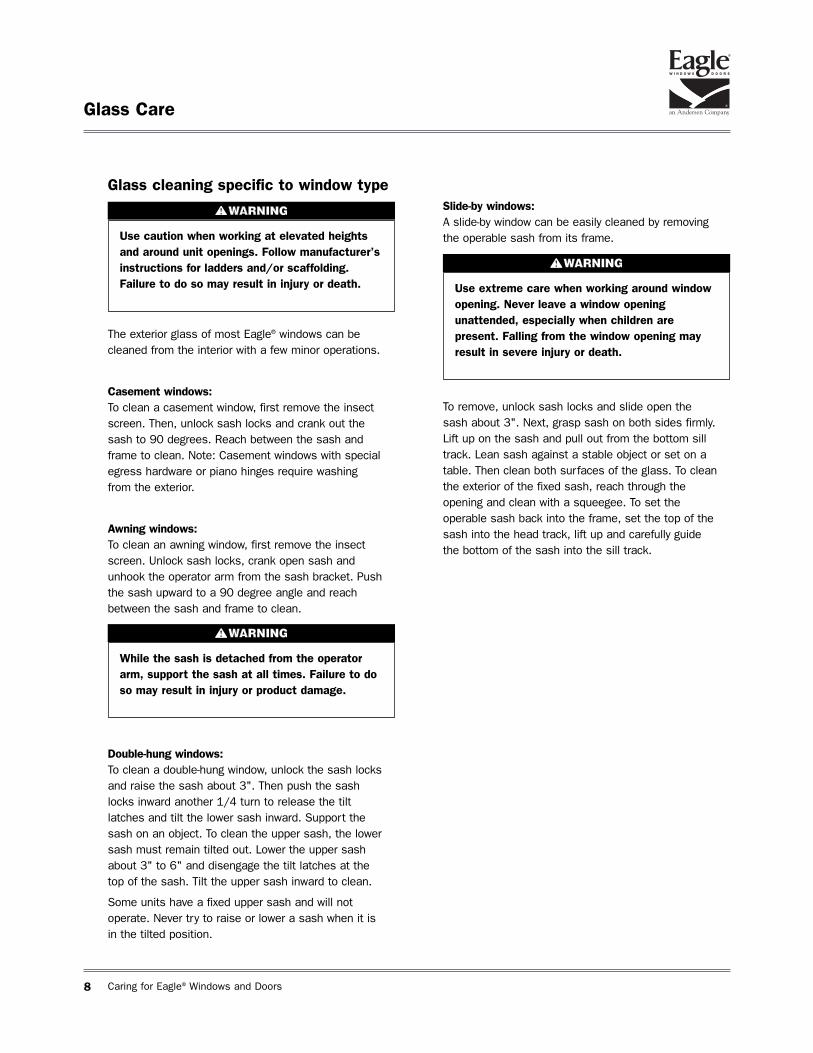
The exterior glass of most Eagle® windows can becleaned from the interior with a few minor operations.
Casement windows:To clean a casement window, first remove the insectscreen. Then, unlock sash locks and crank out thesash to 90 degrees. Reach between the sash andframe to clean. Note: Casement windows with specialegress hardware or piano hinges require washingfrom the exterior.
Awning windows:To clean an awning window, first remove the insectscreen. Unlock sash locks, crank open sash andunhook the operator arm from the sash bracket. Pushthe sash upward to a 90 degree angle and reachbetween the sash and frame to clean.
Double-hung windows:To clean a double-hung window, unlock the sash locksand raise the sash about 3". Then push the sashlocks inward another 1/4 turn to release the tiltlatches and tilt the lower sash inward. Support thesash on an object. To clean the upper sash, the lowersash must remain tilted out. Lower the upper sashabout 3" to 6" and disengage the tilt latches at thetop of the sash. Tilt the upper sash inward to clean.
Some units have a fixed upper sash and will notoperate. Never try to raise or lower a sash when it isin the tilted position.
Slide-by windows:A slide-by window can be easily cleaned by removingthe operable sash from its frame.
To remove, unlock sash locks and slide open thesash about 3". Next, grasp sash on both sides firmly.Lift up on the sash and pull out from the bottom silltrack. Lean sash against a stable object or set on atable. Then clean both surfaces of the glass. To cleanthe exterior of the fixed sash, reach through theopening and clean with a squeegee. To set theoperable sash back into the frame, set the top of thesash into the head track, lift up and carefully guidethe bottom of the sash into the sill track.
8 Caring for Eagle® Windows and Doors
Glass Care
Use extreme care when working around windowopening. Never leave a window openingunattended, especially when children arepresent. Falling from the window opening mayresult in severe injury or death.
Use caution when working at elevated heightsand around unit openings. Follow manufacturer’sinstructions for ladders and/or scaffolding.Failure to do so may result in injury or death.
Glass cleaning specific to window type
While the sash is detached from the operatorarm, support the sash at all times. Failure to doso may result in injury or product damage.

9Caring for Eagle® Windows and Doors
Window, Door and Accessory Care
Prior to cleaning and maintaining the exterior frame and sash members, weatherstrip, hardware, screens, blindsand/or shades of windows and doors, please review the following cautions:
Exterior surfacesExterior finish:To clean the exterior frame and sash members ofaluminum clad windows and doors, use a soft cloth,brush or sponge with a mixture of mild soap and water.Washing should be done with uniform pressure andmotion. Rinse thoroughly with clean water and dry witha soft clean cloth. Always restrict cleaning to mildweather or on the shaded side of the building. Forstubborn dirt or grime, use a mild solvent such asmineral spirits or a solution of water and denaturedalcohol. Always rinse surface with clean water whenfinished and dry with a soft cloth. Periodic waxing withan automotive-type wax may prolong the finish life.Make sure the wax contains no abrasives and followthe wax manufacturer’s instructions.
For coastal seashore (areas of high salt concentration),such as those within two (2) miles of the coastalseashore or industrial atmospheres, it is recommendedthat a systematic fresh water-cleaning program isimplemented that consists of cleaning with mild soapand water at least every three (3) months or more. Thiscleaning prevents the accumulation of concentratedsalt deposits. Periodic waxing with an automotive-typewax may prolong the finish life. Make sure the wax
4Do not use any abrasive cleaners or scraping toolsthat may damage the finish.
4Do not allow solvent-based materials to come incontact with weatherstrip. This will impact itsflexible qualities.
contains no abrasives and follow the wax manufacturer’sinstructions.
Even with a systematic cleaning program, productsinstalled in these conditions can deteriorate more thanproducts installed in less caustic atmospheric conditions.
More information regarding the cleaning and maintaining of exterior finishes is available through the AmericanArchitectural Manufacturers Association (AAMA) online ataamanet.com.
Sill:Clean the exterior sill area under window sashes anddoor panels frequently to prevent dirt and debris frominterfering with the window or door’s performance.
Sealant:Inspect the exterior caulked areas around the windowframe. Trim off any old or deteriorated caulking and sealwith a high-quality exterior caulk.
4Do not use solvents, polishes, cleansers orabrasives on the hardware. This will break downthe protective coating.
4Do not remove grease from moving hardwarecomponents such as gear trains and other areaswhere metals are in contact with each other.

Oil-Rubbed Bronze finish:The oil-rubbed bronze finish is an oxidized black copperfinish. You can expect to have variations in color frompiece to piece. Oil-rubbed bronze is really a “livingfinish” and changes color over time depending uponusage and weather conditions. It is common to haveworn edges and even green patina accents lending itan artisan, old-world look.
To clean, pat gently with a damp, soft clean cloth andpat dry. Just let nature take its course.
(continued on next page)
Maintaining exterior exposed hardware finishes
Remove hardware and mechanisms to ensure that nopaint and finishing products are allowed to come incontact with them during the finishing processes.
Weathering of hardware finishes may vary and is notconsidered a defect. To prolong the finish life, it isrecommended that a systematic fresh water-cleaningprogram is implemented on all exterior exposedhardware finishes. This consists of cleaning with mildsoap and water at least every three (3) months ormore to prevent build up of unwanted elements.
Hardware finish types
Polished Brass, Antique Brass, Pewter, White orBlack Powder Coated finishes:The hardware’s finish is protected with a clear or solidcolor durable paint. To clean, use a mixture of mildsoap and water, rinse and dry with a soft clean cloth.An automotive-type wax may prolong the finish life.Make sure it contains no abrasives and follow the waxmanufacturer’s instructions.
10 Caring for Eagle® Windows and Doors
Window, Door and Accessory Care
WeatherstripInspect and assure the weatherstripping remainsproperly seated and located on windows and doors.Doing so can help prevent costly damage due to waterinfiltration.
Do not perform any abrasive cleaning action likescrubbing or polishing. Do not wax oil-rubbedbronze finishes. Product damage may occur.
Clean weatherstrip with a solution of mild soap andwater. Replace any weatherstrip that is cracked, torn orbrittle. Contact your local Eagle dealer for replacementmaterials.
General hardware maintenanceMaintain the hardware on windows and doors. Keephinges, tracks, operating devices and other parts freeof dirt and debris. A small brush, vacuum and/or adamp, soft cloth with a mixture of mild soap and watermay aid your cleaning efforts.
After cleaning, lubrication of moving parts can be donewith a dry silicone spray. Do not use heavy oillubricants that may collect corrosive particles.

11Caring for Eagle® Windows and Doors
Window, Door and Accessory Care
Hardware finish types (cont’d)
Bright Chrome, Satin Chrome or Limited LifetimeBrass finishes:Because of various atmospheric and weatherconditions (especially where hardware is exposed tohigh concentrations of salt in the air), cleaning isrequired for Bright Chrome, Satin Chrome and LimitedLifetime Brass finishes.
To clean, use a mixture of mild soap and water, rinseand dry with a soft clean cloth. An automotive-type waxmay prolong the finish life. Make sure it contains noabrasives and follow the wax manufacturer’sinstructions.
For severe build-up, a cleaning product named ‘CLR®’,(which can be purchased at most home and garden ordrug stores) will assist the cleaning process. Read andfollow product instructions and warnings on finishmaterial.
Remove the hardware from the window or door.Submerge each piece of hardware into the cleaner.Wait about 1/2 hour. Remove hardware from solutionand rinse with warm running water. Rub with a papertowel to remove the rest of the salt, calcium, dirt or oil.Repeat until all unwanted elements are removed. Applyan automotive-type wax. Make sure it contains noabrasives and follow the wax manufacturer’sinstructions. Then reinstall the hardware.
Stainless Steel finish:Stainless steel is protected from corrosion by a thinlayer of chromium oxide, which occurs naturally. Oxygenfrom the atmosphere combines with the chromium inthe stainless steel to form a passive chromium oxidefilm that protects the metal from further corrosion.However, dirt, oils, salts and other contaminates, thatcan corrode themselves on the surface, interrupt thisnatural passivation process and trap corrosive agentsthat reduce the stainless steel’s corrosion protectionability.
DO NOT USE any cleaning product containingCHLORIDE. Chloride will damage stainless steel.
Salts will cause stainless steel to rust. Therefore,cleaning is required.
To clean, use warm mild soap and water on a softclean cloth. Rinse and dry with a soft clean cloth. Forstains, fingerprints and discoloration only, the namebrand products that follow can be used. Rub in thedirection of the finish lines. The Stainless SteelIndustry of North America (SSINA) approves of theseproducts: 3M® Stainless Steel Cleaner and Polish, Arcal 20, Lac-O-Nu, Lumin Wash, O’Cedar Cream Polish or Stainless Shine.
Use of proprietary names is intended only to indicate a type of cleaner and does not constitute anendorsement. Omission of any proprietary cleanserdoes not imply its inadequacy. All products should beused in strict accordance with manufacturer'sinstructions on package.
Please visit ssina.com for more information onstainless steel and its properties.
All names are owned by their respective companies.
12 Caring for Eagle® Windows and Doors
Window, Door and Accessory Care
Blinds and shadesSystem 3 blinds and shades are attached to aremovable storm panel, which in turn is attached to thesash of the unit. Therefore the blinds and shades areencased in a dust-free environment and are virtuallymaintenance-free. However, occasional cleaning may berequired.
System 3 blinds:To clean a System 3 blind, first remove the insectscreen. Note: The blind drawstring is routed through ascreen grommet in the insect screen. Remove thedrawstring from the screen. Remove the screws aroundthe exterior of the storm panel, and carefully removethe storm panel and blind from the sash. Tilt the blindsin a downward position using the control knob at thebottom of the panel. Use a vacuum cleaner with abrush attachment to remove dust. For fingerprints ordirt, gently wipe clean using a clean, damp cloth. Tiltthe blind the opposite direction and repeat theprocedure. To clean the interior glass of the stormpanel, pull the blind to the stacked position and washthe glass. When complete, reverse these procedures,and reinstall the insect screen.
System 3 fabric shades:To clean a System 3 fabric shade, first remove theinsect screen. Note that the shade drawstring is routedthrough a grommet in the insect screen. Remove thedrawstring from the screen. Remove the screws aroundthe exterior of the storm panel, and carefully removethe storm panel and shade from the sash. Use avacuum cleaner with a brush attachment to removedust. For fingerprints or dirt, gently wipe clean using aclean, damp cloth.
Storm panel - interior glass:To clean the interior glass of the storm panel, pull theblind or shade to the stacked position and wash theglass. When complete, reverse these procedures andreinstall the insect screen.
Do not use cleaners with ammonia. Damage tothe shade fabric will occur.
Insect screensConventional insect screens and TruScene® insectscreens are best cleaned with a damp, soft cloth orsponge.

13Caring for Eagle® Windows and Doors
Understanding Condensation
Condensation and humidityCondensation is the visible result of excess humidity.Warm air holds more moisture than cool air; but whenwarm air comes into contact with a cool surface, itcools and can’t hold as much moisture. That excessmoisture changes to water and becomes visible ascondensation. Window and door surfaces may be thefirst place you notice condensation forming.
Persistent condensation problems on windows anddoors, mold on ceilings or walls, and musty odors areall signs of moisture-related problems in the home.These problems are not only annoying, but can causeextensive damage to your home and windows anddoors if not remedied. There are many steps you cantake to reduce or eliminate condensation from yourhome.
4As a temporary solution, open a window or door ineach room for a few moments. This circulation offresh air will help to remove some of the existingmoisture.
4Open drapes, blinds and shades to help circulate theair. Window coverings can contribute to condensationproblems by restricting the flow of warm room airover the glass surface.
4Use exhaust fans in your kitchen and bath morefrequently in the winter months.
4Move plants away from windows and doors.
4Use a dehumidifier.
Detailed information regarding condensation, why itoccurs and additional steps to help control it isavailable online at EagleWindow.com. Other informationsources include: wdma.com, efficientwindows.org,energystar.gov and cardinalcorp.com. Or speak withyour local heating and cooling specialist for furtherinformation.
14 Caring for Eagle® Windows and Doors
Date of purchase
Phone
Purchase Information
Keep this information for your records
Name
Purchased from:
Address
City State Zip
Date of installation
Phone
Name
Installed by:
Address
City State Zip

15Caring for Eagle® Windows and Doors
Notes

Printed
onpaper
manufactured
with
virginpulp
fromcertified
sourcesand
am
inimum
of10%
post-consumer
recoveredfiber.
Eagle
decreasespaper
consumption
byprinting
onrecycled
paperand
providingcom
prehensiveproduct
andtechnical
information
onlineat
EagleW
indow.com
.Please
helpus
byrecycling
thisbrochure
ifyou
nolonger
needit.
“Eagle”
andall
otherm
arksdenoted
aretradem
arksof
Eagle
Window
&D
oorM
anufacturing,Inc.
©2011
Eagle
Window
&D
oorM
anufacturing,Inc.
All
rightsreserved.
Part
No:
1113
–9050032
2045 Kerper Blvd.Dubuque, IA 52001
TEL 563. 556.2270 FAX 563.556.4408
For more information, or for the dealer nearest you, call 800.453.3633 or visit our website at: EagleWindow.com
Eagle Window & Door
Eagle makes windows and doors that meet ENERGY STAR® performancerequirements. Andersen Corporation, including its subsidiary EagleWindow & Door Manufacturing, Inc., earned the 2011 ENERGY STAR®
Partner of the Year award.