cardboard dulcimer kit - musicmakers · outline position of string board lift tape ... the...
TRANSCRIPT
MUSICMAKERSPO Box 2117
Stillwater, MN 55082800-432-5487
www.harpkit.com
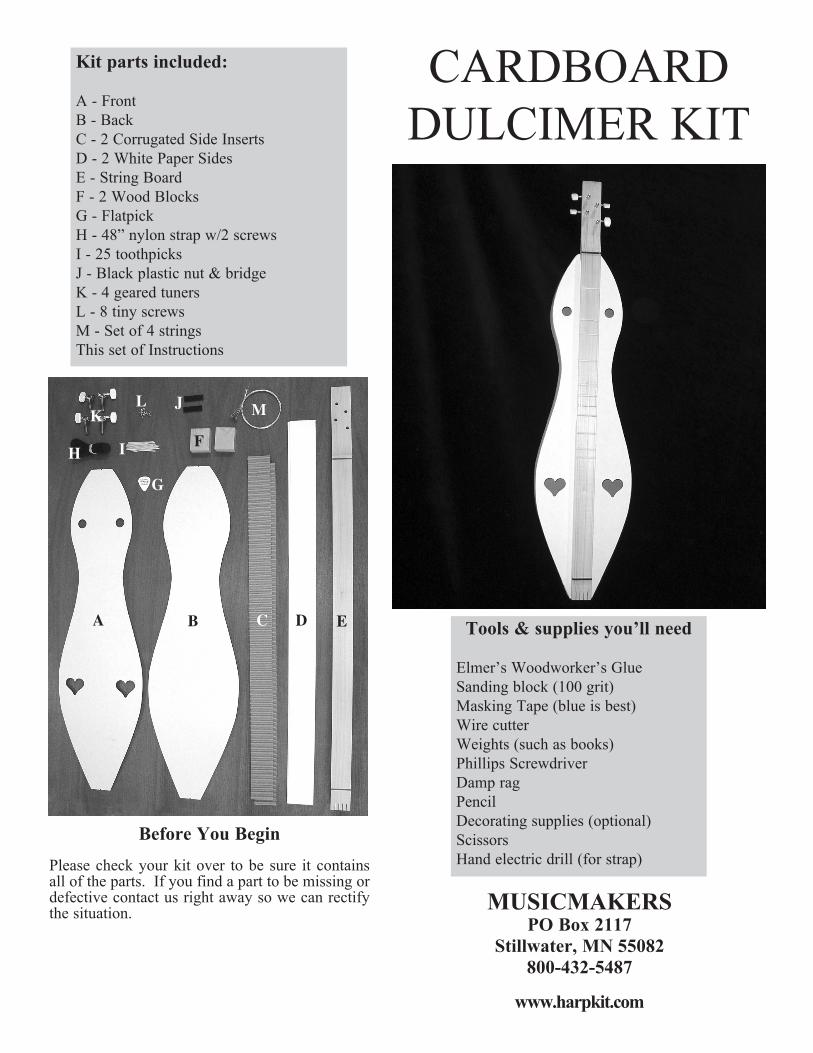
CARDBOARD DULCIMER KIT
Before You BeginPlease check your kit over to be sure it contains all of the parts. If you find a part to be missing or defective contact us right away so we can rectify the situation.
Kit parts included:
A - Front B - BackC - 2 Corrugated Side InsertsD - 2 White Paper SidesE - String BoardF - 2 Wood BlocksG - FlatpickH - 48” nylon strap w/2 screwsI - 25 toothpicksJ - Black plastic nut & bridgeK - 4 geared tunersL - 8 tiny screwsM - Set of 4 stringsThis set of Instructions
Tools & supplies you’ll need
Elmer’s Woodworker’s Glue Sanding block (100 grit)Masking Tape (blue is best) Wire cutterWeights (such as books) Phillips ScrewdriverDamp rag Pencil Decorating supplies (optional)Scissors Hand electric drill (for strap)
A B C D E
F
G
H I
J MKL

MATERIALS NEEDED: (for steps 1-8)
Elmer’s Woodworker’s GlueMasking Tape (blue is best)Weights (such as books)Damp ragPencilScissors
TEACHER’S HINTS:
ASSEMBLY SEQUENCE: These instructions are blocked out into sections to allow you to jump from one section to another or change the sequence to suit your program or time frame (notice estimate time required for each section).
You could, for example, begin at step #10 with the string board before assembling the resonator box.
Sometimes you can gain efficiency by having students jump to the next section while they are waiting for glue to dry.
KEEPING TRACK OF PARTS: If you are working with a number of students, we recommend that you only give out the parts required for the task at hand, so they don’t lose things. Keep the strings and hard-ware parts in a safe place until you need them.
It is also wise to have students put their name or initals on each part to avoid confusion later on. Have a supply of pencils ready for this.
TYPE OF GLUE: We use Elmer’s Woodworker’s Glue (yellowish color) for this entire project. White School Glue does not work as well for wood working.
GLUE BOTTLES: You’ll need at least one glue bottle for every two students. We recommend purchas-ing small bottles that can be refilled from a gallon jug, especially if you plan to repeat this instrument-mak-ing class again.
1. Notice that the cardboard pieces are white on one side and brown on the other. Like new tires on a car, you’ll probably want to show the white sides out. Notice also the small slits on the edge of the cardboard front and back panels, marking the center at each end.
Each wood block has a centerline on it. Begin by gluing the wood blocks to the inside surface of the back piece, lining up the center-line with the slit on the edge of the cardboard. This will help you keep the front & back properly aligned. Use tape to hold things together.
Glue the front panel on top of the wood blocks, using masking tape to prevent the parts from sliding out of position. Pull the mask-ing tape as you press the parts together so the tape holds every-thing tightly until the glue sets (30 minutes).
2. Apply glue to the smooth surface of the long brown (single-face) corrugated strips, as shown. Flip each one over onto a long white paper strip so the corrugations face up. These will be the two sides of your instrument.
Notice that the brown strip is shorter and nar-rower than the white paper. It is important to center the brown strip on the white paper, so there is 1/8” ledge along each side, and at least an inch of space at each end, as shown. Lay a book or two on these strips to hold the parts flat until dry (10-15 minutes).
3. Prepare a bunch of short (2” long) pieces of masking tape and arrange them along the edge of your workspace where they will be handy. (Note: it is helpful to use the blue-colored “low adhesion” masking tape, as it comes off more easily later.)
ASSEMBLING THE RESONATOR BOXTime required for assembling the resonator box (steps 1-8):
approximately 30-60 minutes
glue
masking tape
1/8” ledge on each side
1” or more space at each end
slit
page 2copyright 2009, Musicmaker’s Kits, Inc.all rights reserved
glue
glue
masking tape
wood block
centerline

4. Flip the SIDE over and squirt glue along the narrow ledges of each edge of the SIDE.
HINT: It helps to tilt your glue bottle so the glue flows straight out behind the tip. Otherwise the tip tends to get caught in the bumps of the corrugations.
TEACHER’S HINTS:
MASKING TAPE: For a group project, you should have one roll of masking tape for each pair of stu-dents. They won’t use it all up, but they need to have it close at hand.
KEEPING CLEAN: Gluing the resonator box together is a messy job, especially if you have a group all working together. We recom-mend having a bucket of clean water handy. Each person should have a damp rag, both for cleaning up glue drips and for keeping fingers clean. Be sure to have students wipe up glue before it dries!
TEAMWORK: Gluing the resona-tor sometimes requires more than two hands. We recommend pairing the students together so one helps the other. Have them clean their work surface before beginning the second resonator box.
INTEGRATING WITH ART: Some students will be excited to decorate their instruments with paints, stickers, markers, etc. This is a great way to involve them in an art project at the same time.
Be aware that decorating takes a lot of time! Some teachers send the cardboard body home with the stu-dent for decorating outside of class.
DECORATING CAUTION: Do not use really wet art materials, such as water colors or papier mache. They will get the cardboard too wet. Here’s a list of good decorating mediums:
acrylic paints tempera paintspray paintmarking pensgel markerscrayonscolored pencilsribbonsstencilspaper cut-outsstamping patterns
5. Start attaching one side to the body, begin-ning at the line on one wood block, and proceeding around to the other wood block. Make sure the front and back panels fit into the grooves of the sides.
Use short strips of masking tape to hold the side strips in place as you work around the instrument.
6. Continue this gluing and taping process for the second side, until you have enclosed the entire body. Use a scissors to trim off excess side material when you meet the two ends together, or just let the side pieces overlap.
Add more tape, as needed, to draw the parts firmly together. Allow at least 30 minutes for drying before removing the tape.
7. Once dry, remove masking tape carefully to avoid tearing the cardboard faces. It is best to pull the tape from each end toward the edge, pulling slowly.
8. If you plan to decorate your dulcimer, mark the desired position of the string board on the front of the box so you can keep your decora-tions clear of that area. Glue will not adhere to a painted surface!
The string board has a wide flat bottom area under part of it and a rounded surface under the rest. You can decorate a little further in the area.under the rounded part of the wood.
glue
pulltowardcenter
start atcenter
line
outlinepositionof string
board
lift tape slowly
add glue
copyright 2009, Musicmaker’s Kits, Inc.all rights reserved
page 3
shelf paperfabricsequinsglitterbeads3D paint pensstickersgold braidingbuttonsphotoscut-out letters
9. (Optional) Decorate the body as desired (see list of acceptable decorations at left). Keep decorations away from space where string board will be glued.

TEACHER’S HINTS:
* INTEGRATING WITH MATH: This is a good part of the project to incorporate into a math lesson if you wish to do so. You can have the kids calculate the fret positions with the following procedure (it is easiest to use metric measurements):
--Measure the vibrating length (dis-tance from Nut to Bridge) in milim-eters.
--Multiply that distance by the deci-mal 0.9438743 to find the distance from the bridge to the first half -step position. On a dulcimer, this is just halfway to the first actual fret, so you need to multiply this new distance by the same decimal to find the distance from the bridge to the second half-step, which will be your first actual fret position.
This can be confusing for a student. A dulcimer has some wide spaces and some narrow spaces between frets because it is not a chromatic instrument (like a guitar). There are some whole steps and some half steps on the string board, and whole steps are calculated by running the formula twice.
Look at the pattern sheet below to see where the whole steps (wider spaces) are located.
14. When all the toothpick frets are in place (or if you take a break part-way through the process), turn the string board over on a flat table and put a heavy weight on it to press the toothpicks evenly against the board.
Allow at least 15 minutes for the toothpicks to dry.
13. Use small amounts of Elmer’s Wood Glue to glue the toothpick frets on the top surface of the string board at each pair of marks.
We like to squirt a small puddle of glue onto a scrap of paper or cardboard and use one tooth-pick as an applicator for spreading glue evenly onto each toothpick fret.
Spread the glue onto the widest surface of the toothpick. Be sure to avoid any “dry” spots. You will glue the flat surface of the toothpick to the string board. Let the thin end hang over the edge of the board, as shown.
MATERIALS NEEDED: (for steps 10-18)
Elmer’s Wood GlueDamp ragPencilSanding block (100 grit)
INSTALLING FRETSTime required for fretting the string board (steps 10-18): approximately 45 minutes
10. Cut out the long pattern below (or calclulate the positions mathematically*) for marking the location of each fret.
The pattern is the full length of both facing pages (below). Tape it to the center of the string board, lining up the heavy line with the slot for the nut (near the peg head).
11. Use a pencil to mark the wood for each fret position. Just make short accurate marks on the wood, on each side of the pattern. Then remove the pattern so you can “connect the dots” by gluing toothpicks to the wood.
this pattern is 2 pages wide - cut along lines and tape to wood string board
tape
tape
fretplace-mentchart
align bold line with slot
mark wood on both sides of paper pattern
4th Fret
5th Fret
6th Fret
6 1/2th fret
7th Fret
8th Fret
9th Fret
10th Fret

TEACHER’S HINTS:
PARTS BAGS: Kids are apt to tear open their parts bags and spill the parts all over. We recommend having them just slit one corner to get the toothpicks out, and then hand the bags back in to the teacher for safe keeping.
KEEPING CLEAN: Gluing the frets in place is a messy job, espe-cially if you have a group all work-ing together. Each person should have a damp rag, both for cleaning up glue drips and for keeping fin-gers clean. Be sure to wipe up glue before it dries!
BREAK TIME ACTIVITIES: Sometimes you may find that you need to have the students wait for glue to dry before proceeding to the next step. These breaks make an excellent opportunity for teaching a little about playing. Show them the chord charts and songs on the back page explain how to play chords.
If you have a finished instrument available, use it to demonstrate, or have the kids trade off practicing a chord or two.
If some students finish ahead of oth-ers, ask them to help those who are not done, or have them clean up and rinse the rags out.
SANDING BLOCKS: It would be very helpful to prepare a few flat sanding blocks ahead of time. We cut pieces of 1/4” plywood to small 2” x 6” rectangles and glue some 100 grit sandpaper to one face. These will last you a long time.
15. When dry, hold your thumb on top of a fret and break off the excess length of the toothpick by push-ing down, not lifting up. Do this for each fret.
16. GENTLY sand the frets flush with the edge of the stick. This is best done with a flat sanding block or stick. Be sure to work the sandpaper downward only, so you don’t lift the frets off.
Use the same downward strokes to bevel the ends of the frets a little, as shown, by holding the sanding block at an angle. Test the feel of the string board by sliding your hand along the edges. Everything should feel nice and smooth.
downward motion
This pattern is 2 pages wide - cut along lines and tape to wood string board
17. Level the tops of the frets to make the guitar play correctly. If one fret stands higher than its neighbor, you will get buzzing sounds or false tones. Use a flat sanding block to GENTLY sand the tops of the frets. Take care not to break any frets off, or sand them down to nothing!
sand gently
string board
18. Once the frets are level, we like to sand the edges of each fret to remove the sharp-ness. This makes the guitar more comfortable to play. Just a light sanding at an angle will do the job nicely.
sandingblock
Nut
1st Fret
2nd Fret
3rd Fret

page 6
19. Now you can begin stringing. Notice that we have color-coded the ball end of each string. Install one string at a time by sliding the wire through the slot in the tail end of the string board.
Follow the order shown at right. Pull the wire until the ball end stops against the wood at the tail end.
TEACHER’S HINTS:
HANDING OUT STRINGS: We suggest that you hand out one size string at a time to avoid confu-sion. Have the students thread the strings onto the instrument, but wait for a little coaching before turning the gears.
LEFT-HAND CONFIGURATION:You may have several students who are left-handed, but that does not mean that they need to set up their instrument for reverse playing. Let each student decide for himself.
STRINGING STATION:You may find it helpful to set up a stringing station where you have each student work with you indi-vidually to wind the strings onto the tuning pins and get them up to pitch. This will help avoid string breakage and a number of other possible problems. They can still do the work, but you will be right there coaching them.
INTEGRATING WITH PHYSICS:Point out that the 7th fret position should end up to be the midpoint of the vibrating length. Don’t let the 6-1/2 fret confuse you -- That is the one extra note we add to the dulci-mer to allow playing more advanced music. The 7th fret is the octave position. When the instrument is strung, you can have the students hear the octave pitch at that posi-tion. You can also have them check various harmonics at the 4th, 5th and 7th fret positions, explaining how the string vibrates in “partials” of the overall length.
20. Leave enough slack in the wire to allow for 3-4 wraps around the tuning post as you turn the gear.
TOOLS REQUIRED:
Wire cutterSomething to tune to (such as another instrument, or an elec-tronic tuner)
18. Install the plastic nut and bridge into the slots provided in the string board. No glue required. These plastic parts are mirror image to each other, so they must be oriented correctly. Notice that the string grooves are cut in the plastic at a slope. These grooves should slope down toward each end of the string board. The two slots that are close together should be at the left for the melody strings.
STRINGING AND TUNINGTime required: about 45 minutes
17. Install the 4 geared tuners into the peghead as shown. Note that there are two for the left side and two for the right side. Orient them so the handle shaft with the worm gear is on the north side of the string post. Use an awl or nail to punch into the wood where each screw will be installed. No need to drill a pilot hole -- just a healthy punch into the wood will suffice. Then install the screws.
heaviestwire
lightestwire
peghead
Yellow Yellow Yellow Blue .012 .012 .012 .025
heaviestwire
lightestwires
Turn the white plastic knob of the geared tuner to begin winding the string onto the post. Note that it is best to have the strings feed to the inside of the posts, as shown. Hold the slack wire in your other hand. Did we mention that the goal here is to keep the windings low on the tuning post so the string rests firmly in the groove of the nut?
use lower holes in posts
wind wires to the inside of the posts
BackView
copyright 2009, Musicmaker’s Kits, Inc.all rights reserved
worm gear
on top
NOTE: If you wish to string the dulcimer for left-handed playing, you will simply reverse the nut and bridge, and reverse the string order.
Then thread the wire through the LOWER HOLE in the proper tuning post at the peg head. It is important to keep the wire down near the wood surface of the peghead as you wind the string so the wire angles downward from the nut.

page 7 copyright 2009, Musicmaker’s Kits, Inc.all rights reserved
Once the slack is taken up, start plucking the string to test the pitch. Tune it roughly to the proper pitch. Then move on to the next string.
21. Tune the instrument again after a few min-utes. You’ll find that the strings will stretch a little at first, and the string board will flex slightly under the string tension, so it may take 2 or 3 tunings for everything to stabilize.
Once you know the string is securely wrapped and will hold the pitch, use a wire cutter to trim the excess wire close to the post.
TEACHER’S HINTS:
TUNING STATION: Before start-ing any music lesson, you will find it easiest to have the students bring the instruments to you for tuning. The tendency is for kids to over-tighten and break a string, so it is very helpful to give close supervi-sion at this point. Some kids will have a good ear for tuning, but many others won’t have a clue how close they are to the correct pitch, or whether they need to tighten the string or loosen it to get there.
INTEGRATING WITH SCIENCE: Once the string board is strung and tuned, and before gluing it to the resonator box, you can have the stu-dents test the sound of it on various types of resonators. Note how little sound the board makes by itself, and how it is amplified by holding the board against various objects.
We suggest bringing in a styrofoam cooler, a large balloon, various sizes and shapes of cardboard boxes, tin cans, plastic bottles, and other pos-sible resonators. Notice which ones amplify the high frequencies (tinny sound) versus the lower frequencies (mellow sound).
INTEGRATING WITH MUSIC: We highly recommend reserving at least 30 minutes at the end of this project to actually teach the stu-dents to play a few chords and get accustomed to strumming to a beat. The easiest chords to start with are G7 & C. We show several songs on the back page that can be played with these two chords. Some teach-ers get kids to write their own lyrics to one of the tunes -- a great way to integrate with LANGUAGE ARTS!
22. Glue the string board to the resonator box, using Elmer’s wood glue, and a few books to hold it in place until dry. Allow at least 15 minutes for the glue to dry.
23. Use a hand electric drill with a screwdriver bit to install the black webbing strap. Start the wafer-head screw into the webbing and then screw it into the wood block at one end of the body. (You may need to drill a pilot hole in the wood first.) Install the other end in the same way, into the other wood block. Hold the webbing firmly to keep it from twisting up as you install the screws.
wafer head screw
black webbing
Buzzing strings: If you have a string that buzzes when played in the open position (without fret-ting), the plastic nut (next to the peghead) may need to be raised slightly. Reduce the string ten-sion and push a toothpick under the black plastic nut to raise the strings a little.
If the buzzing occurs up the scale, you may need to either level the frets again (step 17) or place a toothpick under the bridge at the tail end of the instrument.
insert toothpick to raise nut or bridge
if necessary
If you break a string, you can easily purchase replacement guitar strings at any music store. Refer to the gauges shown here to make sure you purchase the correct size strings.
Dulcimer tuning for key of C
C4.012
C4.012
G3.012
C3.025
nut
bridge
Need help tuning? Find our on-line tuner at www.harpkit.
com/freetuner
CONGRATULATIONS -- YOU BUILT IT! Now it’s time to learn to play.

Two-Chord Songs in the Key of C
HE’S GOT THE WHOLE WORLD
CHe’s got the whole world in His hands G7He’s got the whole world in His hands CHe’s got the whole world in His hands G CHe’s got the whole world in His hands
Beginner players often strum the strings at every syllable of the words. That’s fine for starters, but a new goal is to play just the beats of the song, just like tap-ping your foot or clapping your hands.
Try singing the song without the instrument and tapping your foot to the rhythm. That will give you an idea of how to keep the beat with your instrument.
Now try playing the instrument with the same even beat.
Hints for changing between the two chords of a song quickly and easily:
1. Look for ways to keep one finger on the fretboard while arranging other fingers around it for the next chord.
2. In some cases you can simply slide one finger up or down by one position.
3. Keeping physical contact with one finger on the instrument will help you change chords more quickly and smoothly, and you will begin to build “muscle mem-ory” in your hands. That’s how good musicians can play without even looking.
HUSH LITTLE BABY
C G7Hush little baby, don’t say a word, CMomma’s going to buy you a mocking bird. G7If that mocking bird don’t sing, CMomma’s going to buy you a diamond ring. G7If that diamond ring turns brass, CMomma’s going to buy you a looking glass.
DOWN IN THE VALLEY
C G7Down in the valley, valley so low, CHang your head over, hear the wind blow. G7Hear the wind blow, dear, hear the wind blow, CHang your head over, hear the wind blow.
Playing chords is the easiest way to start accompanying your sing-ing. The charts and photos at left show where to put the fingers of your left hand on the strings for sonngs in the key of C.
Press the strings down firmly so they rest on the frets. Focus on playing each chord clearly. That means each finger will touch only the one designated string.
Pluck each string individually as a test -- You’ll know it’s right when you hear a clear tone from each string while fingering the chord.
When you can play both chords, try playing the songs on this page. It’s more fun to learn when you are actually playing music. It is even more fun if you make up your own words to one of these tunes.
C chord
G7 chord
T
1
MARIANNEC G7All day, all night, Marianne, CDown by the seaside sifting sand G7Even little children love Marianne, CDown by the seaside sifting sand. MUSICMAKERS
800-432-5487www.harpkit.com
MERRILY WE ROLL ALONG
C G7 CMerrily we roll along, Roll along, roll along G7 CMerrily we roll along, O’er the deep blue sea.
DOWN AT THE STATION
C G7 CDown at the station early in the morning G7 CSee the little puffabillies all in a row G7 CSee the station master pull the little handle G7 CPuff puff, toot toot, off they go!
HOT CROSS BUNS
C G7 C G7 C Hot cross buns, hot cross buns, G7 C G7 COne-a-penny, two-a-penny, hot cross buns.
Little Liza JaneCI got a house in Baltimore
Little Liza Jane
Street cars runnin’ by my doorG7 CLittle Liza Jane
CHORUS: C Oh Eliza, Little Liza Jane G7 C Oh Eliza, Little Liza Jane
Oh Eliza, Little Liza Jane G7 C Oh Eliza, Little Liza Jane.
T