cara scan 4 scan 4.0 is a dental device (usa: medical device) built by kulzer gmbh, leipziger...
TRANSCRIPT

Operating Manual
All Rights reserved. No parts of this work may be reproduced in any form or by any means – graphic, electronic, or mechanical, including photocopying, recording, taping, or information storage and retrieval systems – without thewritten permission of the publisher.
This publication may contain trademarks of third parties. The use of those trademarks is subject to the terms of use ofthe respective owner.
While every precaution has been taken in the preparation of this document, the publisher and the author assume noresponsibility for errors or omissions, or for damages resulting from the use of information contained in this document orfrom the use of programs and source code that may accompany it. In no event shall the publisher and the author beliable for any loss of profit or any other commercial damage caused or alleged to have been caused directly or indirectlyby this document.
Dated: 2018-06, 63450 Hanau (Germany)
© 2018 Kulzer GmbH
cara Scan 4.0 Operating Manual
W20567_REF_66069511_15_eBA_GB_caraScan4.0_V01© 2018 Kulzer GmbH

3Contents
W20567_REF_66069511_15_eBA_GB_caraScan4.0_V01© 2018 Kulzer GmbH
Table of Contents
1 Scope of applicability 5
.................................................................................................................................. 51.1 General
.................................................................................................................................. 51.2 Description and type of machine
.................................................................................................................................. 61.3 EU statement of conformity
2 Instruction on using the unit safely 7
.................................................................................................................................. 72.1 Explanation of symbols
.................................................................................................................................. 72.2 Transport damage
.................................................................................................................................. 72.3 Operator's obligations
.................................................................................................................................. 72.4 Unit book
.................................................................................................................................. 82.5 Safety information
3 Use in accordance with specifications 9
.................................................................................................................................. 103.1 Working rules
4 Scope of delivery/consumables set 10
.................................................................................................................................. 104.1 Scope of delivery
.................................................................................................................................. 114.2 Accessory kit comprising of
5 Structure and function 11
.................................................................................................................................. 115.1 Product identification
.................................................................................................................................. 125.2 Control elements
6 Location and Installation 13
.................................................................................................................................. 136.1 Transport
.................................................................................................................................. 136.2 Unpacking
.................................................................................................................................. 146.3 Hardware setup
.................................................................................................................................. 176.4 Software setup
7 Operations 18
.................................................................................................................................. 187.1 Putting into operation
.............................................................................................................................. 19Installation Testing7.1.1
.................................................................................................................... 20Reset Axes7.1.1.1
.................................................................................................................... 20Basic Mode Acquisition7.1.1.2
.................................................................................................................................. 227.2 Putting out of operation
.................................................................................................................................. 237.3 Acquiring high models
.................................................................................................................................. 247.4 Troubleshooting
.............................................................................................................................. 24Known Issues7.4.1
.............................................................................................................................. 24Errors and causes7.4.2
.............................................................................................................................. 30System configuration7.4.3
.................................................................................................................... 31System configuration check list7.4.3.1

cara Scan 4.0 Operating Manual4
W20567_REF_66069511_15_eBA_GB_caraScan4.0_V01© 2018 Kulzer GmbH
8 cara Scan 4.0 User's Guide 31
9 Maintenance 31
.................................................................................................................................. 329.1 Maintenance and care
.................................................................................................................................. 339.2 Remove objects fallen inside
.................................................................................................................................. 339.3 Replacing fuses
.................................................................................................................................. 349.4 Calibration
.................................................................................................................................. 359.5 Software update
.................................................................................................................................. 359.6 Repair
.................................................................................................................................. 369.7 Disposal
10 Technical data 37
.................................................................................................................................. 3910.1 Operating conditions
.................................................................................................................................. 3910.2 Information on manufacturer and electrical specification
.................................................................................................................................. 4010.3 Electrical circuit diagram
11 Operations check list 41
12 Service 42
13 Document history 43
5Scope of applicability
W20567_REF_66069511_15_eBA_GB_caraScan4.0_V01© 2018 Kulzer GmbH
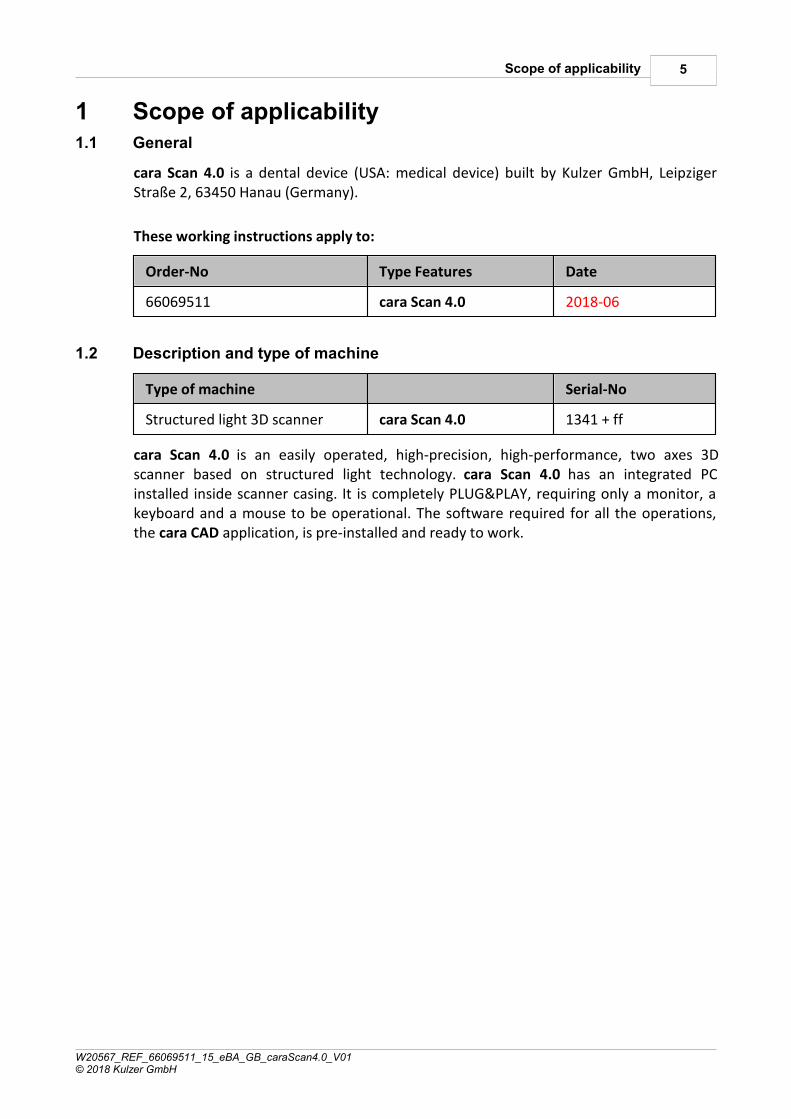
1 Scope of applicability1.1 General
cara Scan 4.0 is a dental device (USA: medical device) built by Kulzer GmbH, LeipzigerStraße 2, 63450 Hanau (Germany).
These working instructions apply to:
Order-No Type Features Date
66069511 cara Scan 4.0 2018-06
1.2 Description and type of machine
Type of machine Serial-No
Structured light 3D scanner cara Scan 4.0 1341 + ff
cara Scan 4.0 is an easily operated, high-precision, high-performance, two axes 3Dscanner based on structured light technology. cara Scan 4.0 has an integrated PCinstalled inside scanner casing. It is completely PLUG&PLAY, requiring only a monitor, akeyboard and a mouse to be operational. The software required for all the operations,the cara CAD application, is pre-installed and ready to work.

6 cara Scan 4.0 Operating Manual
W20567_REF_66069511_15_eBA_GB_caraScan4.0_V01© 2018 Kulzer GmbH
1.3 EU statement of conformity
We, Kulzer GmbH, herewith declare that above mentioned device fulfills the basic safetyrequirements of mentioned standards, regulations and directives. In any case of non-authorized modification, abnormal use or misuse of this device or document Kulzer is notliable for any injury, risk or malfunction that may occur.

7Instruction on using the unit safely
W20567_REF_66069511_15_eBA_GB_caraScan4.0_V01© 2018 Kulzer GmbH
2 Instruction on using the unit safely2.1 Explanation of symbols
Symbol Accompanyingword(s)
Explanation
CAUTION Safety-relevant paragraphs and sections in theseworking instructions have been marked with thissymbol
NOTE Information within the working instructions on theoptimum use of the unit
WARNING This symbol warns of the dangers of electric voltage
DISCONNECT FROM MAINS
Danger of electric shock when unit is opened. Unplug the unit before opening it
2.2 Transport damage
Please check the unit for transport damage and, if necessary, accept the unit withreserve. Report the eventual damages to the forwarder within 24 hours after receivingthe unit.
CAUTION
Under any circumstances, do not work with a damaged unit.
2.3 Operator's obligations
In addition to complying with the statutory regulations specified by the manufacturer,the operator must ensure the statutory obligations are observed and implemented atthe working place, i.e. he must train his personnel and comply with industrial safetylegislation and any other regulations or laws in force.
For working at and with the machine, the operator must draw up written instructions inunderstandable form and give these to his employees in their own language. Theseinstructions must be based on the cara Scan 4.0 Operating Manual and written in light ofthe work to be performed.
2.4 Unit book
Kulzer GmbH recommend you keep a unit book. All tests as well as all essential works(e.g. repair work, modifications) must be documented in this book.
8 cara Scan 4.0 Operating Manual
W20567_REF_66069511_15_eBA_GB_caraScan4.0_V01© 2018 Kulzer GmbH
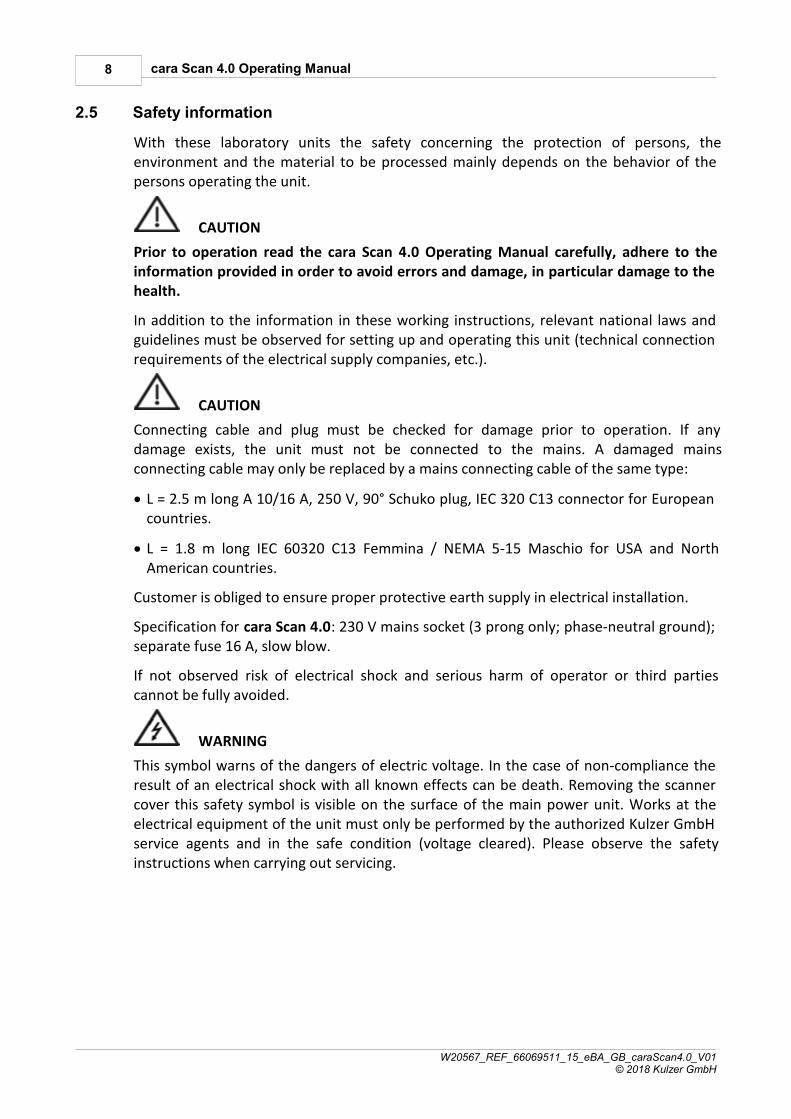
2.5 Safety information
With these laboratory units the safety concerning the protection of persons, theenvironment and the material to be processed mainly depends on the behavior of thepersons operating the unit.
CAUTION
Prior to operation read the cara Scan 4.0 Operating Manual carefully, adhere to theinformation provided in order to avoid errors and damage, in particular damage to thehealth.
In addition to the information in these working instructions, relevant national laws andguidelines must be observed for setting up and operating this unit (technical connectionrequirements of the electrical supply companies, etc.).
CAUTION
Connecting cable and plug must be checked for damage prior to operation. If anydamage exists, the unit must not be connected to the mains. A damaged mainsconnecting cable may only be replaced by a mains connecting cable of the same type:
· L = 2.5 m long A 10/16 A, 250 V, 90° Schuko plug, IEC 320 C13 connector for Europeancountries.
· L = 1.8 m long IEC 60320 C13 Femmina / NEMA 5-15 Maschio for USA and NorthAmerican countries.
Customer is obliged to ensure proper protective earth supply in electrical installation.
Specification for cara Scan 4.0: 230 V mains socket (3 prong only; phase-neutral ground);separate fuse 16 A, slow blow.
If not observed risk of electrical shock and serious harm of operator or third partiescannot be fully avoided.
WARNING
This symbol warns of the dangers of electric voltage. In the case of non-compliance theresult of an electrical shock with all known effects can be death. Removing the scannercover this safety symbol is visible on the surface of the main power unit. Works at theelectrical equipment of the unit must only be performed by the authorized Kulzer GmbHservice agents and in the safe condition (voltage cleared). Please observe the safetyinstructions when carrying out servicing.

9Instruction on using the unit safely
W20567_REF_66069511_15_eBA_GB_caraScan4.0_V01© 2018 Kulzer GmbH
CAUTION
Proper function and safety of the unit are only guaranteed if the required tests,maintenance and repair work have been performed by Kulzer GmbH service agents or bypersonnel adequately trained by Kulzer GmbH. Only permissible original spare partsmust be used. The use of different parts holds unknown risks and must be avoided atany rate.
NOTE
This equipment has been tested and found to comply with the limits for a Class B digitaldevice, pursuant to Part 15 of the FCC rules. These limits are designed to providereasonable protection against harmful interference in a residential installation. Thisequipment generates, uses and can radiate radio frequency energy and, if not installedand used in accordance with the instructions, may cause harmful interference to radiocommunications. However, there is no guarantee that the interference will not occur in aparticular installation. If this equipment does cause harmful interference to radio ortelevision reception, which can be determined by turning the equipment off and on, theuser is encouraged to try to correct the interference by one or more of the followingmeasures:
· Reorient or relocate the receiving antenna.
· Increase the separation between the equipment and receiver.
· Connect the equipment into an outlet on a circuit different from that of the receiver.
· Consult the dealer or an experienced technician for help.
3 Use in accordance with specifications
The structured light 3D scanner is a laboratory unit for acquiring gypsum or implantmodels concerning dental field. The unit is not suitable or intended to acquire any othertype or object, food or pets.
NOTE
· Due to various possible causes for bad models acquisition results, Kulzer GmbH doesnot grant any guarantee for such cases.

10 cara Scan 4.0 Operating Manual
W20567_REF_66069511_15_eBA_GB_caraScan4.0_V01© 2018 Kulzer GmbH
3.1 Working rules
NOTE
· Normally, the unit is suitable to be set up and operated in the following fields:commercial and industrial dental laboratories, dental schools, dental universities,dental hospitals, etc. The unit has been designed for continuous operation. The unitcan be used by both dental technicians as well as semi-skilled workers.
· Cleaned, dry and not dusty gypsum or implant models only.
· Do not fix the gypsum or implant on the working or multidie plate when they aremounted in the scanner. Always remove them from the scanner before fix a model.
· Do not use scan spray on gypsum or implant models directly inside the scanner.
· Do not remove/manipulate the gypsum or implant models during acquisition/resetaxis.
· It is mandatory to close the front door before starting the scan. The unit operates onlywhen the front door is completely closed.
· Do not install additional software if not authorized by Kulzer GmbH service agents orby personnel adequately trained by Kulzer GmbH.
4 Scope of delivery/consumables set
Check that all components are in perfect condition on delivery of the machine. If youwish to make a complaint, contact your supplier.
4.1 Scope of delivery
A) cara Scan 4.0 and cara CAD (1x)
B) Accessory kit (1x)
11Scope of delivery/consumables set
W20567_REF_66069511_15_eBA_GB_caraScan4.0_V01© 2018 Kulzer GmbH
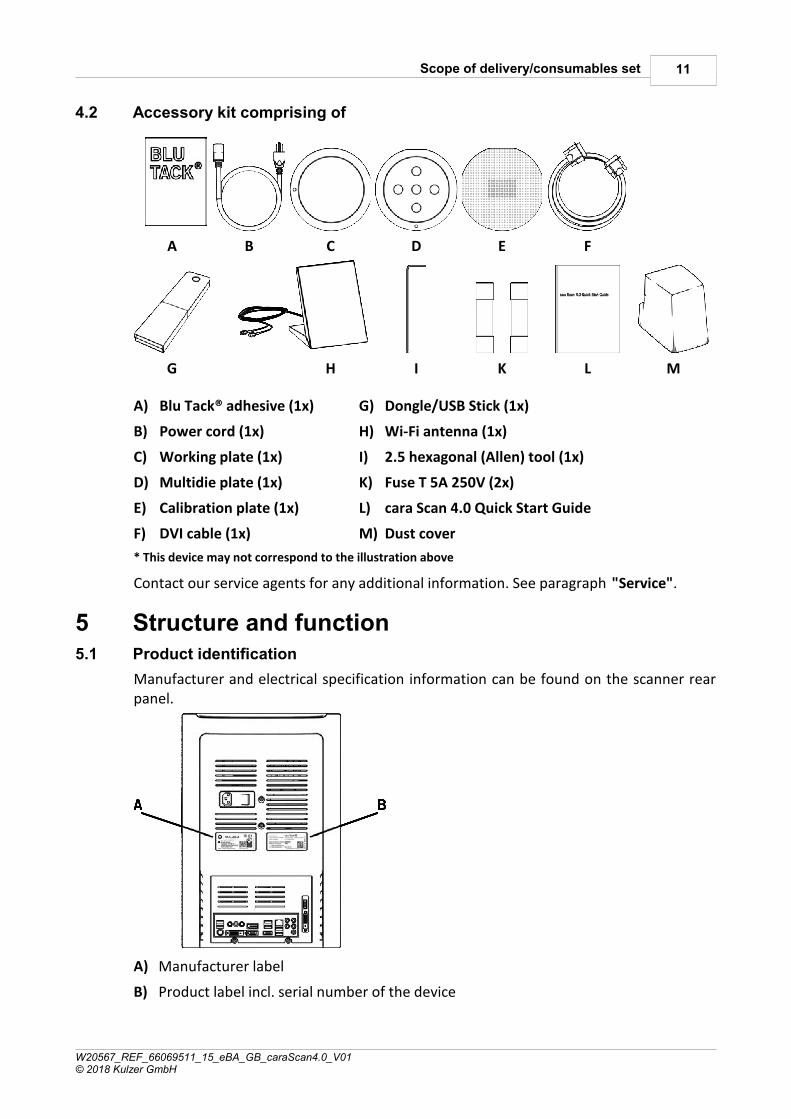
4.2 Accessory kit comprising of
A B C D E F
G H I K L M
A) Blu Tack® adhesive (1x) G) Dongle/USB Stick (1x)
B) Power cord (1x) H) Wi-Fi antenna (1x)
C) Working plate (1x) I) 2.5 hexagonal (Allen) tool (1x)
D) Multidie plate (1x) K) Fuse T 5A 250V (2x)
E) Calibration plate (1x) L) cara Scan 4.0 Quick Start Guide
F) DVI cable (1x) M) Dust cover
* This device may not correspond to the illustration above
Contact our service agents for any additional information. See paragraph "Service".
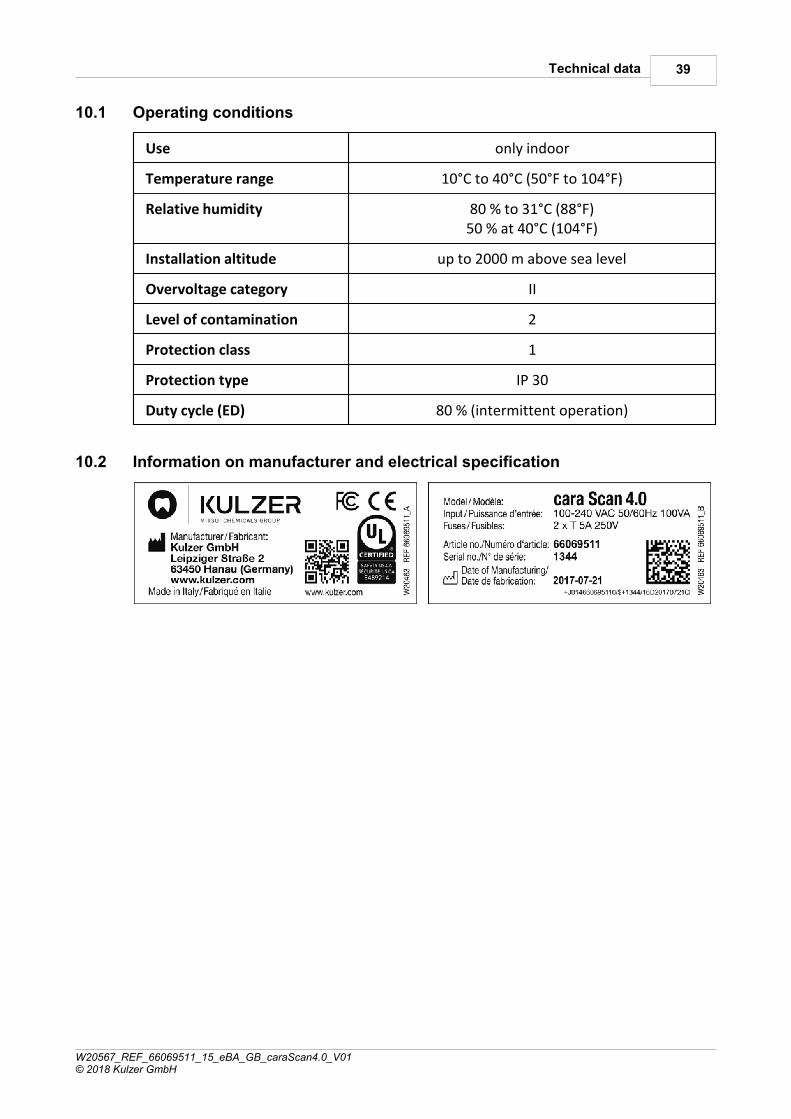
5 Structure and function5.1 Product identification
Manufacturer and electrical specification information can be found on the scanner rearpanel.
A) Manufacturer label
B) Product label incl. serial number of the device
12 cara Scan 4.0 Operating Manual
W20567_REF_66069511_15_eBA_GB_caraScan4.0_V01© 2018 Kulzer GmbH
NOTE
· In any request for technical assistance always take note concerning the serial numberof the device.
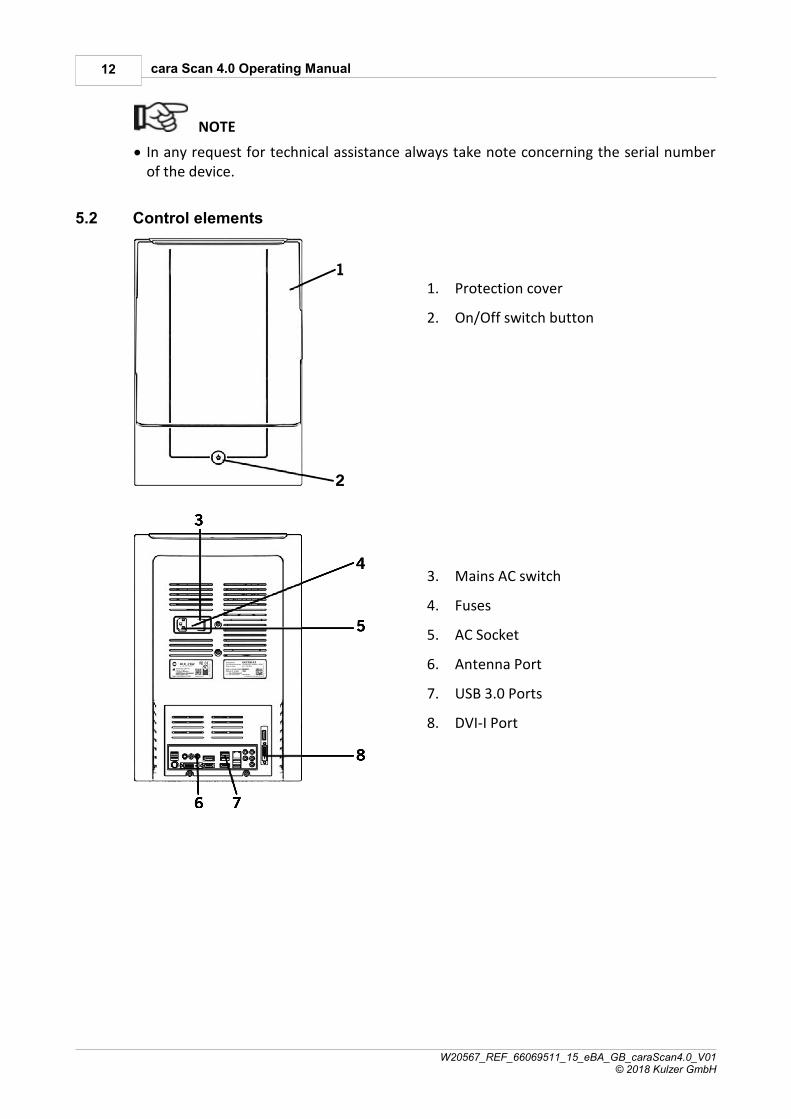
5.2 Control elements
1. Protection cover
2. On/Off switch button
3. Mains AC switch
4. Fuses
5. AC Socket
6. Antenna Port
7. USB 3.0 Ports
8. DVI-I Port

13Structure and function
W20567_REF_66069511_15_eBA_GB_caraScan4.0_V01© 2018 Kulzer GmbH
9. Base plate
10. Base plate retention screws
6 Location and Installation6.1 Transport
NOTE
· Carefully transport the unit horizontally to prevent damage.
· Packings and units must not be stacked.
· Protect from rain.
· Shocks must be avoided!
· Transport temperature should not be less than –40 °C ( –40 °F) or more than 70 °C(158 °F).
· Storage temperature should not be less than 0 °C (32 °F) or more than 50 °C (122 °F).
For dimensions and weight refer to paragraph “Technical data”.
6.2 Unpacking
The cara Scan 4.0 is shipped inside a cardboard box.
1. Open the upper side of the cardboard box at the position where the clamps arepresent.
2. Remove first the Accessory kit and afterwards the inner protective parts both on theright as well as on the left side.

14 cara Scan 4.0 Operating Manual
W20567_REF_66069511_15_eBA_GB_caraScan4.0_V01© 2018 Kulzer GmbH
3. Remove the scanner.
4. Remove door protection.
5. Open the front door and check the position of the base plate. If the position is nothorizontal, gently move it by hand until it is roughly aligned with the inner cover.
The perfect base plate position will be achieved later on through the Reset Axisprocedure described in the "Operations" paragraph.
CAUTION
· Do not perform this operation while the scanner is turned on!
NOTE
· It is suggested to keep the packaging in case you need to ship the scanner for technicalassistance.
6.3 Hardware setup
NOTE
· The scanner must be placed on a solid, rigid and skid-proof surface (laboratory desks,racks) so that a horizontal safe position is ensured.

15Location and Installation
W20567_REF_66069511_15_eBA_GB_caraScan4.0_V01© 2018 Kulzer GmbH
· The scanner should not be placed directly in the sun light or close to a spot lightsource.
· The scanner should not be placed in a position in which it can come into contact withliquids or fluid leaks.
· If the scanner is installed in a very dusty environment protect it as much as possible.When not used always close the front door. In addition a dust cover is provided inorder to secure an optimal protection.
· The room temperature should not be less than 10 °C (50 °F) or more than 40 °C (104 °F).
· The humidity should be less than 80 %.
CAUTION
· The table should have a load bearing capacity of at least 40 kg / 88 lbs.
· Take care not to pinch your fingers when placing the scanner on the table.
· Air inlet and outlet openings in the housing of the unit (rear and side surfaces) mustnot be covered or blocked. The rear and side of the unit must be at least 100 mm /3.94 inch away from the wall to avoid blocking the air outlet of the built-in fan, itmeans it is required a free area (w x d: 550 x 550 mm / 21.65 x 21.65 inch).
· The scanner needs to be positioned with easy accessibility to access the main socketand disconnection from mains is possible, if needed.
· Do not initialize the scanner prior to acclimatization.
· Do not put the device in operation while the dust cover is in place.
To properly setup the hardware follow the below steps:
1. Connect the wireless mouse and the wireless keyboard (both not included in thepackage) using two USB 3.0 ports in the scanner back panel.
16 cara Scan 4.0 Operating Manual
W20567_REF_66069511_15_eBA_GB_caraScan4.0_V01© 2018 Kulzer GmbH
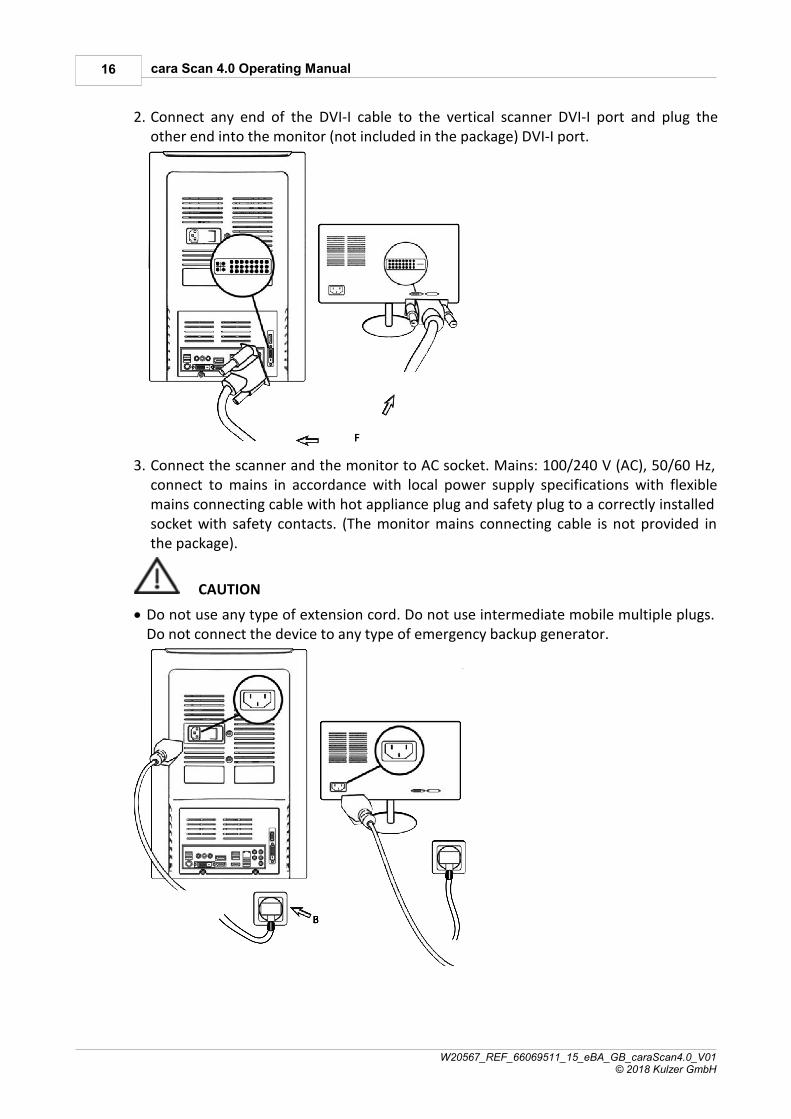
2. Connect any end of the DVI-I cable to the vertical scanner DVI-I port and plug theother end into the monitor (not included in the package) DVI-I port.
3. Connect the scanner and the monitor to AC socket. Mains: 100/240 V (AC), 50/60 Hz,connect to mains in accordance with local power supply specifications with flexiblemains connecting cable with hot appliance plug and safety plug to a correctly installedsocket with safety contacts. (The monitor mains connecting cable is not provided inthe package).
CAUTION
· Do not use any type of extension cord. Do not use intermediate mobile multiple plugs.Do not connect the device to any type of emergency backup generator.

17Location and Installation
W20567_REF_66069511_15_eBA_GB_caraScan4.0_V01© 2018 Kulzer GmbH
4. Insert the Dongle/USB Stick in a USB 3.0 port.
5. Connect the Wi-Fi Antenna.
NOTE
· If additional hardware is installed it could cause malfunctions to the system. Do notinstall additional hardware if not authorized by Kulzer service agents or by personneladequately trained by Kulzer GmbH.
6.4 Software setup
NOTE
· cara Scan 4.0 doesn't require any action. The software is already installed andconfigured. If additional software is installed it could cause malfunctions to the system.Do not install additional software if not authorized by Kulzer GmbH service agents orby personnel adequately trained by Kulzer GmbH.
18 cara Scan 4.0 Operating Manual
W20567_REF_66069511_15_eBA_GB_caraScan4.0_V01© 2018 Kulzer GmbH
7 Operations
The following pages are to provide basic information and tips which are essential forsuccessful and error-free working.
7.1 Putting into operation
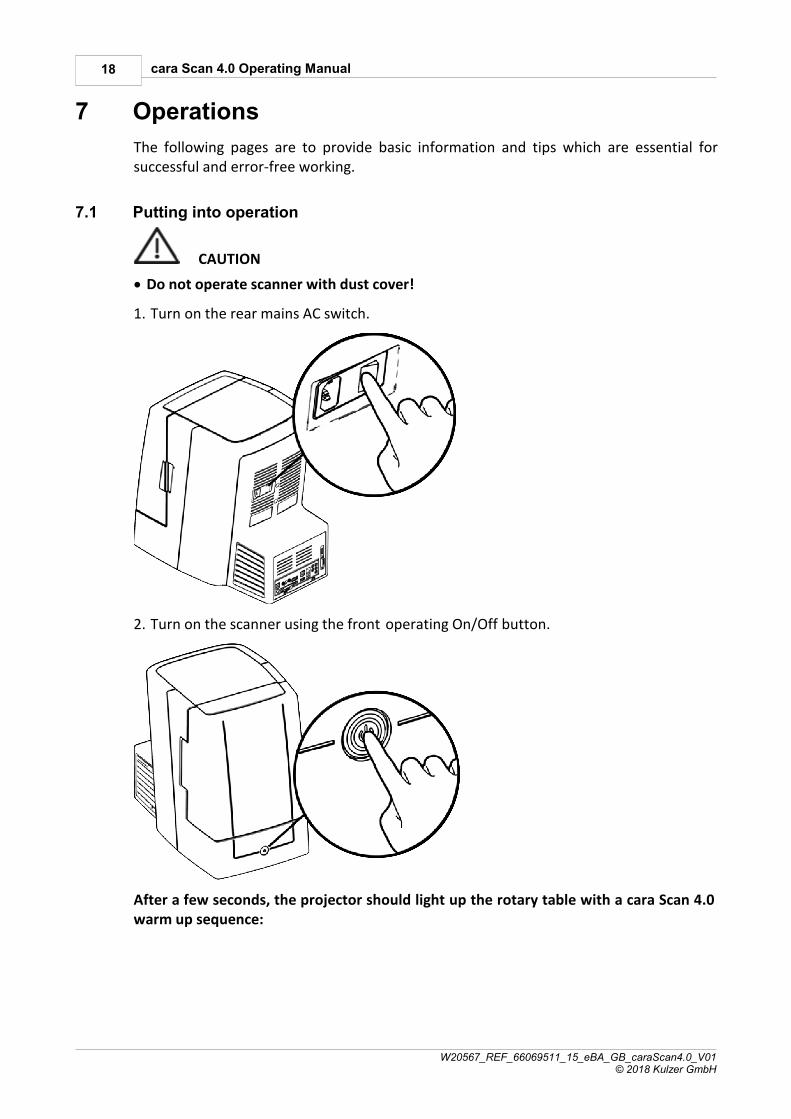
CAUTION
· Do not operate scanner with dust cover!
1. Turn on the rear mains AC switch.
2. Turn on the scanner using the front operating On/Off button.
After a few seconds, the projector should light up the rotary table with a cara Scan 4.0warm up sequence:

19Operations
W20567_REF_66069511_15_eBA_GB_caraScan4.0_V01© 2018 Kulzer GmbH
When the warm up sequence is finished the scanner will be in idle mode ready for theoperations. The PC monitor will show the standard Windows desktop page.
On the left side there are the two icons belonging to cara software application:
cara Scan and cara CAD. See cara Scan or cara CAD User's Guide for more details aboutthem.
NOTE
· The scanner in idle mode do not project any light to save energy.
7.1.1 Installation Testing
NOTE
· Installation testing is required only the first time the scanner is extracted from thepackage or moved to another location. During the day by day operations this activity isnot required.
To check if the scanner is working properly, two mandatory steps have to beperformed:
1. Perform a Reset Axes.
2. Acquire a model in Basic Mode.

20 cara Scan 4.0 Operating Manual
W20567_REF_66069511_15_eBA_GB_caraScan4.0_V01© 2018 Kulzer GmbH
7.1.1.1 Reset Axes
The Reset Axes command has to be used every time the scanner base plate is notproperly oriented. For a more detailed description see Reset Axes in the cara Scan User'sGuide. Follow the below steps:
1. Close the front protection cover.
2. Double click on the cara Scan icon in the desktop .
3. In the drop down menu click on Tool -> Reset Axes or directly the icon .
4. Wait until a dialog box confirms the end of the process.
In a few seconds the plate will start to rotate and tilt. It will stop automatically aftercompleting a predetermined series of rotations, after which it will be aligned.
NOTE
· The Reset Axes command has to be used every time the scanner stops unexpectedlyand the base plate is not properly oriented.
· Do not insert any model in the scanner while performing a Reset Axes!
· If the scanner do not perform a reset axes properly see the paragraph"Troubleshooting, Error and Causes".
7.1.1.2 Basic Mode Acquisition
The Basic Mode is a general purpose application used to test the scanner or to acquire avery simple model. The Basic Mode calls the low level acquisition engine, Lumen, andmove the model in several predefined positions in order to fully cover it from camerasand projector point of view. From each position a points cloud is generated, all the pointsclouds are aligned and merged together to create the final mesh, last operation is calledFinalize. For a more detailed description see Basic Mode in the cara Scan User's Guide.
Follow the below steps:
1. Fix a model on the working plate using Blu-Tack adhesive. The working plate has a planar reference face: A. The incisors teeth have to be oriented as in the image below:
A|
21Operations
W20567_REF_66069511_15_eBA_GB_caraScan4.0_V01© 2018 Kulzer GmbH
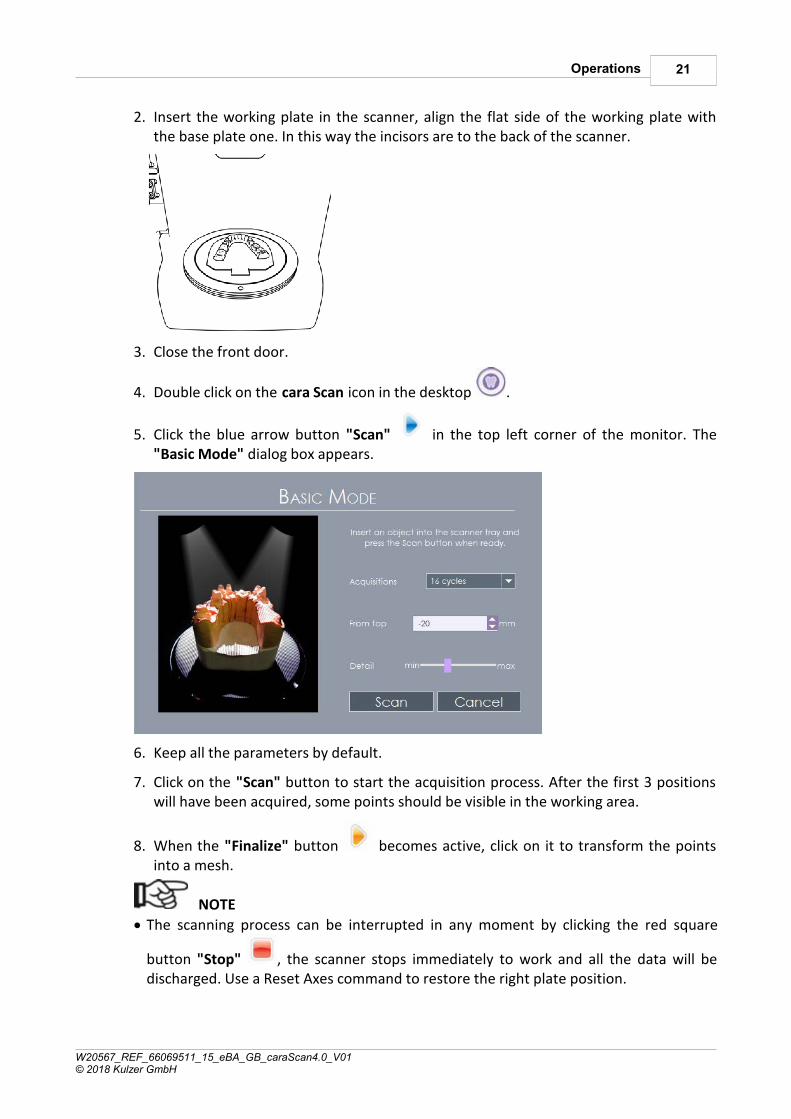
2. Insert the working plate in the scanner, align the flat side of the working plate withthe base plate one. In this way the incisors are to the back of the scanner.
3. Close the front door.
4. Double click on the cara Scan icon in the desktop .
5. Click the blue arrow button "Scan" in the top left corner of the monitor. The"Basic Mode" dialog box appears.
6. Keep all the parameters by default.
7. Click on the "Scan" button to start the acquisition process. After the first 3 positionswill have been acquired, some points should be visible in the working area.
8. When the "Finalize" button becomes active, click on it to transform the pointsinto a mesh.
NOTE
· The scanning process can be interrupted in any moment by clicking the red square
button "Stop" , the scanner stops immediately to work and all the data will bedischarged. Use a Reset Axes command to restore the right plate position.

22 cara Scan 4.0 Operating Manual
W20567_REF_66069511_15_eBA_GB_caraScan4.0_V01© 2018 Kulzer GmbH
· If the system do not perform the acquisition process correctly, see the paragraph"Troubleshooting, Error and Causes".
· As soon as scanning cycle has been started, the front door needs to stay closed all thetime. In case door needs to be opened scanning process will be stopped and all datawill be lost.
7.2 Putting out of operation
Turn off the scanner using the "Shutdown" button in the desktop Start menu or theoperating On/Off button at the front.
NOTE
If the unit is not to be operated for longer periods:
· Turn off the rear mains AC switch.
· Unplug the mains connecting cable.
· Clean the scan chamber.
· Close the front door.
· Cover the scanner with the enclosed dust cover to prevent accumulation of dust inside.

23Operations
W20567_REF_66069511_15_eBA_GB_caraScan4.0_V01© 2018 Kulzer GmbH
7.3 Acquiring high models
It is possible to acquire a very high model, more than 50 / 55 mm (1.97 / 2.17 inch) up to65 / 70 mm (2.56 / 2.76 inch).
Follow the below steps:
1. Remove the working plate from the scanner.
2. Remove the retention screw from the base plate using the 2.5 mm (0.1 inch)hexagonal (Allen) tool (I) provided in the accessory box.
3. Gently remove the base plate just lifting it by hands.
4. Engage directly with the working plate the movable tray.
NOTE
· Do not acquire model less than 55 mm (2.17 inch) high with the working plate in thelower position.
· Do not calibrate the scanner without base plate.
· It is strongly suggested to use the base plate always with the retention screw.

24 cara Scan 4.0 Operating Manual
W20567_REF_66069511_15_eBA_GB_caraScan4.0_V01© 2018 Kulzer GmbH
7.4 Troubleshooting
7.4.1 Known Issues
Hardware
· Web camera connected to PC via USB 3.0 port could malfunction the system.
· Do not use USB 2.0 or 3.0 portable dongles for mobile Internet.
· Unauthorized installation of antivirus application can cause malfunctions.
Software
· At the time of writing, known issues include the following anti-virus software: Avast v.7and above: make sure to disable "auto sandbox" function to correctly install thelicense.
7.4.2 Errors and causes
Error description Possible causes Solutions
1 The scannerdoesn't turn onusing the frontoperation On/Offswitch
· Main connecting cabledisconnected
· Connect the main cable
· Rear AC On/Off switchoff
· Turn on the rear mains ACswitch
· Fuses blow · Replace the fuses
· If none of the above solvesthe problem, contact theKulzer online support
2 The scanner is on,but nothing isvisible on themonitor
· DVI-I cable not properlyconnected to the DVI-Iport at the scanner
· Use only the marked DVI-Iport at the back of thescanner
· DVI-I cable not working · Change the cable or use theones provided in accessorybox
25Operations
W20567_REF_66069511_15_eBA_GB_caraScan4.0_V01© 2018 Kulzer GmbH
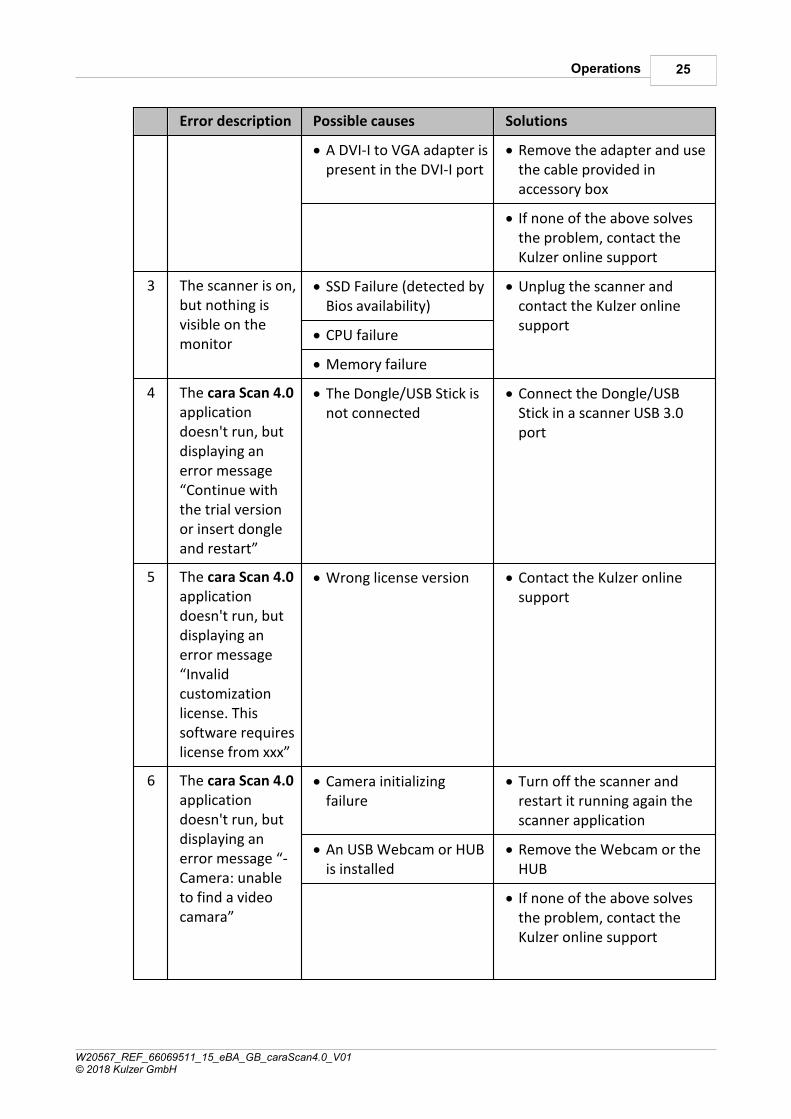
Error description Possible causes Solutions
· A DVI-I to VGA adapter ispresent in the DVI-I port
· Remove the adapter and usethe cable provided inaccessory box
· If none of the above solvesthe problem, contact theKulzer online support
3 The scanner is on,but nothing isvisible on themonitor
· SSD Failure (detected byBios availability)
· Unplug the scanner andcontact the Kulzer onlinesupport· CPU failure
· Memory failure
4 The cara Scan 4.0applicationdoesn't run, butdisplaying anerror message“Continue withthe trial versionor insert dongleand restart”
· The Dongle/USB Stick isnot connected
· Connect the Dongle/USBStick in a scanner USB 3.0port
5 The cara Scan 4.0applicationdoesn't run, butdisplaying anerror message“Invalidcustomizationlicense. Thissoftware requireslicense from xxx”
· Wrong license version · Contact the Kulzer onlinesupport
6 The cara Scan 4.0applicationdoesn't run, butdisplaying anerror message “-Camera: unableto find a videocamara”
· Camera initializingfailure
· Turn off the scanner andrestart it running again thescanner application
· An USB Webcam or HUBis installed
· Remove the Webcam or theHUB
· If none of the above solvesthe problem, contact theKulzer online support

26 cara Scan 4.0 Operating Manual
W20567_REF_66069511_15_eBA_GB_caraScan4.0_V01© 2018 Kulzer GmbH
Error description Possible causes Solutions
7 The cara Scan 4.0application (andOrder Manager)takes too long tostart
· The OS loads wrongprojector driver
· Contact the Kulzer onlinesupport
8 The working plateis in the wrongposition
· The scanner is movedfrom its position orshaken
· Reset Axes
· The acquisition isstopped
· Reset Axes
· The Scanner applicationcrashes duringacquisition
· Reset Axes
· The scanner is turned offusing the front On\Offswitch during acquisition
· Turn On the scanner andReset Axes
· The main AC isdisconnected or turnedOff during acquisition
· Connect or turn On the mainAC and Reset Axes
· If none of the above solvesthe problem, contact theKulzer online support
9 Reset Axesdoesn't move thebase plate in thezero position
· Engine malfunction · Unplug the scanner andcontact the Kulzer onlinesupport
· Mechanical obstruction(detected by mechanicalnoise coming from thescanner)
· Unplug the scanner andremove the obstacle. Ifnecessary use the bottomcover. If nothing visible isdetected contact the Kulzeronline support
· Mechanical failure(detected by Z axismissing rotation)
· Unplug the scanner andcontact the Kulzer onlinesupport
· Optical sensor Zmalfunction (the baseplate rotation doesn'tstop)
· Unplug the scanner andcontact the Kulzer onlinesupport
27Operations
W20567_REF_66069511_15_eBA_GB_caraScan4.0_V01© 2018 Kulzer GmbH
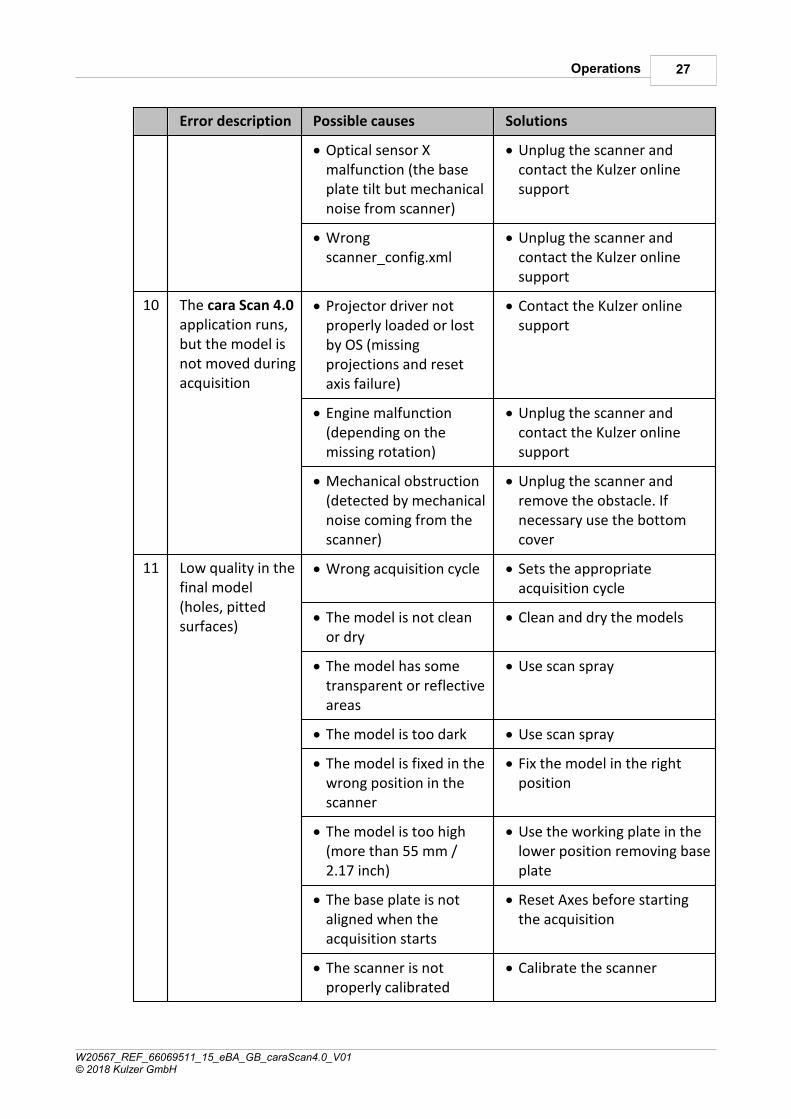
Error description Possible causes Solutions
· Optical sensor Xmalfunction (the baseplate tilt but mechanicalnoise from scanner)
· Unplug the scanner andcontact the Kulzer onlinesupport
· Wrongscanner_config.xml
· Unplug the scanner andcontact the Kulzer onlinesupport
10 The cara Scan 4.0application runs,but the model isnot moved duringacquisition
· Projector driver notproperly loaded or lostby OS (missingprojections and resetaxis failure)
· Contact the Kulzer onlinesupport
· Engine malfunction(depending on themissing rotation)
· Unplug the scanner andcontact the Kulzer onlinesupport
· Mechanical obstruction(detected by mechanicalnoise coming from thescanner)
· Unplug the scanner andremove the obstacle. Ifnecessary use the bottomcover
11 Low quality in thefinal model(holes, pittedsurfaces)
· Wrong acquisition cycle · Sets the appropriateacquisition cycle
· The model is not cleanor dry
· Clean and dry the models
· The model has sometransparent or reflectiveareas
· Use scan spray
· The model is too dark · Use scan spray
· The model is fixed in thewrong position in thescanner
· Fix the model in the rightposition
· The model is too high(more than 55 mm /2.17 inch)
· Use the working plate in thelower position removing baseplate
· The base plate is notaligned when theacquisition starts
· Reset Axes before startingthe acquisition
· The scanner is notproperly calibrated
· Calibrate the scanner
28 cara Scan 4.0 Operating Manual
W20567_REF_66069511_15_eBA_GB_caraScan4.0_V01© 2018 Kulzer GmbH
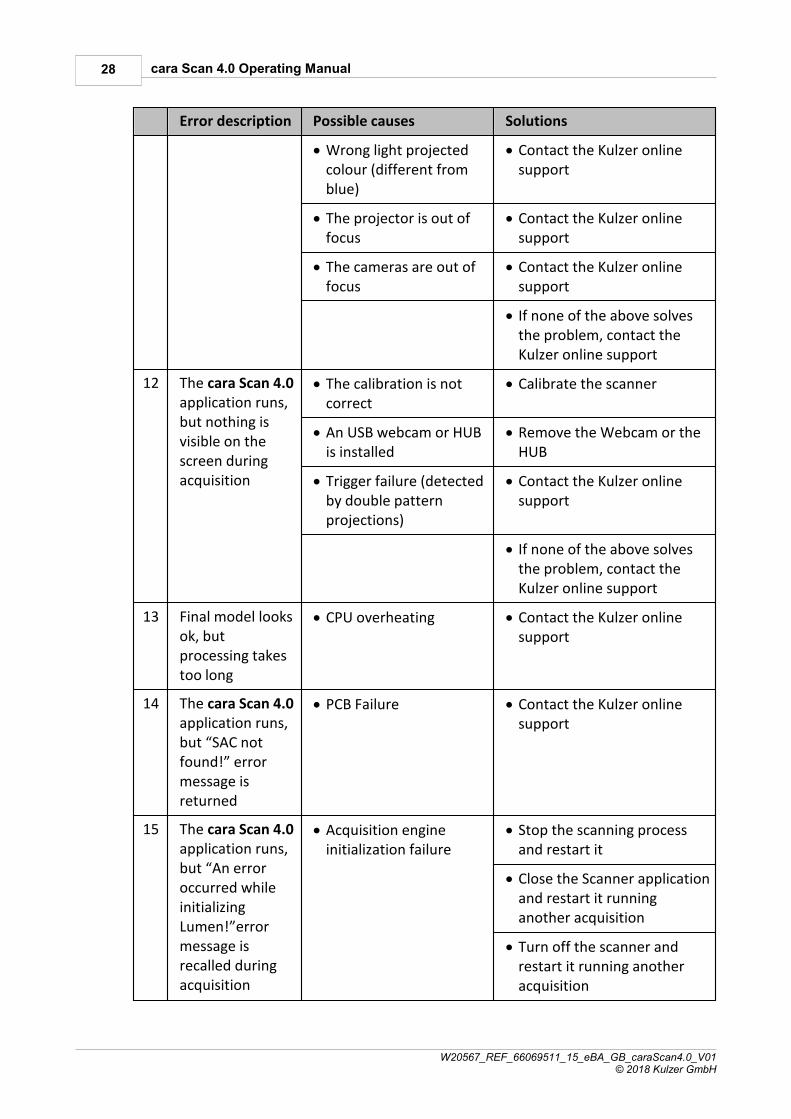
Error description Possible causes Solutions
· Wrong light projectedcolour (different fromblue)
· Contact the Kulzer onlinesupport
· The projector is out offocus
· Contact the Kulzer onlinesupport
· The cameras are out offocus
· Contact the Kulzer onlinesupport
· If none of the above solvesthe problem, contact theKulzer online support
12 The cara Scan 4.0application runs,but nothing isvisible on thescreen duringacquisition
· The calibration is notcorrect
· Calibrate the scanner
· An USB webcam or HUBis installed
· Remove the Webcam or theHUB
· Trigger failure (detectedby double patternprojections)
· Contact the Kulzer onlinesupport
· If none of the above solvesthe problem, contact theKulzer online support
13 Final model looksok, butprocessing takestoo long
· CPU overheating · Contact the Kulzer onlinesupport
14 The cara Scan 4.0application runs,but “SAC notfound!” errormessage isreturned
· PCB Failure · Contact the Kulzer onlinesupport
15 The cara Scan 4.0application runs,but “An erroroccurred whileinitializingLumen!”errormessage isrecalled duringacquisition
· Acquisition engineinitialization failure
· Stop the scanning processand restart it
· Close the Scanner applicationand restart it runninganother acquisition
· Turn off the scanner andrestart it running anotheracquisition

29Operations
W20567_REF_66069511_15_eBA_GB_caraScan4.0_V01© 2018 Kulzer GmbH
Error description Possible causes Solutions
· If none of the above solvesthe problem, contact theKulzer online support
16 The cara Scan 4.0application runs,but “Lcr connectfunctionfailed”errormessage isrecalled duringacquisition
· Projector initializationfailure
· Stop the acquisition andrestart it
· Close the Scanner applicationand restart it runninganother acquisition
· Turn off the scanner andrestart it running anotheracquisition
· Wrong projector IPaddress
· Set the right IP Address
· Warm up sequencestucks
· Contact the Kulzer onlinesupport
· No warm up sequence · Contact the Kulzer onlinesupport
· If none of the above solvesthe problem, contact theKulzer online support
17 The cara Scan 4.0applicationcrashes duringacquisition
· Antivirus applicationinstalled
· Remove the antivirusapplication
· The calibration is notcorrect
· Calibrate the scanner
· If none of the above solvesthe problem, contact theKulzer online support
18 An error message"An erroroccurred in thecalibrationprocess!" isreturned during ascannercalibration
· Calibration procedurefailed
· Calibrate the scanner again
· Close the Scanner applicationand restart it runninganother calibrationprocedure
· Calibration platedamaged or scratched
· Replace the calibration plate
· If none of the above solvesthe problem, contact theKulzer online support

30 cara Scan 4.0 Operating Manual
W20567_REF_66069511_15_eBA_GB_caraScan4.0_V01© 2018 Kulzer GmbH
Error description Possible causes Solutions
19 The projectordoesn't turn offthe white lightafter a calibration
· Projector failure · Unplug the deviceimmediately and contact theKulzer online support
20 The cara Scan 4.0applicationdoesn't run aftera calibration withan error message"-Lumen: unableto findcalibrations file,checkScanManOutputfolder"
Calibration procedurefailed
· Click on "Factory default"and calibrate the scanner
· If none of the above solvesthe problem, contact theKulzer online support
21 Impossible toremove a fallenobject from thescanner
· Remove the inner cover andremove the object
7.4.3 System configuration
Every time cara Scan 4.0 application is started, a check is performed in order to verify thesoftware and hardware settings. If an error is detected, the dialog box of theConfiguration Control Panel will be shown.
31Operations
W20567_REF_66069511_15_eBA_GB_caraScan4.0_V01© 2018 Kulzer GmbH
Depending on the errors detected, some items will be active:
· EDIT button: it opens up a dialog box to solve the issue detected. See SystemConfiguration Check List.
· FACTORY DEFAULT button: reload the default cara Scan 4.0 calibration file.
· REFRESH button: update the configuration status.
· DISABLE SCANNER: the cara Scan 4.0 application is started but the acquisitioncommands are disabled.
· EXIT: exit from cara Scan 4.0 application.
7.4.3.1 System configuration check list
Scanner application requires changes to some of the Operative System settings in orderto run properly. All settings are applied during production before shipping out thescanner. Therefore, do not change any preinstalled settings.
8 cara Scan 4.0 User's Guide
cara Scan 4.0 application can run in two main ways:
1. Basic Mode.
2. Job Driven Mode, invoked automatically from the cara CAD Order Managerapplication.
See the cara Scan 4.0 User's Guide manual for further details. Double click on the
Scanner icon in the desktop. In the drop down menu click on Help -> Contents.
9 Maintenance
Proper function and operational reliability of the unit are only ensured if the requiredtests, maintenance and service work are performed by Kulzer GmbH service agents orpersonnel instructed by Kulzer GmbH.
Kulzer GmbH will not accept any liability for damage – in particular personal injury –resulting from improper maintenance or repair work which has not been performed byKulzer GmbH service agents or adequately trained personnel or if no original spare partsor accessory parts have been used during the exchange of parts.
We recommend to conclude a maintenance contract with our service agents; an offercan be requested there: see paragraph "Service".
32 cara Scan 4.0 Operating Manual
W20567_REF_66069511_15_eBA_GB_caraScan4.0_V01© 2018 Kulzer GmbH
9.1 Maintenance and care
DISCONNECT FROM MAINS
· Prior to maintenance and service work the unit must be switched off and unplugged!
NOTE
· Dust and following inside pollution can be a major problem for the scanner. Itsaccumulation in vents, heat-sinks and fans can block cooling air making the equipmentless reliable. If the scanner is installed in a very dusty environment, try to protect thedevice as much as possible. When not used always close the front door and use theenclosed dust cover to isolate it from environment.
CAUTION
cara Scan 4.0 mechanical parts do not require any maintenance.
· Do not lubricate tilting movement mechanism.
· Do not lubricate door hinges.
cara Scan 4.0 external cover, inner cover, working plate, multidie plate and calibrationplate can be cleaned with a soft cloth dampened either with clean water or with watercontaining a mild detergent.
CAUTION
· The device is not protected against the penetration of liquids.
· Do not spray liquids directly onto the surface of the device.
· Cleaning agents must not enter the inside of the device!
· Do not use an excessively wet cloth or allow water getting inside the case.
· Do not pour liquids directly onto the scanner!
· Use care when cleaning the calibration plate, avoid to remove, damage or scratch theprinted area.
· Do not use solvents such as acetone, isopropyl alcohol and hydrogen peroxide,chloride, iodine, bromide, phenol or other aggressive solutions to clean the plasticsurface of the device. These substances may be harmful, causing discolouration and/ordamage to the plastic materials of the device.
· Do not use abrasive cleaners!
· Do not put the device in operation while dust cover is in place.
cara Scan 4.0 cameras and projector lenses need to be kept clean from dust. Open theblack frontal cover and check the lens status by visual inspection. If required, proceed asfollows: dust off the lenses with a blower or with canned air. Persistent dirt should be

33Maintenance
W20567_REF_66069511_15_eBA_GB_caraScan4.0_V01© 2018 Kulzer GmbH
removed with lens cleaning fluid. Always drip the fluid onto a cloth or a cotton swab andthen wipe the lenses; never apply the fluid directly onto a lens.
9.2 Remove objects fallen inside
DISCONNECT FROM MAINS
· Prior to removing any objects which accidentally fallen inside the unit must beswitched off and unplugged!
· Take out inner plastic cover.
· Remove objects from bottom part of scanner and insert plastic cover again.
NOTE
Don't turn scanner upside down.
Don't shake the scanner.
Don't use tools to get object out of it.
Don't operate the scanner without the inner plastic cover.
9.3 Replacing fuses
DISCONNECT FROM MAINS
· Always disconnect equipment from electrical power before removing a fuse; not doingso may result in serious injury.
cara Scan 4.0 is provided with 2 x T 5A 250 V fuses (slow blow) integrated in the rearmains AC socket to overcurrent protection.
To replace the fuses, remove the fuse holder plastic cap with a small screwdriver.
WARNING
· Always replace a fuse with an identical type and never substitute a fuse with foil oranother object. This could lead to electrocution and fires.

34 cara Scan 4.0 Operating Manual
W20567_REF_66069511_15_eBA_GB_caraScan4.0_V01© 2018 Kulzer GmbH
CAUTION
· If a fuse immediately blows after replacement, do not replace again. In these instances, call a Kulzer service agent or personnel adequately trained byKulzer. Don´t reconnect the device to mains.
9.4 Calibration
NOTE
· Check before starting calibration if the calibrate plate has the same serial number ofthe scanner, the calibration plate serial number is on the back of the plate itself. If not,do not calibrate the scanner and contact Kulzer GmbH customer service.
· Do not use a calibration plate coming from another scanner!
The cara Scan 4.0 calibration procedure is a very simple task:
1. Put the Calibration plate in the scanner, aligning the planar reference face with thebase plate one.
2. Close the front protection cover.
3. Double click on the cara Scan icon in the desktop .
4. In the drop down menu click on Tool -> Calibration.
The "Calibration Mode" dialog box appears:
5. Click the "OK" button.
6. Wait a few minutes until a dialog box confirms the end of the process.

35Maintenance
W20567_REF_66069511_15_eBA_GB_caraScan4.0_V01© 2018 Kulzer GmbH
NOTE
· The scanner uses white light during calibration.
· Use carefully the calibration plate, avoid to damage or scratches. When finish alwaysstore the calibration plate in the protective box included in the original equipment set.
· For cleaning the calibration plate only use a gentle air stream. Don't use any cloth,water or cleaning agents.
· The calibration should be performed always after having moved the device.
· The calibration should be performed only when necessary.
CAUTION
· If projector white light doesn't turn off after calibration unplug the device immediatelyand contact Kulzer GmbH customer service.
· Don´t put the scanner in operation while the dust cover is in place.
9.5 Software update
The cara software application is provided with an automatic update system. See the cara
CAD User's Guide for further details. Double click on the cara CAD icon in thedesktop. In the drop down menu click on Help -> Contents.
During the installation, cara CAD Setup could ask permission to overwrite one file:
· C:\Users\{username}\AppData\Roaming\Kulzer\DentalCAD\ScanManOutput\user_scan_setting.xlm
Answer No if you want to keep previously customized scanner settings.
Answer Yes if you want to discharge any customized scanner settings and restore themto the factory default.
9.6 Repair
CAUTION
· Proper function and safety of the unit are only guaranteed if the required tests,maintenance and repair work have been performed by Kulzer service agents or bypersonnel adequately trained by Kulzer. Only permissible original spare parts must beused. The use of different parts holds unknown risks and must be avoided at anyrate.

36 cara Scan 4.0 Operating Manual
W20567_REF_66069511_15_eBA_GB_caraScan4.0_V01© 2018 Kulzer GmbH
Kulzer will not accept any liability for damage to the unit resulting from an unauthorizedrepair which has not been performed by Kulzer service agents or if no originalspare/accessory parts have been used during the exchange of these parts.
NOTE
· The cara Scan 4.0 is provided with all the software required for the operations. Ifadditional software is installed it could cause malfunctions to the system. Kulzer willnot accept any liability for damage to the unit resulting from a software installation notauthorized by Kulzer service agents or by personnel adequately trained by Kulzer.
· If additional hardware is installed it could cause malfunctions to the system. Kulzer willnot accept any liability for damage to the unit resulting from a hardware installationnot authorized by Kulzer service agents or by personnel adequately trained by Kulzer.
9.7 Disposal
The unit is designed to be operated for 5 years.
NOTE – IMPORTANT
The device must not be disposed off in normal domestic waste.
For the disposal of spare parts, or the unit, please contact the Kulzer subsidiary directlyin your country.
The conditions and precautionary measures for disposing of the device are subject to thevalid legal provisions similar to any other electronic device which has become unusable.
Disposal of old equipment according to WEEE (European Directive) or Electrical and Electronic Equipment Act (German Law ElektroG).
37Maintenance
W20567_REF_66069511_15_eBA_GB_caraScan4.0_V01© 2018 Kulzer GmbH
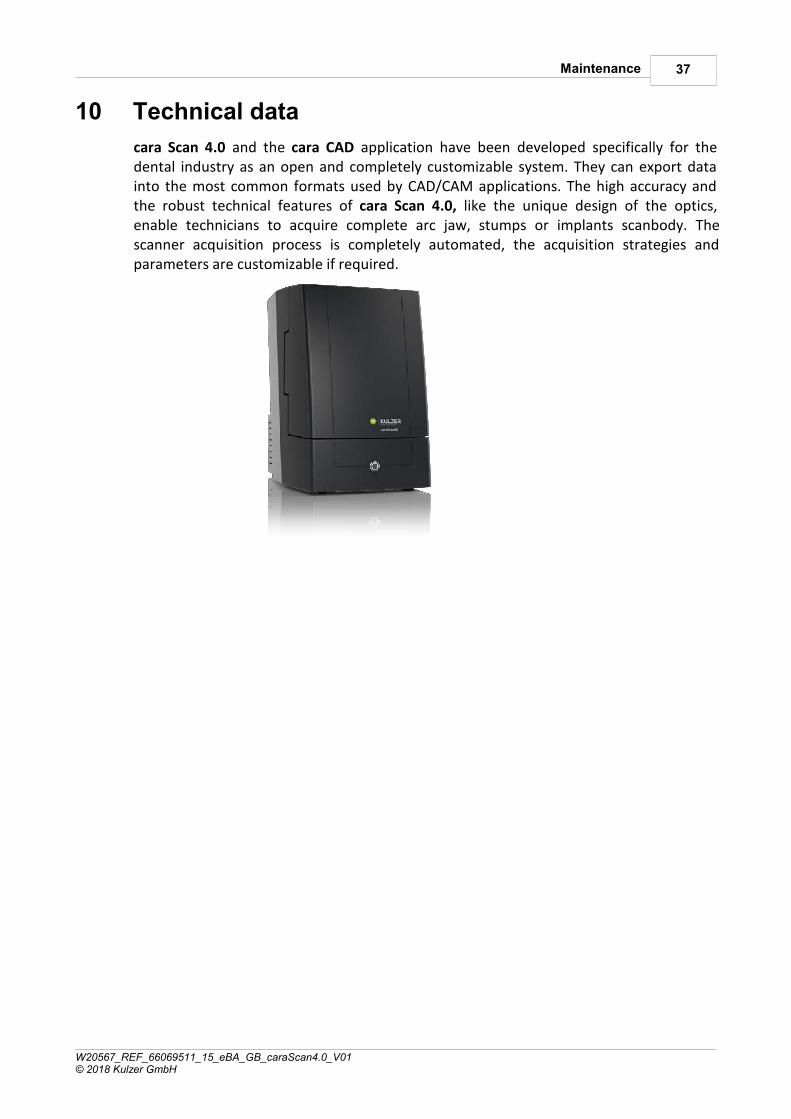
10 Technical data
cara Scan 4.0 and the cara CAD application have been developed specifically for thedental industry as an open and completely customizable system. They can export datainto the most common formats used by CAD/CAM applications. The high accuracy andthe robust technical features of cara Scan 4.0, like the unique design of the optics,enable technicians to acquire complete arc jaw, stumps or implants scanbody. Thescanner acquisition process is completely automated, the acquisition strategies andparameters are customizable if required.
38 cara Scan 4.0 Operating Manual
W20567_REF_66069511_15_eBA_GB_caraScan4.0_V01© 2018 Kulzer GmbH
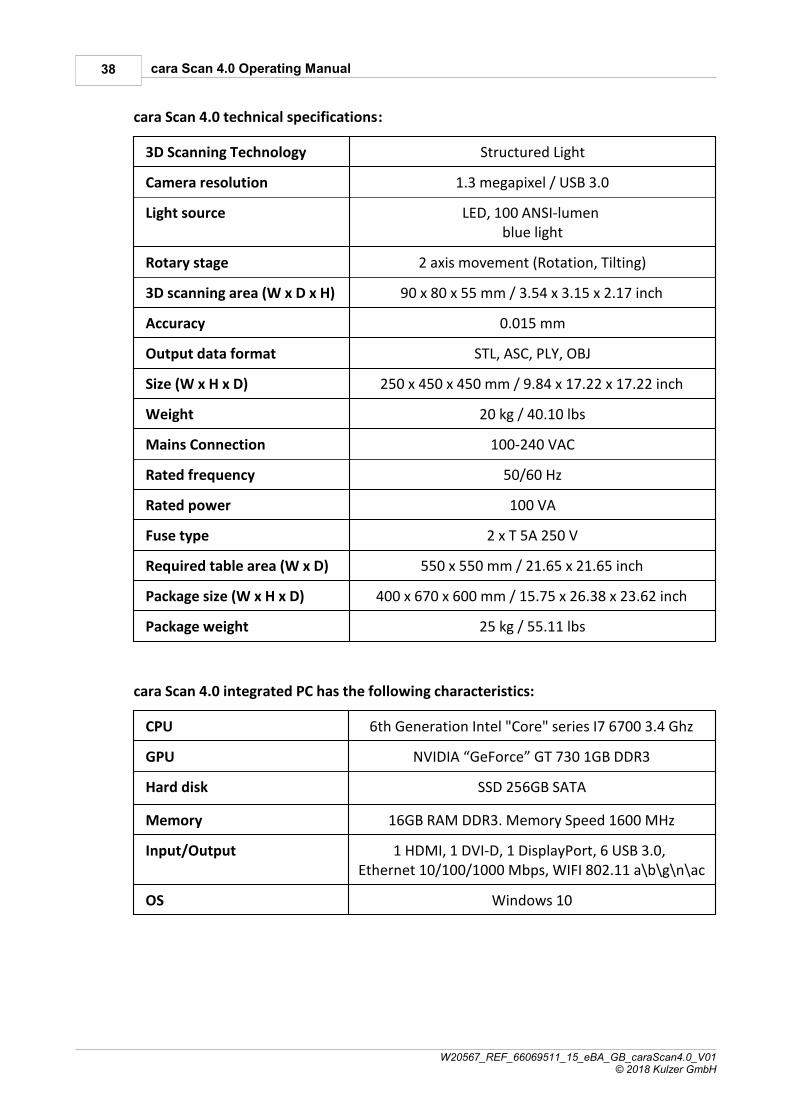
cara Scan 4.0 technical specifications:
3D Scanning Technology Structured Light
Camera resolution 1.3 megapixel / USB 3.0
Light source LED, 100 ANSI-lumen blue light
Rotary stage 2 axis movement (Rotation, Tilting)
3D scanning area (W x D x H) 90 x 80 x 55 mm / 3.54 x 3.15 x 2.17 inch
Accuracy 0.015 mm
Output data format STL, ASC, PLY, OBJ
Size (W x H x D) 250 x 450 x 450 mm / 9.84 x 17.22 x 17.22 inch
Weight 20 kg / 40.10 lbs
Mains Connection 100-240 VAC
Rated frequency 50/60 Hz
Rated power 100 VA
Fuse type 2 x T 5A 250 V
Required table area (W x D) 550 x 550 mm / 21.65 x 21.65 inch
Package size (W x H x D) 400 x 670 x 600 mm / 15.75 x 26.38 x 23.62 inch
Package weight 25 kg / 55.11 lbs
cara Scan 4.0 integrated PC has the following characteristics:
CPU 6th Generation Intel "Core" series I7 6700 3.4 Ghz
GPU NVIDIA “GeForce” GT 730 1GB DDR3
Hard disk SSD 256GB SATA
Memory 16GB RAM DDR3. Memory Speed 1600 MHz
Input/Output 1 HDMI, 1 DVI-D, 1 DisplayPort, 6 USB 3.0, Ethernet 10/100/1000 Mbps, WIFI 802.11 a\b\g\n\ac
OS Windows 10
39Technical data
W20567_REF_66069511_15_eBA_GB_caraScan4.0_V01© 2018 Kulzer GmbH
10.1 Operating conditions
Use only indoor
Temperature range 10°C to 40°C (50°F to 104°F)
Relative humidity 80 % to 31°C (88°F)50 % at 40°C (104°F)
Installation altitude up to 2000 m above sea level
Overvoltage category II
Level of contamination 2
Protection class 1
Protection type IP 30
Duty cycle (ED) 80 % (intermittent operation)
10.2 Information on manufacturer and electrical specification

40 cara Scan 4.0 Operating Manual
W20567_REF_66069511_15_eBA_GB_caraScan4.0_V01© 2018 Kulzer GmbH
10.3 Electrical circuit diagram

41Technical data
W20567_REF_66069511_15_eBA_GB_caraScan4.0_V01© 2018 Kulzer GmbH
11 Operations check list
Putting into operations
1 Turn on the back mains AC On/Off button
2 Turn on the scanner using the front On/Off switch button
3 Wait until warm up sequence is finished and Windows desktop appears
Reset Axis
1 Remove any model from the scanner
2 Close the front protection cover
3 Double click on the cara Scan 4.0 icon in the desktop
4 Click on "Reset Axes" icon
5 Wait until a dialog box confirms the end of the process
Calibration
1 Put the calibration plate in the scanner
2 Close the frontal protection cover
3 Double click on the cara Scan 4.0 icon in the desktop
4 In the drop down menu select Tools -> Calibration
5 Click the "OK" button in the "Calibration Mode" dialog box
6 Wait a few minutes until a dialog box confirms the end of the process

42 cara Scan 4.0 Operating Manual
W20567_REF_66069511_15_eBA_GB_caraScan4.0_V01© 2018 Kulzer GmbH
Acquisition
1 Fix a model on working plate using Blu-Tack adhesive
2 Put the working plate in the scanner
3 Close the frontal protection cover
4 Double click on the cara Scan 4.0 icon in the desktop
5 Click the "Scan" button
6 Select the "Acquisition Cycle", "From Top" and "Detail" parameters thein the dialog box
7 Click on the "Scan" button to start the scanning process
8 Observe the acquired points. If required stop the process with the "Stop"button and repeat the acquisition with different parameters
9 Click on the "Finalize" button to transform the points into a mesh
Putting out of operation
1 Remove the model from the scanner
2 Turn off the scanner using the "Shutdown" button in the desktop Startmenu or the front switch button
12 Service
We appreciate your comments, feedback and suggestions.
Contact in the countries and more information are available by the displayed QR codeor at our website www.kulzer.com

43Service
W20567_REF_66069511_15_eBA_GB_caraScan4.0_V01© 2018 Kulzer GmbH
13 Document history
Edition Date Comments
0 2017-05 Emission
1 2017-07 Document Version 11 – Changed name manufacturer,new address and logo of the manufacturer
2 2017-07 Document Version 12 – Image inserted in paragraph 1.3EU statement of conformity
3 2017-12 Exchange of Declaration of Conformity in paragraph 1.3,update paragraph 9.7, delete paragraph 9.8
4 2018-04 Manufacturer labels paragraph 10.2 changed
5 2018-06 Manufacturer labels paragraph 10.2 changed
Subject to modifications. Dated: 2018-06

© 2018 Kulzer GmbH
All Rights reserved. No parts of this work may be reproduced in any form or by any means – graphic, electronic, or mechanical, including photocopying, recording, taping, or information storage and retrieval systems – without thewritten permission of the publisher.