capture perfect 3.0 operation guide - york university · 2 preface thank you for purchasing a canon...
TRANSCRIPT

Operation GuideENGLISH
PUB. CE-IE-770

2
Preface
Thank you for purchasing a Canon Document Scanner.
CapturePerfect 3.0 is an ISIS-compatible application program that enables the computer to acquire images from the Canon Document Scanner. To fully understand the CapturePerfect 3.0 functions and to be able to use them effectively, please read this guide and the ISIS/TWAIN Driver Help guide as well as your scanner's operating manual.
About Trademarks• ISISTM and MultiStreamTM are trademarks of EMC Corporation.
• Product names mentioned herein are for identification purposes only and may be trademarks and/or registered trademarks of their respective companies.
Copyright• libtiffs
Copyright (c) 1988-1996 Sam LefflerCopyright (c) 1991-1996 Silicon Graphics, Inc.
Permission to use, copy, modify, distribute, and sell this software and its documentation for any purpose is hereby granted without fee, provided that (i) the above copyright notices and this permission notice appear in all copies of the software and related documentation, and (ii) the names of Sam Leffler and Silicon Graphics may not be used in any advertising or publicity relating to the software without the specific, prior written permission of Sam Leffler and Silicon Graphics.
THE SOFTWARE IS PROVIDED "AS-IS" AND WITHOUT WARRANTY OF ANY KIND, EXPRESS, IMPLIED OR OTHERWISE, INCLUDING WITHOUT LIMITATION, ANY WARRANTY OF MERCHANTABILITY OR FITNESS FOR A PARTICULAR PURPOSE. IN NO EVENT SHALL SAM LEFFLER OR SILICON GRAPHICS BE LIABLE FOR ANY SPECIAL, INCIDENTAL, INDIRECT OR CONSEQUENTIAL DAMAGES OF ANY KIND, OR ANY DAMAGES WHATSOEVER RESULTING FROM LOSS OF USE, DATA OR PROFITS, WHETHER OR NOT ADVISED OF THE POSSIBILITY OF DAMAGE, AND ON ANY THEORY OF LIABILITY, ARISING OUT OF OR IN CONNECTION WITH THE USE OR PERFORMANCE OF THIS SOFTWARE.
• libjpegPortions of this software are based in part on the work of the Independent JPEG Group.
Reproduction Warning• Reproduction of documents such as the following is illegal and subject to penalty: paper currency and
other legal tender, valuable instruments and passports issued by a government, as well as licenses, certificates, permits, official documents, and private records issued by a public or private entity.
• Reproduction of copyrighted materials, such as documentation, pictures, imprints, maps, and illustrations, for purposes other than personal use is prohibited.

3
Disclaimer• Reproduction of the contents of this guide, in part or in whole, without prior permission is prohibited.
• This guide is subject to change without notice.
• Every effort has been made to ensure the accuracy of the information in this guide. However, Canon Electronics Inc. and its subsidiaries assume no responsibility for any errors or their consequences.
Copyright © 2006 CANON ELECTRONICS INC. ALL RIGHTS RESERVED
4
Contents
Preface.....................................................................................................................2
Before Using ...........................................................................................................5About the CapturePerfect Window......................................................................................6Scanner Selection and Settings ........................................................................................16About Saving Image Files .................................................................................................18About File Naming.............................................................................................................24About MultiStream Functions............................................................................................27About OCR Functions .......................................................................................................29About Log Files .................................................................................................................32About Barcode/OCR Modification .....................................................................................33About Other Functions ......................................................................................................34
Scanning Methods................................................................................................38Scan Page.........................................................................................................................39Scan Batch to File (Saves scanned images to a specified file).........................................40Scan Batch to Printer (Prints scanned images) ................................................................43Scan Batch to Mail (Attaches scanned images to email) ..................................................45Scan To Presentation (Displays scanned images full-screen)..........................................48Scan JOB (Scan According to a Previously Registered Job)............................................51
Scanned Image Operations .................................................................................55Displaying the Thumbnail Window....................................................................................56Split View ..........................................................................................................................57Saving an Image ...............................................................................................................59Opening an Image File......................................................................................................61Printing an Image..............................................................................................................63Adjusting Brightness of the Displayed Image....................................................................65Inserting/Adding Pages to an Image File ..........................................................................66Replacing a Page in an Image File ...................................................................................69Setting PDF File Security Options.....................................................................................72
Index ......................................................................................................................74

5
Before Using
Please read the following descriptions before using CapturePerfect.
• About the CapturePerfect Window (→P. 6) : Describes the menus in the CapturePerfect window.
• Scanner Selection and Settings (→P. 16) : Describes scanner selection and setup procedures.
• About Saving Image Files (→P. 18) : Describes the file types that can be saved by CapturePerfect.
• About File Naming (→P. 24) : Describes the requirements of file names for files to be saved by CapturePerfect.
• About MultiStream Functions (→P. 27) : Describes the MultiStream output functions.
• About OCR Functions (→P. 29) : Describes the OCR functions.
• About Log Files (→P. 32) : Describes how to save recognition results to a log file when using the barcode detection function or OCR function.
• About Barcode/OCR Modification (→P. 33) : Describes how to verify and edit the log files in which barcode and OCR recognition results are saved.
• About Other Functions (→P. 34) : Describes saving rotated images, saving split pages and capacity warning settings for folders specified as save destinations.
Important• Confirm that your scanner is properly connected to the computer. Refer to your scanner's operating
manual for details.
• Before using CapturePerfect, install the ISIS/TWAIN driver for the scanner. Refer to your scanner's operating manual for ISIS/TWAIN driver installation.

6
About the CapturePerfect Window
The following window appears when CapturePerfect launches. The items in the window's menu and status bar are described here.
File menu Scan menu Edit menu View menu Page menu Options menu Help menu Status Bar
File menuFile menu Scan menu Edit menu View menu Page menu Options menu Help menu Status Bar
Open or buttonOpens saved image files. The following file types saved by CapturePerfect can be opened: TIFF (*.tif), JPEG (*.jpg), BMP (*.bmp) and PDF (*.pdf) files. Opening an Image File (→P. 63)

7
NoteIf security is enabled for a PDF file, you are required to enter a password to open the file. Setting PDF File Security Options (→P. 74)
Save Page As or buttonThis procedure saves open image files with a specified name. Saving an Image (→P. 61)
CloseCloses the open image file.
Close All the FilesCloses all open image files.
Print or buttonPrints the image displayed in the window. Printing an Image (→P. 65)
Print FormatSelects an image size for printing from the submenu.
• Actual SizeRegardless of the printing paper size or scan resolution, the image prints at the same size as the original document.
• Fit to PaperReduces or enlarges images so they fit the size of the paper, and then prints.
• Actual PixelThe image is printed so that one image pixel corresponds to one printer pixel. So the size of the printed image is smaller when printing to a high resolution printer with small dots.
Printer SettingConfigure printer settings for printing images.
ExitExits CapturePerfect.

8
Scan menuFile menu Scan menu Edit menu View menu Page menu Options menu Help menu Status Bar
Select ScannerSelects the scanner to be used. Scanner Selection (→P. 16)
Scanner Setting or buttonSets up the scanner. Scanner Settings (→P. 16)
Scan Page or buttonScans and displays a single document page. Scan Page (→P. 39)
Scan Batch to File or buttonContinuously scans multiple pages of a document and simultaneously saves the page images to a file or files. Scan Batch to File (Saves scanned images to a specified file) (→P. 40)
Scan Batch to PrinterPrints the images as documents are scanned. The scanned images are not saved. Scan Batch to Printer (Prints scanned images) (→P. 45)
Scan Batch to Mail or buttonAttaches scanned images to an email. The scanned images are not saved. Scan Batch to Mail (Attaches scanned images to email) (→P. 47)
Scan To PresentationCapturePerfect switches to full-screen display before scanning. Select whether or not to save scanned images when Scan To Presentation finishes. Scan To Presentation (Displays scanned images full-screen) (→P. 50)

9
NoteIn an environment with a projector connected to the computer, such as a presentation meeting, paper documents can be scanned and instantly projected onto the screen for description.
Scan JOB or button
Select a job title from the JOB list box and click to execute the scan job. Scan JOB (Scan
According to a Previously Registered Job) (→P. 53)
Job Title list boxClick Job in the Edit menu and select a job title, and click on the tool bar. Scan JOB (Scan According to a Previously Registered Job) (→P. 53)
Use Continue Scanning dialogSpecifies the action to take after all the pages in a document are scanned with Scan Batch to File or Scan Batch to Mail. When this item is checked, the Continue Scanning dialog box appears after all the pages are scanned, allowing you to specify whether to continue scanning another document. When this item is not checked, the scan procedure ends after all the pages are scanned. Scan Batch to File (Saves scanned images to a specified file) (→P. 40) Scan Batch to Mail (Attaches scanned images to email) (→P. 47)
Cancel ScanInterrupts the current scanning operation.
Edit menuFile menu Scan menu Edit menu View menu Page menu Options menu Help menu Status Bar
UndoAfter performing a page operation (delete, insert/add or replace), undoes the change to revert to the previous state.

10
RedoExecutes the operation that was last undone.
BrightnessDisplays the Brightness Adjustment dialog box for adjusting brightness and contrast of the displayed image. Adjusting Brightness of the Displayed Image (→P. 67)
CopyCopies the images selected by Select All or in the area specified by Pointer - Selection to the clipboard.Images copied to the clipboard can be pasted into other applications.
Select AllSelects all parts of the displayed image.
PointerChanges the pointer setting from the submenu when selecting a part of the displayed image area.
• HandThe cursor changes to a hand shape when moving it over an image displayed in the image window. When the image is magnified, the displayed area of the image can be moved by dragging.
• Select the rectangleThe cursor changes to a crosshair when moving it over an image displayed in the image window. By dragging the crosshair cursor diagonally, the area dragged over is selected.
Password SettingsThese settings determine password security when opening PDF files. Setting PDF File Security Options (→P. 74)
Remove Security InformationWhen a PDF file with password security has been opened, this allows removing the security settings. Canceling Security (→P. 75)
JobDisplays the Register/Edit/Delete dialog box for registering and editing a job. Scan JOB (Scan According to a Previously Registered Job) (→P. 53)
Modify Barcode/OCRActivated when an image file is open, this option displays the Modify Barcode/OCR dialog box for modifying the barcode or OCR recognition results. About Barcode/OCR Modification (→P. 33)
11
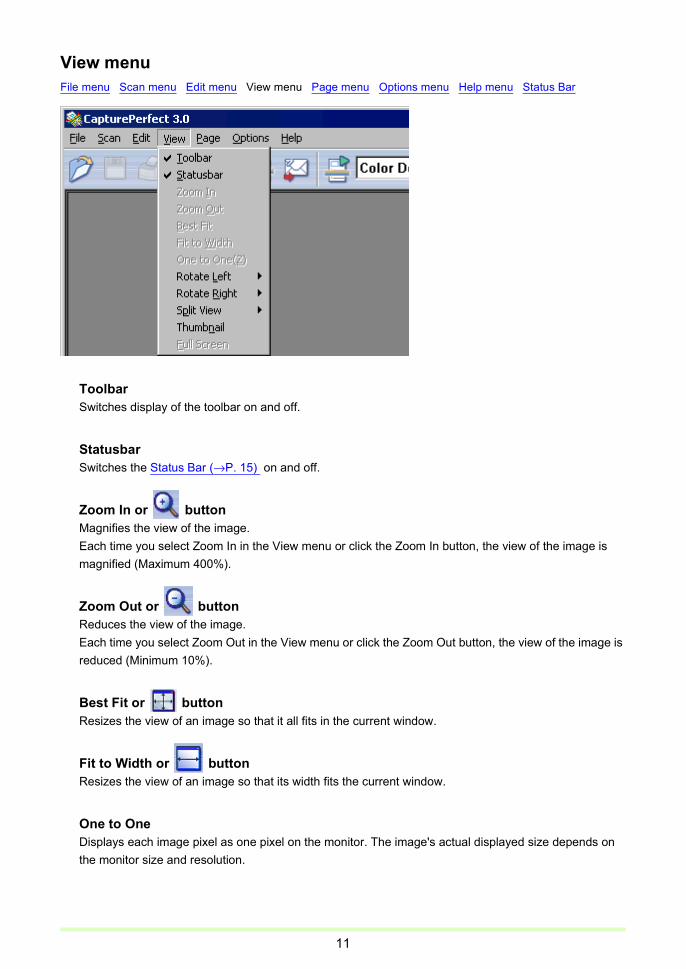
View menuFile menu Scan menu Edit menu View menu Page menu Options menu Help menu Status Bar
ToolbarSwitches display of the toolbar on and off.
StatusbarSwitches the Status Bar (→P. 15) on and off.
Zoom In or buttonMagnifies the view of the image.Each time you select Zoom In in the View menu or click the Zoom In button, the view of the image is magnified (Maximum 400%).
Zoom Out or buttonReduces the view of the image.Each time you select Zoom Out in the View menu or click the Zoom Out button, the view of the image is reduced (Minimum 10%).
Best Fit or buttonResizes the view of an image so that it all fits in the current window.
Fit to Width or buttonResizes the view of an image so that its width fits the current window.
One to OneDisplays each image pixel as one pixel on the monitor. The image's actual displayed size depends on the monitor size and resolution.

12
Rotate Left or buttonRotates the page image(s) specified in the submenu counterclockwise.
Rotate Right or buttonRotates the page image(s) specified in the submenu clockwise.
Split ViewSplits the image display window into two or four screens. Split View (→P. 59)
ThumbnailBy opening the thumbnail window, open images can be viewed at reduced (thumbnail) size. Displaying the Thumbnail Window (→P. 58)
Full ScreenDisplays the open image on the full screen. With full screen display, the display status can be changed from the submenu displayed by the right mouse button. Scan To Presentation (Displays scanned images full-screen) (→P. 50)

13
Page menuFile menu Scan menu Edit menu View menu Page menu Options menu Help menu Status Bar
Next page or buttonDisplays the image of the next page.
Prev. page or buttonDisplays the image of the previous page.
Last PageDisplays the image of the last page.
First PageDisplays the image of the first page.
GoTo PageDisplays the image on a specified page.
Delete PageDeletes the open page.
Insert/Add PagesInserts or adds a page to the open image file.Added pages are read from the scanner or selected from existing files. Inserting/Adding Pages to an Image File (→P. 68)

14
Replace PageReplaces a page in the open image file.Replacement pages are read from the scanner or selected from existing files. Replacing a Page in an Image File (→P. 71)
Options menuFile menu Scan menu Edit menu View menu Page menu Options Help menu Status Bar
TIFF FileSelects TIFF as the file save type. Setting TIFF File Compression Options (→P. 19)
PDF FileSets the compression ratio and OCR target language to use when saving PDF files (*.pdf). Setting PDF File Saving Options (→P. 20)
JPEG compressionSets the storage method to use when saving and compressing JPEG files. Setting JPEG Compression (→P. 21)
MultiStream SettingsMultiStream Settings are enabled if the scanner specified in Select Scanner in the Scan menu supports MultiStream output functions, allowing you to set scanning criteria and file type for MultiStream output. About MultiStream Functions (→P. 27)
NoteIf the specified scanner does not support MultiStream output functions, MultiStream Settings are ignored.
Barcode/OCR LogDisplays the Barcode/OCR LogSetting dialog box for specifying a log file in which to save barcode and OCR recognition results. About Log Files (→P. 32)
Capacity Warning SettingsDisplays the Capacity Warning Settings dialog box for making capacity warning settings. Capacity Warning Settings (→P. 36)

15
OCR SettingsDisplays the OCR Settings dialog box for setting the language for character recognition. About OCR Functions (→P. 29)
Help menuFile menu Scan menu Edit menu View menu Page menu Options menu Help Status Bar
AboutShows CapturePerfect version information.
Help or buttonShows this Help for CapturePerfect.
Image InfoDisplays information about the open image file.
Status BarFile menu Scan menu Edit menu View menu Page menu Options menu Help menu Status Bar
The image's display zoom (%), page number and scanner settings (mode, resolution and paper size) are displayed on the Status bar.
NoteWhen CapturePerfect starts, the Status bar is displayed as "---".

16
Scanner Selection and Settings
Scanner SelectionBefore using CapturePerfect, follow the procedure below to select a scanner to use with it. The selected scanner setting is retained until another scanner is selected.
ImportantVerify that your scanner is properly connected to the computer, and that the scanner and computer are both turned on. Refer to your scanner's operating manual for details.
1 Click Select Scanner in the Scan menu.The Select Scanner dialog box appears.
NoteIf the name of the scanner does not appear in the dialog box, install the ISIS/TWAIN driver for the scanner.
2 Select the scanner to be used, and click the OK button.The Select Scanner dialog box closes and scanner selection is complete.
Scanner SettingsBefore scanning a document, set up the scan settings. Settings remain in effect until changed.
1 Click Scanner Setting in the Scan menu, or click the button.The scanner setting dialog box appears.
Note• The settings dialog box displayed depends on your scanner model.
• Scanner settings can be made in the settings dialog box while scanning. Scanning Methods (→P. 38)

17
2 Make the appropriate settings for your scanning conditions.For help related to these settings, click the Help button in the dialog box to refer to the driver help.
3 Click the OK button to exit the settings dialog.

18
About Saving Image Files
Image file types, file name requirements and multi-page files that can be saved with CapturePerfect are described here.
About File TypesImages scanned with CapturePerfect can be saved as TIFF (*.tif), BMP (*.bmp), JPEG (*.jpg) or PDF (*.pdf) files. However, please note that the JPEG file type can be selected only when the specified scanning mode is 256-level Gray, 24-bit Color, or Auto Color Detection.
Note• The available scanning modes will differ depending on the scanner.
• When the file type is JPEG File (*.jpg), the image quality set by the JPEG compression setting in the Option menu is applied. Refer to Setting JPEG Compression (→P. 21) for details.
• When JPEG File (*.jpg) is selected as the file type with Auto Color Detection as the scanning mode, black and white images are saved as TIFF files using CCITT Group 4 compression, regardless of the current TIFF file compression settings in the Options menu. Color images are saved as JPEG files using the JPEG compression image quality settings in the Options menu.
• When the file type is PDF File (*.pdf), the compression ratio set by the PDF File setting in the Options menu is applied. Refer to Setting PDF File Saving Options (→P. 20) for details.
File Type SettingsThe following file-type-dependent settings are available. Settings are made by selecting the file type from the Options menu (→P. 14) .
Scanning Mode File types that can be savedTIFF BMP PDF JPEG
Black and White Yes Yes Yes NoError Diffusion Yes Yes Yes NoText Enhanced Yes Yes Yes NoAdvanced Text Enhancement Yes Yes Yes NoAdvanced Text Enhancement II Yes Yes Yes NoHi-Speed Text Enhancement Yes Yes Yes No256-level Gray Yes Yes Yes Yes24-bit Color Yes Yes Yes YesAuto Color Detection Yes Yes Yes Yes

19
Setting TIFF File Compression OptionsWhen TIFF file (*.tif) is selected for the file type in Save Page As dialog box, the compression format specified here is applied.
1 Click TIFF File in the Options menu.The TIFF File Settings dialog box appears.
2 Select the image type (Black and White, or Grayscale or Color).
3 Select the compression format from the list box.CCITT Group 4 can be selected when the image type is black and white, and OLD JPEG(6) or JPEG(7) can be selected when the image type is grayscale or color. If compression is set to None, saved files may be quite large.
Note• CCITT Group 4
This compression format is used by faxes and other such devices for data transmission, and is used to compress black and white images.
• OLD JPEG(6) and JPEG(7)These compression formats are for saving grayscale and color images. When OLD JPEG(6) or JPEG(7) is selected, the value set in the JPEG compression dialog box is applied.
Important• OLD JPEG(6) is the JPEG format supported by Image Viewer that was bundled with Windows prior to
Windows 2000, and is no longer supported by the Windows Image and Fax Viewer bundled with Windows XP.
• JPEG(7) is not supported by Image Viewer that was bundled with Windows prior to Windows 2000.
• The compression format supported by CapturePerfect may not be supported by other applications. If a TIFF file saved by CapturePerfect cannot be opened by another application, set the compression to None and save it again.

20
Setting PDF File Saving OptionsWhen saving scanned images as PDF (*.pdf) files, set the compression and OCR object language saving options.
1 Click PDF File in the Options menu.The PDF File Setting dialog box appears.
2 Make the following settings:• Mode
Select the PDF file compression ratio.
– High CompressionFiles are saved with high compression. Image quality is degraded, but the file size is smaller.
– StandardFiles are saved with standard compression.
– Character PrecedenceTo prevent character legibility from degrading, only non-character areas are compressed when files are saved.
NoteThe Mode setting is only valid when the specified scanning mode is 256-level Gray or 24-bit Color, or when a color document is detected with Auto Color Detection as the scanning mode. If the scanning mode is a two-color mode such as Black and White, or Error Diffusion, the size of the file depends on the size of the document.
• Language for OCRWhen the Apply OCR check box is selected, you can select from the list box the language of the text to be scanned.
• Apply OCRSelect this check box to cause printed characters in the image to be recognized and saved as text data attached to the recognized area.

21
Note– For PDF files (*.pdf) with attached OCR information, document character strings scanned as
images are recognized as text and saved as text data.
– When the Apply OCR check box is selected, deskewing is performed regardless of the scanner driver's Deskew setting. If you scan sizes smaller than the set scan size or you set the TWAIN driver Margin to a large value, the image is moved to the upper-left corner.
– Depending on documents, some images may be truncated if the Apply OCR box is selected. If this happens clear the Apply OCR check box.
• Hi-speed transferHi-speed transfer can be enabled if your scanner supports JPEG transfers.When the scanning mode specified during scanner setup is 256-level Gray or 24-bit Color, this feature applies JPEG compression to images transferred from the scanner to the computer.
NoteWhen Hi-speed transfer is enabled, the settings from the JPEG compression dialog box settings are applied.
3 Click the OK button.The PDF File Setting dialog box closes.
Setting JPEG Compression Select the image quality to be applied when saving scanned images as JPEG files, when Hi-speed transfer is enabled under the PDF file settings, or when OLD JPEG(6) or JPEG(7) is selected under the TIFF file settings. The selected image quality will determine the file size.
1 Click JPEG compression in the Options menu.The JPEG compression dialog box appears.

22
2 Make the following settings:QualitySelect the quality of files to be saved from the following choices. The slider position changes when an item is selected.
NoteWhen High Quality is selected, the quality of saved images has priority, but files are large. When High Compression is selected, the size of saved image has priority, but image quality is poorer.
3 Click the OK button.The JPEG compression dialog box closes.
About Multi-Page FilesWhen scanning with Scan Batch to File (→P. 40) or Scan Batch to Mail (→P. 47) , and when performing Save Open Image (→P. 61) , the MultiPage function can be used to save multiple images to one TIFF or PDF file.
MultiPage SettingsMultiPage settings are made from a settings dialog box when Scan Batch to File (→P. 40) or Scan Batch to Mail (→P. 47) is selected for scanning.
Available MultiPage settings are determined by the file type (BMP, JPEG, TIFF or PDF) selected in the scan settings dialog box.
When BMP or JPEG is Selected
Only Single Page is available in the list box, and one image is saved per file. Also, the Schema Settings button is enabled, and scanning information can be included in the specified File Name. About Schema (→P. 24)
Quality Setting Slider Value Image Quality File SizeHigh Quality 90 (Auto) High LargeStandard 75 (Auto) Standard StandardHigh Compression 10 (Auto) Low SmallUser Manual setting See Note See Note

23
When TIFF or PDF is Selected
• Single PageMultiple scanned page images are saved as one image per file.
• Multi Page (All Pages)All scanned page images are saved as one multi-page file.
• Multi Page (Specified Pages)Page Number is enabled, and multiple scanned page images are saved to multiple multi-page files, each with the specified number of pages.
When Multi Page (All Pages) or Multi Page (Specified Pages) is displayed in the list box, multiple page images can be saved in one file.
NoteWhen Multi Page (Specified Pages) is selected, page images are saved to multiple multi-page files, divided according to the number of pages specified in the Page Number field. Also, the batch separation type specified in the Scan Batch to File Settings (→P. 40) dialog box is changed to None.

24
About File Naming
Requirements and limitations of file names assigned to images scanned and saved by CapturePerfect are described here.
About File Name Settings• After selecting the BMP, JPEG, TIFF, or PDF file type and specifying Single Page as the MultiPage
Setting, the character string specified for Schema Setting is automatically appended to the specified file name.
• When the TIFF or PDF file type is selected and one of the Multi Page settings is selected in the Multi Page Settings list box, multiple page images are saved in one file. About Multi-Page Files (→P. 22)
About SchemaThe Schema is always applied to file names saved when Single Page is selected as the MultiPage Settings (→P. 22) . If no Schema settings have been made, a serial number consisting of four digits (by default) is added to the specified file name. Example: docs0001.tif

25
Schema SettingsSelecting the check boxes in the Schema Settings dialog box causes the checked information to be automatically added to the names of files to be saved.
• The example file name reflects the effects selected by the check boxes.
• When Schema settings are performed with MultiStream settings, "Pri" or "Sec" is added to the specified file name.
The character strings to be added are as follows for each selected item:
• The Counter check mark cannot be cleared unless one of the following is selected: Barcode, Imprinter, OCR, or Date.
• The Barcode, Imprinter and OCR check boxes cannot be selected at the same time.
• Barcode is valid when supported by the scanner, and when the Barcode Search scanner setting is enabled. Up to four recognized barcode results can be added. However, the total number of characters added cannot exceed 64.
• Selecting the OCR check box enables OCR recognition and adds the first 64 recognized characters to the file name.
• Imprinter is valid when supported by the scanner, adding to the file name the character string that is printed with the imprinter.
• Date adds the year, month, day, hour, minute, second, and millisecond of scanning as 17 digits.
• Scanning Side adds "Fron" or "Back" to the file name to indicate front-side and back-side images, respectively.
• The following character strings are added to the file name when selecting Image Format, Resolution and DropOut.
Schema Setting Driver Setting Characters Appended to File Name
Image Format
Black and White BinaError Diffusion ErroText Enhanced TextAdvanced Text Enhancement ATexAdvanced Text Enhancement II ATx2Hi-Speed Text Enhancement FTex256-level Gray Gray24-bit Color ColoAuto Color Detection Bina or Colo
Resolution
100 dpi 100150 dpi 150200 dpi 200240 dpi 240300 dpi 300400 dpi 400600 dpi 600
26
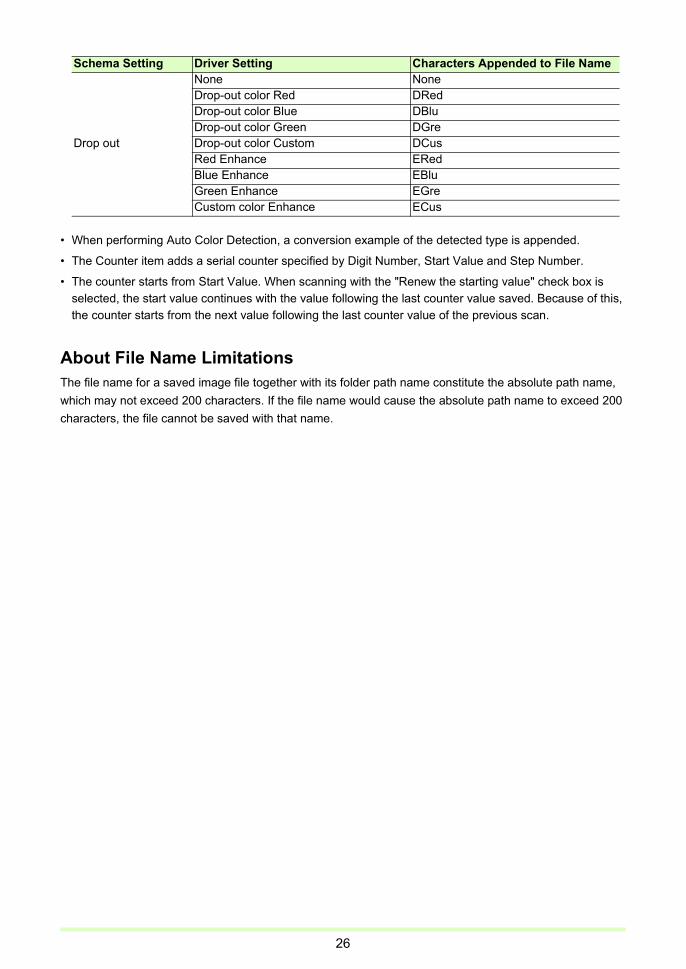
• When performing Auto Color Detection, a conversion example of the detected type is appended.
• The Counter item adds a serial counter specified by Digit Number, Start Value and Step Number.
• The counter starts from Start Value. When scanning with the "Renew the starting value" check box is selected, the start value continues with the value following the last counter value saved. Because of this, the counter starts from the next value following the last counter value of the previous scan.
About File Name LimitationsThe file name for a saved image file together with its folder path name constitute the absolute path name, which may not exceed 200 characters. If the file name would cause the absolute path name to exceed 200 characters, the file cannot be saved with that name.
Drop out
None NoneDrop-out color Red DRedDrop-out color Blue DBluDrop-out color Green DGreDrop-out color Custom DCusRed Enhance ERedBlue Enhance EBluGreen Enhance EGreCustom color Enhance ECus
Schema Setting Driver Setting Characters Appended to File Name
27
About MultiStream Functions
If your scanner supports MultiStream functions, you can scan two different types of image data (such as color and black and white or grayscale and black and white) at once, and output the different types of image data for the front and back of a page.
The MultiStream Settings dialog box is available if your scanner supports the MultiStream function, by selecting MultiStream Settings in the Options menu or the Scan Batch to File Setting (→P. 40) dialog box.
NoteMultiStream functions are disabled when Mode is set to Auto Color Detection in the scanner settings.
About MultiStream Settings1 Select the Use MultiStream check box.
NoteWhen MultiStream is enabled, file type and multi-page settings are disabled because they are made in the MultiStream Settings dialog box.
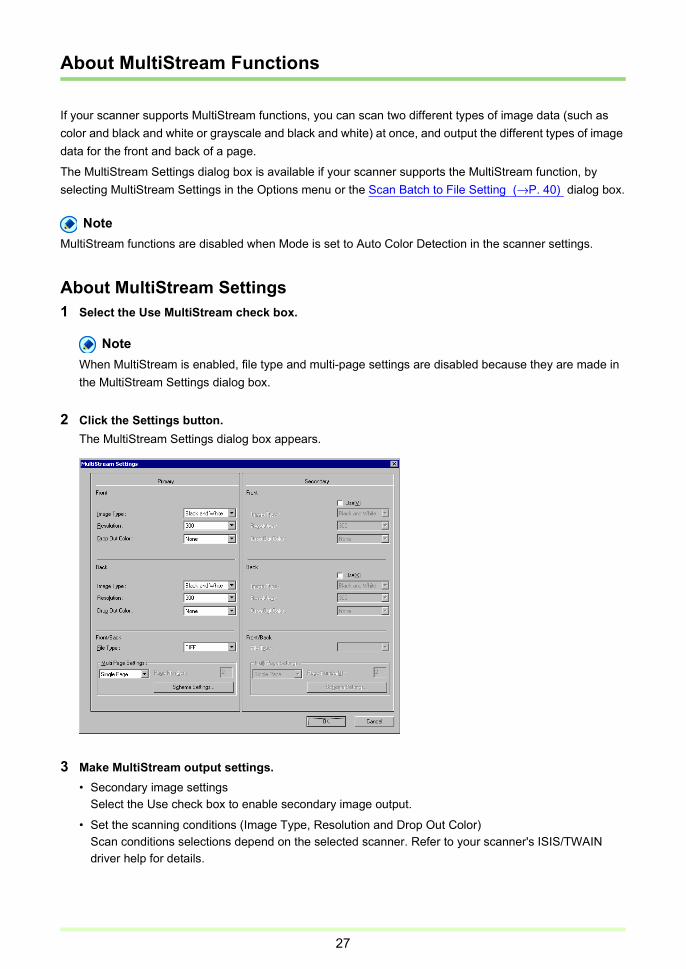
2 Click the Settings button.The MultiStream Settings dialog box appears.
3 Make MultiStream output settings.• Secondary image settings
Select the Use check box to enable secondary image output.
• Set the scanning conditions (Image Type, Resolution and Drop Out Color)Scan conditions selections depend on the selected scanner. Refer to your scanner's ISIS/TWAIN driver help for details.

28
• File TypeSelect the type (TIFF, BMP, PDF or JPEG) for saving files. However, JPEG is displayed when the Image Format is set to 256-level Gray or 24-bit Color. About Saving Image Files (→P. 18)
• Multi Page SettingSet the Multi Page and Schema settings to suit the file type. MultiPage Settings (→P. 22)
4 Click the OK button.The MultiStream Settings dialog box closes.
Note• When you use MultiStream, the "Folio", "Skip blank page", "Prescan", "Text Orientation Recognition", and
"Patch Code (File Separator)" functions are disabled for some scanners.
• In the DR-7080C/DR-7090C scanner's settings, if Feeding Option is set to Standard Feeding, the MultiStream output functions are not valid on images scanned from the flatbed. To enable the MultiStream output functions on images scanned from the flatbed, select Panel-Feeding in the Feeding Option list.

29
About OCR Functions
CapturePerfect provides OCR functions that can recognize characters in scanned images as text information. Character recognition is activated when the Enable check box is selected in the OCR Settings dialog box.
Note• When OCR functions are enabled, deskewing is performed on the scanned image.
• Refer to Setting PDF File Saving Options (→P. 20) for settings to add character information to PDF files.
• Refer to About Schema (→P. 24) for Schema settings.
• When both of the above functions are enabled, character recognition is performed twice on each scanned image.
About OCR Settings1 Select OCR Settings in the Options menu.
The OCR Settings dialog box appears.
2 Select the Enable check box.The OCR Settings are enabled.

30
3 Select the language of the text to be recognized from the list box.
NoteChinese character recognition results display correctly only in Chinese environments.
4 Click the Area button.The OCR Area Settings dialog box appears.
5 Enter the area in which to search for text.
6 Load one document page on which character recognition is to be performed, and click the Preview button.The scanner scans the document.

31
Note• The displayed image size can be changed by the Zoom In and Zoom Out buttons so that characters in
the image can be compared with recognition results.
• The area for OCR can be changed by dragging the mouse diagonally on the previewed image.
7 Click the OK button to close each dialog box and finish OCR settings.

32
About Log Files
The results of recognition performed with the barcode detection function or OCR function can be saved as a log file in the CSV format.
To save a log file, select the Write LogFile check box in the appropriate tab of the Barcode/OCR LogSetting dialog box shown below, and then specify a destination log file.
Note• The barcode tab is activated when the scanner supports barcode scanning.
• If editing (addition, deletion, replacement) is performed on the image file page for which a log file is saved, the corresponding log file is also edited. In this case, depending on the size of the log file, it may take a while for editing of the log file to finish.

33
About Barcode/OCR Modification
The barcode and OCR recognition results are saved in a log file. About Log Files (→P. 32)
In the Modify Barcode/OCR dialog box, you can display and modify the recognition results stored in a log file, as needed.
Note• Modifications to the recognition results are applied to the log file.
• If the image file is moved to another storage location, the log file becomes invalid and barcode/OCR modification cannot be performed.
• Barcode/OCR modification cannot be performed if the Write LogFile check box is not selected in the Barcode/OCR LogSetting dialog box accessed from the Options menu.

34
About Other Functions
CapturePerfect provides the "Save Rotated Image" and "Save As Two Images" functions that save scanned images after specified rotation, or after splitting into top and bottom or left and right halves, respectively. Select the "Save Rotated Image" or "Save As Two Images" option before scanning so that scanned images are processed efficiently. These options are selectable from the setting dialog box that appears when a scan method is selected from the Scan menu, or when you click the Detail Settings button in a job's Create/Edit dialog box.
Also, in the Capacity Warning Settings, you can specify a folder in which to save scanned images, and specify the storage capacity for that folder. The Capacity Warning displays a message at scan start time or while scanning if the preset capacity for the specified folder is exceeded.
Save Rotated Image
The Save Rotated Image function rotates scanned images 90 degrees counterclockwise (left) or clockwise (right) before saving.
1 Select the Save Rotated Image check box.
2 Click the Rotation Settings button.The Save Rotated Image dialog box appears.
3 Select the rotation direction, and click the OK button.Rotate Left 90°: Scanned images are rotated 90° counterclockwise before saving.
Save Rotated Image Save As Two Images Capacity Warning Settings

35
Rotate Right 90°: Scanned images are rotated 90° clockwise before saving.
Rotate 180°: Scanned images are rotated 180° before saving.
Save As Two Images
By splitting an image, two separate images are created from each one scanned, by splitting it either horizontally or vertically before saving. This is useful for documents containing two pages per image, when you want to save them as two images (one page per image).
1 Select the "Save As Two Images" check box.
2 Click the "Divide Settings" button.The "Save As Two Images" dialog box appears.
Save Rotated Image Save As Two Images Capacity Warning Settings

36
3 Select the split orientation.divide up and down: Splits the scanned image horizontally into two separate images.
divide right and left: Splits the scanned image vertically into two separate images.
NoteWhen saving split images, the names of the single-page files are applied in the order top-bottom or left-right.
Capacity Warning Settings
After specifying the folder in which to save image files, the storage capacity of that folder can be specified for Capacity Warning. A warning message then appears when starting to scan (or while scanning) if the cumulative file size would exceed the specified capacity.
Save Rotated Image Save As Two Images Capacity Warning Settings

37
1 Select Capacity Warning Settings in the Options menu.The Capacity Warning Settings dialog box appears.
2 Select a folder number (1 to 5) to monitor for the Register Folder item.
3 Specify which folder to monitor.
4 Enter the warning threshold (MB).
5 Select the Display Warning Dialog check box.An asterisk appears with the Register Folder item.
6 Click the OK button to close the Capacity Warning Settings dialog box.
Note• When capacity warning is enabled and the total size of files in the specified folder would exceed the
specified threshold, the warning message appears when starting to scan, regardless of scanning method.
• Files that are not normally displayed, such as hidden and system files, are not included in the capacity warning threshold calculation (nor are folders).
• A maximum of five folders can be specified for capacity warning.
• When a warning is displayed, follow the message instructions to continue or change the save destination.

38
Scanning Methods
The following scanning methods are available with CapturePerfect. Select the scanning method as occasion demands.
• Scan Page (→P. 39) : Scans a document to a single page image. The scanned image can be saved or printed as needed.
• Scan Batch to File (→P. 40) : Scanned images are saved to the files specified when starting to scan.
• Scan Batch to Printer (→P. 45) : Scanned images are printed directly to the specified printer. (Images are not saved.)
• Scan Batch to Mail (→P. 47) : Attaches scanned images to an email. (Images are not saved.)
• Scan To Presentation (→P. 50) : Scans with the CapturePerfect window set for full-screen display, and retains full-screen display of scanned images. Scanned images are saved when you Scan To Presentation.
• Scan JOB (→P. 53) : Scanning conditions and post-scan processing are registered beforehand as a job, so that scanning is performed according to the registered job settings. Scan jobs are executed from the tool bar.

39
Scan Page
Scan Page scans one page of a document. You can save or print the scanned image as needed. Saving an Image (→P. 61) , Printing an Image (→P. 65)
1 Select Scanner Setting in the Scan menu or click the button to open the scanner's setup dialog box.
2 Set the scan criteria.For help related to these settings, click the Help button in the dialog box to see the driver help.
3 Place a document in the scanner. Refer to the scanner's operating manual for details about placing documents for scanning.
4 Click the button, or click Scan Page in the Scan menu.One page is scanned, its image is displayed, and processing ends.

40
Scan Batch to File (Saves scanned images to a specified file)
Scan Batch to File saves scanned images to a file or files with a name and type specified before scanning.
Scan Batch to File is performed by the following steps:
1 Click the button, or click Scan Batch to File in the Scan menu.The Scan Batch to File Setting dialog box appears.
NoteIf your scanner does not support MultiStream functions, the Use MultiStream option will not appear. About MultiStream Functions (→P. 27)
2 Select the file name and file type to be created.
NoteIf the scanner is set to any scanning mode other than 24-bit Color or 265-level Gray, you cannot save scanned images in JPEG format. About File Types (→P. 18)
3 Click the Scanner Setting button, and configure scan settings. Scan Condition Settings (→P. 16)
NoteYou can configure batch separation settings from the Scan Conditon Settings.
(→P. 34) (→P. 35)
(→P. 24)
(→P. 27)

41
4 When performing batch separation, configure the "Batch Separator" and "Type of batch separation" settings. • The "Batch Separator" settings are the same as those found in the scanner settings dialog box. In
addition to the options available in the scanner settings dialog box, the Barcode option becomes available under Batch Separator if your scanner supports barcode scanning. When the Barcode option is selected, the Barcode Separator Settings button is enabled, and you can click it to configure barcode separator settings. Barcode Separator Settings (→P. 42)
• Select a "Type of batch separation" setting other than "None" when performing batch separation. The options available will differ depending on whether your scanner supports patch code and barcode detection.
Scanner Supports Patch Code/Barcode Detection
– None Disables batch separation.
– Scan, Continue Scanning When a patch code or barcode sheet is detected, the image on that sheet is saved, regardless of the type of patch code or barcode, and scanning continues.
– Skip, Continue Scanning When a "Patch II" patch code sheet or a barcode sheet is detected, the image on that sheet is saved and scanning continues. When a "Patch T" patch code sheet is detected, however, the image on that sheet is not saved.
Scanner Does Not Support Patch Code/Barcode Detection
– None Disables batch separation.
– Skip, Continue Scanning Enables batch separation.
5 Set the other setting to suit the documents to be scanned. About Other Functions (→P. 34)
6 Place a document in the scanner. Refer to the operating manual of the scanner for details about placing documents for scanning.
7 Click the Save button.The documents are scanned.
42
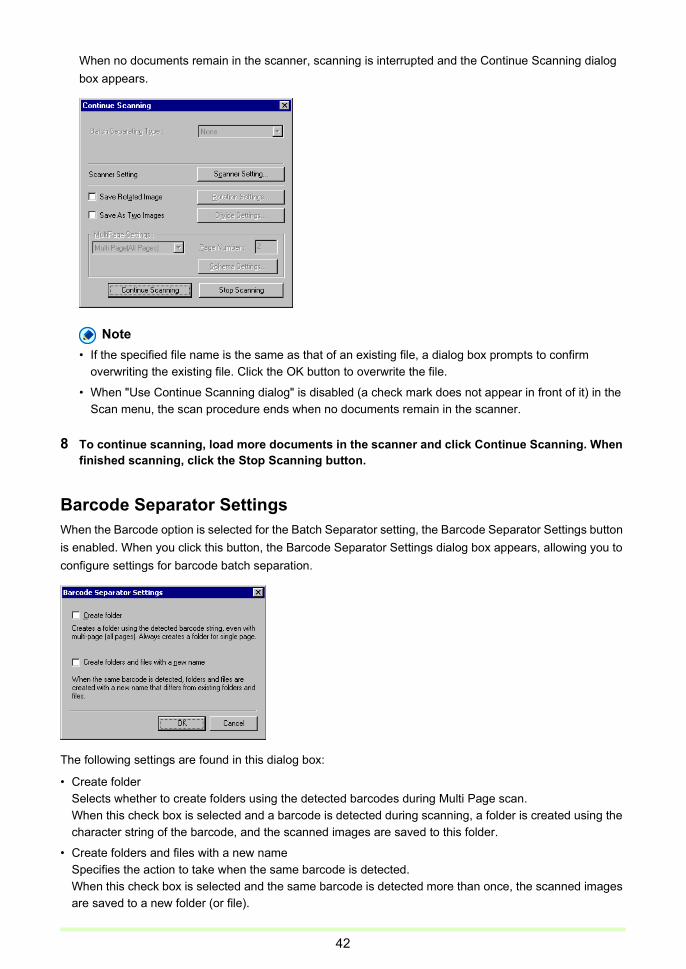
When no documents remain in the scanner, scanning is interrupted and the Continue Scanning dialog box appears.
Note• If the specified file name is the same as that of an existing file, a dialog box prompts to confirm
overwriting the existing file. Click the OK button to overwrite the file.
• When "Use Continue Scanning dialog" is disabled (a check mark does not appear in front of it) in the Scan menu, the scan procedure ends when no documents remain in the scanner.
8 To continue scanning, load more documents in the scanner and click Continue Scanning. When finished scanning, click the Stop Scanning button.
Barcode Separator SettingsWhen the Barcode option is selected for the Batch Separator setting, the Barcode Separator Settings button is enabled. When you click this button, the Barcode Separator Settings dialog box appears, allowing you to configure settings for barcode batch separation.
The following settings are found in this dialog box:
• Create folder Selects whether to create folders using the detected barcodes during Multi Page scan. When this check box is selected and a barcode is detected during scanning, a folder is created using the character string of the barcode, and the scanned images are saved to this folder.
• Create folders and files with a new name Specifies the action to take when the same barcode is detected. When this check box is selected and the same barcode is detected more than once, the scanned images are saved to a new folder (or file).

43
If the following type of document is scanned, for example, batch separation will occur as follows depending on the MultiPage Settings option selected in the Scan Batch to File dialog box.
Barcode string: January, February, March, and January barcodes inserted in order, every 2 pages
File name: imageXXXX
File format: TIFF
When MultiPage Settings is set to Single PageFolders named after the barcode strings are created, regardless of the "Create folder" setting.
When "Create folders and files with a new name" is enabled, scanned images separated by the second appearance of a given barcode are saved under a new folder that is created automatically using the same name as the barcode's first appearance, but with a number added (the "January_0001" folder in the example below).
When MultiPage Settings is set to Multi PageThe barcode string is added to the end of the file name specifed for image files scanned in Multi Page.
When "Create folders and files with a new name" is disabled, pages separated by the same barcode (January) are added and saved to the same file. In the example below, the images scanned in pages 7 and 8 are added to the same image file as pages 1 and 2.
When "Create folders and files with a new name" is enabled, scanned images separated by the same barcode are saved with the same name followed by a number ("imageJanuary_0001.tiff" in the example below), or under a new folder name followed by a number (the "January_0001" folder in the example below).
"Create folder" is disabled "Create folder" is enabled
"Create folders and files with a new name" is disabled
January\image0001.tifJanuary\image0002.tifFebruary\image0001.tifFebruary\image0002.tifMarch\image0001.tifMarch\image0002.tifJanuary\image0003.tifJanuary\image0004.tif
"Create folders and files with a new name" is enabled
January\image0001.tifJanuary\image0002.tifFebruary\image0001.tifFebruary\image0002.tifMarch\image0001.tifMarch\image0002.tifJanuary_0001\image0001.tifJanuary_0001\image0002.tif

44
Note• If more than one barcode is detected on a single page, all of the barcode strings will be used in the file
name, starting with the barcode that is closest to the top left corner of the page and with each barcode string separated by a space.
• When Multi Page scan is performed while "Create folders and files with a new name" is disabled, and the file name that the scanned images will be saved under already exists, the scanned images will be added to the existing file. For instance, if an "imageJanuary.tif" file already exists in the example above, scanned images separated by the "January" barcode will be added to that existing file.
"Create folder" is disabled "Create folder" is enabled
"Create folders and files with a new name" is disabled
imageJanuary.tifimageFebruary.tifimageMarch.tif
January\imageJanuary.tifFebruary\imageFebruary.tifMarch\imageMarch.tif
"Create folders and files with a new name" is enabled
imageJanuary.tifimageFebruary.tifimageMarch.tifimageJanuary_0001.tif
January\imageJanuary.tifFebruary\imageFebruary.tifMarch\imageMarch.tifJanuary_0001\imageJanuary.tif

45
Scan Batch to Printer (Prints scanned images)
With Scan Batch to Printer scanning, scanned images are printed directly to the specified printer. (Images are not saved with Scan Batch to Printer.)
NoteTo save and print scanned images, use Scan Batch to File (→P. 40) to print the scanned images after saving.
Scan Batch to Printer is performed by the following steps:
1 Select Print Format in the File menu, and select a format.• Actual Size
Regardless of the printing paper size or scan resolution, the image prints at the same size as the original document.
• Fit to PaperReduces or enlarges images so they fit the size of the paper, and then prints.
• Actual PixelThe image is printed so that one image pixel corresponds to one printer pixel. So the size of the printed image is smaller when printing to a high resolution printer with small dots.
2 Click Scan Batch to Printer in the Scan menu.The Scan Batch to Print Setting dialog box appears.
46
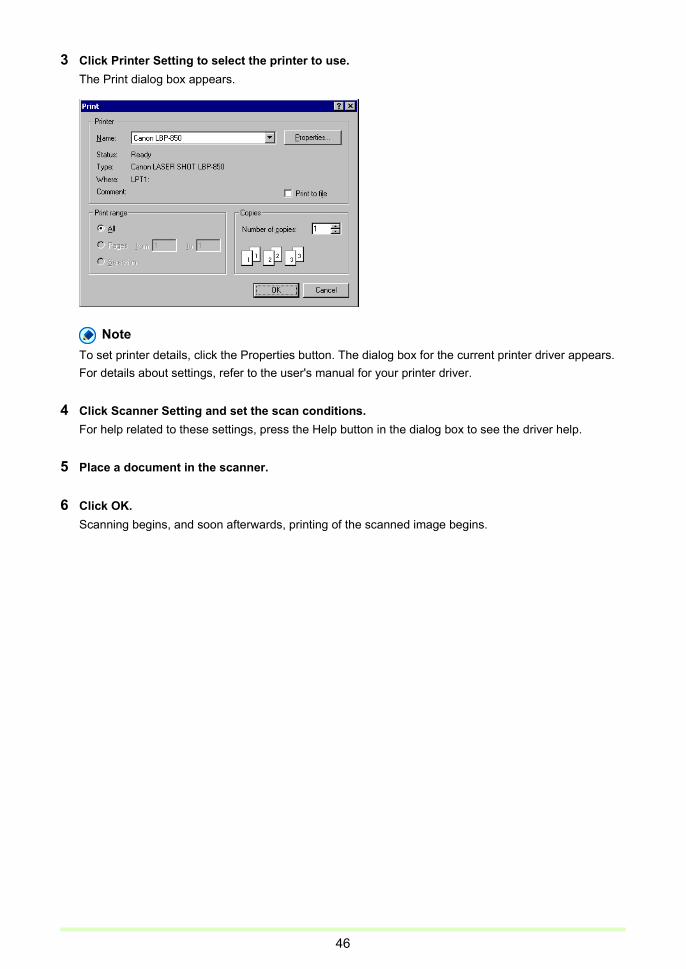
3 Click Printer Setting to select the printer to use.The Print dialog box appears.
NoteTo set printer details, click the Properties button. The dialog box for the current printer driver appears. For details about settings, refer to the user's manual for your printer driver.
4 Click Scanner Setting and set the scan conditions.For help related to these settings, press the Help button in the dialog box to see the driver help.
5 Place a document in the scanner.
6 Click OK.Scanning begins, and soon afterwards, printing of the scanned image begins.

47
Scan Batch to Mail (Attaches scanned images to email)
Scan Batch to Mail attaches scanned images to email for sending. (Images are not saved with Scan Batch to Mail.)
Note• To use Scan Batch to Mail, a MAPI (Microsoft Messaging Application Programming Interface) -compliant
email application program must be installed on the computer.
• Before using this operation, the e-mail software must be set to start by selecting it as follows: Start menu -Settings - Control Panel - Internet Options - Programs tab - E-mail. (This example is for Windows 98: please follow the corresponding procedure for your operating system.)
Use the following procedure to attach scanned images to email for sending:
1 Click the button, or click Scan Batch to Mail in the Scan menu.The Scan Batch to Mail Setting dialog box appears.
2 Select the file name and file type to be created.
NoteIf the scanner is set to any scanning mode other than 24-bit Color or 265-level Gray, "jpg" will not appear under the File Type setting. About File Types (→P. 18)
3 Click Scanner Setting and set the scan conditions.For help related to these settings, click the Help button in the dialog box to see the driver help.

48
4 Set the other setting to suit the documents to be scanned.
5 Place a document in the scanner. Refer to the operating manual of the scanner for details about placing documents for scanning.
6 Click the OK button.The documents are scanned.When no documents remain in the scanner, scanning is interrupted and the Continue Scanning dialog box appears.
NoteWhen "Use Continue Scanning dialog" is disabled (a check mark does not appear in front of it) in the Scan menu, the scan procedure ends when no documents remain in the scanner. In this case, skip to step 8.
7 To continue scanning, load more documents in the scanner and click Continue Scanning. When finished scanning, click the Stop Scanning button.

49
8 When finished scanning, the scanned image files will ready as new e-mail attachments.The e-mail software starts with the open message that has the attached image files.
Example with Microsoft Outlook Express.
9 Enter the address, subject and message text as needed, and click the Send button to send the e-mail. Refer to your e-mail software's manual for details of the e-mail sending procedure.

50
Scan To Presentation (Displays scanned images full-screen)
Scan To Presentation displays a scanned image full-screen. Useful in an environment where the computer is connected to a big-screen display or projector, such as for presentations, documents can be scanned and displayed as they are described.
Scan To Presentation operates as follows.
Document Scanning1 Click Scan To Presentation in the Scan menu.
The CapturePerfect window switches to full-screen display when starting Scan To Presentation.
2 Set a document according to the message.Scan To Presentation operates as follows.
Scan Conditions
Note• Scan To Presentation scans with the above scanning conditions regardless of ISIS driver settings.
• Depending on the scanner, the above scan conditions may not be supported.
• Actual performance of the "Skip blank page" function is affected by the ISIS driver's "Ratio of black pixels" setting.
Setting Item ValueMode 24-bit ColorScan Size Auto-detectResolution 200 dpiScan Sides Skip blank pageFeeding Option Automatic FeedingText Orientation Recognition EnabledDeskew Enabled

51
3 When the loaded document is finished, scanning stops.
4 To continue scanning, load another document. When finished, click "×" at the top right.
Note• You can press the ESC key on the keyboard to exit Scan To Presentation.
• Scanned images can be saved as occasion demands when exiting Scan To Presentation.
Screen Operations with Full-Screen DisplayScreen operations can be performed during full-screen display by right-clicking the mouse and using the functions in the submenu that appears, or their assigned shortcut keys.
The functions and shortcut keys displayed in the submenu are as follows:
Submenu Shortcut keysBrightness Ctrl + BFit Window Ctrl + FZoom In Ctrl + IZoom Out Ctrl + OFit Window Width Ctrl + WRotate the current page to the left Ctrl + LRotate all the pages to the left Shift + LRotate the current page to the right Ctrl + RRotate all the pages to the right Shift + RNext Page ENTERPrevious Page BSThumbnail Ctrl + TExit Scan To Presentation or Exit Full Screen ESC

52
Exit Scan To PresentationExit Scan To Presentation mode by pressing the Esc key on the keyboard, or by clicking Exit Scan To Presentation on the submenu.
When exiting Scan To Presentation mode, a message asks if you want to save image files. Save the image files as occasion demands.
53
Scan JOB (Scan According to a Previously Registered Job)
Scan JOB utilizes previously registered scan conditions and methods (Scan Batch to File, Scan Batch to Print or Scan Batch to Mail) to scan according to the specified job.
Job RegistrationUse the following procedure to register jobs for access by Scan JOB.
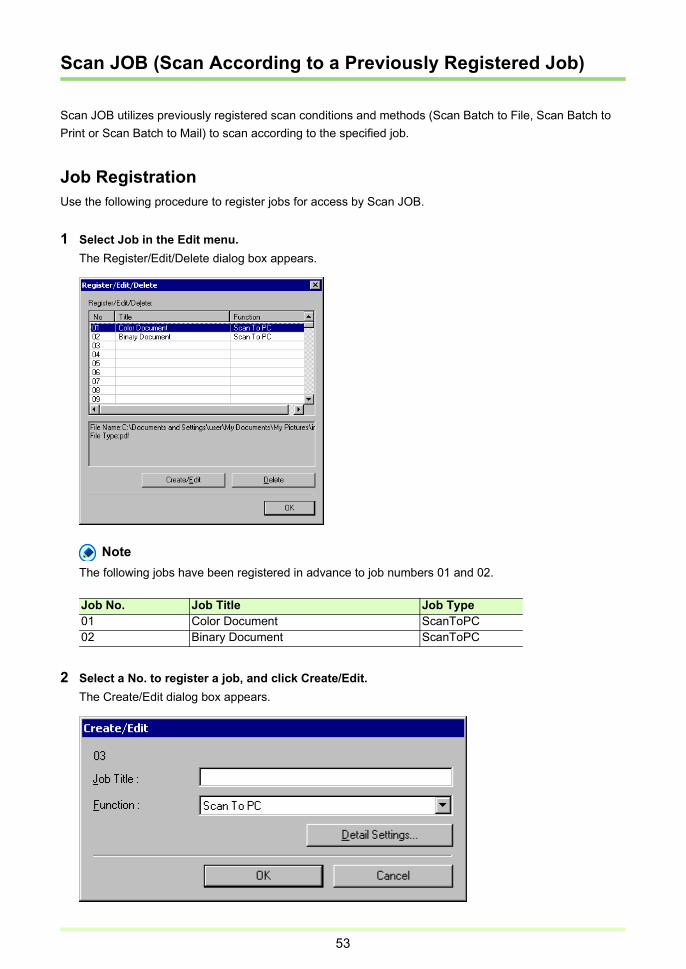
1 Select Job in the Edit menu.The Register/Edit/Delete dialog box appears.
NoteThe following jobs have been registered in advance to job numbers 01 and 02.
2 Select a No. to register a job, and click Create/Edit.The Create/Edit dialog box appears.
Job No. Job Title Job Type01 Color Document ScanToPC02 Binary Document ScanToPC

54
3 Enter a Job Title.
NoteJob titles may consist of up to 64 alphanumeric characters.
4 Select a Function from the list box.
• Scan To PC: Scanned images are saved to the specified PC.
• Scan To Mail: Attaches scanned images to an e-mail.
• Scan To Print: Scanned images are printed by the specified printer.
5 Click Detail Settings.A setting dialog box appears according to the selected function.
• Scan To PC: Refer to Scan Batch to File (→P. 40) for setting details.

55
• Scan To Mail: Refer to Scan Batch to Mail (→P. 47) for setting details.
• Scan To Print: Refer to Scan Batch to Printer (→P. 45) for setting details.
NoteThe Details of File Settings button and JPEG compression button appear in the Scan Batch to File Setting and Scan Batch to Mail Setting dialog boxes. This button is enabled when a file type other than bitmap file (*.bmp) is selected for File Type, and allows you to set the file types for each job. File Type Settings (→P. 18)
6 Click the OK button (the Save button for Scan To PC) to close the Settings dialog box.Registered contents are displayed in the Register/Edit/Delete dialog box.

56
7 Click the OK button to close the Register/Edit/Delete dialog box.
Note• Up to 99 jobs can be registered.
• To modify the contents of a registered job, select it and click the Create/Edit button.
• To delete a registered job, click it and then click the Delete button.
Scan Job Execution1 Register a job by clicking Job in the Edit menu. Job Registration (→P. 53)
2 Select a job title from the list box on the tool bar.
Note• Job titles highlighted in the Register/Edit/Delete dialog box appear in the list box.
• You can verify the registered contents of the job by selecting Job in the Edit menu.
3 Place a document in the scanner. Refer to the scanner's operating manual for details about placing documents for scanning.
4 Select Scan JOB in the Scan menu, or click the button to scan according to the conditions registered for the job.

57
Scanned Image Operations
The operations you can perform on scanned or opened images are described here. The way scanned images are viewed can be changed, and images can also be saved or printed.
• Displaying the Thumbnail Window (→P. 58) : Displays the thumbnail window.
• Split View (→P. 59) : Split the display window into two or four screens.
• Saving an Image (→P. 61) : Save the displayed image.
• Opening an Image File (→P. 63) : Opens saved images.
• Printing an Image (→P. 65) : Print the displayed image.
• Adjusting Brightness of the Displayed Image (→P. 67) : Adjusts brightness of the open image.
• Inserting/Adding Pages to an Image File (→P. 68) : Adds a page to the open image file.
• Replacing a Page in an Image File (→P. 71) : Replaces a page in the open image with the specified image.
• Setting PDF File Security Options (→P. 74) : Sets security to restrict viewing and printing of PDF file.

58
Displaying the Thumbnail Window
Thumbnail (reduced) views of opened images are displayed in the Thumbnail window, and the selected thumbnail in the Thumbnail window is displayed in the Image View window.
To turn display of the Thumbnail window on and off, click Thumbnail in the View menu.
Note• The thumbnail view state is retained upon closing CapturePerfect, so it will have the same view state
when next opened.
• During full-screen display, the thumbnail window can be displayed by clicking Thumbnail in the submenu displayed by the right mouse button.

59
Split View
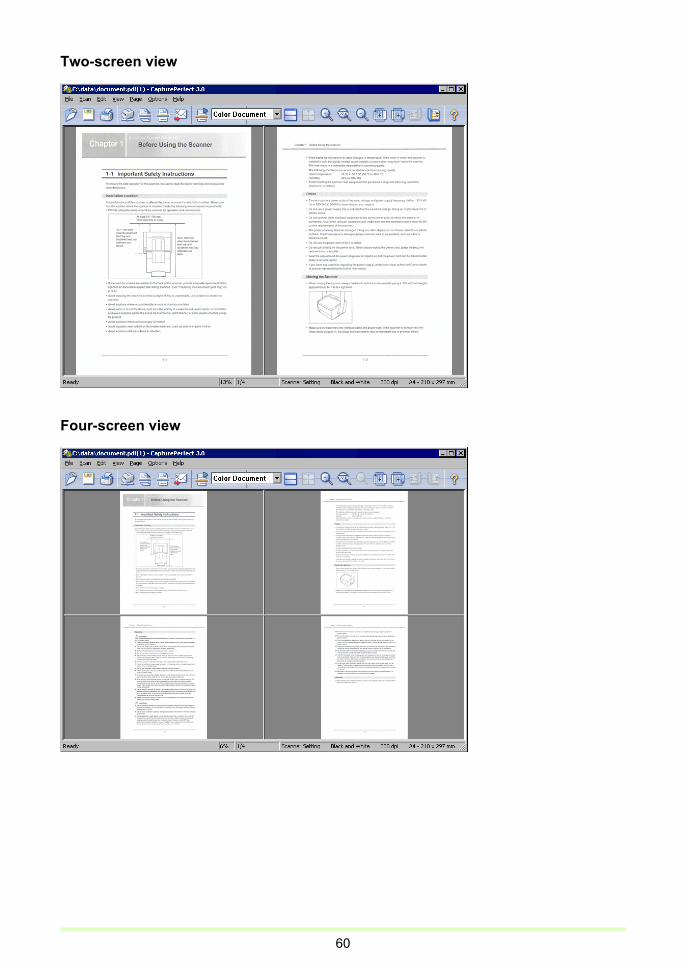
By splitting the display window, you can display multiple page images at once.
To split the display window, select Split View from the View menu. You can split the window into 2 or 4 screens.
ImportantWith split view, the size of images you display or the number of screens you display can use a lot of memory. If a memory shortage occurs, refrain from using split view.
Note• Split windows are displayed sequentially from left to right.
• Scanning can be performed with the split view enabled.
• The display method (magnification, reduction and rotation) of each image in the split view can be changed independently.
• To return split view to a single image, select Split View from the View menu and specify 1 window.
• The split view state is kept upon closing CapturePerfect, hence the software will open the next time with the same view state.
• If CapturePerfect is closed with the Split Screen feature enabled, a message appears warning that a memory shortage might occur when CapturePerfect is restarted. Please bear this warning in mind when shutting CapturePerfect down with Split Screen enabled.
Splitting the view into 2 or 4 screensTo split the view into 2 or 4 screens, select Split View from the View menu, and specify the number of screens in the submenu.
60
Two-screen view
Four-screen view

61
Saving an Image
This procedure saves open image files with a specified name.
NoteIf multiple image files are open, all pages are saved.
ImportantIf several image files have been opened and a PDF file with password security is among them, you cannot save files with a new name (Save As).
1 Click the (Save As) button on the toolbar. (Or click Save Page As in the File menu.)The Save As dialog box appears.
2 Make the following settings:• Save in
Select the folder in which to save the file.
• File nameEnter the file name for the image.
• Save as typeSelect a file type from TIFF File (*.tif), BMP File (*.bmp), JPEG File (*.jpg) or PDF File (*.pdf). The types of files that can be saved depend on the scanning mode specified before scanning. Refer to About Saving Image Files (→P. 18) for details.
Note– When the file type is PDF File (*.pdf), the compression ratio set by the PDF File setting in the
Options menu is applied. Refer to Setting PDF File Saving Options (→P. 20) for details.

62
– When the selected file type is JPEG File (*.jpg), the image quality set by the JPEG compression setting in the Options menu is applied. Refer to Setting JPEG Compression (→P. 21) for details.
ImportantIf you select JPEG file (*.jpg) when a black and white image file is open, it is saved as a Grayscale Image.
3 When saving a multi-page image file, set the page range to be saved.
NoteFor a PDF file with password security, the Current Page and Specified Page options are disabled.
4 When saving a multi-page image file as a single image file, select the Multi-page file check box.
NoteWhen the Multi-page file check box is not selected, the image file is divided by page, and a four-digit sequential number is appended to each new saved file. However, if the saved image file is only one page, the four-digit sequential number is not appended to the file name.
5 Click the Save button.The Save As dialog box closes and the image is saved.
Original image (Black & White) Image saved as a JPEG (Grayscale)

63
Opening an Image File
This procedure opens image files that were saved by CapturePerfect.
NoteThe following file types saved by CapturePerfect can be opened: TIFF (*.tif), JPEG (*.jpg), BMP (*.bmp) and PDF (*.pdf) files.
1 Click the button on the toolbar. (Or click Open in the File menu.)The Open dialog box appears.
2 Select a file and click the Open button.The selected image file appears on the screen.

64
NoteMultiple files can be selected to be opened together. By selecting one file and holding the Shift key while selecting another file, all files in between are selected. Files can also be selected by holding the Ctrl key while selecting each file.

65
Printing an Image
The following procedure prints the image displayed in the window:
1 Click Printer Setting on the File menu.The Print Setup dialog box appears.
2 Select the printer, paper and printing orientation as needed, and click the OK button.
NoteTo set printer details, click the Properties button. The dialog box for the current printer driver appears. For details about settings, refer to the user's manual for your printer driver.
3 Click Print Format on the File menu, and select the desired print format from the following:• Actual Size
Regardless of the printing paper size or scan resolution, the image prints at the same size as the original document.
• Fit to PaperReduces or enlarges images so they fit the size of the paper, and then prints.
• Actual PixelThe image is printed so that one image pixel corresponds to one printer pixel. So the size of the printed image is smaller when printing to a high resolution printer with small dots.
66
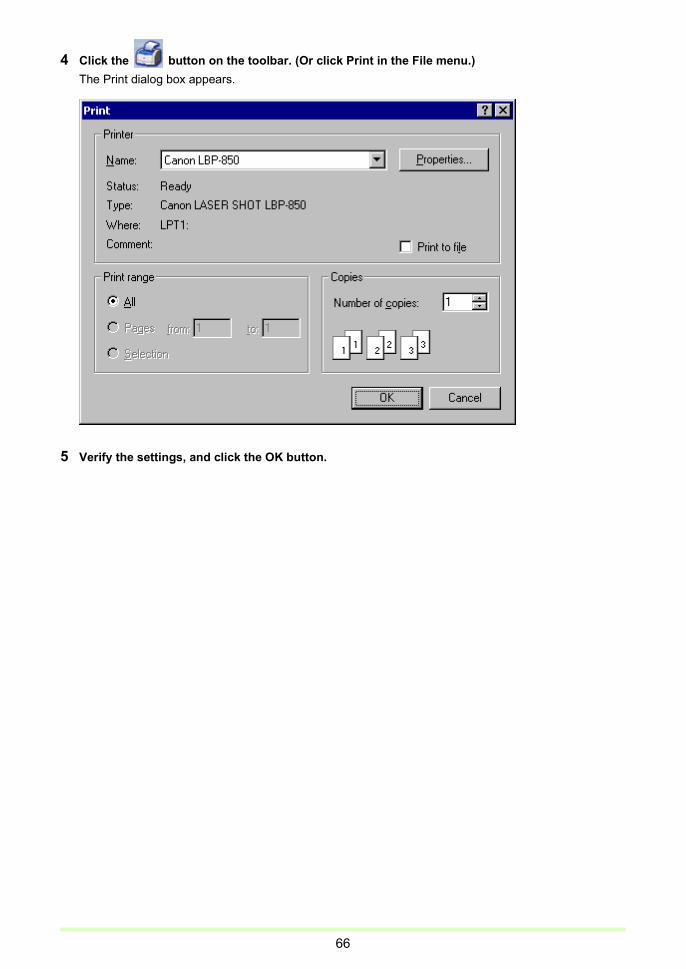
4 Click the button on the toolbar. (Or click Print in the File menu.)The Print dialog box appears.
5 Verify the settings, and click the OK button.

67
Adjusting Brightness of the Displayed Image
You can adjust the brightness and contrast of the displayed image.
Select Brightness in the Edit menu to open the Brightness Adjustment dialog box.
Moving the sliders left and right adjusts the brightness and contrast of the displayed image.
Note• For grayscale and color images, the image file can be re-saved with the adjusted brightness.
• For black and white images, brightness can be adjusted if the image is displayed as grayscale (other than "1 to 1" display). However, the image cannot be saved with adjusted brightness.
• Brightness can be adjusted for each page.
• When displaying a PDF file, you cannot save the brightness adjustments with the image.

68
Inserting/Adding Pages to an Image File
Pages can be inserted and added to TIFF or PDF files.
For the image to insert/add, you can specify an image from the scanner or a file saved with CapturePerfect.
1 Open the TIFF or PDF file in which to insert the page.
Note• Pages cannot be added to BMP or JPEG files.
• To add a page to an image currently saved as a BMP or JPEG file, first resave the image as a TIFF or PDF file.
2 Click Insert/Add Pages in the Page menu to open the submenu.
3 Select the source of the image to add or insert.• from Scanner
Scans the image to add/insert.
• from FileSelect the image to add/insert from saved image files.
4 Add/insert a page.

69
When "from Scanner" is selected1) The Append Page dialog box is displayed.
2) Select the location to add or insert the page, make the Scanner Settings, and click OK.Scanning begins, and pages are added or inserted.
3) When there are no more documents, scanning stops.
When "from File" is selected1) The Open dialog box is displayed.

70
2) Select the image file to add or insert, and click Open.The Insert/Add from the file dialog box appears.
3) Select the location to add or insert the page, the image file page to be inserted, and click OK.
5 When finished inserting/adding the page, confirm that the page was added or inserted in the specified location.
Note• To save the image file with added or inserted pages, select Save Page As or Close from the File menu.
• When Close is selected, a message appears asking if you want to save the file. Click Yes to overwrite the image file.

71
Replacing a Page in an Image File
You can replace a page in a saved multi-page TIFF or PDF file. For the replacement image, you can specify an image from the scanner or a file saved with CapturePerfect.
1 Open the TIFF or PDF file in which to insert the page.
2 Click Replace Page in the Page menu to display the submenu.The Replace Page dialog box appears.
3 Select the source of the image to add or insert.• from Scanner
Scans the image to add/insert.
• from FileSelect the image to add/insert from saved image files.
Note• When "from Scanner" is selected, pages following the displayed page are replaced by scanned
images.
• When "from File" is selected, pages following the displayed page are replaced by the selected images.

72
4 Replace the page.
When "from Scanner" is selected1) The Replace Page dialog box is displayed.
2) Set the Scanner Settings, and click OK.Scanning begins, and pages following the displayed page are replaced.
3) When there are no more documents, scanning stops.
When "from File" is selected1) The Open dialog box is displayed.

73
2) Select the image file containing the image to be replaced, and click Open.The Replace the page from the file dialog box appears.
3) Confirm the replacement image(s) in the image file by clicking Next Page and Prev. Page, specify the page range for replacement, and click OK.Pages following the displayed page are replaced by the image(s) specified for the Page Range.
5 When finished page replacement, confirm that the image(s) of the specified page(s) are replaced.
Note• To save the image file with replaced pages, select Save Page As or Close from the File menu.
• When Close is selected, a message appears asking if you want to save the file. Click Yes to overwrite the image file.
74
Setting PDF File Security Options
Set the security options to restrict viewing, printing and page editing of PDF files.
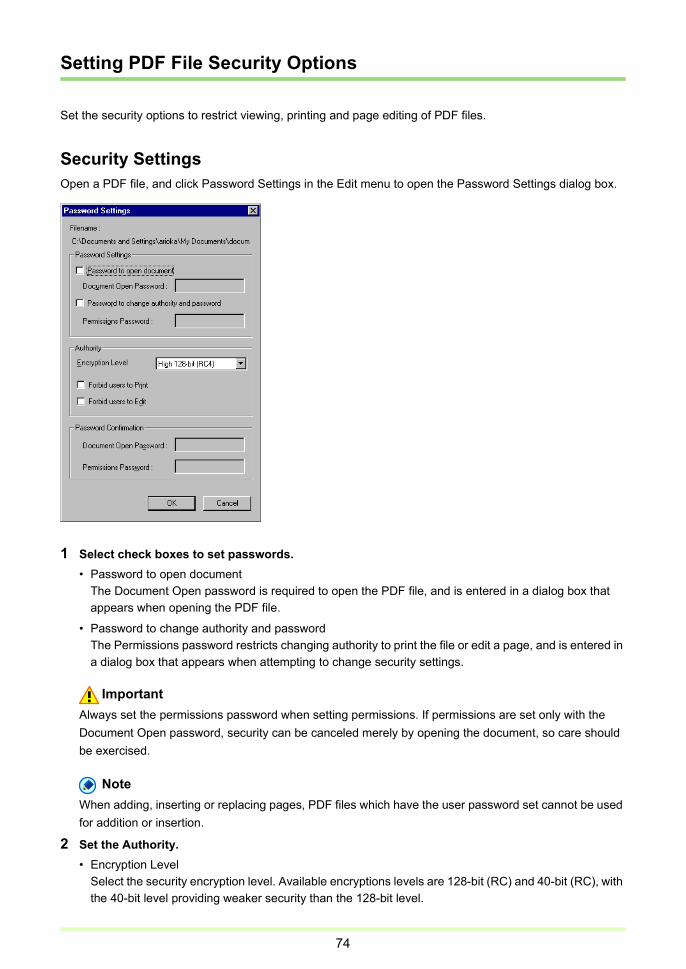
Security SettingsOpen a PDF file, and click Password Settings in the Edit menu to open the Password Settings dialog box.
1 Select check boxes to set passwords.• Password to open document
The Document Open password is required to open the PDF file, and is entered in a dialog box that appears when opening the PDF file.
• Password to change authority and passwordThe Permissions password restricts changing authority to print the file or edit a page, and is entered in a dialog box that appears when attempting to change security settings.
ImportantAlways set the permissions password when setting permissions. If permissions are set only with the Document Open password, security can be canceled merely by opening the document, so care should be exercised.
NoteWhen adding, inserting or replacing pages, PDF files which have the user password set cannot be used for addition or insertion.
2 Set the Authority.• Encryption Level
Select the security encryption level. Available encryptions levels are 128-bit (RC) and 40-bit (RC), with the 40-bit level providing weaker security than the 128-bit level.

75
• Forbid users to PrintProhibits printing of the PDF file.
• Forbid users to EditProhibits page operations (add, insert and replace).
ImportantWhen setting authority, set the Permissions Password to prevent users from canceling security.
3 Enter the same password in Password Confirmation that you entered in Password Settings.
4 Click OK to activate security.
NoteSetting or canceling security takes effect regardless of whether the file has been saved.
Canceling SecurityWhen opening a PDF file that has security set, Remove Security Information is enabled in the Edit menu. To cancel security, click Remove Security Information and following the message instructions.
Note• The Permissions Password must be entered if it has been set.
• If only the Document Open password has been set, clicking Remove Security Information displays a confirmation message to cancel security. Click OK to cancel security.

74
Index
AAdding (Pages) .................66Adjusting Brightness .........65
BBarcode/OCR
Modification ...................33
CCapacity Warning
Settings .........................36
EEdit menu ............................9
FFile menu ............................6File Name..........................24
File Name Limitations .26File Types..........................18Full-Screen Display ...........49
HHelp menu.........................15
IImage Operations
Opening ......................61Printing........................63Saving .........................59
Inserting (Pages)...............66Inserting/Adding Pages .....66
JJob ....................................51
LLog Files............................32
MMulti-Page Files................ 22MultiStream ...................... 27
OOCR Functions................. 29Opening............................ 61Options menu ................... 14
PPage menu ....................... 13Pointer setting .................. 10Print Format........................ 7Printing ............................. 63
RReplacing (a Page)........... 69Replacing a Page ............. 69
SSave As Two Images ....... 35Save Rotated Image......... 34Saving .............................. 59Scan Batch to File ............ 40Scan Batch to Mail ........... 45Scan Batch to Printer ....... 43Scan JOB ......................... 51Scan menu ......................... 8Scan Page........................ 39Scan To Presentation....... 48Scanner Selection ............ 16Scanner Settings .............. 16Schema ............................ 24Security Settings .............. 72
Canceling ................... 73
SettingCapacity Warning ....... 36JPEG Compression .... 21PDF File...................... 20Pointer ........................ 10Scanner ...................... 16TIFF File ..................... 19

75
Setting JPEG Compression .................21
Setting PDF File ................20Setting TIFF File................19Split View ..........................57Status Bar .........................15
TThumbnail .........................56
VView menu ........................11