camera setup guide - sentry360 ip megapixel...
TRANSCRIPT
Rev. 7/24/13 1 / 8
Camera Setup GuideThis guide will show you how to add and configure Sentry360 cameras in Genetec Security
Desk 5.2
Contents
I. How to Add Professional Series 5MP, 8MP, and 10MP CamerasII. How to Add Mini Series 2MP – 5MP CamerasIII. How to Configure 360° dewarping
Technical Support
For Technical Support regarding Sentry360 cameras:
Website: http://www.sentry360.comSupport Email: [email protected]
Toll Free: 1-800-261-2707Direct: 1-630-355-3440
For Technical Support regarding Genetec:
Website: http://www.genetec.comSupport Email: [email protected]
Toll Free (Canada and US): 1-866-338-2988Toll Free (Europe): 00 800 01 81 82 00
Direct 1-514-856-7100
This guide is subject to change. Please visit http://www.sentry360.com for the most up to date information.

Rev. 7/24/13 2 / 8
I. How to Add Professional Series 5MP, 8MP, and 10MPCamerasApplies to FS-IP5000, IS-IP500, FS-IP8180, FS-IP10K, and IS-IP10K camera models
Firmware Upgrade
Sentry360 cameras must be running the latest version of our Genetec firmware. The currentversion is 437 (fw_genetec_437.bin). The file can be downloaded from Sentry360’s PartnerPortal website which can be found at http://www.sentry360.com/Partner/
Add camera
To add a camera, open Genetec’s Config Tool and click on the Video icon

Rev. 7/24/13 3 / 8
Click on “Add Entity” at the bottom left of the window and select “Video Unit” from the list
For each option, specify the following:
Manufacturer: Genetec ProtocolProduct type: All
IP address: Use the IP address of the cameraHTTP port: Use port 80 unless the camera has another HTTP port specified
Authentication: Use “Default logon” unless the camera has a username and passwordassigned to it, in that case select “Specific” and use that logon
Click Add and you'll see Genetec communicate with the camera to add it into Security Desk.Once the camera has been successfully added, refresh your Archiver and you'll see thecamera appear in the list.
Rev. 7/24/13 4 / 8
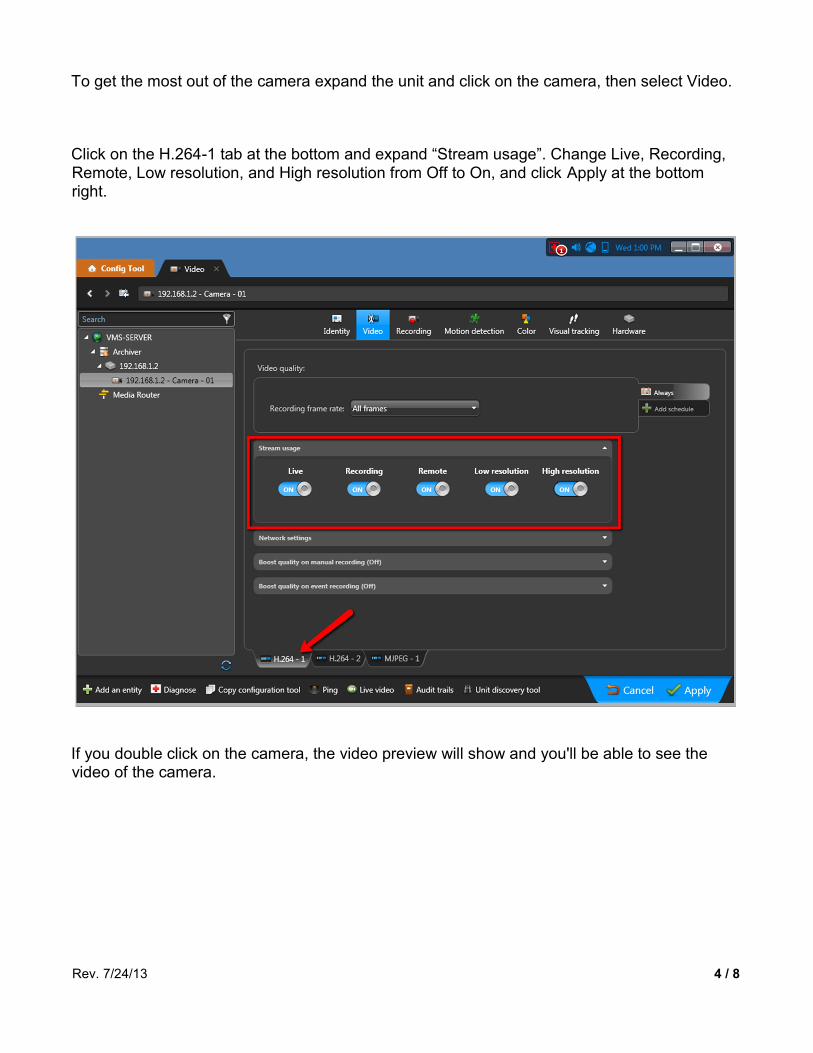
To get the most out of the camera expand the unit and click on the camera, then select Video.
Click on the H.264-1 tab at the bottom and expand “Stream usage”. Change Live, Recording,Remote, Low resolution, and High resolution from Off to On, and click Apply at the bottomright.
If you double click on the camera, the video preview will show and you'll be able to see thevideo of the camera.
Rev. 7/24/13 5 / 8
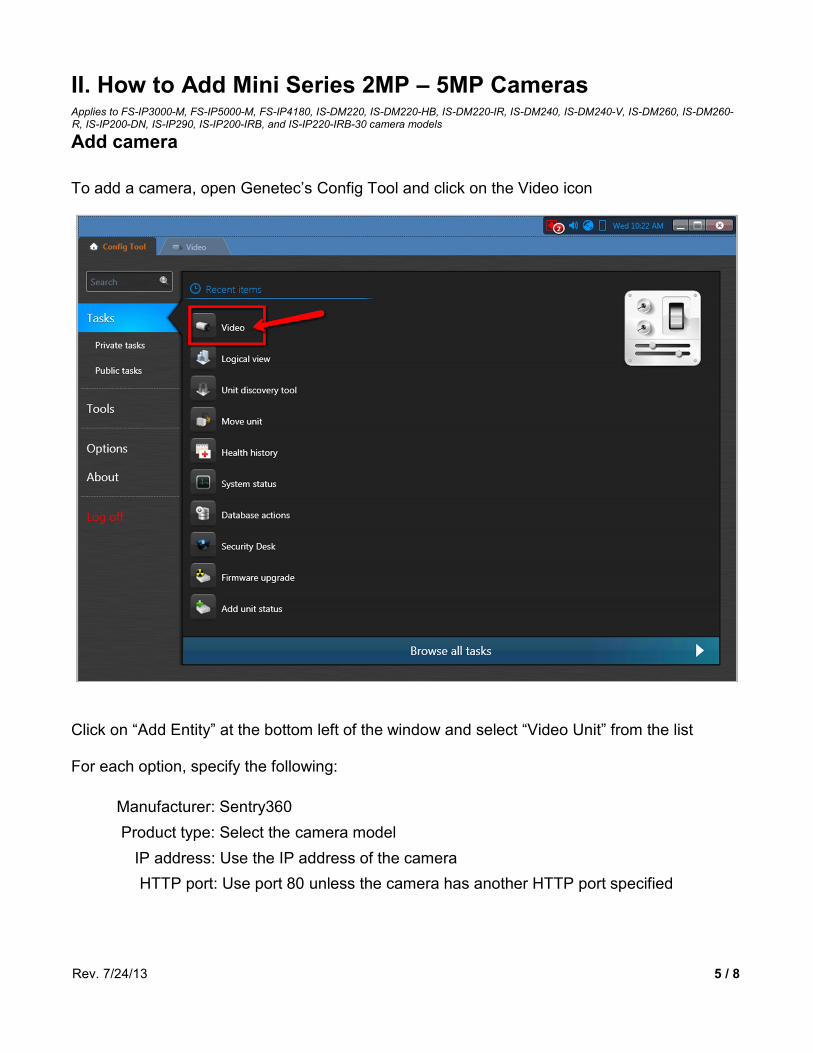
II. How to Add Mini Series 2MP – 5MP CamerasApplies to FS-IP3000-M, FS-IP5000-M, FS-IP4180, IS-DM220, IS-DM220-HB, IS-DM220-IR, IS-DM240, IS-DM240-V, IS-DM260, IS-DM260-R, IS-IP200-DN, IS-IP290, IS-IP200-IRB, and IS-IP220-IRB-30 camera models
Add camera
To add a camera, open Genetec’s Config Tool and click on the Video icon
Click on “Add Entity” at the bottom left of the window and select “Video Unit” from the list
For each option, specify the following:
Manufacturer: Sentry360Product type: Select the camera model
IP address: Use the IP address of the cameraHTTP port: Use port 80 unless the camera has another HTTP port specified

Rev. 7/24/13 6 / 8
Authentication: Use “Specific”, the default username is “Admin” and the default passwordis “1234”
Click Add and you'll see Genetec communicate with the camera to add it into Security Desk.Once the camera has been successfully added, refresh your Archiver and you'll see thecamera appear in the list.

Rev. 7/24/13 7 / 8
II. How to Configure 360° DewarpingApplies to FS-IP3000, FS-IP5000, and FS-IP10K camera models
Configure DewarpingTo configure 360° dewarping parameters in Genetec Security Desk, expand the unit and clickon the camera, then select Hardware to go to the hardware options. Select “Sentry360” as theLens type and click Apply.
Rev. 7/24/13 8 / 8
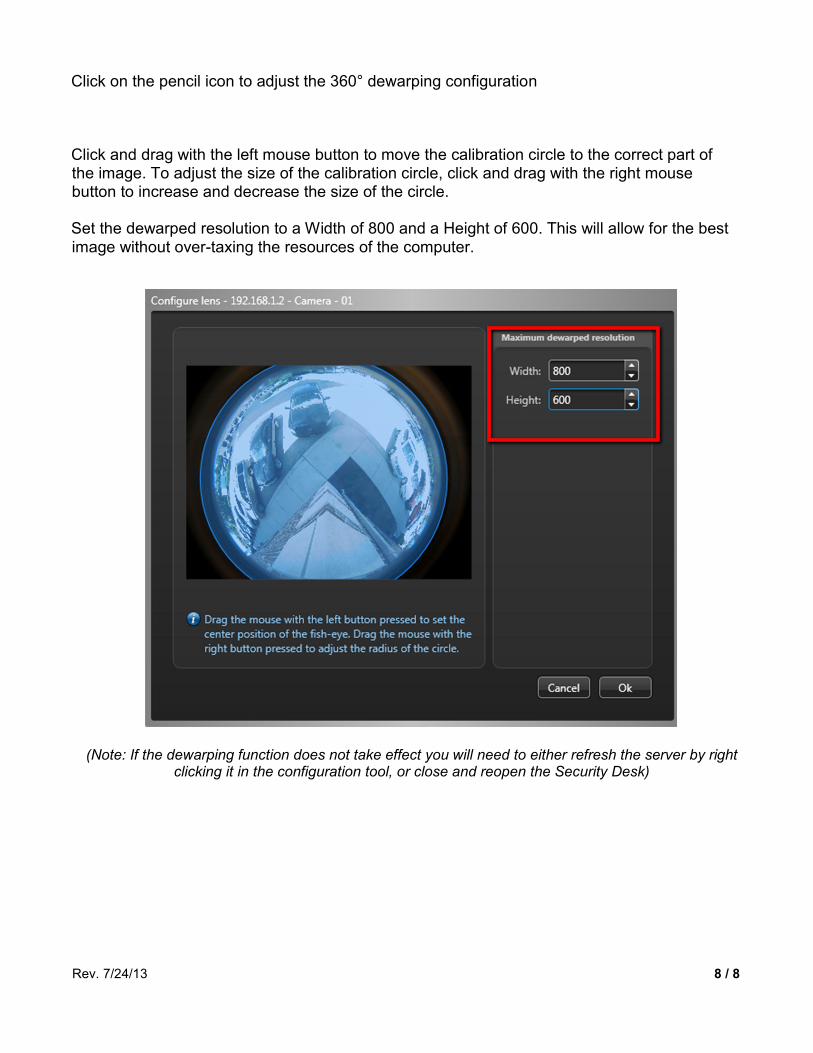
Click on the pencil icon to adjust the 360° dewarping configuration
Click and drag with the left mouse button to move the calibration circle to the correct part ofthe image. To adjust the size of the calibration circle, click and drag with the right mousebutton to increase and decrease the size of the circle.
Set the dewarped resolution to a Width of 800 and a Height of 600. This will allow for the bestimage without over-taxing the resources of the computer.
(Note: If the dewarping function does not take effect you will need to either refresh the server by rightclicking it in the configuration tool, or close and reopen the Security Desk)