camera & imaging 7 - ソフトバンク step c. to redo, press c. to save, tap . ・using auto...
TRANSCRIPT
7Camera & ImagingCapturing Picture, Recording Movie & Editing ............................. 7-2Camera .......................................................................................... 7-3
Using Display as Viewfinder ................................................................. 7-3Single Shot .......................................................................................... 7-5Normal ................................................................................................ 7-6Scene .................................................................................................. 7-6Face Shot ............................................................................................ 7-6Multi Shot ........................................................................................... 7-7Capturing Still Images with Frame ........................................................ 7-7Photo Combination ............................................................................. 7-7Panorama Shot .................................................................................... 7-8Viewing Captured Pictures (Quick Play) ................................................ 7-8
Video ............................................................................................. 7-9Using Display as Viewfinder ................................................................. 7-9Recording Video ................................................................................ 7-10Video Mode ...................................................................................... 7-11Viewing Recorded Video (Quick Play) ................................................. 7-11
Editing Images ............................................................................. 7-12Editing Still Images ............................................................................ 7-12Oekaki Anime .................................................................................... 7-12
Printing Still Images .................................................................... 7-14Printing via Bluetooth® ...................................................................... 7-14Printing via USB................................................................................. 7-15
Advanced Settings ....................................................................... 7-15Capturing Still Images ........................................................................ 7-15Recording Videos ............................................................................... 7-17Editing Still Images ............................................................................ 7-18
Camera &
Imaging
7-2
7
Capturing Picture, Recording Movie & Editing
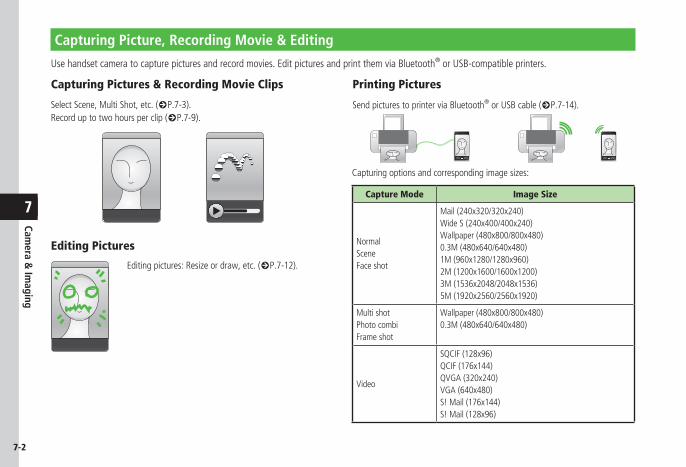
Use handset camera to capture pictures and record movies. Edit pictures and print them via Bluetooth® or USB-compatible printers.
Capturing Pictures & Recording Movie Clips Printing Pictures
Editing Pictures
Select Scene, Multi Shot, etc. (fP.7-3).Record up to two hours per clip (fP.7-9).
Editing pictures: Resize or draw, etc. (fP.7-12).
Send pictures to printer via Bluetooth® or USB cable (fP.7-14).
Capturing options and corresponding image sizes:
Capture Mode Image Size
NormalSceneFace shot
Mail (240x320/320x240)Wide S (240x400/400x240)Wallpaper (480x800/800x480)0.3M (480x640/640x480)1M (960x1280/1280x960)2M (1200x1600/1600x1200)3M (1536x2048/2048x1536)5M (1920x2560/2560x1920)
Multi shotPhoto combiFrame shot
Wallpaper (480x800/800x480)0.3M (480x640/640x480)
Video
SQCIF (128x96)QCIF (176x144)QVGA (320x240)VGA (640x480)S! Mail (176x144)S! Mail (128x96)
Camera &
Imaging
7-3
7
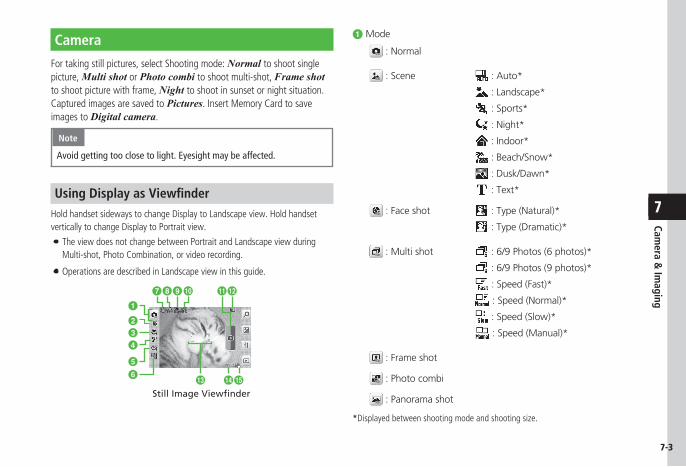
Camera
For taking still pictures, select Shooting mode: Normal to shoot single picture, Multi shot or Photo combi to shoot multi-shot, Frame shot to shoot picture with frame, Night to shoot in sunset or night situation.Captured images are saved to Pictures. Insert Memory Card to save images to Digital camera.
Note
Avoid getting too close to light . Eyesight may be affected .
Using Display as ViewfinderHold handset sideways to change Display to Landscape view. Hold handset vertically to change Display to Portrait view.
・ The view does not change between Portrait and Landscape view during Multi-shot, Photo Combination, or video recording.
・ Operations are described in Landscape view in this guide.
Still Image Viewfinder
m no
ghij lk
a
b
c
d
e
f
a Mode
: Normal
: Scene : Auto*
: Landscape*
: Sports*
: Night*
: Indoor*
: Beach/Snow*
: Dusk/Dawn*
: Text*
: Face shot : Type (Natural)*
: Type (Dramatic)*
: Multi shot : 6/9Photos (6 photos)*
: 6/9 Photos (9 photos)*
: Speed (Fast)*
: Speed (Normal)*
: Speed (Slow)*
: Speed (Manual)*
: Frame shot
: Photo combi
: Panorama shot
*Displayed between shooting mode and shooting size.

Camera &
Imaging
7-4
7
b Size (the size varies on the view)
: 5M (2560×1920) *
: 3M (2048×1536) *
: 2M (1600×1200) *
: 1M (1280×960) *
: Wallpaper (800×480)
: 0.3M (640×480)
: Wide S (400×240) *
: Mail (320×240) *
* Only when the shooting mode is set to Normal, Scene or Face shot.
c Focus
: Macro : AF
d Light
: On : Off
e Timer
: Off : 3 seconds
: 5 seconds : 10 seconds
f White balance
: Auto : Daylight
: Incandescent : Fluorescent
: Cloudy
g Anti-shake
: Anti-shake On
None: Anti-shake Off
h Quality
:Superfine
: Fine
: Normal
: Economy
i ISO
: Auto : 100 : 200 : 400 : 800
j Exposure metering
: Matrix : Center-weight
: Spot
k Shutter
l Battery Level
m Focus frame
n Available remaining shooting number
o Save to : Phone or Ask each time
: Memory card or Digital camera
・ Tapping the icons (b to f)attheleftsideofViewfinderopensamenu.・TappinganimageonViewfindershowsorhidesicons/thecurrentsettings.
Camera &
Imaging
7-5
7
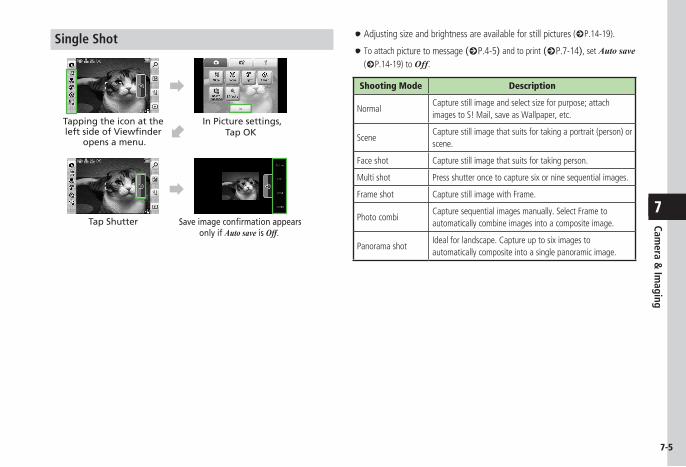
Single Shot
ビューファインダー左端のアイコン表示部を
タップ
In Picture settings,Tap OK
Tap Shutter Save image confirmation appearsonly if Auto save is Off.
Tapping the icon at the left side of Viewfinder
opens a menu.
・ Adjusting size and brightness are available for still pictures (fP.14-19).
・ To attach picture to message (fP.4-5) and to print (fP.7-14), set Auto save (fP.14-19) to Off.
Shooting Mode Description
NormalCapture still image and select size for purpose; attach images to S! Mail, save as Wallpaper, etc.
SceneCapture still image that suits for taking a portrait (person) or scene.
Face shot Capture still image that suits for taking person.
Multi shot Press shutter once to capture six or nine sequential images.
Frame shot Capture still image with Frame.
Photo combiCapture sequential images manually. Select Frame to automatically combine images into a composite image.
Panorama shotIdeal for landscape. Capture up to six images to automatically composite into a single panoramic image.
Camera &
Imaging
7-6
7
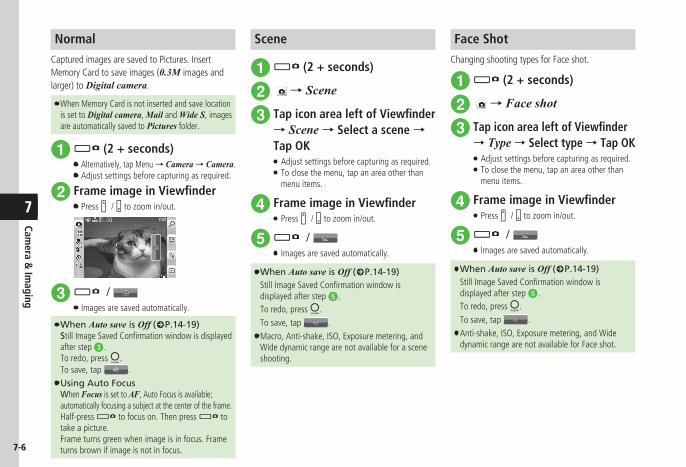
NormalCaptured images are saved to Pictures. InsertMemory Card to save images (0.3M images andlarger) to Digital camera.
・ When Memory Card is not inserted and save location is set to Digital camera, Mail and Wide S, images are automatically saved to Pictures folder.
a k (2 + seconds) ・ Alternatively, tap Menu → Camera → Camera.・ Adjust settings before capturing as required.
b Frame image in Viewfinder・ Press n / b to zoom in/out.
c k / ・ Images are saved automatically.
・ When Auto save is Off (fP.14-19)StillImageSavedConfirmationwindowisdisplayedafter step c.To redo, press c. To save, tap .
・ Using Auto FocusWhen Focus is set to AF, Auto Focus is available; automatically focusing a subject at the center of the frame.Half-press k to focus on. Then press k to take a picture. Frame turns green when image is in focus. Frame turns brown if image is not in focus.
Scene
a k (2 + seconds)
b → Scene
c Tap icon area left of Viewfinder → Scene → Select a scene → Tap OK・ Adjust settings before capturing as required.・ To close the menu, tap an area other than
menu items.
d Frame image in Viewfinder・ Press n / b to zoom in/out.
e k / ・ Images are saved automatically.
・ When Auto save is Off (fP.14-19) StillImageSavedConfirmationwindowis
displayed after step e. To redo, press c. To save, tap .
・ Macro, Anti-shake, ISO, Exposure metering, and Wide dynamic range are not available for a scene shooting.
Face ShotChanging shooting types for Face shot.
a k (2 + seconds)
b → Face shot
c Tap icon area left of Viewfinder → Type → Select type → Tap OK・ Adjust settings before capturing as required.・ To close the menu, tap an area other than
menu items.
d Frame image in Viewfinder・ Press n / b to zoom in/out.
e k / ・ Images are saved automatically.
・ When Auto save is Off (fP.14-19) StillImageSavedConfirmationwindowis
displayed after step e. To redo, press c. To save, tap .
・ Anti-shake, ISO, Exposure metering, and Wide dynamic range are not available for Face shot.
Camera &
Imaging
7-7
7
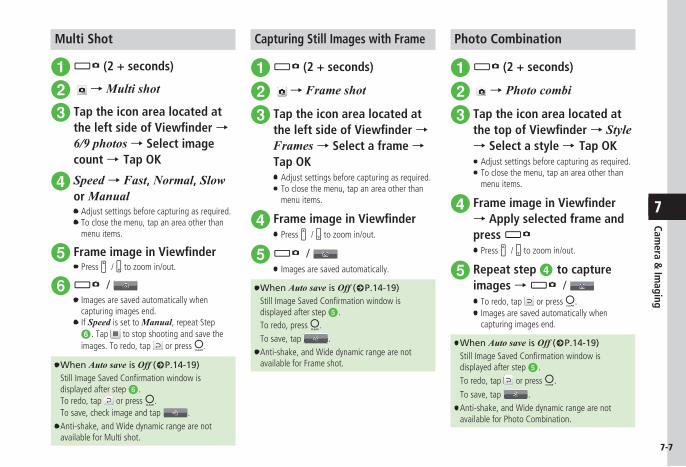
Multi Shot
a k (2 + seconds)
b → Multi shot
c Tap the icon area located at the left side of Viewfinder → 6/9 photos → Select image count → Tap OK
d Speed → Fast, Normal, Slow or Manual・ Adjust settings before capturing as required.・ To close the menu, tap an area other than
menu items.
e Frame image in Viewfinder・ Press n / b to zoom in/out.
f k / ・ Images are saved automatically when
capturing images end.・ If Speed is set to Manual, repeat Step
f. Tap to stop shooting and save the images. To redo, tap or press c.
・ When Auto save is Off (fP.14-19) StillImageSavedConfirmationwindowis
displayed after step f.To redo, tap or press c.To save, check image and tap .
・ Anti-shake, and Wide dynamic range are not available for Multi shot.
Capturing Still Images with Frame
a k (2 + seconds)
b → Frame shot
c Tap the icon area located at the left side of Viewfinder → Frames → Select a frame → Tap OK・ Adjust settings before capturing as required.・ To close the menu, tap an area other than
menu items.
d Frame image in Viewfinder・ Press n / b to zoom in/out.
e k / ・ Images are saved automatically.
・ When Auto save is Off (fP.14-19) StillImageSavedConfirmationwindowis
displayed after step e. To redo, press c. To save, tap .
・ Anti-shake, and Wide dynamic range are not available for Frame shot.
Photo Combination
a k (2 + seconds)
b → Photo combi
c Tap the icon area located at the top of Viewfinder → Style → Select a style → Tap OK・ Adjust settings before capturing as required.・ To close the menu, tap an area other than
menu items.
d Frame image in Viewfinder → Apply selected frame and press k・ Press n / b to zoom in/out.
e Repeat step d to capture images → k / ・ To redo, tap or press c.・ Images are saved automatically when
capturing images end.
・ When Auto save is Off (fP.14-19) StillImageSavedConfirmationwindowis
displayed after step e. To redo, tap or press c.
To save, tap .
・ Anti-shake, and Wide dynamic range are not available for Photo Combination.
Camera &
Imaging
7-8
7
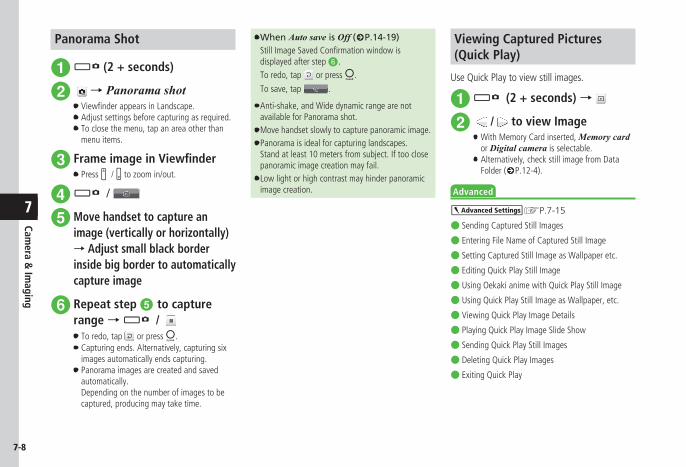
Panorama Shot
a k (2 + seconds)
b → Panorama shot・ViewfinderappearsinLandscape.・ Adjust settings before capturing as required.・ To close the menu, tap an area other than
menu items.
c Frame image in Viewfinder・ Press n / b to zoom in/out.
d k /
e Move handset to capture an image (vertically or horizontally) → Adjust small black border inside big border to automatically capture image
f Repeat step e to capture range → k / ・ To redo, tap or press c.・ Capturing ends. Alternatively, capturing six
images automatically ends capturing.・ Panorama images are created and saved
automatically. Depending on the number of images to be captured, producing may take time.
・ When Auto save is Off (fP.14-19) StillImageSavedConfirmationwindowis
displayed after step f. To redo, tap or press c.
To save, tap .
・ Anti-shake, and Wide dynamic range are not available for Panorama shot.・ Move handset slowly to capture panoramic image.・ Panorama is ideal for capturing landscapes.
Stand at least 10 meters from subject. If too close panoramic image creation may fail.・ Low light or high contrast may hinder panoramic
image creation.
Viewing Captured Pictures (Quick Play)
Use Quick Play to view still images.
a k (2 + seconds) →
b / to view Image・With Memory Card inserted, Memory card
or Digital camera is selectable.・Alternatively, check still image from Data
Folder (fP.12-4).
Advanced
brP.7-15
● Sending Captured Still Images
● Entering File Name of Captured Still Image
● Setting Captured Still Image as Wallpaper etc.
● Editing Quick Play Still Image
● Using Oekaki anime with Quick Play Still Image
● Using Quick Play Still Image as Wallpaper, etc.
● Viewing Quick Play Image Details
● Playing Quick Play Image Slide Show
● Sending Quick Play Still Images
● Deleting Quick Play Images
● Exiting Quick Play
Camera &
Imaging
7-9
7
s
● Set Anti-Shake (rP.14-19)
● Activate or cancel Auto Save (rP.14-19)
● Set Contrast (rP.14-19)
● Set Saturation (rP.14-19)
● Set Sharpness (rP.14-19)
● Adjusting Brightness (rP.14-19)
● Setting Shooting Size (rP.14-19)
● Select Quality (rP.14-20)
● Set ISO (rP.14-20)
● Set Exposure metering (rP.14-20)
● Set Wide Dynamic Range (rP.14-20)
● Set save location when Memory Card is inserted (rP.14-20)
● Show or hide Guideline (rP.14-20)
● Set Face Link Display (rP.14-20)
● Set Shutter Sound (rP.14-20)
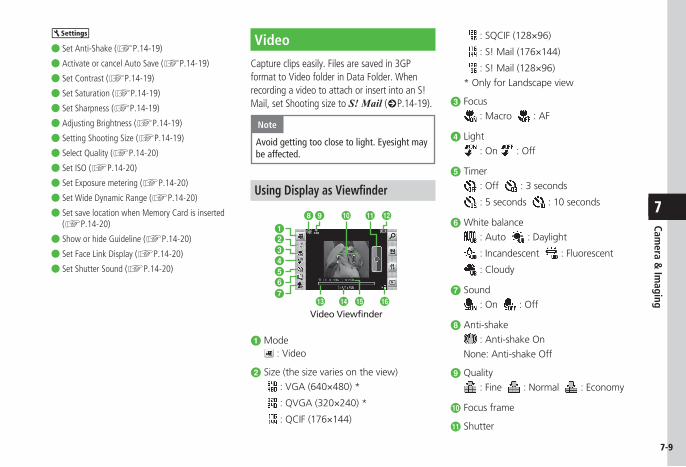
Video
Capture clips easily. Files are saved in 3GP format to Video folder in Data Folder. When recording a video to attach or insert into an S! Mail, set Shooting size to S! Mail (fP.14-19).
Note
Avoid getting too close to light . Eyesight may be affected .
Using Display as Viewfinder
Video Viewfinder
abcdef
o pg
j kih
nm
l
a Mode : Video
b Size (the size varies on the view)
: VGA (640×480) *
: QVGA (320×240) *
: QCIF (176×144)
: SQCIF (128×96)
: S! Mail (176×144)
: S! Mail (128×96)
* Only for Landscape view
c Focus
: Macro : AF
d Light
: On : Off
e Timer
: Off : 3 seconds
: 5 seconds : 10 seconds
f White balance
: Auto : Daylight
: Incandescent : Fluorescent
: Cloudy
g Sound
: On : Off
h Anti-shake
: Anti-shake On
None: Anti-shake Off
i Quality
: Fine : Normal : Economy
j Focus frame
k Shutter
Camera &
Imaging
7-10
7
l Battery Level
m Progress bar
n Expected video size/Available memory at the time you started the shooting・ If Size is set to S! Mail, the shooting data size/available
shooting size appear.
o Elapsed recording time/Available recording time・ If Size is set to S! Mail, only the elapsed recording time
appears.
p Save to : Phone or Ask each time
: Memory card or Digital camera
・ Tapping the icons (b to g)attheleftsideofViewfinderopensamenu.・TappinganimageonViewfindershowsorhidesicons/thecurrentsettings.
Shooting Mode Description
Video Record video that suits for attaching to S! Mail or save to handset.
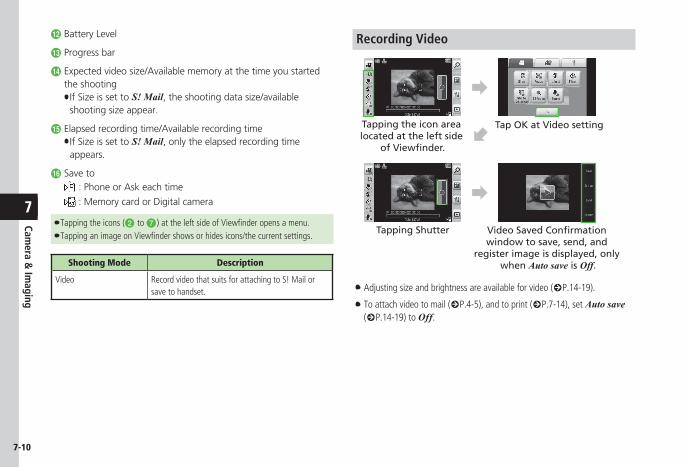
Recording Video
Tapping the icon area located at the left side
of Viewfinder.
Tap OK at Video setting
Tapping Shutter Video Saved Confirmation window to save, send, and
register image is displayed, only when Auto save is Off.
・ Adjusting size and brightness are available for video (fP.14-19).
・ To attach video to mail (fP.4-5), and to print (fP.7-14), set Auto save (fP.14-19) to Off.
Camera &
Imaging
7-11
7
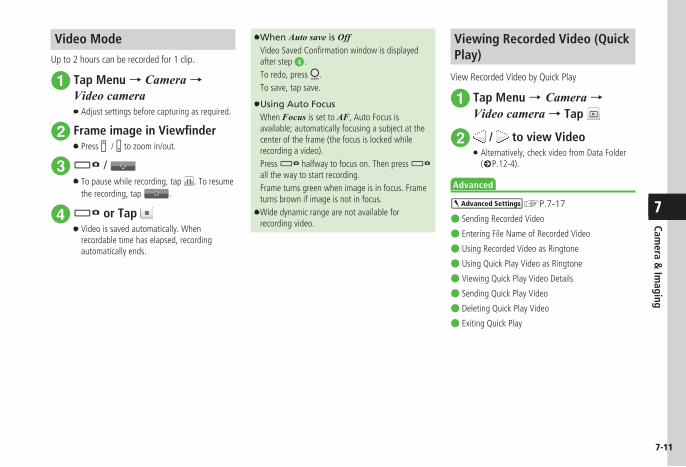
Video ModeUp to 2 hours can be recorded for 1 clip.
a Tap Menu → Camera → Video camera・ Adjust settings before capturing as required.
b Frame image in Viewfinder・ Press n / b to zoom in/out.
c k/ ・ To pause while recording, tap . To resume
the recording, tap .
d k or Tap ・ Video is saved automatically. When
recordable time has elapsed, recording automatically ends.
・ When Auto save is Off VideoSavedConfirmationwindowisdisplayed
after step d. To redo, press c. To save, tap save.
・ Using Auto Focus When Focus is set to AF, Auto Focus is
available; automatically focusing a subject at the center of the frame (the focus is locked while recording a video).
Press k halfway to focus on. Then press k all the way to start recording.
Frame turns green when image is in focus. Frame turns brown if image is not in focus.・ Wide dynamic range are not available for
recording video.
Viewing Recorded Video (Quick Play)
View Recorded Video by Quick Play
a Tap Menu → Camera → Video camera → Tap
b / to view Video・Alternatively, check video from Data Folder
(fP.12-4).
Advanced
brP.7-17
● Sending Recorded Video
● Entering File Name of Recorded Video
● Using Recorded Video as Ringtone
● Using Quick Play Video as Ringtone
● Viewing Quick Play Video Details
● Sending Quick Play Video
● Deleting Quick Play Video
● Exiting Quick Play
Camera &
Imaging
7-12
7
s
● Set Anti-Shake (rP.14-19)
● Activate or cancel Auto Save (rP.14-19)
● Set Contrast (rP.14-19)
● Set Saturation (rP.14-19)
● Set Sharpness (rP.14-19)
● Adjusting Brightness (rP.14-19)
● Setting Shooting Size (rP.14-19)
● Select Quality (rP.14-20)
● Set save location (rP.14-20)
● Show or hide Guideline (rP.14-20)
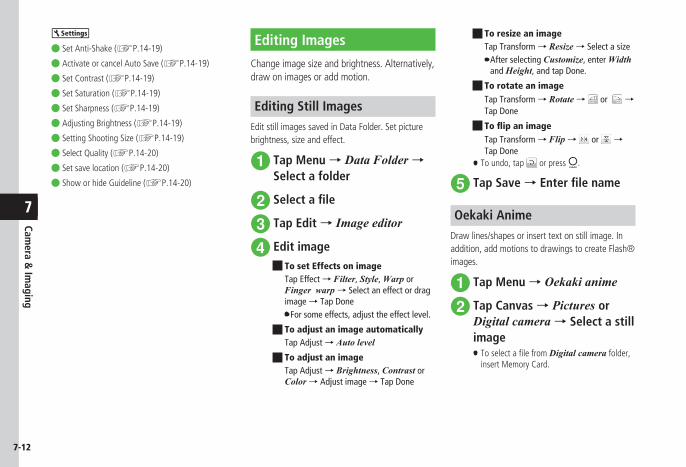
Editing Images
Change image size and brightness. Alternatively, draw on images or add motion.
Editing Still ImagesEdit still images saved in Data Folder. Set picture brightness, size and effect.
a Tap Menu → Data Folder → Select a folder
b Select a file
c Tap Edit → Image editor
d Edit image■ To set Effects on image
Tap Effect → Filter, Style, Warp or Finger warp → Select an effect or drag image → Tap Done・ For some effects, adjust the effect level .
■ To adjust an image automaticallyTap Adjust → Auto level
■ To adjust an imageTap Adjust → Brightness, Contrast or Color → Adjust image → Tap Done
■ To resize an imageTap Transform → Resize → Select a size・ After selecting Customize, enter Width
and Height, and tap Done .
■ To rotate an imageTap Transform → Rotate → or → Tap Done
■ To flip an imageTap Transform → Flip → or → Tap Done
・ To undo, tap or press c.
e Tap Save → Enter file name
Oekaki AnimeDraw lines/shapes or insert text on still image. In addition, add motions to drawings to create Flash® images.
a Tap Menu → Oekaki anime
b Tap Canvas → Pictures or Digital camera → Select a still image・ToselectafilefromDigital camera folder,
insert Memory Card.
Camera &
Imaging
7-13
7
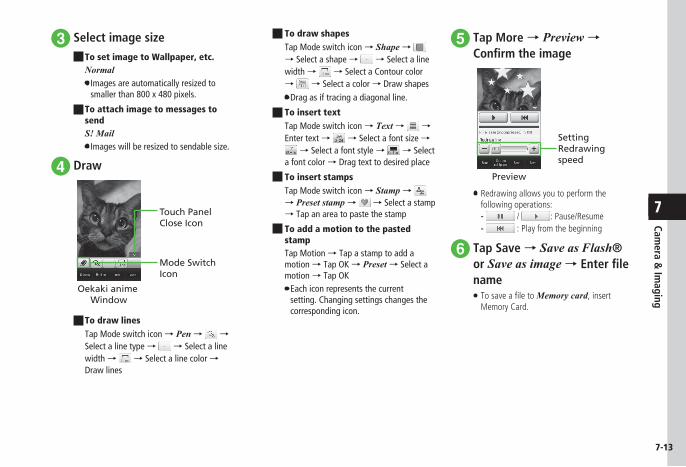
c Select image size■ To set image to Wallpaper, etc.
Normal・ Images are automatically resized to
smaller than 800 x 480 pixels .
■ To attach image to messages to sendS! Mail・ Images will be resized to sendable size .
d Draw
Mode Switch Icon
Touch Panel Close Icon
Oekaki anime Window
■ To draw linesTap Mode switch icon → Pen → → Select a line type → → Select a line width → → Select a line color → Draw lines
■ To draw shapesTap Mode switch icon → Shape → → Select a shape → → Select a line width → → Select a Contour color → → Select a color → Draw shapes
・ Drag as if tracing a diagonal line .
■ To insert textTap Mode switch icon → Text → → Enter text → → Select a font size →
→ Select a font style → → Select a font color → Drag text to desired place
■ To insert stampsTap Mode switch icon → Stamp → → Preset stamp → → Select a stamp → Tap an area to paste the stamp
■ To add a motion to the pasted stampTap Motion → Tap a stamp to add a motion → Tap OK → Preset → Select a motion → Tap OK・ Each icon represents the current
setting . Changing settings changes the corresponding icon .
e Tap More → Preview → Confirm the image
Preview
Setting Redrawing speed
・ Redrawing allows you to perform the following operations:
- / : Pause/Resume - : Play from the beginning
f Tap Save → Save as Flash® or Save as image → Enter file name・TosaveafiletoMemory card, insert
Memory Card.
Camera &
Imaging
7-14
7
Advanced
brP.7-18
● Cropping and Editing Still Images
● Using Oekaki anime with Camera Images
● Using Oekaki anime with Colored Background
● Undoing Edit Operation of Oekaki anime
● Setting Created Image to Wallpaper
● Saving and Sending Created Image
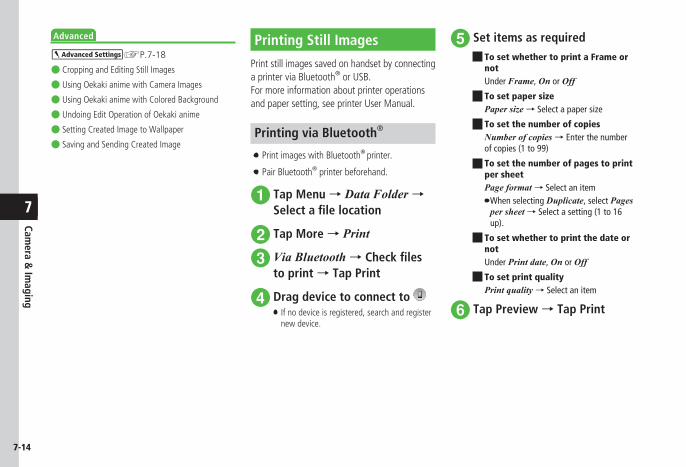
Printing Still Images
Print still images saved on handset by connecting a printer via Bluetooth® or USB.For more information about printer operations and paper setting, see printer User Manual.
Printing via Bluetooth®
・ Print images with Bluetooth® printer.
・ Pair Bluetooth® printer beforehand.
a Tap Menu → Data Folder → Select a file location
b Tap More → Print
c Via Bluetooth → Check files to print → Tap Print
d Drag device to connect to ・ If no device is registered, search and register
new device.
e Set items as required■ To set whether to print a Frame or
not Under Frame, On or Off
■ To set paper sizePaper size → Select a paper size
■ To set the number of copiesNumber of copies → Enter the number of copies (1 to 99)
■ To set the number of pages to print per sheetPage format → Select an item・ When selecting Duplicate, select Pages
per sheet → Select a setting (1 to 16 up) .
■ To set whether to print the date or notUnder Print date, On or Off
■ To set print qualityPrint quality → Select an item
f Tap Preview → Tap Print
Camera &
Imaging
7-15
7
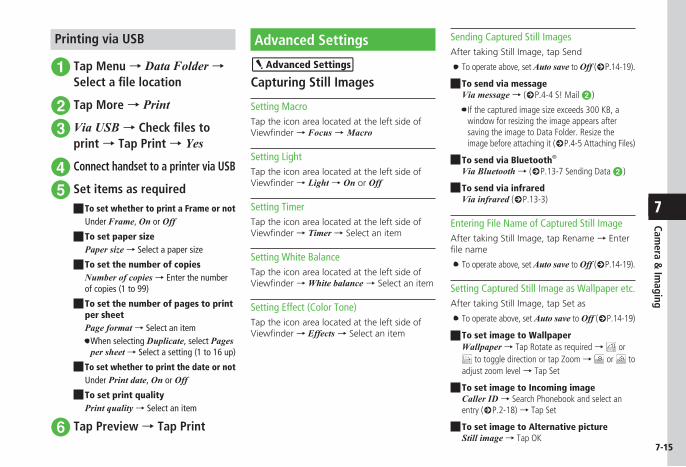
Printing via USB
a Tap Menu → Data Folder → Select a file location
b Tap More → Print
c Via USB → Check files to print → Tap Print → Yes
d Connect handset to a printer via USB
e Set items as required■ To set whether to print a Frame or not
Under Frame, On or Off■ To set paper size
Paper size → Select a paper size
■ To set the number of copiesNumber of copies → Enter the number of copies (1 to 99)
■ To set the number of pages to print per sheetPage format → Select an item・ When selecting Duplicate, select Pages
per sheet → Select a setting (1 to 16 up)
■ To set whether to print the date or notUnder Print date, On or Off
■ To set print qualityPrint quality → Select an item
f Tap Preview → Tap Print
Advanced Settings
bCapturing Still Images
Setting MacroTap the icon area located at the left side of Viewfinder→ Focus → Macro
Setting LightTap the icon area located at the left side of Viewfinder→ Light → On or Off
Setting TimerTap the icon area located at the left side of Viewfinder→ Timer → Select an item
Setting White BalanceTap the icon area located at the left side of Viewfinder→ White balance → Select an item
Setting Effect (Color Tone)Tap the icon area located at the left side of Viewfinder→ Effects → Select an item
Sending Captured Still ImagesAfter taking Still Image, tap Send
・ To operate above, set Auto save to Off (fP.14-19).
■ To send via messageVia message → (fP.4-4 S! Mail b)
・ If the captured image size exceeds 300 KB, a window for resizing the image appears after saving the image to Data Folder. Resize the image before attaching it (fP.4-5 Attaching Files)
■ To send via Bluetooth®
Via Bluetooth → (fP.13-7 Sending Data b)
■ To send via infraredVia infrared (fP.13-3)
Entering File Name of Captured Still ImageAfter taking Still Image, tap Rename → Enter filename
・ To operate above, set Auto save to Off (fP.14-19).
Setting Captured Still Image as Wallpaper etc .After taking Still Image, tap Set as
・ To operate above, set Auto save to Off (fP.14-19)
■ To set image to WallpaperWallpaper → Tap Rotate as required → or
to toggle direction or tap Zoom → or to adjust zoom level → Tap Set
■ To set image to Incoming imageCaller ID → Search Phonebook and select an entry (fP.2-18) → Tap Set
■ To set image to Alternative pictureStill image → Tap OK
Camera &
Imaging
7-16
7
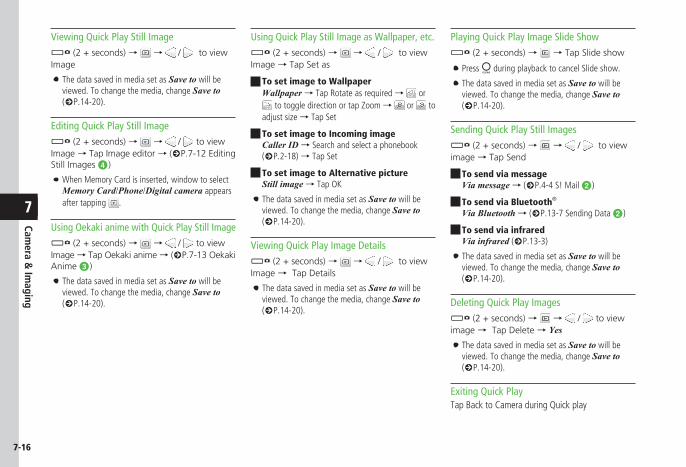
Viewing Quick Play Still Imagek (2 + seconds) → → / to view Image
・ The data saved in media set as Save to will be viewed. To change the media, change Save to (fP.14-20).
Editing Quick Play Still Imagek (2 + seconds) → → / to view Image → Tap Image editor → (fP.7-12 Editing Still Images d)
・ When Memory Card is inserted, window to select Memory Card/Phone/Digital camera appears after tapping .
Using Oekaki anime with Quick Play Still Imagek (2 + seconds) → → / to view Image → Tap Oekaki anime → (fP.7-13 Oekaki Anime c)
・ The data saved in media set as Save to will be viewed. To change the media, change Save to (fP.14-20).
Using Quick Play Still Image as Wallpaper, etc .k (2 + seconds) → → / to view Image → Tap Set as
■ To set image to WallpaperWallpaper → Tap Rotate as required → or
to toggle direction or tap Zoom → or to adjust size → Tap Set
■ To set image to Incoming imageCaller ID → Search and select a phonebook (fP.2-18) → Tap Set
■ To set image to Alternative pictureStill image → Tap OK
・ The data saved in media set as Save to will be viewed. To change the media, change Save to (fP.14-20).
Viewing Quick Play Image Detailsk (2 + seconds) → → / to view Image → Tap Details
・ The data saved in media set as Save to will be viewed. To change the media, change Save to (fP.14-20).
Playing Quick Play Image Slide Showk (2 + seconds) → → Tap Slide show
・ Press c during playback to cancel Slide show.
・ The data saved in media set as Save to will be viewed. To change the media, change Save to (fP.14-20).
Sending Quick Play Still Imagesk (2 + seconds) → → / to view image → Tap Send
■ To send via messageVia message → (fP.4-4 S! Mail b)
■ To send via Bluetooth®
Via Bluetooth → (fP.13-7 Sending Data b)
■ To send via infraredVia infrared (fP.13-3)
・ The data saved in media set as Save to will be viewed. To change the media, change Save to (fP.14-20).
Deleting Quick Play Imagesk (2 + seconds) → → / to view image → Tap Delete → Yes・ The data saved in media set as Save to will be
viewed. To change the media, change Save to (fP.14-20).
Exiting Quick PlayTap Back to Camera during Quick play
Camera &
Imaging
7-17
7
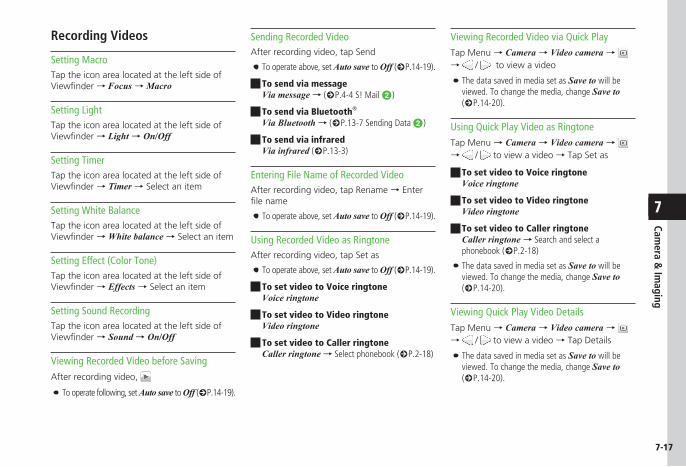
Recording Videos
Setting MacroTap the icon area located at the left side of Viewfinder→ Focus → Macro
Setting LightTap the icon area located at the left side of Viewfinder→ Light → On/Off
Setting TimerTap the icon area located at the left side of Viewfinder→ Timer → Select an item
Setting White BalanceTap the icon area located at the left side of Viewfinder→ White balance → Select an item
Setting Effect (Color Tone)Tap the icon area located at the left side of Viewfinder→ Effects → Select an item
Setting Sound RecordingTap the icon area located at the left side of Viewfinder→ Sound → On/Off
Viewing Recorded Video before SavingAfter recording video,
・ To operate following, set Auto save to Off (fP.14-19).
Sending Recorded VideoAfter recording video, tap Send
・ To operate above, set Auto save to Off (fP.14-19).
■ To send via messageVia message → (fP.4-4 S! Mail b)
■ To send via Bluetooth®
Via Bluetooth → (fP.13-7 Sending Data b)
■ To send via infraredVia infrared (fP.13-3)
Entering File Name of Recorded VideoAfter recording video, tap Rename → Enter filename
・ To operate above, set Auto save to Off (fP.14-19).
Using Recorded Video as RingtoneAfter recording video, tap Set as
・ To operate above, set Auto save to Off (fP.14-19).
■ To set video to Voice ringtoneVoice ringtone
■ To set video to Video ringtoneVideo ringtone
■ To set video to Caller ringtoneCaller ringtone → Select phonebook (fP.2-18)
Viewing Recorded Video via Quick PlayTap Menu → Camera → Video camera → → / to view a video
・ The data saved in media set as Save to will be viewed. To change the media, change Save to (fP.14-20).
Using Quick Play Video as RingtoneTap Menu → Camera → Video camera → → / to view a video → Tap Set as
■ To set video to Voice ringtoneVoice ringtone
■ To set video to Video ringtoneVideo ringtone
■ To set video to Caller ringtoneCaller ringtone → Search and select a phonebook (fP.2-18)
・ The data saved in media set as Save to will be viewed. To change the media, change Save to (fP.14-20).
Viewing Quick Play Video DetailsTap Menu → Camera → Video camera → → / to view a video → Tap Details
・ The data saved in media set as Save to will be viewed. To change the media, change Save to (fP.14-20).
Camera &
Imaging
7-18
7
Sending Quick Play VideoTap Menu → Camera → Video camera → → / to view a video → Tap Send
■ To send via messageVia message → (fP.4-4 S! Mail b)
■ To send via Bluetooth®
Via Bluetooth → (fP.13-7 Sending Data b)
■ To send via infraredVia infrared (fP.13-3)
・ The data saved in media set as Save to will be viewed. To change the media, change Save to (fP.14-20).
Deleting Quick Play VideoTap Menu → Camera → Video camera → → / to view a video → Tap Delete → Yes・ The data saved in media set as Save to will be
viewed. To change the media, change Save to (fP.14-20).
Exiting Quick PlayTap Back to Camcorder during Quick play
Editing Still Images
Cropping and Editing Still ImagesTap Menu → Data Folder →Selectafilelocation →Selectafile→ Tap Edit → Image editor → Tap Transform → Crop
■ To adjust cropping areaTouch and hold inside cropping frame and drag → Tap Crop → Tap Save → Enter an image name
■ To change cropping size or shapeStretch cropping frame → Tap Crop → Tap Save → Enter an image name
Using Oekaki anime with Camera ImagesTap Menu → Oekaki anime → Tap Canvas → Take photo → Capture an image → Normal/S! Mail
Using Oekaki anime with Colored BackgroundTap Menu → Oekaki anime → Tap Canvas → Color canvas → Select a background color
Editing Entered TextIn Oekaki anime window, tap → Text → Tap text you already entered → Tap / / / / → Change the Font size, Font, Font color, or the location of the text
Adding Emoticon Clip Art to Still ImagesIn Oekaki anime window, tap → Stamp →
→ Photo stamp → as required
■ To select from saved still imagesPictures or Digital camera → Select a still image for a stamp → Tap Yes/No as required → Tap area to paste it
・ToselectafilefromDigital camera folder, insert Memory Card.
■ To capture an image by CameraTake photo → Take a still picture → Yes (When cropping, crop)/No (When not cropping) → Tap an area to paste it as a stamp
・ Each icon represents the current setting. Changing settings changes the corresponding icons.
Adding Motions to Lines or Shapes You DrewIn Oekaki anime window, tap Motion → Tap Window → Drag to enclose a line or shape to add a motion → Tap OK → Preset → Select a motion → Tap OK
・ Drag as if tracing a diagonal line of the area to add the motion.
Camera &
Imaging
7-19
7
Moving along with a LineIn Oekaki anime window, tap Motion → Tap Window
■ For lines or shapesDrag to enclose the desired line or shape → Tap OK → Motion line → Draw a motion line starting from the selected line or shape → Preview → Tap OK
・ Drag as if tracing a diagonal line of the desired area.
■ For stampsTap the desired stamp → Tap OK → Motion line → Draw a motion line starting from the selected stamp → Preview → Tap OK
・ To delete the motion line and draw again, tap Undo.
Deleting MotionsIn Oekaki anime window, tap Motion → Tap a line, shape, or stamp to remove the motion → Tap OK
■ To delete PresetPreset → → Tap OK
■ To delete Motion lineMotion line → Off → Tap OK
Undoing Edit Operation of Oekaki animeIn Oekaki anime window, tap Undo
・ Undo the last operation performed in Oekaki anime window such as drawing a line or selecting a setting option.
Deleting Lines, Shapes, Text, or StampsIn Oekaki anime window, tap Mode switch icon → Delete
■ For lines or shapes without any motionDrag to enclose the line or shape to delete
・ Drag as if tracing a diagonal line of the area to delete.
■ For lines or shapes with motionsTap a line or shape to delete
■ For text or stampsTap text or stamp to delete
Setting Created Image to WallpaperTap More → Preview → Tap Set as wallpaper → Flash®/Image →Enterfilename
Saving and Sending Created ImageTap More → Preview → tap Send
■ To send via MessageVia message → Flash®/Image → (fP.4-4 S! Mail b)
■ To send via Bluetooth®
Via Bluetooth → Flash®/Image → (fP.13-7 Sending Data b)
■ To send via infraredVia infrared → Flash®/Image → (fP.13-3)
Changing Saving Location for Created ImagesIn Oekaki anime window, tap More → Settings → Under Save to, Phone, Memory card, or Ask each time・ When no Memory Card is inserted, the saving
location is automatically set to Phone.
Setting Oekaki Process Playback SpeedIn Oekaki anime window, tap More → Settings → Adjust Oekaki process playback speed
Compressing FilesIn Oekaki anime window, tap More → Settings → Under File compression, High/Normal → Tap OK
Memo