cable exersize machine
TRANSCRIPT

8/13/2019 Cable Exersize Machine
http://slidepdf.com/reader/full/cable-exersize-machine 1/19
http://www.instructables.com/id/Cable-Exersize-Machine/
Food Living Outside Play Technology Workshop
Cable Exercise Machineby Isshinryu on September 22, 2012
Table of Contents
Cable Exercise Machine ........................................................................................................
Intro: Cable Exercise Machine .................................................................................................
File Downloads ...........................................................................................................
Step 1: 2. Parts/Tools List ....................................................................................................
Step 2: The base ...........................................................................................................
Step 3: Upper pulley assembly ................................................................................................
Step 4: Attach upright assembly to base .........................................................................................
Step 5: Attach 45 degree supports ..............................................................................................
Step 6: Attach lower pulley ...................................................................................................
Step 7: Make the stool ....................................................................................................... 1
Step 8: Attach cable ........................................................................................................ 1
Step 9: Extra features ....................................................................................................... 1
Step 10: Use and safety ..................................................................................................... 1
Step 11: Weight rating justification. ............................................................................................. 1
Related Instructables ........................................................................................................ 1
Advertisements ............................................................................................................... 1
Comments ................................................................................................................ 1
8/13/2019 Cable Exersize Machine
http://slidepdf.com/reader/full/cable-exersize-machine 2/19
http://www.instructables.com/id/Cable-Exersize-Machine/
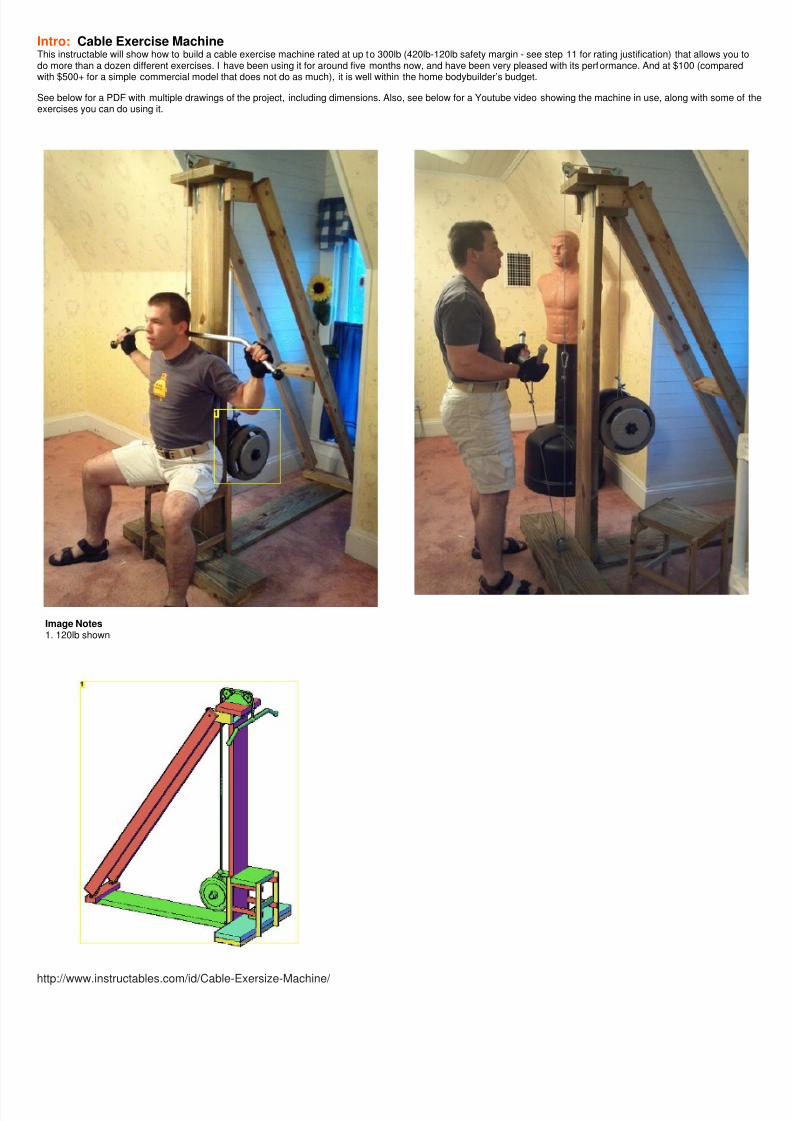
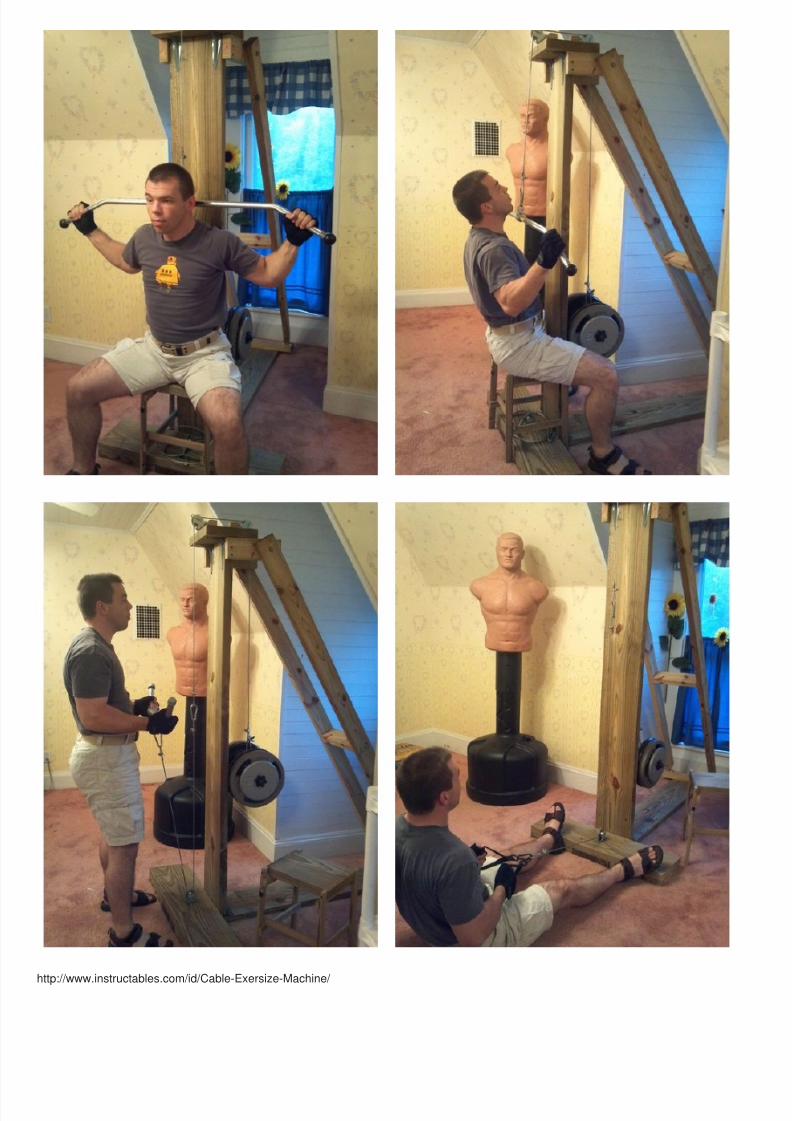
Intro: Cable Exercise MachineThis instructable will show how to build a cable exercise machine rated at up to 300lb (420lb-120lb safety margin - see step 11 for rating justification) that allows you tdo more than a dozen different exercises. I have been using it for around five months now, and have been very pleased with its performance. And at $100 (comparedwith $500+ for a simple commercial model that does not do as much), it is well within the home bodybuilder’s budget.
See below for a PDF with multiple drawings of the project, including dimensions. Also, see below for a Youtube video showing the machine in use, along with some ofexercises you can do using it.
Image Notes1. 120lb shown

8/13/2019 Cable Exersize Machine
http://slidepdf.com/reader/full/cable-exersize-machine 3/19
http://www.instructables.com/id/Cable-Exersize-Machine/
Image Notes1. This is the CAD drawing of the final machine. The main photo on each step willhighlight from this drawing the part being worked on in that step.
File Downloads
Pully Machine Drawings.pdf (1 MB)[NOTE: When saving, if you see .tmp as the file ext, rename it to 'Pully Machine Drawings.pdf']
Step 1: 2. Parts/Tools ListBelow is a list of everything you will need to make this project.
Notes:Unless otherwise noted, all item numbers are from Lowe's. Just go to www.lowes.com and enter the item number in the search bar to see exactly what I am talking ab
PARTS:1. 8-foot 10"x2" board, cut by your f riendly Lowe's representative into a 6' section and two 1' sections (Item #201521, $9.57)2. 10-foot 10"x2" board, cut into the following pieces:(Item #201523, $12.97)a. 12” pieceb. 12.25” piece (x1)c. 33.25” piece (x1)d. 62.5” piece (x1)3. 8-foot long 2"x4" board, cut into the following pieces:(Item #46905, $2.47)a. 82" pieceb. 9" piece4. 10-foot long 2"x4" board, cut into the following pieces:
(Item #76854, $4.97)a. 82” pieceb. 9” piecec. 16.25” pieced. 4-5” piece5. 2 3/8"-16X3-1/2 Grade 8 bolts ( Item #136102, $1.46/2 pack)6. 4 Flat washers 3/8-16 Grade 8 (Item #136056, $1.09/pack)7. 2 Hex nuts 3/8-16 Grade 8 (Item #136068, $1.21/pack)8. 3 3" 5/8R Satin brass door hinges (Item #308904, $2.17 each)9. 3" screws, approx. 40 (Item #112363; buy from local store where you can buy just what you need by weight)10. 1.25" screws, approx. 85 (Item #227168; same as above)11. 16' of 3/16" steel cable, 740lb rating (Item #348184, $0.58/foot) cut into the following pieces:a. 7' pieceb. 7.5' piecec. 9" piece (x2)12. 8 3/16" wire rope clips (a.k.a, cable clamps) (Item #348302, $0.88/ each)13. 3 heavy-duty pulleys, rated at 480lb (I tem #348562, $4.58 each)14. 2 4" T-hinges (Item #315669, $1.78)
15. 4 4"x6" Shelf Brackets (ACE Hardware, Item #5294079, $0.99 each)16. 2 8-foot 1"x2" boards cut into the following pieces:(Item #201999, $1.97 each)a. 18” piece (x4)b. 12” piece (x1)c. 12.5” piece (x4)18. 4 Carabiners, "Zinc-Galvanized Steel Carabiner Spring Snap Link Hook" f rom Amazon,$2.06 each, 100mm size for 500lb rating.17. 1 Dumbbell - This one is up to you. Personally, I bought the $6.87 dumbbell handle from Wal-Mart (Item #SDA-GG14TRB), and it has lasted just fine with no signswear. If you want to pay $40-$50 for a set of handles that are officially rated to any weight you want to put on them (such as the Troy GOD-20 Olympic Dumbbell Handthat is your choice.
TOOLS:1. Drill2. Measuring tape4. Various drill bits5. Small hand saw6. 2 pairs pliers or lock clamps
SAFETY:While building this cable machine, you will be using several things that could be potentially dangerous. For the tools (drill, saw), make sure you have read the ownersmanual for your specific tool and know how to use it, and wear the appropriate protective clothing (safety glasses, gloves). For safety in using the finished cable machsee last step.

8/13/2019 Cable Exersize Machine
http://slidepdf.com/reader/full/cable-exersize-machine 4/19
http://www.instructables.com/id/Cable-Exersize-Machine/
Step 2: The baseFor the base, I found it worked best to assemble it upside down.
Place the 33.25” 2x10 board flat on the floor. Place the end of the 62.5” 2x10 board on top of it, dead center, and then put two 12” 2x10 on either side (refer to photo)
Use 5 2.5” screws per board to fasten down the 12” boards, and 4 screws for the 62.5” board. Make sure to bury the screw heads just a little, so that they wil l not messup whatever floor you place the machine on.
NOTES:1. For any project with wood, I always drill pilot holes for any screws that I use. It ensures that the screws go in straight, and prevents the wood from splitting. All stepsthis project assume that you are drill ing pilot holes for every screw.2. In case you are confused by some of the dimensions I am throwing out vs. what is on the dimensioned drawing, there is a difference between the advertised wood sand the actual wood size when buying lumber. 2”x10” is the size of board before they compressed it. The actual size is now 9.25”x1.5”. The same concept holds truefor the other sizes of boards.
8/13/2019 Cable Exersize Machine
http://slidepdf.com/reader/full/cable-exersize-machine 5/19
http://www.instructables.com/id/Cable-Exersize-Machine/
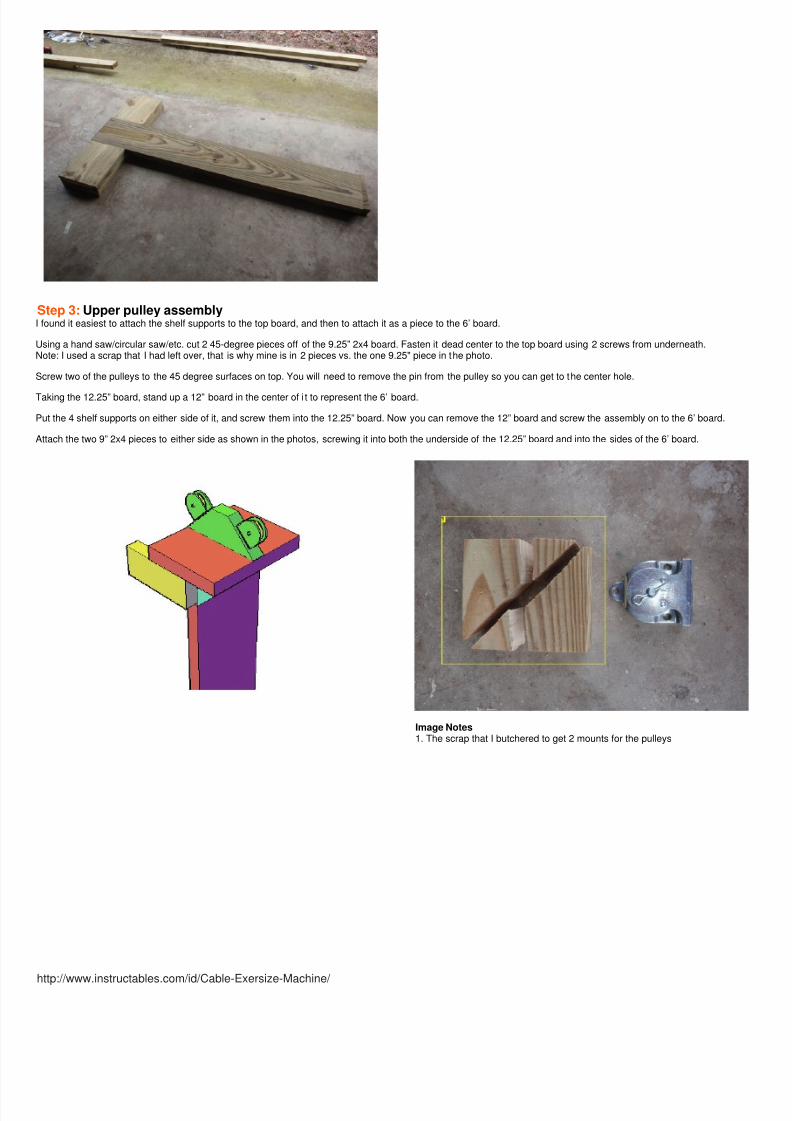
Step 3: Upper pulley assemblyI found it easiest to attach the shelf supports to the top board, and then to attach it as a piece to the 6’ board.
Using a hand saw/circular saw/etc. cut 2 45-degree pieces off of the 9.25” 2x4 board. Fasten it dead center to the top board using 2 screws from underneath.Note: I used a scrap that I had left over, that is why mine is in 2 pieces vs. the one 9.25" piece in the photo.
Screw two of the pulleys to the 45 degree surfaces on top. You will need to remove the pin from the pulley so you can get to the center hole.
Taking the 12.25” board, stand up a 12” board in the center of i t to represent the 6’ board.
Put the 4 shelf supports on either side of it, and screw them into the 12.25” board. Now you can remove the 12” board and screw the assembly on to the 6’ board.
Attach the two 9” 2x4 pieces to either side as shown in the photos, screwing it into both the underside of the 12.25” board and into the sides of the 6’ board.
Image Notes1. The scrap that I butchered to get 2 mounts for the pulleys

8/13/2019 Cable Exersize Machine
http://slidepdf.com/reader/full/cable-exersize-machine 6/19
http://www.instructables.com/id/Cable-Exersize-Machine/
Image Notes1. Make sure that you drill pilot holes on all of these to prevent anything fromsplitting.
8/13/2019 Cable Exersize Machine
http://slidepdf.com/reader/full/cable-exersize-machine 7/19
http://www.instructables.com/id/Cable-Exersize-Machine/
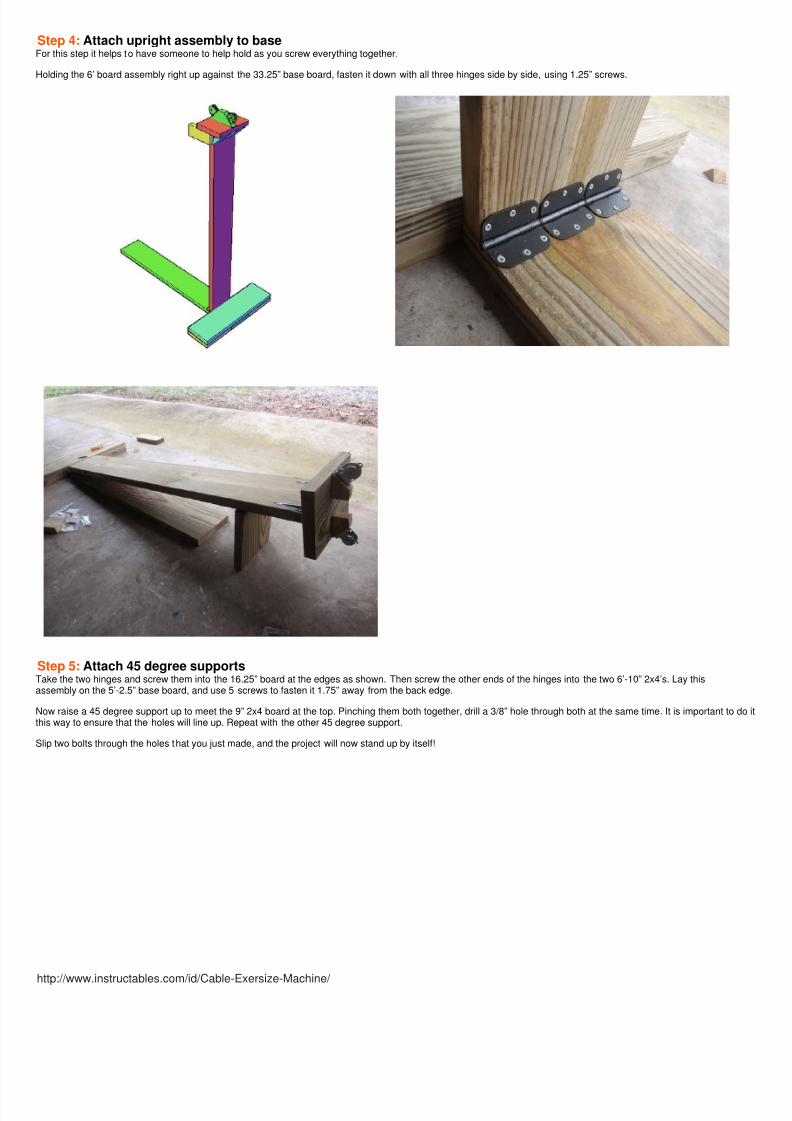
Step 4: Attach upright assembly to baseFor this step it helps to have someone to help hold as you screw everything together.
Holding the 6’ board assembly right up against the 33.25” base board, fasten it down with all three hinges side by side, using 1.25” screws.
Step 5: Attach 45 degree supportsTake the two hinges and screw them into the 16.25” board at the edges as shown. Then screw the other ends of the hinges into the two 6’-10” 2x4’s. Lay thisassembly on the 5’-2.5” base board, and use 5 screws to fasten it 1.75” away from the back edge.
Now raise a 45 degree support up to meet the 9” 2x4 board at the top. Pinching them both together, drill a 3/8” hole through both at the same time. It is important to dothis way to ensure that the holes will line up. Repeat with the other 45 degree support.
Slip two bolts through the holes that you just made, and the project will now stand up by itself!

8/13/2019 Cable Exersize Machine
http://slidepdf.com/reader/full/cable-exersize-machine 8/19
http://www.instructables.com/id/Cable-Exersize-Machine/
Image Notes
1. Electrical tape holds everything in place while I drill.2. Electrical tape holds everything in place while I drill.
Image Notes1. Optional - I added a spare piece of 2x4 in the middle for stability
8/13/2019 Cable Exersize Machine
http://slidepdf.com/reader/full/cable-exersize-machine 9/19
http://www.instructables.com/id/Cable-Exersize-Machine/
Image Notes
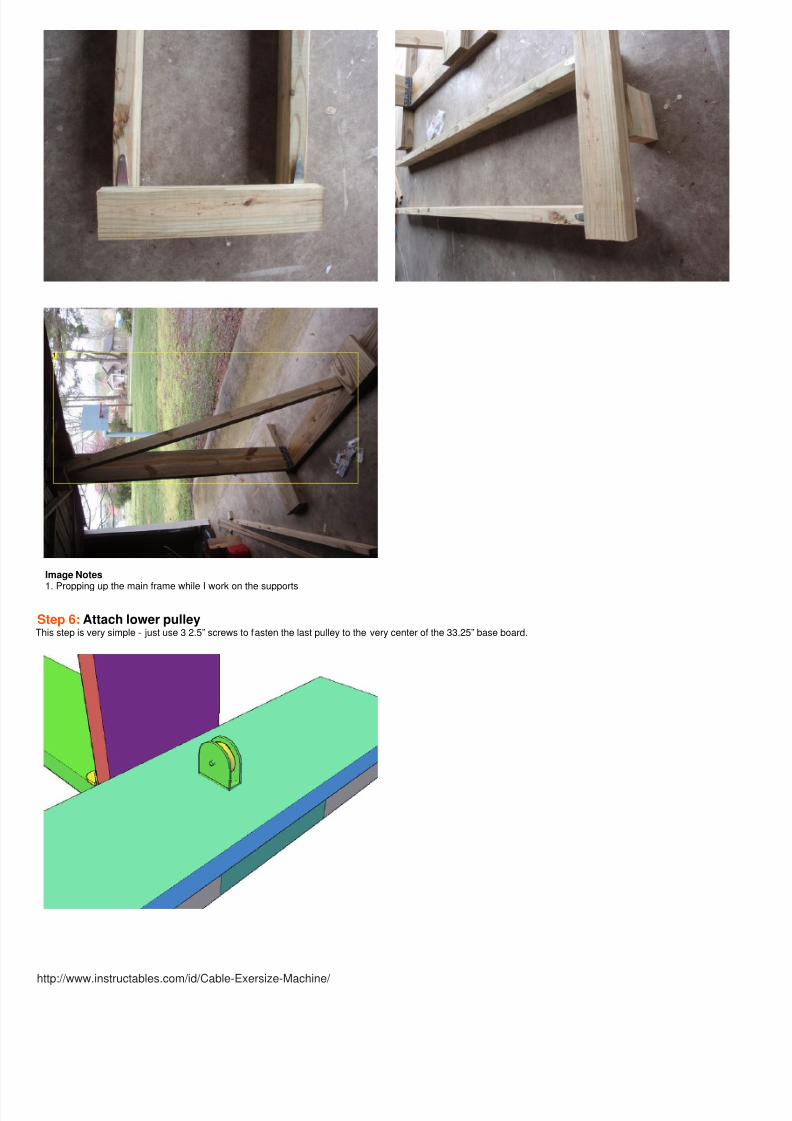
1. Propping up the main frame while I work on the supports
Step 6: Attach lower pulleyThis step is very simple - just use 3 2.5” screws to fasten the last pulley to the very center of the 33.25” base board.
8/13/2019 Cable Exersize Machine
http://slidepdf.com/reader/full/cable-exersize-machine 10/19
http://www.instructables.com/id/Cable-Exersize-Machine/
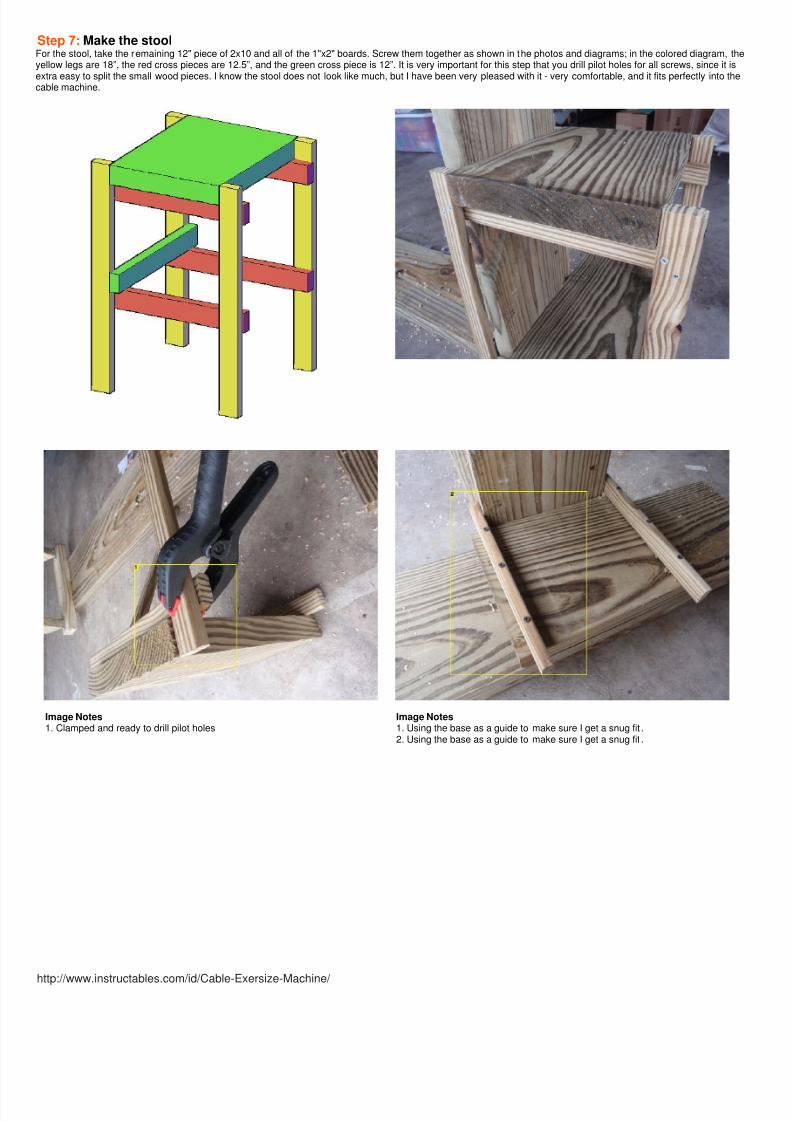
Step 7: Make the stoolFor the stool, take the remaining 12" piece of 2x10 and all of the 1"x2" boards. Screw them together as shown in the photos and diagrams; in the colored diagram, theyellow legs are 18”, the red cross pieces are 12.5”, and the green cross piece is 12”. It is very important for this step that you drill pilot holes for all screws, since it isextra easy to split the small wood pieces. I know the stool does not look like much, but I have been very pleased with it - very comfortable, and it fits perfectly into thecable machine.
Image Notes1. Clamped and ready to drill pilot holes
Image Notes1. Using the base as a guide to make sure I get a snug fit .2. Using the base as a guide to make sure I get a snug fit .

8/13/2019 Cable Exersize Machine
http://slidepdf.com/reader/full/cable-exersize-machine 11/19
http://www.instructables.com/id/Cable-Exersize-Machine/
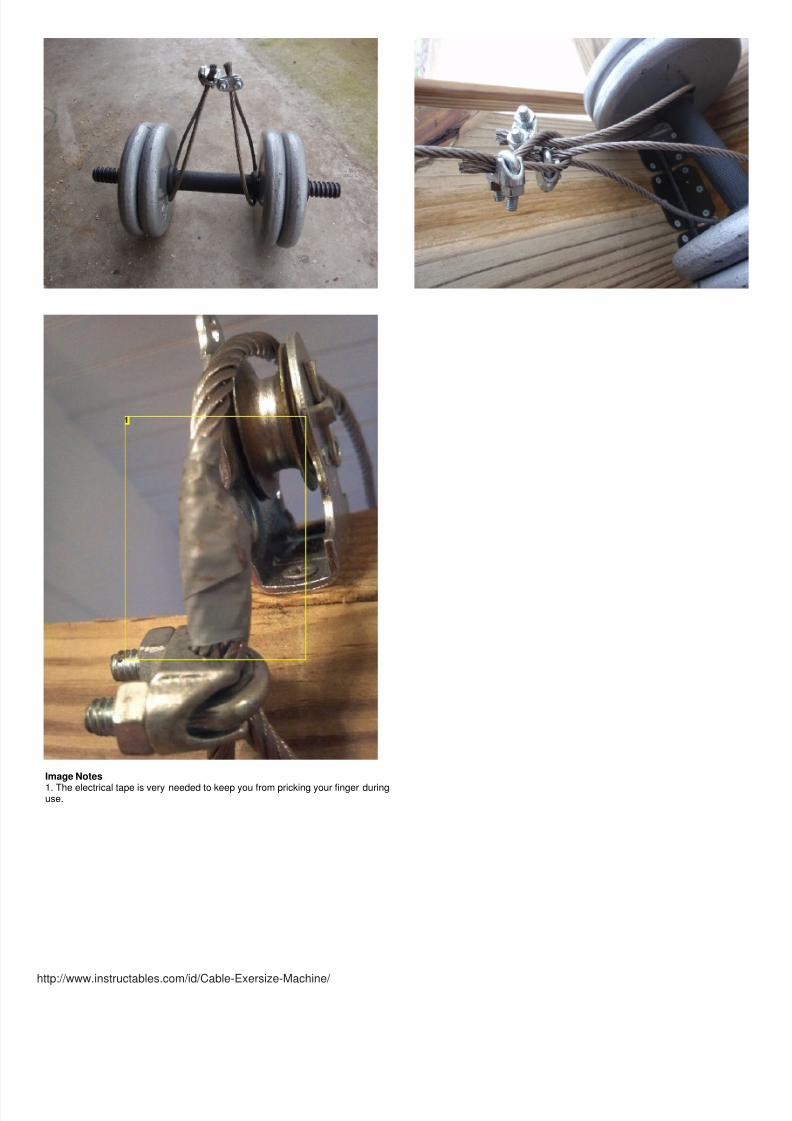
Step 8: Attach cableWhen fastening cable clamps, I found that I could make the clamps very tight by using a pair of pliers along with a socket wrench. See photos for an example.
Take each 9” piece of cable and, folding i t in half, fasten the ends together with a cable clamp. That being done, fasten each loop to the dumbbell handle wi th a hoseclamp.
Now for the main length of cable. Since it is almost impossible to fold over a small loop and clamp it, I found that the easiest thing to do was make a large loop in the eof the cable, very lightly clamp it, and then pull one end through the clamp until it became a small loop. Having done this in one end of the 7.5” cable, run the other endthrough the two loops created above for the barbell before repeating the process on the other end.
For the cable going to the lower pulley, you will need to thread the cable through the pulley before making the loops on each end, since once completed the ends will btoo large to go through the pulley.
After you have finished making all of the loops in the cables, use electrical tape to make sure the cable ends stay t idy and do not poke you as you are changing weigh
Image Notes1. The pliers lock across both threads while the wrench tightens the bolt.
8/13/2019 Cable Exersize Machine
http://slidepdf.com/reader/full/cable-exersize-machine 12/19
http://www.instructables.com/id/Cable-Exersize-Machine/
Image Notes
1. The electrical tape is very needed to keep you from pricking your finger duringuse.
8/13/2019 Cable Exersize Machine
http://slidepdf.com/reader/full/cable-exersize-machine 13/19
http://www.instructables.com/id/Cable-Exersize-Machine/
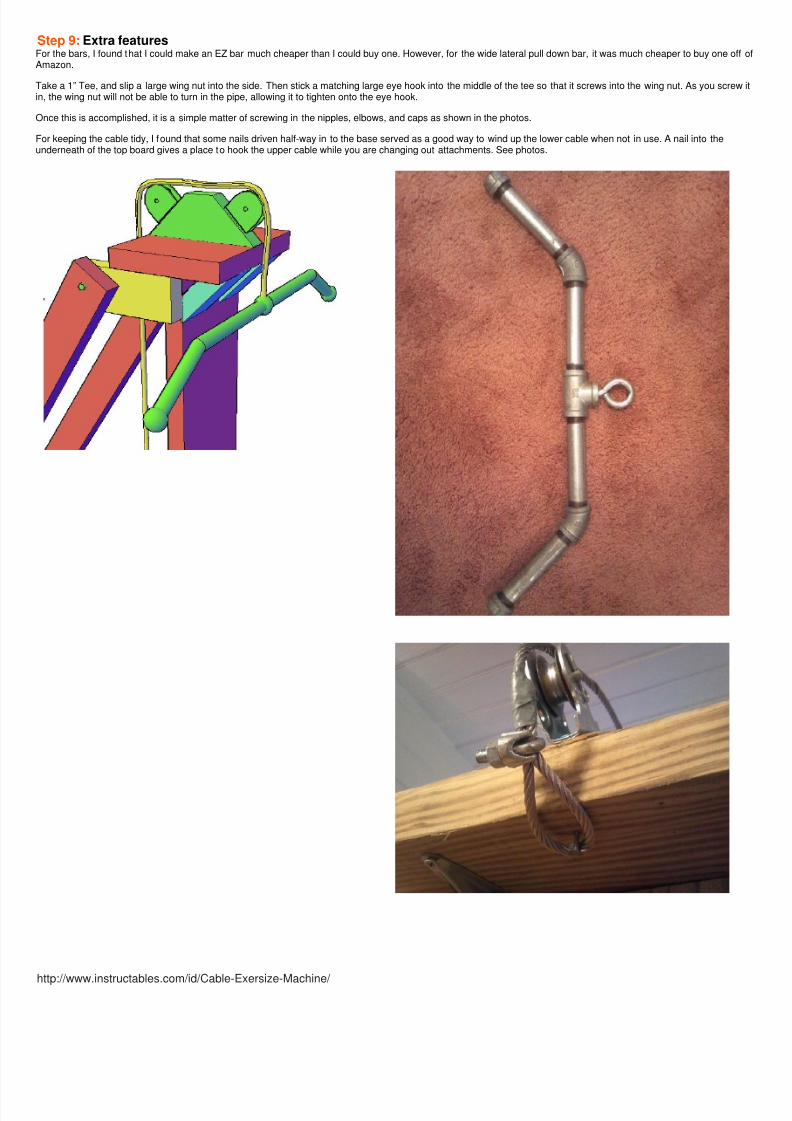
Step 9: Extra featuresFor the bars, I found that I could make an EZ bar much cheaper than I could buy one. However, for the wide lateral pull down bar, it was much cheaper to buy one off Amazon.
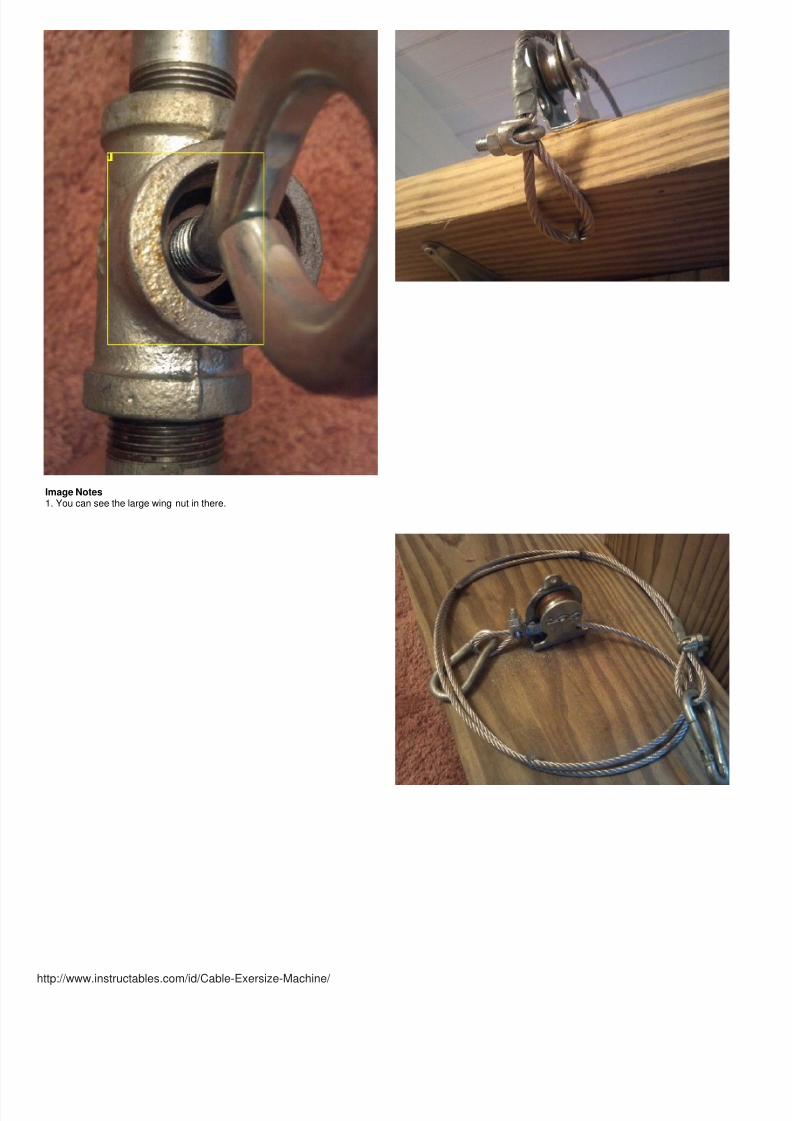
Take a 1” Tee, and slip a large wing nut into the side. Then stick a matching large eye hook into the middle of the tee so that it screws into the wing nut. As you screw in, the wing nut will not be able to turn in the pipe, allowing it to tighten onto the eye hook.
Once this is accomplished, it is a simple matter of screwing in the nipples, elbows, and caps as shown in the photos.
For keeping the cable tidy, I found that some nails driven half-way in to the base served as a good way to wind up the lower cable when not in use. A nail into theunderneath of the top board gives a place to hook the upper cable while you are changing out attachments. See photos.
8/13/2019 Cable Exersize Machine
http://slidepdf.com/reader/full/cable-exersize-machine 14/19
http://www.instructables.com/id/Cable-Exersize-Machine/
Image Notes1. You can see the large wing nut in there.

8/13/2019 Cable Exersize Machine
http://slidepdf.com/reader/full/cable-exersize-machine 15/19
http://www.instructables.com/id/Cable-Exersize-Machine/
Step 10: Use and safetyThe safety of this exercise machine, as with any exercise machine, is dependent on the condition that it is in and in proper use.
If you see something is getting worn or cracked, replace it immediately. I have been using this machine in almost every workout for the last six months, and I havereplaced the cables only once in that time because they were getting frayed.
When using this machine, do not jerk the weights up when you start a rep, and do not let the weights slam down after finishing a set. That is bad both for the machine for you - whenever you exercise, you are only supposed to use a weight that allows you to complete the exercise using good form.
8/13/2019 Cable Exersize Machine
http://slidepdf.com/reader/full/cable-exersize-machine 16/19
http://www.instructables.com/id/Cable-Exersize-Machine/
8/13/2019 Cable Exersize Machine
http://slidepdf.com/reader/full/cable-exersize-machine 17/19
http://www.instructables.com/id/Cable-Exersize-Machine/
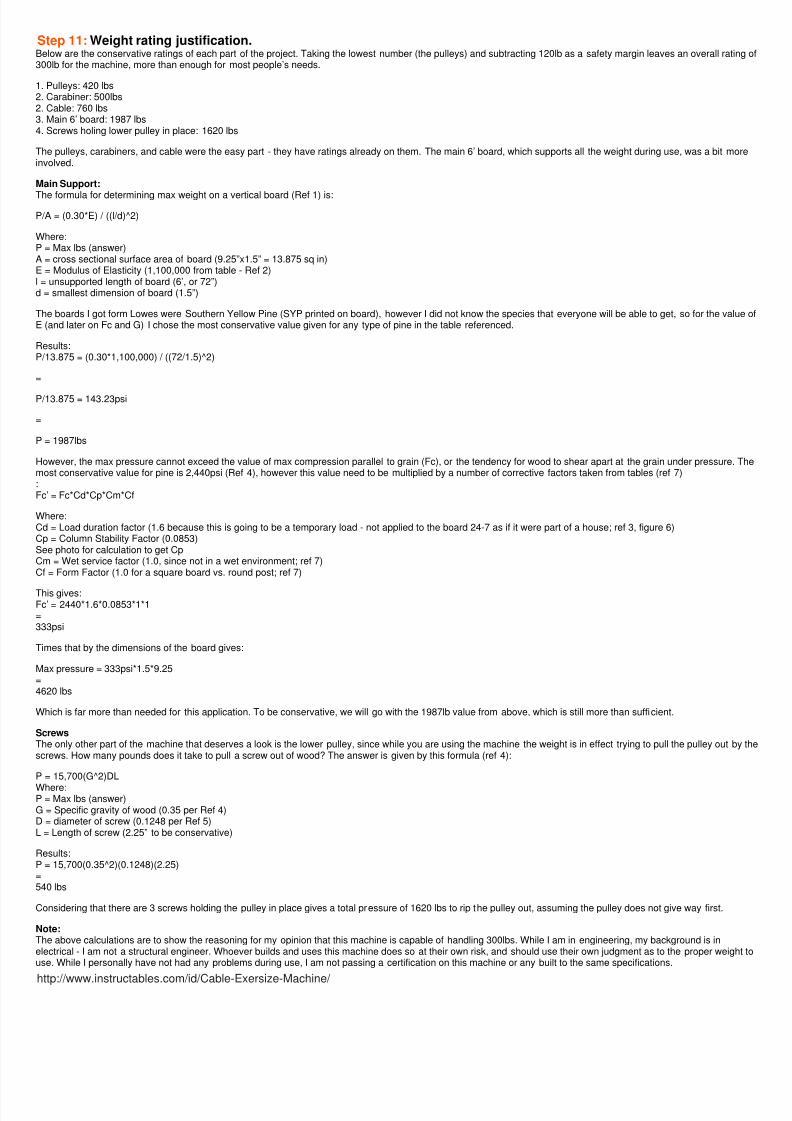
Step 11: Weight rating justification.Below are the conservative ratings of each part of the project. Taking the lowest number (the pulleys) and subtracting 120lb as a safety margin leaves an overall rating300lb for the machine, more than enough for most people’s needs.
1. Pulleys: 420 lbs2. Carabiner: 500lbs2. Cable: 760 lbs3. Main 6’ board: 1987 lbs4. Screws holing lower pulley in place: 1620 lbs
The pulleys, carabiners, and cable were the easy part - they have ratings already on them. The main 6’ board, which supports all the weight during use, was a bit morinvolved.
Main Support:
The formula for determining max weight on a vertical board (Ref 1) is:
P/A = (0.30*E) / ((l/d)^2)
Where:P = Max lbs (answer)A = cross sectional surface area of board (9.25”x1.5” = 13.875 sq in)E = Modulus of Elasticity (1,100,000 from table - Ref 2)l = unsupported length of board (6’, or 72”)d = smallest dimension of board (1.5”)
The boards I got form Lowes were Southern Yellow Pine (SYP printed on board), however I did not know the species that everyone will be able to get, so for the valueE (and later on Fc and G) I chose the most conservative value given for any type of pine in the table referenced.
Results:P/13.875 = (0.30*1,100,000) / ((72/1.5)^2)
=
P/13.875 = 143.23psi
=
P = 1987lbs
However, the max pressure cannot exceed the value of max compression parallel to grain (Fc), or the tendency for wood to shear apart at the grain under pressure. Tmost conservative value for pine is 2,440psi (Ref 4), however this value need to be multiplied by a number of corrective factors taken from tables (ref 7):Fc’ = Fc*Cd*Cp*Cm*Cf
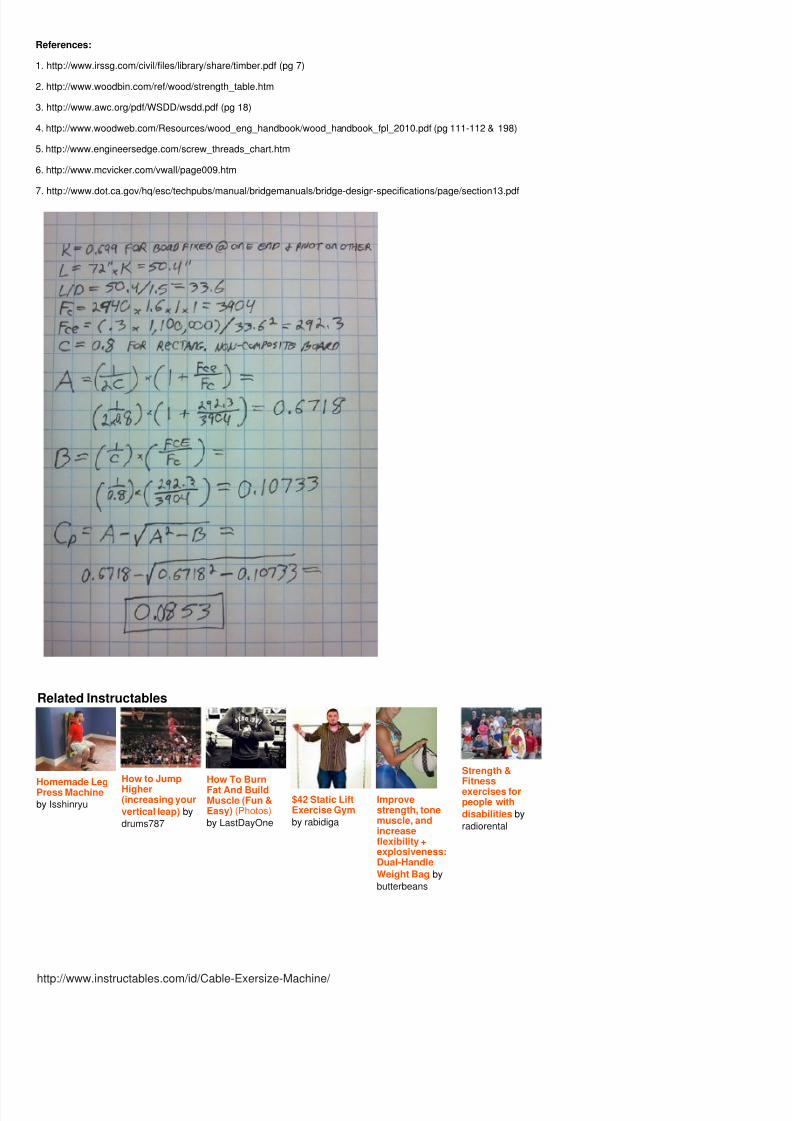
Where:Cd = Load duration factor (1.6 because this is going to be a temporary load - not applied to the board 24-7 as if it were part of a house; ref 3, figure 6)Cp = Column Stability Factor (0.0853)See photo for calculation to get CpCm = Wet service factor (1.0, since not in a wet environment; ref 7)Cf = Form Factor (1.0 for a square board vs. round post; ref 7)
This gives:Fc’ = 2440*1.6*0.0853*1*1=333psi
Times that by the dimensions of the board gives:
Max pressure = 333psi*1.5*9.25=4620 lbs
Which is far more than needed for this application. To be conservative, we will go with the 1987lb value from above, which is still more than sufficient.
ScrewsThe only other part of the machine that deserves a look is the lower pulley, since while you are using the machine the weight is in effect trying to pull the pulley out by screws. How many pounds does it take to pull a screw out of wood? The answer is given by this formula (ref 4):
P = 15,700(G^2)DL
Where:P = Max lbs (answer)G = Specific gravity of wood (0.35 per Ref 4)D = diameter of screw (0.1248 per Ref 5)L = Length of screw (2.25” to be conservative)
Results:P = 15,700(0.35^2)(0.1248)(2.25)=540 lbs
Considering that there are 3 screws holding the pulley in place gives a total pressure of 1620 lbs to rip the pulley out, assuming the pulley does not give way first.
Note:The above calculations are to show the reasoning for my opinion that this machine is capable of handling 300lbs. While I am in engineering, my background is inelectrical - I am not a structural engineer. Whoever builds and uses this machine does so at their own risk, and should use their own judgment as to the proper weight use. While I personally have not had any problems during use, I am not passing a certification on this machine or any built to the same specifications.
8/13/2019 Cable Exersize Machine
http://slidepdf.com/reader/full/cable-exersize-machine 18/19
http://www.instructables.com/id/Cable-Exersize-Machine/
References:
1. http://www.irssg.com/civil/files/library/share/timber.pdf (pg 7)
2. http://www.woodbin.com/ref/wood/strength_table.htm
3. http://www.awc.org/pdf/WSDD/wsdd.pdf (pg 18)
4. http://www.woodweb.com/Resources/wood_eng_handbook/wood_handbook_fpl_2010.pdf (pg 111-112 & 198)
5. http://www.engineersedge.com/screw_threads_chart.htm
6. http://www.mcvicker.com/vwall/page009.htm
7. http://www.dot.ca.gov/hq/esc/techpubs/manual/bridgemanuals/bridge-design-specifications/page/section13.pdf
Related Instructables
Homemade LegPress Machineby Isshinryu
How to JumpHigher(increasing your
vertical leap) by
drums787
How To BurnFat And BuildMuscle (Fun &Easy) (Photos)
by LastDayOne
$42 Static LiftExercise Gym
by rabidiga
Improvestrength, tonemuscle, andincreaseflexibility +explosiveness:Dual-Handle
Weight Bag by
butterbeans
Strength &
Fitnessexercises forpeople with
disabilities by
radiorental

8/13/2019 Cable Exersize Machine
http://slidepdf.com/reader/full/cable-exersize-machine 19/19
vertisemets
Comments
2 comments Add Comment
CrLz says: Oct 9, 2012. 12:56 AM REP
Thanks for posting, great equipment.
audreyobscura says: Oct 8, 2012. 5:25 PM REP
Wow this is rad, and I like the way you assembled your plan diagrams. Thank you so much for the post.