;c.4 1. t4 home processing of poultry
TRANSCRIPT

Melvin L. Hamre University of Minnesota ) • Agricultu ral Ex ten ton Service
:<
HOME PROCESSING OF POULTRY
Pou ltry can be processed at home wi th little or no special equipment. If you are processing only a few bi rds you ca n improvise facilities fo r t he job qu ite easily. However, if you are process ing many birds you might want to consider more adequate faci lities and equ ipment to make the job easier. When many birds are to be processed at one t ime you might have the birds custom pro· cessed if there is a locker plant in you r area .
This publi cation should help you under· stand the importance of cleanliness and the procedures for properly processi ng poultry. In processing you must follow a number of steps to convert the live animal to meat for human consumption. You mu st develop your processi ng t ech· niques to prevent contamination of t he meat with intestinal or crop contents. Pou ltry meat ca n also become contami · nated from dirty equipment and fac ili t ies or from people who have a transmis· sib le di sea se. Any form of contamina· tion of the poultry ca rcass lowers its quality and shortens the sto rage time as a wholesome product . The following sugcested procedures provide an order· ly manner for converting your live poul · try into a clean, attractive, dressed car· cass. Study the procedures, develop your techniques, and proceed in an orderly manner processing each bird .
The job is not unpleasant if properly done in clean surroundings even with a mi nimal amount of equipment .
Selecting Birds for Slaughter
Top quality poultry carcasses can only be obtained from live birds in good hea lt h, well -finished, and well-fleshed by slaughter time. So good care and management during the growing phase is an important part of producing poul · try meat successfully. The many strains of poultry, as wel l as t he different breeds, vary in the growing t ime re· quired to reach the best size and con· d ition for slaughter. You will normally process all the healthy birds from a farm f lock. Select your best birds for marketing. Youth project members will li kewise want to se lect on ly hea lthy, well -f leshed, well -finished birJs free f rom defects for exhibition . Breast blis· ters, bruises, skin tears, and simi lar wounds must be avoided when select ing birds for competition . These birds ca n be processed, the damaged tissue trim· med, and yet a who lesome carcass re· main s for meat purposes . Do not at· tempt to dress pinfeathery birds. Wait a week or two unti l these feathers have grown out and are more easily seen and removed during processing.
Poult ry Fact Sheet 33, Judging and Grading Live Market and Ready-to-Cook
3· Ex tension Bulletin 385-1974
;c.4 1. T4
Poultry out l ines factors to consider. Study this information on quality con · siderations before getting your birds ready for market or competition .
Poultry to be processed shou ld not be fed for 6·8 hours before slaughter, but should have access to water. Fasting reduces the feed and ingested material in the digest ive tract and helps prevent contamination during processing. It is best to have a wire-bottom holding cage or crate for the birds during the fasting period to help keep them clean. Dirty birds contaminate the scald water. Keeping the scald water clean will re· duce contamination and increase stor· age time for your processed poultry.
Processing Facilities and Equipment
The processing area should be a place that is clean, has an adequate water supply, and is free from flies . The pro· cessi ng procedure shou ld be done in three steps: 1) Ki ll ing, scalding, pick· ing, singeing; 2) eviscerating and wash· ing; and 3) chilling and packaging. To reduce possibilities of contamination , the operations in the first step should be completed before starting the evisce· ration procedures or done in a separate room or outside. The area should be arranged and equipped for ease and clean liness of work.

Knives should be sharpened before starting work . Boning and cutting knives (fig . 1e) are adequate for home dressing of poultry . Spec ial knives with thin, sharp blades and points (fig. 1d) make some phases of eviscerat ing easier. If birds have pinfeathers a pinning knife (fi g. 1c) may help scrape off the pin· feathers after the Ia rger feathers are removed . Kitc hen shears are used by some processors for harvesting and cleaning gib lets . A lung scraping tool (fig. lf) helps detach and remove lungs from the body cavity . Clean plastic or galvanized garbage-type cans make good containers for sca lding and chilling water. Sim ilar conta iners or boxes lined with plast ic bags can be used for feather and offal containers. A sturdy tab le wil l be necessa ry for a worktable. Most tables wi ll not have a good clean work· ing surface so a disposable plastic cov· ering shou ld be used . Gibl ets should be placed in a clean kitchen pan large enough to hold gib lets from the number of birds being processed. Sca ld water temperature can be better ad justed if you have a thermometer that registers in the 120° to 212° F. temperature range. A po::ket model with a protective case (fig. 1b) is less subject to break· age when not in use. Have an adequate supply of packaging materials so that birds can be packaged for hand ling and storage after they have been processed and cooled .
a b c d e f
Killing and Dressing
Killing. Remove birds from coops and crates ca refu lly to reduce bruis ing (fig. 2) . Place the bird in a killing cone or hang it from a shack le. If neither of these de·1ices is available, pou ltry can be suspended from a clot hes line or other support by the feet with a short piece of rope with a sma ll square of plywood held fast to t he end by a knot (f igs . 1a, 3 , 4). Hold the head in one hand and pu ll down for a slight tension
to steady the bird (fig. 5). Using a sharp knife, cut the bird's throat on one or both sides, severing the jugular vein . Hold the front part of the head secure ly to avoid cutt ing your hand. To prevent excess ive sp latter ing of blood, hold the head of the bird for a few moments until the bleed ing and f lopping stops (fig. 6). Catch the blood in a container to aid with your clea nup operation.
Sca lding. Dry picking today is usually limited to some waterfowl process ing to save the down . Pick these bird s immediately after they have been bled .
- 2 -
The appearance of t he dressed carcass as well as t he ease of feather remova l wil l be determined by t he time and temperatu re of the sca lding proced ure . Lower temperatures are used with longer periods of immers ion in the sca ld water. The hotter the water the shorter the scald t ime and more chance of oversca lding. The use of higher temperatures results in the loss of the yell ow cuti cle layer of the skin and may resu lt in more skin tears during feather removal. Boi l· ing water shou ld be kept nearby to keep the sca ld water hot enough during the ent ire process ing period . For best results check water temperature with a thermometer.
Younger birds with more eas ily removed feathers can be sca lded at 125° . 130° F. for 30 to 75 seconds. The proper length of time for adequate feather re-, moval leaves the epiderma l layer of the birds ' skin intact . Temperatures of near 140° F. for 30 to 75 seconds ca n be used with older birds for eas ier feather removal. The cut icle covering of the sk in wil l general ly be removed at this temperature. Beca use of the diff i· culty in removing feathers from waterfow l, ducks and geese are frequent ly processed at higher temperatures - 30 to 60 seconds in water at 160°·180° F. Adding detergent to the water for waterfowl sea ld i ng he Ips water penetration through the feathers.
Immerse the bird, head f irst in t he sca ld water whi le holding the bird by t he shanks (fig. 7). The bird shou ld be moved up and down and from side to side in the sca lding conta iner to aid in more even and thorough sca ld ing . If a proper sca ld has been achieved, the tail and wing feathers ca n quite readi ly be removed. Repeat dips of short durat ion may be necessa ry for difficu lt -to-remove fea thers.
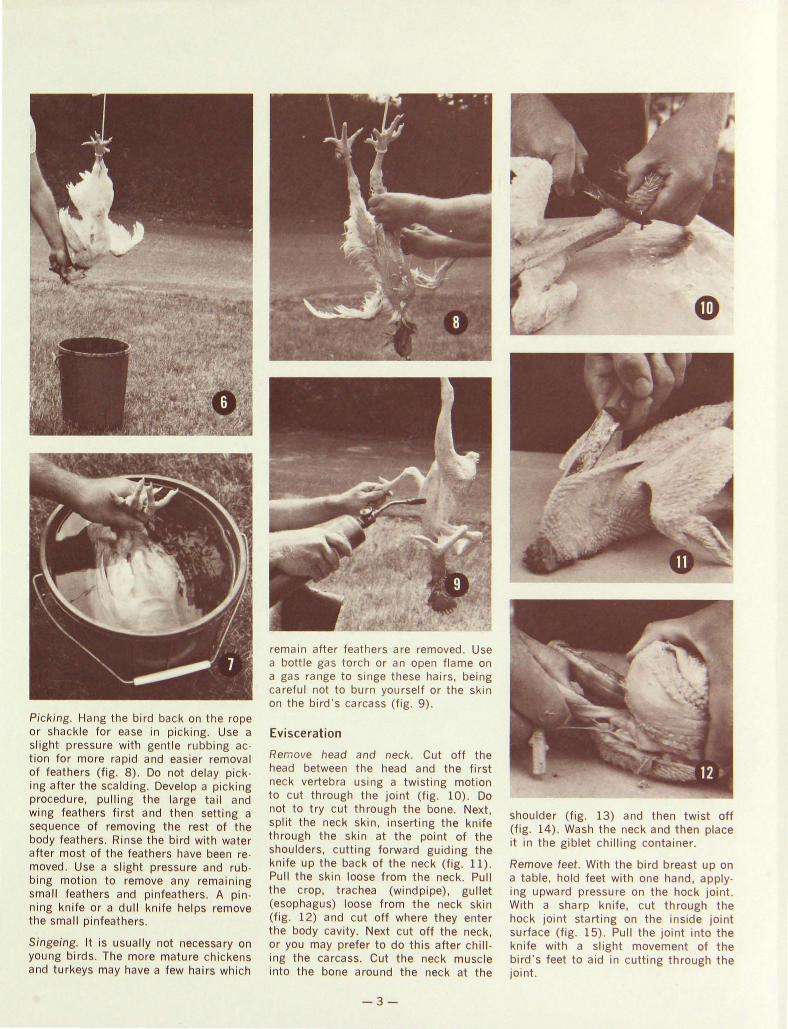
Picking. Hang the bird back on the rope or shackle for ease in picking. Use a slight pressure with gent le rubbing ac· tion for more rap id and easier removal of feathers (fig. 8) . Do not delay pick· ing after the scalding. Develop a picking procedure, pulling the large tail and wing feathers first and then setting a sequence of removing the rest of the body feathers. Rin se the bird with water after most of the feathers have been re· moved . Use a slight pressure and rub· bing motion to remove any remaining small feathers and pinfeathers. A pin · ning knife or a dull knife helps remove the small pinfeathers.
Singeing. It is usually not necessary on young birds. The more mature chickens and turkeys may have a few hairs which
remain after feathers are removed. Use a bottle gas torch or an open flame on a gas range to singe these hairs, being careful not to burn yourself or the skin on the bird 's carcass (fig. 9) .
Evisceration
Remove head and neck. Cut off the head between the head and the first neck vertebra using a twisting motion to cut through the joint (fig . 10). Do not to try cut t hrough the bone. Next, split the neck skin, inserting the knife through the skin at the point of the shou lders, cutting forward guiding the knife up the back of the neck (fig. 11) . Pull the skin loose from the neck. Pull the crop, trachea (windpi pe), gu llet (esophagus) loose from the neck skin (fig. 12) and cut off where they enter the body cavity . Next cut off the neck, or you may prefer to do this after chill· ing the carcass. Cut the neck muscle into the bone around the neck at the
-3-
shou lder (fig. 13) and then twist off (fig. 14) . Wash the neck and then place it in the giblet chilling container.
Remove feet . With the bird breast up on a table , hold feet with one hand, apply· ing upward pressure on the hock joint. With a sharp knife, cut through the hock joint starting on the inside joint surface (fig. 15) . Pull the joint into the knife with a slight movement of the bird's feet to aid in cutting through the joint .
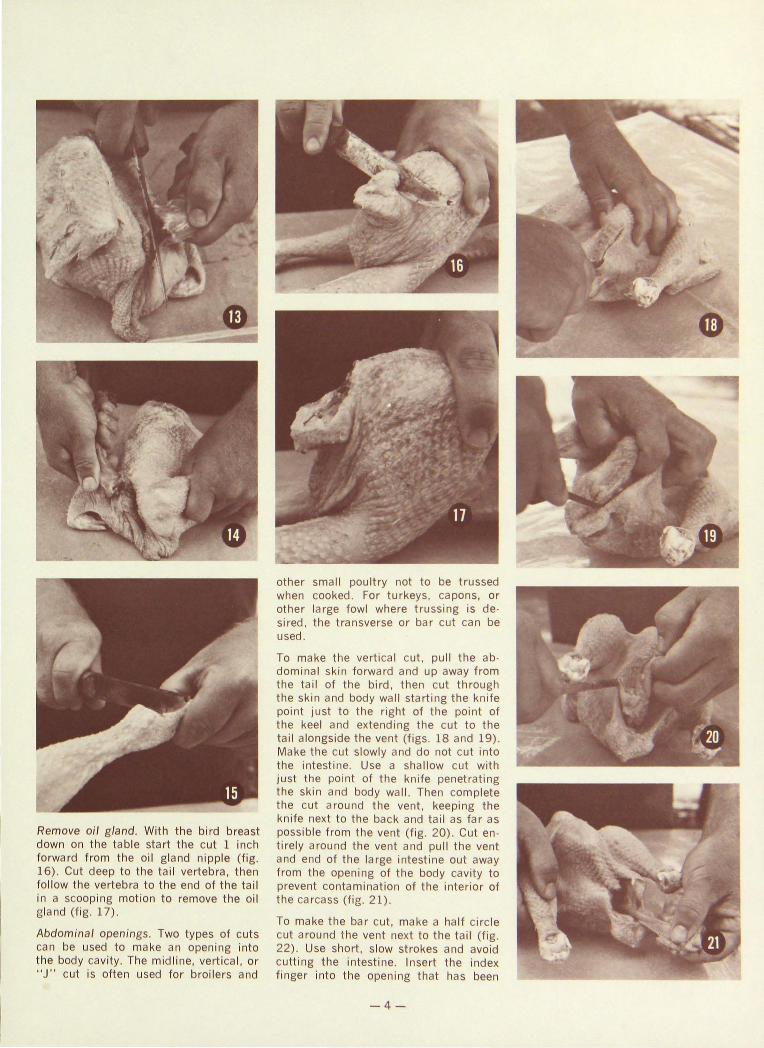
Remove oi l g land. Wit h the bird breast down on the tab le start the cut 1 inch forward from the oi l gland nipple (fig. 16) . Cut deep to the ta il vertebra, then fo llow the vertebra to t he end of the t ail in a scoop ing motion to remove the oi l gland (f ig. 1 7).
Abdomina l openings . Two types of cuts can be used to make an opening into t he body cav ity . The mid line, vertical, or "J" cut is often used for bro ilers and
other small poultry not to be trussed when cooked. For turkeys, capons, or other large fowl where trussing is de· sired, the transverse or bar cut can be used .
To make the vertica l cut, pull the abdominal skin forward and up away from the ta i I of the bird, then cut through the skin and body wall starting the knife point just to the right of the point of the keel and extending the cut to the tail alongside the vent (figs . 18 and 19). Make the cut slowly and do not cut into the intestine. Use a shallow cut with just the po int of the knife penetrating the skin and body wall . Then complete the cut around the vent , keeping the knife next to the back and tail as far as poss ible from the vent (fig. 20) . Cut en tirely around the vent and pull the vent and end of the large intestine out away from the opening of the body cavity to prevent contamination of the interior of the carcass (fig. 21).
To make the bar cut, make a half circle cut around the vent next to the tail (fig. 22) . Use short, slow strokes and avoid cutt ing the intestine. Insert the index finger into the opening that has been
-4-

cut , up over the intestine. Using your finger as a guide, extend the cut with the knife or shears to a complete circle on around to free the vent (fig. 23) . Pull the vent and a short section of the intest ine out to prevent contam ination of the body cavity. Now make a cut from side to side of the bird about 3 inches long, 11/ 2 to 2 inches below the point of the keel (fig. 24). This will leave a bar of skin about 1% to 2 inches wide between this cut and the opening where the vent was cut free (fig. 25) . Now thread the end of the intestine up over the skin bar and leave extended from the body cav ity.
Removal of viscera (entrails). Stretch the abdominal opening, insert the hand as far forward as possible in the body cavity, breaking the attachment of or· gans to the wall as you go (fig. 26) . Pick up the heart between index and second finger, cup hand and gently pull all viscera out, using a slight twisting motion as the viscera is brought out of the body cav ity (fig. 27).
-5-
Harvesting giblets. The gizzard, liver, and heart should be removed from the viscera . Cut the gizzard from the stomach and intestine and peel excess fat from the outside (fig. 28) . Remove the heart, trim off t he heart sac and the heavy vessels around the top part (fig. 29) . Avoid cutting the gal lbladder when trimming off the liver (fig. 30). The ga llbladder may either be cut or pinched off the liver. Split the gizzard and open under a stream of water to re move the gizzard contents (fig. 31) . Peel the lining from the gizzard by inserting the thumbnail under the lining at the edge of the cut surface and
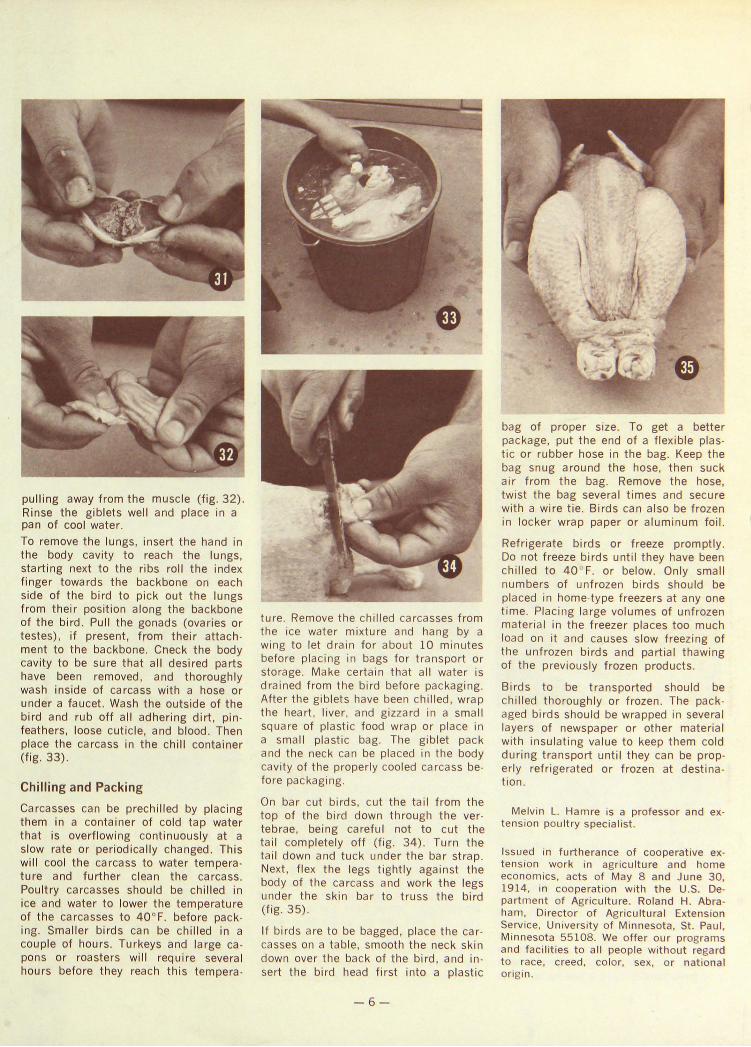
pu ll ing away from the muscle (fig. 32). Rinse the giblets well and place in a pan of cool water.
To remove the lungs, insert the hand in t he body cavity to reach the lungs, starting next to the ribs roll the index f inger towards the backbone on each side of the bird to pick out the lungs from their posit ion along the backbone of the bird . Pul l the gonads (ovaries or testes) , if present, from their attachment to the backbone. Cneck the body cav ity to be sure that a II desired parts have been removed, and thoroughly wash inside of carcass with a hose or under a faucet . Wash the outside of the bird and rub off all adhering dirt, pinfeathers, loose cutic le, and blood . Then place the carcass in the chill container (fig. 33).
Chilling and Packing
Carcasses can be prechi lled by placing them in a container of cold tap water that is overflowing continuously at a slow rate or periodically changed. This wi ll cool the carcass to water temperature and further clean the carcass. Pou ltry carcasses shou ld be chi lled in ice and water to lower the temperature of t he carcasses to 40°F. before packing. Sma ller birds can be ch il led in a couple of hours . Turkeys and large capons or roasters wi ll require severa l hours before they reach this tempera -
ture. Remove the chi lled carcasses from the ice water mixture and hang by a wing to let drain for about 10 minutes before placing in bags for transport or storage. Make certa in that all water is drained from the bird before packaging . After the giblets have been chilled, wrap the heart, liver, and gizzard in a small square of plastic food wrap or place in a small plastic bag. The giblet pack and the neck can be placed in the body cav ity of the properly cooled carcass before packaging.
On bar cut birds, cut the tail from the top of the bird down through the vertebrae, being careful not to cut the tail completely off (fig. 34) . Turn the tail down and tuck under the bar strap. Next, flex the legs tightly aga inst the body of the carcass and work the legs under the skin bar to truss the bird (fig. 35) .
If birds are to be bagged, place the carcasses on a table, smooth the neck skin down over the back of the bird, and in sert the bird head first into a plastic
-6-
bag of proper size. To get a better package, put the end of a flexible plastic or rubber hose in the bag. Keep the bag snug around the hose, then suck air from the bag. Remove the hose, tw ist the bag several times and secure with a wire tie. Birds can also be frozen in locker wrap paper or aluminum foil.
Refrigerate birds or freeze promptly. Do not freeze birds until they have been chilled to 40 ° F. or below. Only small numbers of unfrozen birds should be placed in home-type freezers at any one time. Placing large vo lumes of unfrozen material in the freezer places too much load on it and causes slow freezing of the unfrozen birds and partial thawing of the previously frozen products.
Birds to be transported should be chilled thoroughly or frozen . The packaged birds should be wrapped in several layers of newspaper or other material with insulat ing value to keep them cold during transport until they can be properly refrigerated or frozen at destina tion .
Melvin L. Hamre is a professor and extension poultry specialist .
Issued in furtherance of cooperative extension work in agriculture and home economics, acts of May 8 and June 30, 1914, in cooperation with the U.S. Department of Agriculture. Roland H. Abra ham, Director of Agricultural Extension Service, University of Minnesota, St. Paul , Minnesota 55108. We offer our programs and facilities to all people without regard to race, creed, co lor, sex, or national origin.