by sanjay and arvind seshan - ev3...
TRANSCRIPT

By Sanjay and Arvind Seshan

§ Learn how to use the HiTechnic Color Sensor V.2
§ Learn how to configure your sensor
§ Learn how to position your sensor
§ Learn about the different modes the sensor uses
© 2017 EV3Lessons.com, Last Edit 3/04/2017 2

§ The EV3 Block for the sensor can be download from the manufacturer’s download page:§ https://www.hitechnic.com/downloads
§ Add the block to your software. § If you do not know how to add a block to your software, complete
the “Importing HiTechnic Blocks” lesson on EV3Lessons.com àLessons àWRO
© 2017 EV3Lessons.com, Last Edit 3/04/2017 3

§ There are two electric supply frequencies commonly used (50Hz and 60Hz).
§ The sensor is configured for 60Hz (US, Canada and other countries) by default
§ To check if you need to configure your sensor, consult the Electricity Frequency Table on this page: https://www.hitechnic.com/colorsensor
§ If you need to switch the frequency, you must have an NXT and NXT software installed
© 2017 EV3Lessons.com, Last Edit 3/04/2017 4

§ Download the Configuration Program for 50Hz (SetTo50Hz) from https://www.hitechnic.com/colorsensor
§ Start NXT Software
§ Connect an NXT Brick to your computer
§ In the NXT software§ Create a New Program§ Select the NXT Window button§ Pick the Memory Tab§ Pick Download and select the file to the
download to the brick
§ Connect the HiTechnic Sensor to Port 1
§ Use the brick buttons to pick My Files àSoftware Files à SetTo50Hz file. Select the file to run the program. You should see the confirmation screen on the right
§ Disconnect your HiTechnic Color Sensor and use it on your EV3
© 2017 EV3Lessons.com, Last Edit 3/04/2017 5
Image Credit: HiTechnic.com
Nxt Window
Memory Tab
Download
Note: We confirmed these instructions. We also compared sensors set to 50Hz and 60Hz. We found that the frequency does make a difference in the readings depending upon room lighting.

§ The Color Sensor V2 works best when it is positioned a little further away from the target§ Approximately 4 LEGO studs distance (see
image)
§ Ideally, the sensor must be placed at an angle. The angle prevents the direct reflection of the light from the LED from coming back into the sensor element (see image)
© 2017 EV3Lessons.com, Last Edit 3/04/2017 6
© 2017 EV3Lessons.com, Last Edit 3/04/2017 7
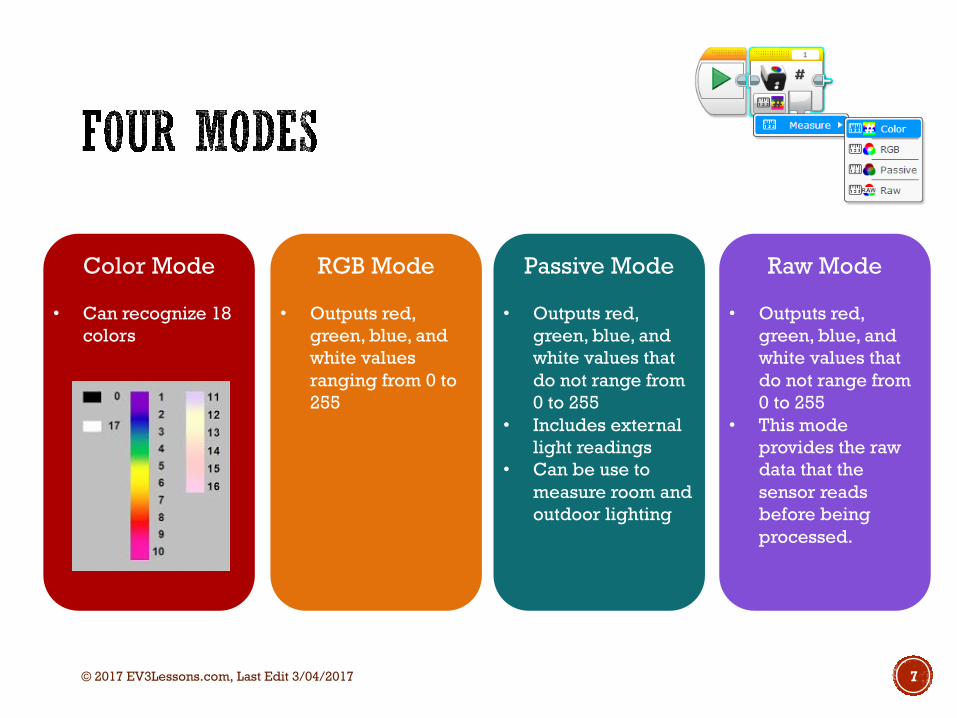
Color Mode RGB Mode Passive Mode Raw Mode
• Can recognize 18 colors
• Outputs red, green, blue, and white values ranging from 0 to 255
• Outputs red, green, blue, and white values that do not range from 0 to 255
• Includes external light readings
• Can be use to measure room and outdoor lighting
• Outputs red, green, blue, and white values that do not range from 0 to 255
• This mode provides the raw data that the sensor reads before being processed.
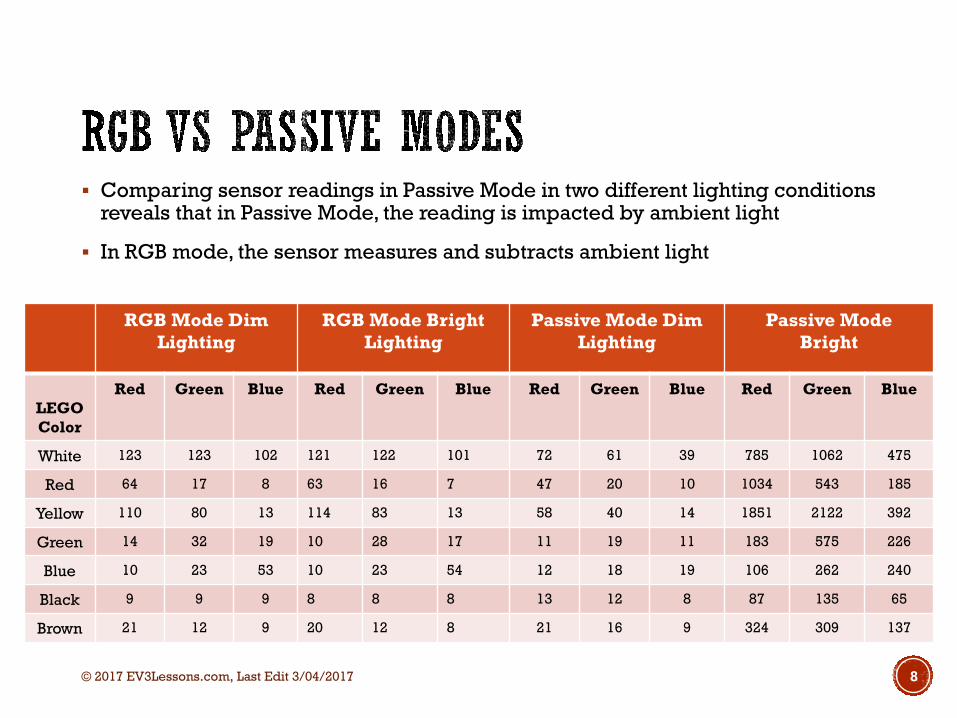
§ Comparing sensor readings in Passive Mode in two different lighting conditions reveals that in Passive Mode, the reading is impacted by ambient light
§ In RGB mode, the sensor measures and subtracts ambient light
© 2017 EV3Lessons.com, Last Edit 3/04/2017 8
RGB Mode Dim Lighting
RGB Mode Bright Lighting
Passive Mode Dim Lighting
Passive ModeBright
LEGO Color
Red Green Blue Red Green Blue Red Green Blue Red Green Blue
White 123 123 102 121 122 101 72 61 39 785 1062 475
Red 64 17 8 63 16 7 47 20 10 1034 543 185
Yellow 110 80 13 114 83 13 58 40 14 1851 2122 392
Green 14 32 19 10 28 17 11 19 11 183 575 226
Blue 10 23 53 10 23 54 12 18 19 106 262 240
Black 9 9 9 8 8 8 13 12 8 87 135 65
Brown 21 12 9 20 12 8 21 16 9 324 309 137
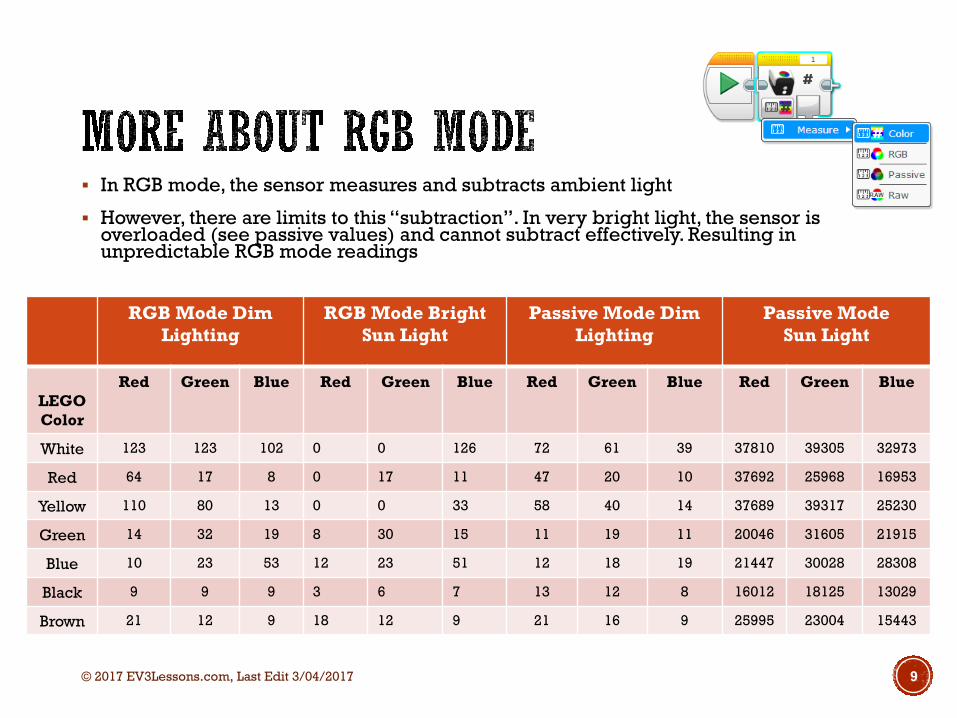
§ In RGB mode, the sensor measures and subtracts ambient light
§ However, there are limits to this “subtraction”. In very bright light, the sensor is overloaded (see passive values) and cannot subtract effectively. Resulting in unpredictable RGB mode readings
© 2017 EV3Lessons.com, Last Edit 3/04/2017 9
RGB Mode Dim Lighting
RGB Mode Bright Sun Light
Passive Mode Dim Lighting
Passive ModeSun Light
LEGO Color
Red Green Blue Red Green Blue Red Green Blue Red Green Blue
White 123 123 102 0 0 126 72 61 39 37810 39305 32973
Red 64 17 8 0 17 11 47 20 10 37692 25968 16953
Yellow 110 80 13 0 0 33 58 40 14 37689 39317 25230
Green 14 32 19 8 30 15 11 19 11 20046 31605 21915
Blue 10 23 53 12 23 51 12 18 19 21447 30028 28308
Black 9 9 9 3 6 7 13 12 8 16012 18125 13029
Brown 21 12 9 18 12 9 21 16 9 25995 23004 15443

§ By conducting tests, we found that the Raw Mode readings are processed through a linear equation to generate the RGB data.
§ Note that the different colors are scaled differently. White might show up as [120 red, 120 green, 120 blue] in RGB mode but as [285 red, 450 green, 300 blue] in Raw Mode
© 2017 EV3Lessons.com, Last Edit 3/04/2017 10
y = 2.1786x + 14.053
y = 3.4245x + 31.227
y = 2.2779x + 30.46
0
100
200
300
400
500
600
0 20 40 60 80 100 120 140
Raw
Dat
a
RGB Data
Raw vs. RGB modes For The HiTechnic Sensor
§ Position: Follow manufacturer’s recommendations for angle and distance from target.
§ Configuring: If you live in an area that is 50Hz, you will have to configure your sensor using an NXT.
§ Color Mode: This mode can measure 18 colors.
§ Passive Mode: Does not subtract values for external light. This mode is useful to measure external lighting.
§ Raw vs. RGB: The data outputted from the RGB mode is derived from the Raw mode’s readings. The raw data is processed for the RGB mode.
© 2017 EV3Lessons.com, Last Edit 3/04/2017 11

• This tutorial was created by Sanjay Seshan and Arvind Seshan
• More lessons at www.ev3lessons.com
© 2017 EV3Lessons.com, Last Edit 3/04/2017 12
This work is licensed under a Creative Commons Attribution-NonCommercial-ShareAlike 4.0 International License.